
Configuration
Users with the Administration role can configure and maintain a Quark Publishing Platform workgroup's workflow. In addition to establishing structure for users and the content they generate, Administrators control security, set defaults, specify storage locations, and customize the parameters for tracking every asset in their workflow.
Administration client
To administer Quark Publishing Platform Server, navigate to the following URL in a Web browser:
http://[IP address of Platform Server computer]:61400/adminYou can also display the administration from the home page, which is http://[IP address of Platform Server computer]:61400
The Quark Publishing Platform Web Administrator displays.
When you select User Activity, the admin client displays the list of all logged-on users, including each user's name, the time and date each user logged on, each user's machine name, and each user's application. If you need to log off a user, select the user's name in the list and click Log Off Users. You can also log off users and send a message to a logged-on user.
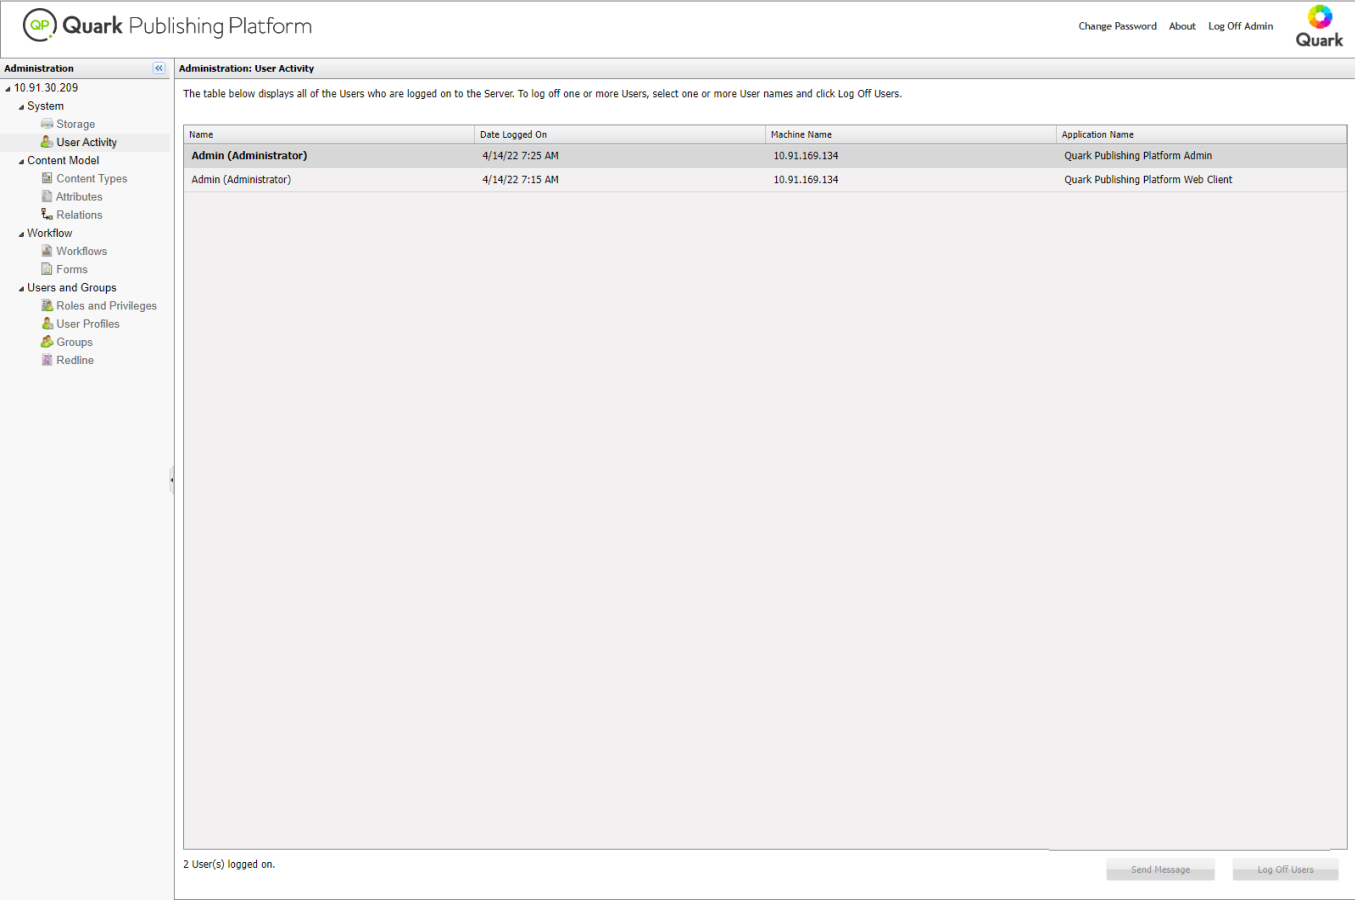
You can configure the way that the user name is displayed in the User Activity panel in one of three ways:
-
[username] -
[username] ([first name] [last name]) -
[username] ([last name], [first name])
See the Platform System Administration Guide for more information.
System area
The System area includes the following controls:
-
Storage: Use this control to specify one or more storage folders for assets and to establish rules for storing different file types. For more information, see Configuring storage options.
-
User Activity: Lets you view logged-on users. For more information, see Administration client.
Content Model area
The Content Model area includes the following controls:
-
Content Types: Use these controls to specify which types of content the Platform is managing. For more information, see Working with content types.
-
Attributes (aka "metadata" or "headers"): Use these controls to create and configure attributes that can be associated with assets, article components, collection types, and layout types. For example, you could create an attribute called "Image approved" for picture file types. When a user approves an image, he or she can check "Image approved" for the picture. When another user searches for approved pictures, the user can include the "Image approved" attribute in the search criteria and limit the search results to approved images. For more information, see Defining attributes.
-
Relations: Use these controls to configure the relationships available between Platform assets. For more information, see Working with relationships.
Workflow area
The Workflow area includes the following controls:
-
Workflow Definition: Use these controls to create and configure workflows. For more information, see Working with workflows.
Users and Groups area
The Users and Groups area includes the following controls:
-
Roles and Privileges: Use these controls to create, delete, rename, and modify roles and their associated privileges. For details about setting privileges, see Quark Publishing Platform Privileges. For example, you can create a role called "Editorial", and assign this role to your writers and editors. All users with this role will have the same privileges to perform editorial functions.
-
User Profiles: Use these controls to create a user, assign a role to the user, assign a password, and enable or disable the user's ability to log on. You can also delete, rename, and modify user accounts.
-
Groups: Use these controls to combine user profiles into groups to which assets can be routed. When you route an assignment to a group, that asset appears in the assignments for everyone in that group. The first person in the group who checks out the asset gains control of that asset. You can delete, rename, and modify groups. You can also assign a role to a group. When you assign a role to a group, every user in that group will have this role, along with the associated privileges.
There are two types of groups:
-
Local Groups: These groups are local to Quark Publishing Platform. You can create these groups by using the (+) button under the Group tab.
-
Ldap Groups: These group are not local to Quark Publishing Platform. These are imported from Active Directory.
-
-
Redline: Use these controls to specify default redline tracking colors for each user.
Configuring storage options
In versions of Quark Publishing Platform prior to 9.5, you could set up separate repositories for different file types. In version 9.5 and later, you can simply set up a single repository for all asset types. You can add additional repositories if you need additional space, and change the priority of your repositories to control which one new assets are written into.
To configure storage options, click Storage.
Adding repositories
Setting up a file system storage repository
To add a file system storage repository:
-
Click the Repository tab in the Administration: Storage window.
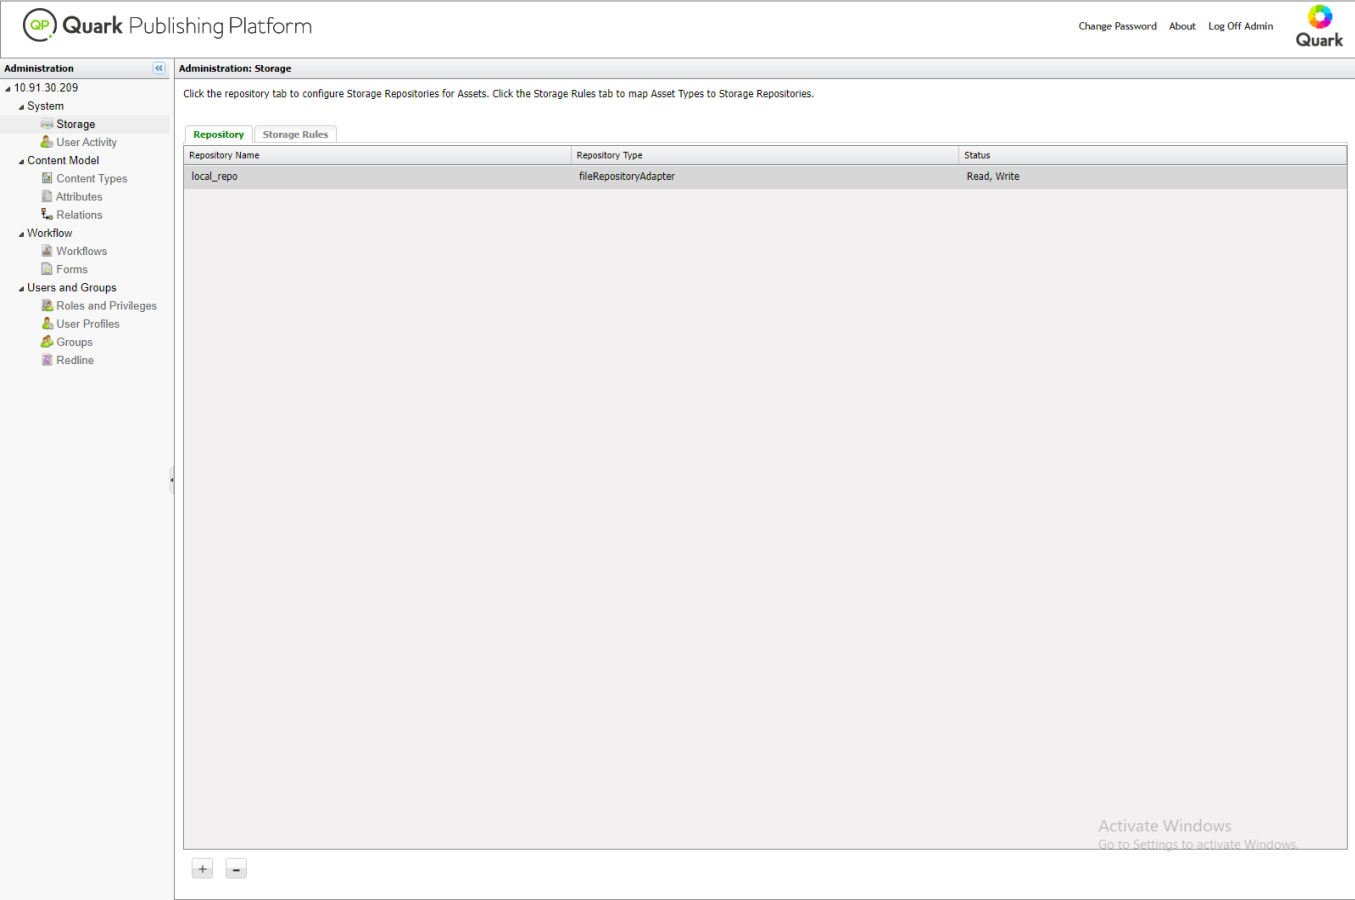
Use the Repository tab of the Administration: Storage area to view and manage the folders where Quark Publishing Platform assets are stored. -
Click + to display the New Repository dialog box.
-
Enter a name for the repository in the Name field.
-
To specify a specific file system directory, choose fileRepositoryAdapter and then specify a URL in the URL field (for example:
/Users/Name/QPP Repositoryfor Mac OS, orC:\QPP Repositoryfor Windows).
For information about creating a SharePoint repository, see the Quark Publishing Platform SharePoint Adapter ReadMe.
The storage location must include read/write permissions.
Setting up an AWS S3 bucket storage repository
For steps necessary to use Amazon S3 bucket as a repository adapter in Quark Publishing Platform, see the Settting up the Amazon S3 bucket as a Platform server repository section of the Quark Publishing Platform System Admin Guide.
Deleting repositories
To remove a storage repository, click the Repository tab in the Administration: Storage window, select the repository you want to remove, then click – (minus sign). A warning message prompts you to confirm the deletion.
Working with content types
Quark Publishing Platform supports a variety of different types of content, including QuarkXPress projects, QuarkCopyDesk articles, picture files, multimedia files, and XML files. The Content Types pane lets you control the way in which information about each of these content types display in Quark Publishing Platform user interfaces.
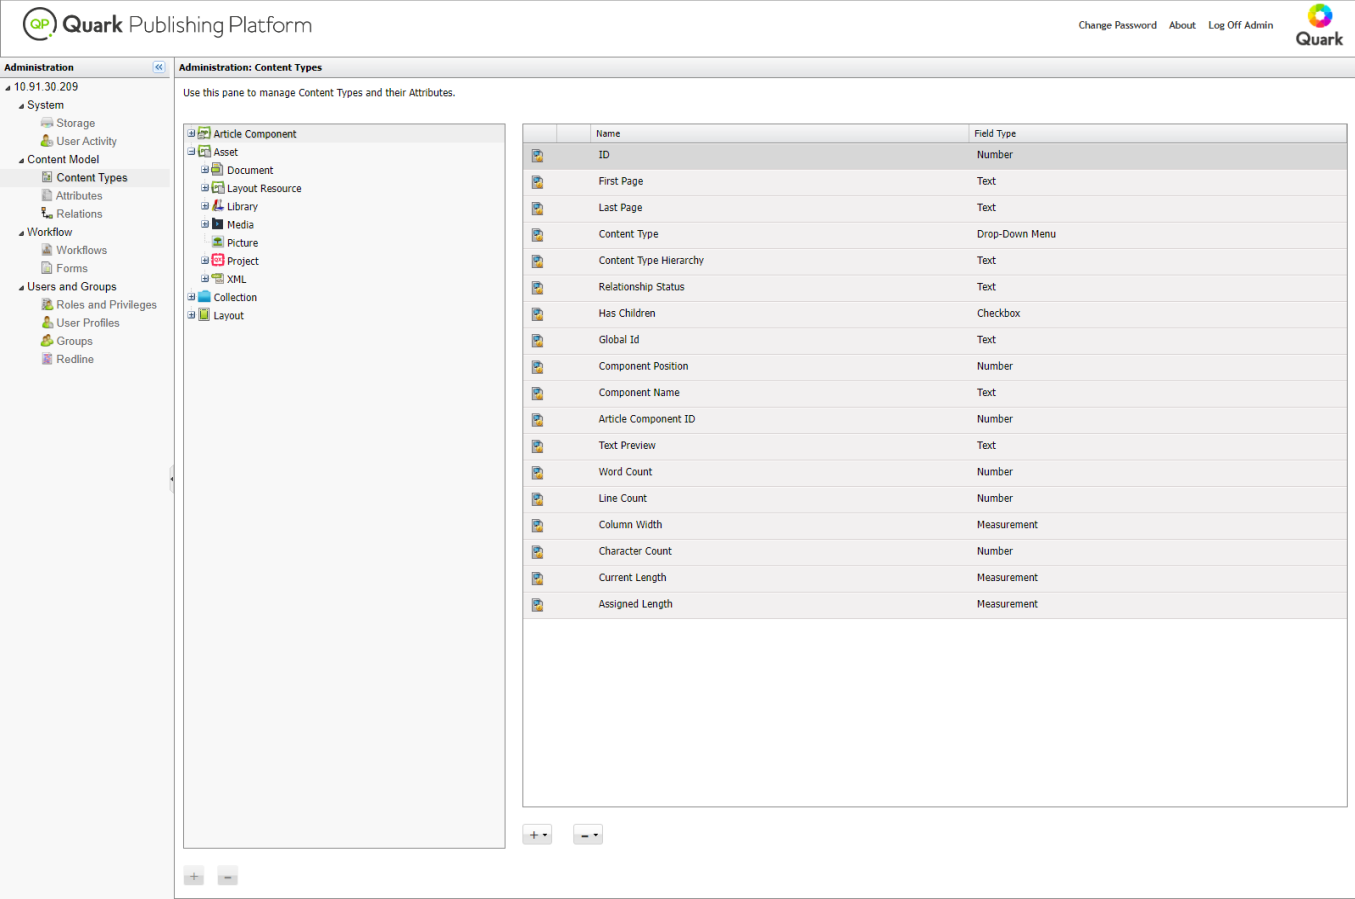
Different types of content have different attributes. For example, the list of attributes for a picture includes values for "Pixel width", "Pixel height", and "Resolution", and the list of attributes for a text component includes values for "Word count" and "Line count" . Some attributes, such as "Checked out duration", are relevant only to Quark Publishing Platform, and are stored only in Quark Publishing Platform.
For XML files that adhere to the DITA and BusDocs schemas, Quark Publishing Platform
provides access to specific file-level element and attribute values. For example,
you can use the Quark Publishing Platform user interface to view the values of a DITA
XML file's <title> and <author> elements without having to open the file.
By default, Quark Publishing Platform is configured to provide access to a variety of attributes for four categories of content types:
-
Article components
-
Assets (of various types)
-
Quark Publishing Platform collection types (for more information, see Working with collection types
-
QuarkXPress layouts
You can create new content types for asset, text components, and picture components. You can also create new collection types. To add a new content type, select an eligible parent content type, then click the plus button under the content type list on the left.
You can add new attributes to any content type. These can be existing attributes from the Attributes pane, or entirely new attributes.
-
To add an existing attribute to the selected content type, click the plus button under the attribute list on the right and choose Select from Existing.
-
To create a new attribute, click the plus button under the attribute list on the right and choose Create New. For more information, see Understanding attribute types. Any new attributes you create are automatically added to the attribute list displayed in the Attributes pane.
There are two ways to disassociate an attribute from a content type:
-
To permanently delete the attribute, select it, click the minus button under the attribute list on the right, and choose Delete.
-
To disassociate the attribute from the selected content type but leave it in the attribute pool, select the attribute, click the minus button under the attribute list on the right, and choose Remove Mapping.
Working with collection types
A collection type is similar to an asset type in that it has a particular set of attributes. By applying a collection type to a collection, you enable users to view and edit attributes for that collection and create a form for editing those attributes.
To configure a collection type, expand the Collection category in the content type tree and select the collection type you want to configure.
Working with attributes
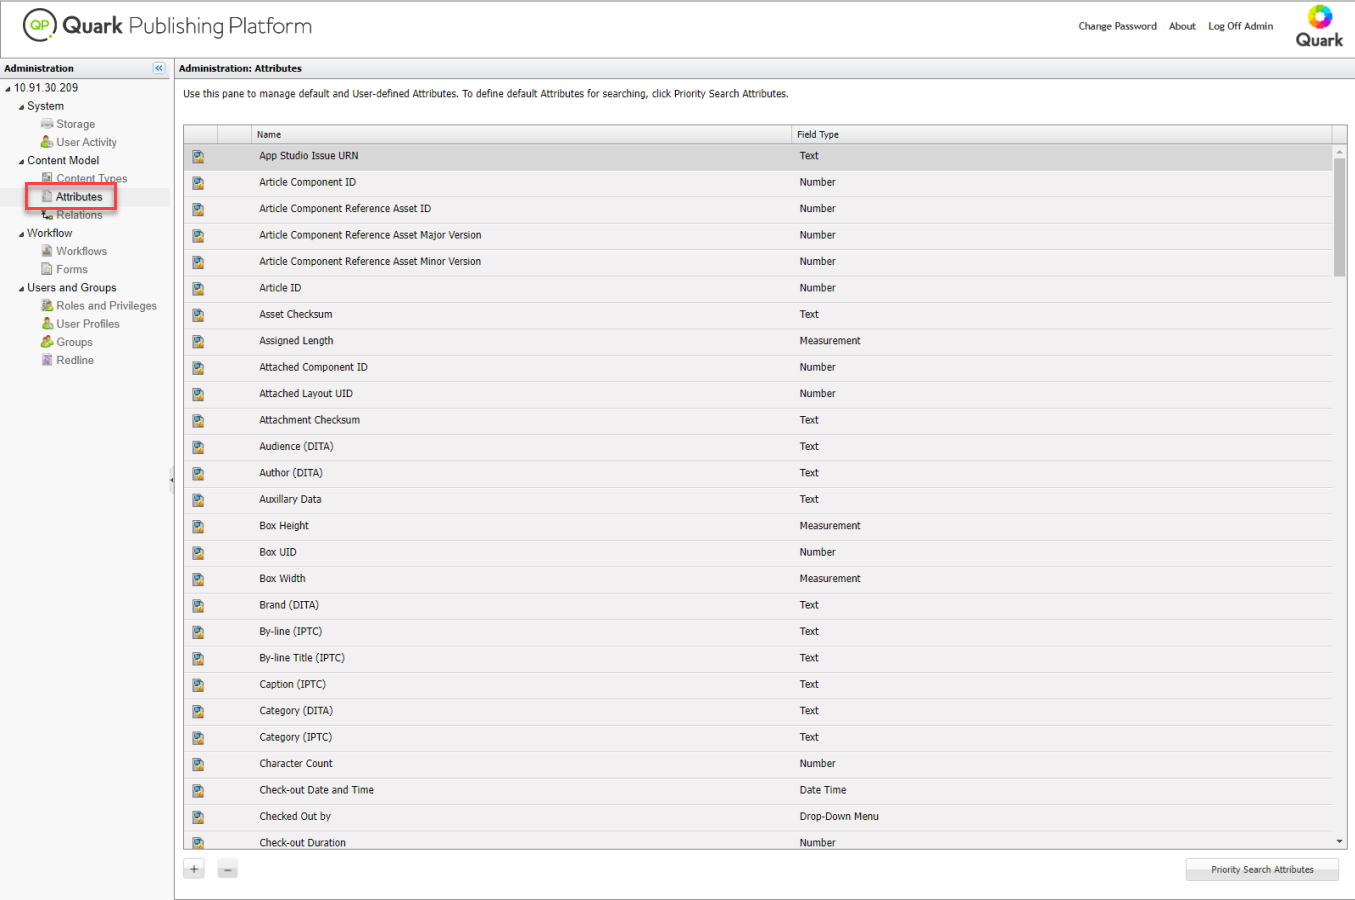
Each content type has its own set of attributes. For convenience, all attributes are listed in the Attributes pane. You can assign attributes to content types in the Content Types pane. For more information, see Working with content types.
Defining attributes
Each asset in Quark Publishing Platform has a corresponding set of attributes that describes the asset and its status in the Quark Publishing Platform workflow. Each content type can have its own set of attributes. These attributes include system-generated information such as the date and time of the last modification, default Quark Publishing Platform attributes such as Checked Out By, and any custom attributes you create to meet the needs of your workflow.
For example, you could create an attribute called Image approved for picture file types.
-
When a user approves an image, he or she could check Image approved for the picture.
-
When another user searches for approved pictures, the user could include the Image approved attribute in the search criteria and limit the search results to approved images.
You can create eight kinds of attribute types: Text, Date, Time, Number, Measurement, Check Box, Drop-down Menu, and Date Time. Each attribute type can have a default value. For each attribute, you can limit access so that only users with the privileges to edit "limited-access" fields can edit the attribute values. Attributes are defined at the server level, so each attribute can be used by multiple asset types and collection types.
The attribute type Drop-down Menu, can have multiple values and hierarchical values.
To create, delete, and modify attributes, click Attributes in the navigation pane. The right pane displays the list of attributes available in the system.
Creating an attribute
To create an attribute:
-
Click + (plus sign) to display the Create Attribute dialog box.
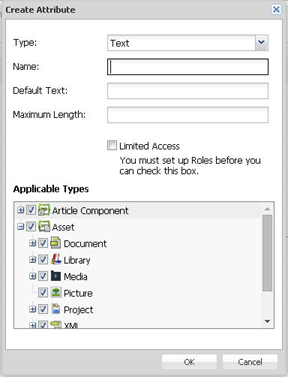
Specify the attribute name and type in the Create Attribute dialog box. -
Choose an attribute type from the Type drop-down menu. (For more information about attribute types, see Understanding attribute types)
-
Enter a name for the attribute in the Name field.
-
To allow only users with the "Edit normal- and limited-access fields" privilege to access the attribute, check "Limited Access." For more information, see Defining Roles and Privileges.
-
Configure the remaining controls. These controls vary depending on which attribute type is selected. For more information, see Understanding attribute types.
-
To control which content types the attribute is applicable to, check the appropriate boxes in the Applicable Types list.
Understanding attribute types
There are eight kinds of attributes: Text, Date, Time, Number, Measurement, Check Box, Drop-down Menu, and Date Time.
Text
Use the Text attribute type to create text attributes.
-
Enter a default value in the Default Text field.
-
To indicate the maximum length of text in the field, enter a value in the Maximum Length field.
Date
Use the Date attribute type to create date attributes.
-
Enter a default date in the Default Date field.
-
To constrain users to a particular date range, enter a starting date in the Start Date field and an ending date in the End Date field.
Time
Use the Time attribute type to create attributes where users can enter times.
-
Enter a default time in the Default Time field.
-
To constrain users to a particular time range, choose a starting time from the Start Time drop-down menu and an ending time from the End Time drop-down menu.
Time values are determined by the Quark Publishing Platform user's locale setting.
Number
Use the Number attribute type to create attributes where users can enter only numbers.
-
Enter a default number in the Default Value field.
-
To constrain users to a particular numeric range, enter a minimum number in the Minimum Value field and a maximum value in the Maximum Value field.
Measurement
Use the Measurement attribute type to create attributes where users can enter only measurements.
-
Enter a default number in the Default Value field.
-
Use the Units drop-down menu to specify the unified unit of measure (for example, Picas or Millimeters).
-
To constrain users to a particular measurement range, enter a minimum value in the Minimum Value field and a maximum value in the Maximum Value field.
Check box
Use the CheckBox attribute type to create check box attributes. To display the attribute with a checkmark by default, check Checked by Default.
Drop-down Menu
Use the Drop-down Menu attribute type to create drop-down menu attributes.
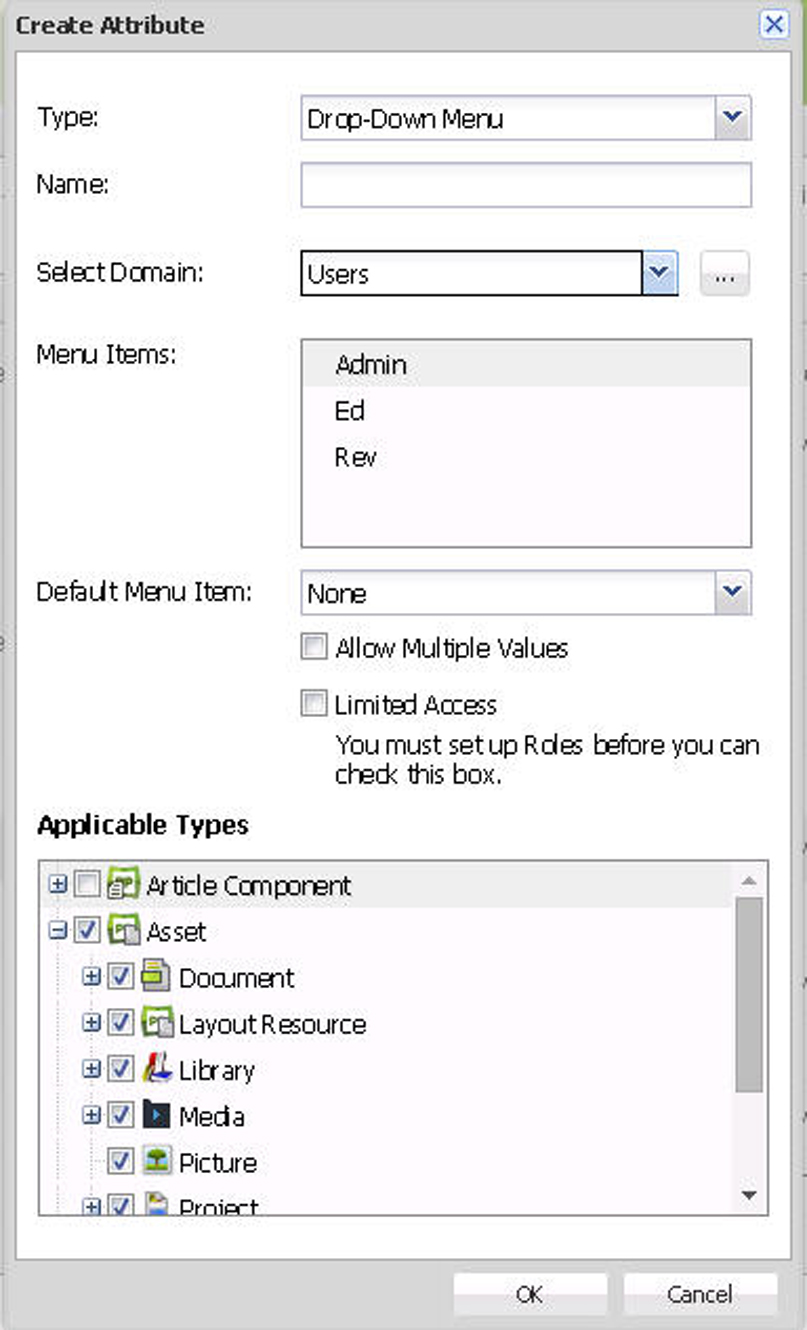
Drop-down menu attributes can display lists of values called attribute domains. For example, if you create a drop-down menu attribute that requires the list of users on your system, you can use the existing list of users with the attribute rather than entering all the names manually.
To assign an attribute domain to a drop-down menu attribute, choose the attribute domain from the Select Domain drop-down menu. The attribute domain's contents display in the Menu Items list.
To edit an attribute domain or create a custom attribute domain:
-
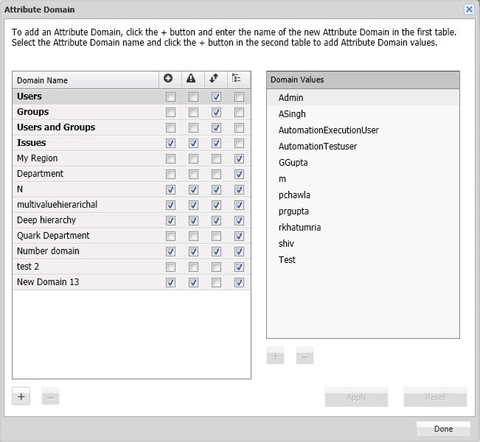
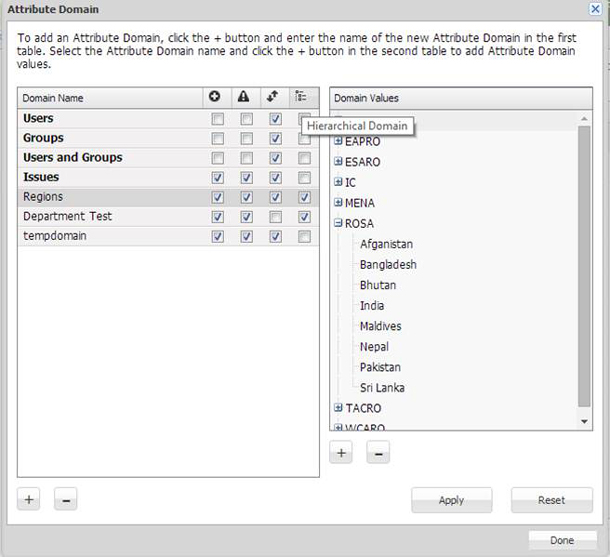
Click … to the right of the Select Domain drop-down menu. The Attribute Domain dialog box displays.
-
To rename the domain name, double-click its name, to add an attribute domain, click the + (plus sign) below the Domain Name column.
-
To enable users to add entries to the drop-down menu attribute, check the box in the Allow Users to Ad Entries column.
-
To warn users when they add an entry to the drop-down menu attribute, check the box in the Display Alert on New Entry column.
-
To alphabetically sort items in the drop-down menu attribute, check the box in the Sort Drop-down Menu Items column.
-
To allow hierarchical attribute domains in the drop down menu, check the box in the Hierarchical Domain column. Hierarchical domains can have multiple or single values.
-
To add values to the selected attribute domain, click + (plus sign) below the Domain Values column.
Hierarchical domains are not supported with an HSQL database.
-
-
Click Done to close the Attribute Domain dialog box and continue creating your drop-down menu attribute.
Multi valued attributes
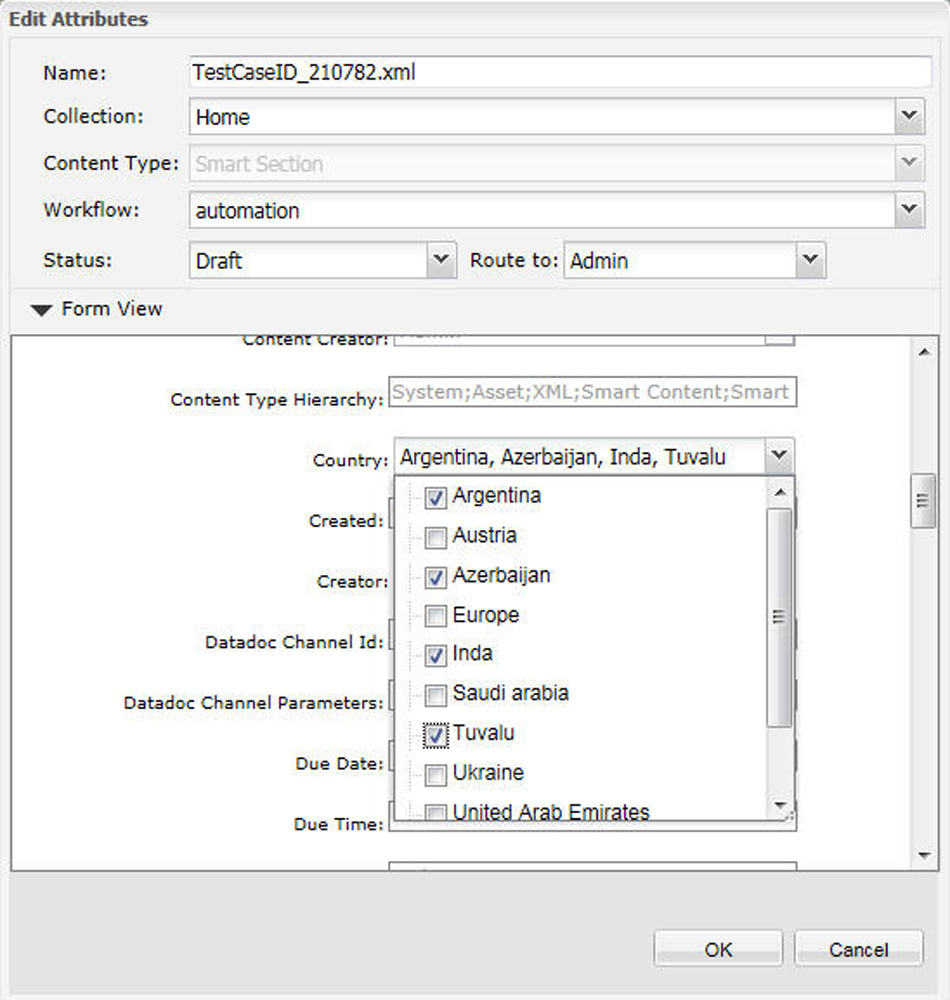
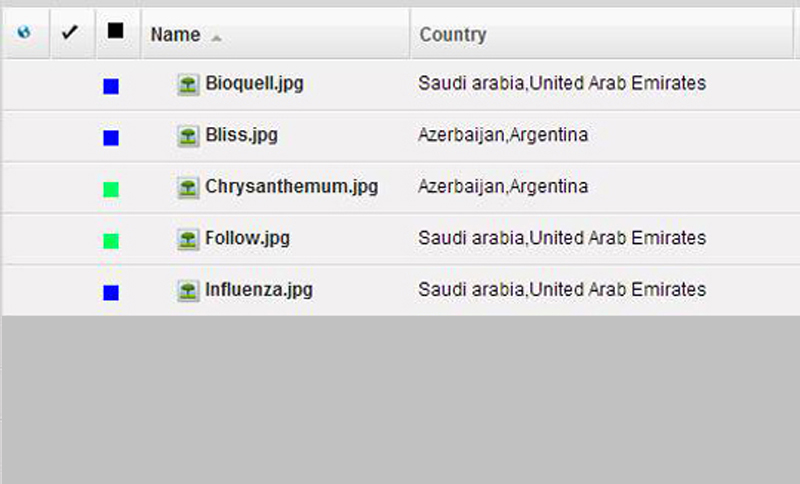
When defining the drop-down menu attribue type, you can capture multiple values for the attribute. To allow the attribute to contain multiple values check the Allow Multiple Values box in the Create Attribute dialog.
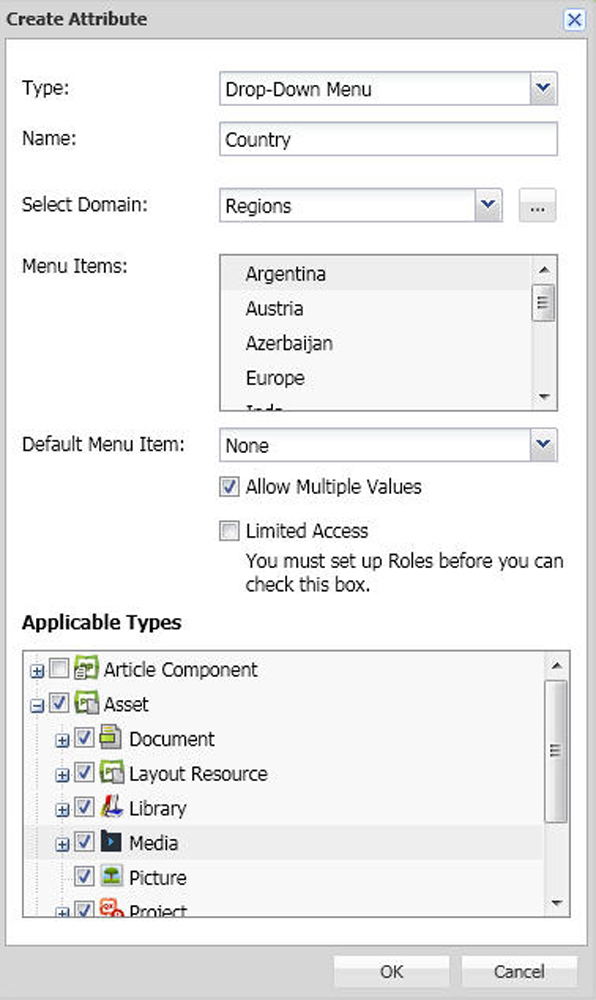
When editing the attributes of an asset, for a drop-down menu attribute type, you can select to display a single value or multiple values.
Hierarchical attribute domains
When editing or adding an attribute domain, you can allow hierarchical attribute domains by checking the box in the Hierarchical Domain column.
Hierarchical domains can have multiple or single values.
Date Time
Use the Date Time attribute type to create attributes for tracking both dates and times.
-
Enter a default date and time in the Default Date field.
-
To constrain users to a particular date/time range, enter a starting date and time in the Start Date field and an ending date and time in the End Date field.
Time values are determined by the Quark Publishing Platform user's locale setting.
Setting priority search attributes
Priority search attributes display at the top of the list of search criteria in the search controls. After the priority search attributes, all search attributes display alphabetically.
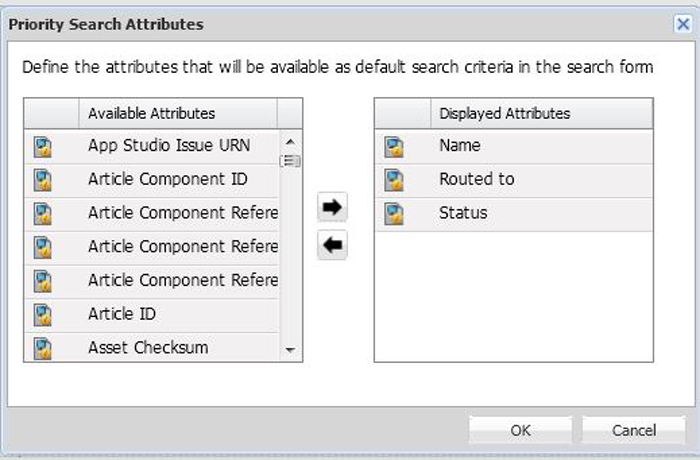
To designate priority search attributes, click Attributes in the navigation pane, and then click Priority Search Attributes. The Priority Search Attributes dialog box displays. To add an attribute to the list, select it in the list on the left and then click the right arrow button.
Adding constraints to attributes
Users can edit asset attributes when they check in an asset, when they save a revision, and by selecting an asset and clicking Edit Attributes. Constraints let a Quark Publishing Platform administrator place some controls on how users edit attributes at these times. For example, if you want users with the Editor role to explicitly approve an asset when it reaches Final status, you can use the Require Value constraint to require these users to indicate that the asset is approved or not approved. If a user does not enter a value, "Errors found" displays in red at the bottom of the Check In, Save Revision, or Edit Attribute dialog box. The attribute is also highlighted in red, and the user cannot proceed until he or she provides a value.
Only user-modifiable attributes can be constrained. In addition, you cannot constrain the Workflow and Collection attributes because privileges determine whether these attributes can be modified.
To constrain an attribute for a particular workflow:
-
Click Workflows. The Workflows pane displays.
-
Select a workflow in the Workflow Name list.
-
Click the Attribute Constraints tab.
-
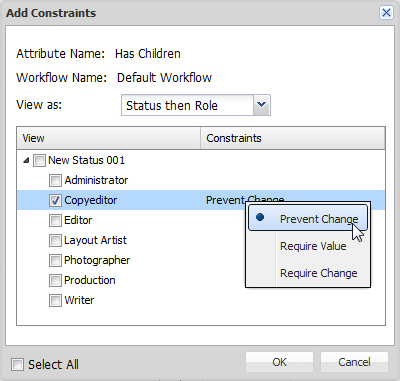
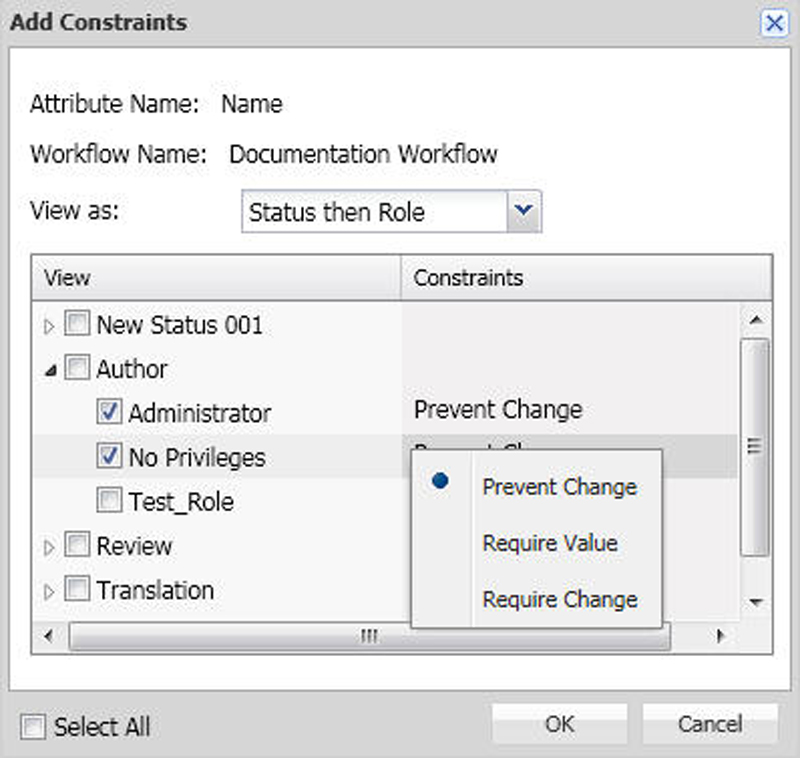
Select the attribute you want to constrain and click Add Constraints. The Add Constraints dialog box displays.
-
Choose an option from the View as drop-down menu. This value controls how the information in the list of statuses and roles displays while you establish a constraint. Options include:
-
Status then Role: Displays a hierarchical list with statuses as main headings and roles as subheadings. You can apply the constraint to individual roles at specific statuses.
-
Role then Status: Displays a hierarchical list with roles as main headings and statuses as subheadings. You can apply the constraint to individual statuses for specific roles.
If you change the View as option, the active setting will be retained, but will display according to the View as drop-down menu hierarchy.
-
-
Check the box for the status or user role the constraint is for.
-
When you check a role or status in the list, the constraint types become available for the selected line in the list. There are three kinds of constraints:
-
Prevent Change: Prevents users from altering the attribute's value.
-
Require Value: Prevents users from leaving an attribute's value unspecified.
-
Require Change: Forces users to change the attribute value.
-
-
To display the status only, check Select All. You can apply the constraint to all or none of the roles at specific statuses. Unchecking Select All displays the roles only.
Constraints are applied based on the user's role and the asset's status at the time the Check in, Save Revision, or Edit Attribute dialog box is displayed. The constraints in effect in these dialog boxes remain the same even if you change the value of the Status drop-down menu.
You can use constraints to enforce automatic routing according to status. For example, you can set up automatic routing for a collection at the status level and use Prevent Change (in the Add Constraints dialog box) to disable modifications of the Route to drop-down menu in the Check In dialog box. This will cause assets to be rerouted when their status changes and prevent users from changing the routing of the asset.
Working with relationships
A relationship is an object that stores the metadata for the association between two objects. Whenever you assign an article from a QuarkXPress layout, drag a picture into a layout, or create an interactive object with App Studio, a relationship object is created to store information about the link you've just created.
For example, if you drag a picture into a QuarkXPress layout, a relationship is created. Among other things, that relationship stores the IDs of both the picture and the layout. This makes it easy to find out which layouts are using a given picture, or how many pictures are attached to a given layout.
There are many different types of relationship:
-
Primary Attachment: Stores information about a primary attachment.
-
Secondary Attachment: Stores information about a secondary attachment.
-
Overlay Attachment: Stores information about an App Studio or ePub attachment.
-
Article Component Reference: Stores information about the association between an article component and a linked asset such as a picture.
-
XML Component Reference: Stores information about a reference from one XML file to another.
-
InDesign behaviour Reference: This will create a relation between a Platform document and a Platform asset used in Open file interactivity.
-
InDesign Hyperlink Reference: This will create a relation between a Platform document and a Platform asset used in Hyperlinks.
-
Excel Data Object Reference: This will create a relation between a Platform document and an Excel data object.
-
PowerPoint Data Object Reference: This will create a relation between a Platform document and a PowerPoint data object.
-
Visio Data Object Reference: This will create a relation between a Platform document and a Visio data object.
-
PowerPoint Reference: This will create a relation between a Platform document and components in PowerPoint documents like Excel data, PowerPoint deck/slide, Image etc.
-
Review Document Reference: This will create a relation between a Platform document and a review document reference.
-
Custom Relation: Developers can create their own relationship types for custom applications.
For more information about attachments, see Primary and secondary attachments.
Administrators can view the fields assigned to each type of relationship in the Relations pane.
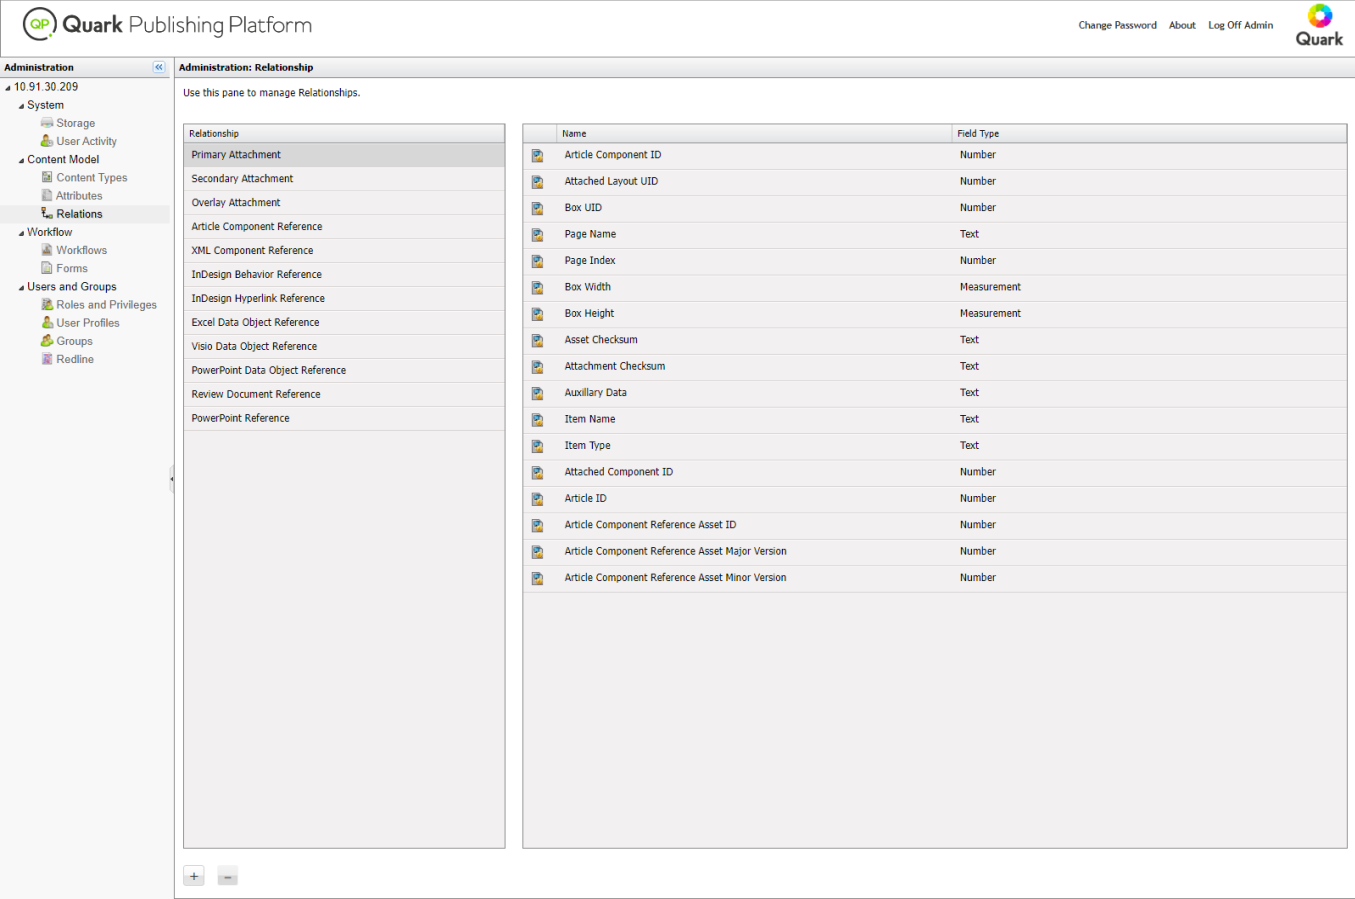
Administrators can also add custom relationship types and assign attributes to them. To view or edit the attributes associated with a relationship type, double-click the relationship type.
In Quark Publishing Platform Web client, users can view the relationships for an asset by displaying that asset in List View with Relationship Status. Other Platform clients can view relationships with Relationship View.
Working with workflows
In Quark Publishing Platform terminology, a workflow is a set of steps that helps you to publish a document. You define workflows at the server level and then apply them to collections.
Each workflow has the following characteristics:
-
A name
-
A list of the asset types to which it applies
-
A set of statuses, in a particular order. The order of the statuses reflects the order of the steps necessary for completing the workflow. For example, you might specify that assets begin with a status called "Assigned", followed by "In Progress", "In Review", and "Completed". You can specify that an asset with the "Completed" status automatically routes to an editor for final approval (for more information, see Setting up auto routing). You can also enable or disable Redline tracking, check-in layout evaluation, and output layout evaluation for each status.
Status transitions can be overridden per role.
-
A list of asset attributes. Attributes are defined at the server level, so you can use an attribute in any number of workflows. You can define constraints for some attributes at the workflow level.
-
An attribute form for each asset type. (The attribute form displays when you check an asset in)
Creating a workflow
To create a workflow:
-
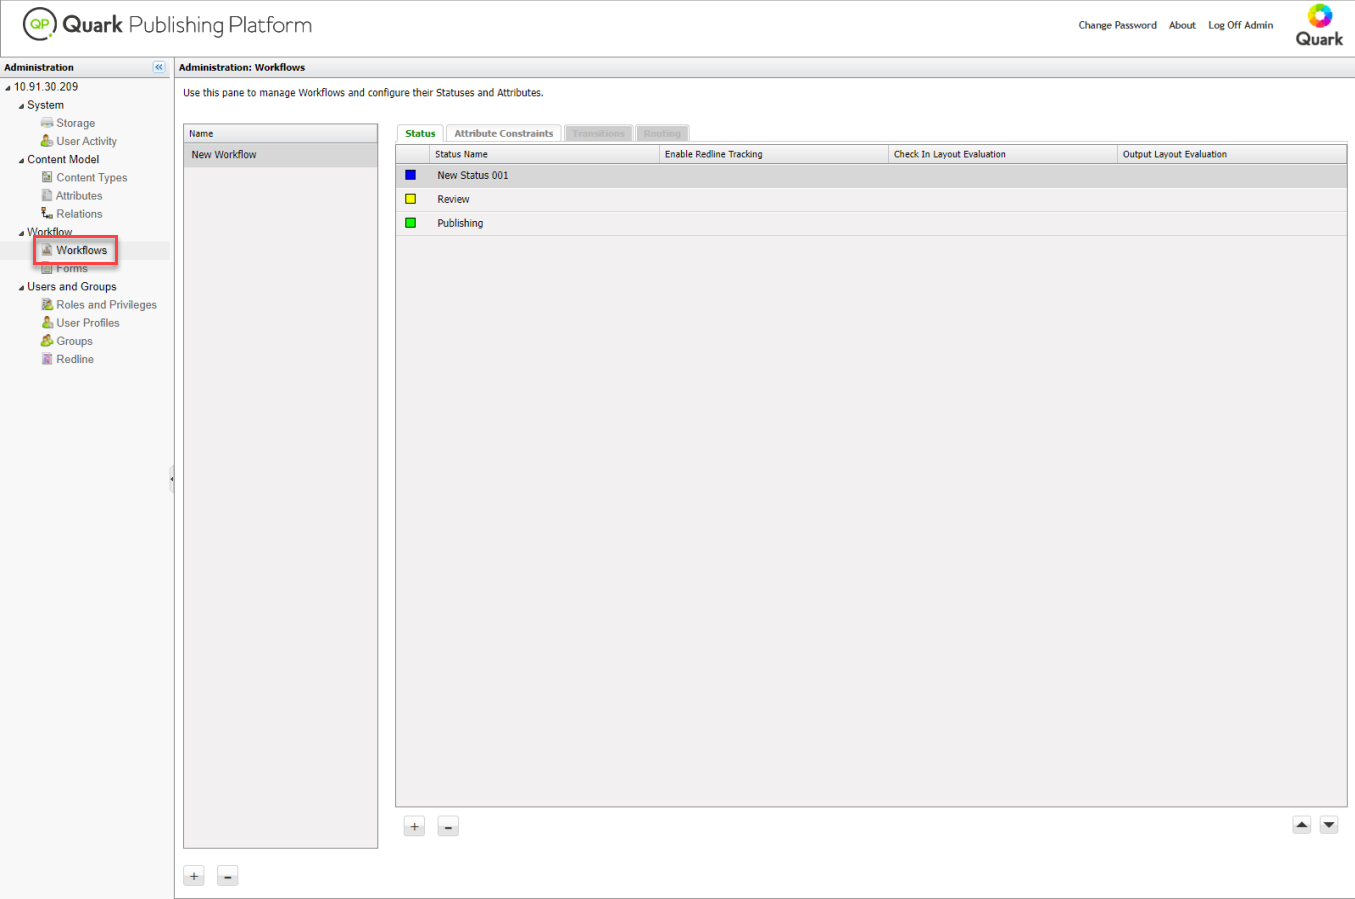
Click Workflows. The Administration: Workflows screen displays.
-
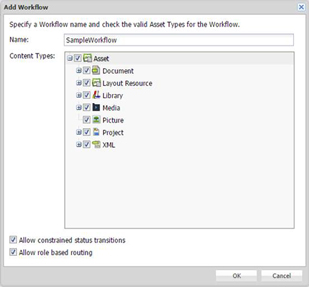
To create a workflow, click + under the Name list. The Add Workflow dialog box displays.
Add Workflow dialog box -
Enter a name for the workflow in the Name field.
-
Under Asset Types, check the asset types you want this workflow to be available for.
-
Check Allow constrained status transitions to enable the Transitions tab.
-
Check Allow role based routing to enable the Routing tab
-
Click OK.
For information on configuring a workflow, see the following topics.
Working with statuses
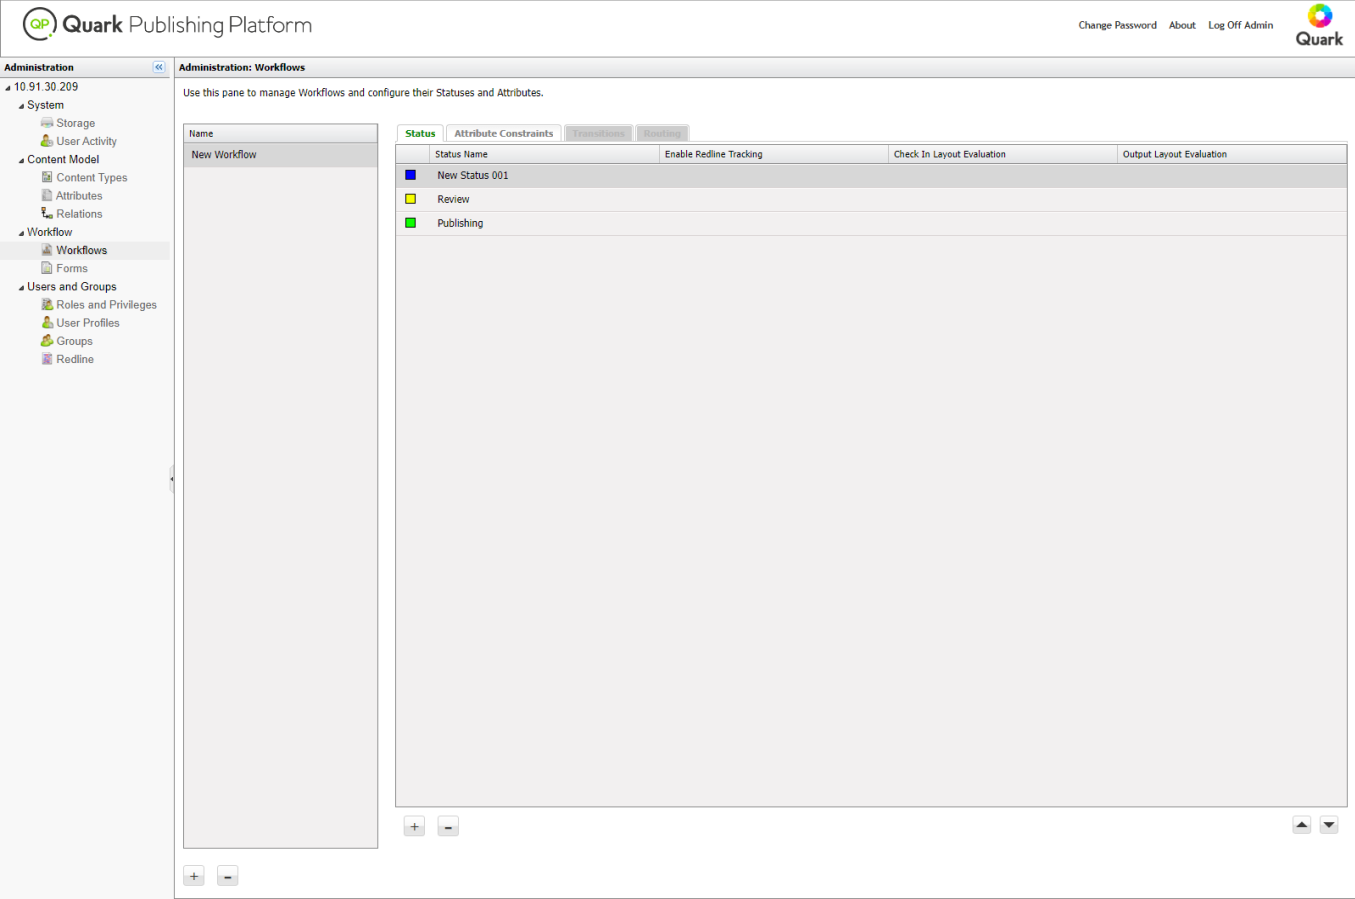
Each workflow has its own sequence of statuses. To work with a workflow's statuses:
-
Click Workflows. The Workflows pane displays.
-
Select a workflow in the Workflow Name list.
-
Click the Status tab.
-
To delete a status, select it and click -.
-
To edit a status, double-click its name.
-
To duplicate a status, Option+click/right-click the status and choose Duplicate from the context menu.
-
-
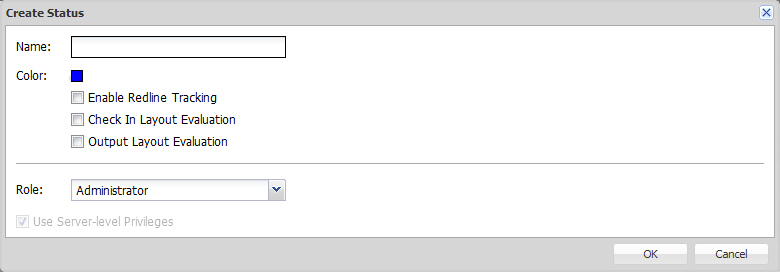
To add a status, click +. The Create Status dialog box displays.
-
Enter a name for the status in the Name field.
-
Use the Color control to associate a color with the status. This color displays in the Status icon column in the Workspace window.
-
To enable redline tracking for articles with this status in this workflow, check Enable Redline Tracking.
-
To automatically evaluate layouts with this status in this workflow when their projects are checked in, check Check In Layout Evaluation.
-
To automatically evaluate layouts with this status in this workflow when they are sent to output, check Output Layout Evaluation.
-
You can give a status an associated set of privileges based on the role privileges defined at the server level, or you can custom design a set of privileges for the status.
-
You can specify that a status grants the privileges defined for a particular role at the server level by choosing an option from the Role drop-down menu and checking Use Server-level Privileges.
-
You can choose an option from the Role drop-down menu and then modify the settings in the Privileges list. This does not affect the role privileges settings at the server level; rather, it creates an exception for privileges when assets reach the chosen status.
Privileges for roles overridden at the status level will be the union of all privileges per role, for all applicable roles of a user in a collection.
-
-
Click OK.
-
Use the arrows at the bottom right of the Status area to set up the statuses so that they occur in the proper order (from top to bottom).
Working with attribute constraints
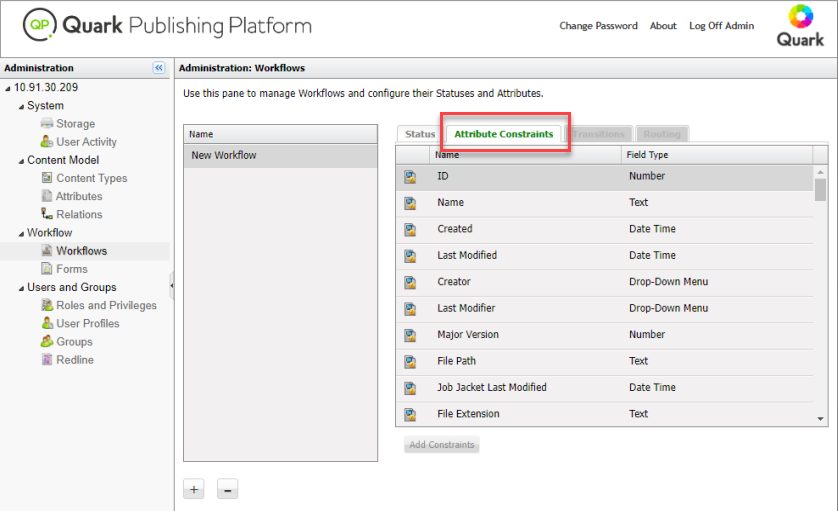
Each workflow has a list of available attributes. The list of attributes available to a workflow is dependent upon the asset types to which this workflow is available. To work with a workflow's attributes:
-
Click Workflows. The Workflows pane displays.
-
Select a workflow in the Workflow Name list.
-
Click the Attribute Constraints tab.
-
To add constraints to an attribute, select the attribute and click Add Constraints. The Add Constraints dialog box displays.
-
Select to view the list by Role or Status first in the View as drop-down menu.
-
If viewing by Status then Role, select a status from the list on the right, check a role available to that status and then choose the constraint you want to place on that status/role combination when working with the selected attribute.
-
If viewing by Role then Status, select a role from the list on the right, check a status available to that role and then choose the constraint you want to place on that role/status combination when working with the selected attribute.
-
To automatically place a default constraint of Prevent Change on every role and status combination, check Select All.
-
Click OK.
Working with status transitions
The Transitions tab is used to specify a list of initial statuses per workflow on which new Check ins are applicable. This tab is also used to configure the statuses that each role is allowed to transition to within a given workflow.
A users role defined in the collection takes precedence over his role specified in the User Profiles tab when assigning the status in the workflow.
To configure a workflow's allowable status transitions:
-
Click Workflows. The Workflows pane displays.
-
Select a workflow in the Workflow Name list.
-
Click the Transitions tab.
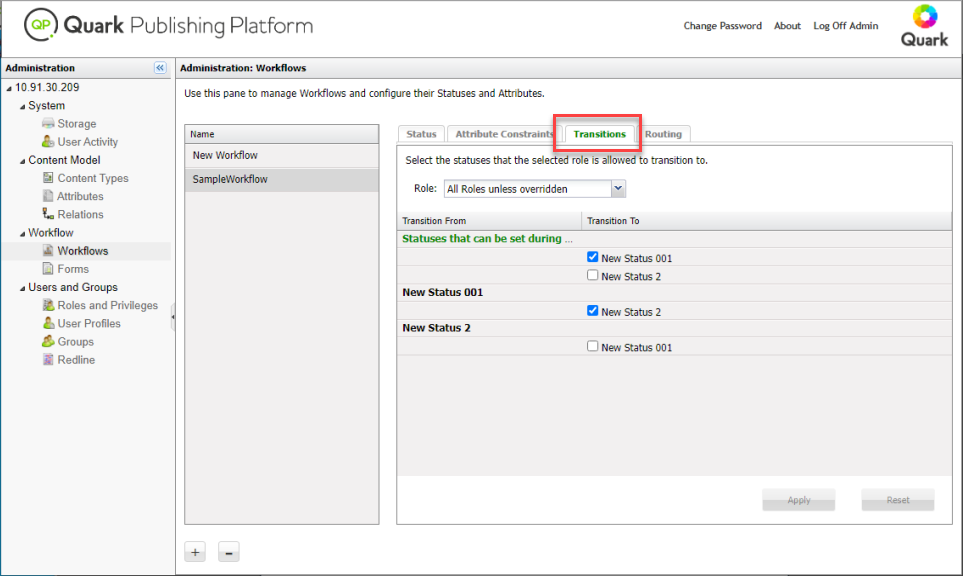
The Transitions is only available if the Allow constrained status transitions option was selected when the workflow was created or edited.
-
Select a role from the Role drop-down menu.
Select All Roles unless overridden to display all roles available to this workflow.
-
Select a status from the Transition From column and check the statuses this role is allowed to transition to from the Transition To column.
-
Click Apply to apply your selections or click Reset to reset all selections to their previous state.
Working with status routing
The Routing tab allows you to select roles that are applicable to each status. This mapping is used to route assets to users in these roles. It is also used to filter the list of users based on the current status and the current users evaluated role during check in of an asset.
To configure a workflow's status based routing:
-
Click Workflows. The Workflows pane displays.
-
Select a workflow in the Workflow Name list.
-
Click the Routing tab.
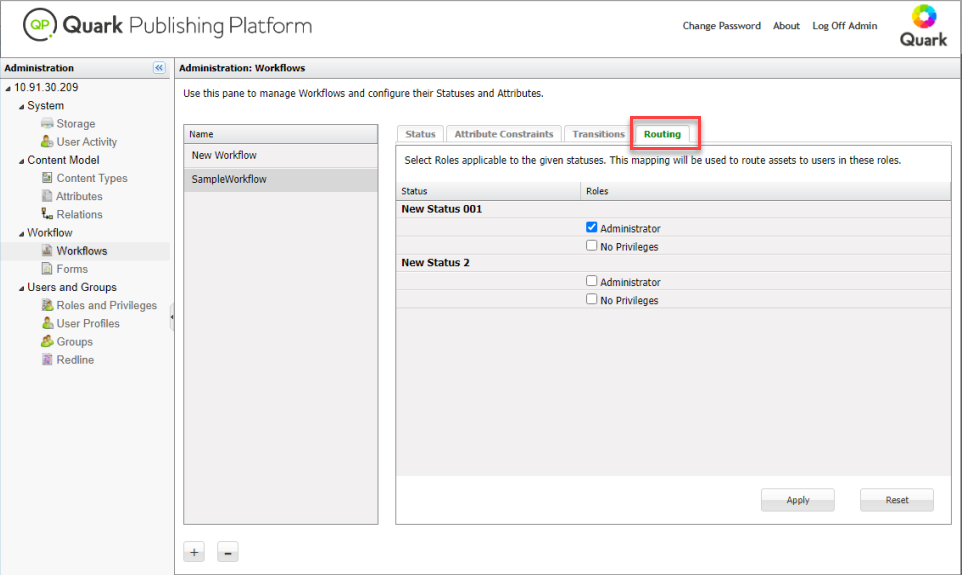
The Routing is only available if the Allow role based routing option was selected when the workflow was created or edited.
-
For each status in the Status column, check the roles that assets are allowed to be routed to while in this status in the Roles column.
-
Click Apply to apply your selections or click Reset to reset all selections to their previous state.
Working with forms
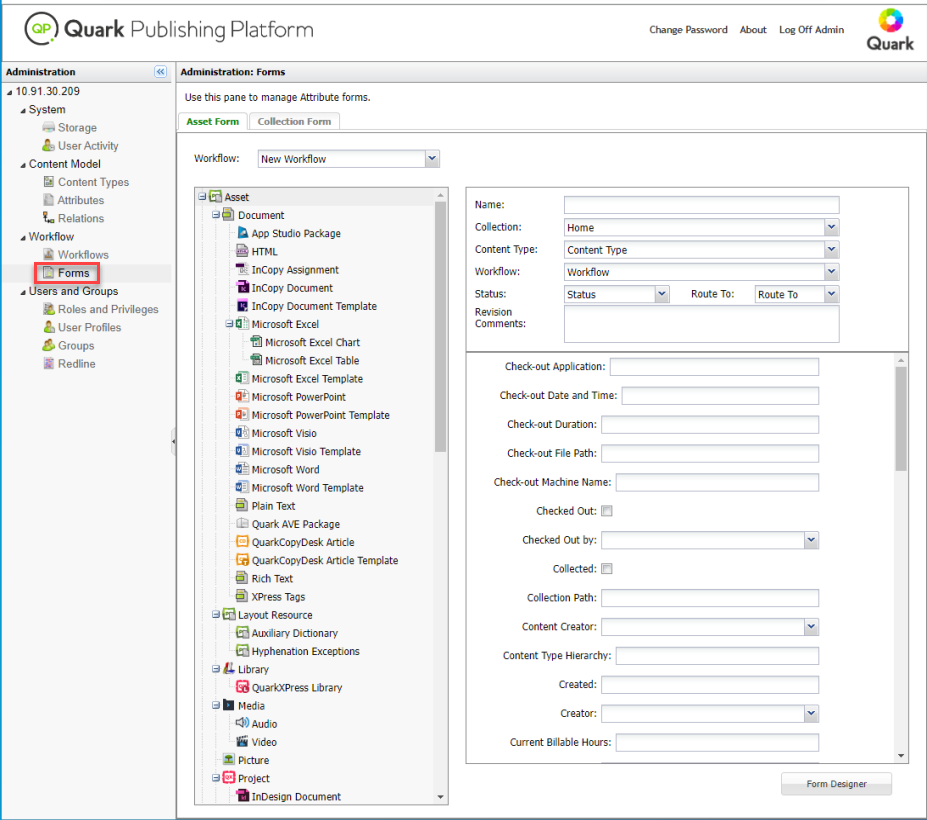
The Asset Form tab of the Forms pane lets you edit the asset forms for each of the content types. The Collection Form tab lets you edit the forms associated with the various collection types. To configure a form:
-
Click Forms in the navigation pane. The Forms pane displays.
-
Click the Asset Form or Collection Form tab.
-
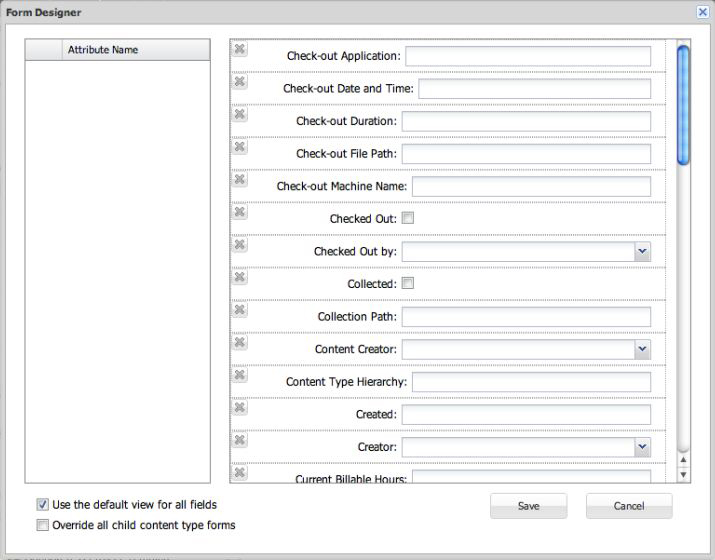
Select a content type or collection type in the tree on the left and click Form Designer. The Form Designer dialog box displays.
Form Designer dialog box -
To display all attributes in a default layout, check Use the Default View for All Fields. To add individual attributes, drag them from the Attribute Name list to the grid. To remove an attribute, click its close box at the upper left. Use each attribute's handles to move and resize the attribute in the grid.
-
Click Save.
Defining Roles and Privileges
All users must belong to a role. A role defines the Quark Publishing Platform privileges for its members.
Roles and Privileges
A role specifies a set of privileges for working within Quark Publishing Platform applications. Each Quark Publishing Platform user belongs to at least one role. To create, delete, rename, and modify roles and their associated privileges, click Roles and Privileges.
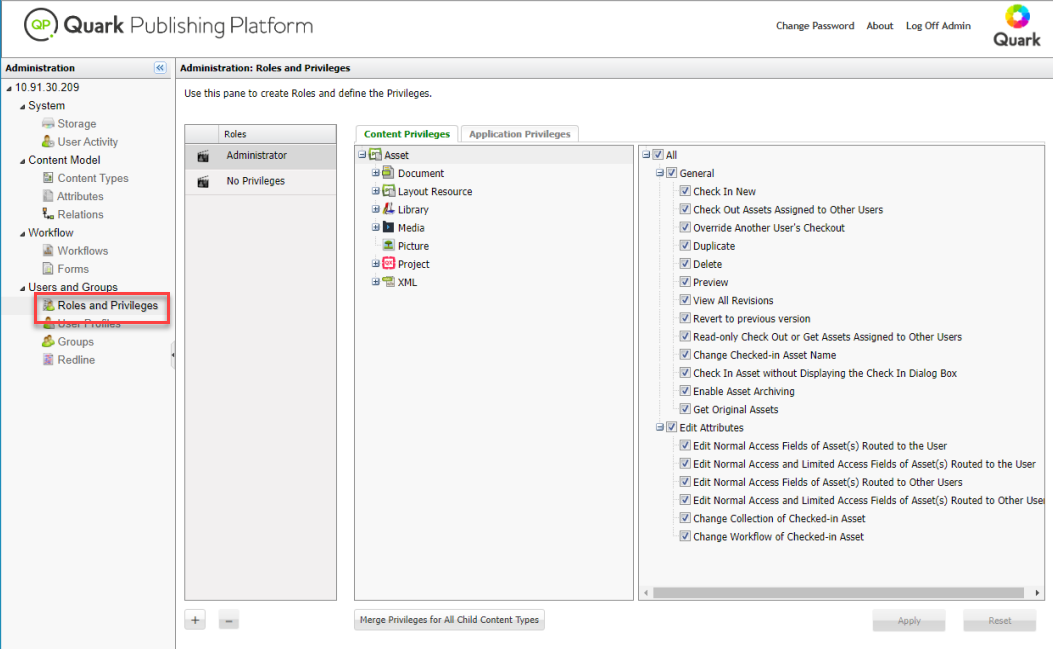
-
To add a role, click + (plus sign). A new role displays in the Roles column. The role's content-type privileges display in a tree in the Content Privileges tab, and the role's available application-specific privileges display in a tree in the Application Privileges tab. Check privileges to enable them, and uncheck privileges to disable them. For detailed descriptions of the available resources, see Privileges.
-
To change the name of a role, Control+click/right-click the role, then choose Rename Role from the context menu. You can also use the toolbar or the contextual menu to rename a role.
-
To make a copy of a role, Control+click/right-click the role, then choose Duplicate from the context menu.
-
To delete a role, click – (minus sign). An alert asks you to confirm the deletion. If users are assigned to the role, you can assign them to a different role at this time.
The default role No Privileges is an empty role that does not have any privileges enabled. This role cannot be modified.
Creating and deleting users
To create and delete user profiles, click User Profiles.
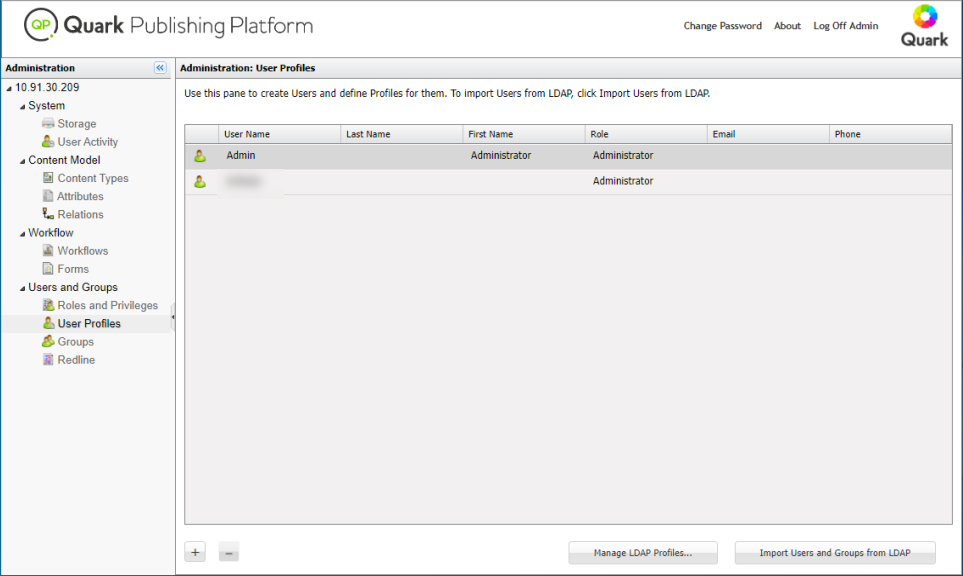
-
To create a user profile, click +. In the Create User Profile dialog box, enter a user name and password, enter the user's last name and first name, choose a role, and enter the user's e-mail address and phone number. To prevent the user from logging on (for example, if the user is on extended leave), check Disable Log On.
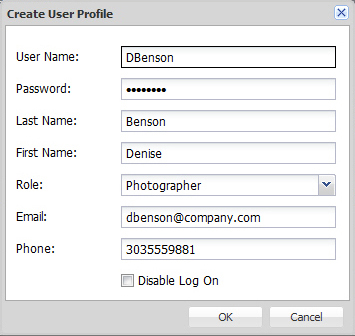
You can edit a user name by double-clicking it or using the contextual menu.
When you add users, you can pull them from your Lightweight Directory Application Protocol (LDAP) list. See Managing User Lists with LDAP for instructions. You can add Quark Publishing Platform users in addition to users you manage through the LDAP service.
-
To delete a user profile, select the profile and click–(minus sign). An alert prompts you to confirm the deletion. If the user had assets routed to him or her, you can reroute the assets at this time.
-
To duplicate a user profile, select the user profile and choose Duplicate from the contextual menu.
Managing user lists with LDAP
Many system administrators use directory services to manage users on an enterprise network, such as Lightweight Directory Application Protocol (LDAP). The LDAP protocol provides global management over user names and passwords. Quark Publishing Platform administrators are not required to use LDAP, but if they rely on LDAP for other systems, then Quark Publishing Platform can be configured so that Quark Publishing Platform users can log on to Quark Publishing Platform Server with the same domain username and password they use for other systems on their enterprise network.
The LDAP service must exist within the same domain as your Quark Publishing Platform Server.
Quark Publishing Platform Server is the only Quark Publishing Platform application that maintains communication with the LDAP service.
Quark Publishing Platform Server works with LDAP v3, and X.500 DAP is not required for or supported by this implementation.
Refer to the Quark Publishing Platform Administration Guide and Quark Publishing Platform ReadMe for more information about integrating LDAP and Quark Publishing Platform Server.
Before you can integrate Quark Publishing Platform Server with an LDAP Directory Server, you must create an LDAP profile and map the LDAP attributes to Quark Publishing Platform user attributes. The topics below explain how to do this.
Managing LDAP profiles
Before you can import LDAP users into Quark Publishing Platform, you must create an LDAP profile. An LDAP profile lets you supply the Active Directory Server credentials that are necessary to allow you to import LDAP users.
To create an LDAP profile:
-
Click User Profiles.
-
Click Manage LDAP Profiles. The Manage LDAP Profile dialog box displays.
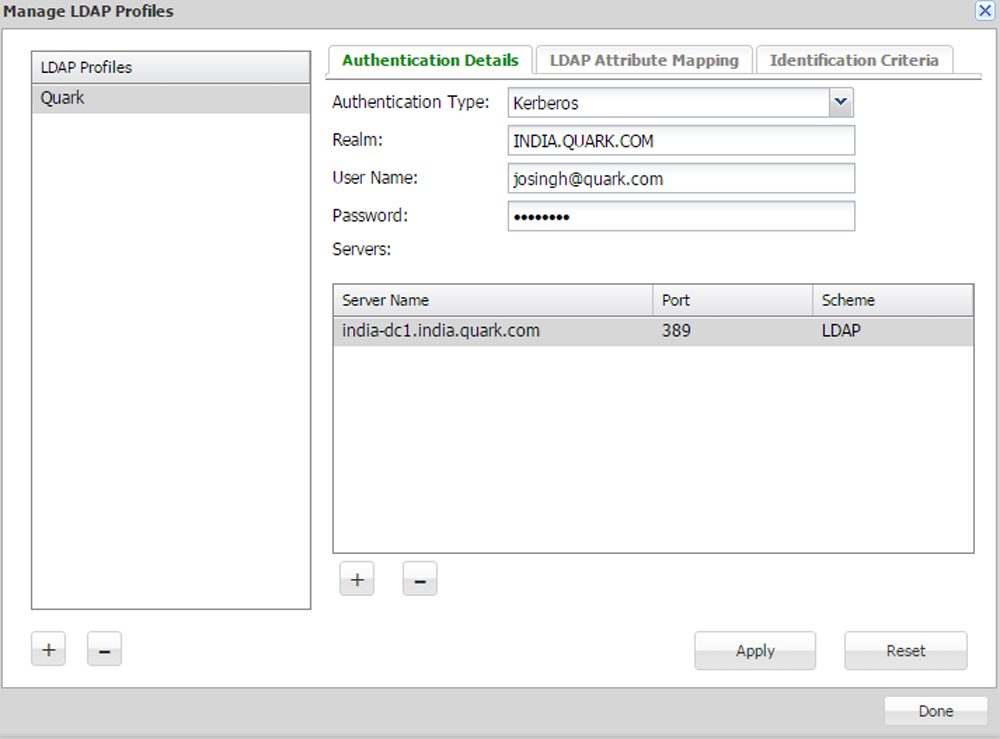
Manage LDAP Profile dialog box -
In the Authentication Details tab, click the + button under the LDAP Profiles list to create a new LDAP profile.
-
Enter a name for the LDAP profile.
-
Choose the LDAP server's authentication method from the Authentication Type drop-down menu. Valid values include Kerberos, Digest-MD5, and Simple.
-
Enter the realm name in the Realm field.
The convention is to enter realm names in upper-case letters.
Each profile must have a unique realm name.
-
Enter the user name and password of a user who has read access to the Directory Server (that is, the designated name in the Directory Server). This user authentication will be used to retrieve the list of users from the Directory Server.
-
To add an LDAP server to the profile, click the + button under the Servers list.
-
Enter the Server Name, Port and Scheme for the new server.
-
Click Apply.
The Identification Criteria tab displays requesting that you fill in the value for Base DN. For more information, see Identification criteria.
-
Click Done.
Mapping LDAP attributes
Before you can import LDAP users into Quark Publishing Platform, you must map the LDAP attributes to Quark Publishing Platform user attributes.
To map LDAP attributes:
-
Click User Profiles.
-
Click Manage LDAP Profiles. The Manage LDAP Profiles dialog box displays. Select the LDAP Attribute Mapping tab.
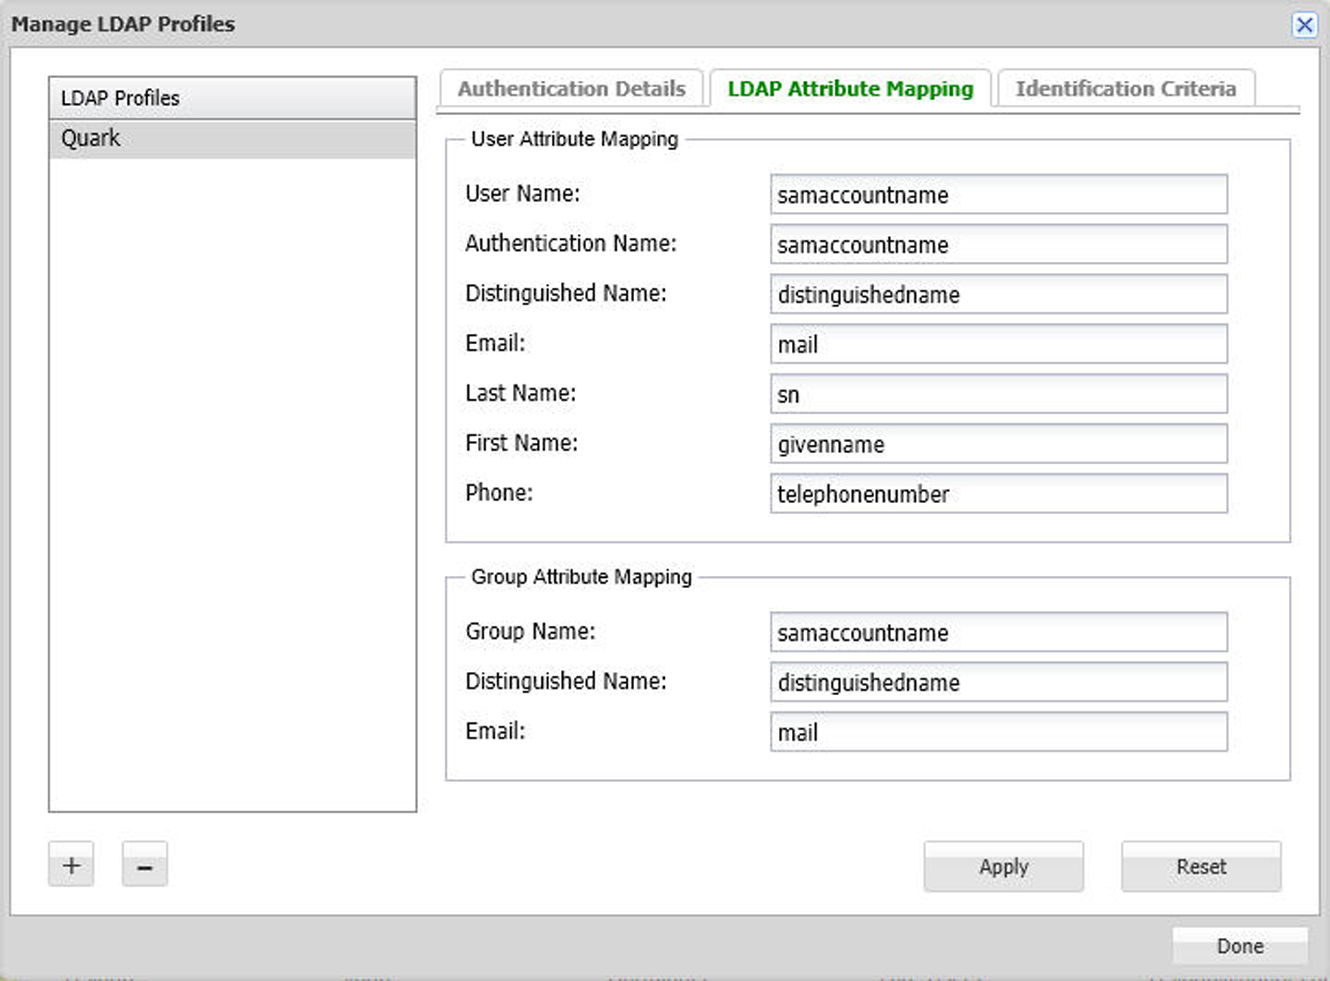
LDAP Attribute Mapping tab of the Manage LDAP Profiles dialog box -
You can map LDAP attributes to a Quark Publishing Platform user or to a Group. For each field in the tab, specify the corresponding LDAP field.
-
Click Apply.
Identification criteria
The identification criteria tab allows you to define the attributes and filters that enable you to define the search criteria and provide more efficient and effective searches. The identification criteria allows you to describe the base dn for any active directory in your organization. A base dn is the point from where a server will search for users.
To describe the LDAP identification criteria:
-
Click User Profiles.
-
Click Manage LDAP Profiles. The Manage LDAP Profiles dialog box displays. Select the Identification Criteria tab.
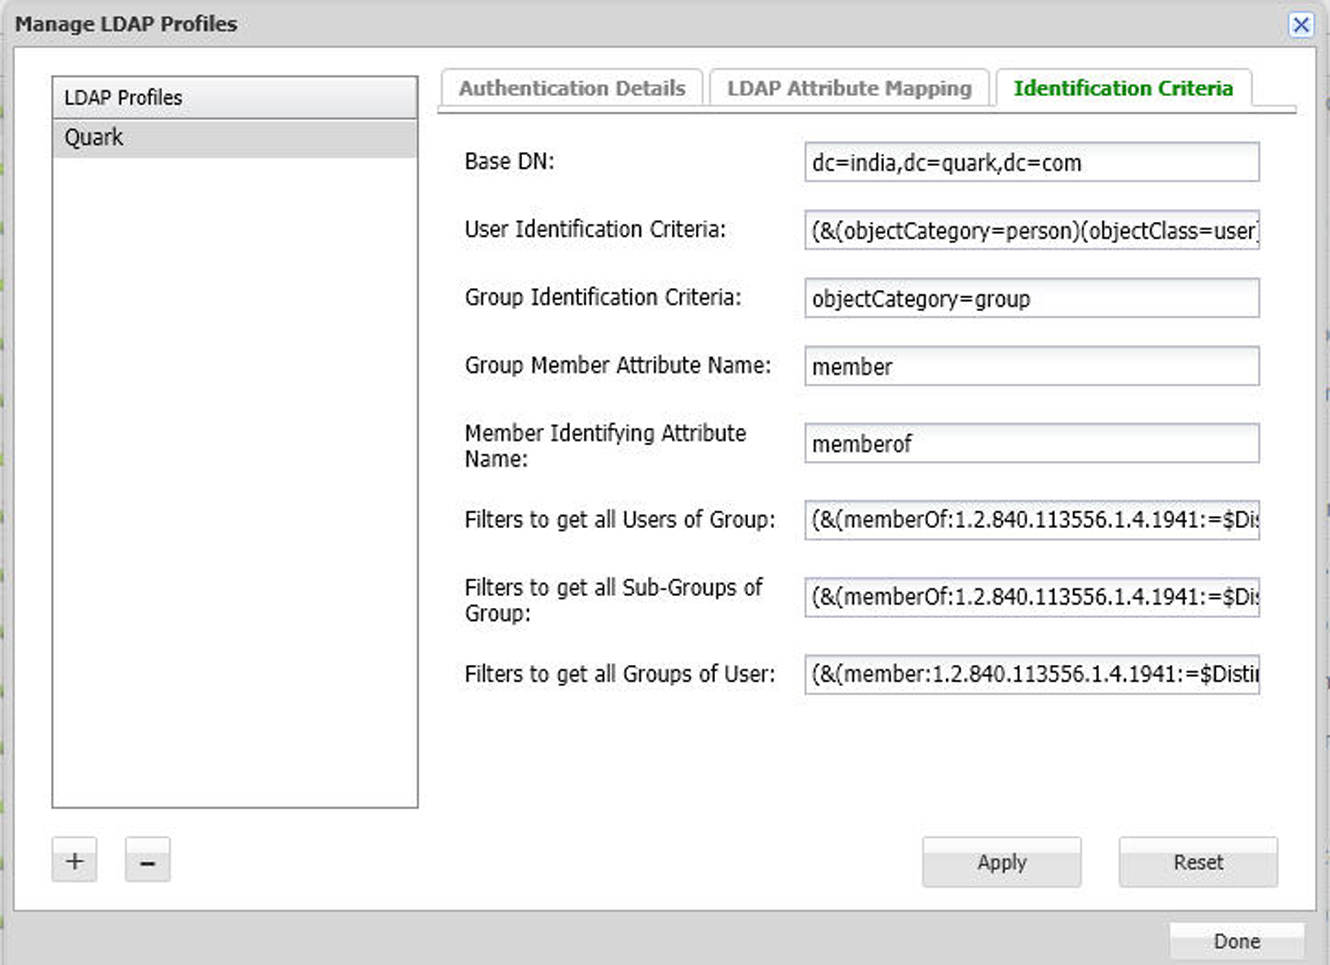
LDAP Attribute Mapping tab of the Manage LDAP Profiles dialog box -
Select the LDAP profile whose identification criteria you want to set .
-
Fill out the fields:
-
Enter the base string in the Base DN field. This string represents the search base used to search for users in the Active Directory server computer's hierarchy. The Base DN field is mandatory.
-
The User Identification Criteria field allows you to filter for specific users in your active directory. The default string represents the search base used to search for all users in the Active Directory. This field allows you to search for categorys like Person, eliminating machines from showing up in your searches. The User Identification Criteria field is optional.
-
The Group Identification Criteria field allows you to search for specific groups in your active directory. The default string represents the search base used to search for all groups in the Active Directory. The Group Identification Criteria field is optional.
-
The Group Member Attribute Name field denotes the common attribute of the set of users in a group. The Group Member Attribute Name field is optional.
-
The Member Identifying Attribute Name field is used to denote membership in a group. The Member Identifying Attribute Name field is optional.
-
The Filters to get all Users of Group field allows you to specify the criteria needed to search for all the users of a particular group. The Filters to get all Users of Group field is optional.
-
The Filters to get all Sub-Groups of Group field allows you to specify the criteria needed to search for all the sub-groups of a particular group. The Filters to get all Sub-Groups of Group field is optional.
-
The Filters to get all Groups of User field allows you to specify the criteria needed to search for all the groups of a particular user. The Filters to get all Groups of User field is optional.
-
-
Click Apply.
Importing LDAP users and groups
To import users and groups from your LDAP service:
-
Click User Profiles.
-
Click Import Users and Groups From LDAP. The Import Users and Groups from LDAP dialog box displays.
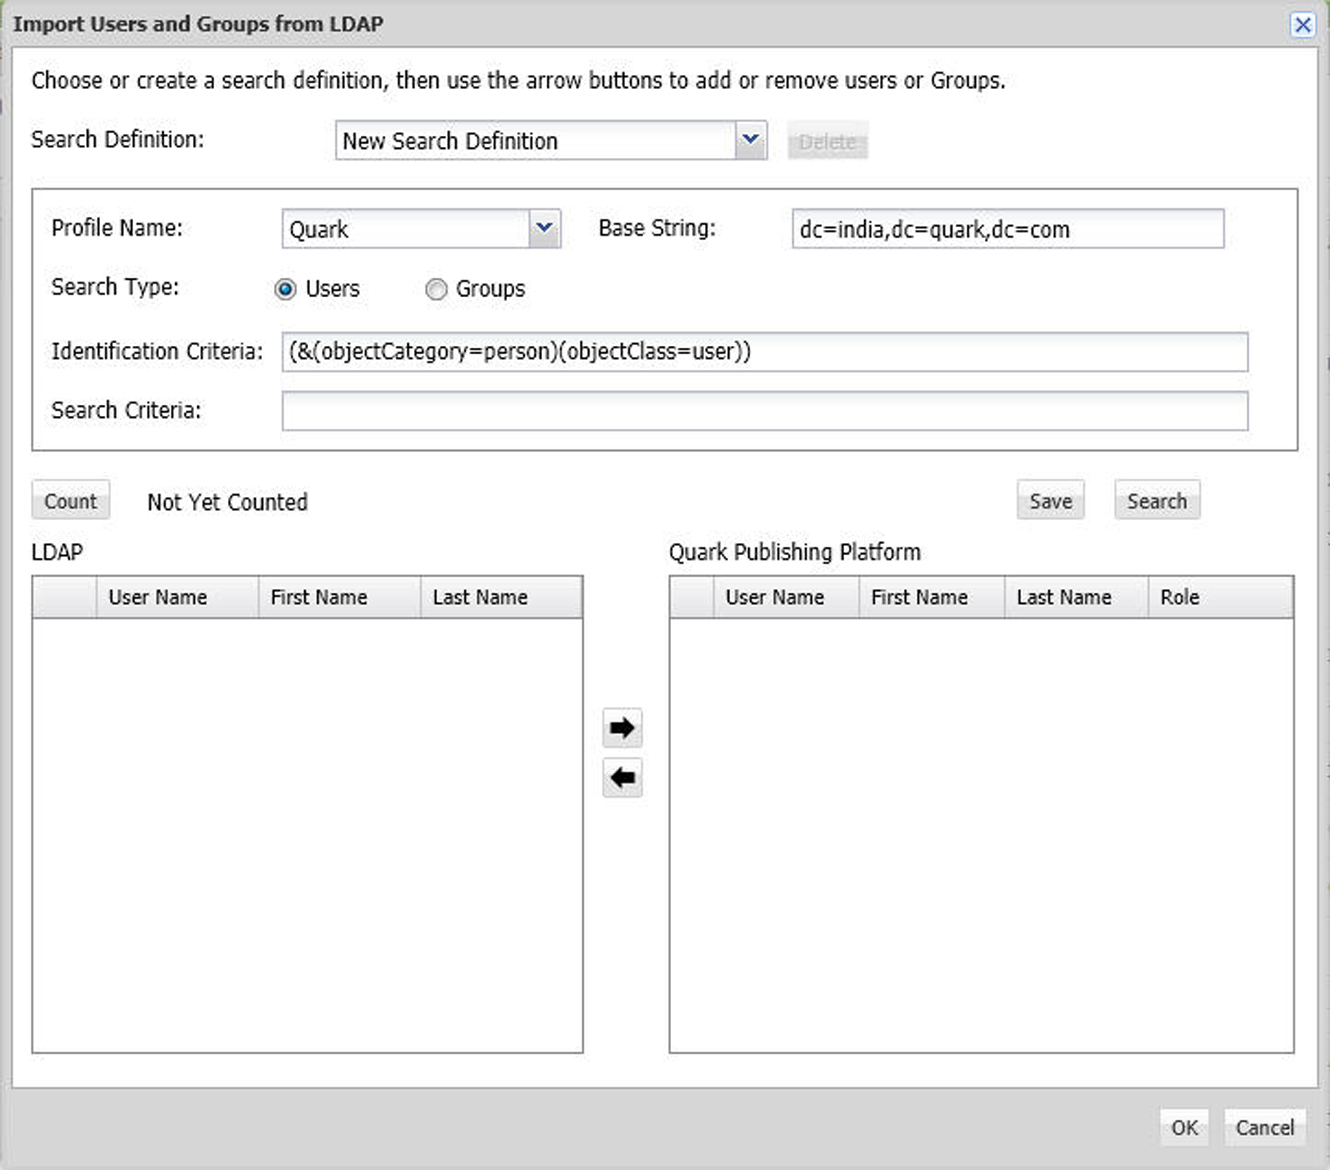
Use the Import Users and Groups From LDAP dialog box to add users or groups to your Quark Publishing Platform list.
-
The search controls at the top of the dialog box let you specify which users or groups you want to be able to import. To create a search:
-
Choose the name of the appropriate LDAP profile from the Profile Name drop-down menu.
-
Choose to search Users or Groups.
-
Enter the search criteria in the Search Criteria field. For example, to import all LDAP users that meet the criteria
samaccountname=*, entersamaccountname=* -
Enter the base string in the Base String field. In this string,
ouis an abbreviation for "organizational unit" anddcis short for "domain component." This string represents the search base used to search for users in the Active Directory server computer's hierarchy. -
Click Save to save the search and provide a name for the search in the dialog box that displays.
-
-
Choose the search to execute. The matching users or groups are listed on the left.
-
Select one or more names from the LDAP Users/Groups list on the left and click the right arrow to add the selected users or groups to the Quark Publishing Platform list of users or groups on the right.
The Assign Role dialog box displays.
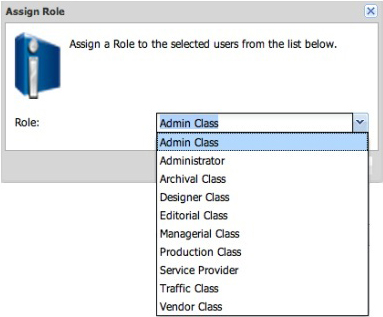
Use the Assign Role dialog box to assign a role to a Quark Publishing Platform user or group. -
Choose a role from the Role drop-down menu in the Assign Role dialog box and then click OK.
You can change the search criteria, execute more searches, and continue to add users/groups until you click OK in the Import Users from LDAP dialog box.
-
Click OK. The users or groups in the list on the right are imported.
If you duplicate a Quark Publishing Platform user or group that you imported from your LDAP service, the duplicated user or group is not connected to your LDAP service (that is, it's like creating a new user or group).
You cannot have two Quark Publishing Platform users or groups with the same name. If you attempt to add a user or group name that is the same as an existing name, you will not be allowed to add the duplicate name.
When you import a group, all users in that group will be imported. If the group you imported contains sub-groups, the sub-group and all users within that sub-group will also be imported. When you assign a Role to a group, all users in that group will be assigned that role. If you import a group from LDAP, you cannot add users to that group using Quark Publishing Platform, you must add users to these groups using active directory.
A Quark Publishing Platform administrator must have the "Manage LDAP Users" privilege for the Import Users from LDAP functionality to be available.
Creating and deleting groups
If you combine users into groups, you can route an asset to a group, and any user in that group can check out the asset and work on it. To create and delete groups, click Groups.
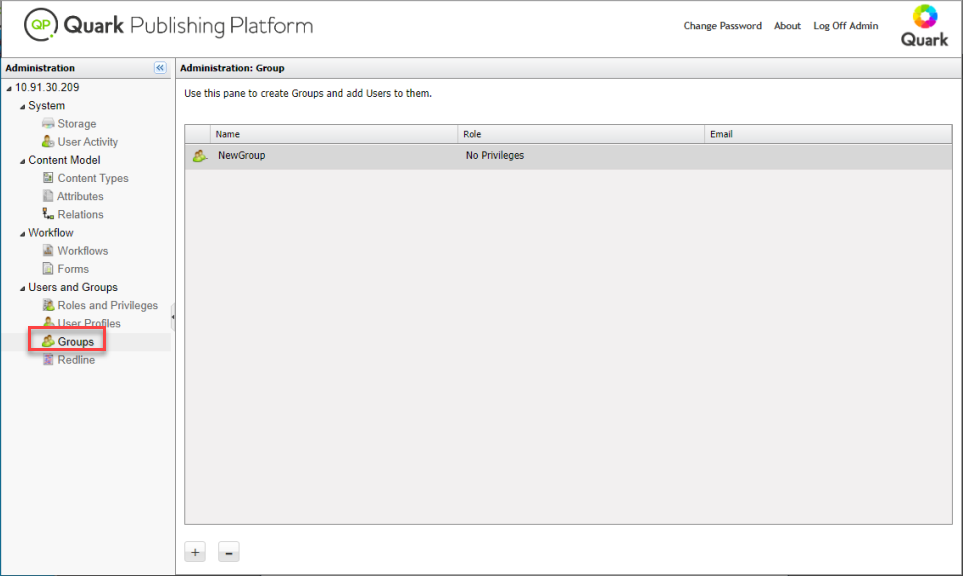
-
To create a group, click + (plus sign). In the Create Group dialog box, enter a group name, and optionally a role and an Email address for the group. Use the -> arrow to add users to the group and the <- arrow to delete users from the group. If you assign a role to a group, every member of that group now belongs to that role and inherits all of the privileges of that role. The default role assigned when creating a group is No Privileges, but you can assign any other role to the group.
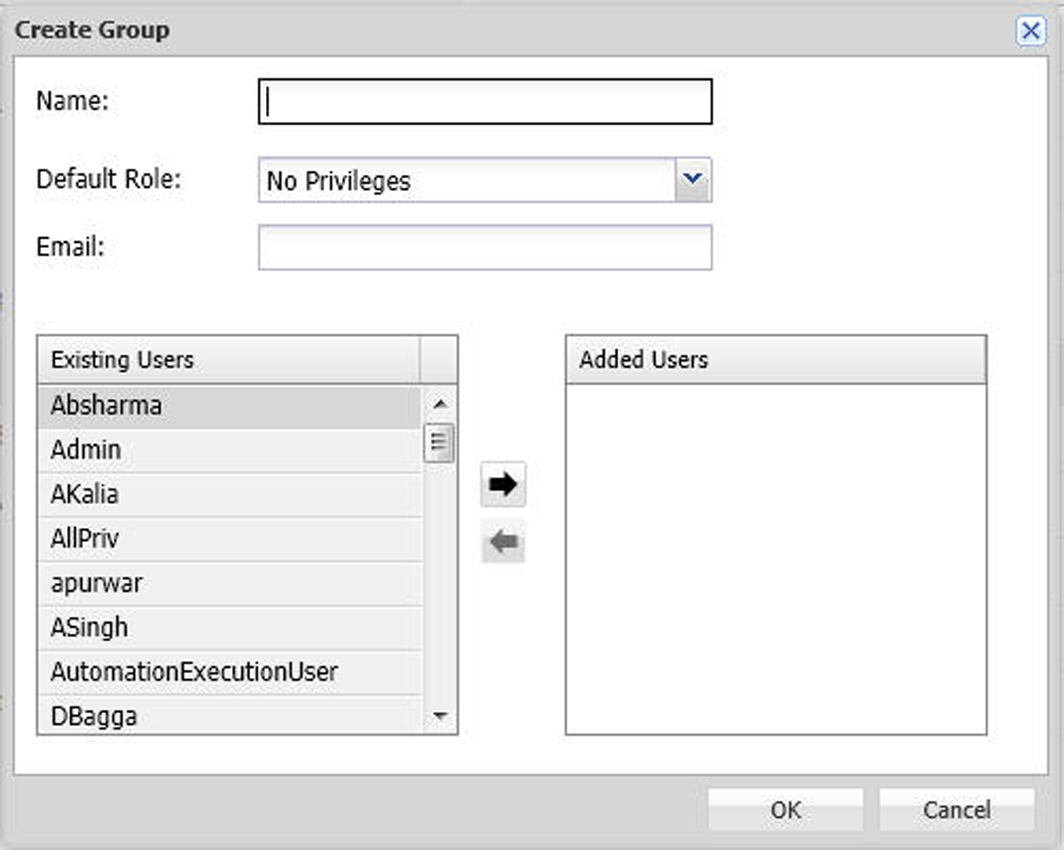
You can edit a group name by double-clicking it, using the toolbar, or using the contextual menu.
-
To delete a group, select the group and click – (minus sign). An alert prompts you to confirm the deletion.
-
To edit a group, double-click the group name.
Configuring Redline colors
For users with redline privileges, administrators specify colors that identify each user's changes.
To specify redline colors:
-
Click Redline. The Redline pane displays.
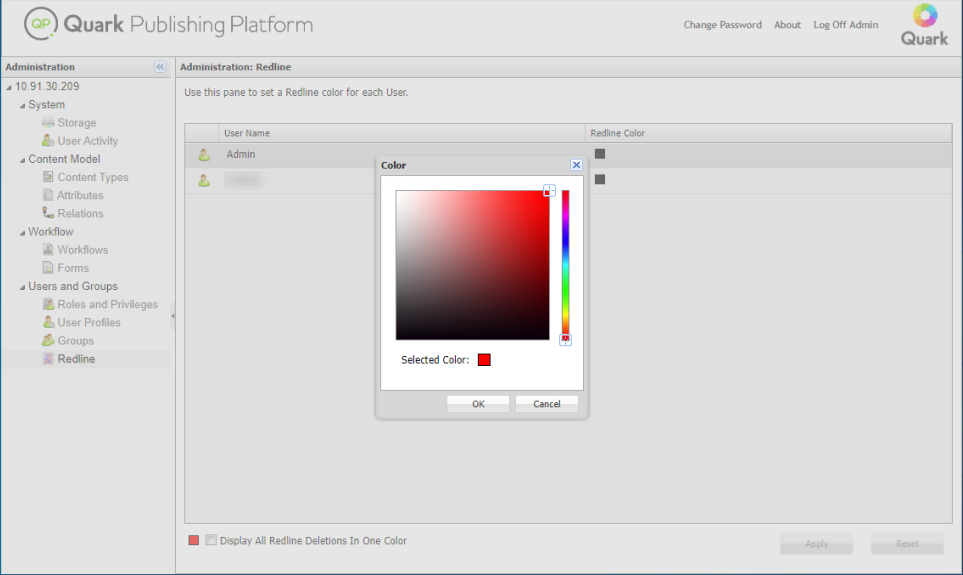
The Redline screen lets you assign redline colors to users. -
Select a user from the User Name list, then click the box in the Redline Color list to display the Colors dialog box. Use the controls in the Colors dialog box to specify a specific color to be applied to text when the user enters text with redlining enabled.
Alternatively, you can check Display All Redline Deletions in One Color to use a single color for identifying deletions by all users.
-
Click Apply.
QuarkXPress and QuarkCopyDesk users can specify default redline colors and styles to differentiate insertions and deletions in WYSIWYG, Full Screen, and Galley views. However, when a QuarkXPress or QuarkCopyDesk user is logged on to Quark Publishing Platform and working on an article tracked by Quark Publishing Platform, the colors assigned by the administrator override the colors specified in the Preferences dialog box. See A Guide to QuarkCopyDesk for information about using the Redline feature outside of a Quark Publishing Platform workflow.
You can turn Redline feature on and off on a status-by-status basis. For more information, see Working with statuses.