
Work with Documents
This section provides information on all the features and capabilities related to the documents that Quark Publishing Platform Adapter for Quark XML Author offers.
Basic Document Features
Quark Publishing Platform Adapter for Quark XML Author provides all the basic file operations, including New (create a new document), Open (check out a document for editing), and Save (check in to be referenced by other documents).
What is a Smart Document?
Smart Document in Quark XML Author (QXA) is designed for creating highly structured, reusable, and metadata-driven content. It's more advanced, typically used by technical writers or content creators who need more control over XML structures. It allows for creating modular, reusable content that can be dynamically assembled based on specific outputs.
Smart Document often includes metadata and structure that make it ideal for multi-channel publishing, where content needs to be repurposed and adapted for different formats, such as web, print, or mobile.
A top-level section in Smart Document represents a distinct unit of content, such as a module, topic, or section, designed to be reusable and repurposable across different outputs. You can organize the structure of your content by inserting child sections, creating a hierarchy that allows for flexibility and content modularity. The section hierarchy ensures consistency and clarity in content organization.
The following are examples of a Smart Document that you can create as XML-based structured documents:
-
Technical documentation
-
Product manuals and user guides
-
Compliance and regulatory content
-
Training materials and eLearning content
-
Standard operating procedures (SOPs)
-
Reference manuals
By leveraging the power of Smart Document, you can manage complex documents with ease, ensuring content is easily maintained, reused, and dynamically published across multiple platforms.
Author a Smart Document
The primary steps to author a Smart document are as follows:
-
Create a new document
-
Insert sections and reusable components to structure your content
-
Add metadata and assign attributes to the document
-
Assign metadata to individual sections for enhanced content management and reuse
-
Validate the document to ensure XML structure compliance
Create a New Document
Quark Publishing Platform Adapter for Quark XML Author allows you to create a new document and structure it based on your requirements. You can also create a document using an already available document in the repository as a template.
To create a new document:
-
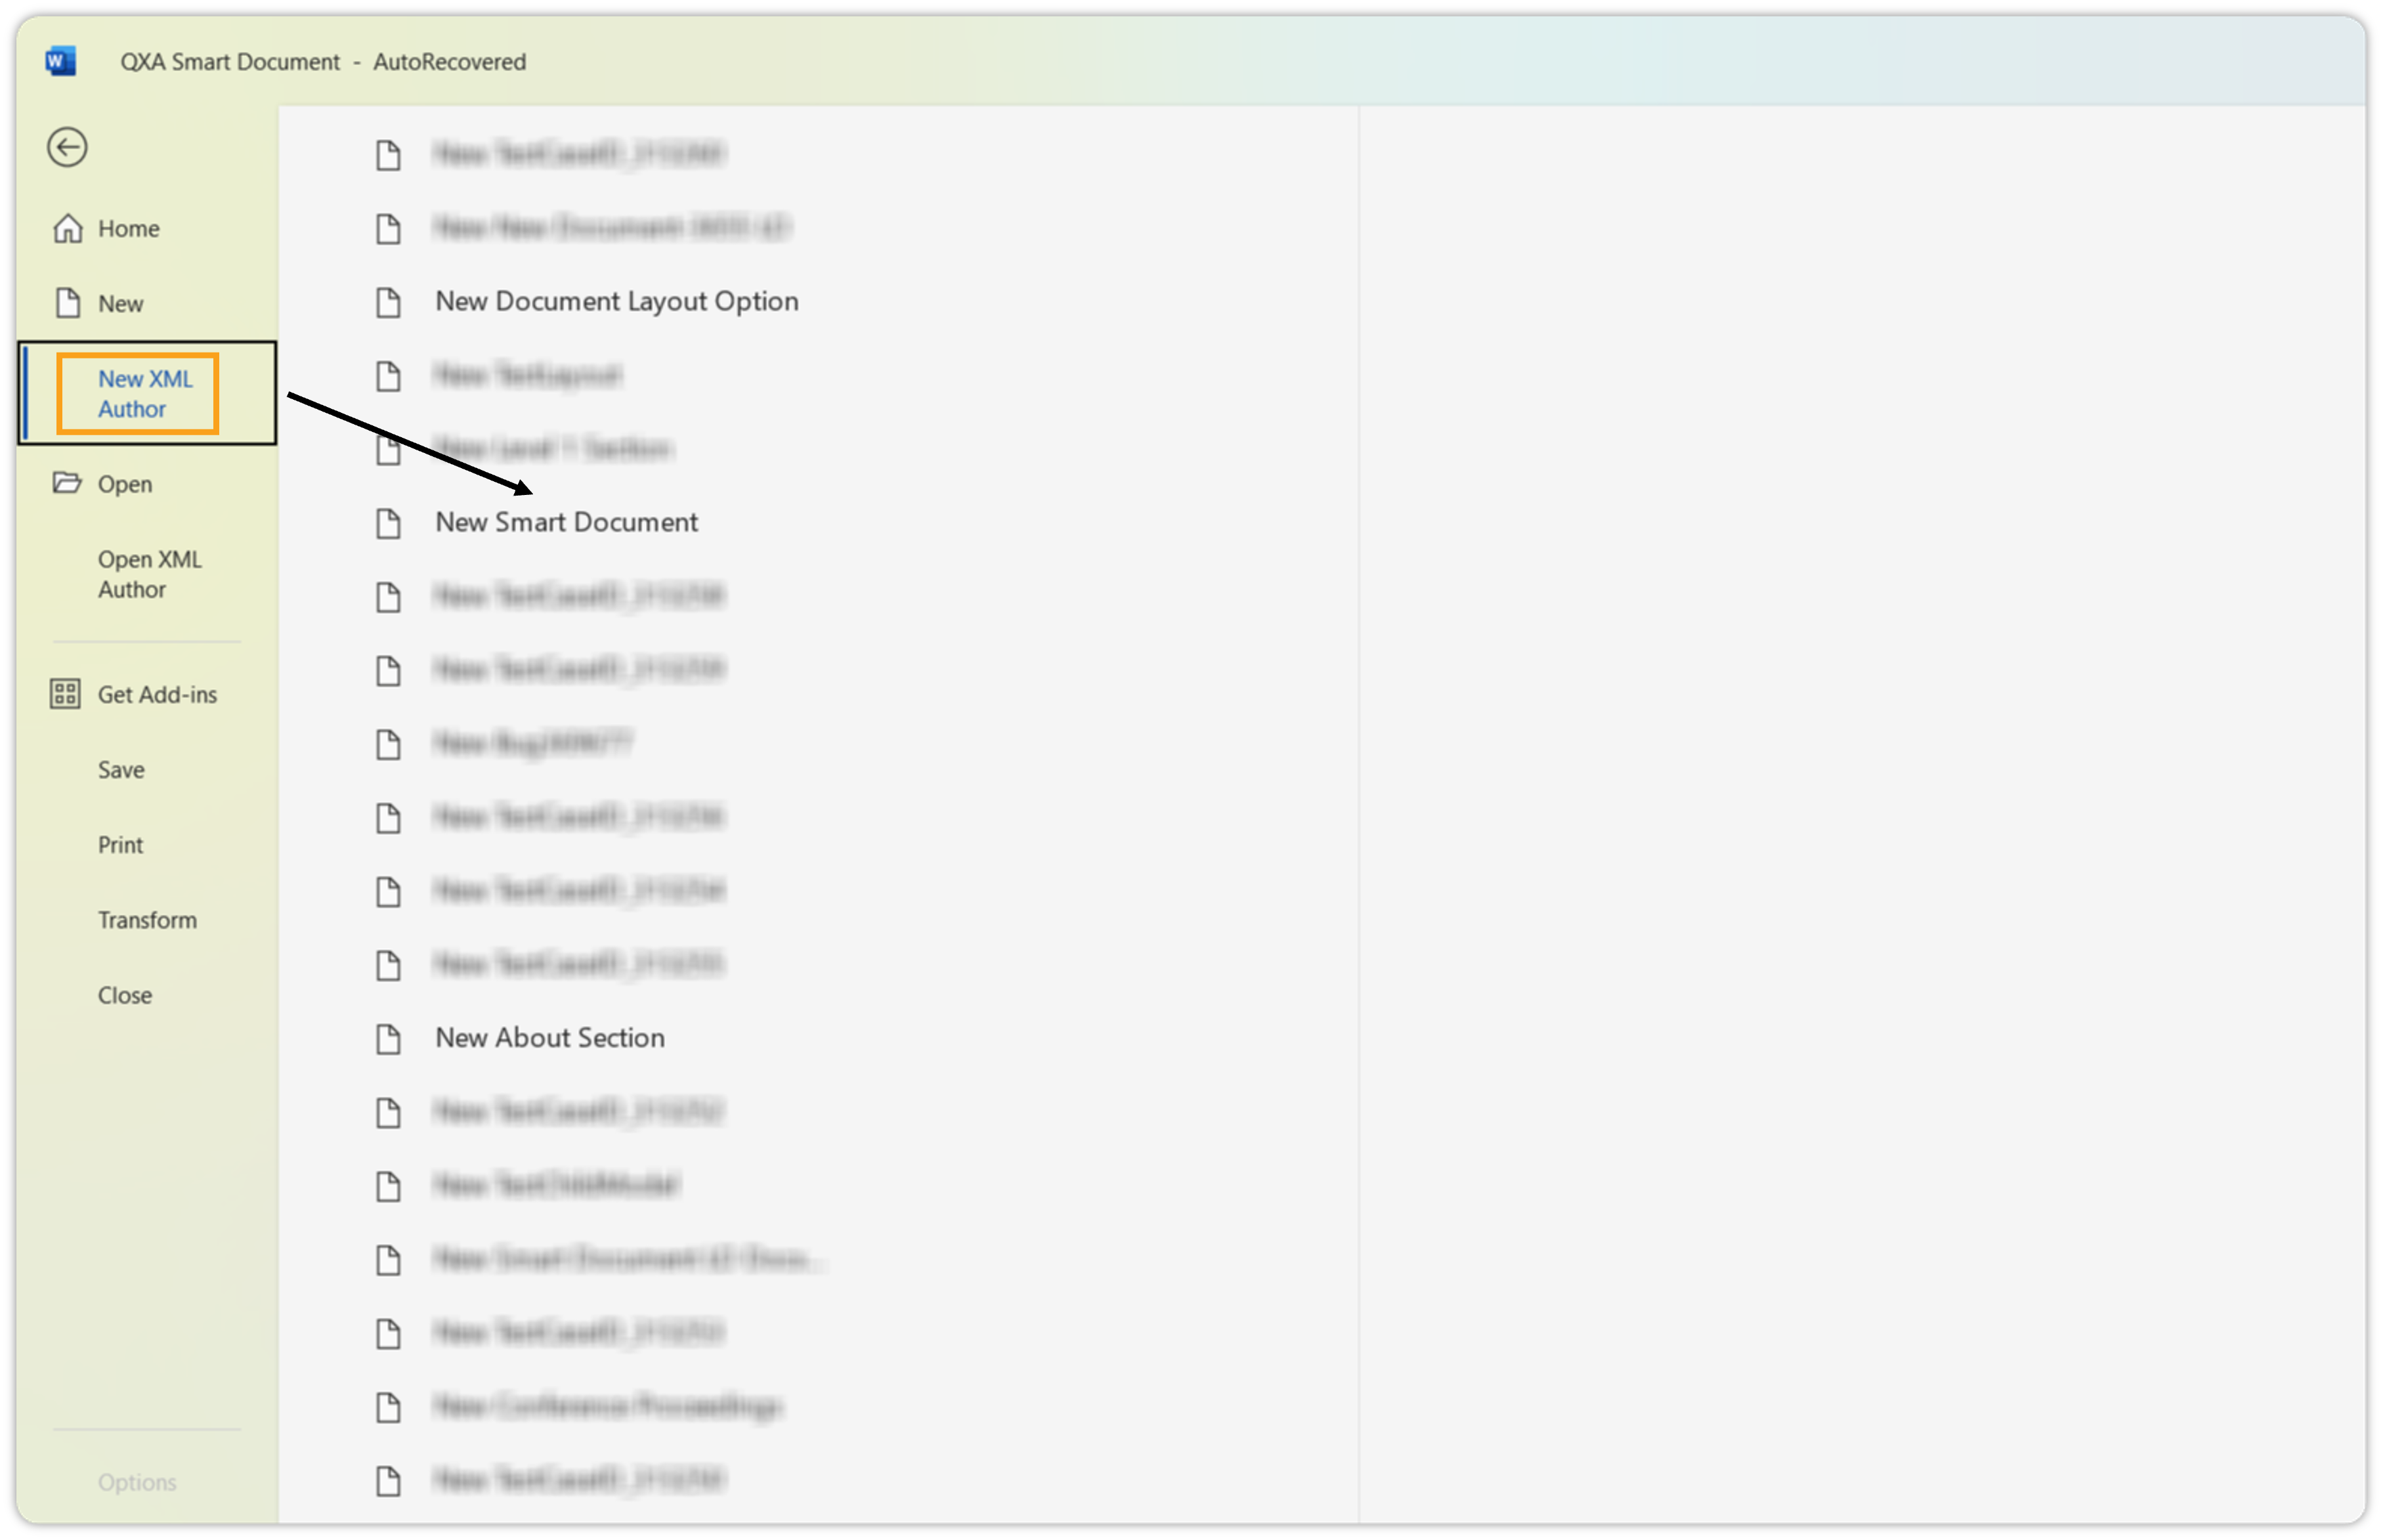
Click File > New XML Author.
-
You'll see a list of the available templates. Choose the desired one to start authoring a new document.
-
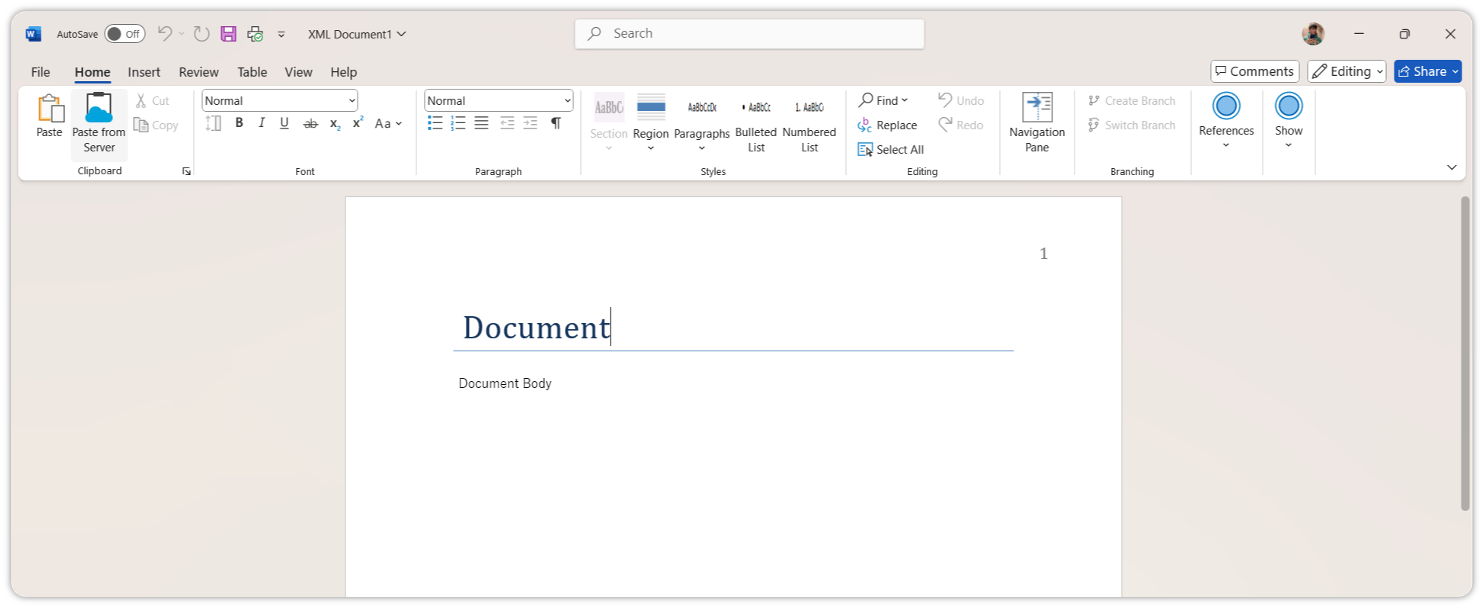
Quark Publishing Platform Adapter for Quark XML Author opens a new document with the text Document as a placeholder for the title of your document.
Add a Document Title
To add a document title:
-
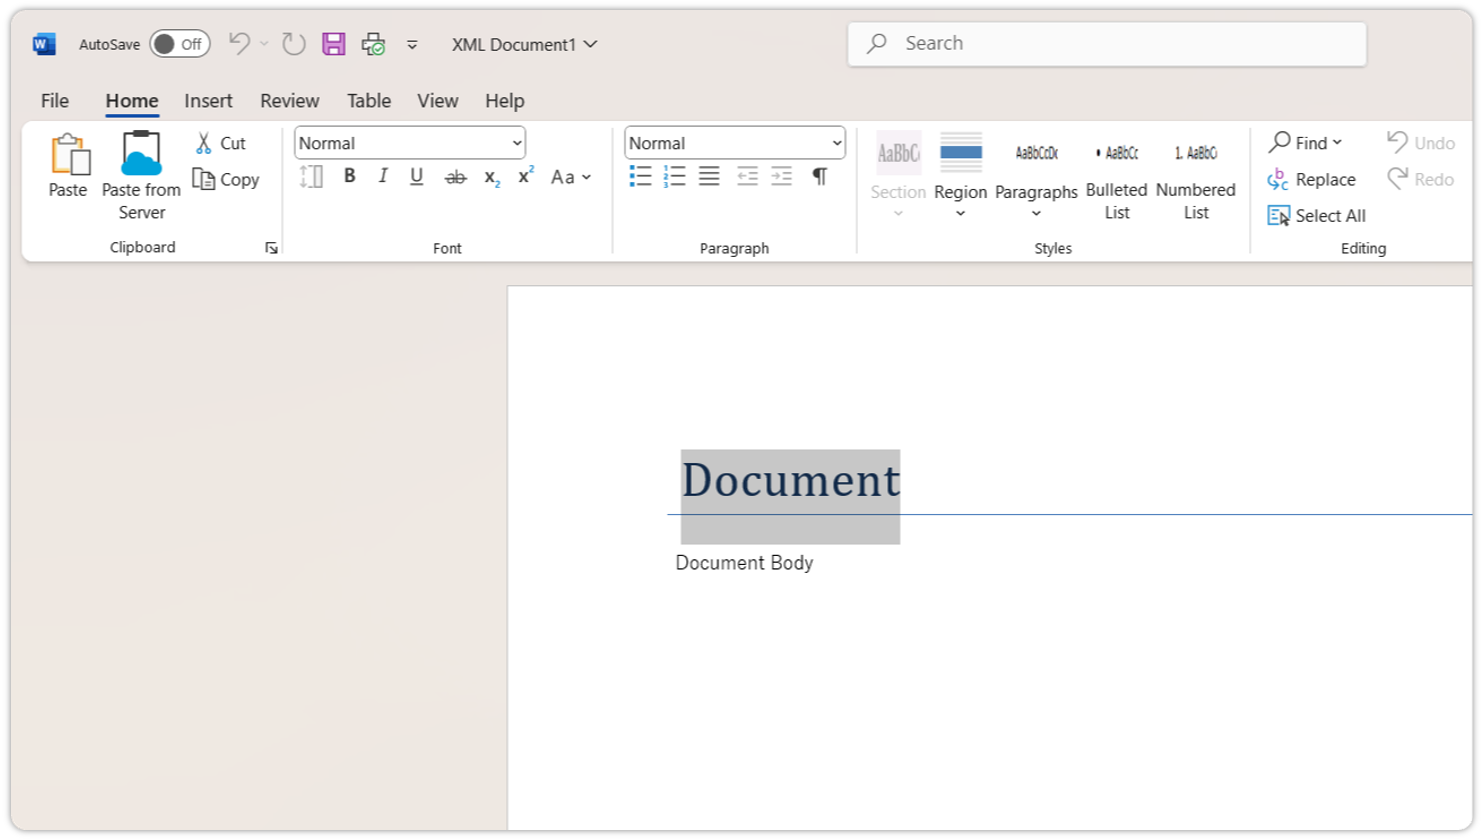
Click the entire placeholder text "[Document]".
-
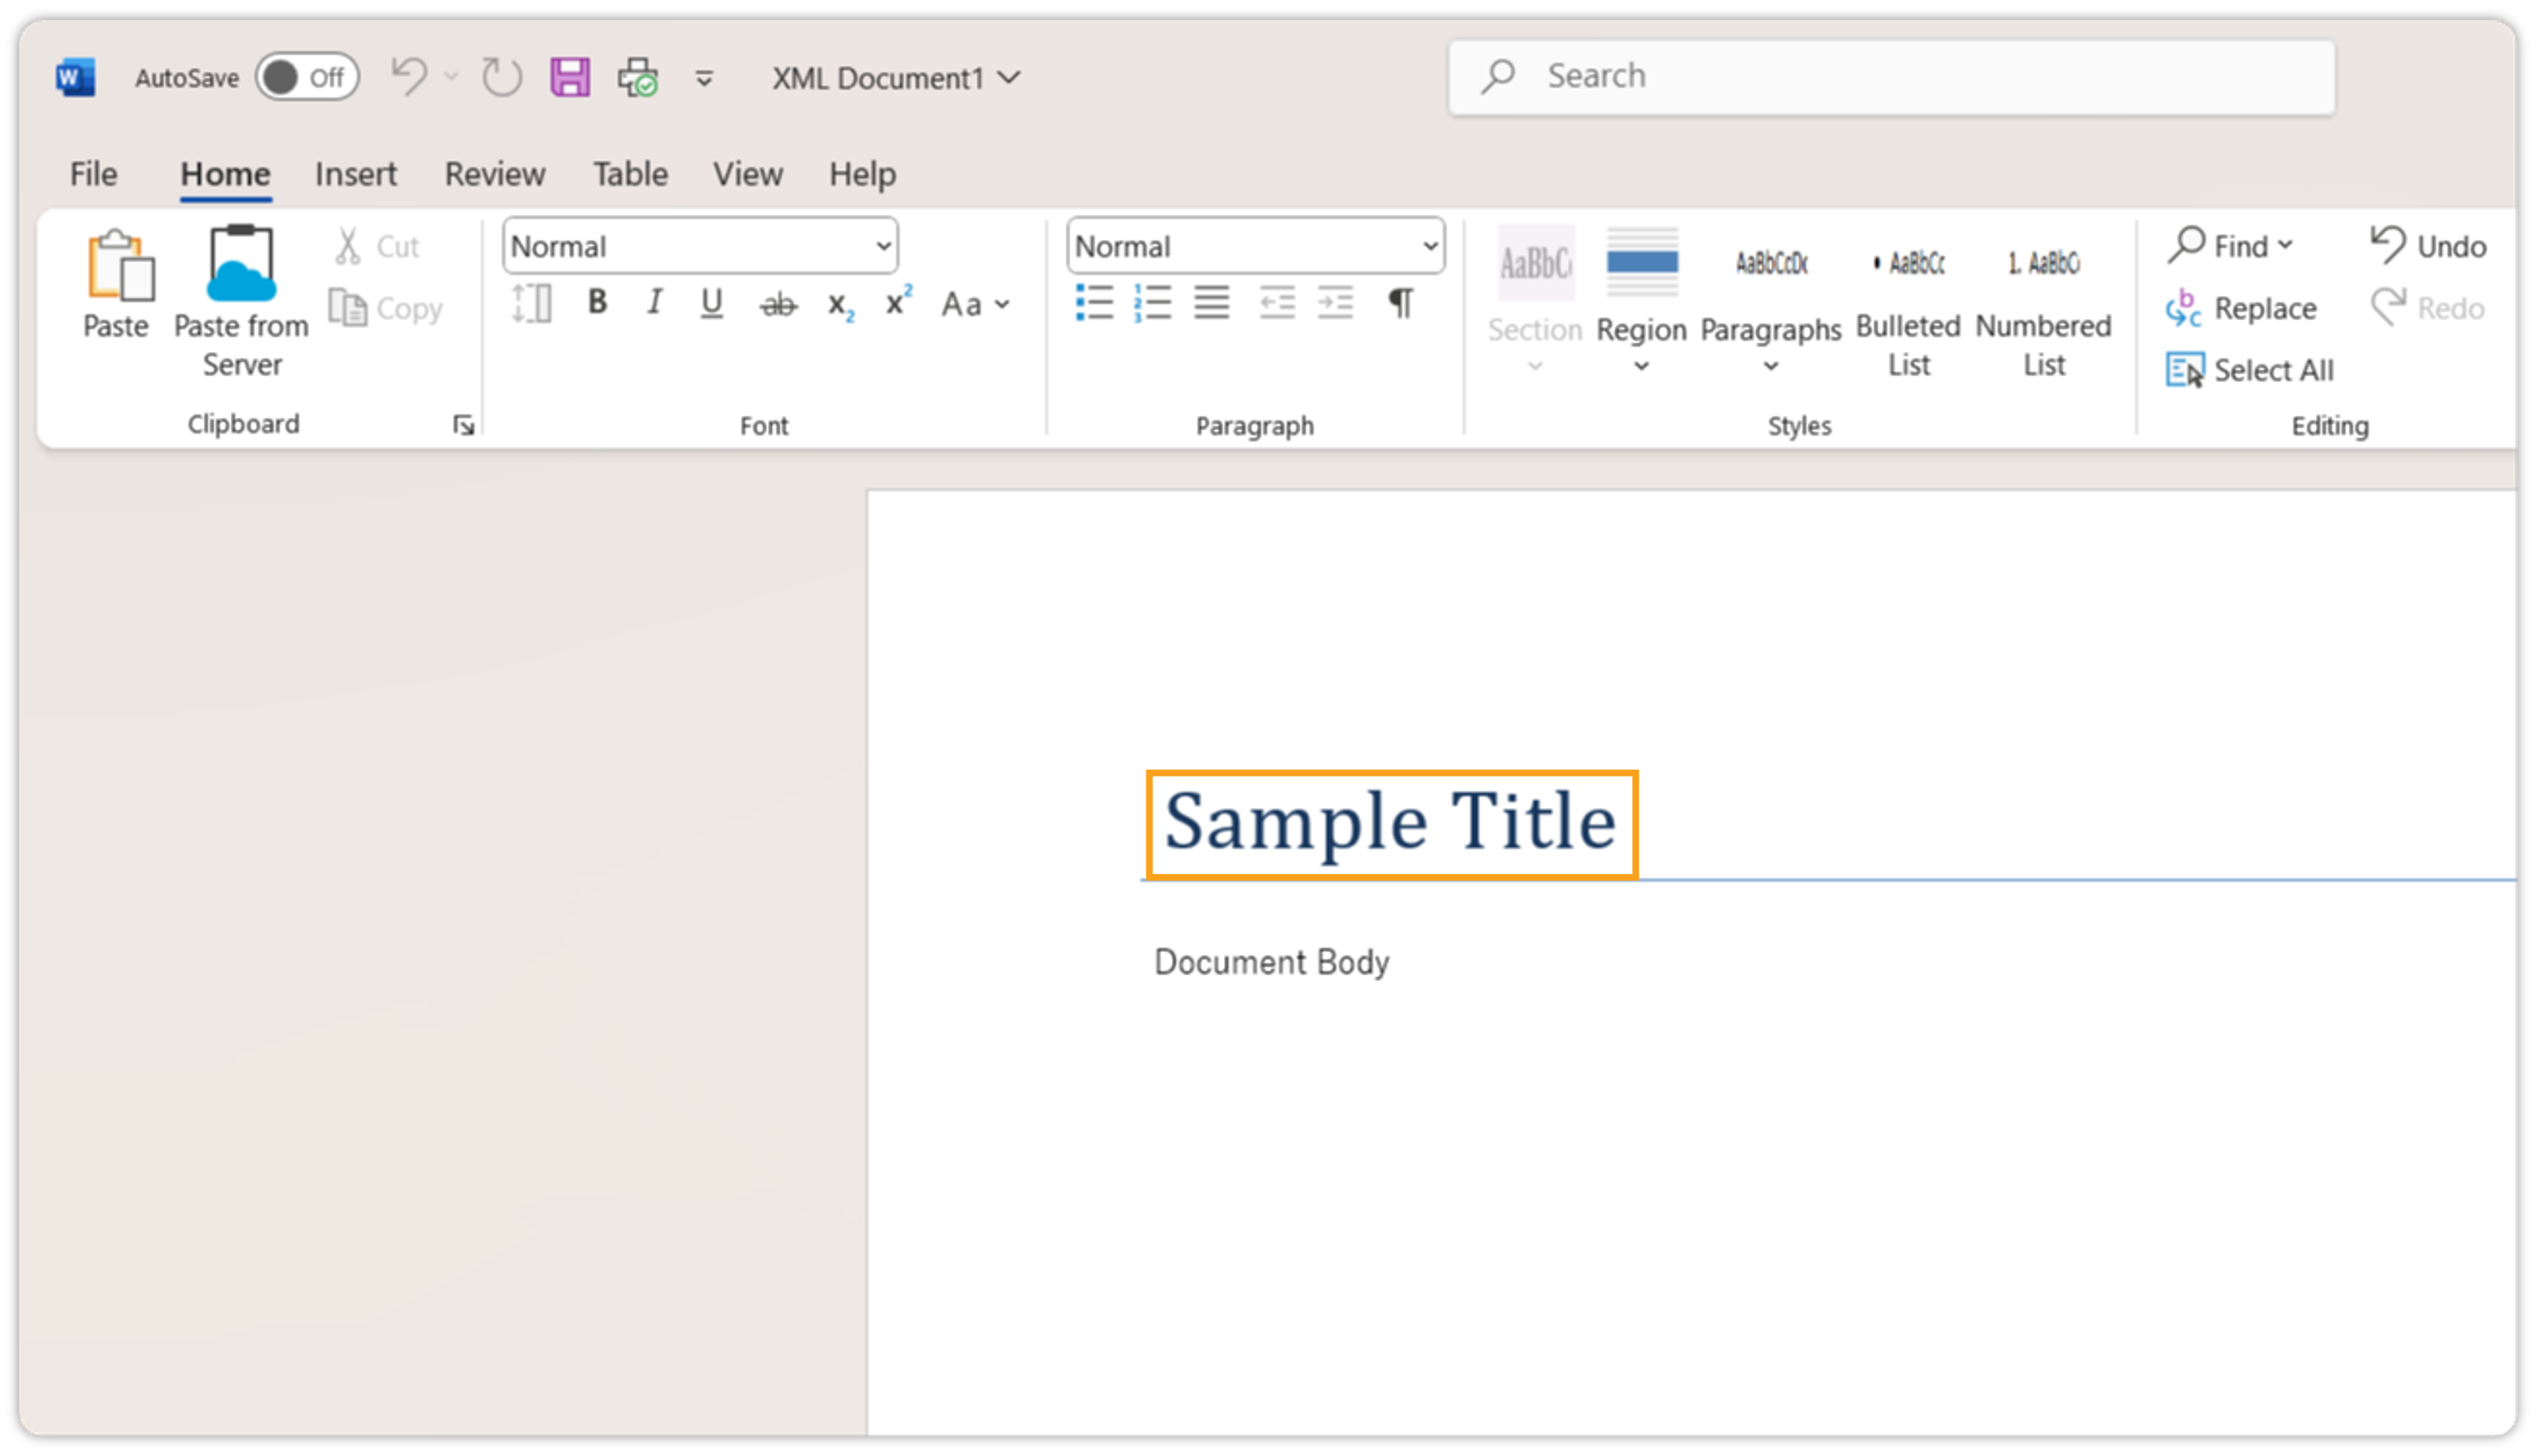
Type your title.
Insert a Section
You can add sections and subsections within a document to define the hierarchy of the information.
To add a section:
-
In the Word canvas, position your cursor to where you want to add a section.
-
Then click Section within the Styles tab, and then select the desired option: either create a new section or copy a section from the server.
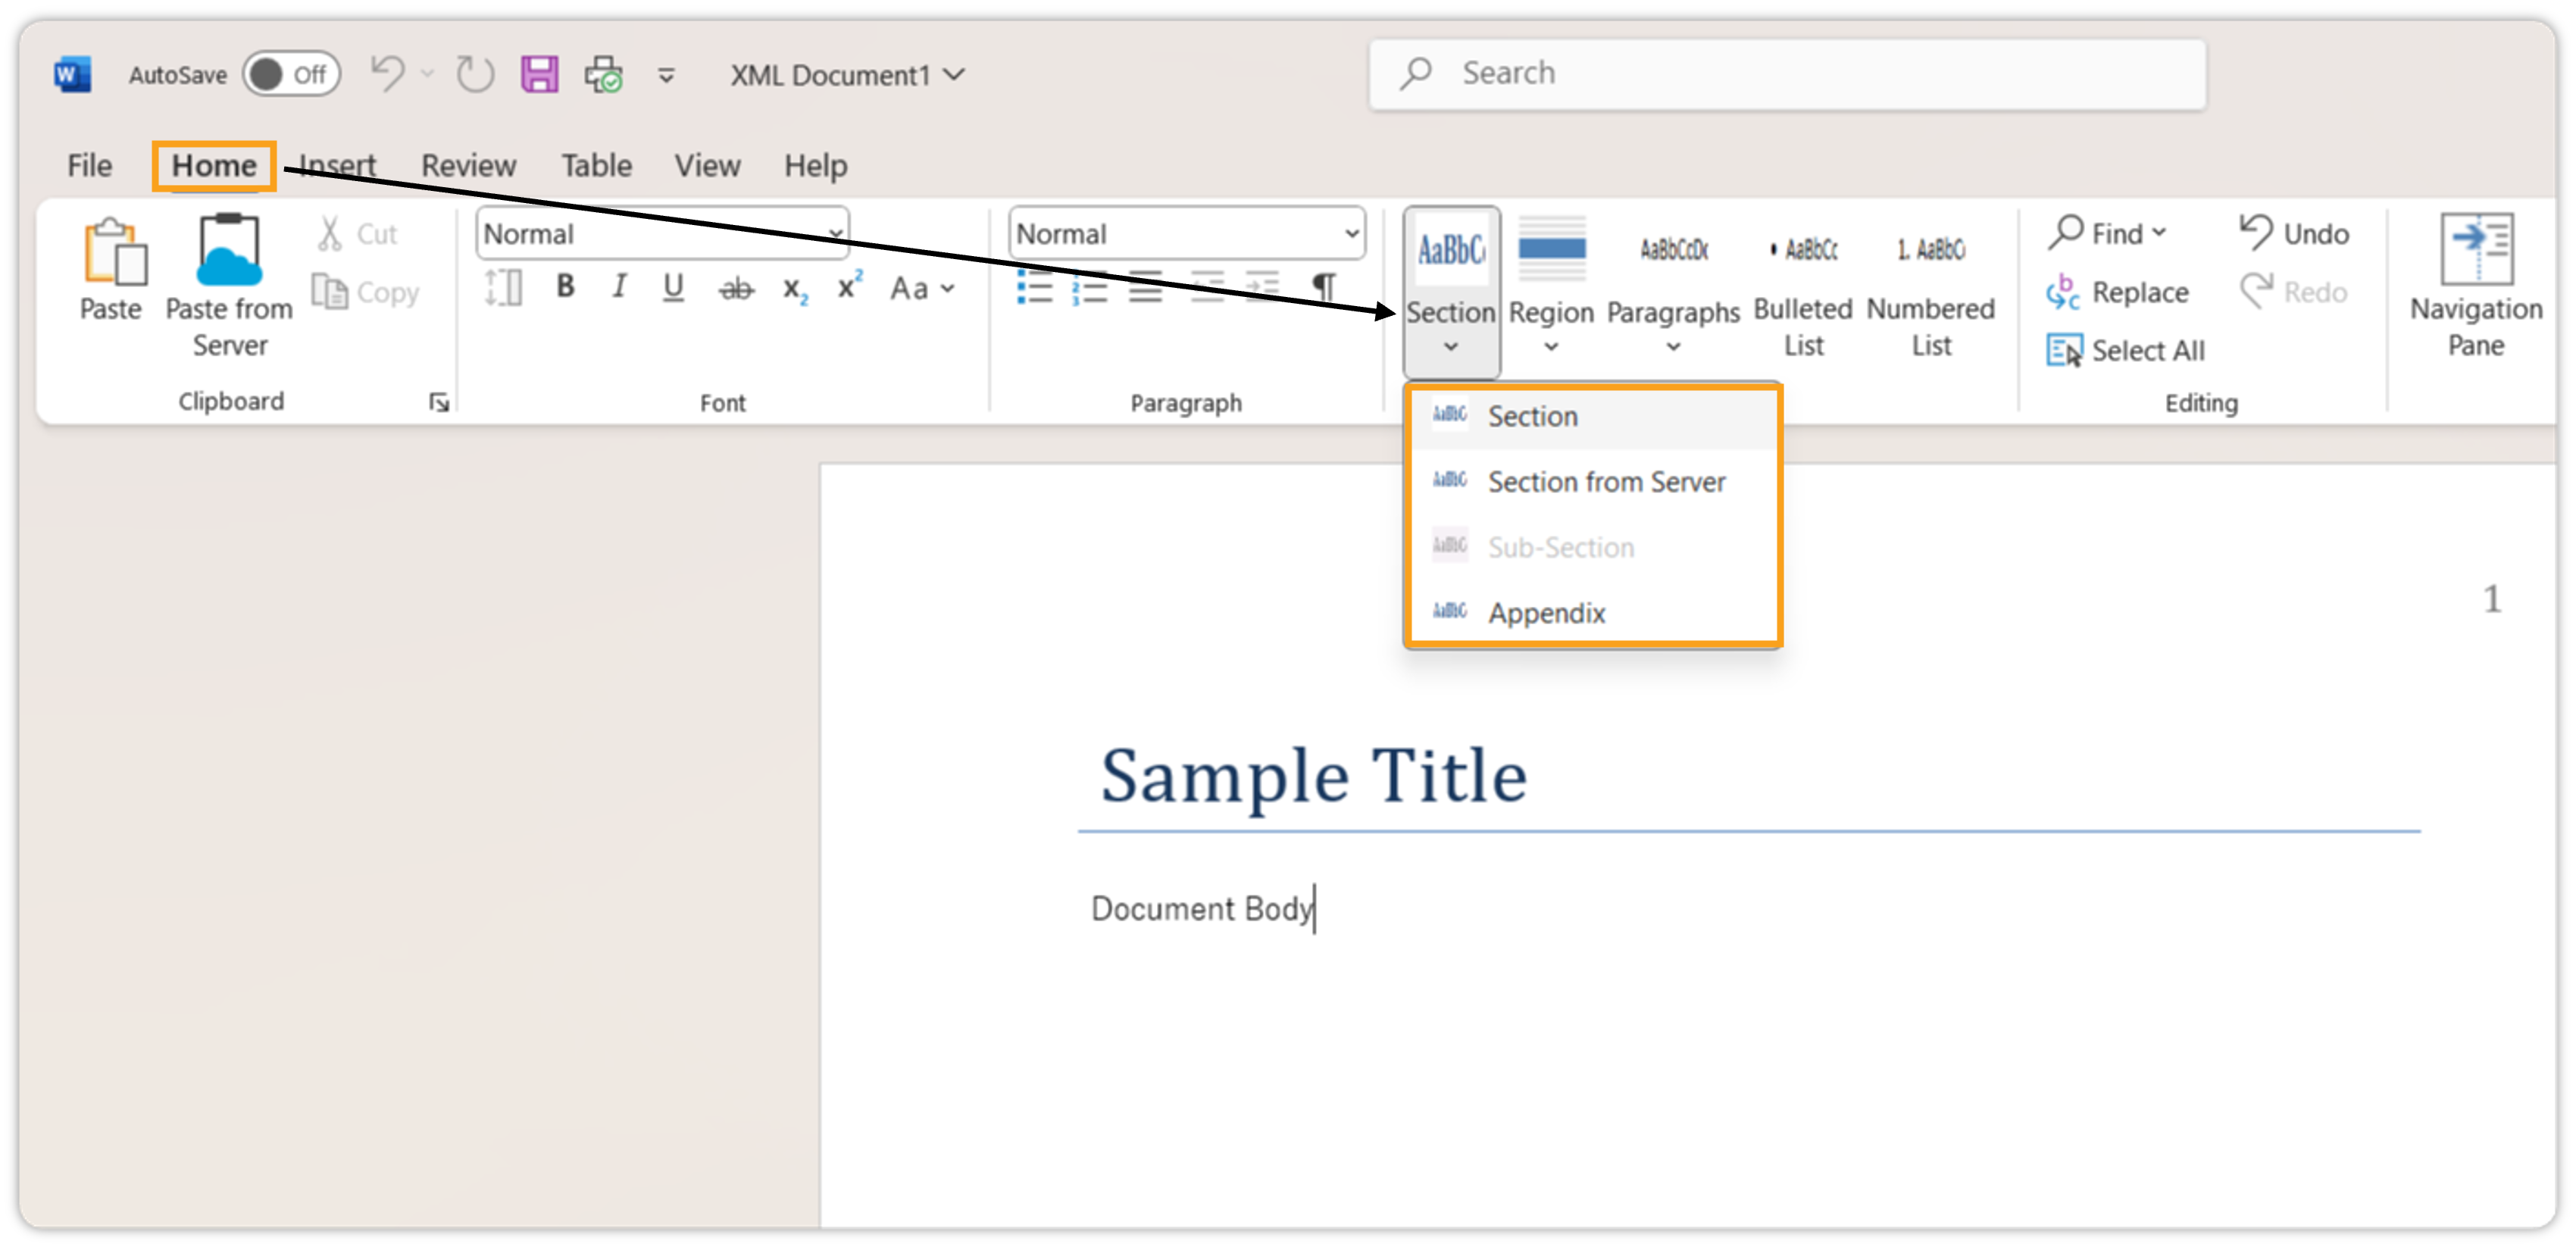
Add a Section from Server
Quark Publishing Platform Adapter for Quark XML Author also allows you to add sections from the repository. A section from the repository is essentially an already checked-in document that you can use as a part of your current document.
To add a section from the server:
-
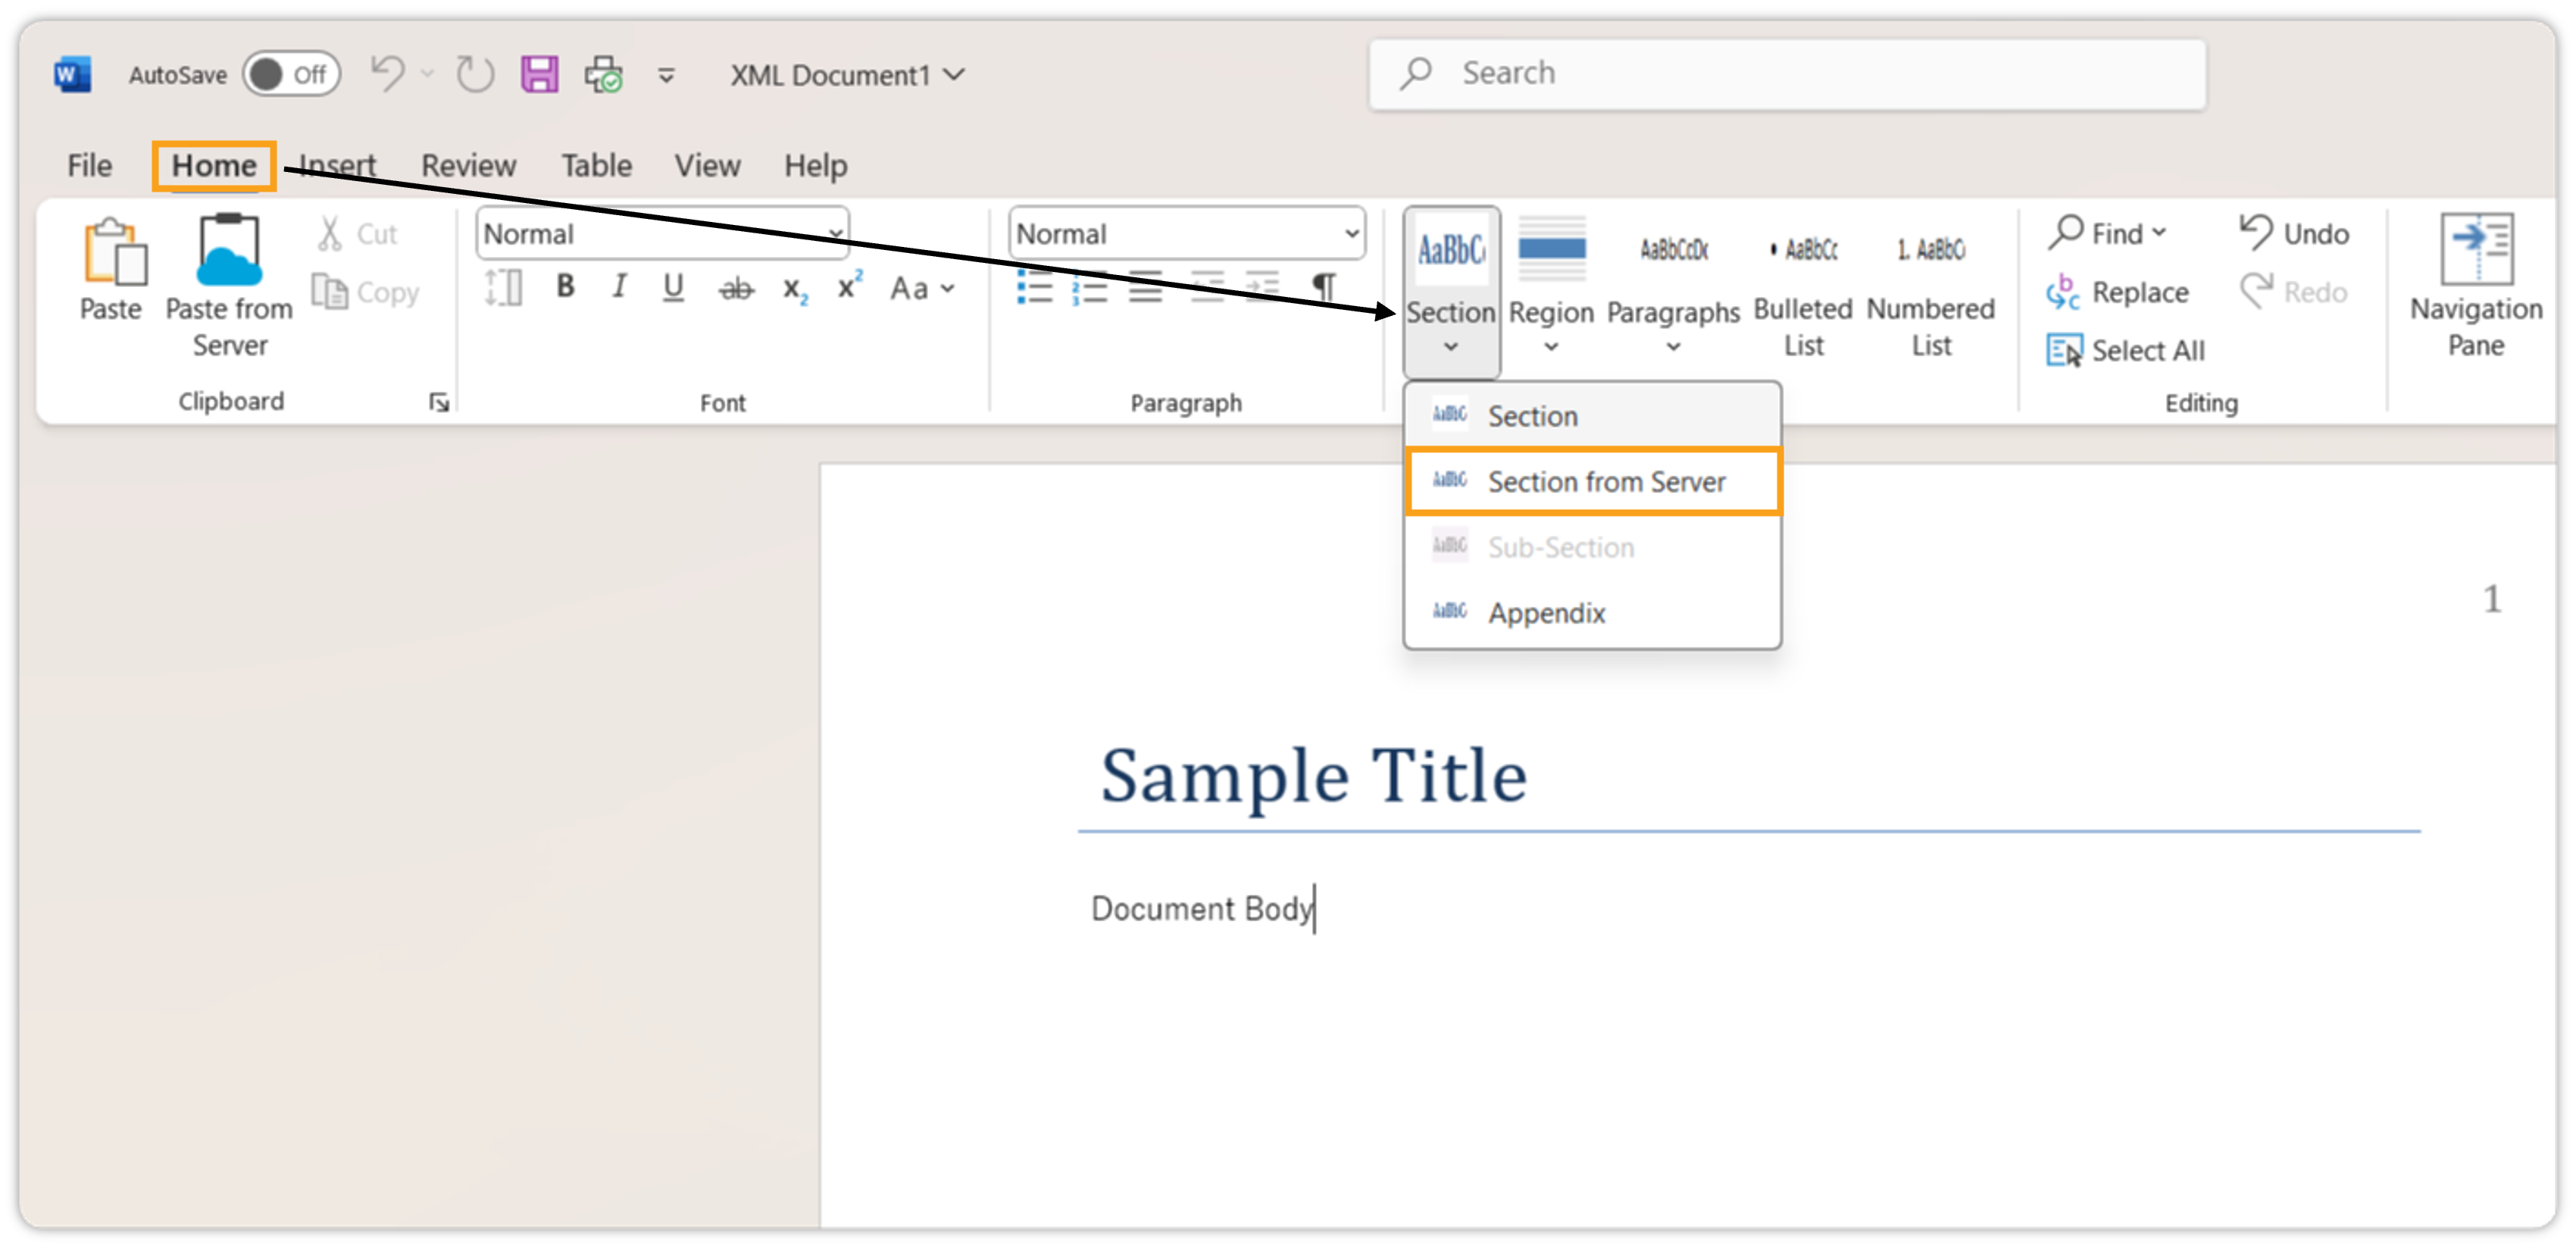
Click Section from Server in the context menu/Style group menu.
-
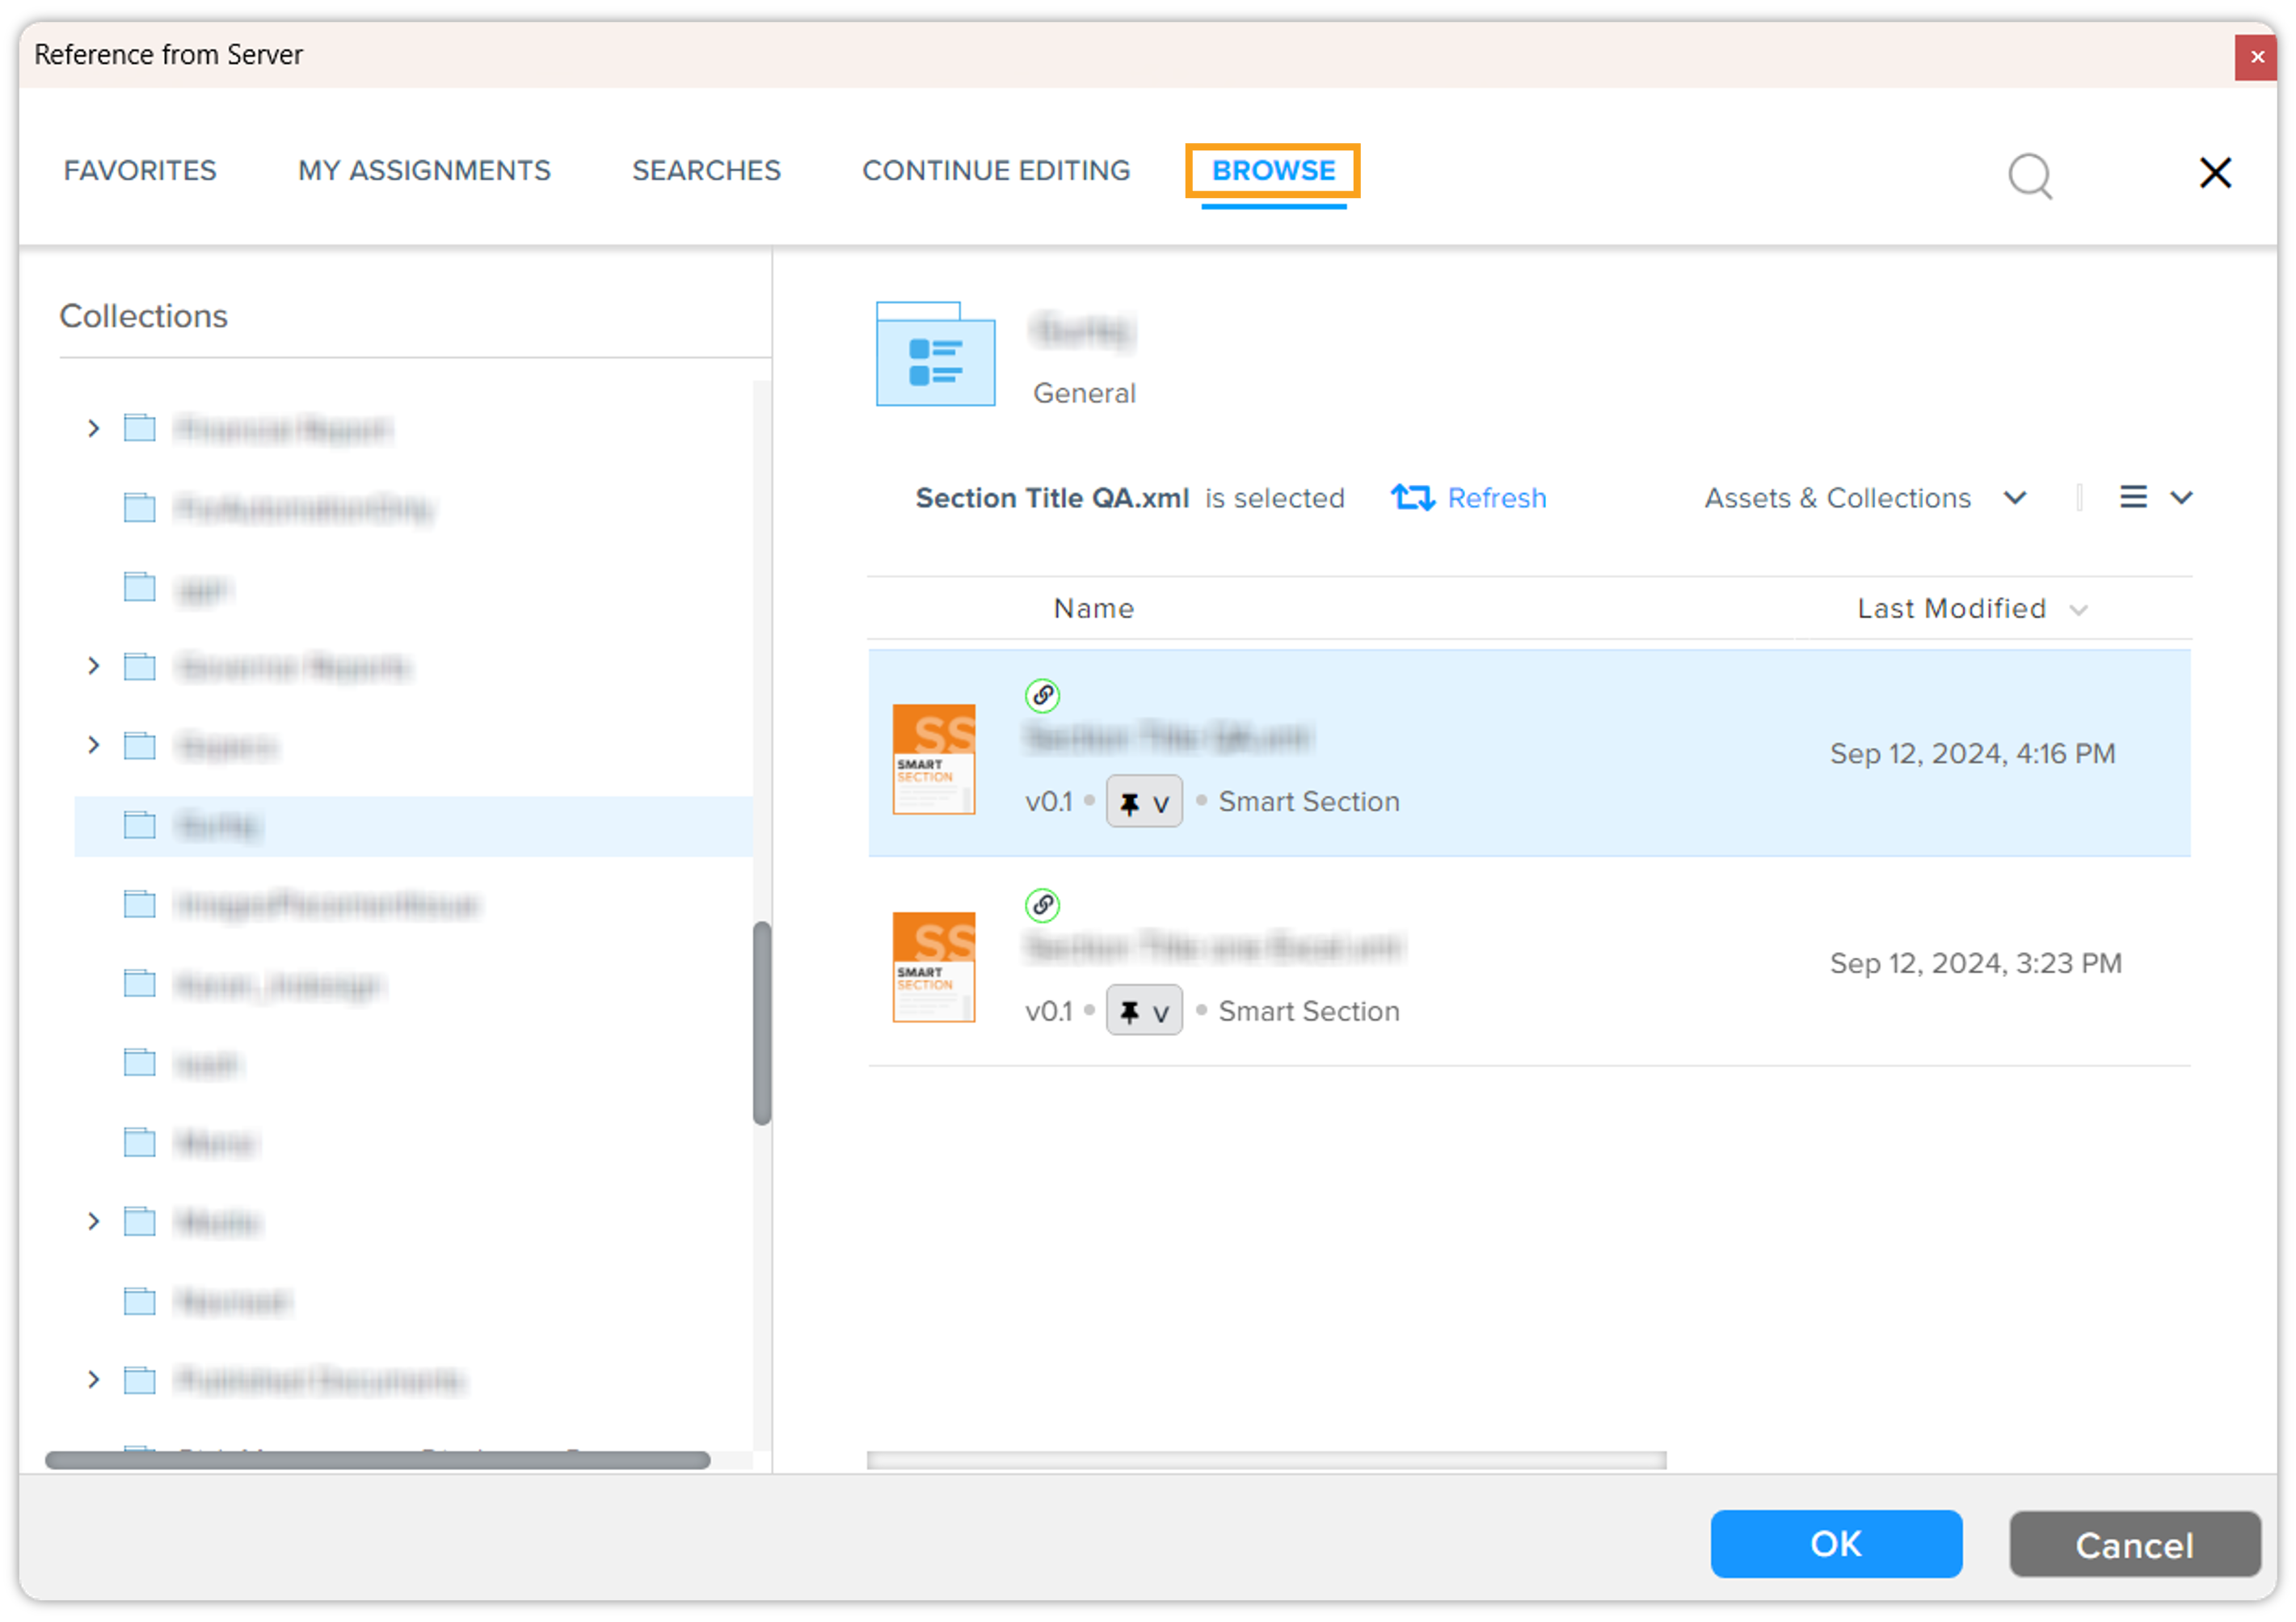
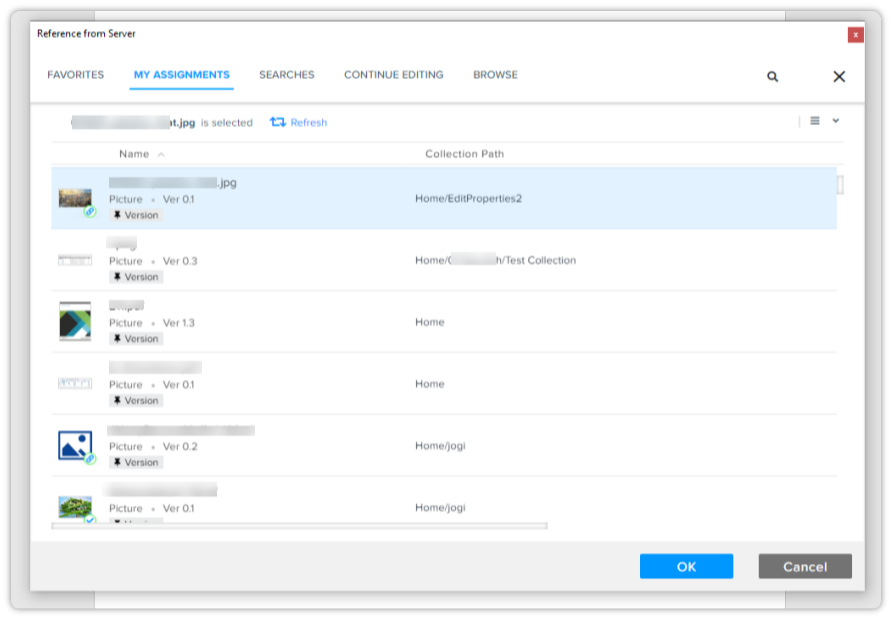
In the Reference from Server dialog box, browse for the document you want to add as a section through one of the paginated tabs or through the Search tool.
-
Select the document (its version or branch, if required) and then click OK.
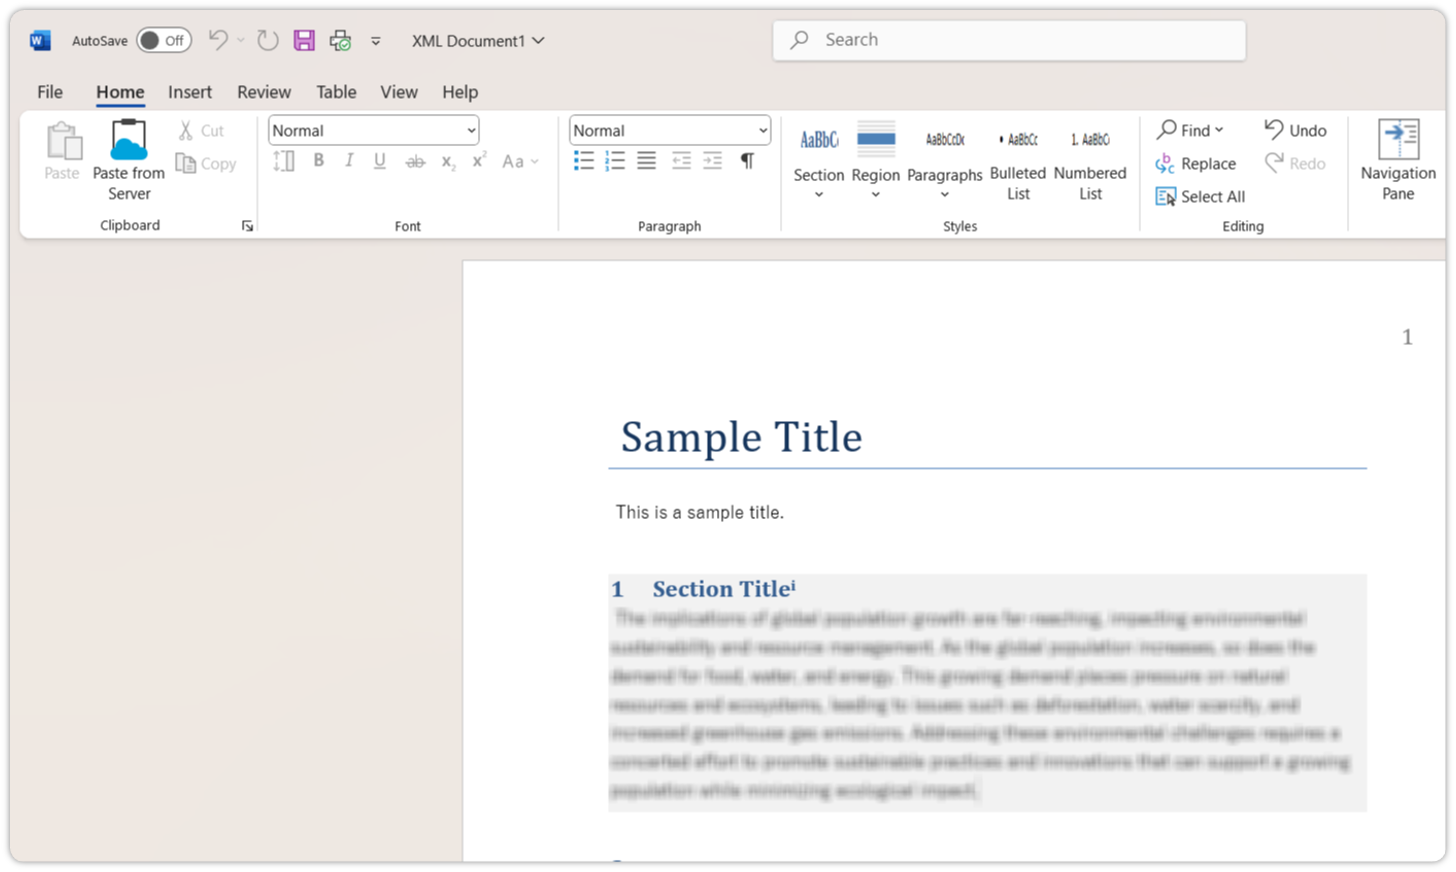
Quark Publishing Platform Adapter for Quark XML Author adds the entire content of the document as a section in your current document.
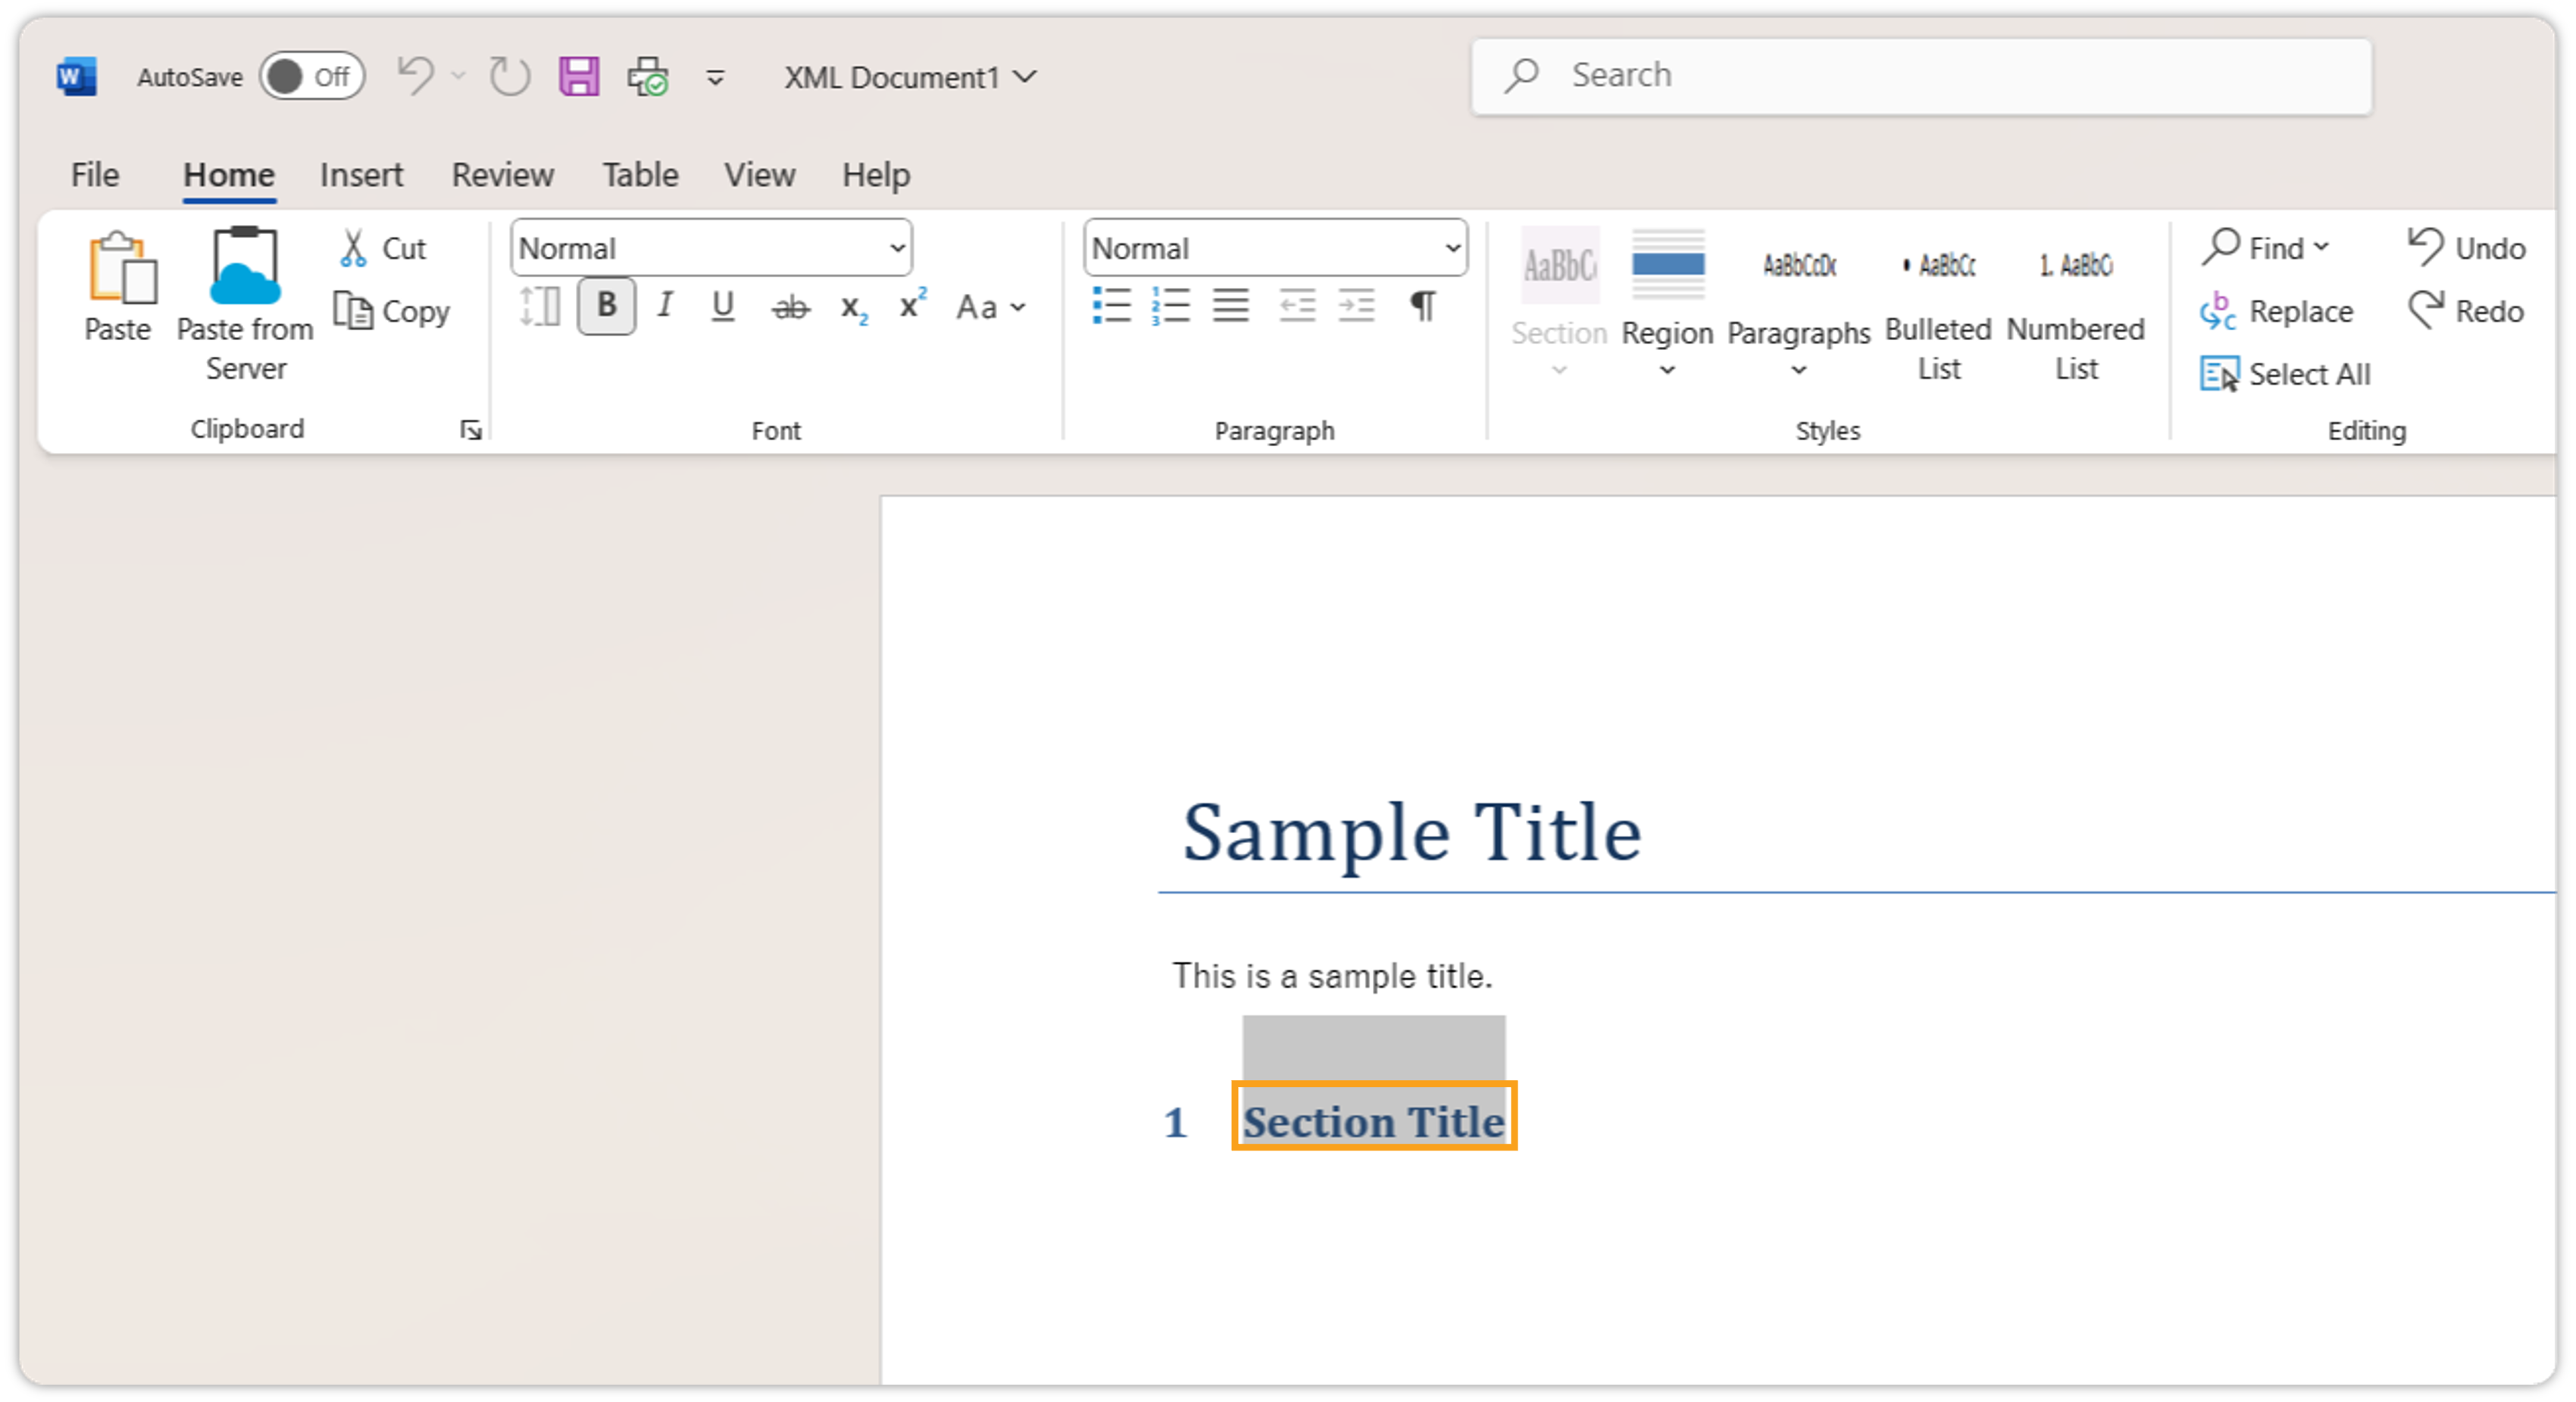
Add a Section Title
You can add a section title, in the same manner, you add a document title.
To add a section title:
-
Select the entire placeholder text.
-
Type a section title.
Save in Microsoft Word Format
Quark Publishing Platform Adapter for Quark XML Author allows you to save documents in Microsoft Word format on your local machine.
To save the content of a document in Microsoft Word format:
-
Click File > Save As.
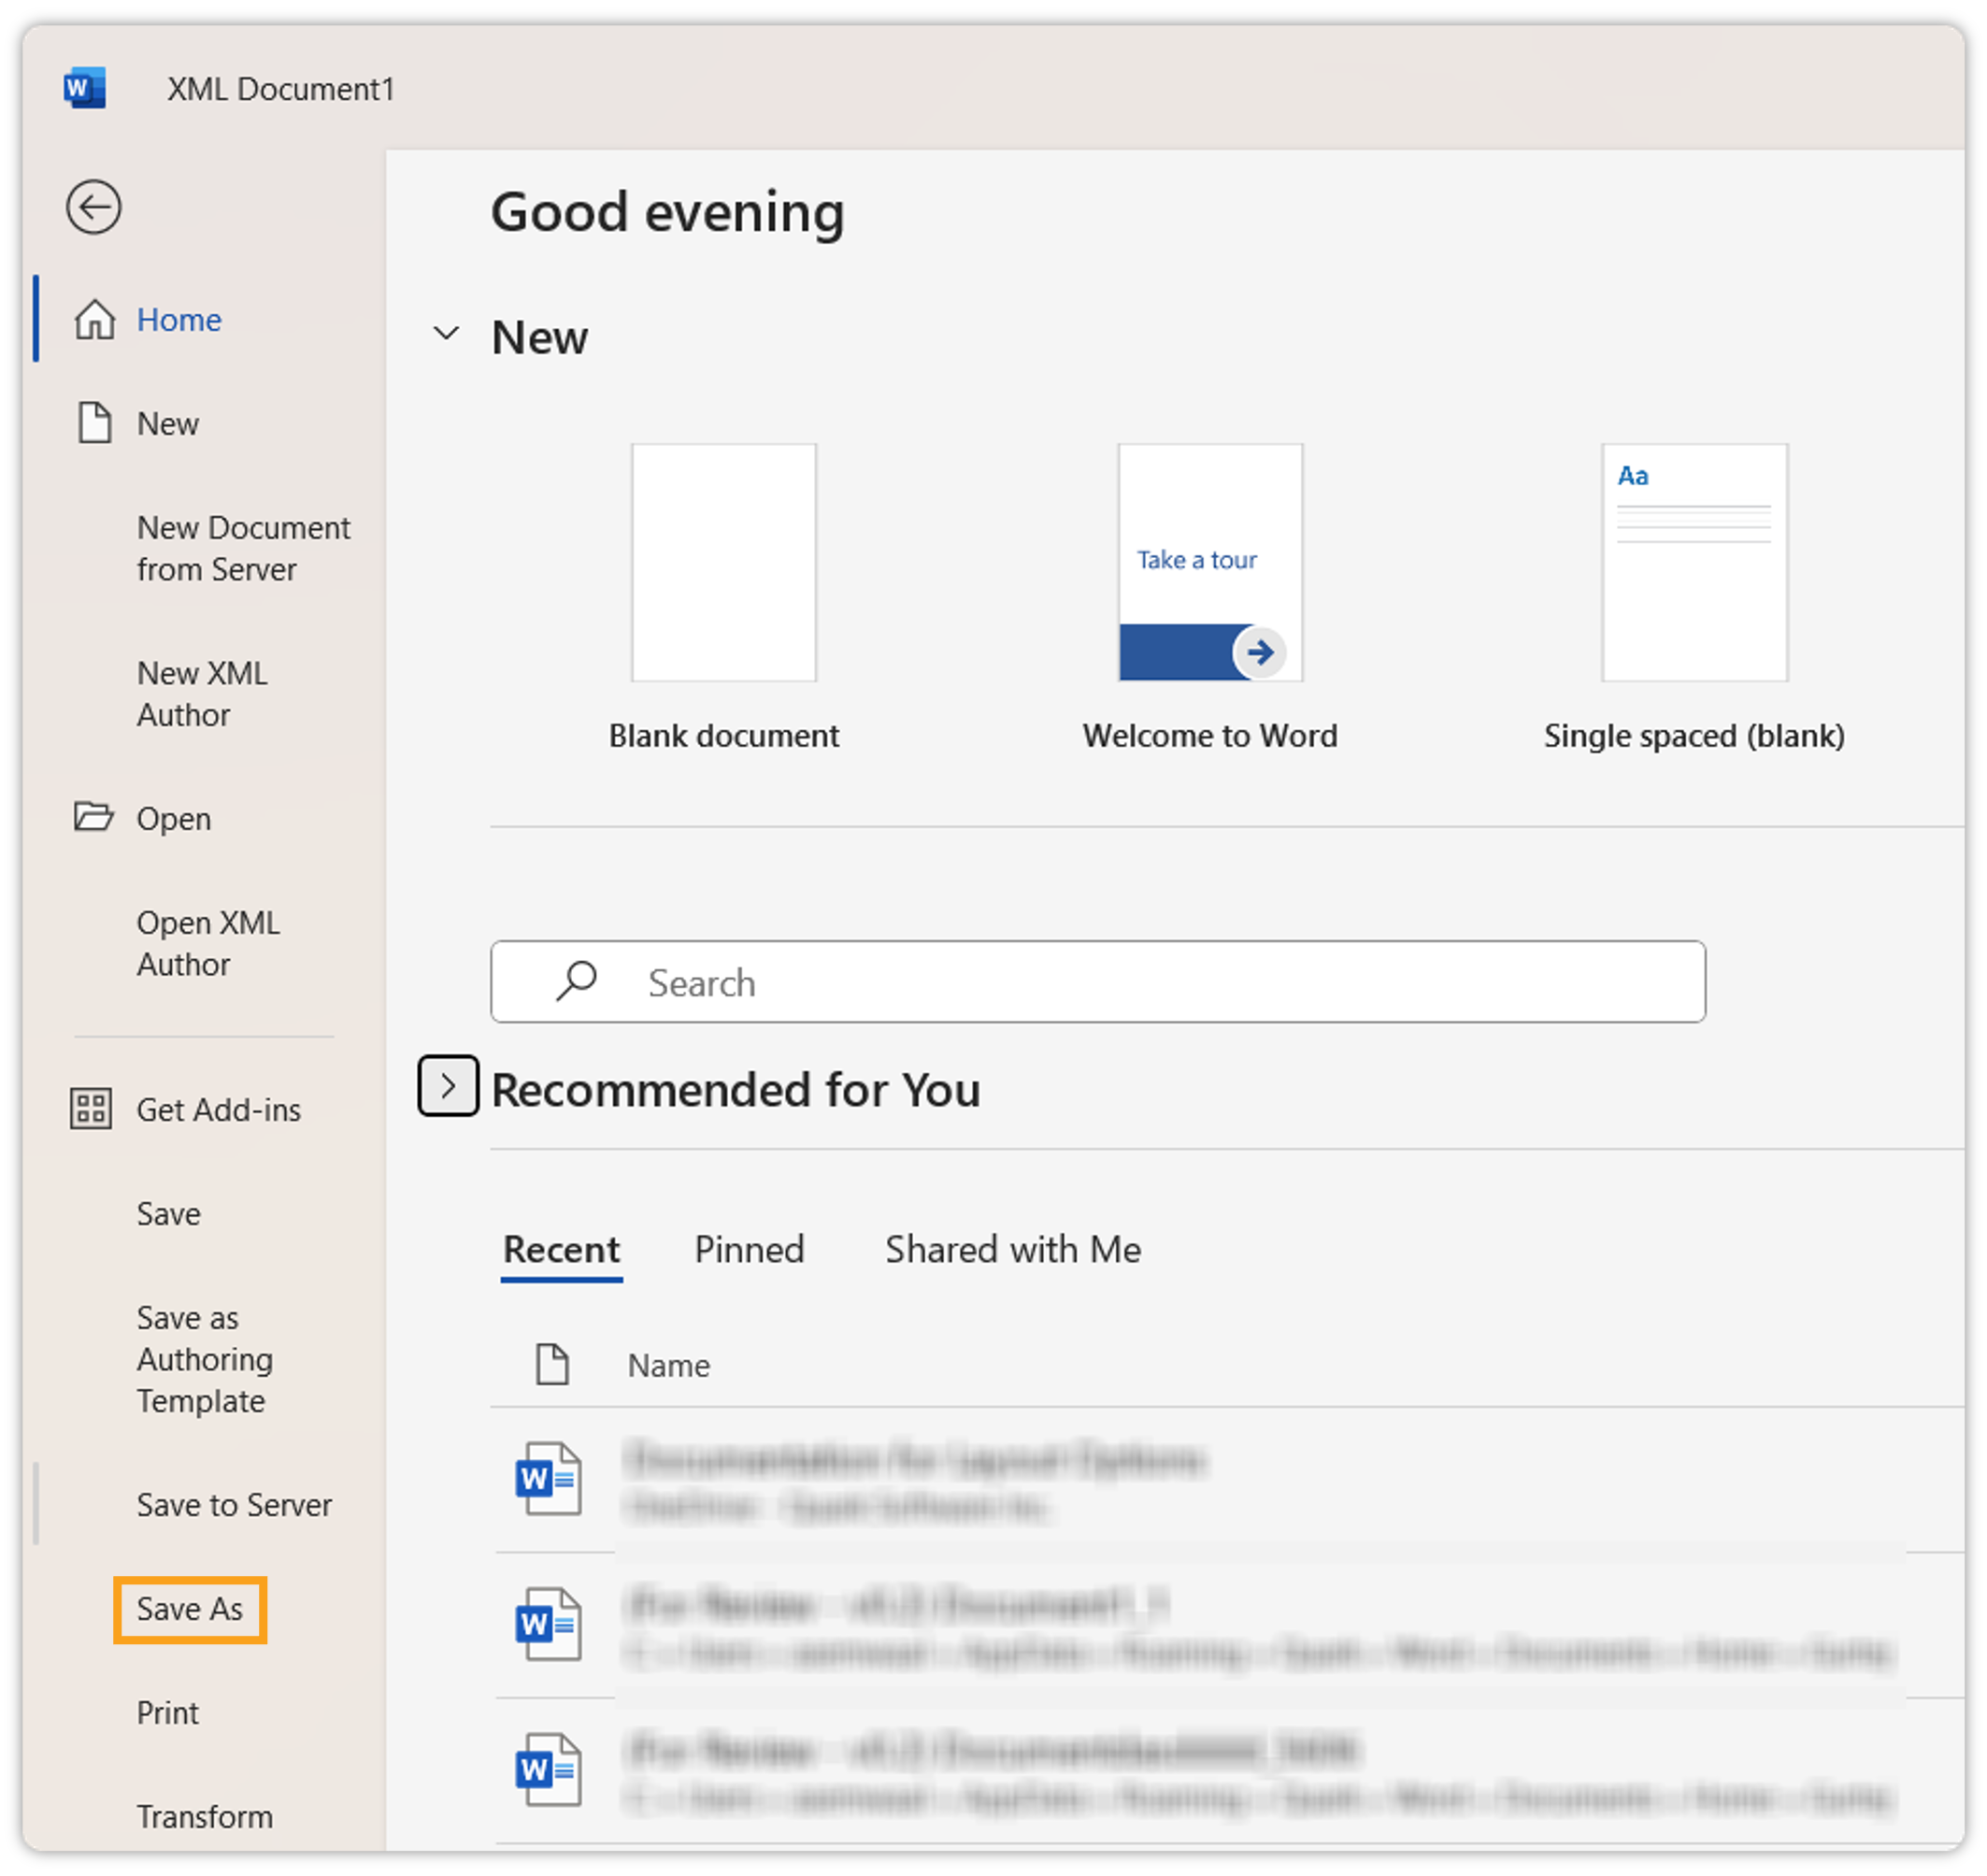
-
In the dialog box Save As, browse to the location where you want to save the file.
-
Enter the file name.
-
In the input field, Save as type, and click Word Document.
-
Click Save.
View XML
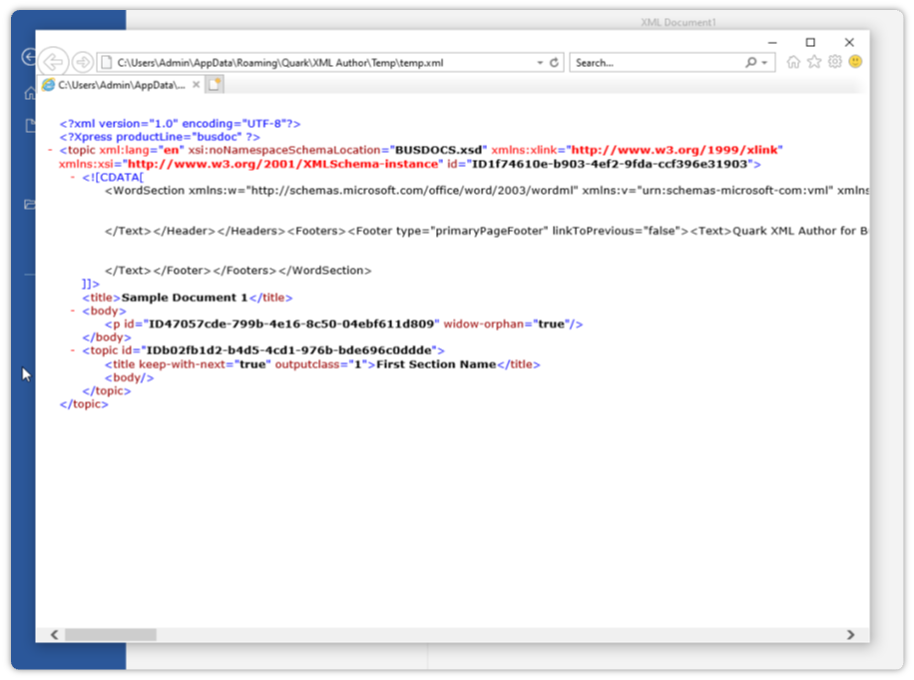
You can view the XML of the current document in a web browser.
To view the XML:
-
Click File > More > Save & Send.
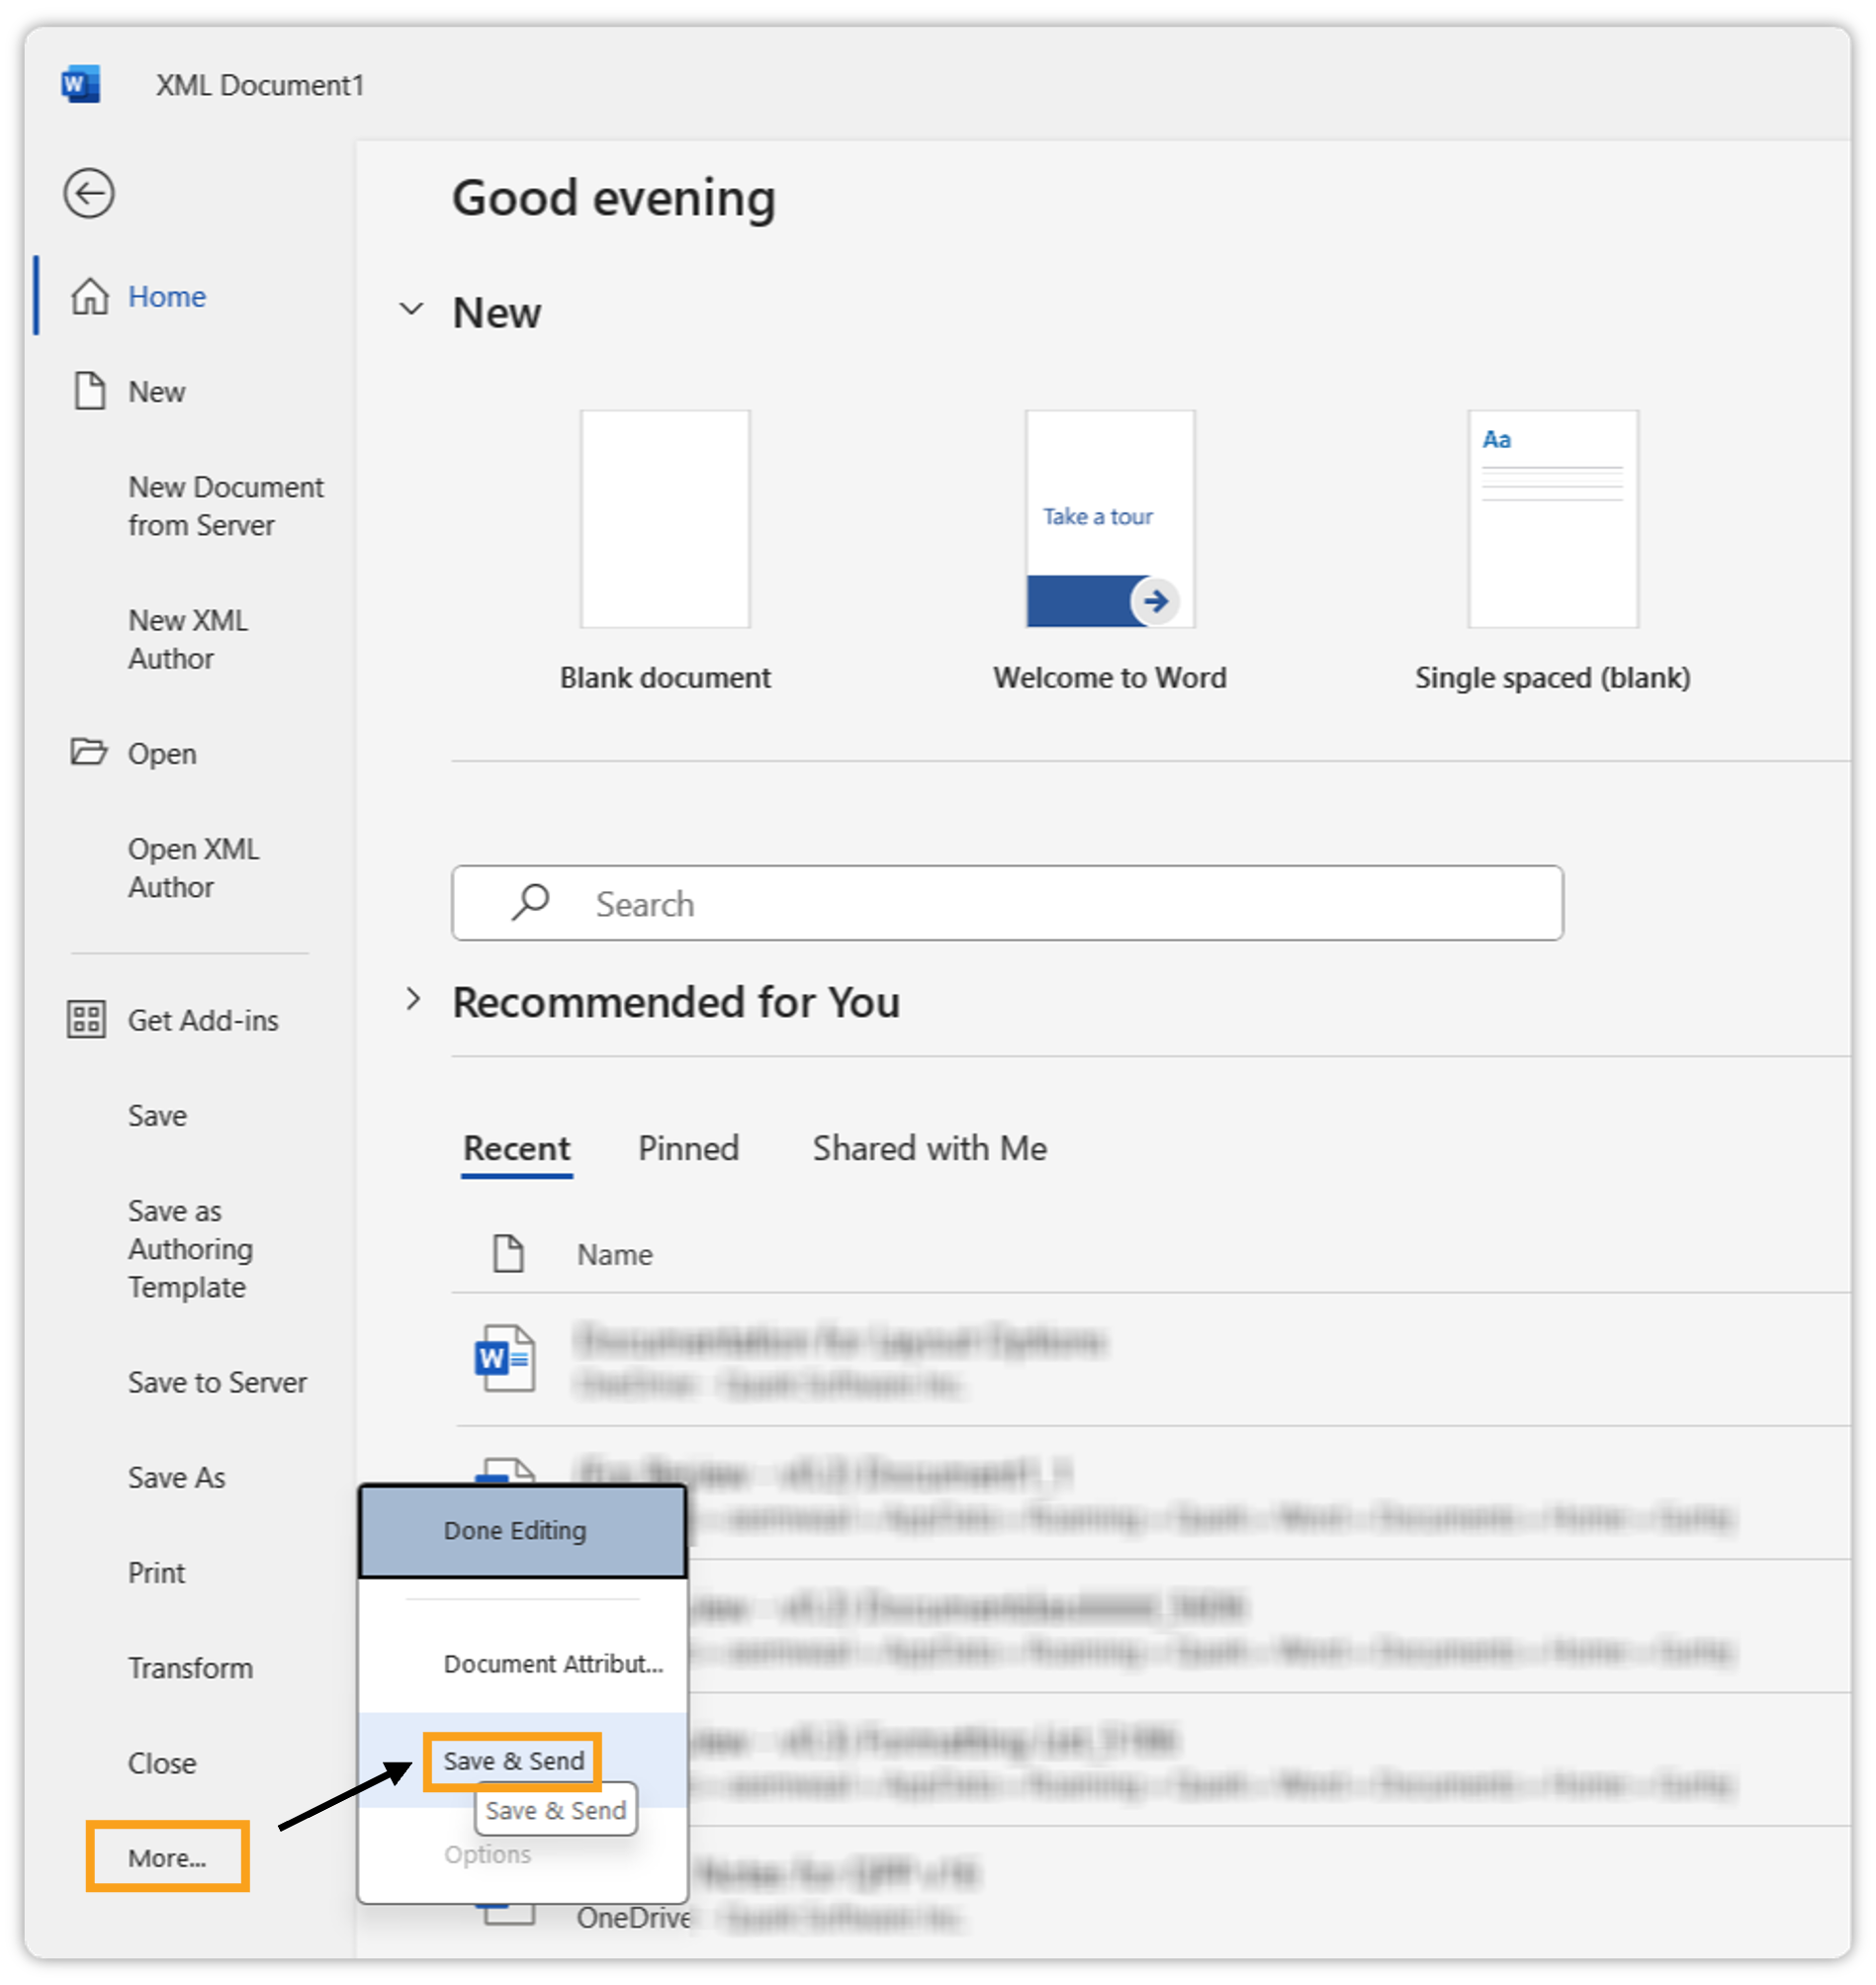
-
In the Save & Send menu, click View XML > View XML.
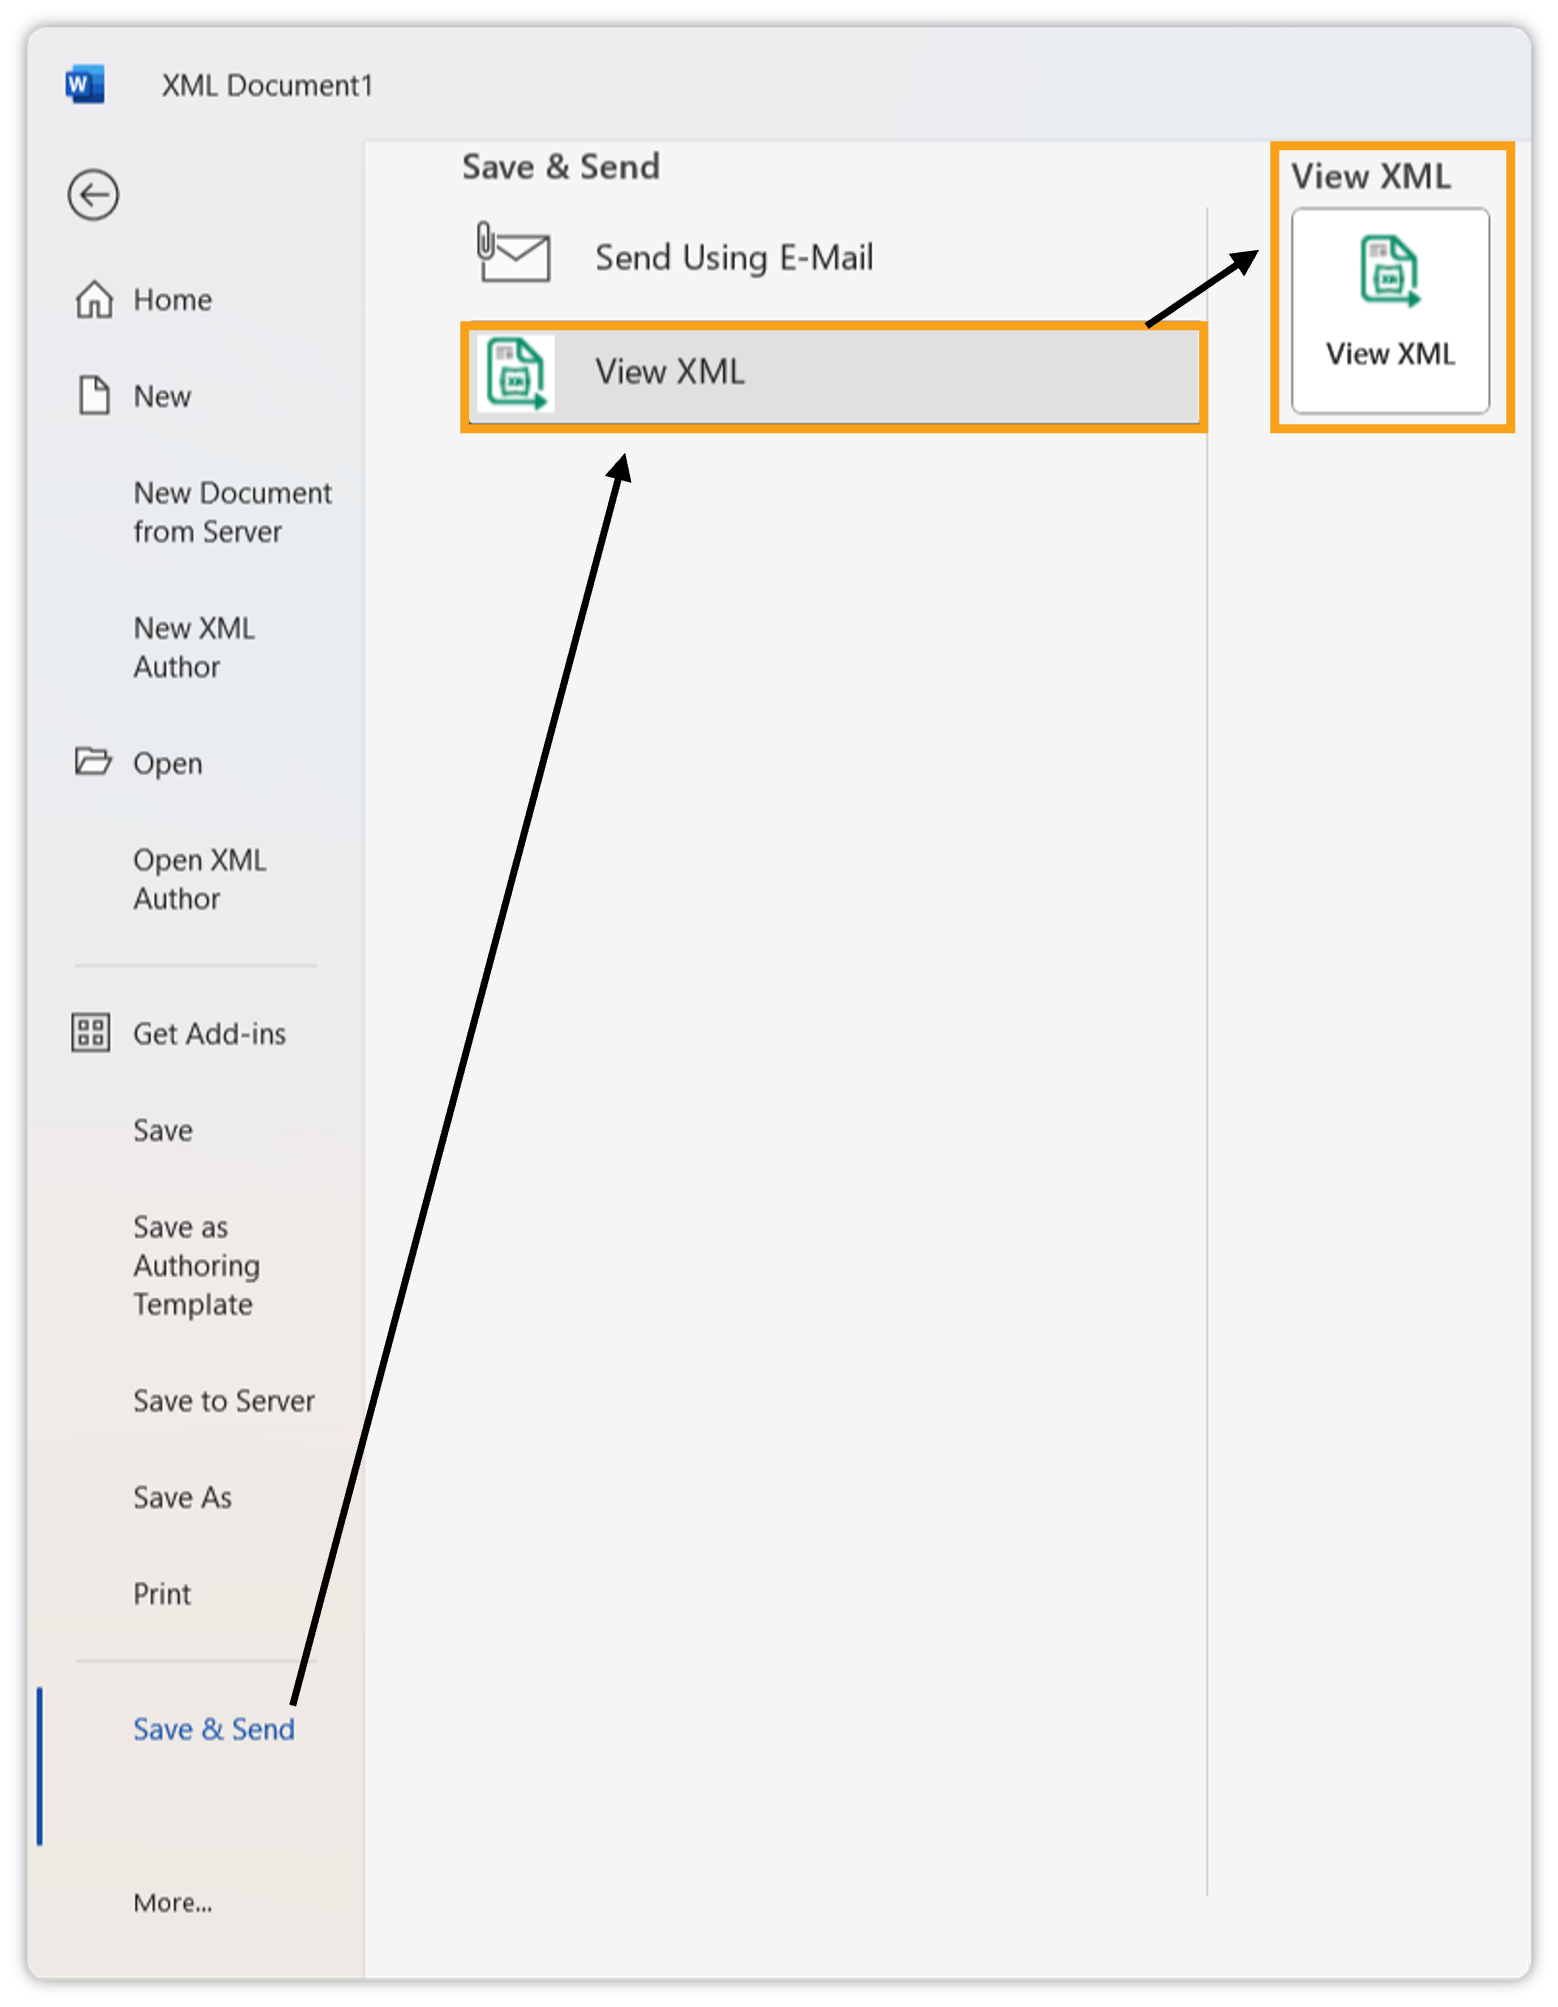
Quark Publishing Platform Adapter for Quark XML Author opens a new browser window with the XML of the current document.
E-mail a Document
Quark Publishing Platform Adapter for Quark XML Author allows you to email a document directly from within the application.
To email a document:
-
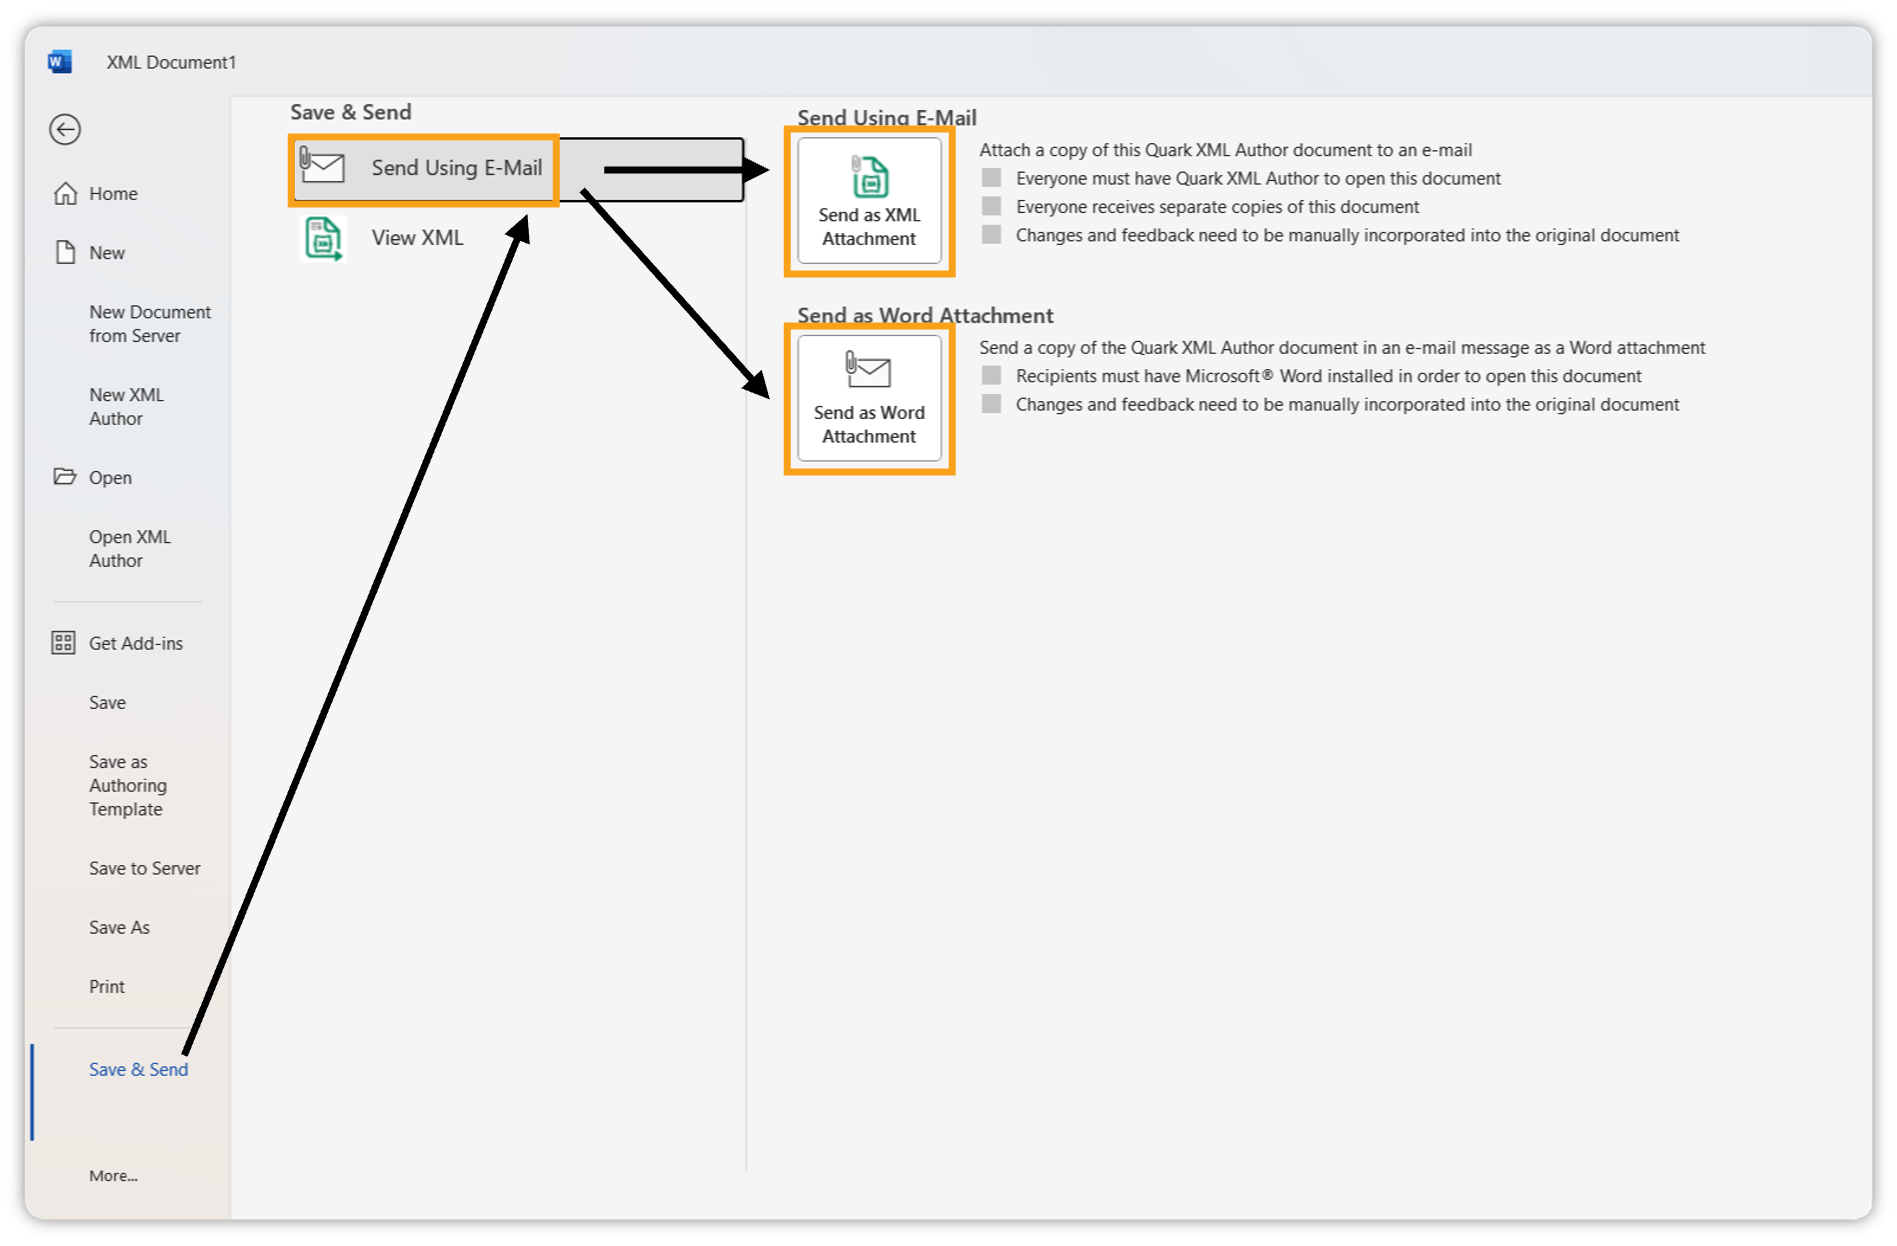
Click File > Save & Send.
-
In the Save & Send menu, click Send Using E-Mail and then select:
-
Send as XML Attachment if you want to send an XML document.
-
Send as Word Attachment if you want to send a Word document.
-
-
Enter an email address and then click Send.
Elements
Quark Publishing Platform Adapter for Quark XML Author is a structured authoring tool that lets you easily insert, copy, move and delete content elements (section, region, tables, figure, hyperlink, etc.) to create a valid structured document.
Insert Elements
Quark Publishing Platform Adapter for Quark XML Author allows you to insert several types of elements such as section, region, tables, figure, hyperlink, and so based on the documentation required. You can insert several types of elements using Word's header ribbon tabs Home and Insert.
The following table displays the type of elements you can insert using these tabs.
|
Tab |
Elements |
|
Home |
|
|
Insert |
|
You can insert an element either from the header ribbon or through right-click on the Word canvas.
To insert an element from the header ribbon:
-
Click the tab Home/Insert.


-
Select the element you want to insert.
To insert an element through the right-click:
-
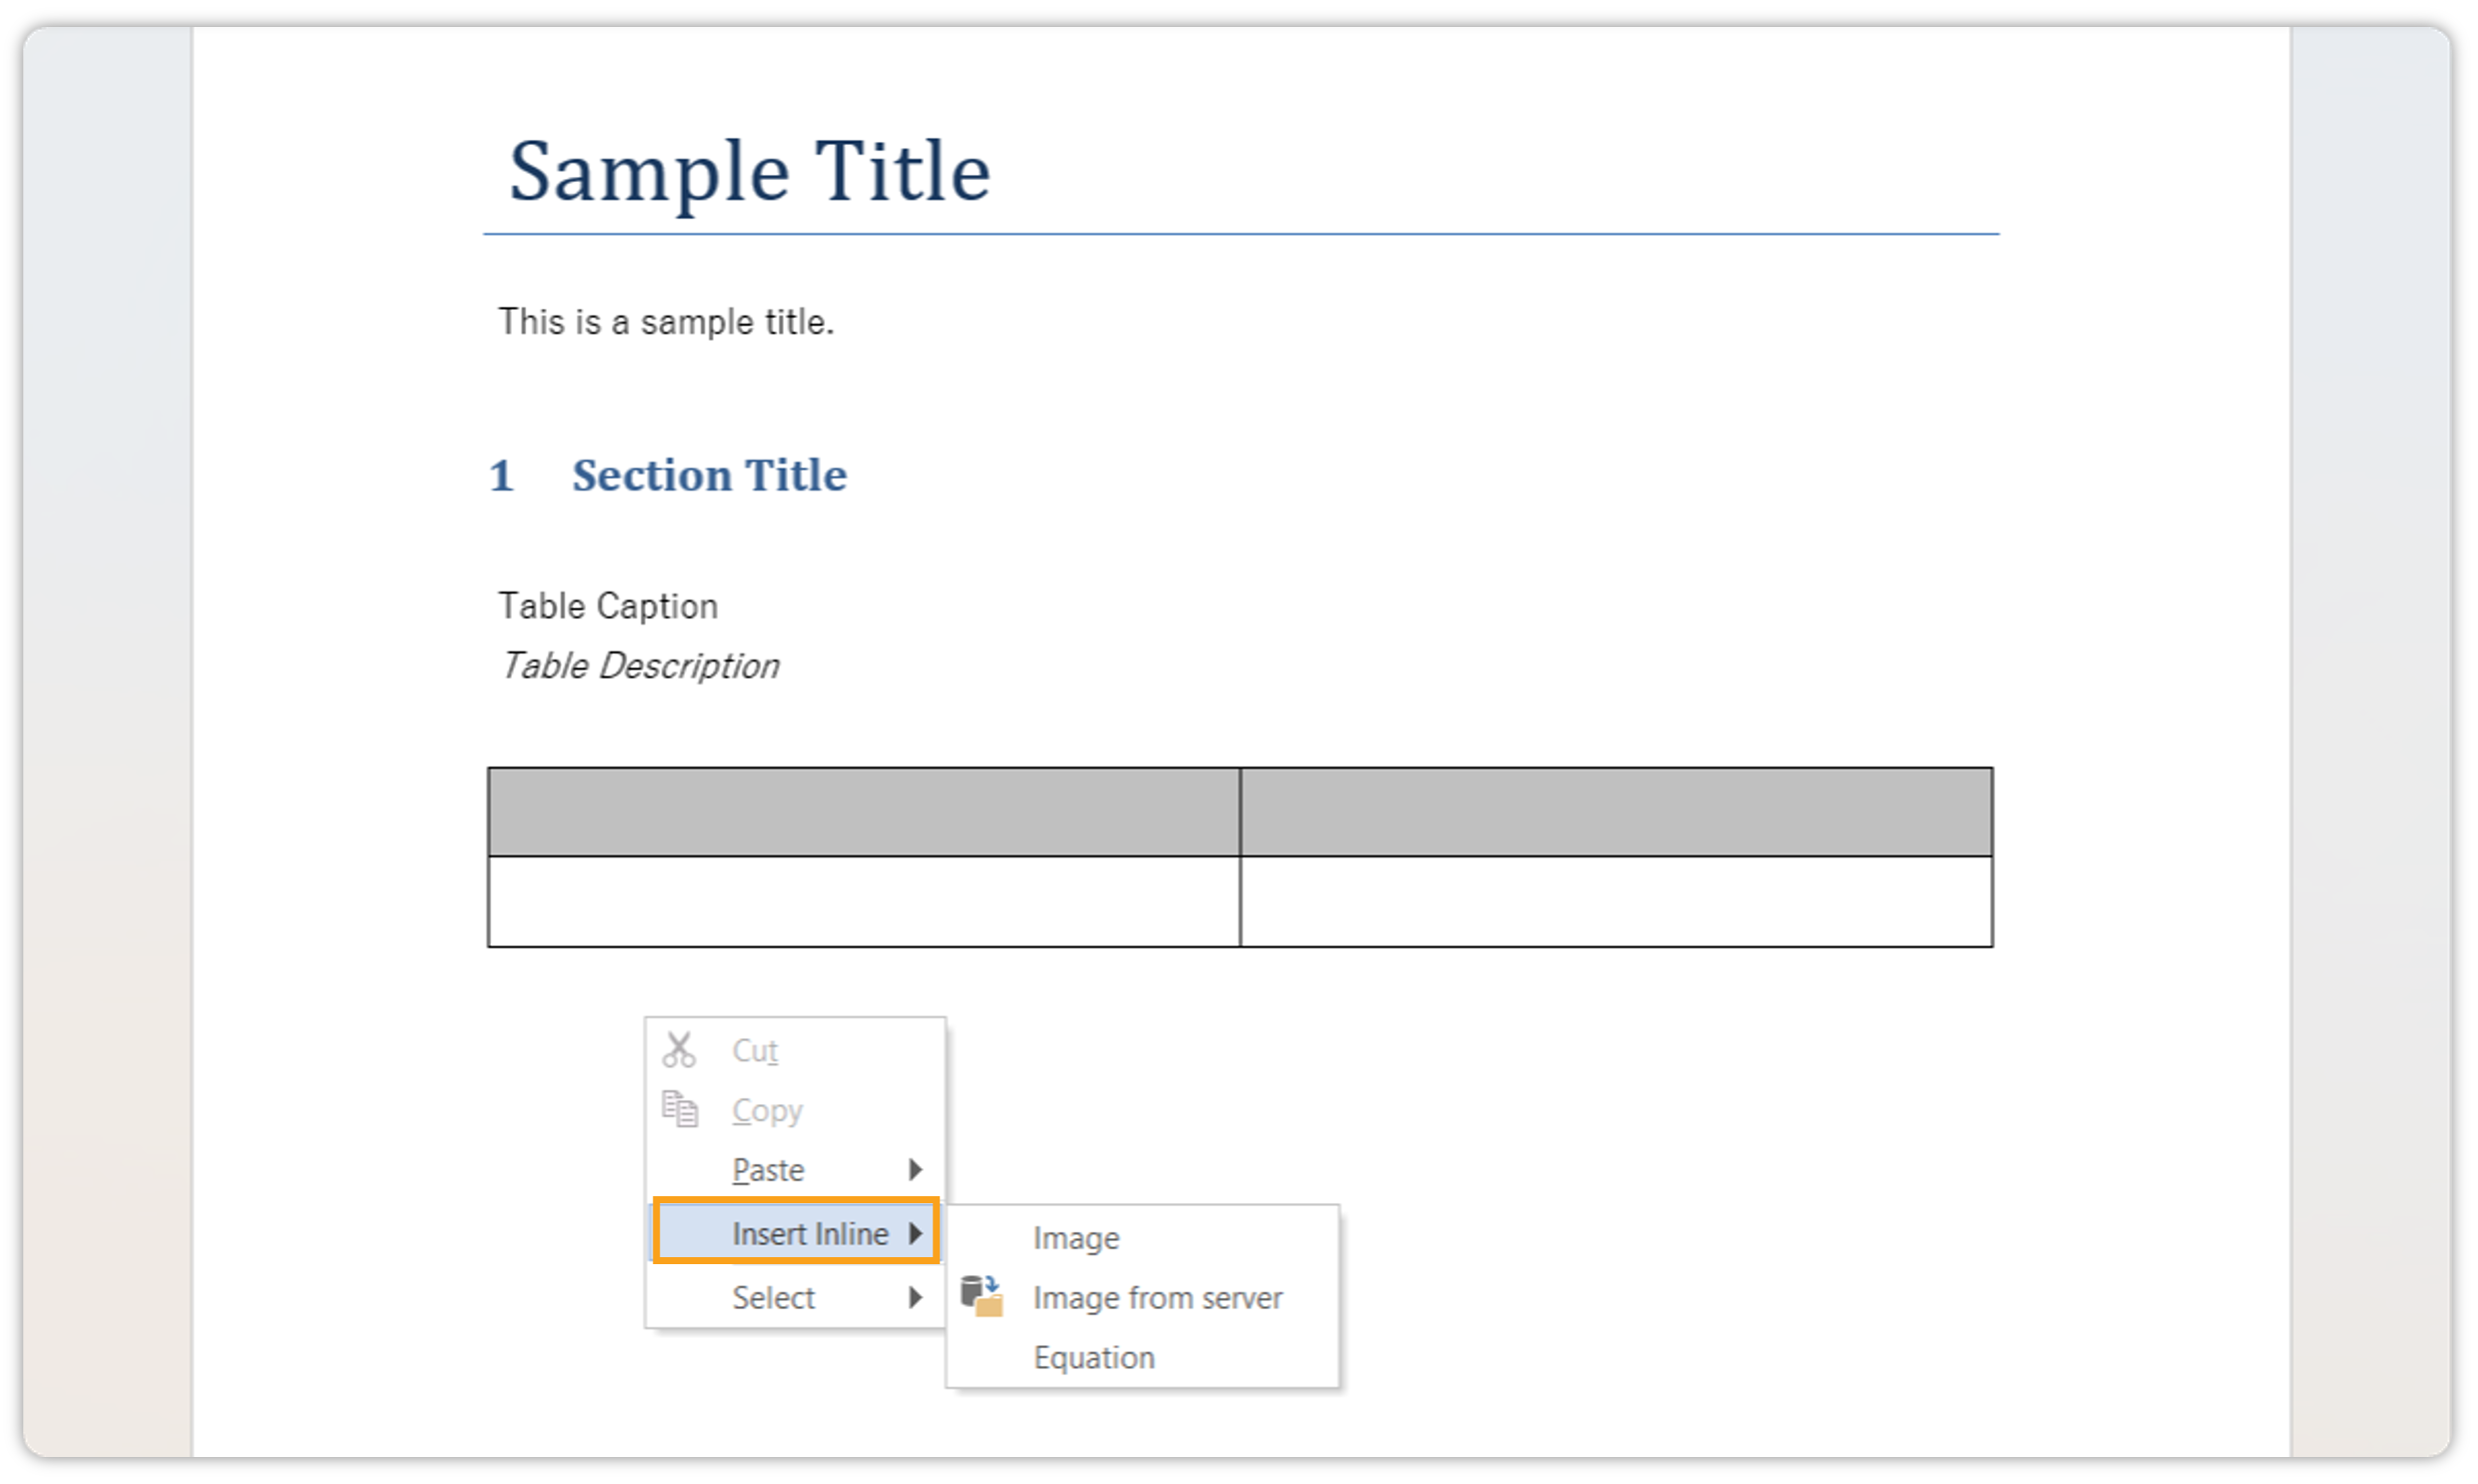
Right-click on the work canvas where you want to insert an element.
-
Click Insert Inline.
-
-
Browse to/select the element in the context menu.
About Inserting Elements in Structured Authoring
An XML document is a structured document that must follow the structure rules specified by the XML schema for the type of document you are authoring.
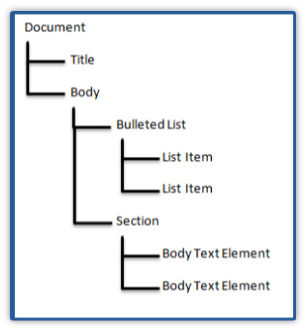
For example, if your document contains a title, a bulleted list, or a section with two paragraphs, QPP Adapter for Quark XML Author displays these elements on the Word canvas in the following manner:
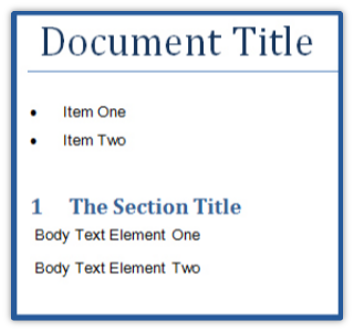
Internally, the structure of the document has the following hierarchy:
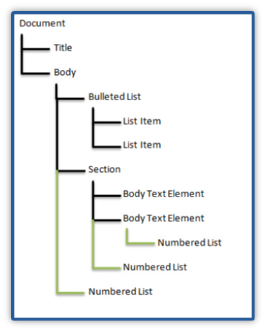
If you want to add an element immediately below the second paragraph, you have the option to add one of the following:
-
A child of the second paragraph (for example, an image or a note)
-
A sibling of the second paragraph (for example, another paragraph)
-
A child of body/sibling of the bulleted list and the section
Copy/Move Elements
QPP Adapter for Quark XML Author allows you to copy/move an element (along with attributes and child elements) to a new location within a document or in a different document irrespective of whether the element or any of its child element is a content reference.
To copy/move an element:
-
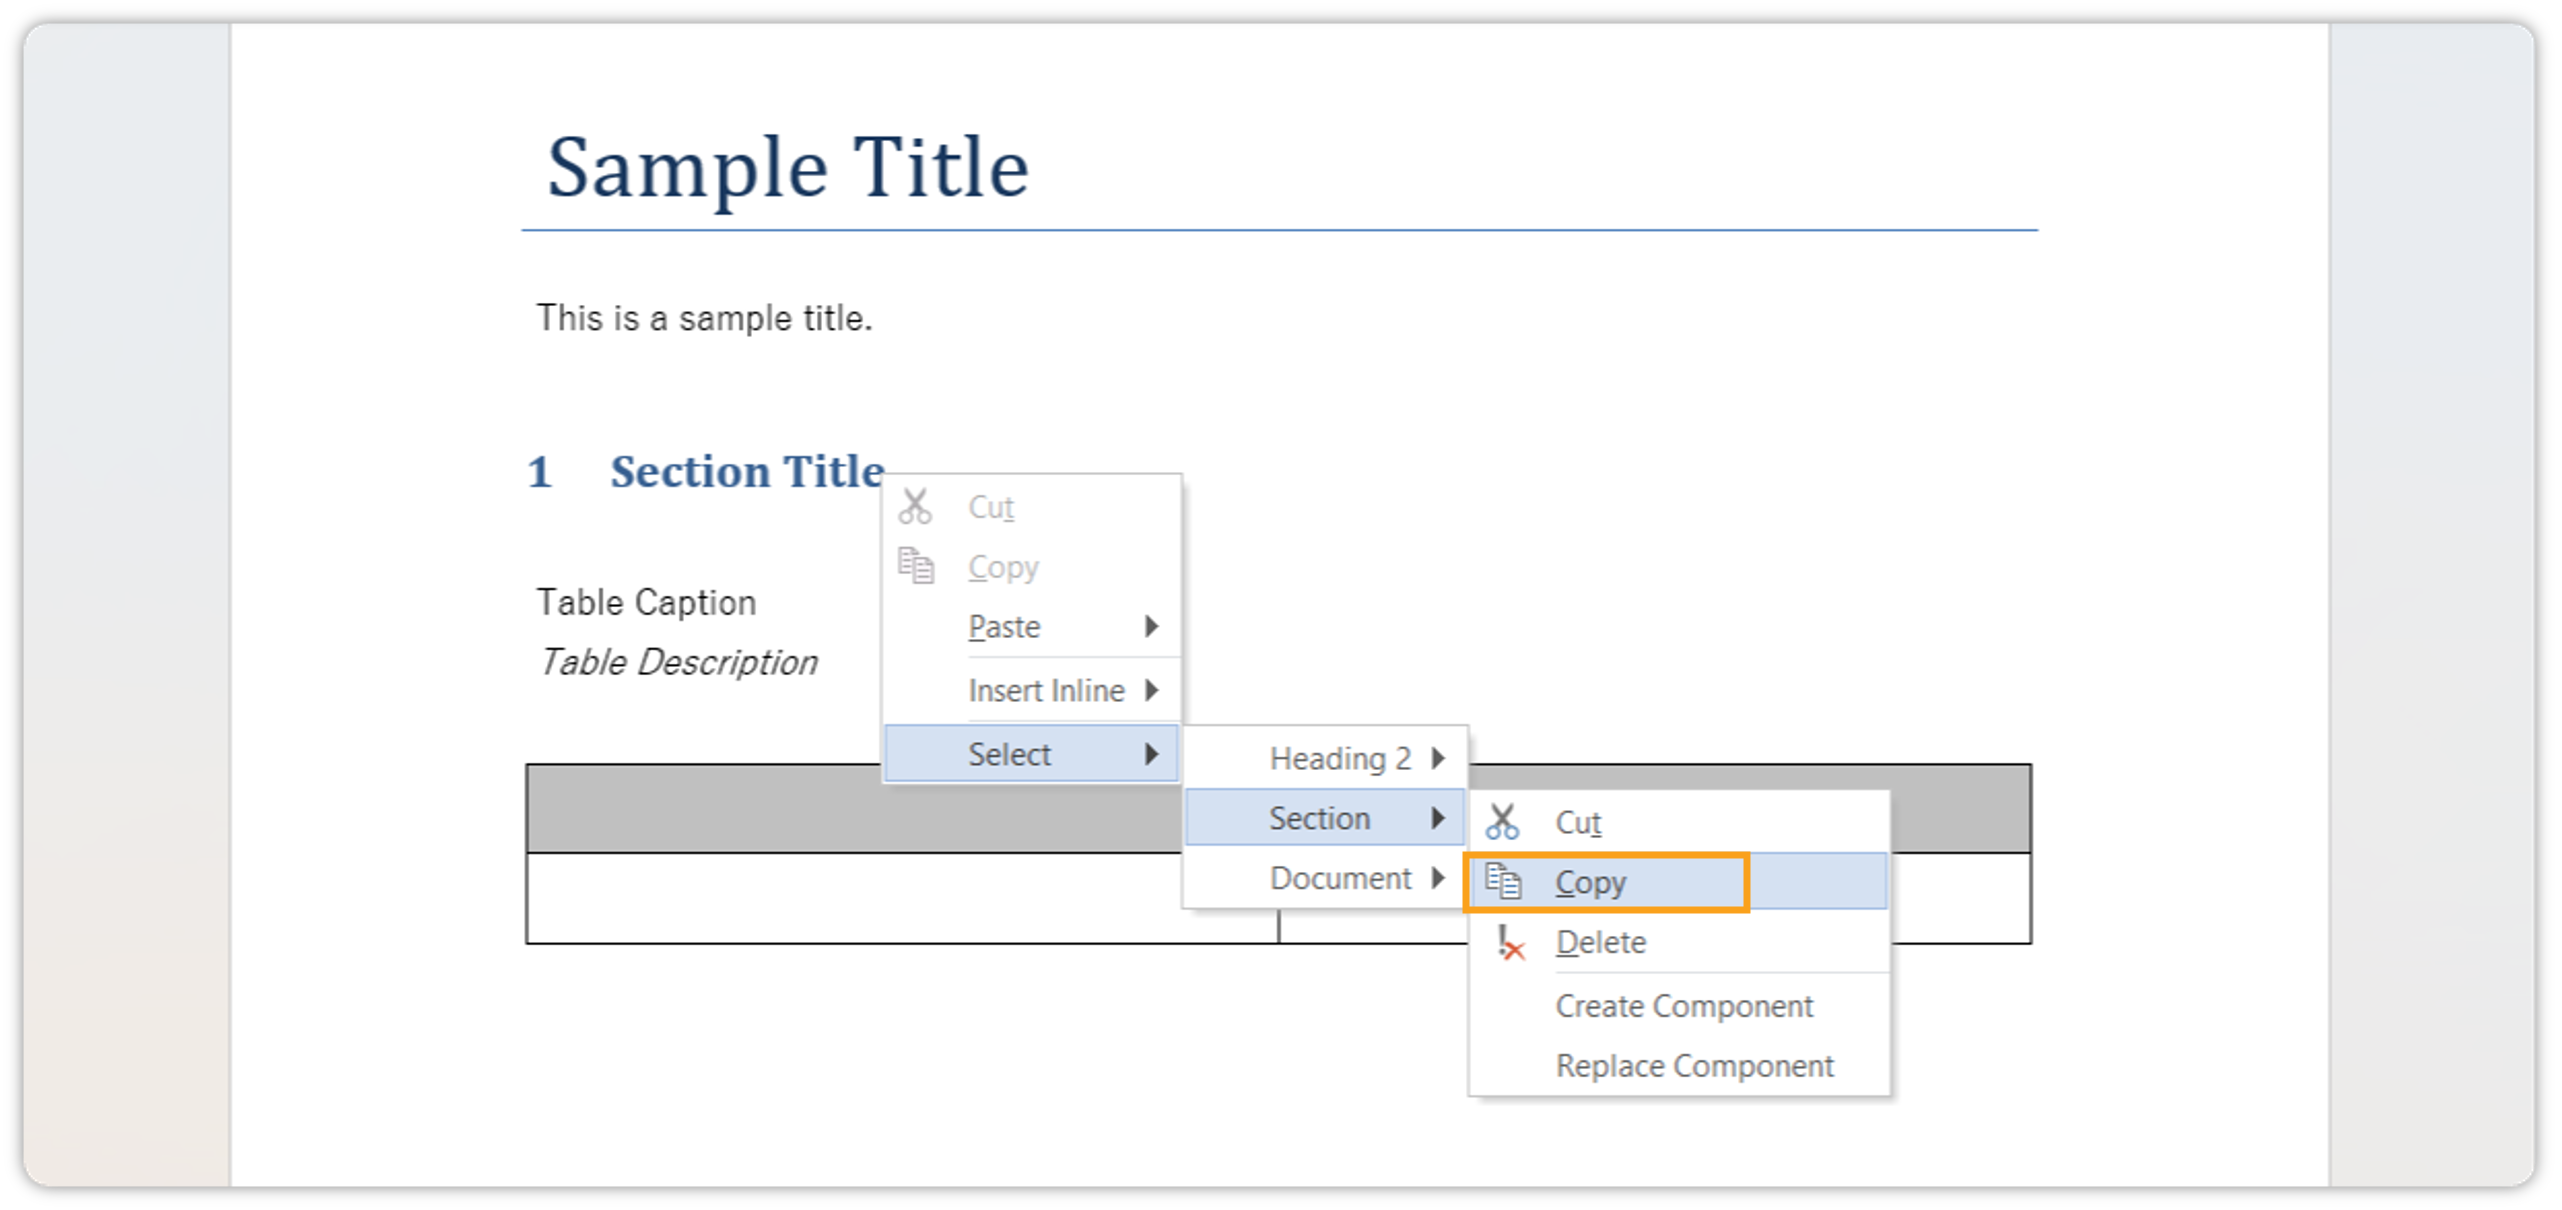
Right-click on the element that you want to copy/move to the clipboard.
-
In the context menu, click Select, select the element you want to copy/move and then click Copy/Cut.
-
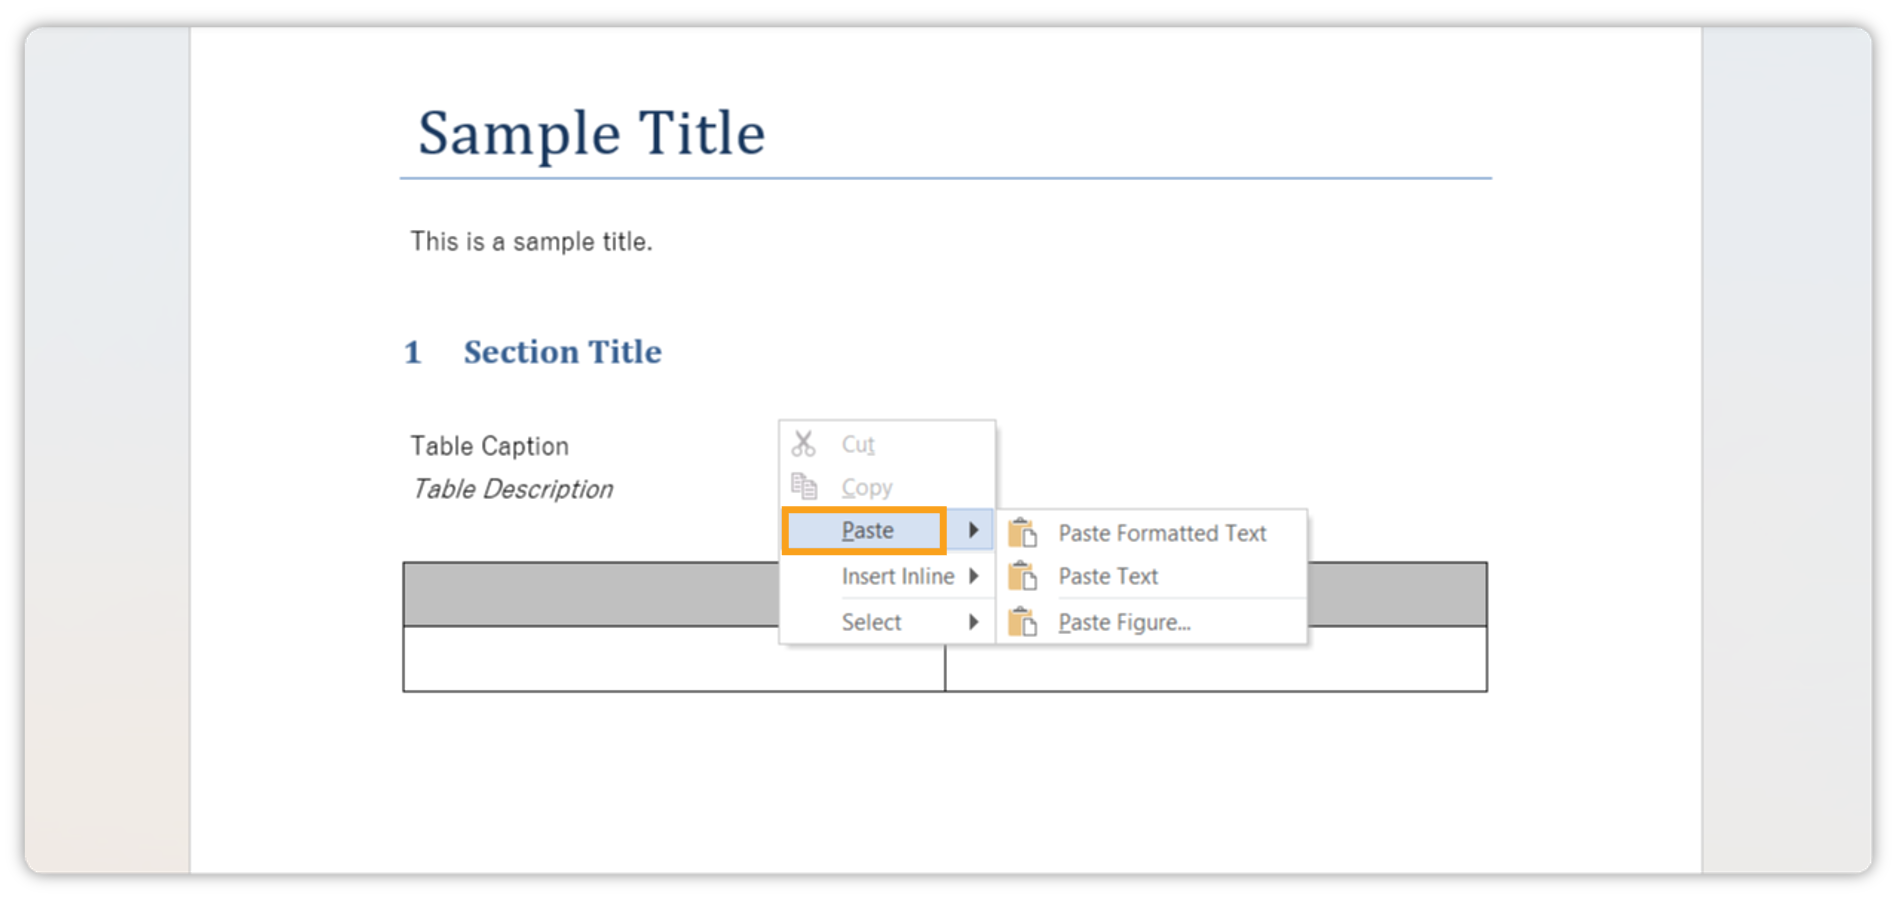
Position the cursor where you want to paste the element, then right-click.
-
In the context menu, click Paste > Paste {element name}.
Delete Elements
QPP Adapter for Quark XML Author allows you to copy/move an element (along with attributes and child elements).
-
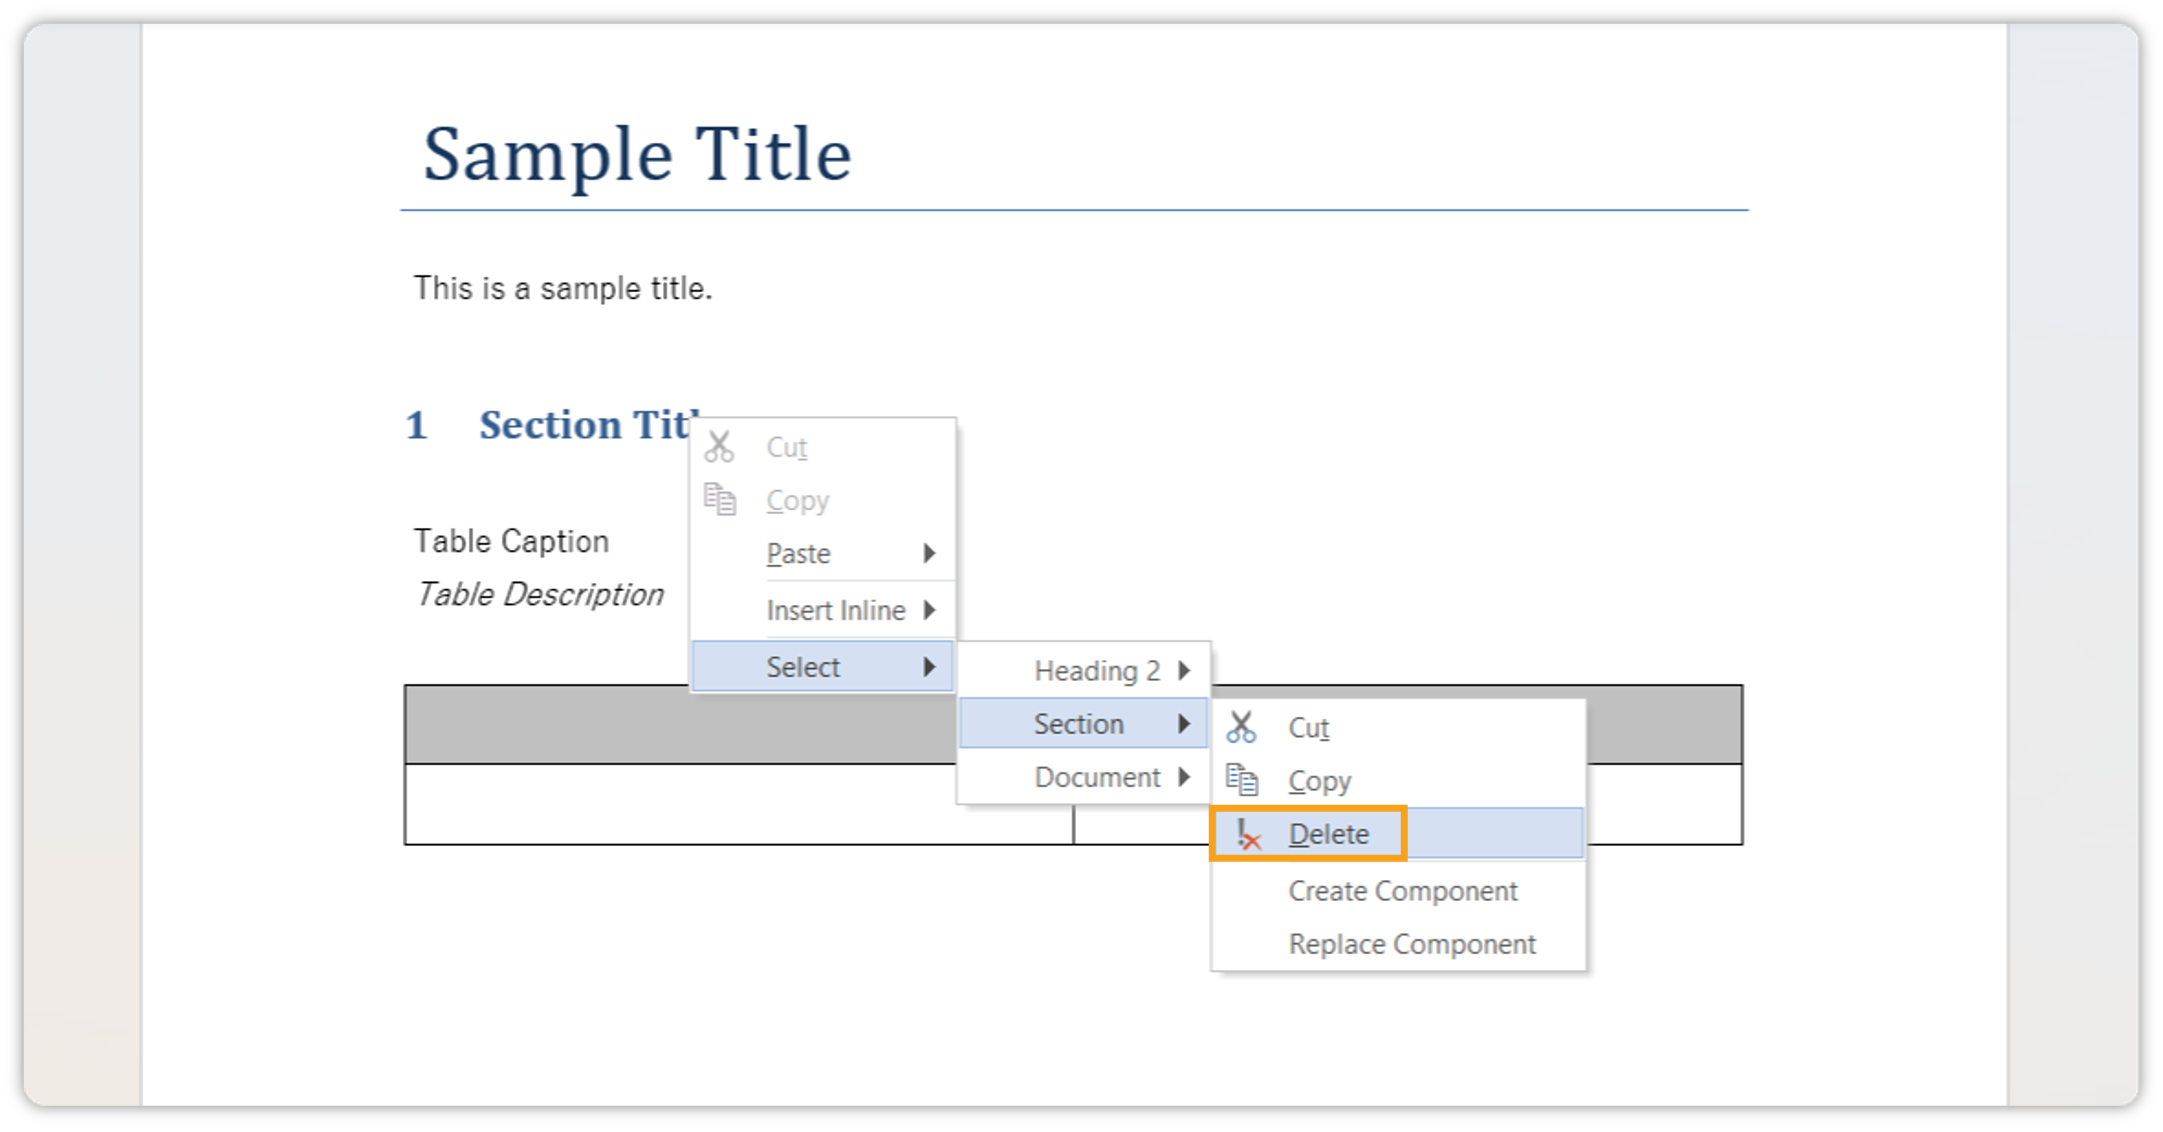
Right-click on the element that you want to delete.
-
In the context menu, click Select, select the element you want to delete and then click Delete.
-
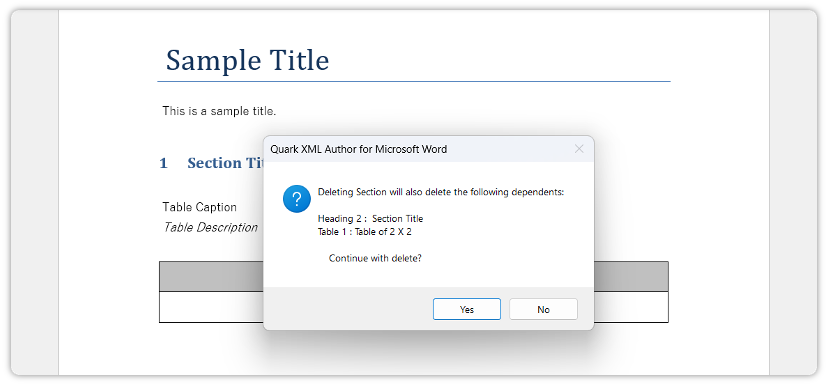
When the current element has child elements, QPP Adapter for Quark XML Author prompts a message that lists all the child elements and asks to continue to delete.
-
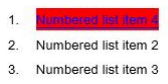
Click Yes (if you want to delete the element along with all the child elements).
About Deleting Elements in Structured Authoring
Deleting content in a structured authoring tool is significantly different from deleting content in Microsoft Word. While you can delete text in both the authoring tools, in the same manner, to delete elements, you have to adhere to specific rules to ensure that structure of your XML document remains intact.
This is because most of the XML schemas have some sort of content requirement. For example, if an XML schema requires a parent element with a child element, you cannot delete the child element. Additionally, some elements have certain content requirements regardless of XML schema. For example, a bulleted list requires at least one list item and a table requires at least one row, column, or cell. Therefore, commands like Cut or Delete are not available in these scenarios because this also moves/deletes the parent element.
The same rules apply to QPP Adapter for Quark XML Author when you move/delete an element through Cut and Delete, irrespective of whether you use the header ribbon, context menu, or keyboard shortcut keys.
About Backspace and Delete Key Features
Structured Authoring rules define the function that the keyboard keys Backspace and Delete can perform, which depends on the cursor position and the selected element.
The following sections describe how the keys Backspace and Delete function with and without selected elements based on the cursor position:
With Selected Elements
-
When the selection contains only text, QPP Adapter for Quark XML Author deletes the text.
-
When the selection contains only optional elements, QPP Adapter for Quark XML Author deletes the option elements.
-
When the selection contains a required element outside a table/inside a table, QPP Adapter for Quark XML Author deletes the optional elements and text in the required elements. This applies to selections that span any table elements such as cells, rows, sections, and so on.
-
When the selection contains all or part of a table and no adjacent elements or empty elements, QPP Adapter for Quark XML Author deletes the selected content and does not change the table structure.
-
When the selection contains an entire table, one or more adjacent empty elements, and no adjacent elements, QPP Adapter for Quark XML Author deletes the table content and structure.
-
When the selection contains part of a table and one or more adjacent elements or empty elements, QPP Adapter for Quark XML Author does not perform any action.
Without Selected Elements
-
When you press the key Backspace, QPP Adapter for Quark XML Author deletes the text until no text remains to the left of the cursor.
-
In an optional element, when you press the key Backspace at the left-most cursor position, QPP Adapter for Quark XML Author merges the text with the previous element and deletes the current element. This also applies when the current selection is a list item.
-
In a required element, when you press the key Backspace at the left-most cursor position, QPP Adapter for Quark XML Author doesn't perform any action.
-
When you press the key Delete, QPPAdapter for Quark XML Author deletes text until no text remains to the right of the cursor. When you press the key Delete at the rightmost cursor position, QPP Adapter for Quark XML Author doesn't perform any action.
Move or Copy Several Elements — Overview
The commands Cut, Copy, and Paste work with selections that may include several elements and content types such as text, images, tables, and so on. The selection also includes metadata, the emphasis within the selection, and child elements.
While selecting several elements, when you select only a part of an element, performing actions like copy/move may have unexpected results. Therefore, the best way to select several elements is to start the selection from the beginning of the first element till the end of the last element that you want to copy/move.
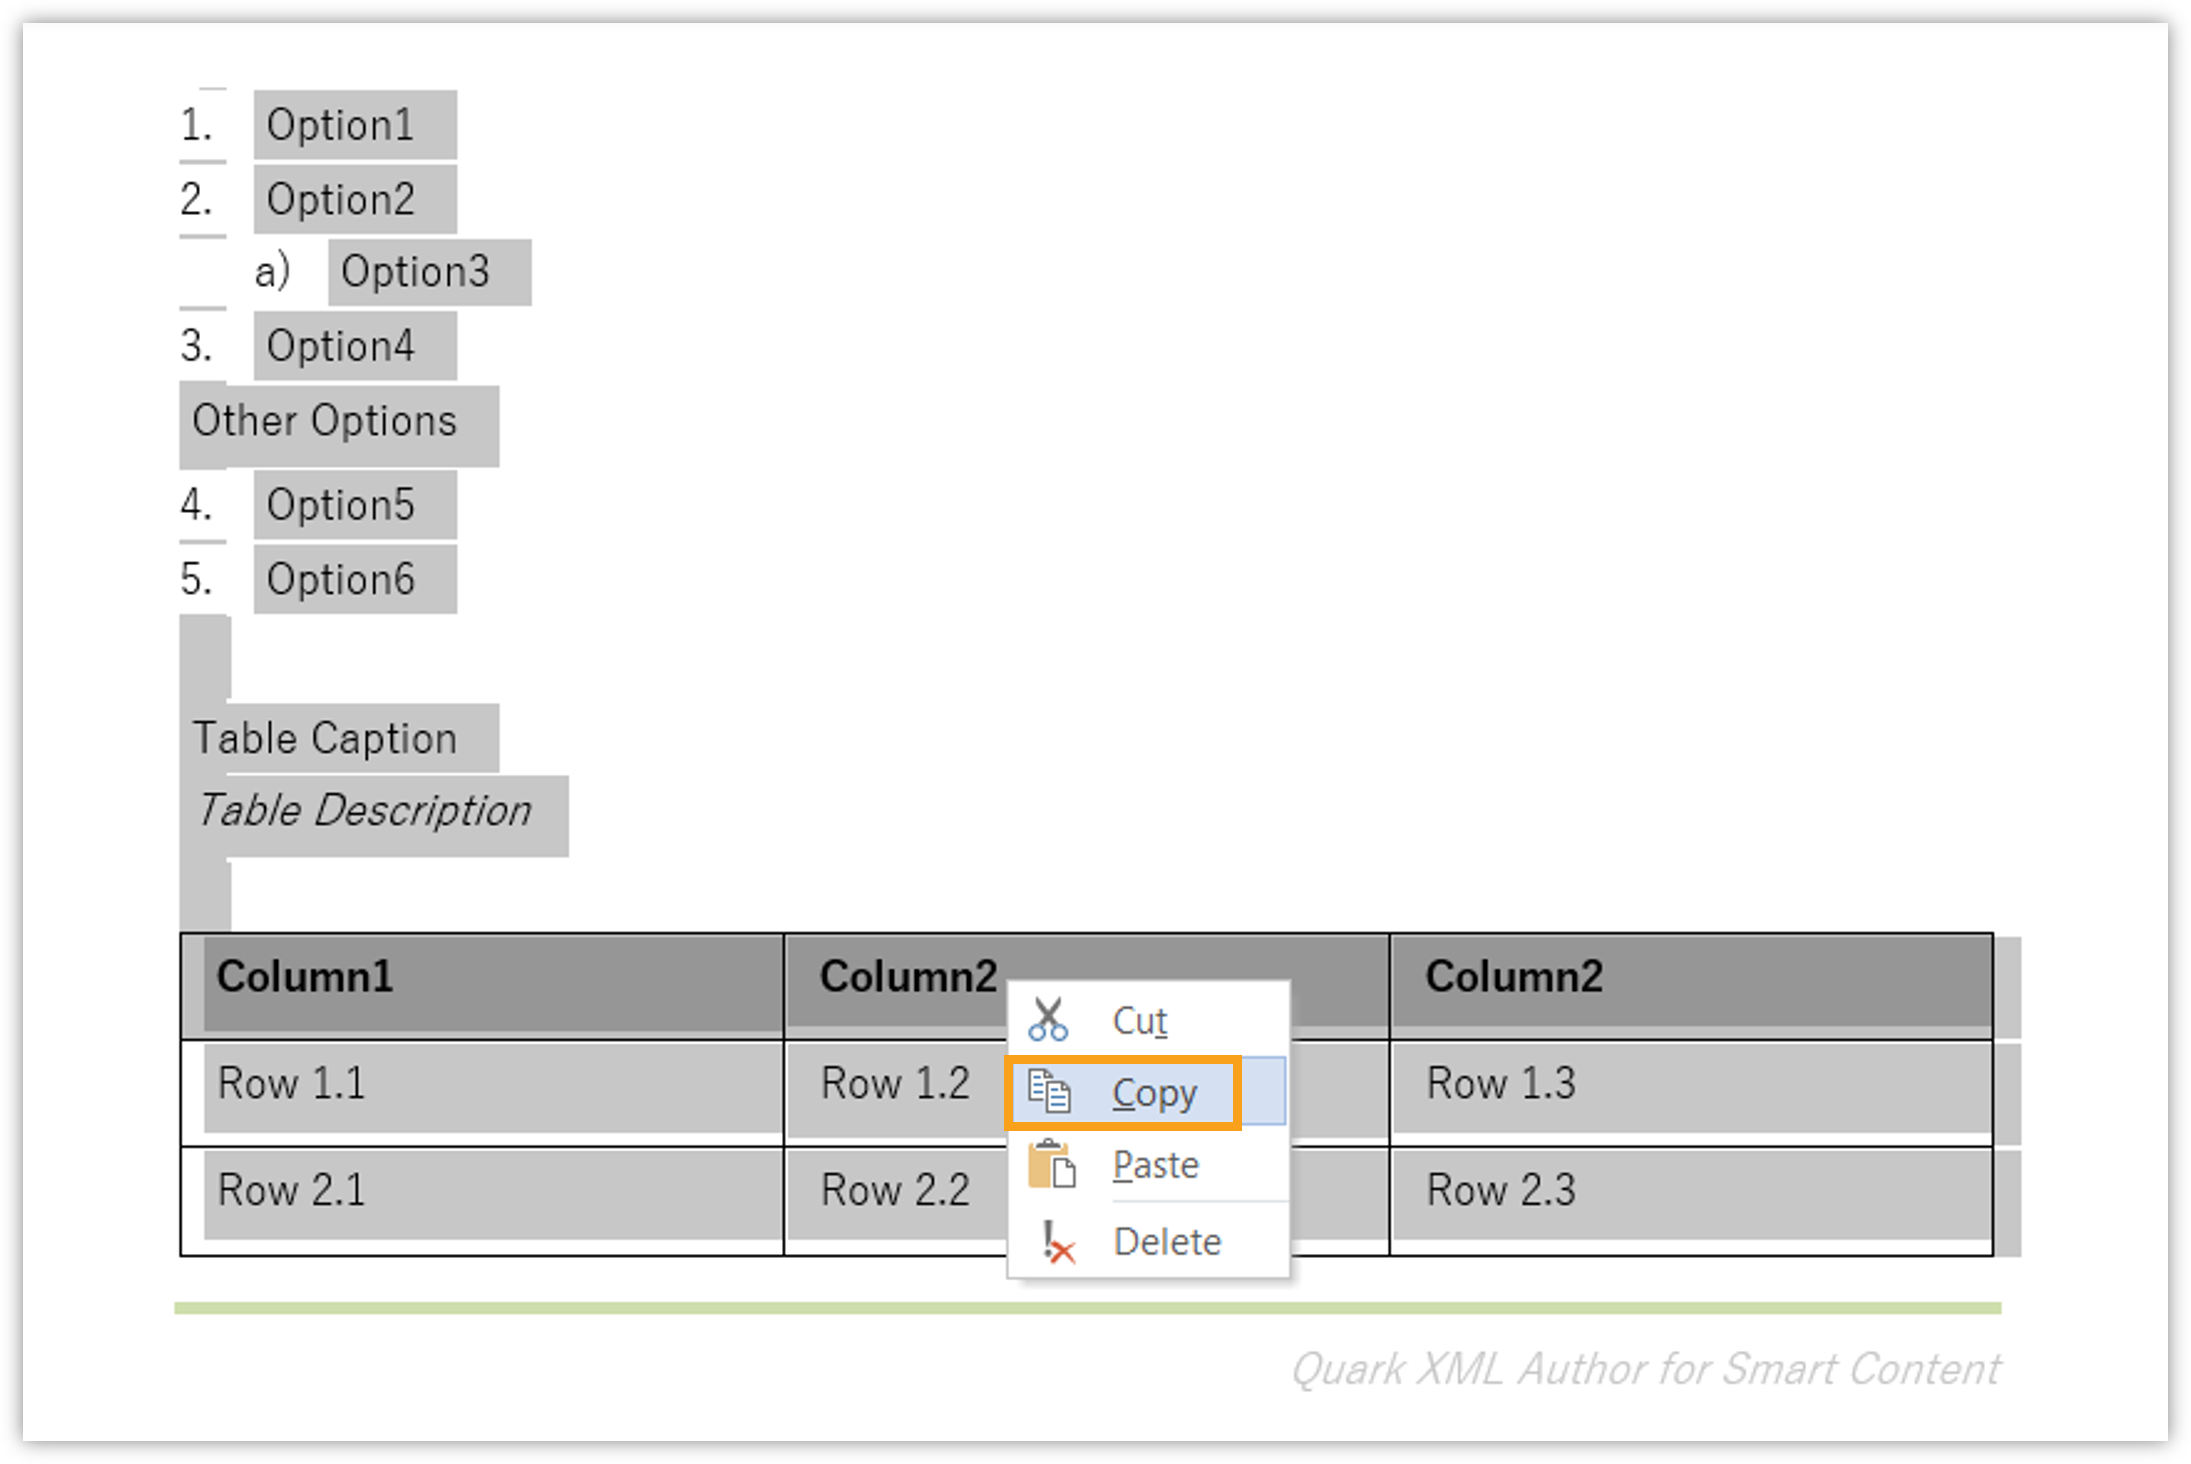
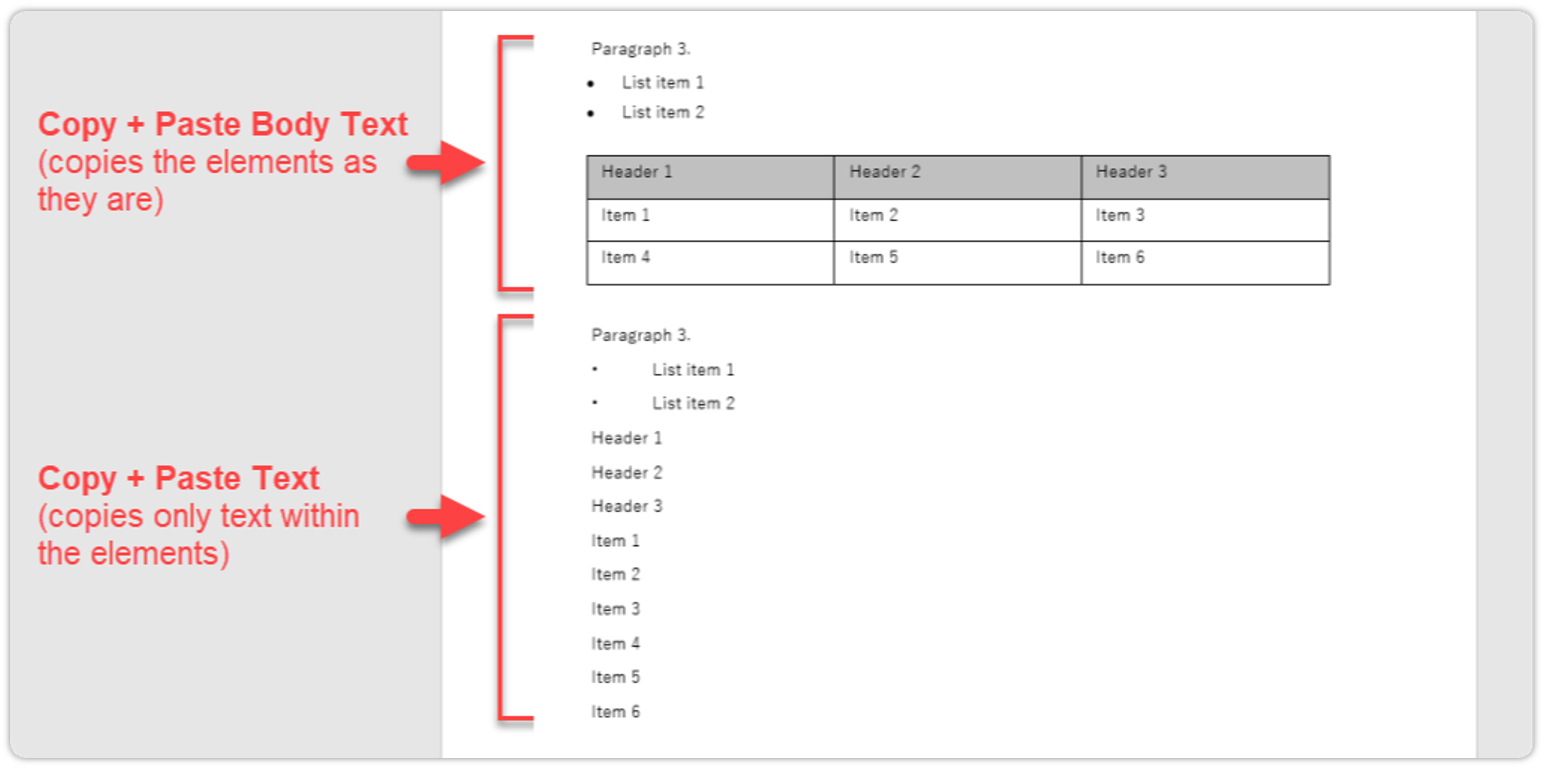
When you paste your selection through the context menu, you get two options: Paste Text and Paste Body Text.
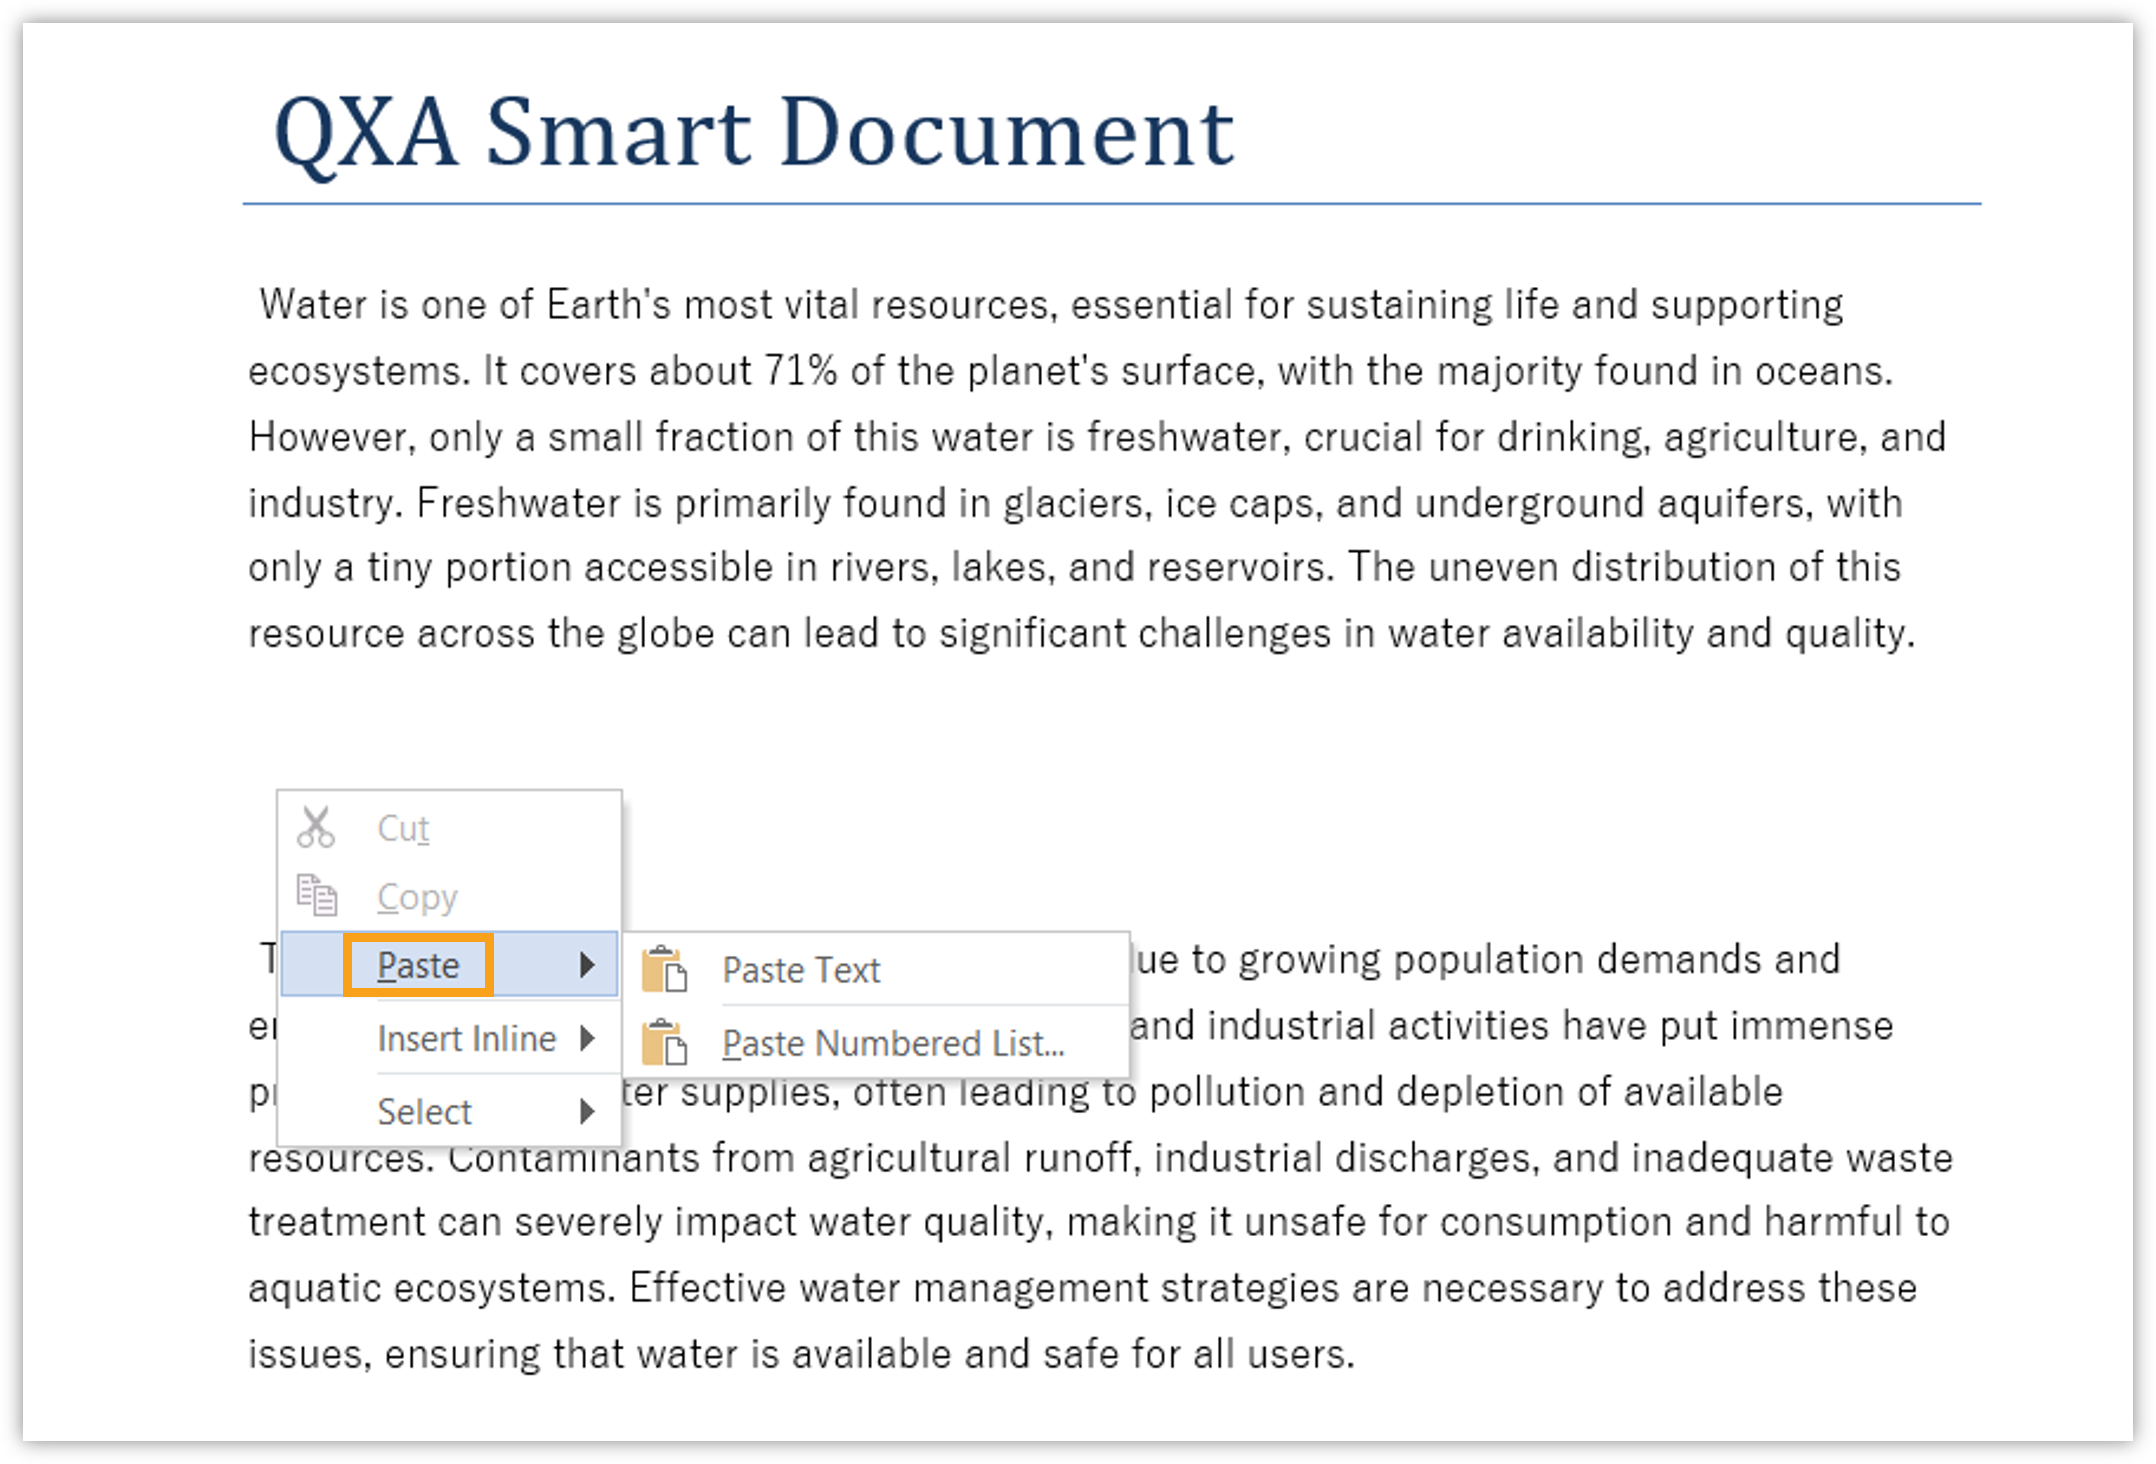
When you click Paste Body Text, QPP Adapter for Quark XML Author pastes the elements as they are; however, when you click Paste Text, QPP Adapter for Quark XML Author pastes only the text within the elements.
Move or Copy Several Elements — Use Cases
The following are some functions that the commands Cut, Copy, and Paste support when you select several elements to move or copy:
-
For required elements, QPP Adapter for Quark XML Author also copies/moves the elements outside of the selection. For example, when you select only the title of a section and not the text under that section, QPP Adapter for Quark XML Author automatically includes the body text along with the title.
-
For child elements, such as list items, the available functions depend on whether you have selected all the items. For example, when you have selected all the list items, QPP for Quark XML Author automatically includes the parent list and its metadata. When you select a subset of the list items, QPP Adapter for Quark XML Author doesn't include the parent list element and you can copy/move the selection within a list.
-
When you select an element with child elements, QPP Adapter for Quark XML Author automatically includes all the child elements.
-
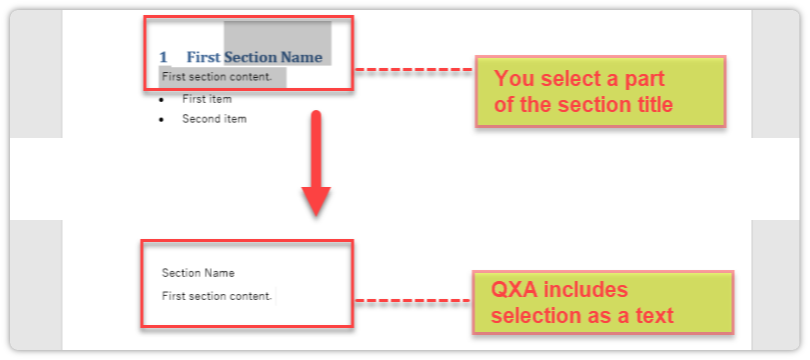
A selection may include only a portion of the text of an element. For required elements, this can negate the inclusion of the parent element. For example, when you select only a part of the title of a section, QPP Adapter for Quark XML Author includes only the selected part of the title but as plain text not as a section title.
-
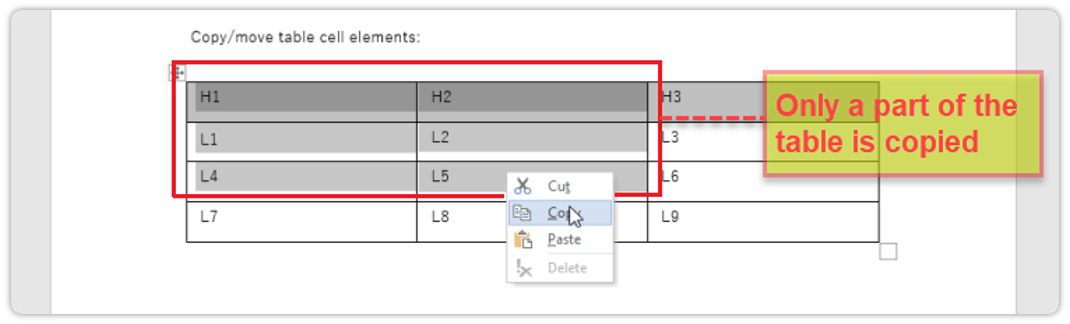
When you select a portion of a table, QPP Adapter for Quark XML Author only includes the cells within that portion.
Enter Text
To enter text in an element that allows narrative text, position the cursor in the element and then type the text.
Copy or Move Text
The commands Cut, Copy, and Paste function in the same way in QPP Adapter for Quark XML Author as they function in Microsoft Word. You can copy/move text using these commands through the tab Home in the header ribbon, through right-click, or through keyboard shortcut keys (Ctrl+X, Ctrl+C, and Ctrl+V).
The following are some functions that the commands Cut, Copy, and Paste support when you select text:
-
When the selected text contains emphasis (such as bold or italic), QPP Adapter for Quark XML Author retains the emphasis when you move/copy the text.
-
You can move text within a single element, but you cannot move text within several elements.
-
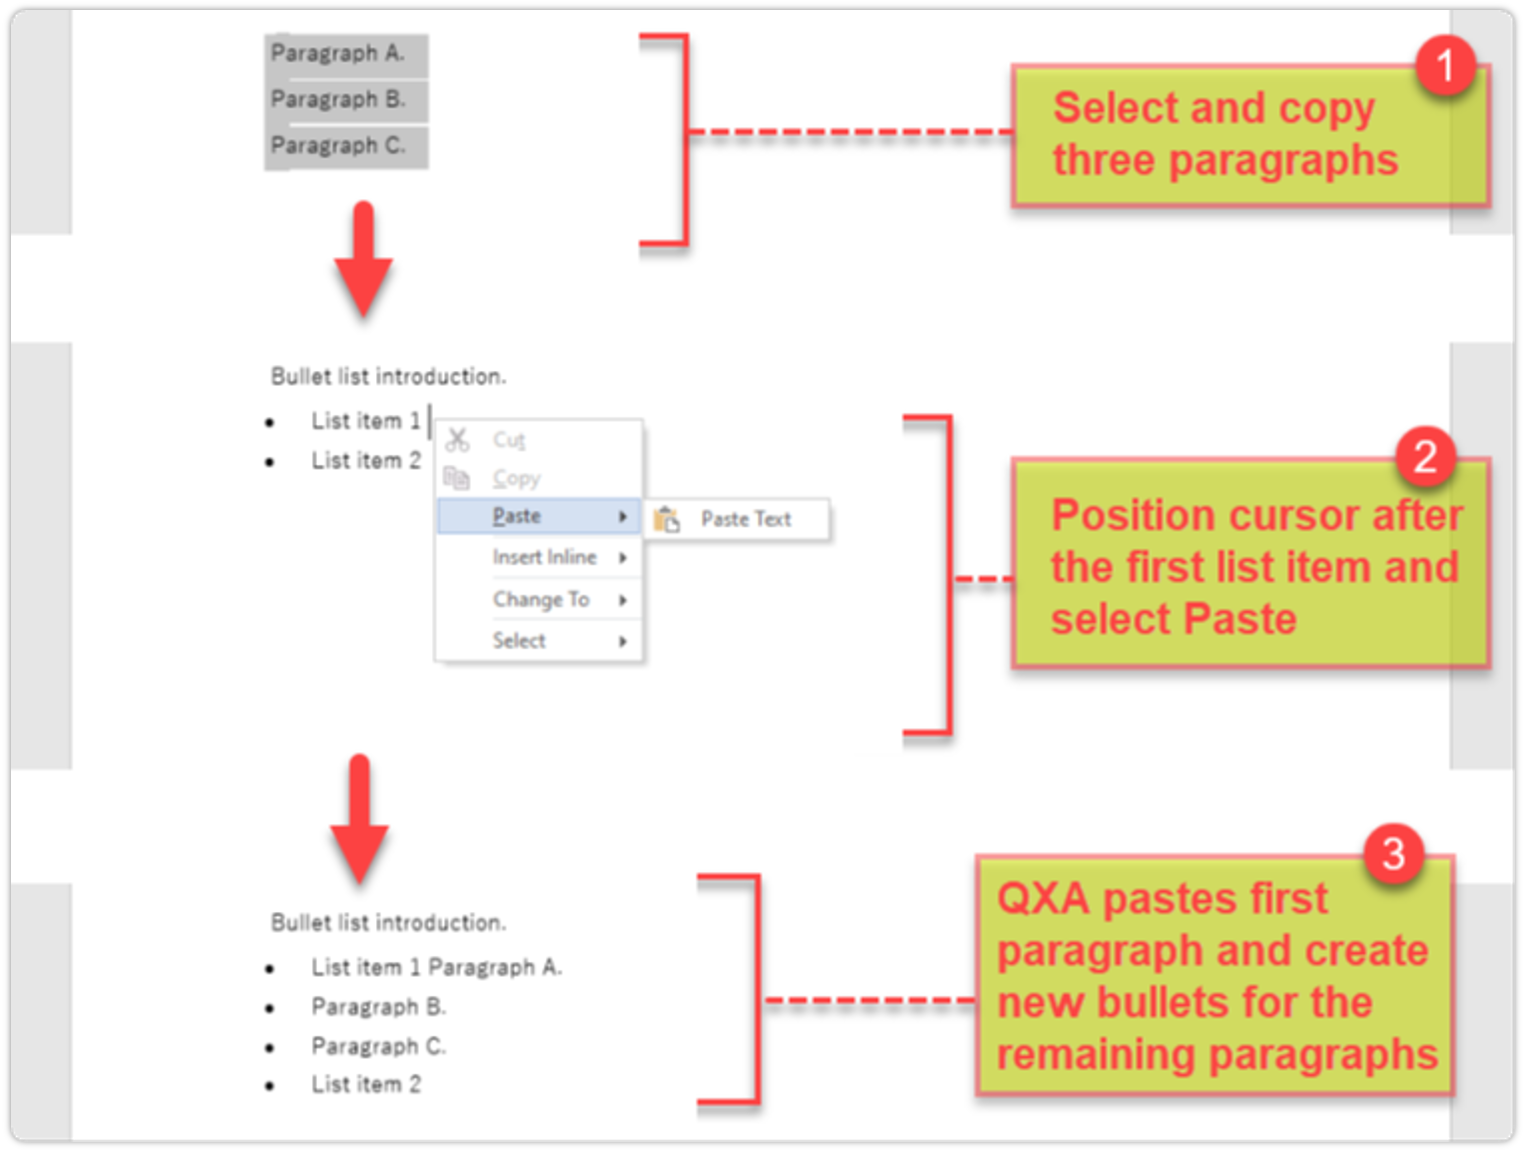
Outside the tables, you can move/copy the text of several elements into another text-based element. QPP Adapter for Quark XML Author pastes the first element and creates siblings of the destination element to accommodate the remaining text. For example, when you copy the text of three paragraphs and then paste it into a bulleted list item, QPP Adapter for Quark XML Author pastes the first paragraph inline to the current list item and creates two new sibling bulleted items and pastes the text of the second and third paragraph into the new bulleted list items.
Enter or Paste Text into a Selection
Based on the type of content selected, QPP Adapter for Quark XML Author allows the following function when you type or paste the text into a selected content:
-
When the selection only includes text within a single element, QPP Adapter for Quark XML Author replaces that selection with the character that you type or the text that you paste.
-
When the selection includes more than one element and you type or pastes a printable character, QPP Adapter for Quark XML Author does not perform any action.
-
Inside a table, you can move/copy the text of several cells. While moving/copying text elements within a table, the number of cells you selected should not be more than the number of cells available after the destination cell. For example, when you select three cells in a row and then paste them in the last cell of the last row, QPP Adapter for Quark XML Author pastes the text of the first cell in the destination cell and creates two new columns to accommodate the remaining cells.
Placeholders
A placeholder is a text within a document template that provides you with instructions and guidance on where to specify certain content. For example, when you open a new document template, the text "[Document Title]" is a placeholder, or when you add a section, the text "[Section 1 Title]" is a placeholder.
QPP Adapter for Quark XML Author keeps a placeholder text highlighted until you add narrative text/title to replace it.
Edit Placeholders
You can put placeholder text in specific locations in a document template and replace (or allow other users to replace) them when you author with narrative text and titles later.
To replace a placeholder:
-
Select the entire placeholder text.
-
Type new text.
Tables
This section provides details on all the table-related features and capabilities that QPP Adapter for Quark XML Author has.
QPP Adapter for Quark XML Author supports only one table type: Smart Table.
The Smart Table in Smart Document is specially designed to take advantage of XML capabilities, allowing for dynamic content and interactivity. This table type is optimized for technical documents and can incorporate complex data presentations while maintaining structural integrity.
Insert a Table
QPP Adapter for Quark XML Author allows you to insert tables in the same manner as in Microsoft Word.
To insert a table:
-
In the document, position the cursor where you want to insert a new table.
-
There are three different options to create/add a table in the document:
-
Create a new table
-
Add table from Server
-
Add table from an Excel file
-
-
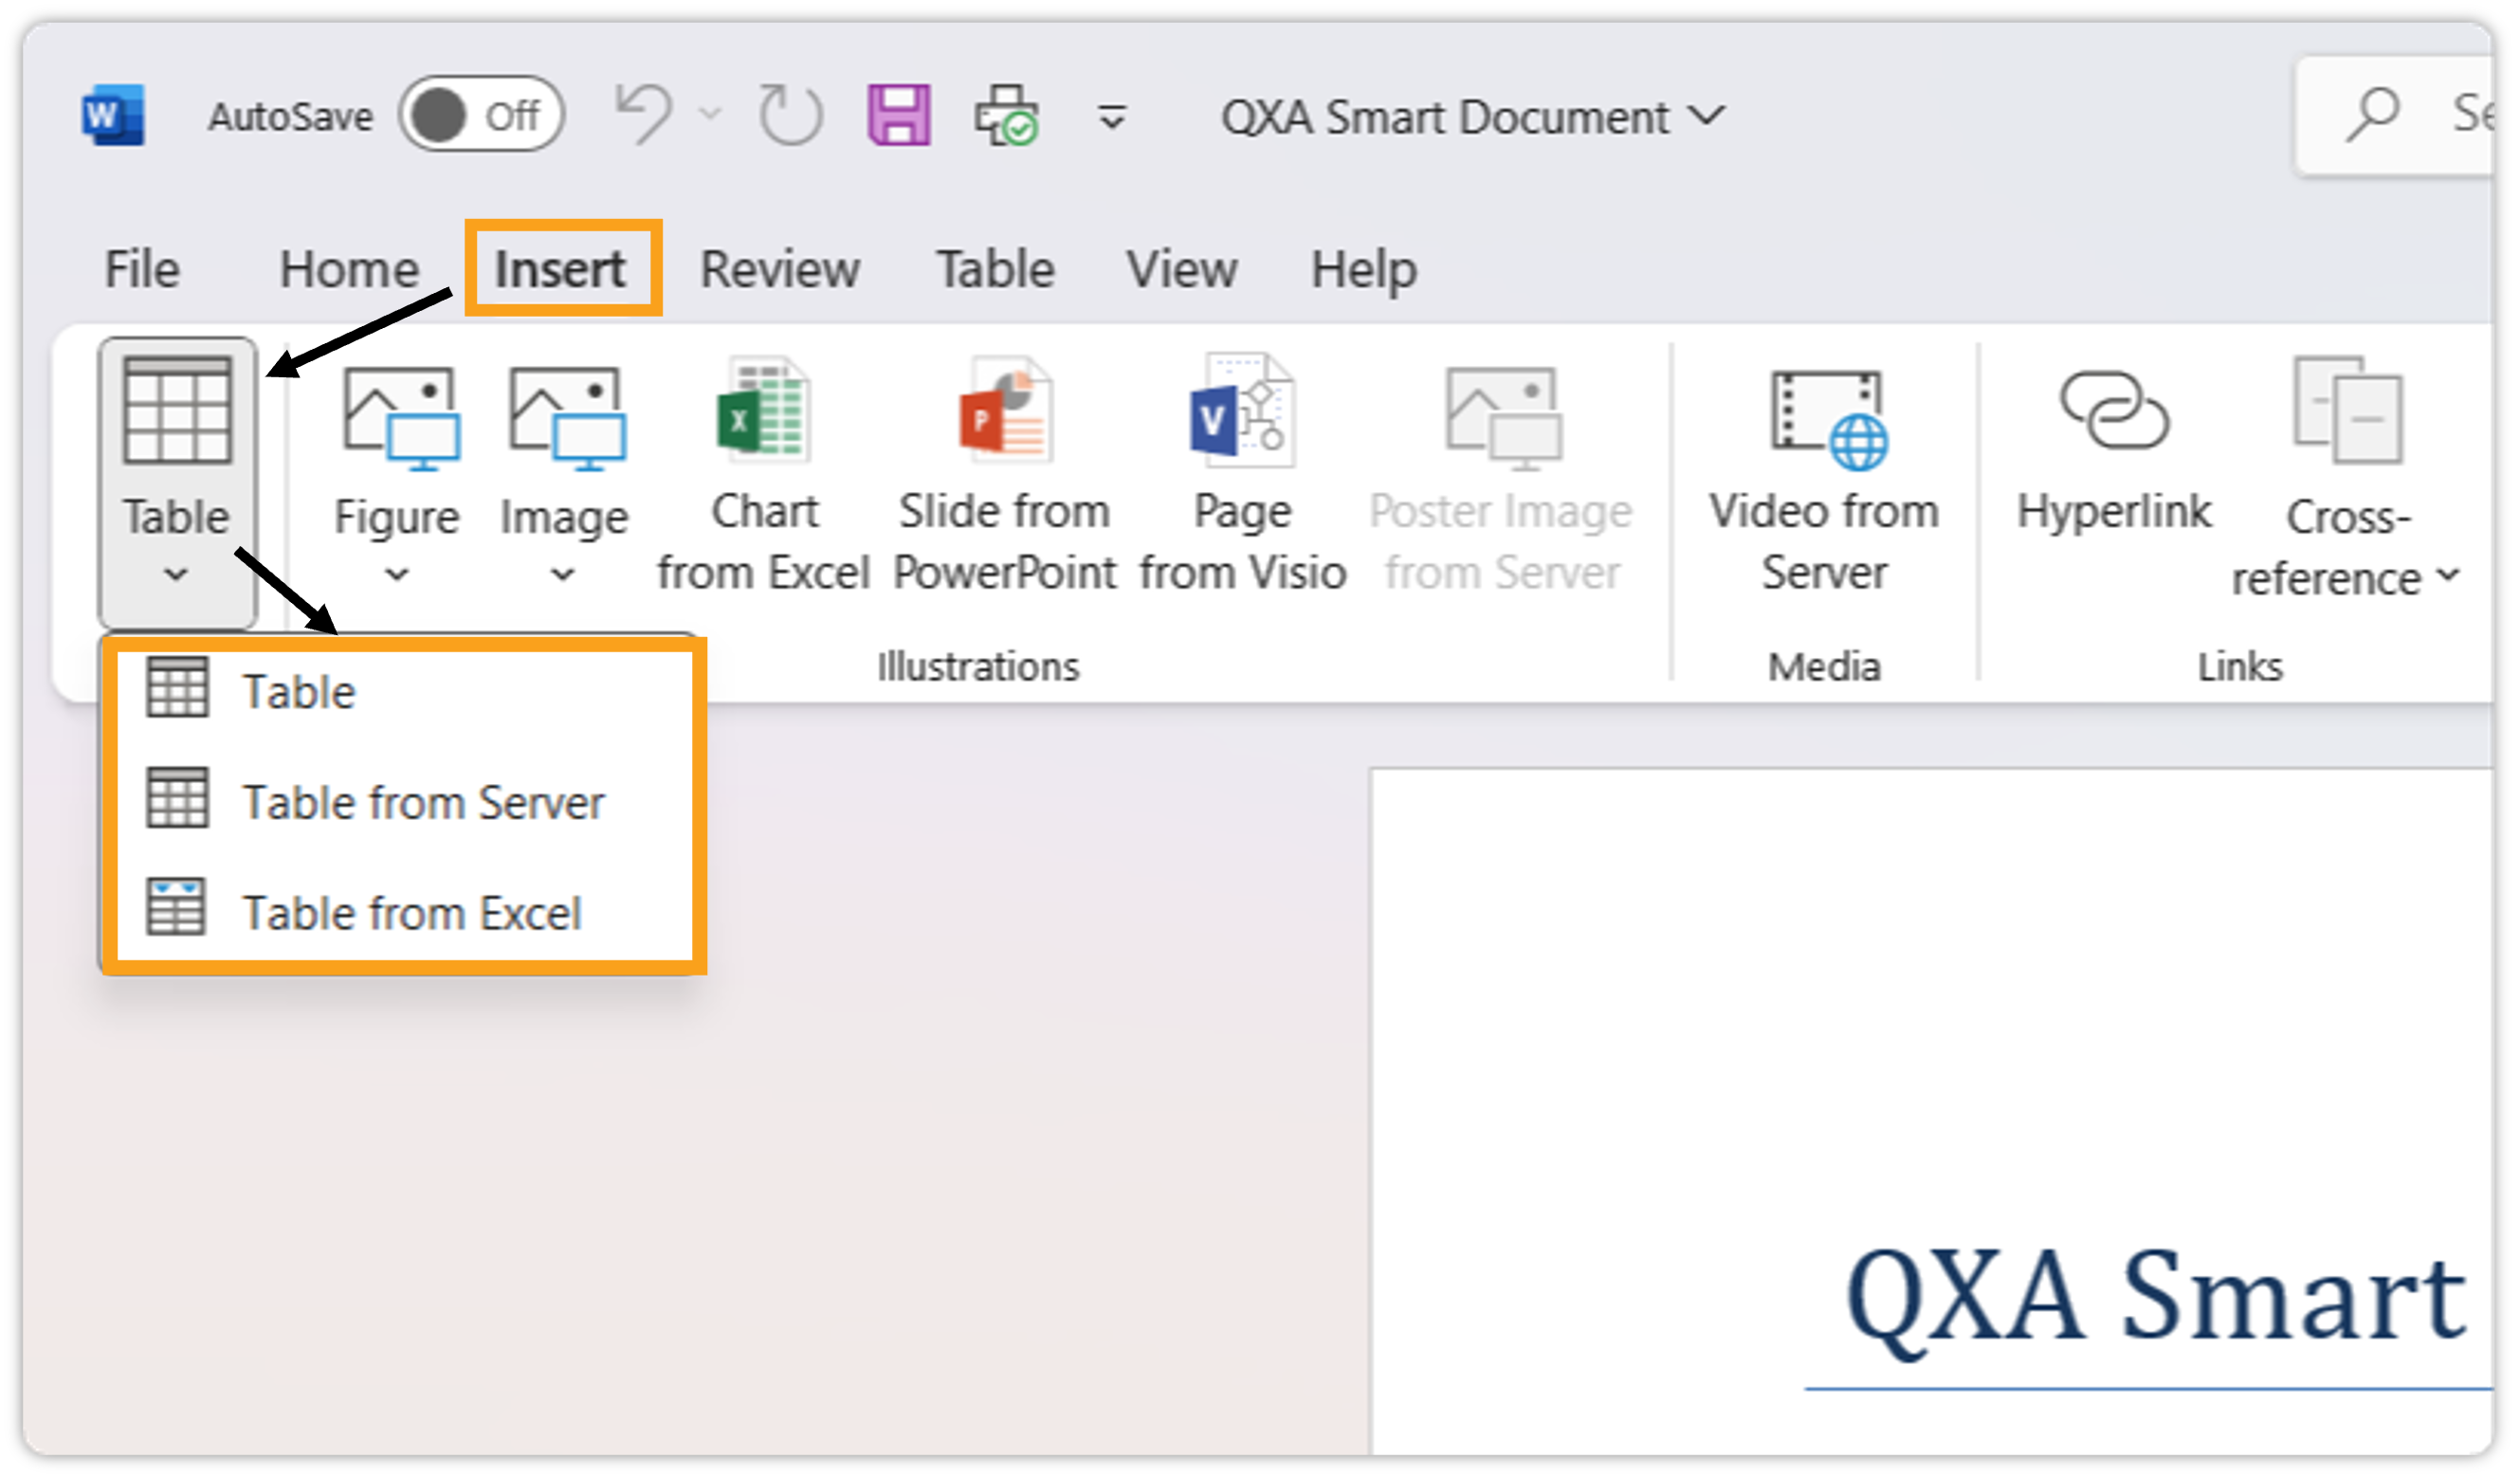
Create a New Table
-
To create a new table, navigate to the Insert > Table > Table.
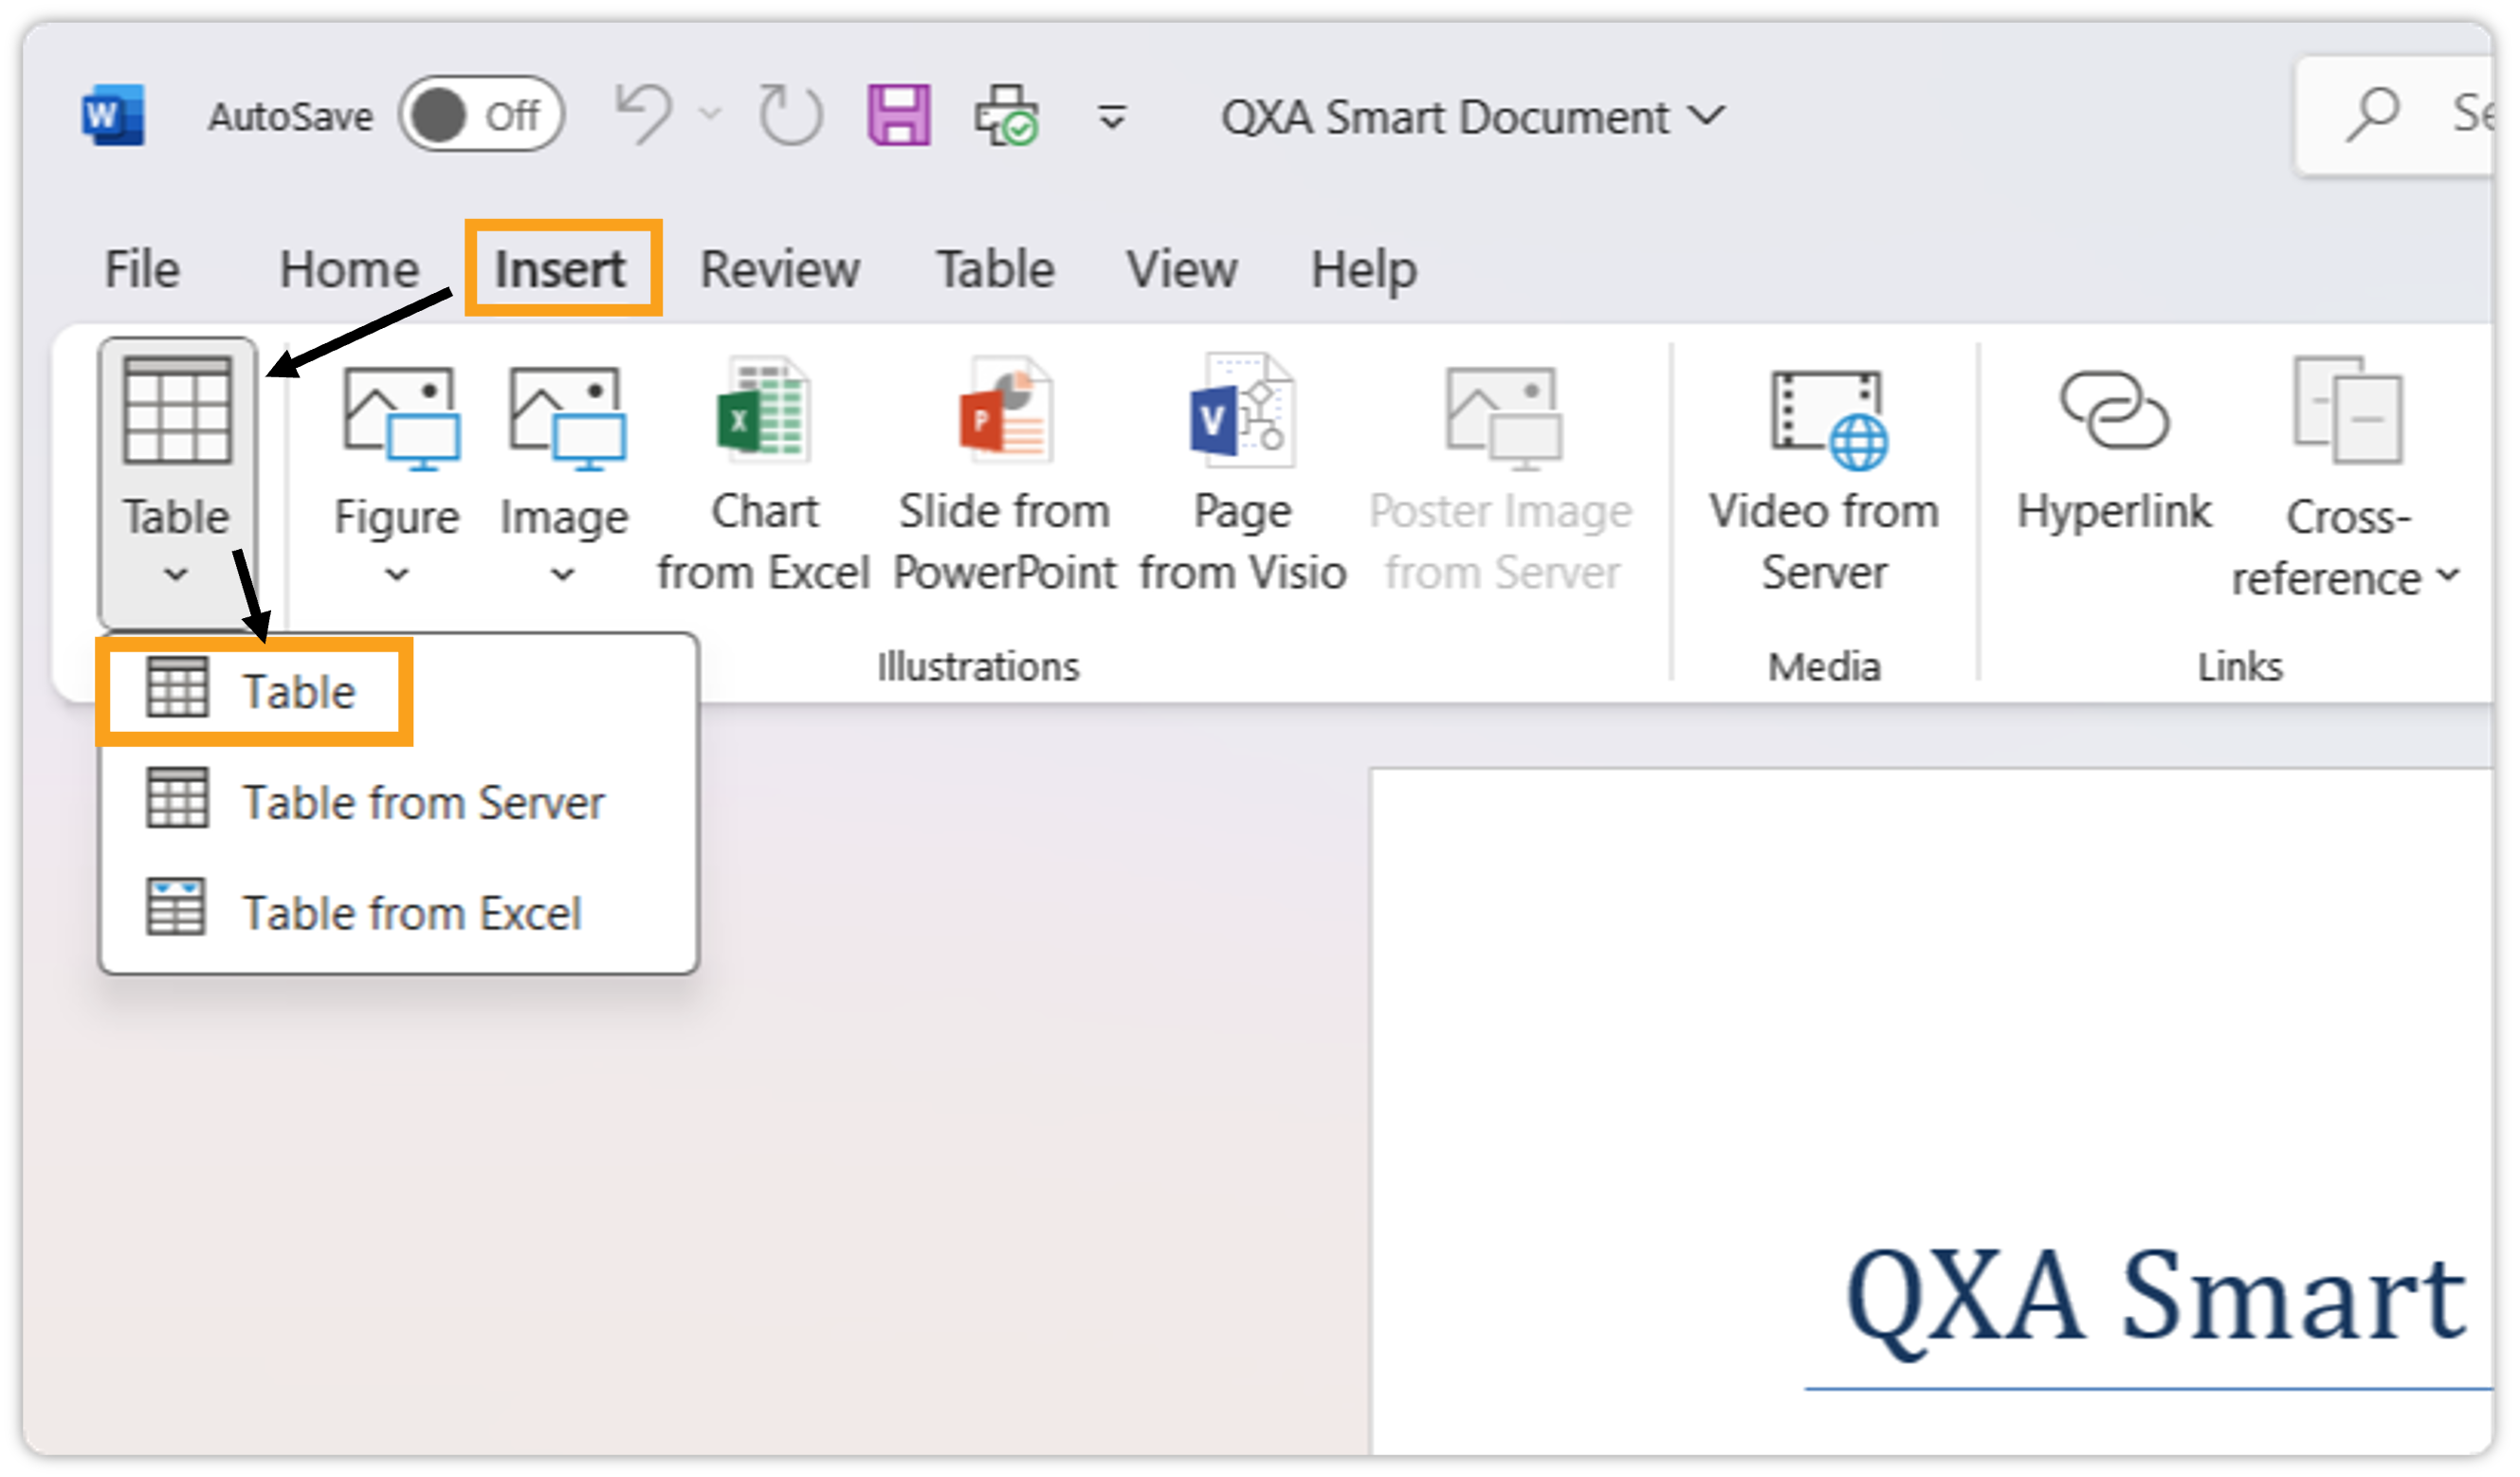
-
Choose the desired number of rows and columns in the dialog box that appears.
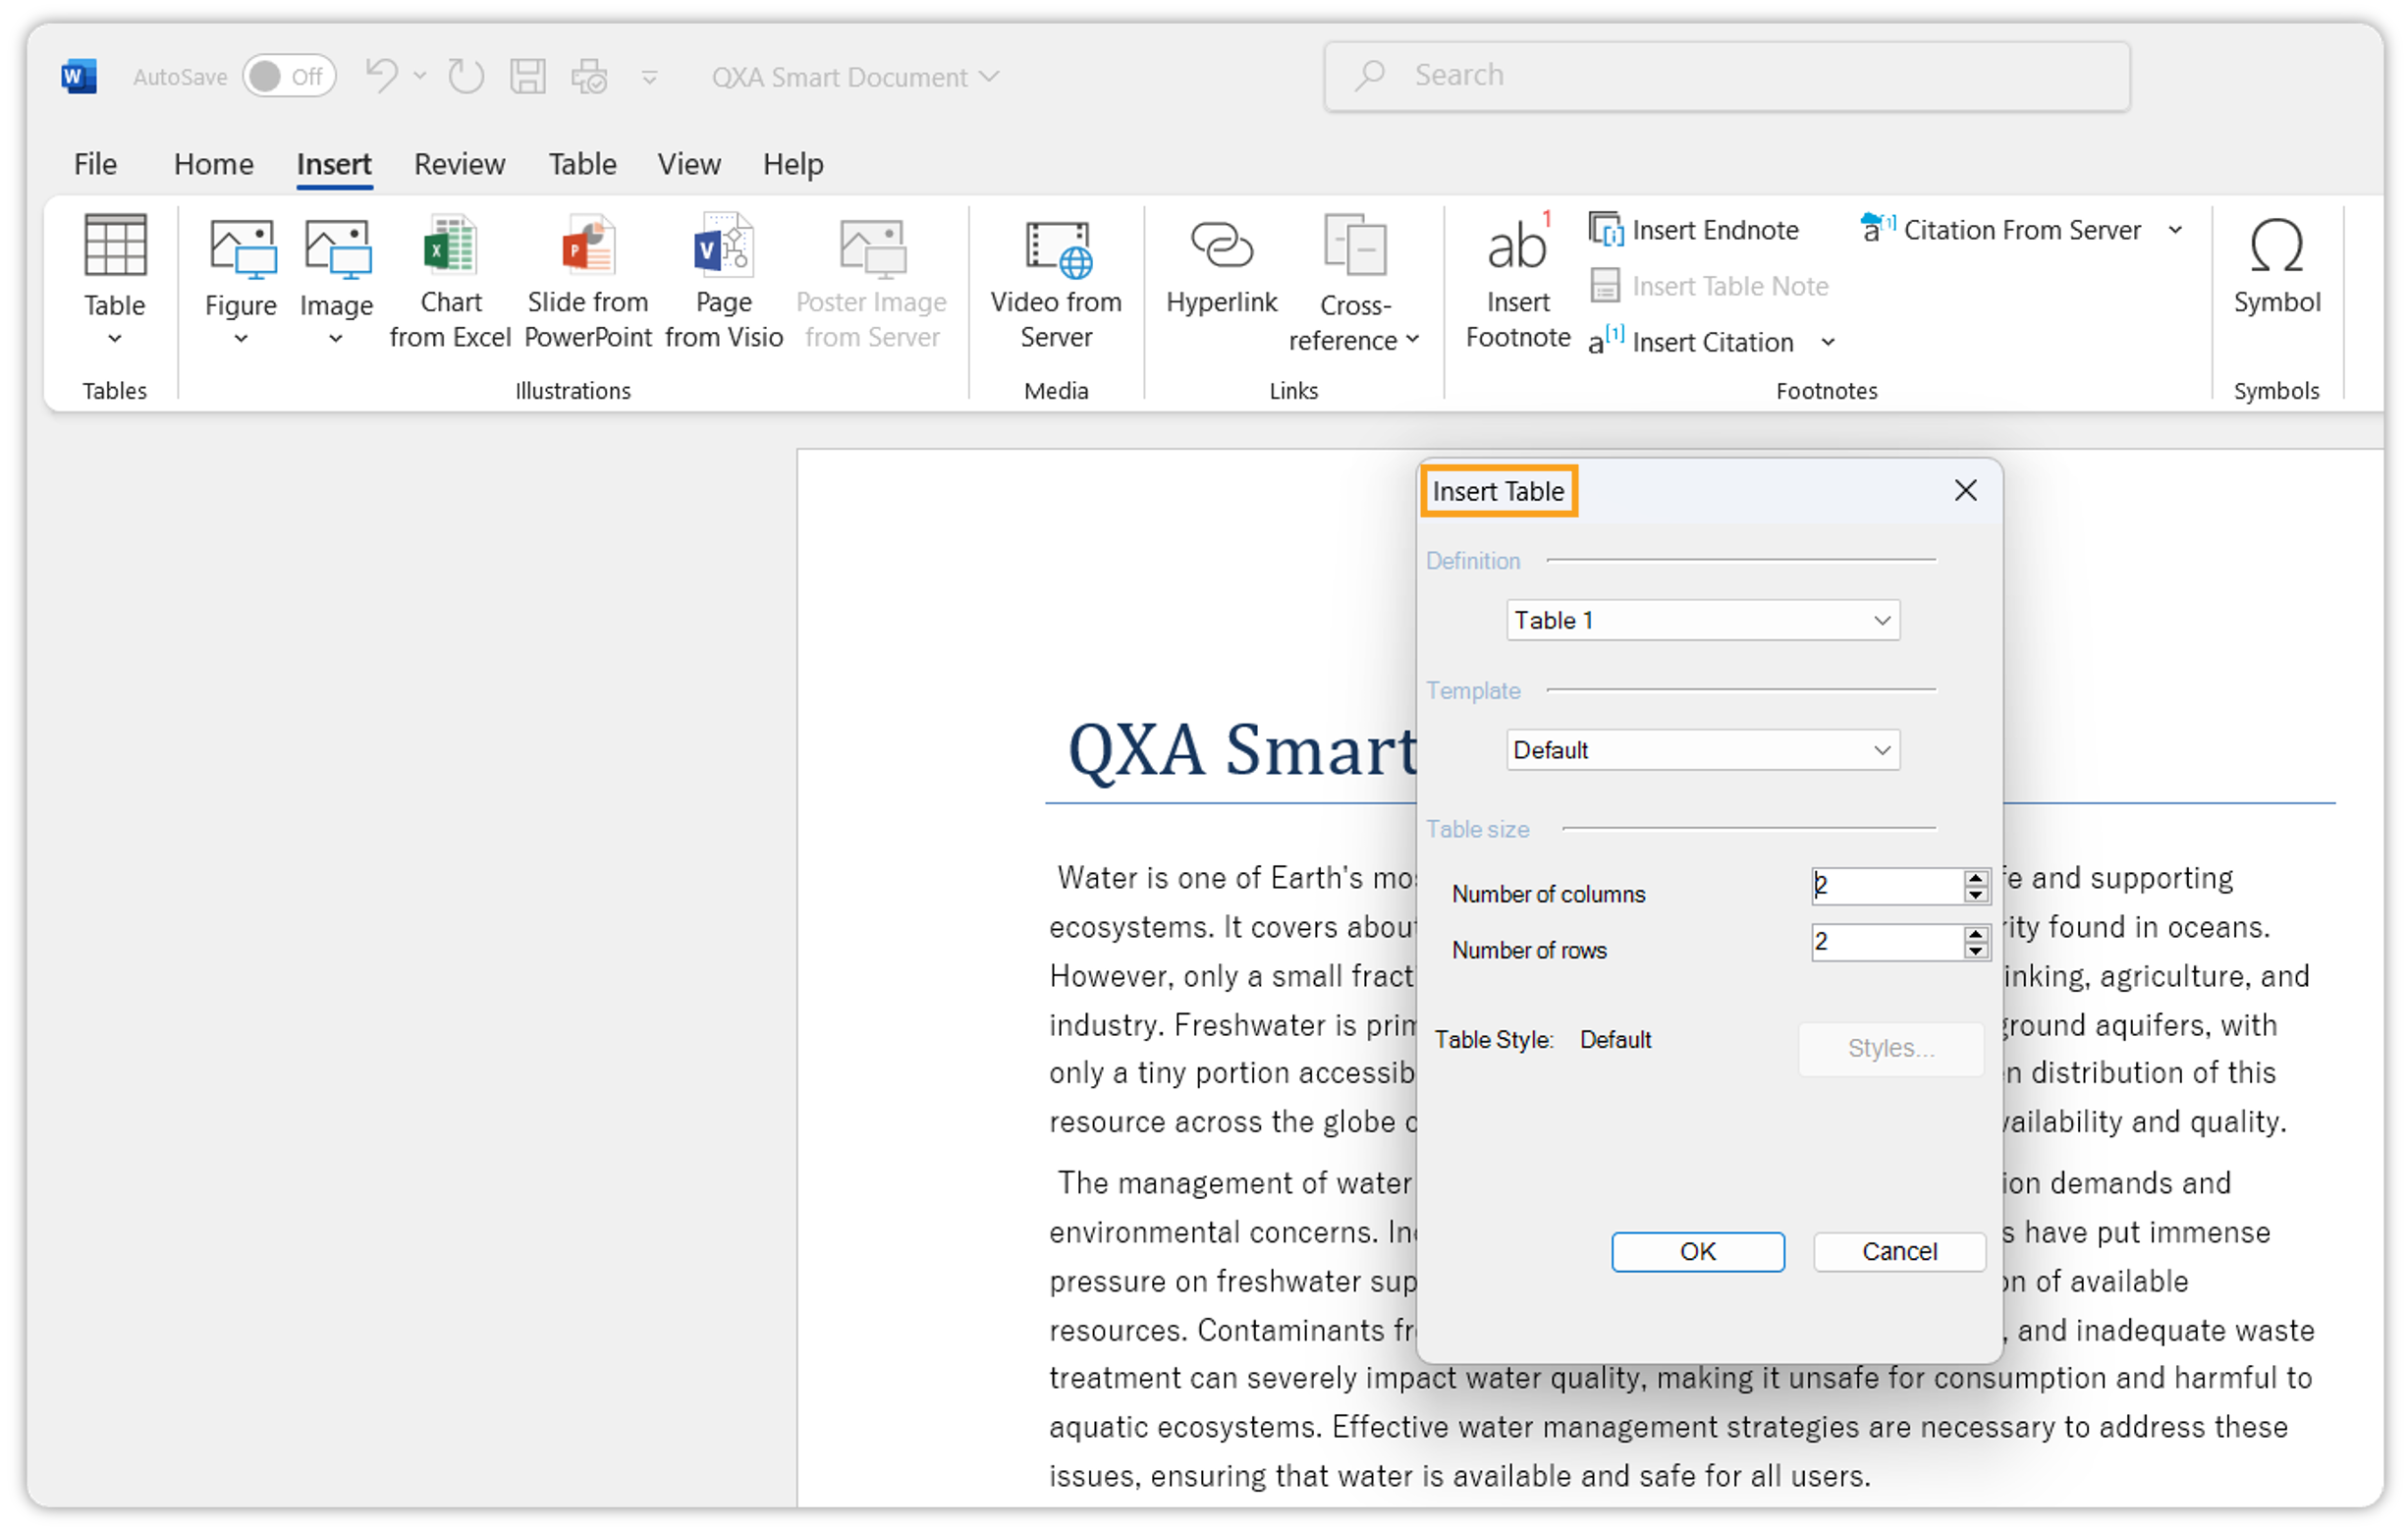
-
Click OK to insert the table into your document. You can then customize it as needed.
Add table from server
-
To import a table from the server, click the Table from Server option in the drop-down menu.
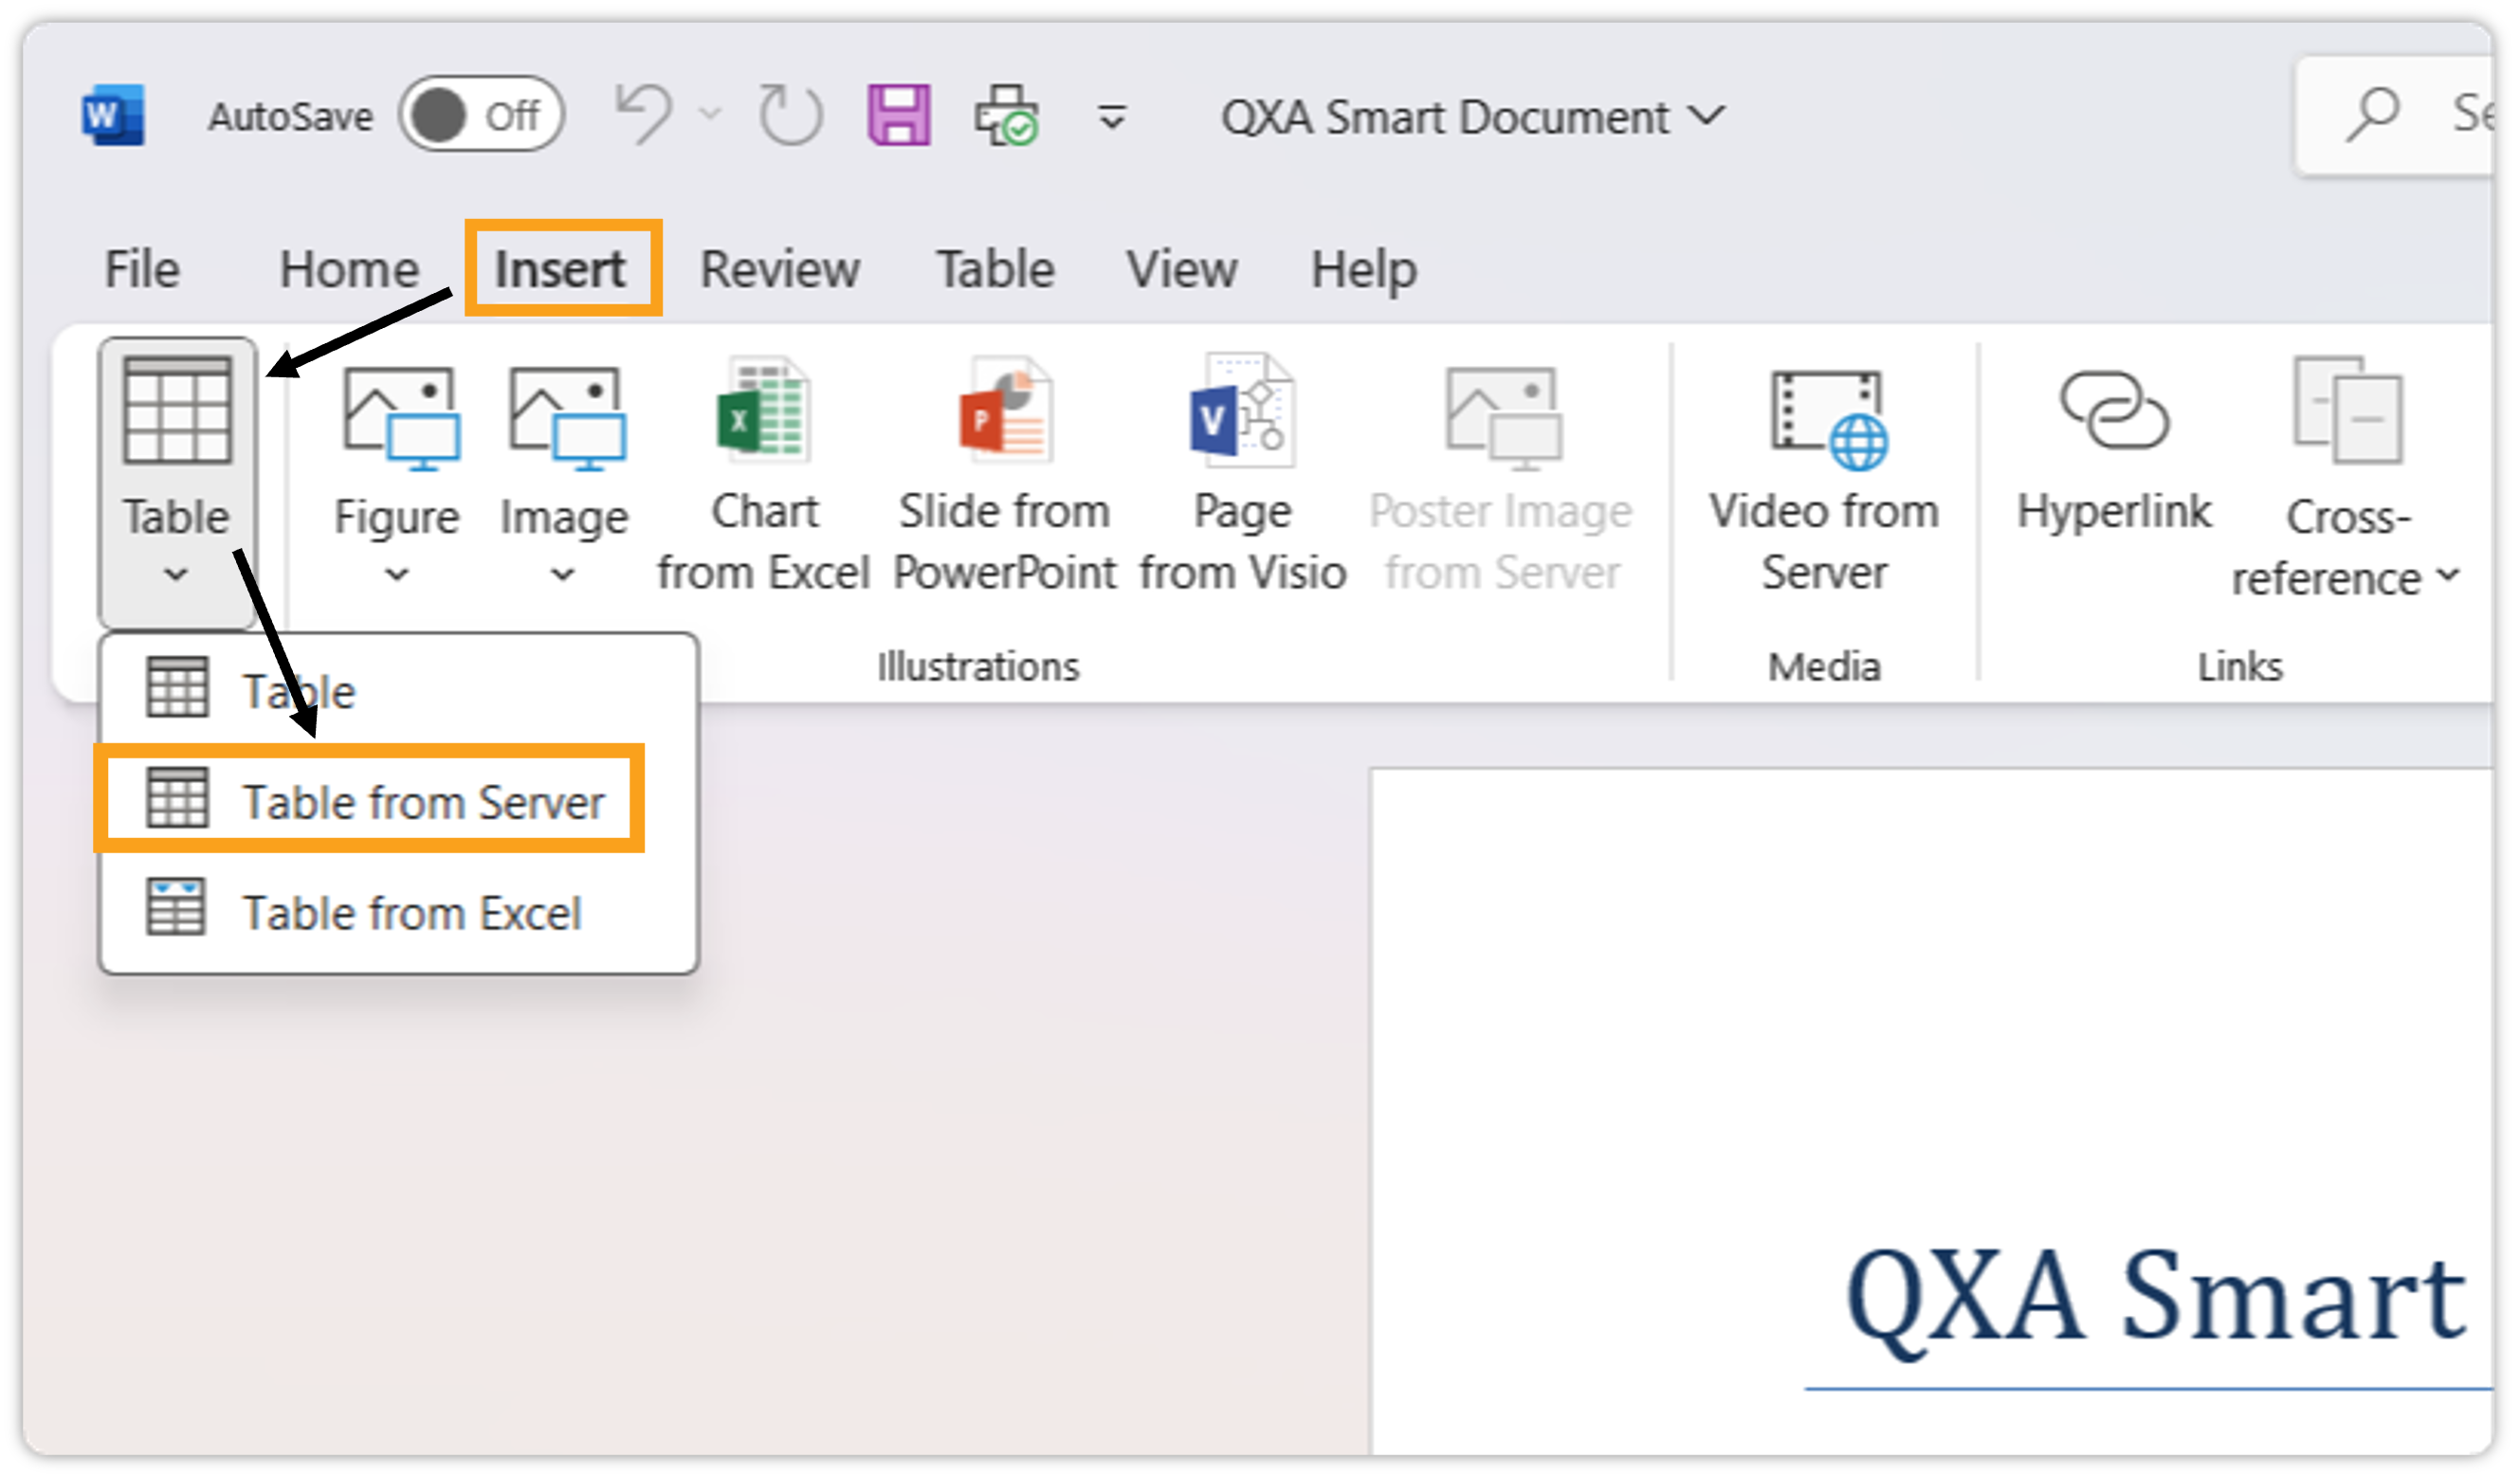
-
On the Reference from Server dialog box, navigate to the server repository where your tables are stored.
-
Select the desired table and click OK.
Add table from an Excel file
-
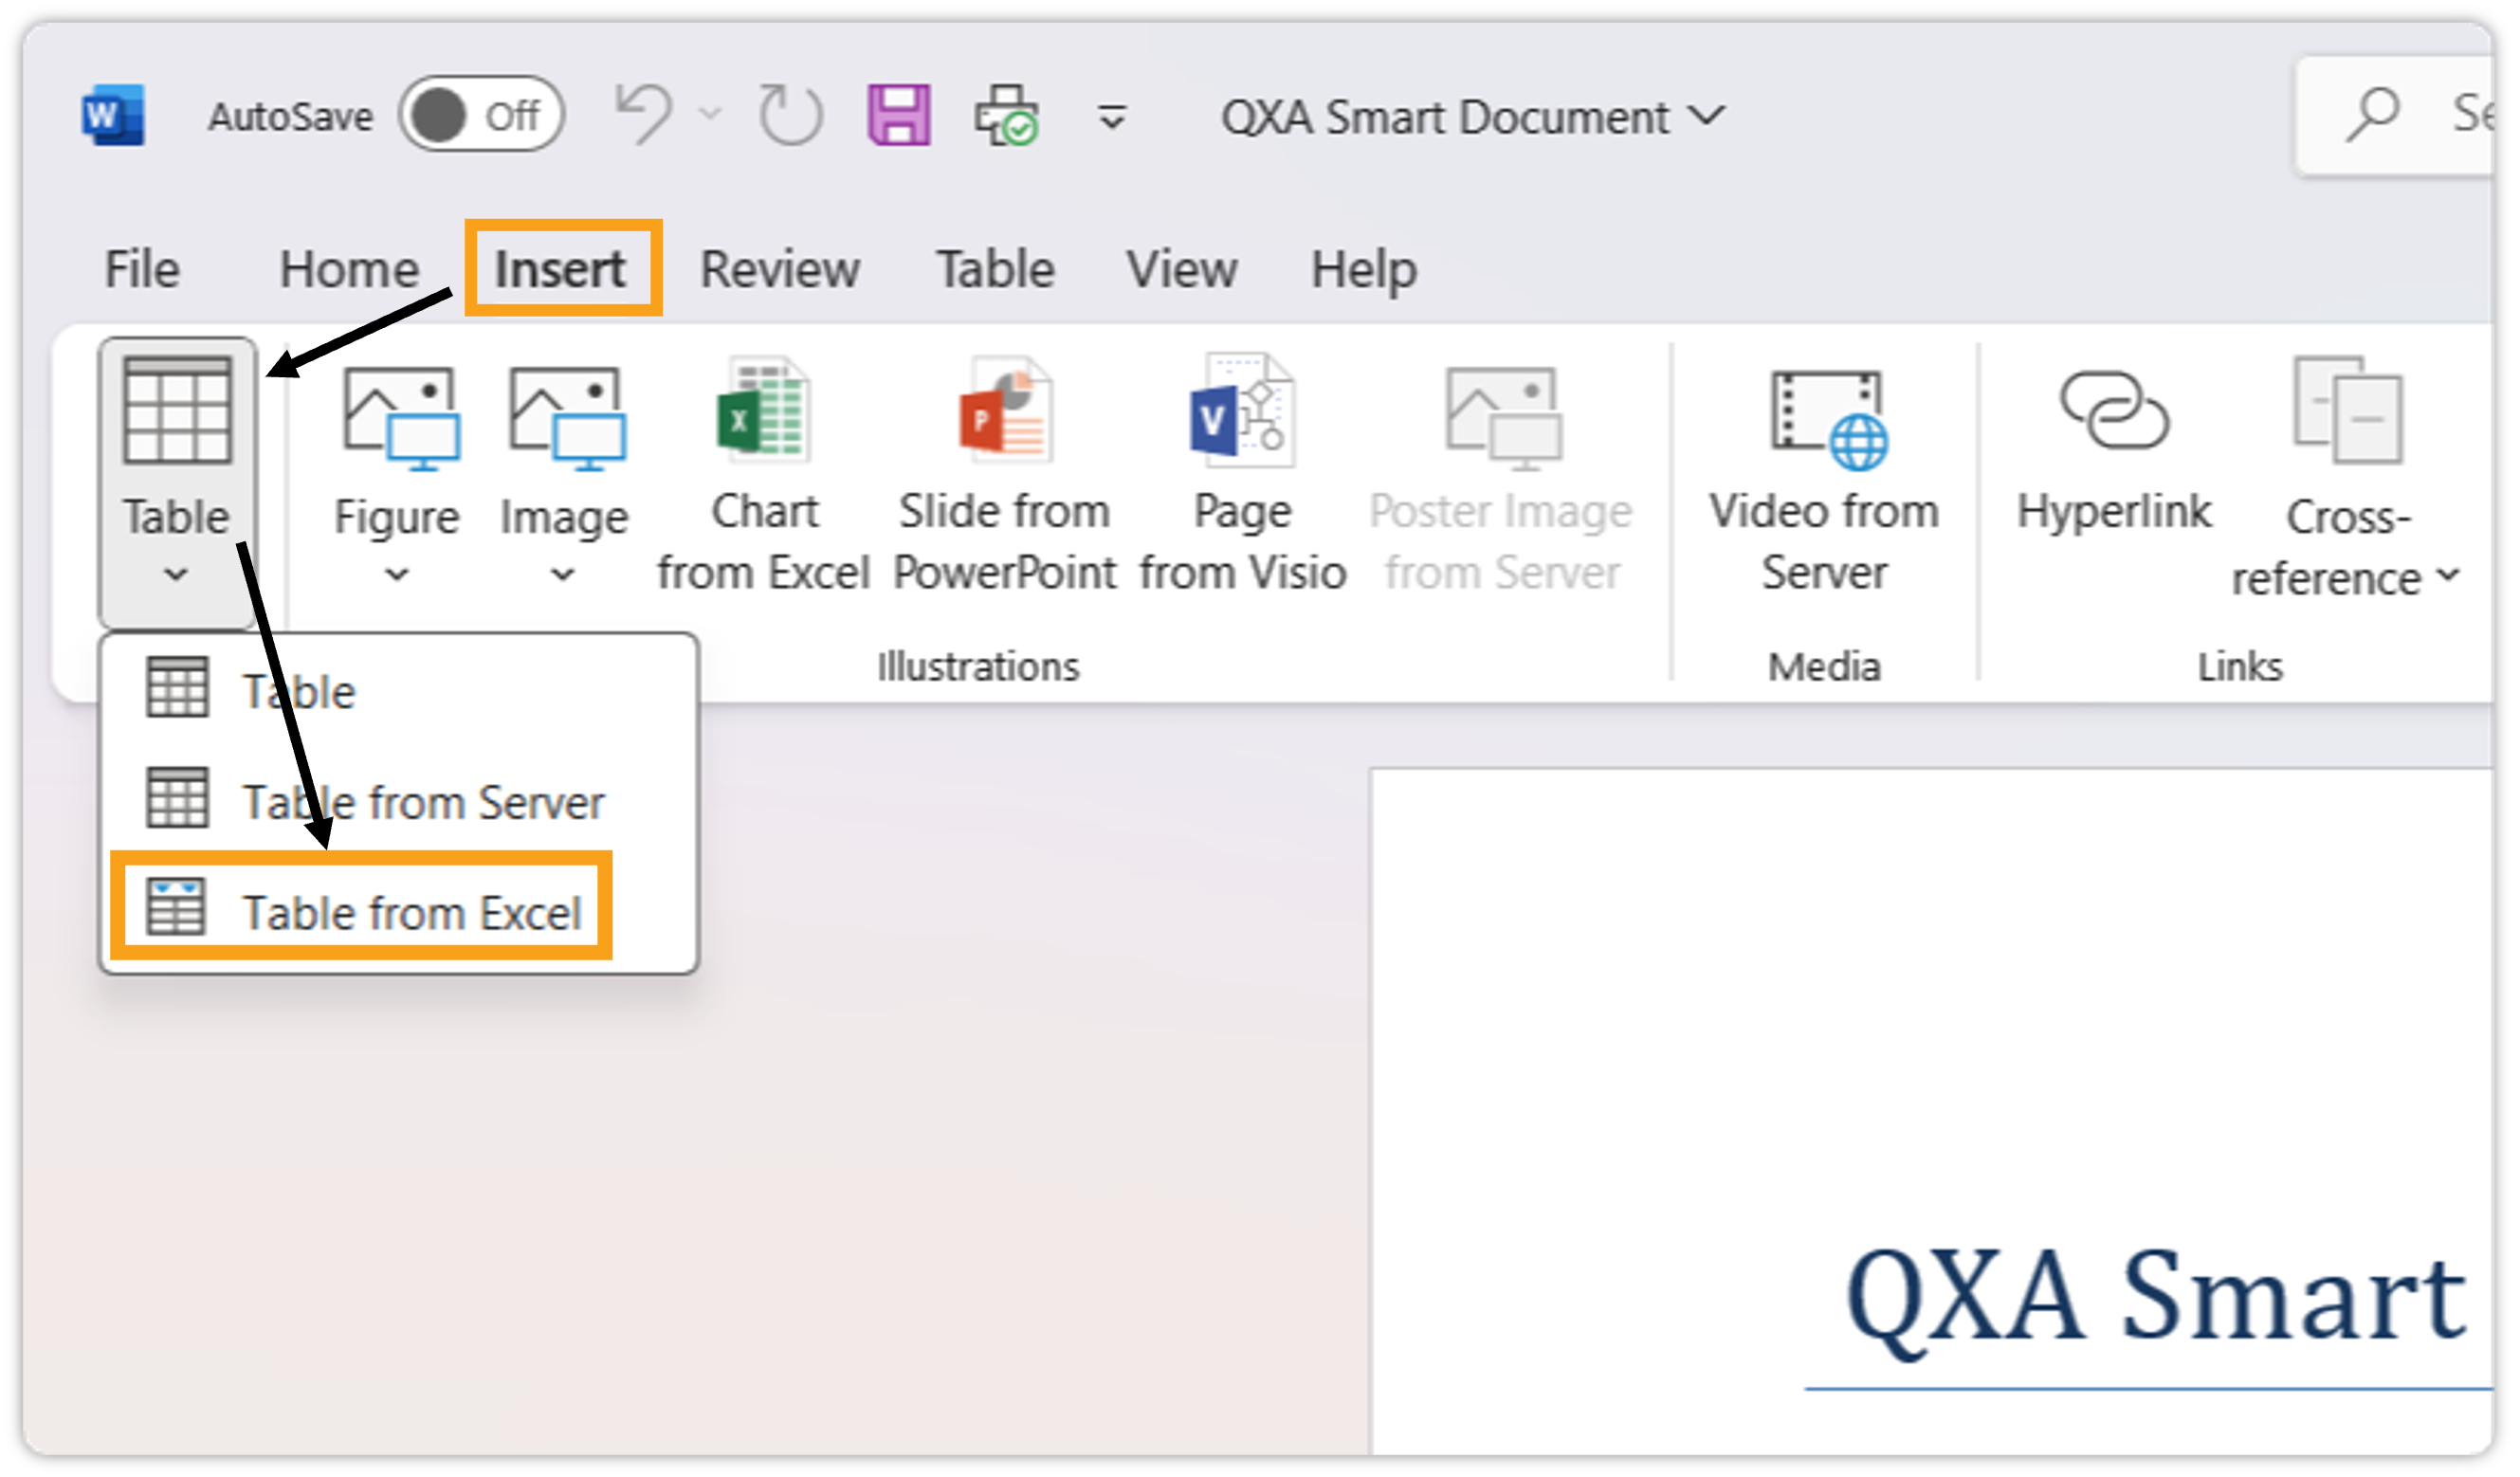
If you prefer to import a table from an Excel file, click the Table from Excel option in the drop-down menu.
-
On the Reference from Server dialog box, navigate to the server repository where your Excel files are stored.
-
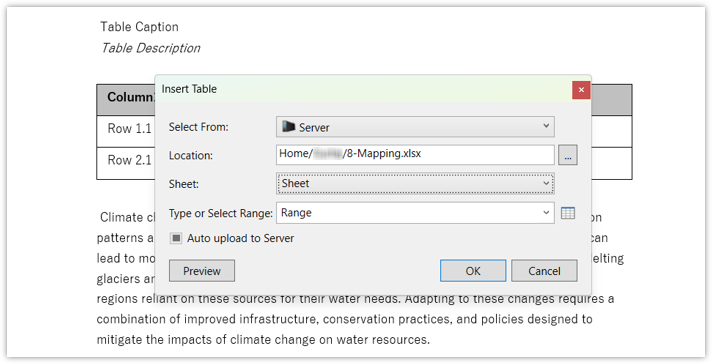
Select the desired Excel file and click OK. You will then be prompted to choose which table or range to import from the selected file.
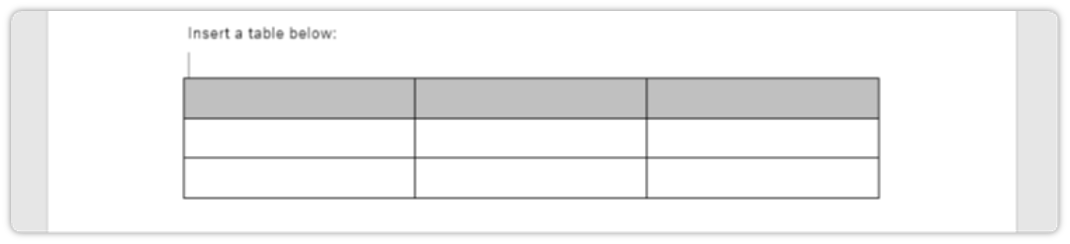
QPP Adapter for Quark XML Author inserts a table.
Smart Table
Smart Table is focused on dynamic content and complex data presentation, primarily used in technical documentation (smart document).
-
Dynamic Capabilities:
-
Designed to handle interactive and multimedia content, supporting features like conditional formatting or dynamic updates based on user interactions or content filters.
-
Can adapt to changes in content more fluidly, allowing for a higher degree of versatility in presentation.
-
-
Use Cases:
-
Best suited for user manuals, technical articles, and training guides where the need for interactivity and engaging content is higher.
-
Useful when authors need to incorporate graphics, links, or variable content that can change based on context.
-
-
Functionality:
-
Smart Tables often allow for advanced features such as nested tables, custom styles, and cross-referencing with other content elements, providing a robust way to manage complex information.
-
When you insert a table in a document, QPP Adapter for Quark XML Author adds three rows and three columns, by default.
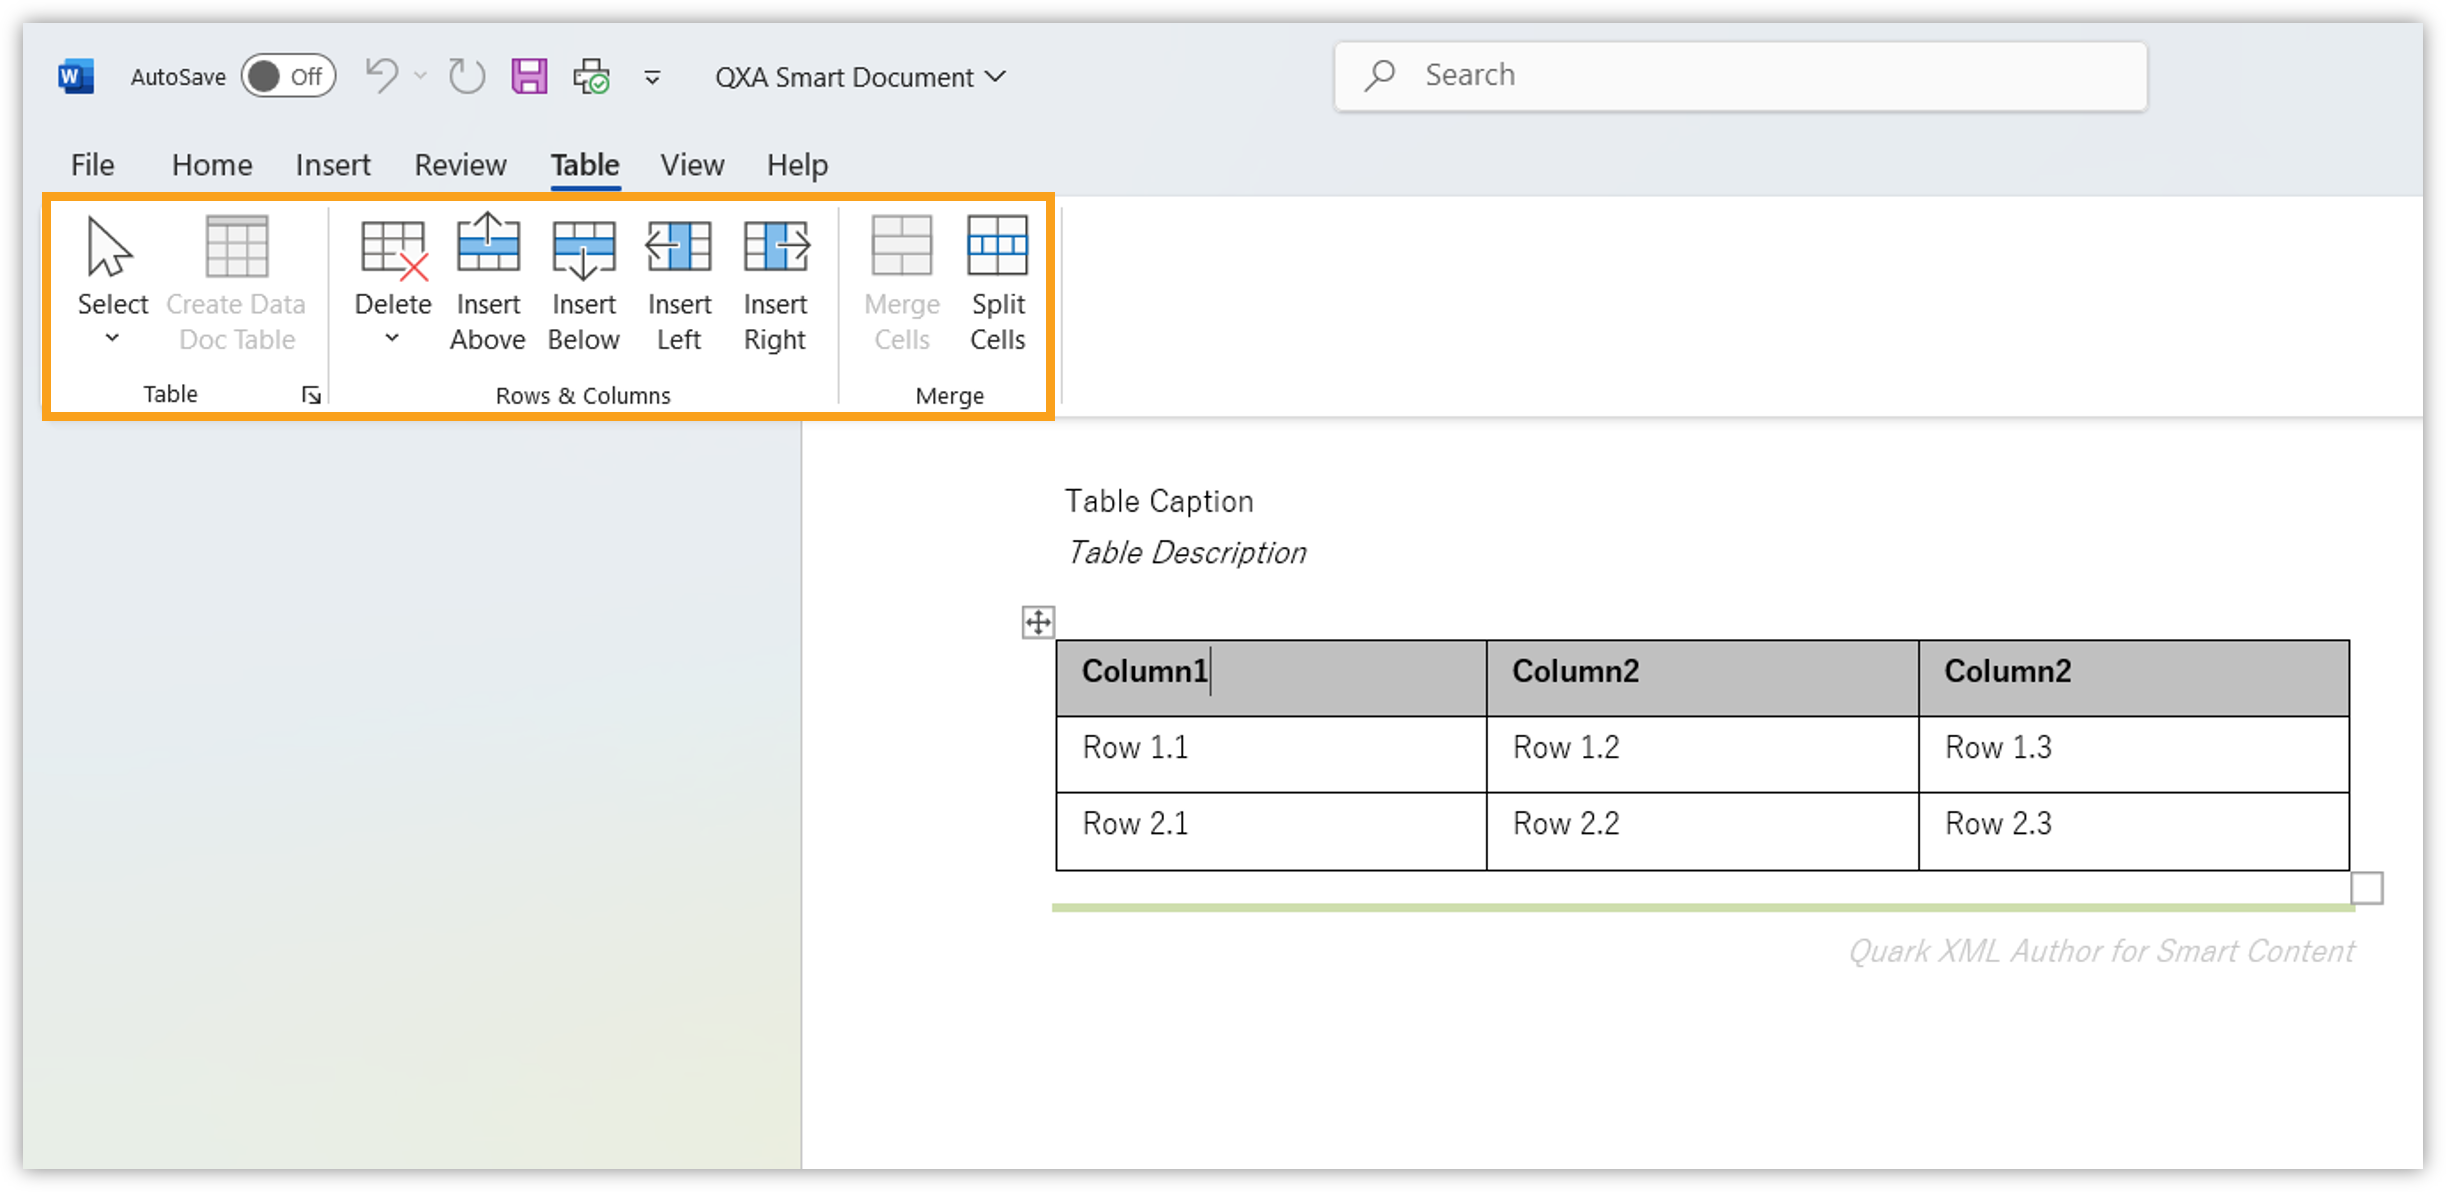
Once QPP Adapter for Quark XML Author has added a table, you can perform all the standard table functions (insert rows/columns, merge/split cells, add text within cells, and so on) and custom formatting (adjust cell margins and alignment, change shading, and specify text alignment and direction and so on) using the header ribbon tab Table. Additionally, you can also add table caption and description.
Author in Tables
Quark XML Author allows you to author in tables cells in the same manner as in Microsoft Word. When you insert a table, Quark XML Author automatically inserts an empty paragraph in each of the cells to make each cell act as a miniature Word canvas. You can also set the default content type for cells.
|
In a table cell, you can |
In a table cell, you can't |
|
|
The following features are also available when you author in tables:
-
Insert a row above/below the selected row.
-
Insert a column right/left to the selected column.
-
Merge several cells together and split a cell.
Insert Elements in a Table Cell
You can insert elements in a table cell, in the same manner, you insert an element in Word canvas. By default, the element type of the cell is text. So, to insert text, you only have to position your cursor to the cell where you want the text and then type.
To insert other elements:
-
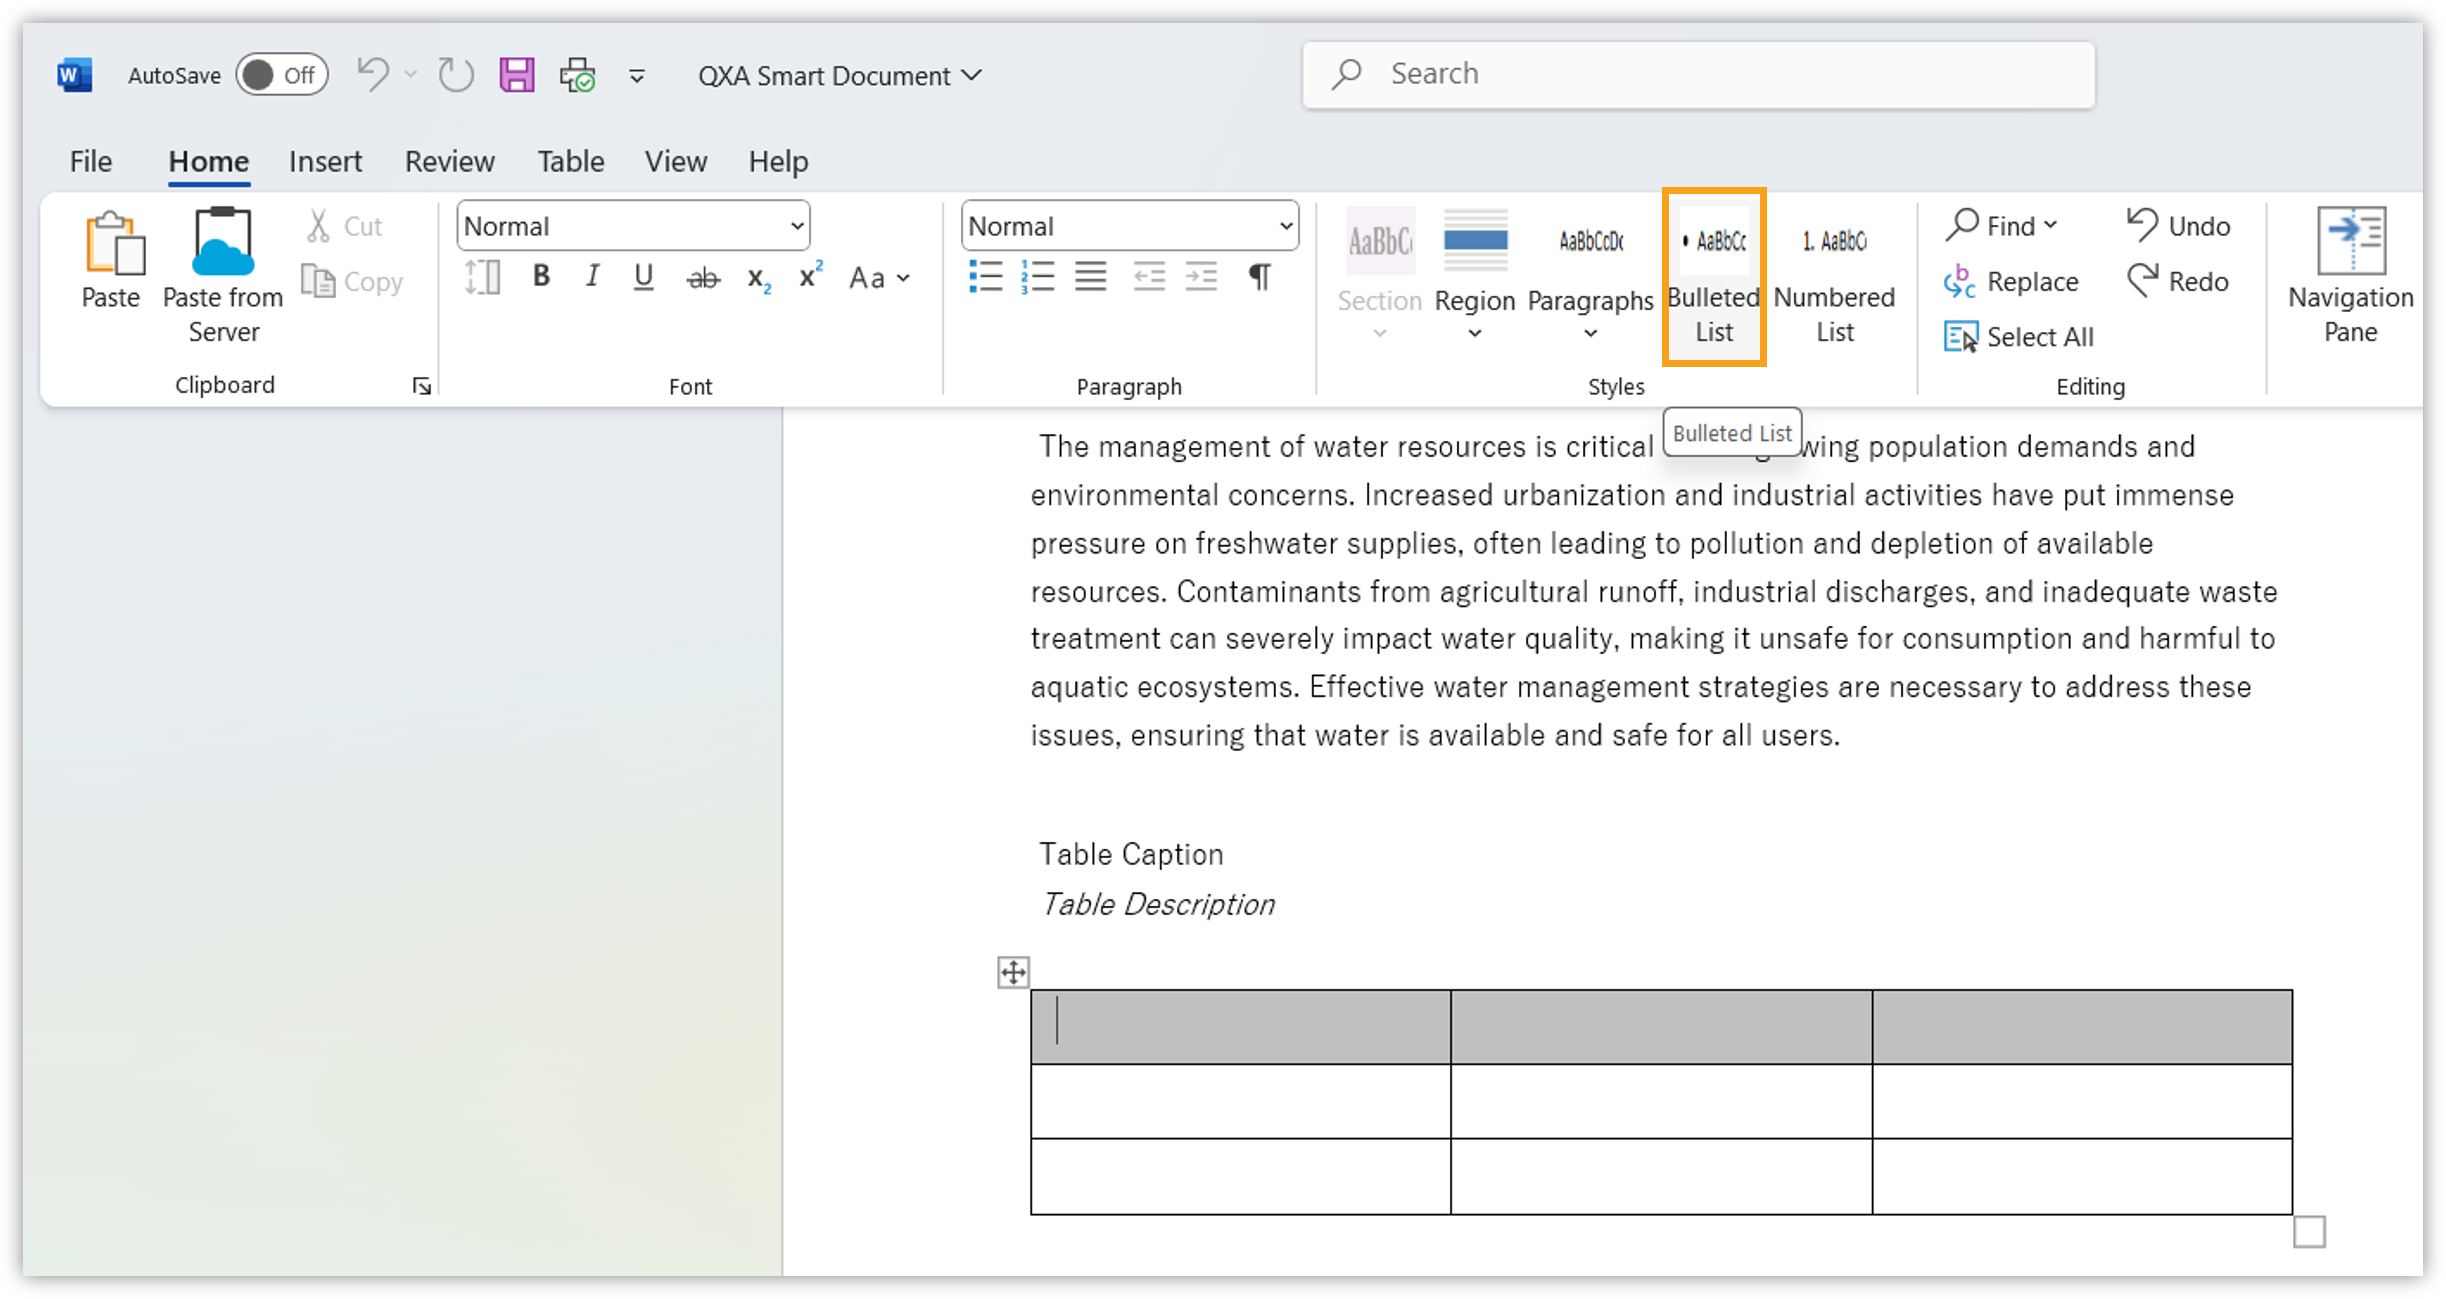
Position your cursor on the cell where you want to insert an element (for example, a bulleted list).
-
On the Home tab in the header ribbon, click the Bulleted List within the Styles tab.
-
Type list items in the same manner as you do in Word canvas.
Copy and Move Table Elements
QPP Adapter for Quark XML Author allows you to copy/move table elements (along with attributes and child elements) to a new location within the same table or to a different table. QPP Adapter for Quark XML Author also copies/moves any element that is a content reference.
You can copy/move several cells, rows, and columns at once; however, you can't move required table elements.
To copy/move a table element:
-
Select the element that you want to copy/move.
-
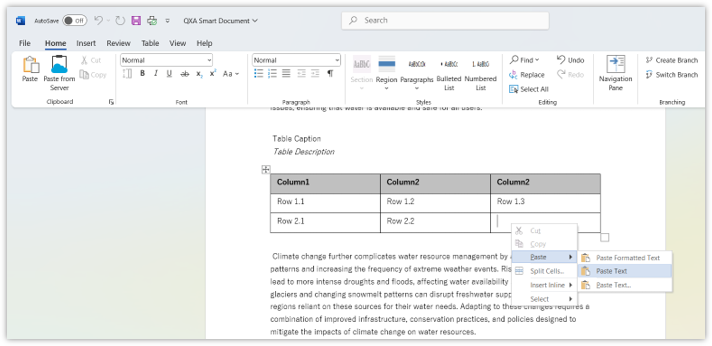
Right-click and then select Copy/Cut in the context menu.
-
Go to the cell where you want to copy/move the element.
-
Right-click and select one of the paste options based on your requirement.
Pasting Table Elements — Advanced
This is an advanced discussion of the Paste table elements feature. Table elements have been placed on the clipboard using either the cut or copy table element feature.
The Paste table elements features function differently depending on several factors, such as:
"Are any table elements elected at the paste location?"
or
"If table elements are selected, are the dimensions of the selection different from the dimensions of the table elements you're pasting?"
and so on.
The discussion is organized into the following sections:
-
Pasting into a selection
-
Pasting without a selection
Pasting table elements into a selection
When you are pasting into a selection of table elements and the dimensions of the selection are different from the dimensions of the table elements you are pasting, then either repeating or truncation of table cells can occur.
The following examples illustrate this logic.
Example 1: The clipboard contains a selection of table cells with the dimensions 3 x 2.
|
A1 |
B1 |
C1 |
|
A2 |
B2 |
C2 |
At the paste location, you select 2 cells x 3 cells.
|
|
|
|
|
|
|
|
|
When you paste, the results are as follows:
|
A1 |
B1 |
|
A2 |
B2 |
|
A1 |
B1 |
Example 2: The clipboard contains a selection of table cells with the dimensions 2 x 3.
|
A1 |
B1 |
|
A2 |
B2 |
|
A3 |
B3 |
At the paste location, you select 3 cells x 2 cells.
|
|
|
|
|
|
|
|
When you paste, the results are as follows:
|
A1 |
B1 |
A1 |
|
A2 |
B2 |
A2 |
Pasting table elements without a selection
When you are pasting table elements into a table and the dimensions of the table are different from the dimensions of the table elements you are pasting, then the table can potentially grow as necessary to accommodate the elements you are pasting. The following examples illustrate this logic.
Example 1: the clipboard contains a selection of table cells with the dimensions 1 x 3 and contents 1, 2, and 3.
|
1 |
2 |
3 |
The paste location is a table with the dimension 1 x 3 and the content A, B, and C.
|
A |
B |
C |
Place the cursor in the first cell of the paste location. The asterisk indicates the cursor position. No text or table elements are selected.
|
*A |
B |
C |
When you paste, the results are as follows:
|
1 |
2 |
3 |
The contents A, B, and C become 1, 2, and 3.
Example 2: The clipboard contains a selection of table cells with dimensions 1 x 3 and contents 1, 2, and 3.
|
1 |
2 |
3 |
The paste location is a table with the dimension 1 x 3 and the content A, B, and C.
|
A |
B |
C |
Place the cursor in the second cell of the paste location. The asterisk indicates the cursor position. No text or table elements are selected.
|
A |
*B |
C |
When you paste, the results are as follows:
|
A |
1 |
2 |
3 |
The contents B, and C become 1 and 2, and an additional column is added to the table. This is true no matter how many rows are in the table at the paste location.
Example 3: The clipboard contains a selection of table cells with the dimensions 3 x 1 and the contents 1, 2, and 3.
|
1 |
|
2 |
|
3 |
The paste location is a table with the dimensions 3 x 2 and the content A, B, C, D, E, and F.
|
A |
D |
|
B |
E |
|
C |
F |
Place the cursor in the first cell of the paste location. The asterisk indicates the cursor position. No text or table elements are selected.
|
*A |
D |
|
B |
E |
|
C |
F |
When you paste, the results are as follows:
|
1 |
D |
|
2 |
E |
|
3 |
F |
The contents A, B, and C become 1, 2, and 3.
Example 4: The clipboard contains a selection of table cells with the dimensions 3 x 1 and the contents 1, 2, and 3.
|
1 |
|
2 |
|
3 |
The paste location is a table with the dimensions 3 x 2 and the content A, B, C, D, E, and F.
|
A |
D |
|
B |
E |
|
C |
F |
Place the cursor in the second cell of the paste location. The asterisk indicates the cursor position. No text or table elements are selected.
|
A |
D |
|
*B |
E |
|
C |
F |
When you paste, the results are as follows:
|
A |
D |
|
1 |
E |
|
2 |
F |
|
3 |
|
The contents B and C become 1 and 2 and an additional row is added to the table. This is true no matter how many columns are in the table at the paste location.
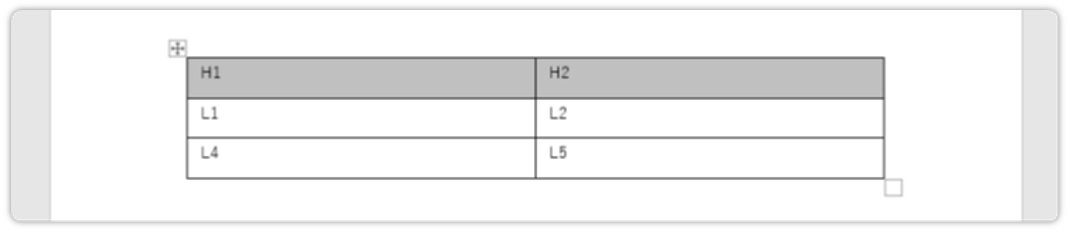
Create Tables Using Copied Content
When you want to create a table that is similar to a table that is already available in a document (current or in the repository), you can copy the content of the table and paste it into the Word canvas to create a new table. You can also select only a part of the original table if you do not want all the rows and columns in the new table.
To create a new table using copied content:
-
Select the elements that you want to copy from the original table.
-
Right-click on the selection and then click Copy.
-
Position your cursor in the Word canvas where you want to create a new table, right-click and click Paste Table.
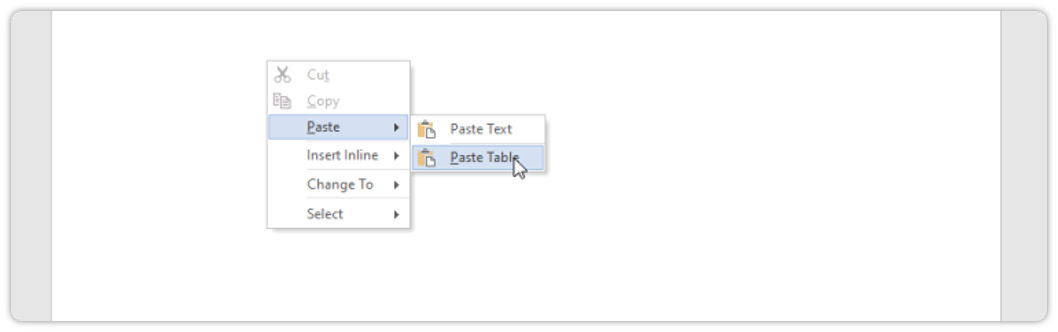
QPP Adapter for Quark XML Author creates a new table from the elements that you selected in the original table.
Copying Tables from Microsoft Excel
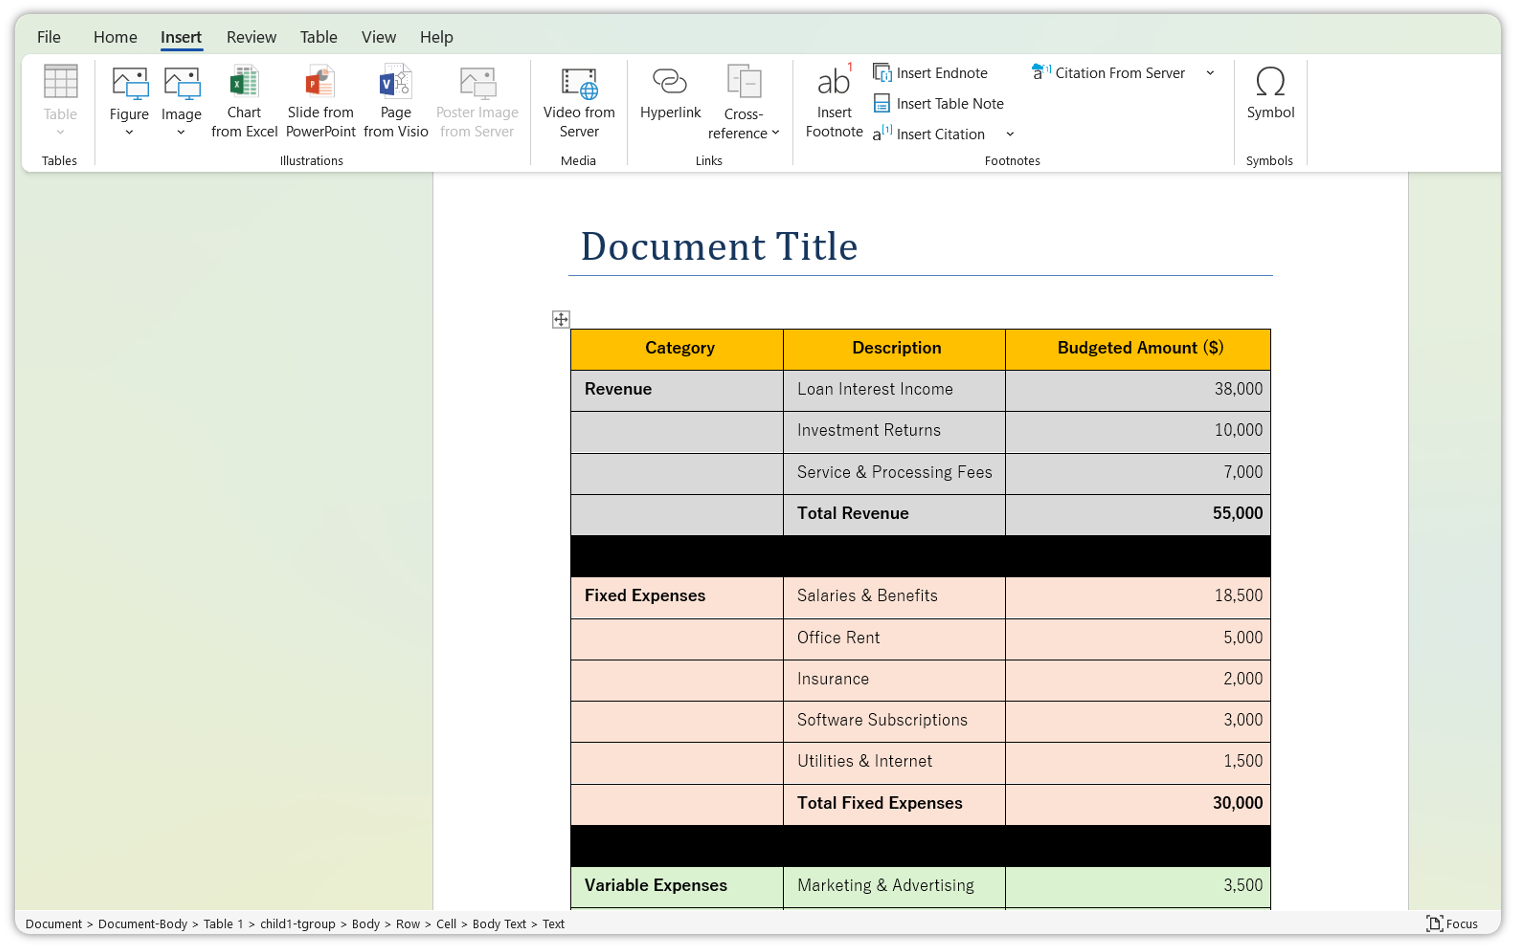
You can seamlessly import tables from Microsoft Excel into your Quark XML Author (QXA) Smart Documents while maintaining visual fidelity. This feature ensures that all cell background colors and formatting are preserved, allowing you to move data between applications without losing critical design elements or manual rework.
Steps to copy and format tables:
-
Open a new or existing Smart Document in QXA.
-
Open your Microsoft Excel spreadsheet and copy the specific table or range of cells you wish to import.
-
Return to your Smart Document and paste the table into your desired location. The table will render immediately, keeping all cell background colors and styles intact.
-
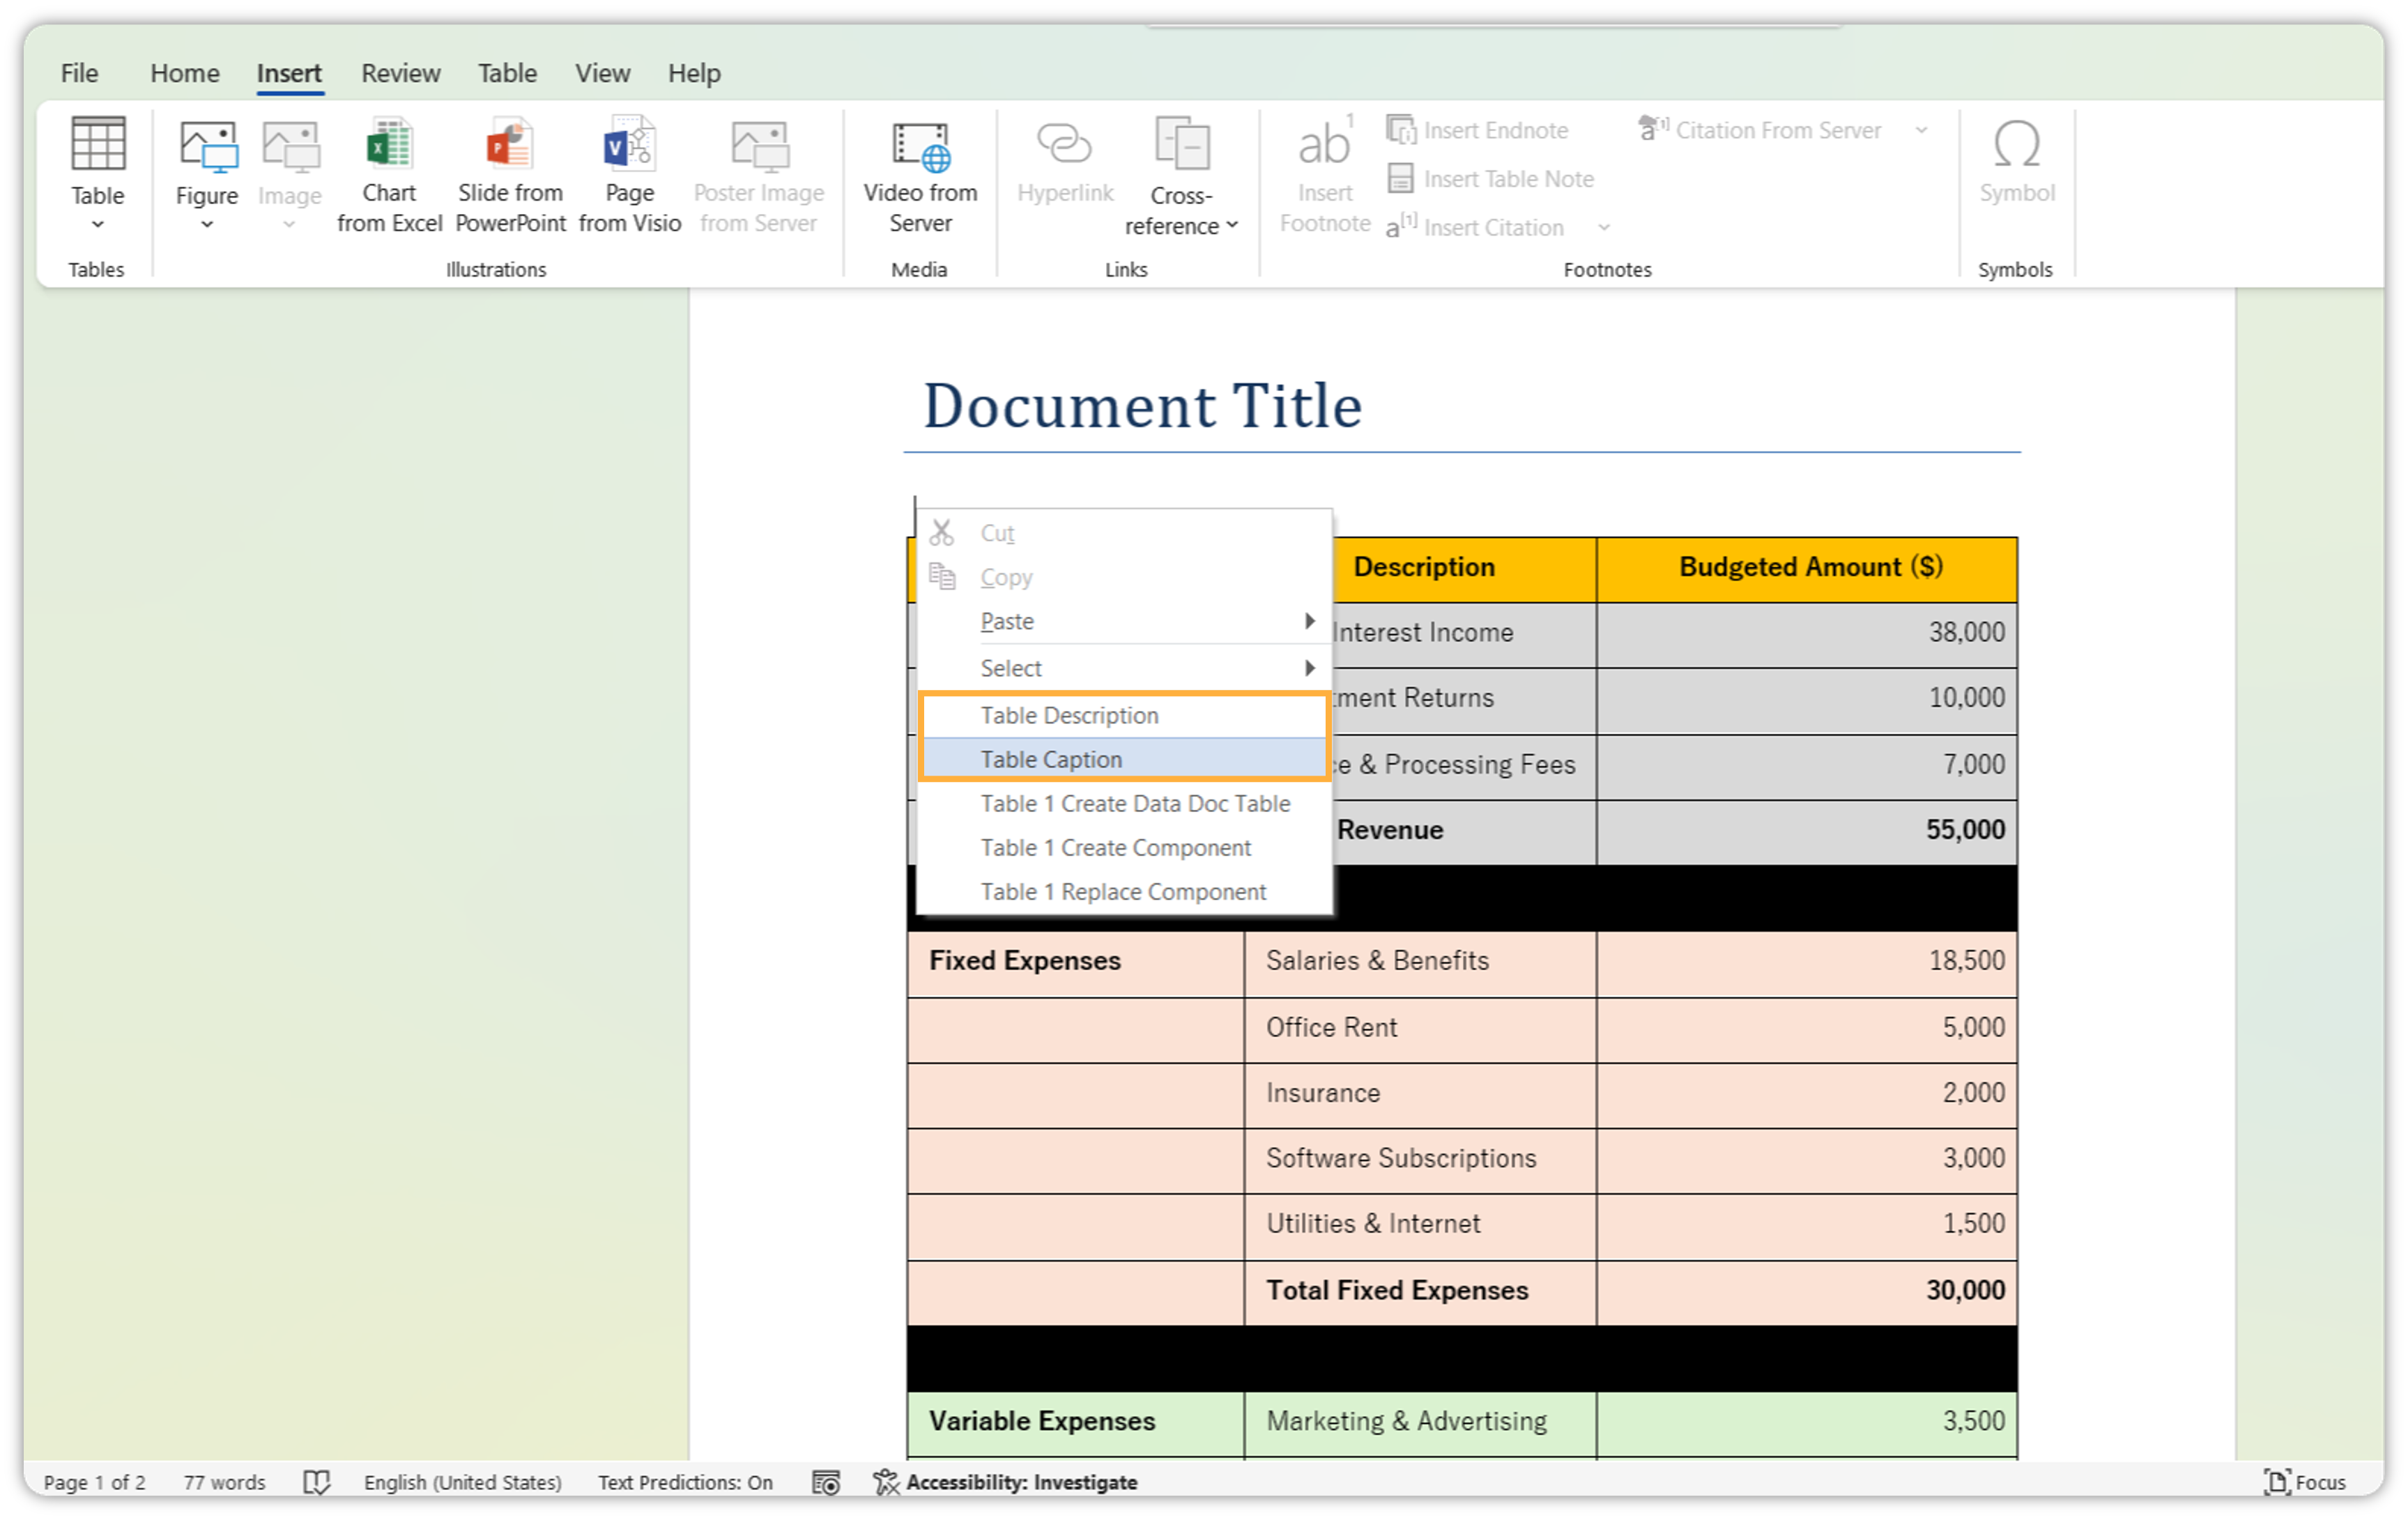
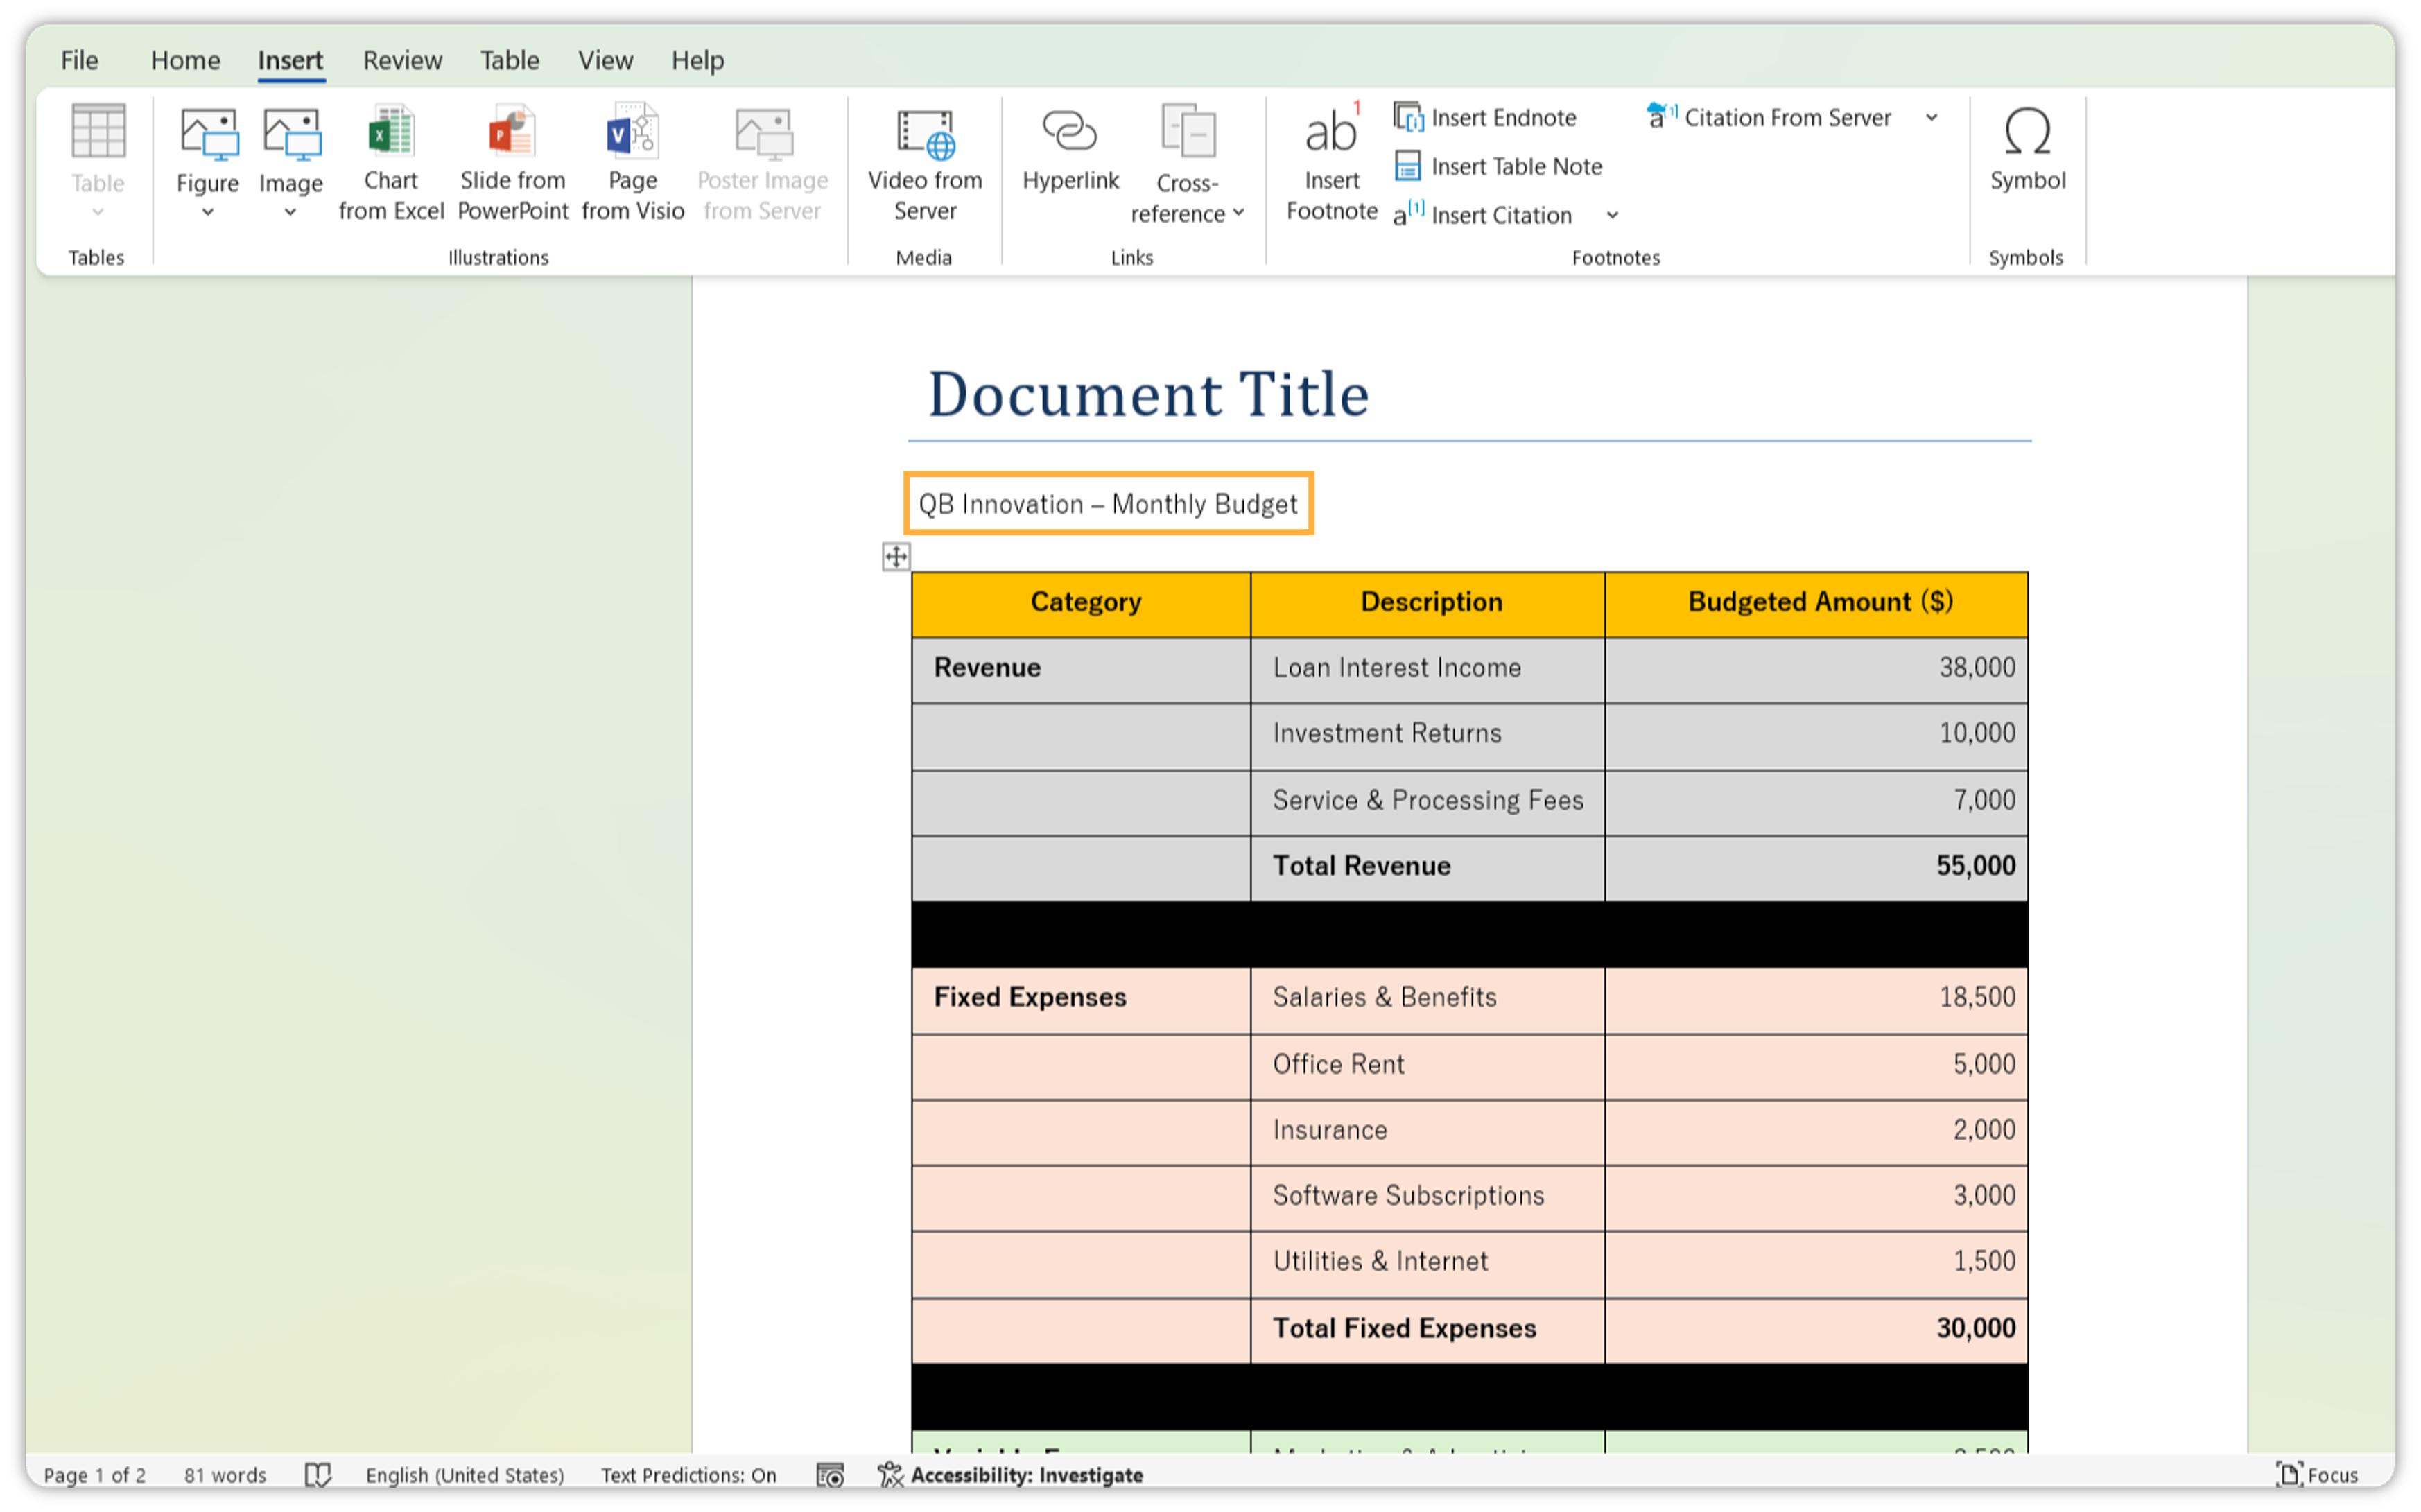
To enhance accessibility and context, you can add a caption or description to your newly pasted table:
-
Right-click on the top border of the table.
-
Select Caption/Description from the context menu.
-
A structured field will appear. Type your caption or accessibility description directly into the field.
-
Known Behavior
Excel tables containing multiple font styles may render using a single font in QXA. The system will still retain the original formatting during publishing and in Quark Author; however, the font variations may not be visualized in QXA. There is no content loss — the system is designed to enforce a harmonized font within tables.
The default font can be changed through dynamic configuration by updating the default template.dotx file to set the required table font.
Excel References
QPP Adapter for Quark XML Author allows you to embed sheets from an Excel spreadsheet as an editable table or as an image within an XML Author document. You can also embed charts from an Excel spreadsheet as an image. The Excel spreadsheet can be from the server or your local machine or from the clipboard.
Insert Excel Tables
To insert an Excel spreadsheet as a table/image:
-
In the document, position the cursor where you want to insert an Excel table.
-
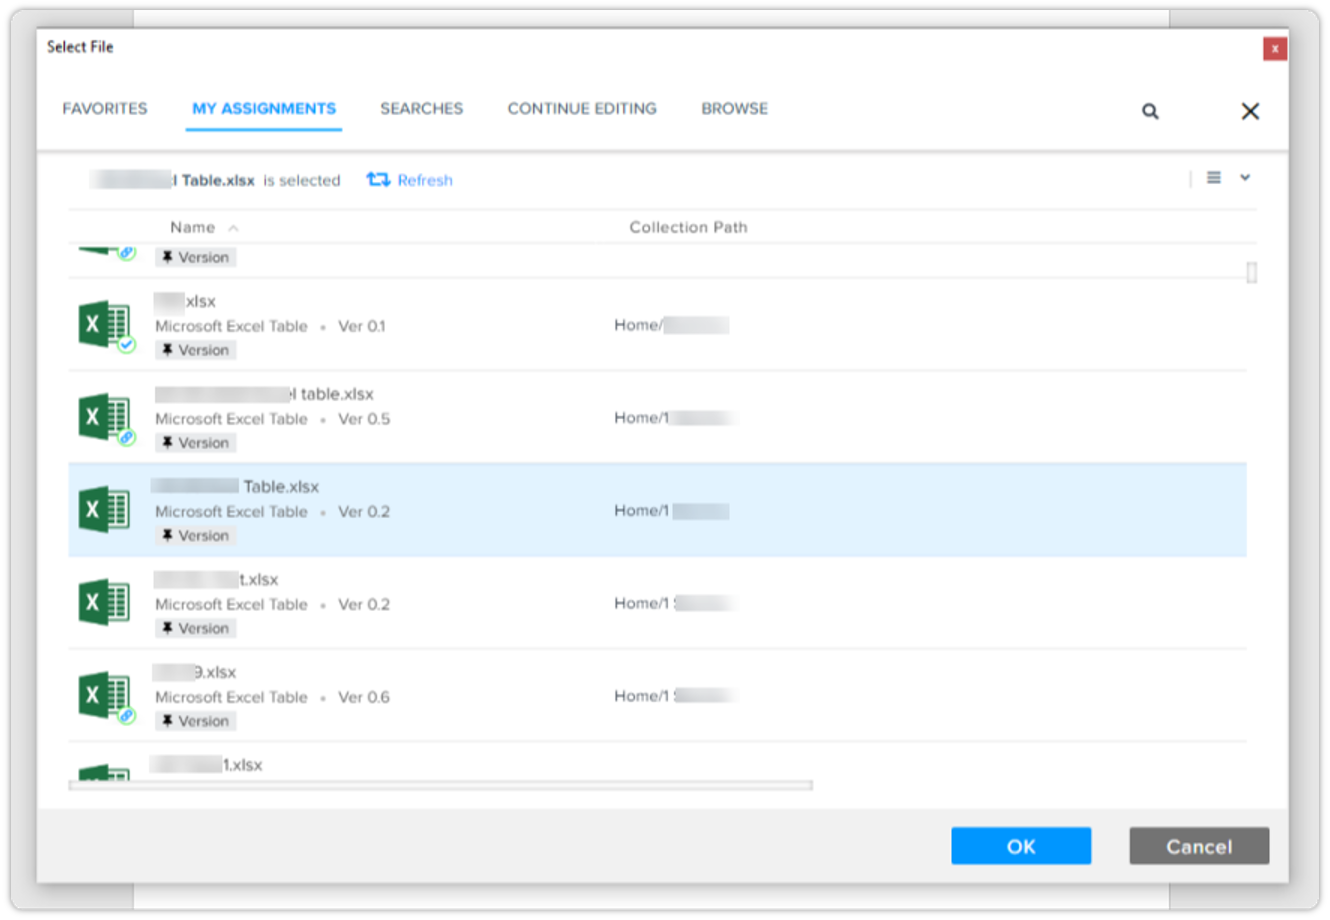
Now, in the header ribbon, click Insert > Table and then click Table from Excel in the Insert Table drop-down menu.
-
On the Select File dialog box, select the spreadsheet you want to import and then click OK.
-
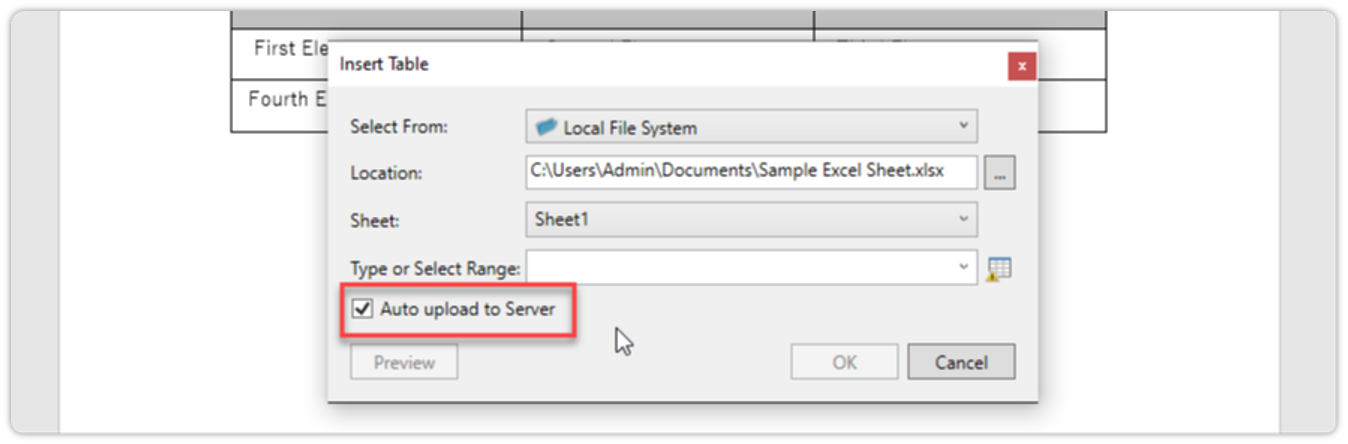
When the Excel spreadsheet you want to import is not stored as a component in the repository, QPP Adapter for Quark XML Author displays another dialog box Insert Table. You have to select the following in the Insert Table dialog box to insert a table from the Excel spreadsheet:
-
Select From: The option to select whether you want to insert an Excel table from the server or from your local machine.
-
Location: The location/file path of the Excel spreadsheet on the server.
-
Sheet: Sheet number if the spreadsheet has several sheets.
-
Type of Select Range: Select the range of the table (part of the spreadsheet) that you want to import.
-
-
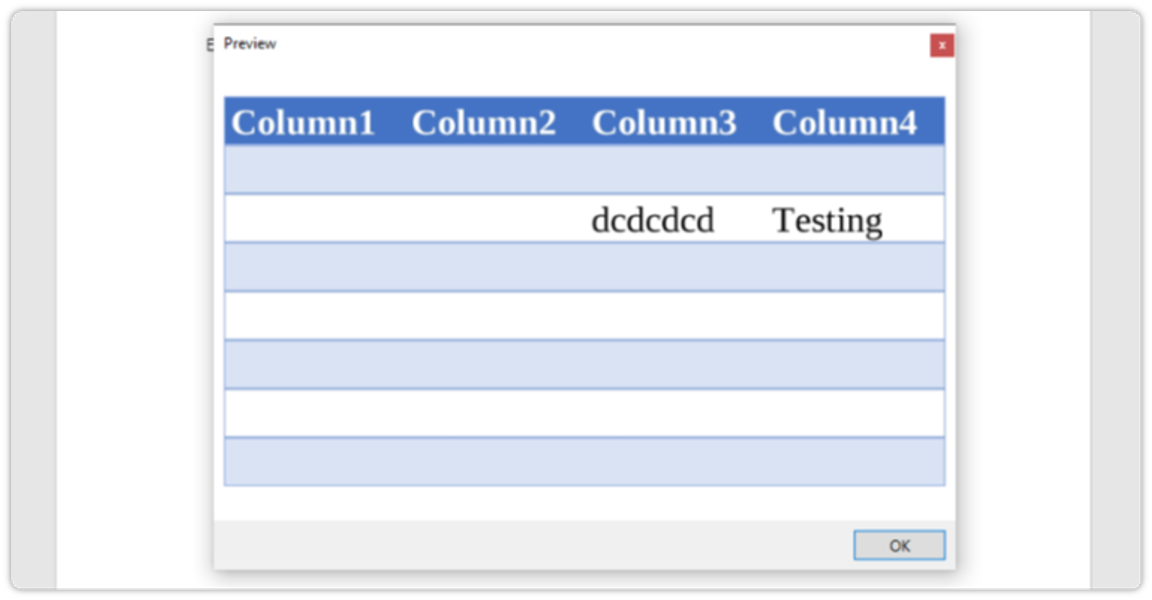
QPP Adapter for Quark XML Author inserts the Excel spreadsheet as an editable table in the document.
To insert an Excel spreadsheet from your local machine:
-
Close the dialog box Select File that opens when your select the option Table from Excel/Table Image from Excel. QPP Adapter for Quark XML Author now displays the dialog box Insert Table.
-
On the dialog box Insert Table, select Local File System in the input field Select From.
-
Browse and select a file from your local machine. This populates the path of the file in your local machine in the input field Location.
-
Select the Sheet and Range when applicable.
-
Check the checkbox Auto Upload if you also want QPP Adapter for Quark XML Author to upload the inserted Excel sheet along with the document at the same location on the server.
-
Click OK.
Insert Excel Charts
To insert a chart from an Excel spreadsheet:
-
In the document, position the cursor where you want to insert an Excel chart.
-
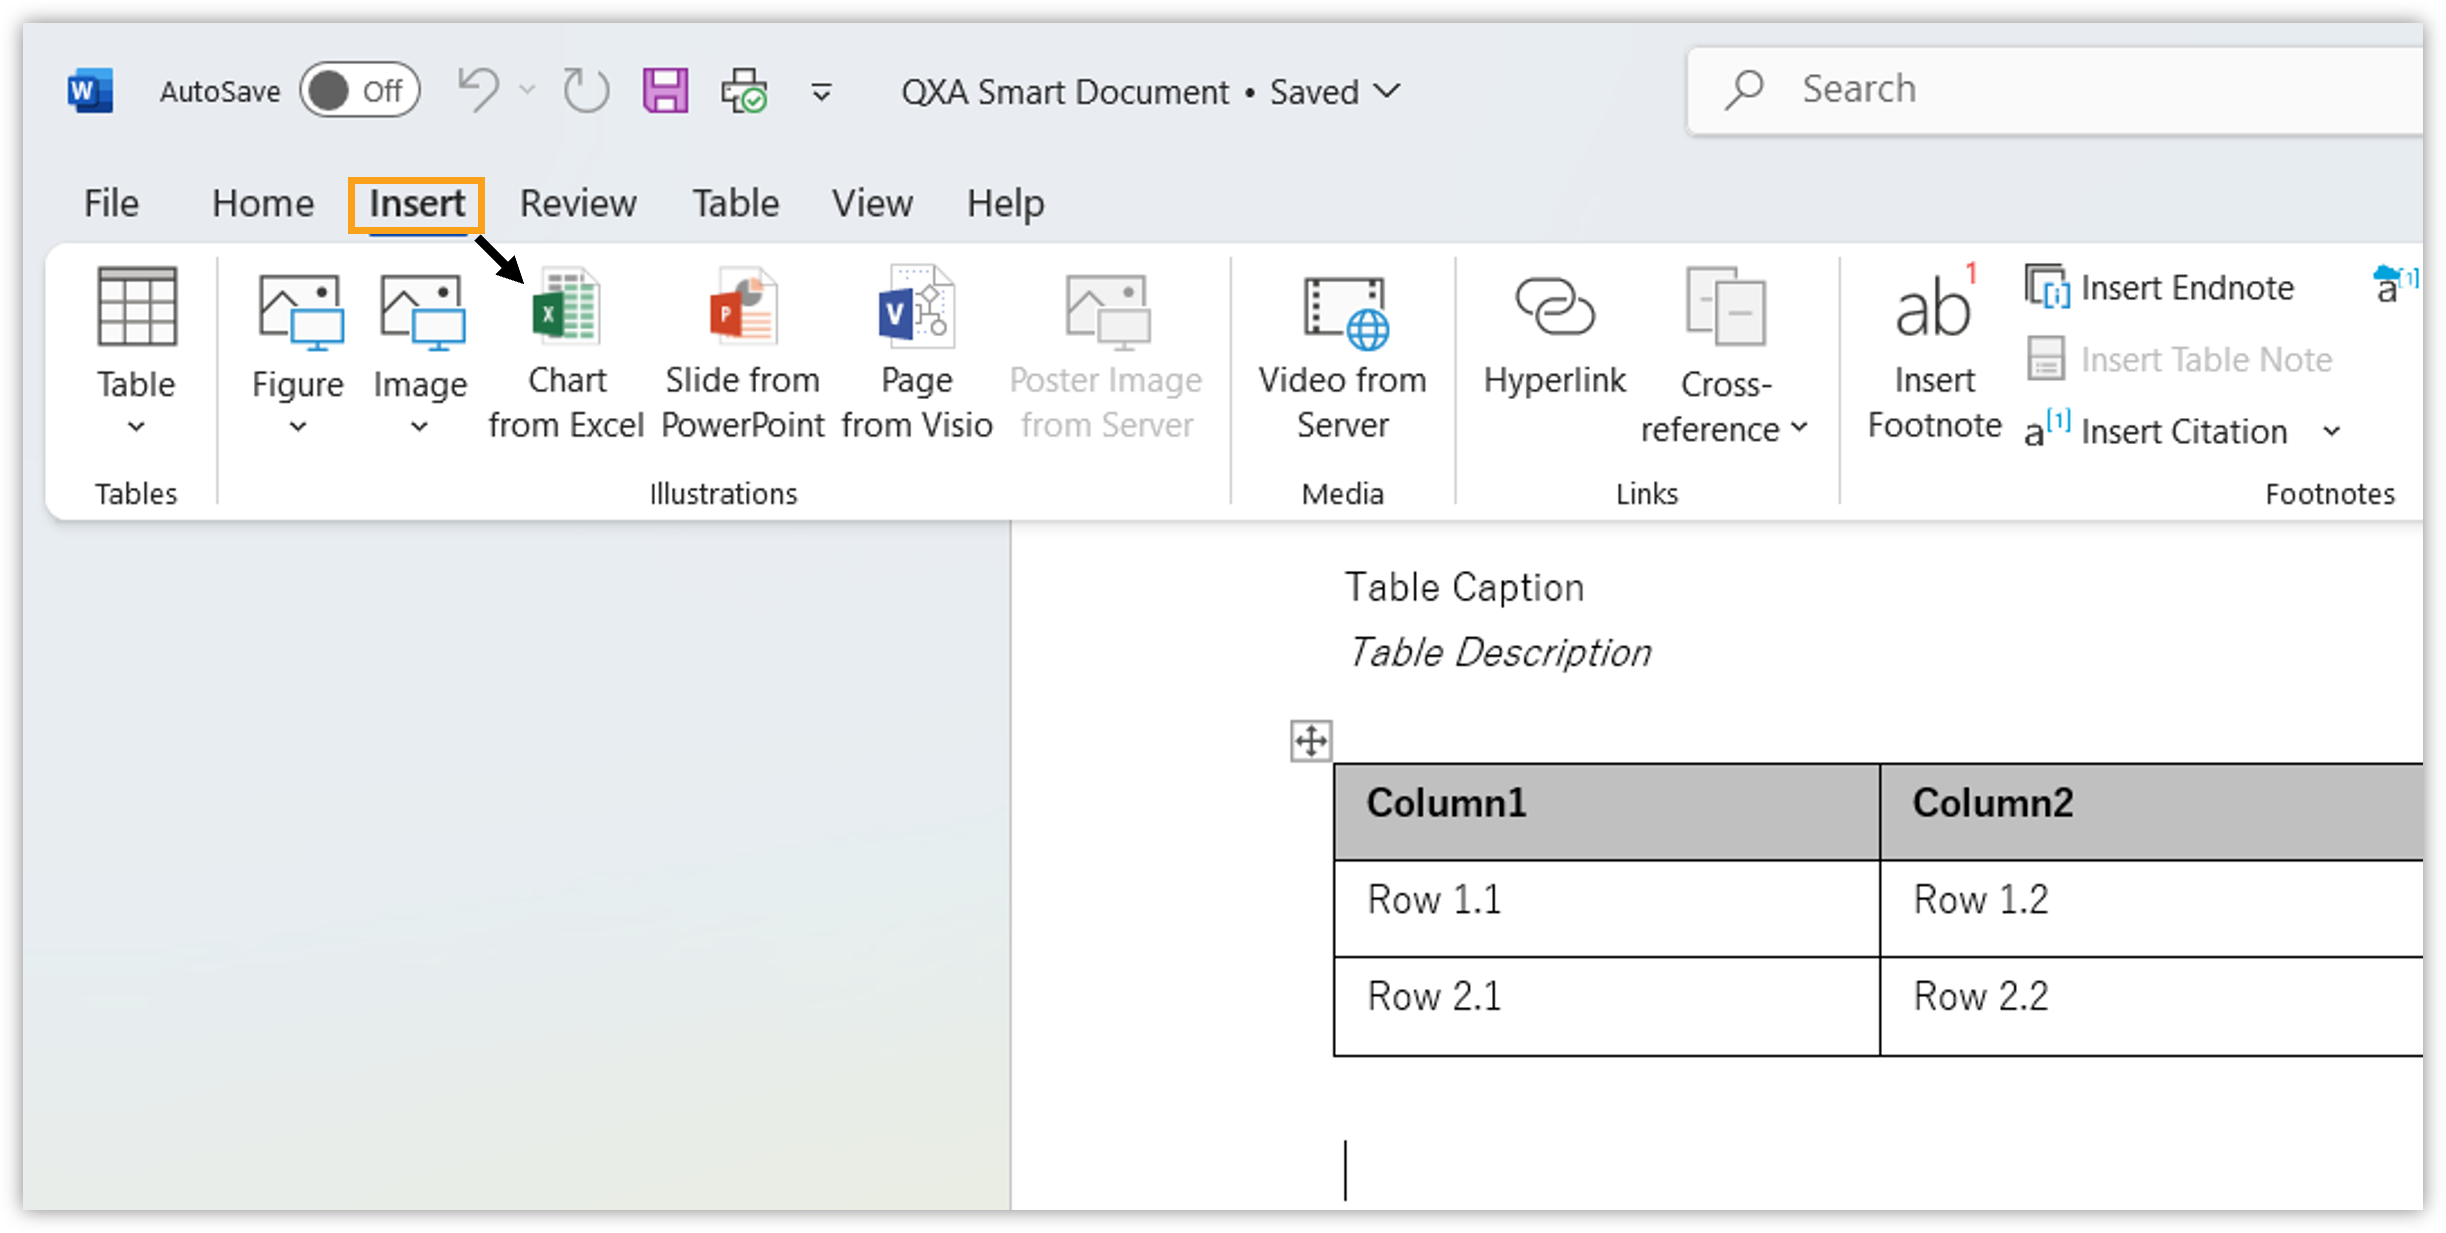
In the header ribbon, click Insert > Chart from Excel.
-
In the Select File dialog box, select the chart you want to import and then click OK.
-
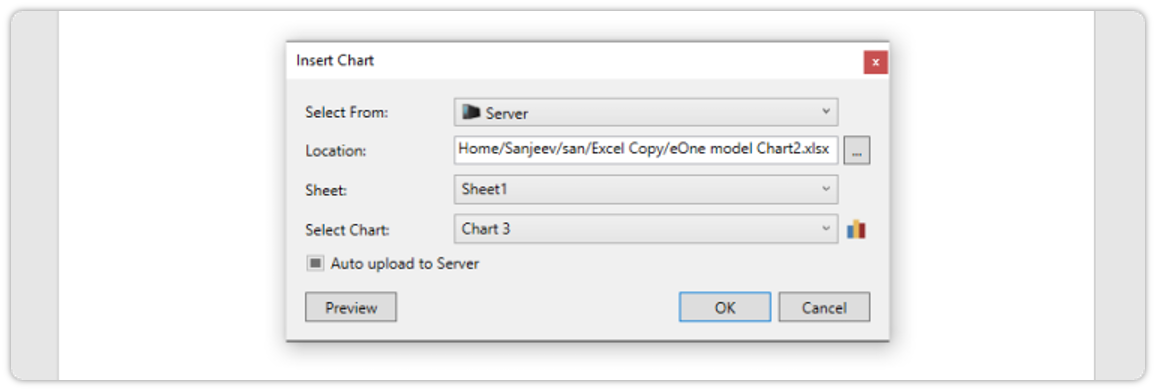
In the Insert Chart dialog box, select the following and then click OK:
-
Select From: The option to select whether you want to insert an Excel spreadsheet from the server or from your local machine.
-
Location: The location/file path of the Excel spreadsheet on the server.
-
Sheet: Sheet number if the chart has several sheets.
-
Chart: Select the chart within the spreadsheet.
-
To insert an Excel chart from your local machine:
-
Close the dialog box Select File that opens when your select the option Chart from Excel. QPP Adapter for Quark XML Author now displays the dialog box Insert Chart.
-
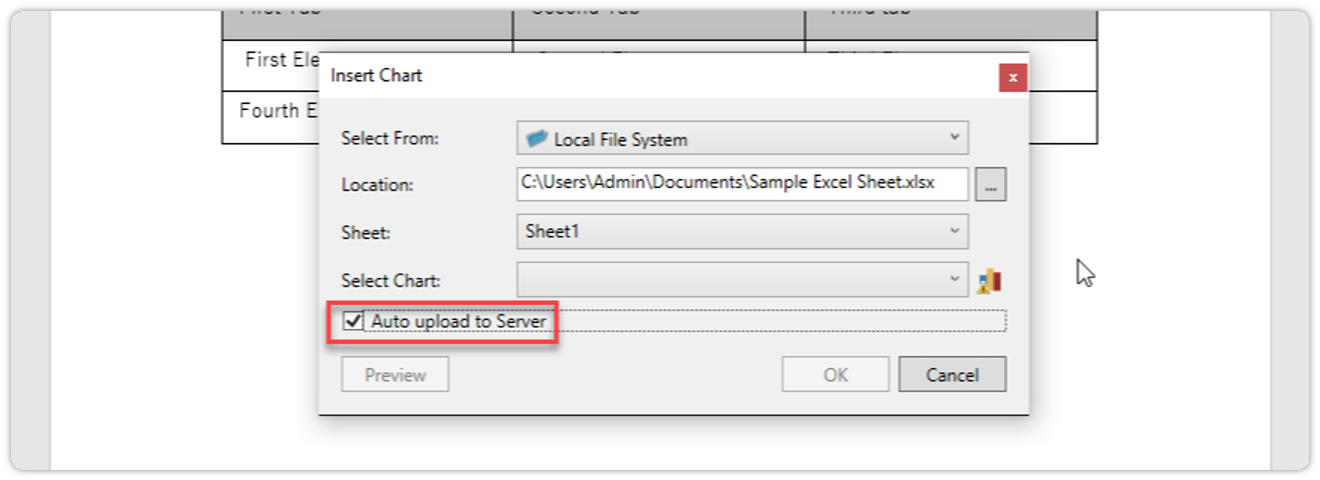
In the dialog box Insert Chart, select Local File System in the input field Select From.
-
Browse and select a file from your local machine. This populates the path of the file in your local machine in the input field Location.
-
Select the Sheet and Range when applicable.
-
Check the checkbox Auto Upload if you also want QPP Adapter for Quark XML Author to upload the inserted Excel chart along with the document at the same location on the server.
-
Click OK.
Edit Excel References
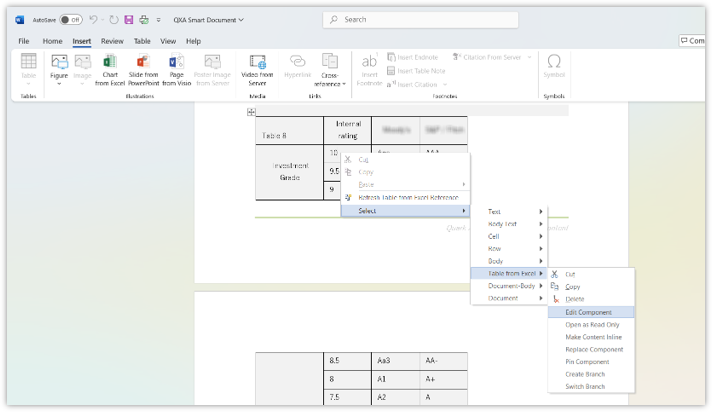
You cannot edit an Excel reference (table or chart) directly through Word canvas. To edit an Excel reference:
-
Right-click on the table/chart and in the context menu, click Select> Table from Excel/Chart from Excel > Edit Component.
-
QPP Adapter for Quark XML Author opens the Excel spreadsheet for you to make the edits.
-
Make your edits in the Excel spreadsheet.
PowerPoint References
QPP Adapter for Quark XML Author allows you to embed PowerPoint presentation slides as images within an XML Author document.
Insert PowerPoint Slides
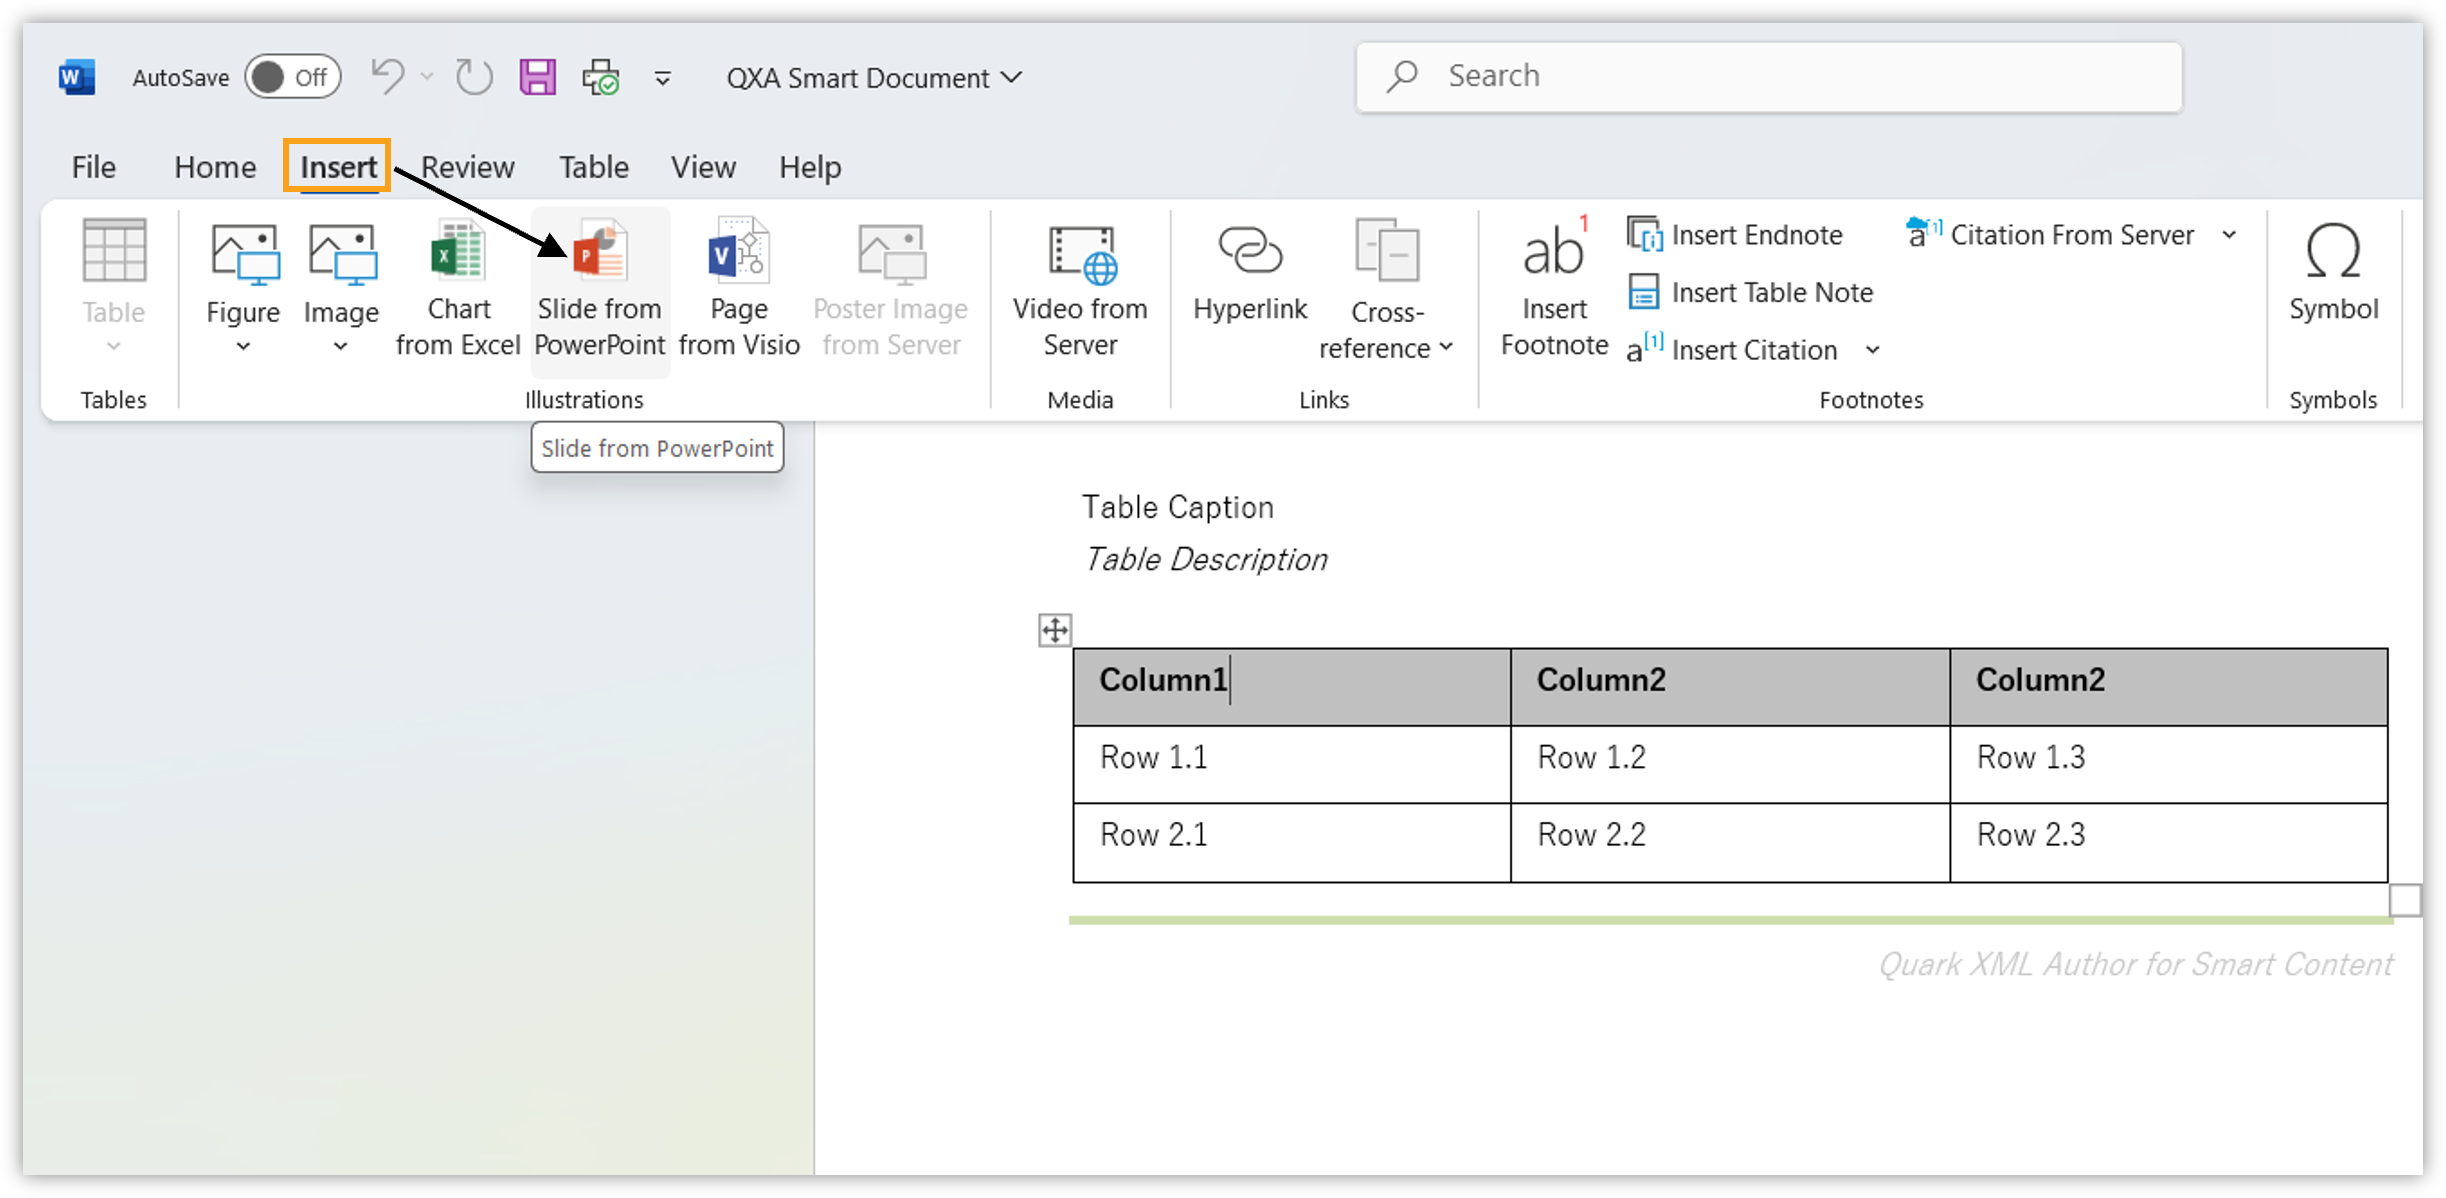
To insert a PowerPoint slide as an image:
-
In the document, position the cursor where you want to insert a PowerPoint slide as an image.
-
In the header ribbon, click Insert > Slide from PowerPoint.
-
On the Reference from Server dialog box, select the PowerPoint presentation from which you want to insert a slide.
Pictures
QPP Adapter for Quark XML Author allows you to insert pictures in a document anywhere the XML schema allows. When you insert a picture, QPP Adapter for Quark XML Author renders the image file on the Word canvas.
QPP Adapter for Quark XML Author supports the following image file formats:
|
BMP |
JPEG |
|
DIB |
JPG |
|
EMF |
PNG |
|
EMZ |
RLE |
|
EPS |
TIFF |
|
GIF |
TIF |
|
JFIF |
WMF |
|
JPE |
WMZ |
Insert Images
Quark XML Author allows you to insert within an element (Insert Inline) or adjacent to an element (Insert After/Insert Before). Quark XML Author doesn't embed images in a document and instead references them. When you insert an image, Quark XML Author stores the location path as the HREF attribute of the image element.
You can insert images from your local machine, network drive or repository.
To insert an image from the local machine/network drive:
-
Position the cursor where you want to insert a new image.
-
Use one of the following methods:
-
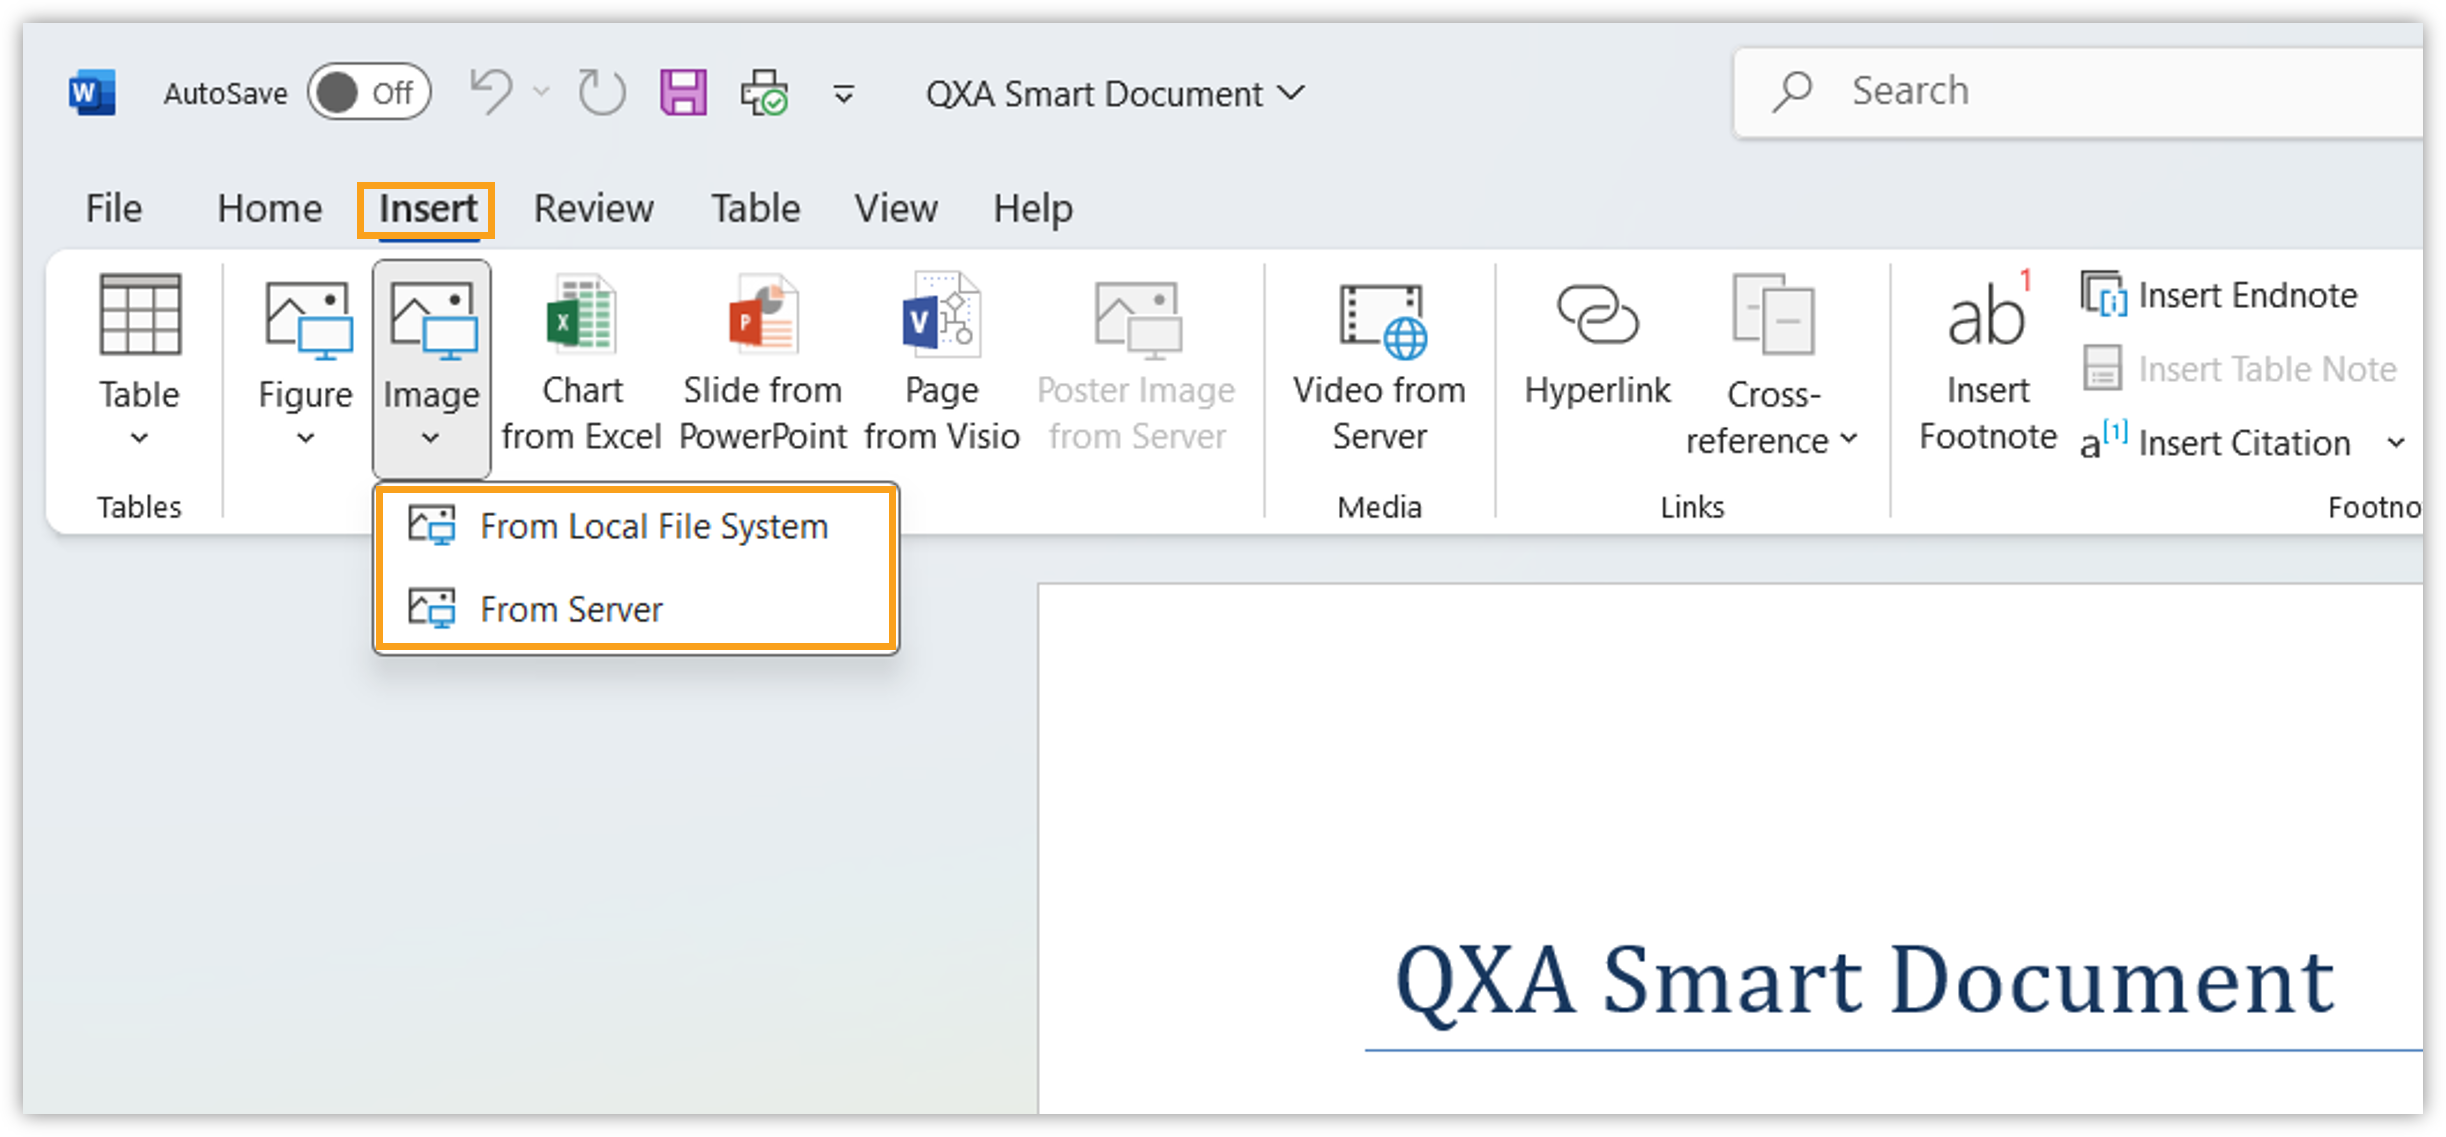
In the header ribbon, click Insert > Picture.
-
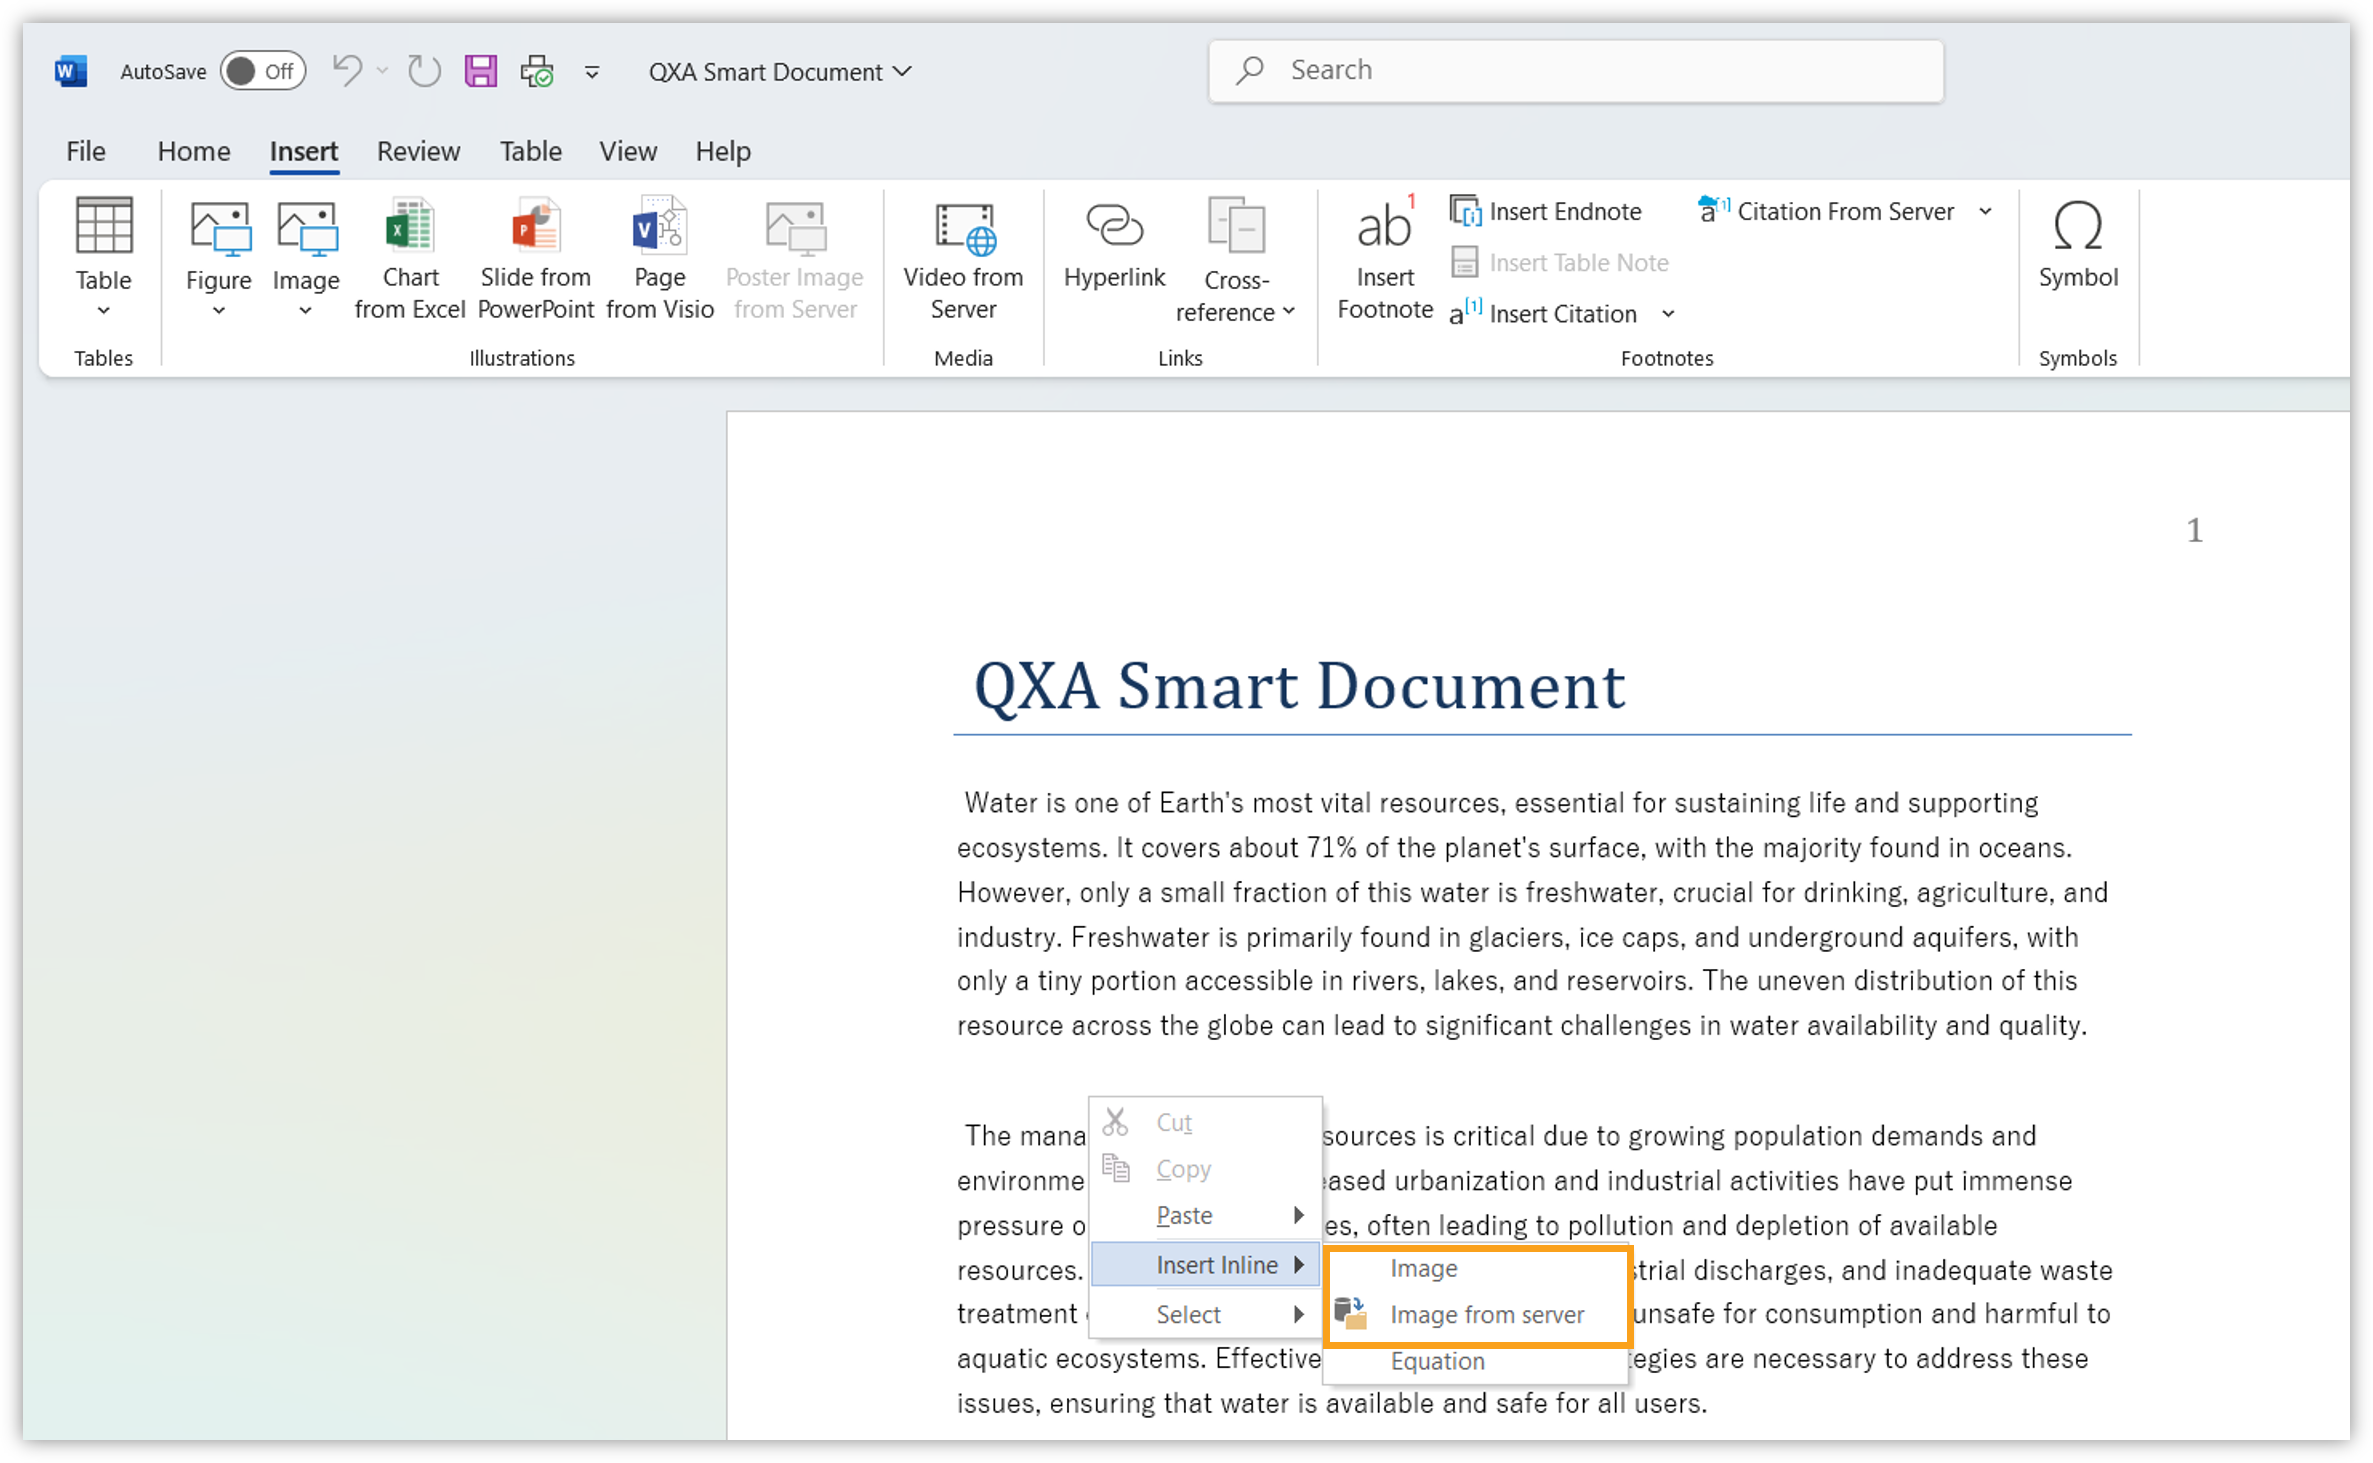
Right-click and in the context menu, select Insert Inline and then select Image/Image from Server.
-
-
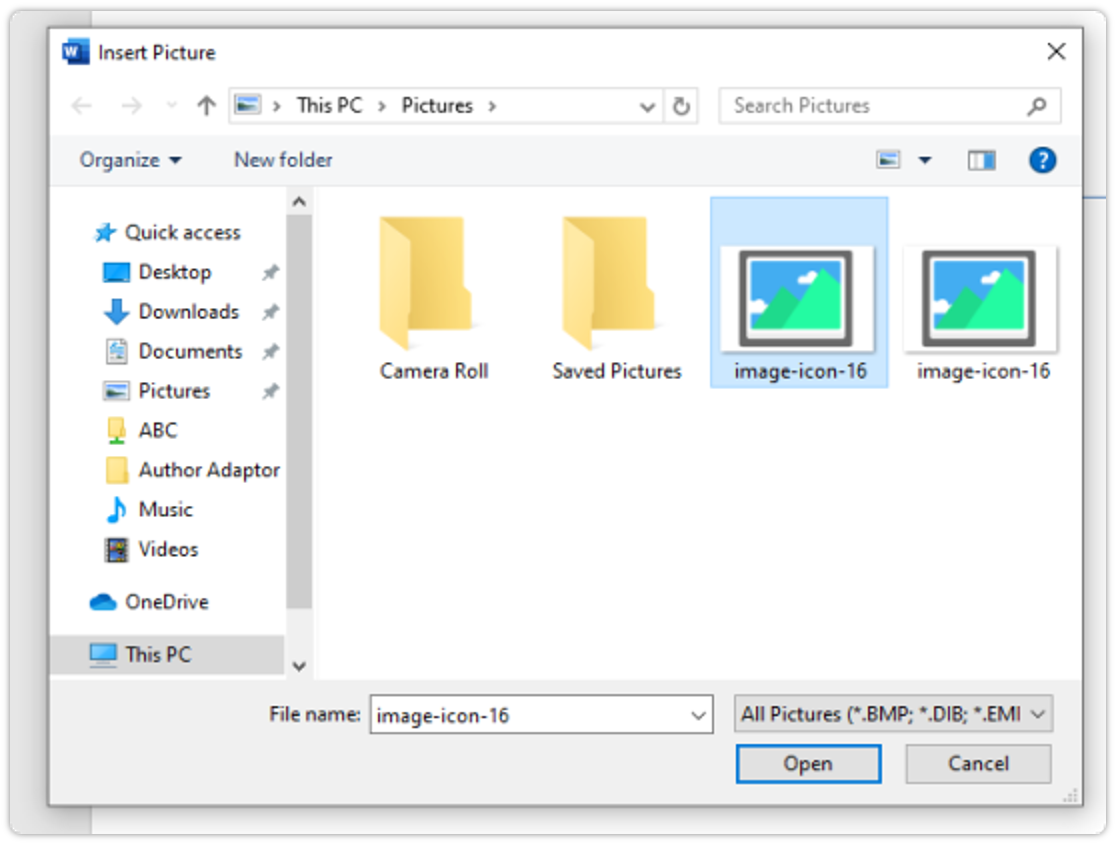
In the Insert Picture dialog box, select the image you want to insert and then click Open.
To insert an image from the repository:
-
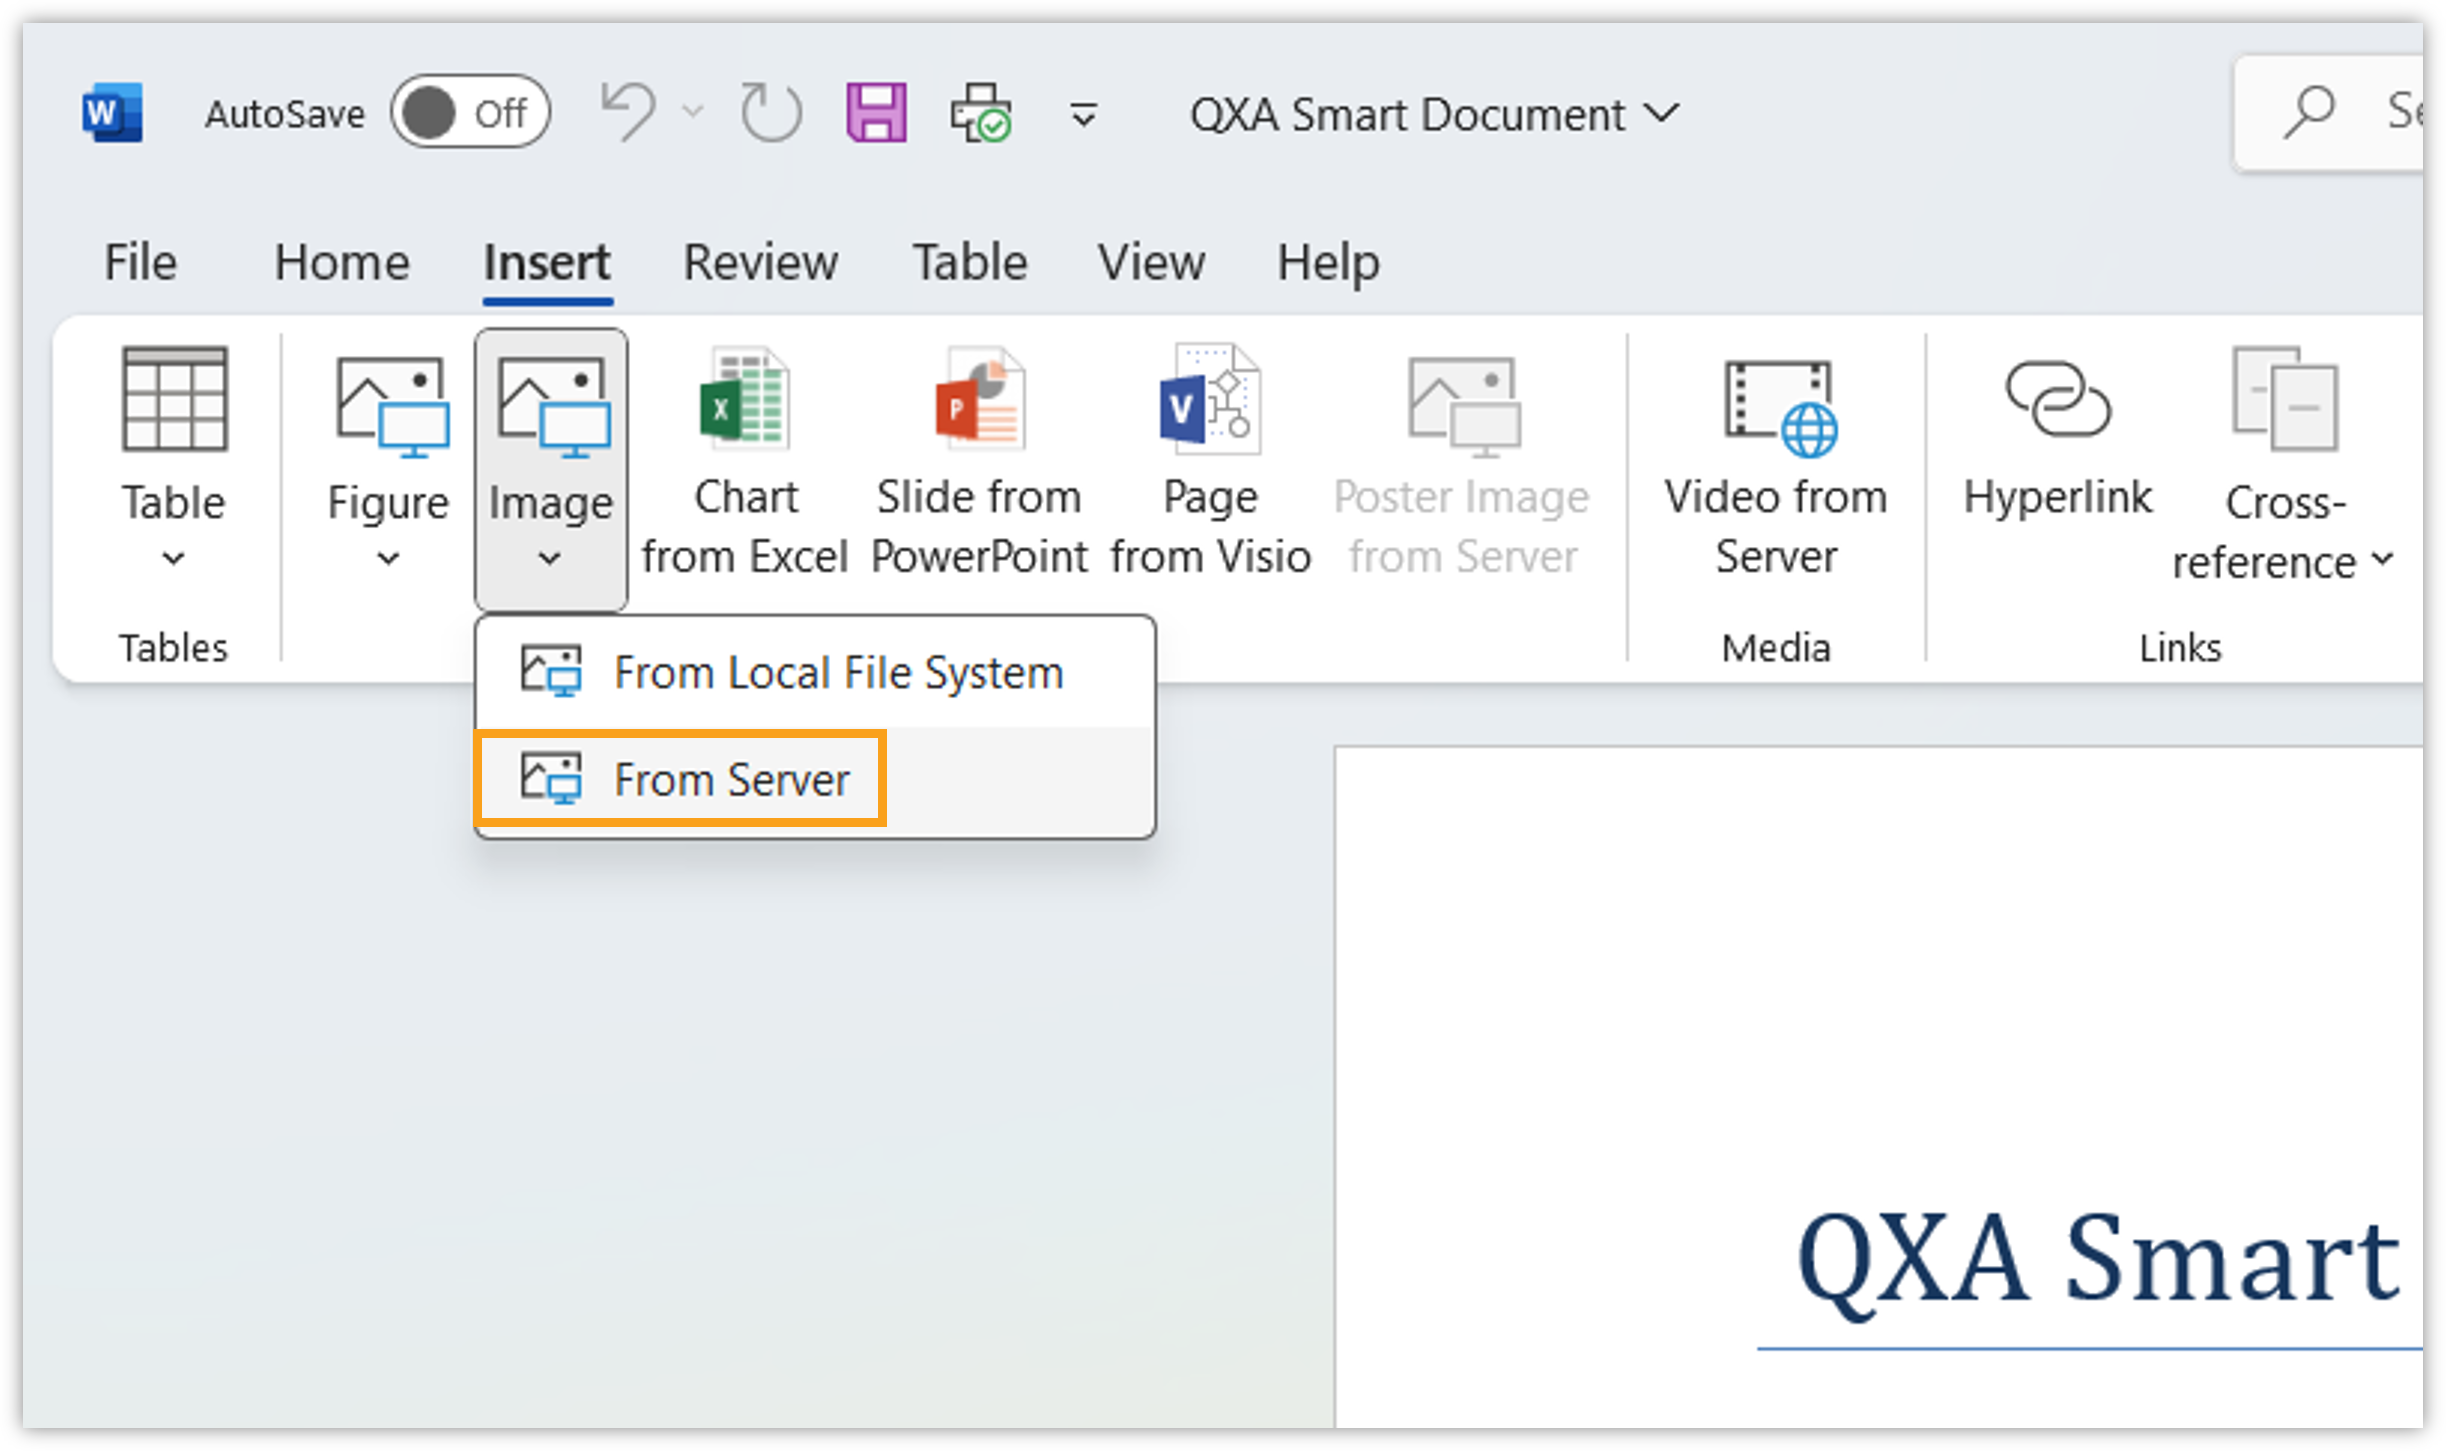
In the header ribbon, click Insert > Image > From Server.
-
On the dialog box Reference from Server, select the image you want to insert and then click OK.
When you delete a picture that is referenced in an XML document or the reference to
an image is somehow altered/broken, Quark XML Author displays the icon of a broken
image reference  .
Refresh Image References
When you replace/make some changes to an image on the server that is already referenced in one or more documents, you do not have to insert that image again in the related documents. You can refresh the image reference to get the latest copy of the image file.
To refresh an image reference:
-
Open a document that contains the picture reference that you want to refresh.
-
Right-click on the image and then click Refresh Image Reference.
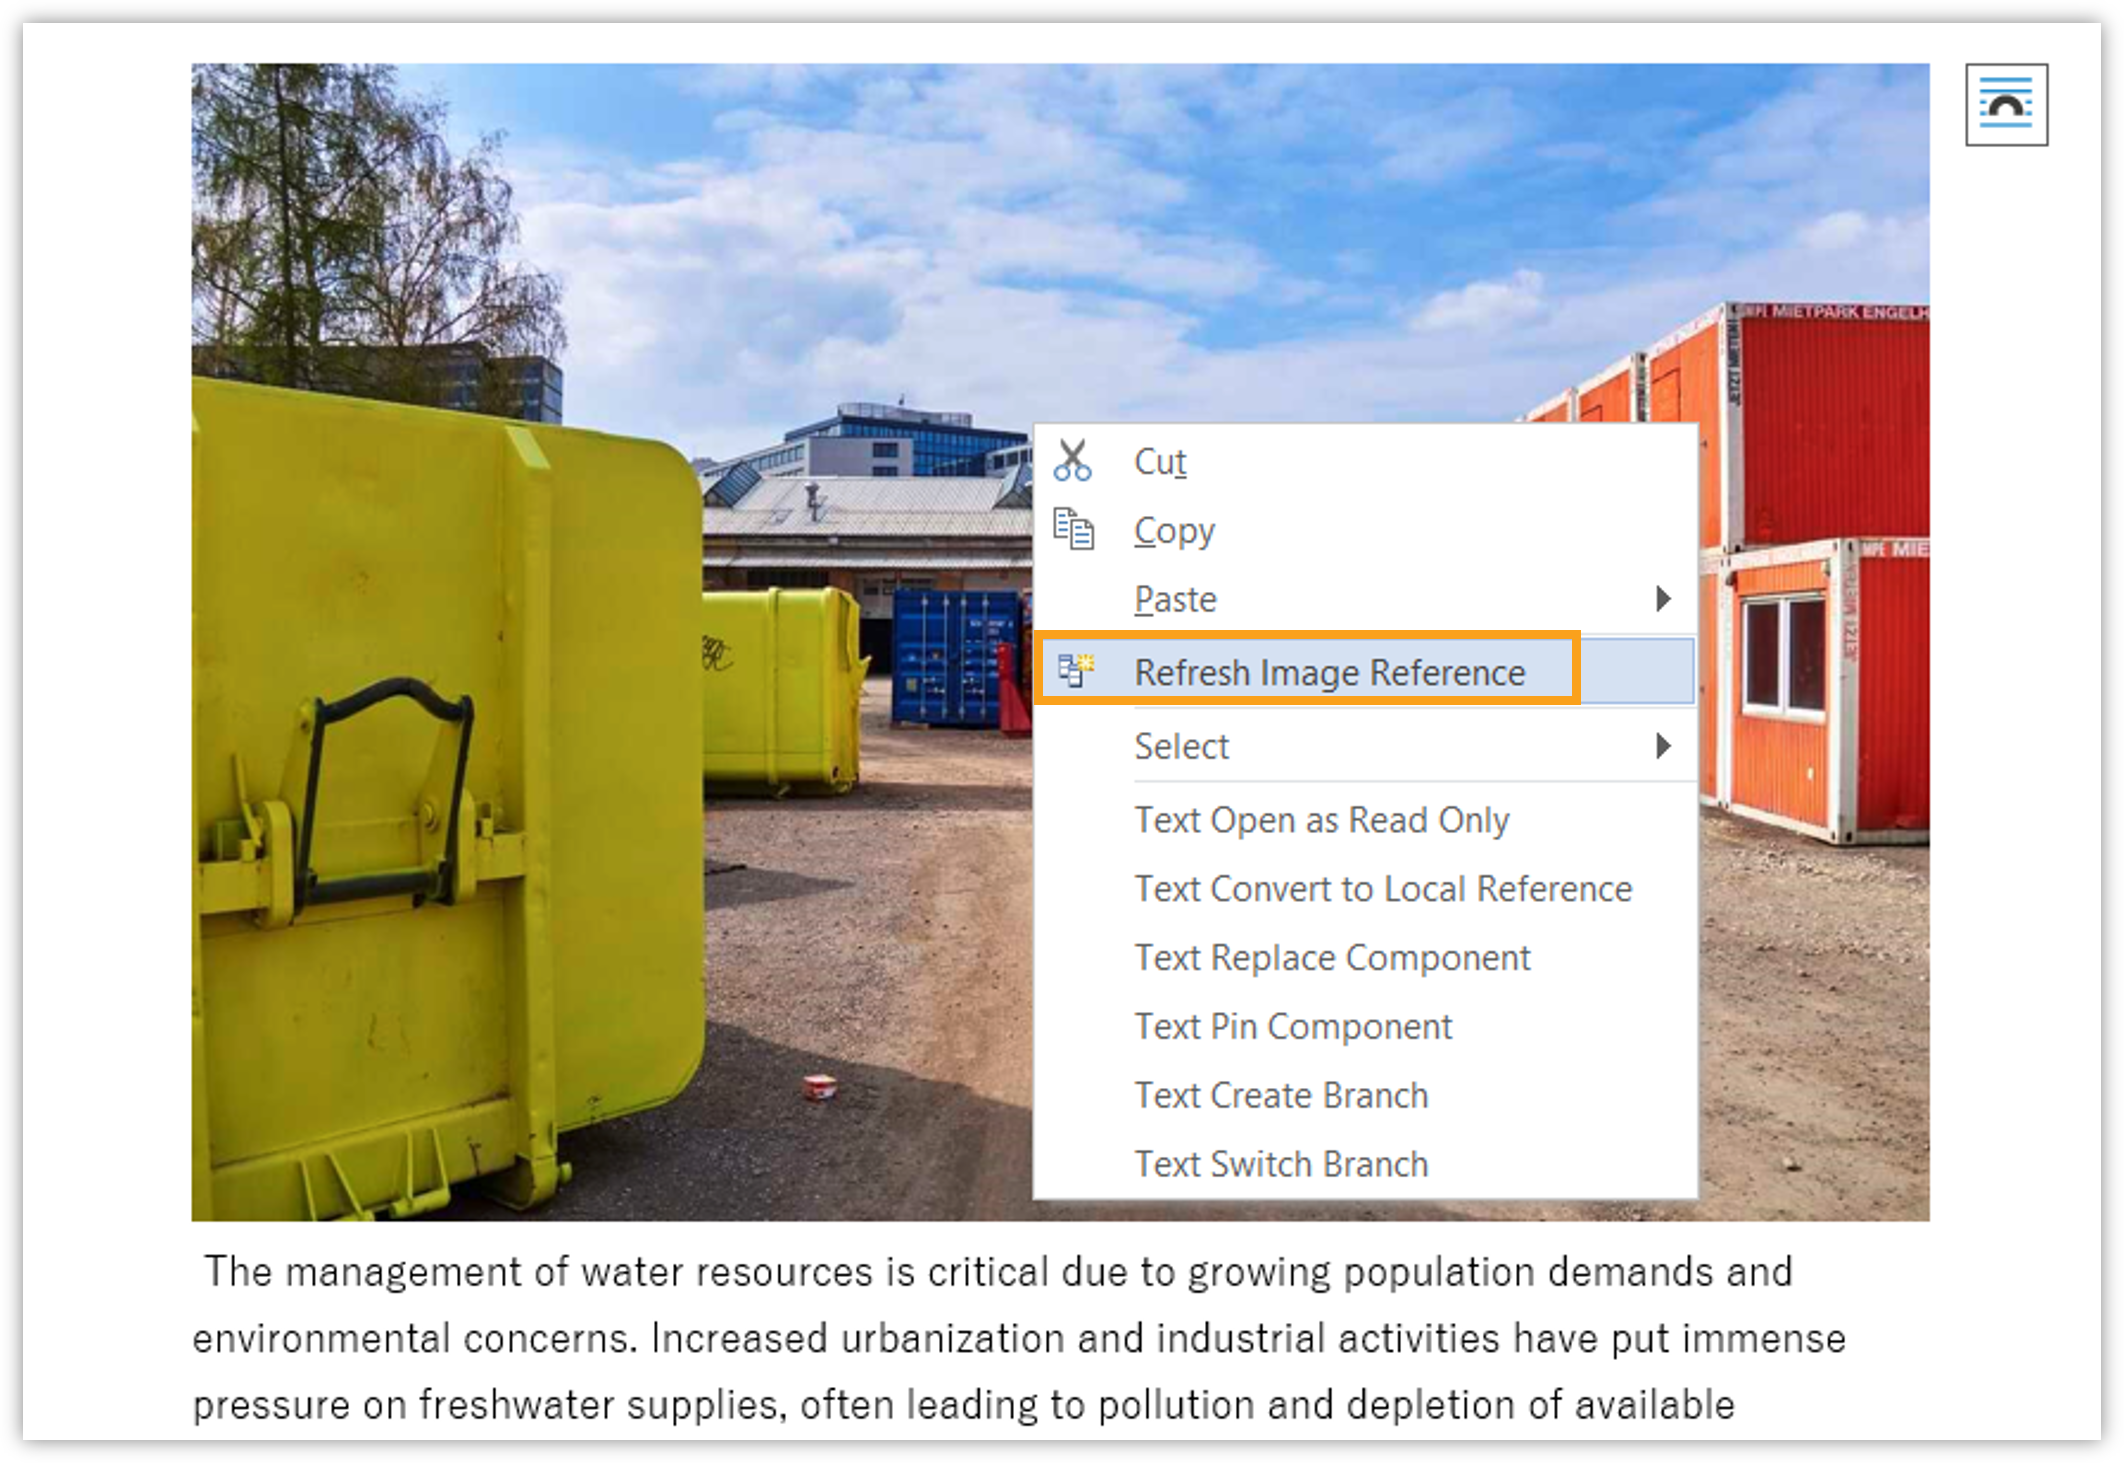
QPP Adapter for Quark XML Author replaces the picture reference with the latest copy of the image on the server.
Insert Video from the Repository
QPP Adapter for Quark XML Author allows you to insert video files anywhere in the document where your XML schema allows. When you insert a video element, QPP Adapter for Quark XML Author displays the name of the video file on the Word canvas. You can only insert video elements that are already stored in the repository.
Video Formats
QPP Adapter for Quark XML Author supports the following video file formats:
-
mpeg
-
quicktime
-
3gpp
-
h263
-
h264
-
mp4
-
ogg
-
x-flv
-
x-la-asf
-
x-ms-asf
-
x-msvideo
-
x-sgi-movie
To insert a video:
-
In the document, position the cursor where you want to insert an audio/video element.
-
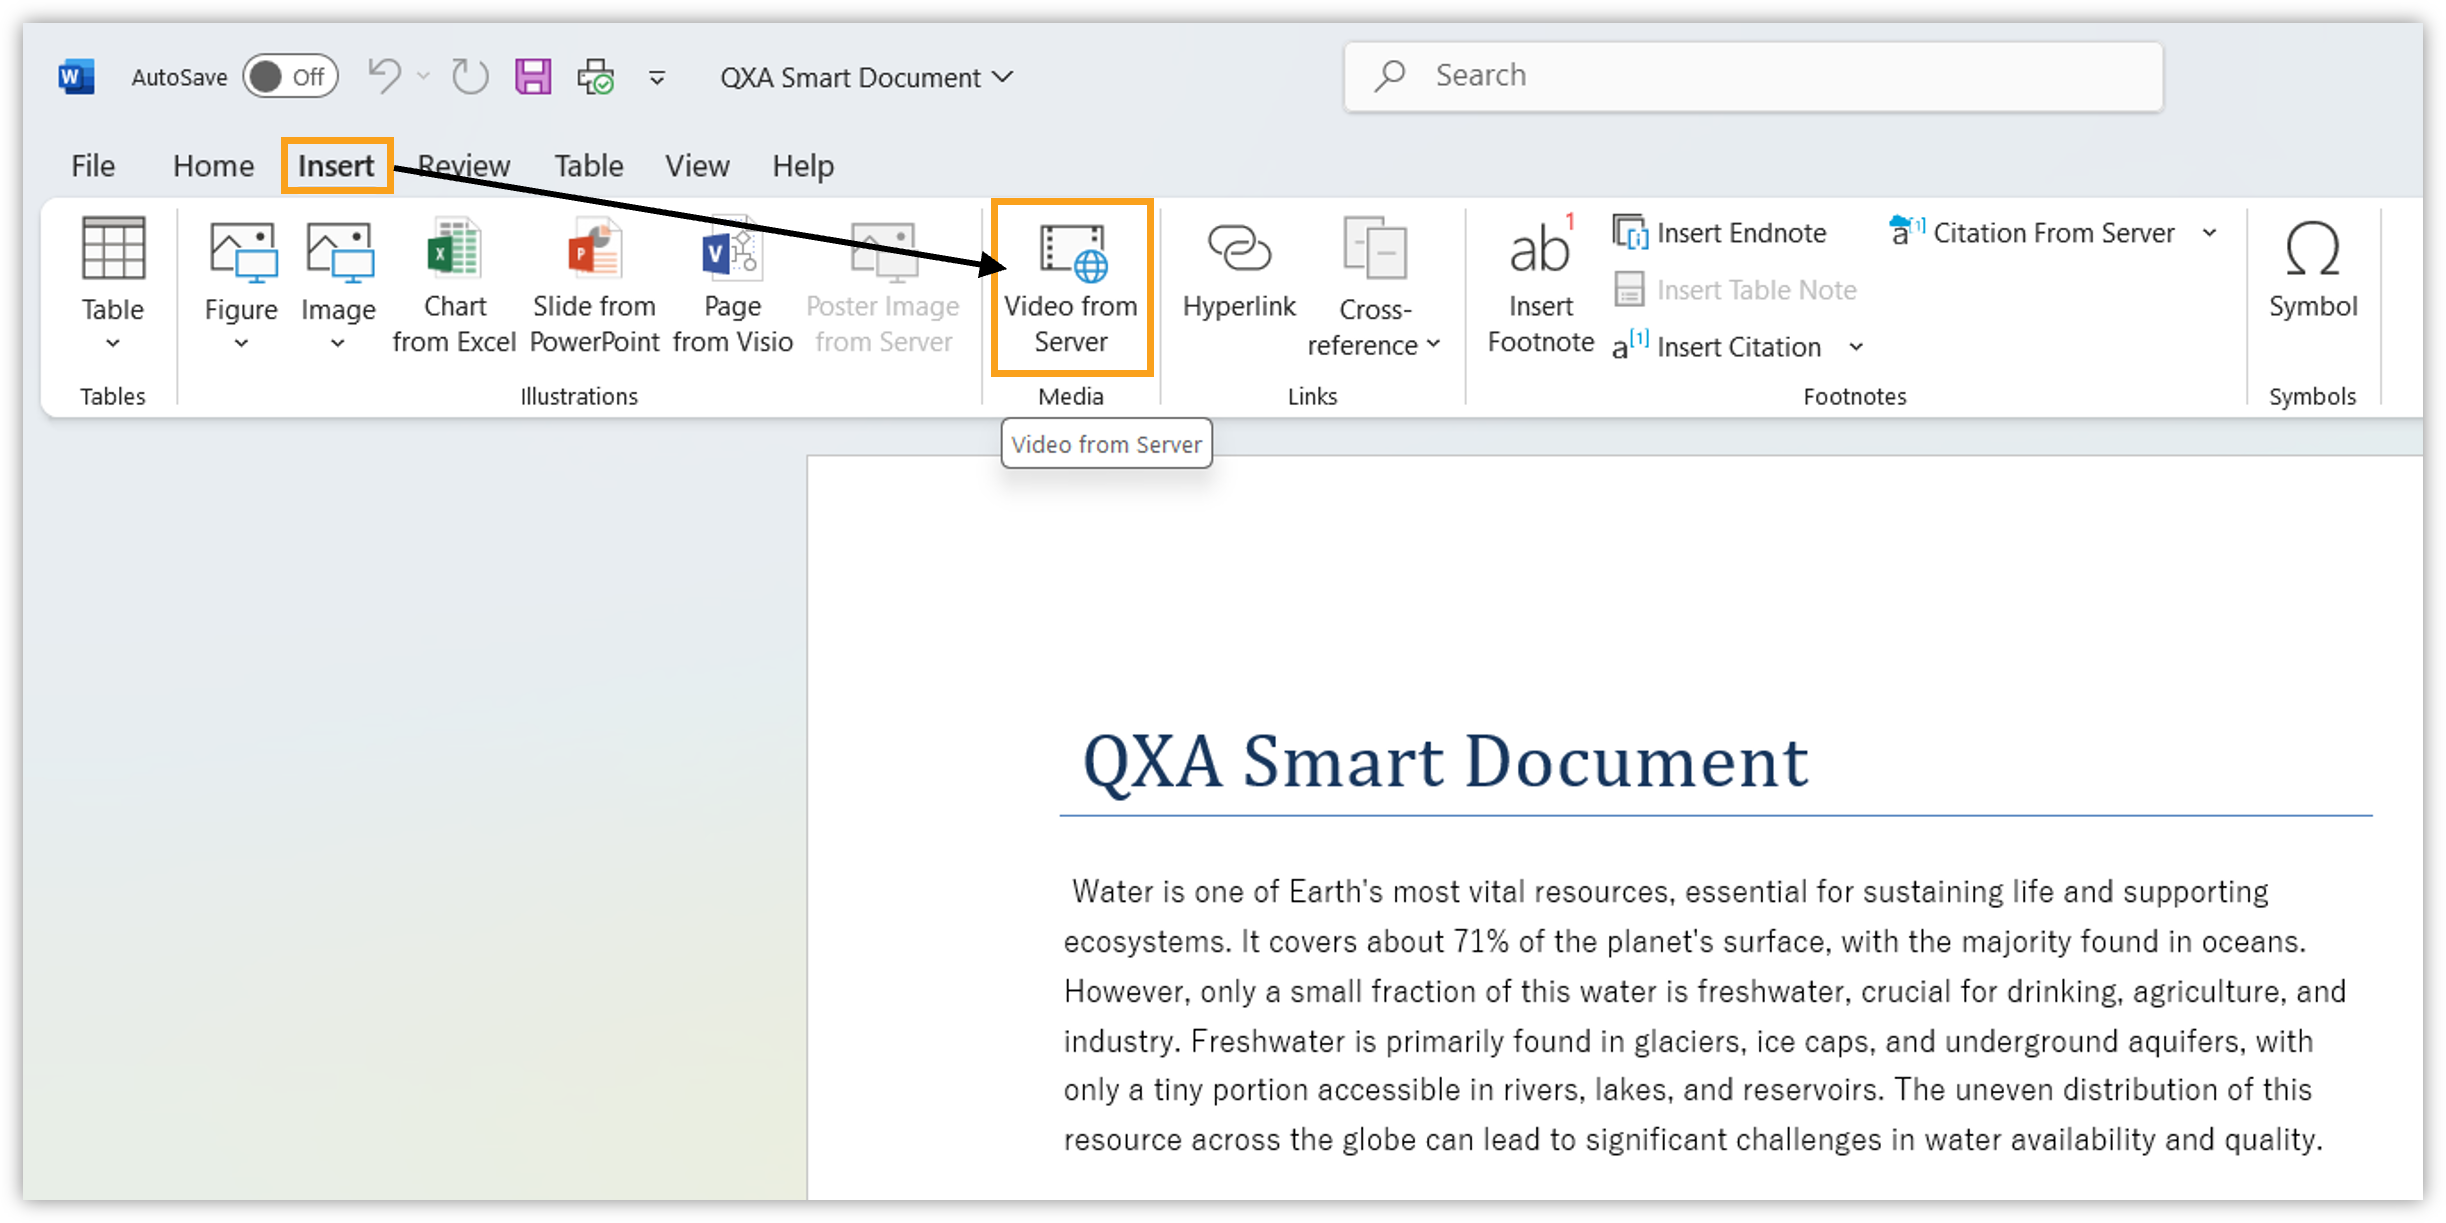
In the header ribbon, click Insert > Video from Server.
-
In the Reference from Server dialog box, browse to the video file you want to insert, select the file, and then click OK.
QPP Adapter for Quark XML Author inserts the video file in the Word canvas and displays the name of the file.
Lists
Lists in QPP Adapter for Quark XML Author are similar to the lists in standard Microsoft® Word. Features that are not applicable to XML word processing have been removed and new features have been added.
List Features
-
Indent list items
-
Out-dent list items
-
Continue numbering
-
Restart numbering
-
Set numbering
-
Change style
Available List Styles
-
Bulleted list
-
Numbered list
-
Paragraph
Expected Behaviors
-
When you press the key Enter in a filled list item, QPP Adapter for Quark XML Author creates a sibling list item below.
-
When you press the key Enter in an empty list item, QPP Adapter for Quark XML Author brings you out of the list structure and creates an empty paragraph element below the list.
Set List Numbering
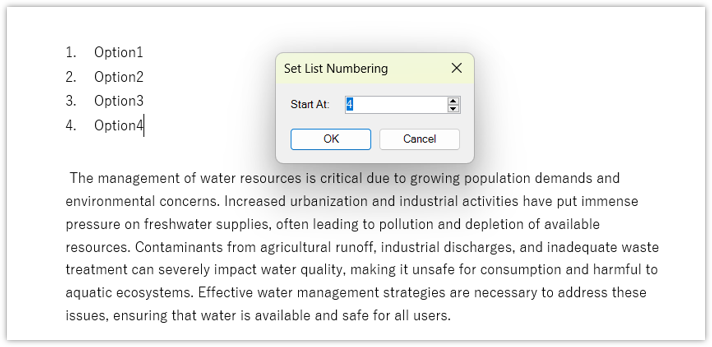
When you create a list, QPP Adapter for Quark XML Author automatically assigns a number (numeric, roman, big alpha, or little alpha) to each list item in increasing order. The option Set List Numbering allows you to change that assigned number to any other number. When you set the number of a list item, QPP Adapter for Quark XML Author also renumbers all the sibling list items that follow that list item.
To set the numbering of a list item:
-
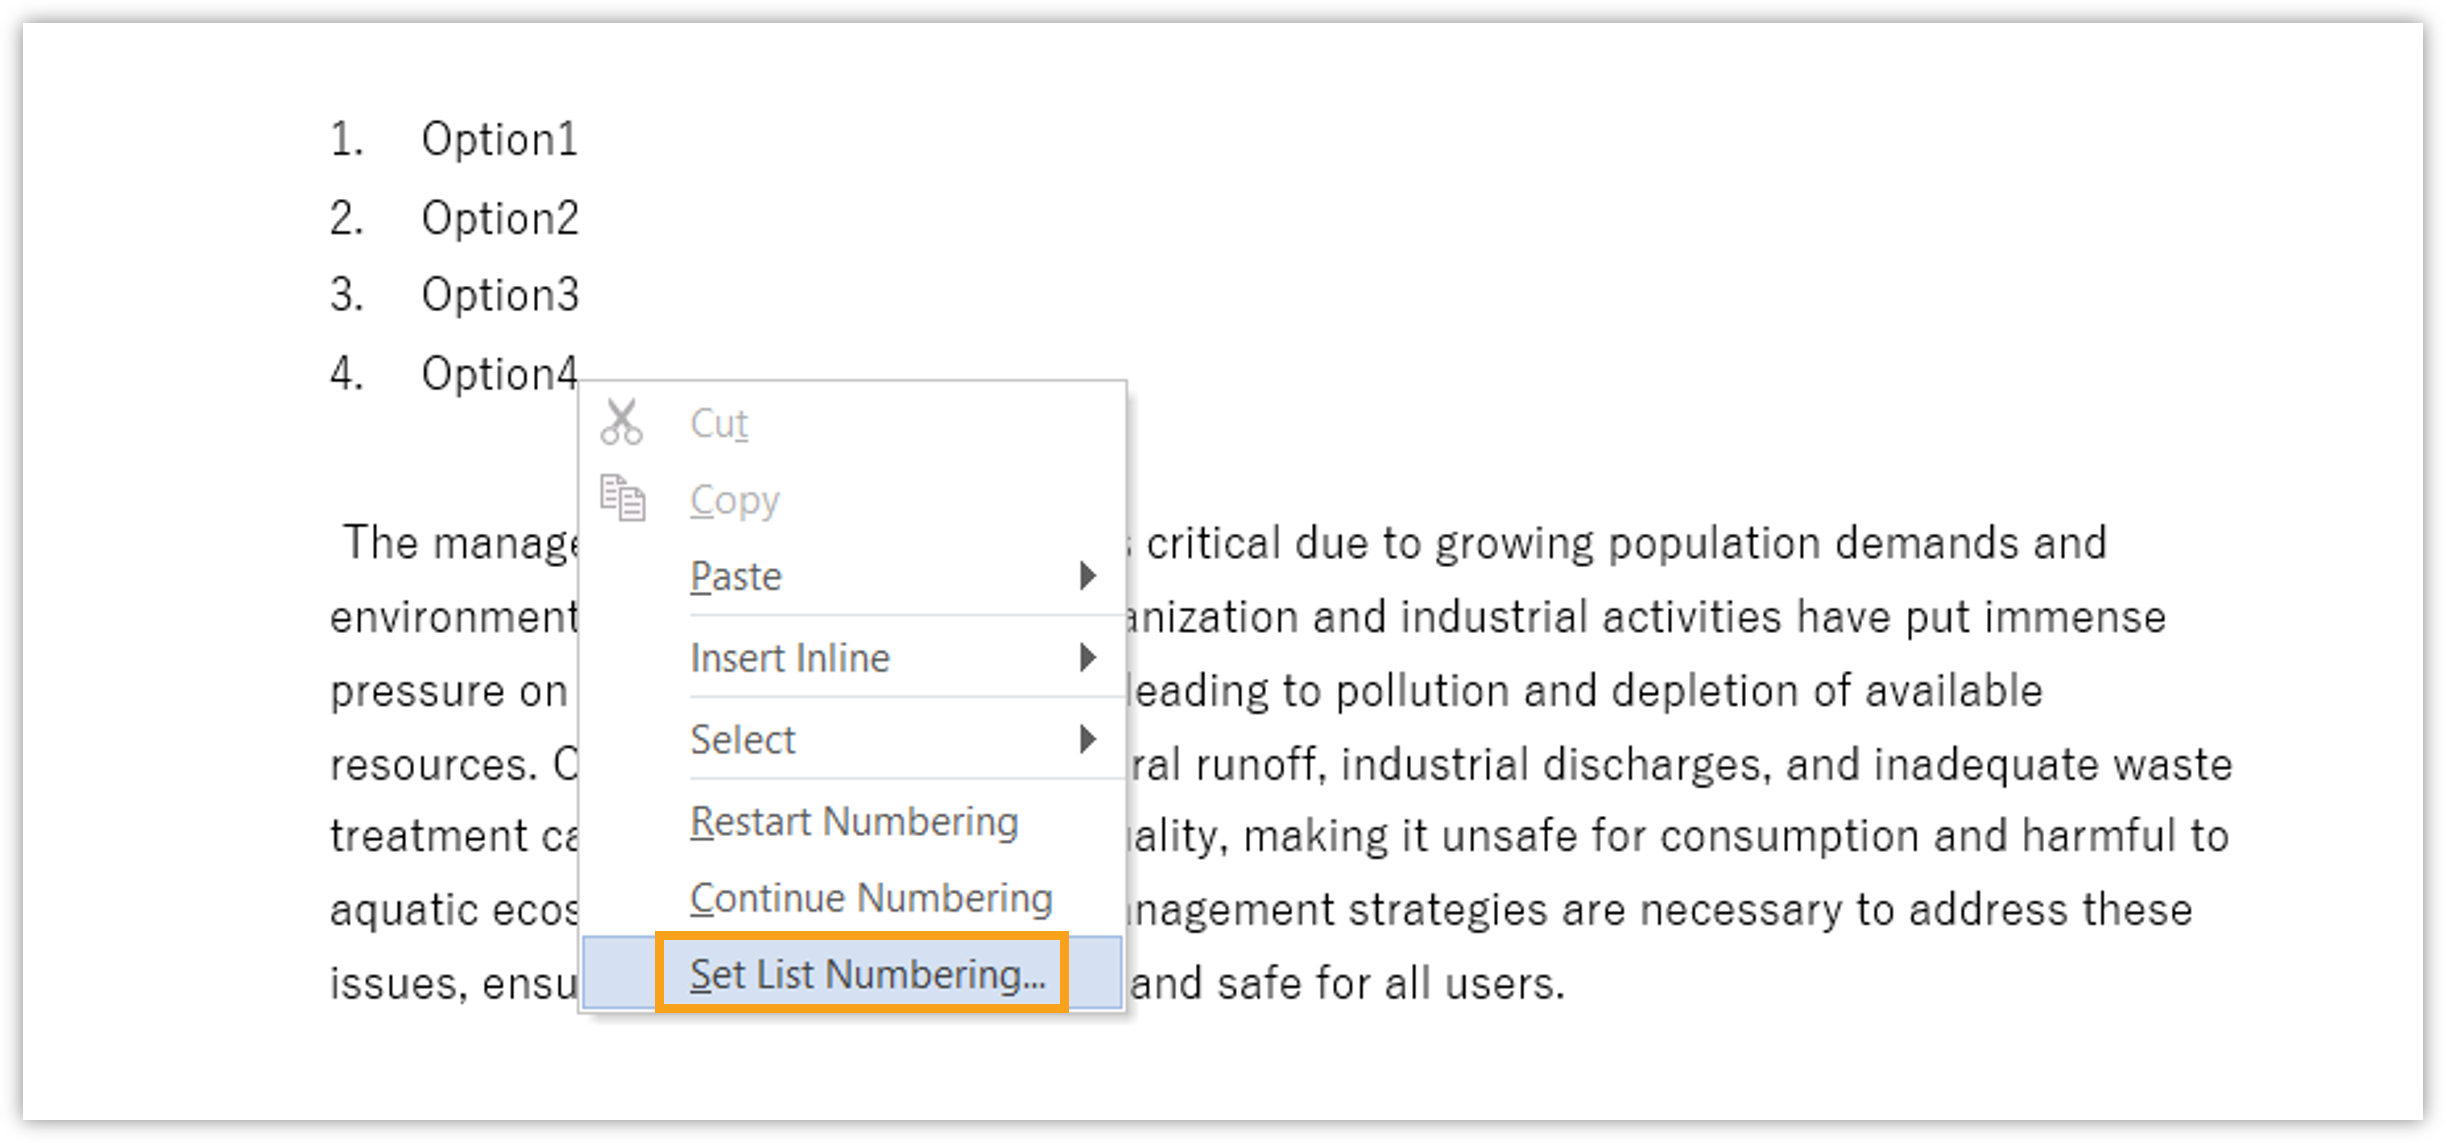
Right-click on the list item at the point in the list where you want to set the numbering.
-
In the context menu, click Set List Numbering.
-
In the Set List Numbering dialog box, specify the number you want to set for the list item in the field Start At.
-
Click OK.
Restart List Numbering
The option Restart List Numbering allows you to change that assigned number to the first number. When you restart the number of a list item, QPP Adapter for Quark XML Author also renumbers all the sibling list items that follow that list item.
To restart the numbering of a list item:
-
Right-click on the list item at the point in the list where you want to restart the numbering.
-
In the context menu, click Restart Numbering.
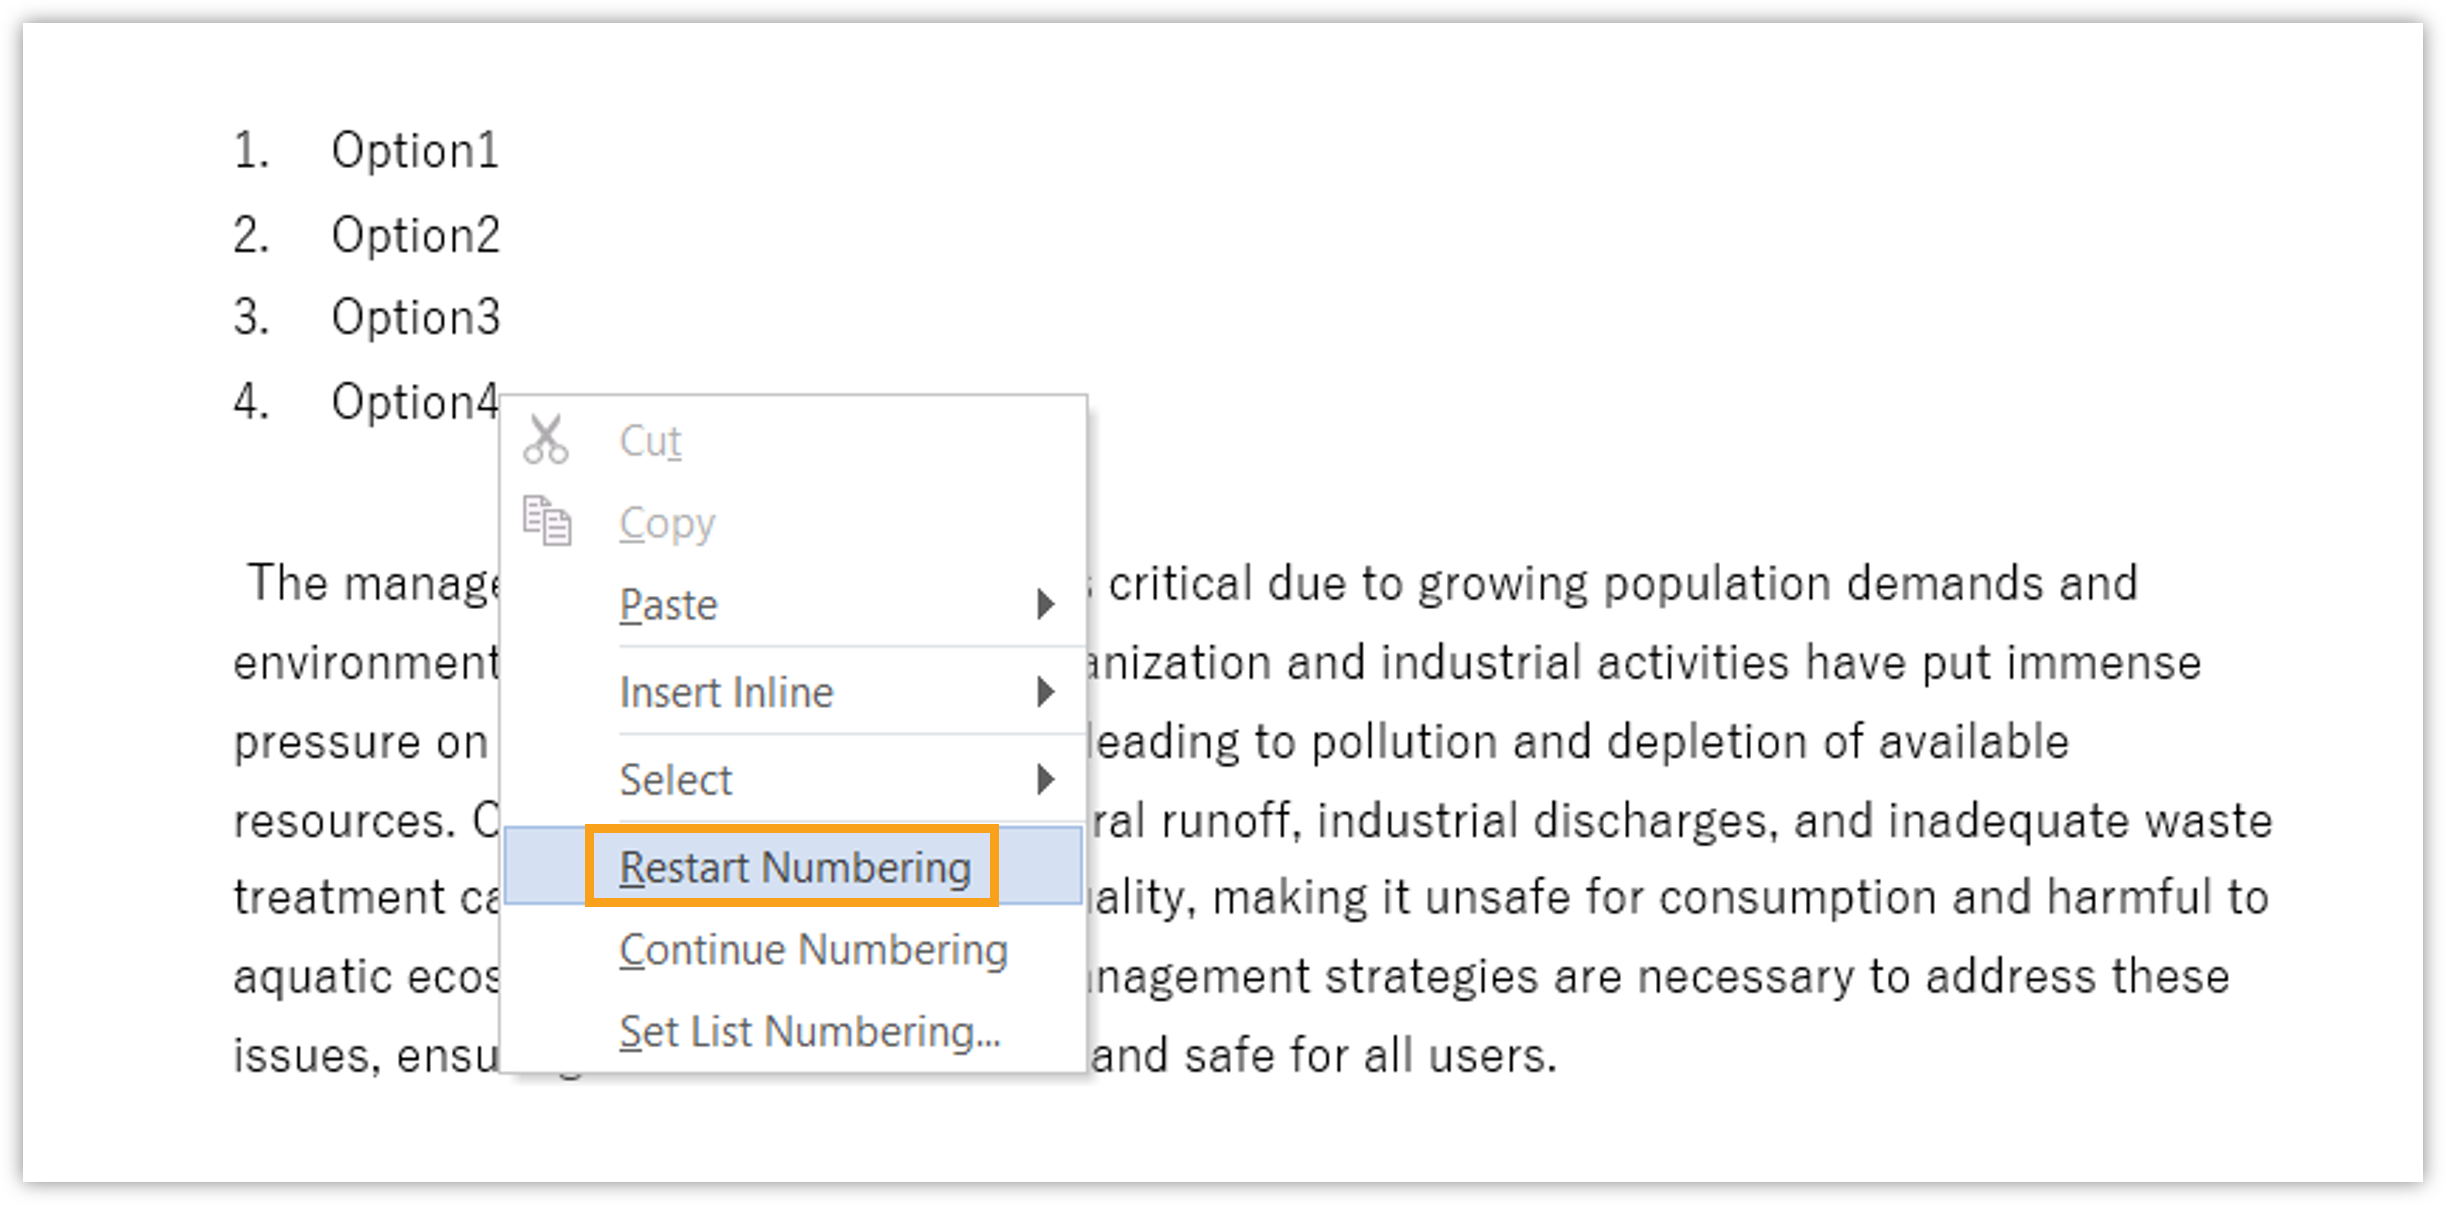
QPP Adapter for Quark XML Author restarts the list number from the selected list item.
Continue List Numbering
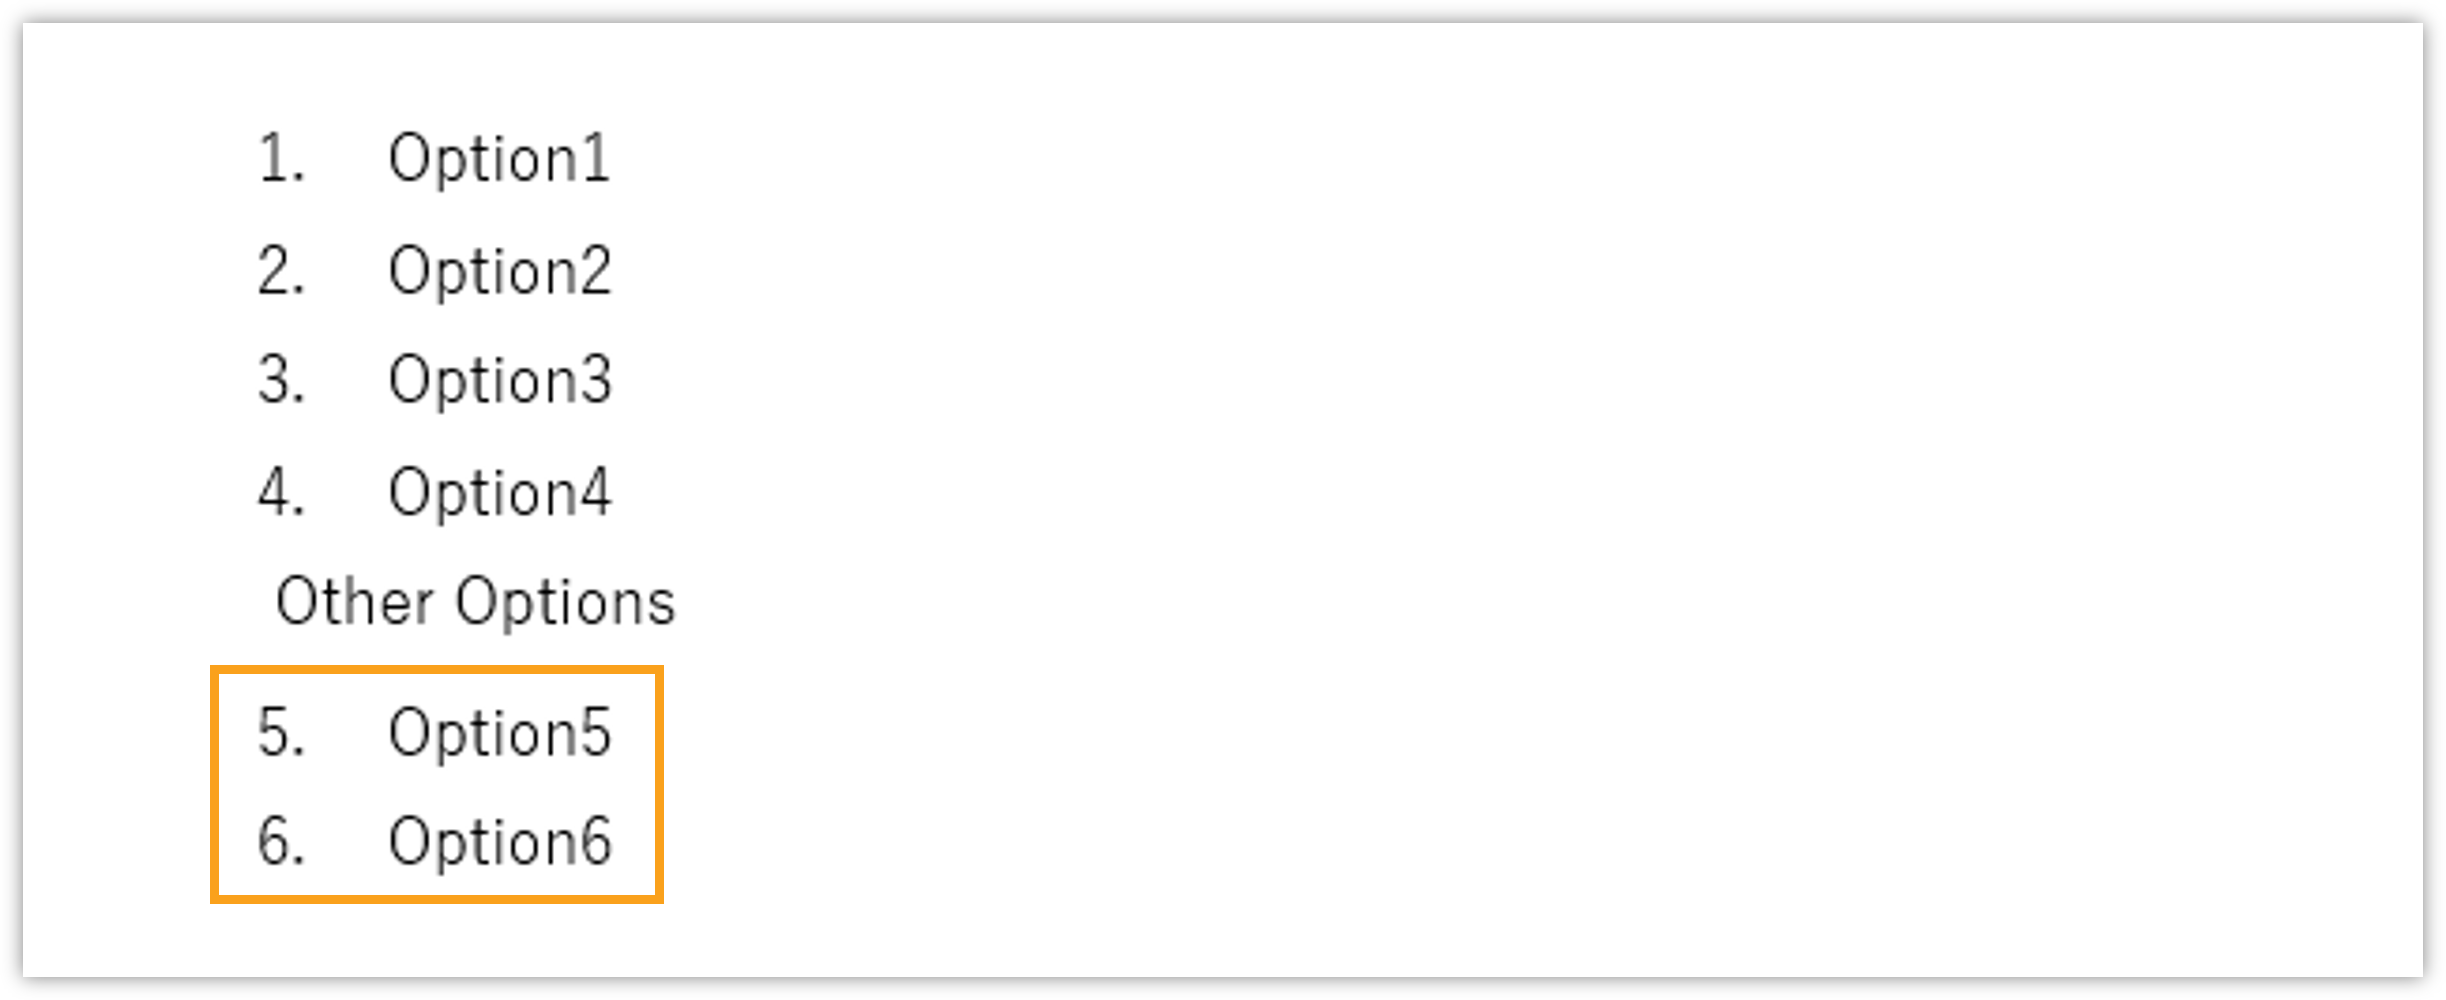
The option Continue List Numbering allows you to associate the current list with an earlier list so that the numbering of the current list is a continuation of the earlier list.
To continue list numbering:
-
Right-click on the list item at the point in the current list from where you want to continue the numbering.
-
In the context menu, click Continue Numbering.
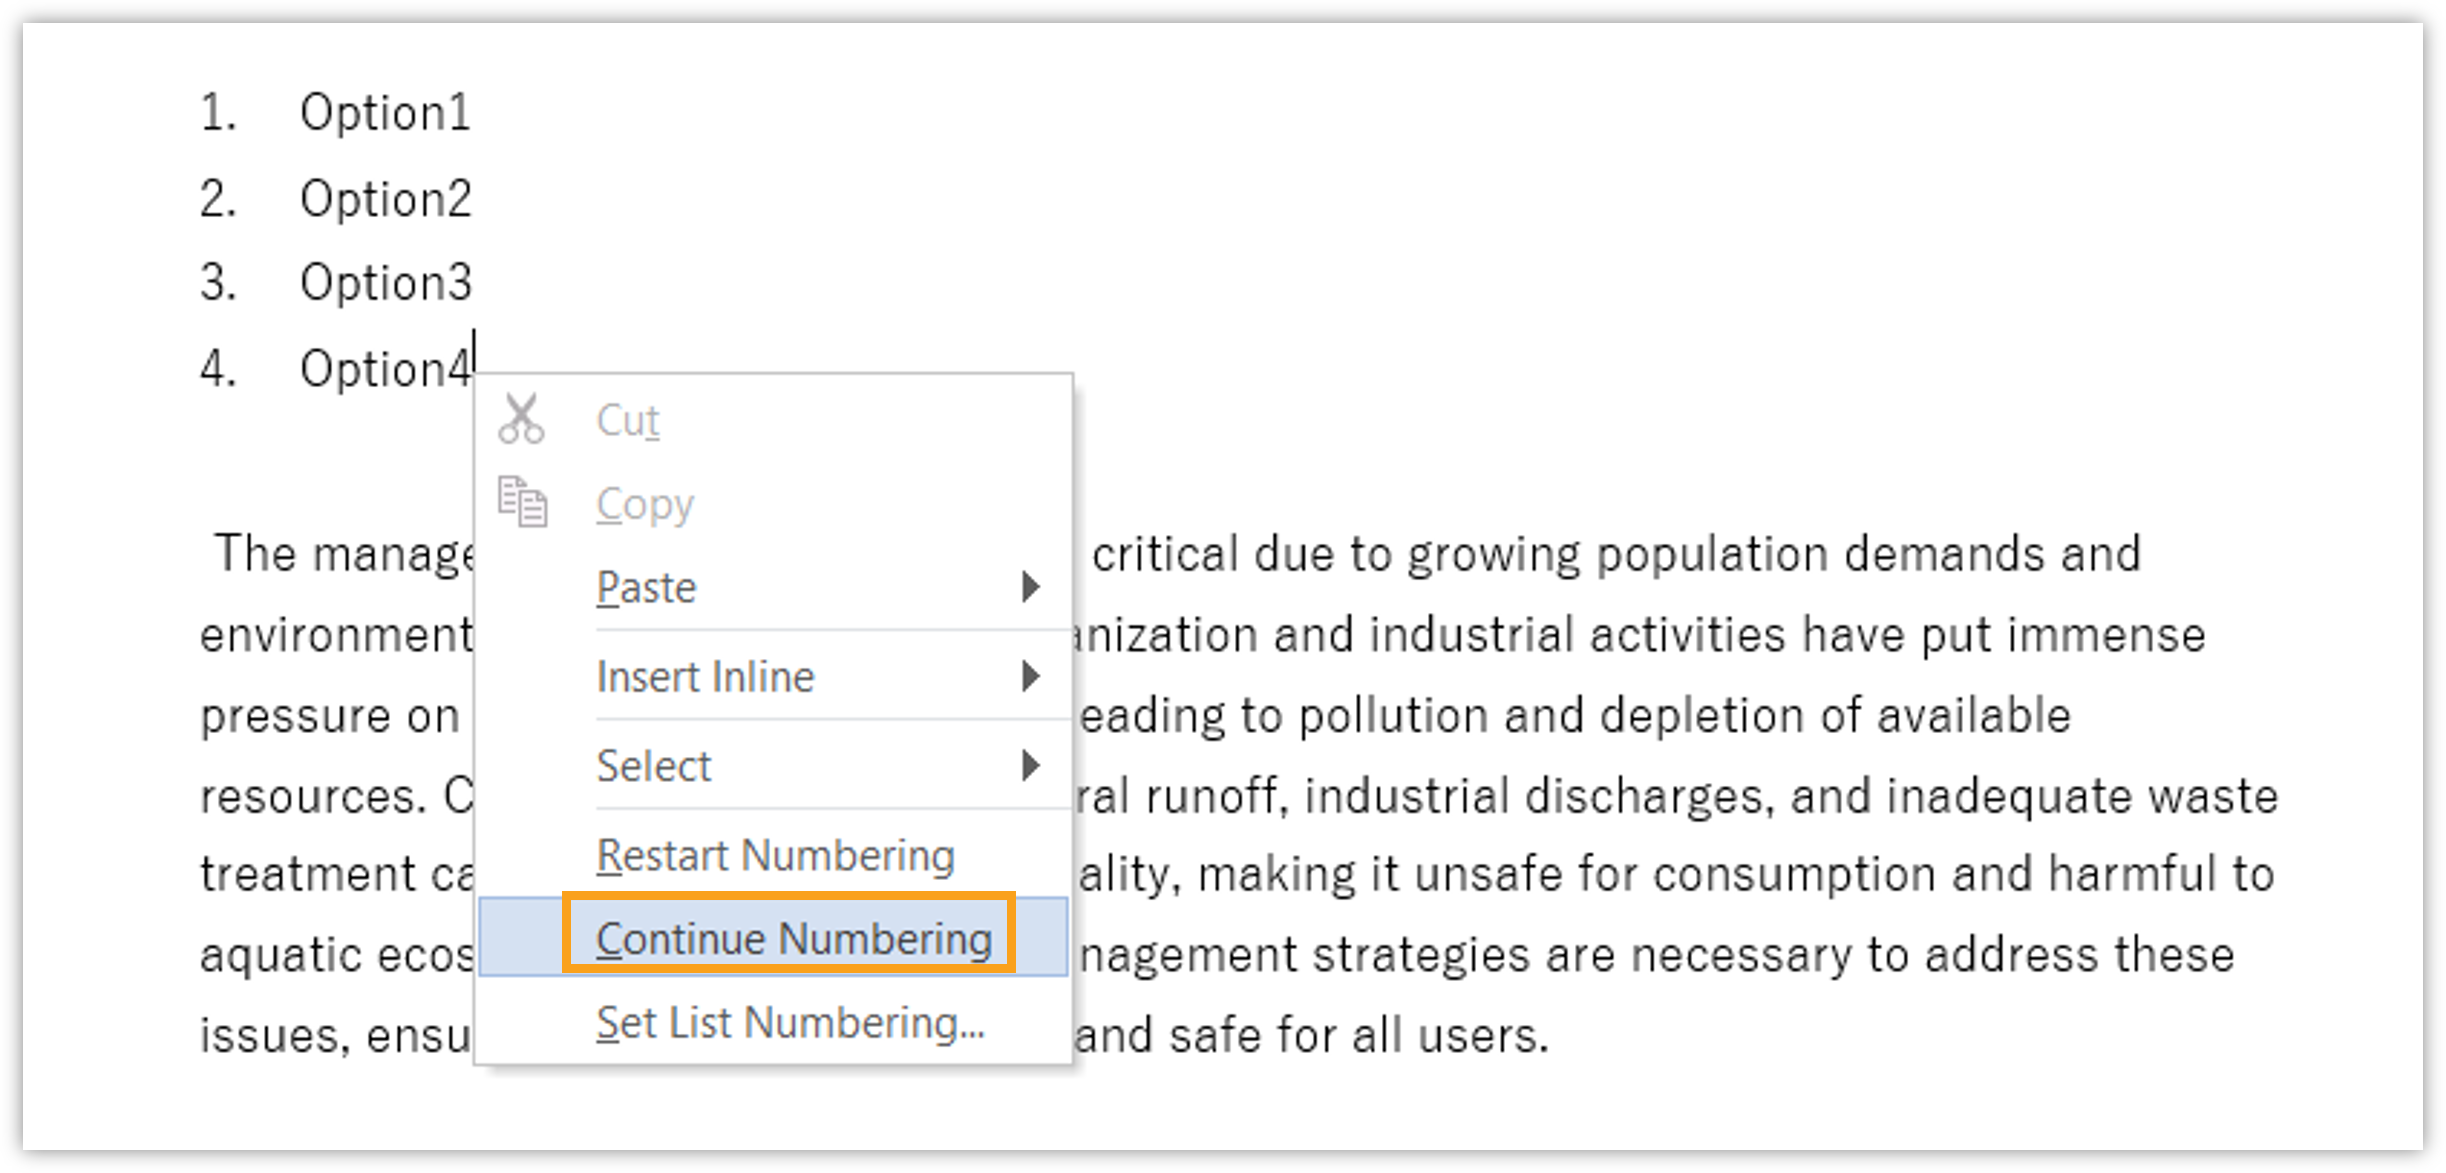
QPP Adapter for Quark XML Author continues the numbering of the list item in the current list from where the numbering of list items ends in the earlier list.
Indent List Items
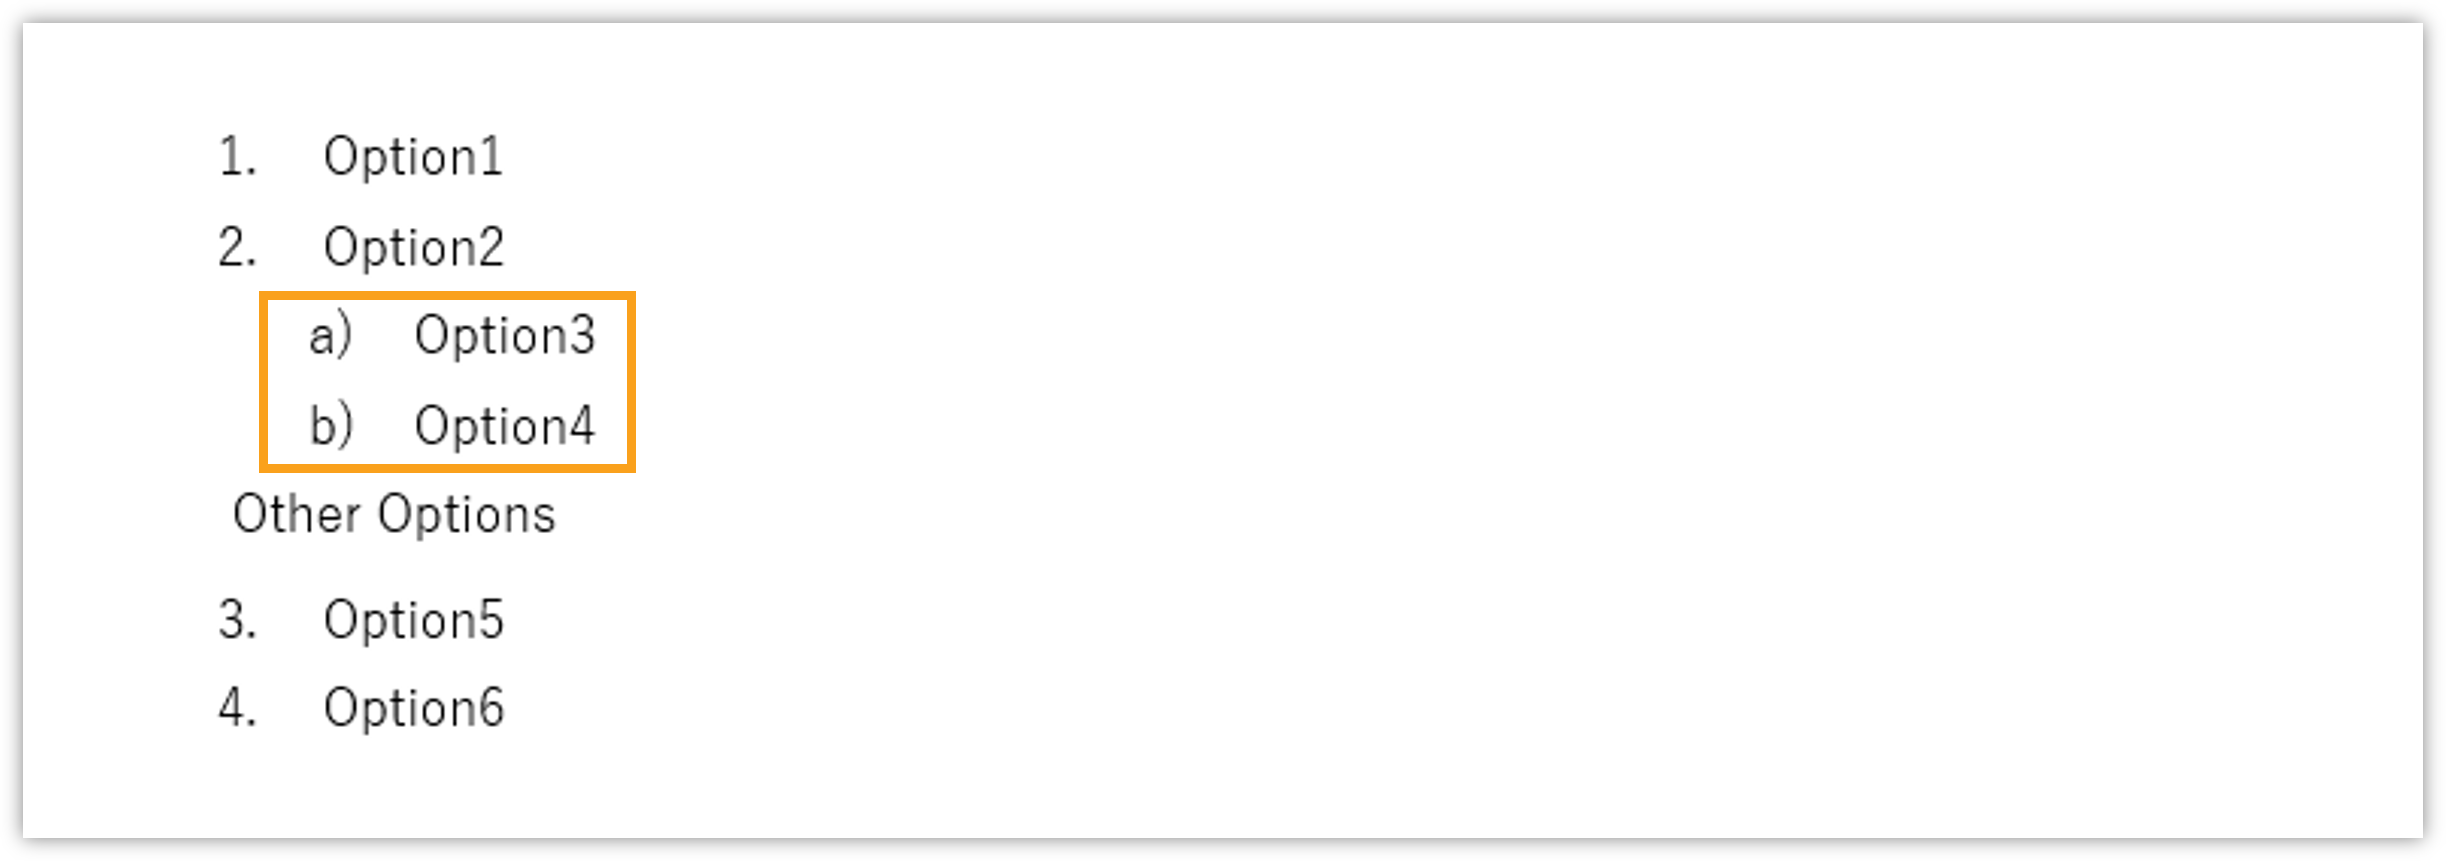
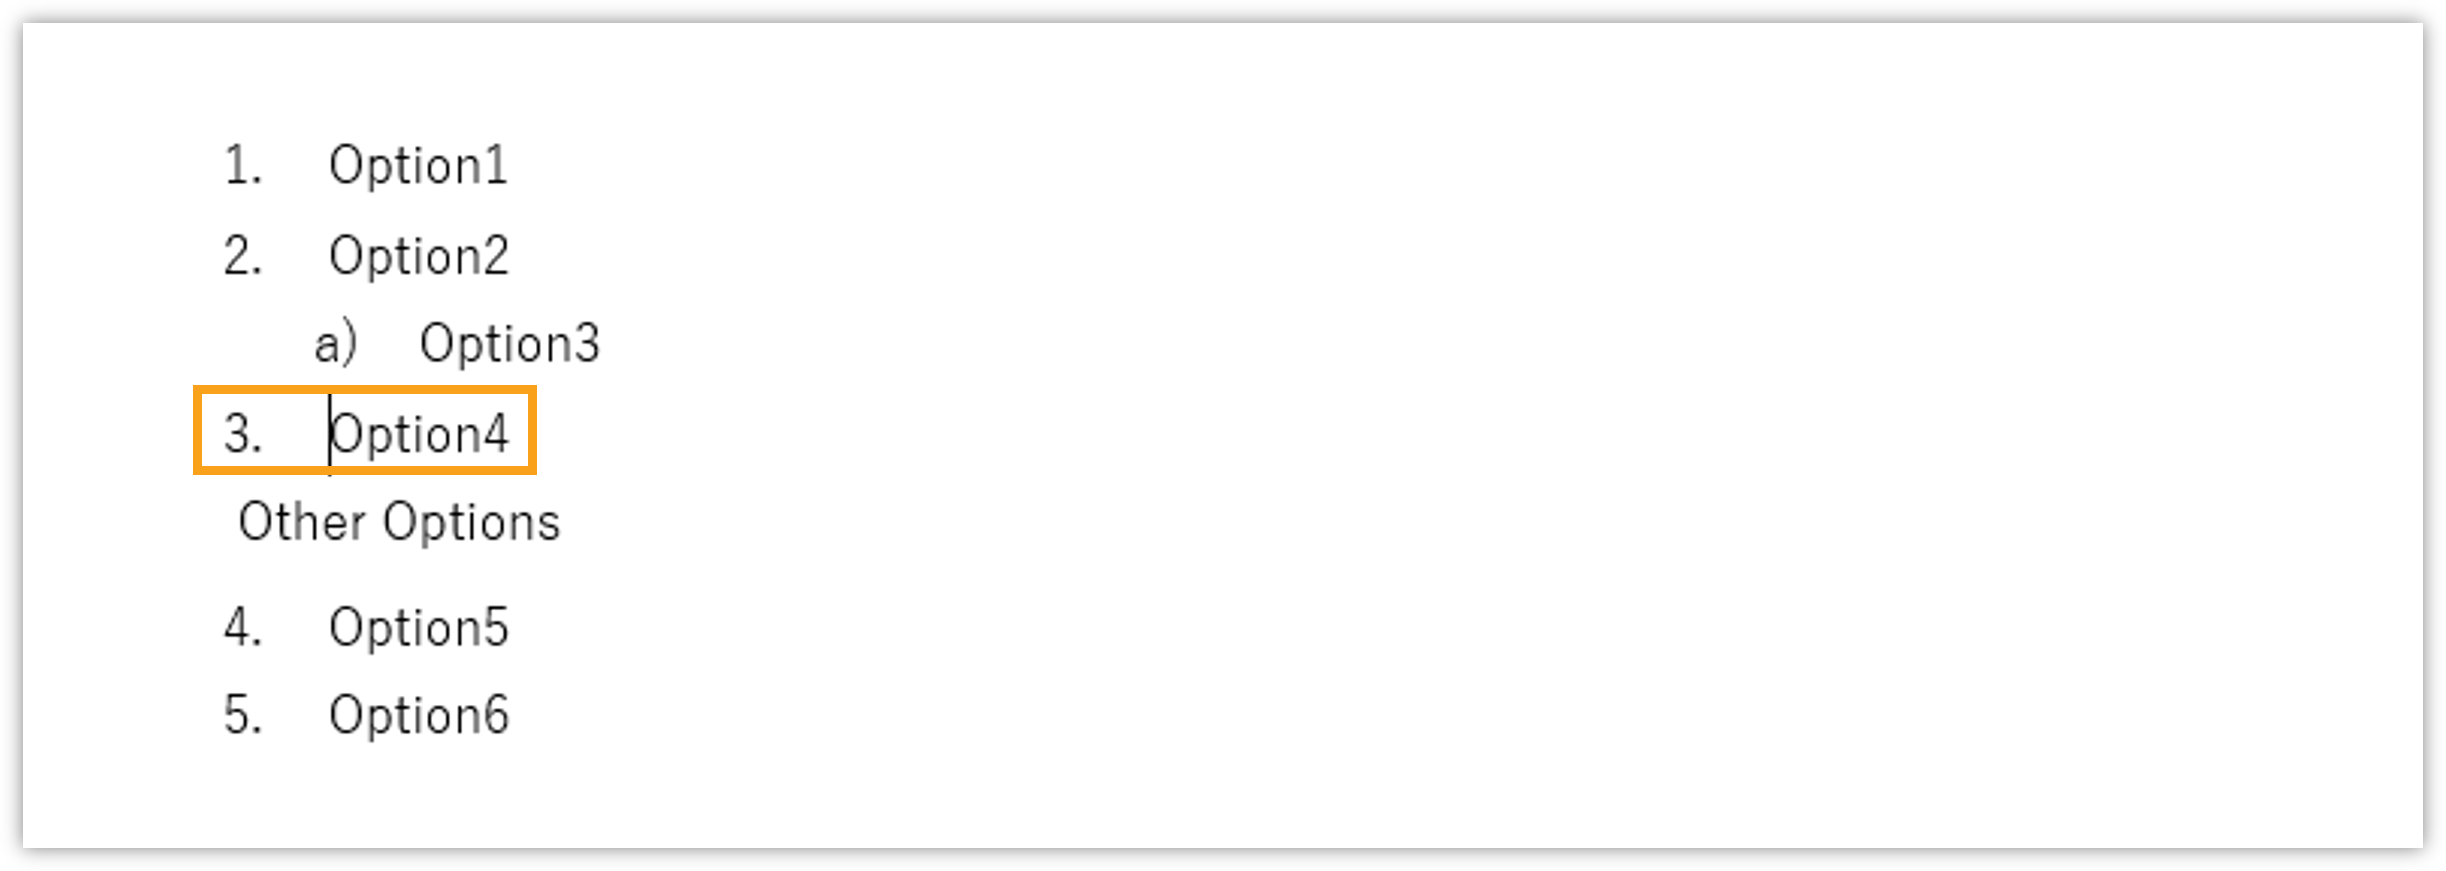
QPP Adapter for Quark XML Author allows you to indent list items up to one level (up or down). Increasing indenting moves the selected list items from a parent list to a sub-list and decreasing indenting moves the selected list items from a sub-list to a parent list that immediately precedes the selection. You can indent any list item except the first list item.
To increase the indent of a list item:
-
Position the cursor in the desired list item or select one or more list items.
-
In the header ribbon, click on the Increase Indent icon.
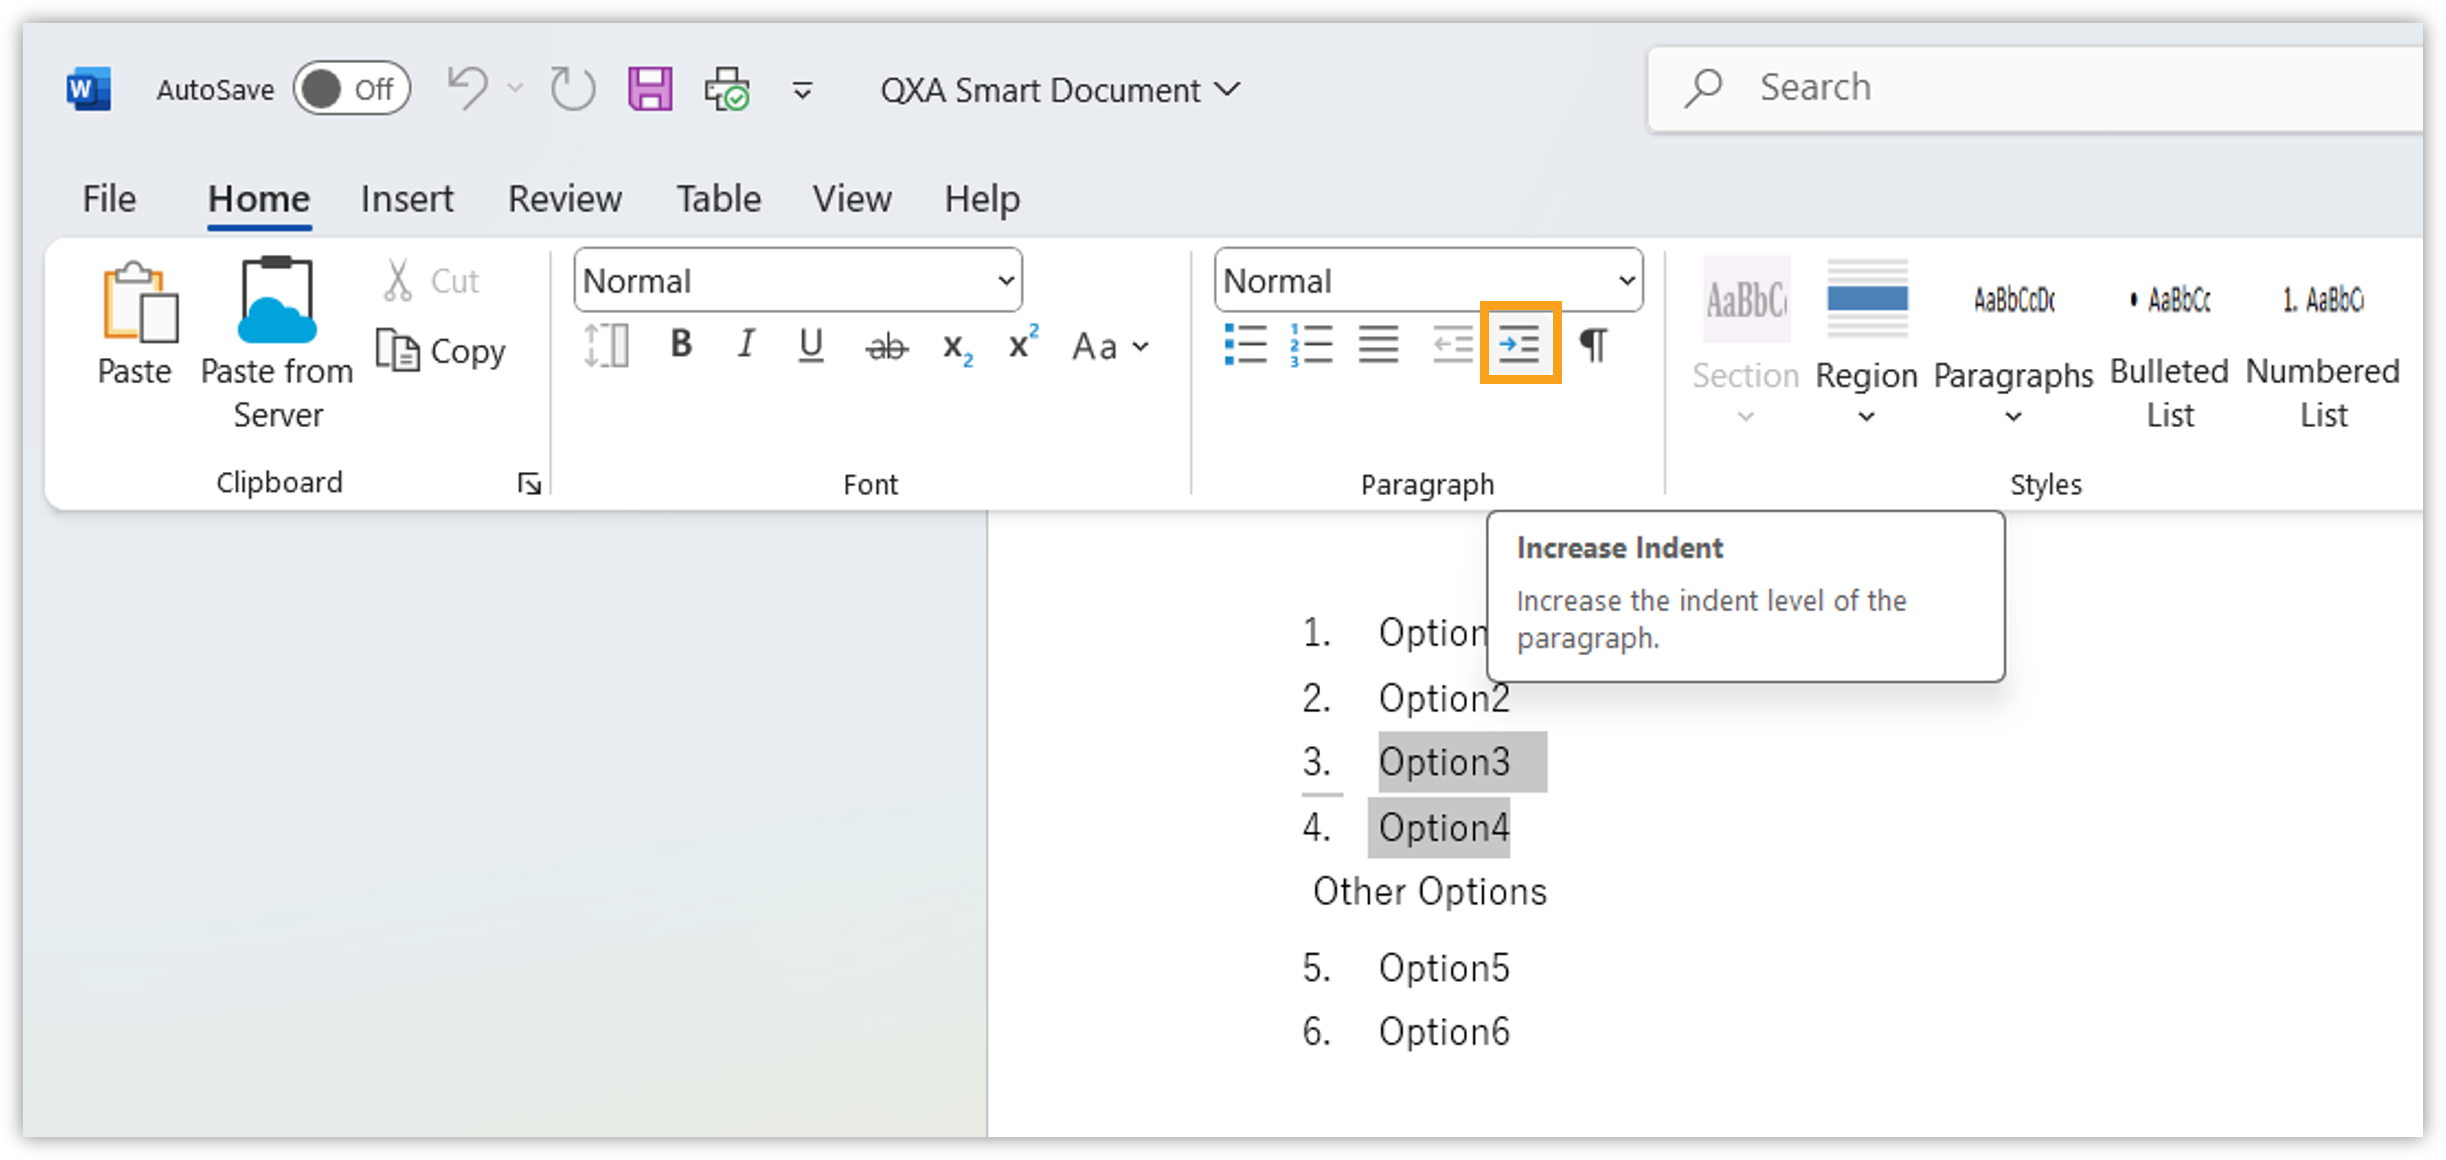
QPP Adapter for Quark XML Author increases the indent of the selected list items.
To decrease the indent of a list item:
-
Position the cursor in the desired list item or select one or more list items.
-
In the header ribbon, under the tab Home, click the Decrease Indent icon.
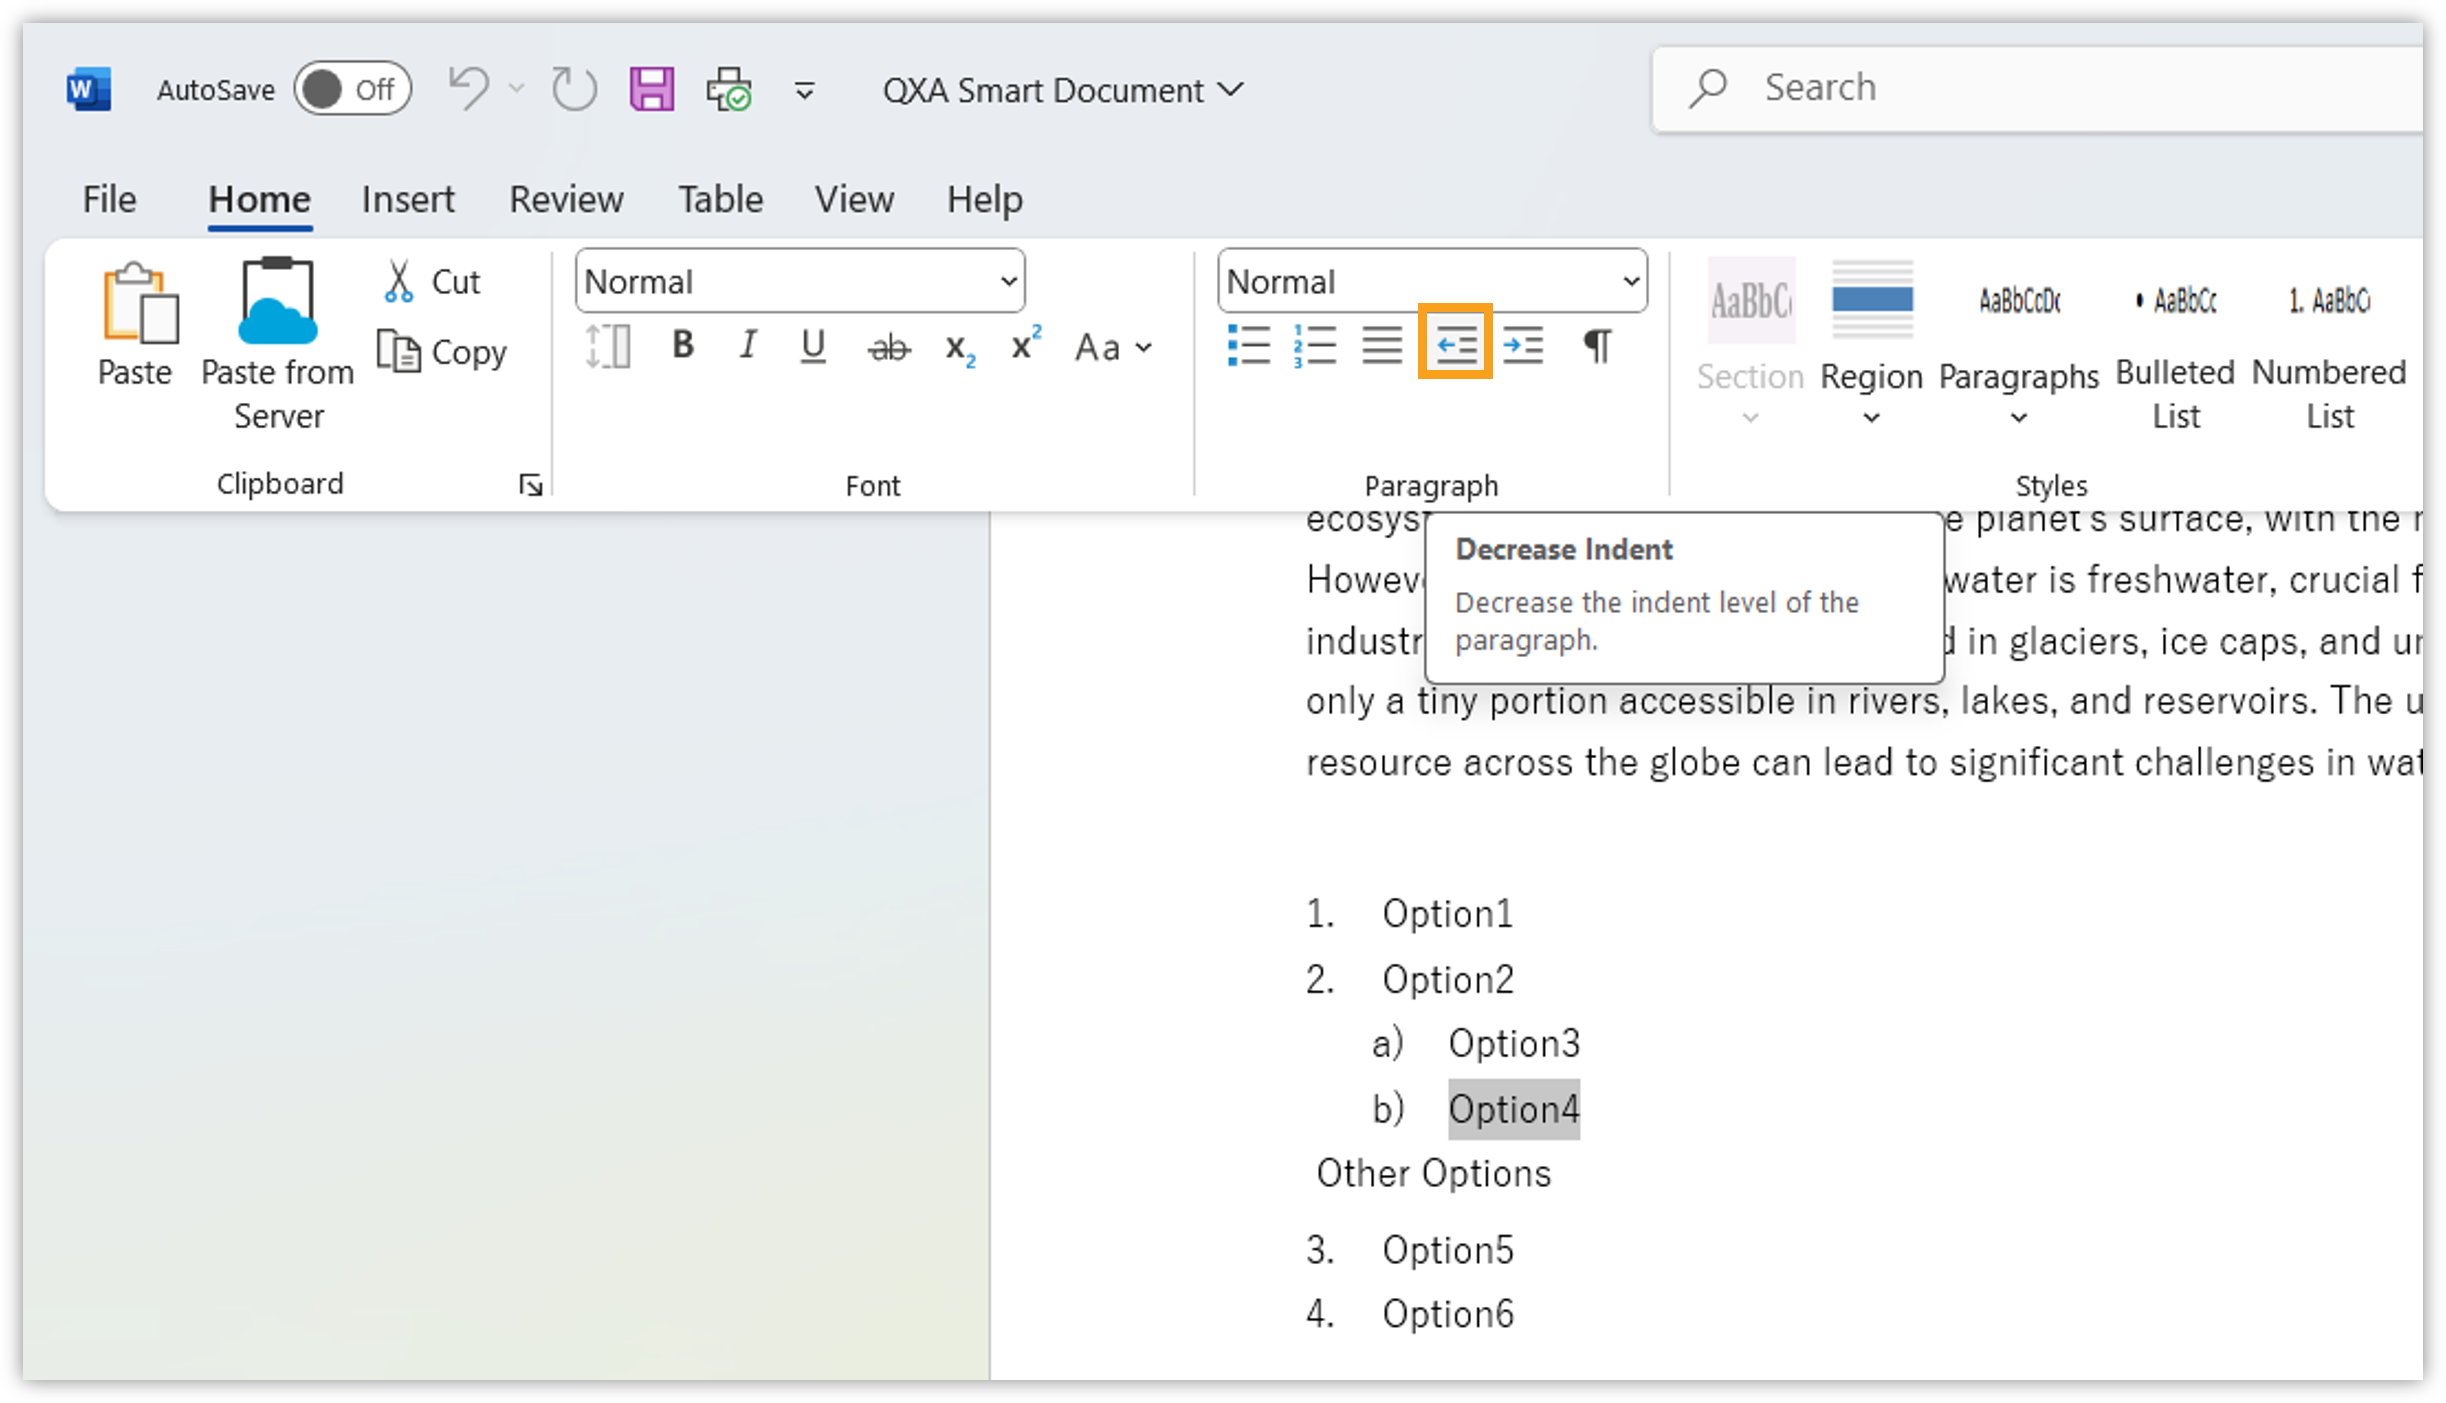
QPP Adapter for Quark XML Author decreases the indent of the selected list items.
Character Formatting
You can apply character formatting such as Bold, Italic, and so on to all the types of text elements, in the same manner, you apply character formatting in Microsoft word.
Format Text
You can apply character formatting to several text elements at once. You can also overlap or nest text formatting. For example, you can apply Bold and Italic formatting to the same text element or you can apply Bold formatting to a word within a phrase on which you have already applied Italic formatting.
All the primary text formatting options are available in the header ribbon under the tab Home.
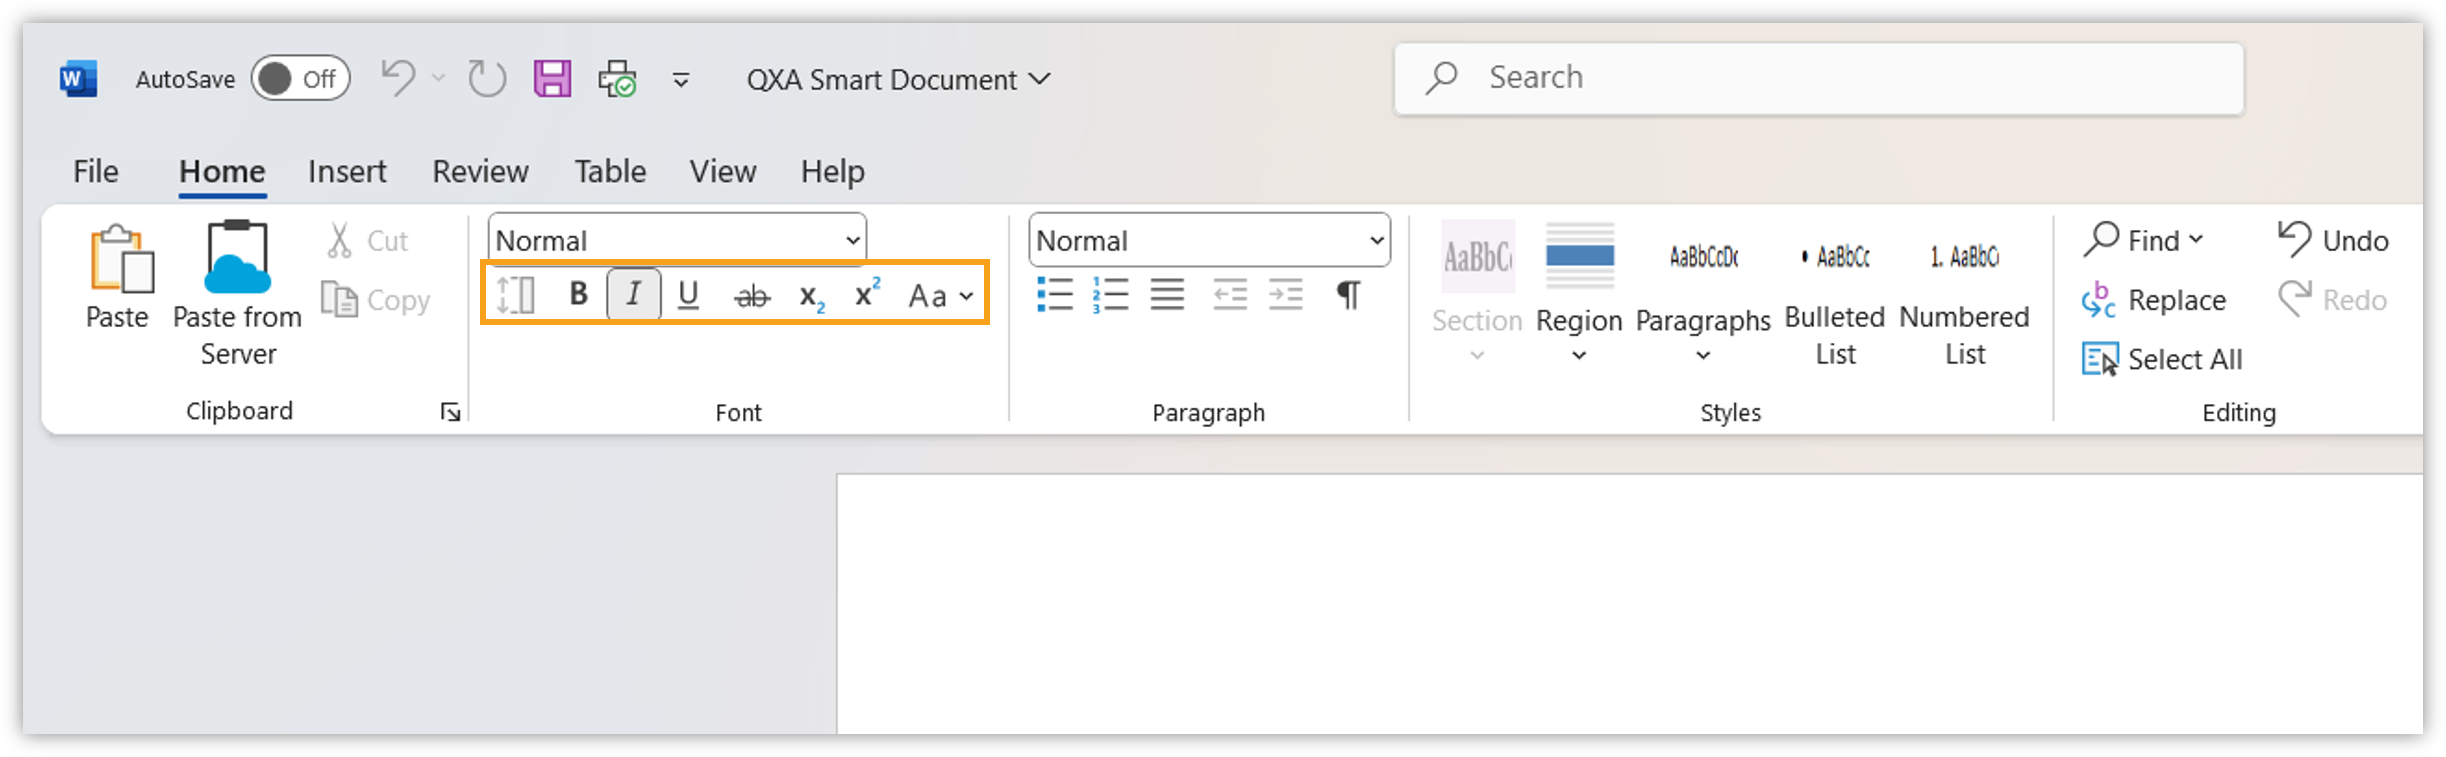
These options are as follows (in the same sequence as they appear in the screenshot):
-
Bold
-
Italic
-
Underline
-
Strikethrough
-
Subscript
-
Superscript
To apply formatting on a text element:
-
Select the text element(s) that you want to format.
-
In the header ribbon, select the formatting icon that you want to apply.
Change Styles
QPP Adapter for Quark XML Author allows you to change the style of an element within the Word canvas. For example, with the change styles feature, you can convert a paragraph into a note, convert a bulleted list into a numbered list, and so on. When you change the style of an element, QPP Adapter for Quark XML Author replaces the old element with the new element and copies the content and metadata of the old element into the new element.
Rules for Changing Styles
General
-
You can't change the style of an element that is required, based on your XML schema.
-
You can't change the style of an element that has child elements that are required, based on your XML schema.
-
When an element has child elements and the style you want to apply to the parent element can also be applied to the child elements, you change the style of the element. For example, if the items in a bulleted list have child paragraphs and since numbered list items can also have child paragraphs, you can change the style from bulleted list items to numbered list items.
-
When you select several elements to change the style, all the elements must be of the same type.
-
When you select several elements to change the style, you must also select all the child elements.
-
You can't change an element style to all the other element styles. Your XML schema defines which element styles you can convert an element style to.
Paragraphs
-
The paragraphs you select to change style must belong to the same section.
Lists
-
When you select several list items to change the style, all the selected list items must belong to the same list.
Change the Style of an Element
To change the style of an element (for example a paragraph):
-
Place your cursor at the very beginning of the text you want to restyle. For instance, if you're working with a paragraph, click right before the first word in the paragraph.
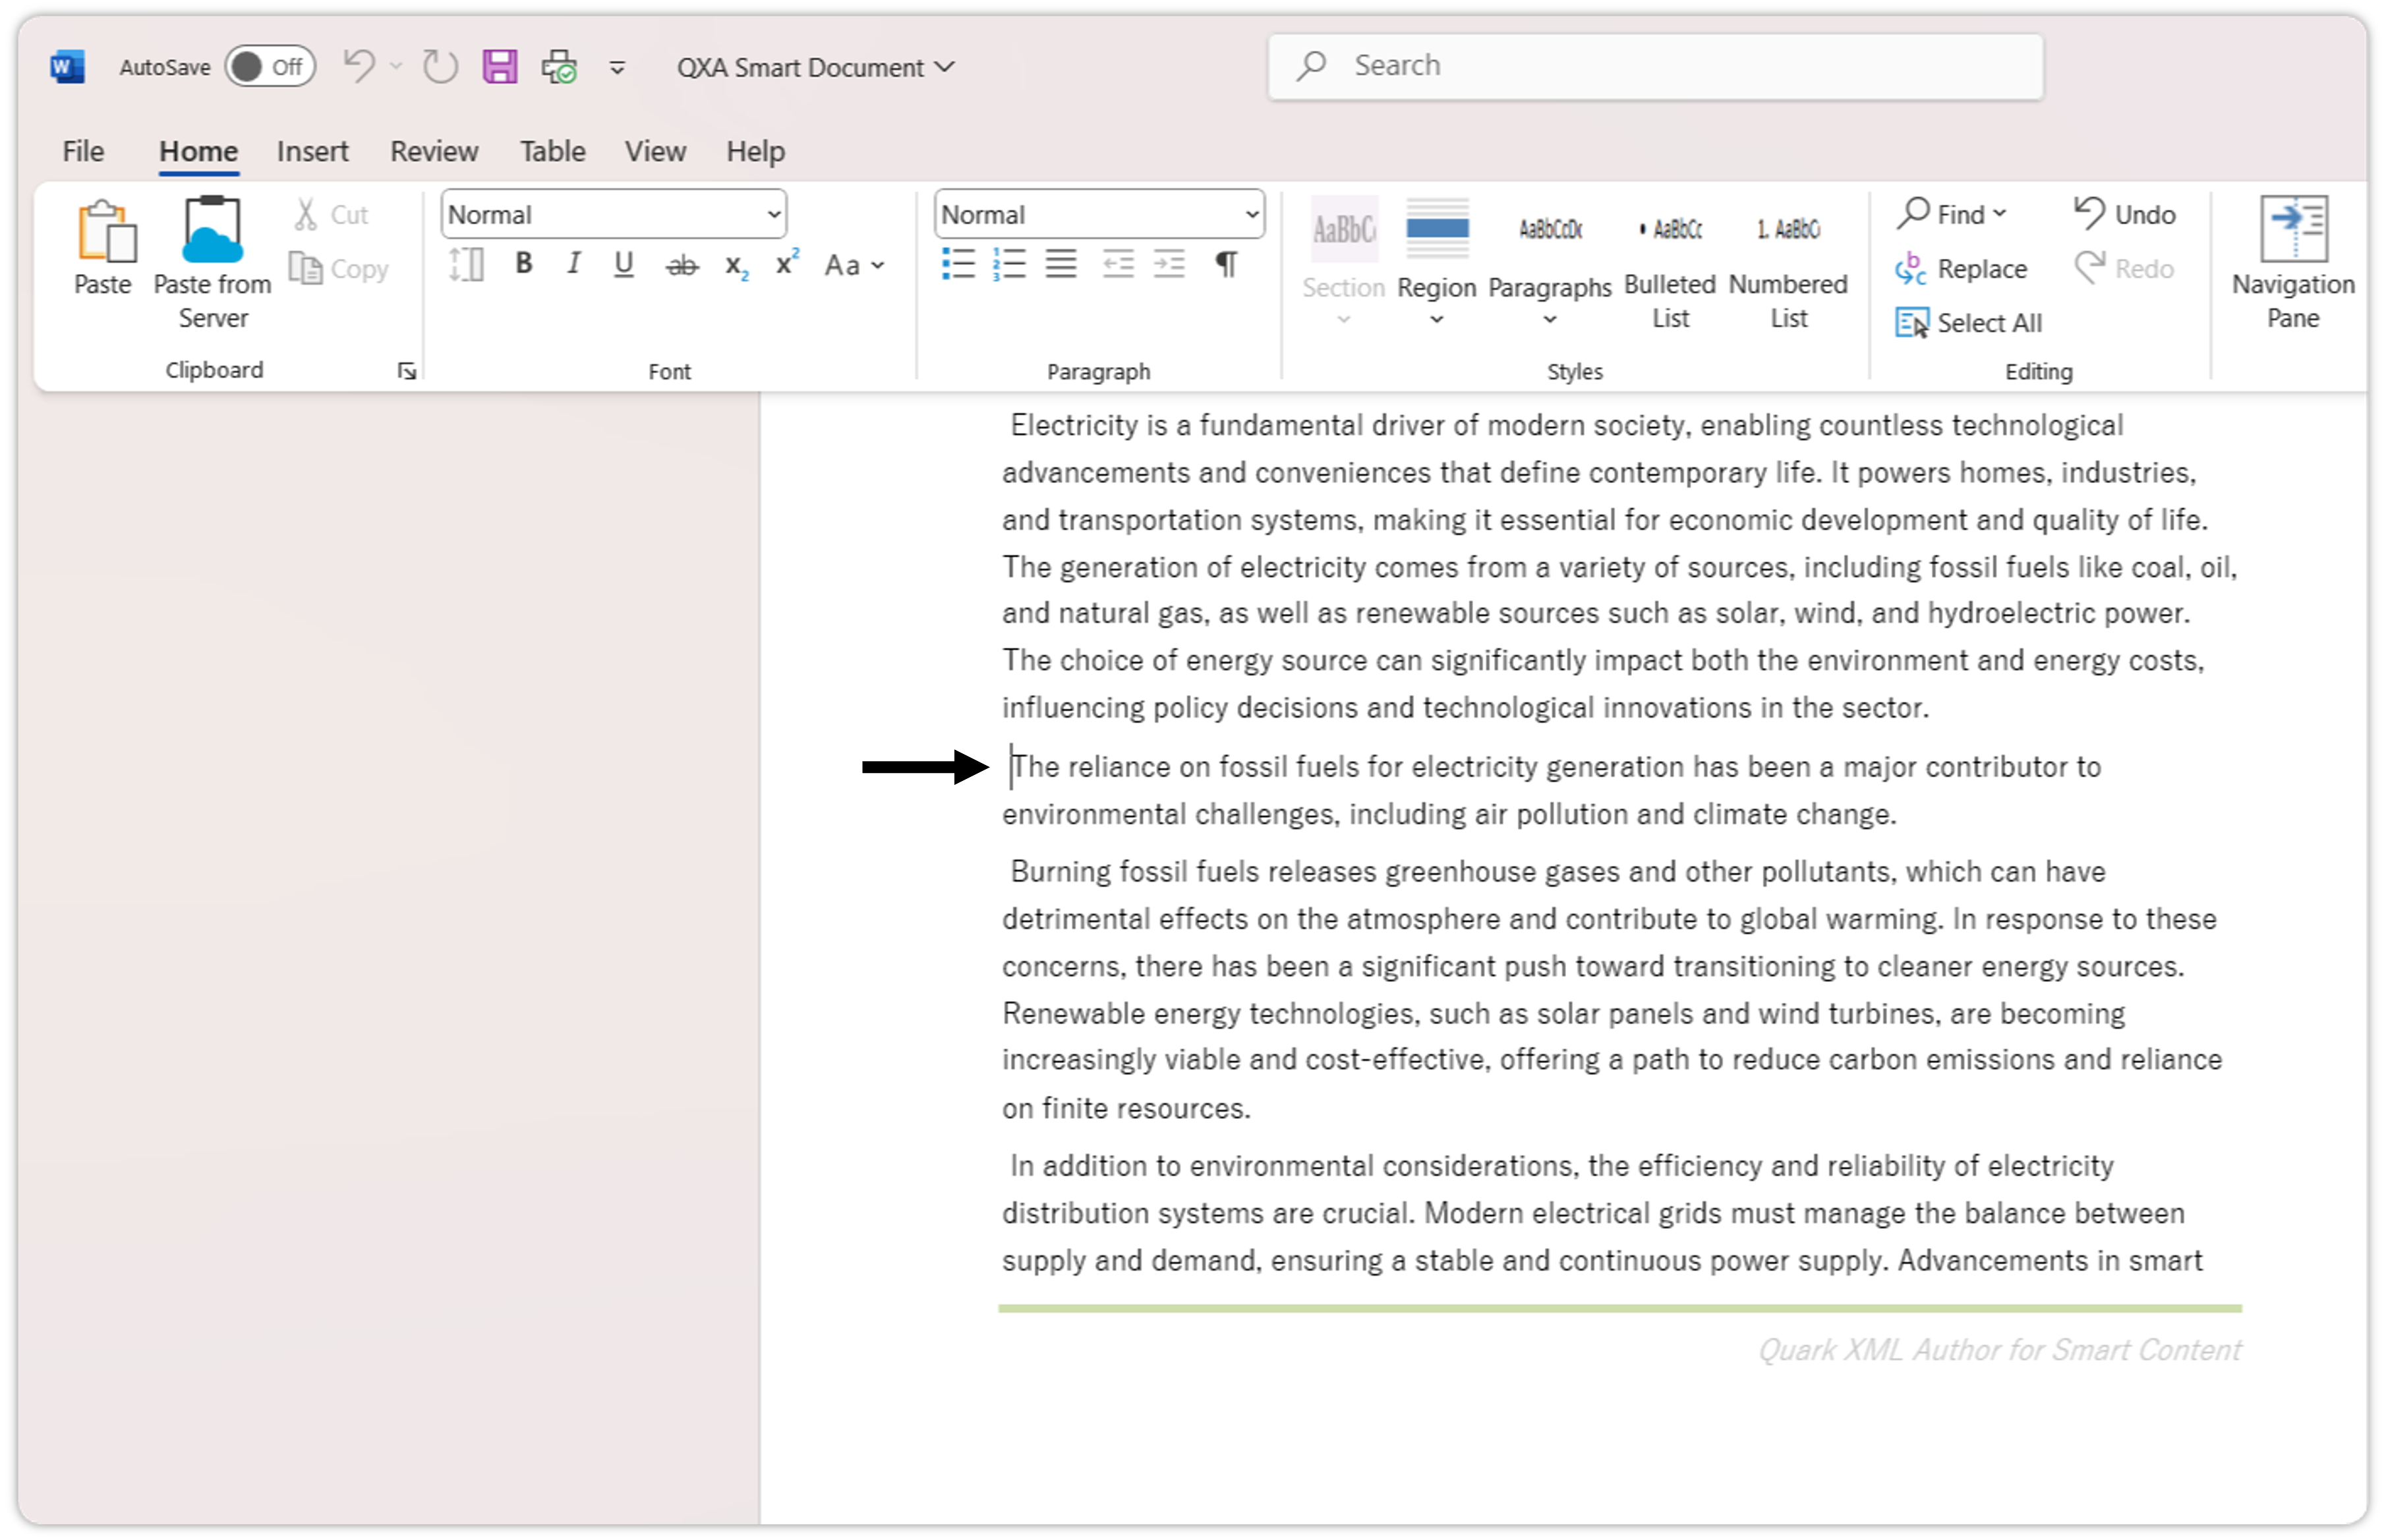
-
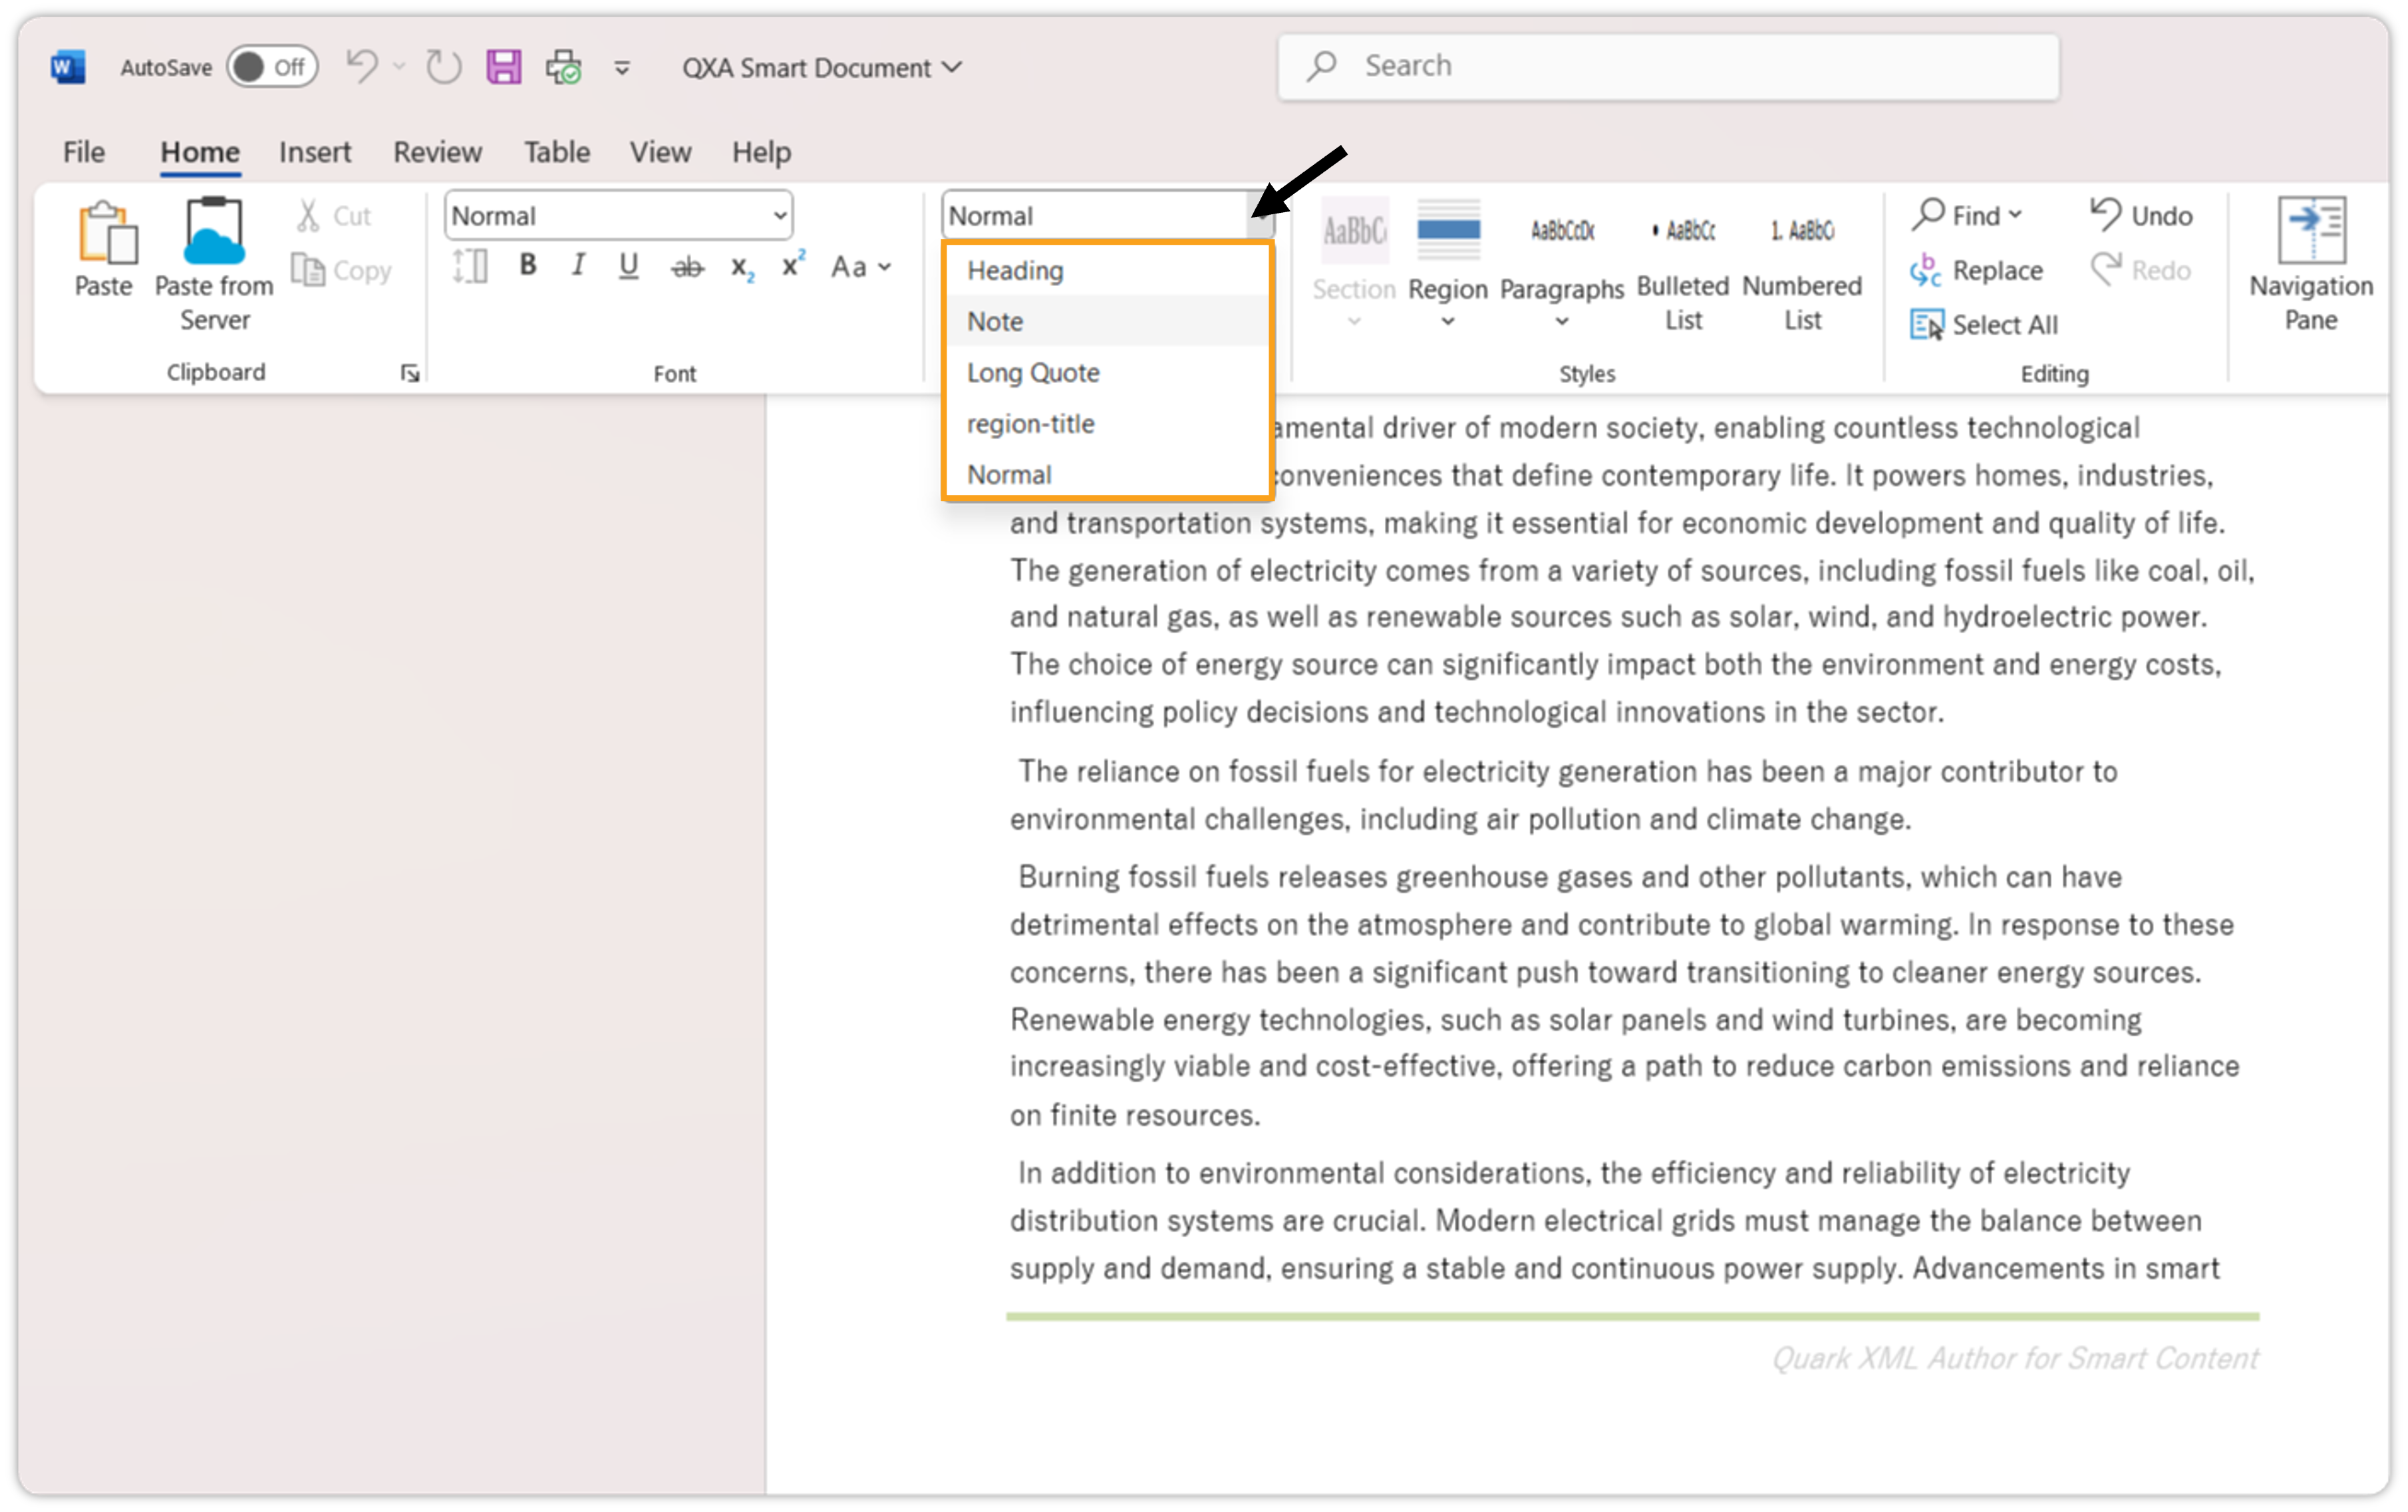
Once the cursor is in place, click on the drop-down menu in the header ribbon (highlighted in the screenshot) and select your desired style—for example, Note—to apply it.
-
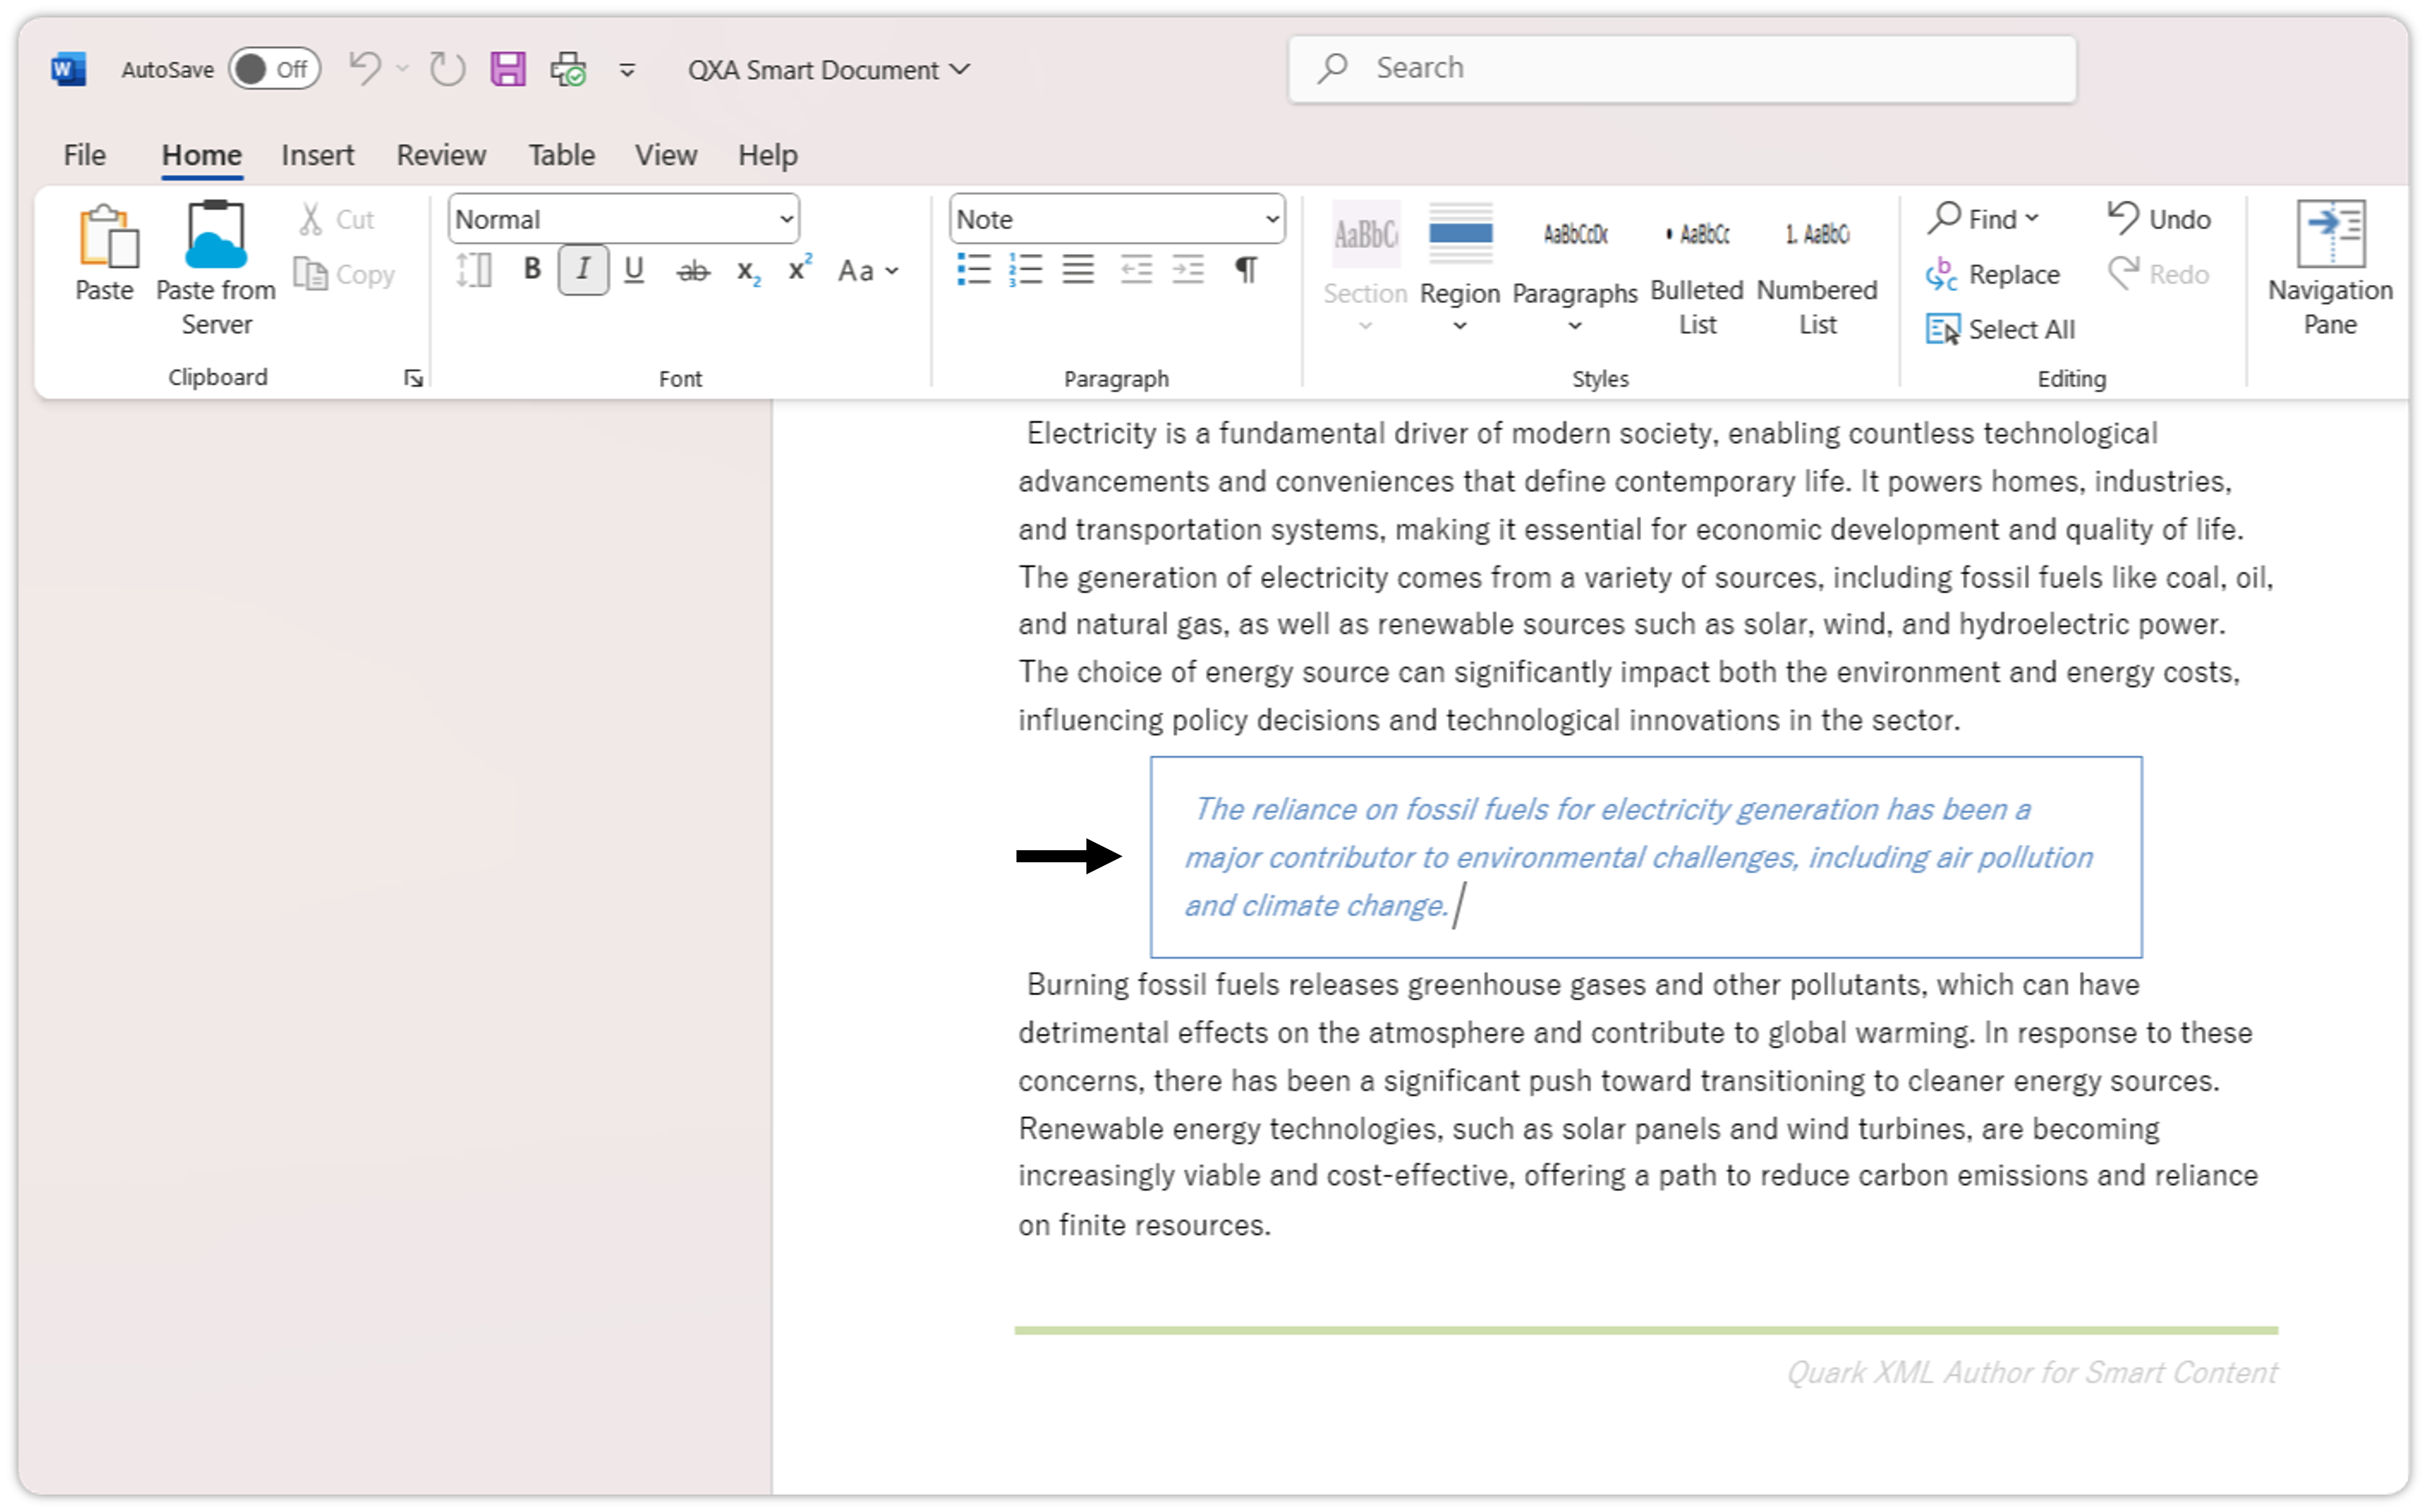
QPP Adapter for Quark XML Author will change the element from its original style (e.g., Paragraph) to the newly chosen style (e.g., Note).
Insert Hyperlinks
QPP Adapter for Quark XML Author allows you to insert hyperlinks in the same manner as in Microsoft Word.
To insert a hyperlink:
-
Click the word or phrase that you want to hyperlink.
-
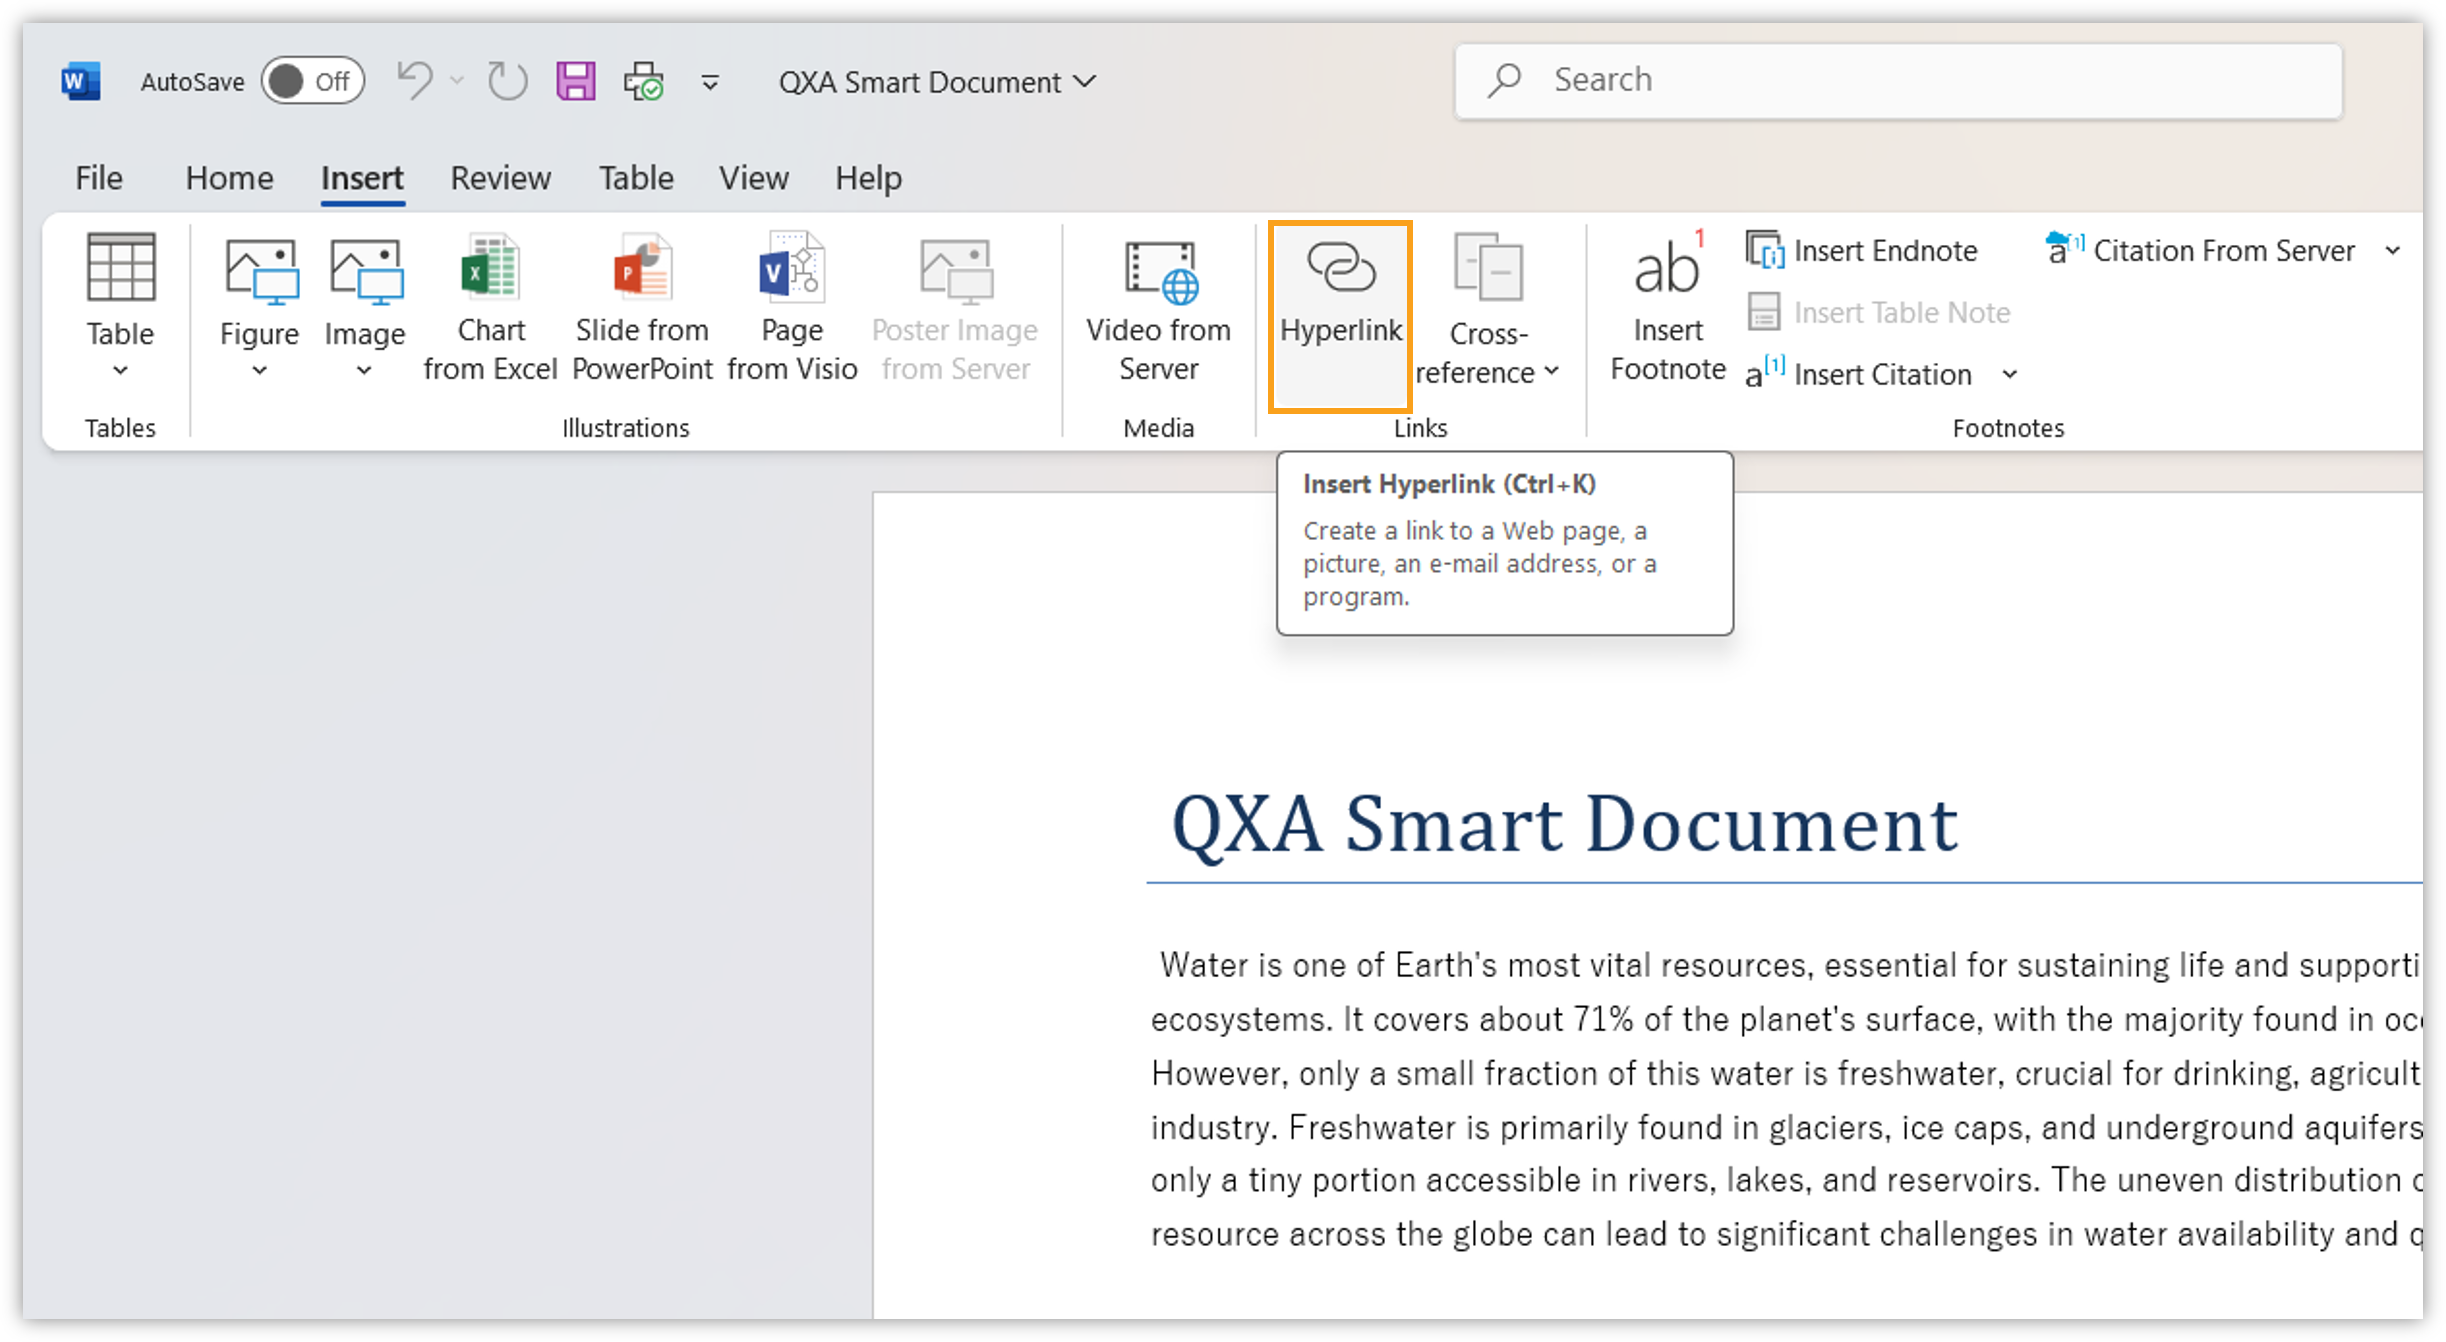
In the header ribbon, under tab Insert, click Hyperlink to open the dialog box Insert Hyperlink.
-
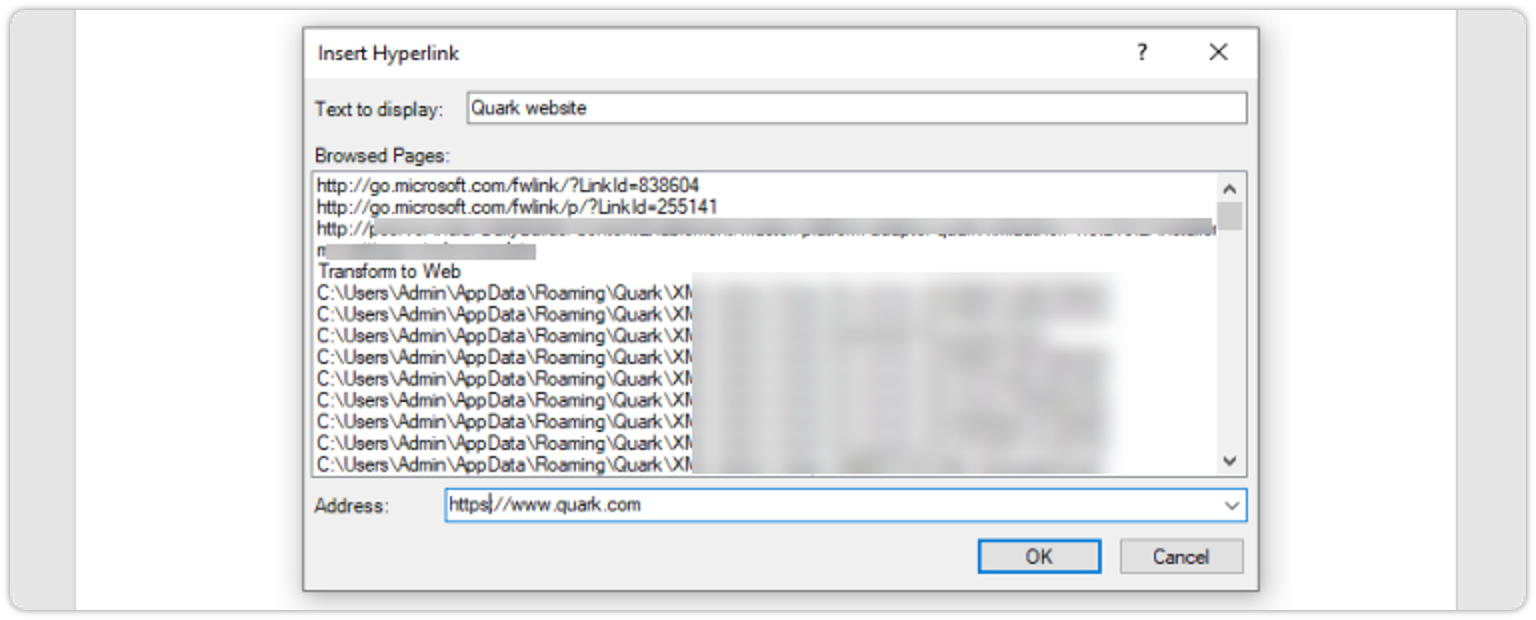
In the dialog box Insert Hyperlink, provide the following inputs:
-
Text to display: Change the text in the selection if required. By default, this input field displays the text you selected on Word canvas.
-
Browsed Pages: Hyperlink the selected text with one of the recently browsed URLs and file location.
-
Address: Enter a new URL/file location if you do not find the destination URL/file location in Browsed Pages.
-
-
Click OK.
QPP Adapter for Quark XML Author inserts a hyperlink with the destination URL/file location to the selected text.

Hyperlink Images
You can also hyperlink images that are inline with a text element. The process to hyperlink an inline image is the same as that to hyperlink text.
Open Hyperlinks
To open a hyperlink:
-
Position the cursor over the hyperlinked text.
-
Use one of the following methods:
-
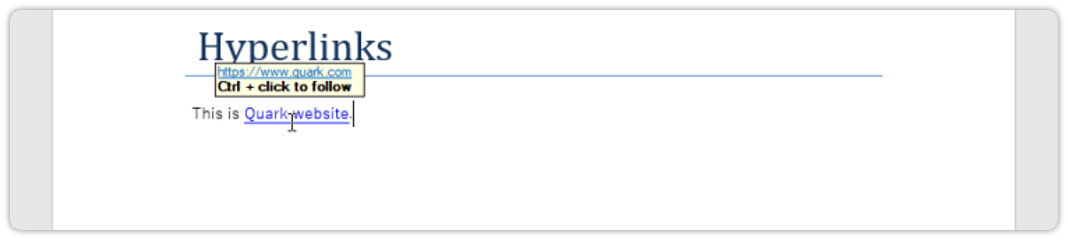
Press the keyboard key Control and then click the hyperlinked text.
-
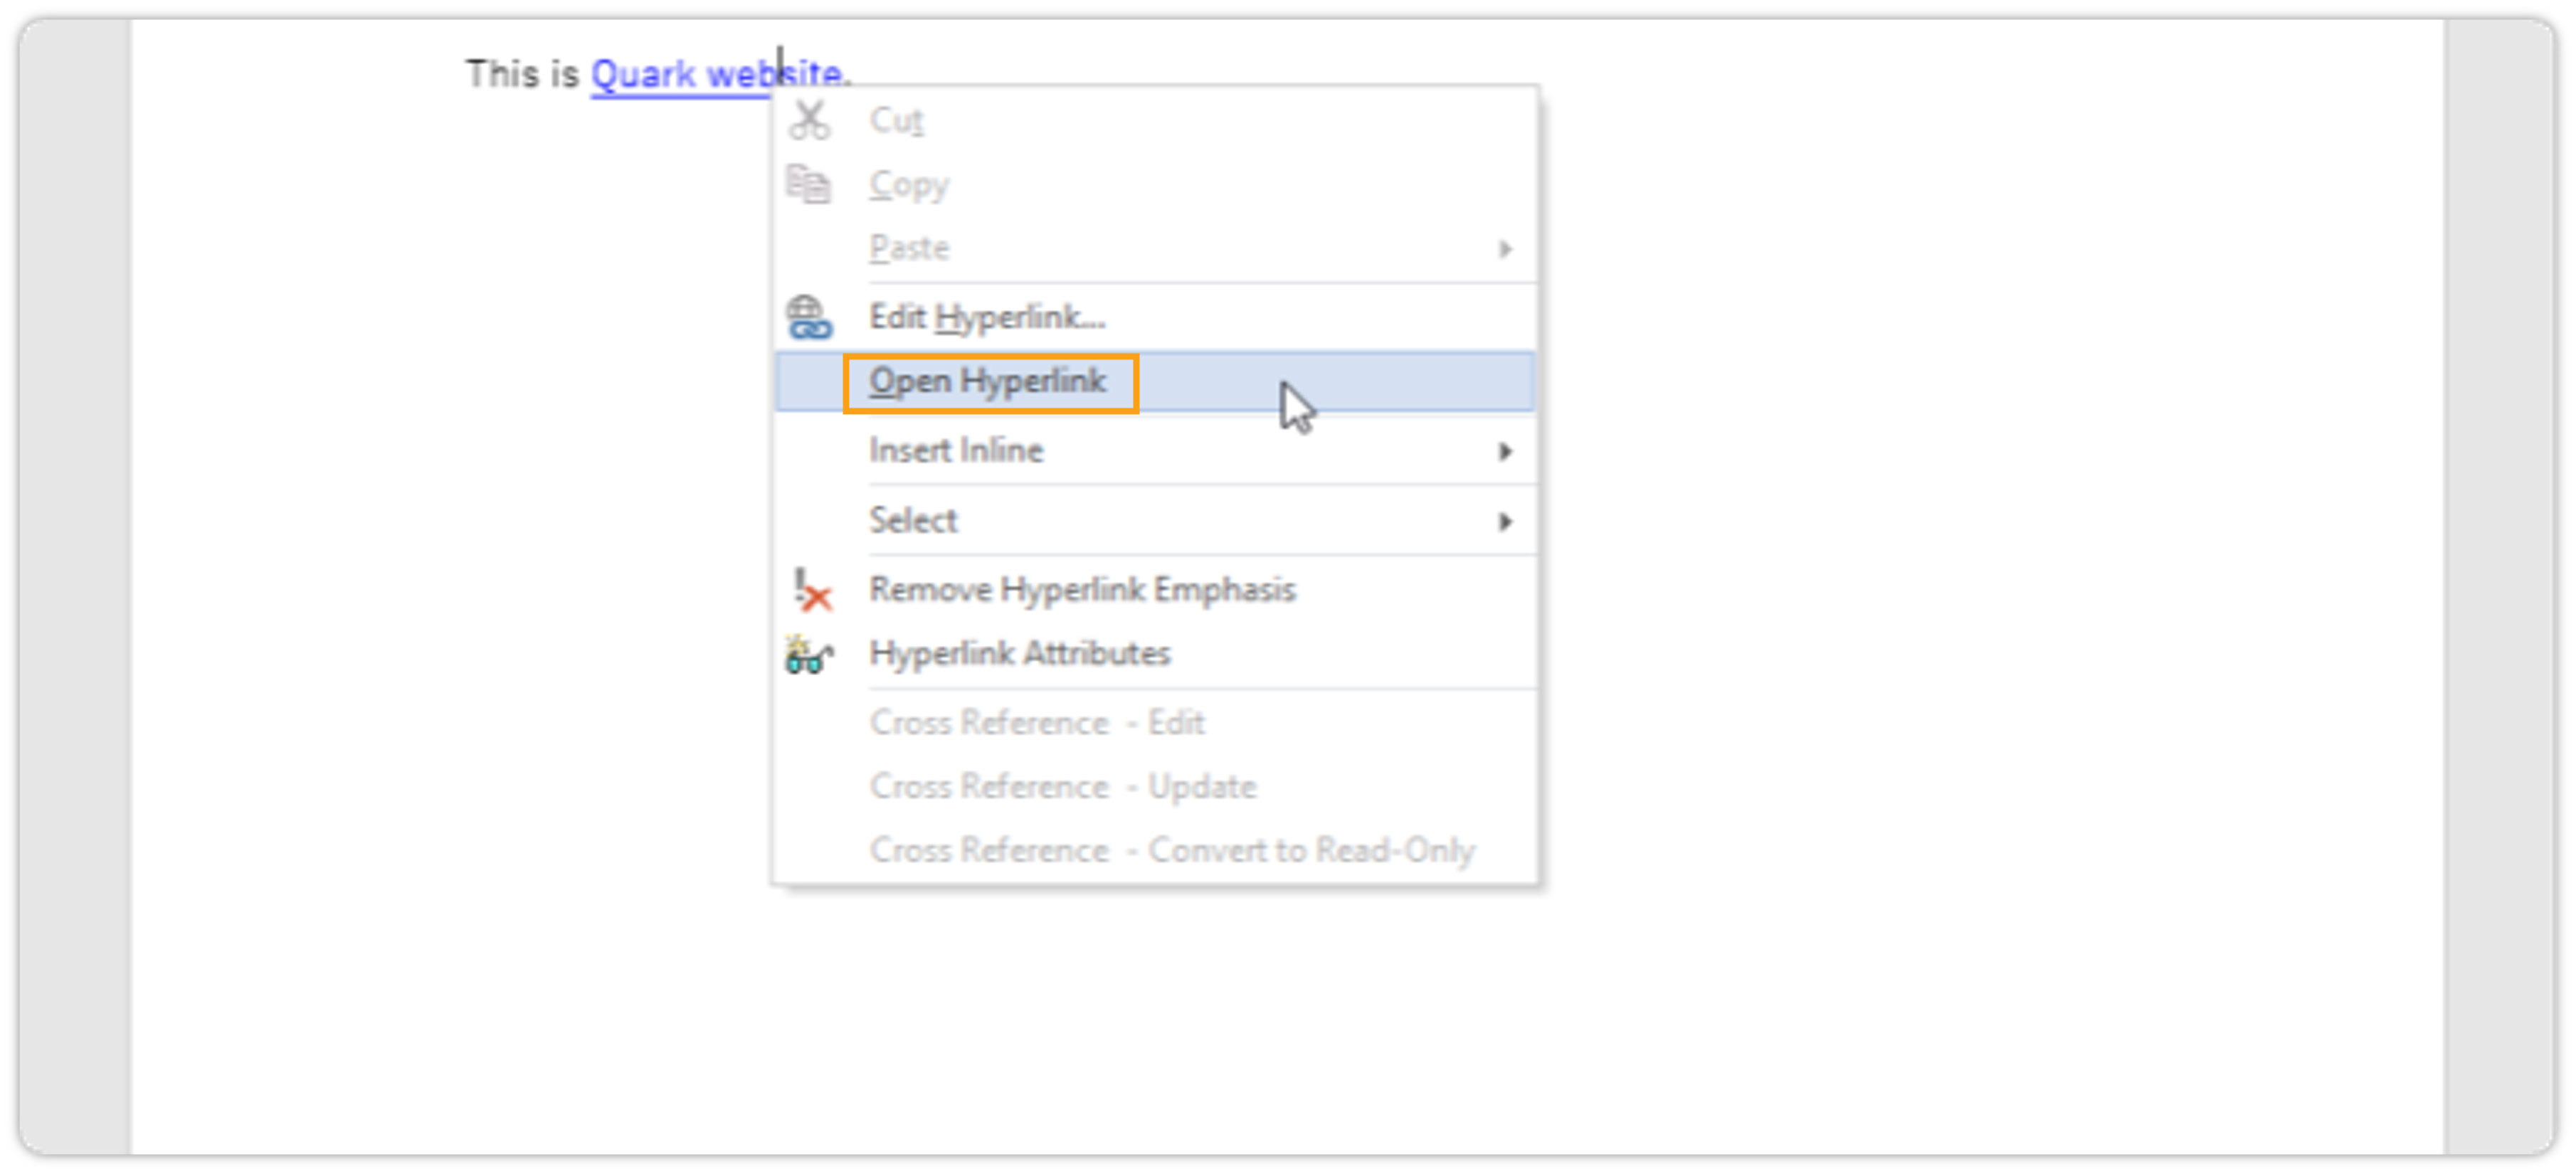
Right-click and then in the context menu, click Open Hyperlink.
-
Edit Hyperlinks
To edit a hyperlink:
-
Position the cursor over the hyperlinked text.
-
Right-click and then in the context menu, click Edit Hyperlink to open the dialog box Insert Hyperlink.
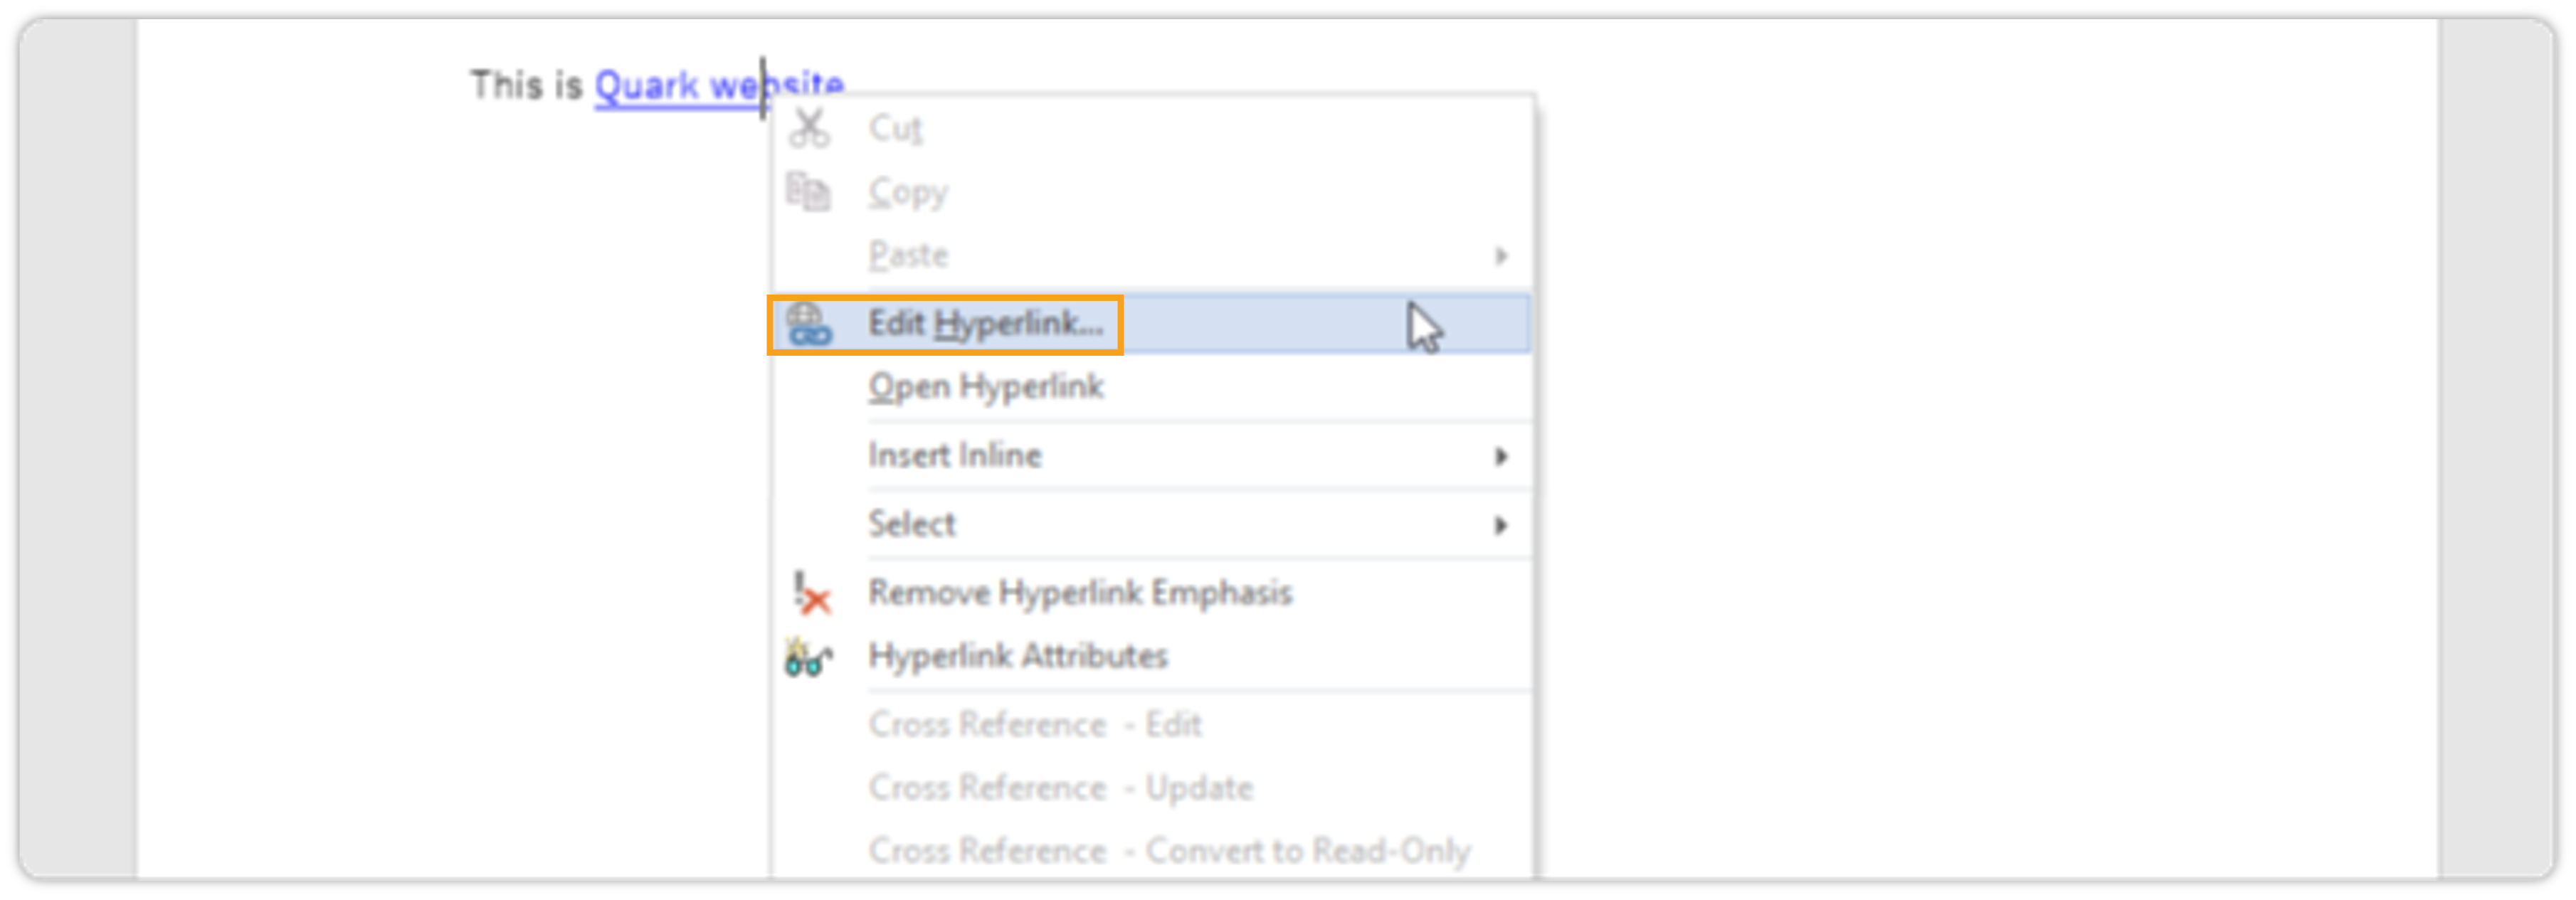
-
In the dialog box Insert Hyperlink, make your edits, and then click OK.
Insert Citation
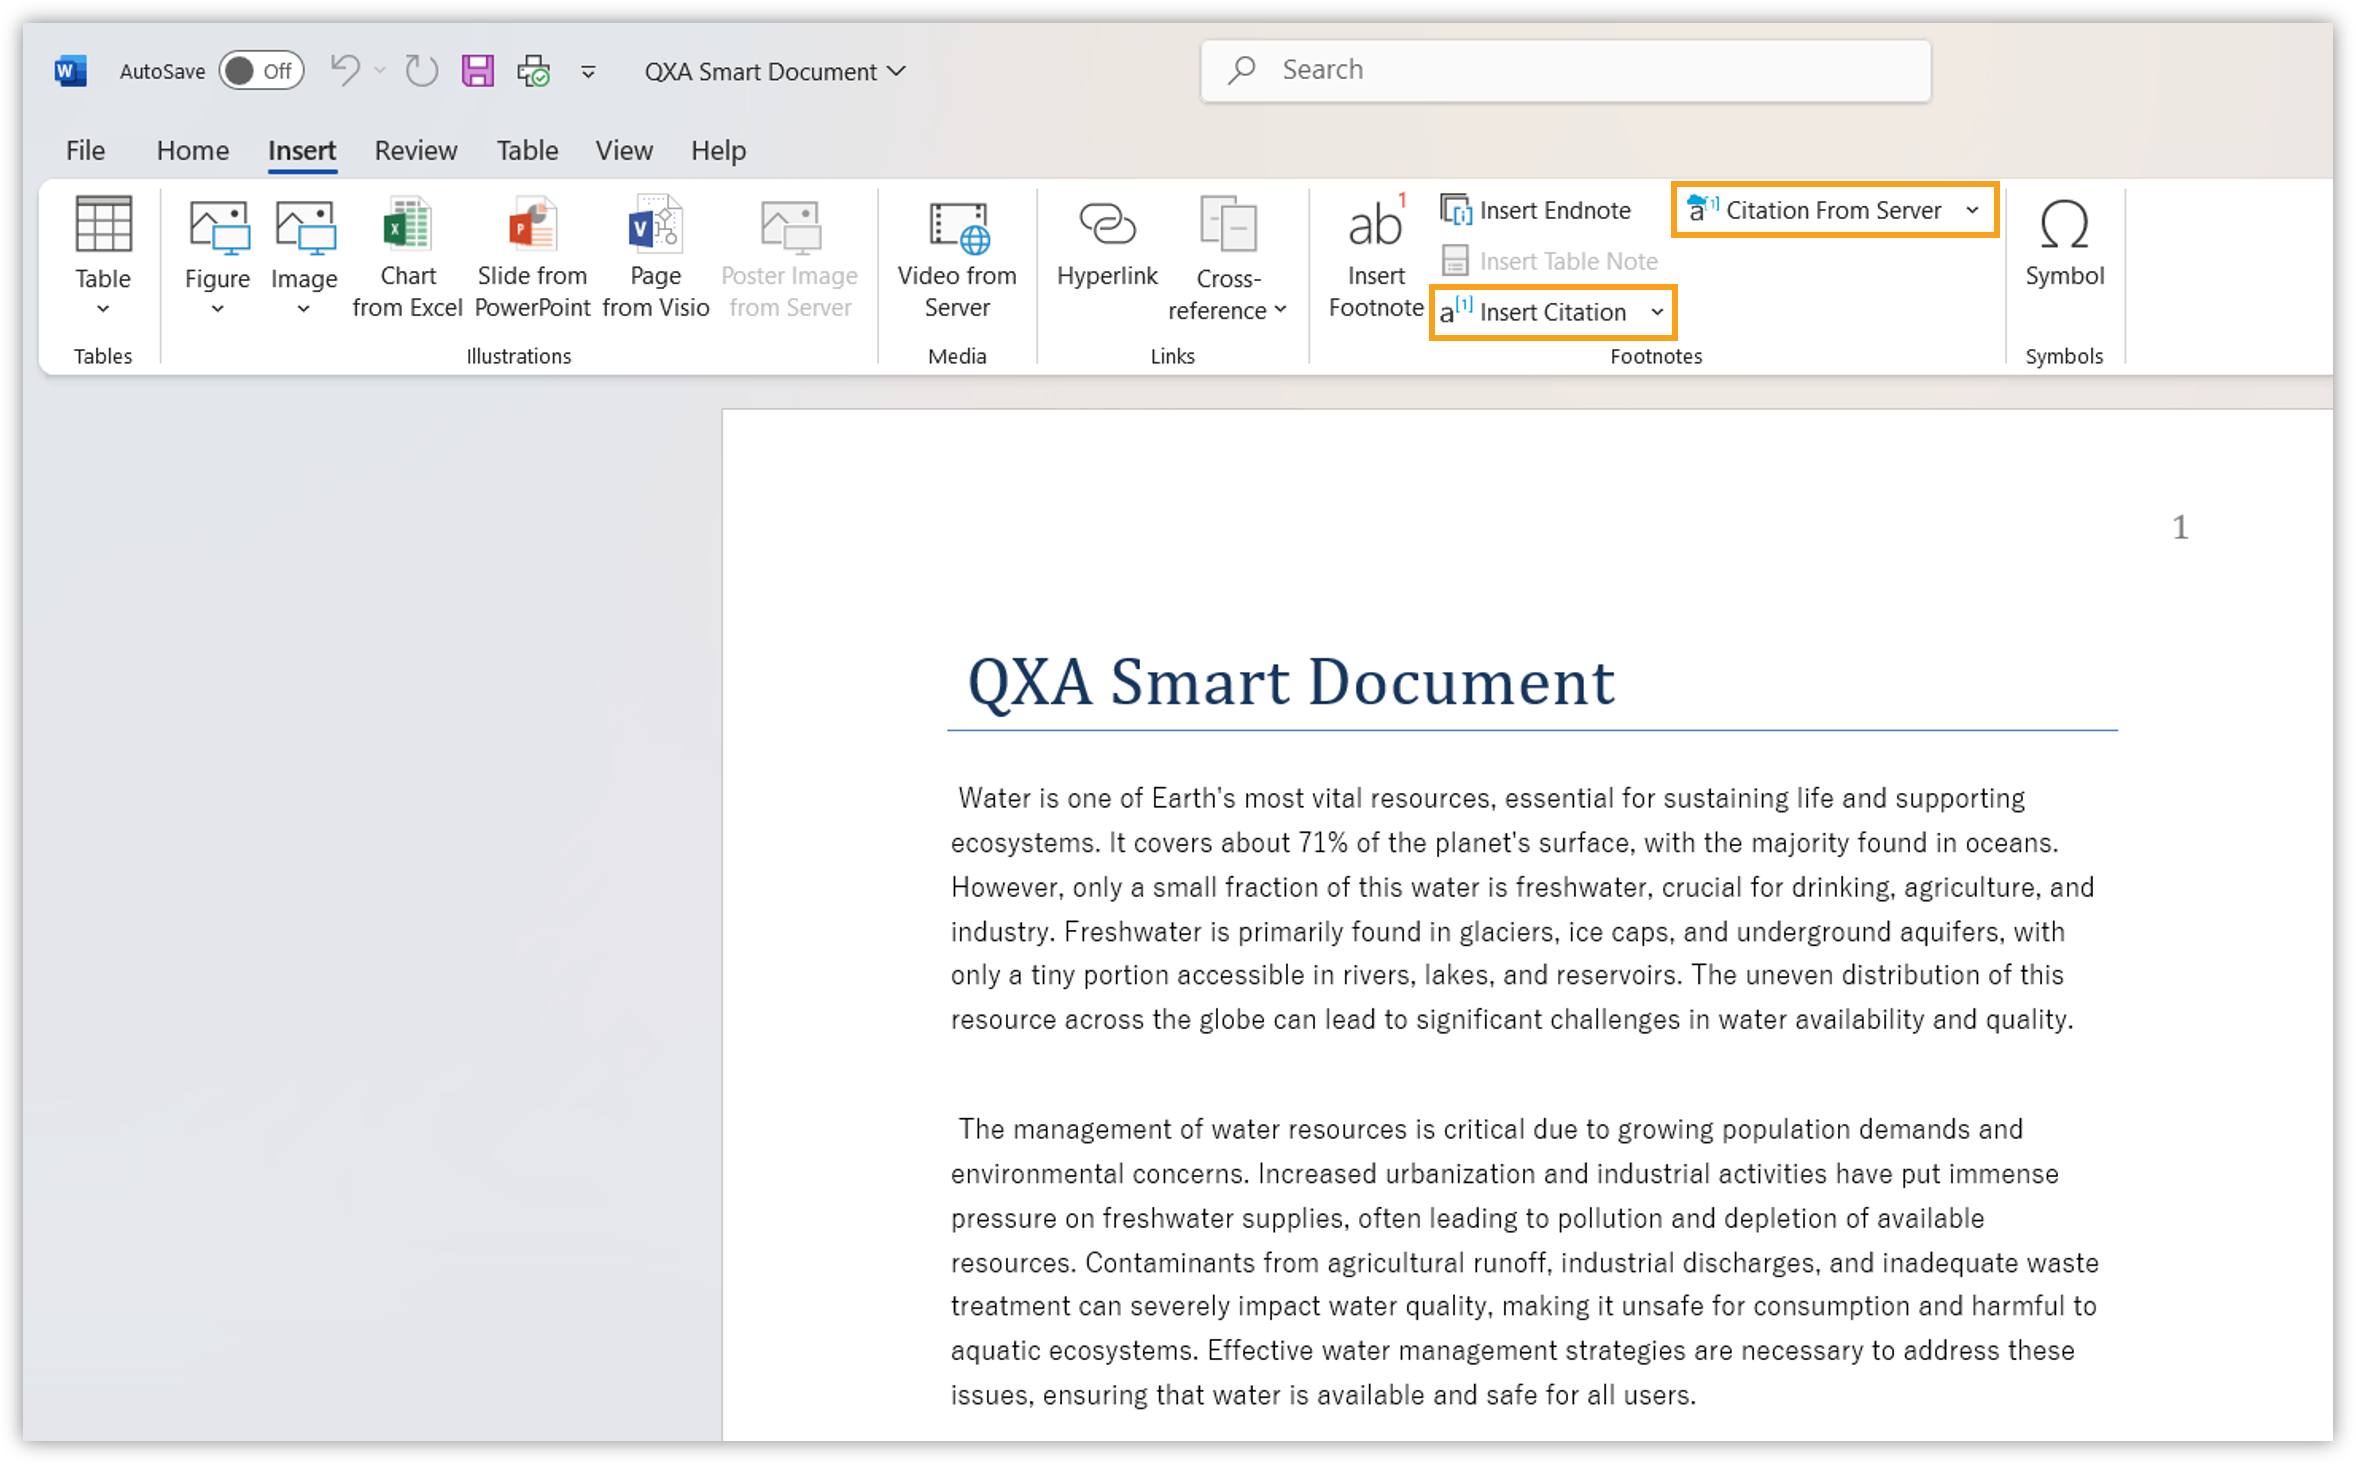
The adapter for Quark XML Author (QXA) includes robust citation support, allowing you to easily acknowledge sources of information in your documents. There are two different ways to insert citations into your document:
-
Inline Citation: Inline citations help you add citations directly within the text of your document. This method is useful for acknowledging sources of information immediately where they're referenced.
-
Citation from Server: Citations from the server allow you to insert citations from an external file stored on a server. This method is useful for managing and inserting citations from a centralized repository, i.e. Quark Publishing Platform.
Steps to Insert a Citation
-
Place the cursor where you want to insert the citation.
-
Navigate to the MS Word toolbar and click on the Insert tab.
-
Click the drop-down arrow next to the Insert Citation option to expand a box containing two options: Insert Citation and Insert Citation from Server.
Insert Symbols
QPP Adapter for Quark XML Author allows you to insert symbols that are not available on a keyboard.
To insert a symbol:
-
Position the cursor where you want to insert a symbol.
-
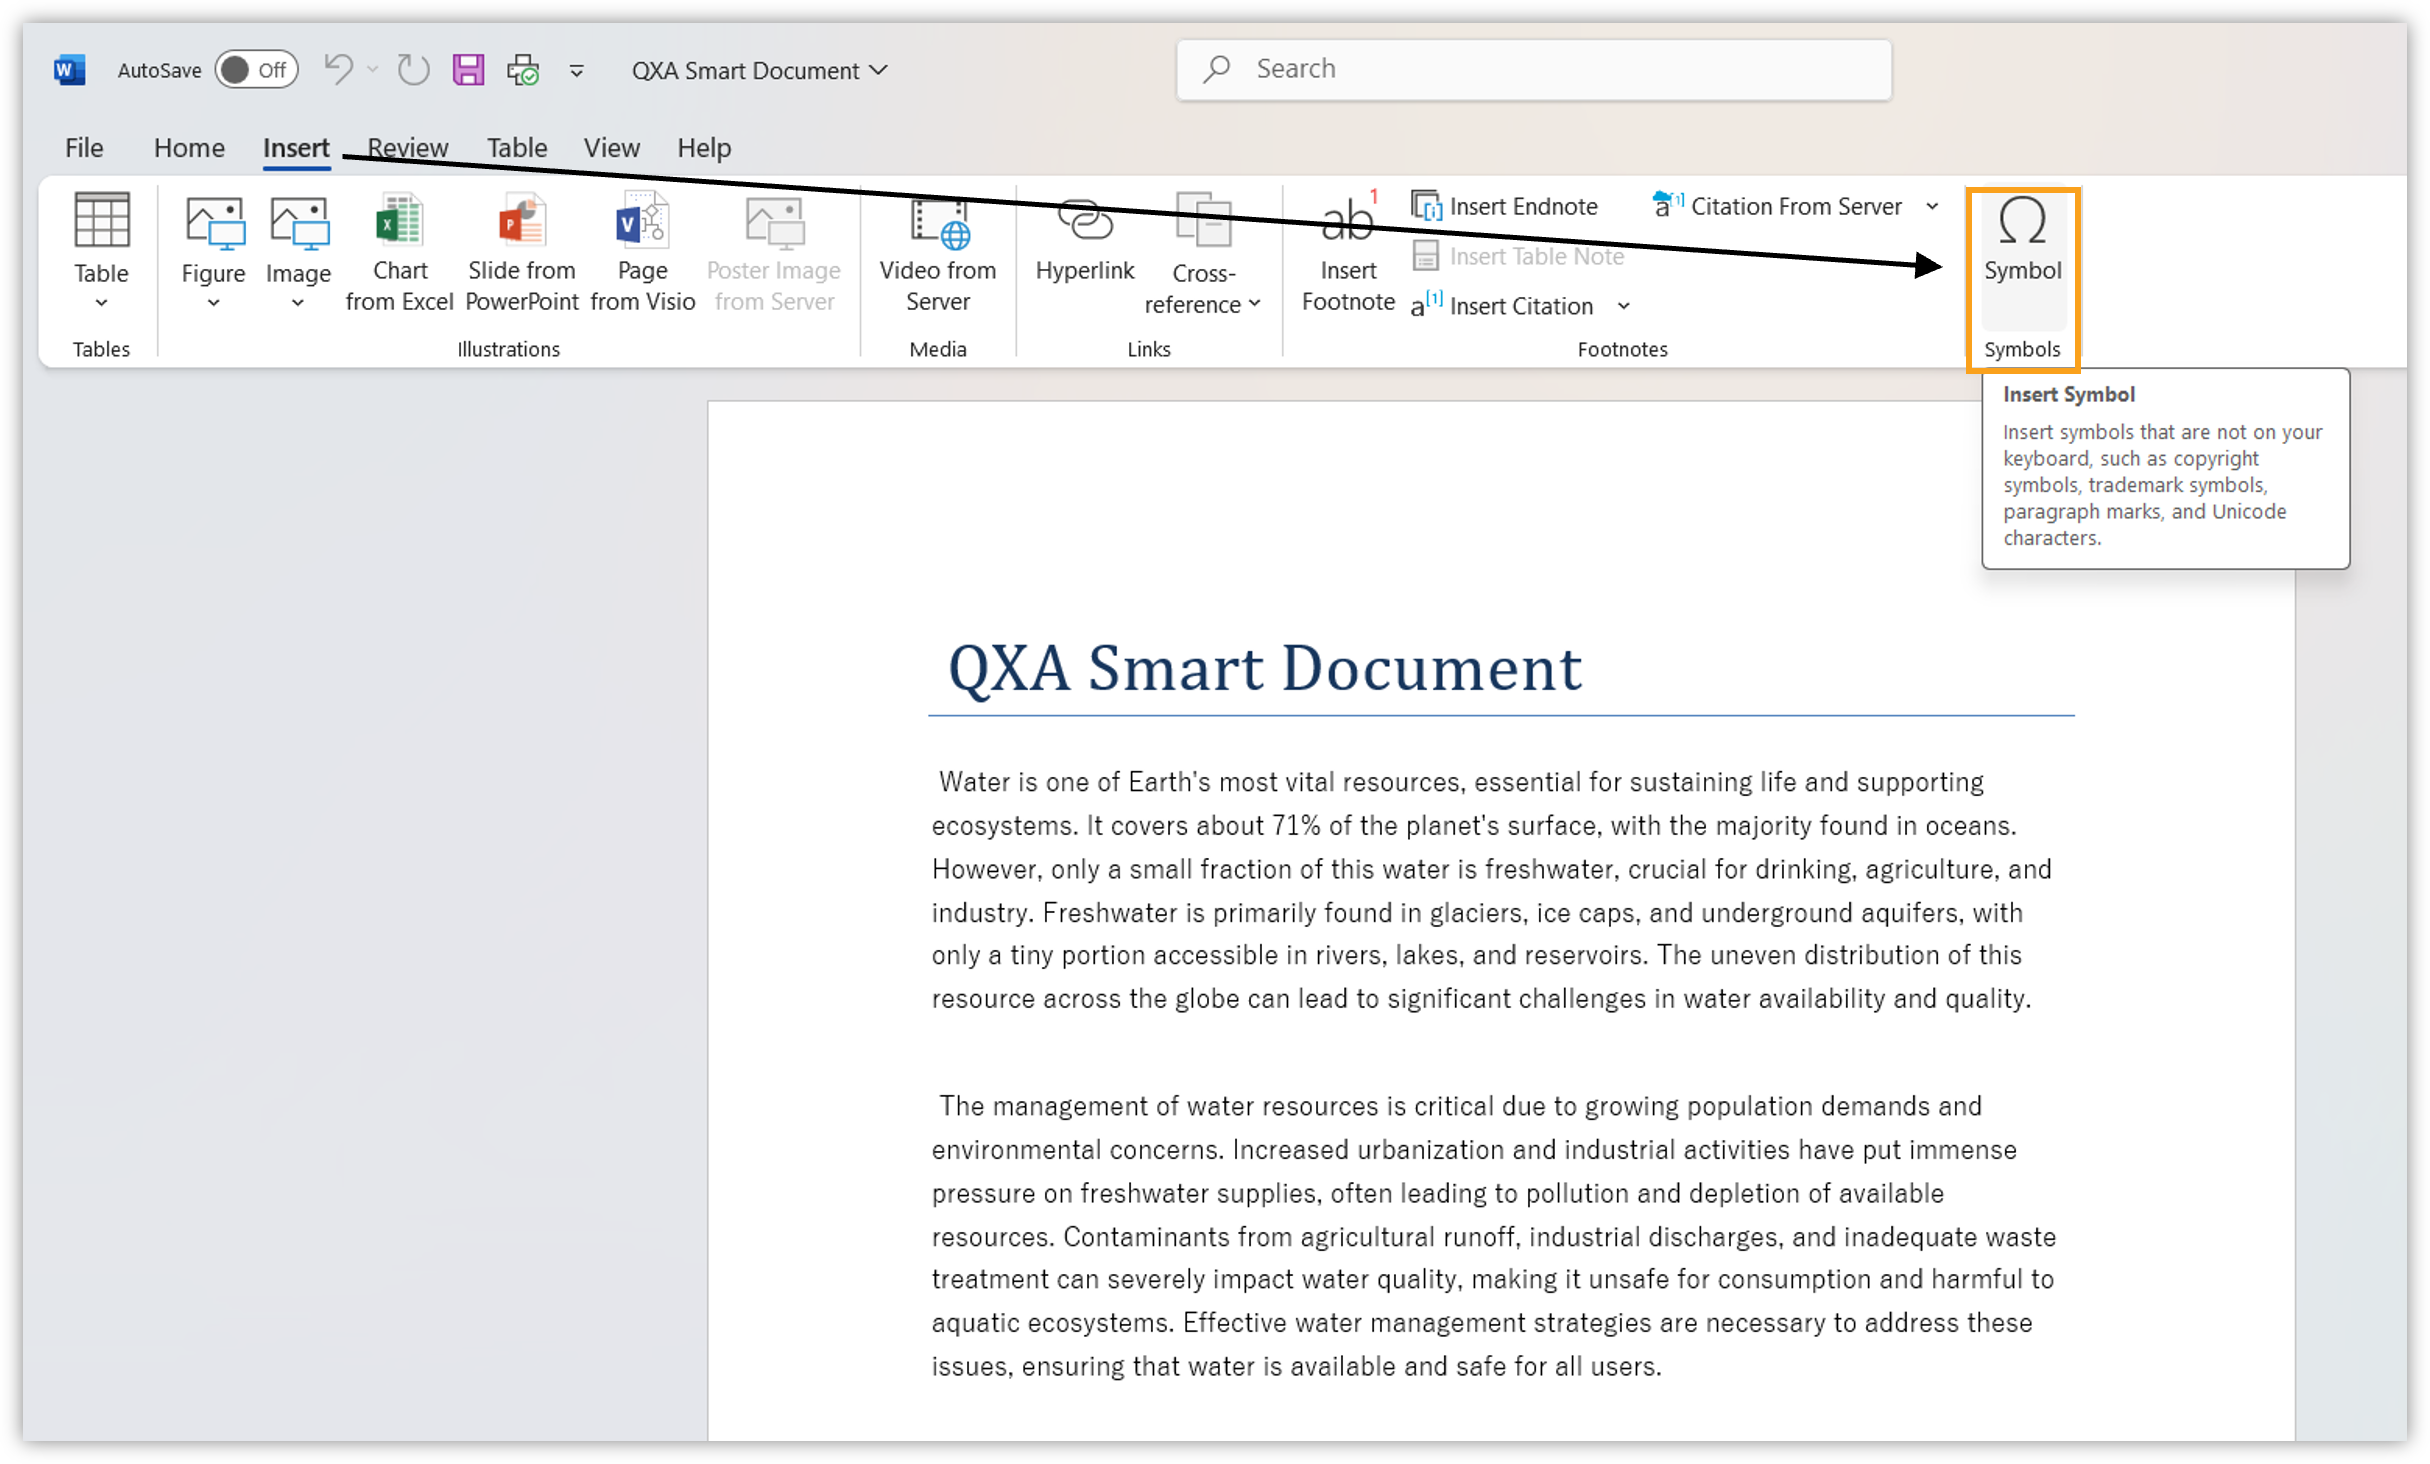
In the header ribbon, under the tab Insert, click the Symbol icon
 to open the dialog box Symbol.
-
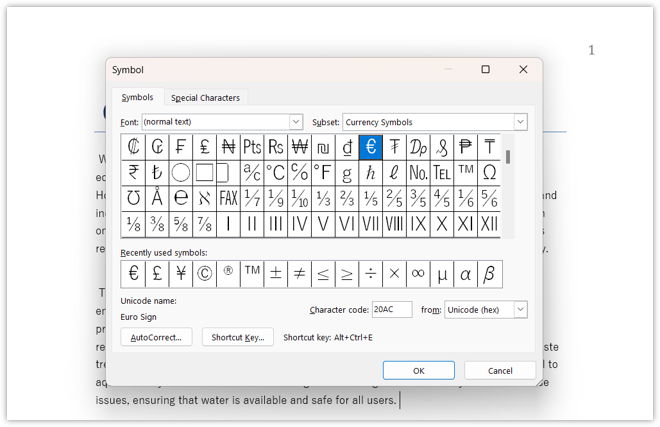
In the dialog box Symbol, browse/search for the symbol that you want to insert and then click OK.
Notes
This section provides details on all notes-related features and capabilities that QPP Adapter for Quark XML Author offers.
Footnotes
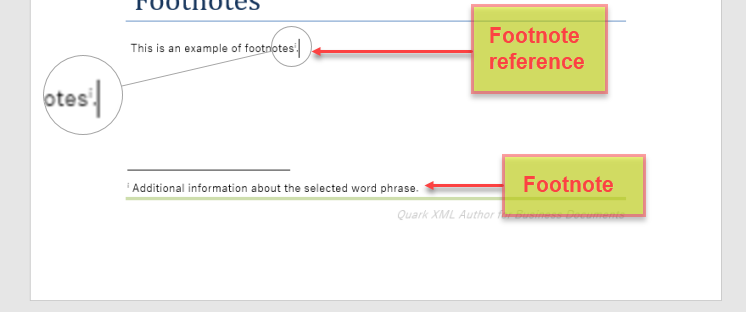
Footnotes are comments at the end of a page that provide additional information on a word or phrase that you have used in your narrative text within that page.
When you insert a footnote, QPP Adapter for Quark XML Author creates a footnote (the actual comment) and a footnote reference (a roman number as a superscript against the word or phrase that you have added the footnote for).
QPP Adapter for Quark XML Author lists footnotes at the bottom of the current page under a line separator.
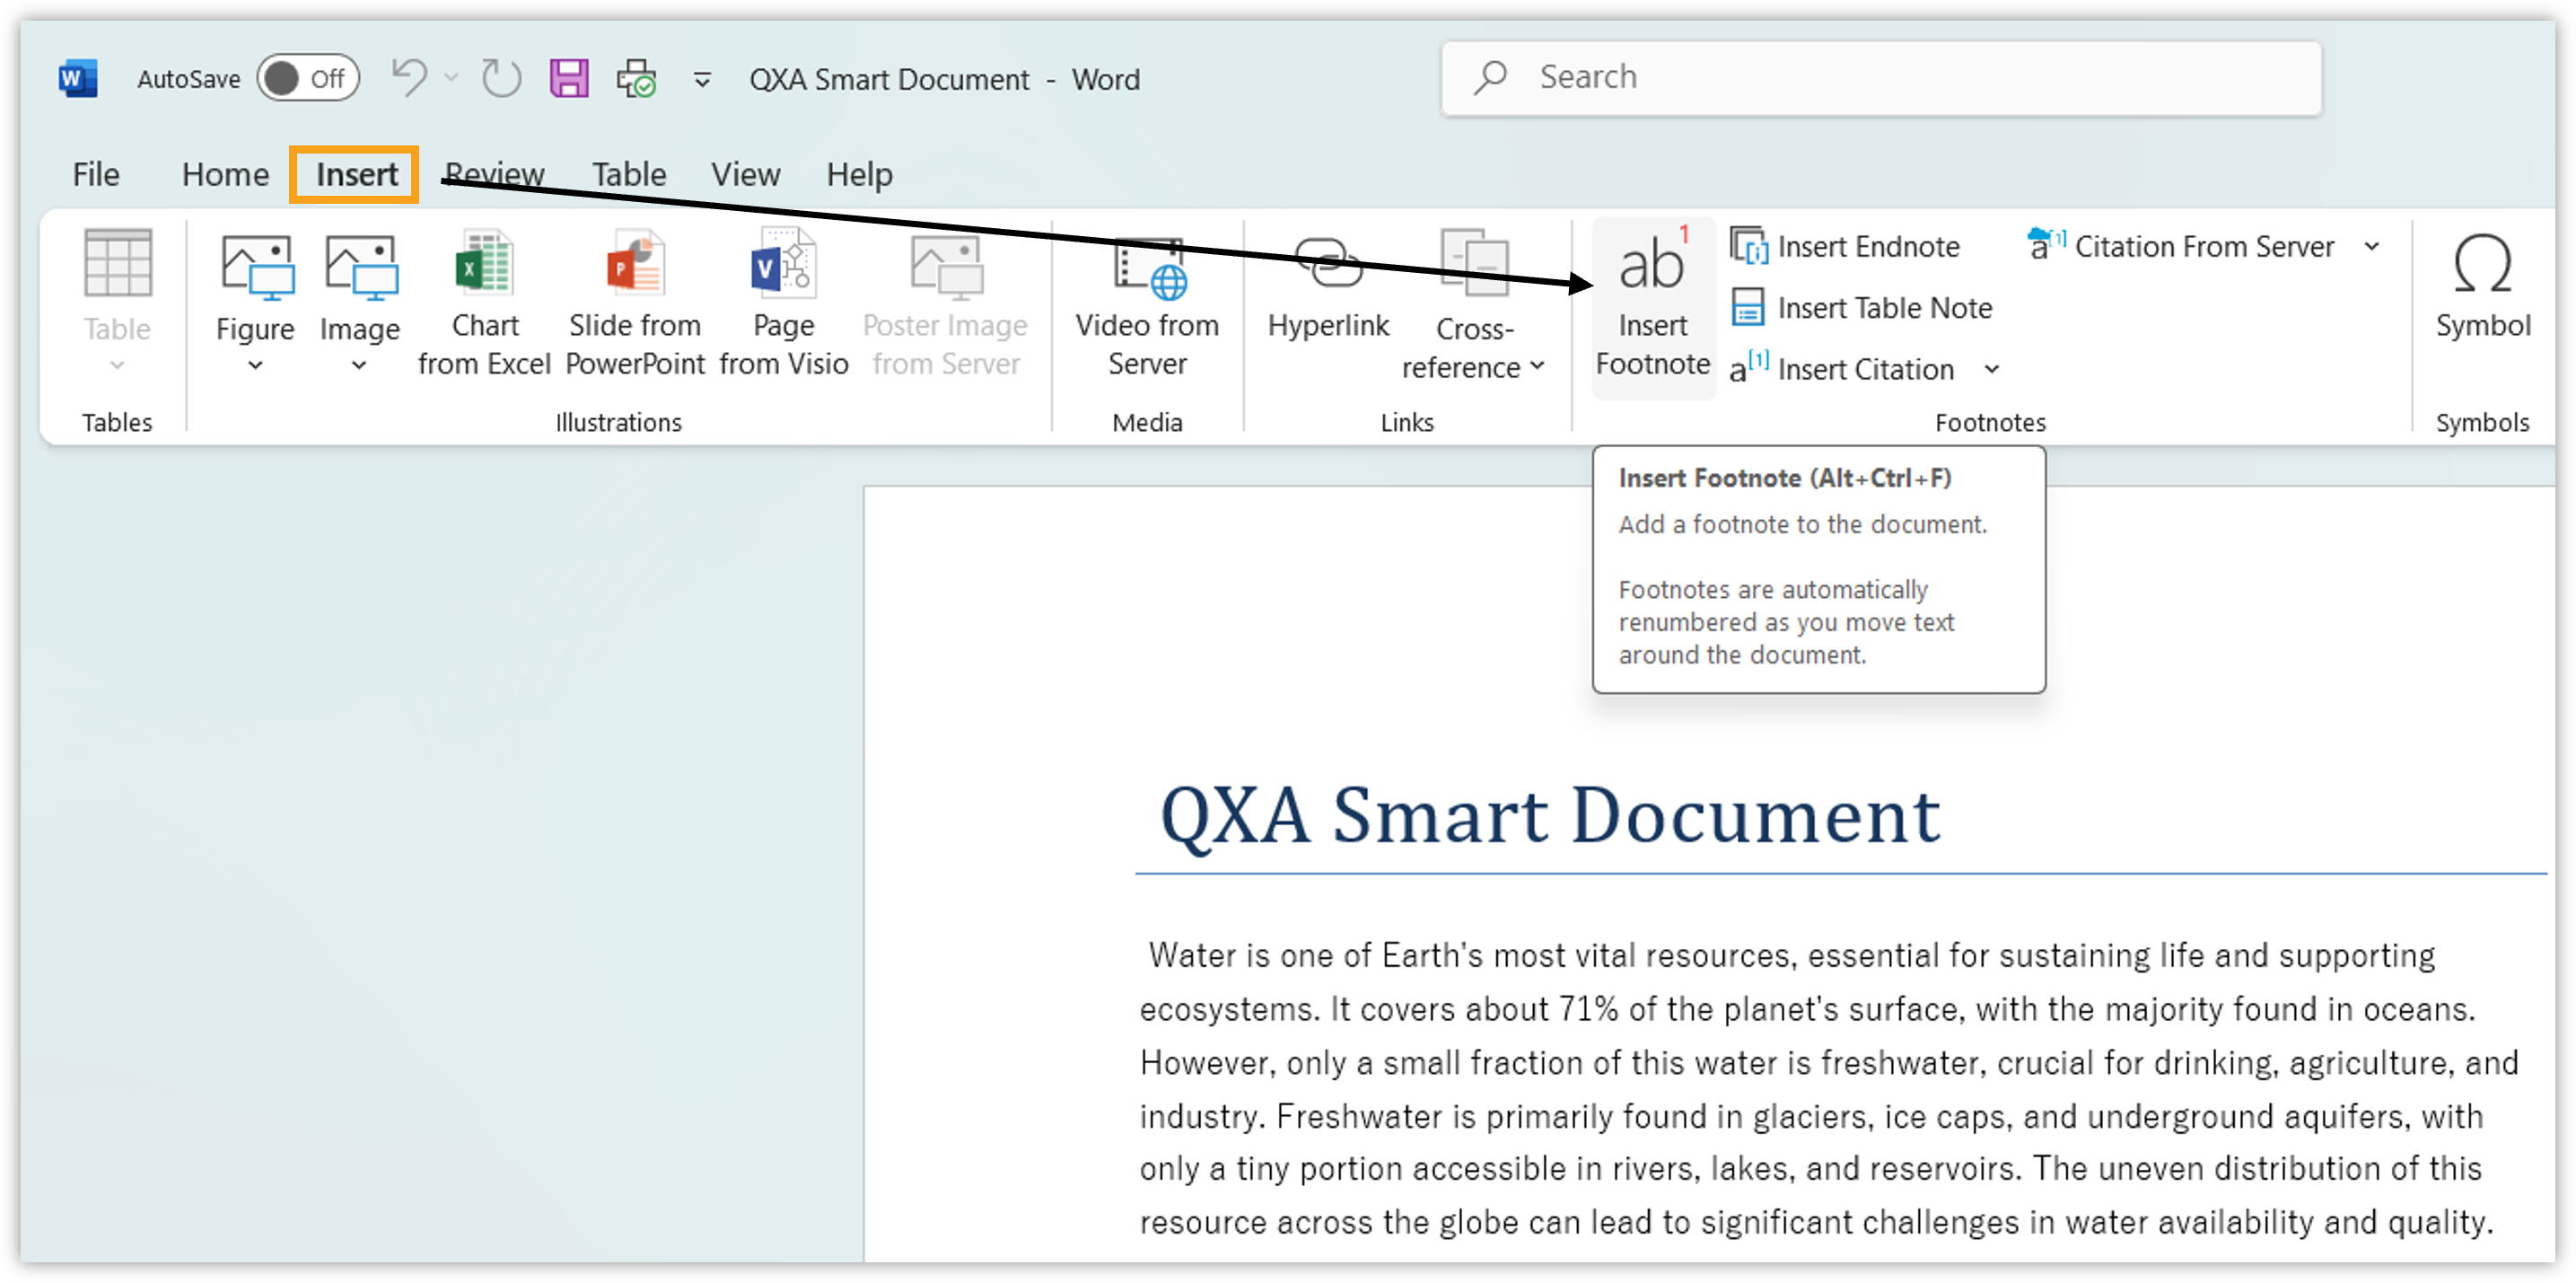
To insert a footnote:
-
Select the text you want to add a footnote for.
-
In the header ribbon, under the tab Insert, click Insert Footnote.
Endnotes
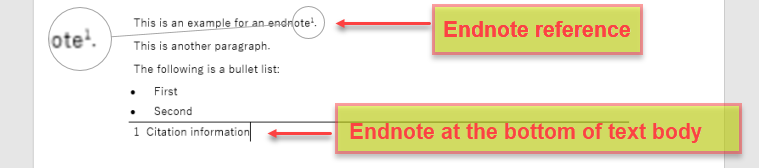
Endnotes are comments at the end of a page that provides citation information on a word or phrase that you have used in your narrative text within that page.
When you insert an endnote, QPP Adapter for Quark XML Author creates an endnote (the actual comment) and an endnote reference (a digit as a superscript against the word or phrase you have added the endnote for).
Unlike footnotes, QPP Adapter for Quark XML Author lists endnotes at the bottom of the text under a line separator.
To insert an endnote:
-
Select the text you want to add an endnote for.
-
In the header ribbon, under the tab Insert, click Insert Endnote.
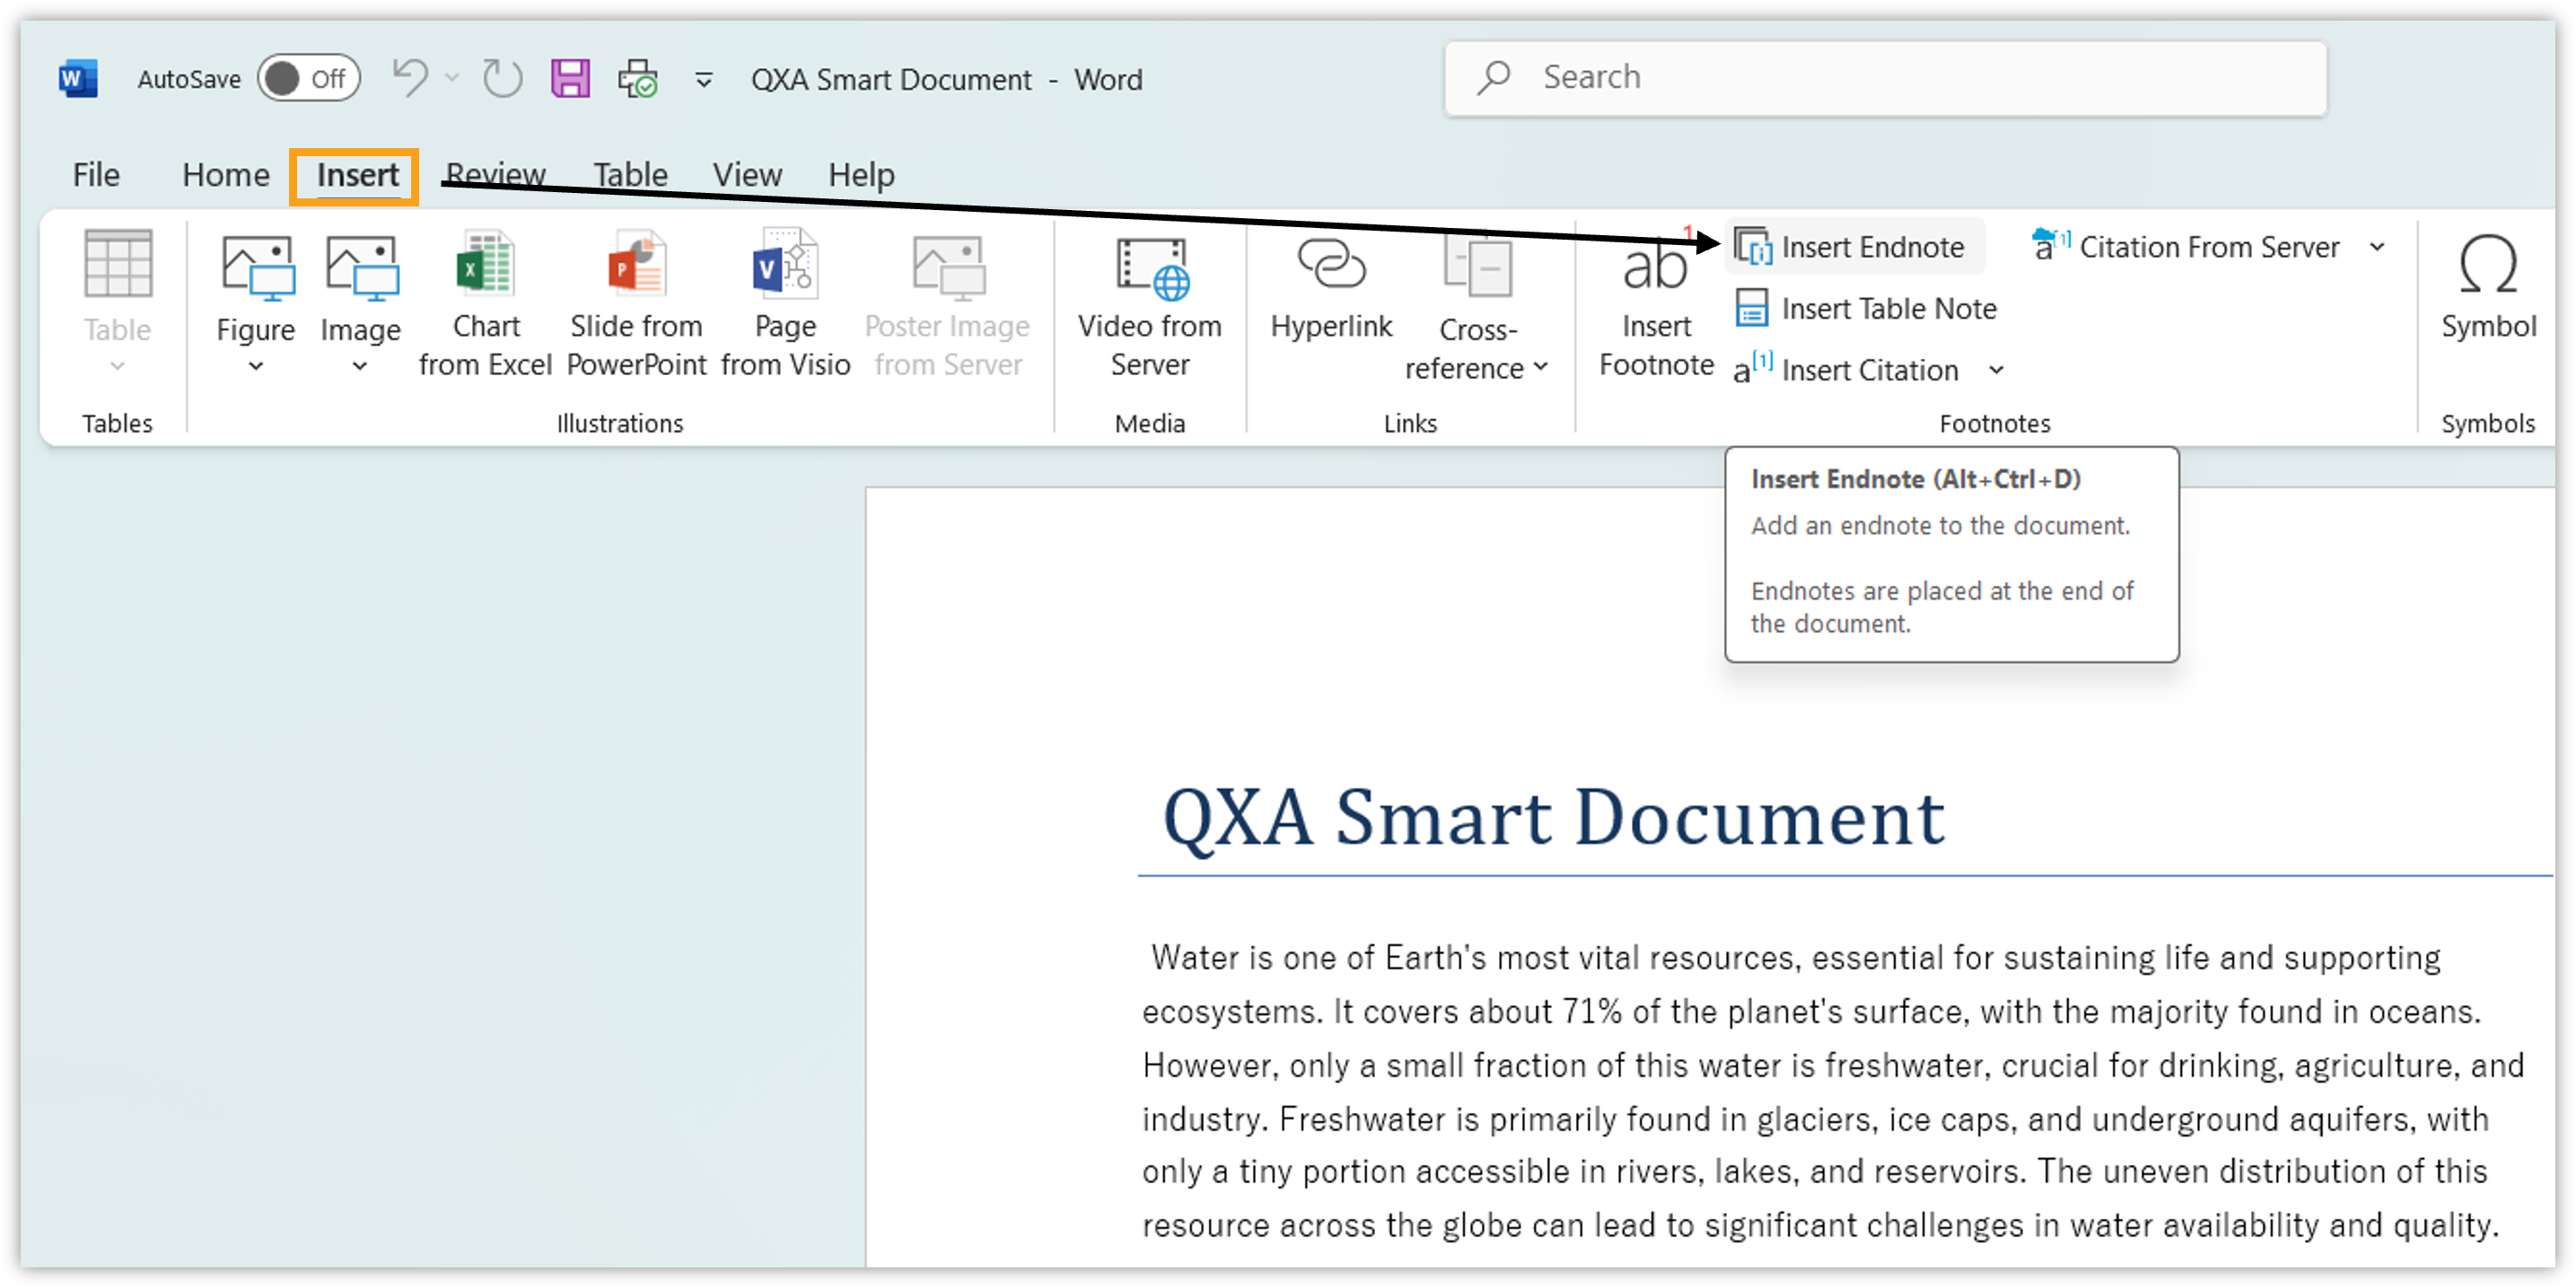
Table Notes
Table notes are comments at the end of a table that provides additional information on a word or phrase within a table cell.
When you insert a table note, QPP Adapter for Quark XML Author creates a table note (the actual comment) and a table note reference (a number as a superscript against the word or phrase you have added the table note for).
QPP Adapter for Quark XML Author lists table notes at the bottom of the table under a line separator.

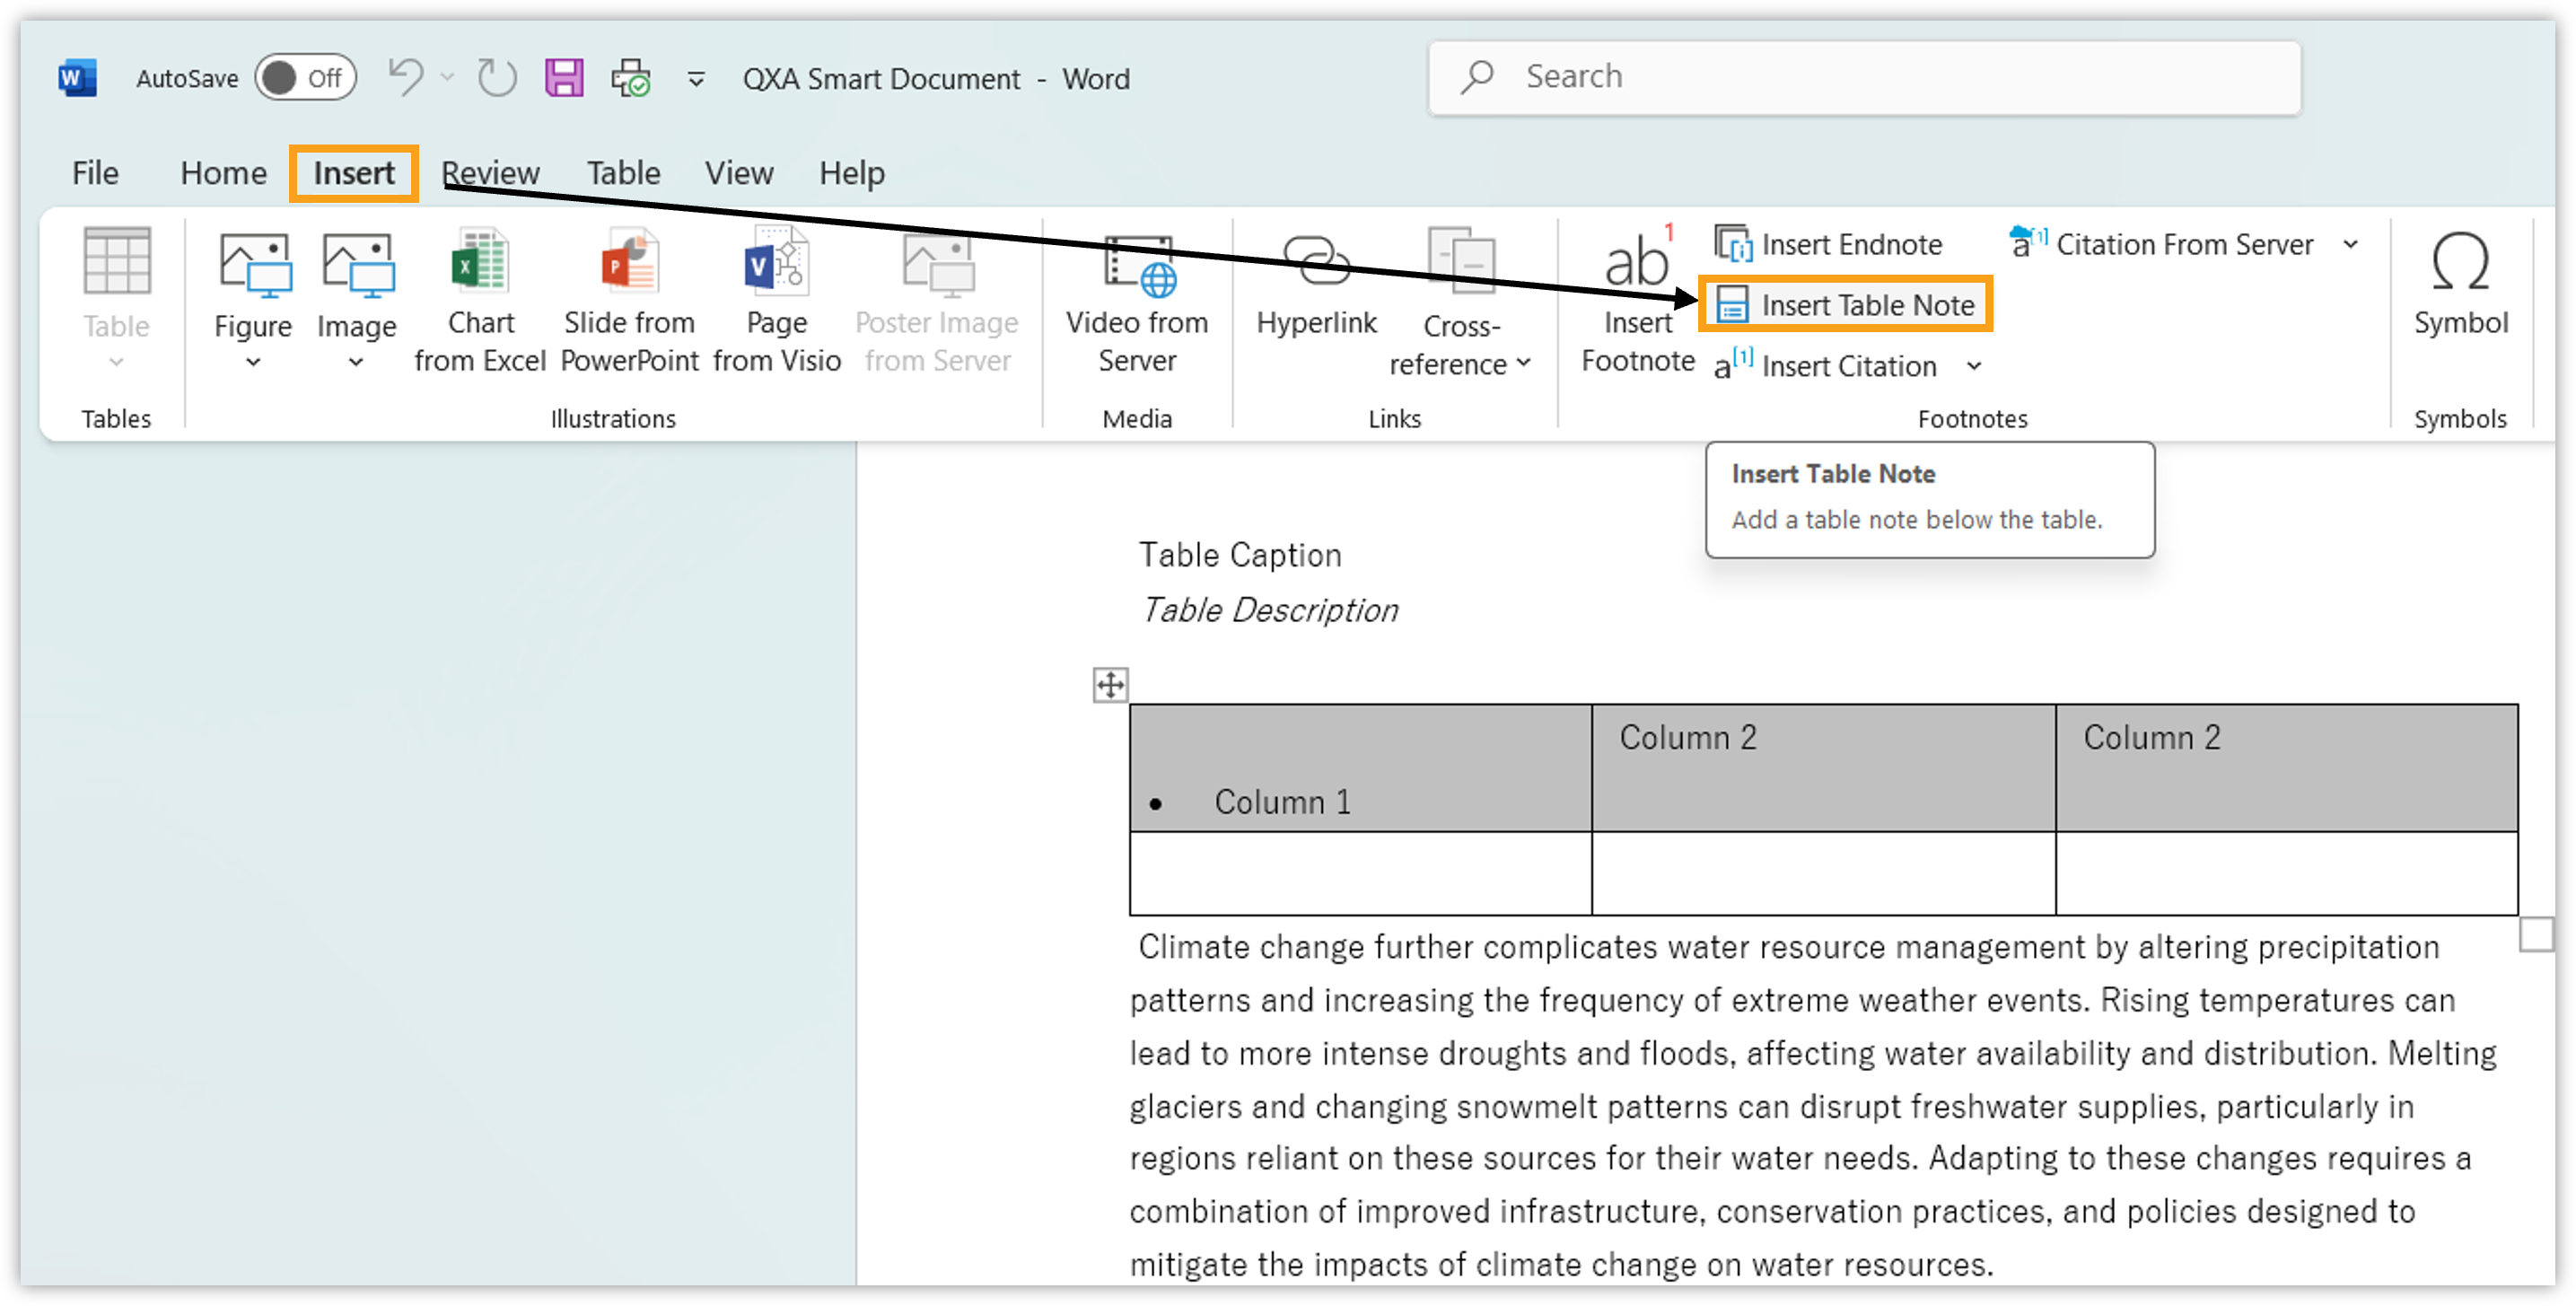
To insert a table note:
-
Select the text you want to add a table note for.
-
In the header ribbon, under the tab Insert, click Insert Table Note.
Assign a Reference Number to a Note
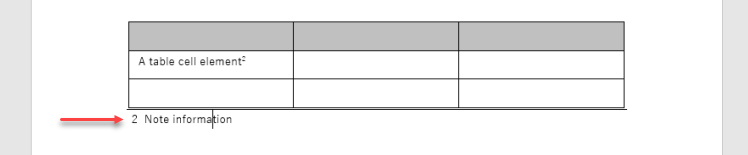
When you add the first note (footnote, endnote, or table note) in a document, QPP Adapter for Quark XML Author automatically assigns the note the first reference number (Roman or Arabic) and continues to increase the reference number as you add more notes to the same document. However, you can manually assign a reference number of your choice to a note reference.
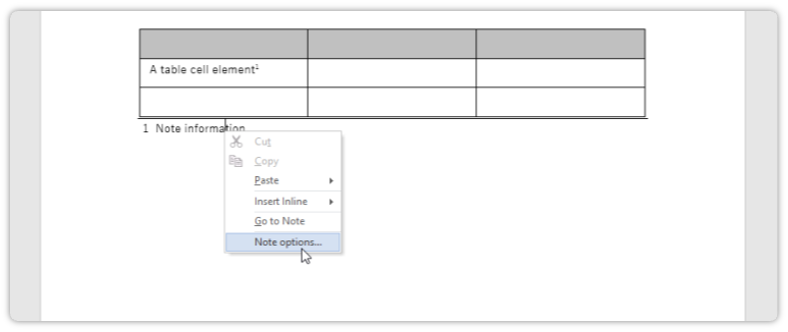
To manually assign a reference number to a note reference:
-
Right-click on the note for which you want to change the reference number.
-
In the context menu, click Note options to open the dialog box Note Options.
-
In the dialog box Note Options, in the input field First Note Number, enter the reference number you want to assign and then click OK.

QPP Adapter for Quark XML Author assigns a new number to the note based on your input.
Assign a Custom Mark or Citation to a Note
QPP Adapter for Quark XML Author allows you to assign a custom mark (a symbol) or citation to a note as an alternative to assigning a number.
To assign a custom mark or citation to a note:
-
Right-click on the note for which you assign a custom mark or citation.
-
In the context menu, click Note options to open the dialog box Note Options.
-
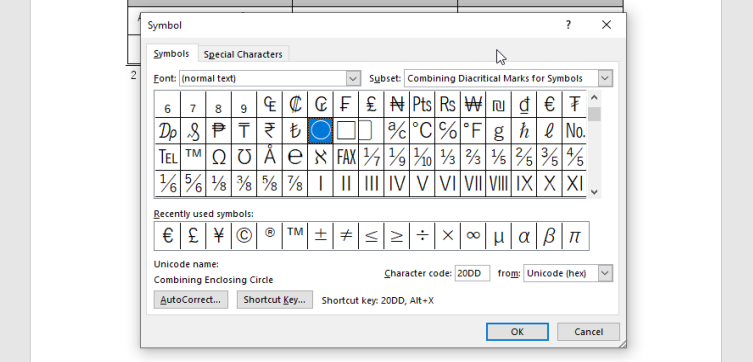
In the dialog box Note Options, in the Custom Mark input field, click Symbols to open the dialog box Symbols.

-
In the dialog box Symbols, select a symbol and then click OK.
-
Click OK in the dialog box Note Options.
QPP Adapter for Quark XML Author adds a custom mark to the note in place of a number.

Go to a Reference from a Note
You can follow back from a note to the note reference.
To go to a note reference:
-
Right-click on the note you want to see the note reference.
-
In the context menu, click Go to Note.
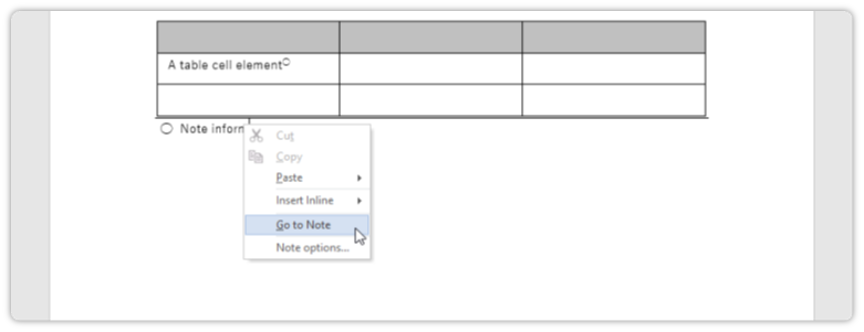
QPP Adapter for Quark XML Author shifts the cursor to the word/phrase linked to the note as a note reference.
Delete a Note
You can delete a note reference and the associated note.
To delete a note:
-
Position the cursor to the left/right of the superscript number/custom mark of the note reference.
-
Press the keyboard key Delete/Backspace (based on the position of your cursor).
QPP Adapter for Quark XML Author deletes the note.
Cross-references
The Cross-Reference feature in Quark XML Author (QXA) allows you to create dynamic links within a single document or across multiple documents stored on the QPP repository. These references ensure document integrity by automatically tracking the location and content of referenced elements such as sections, tables, figures, and regions.
Cross-Reference Options
The following options are available within the Links group of the Insert tab:
-
Insert Cross Reference: Creates a link to an element located within the currently opened document.
-
Insert Document Cross Reference: Creates a link to another document stored on the platform.
-
Insert Inter-document Cross Reference: Creates a link to a specific element (such as a section or table) located within a different document on the platform.
-
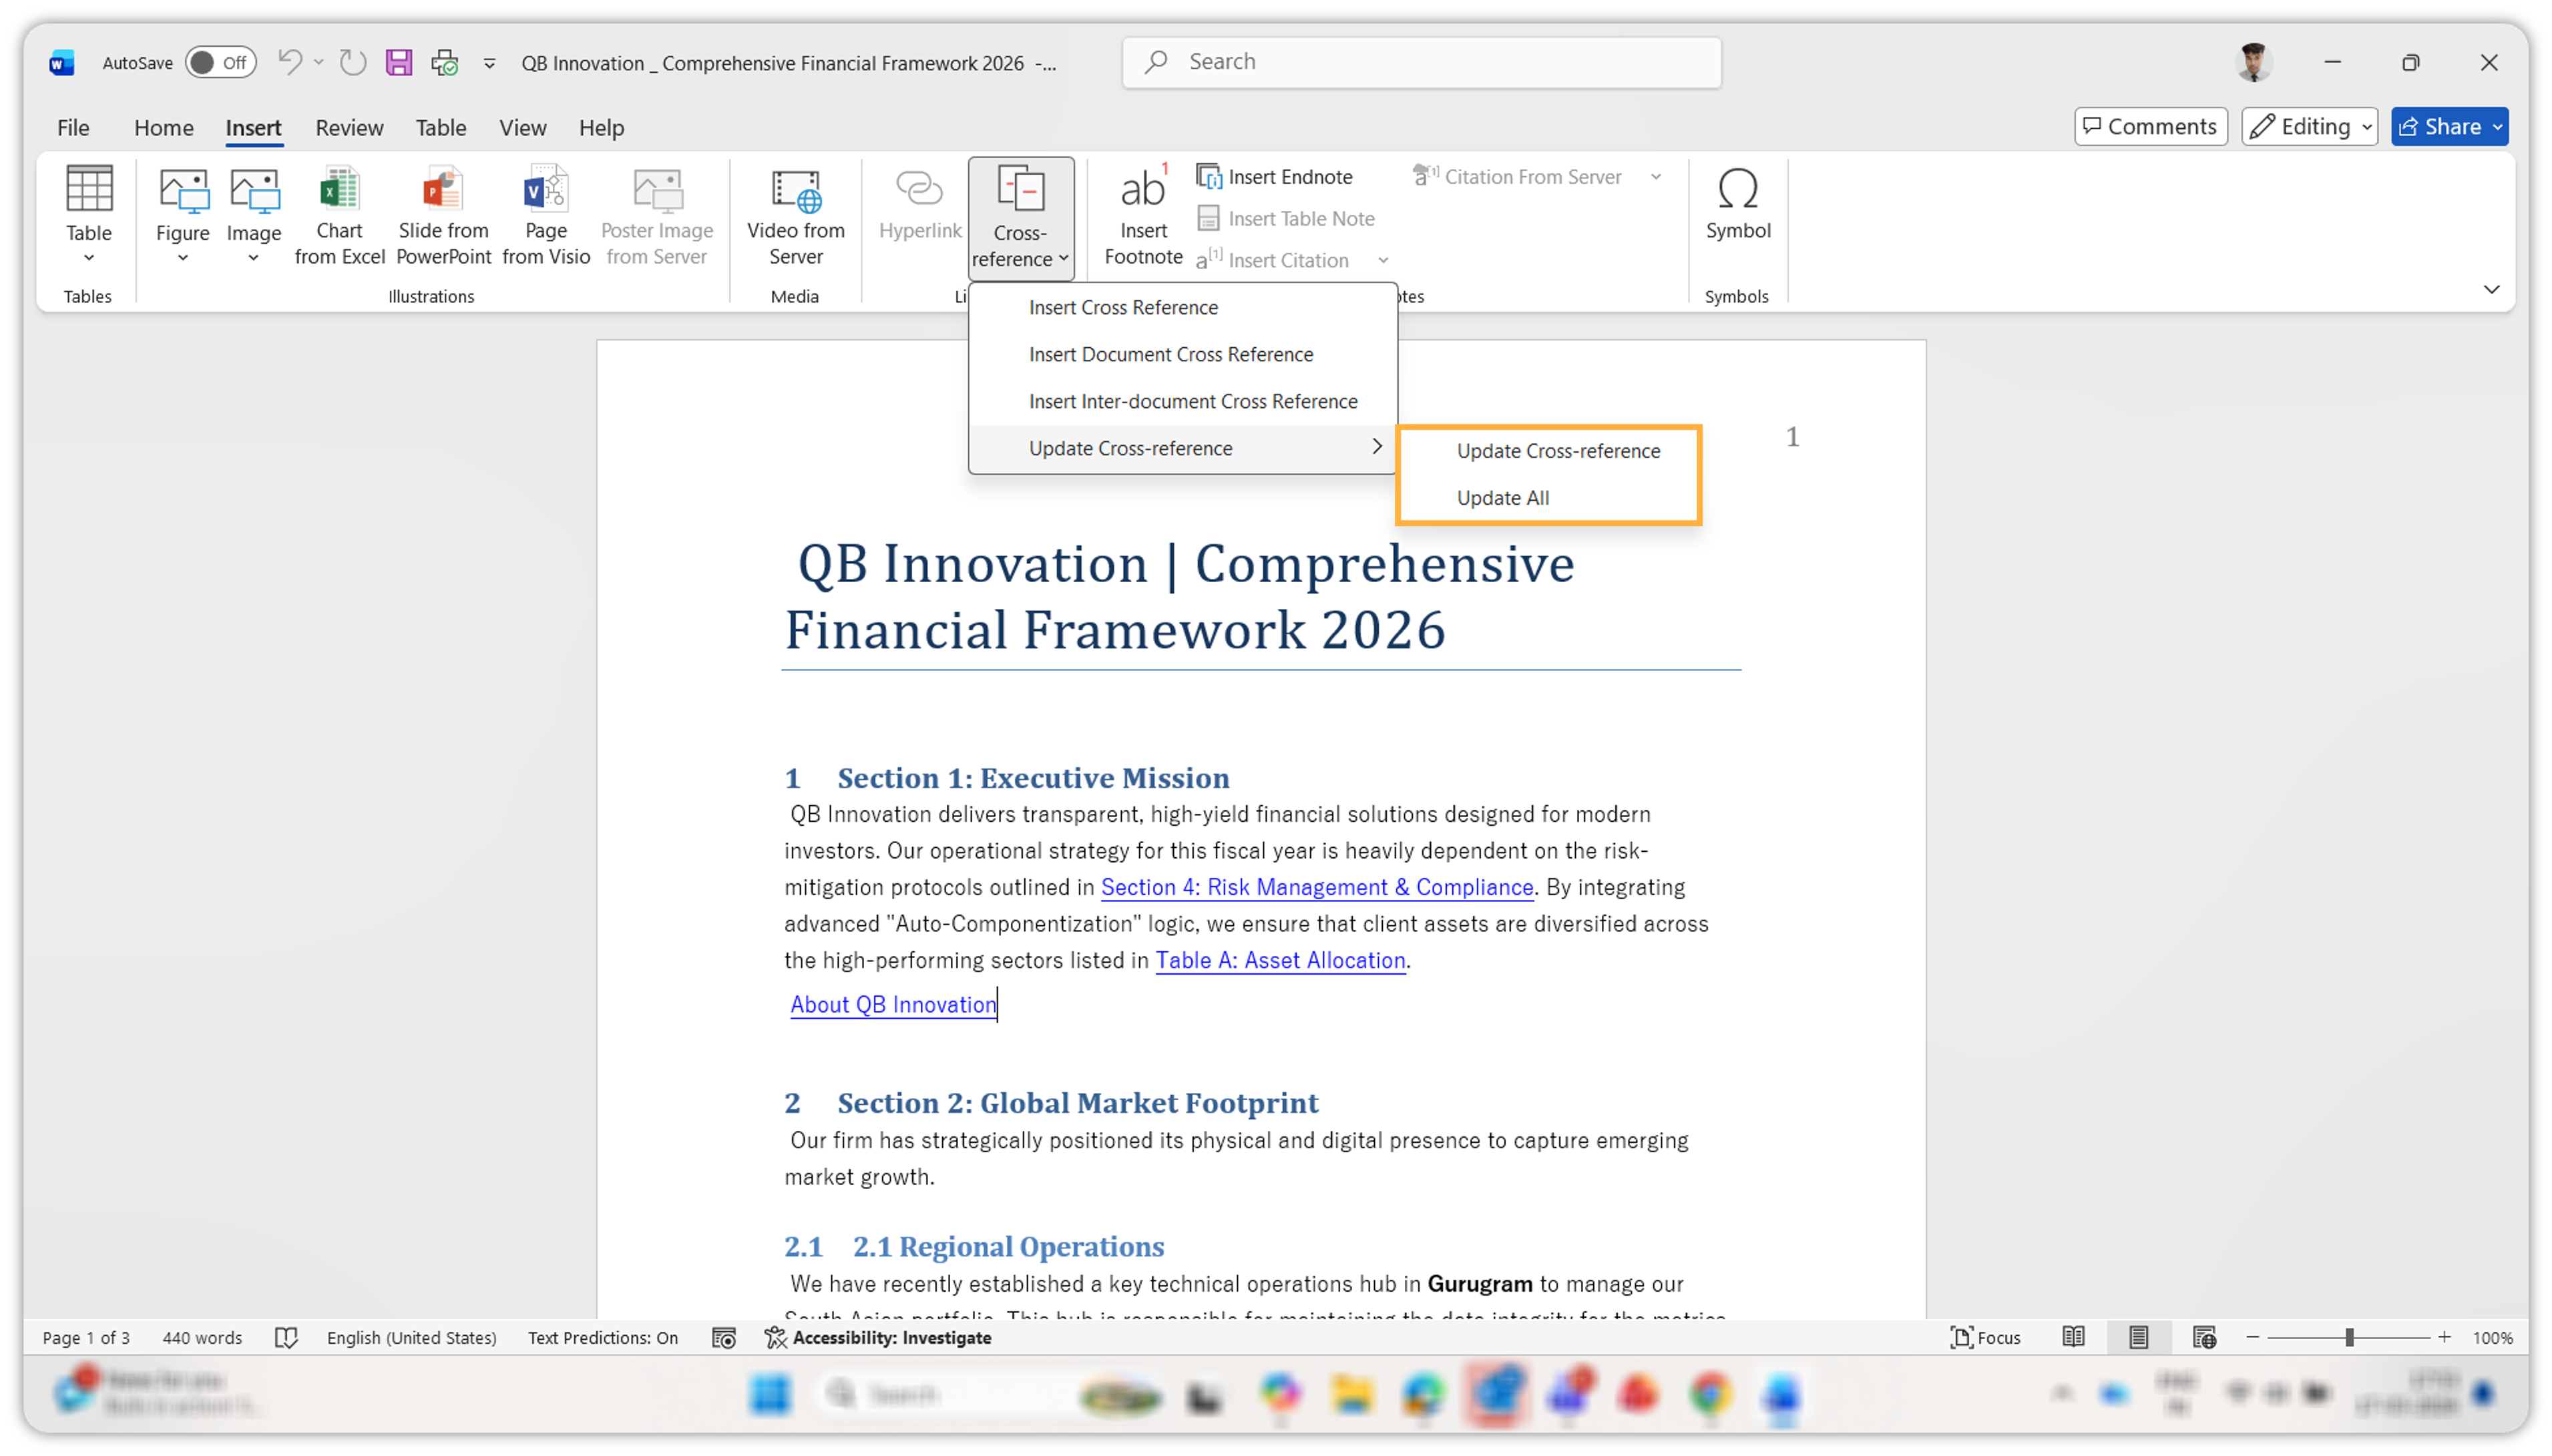
Update Cross Reference: Synchronizes existing links to ensure the display text matches the current source content and verifies that the link targets are still valid.
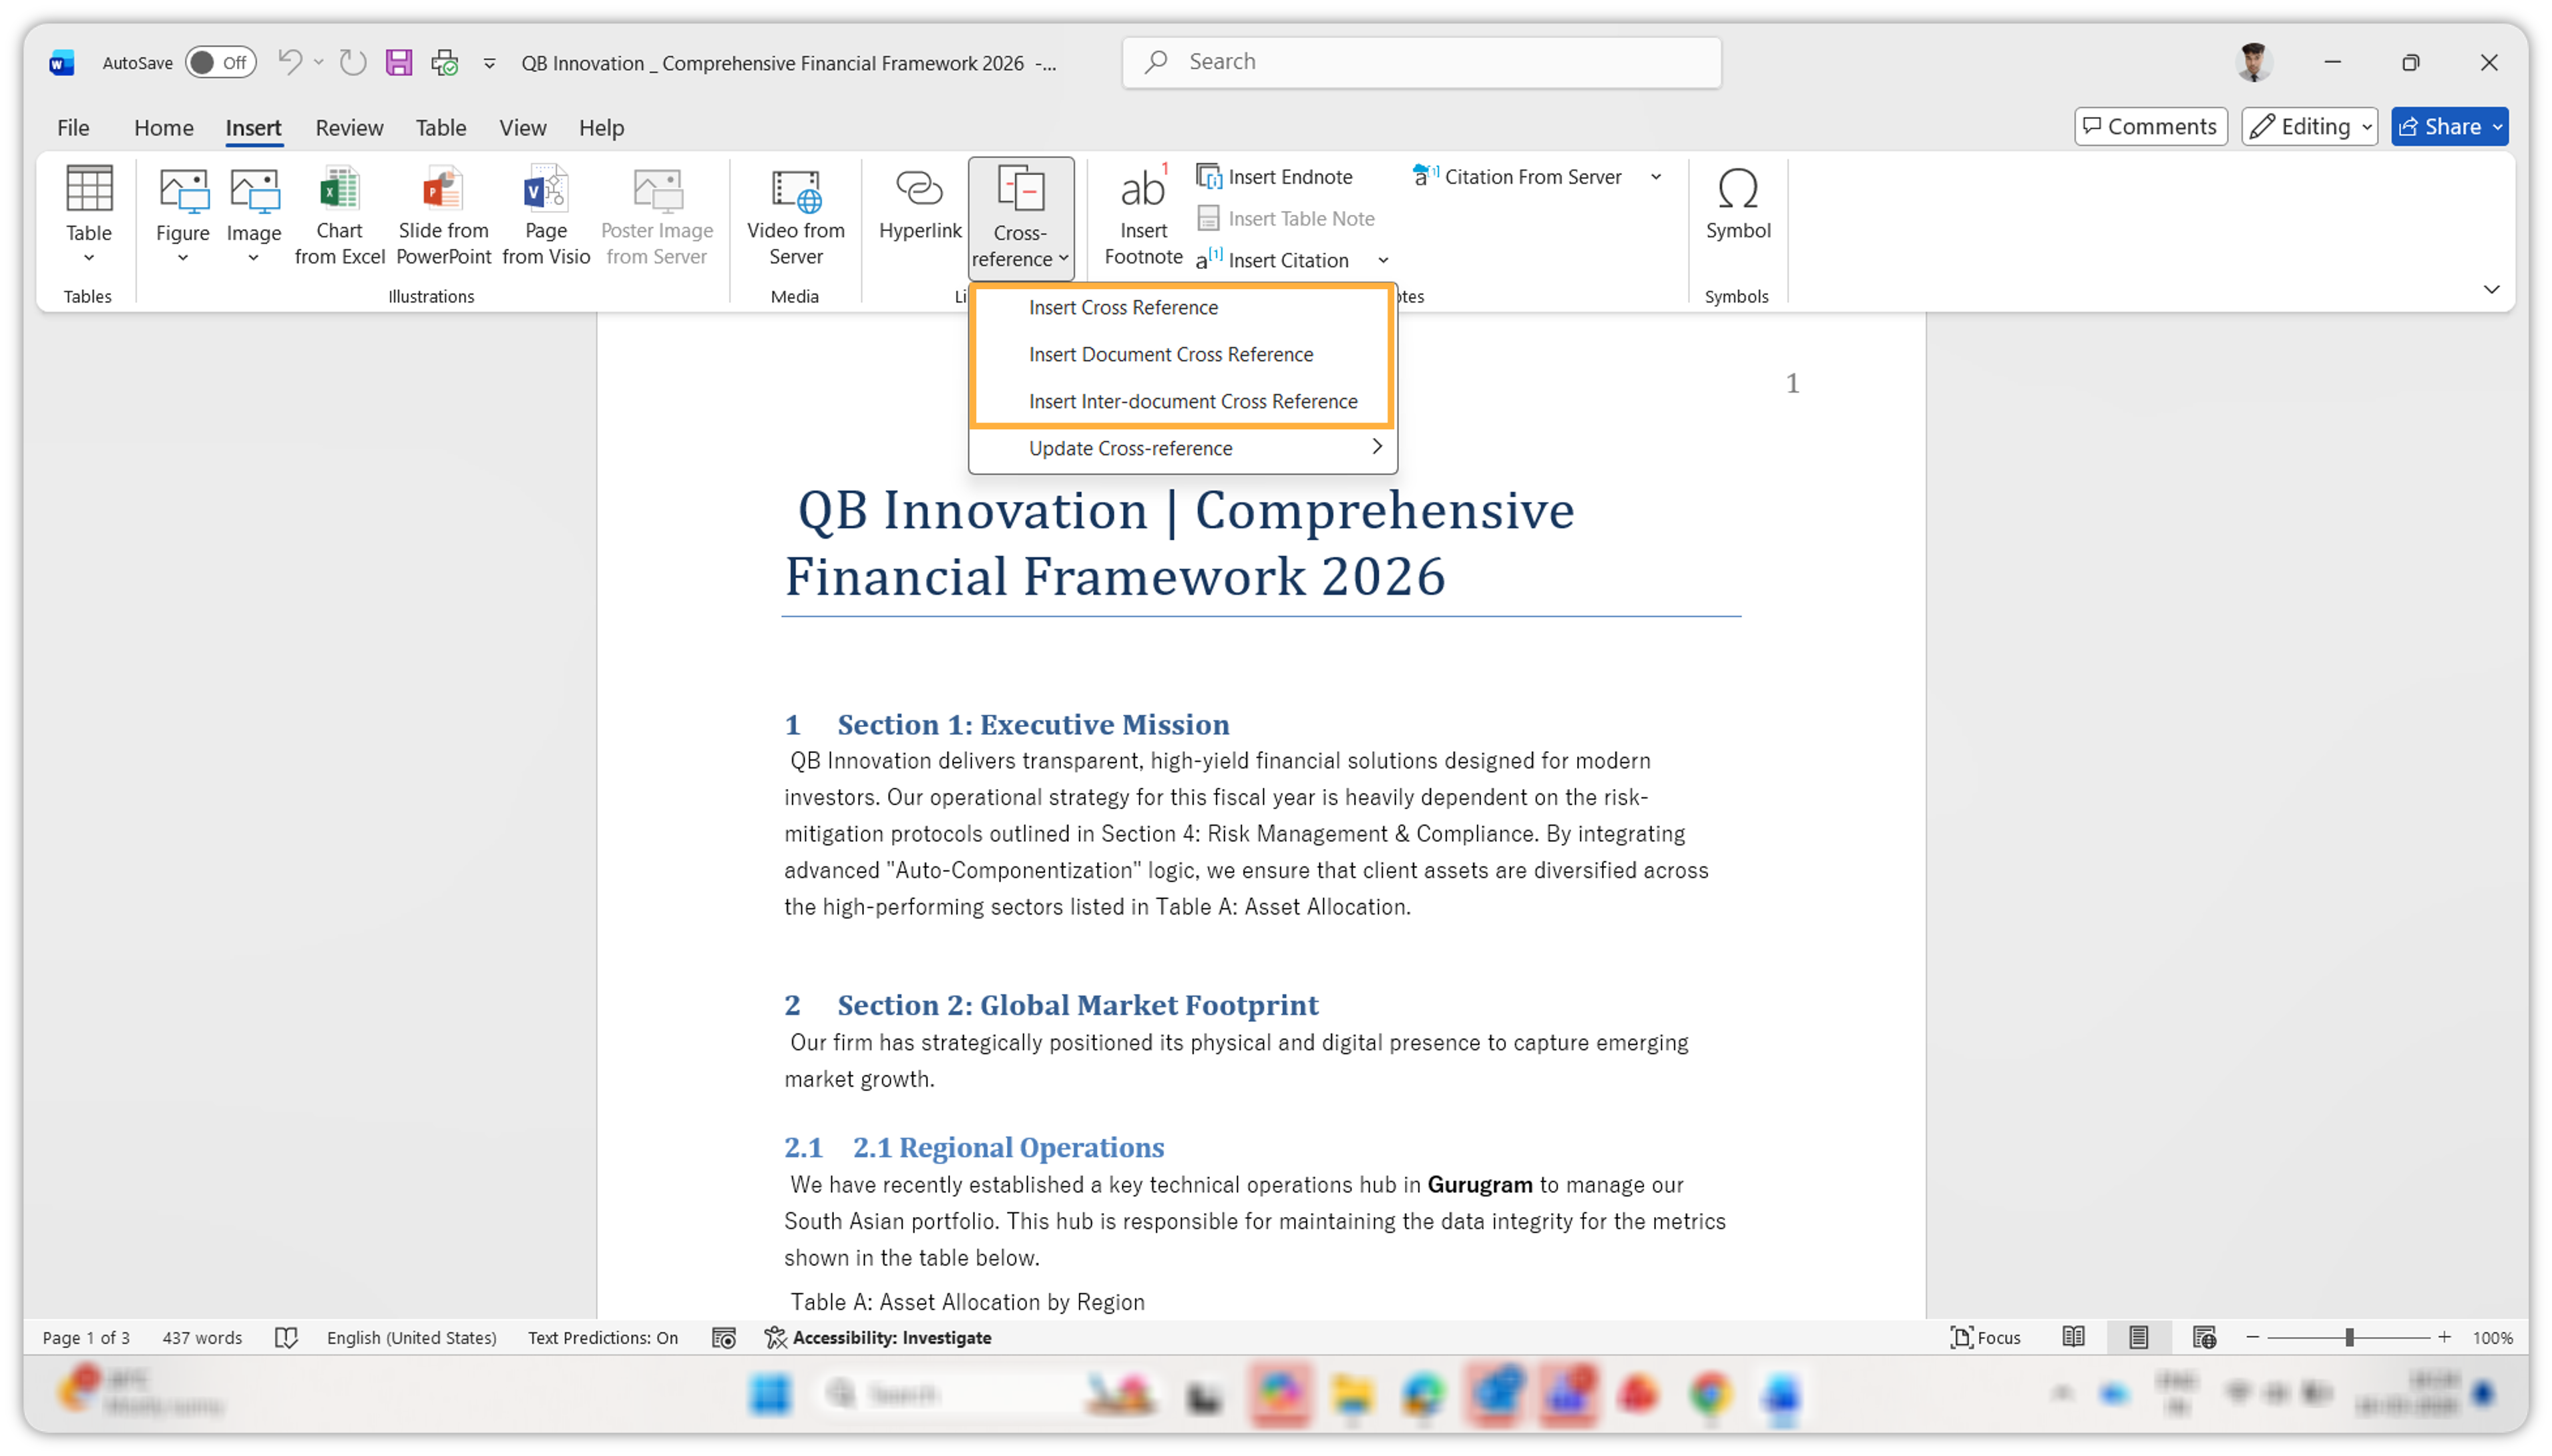
Inserting a Cross-Reference
Use this option to link to a target within your current document.
-
Select the text in your document that you wish to convert into a link.
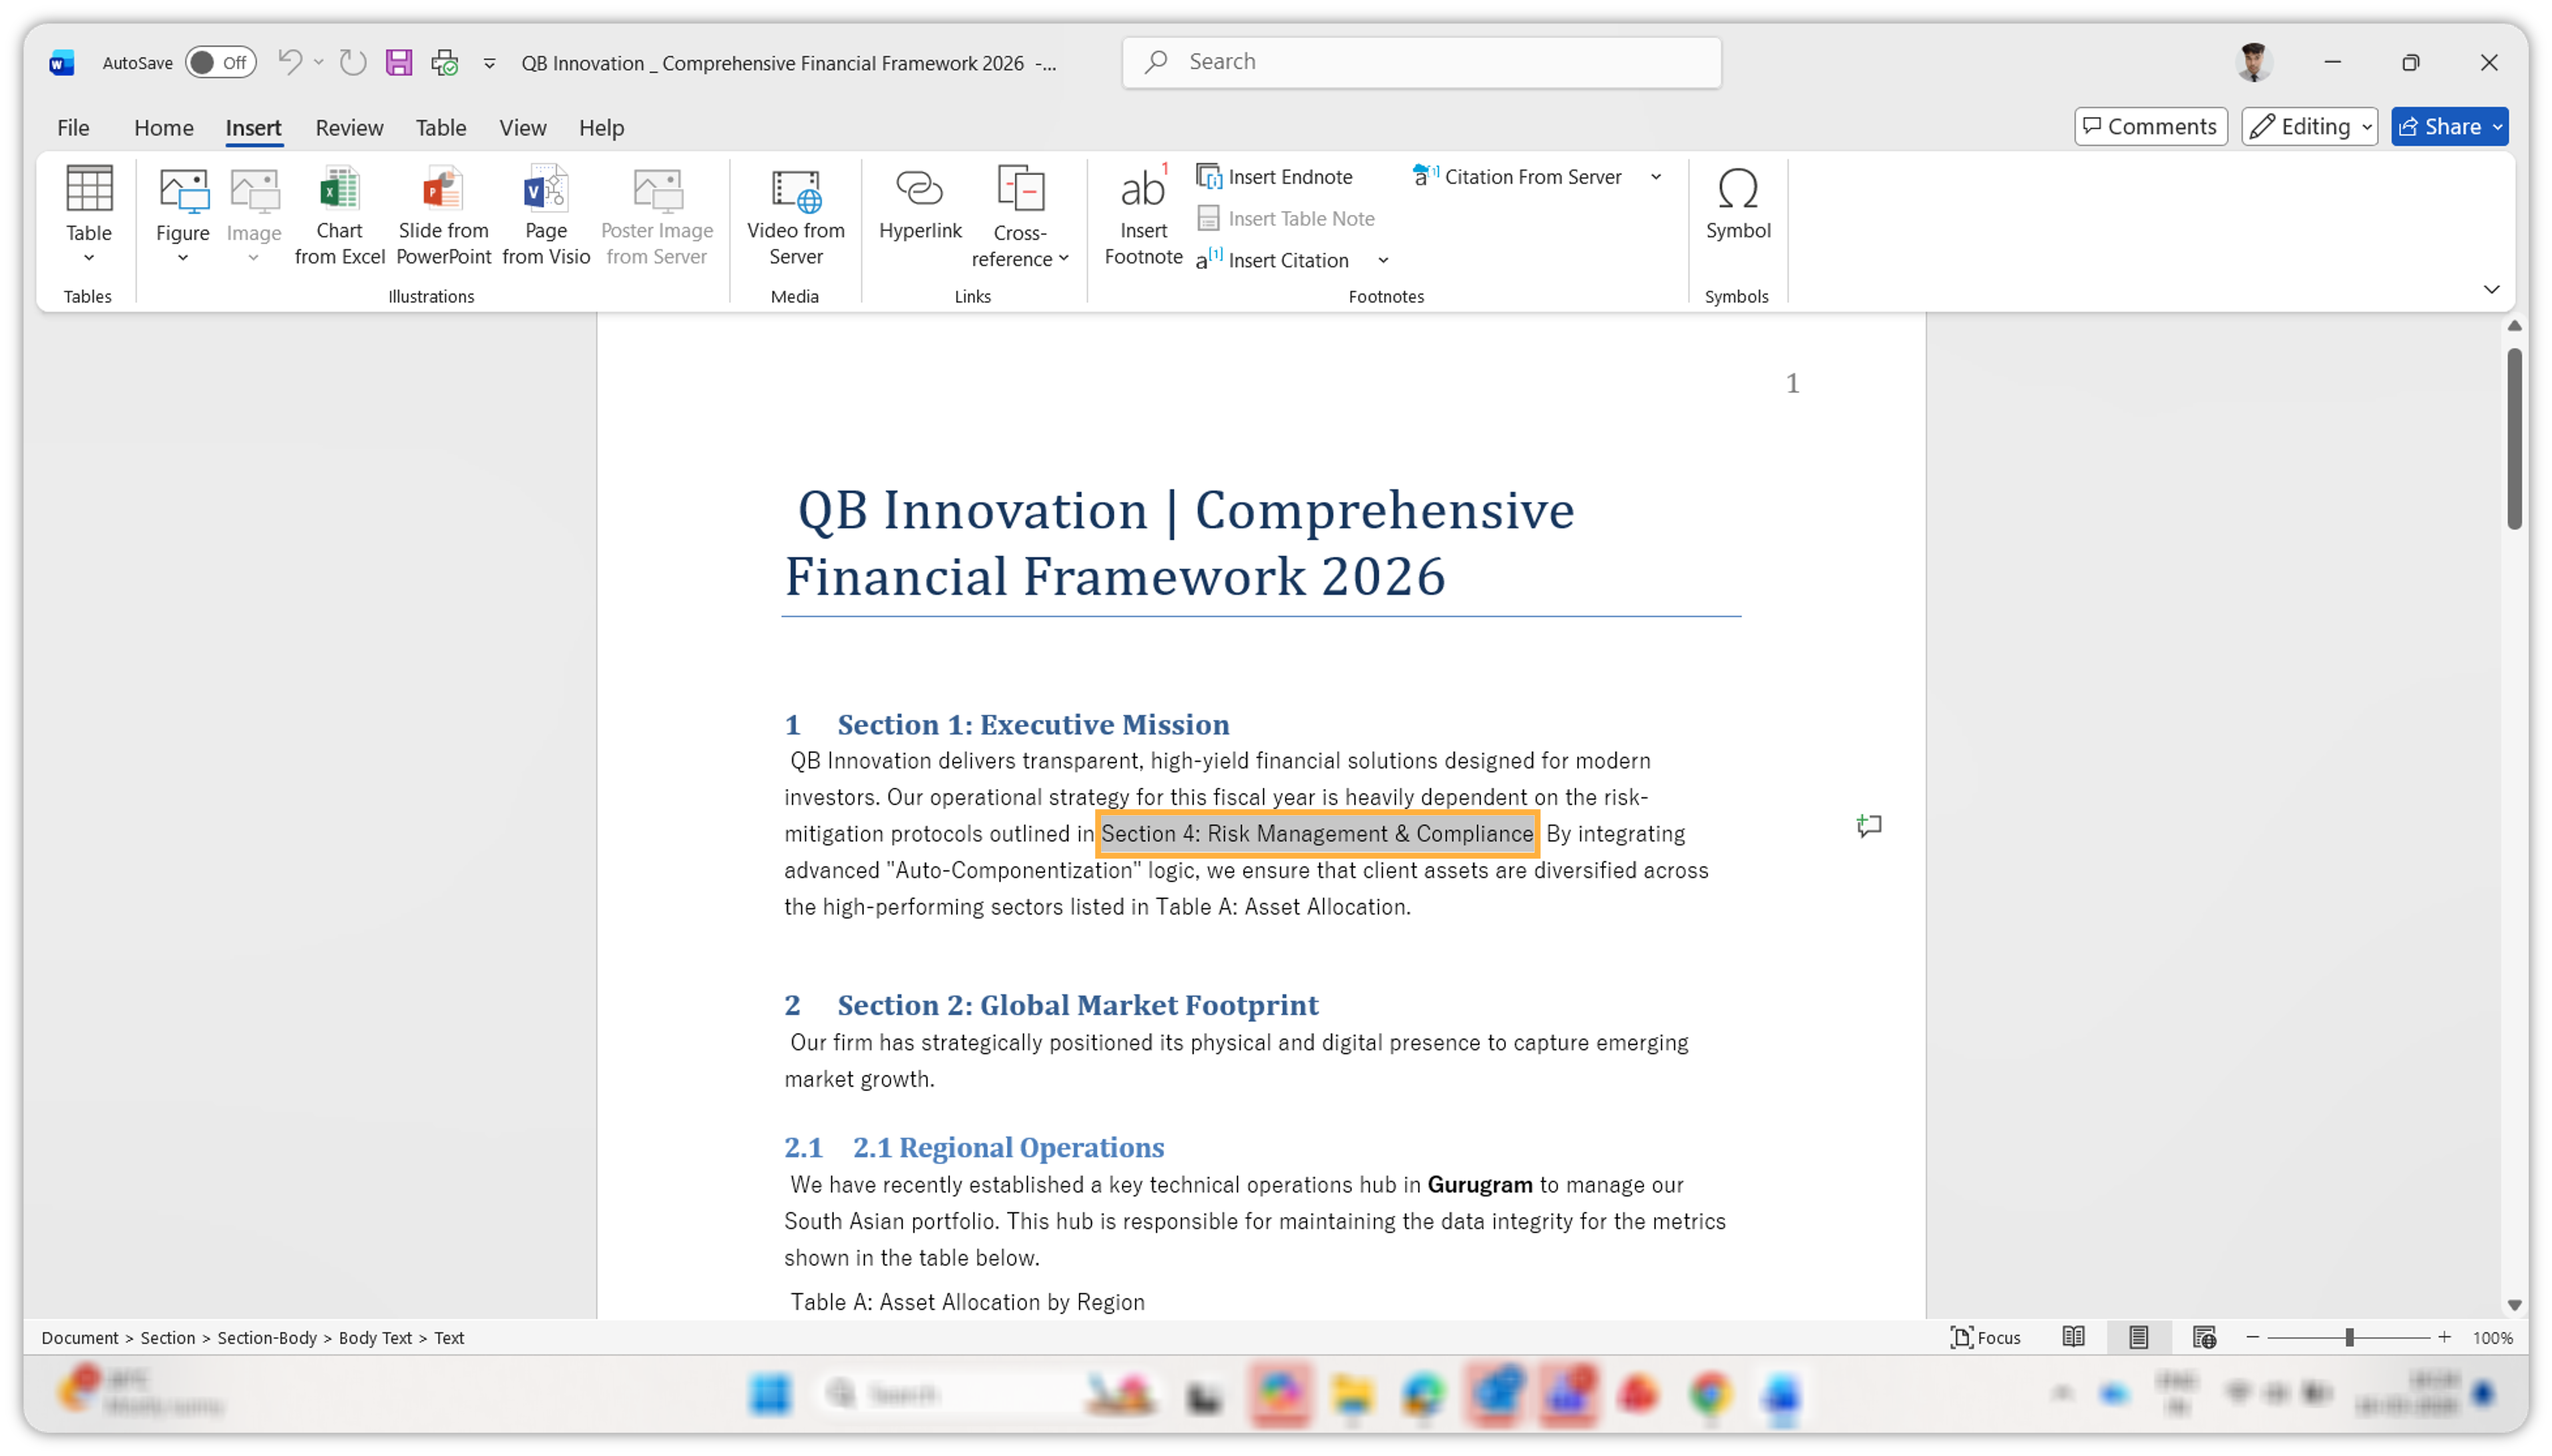
-
In the Links group, click Cross-Reference and then click Insert Cross Reference.
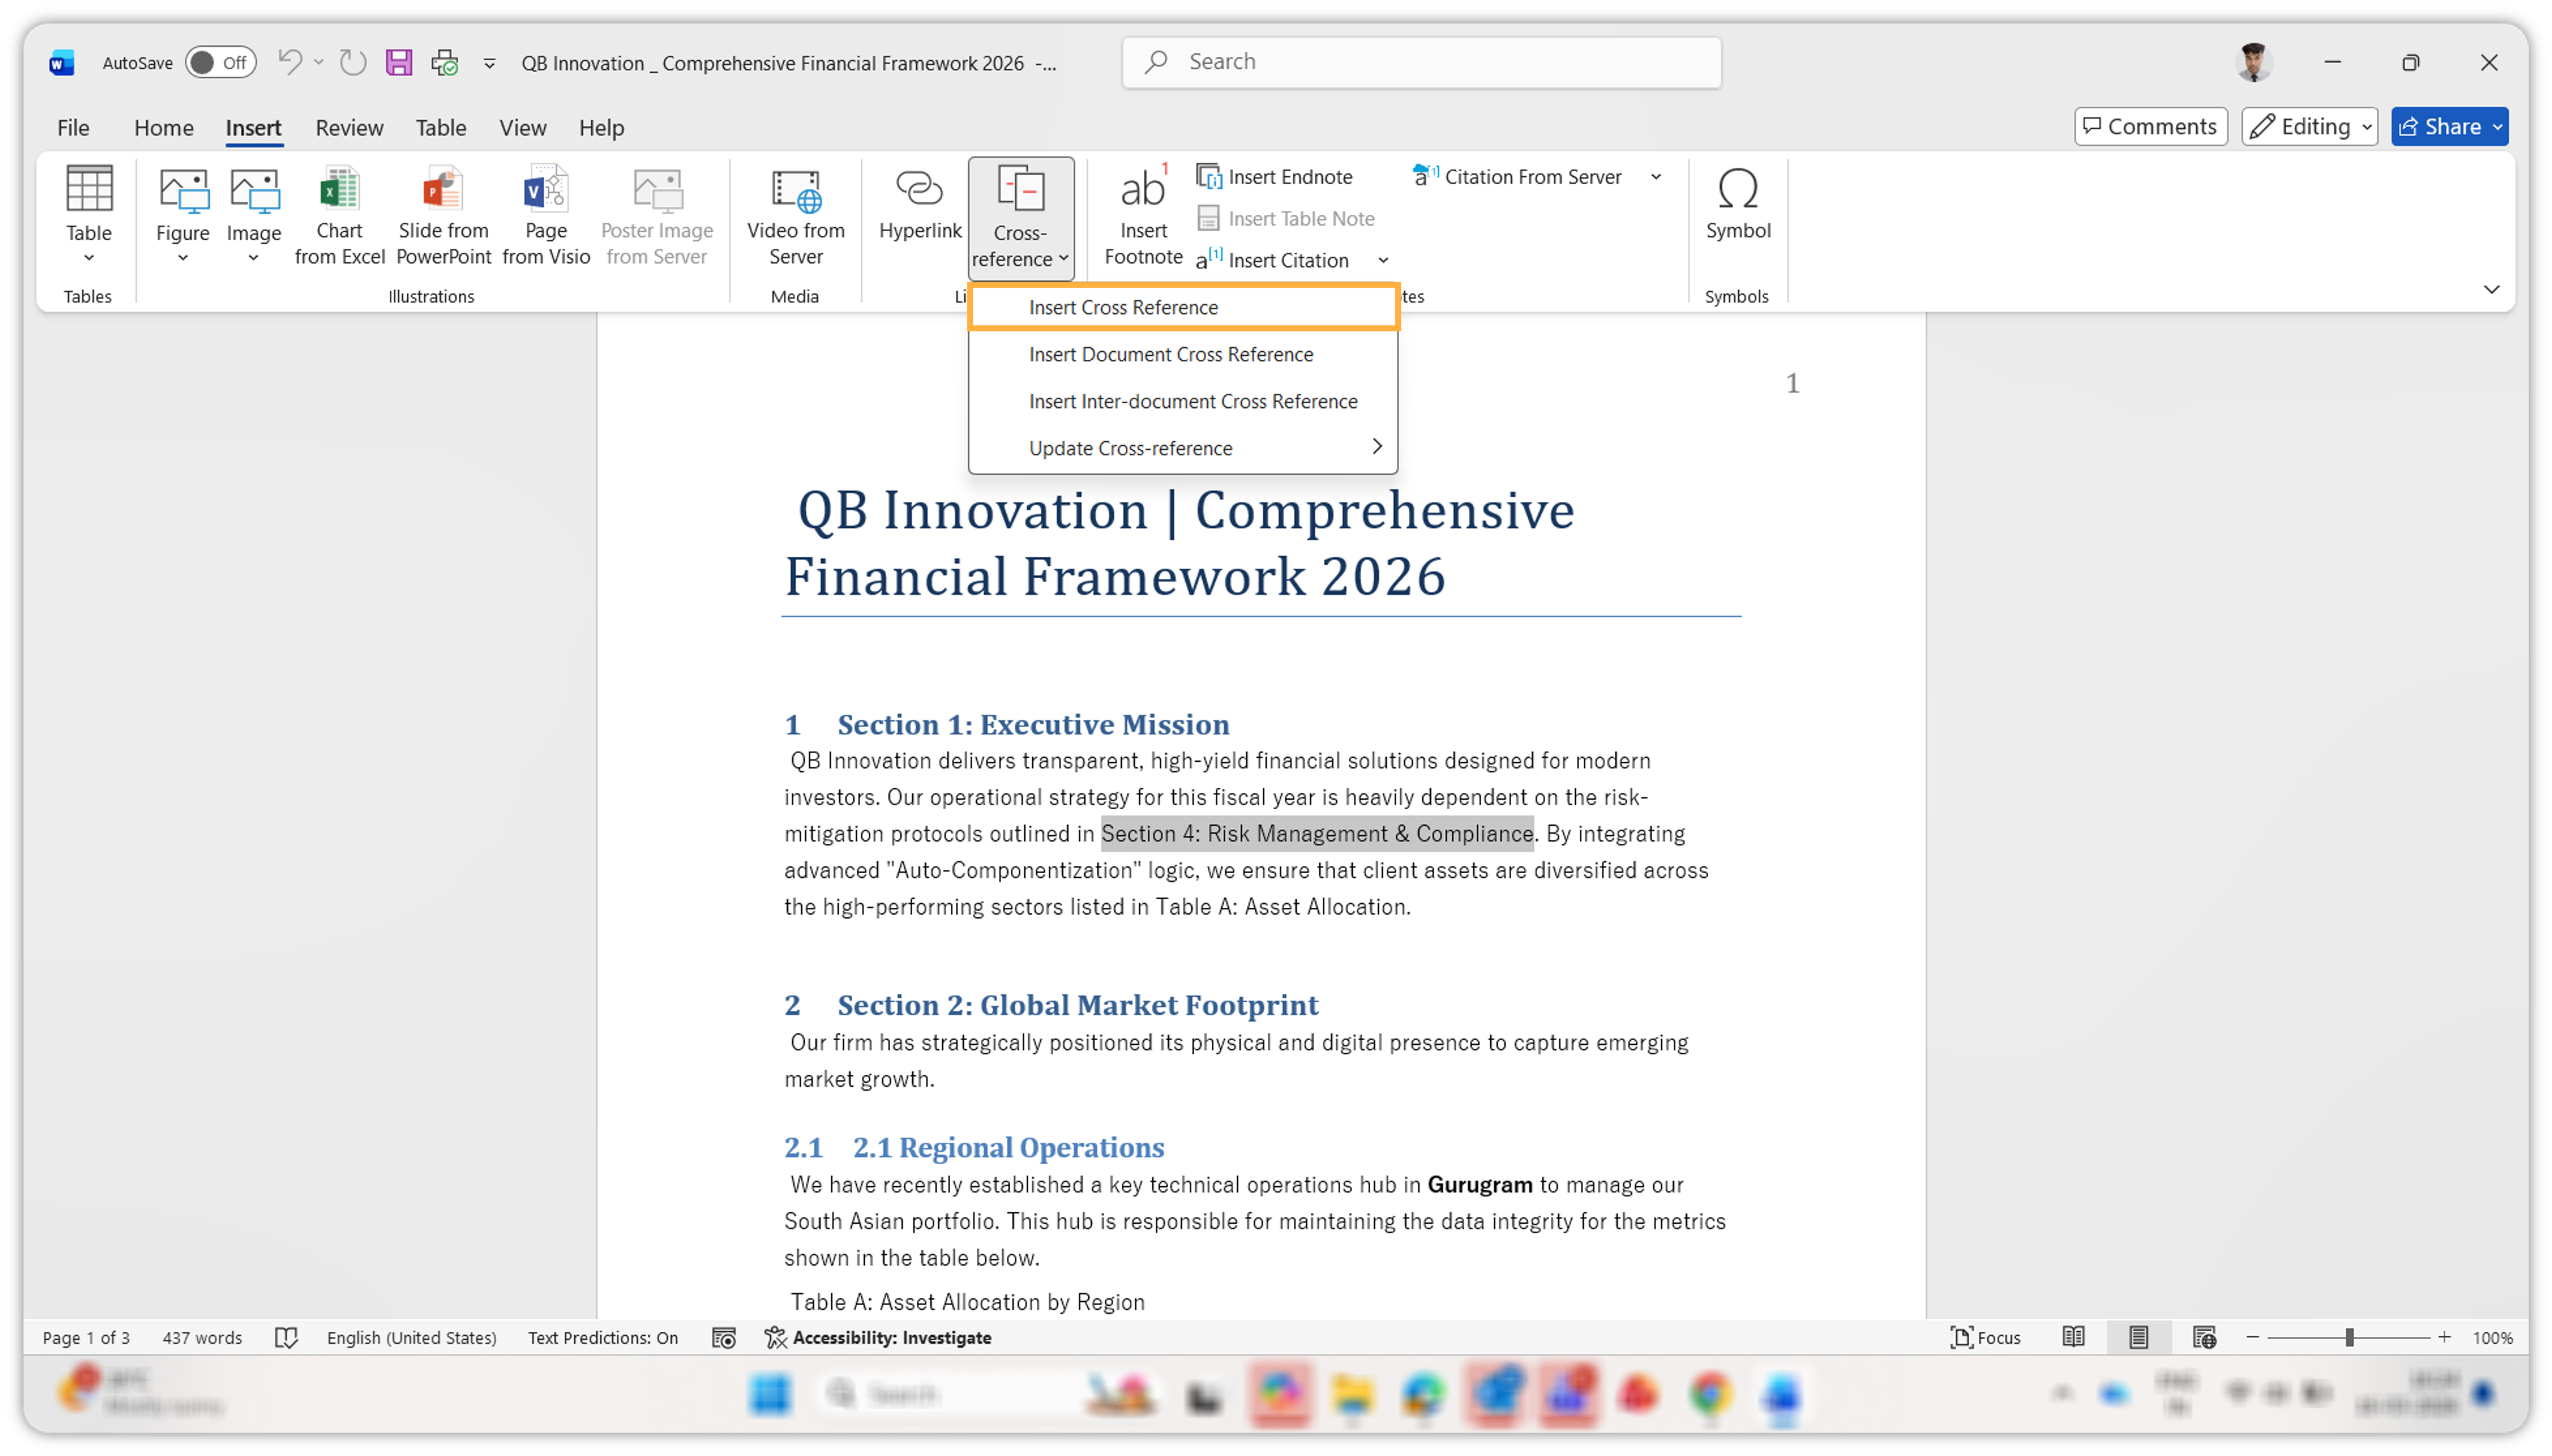
-
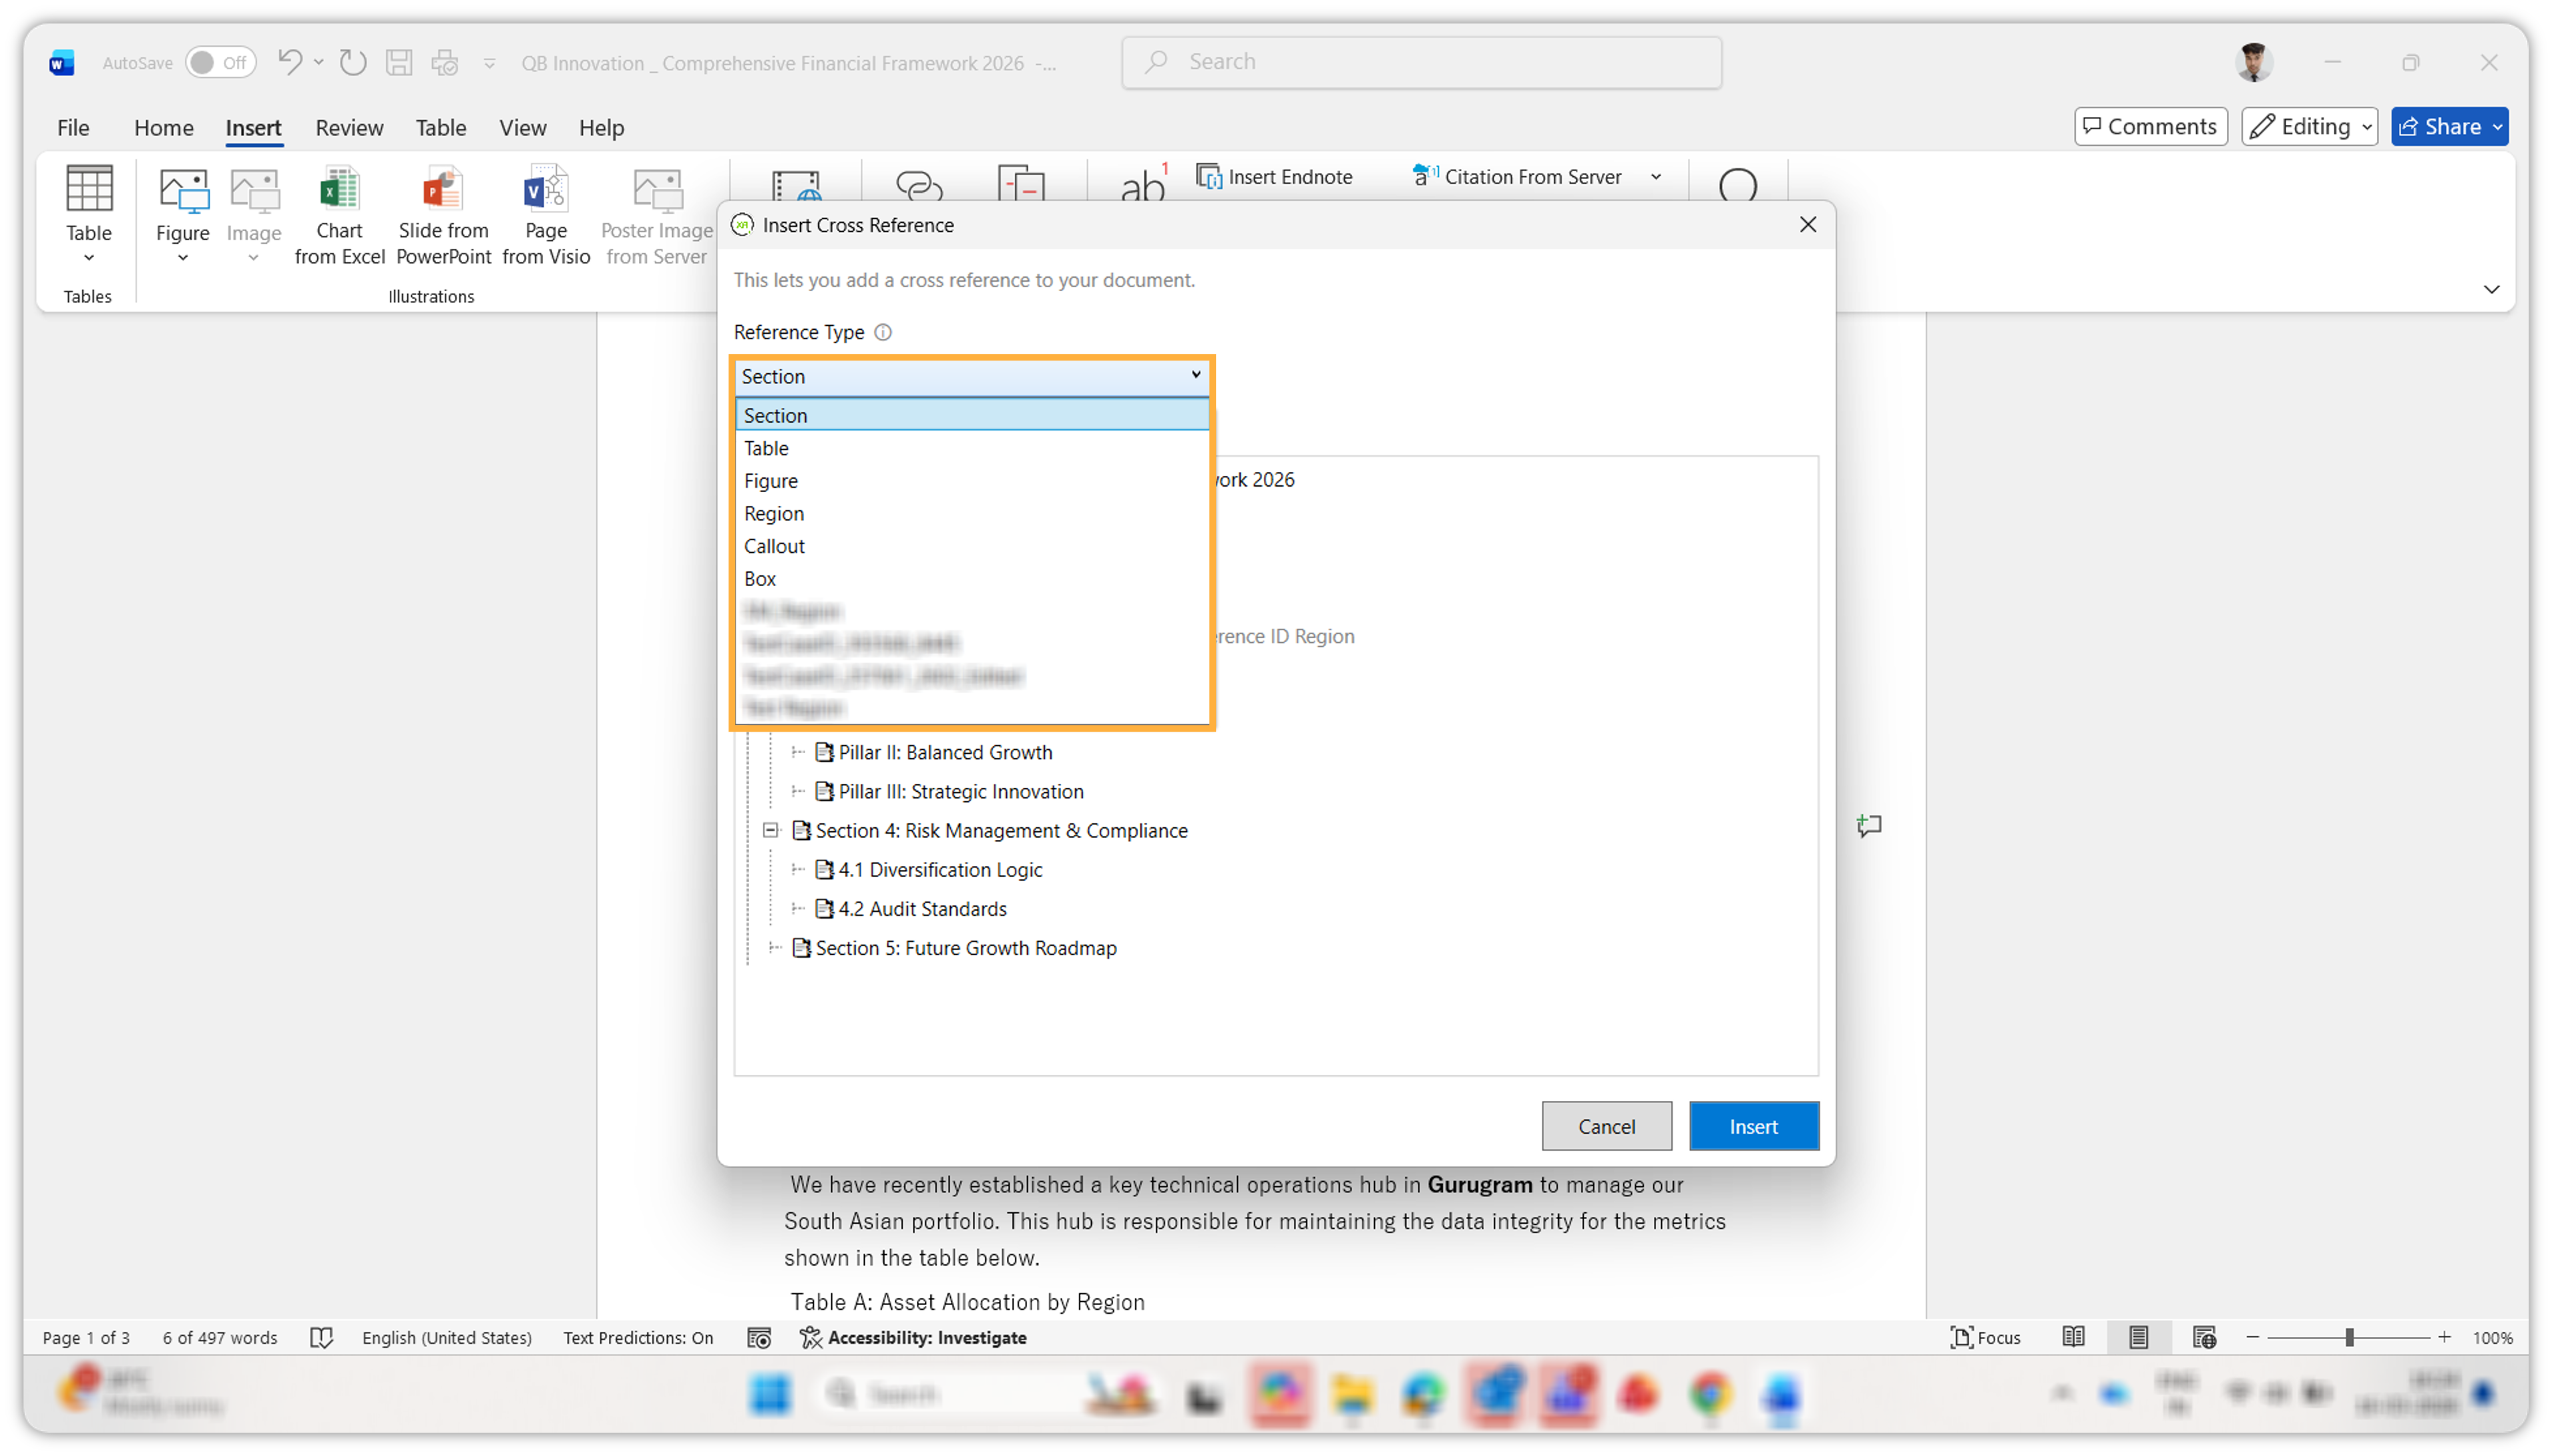
In the Insert Cross Reference dialog, select the Reference Type (e.g., Section, Table, Figure, or Region).
-
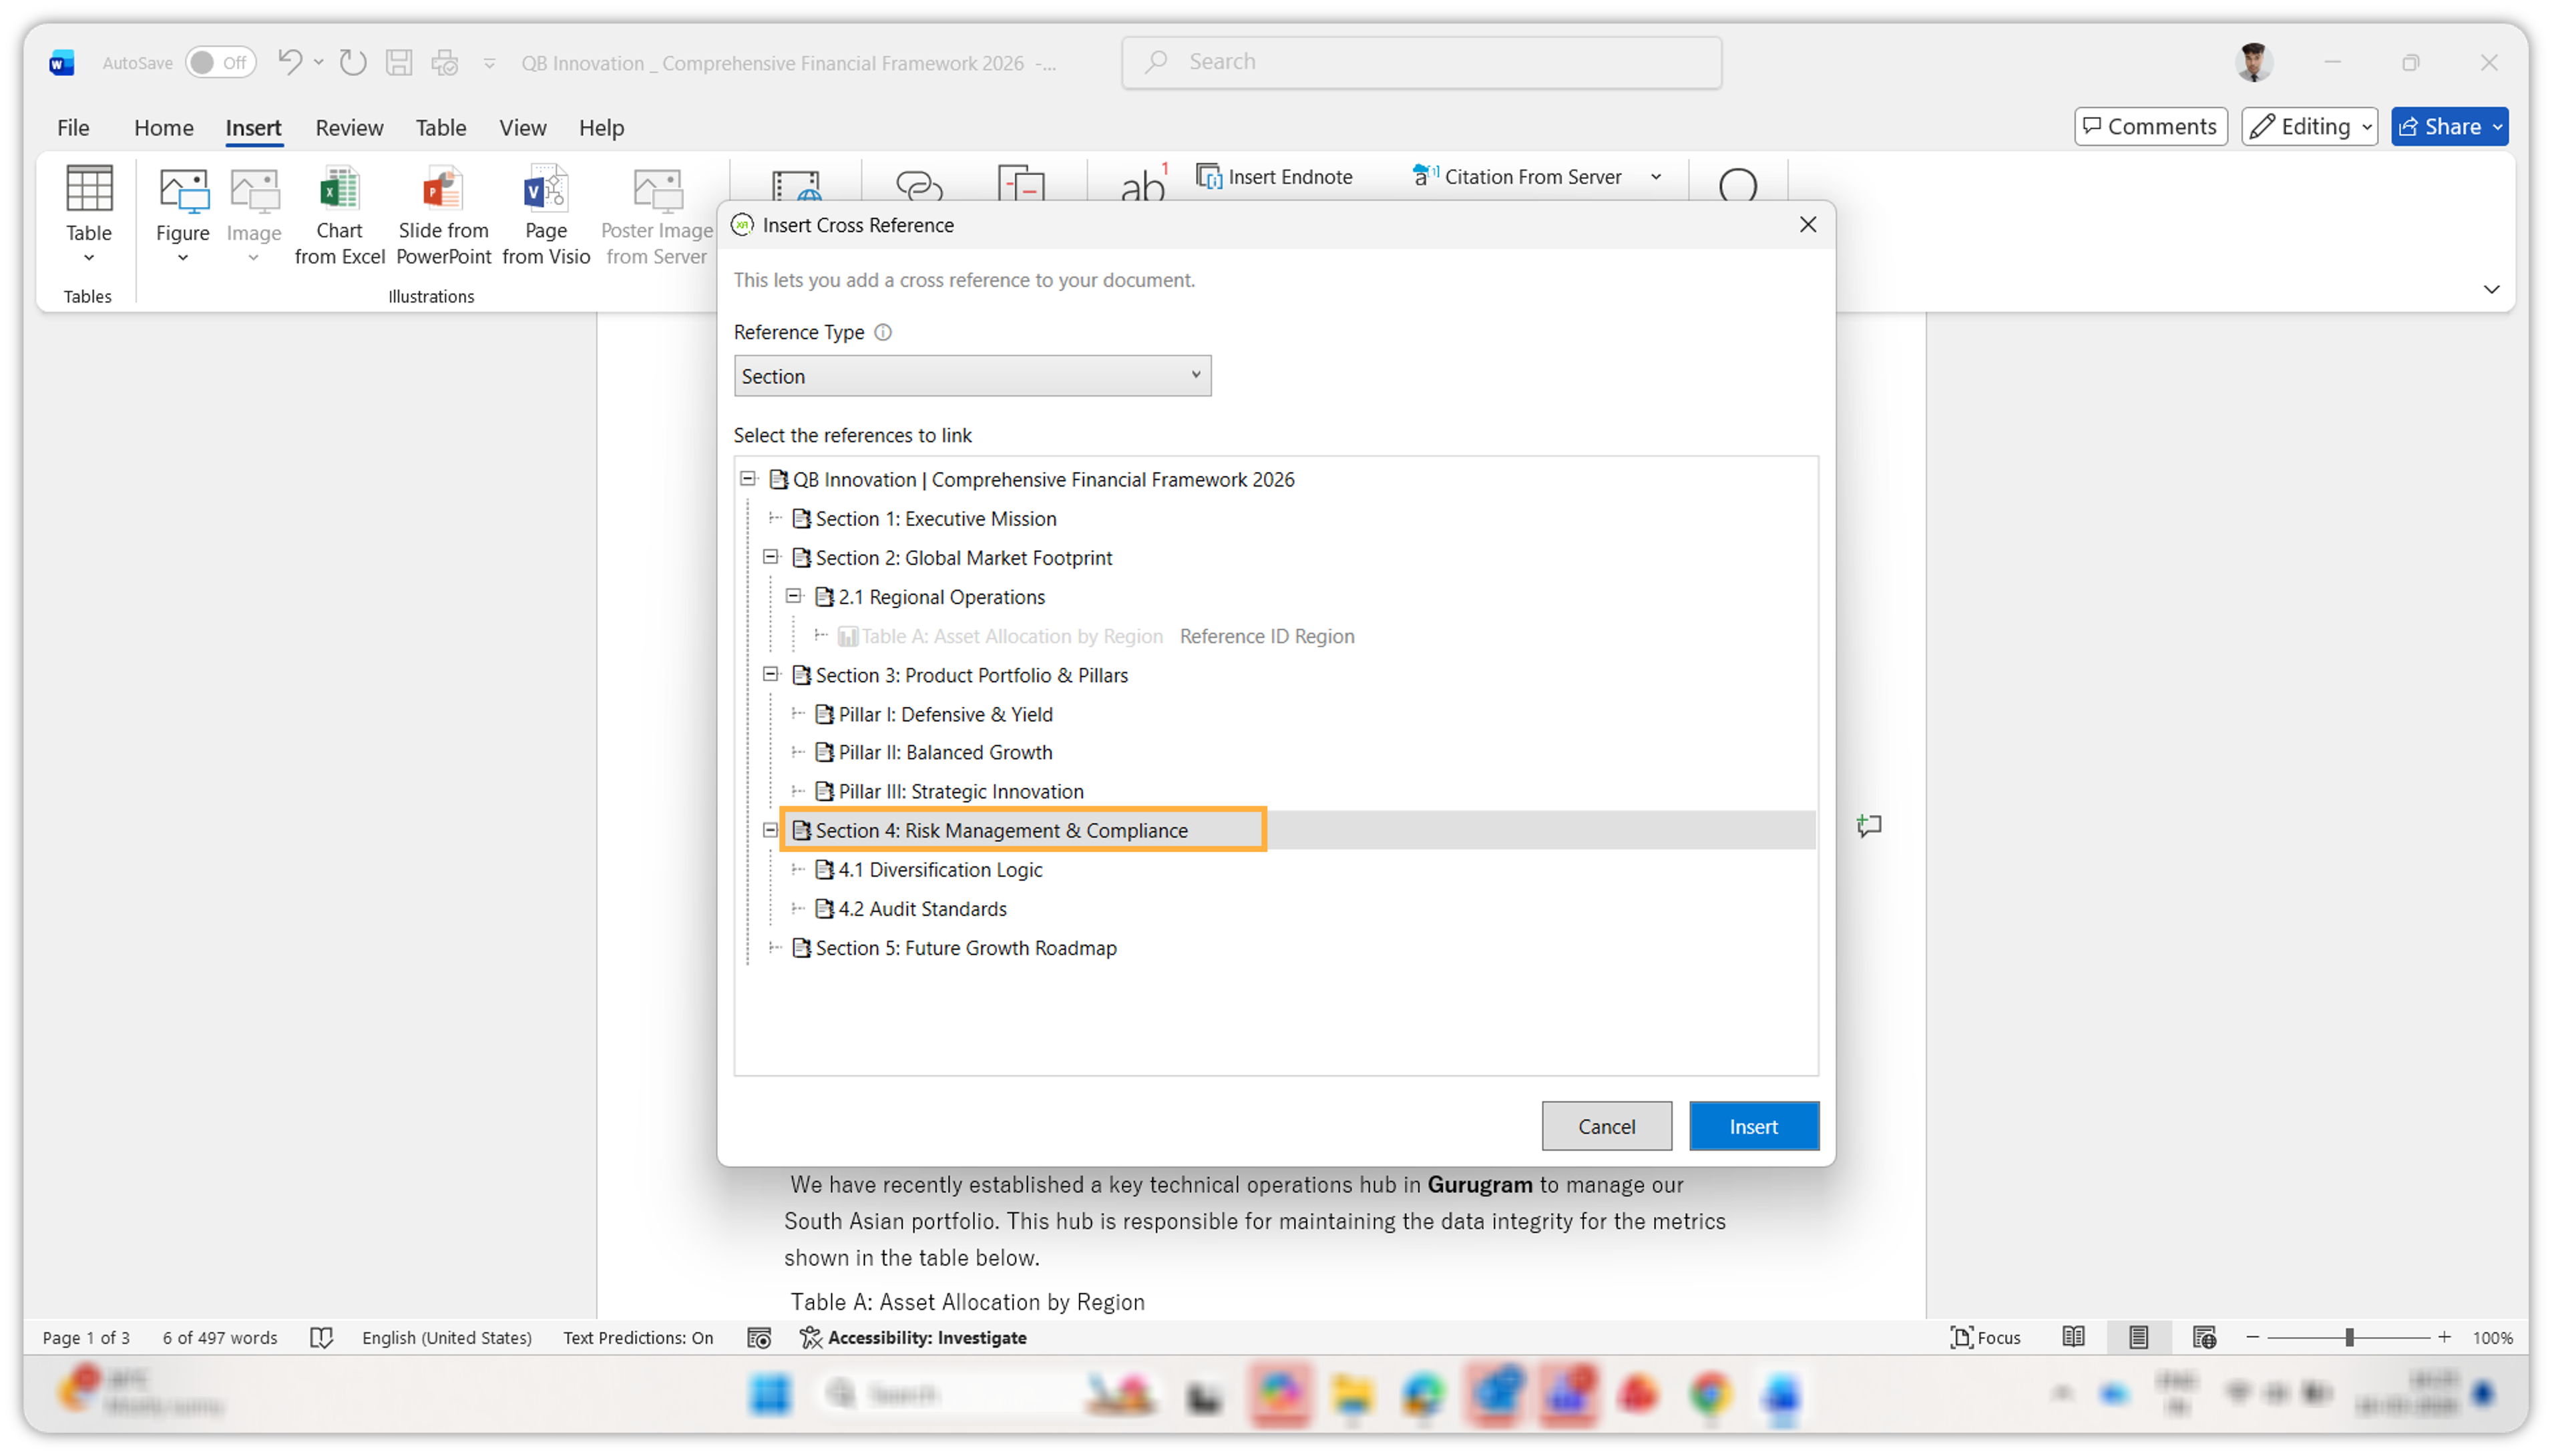
Browse the tree hierarchy of the document and select the specific target element. Click Insert.
-
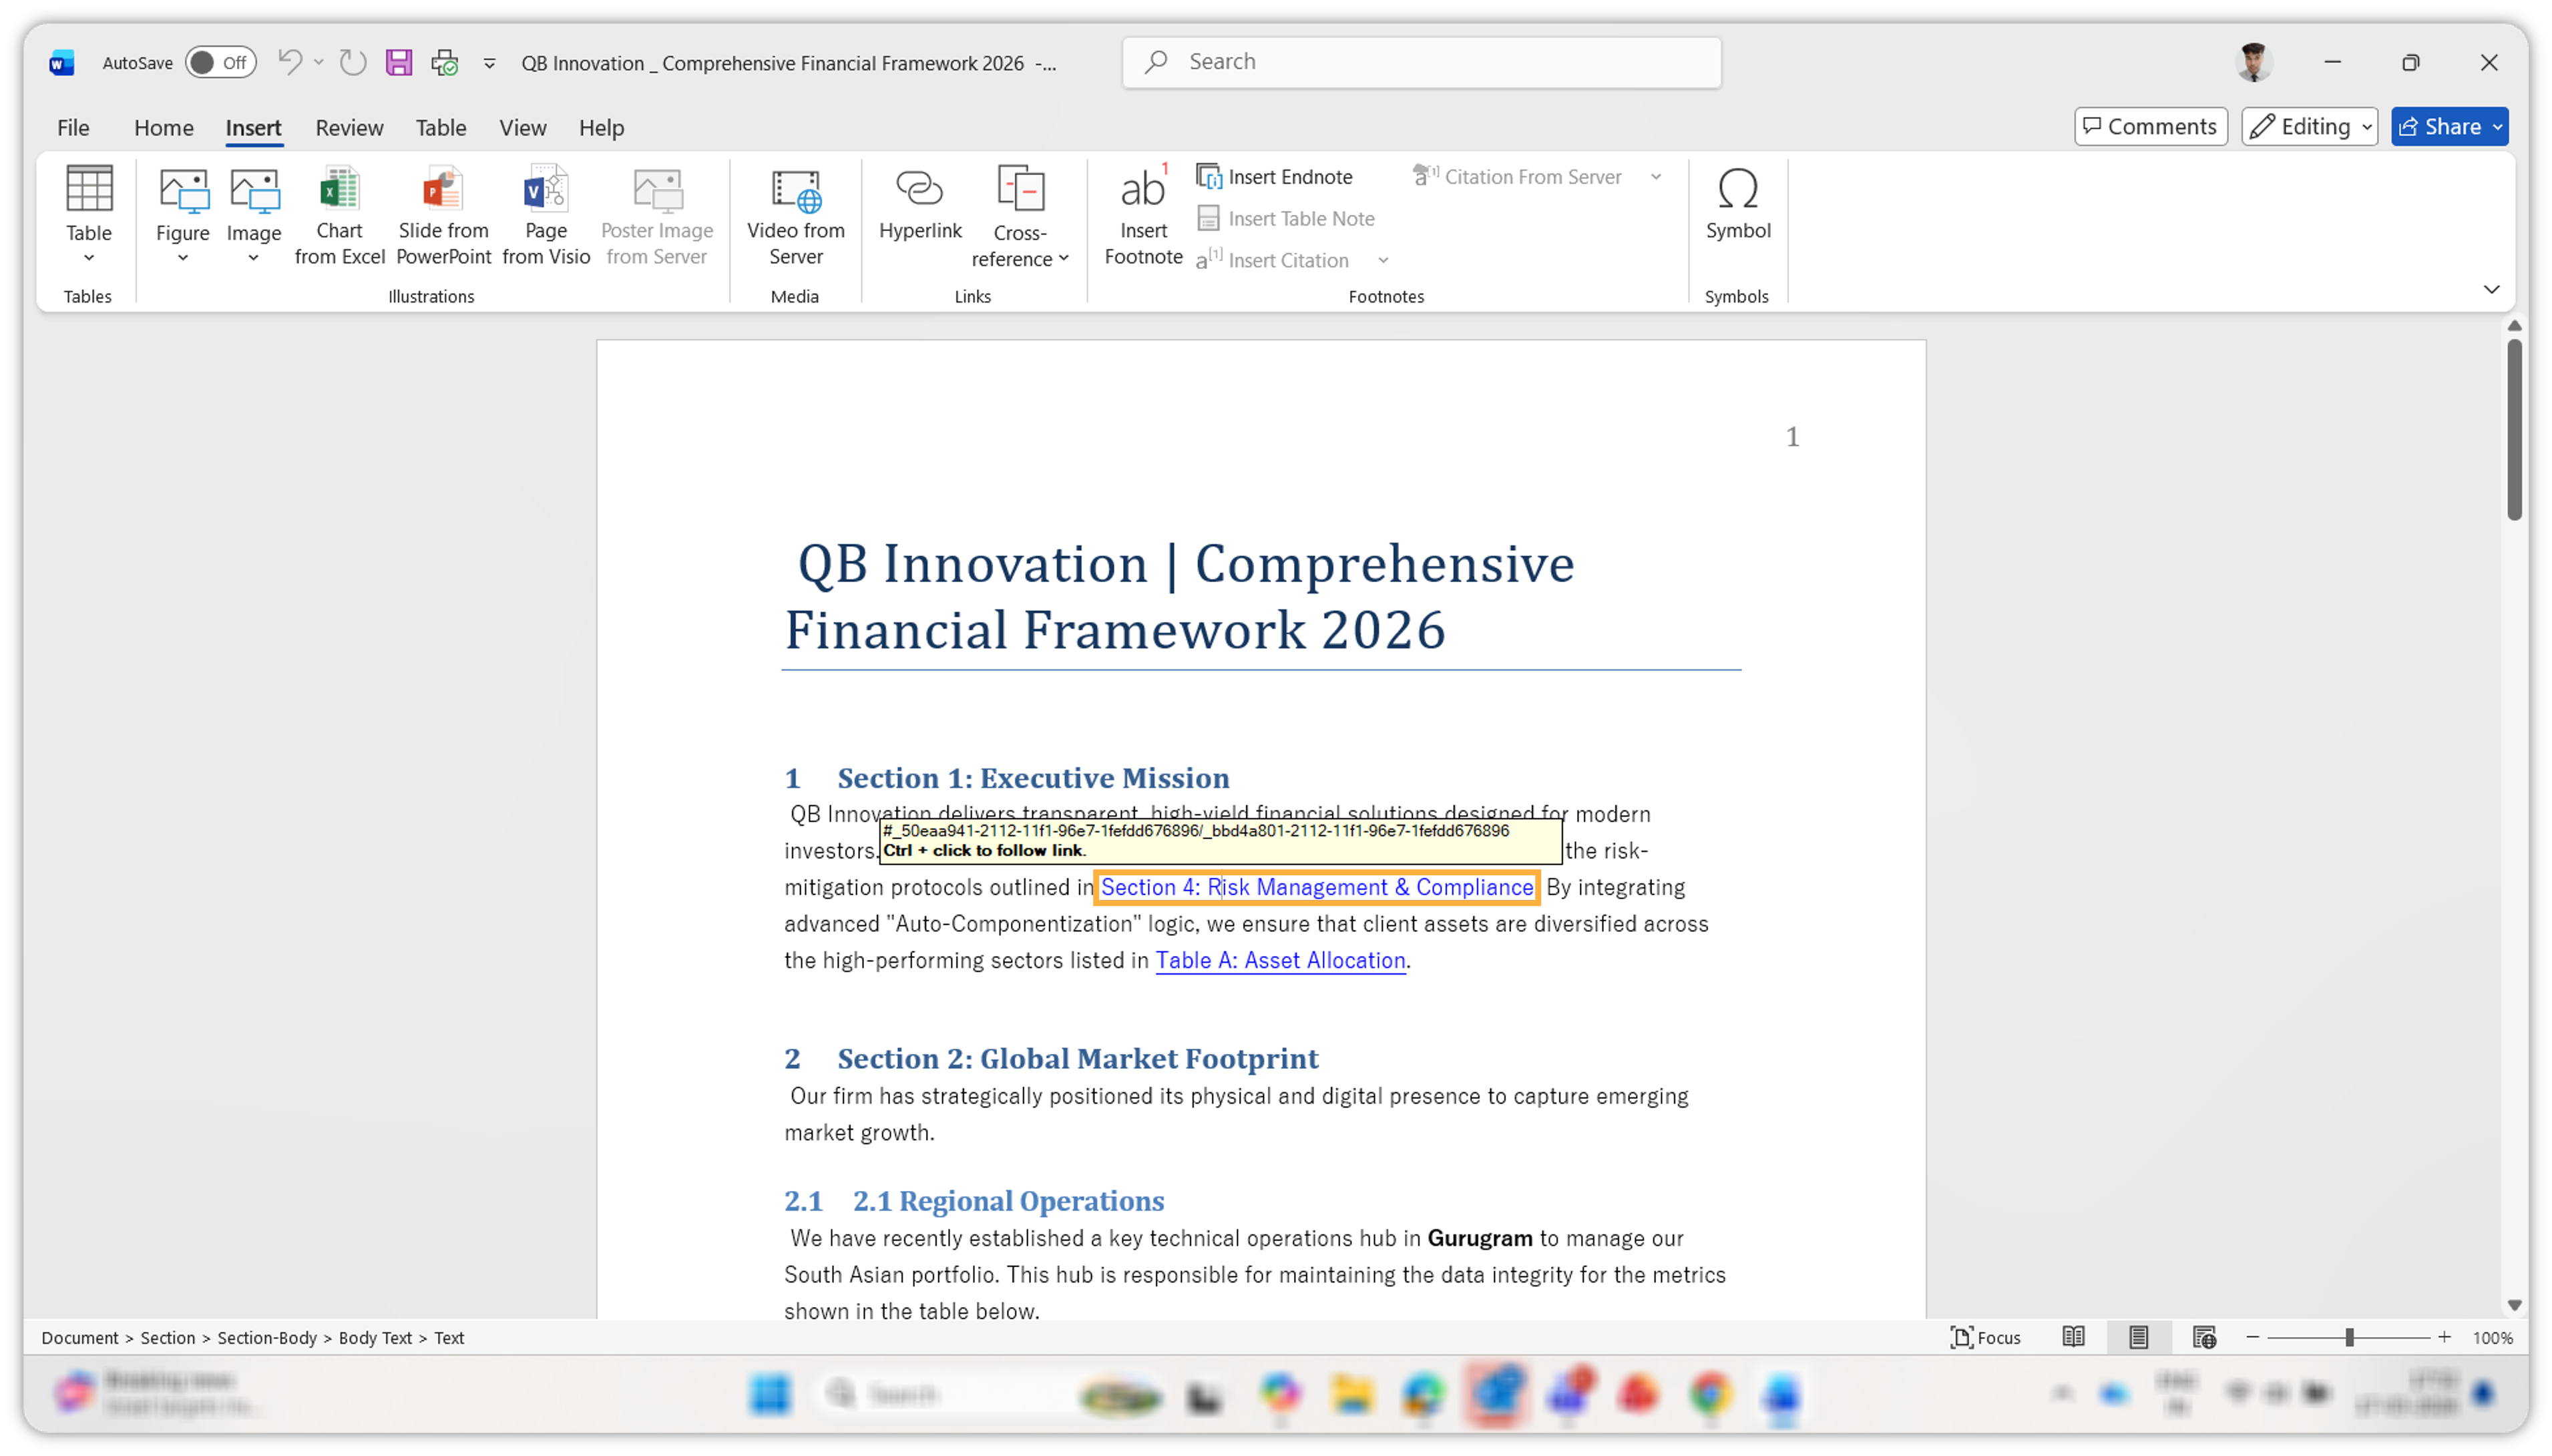
The link is successfully inserted.
-
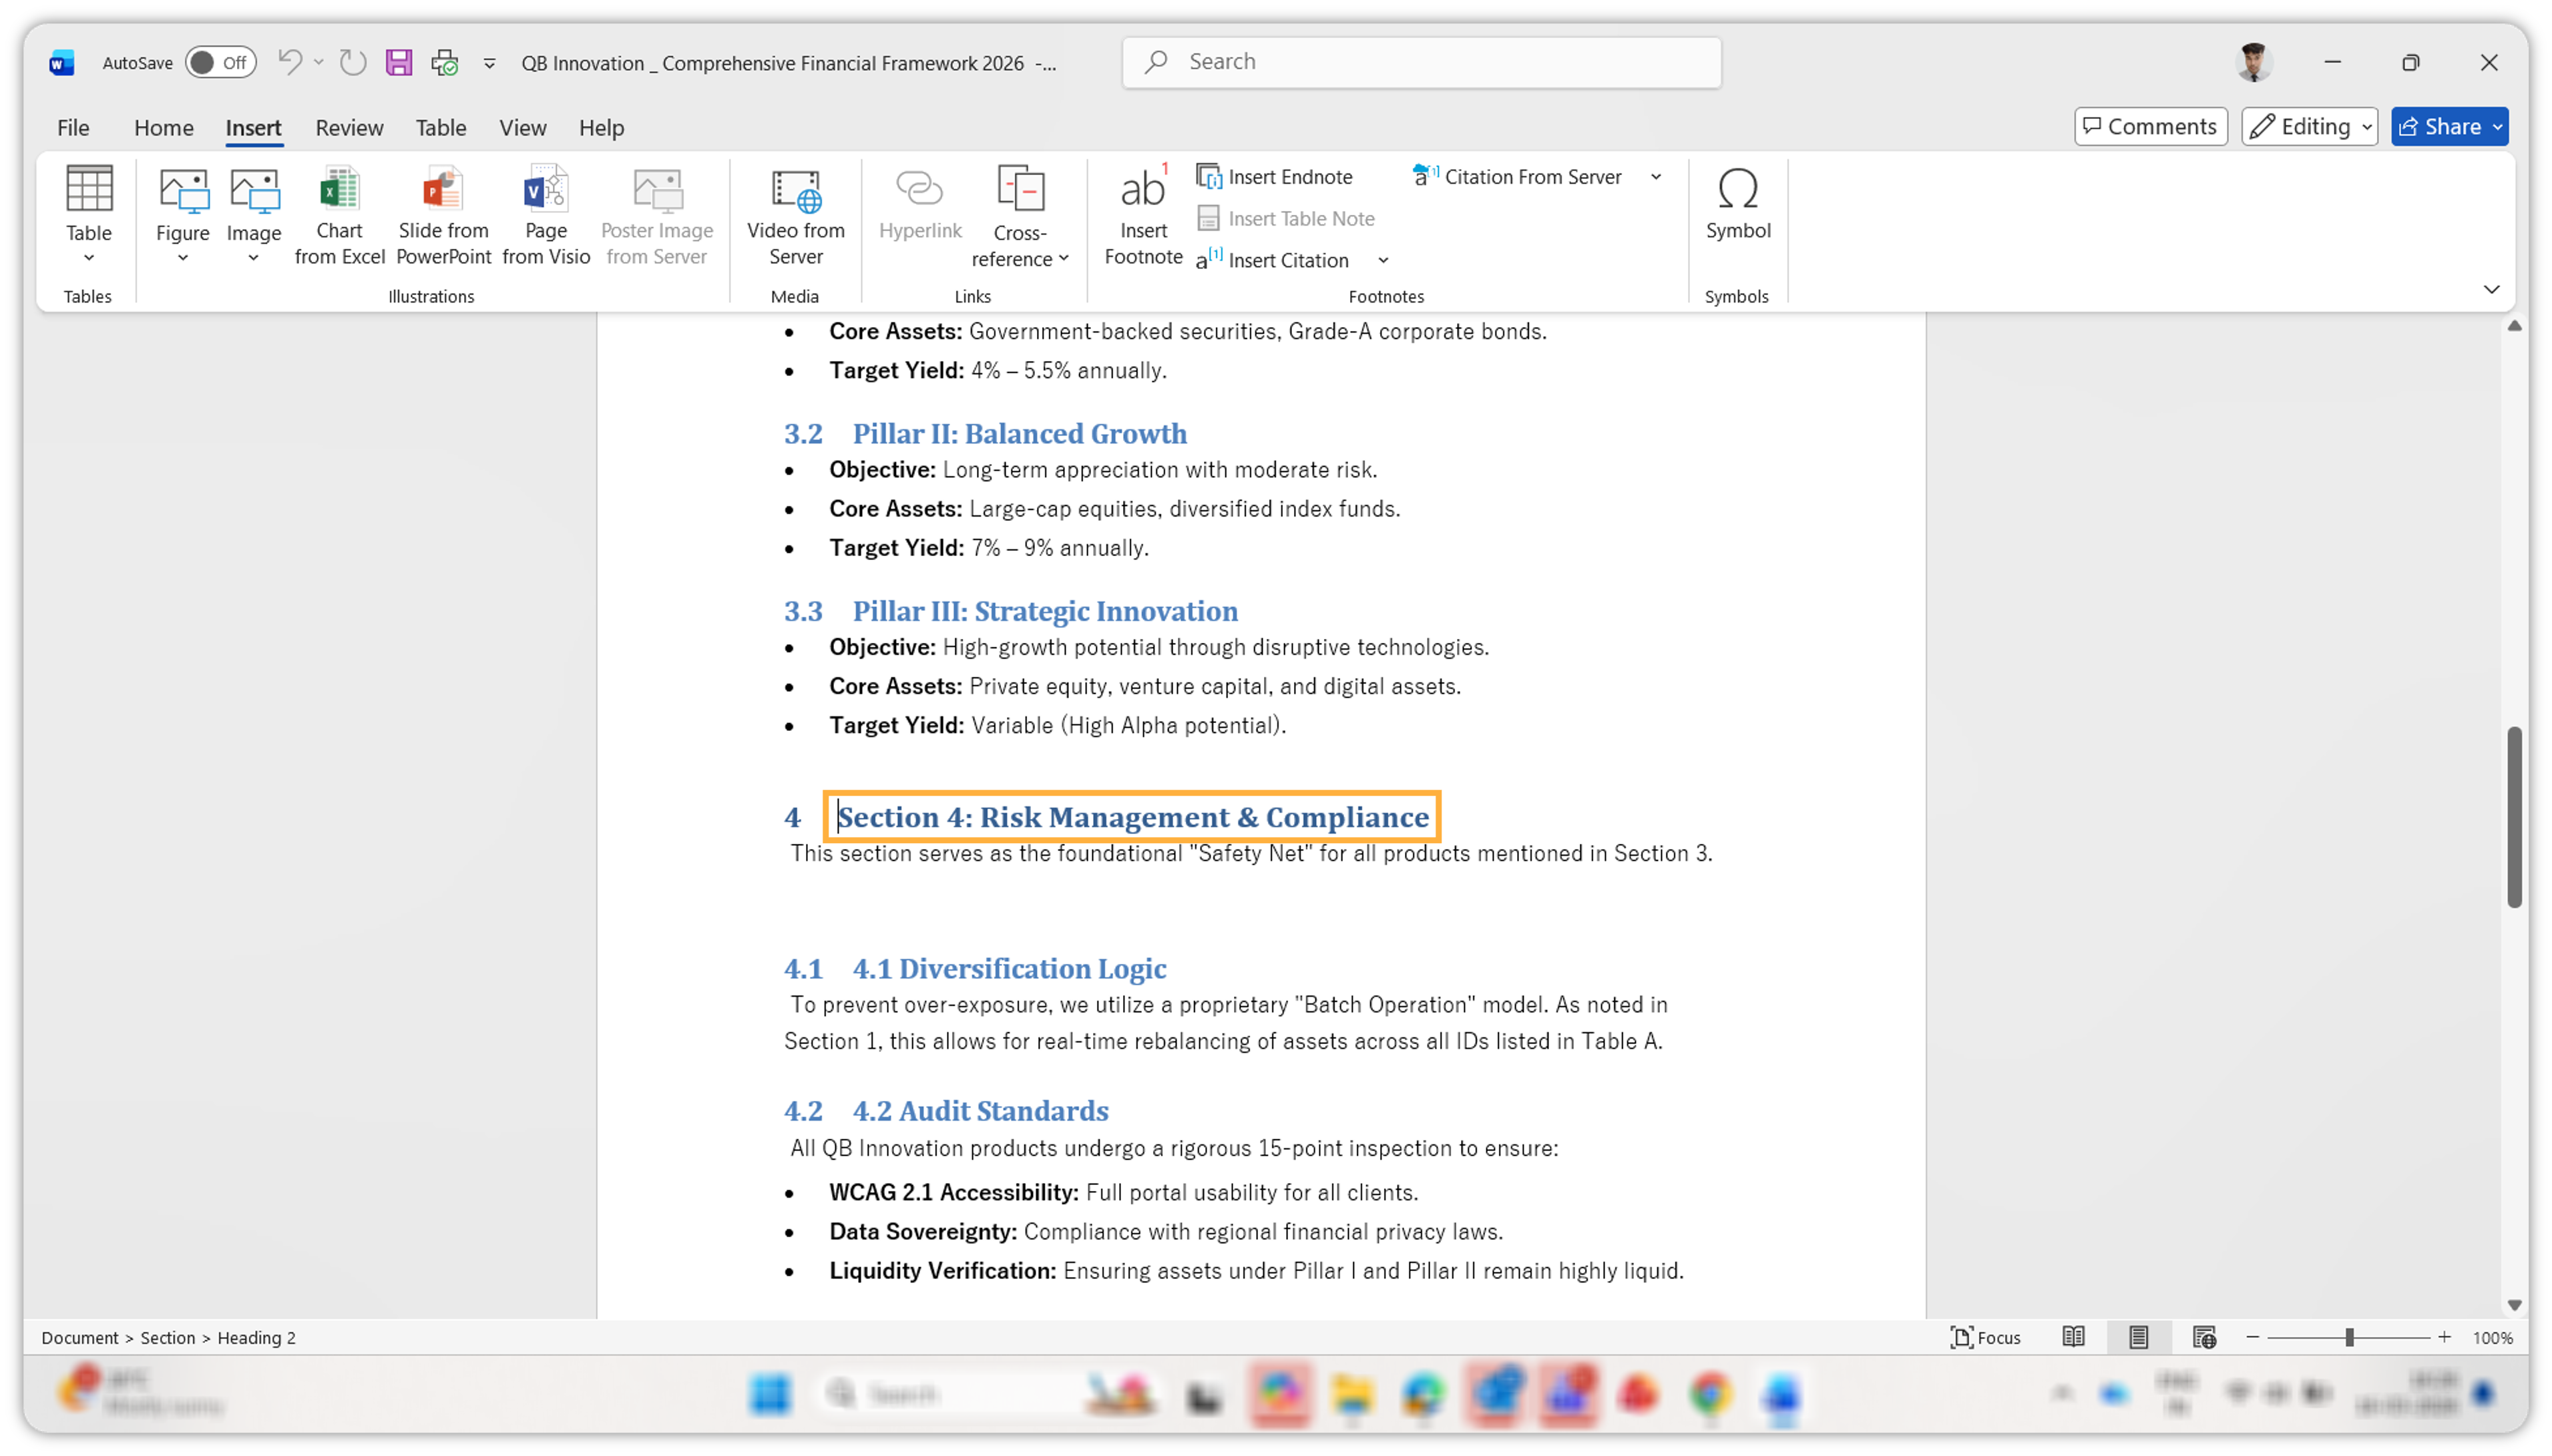
Press Ctrl and click the link to go to the referenced element in the document.
Inserting a Document Cross-Reference
Use this option to link to an entire document on the platform.
-
Place your cursor where you want the link to appear.
-
In the Links group, click Cross-Reference and then click Insert Document Cross Reference.
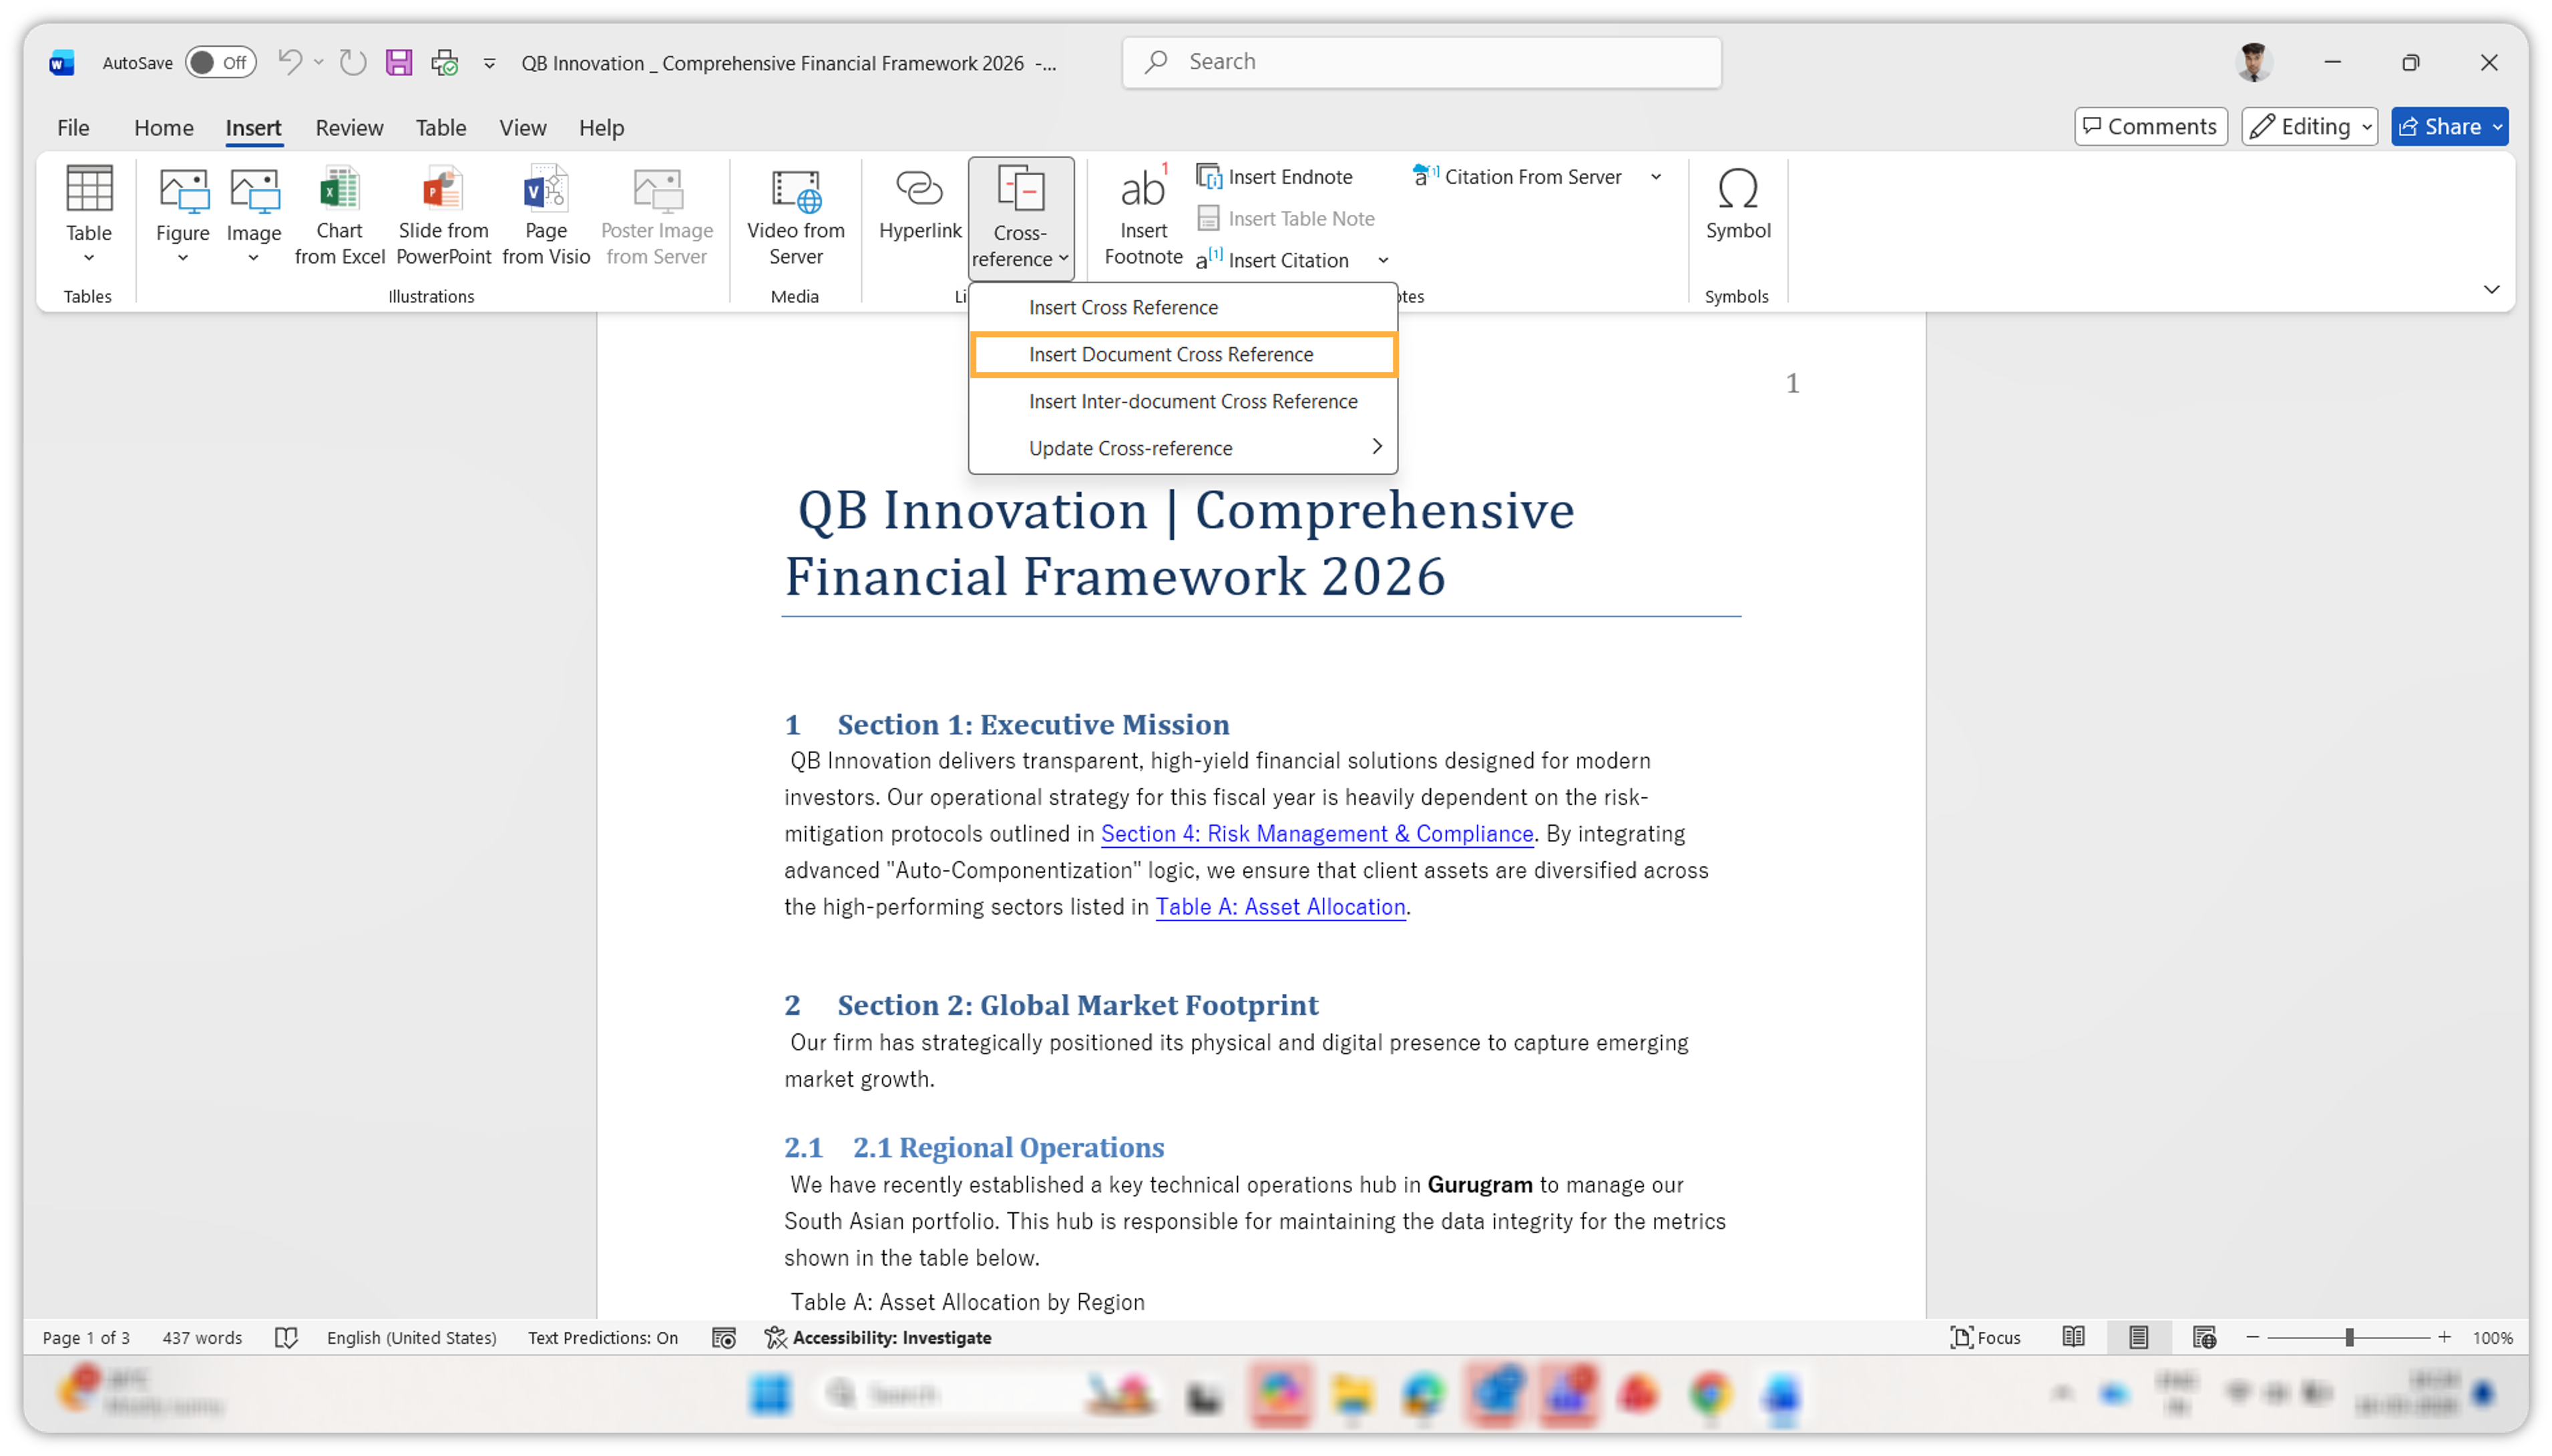
-
The Cross Reference from Server dialog appears. Use the search or browse functions to locate the desired document. Select the document and click OK.
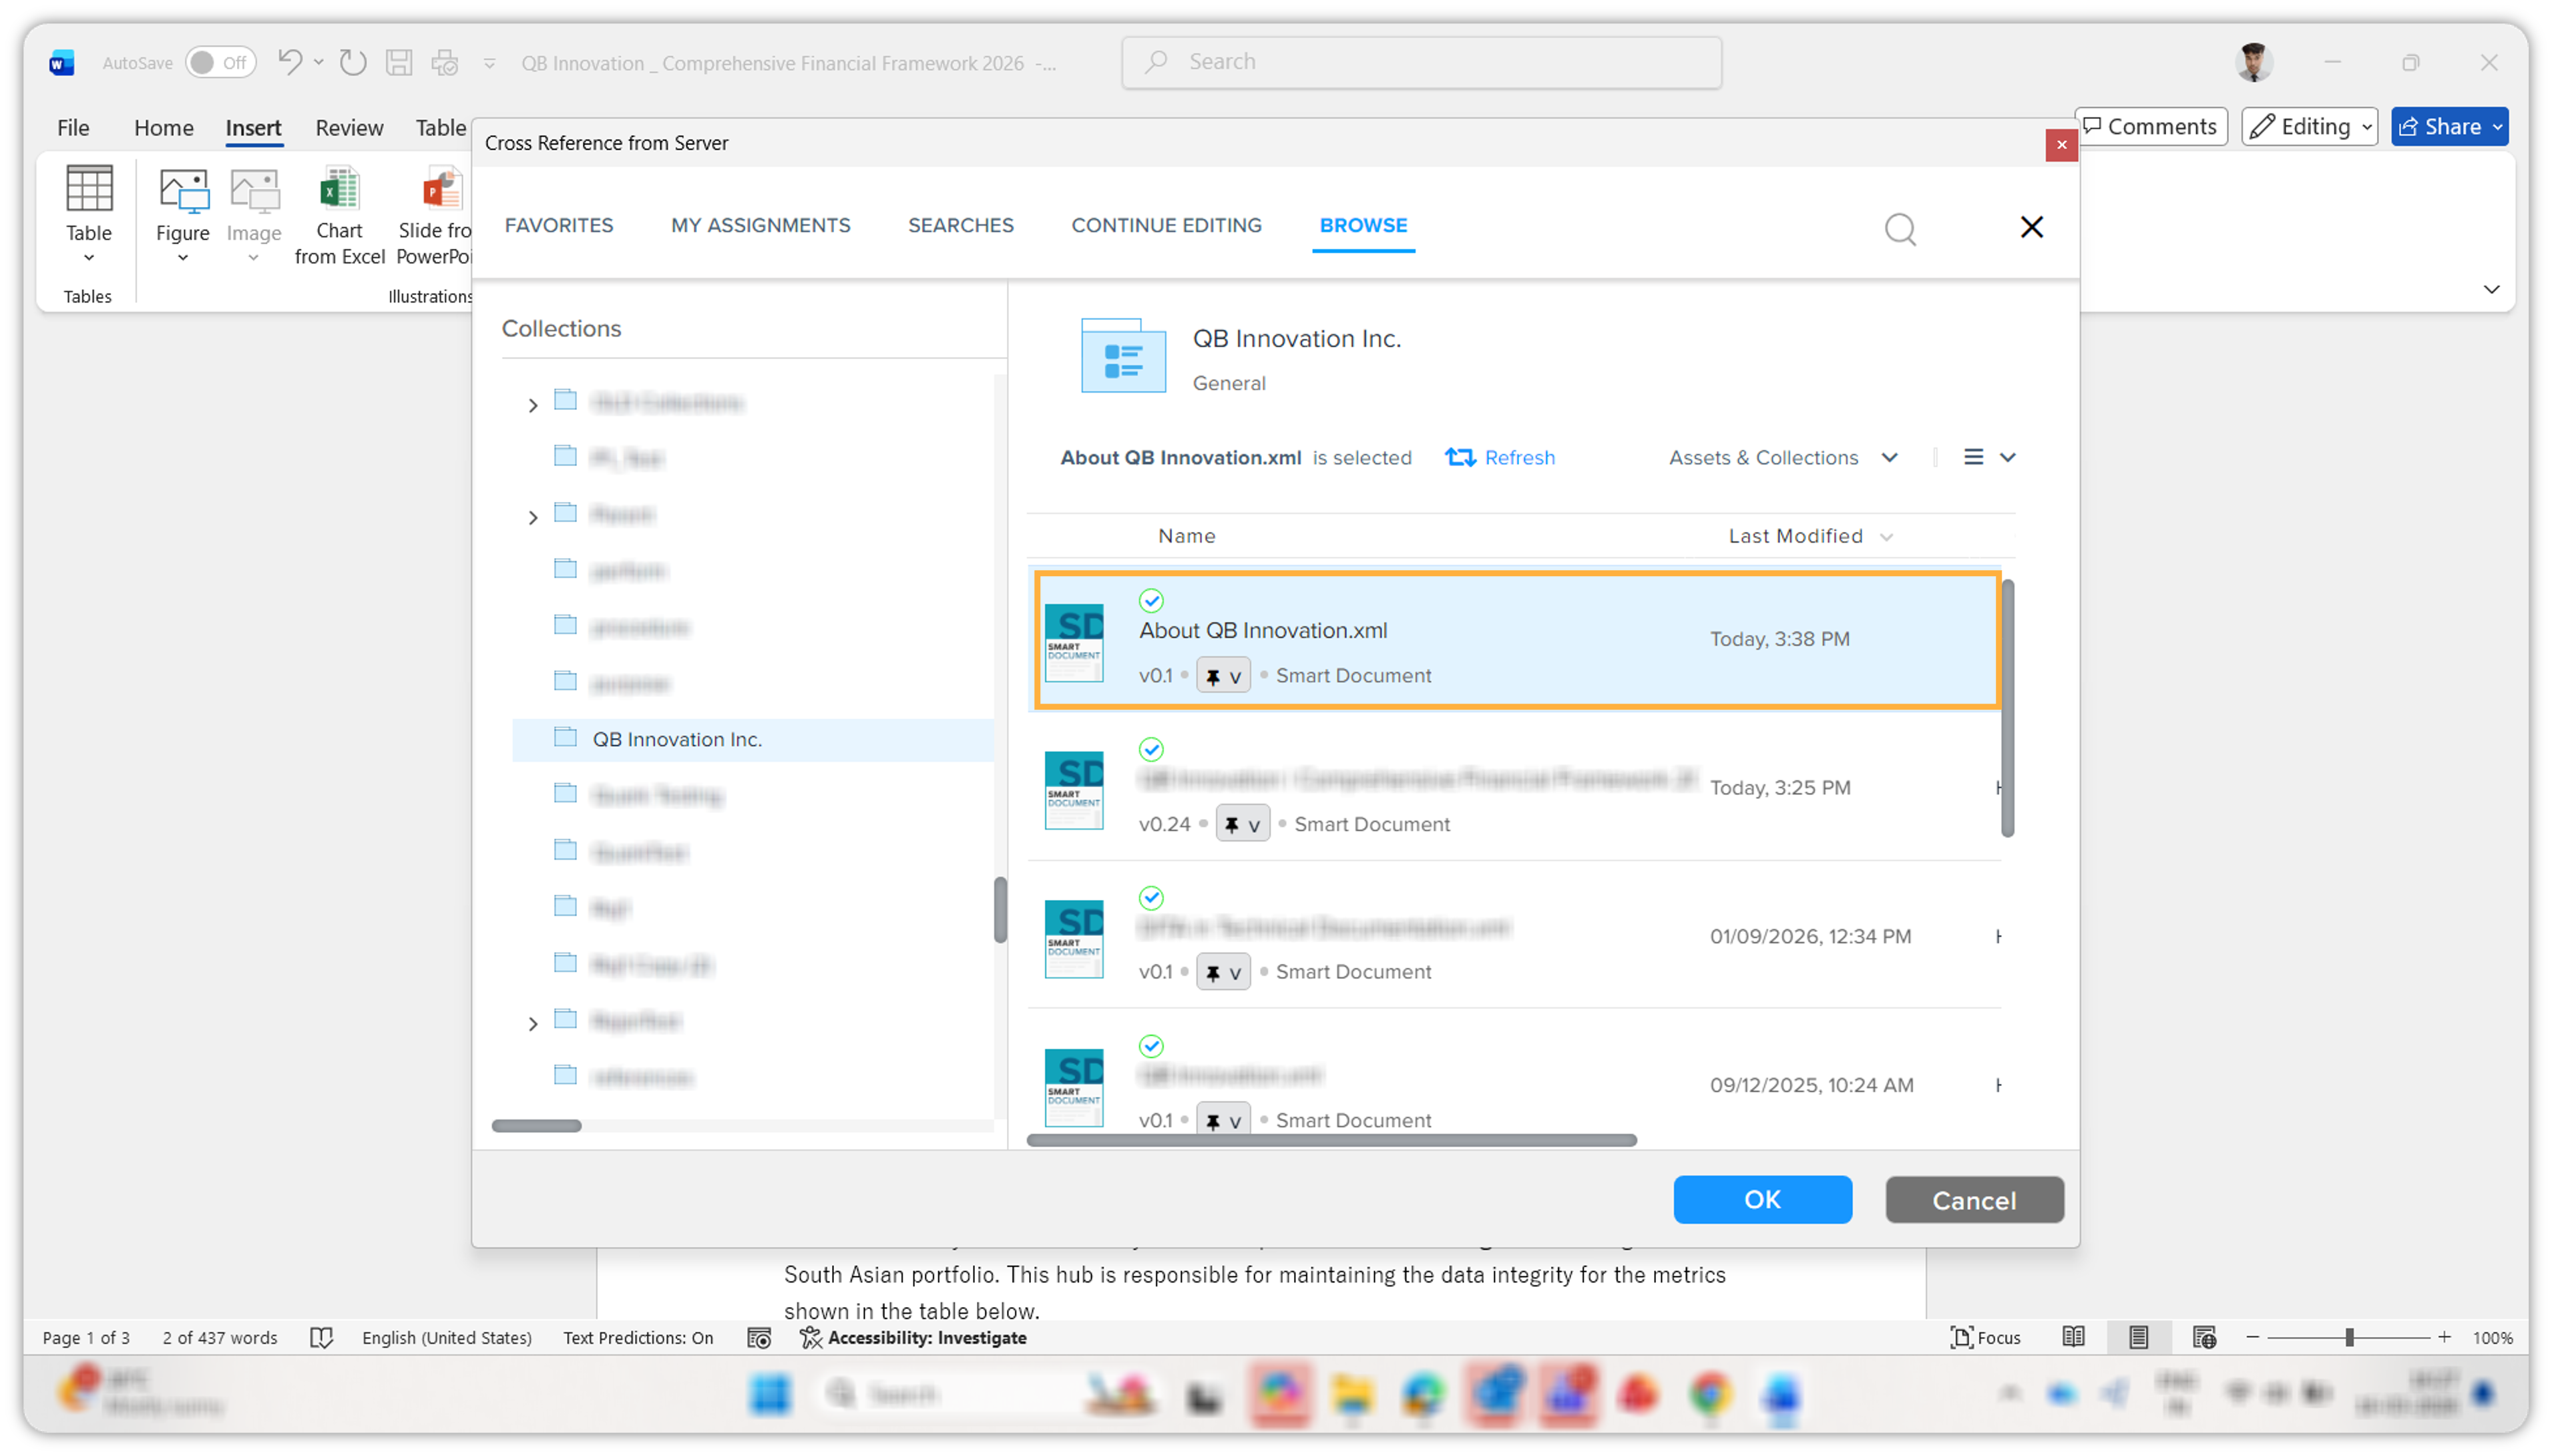
-
The link is inserted, pointing to the referenced document.
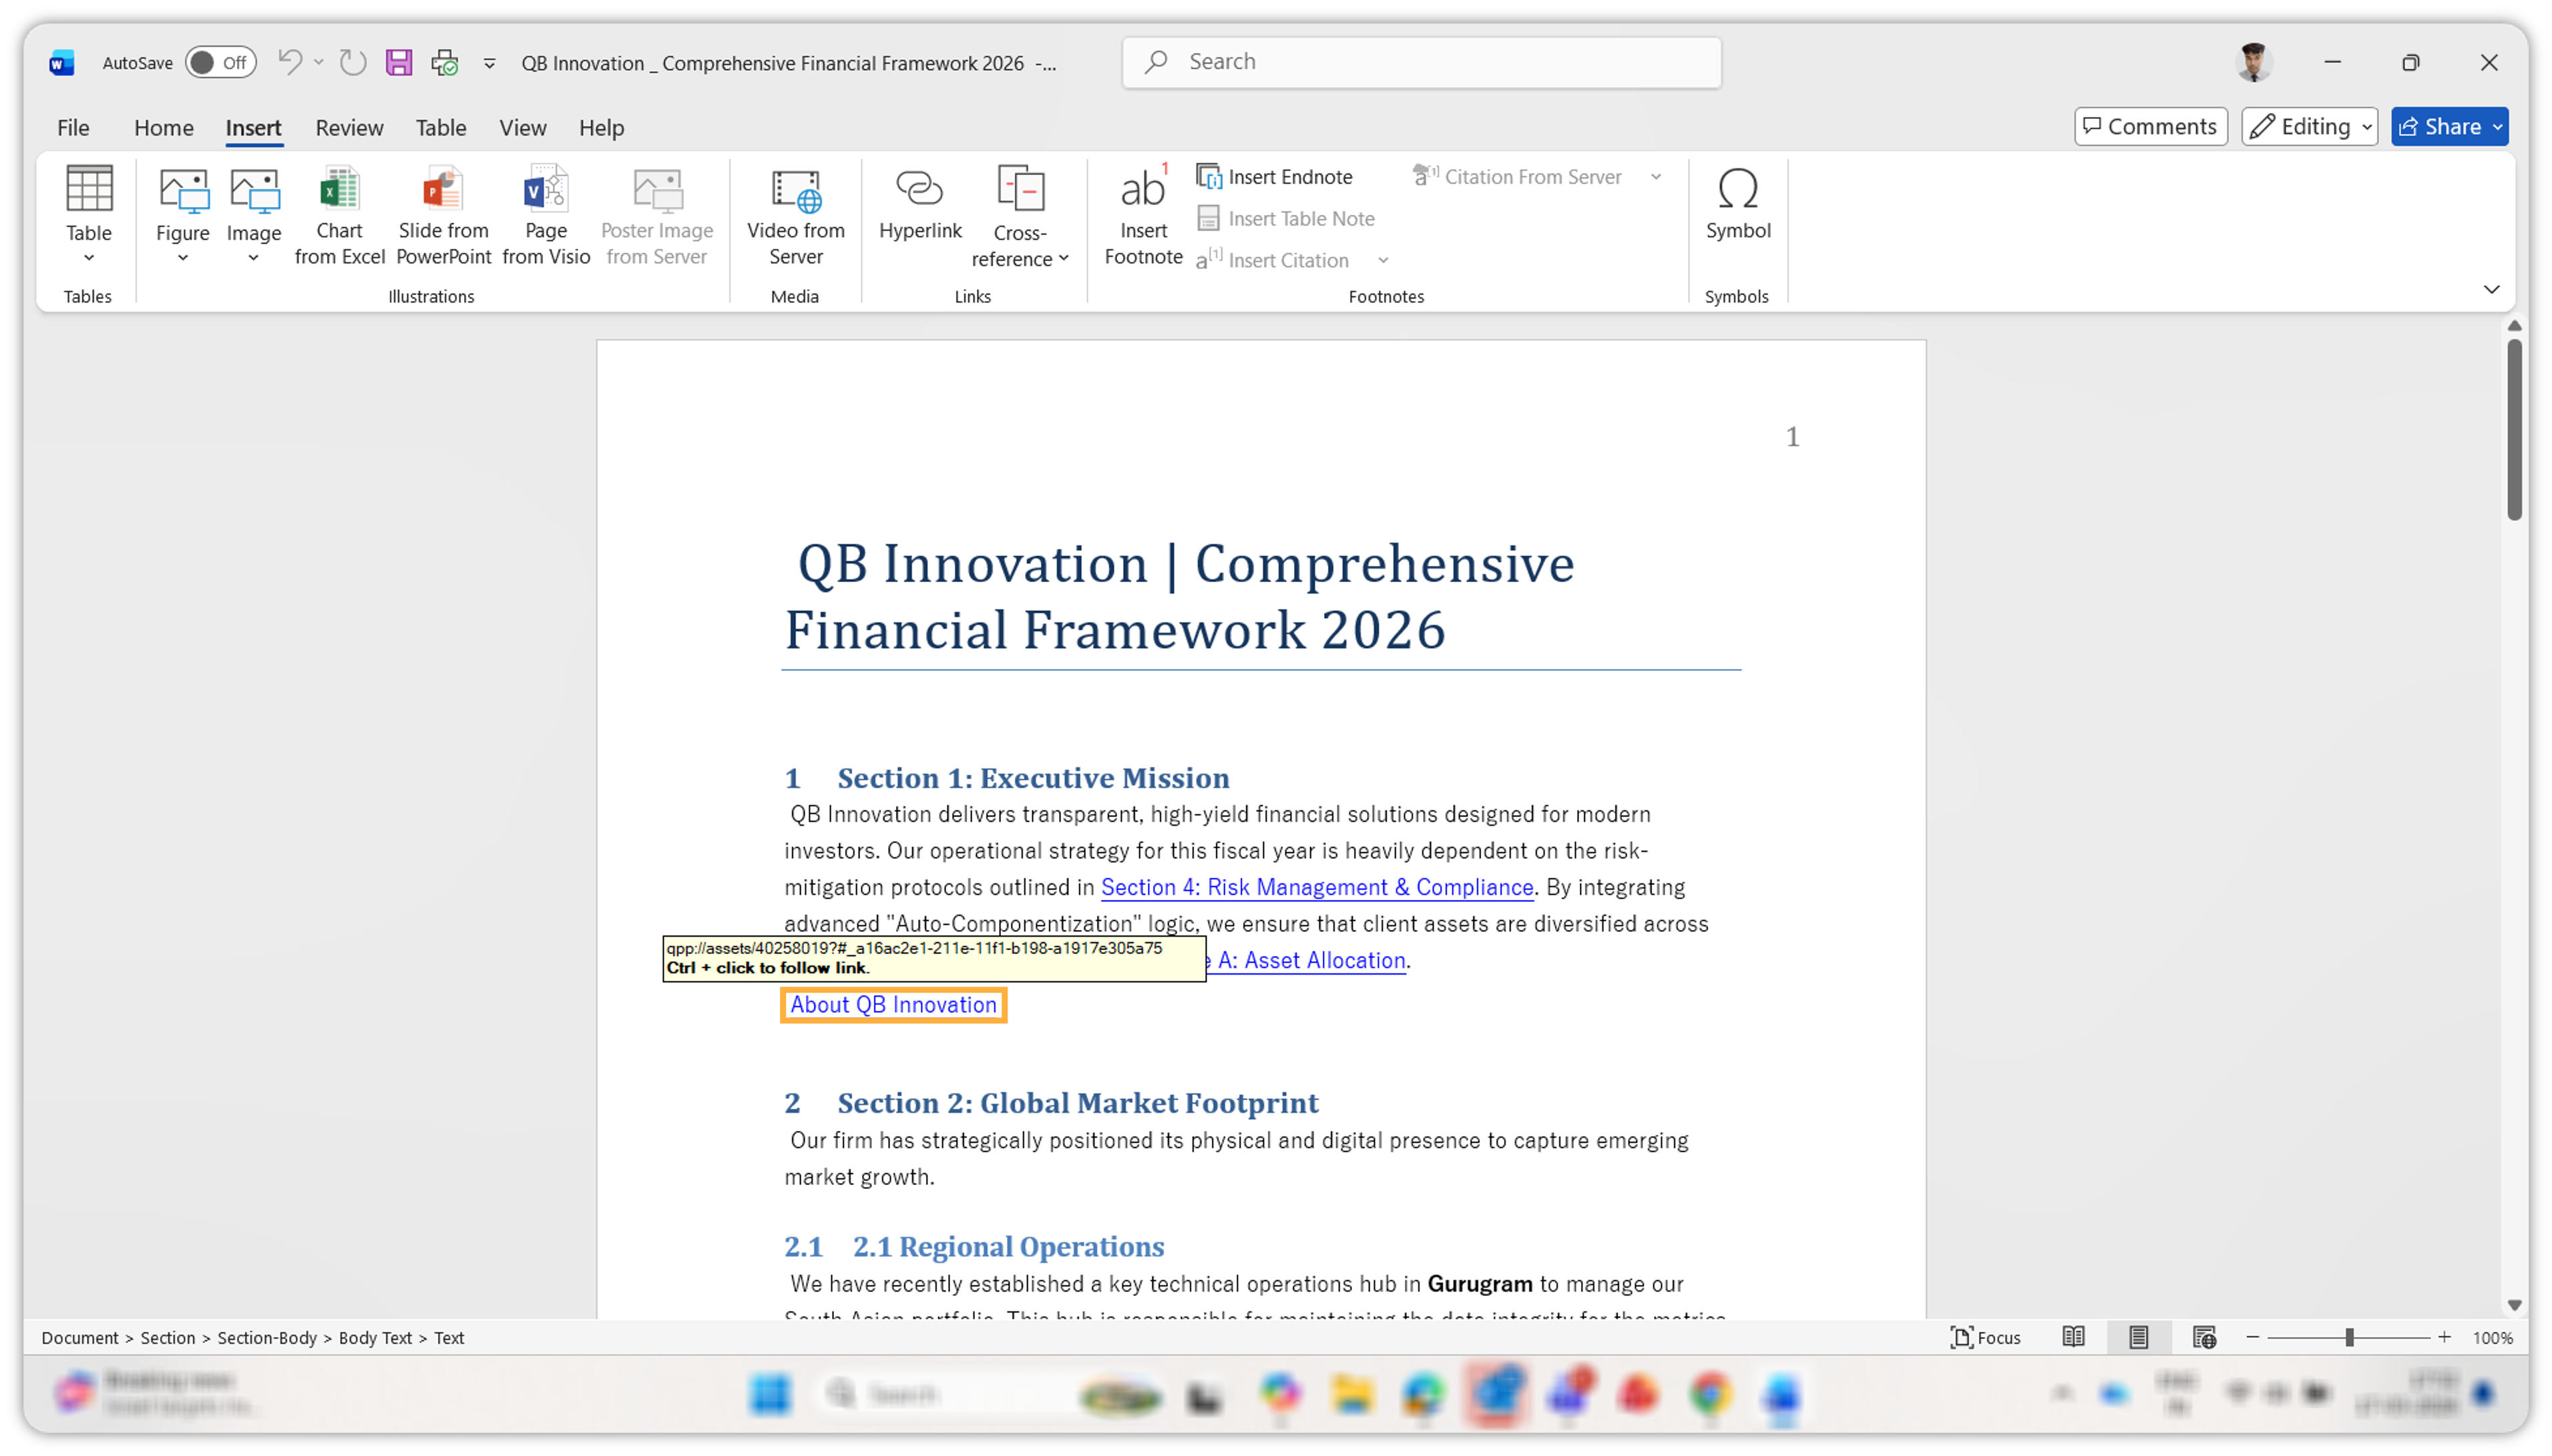
-
Press Ctrl and click the link to open the document in a separate window in read-only mode.
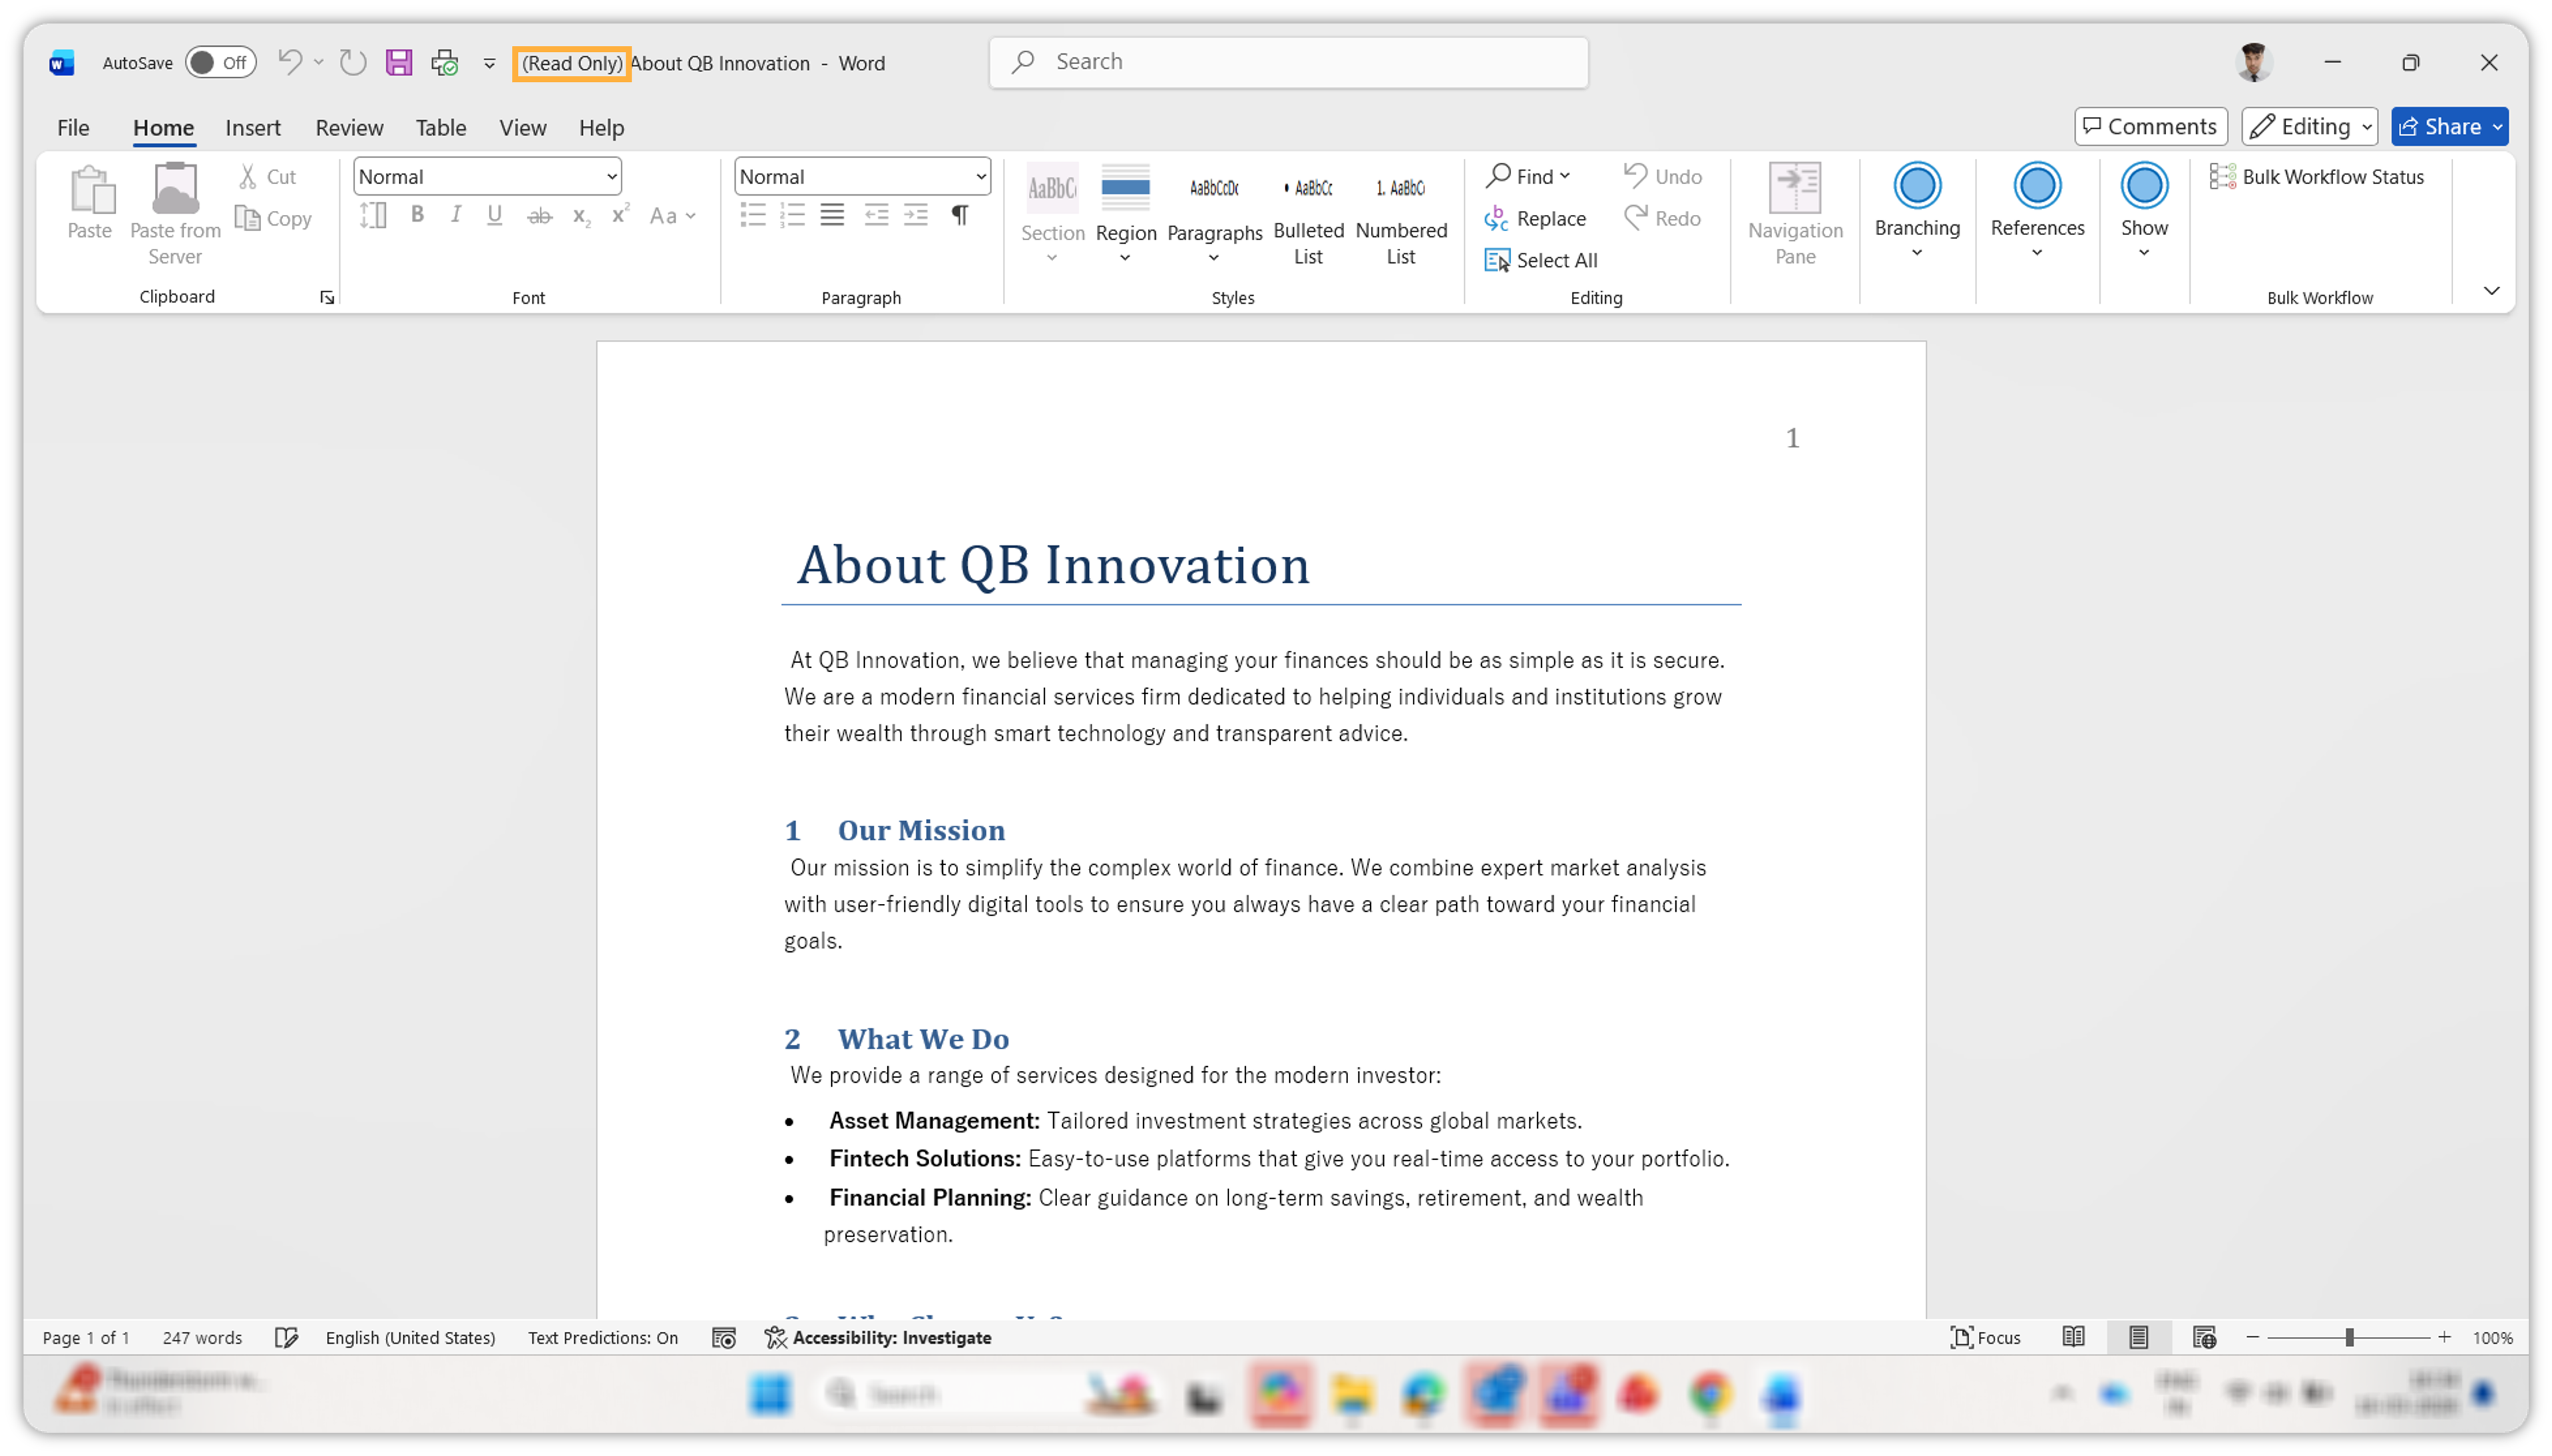
Inserting an Inter-Document Cross-Reference
Use this option to link to a specific element inside a different document.
-
Select the text you wish to use as the link source or place your cursor where you want the link to appear.
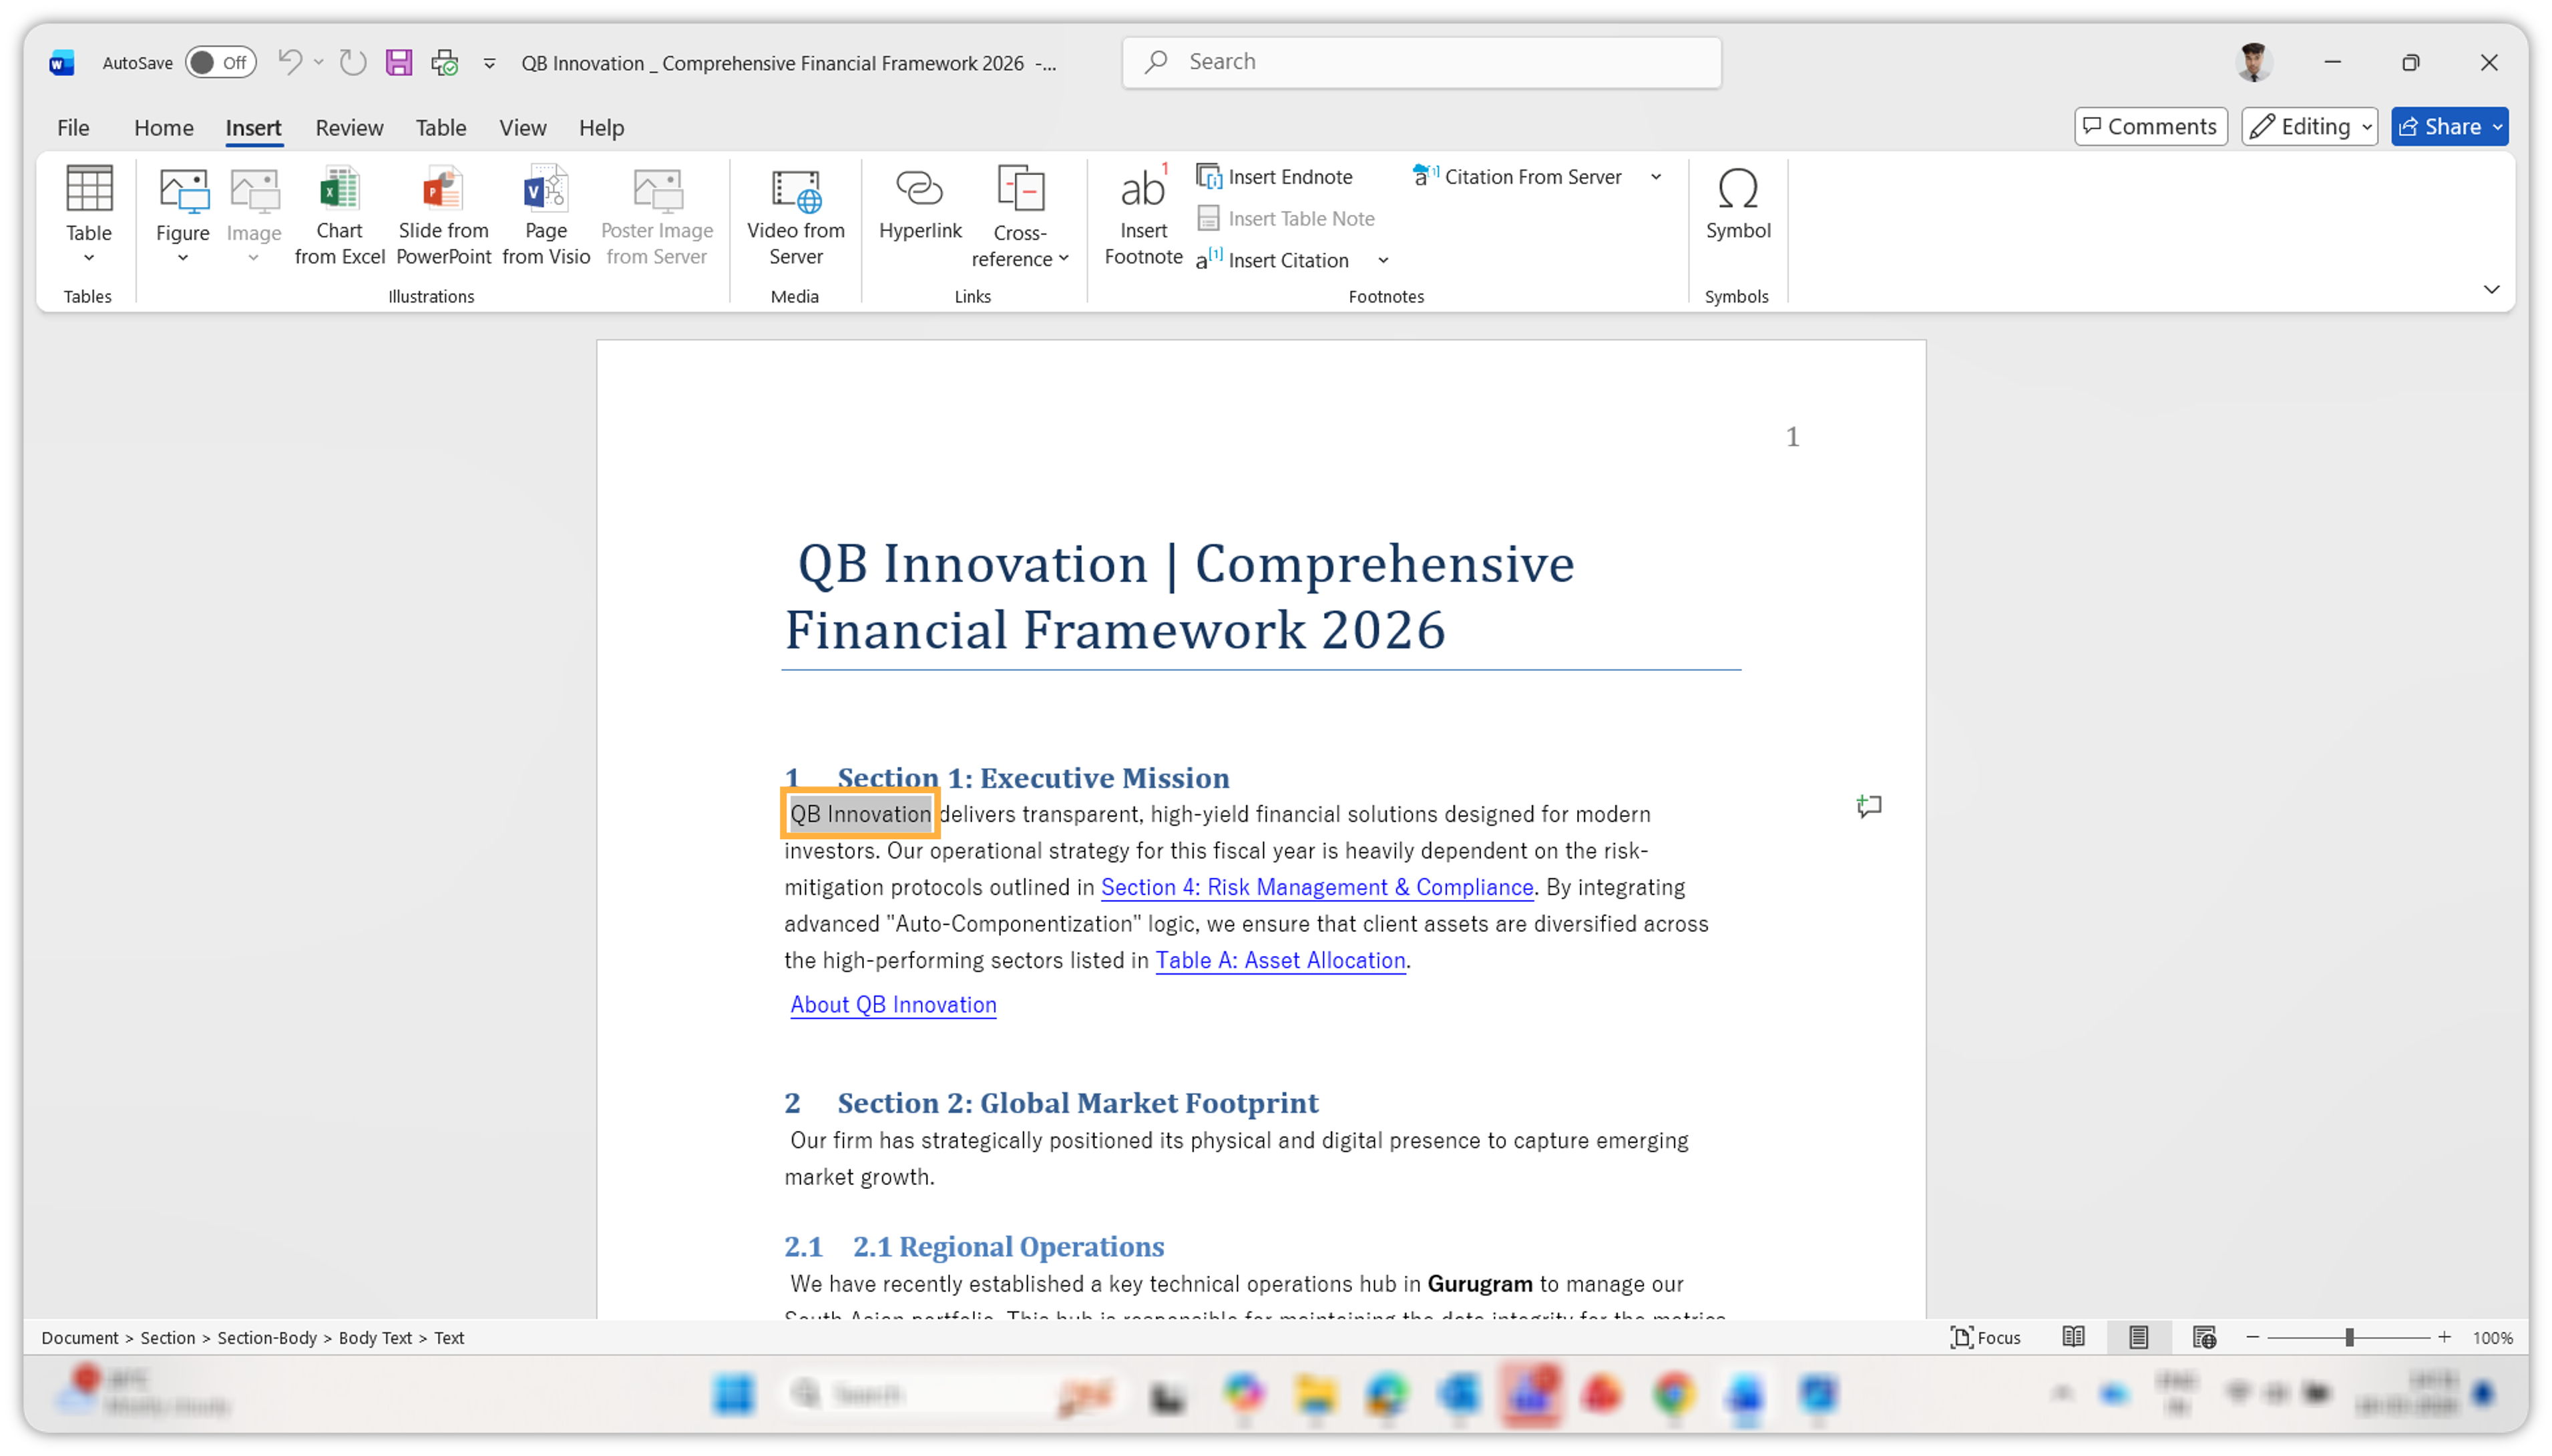
-
In the Links group, click Cross-Reference and then click Insert Inter-document Cross Reference.
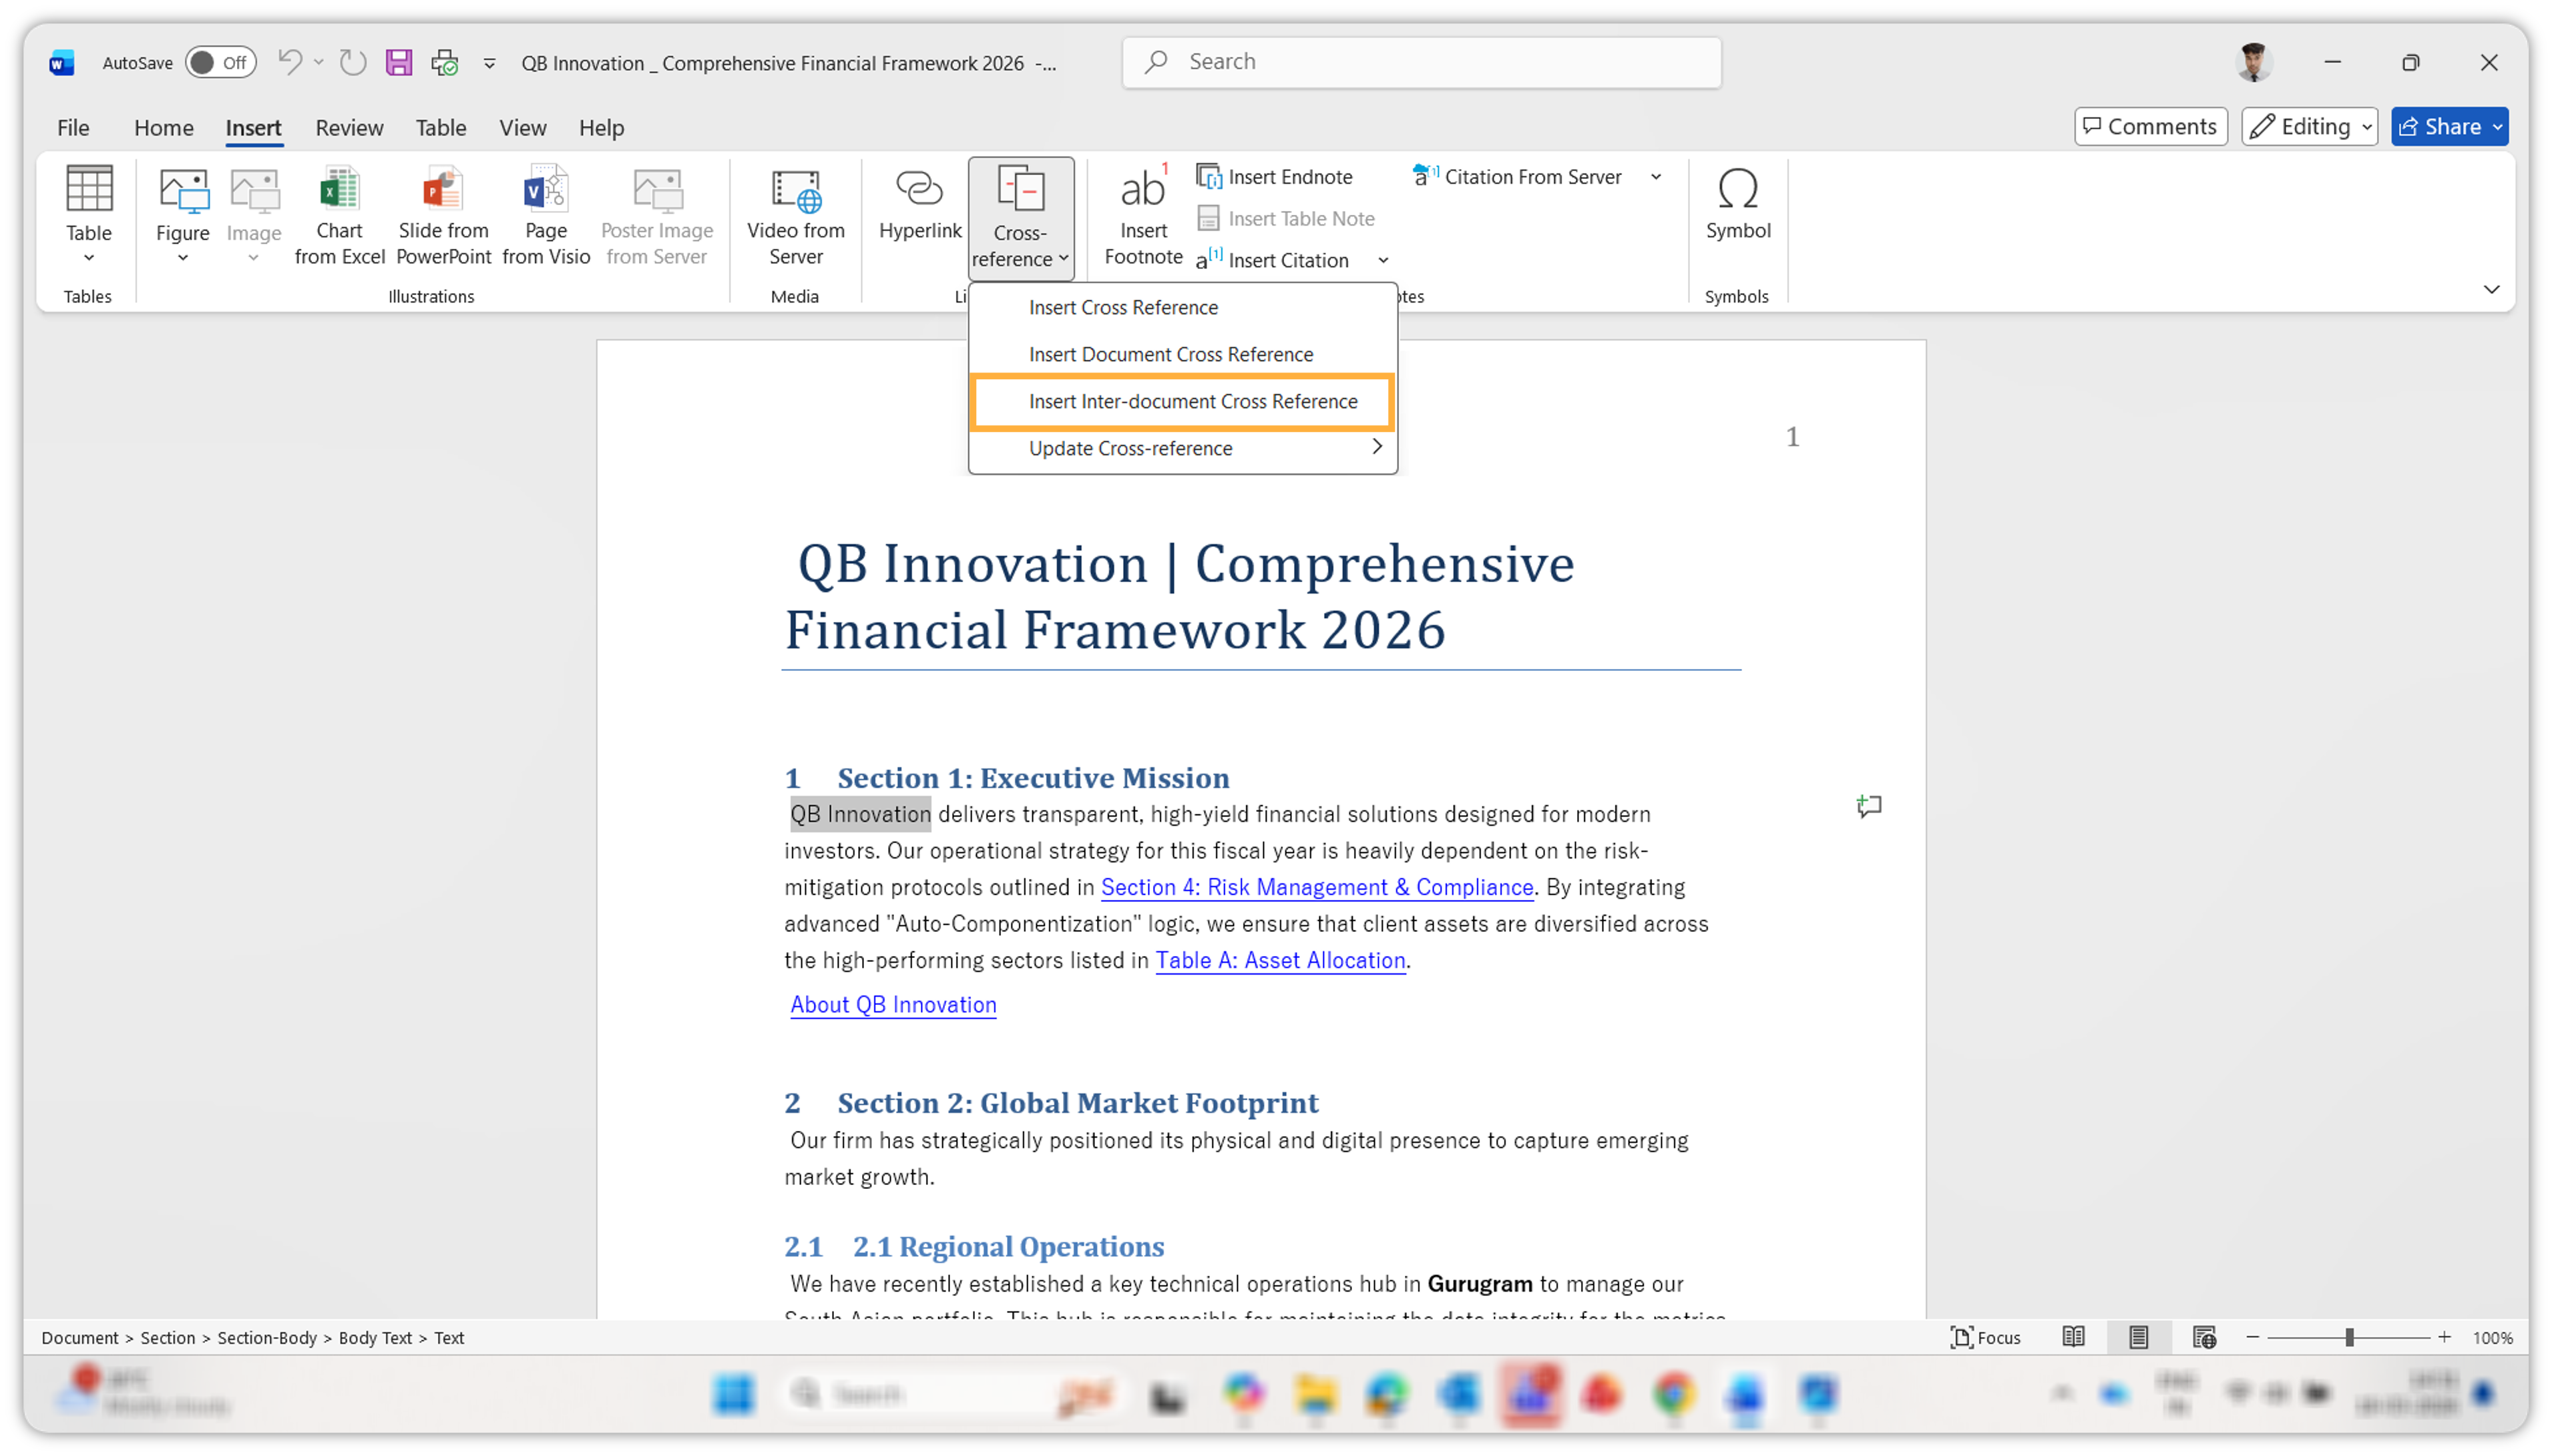
-
The Cross Reference from Server dialog appears. Select the document containing the target element and click OK.
-
The Insert Inter-document Cross Reference dialog opens, displaying the tree hierarchy of the selected document.
-
Select the Reference Type (e.g., Section, Table, Figure, or Region) and then browse the tree hierarchy of the document to select the target element. Click Insert.
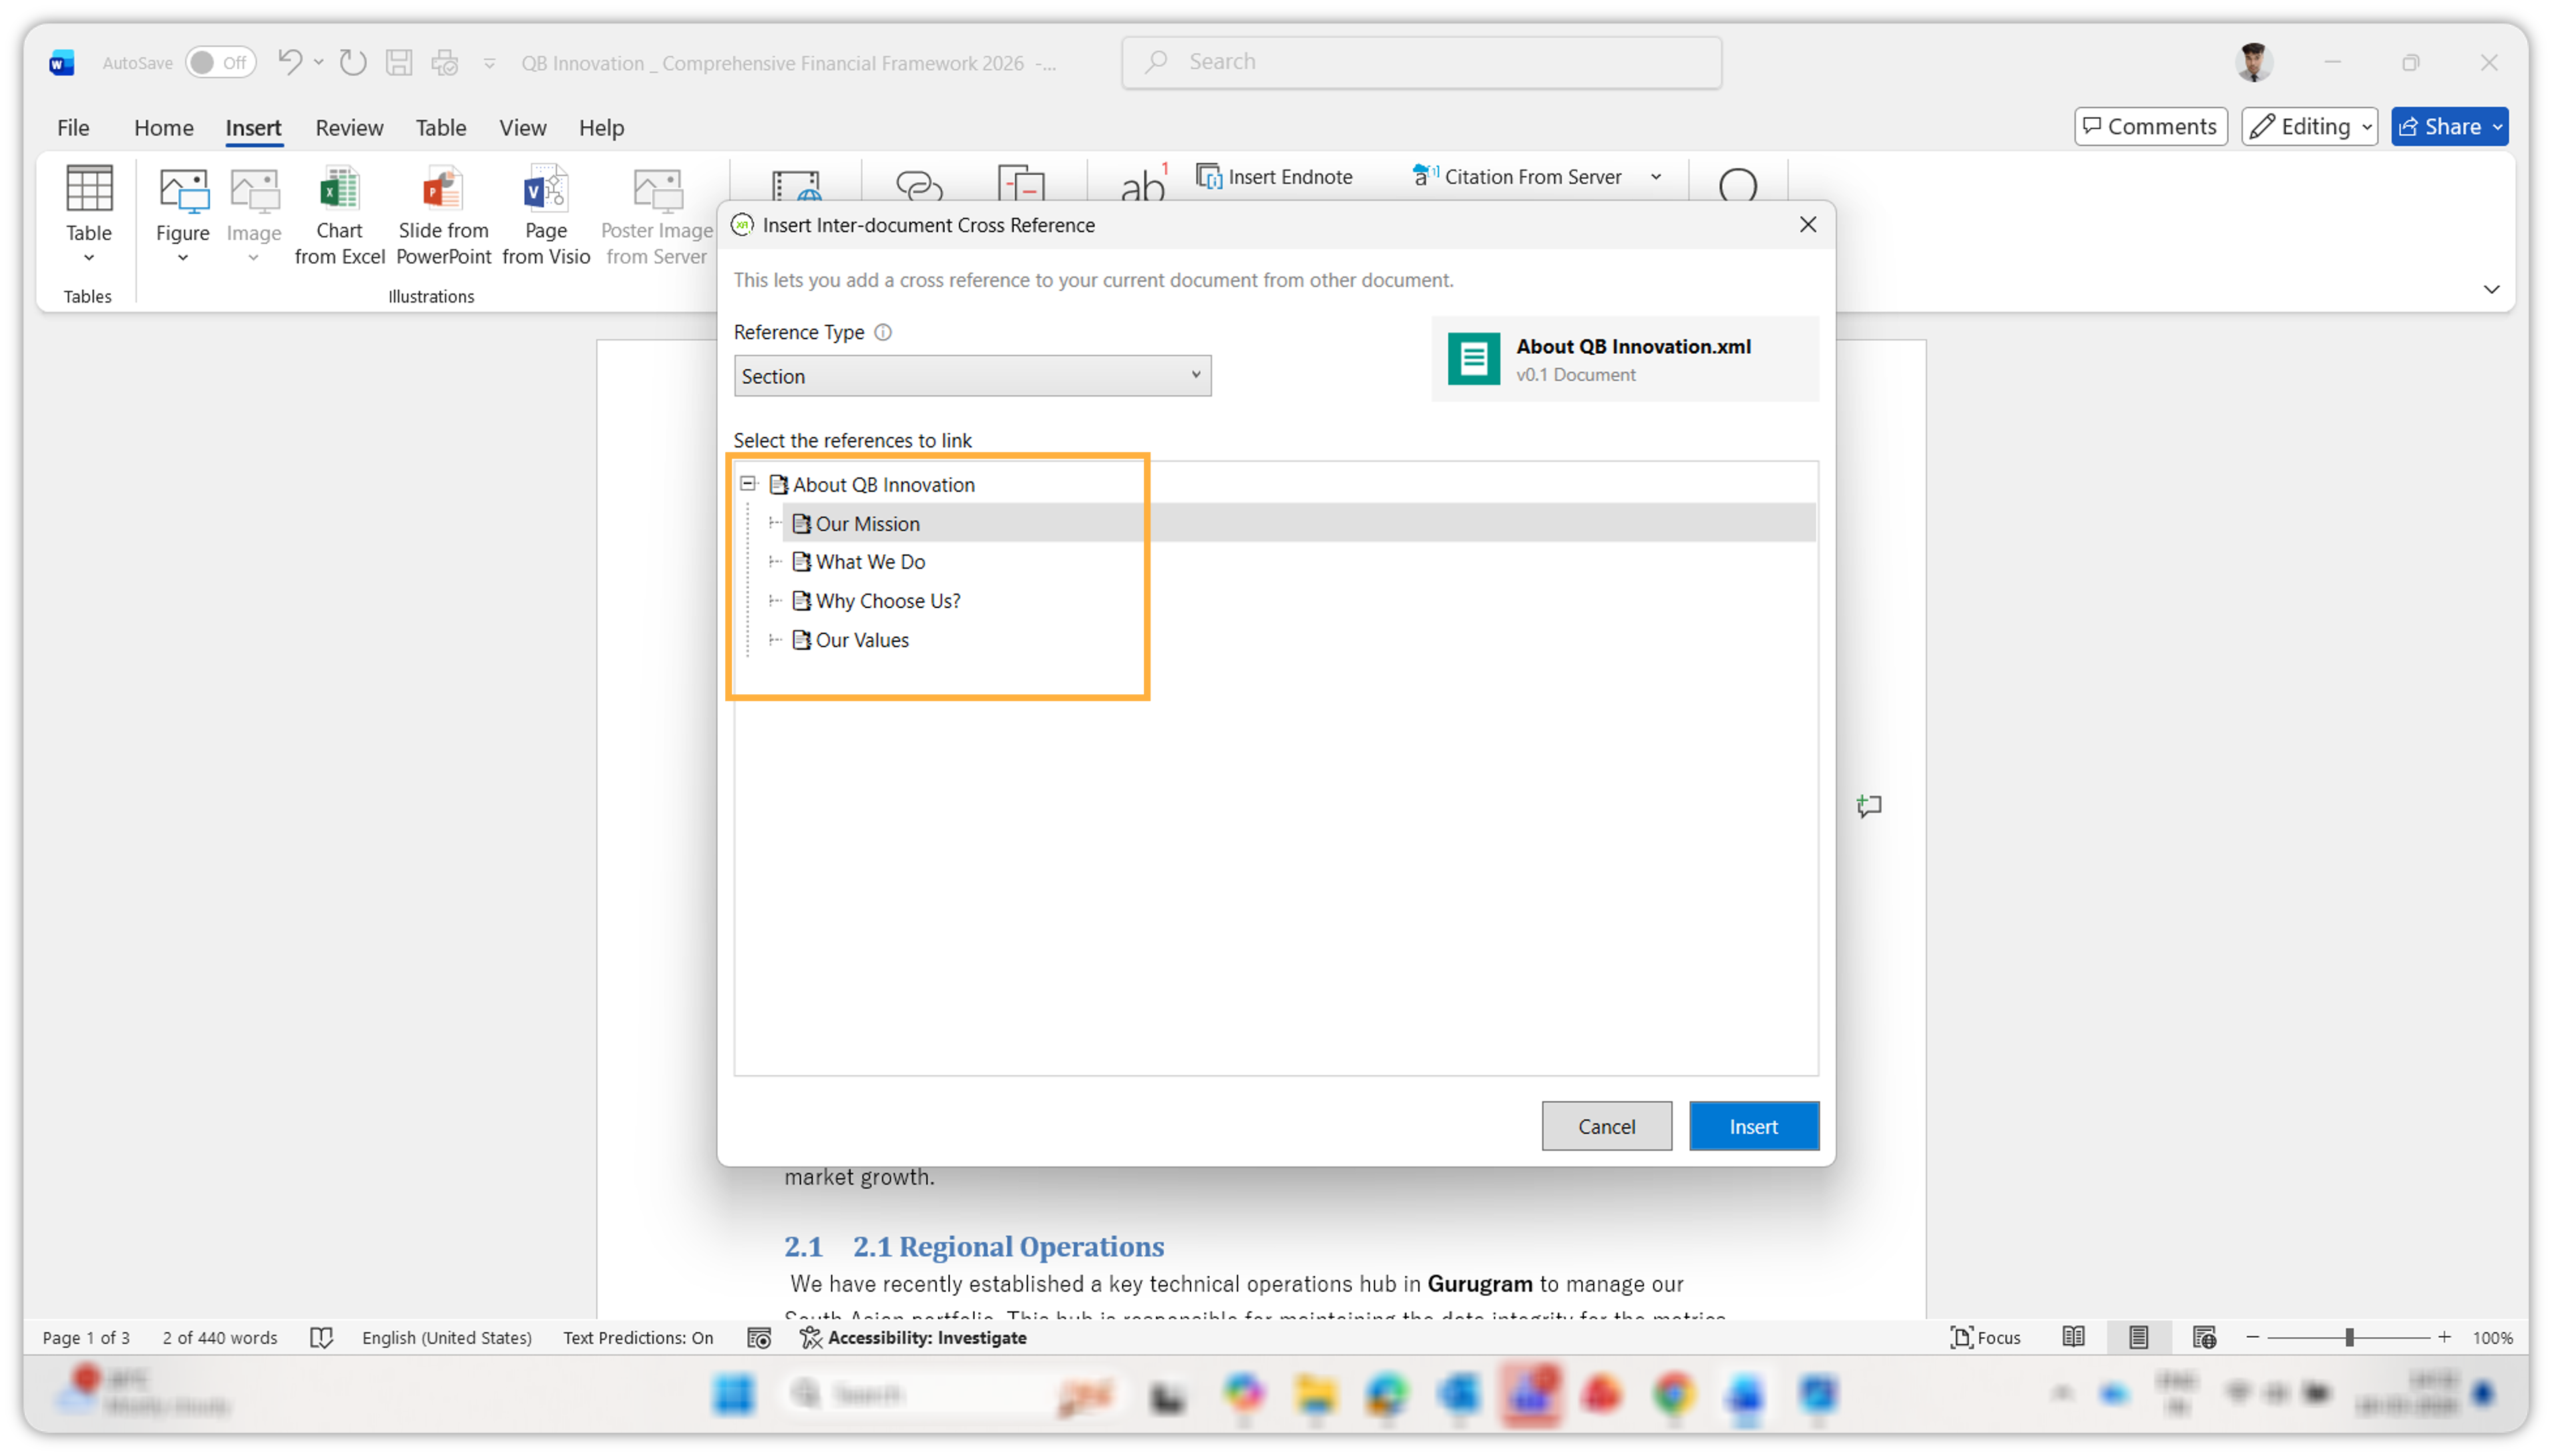
-
The link is inserted, pointing to the element in the referenced document.
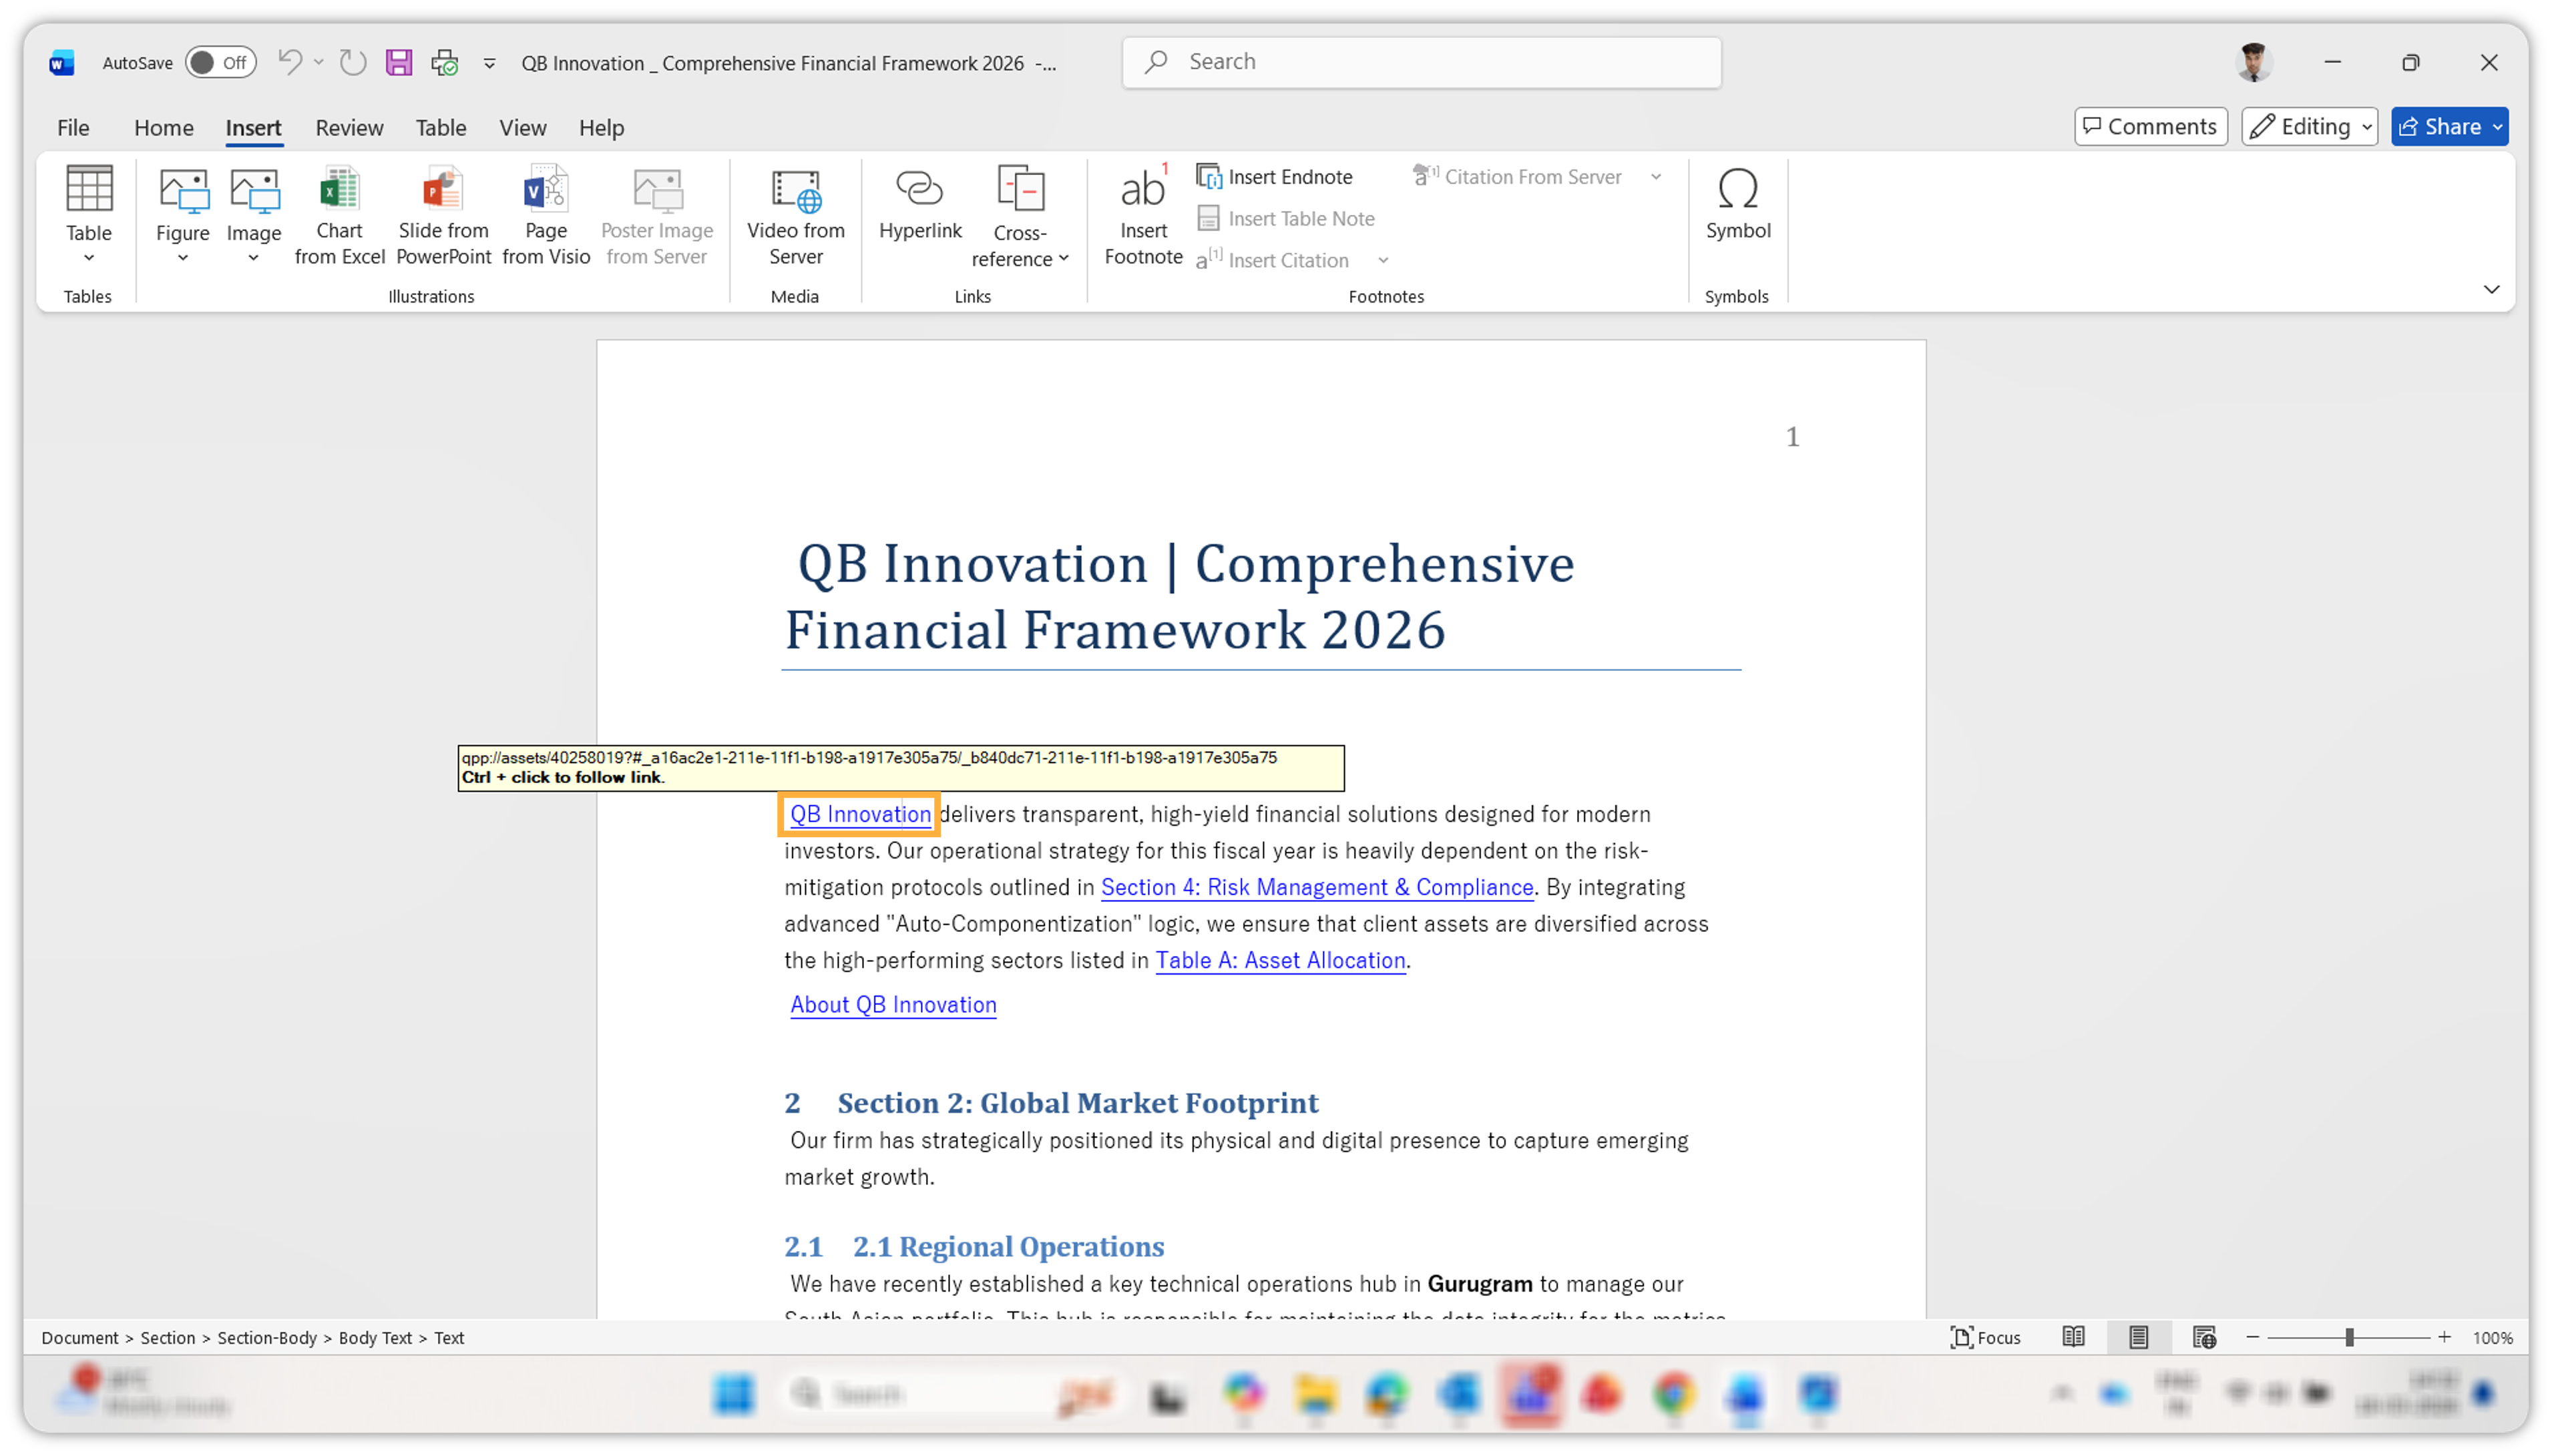
-
Press Ctrl and click the link to navigate to the referenced element of the document in a separate window in read-only mode.
Updating a Cross-Reference
To ensure all links reflect the most recent changes in the source content:
-
Place your cursor anywhere in the document.
-
In the Links group, click Cross-Reference and then click Update Cross Reference.
-
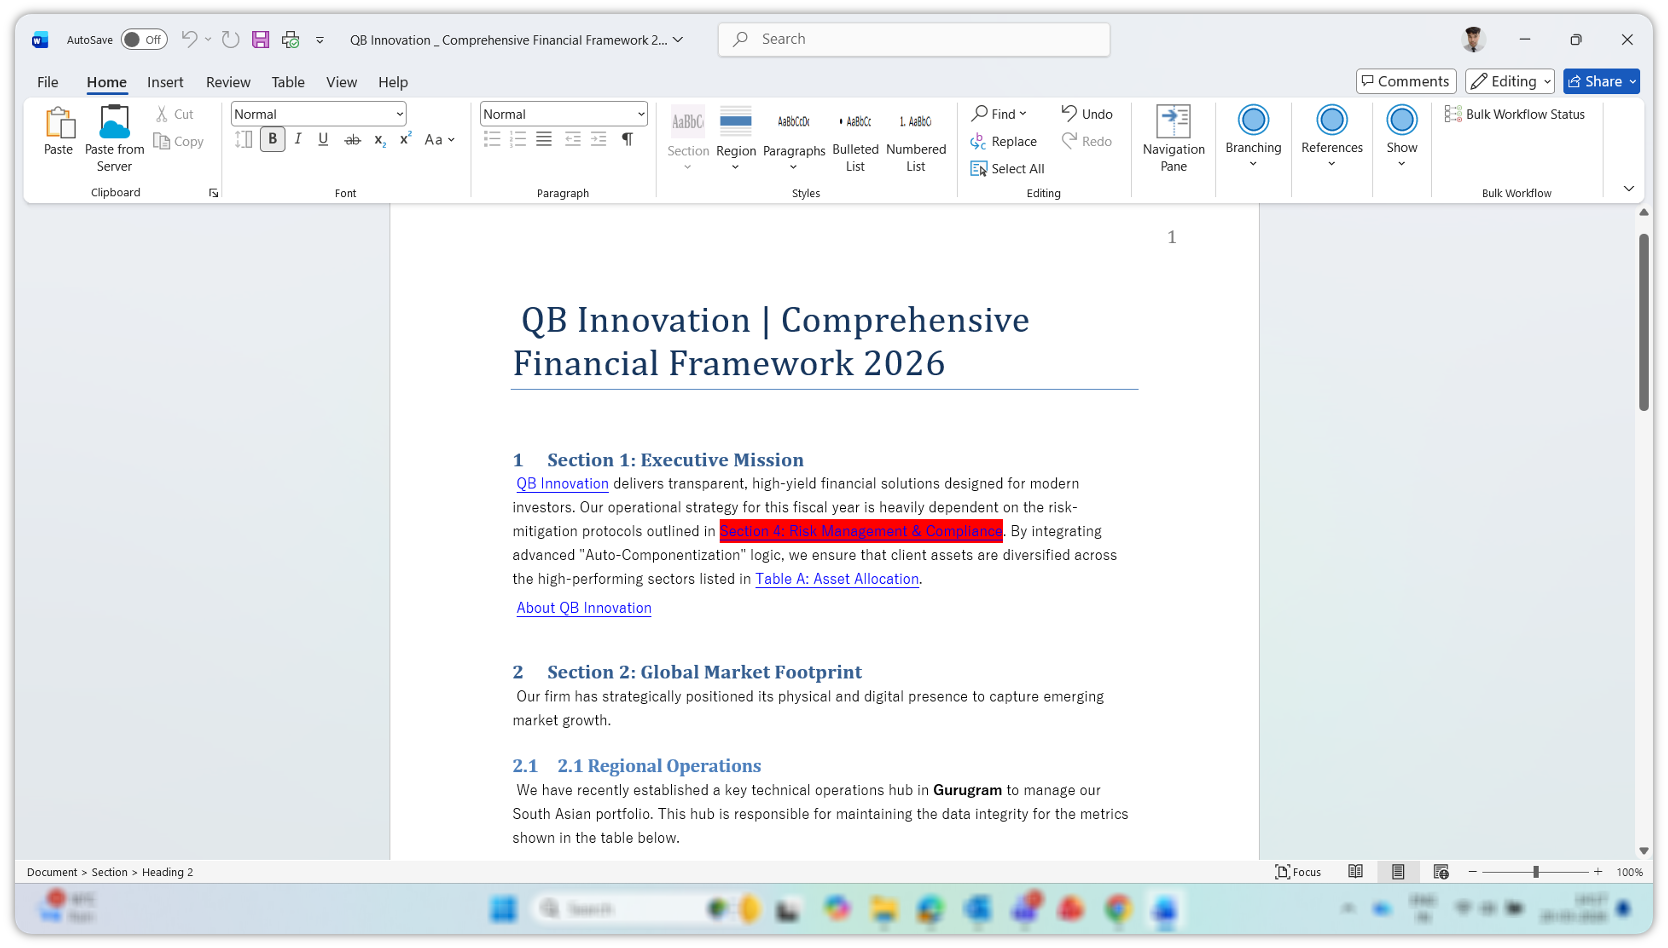
The system will scan the document and update the text of all dynamic links.
-
Review the editor pane for any notifications regarding missing or broken references that require manual resolution.
Insert a Cross-reference
Alternatively, you can also insert a cross-reference from the document body. To insert a cross-reference:
-
Open the document in which the destination of the cross-reference is available. Or if you want to insert a cross-reference from the same document, go to the content element you want to cross-reference.
-
Select the content you want to cross-reference, right-click and in the context menu, select the element style and click Copy.
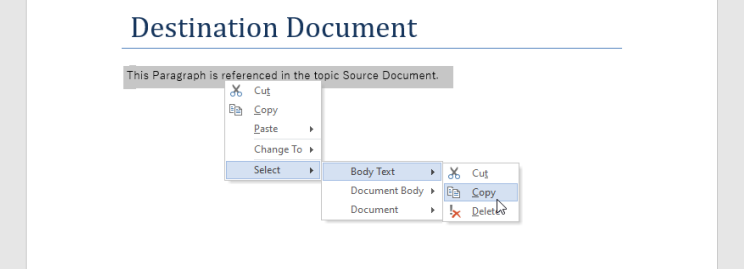 You can't cross-reference a document title or a section title; therefore, you have to copy the element to which you want to link rather than the title of that element. XML language supports a cross-reference to a title; however, some publishing engines do not support it.
-
Go to the current document and position your cursor to the location where you want to insert a cross-reference.
-
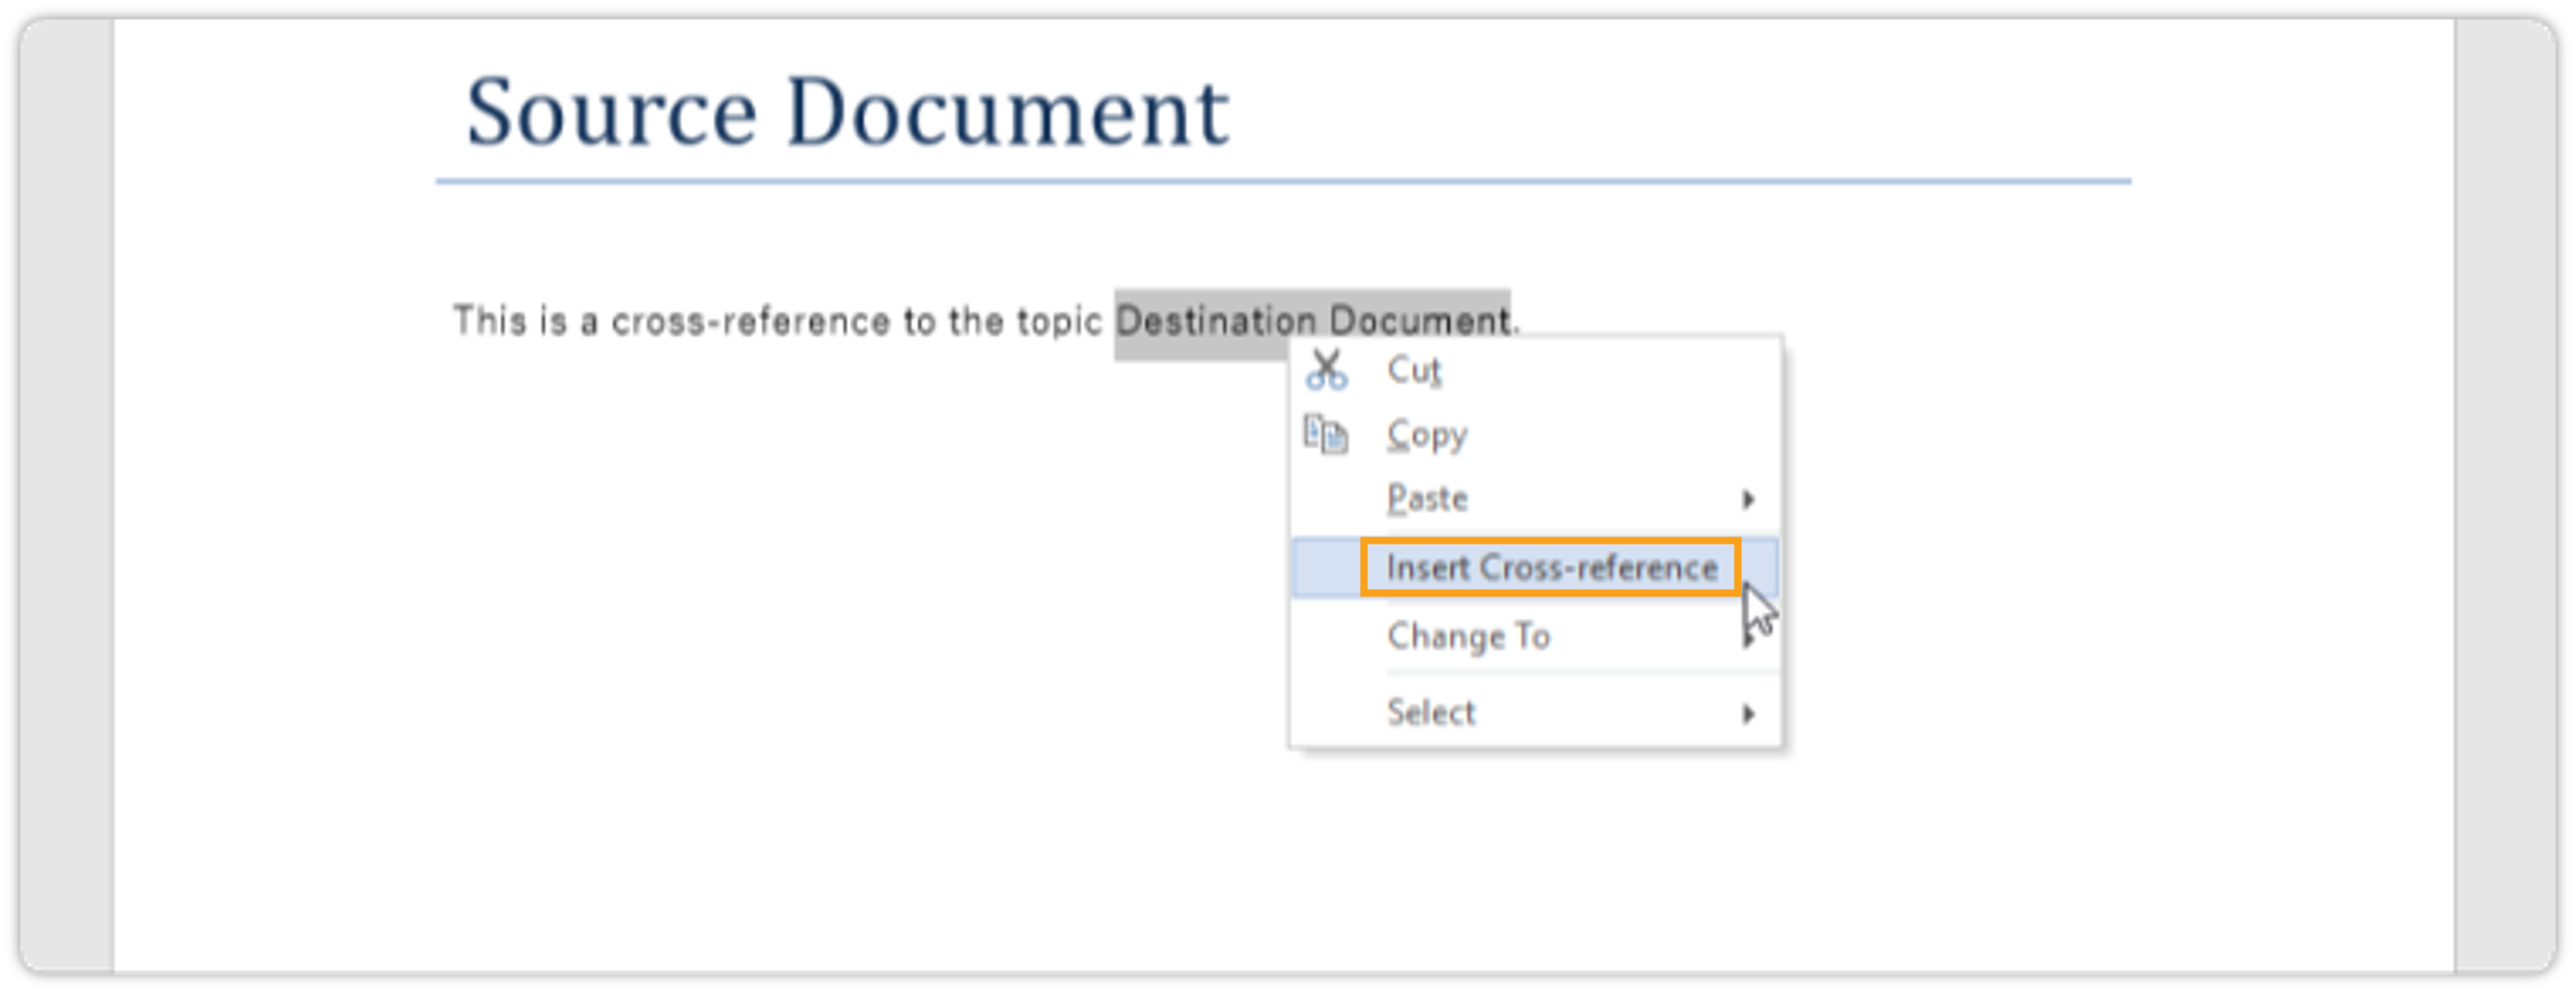
Right-click and in the context menu, click Insert Cross-reference.
-
Edit the text of the hyperlink that QPP Adapter for Quark XML Author adds as a cross-reference, which by default, displays the text from the destination of the cross-reference.
Edit a Cross-reference
To follow a cross-reference link, press the key CTRL and click the link.
-
When the destination of the cross-reference is in a separator document, QPP Adapter for Quark XML Author opens the destination document and moves the cursor to the location that is cross-referenced.
-
When the destination of the cross-reference is within the same document, QPP for Quark XML Author moves the cursor to the location that is cross-referenced.
Delete a Cross-reference
To delete a cross-reference:
-
Right-click on the cross-reference that you want to delete.
-
In the context menu, choose Remove Cross-Reference Emphasis.
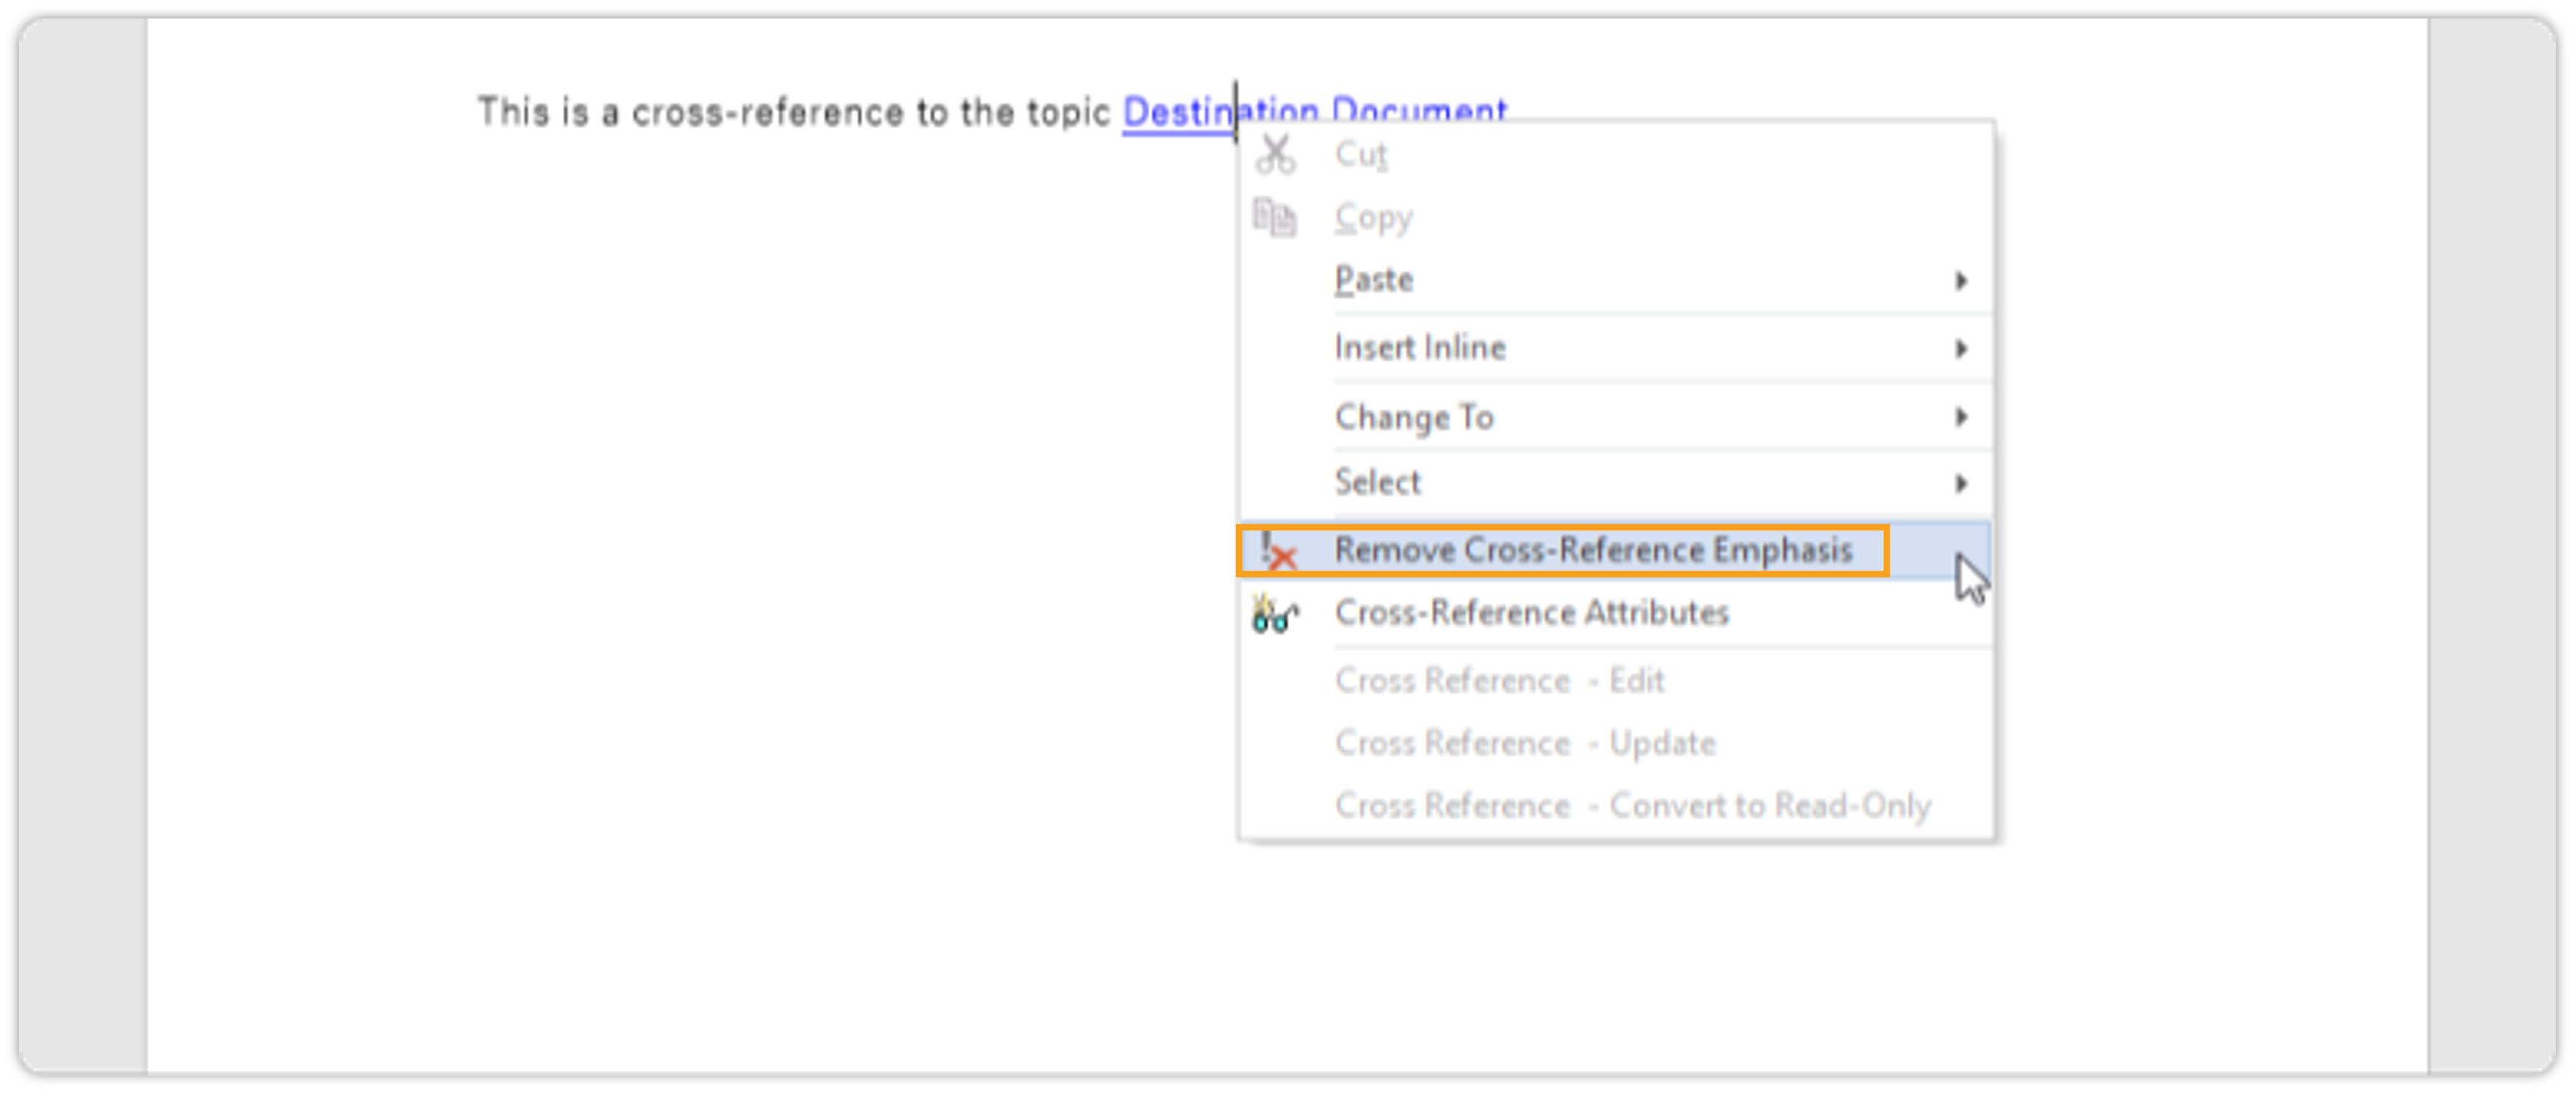
QPP Adapter for Quark XML Author deletes the cross-reference.
You can also delete a cross-reference by deleting the cross-referenced text using the standard keyboard keys Backspace or Delete.
Lock/Unlock Component
Content Component Locking lets administrators and content designers protect critical statement blocks from unwanted removal or inline conversion, ensuring that key legal and compliance text remains intact.
You can lock or unlock any smart section (component) from three locations:
-
Component Reference toolbar
-
Navigation pane (left-hand TOC)
-
Smart Document Pane
Component Reference Toolbar
-
Navigate to the smart section (component) you want to lock and then double-click it to see the options.
-
Click Select > Section > Lock Component.
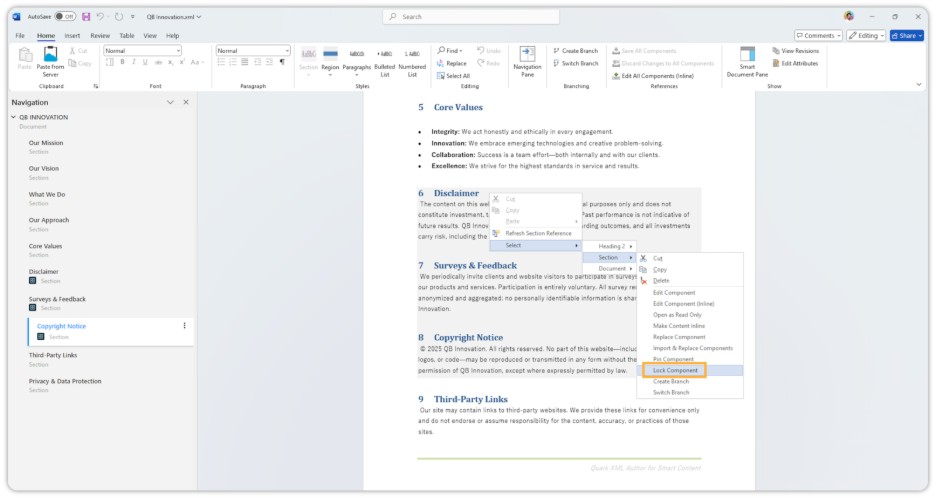
-
The component will be successfully locked.
Navigation Pane
-
Go to the navigation pane (left-hand TOC) and click the kebab menu icon.
-
Then click Lock Component.
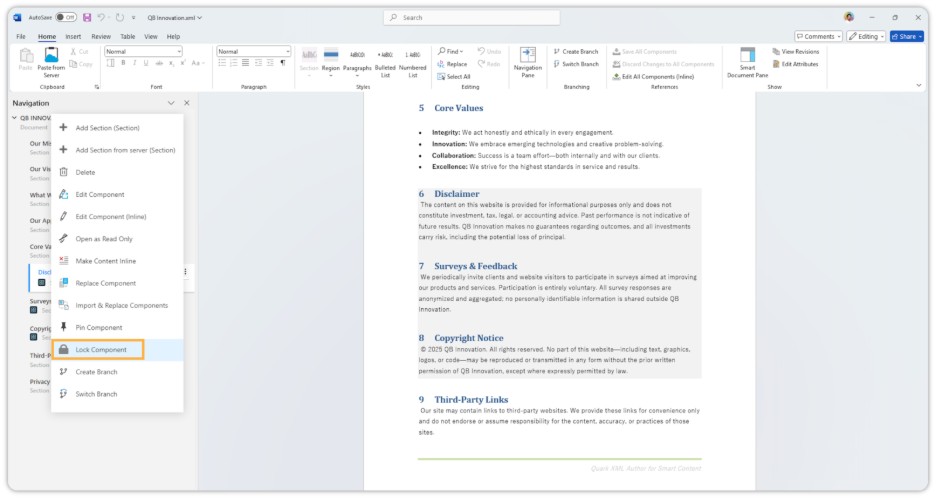
-
The component will be successfully locked.
Smart Document Pane
-
Go to the Smart Document Pane. It will show the list of the linked components.
-
Click the kebab menu icon next to the component you want to lock and then click Lock Component.
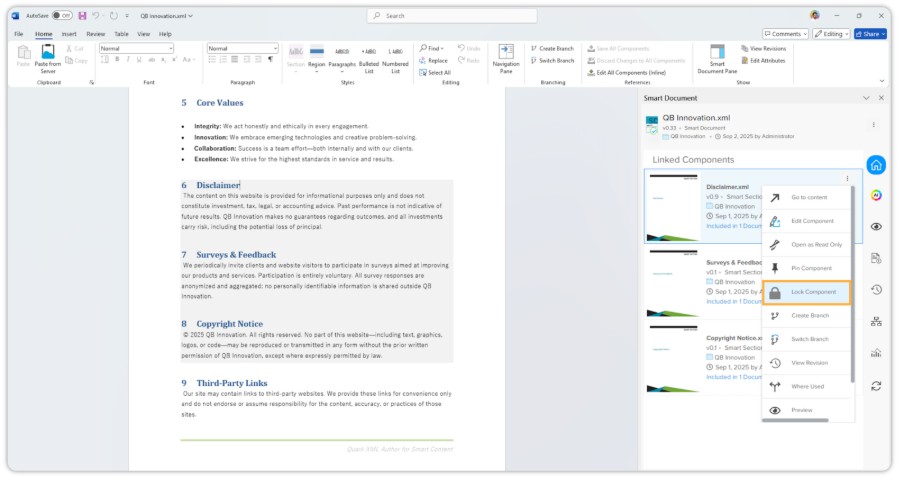
-
The component will be successfully locked.
To unlock the component, go to the places from where you have locked it. There you will find the Unlock Component option. Click it and the component will be successfully unlocked.
Bulk Workflow Status Change
Bulk Workflow Status Change is designed to significantly simplify your content management tasks, allowing for greater productivity and smoother workflow. It allows you to manage multiple content components in Quark XML Author efficiently. This section will walk you through the functionality and usage of this powerful tool.
Accessing the feature
-
Open any smart document within Quark XML Author (QXA).
-
Locate the newly added Batch Workflow Status Change option on the taskbar.
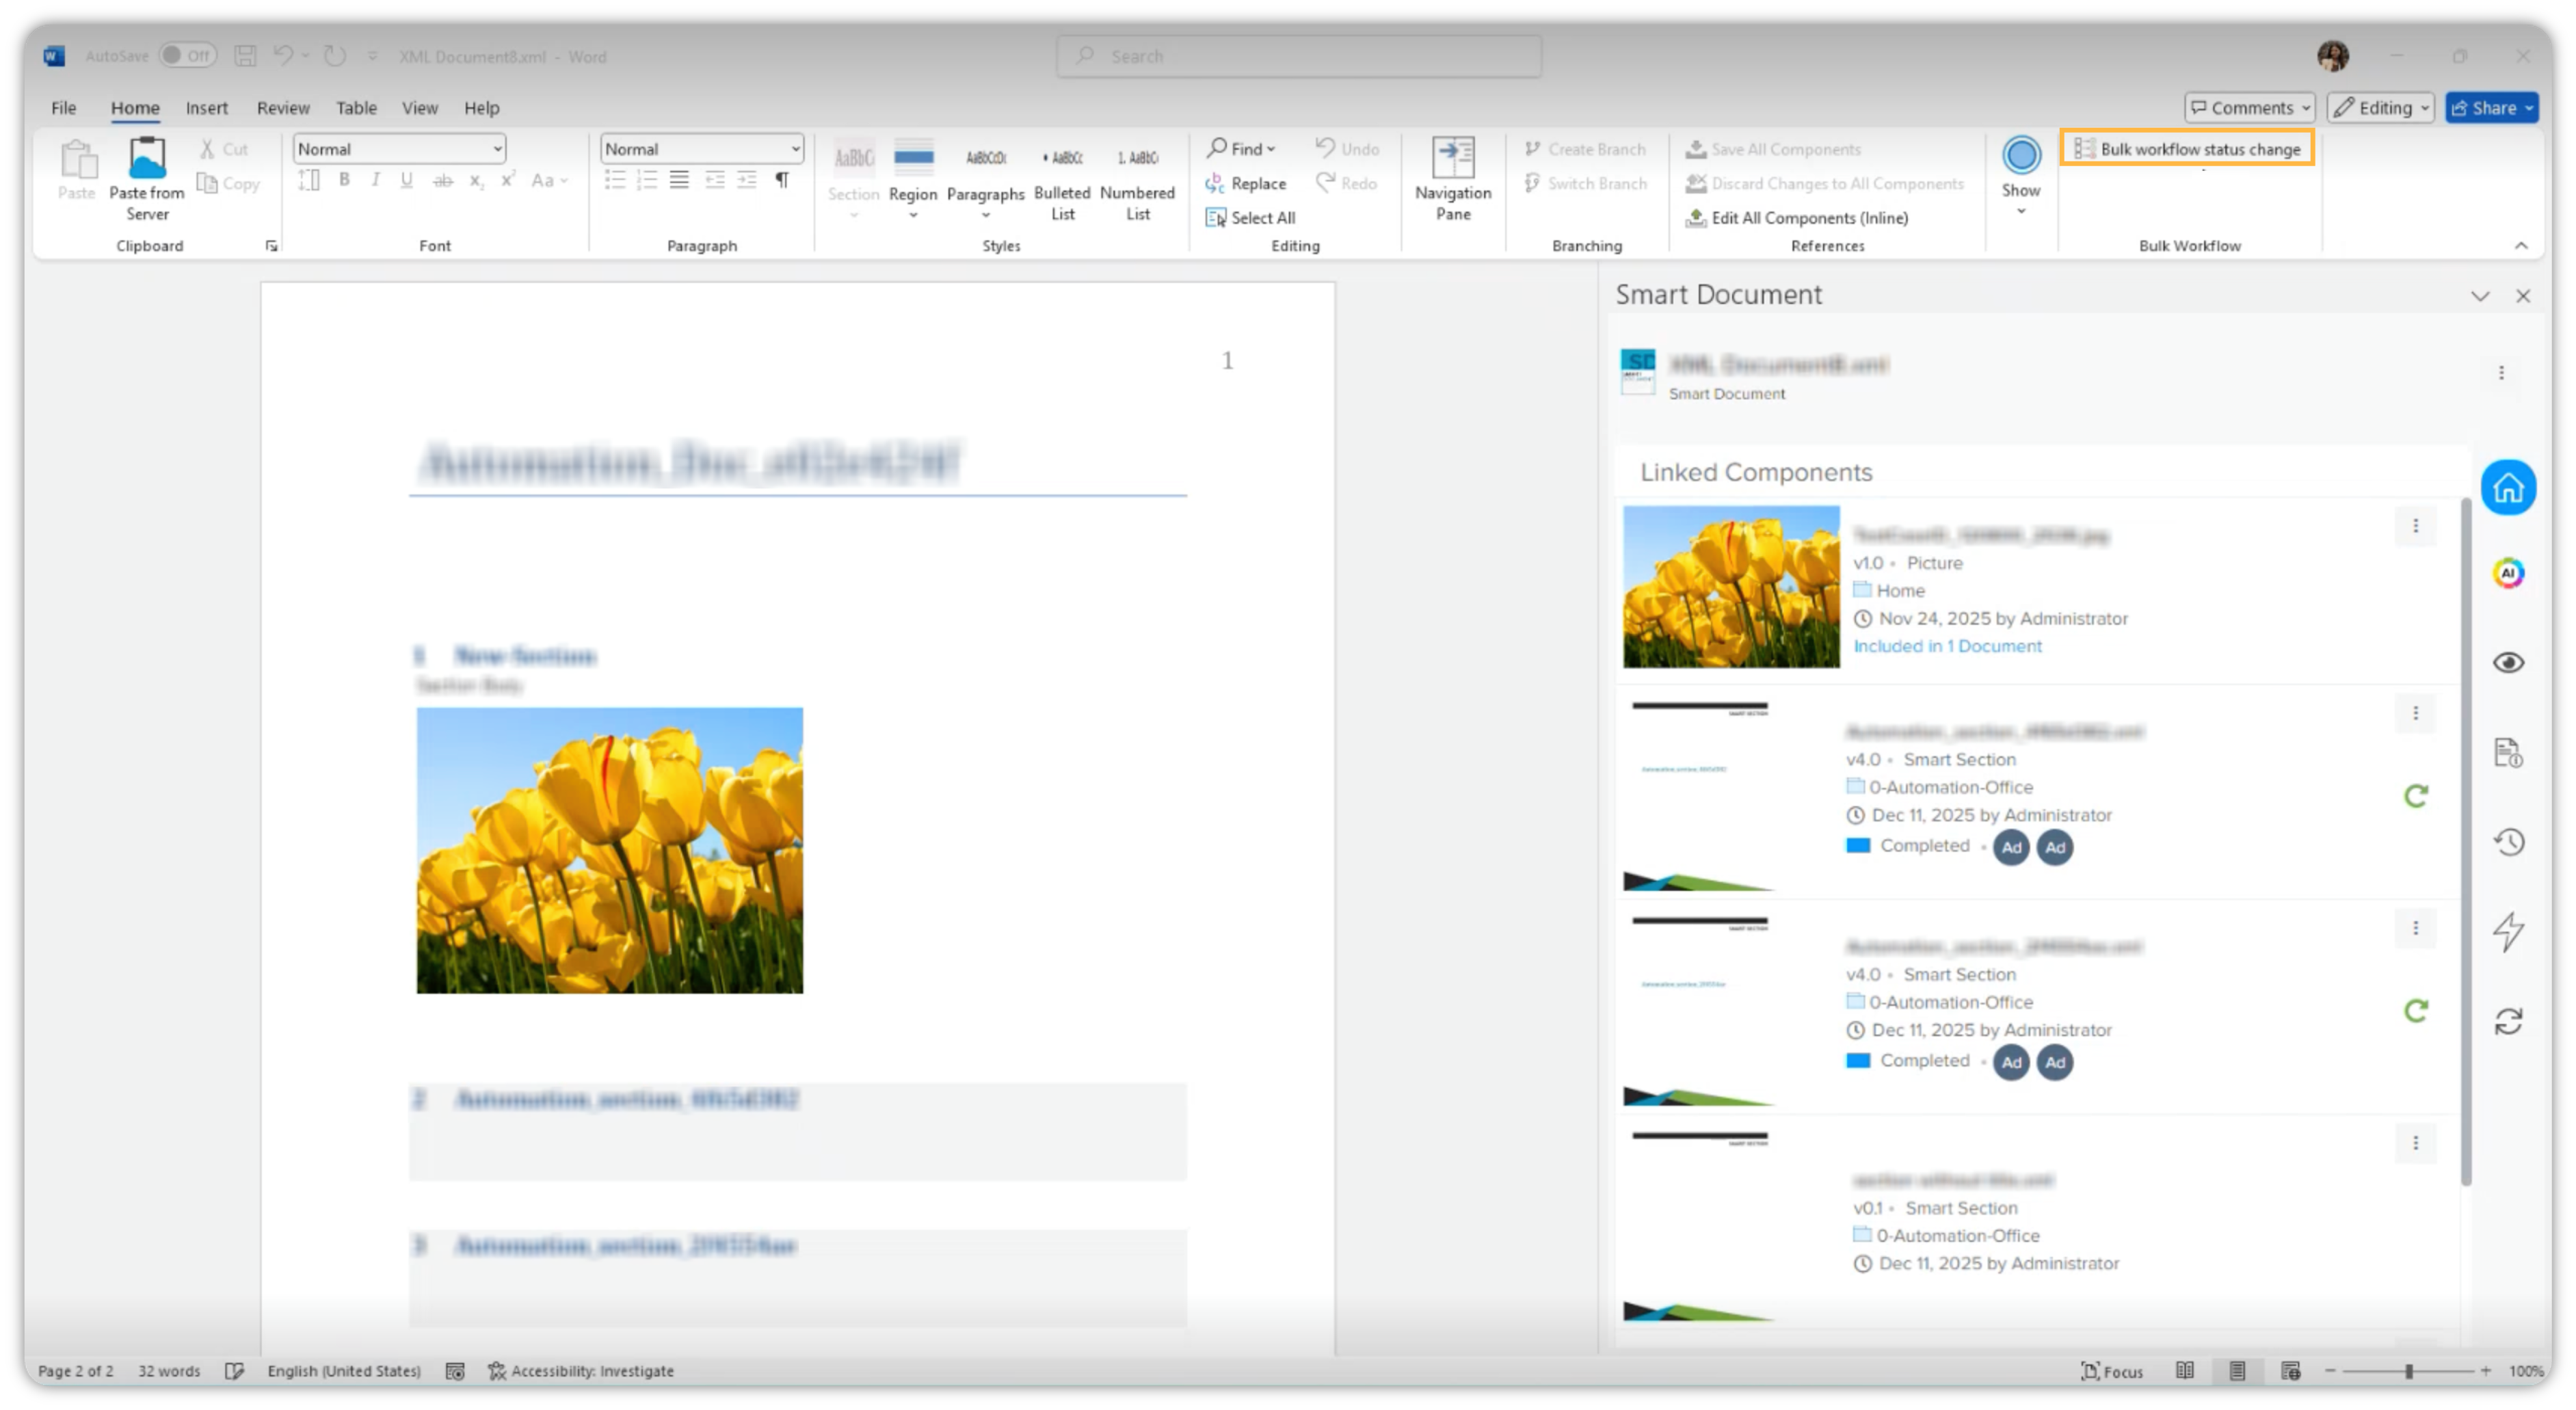
Bulk Workflow Status
To change to workflow status of your components in bulk, follow these steps:
-
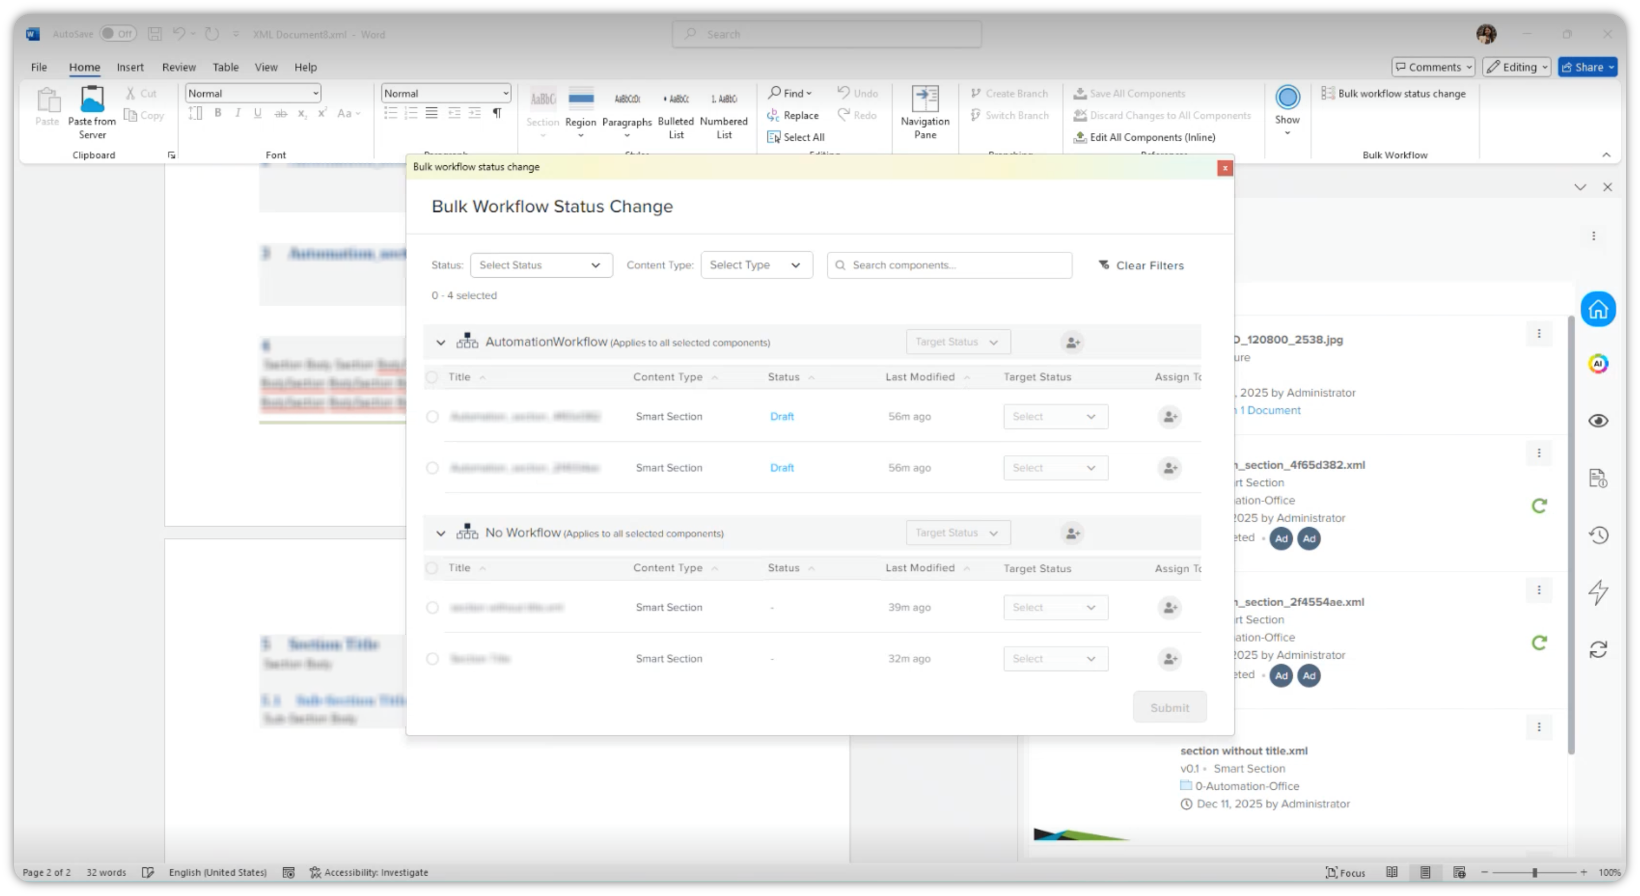
Click Batch Workflow Status Change on the taskbar.
-
The Batch Workflow Status Change dialog appears, displaying a comprehensive list of components, their content types, current statuses, and last modification dates.
-
Utilize the filter options to narrow down the list, allowing you to focus only on the desired workflow statuses and content types you wish to manage.
-
You can choose either individual components, a selection of components, or all components belonging to a specific workflow (or across all workflows) simultaneously for updating their statuses.
-
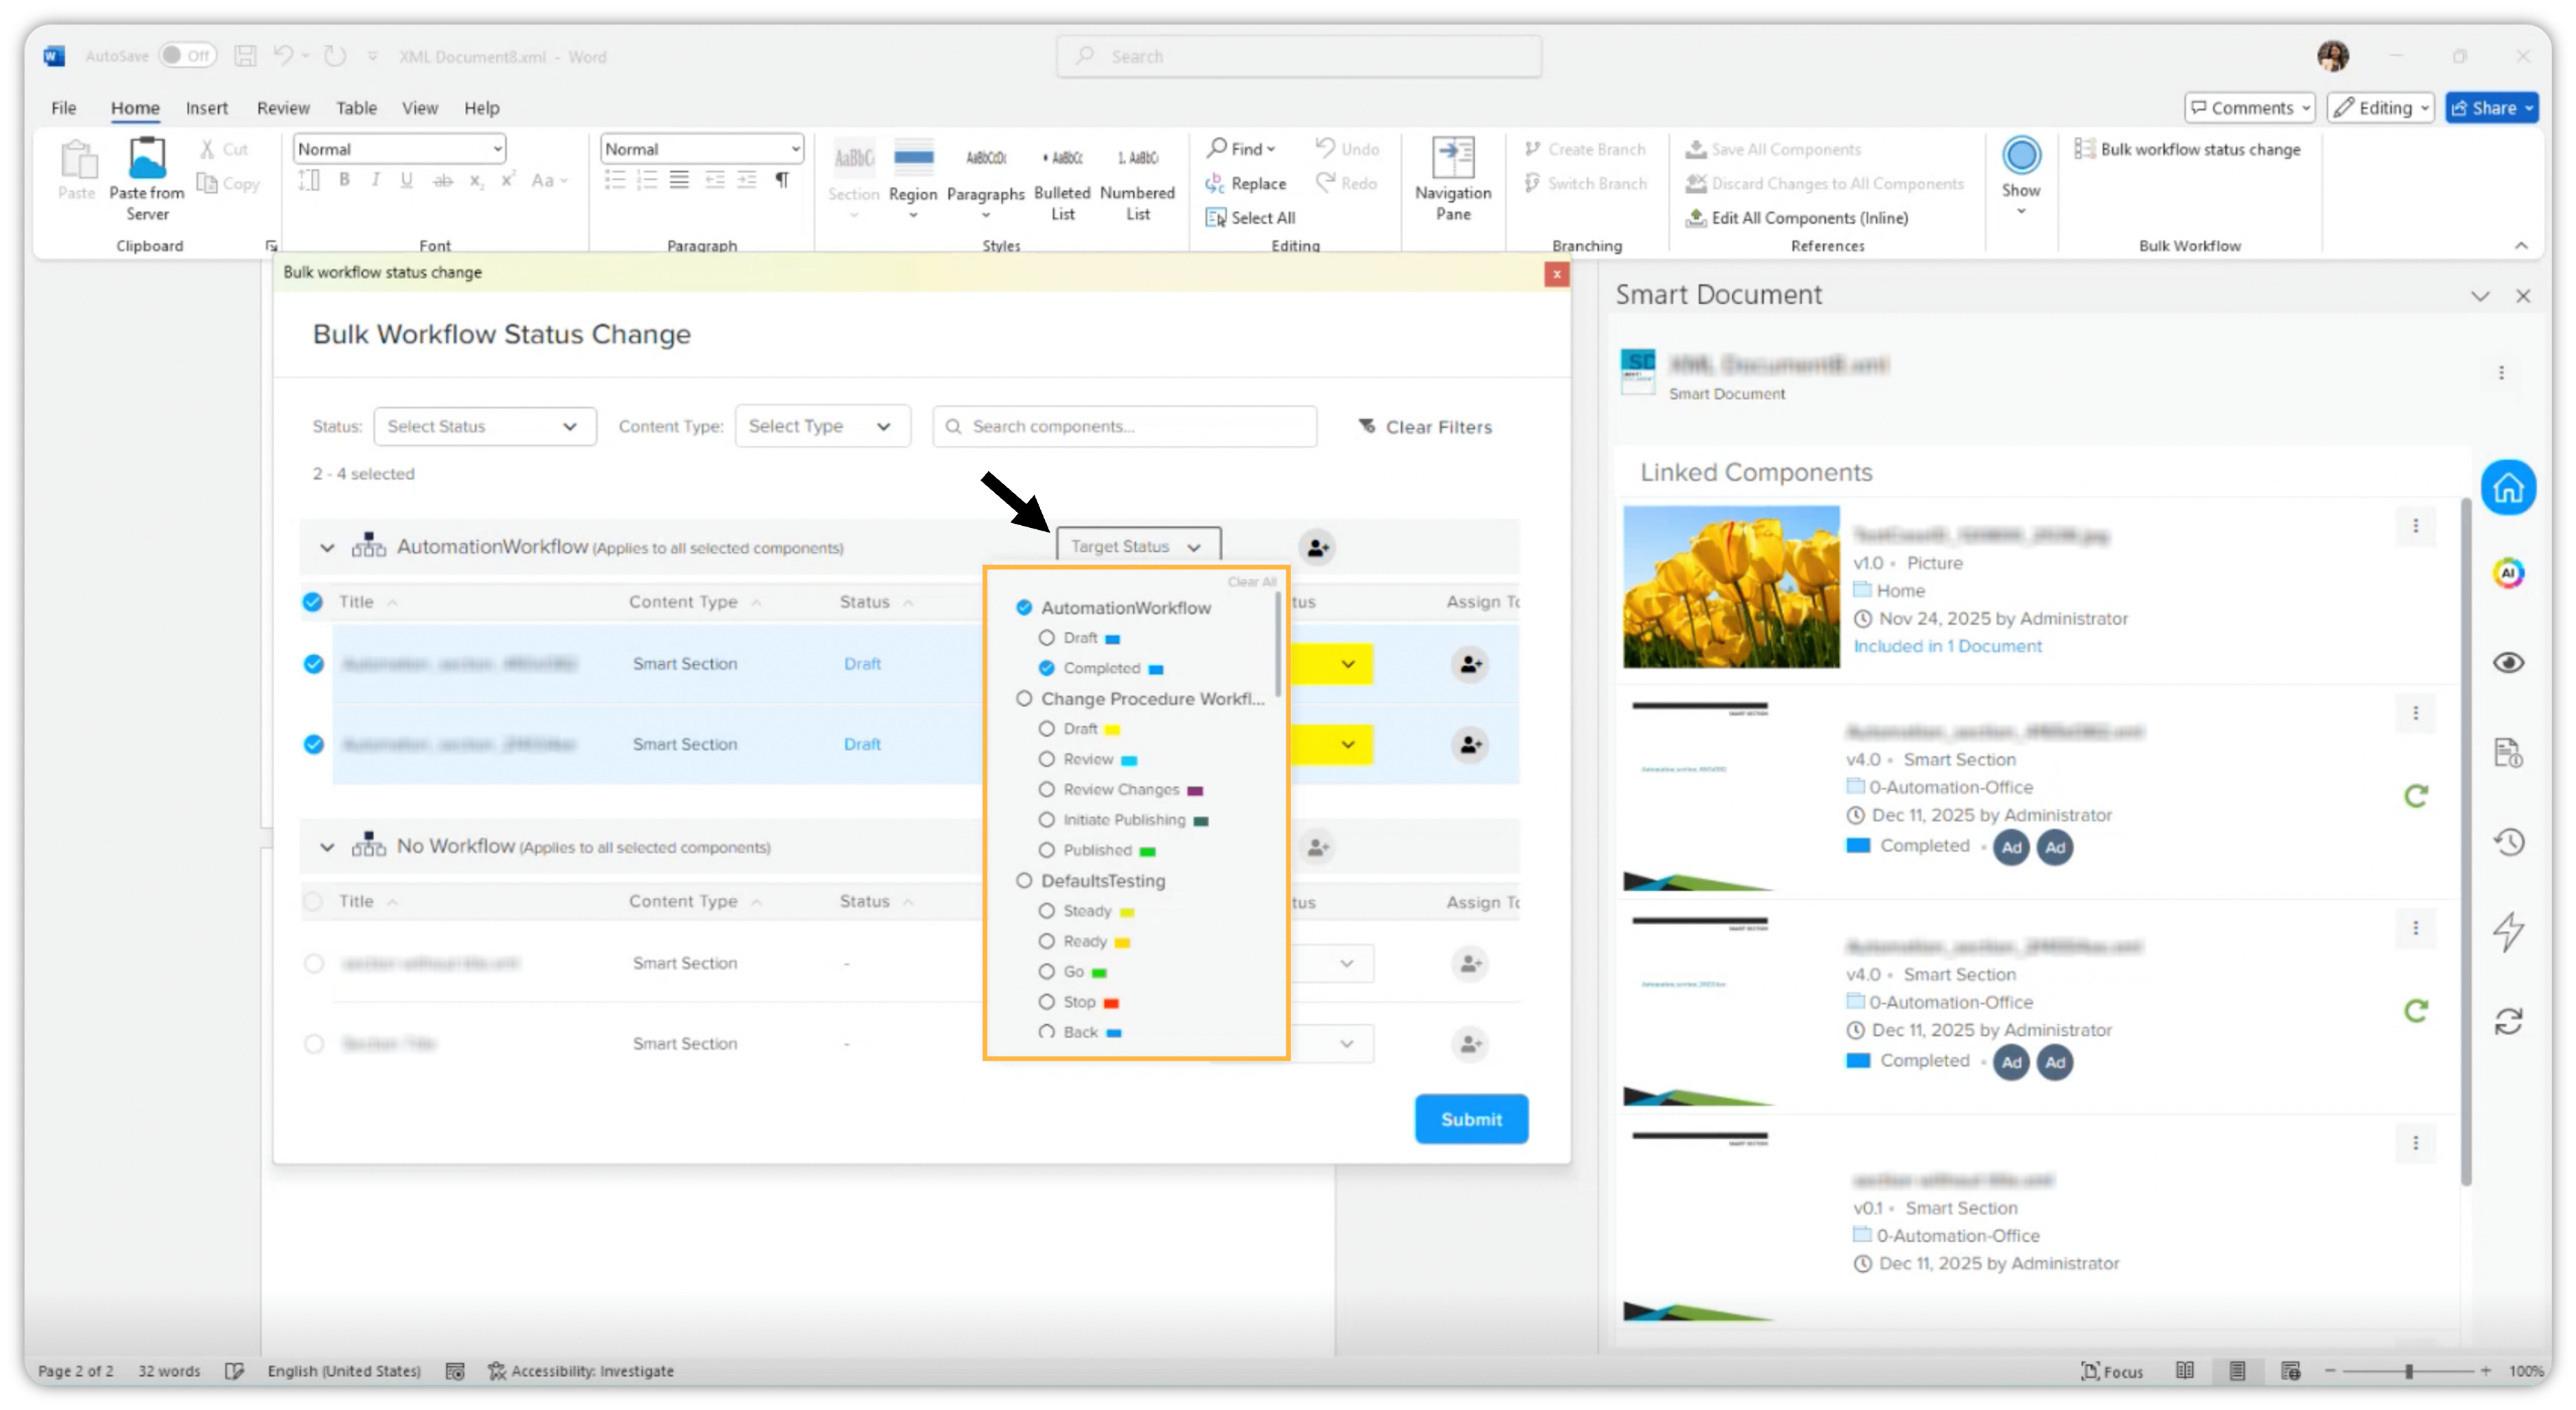
Once components are selected, you can choose to set the target status for those components based on different criteria: either for all components within a single workflow, across multiple workflows, or individually.
-
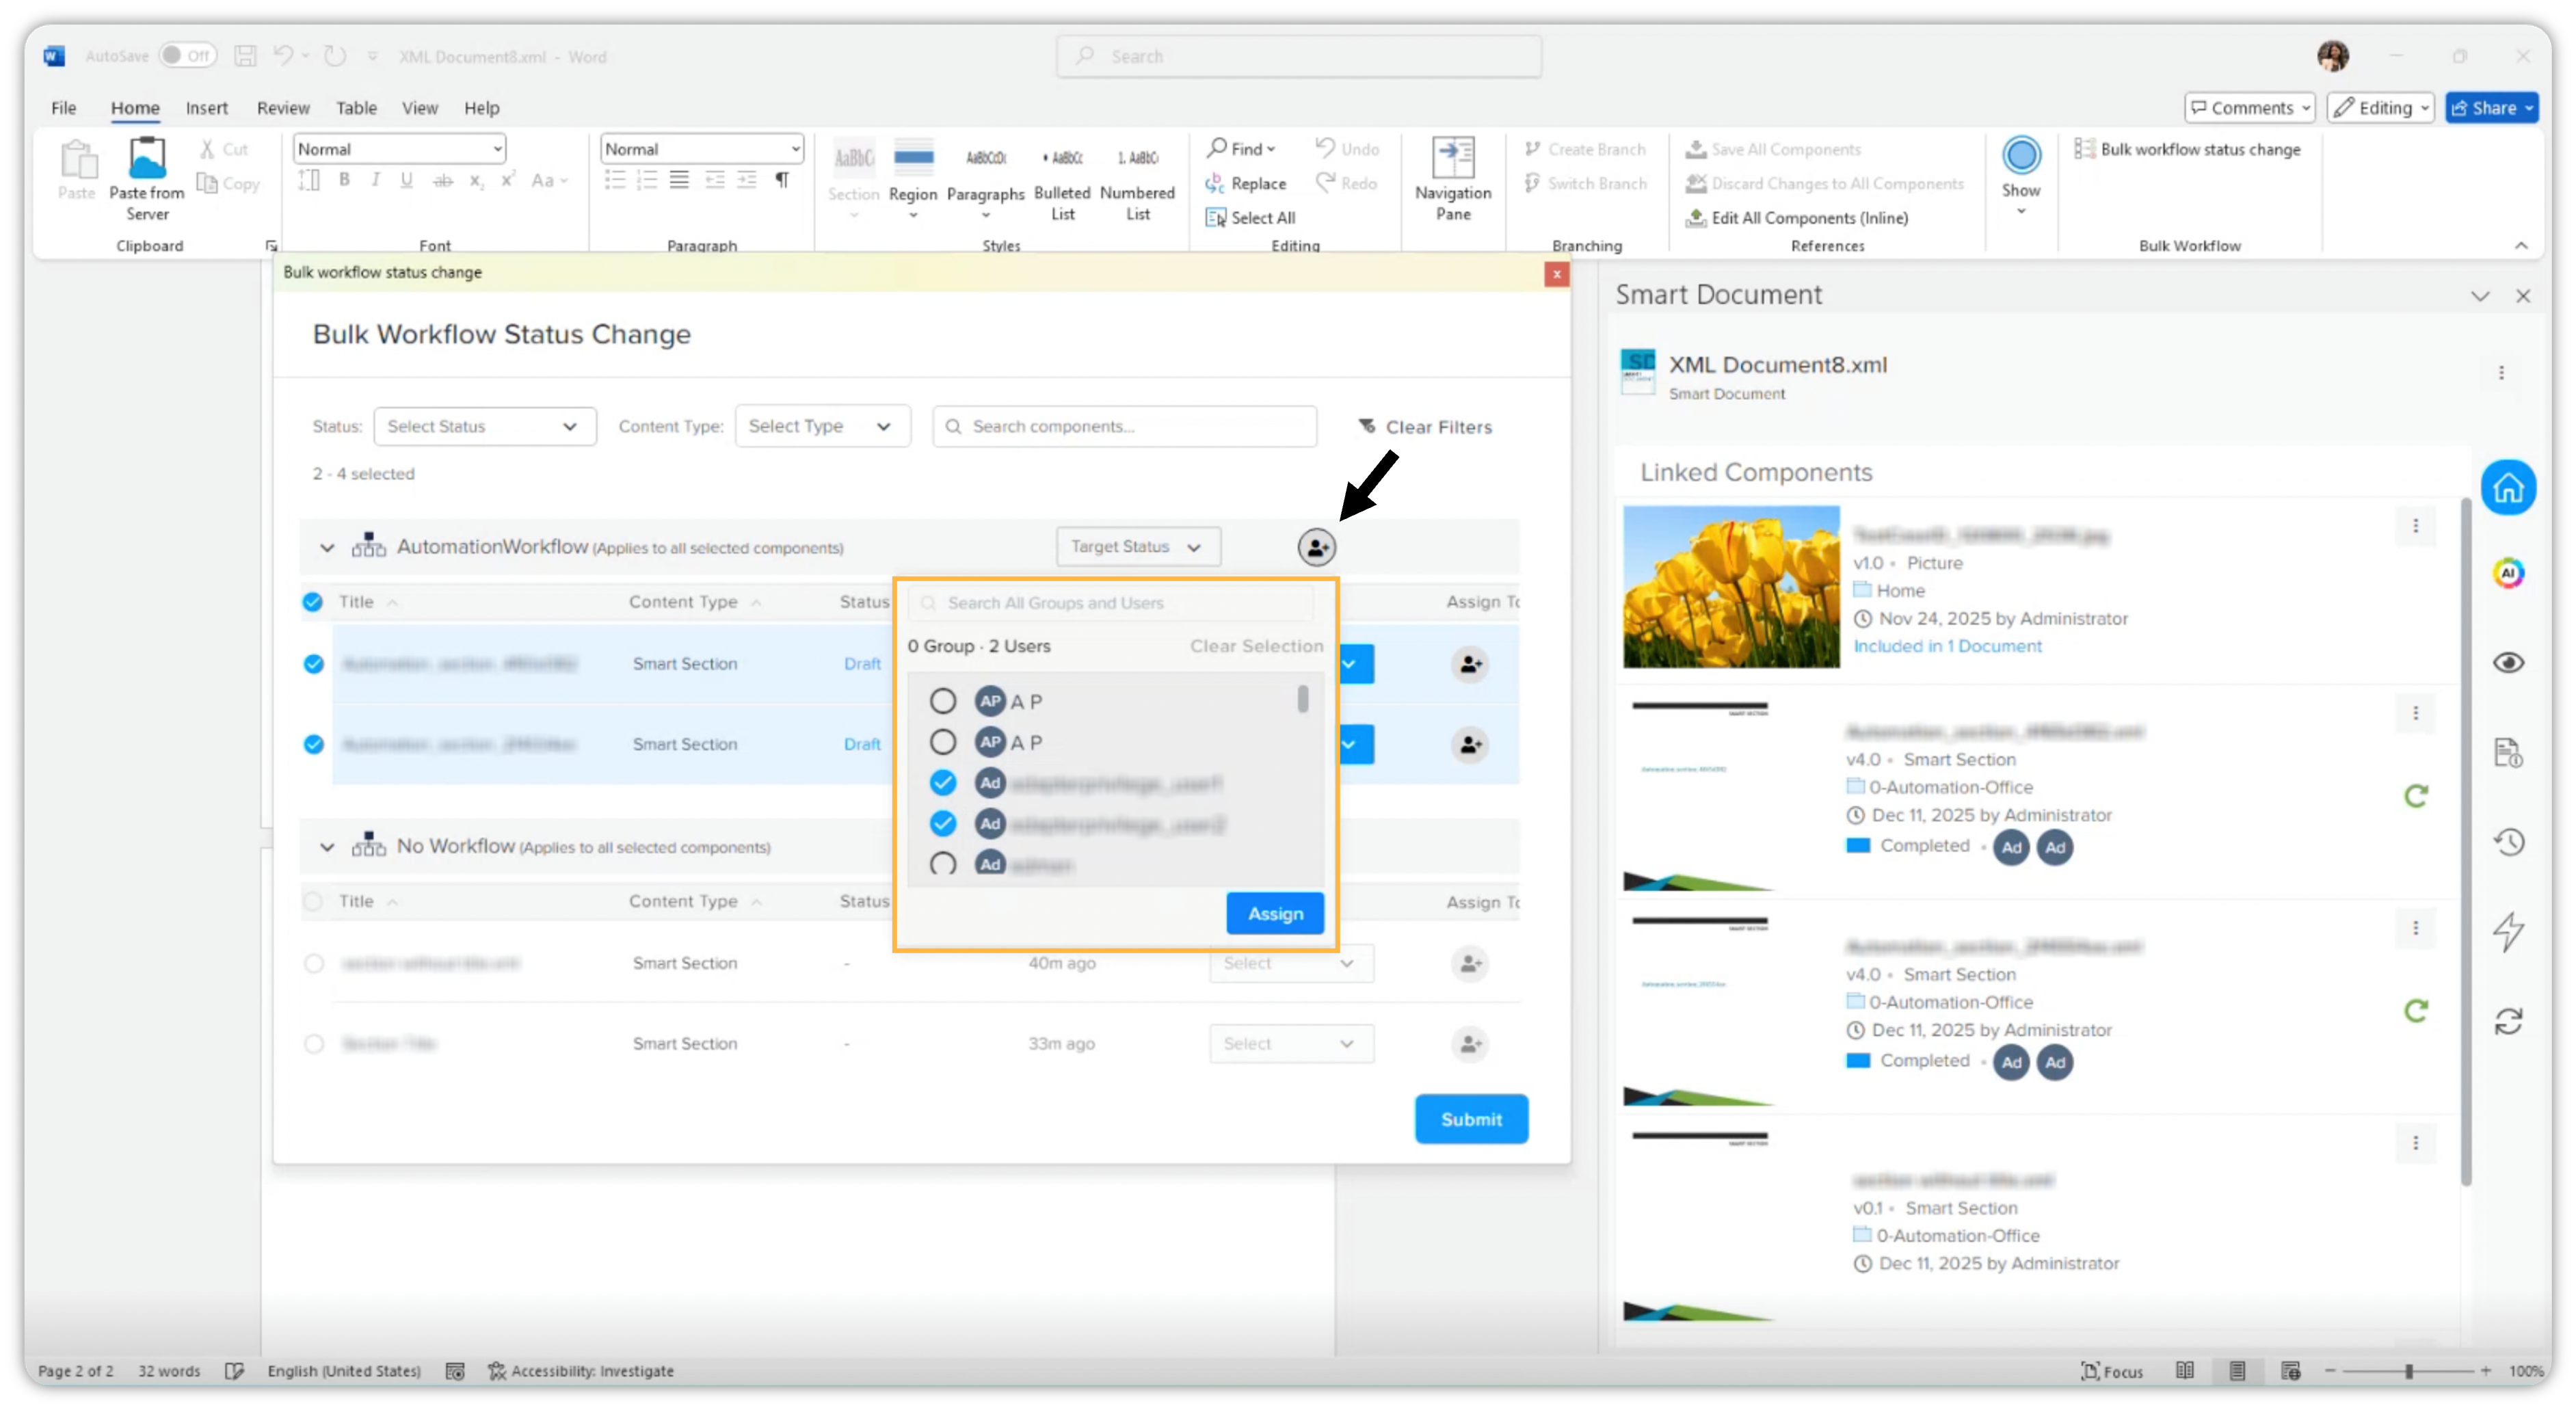
After setting the target status, you can assign specific users or user groups to those selected components, ensuring proper management and accountability.
-
If you prefer not to set the status for all selected components at the global level for a specific workflow or across workflows, you can individually set the status for multiple components one at a time and assign them to desired users or user groups.
-
Once all selections are made, click Submit, which opens a confirmation dialog to finalize the changes.
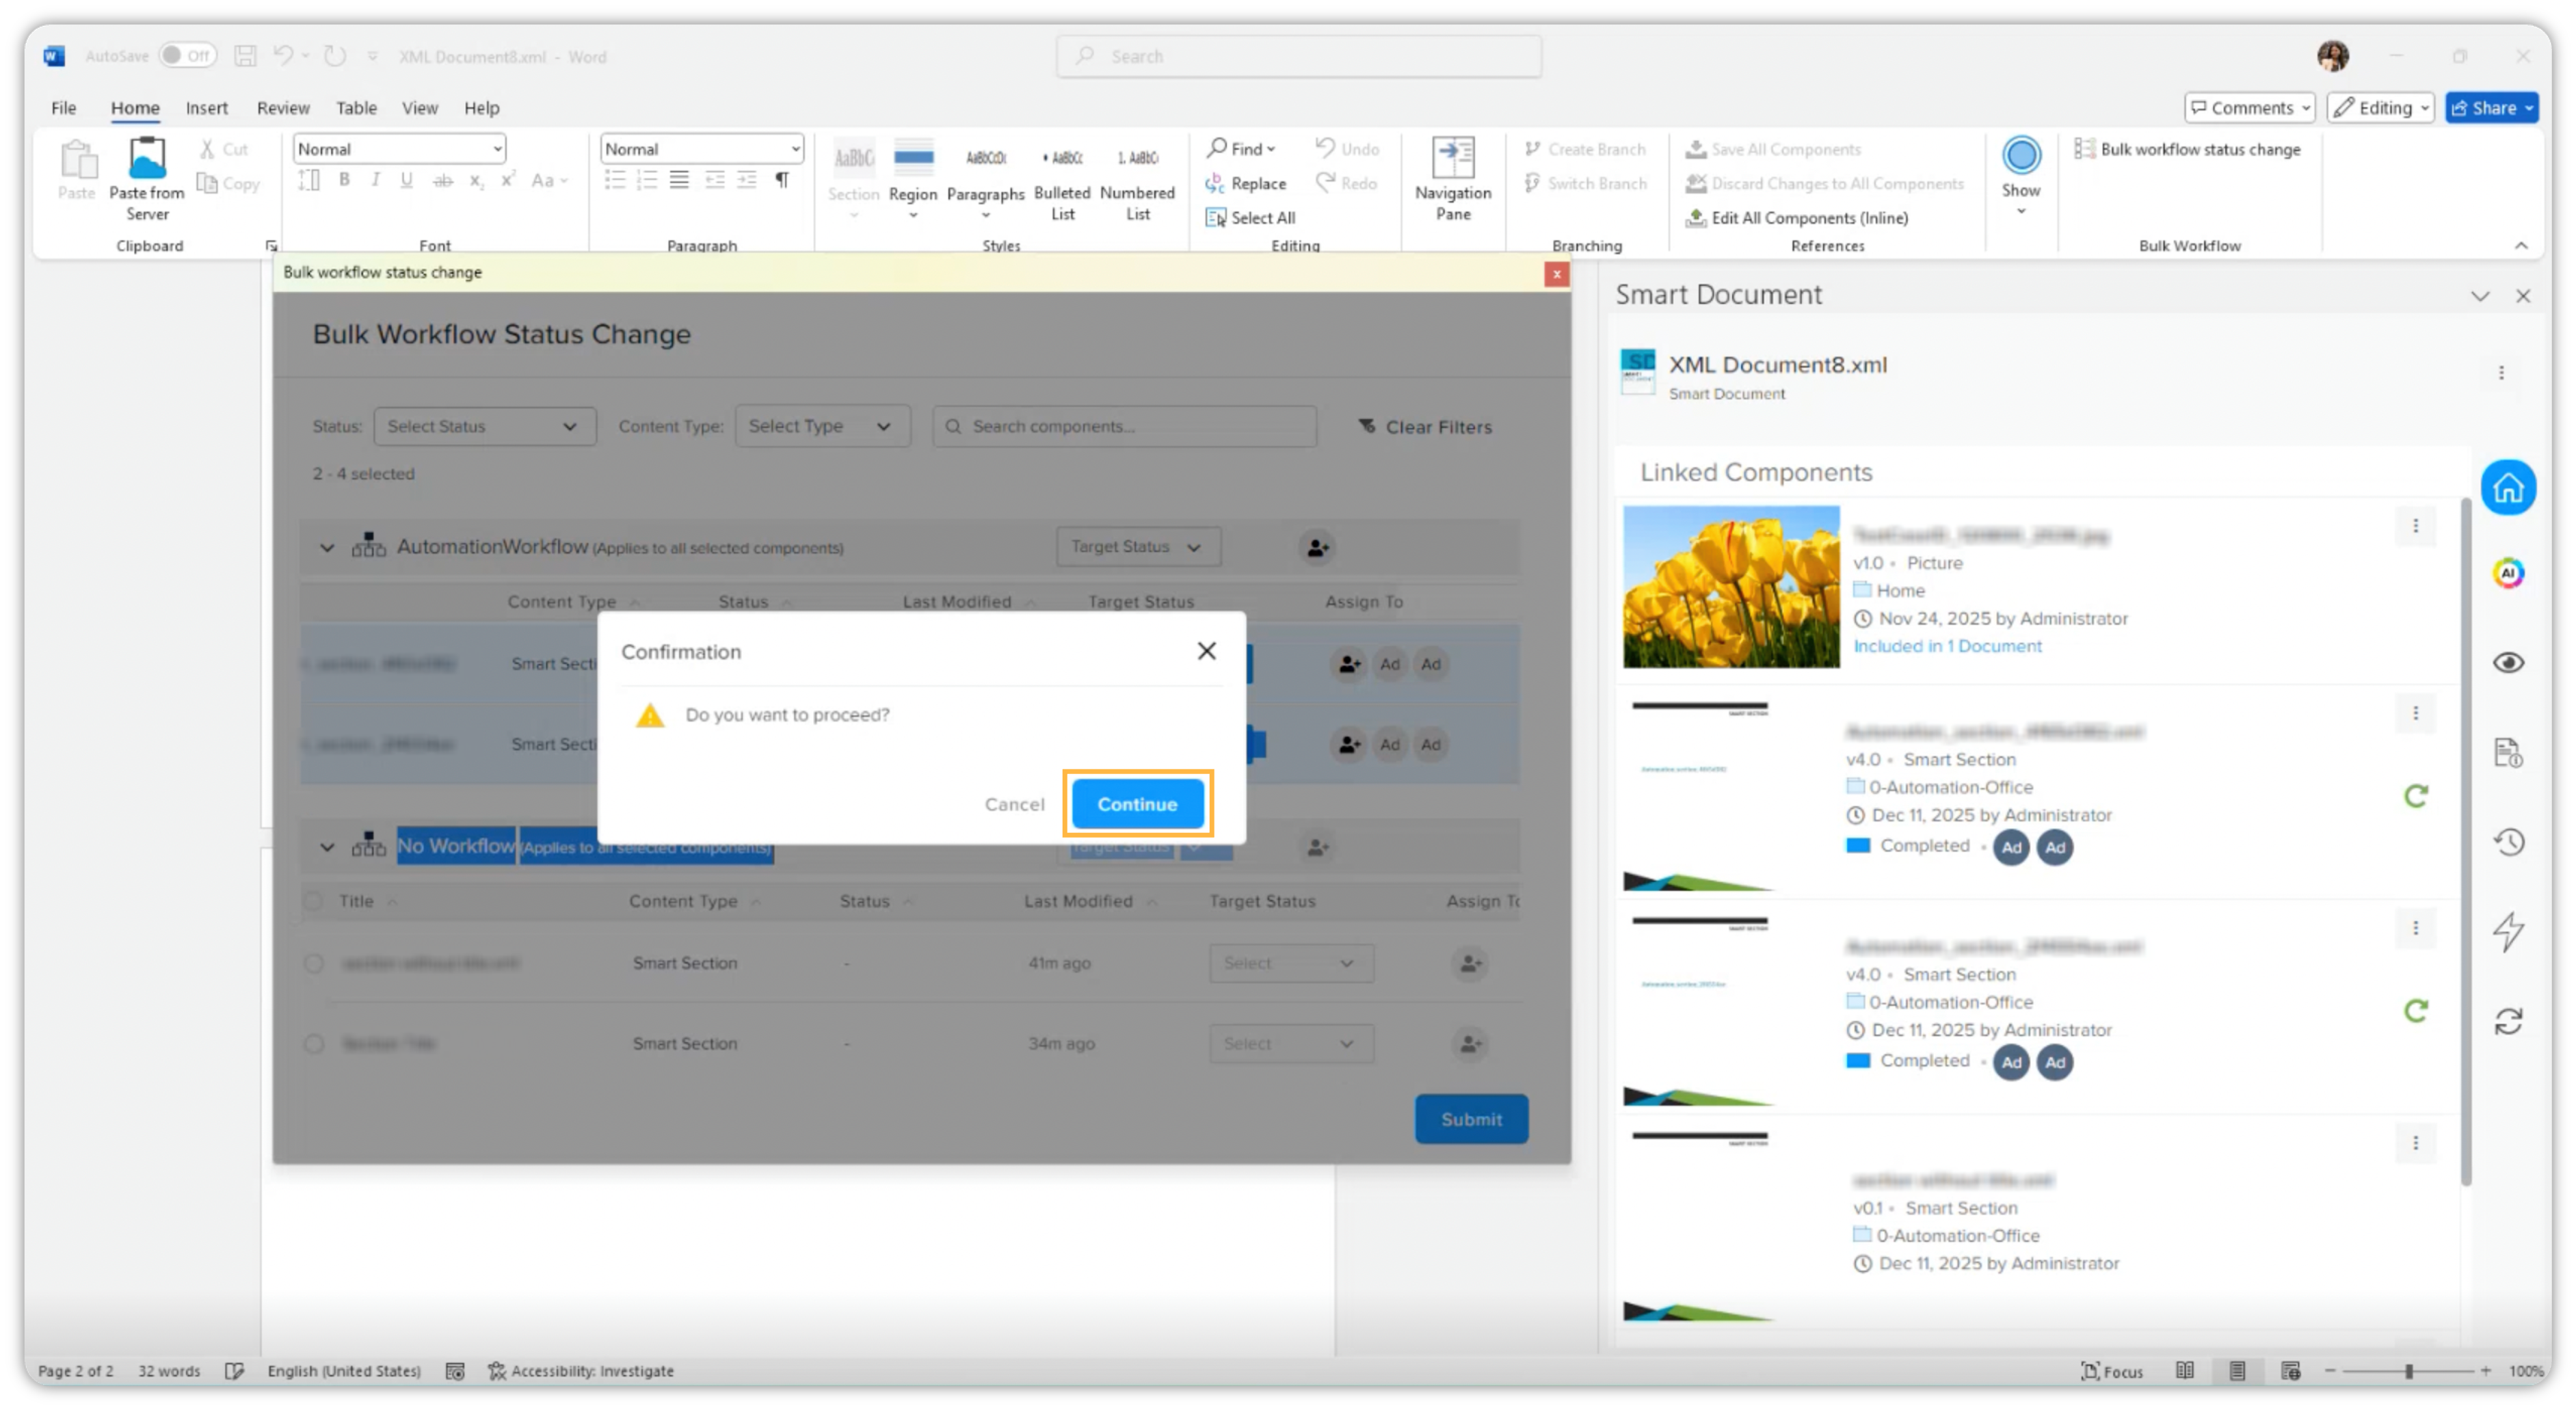
-
The processing will start, and it typically completes within seconds. Upon successful completion of the process, a message will appear on the screen, confirming that the changes have been applied.
-
The workflow status or status change has been successfully applied to the selected components, along with their assigned users.