
Smart Document Pane
The Smart Document Pane offers a range of features related to the document open in the Word canvas such as previewing the output, seeing older versions, and so on.
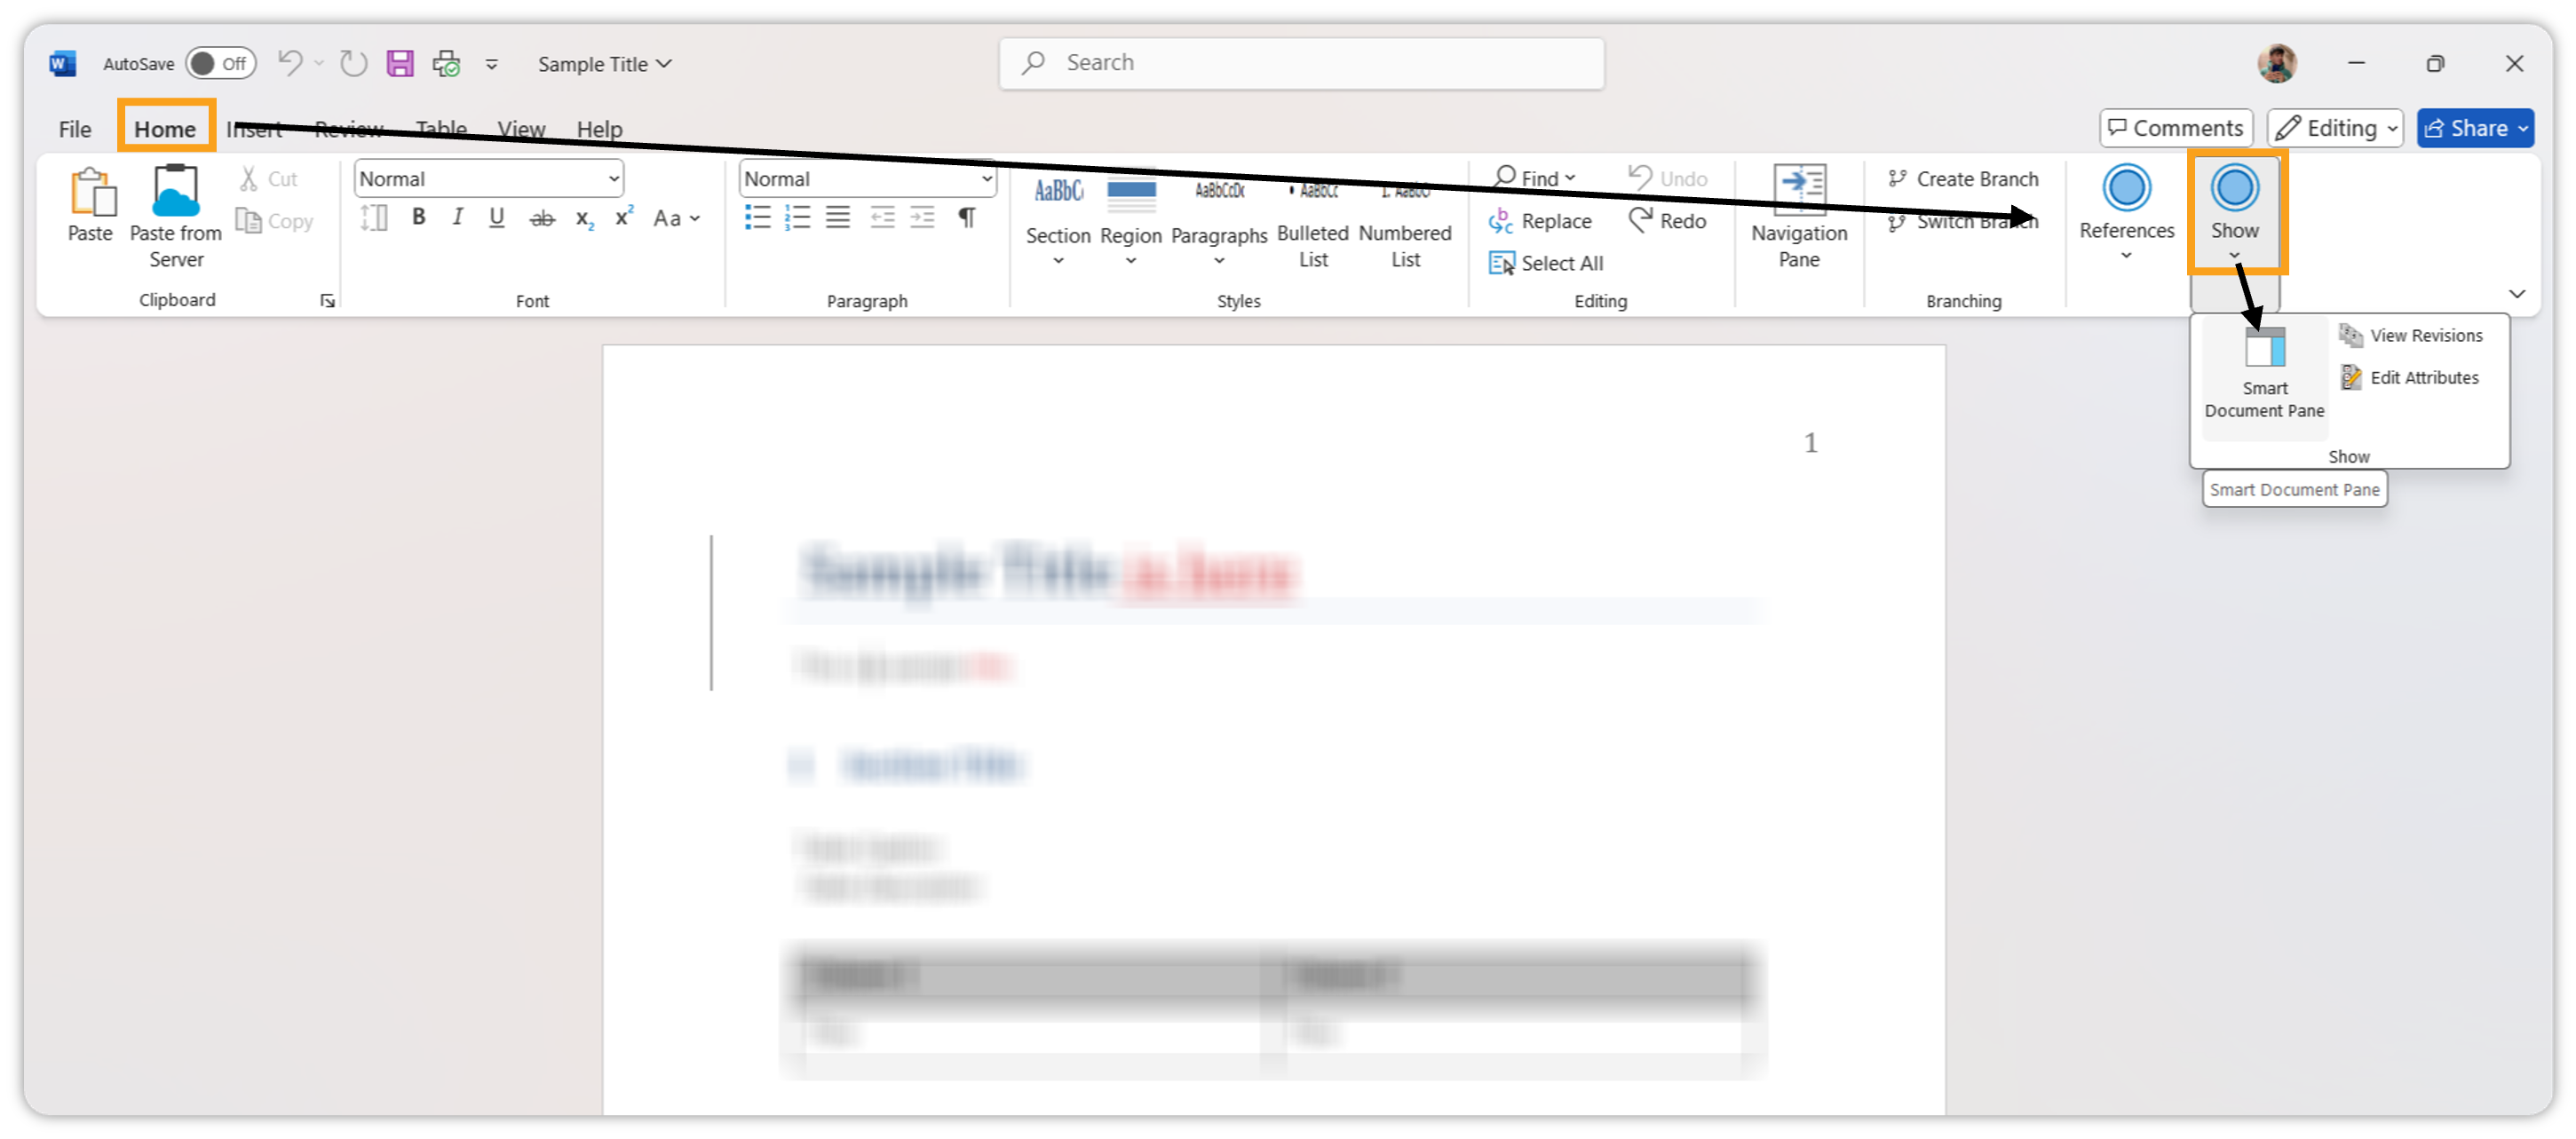
To open the Smart Document Pane:
-
In the header ribbon, click on the tab Home.
-
Click on the Show drop-down, and then click on Smart Document Pane.
QPP Adapter for Quark XML Author opens the Smart Document Pane on the right side of the Word canvas.
Home Tab
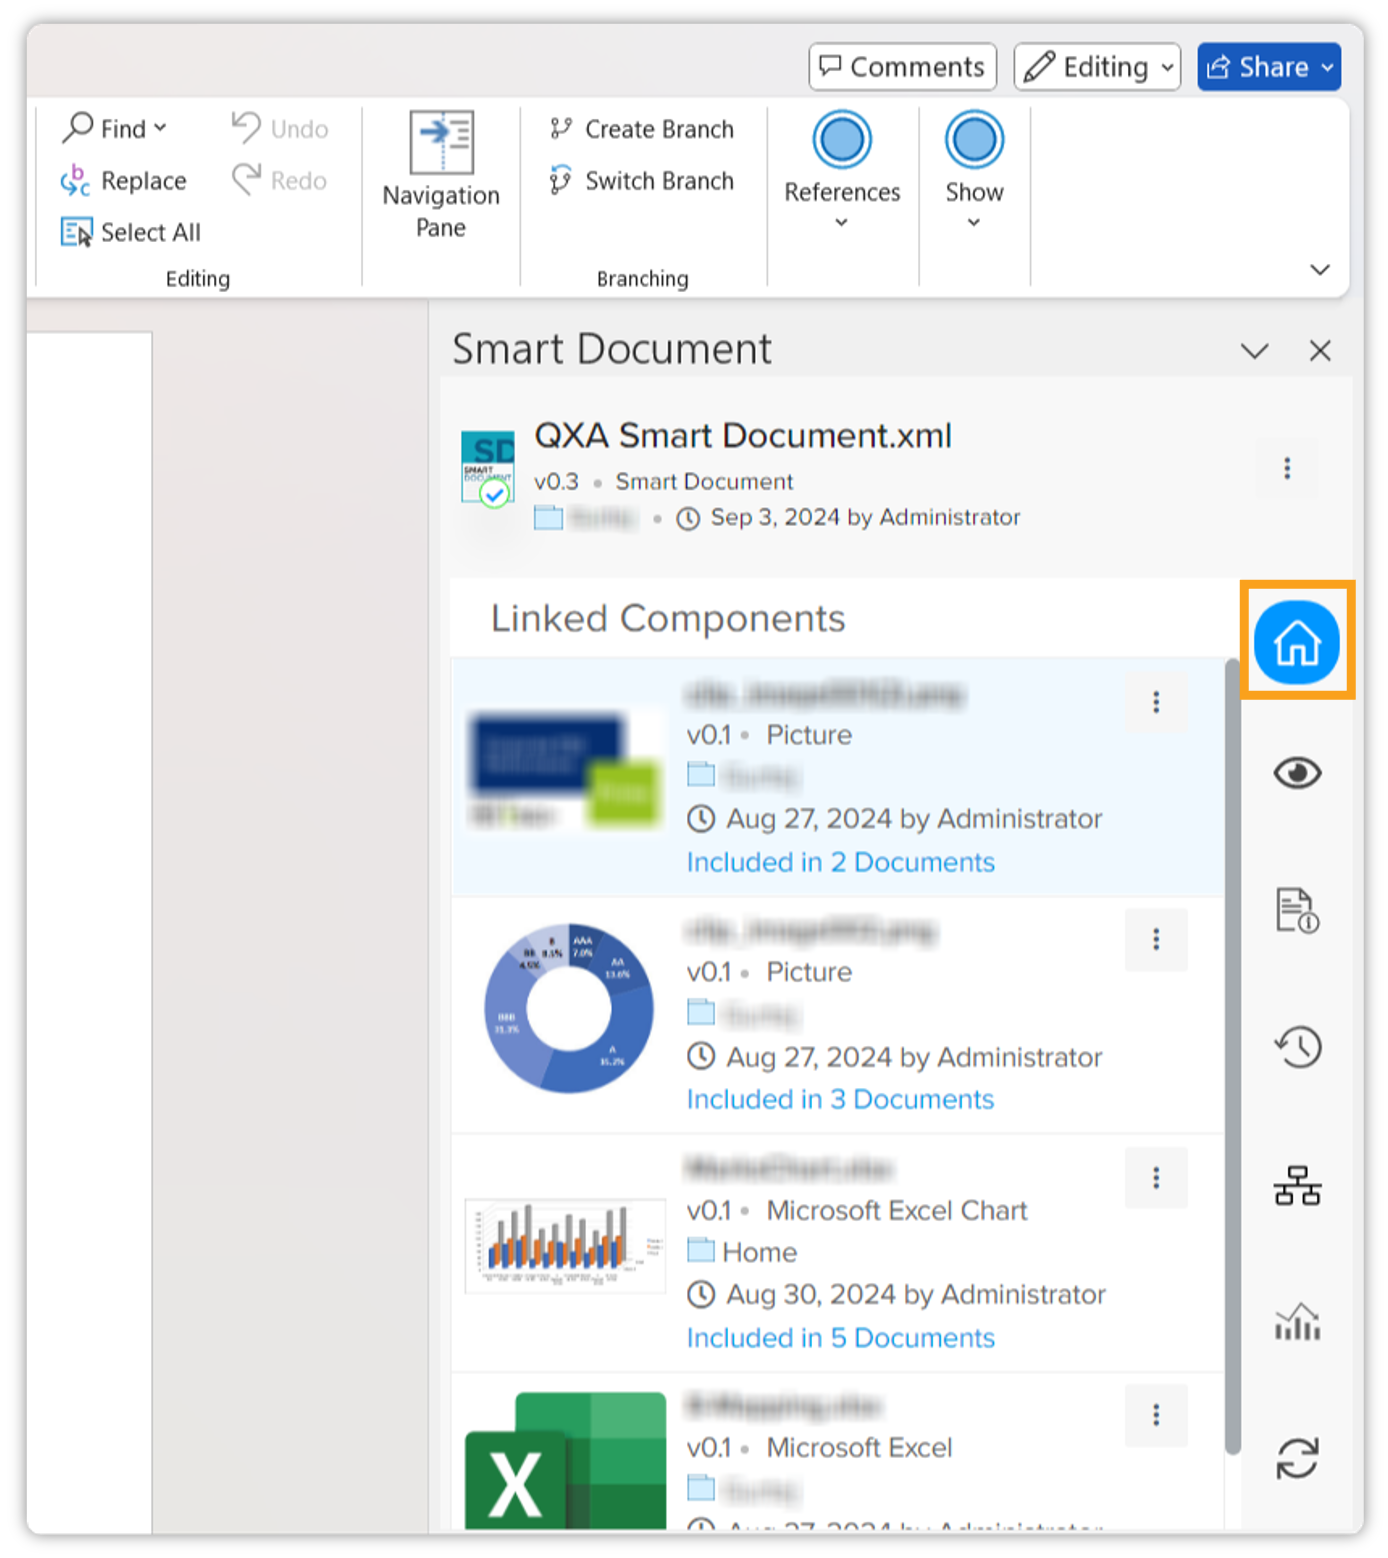
The Home tab displays the following generic information about a document:
-
Location
-
Authored by
-
Last date of modification
-
Status
-
Version number
-
List of content references that are visible on the authoring canvas. For example, if a document has 40 references but the visible authoring canvas has only two, the Home tab only displays the visible references. And as you scroll through the authoring canvas, the Home tab continuously updates the list of content references.
-
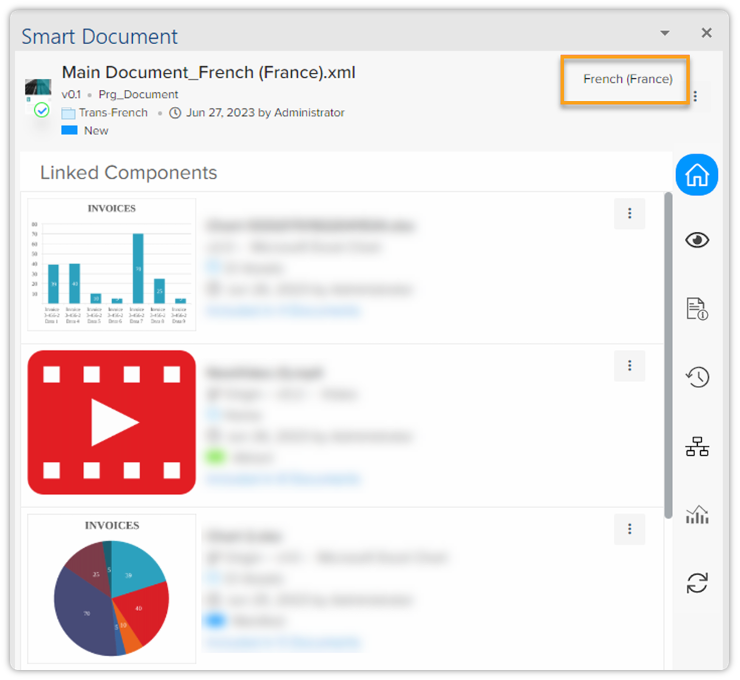
For translated assets, the Home tab also displays the name of the associated translation configuration at the top-right corner.
Asset Actions
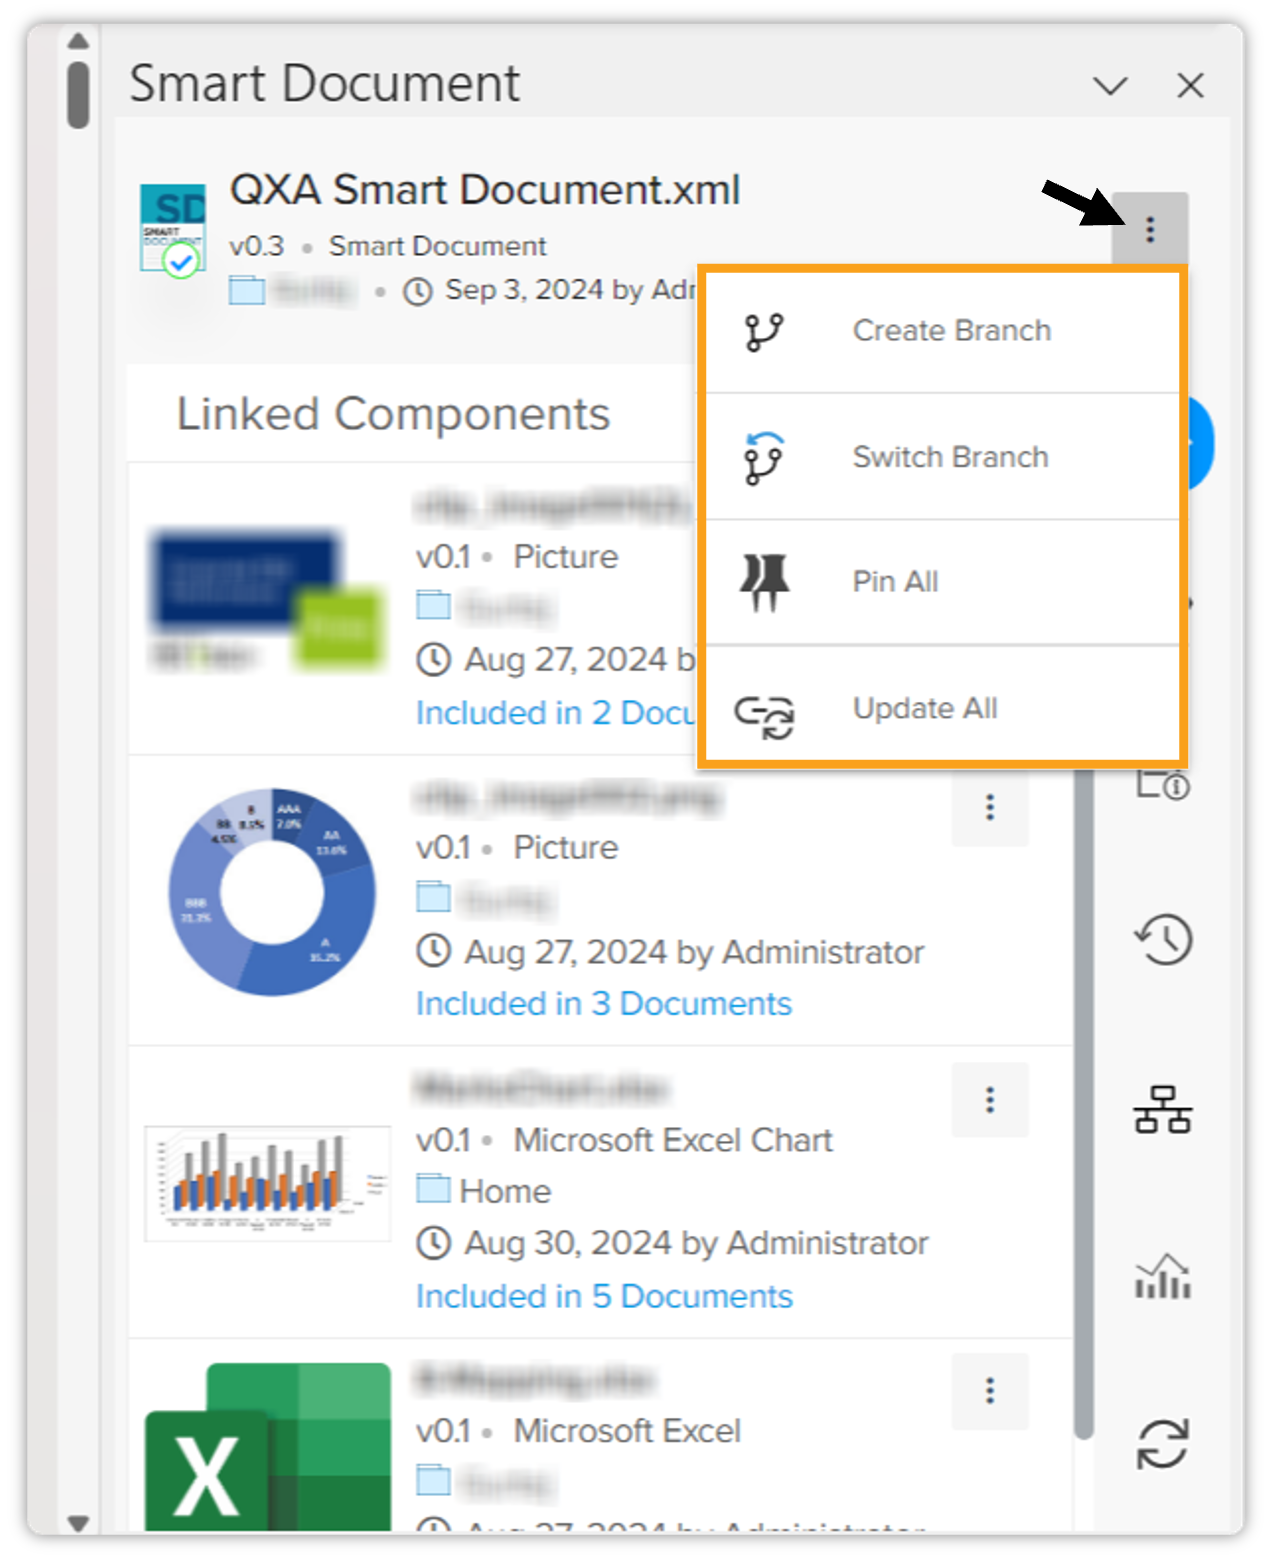
You can access the asset actions through the kebab menu in the Smart Document Pane. These actions are as follows:
-
Create Branch: Allows you to create a branch of the asset.
-
Switch Branch: Allows you to switch the branch of the asset.
-
Pin/Unpin All: Pins all the referenced content used in the asset.
-
Update All: Update all the listed referenced content pieces.
Linked Component Actions
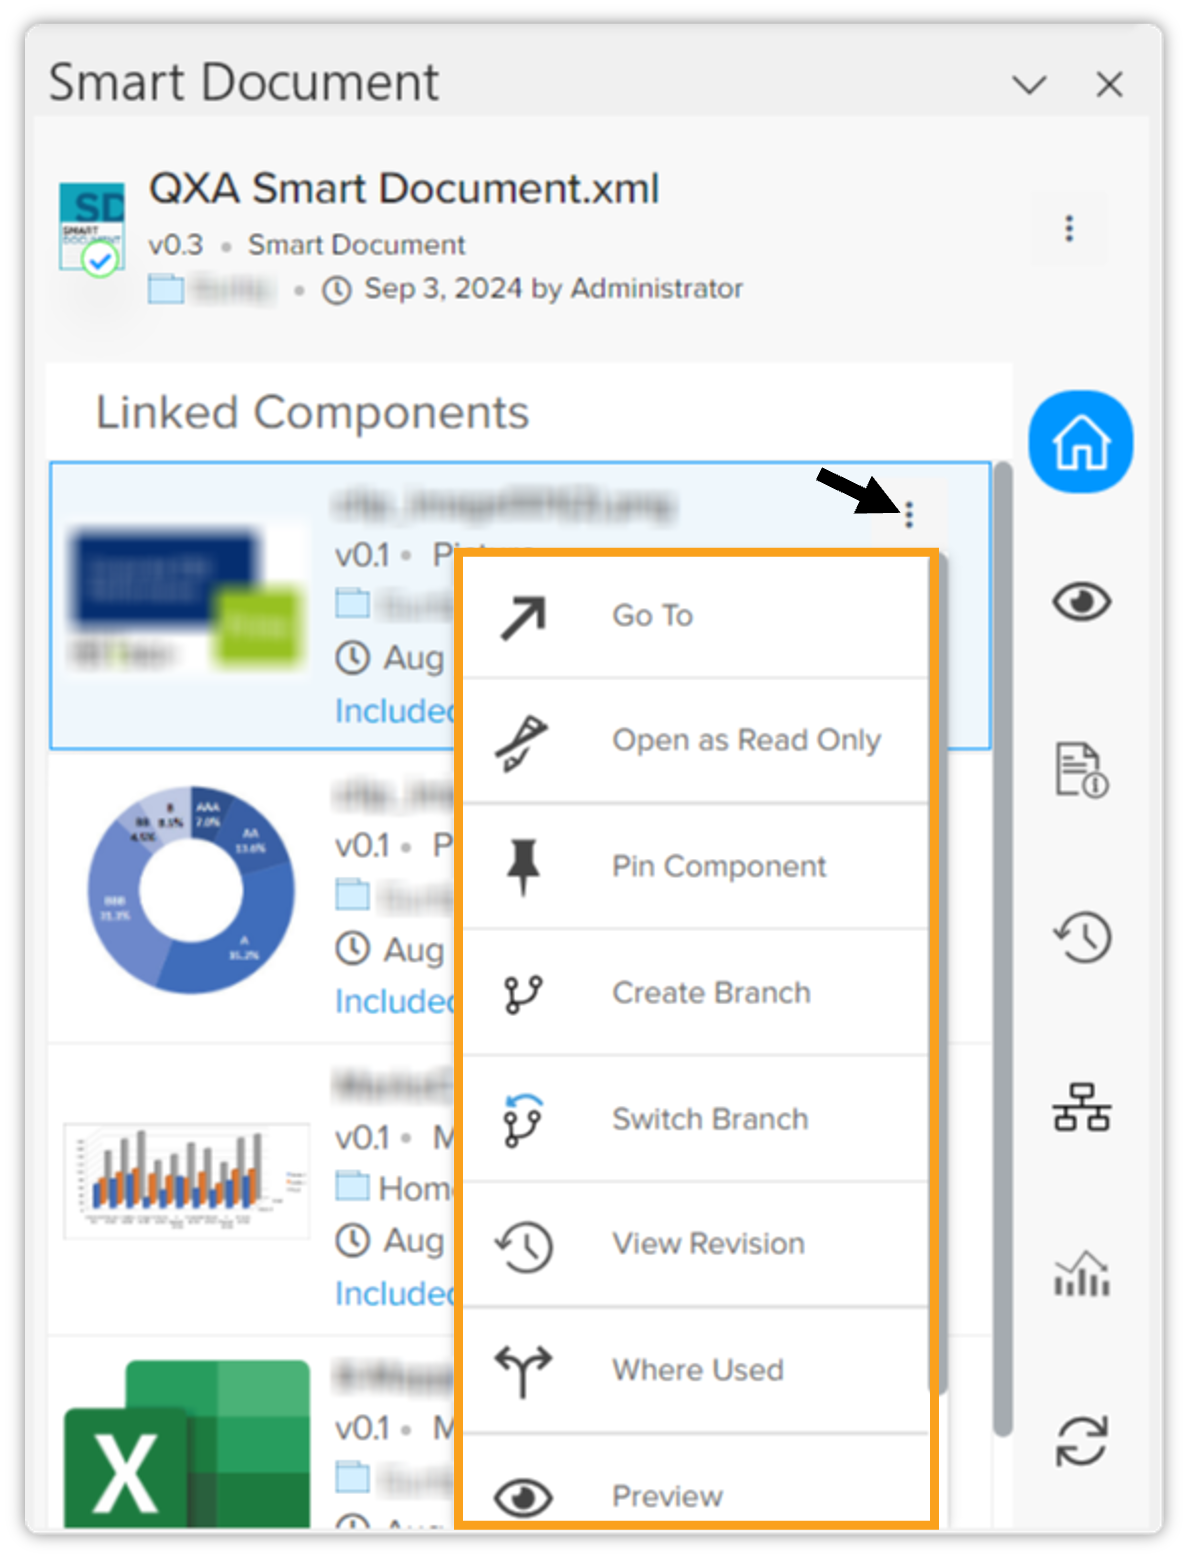
You can access the linked component actions through the kebab menu on a linked component card. These actions are as follows:
-
Go To: Opens the referenced content in a new document window that you edit like a regular document.
-
Open as Read-Only: Opens the read-only version of the referenced content in a new document window.
-
Create Branch: Allows you to create a branch of the component.
-
Switch Branch: Allows you to switch the branch of the component.
-
Pin Component: Pins the selected referenced content.
-
View Revisions: Same as the tab History.
-
Where Used: Displays all the documents where referenced content is used.
-
Preview: Same as the tab Preview.
-
Properties: Displays document properties such as metadata.
Preview Tab
The Preview tab allows you to preview the publication in several available publishing channel formats.
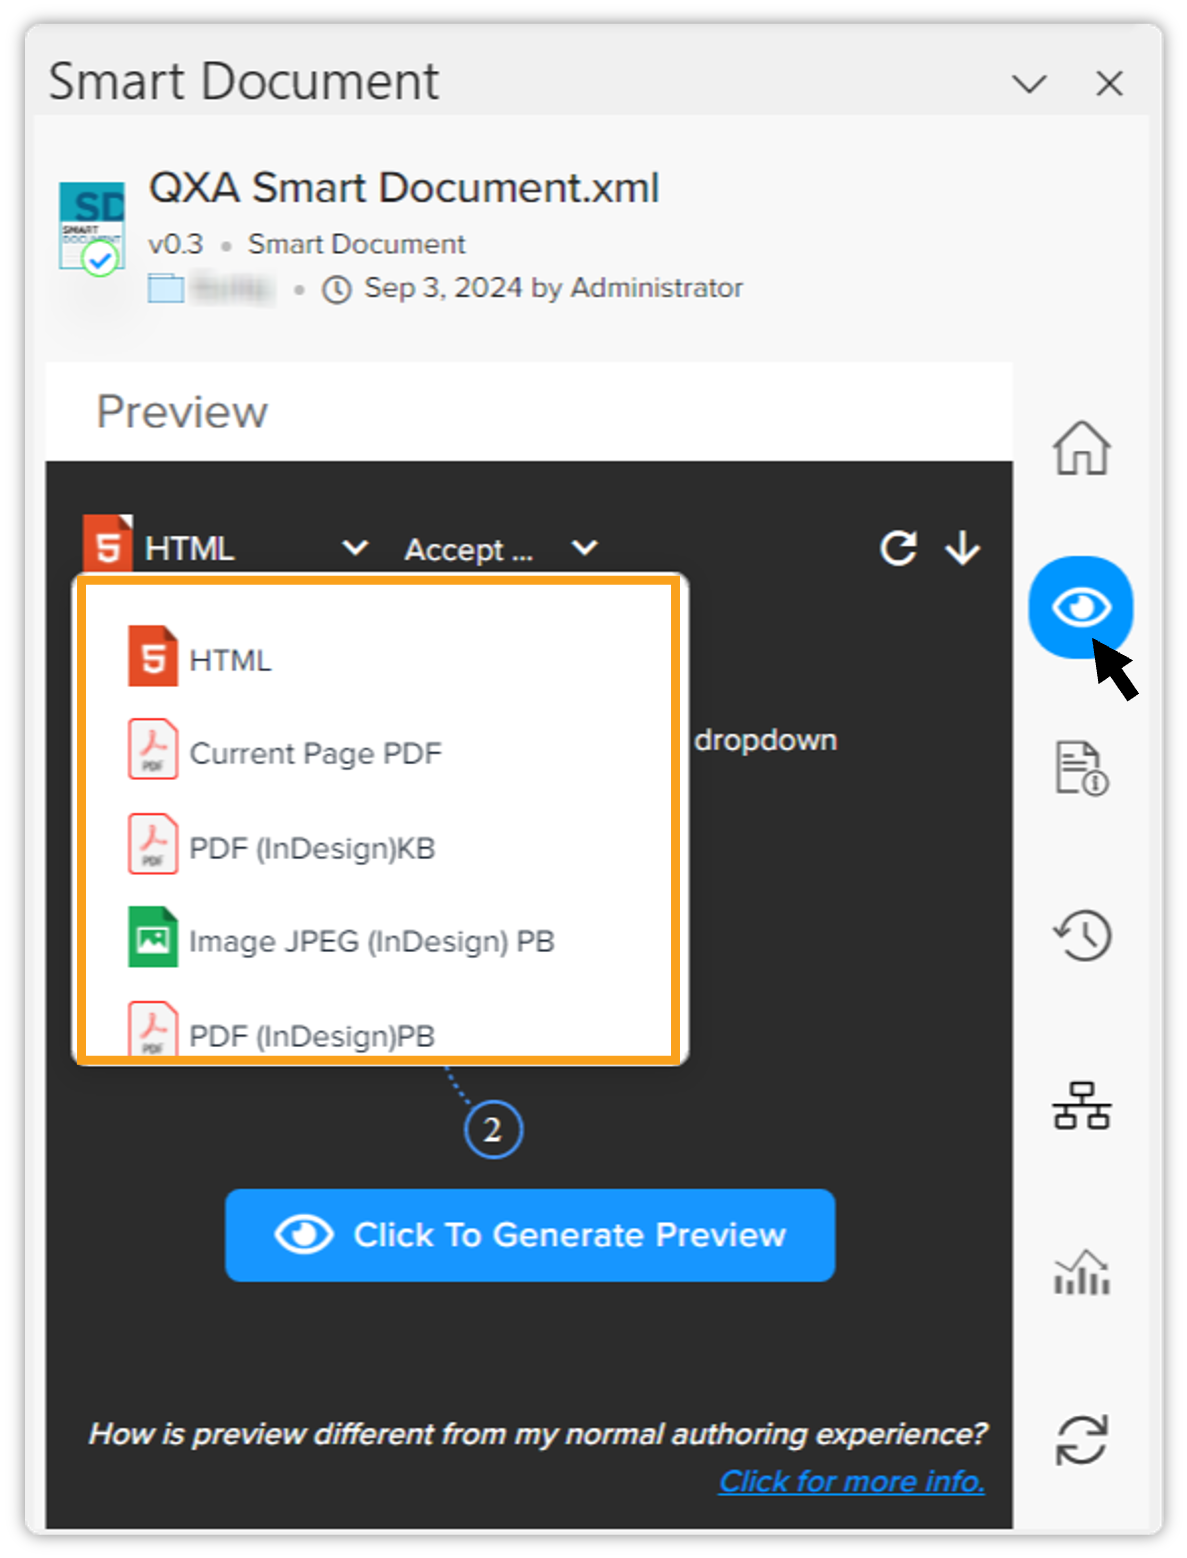
To generate the preview of your document in the defined publishing channel format, click the Click To Generate Preview button. Within a few seconds, the preview will be generated.
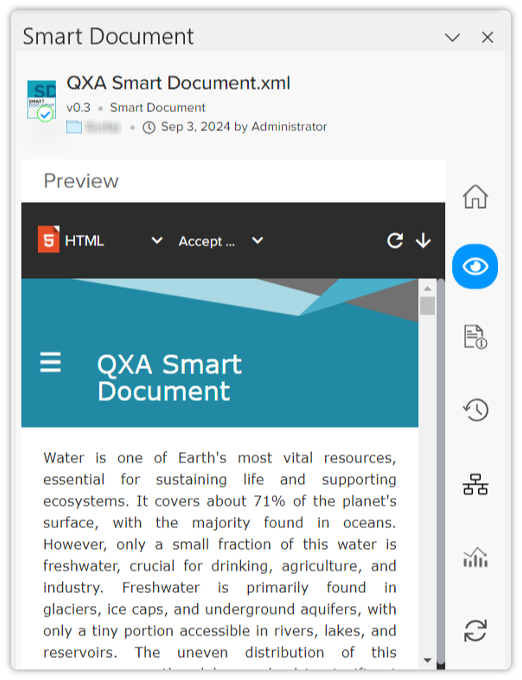
We've enhanced the preview pane in QXA (Quark XML Author) to provide you with a clear understanding of the preview generation process, making it easier and more intuitive to review your documents before publishing. For more information, refer to the knowledge base article — Understanding the Stages in the Preview Pane QA & QXA.
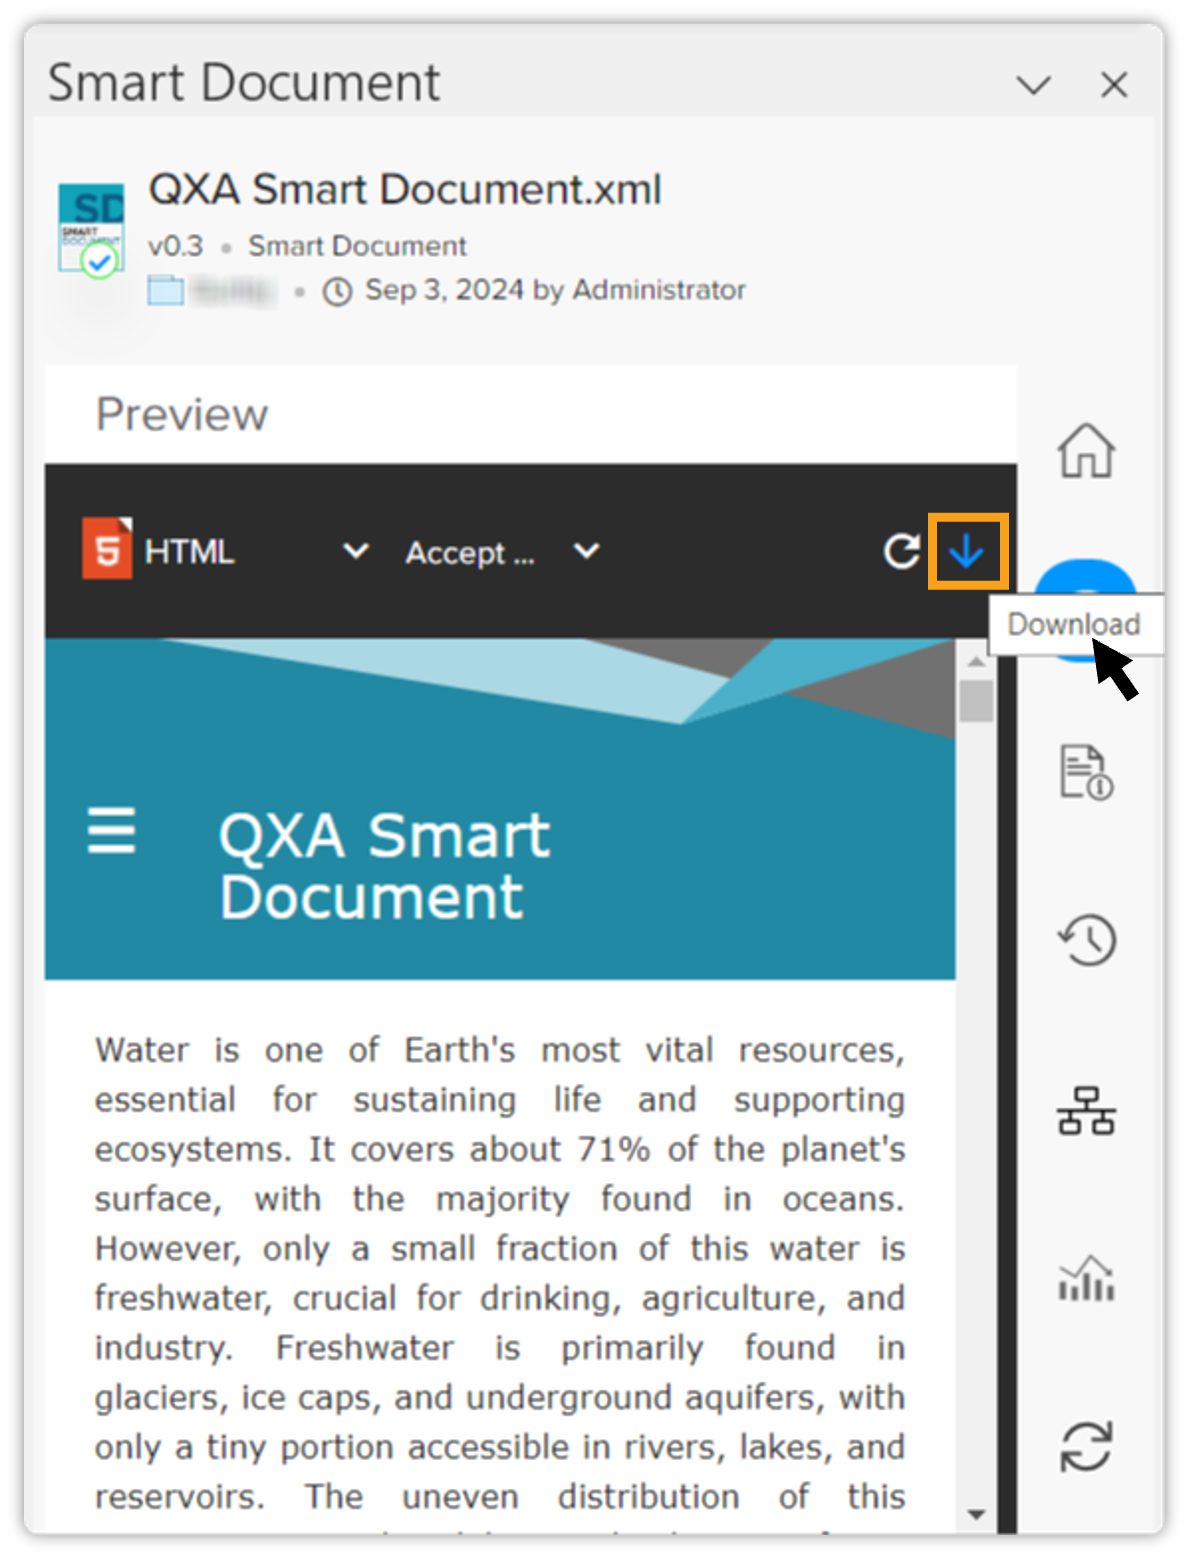
In the Preview tab, you have the following additional features:
-
Refresh (refresh the preview to see any changes that you have made in real-time)
-
Download
Metadata Tab
The Metadata tab is specifically designed to let authors manage document metadata within Microsoft Word, directly tied to the structured XML content. There are three nested tabs: Properties, Layout Options, and Variables, provide distinct functionalities:
Properties
The Properties tab displays several types of properties of a document or an element/section within a document.
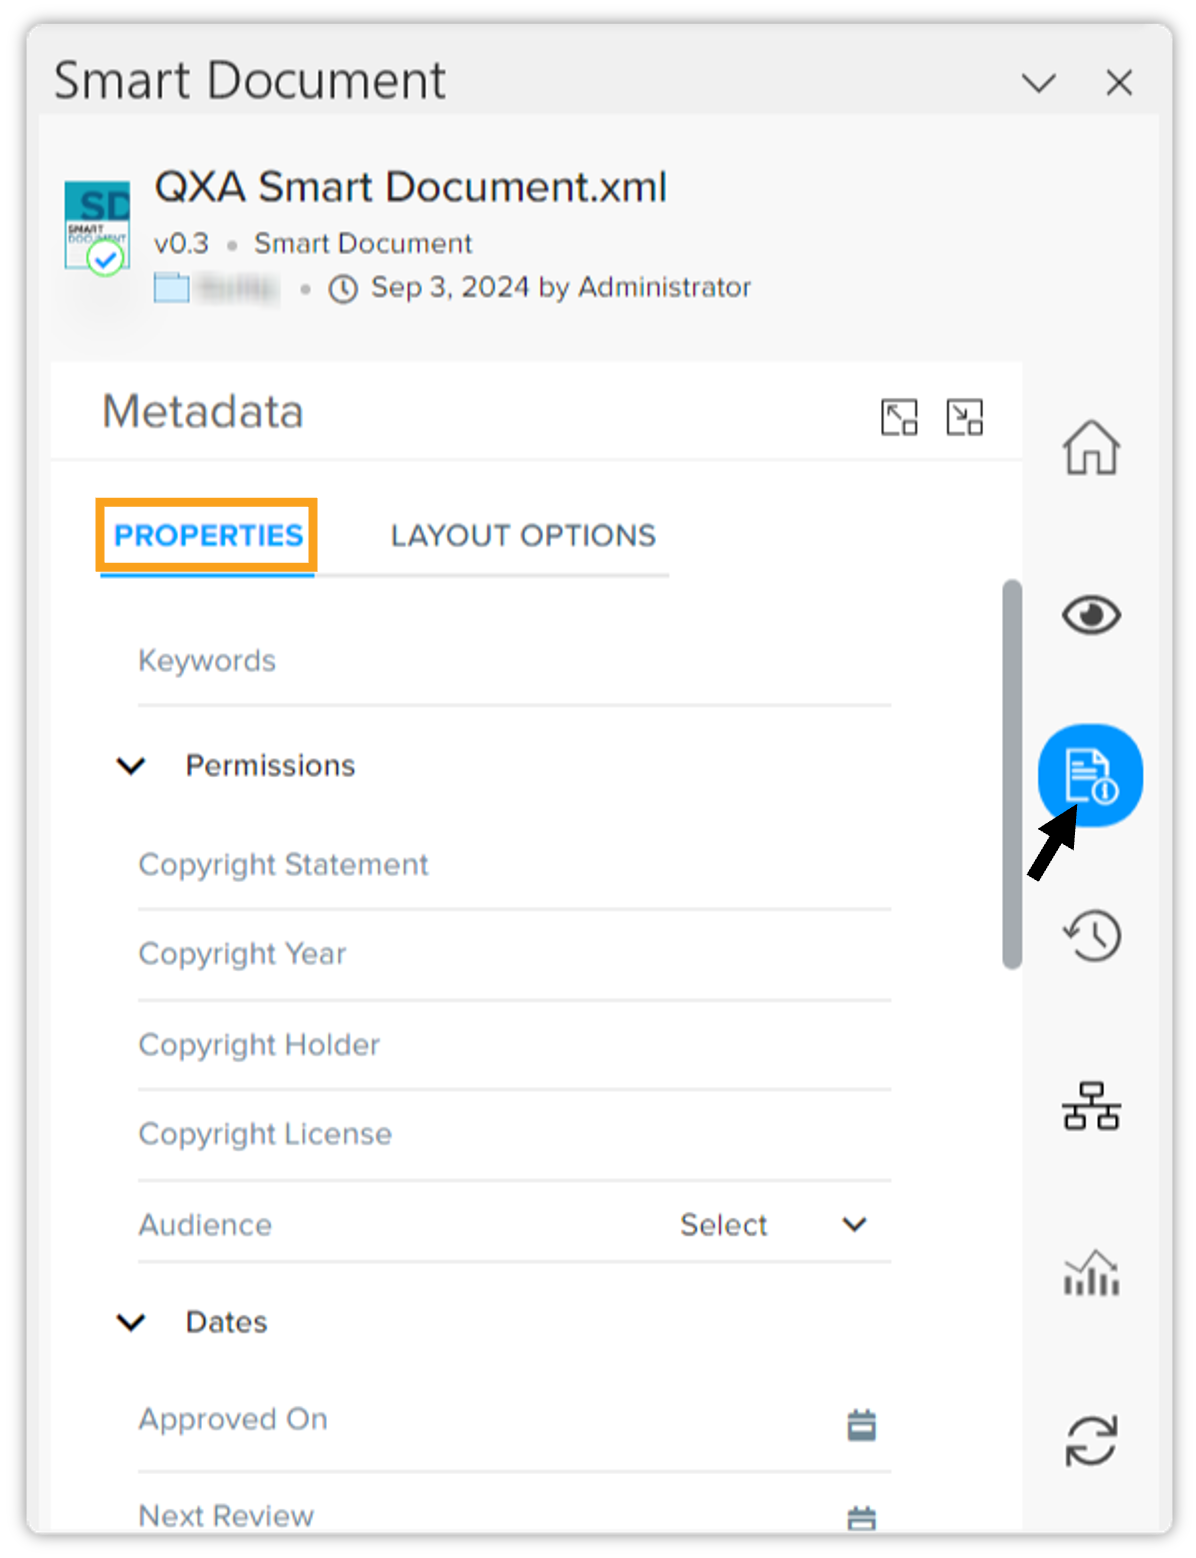
You can switch between properties of the entire document and of a specific section through the Increase Scope/Decrease Scope buttons at the upper-right corner of the Properties pane. For a section (decreased scope), the Properties pane only displays Keywords.
Layout Options
The Layout Options tab enables you to define layout settings for the documents you’re creating. This tab hosts a comprehensive array of out-of-the-box layout options, allowing you to adjust specific design parameters directly in the authoring environment. Notably, you can set layout parameters and view a live preview simultaneously before saving the document. Currently, Layout Options are supported only for PDF and DOCX publishing channels.
For detailed information, refer to Layout Options — User Guide.
Below is the list of the available parameters for the layout options:
-
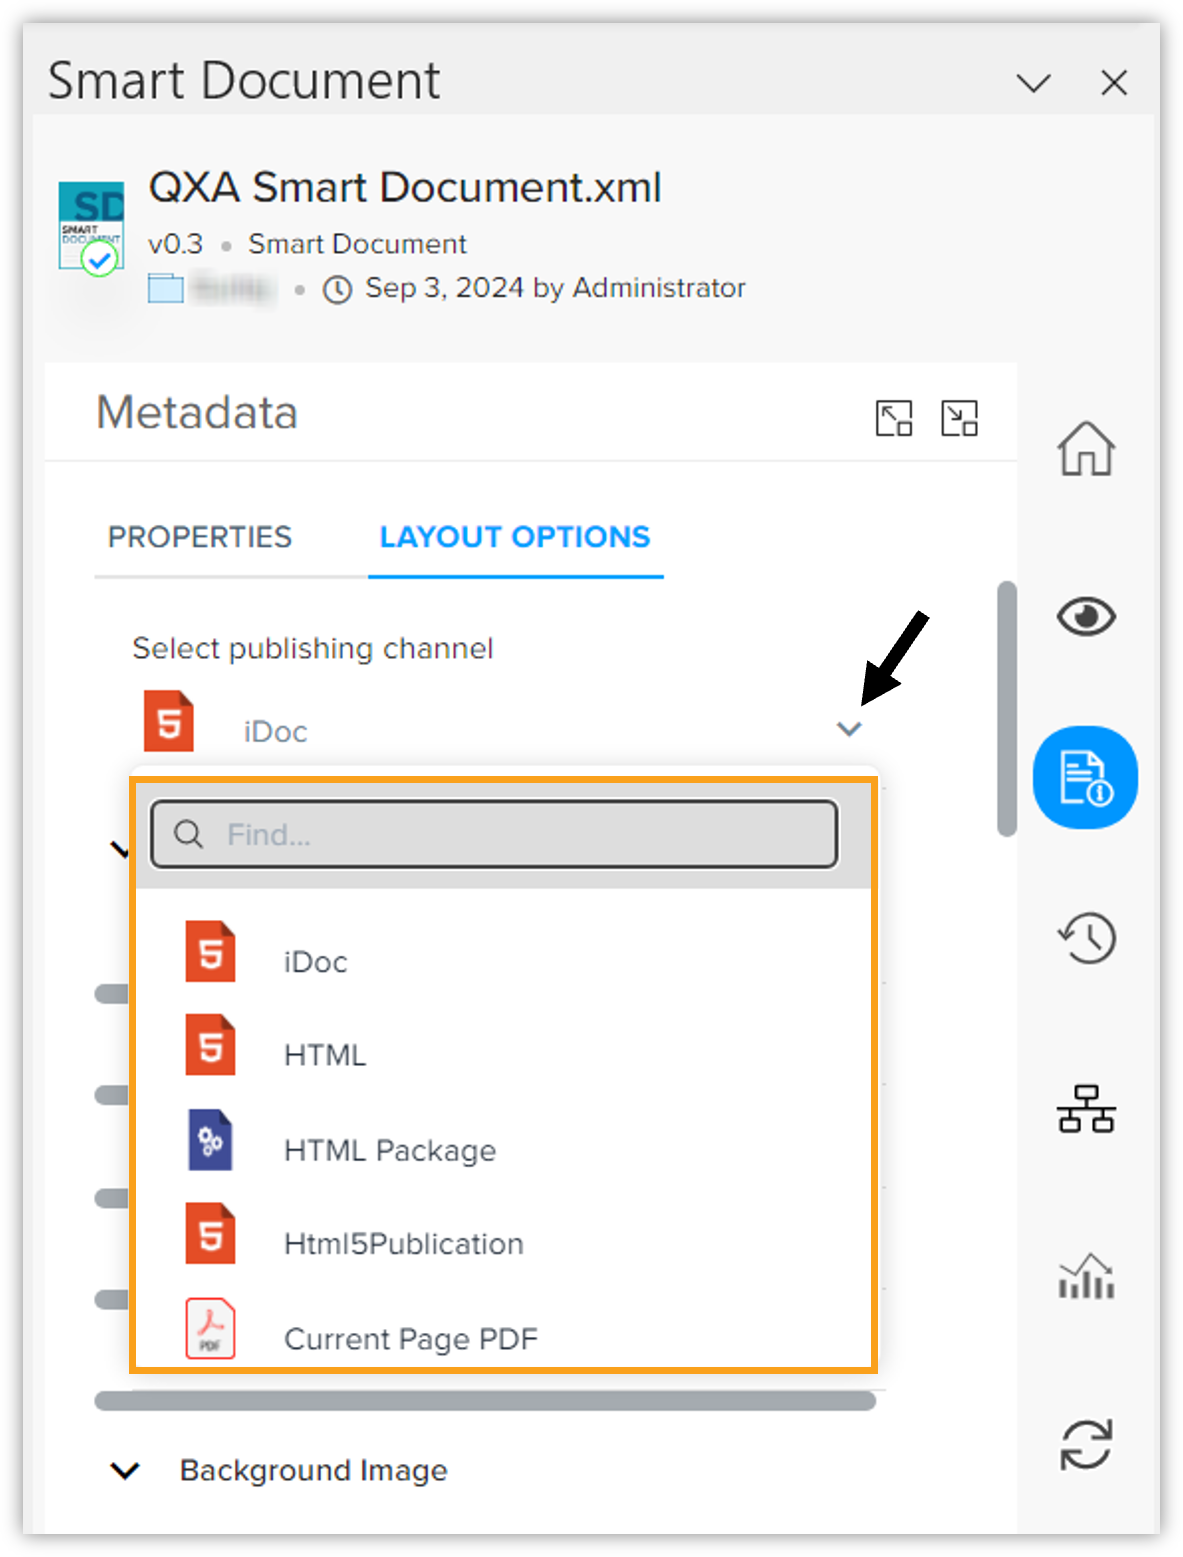
Select Publishing Channels: Click the drop down to view the list of available publishing channels and select the desired one. Please note that the layout options only support PDF and DOCX channels.
-
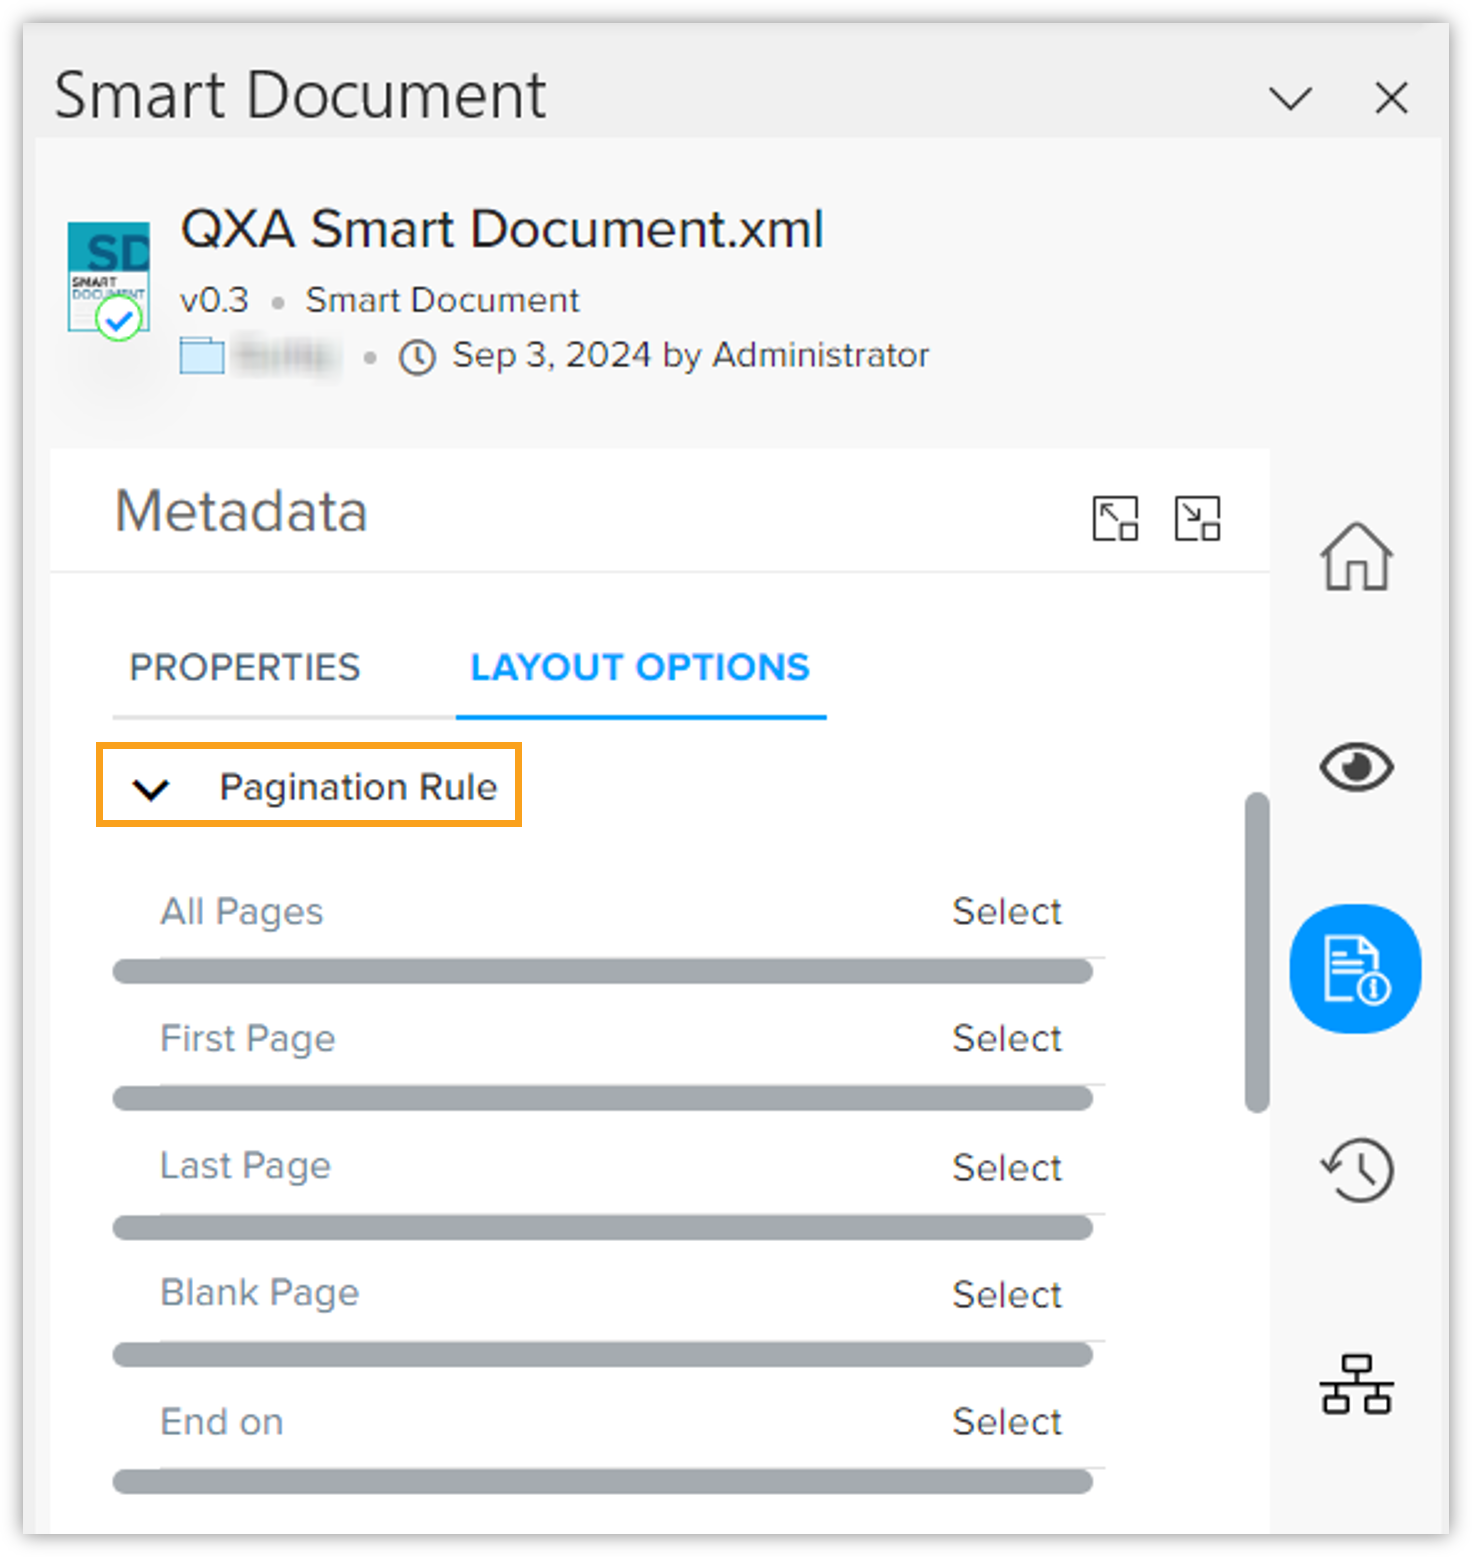
Pagination Rule: Defines where and how pagination appears throughout the document:
-
All Pages: This option applies the selected master page layout to every page in the document. Users can select from various master pages available in the drop-down to customize the appearance of all pages uniformly.
-
First Page: Users can define a specific master page for the first page of the document. This is useful for creating title pages or cover pages that may require distinct formatting. A drop-down list provides various master page options for customization.
-
Last Page: Similar to the First Page setting, this option allows users to choose a master page specifically for the last page of the document, which can be useful for acknowledgments, endnotes, or other concluding content.
-
Blank Page: This allows users to specify a master page for any blank pages within the document. Selecting a master page for blank pages can help maintain consistent formatting throughout the document, especially in manuscripts where the layout needs precision.
-
End On: This parameter controls how the document's pagination will conclude. Users can select one of the following values:
-
None: No special pagination rule is applied, allowing the document to continue as per default settings.
-
Odd: The final page will always be an odd-numbered page, ensuring that any concluding content lands on an odd page, which is particularly useful for printed materials.
-
Even: This option ensures that the last page is an even-numbered page, providing a consistent layout for physical printing or binding.
-
-
-
Background Image: Allows you to set background images for different types of pages within a document:
-
All Page Image: Selecting All Page Image will apply the chosen background image to every page in the document.
-
First Page Image: Selecting First Page Image will apply the background image exclusively to the first page of the document.
-
Last Page Image: Selecting Last Page Image will apply the background image only to the final page of the document.
-
Blank Page Image: Selecting Blank Page Image will apply the background image to any pages in the document that are blank (without content).
-
-
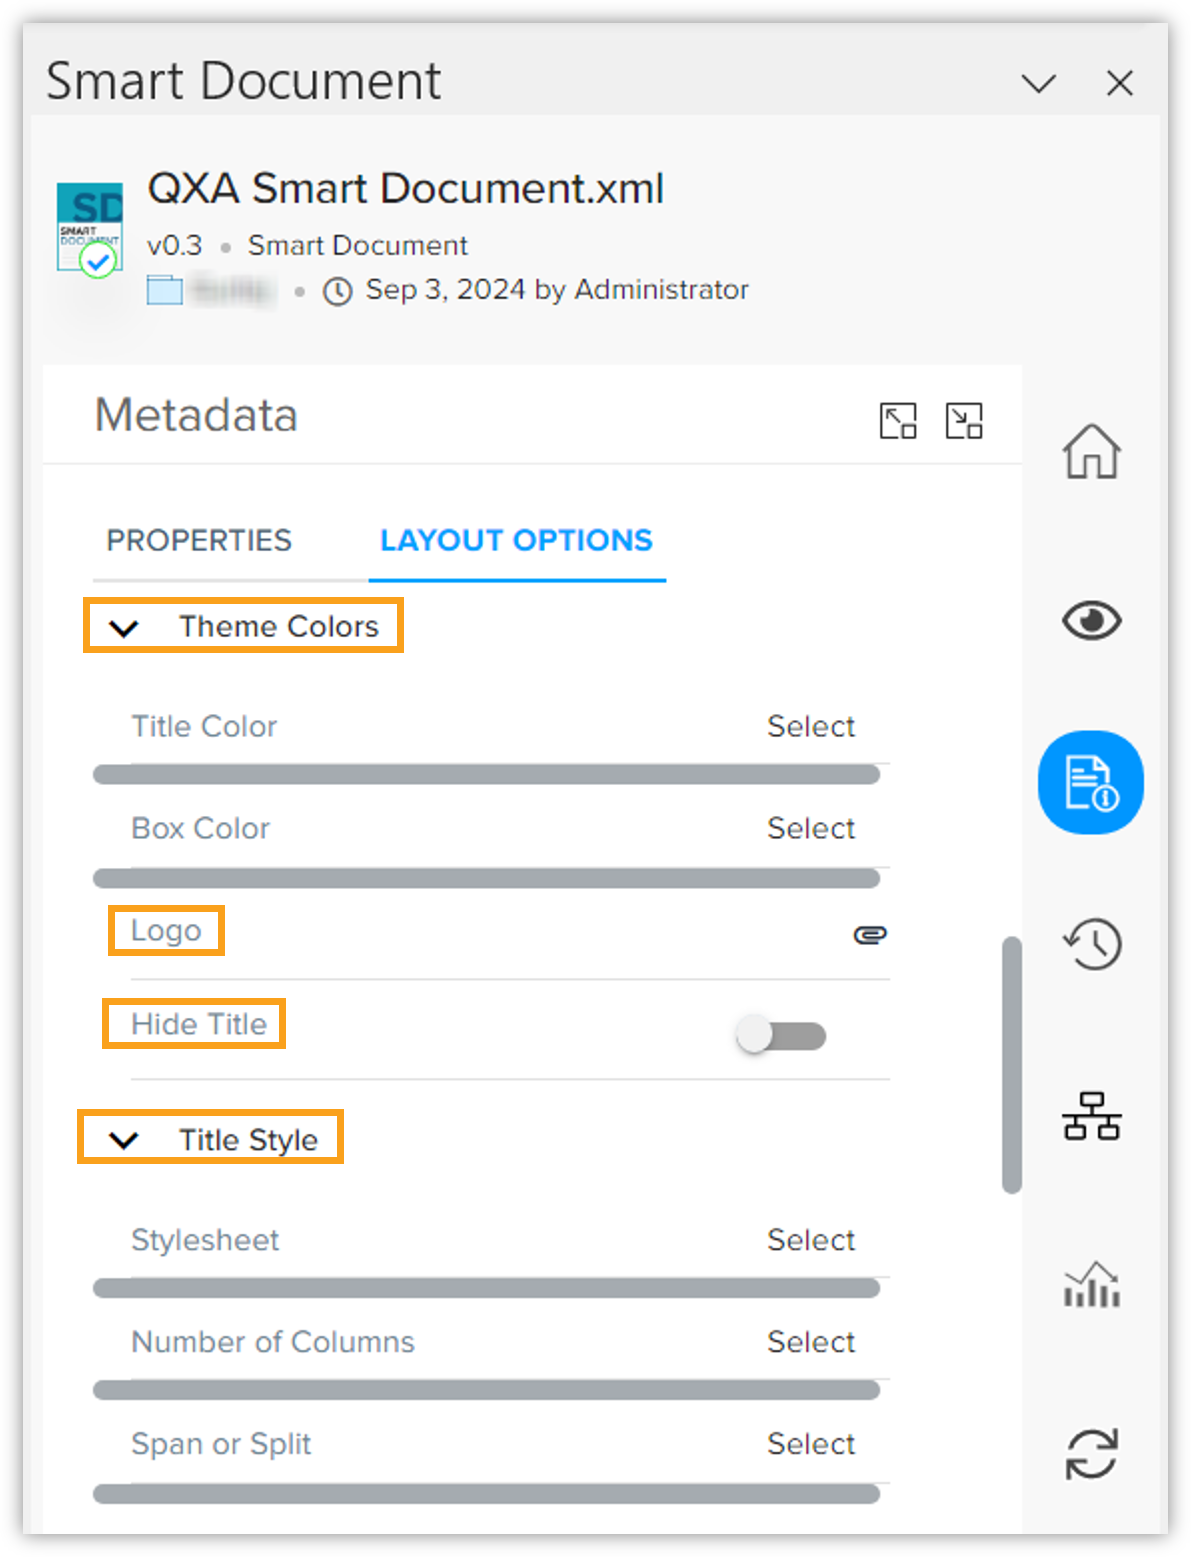
Theme Colors: Controls the color scheme for specific elements in the document layout:
-
Title Color: Specifies the color for the title text.
-
Box Color: Sets the background color of any boxes or sections that contain text or other content.
-
-
Logo: Click on the attachment icon to select a logo for your document. It ensures branding consistency across the document.
-
Hide Title: This option controls whether the document title should be displayed or hidden. Hiding the title might be useful for documents that don’t require a visible title on the cover page but still need the title for metadata purposes. The title is visible unless the toggle is manually enabled to hide it.
-
Title Style: Defines the formatting options for the document titles:
-
Stylesheet: Applies a predefined stylesheet to the title, controlling font, size, alignment, etc.
-
Number of Columns: Select the number of columns: one, two, or three.
-
Span or Split: Select the desired option to determine how content is arranged across columns or pages. The available options are None, Span, or Split.
-
-
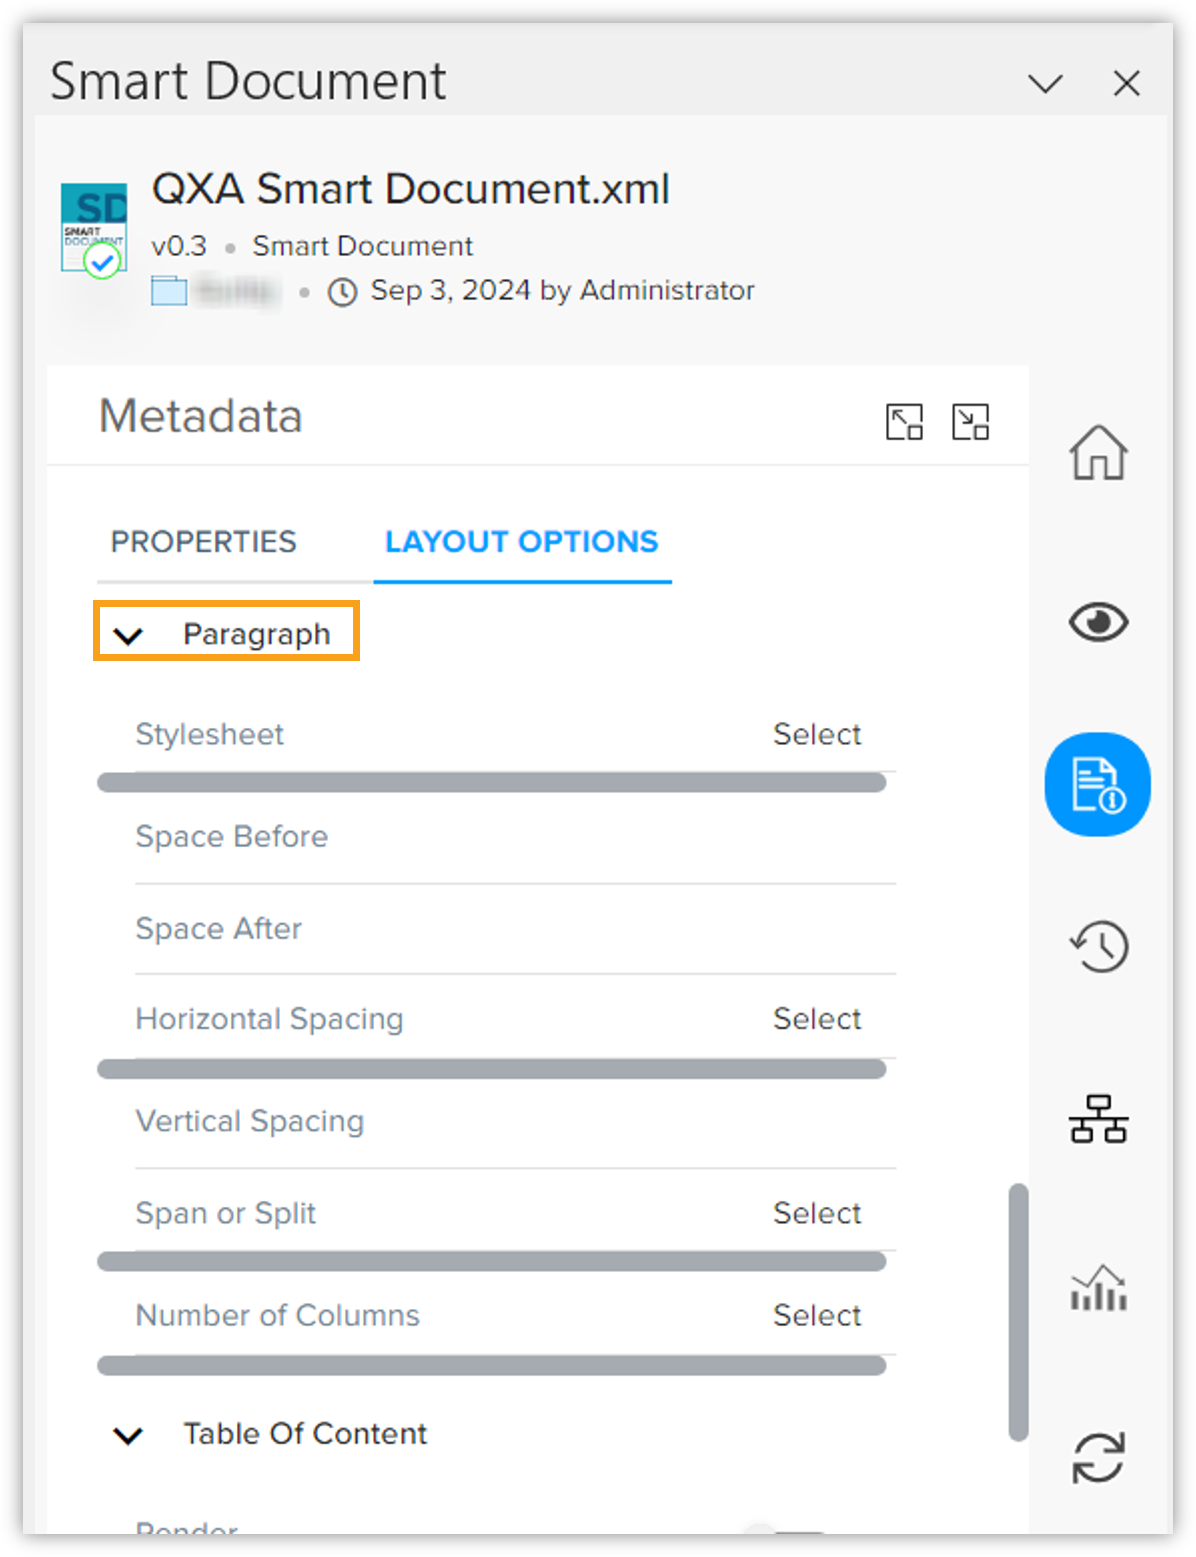
Paragraph: Specifies the formatting for paragraphs within the document:
-
Stylesheet: Applies a predefined stylesheet to the paragraph to ensure consistent formatting (font, size, etc.).
-
Space Before: Determines the vertical space before the paragraph begins.
-
Space After: Determines the vertical space after the paragraph ends.
-
Horizontal Spacing: Controls the vertical spacing between lines within the paragraph (e.g., single, double, 1.5 spacing).
-
Vertical Spacing: Adjusts the amount of space between individual characters in the paragraph.
-
Span or Split: Defines whether the paragraph spans across multiple columns or is split between them.
-
Number of Columns: Specifies how many columns the paragraph should occupy.
-
-
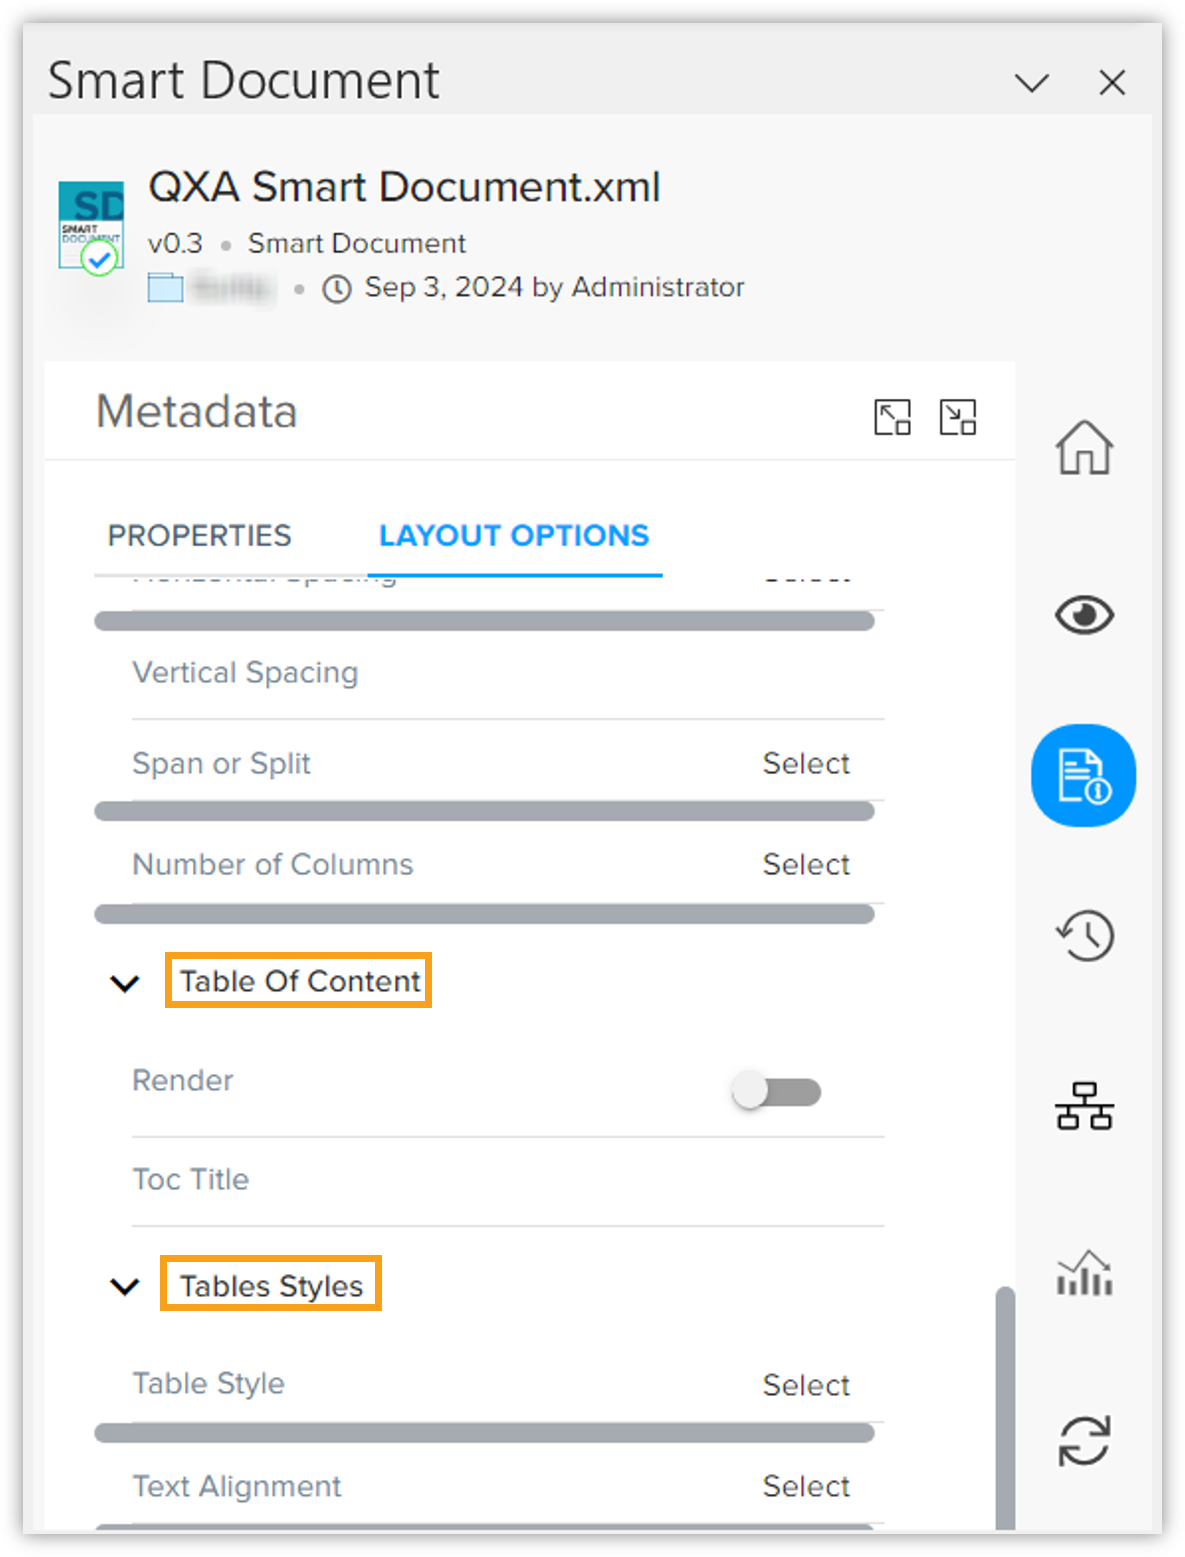
Table of Content: Configures how the table of contents appears:
-
Render: Rendering is a process of displaying the outline or hierarchy of headings and subheadings within a document, such as a book, article, or webpage. Use the toggle switch to enable/disable it.
-
TOC Title: Customizes the title of the table of contents (e.g., "Contents", "Table of Contents", or any preferred title).
-
-
Table Styles: Controls the appearance of tables within the document:
-
Table Style: Applies a predefined style to tables, controlling their borders, cell padding, font size, etc.
-
Text Alignment: Specifies how the table is aligned on the page, i.e. left, center, right, or center (first column left).
-
Variables
The Variables tab allows users to assign specific values to the variables at both document and section levels. Follow these steps to insert and manage variables in your documents:
Insert Variables and Define Values
-
Open an existing document or create a new one in Quark XML Author.
-
Place your cursor on the canvas where you want to insert the variable.
-
To insert at the document-level: Place your cursor in the canvas where you want the variable to appear, ensuring it is not within any specific section of the document.
-
To insert at the section-level: Place your cursor within a section in the canvas where you want the variable to appear.
-
-
Now navigate to Smart Document Pane: on the Home ribbon, click Show > Smart Document Pane.
-
On the right-side Smart Document Pane, click the Metadata tab.
-
Within the Metadata section, click the Variables tab. This tab displays all variables that have been added to the content model associated with your document.
-
Double-click the field next to the variable you want to insert. Enter the value.
-
Then click the plus icon (+) next to the variable you wish to insert.
-
The variable will appear at the current cursor location as <variable name> in light Grey text.
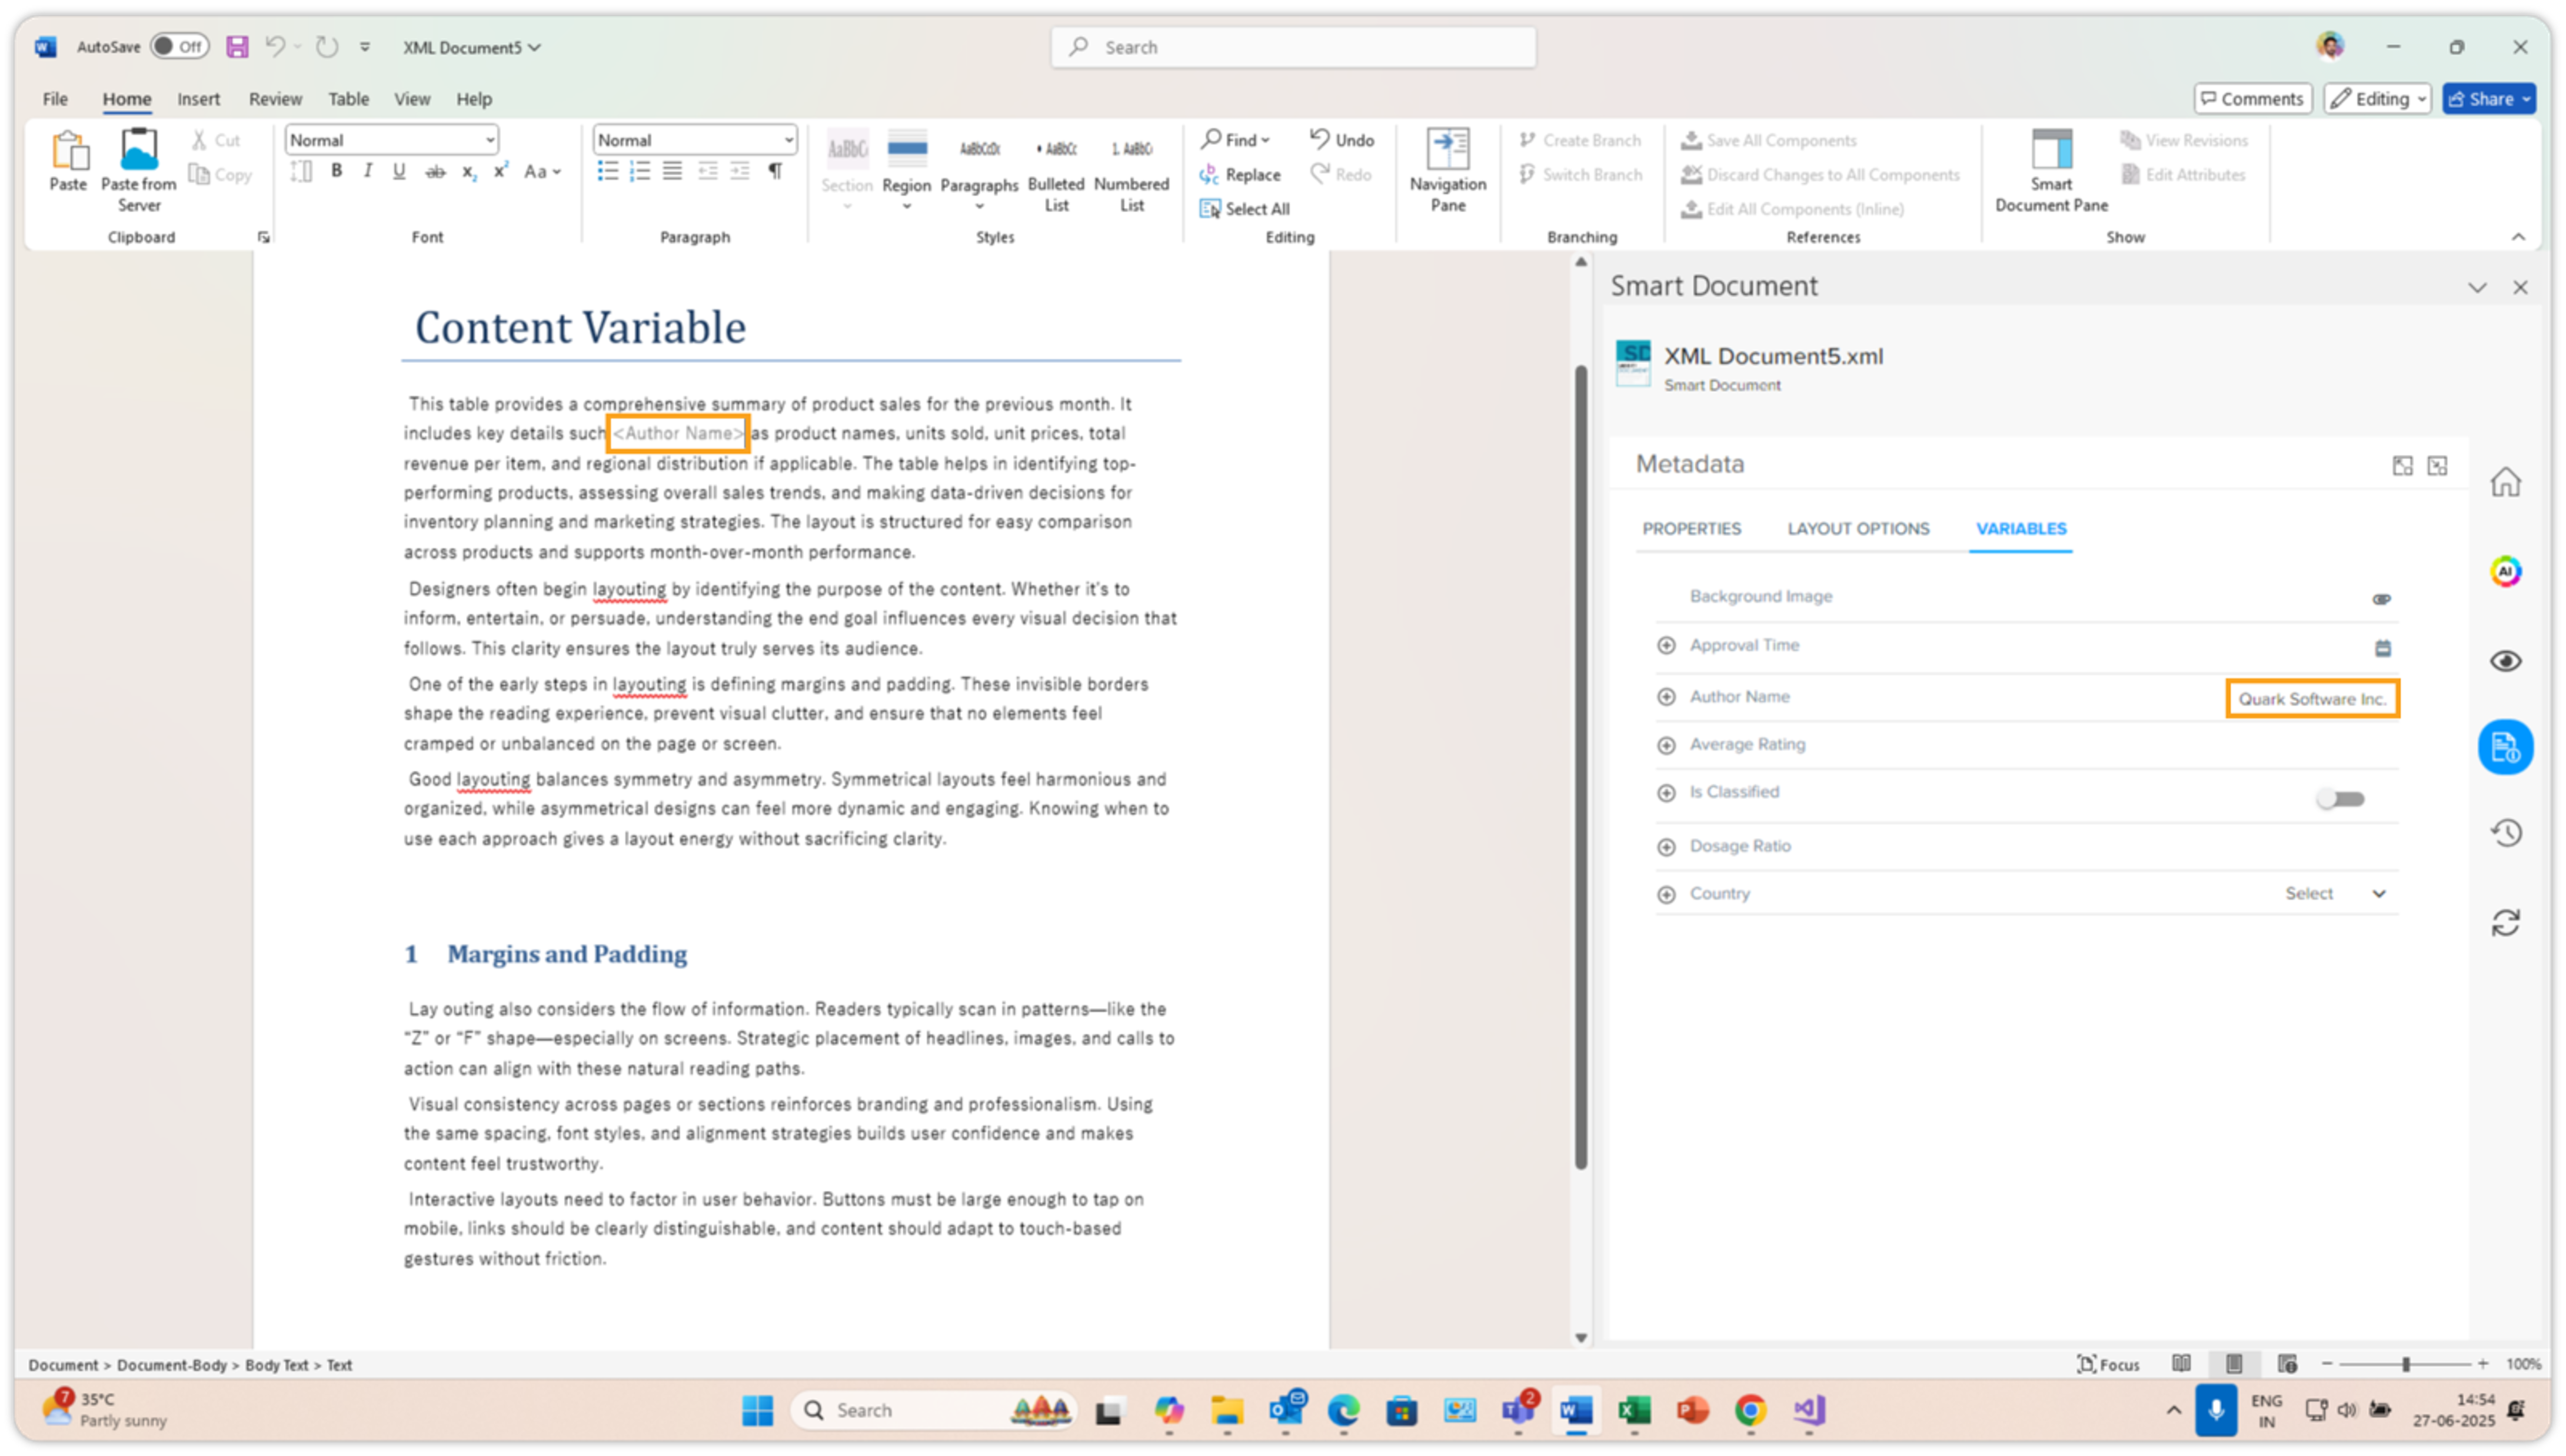 For variables that require an image, an attachment icon will be displayed instead of a plus icon.
You can add multiple variables in different parts of your document, whether it's for the whole document or just specific section(s). The process for adding these variables is the same in both cases. Just make sure your cursor is in the correct spot where you want to insert the variable. If you use the same variable name at both the document and section levels, you'll need to set its value separately for each level.
Publishing
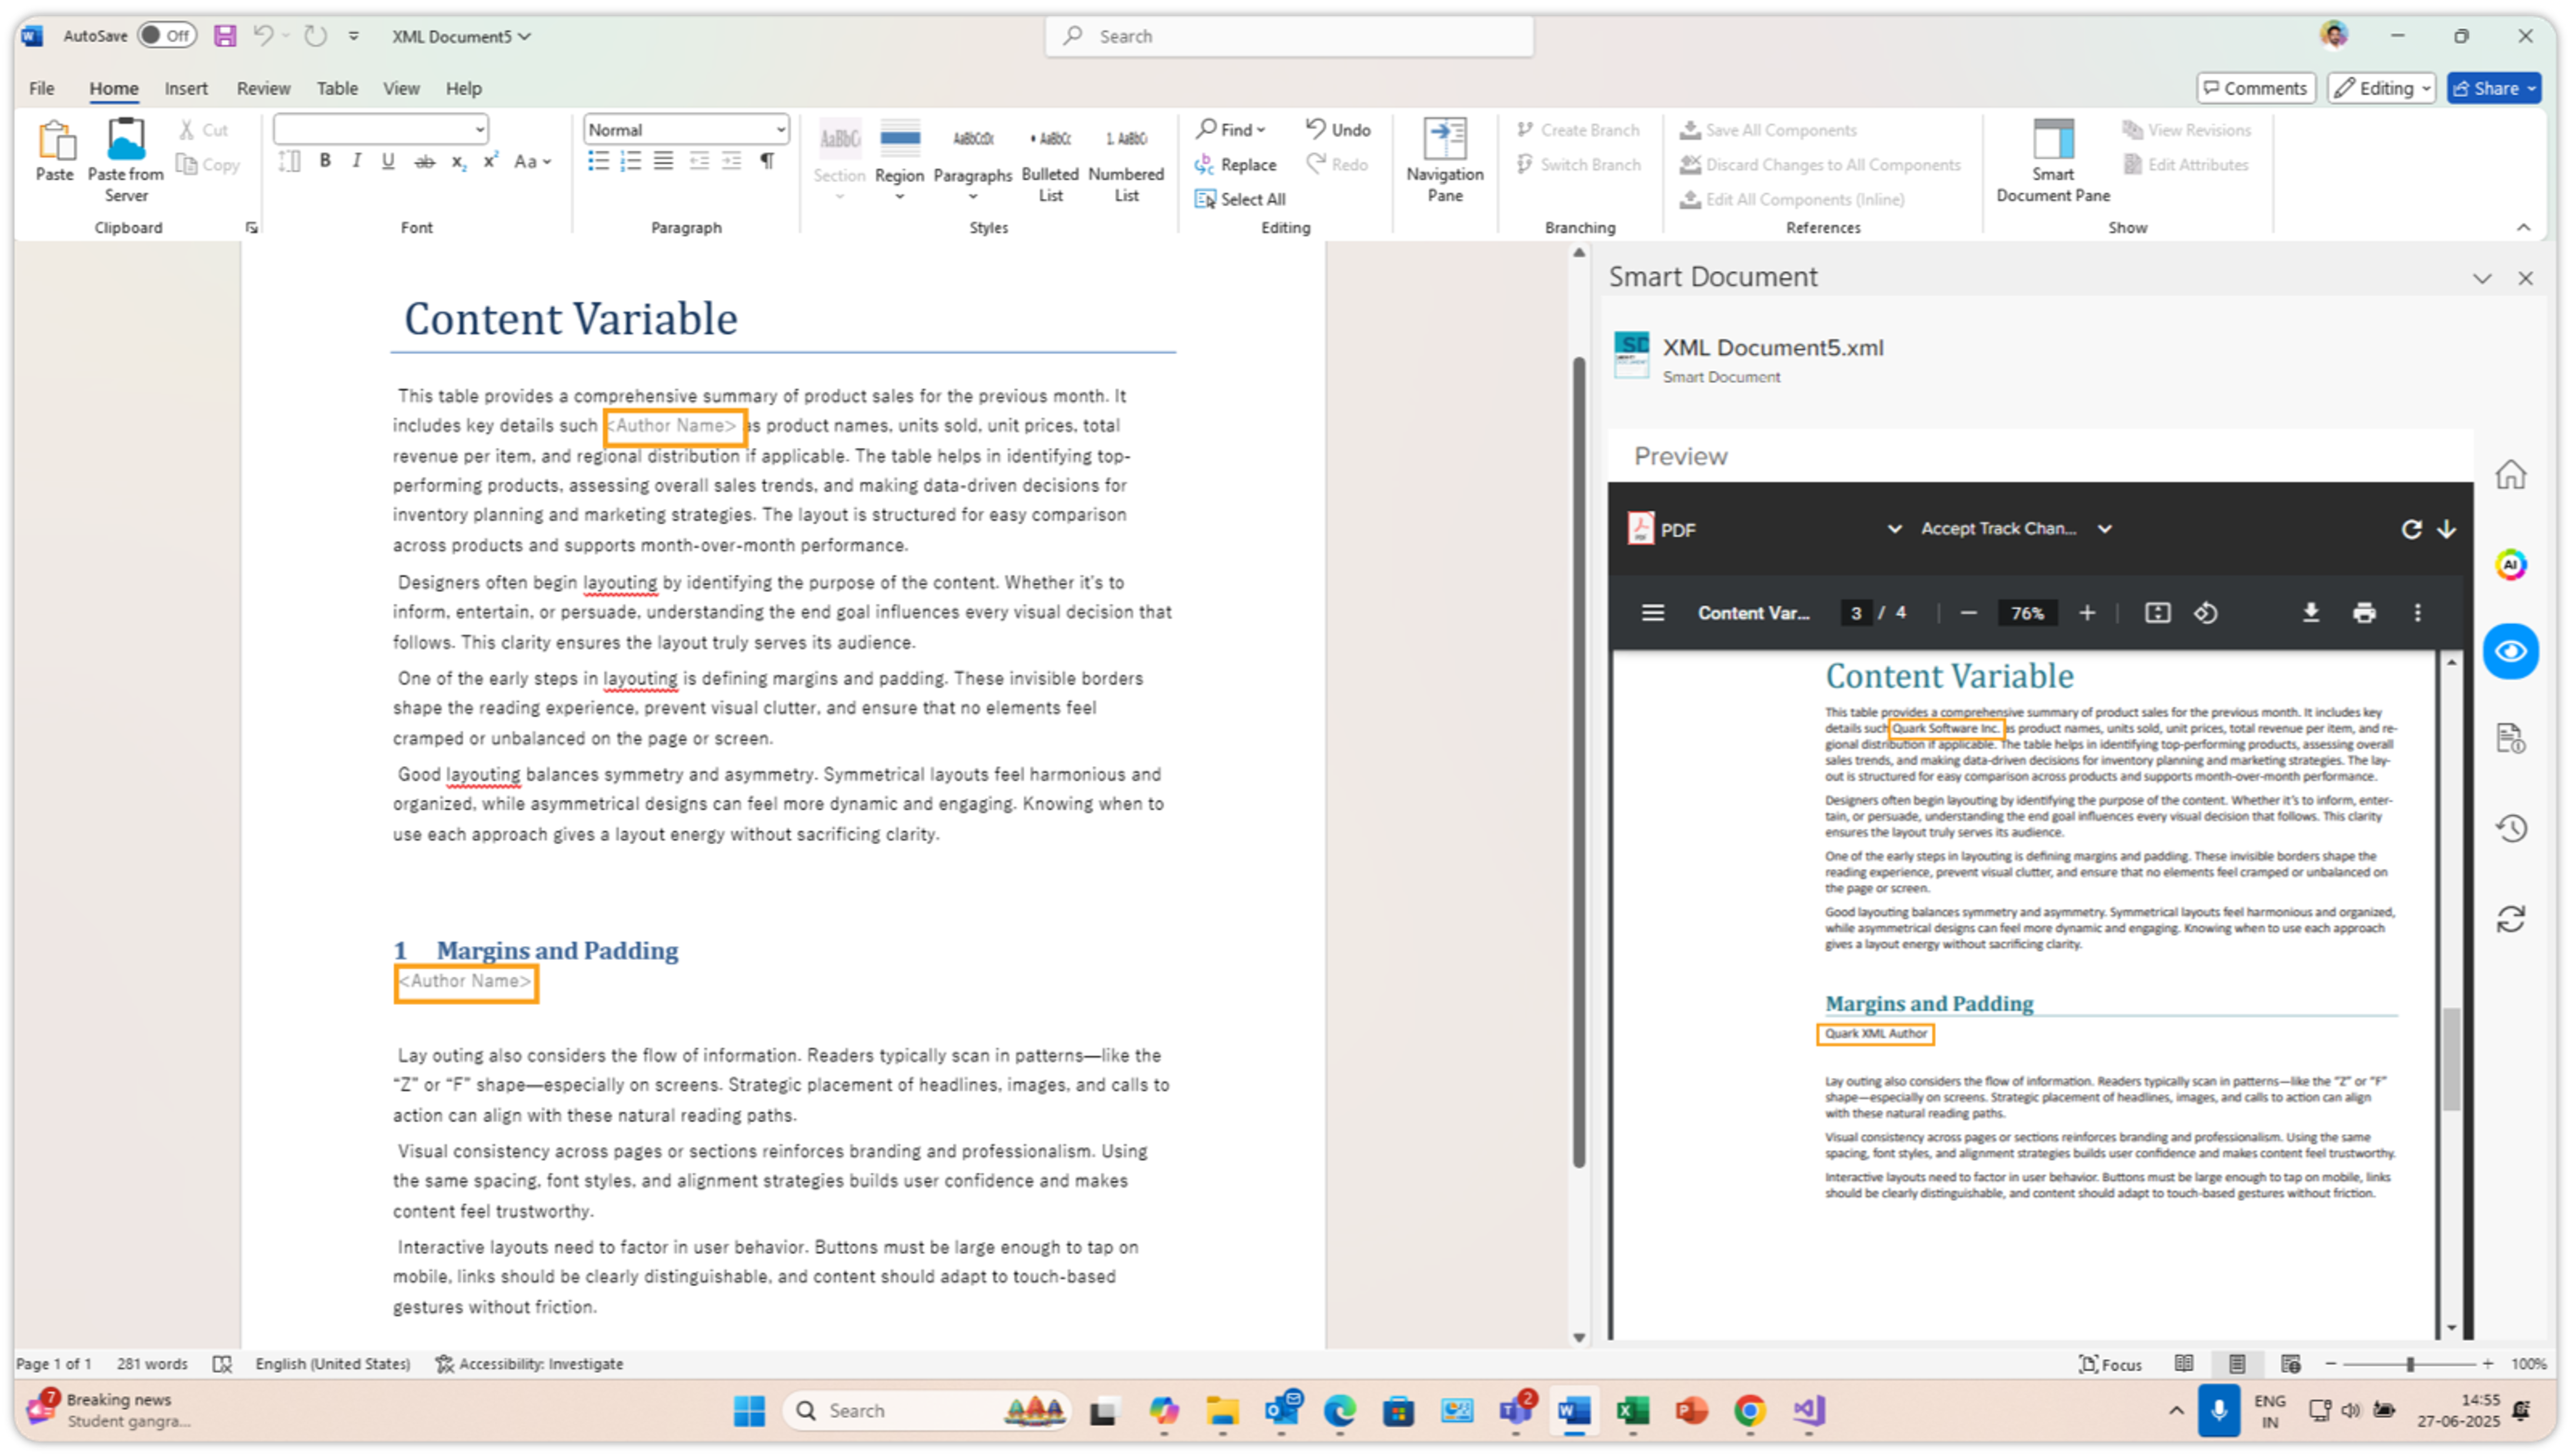
To see how your variable will appear in the published output, use the preview functionality:
-
Click the Preview tab in the Smart Document Pane.
-
Select your desired publishing channel (e.g., PDF). Click the button Click to Generate Preview.
-
Within a few seconds, the preview will be generated, allowing you to review how your variable is resolving and appearing in the output.
History Tab
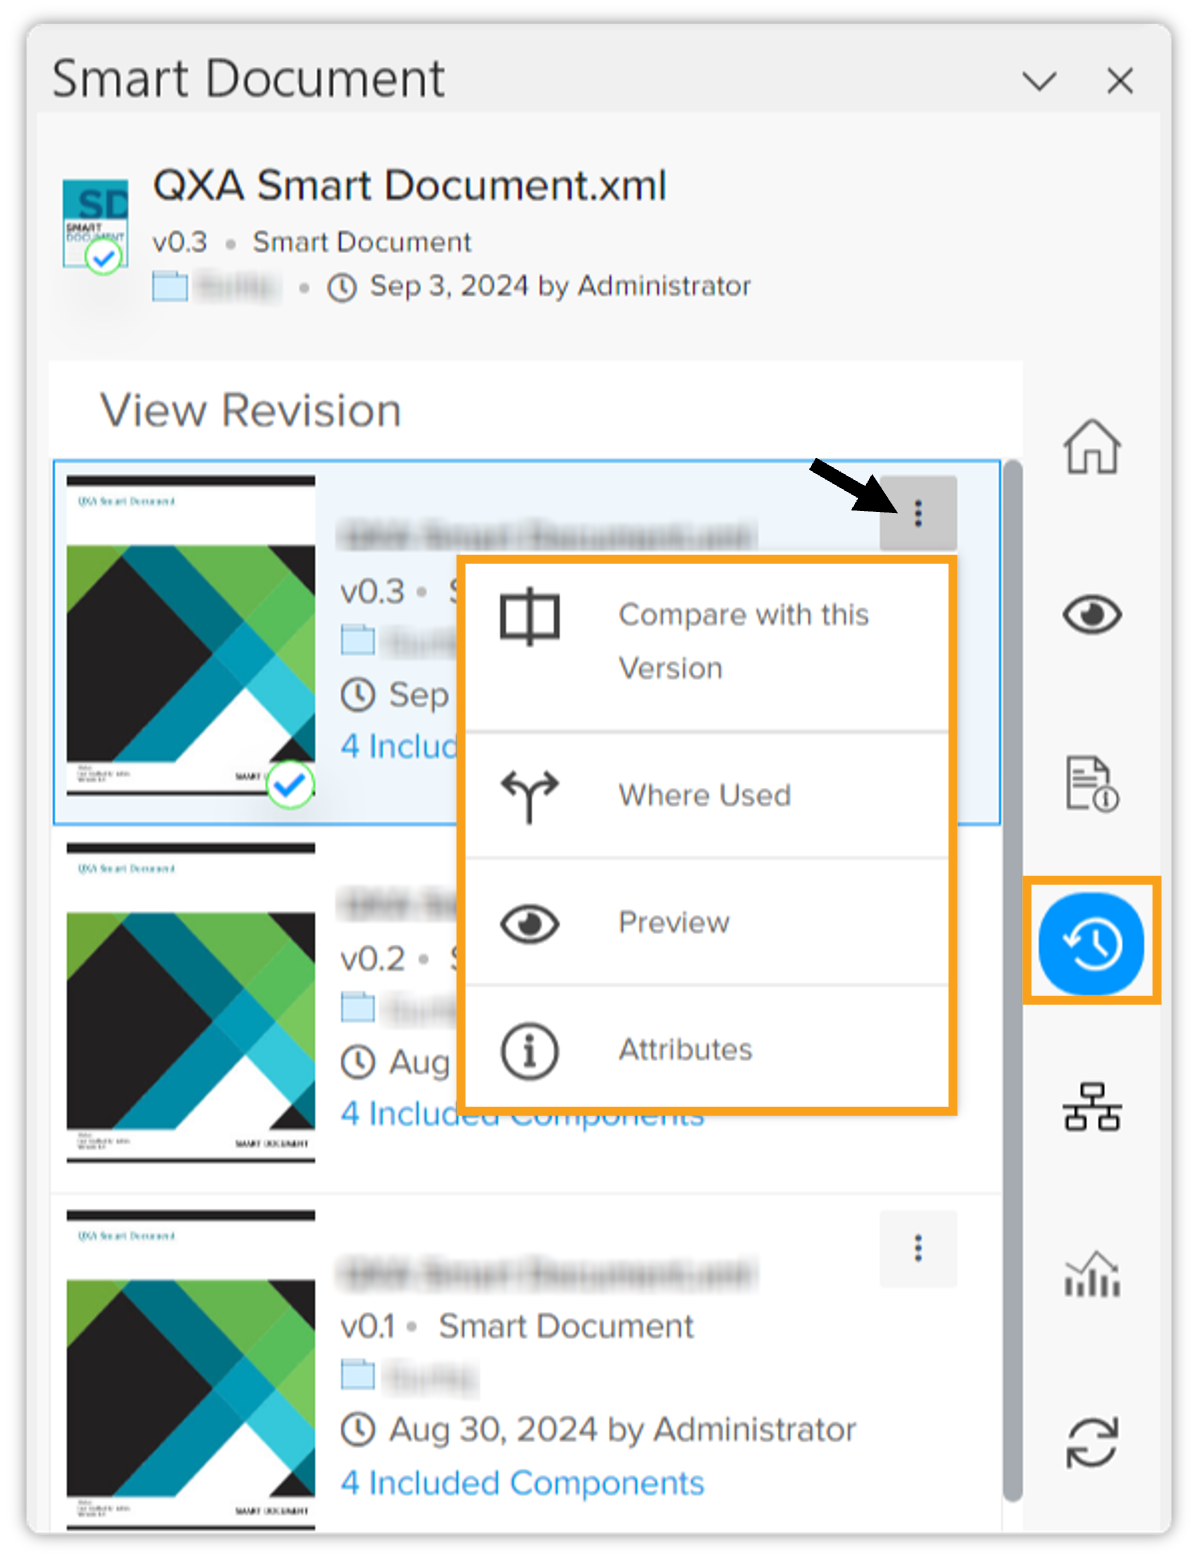
The History tab displays all the versions of the document stored in the repository.
Additionally, the History tab gives you the following options through the hamburger menu icon  :
-
Compare the open version and the version you select
-
Check to see where a version is referenced
-
Preview a version
-
See properties (such as metadata)
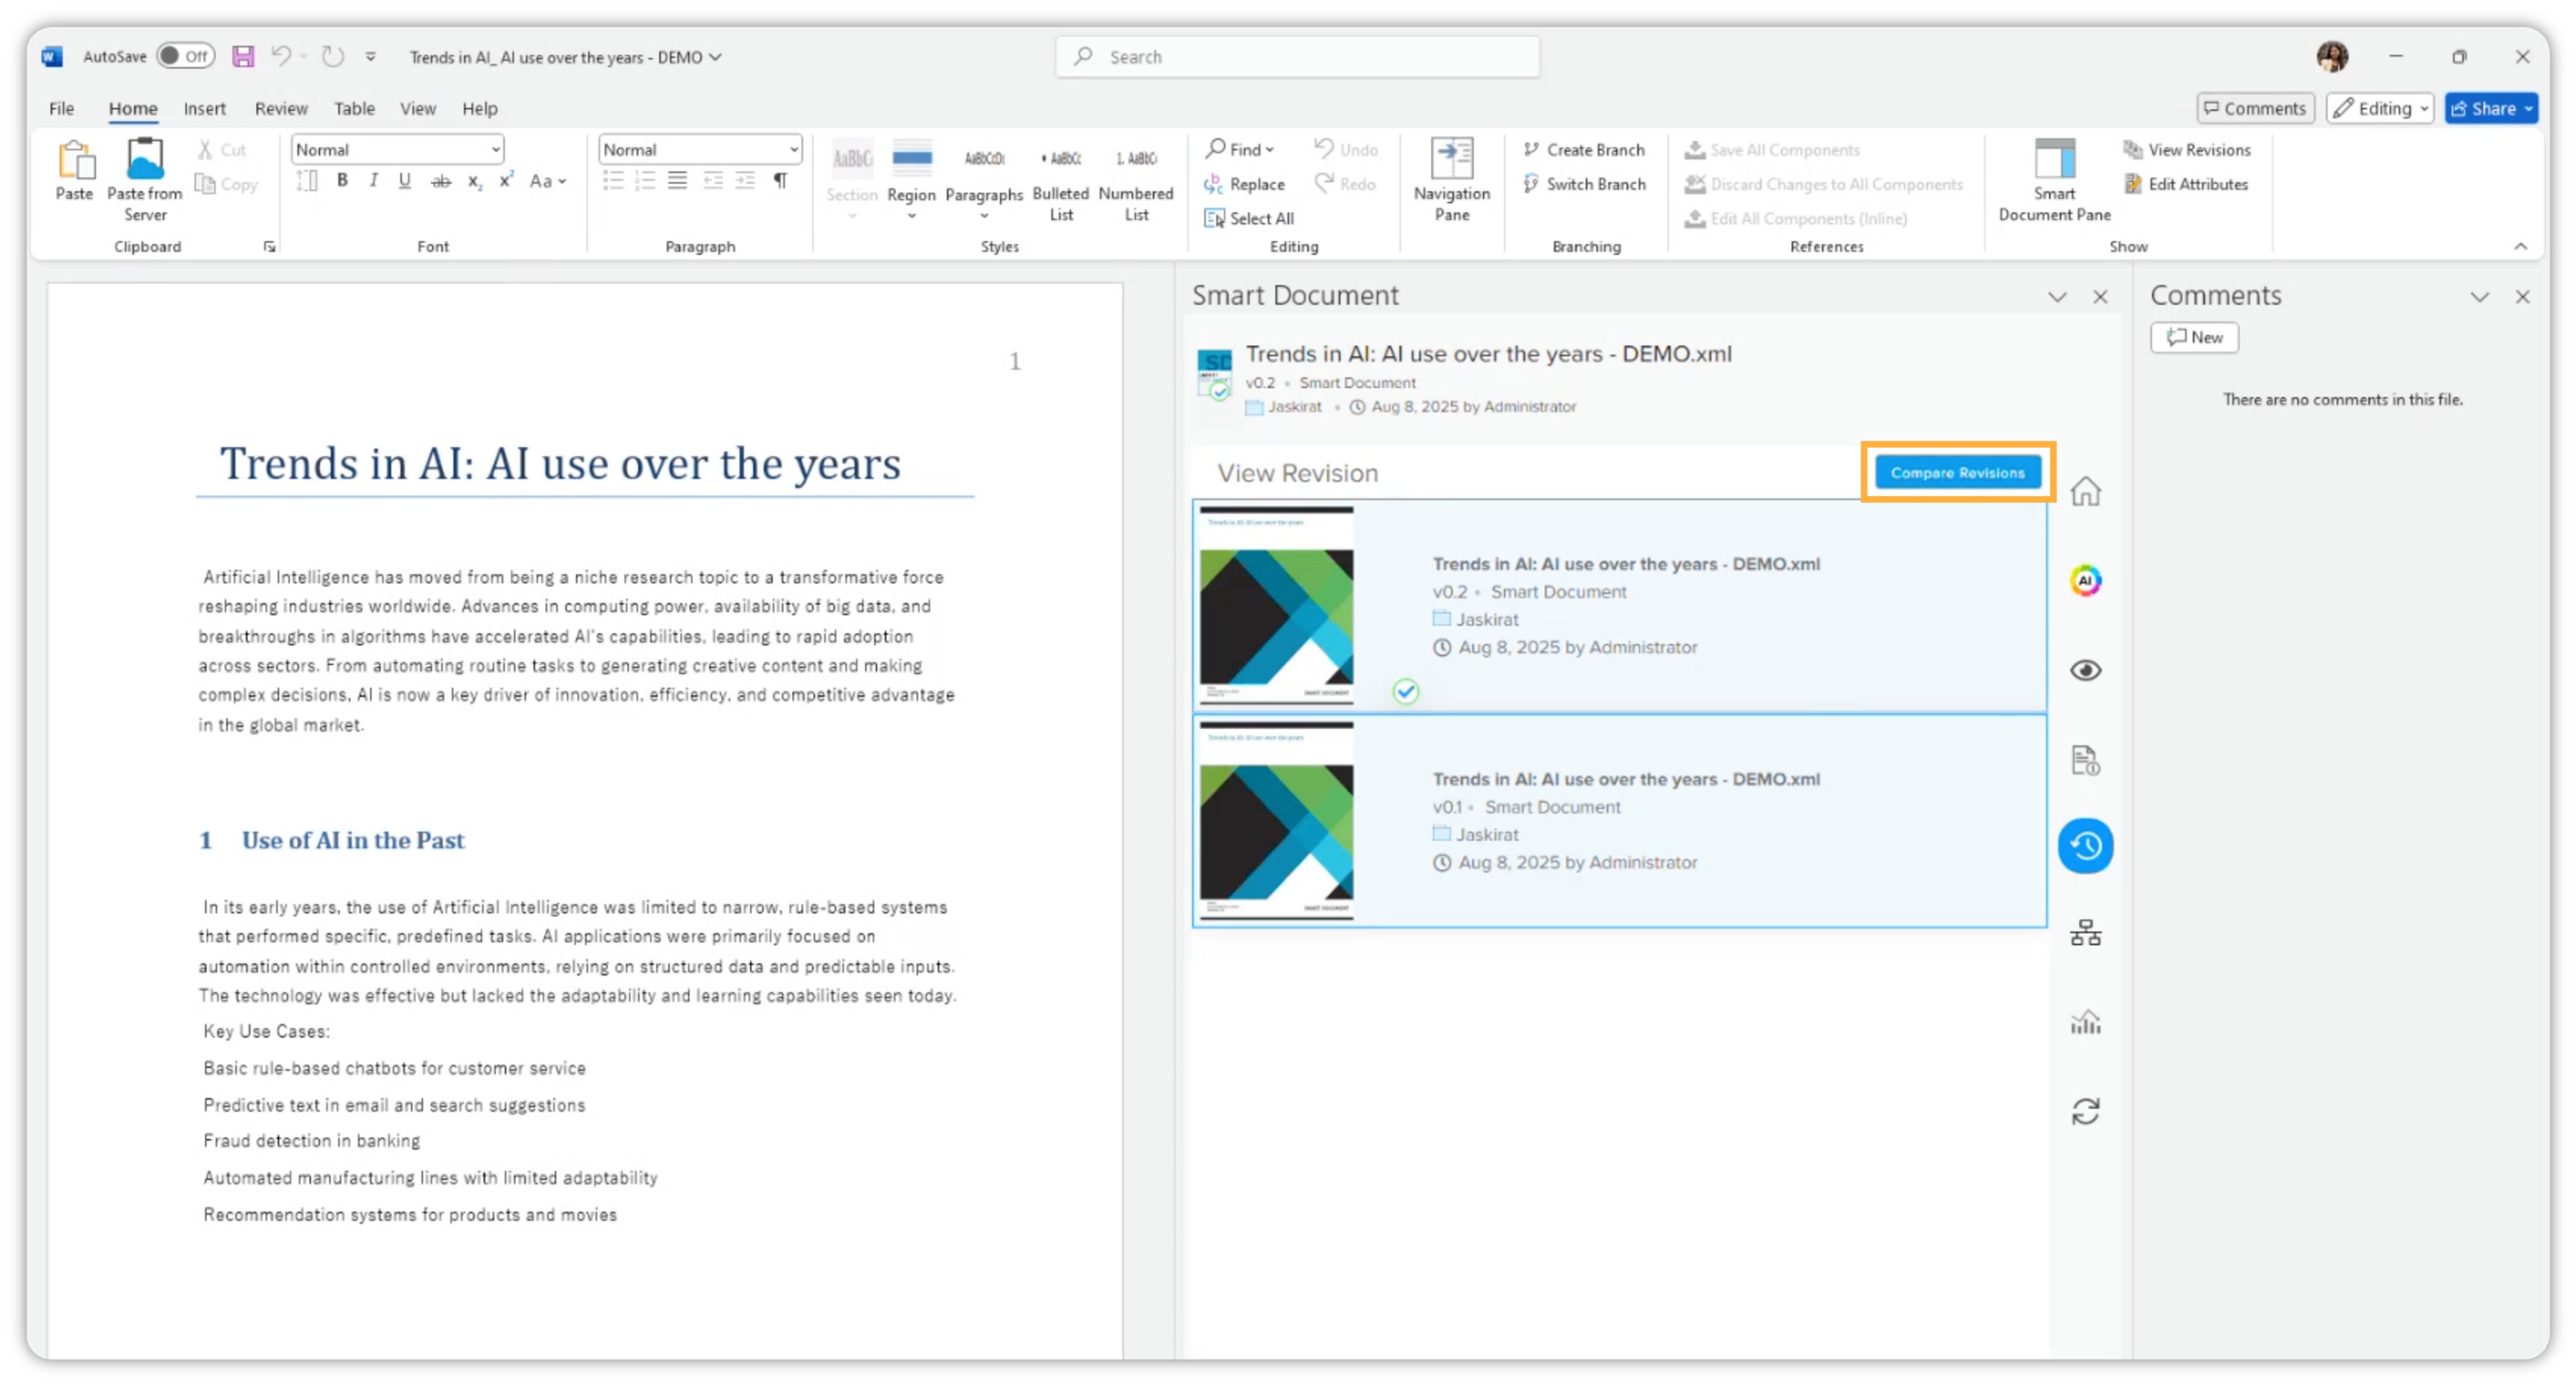
The enhanced Compare Revision capability allows users to compare different versions of their documents directly within QXA, with improved reliability and interoperability when working with Quark Author (QA).
-
Go to the History tab and select any two document versions. Click Compare Revisions to open the comparison window.
-
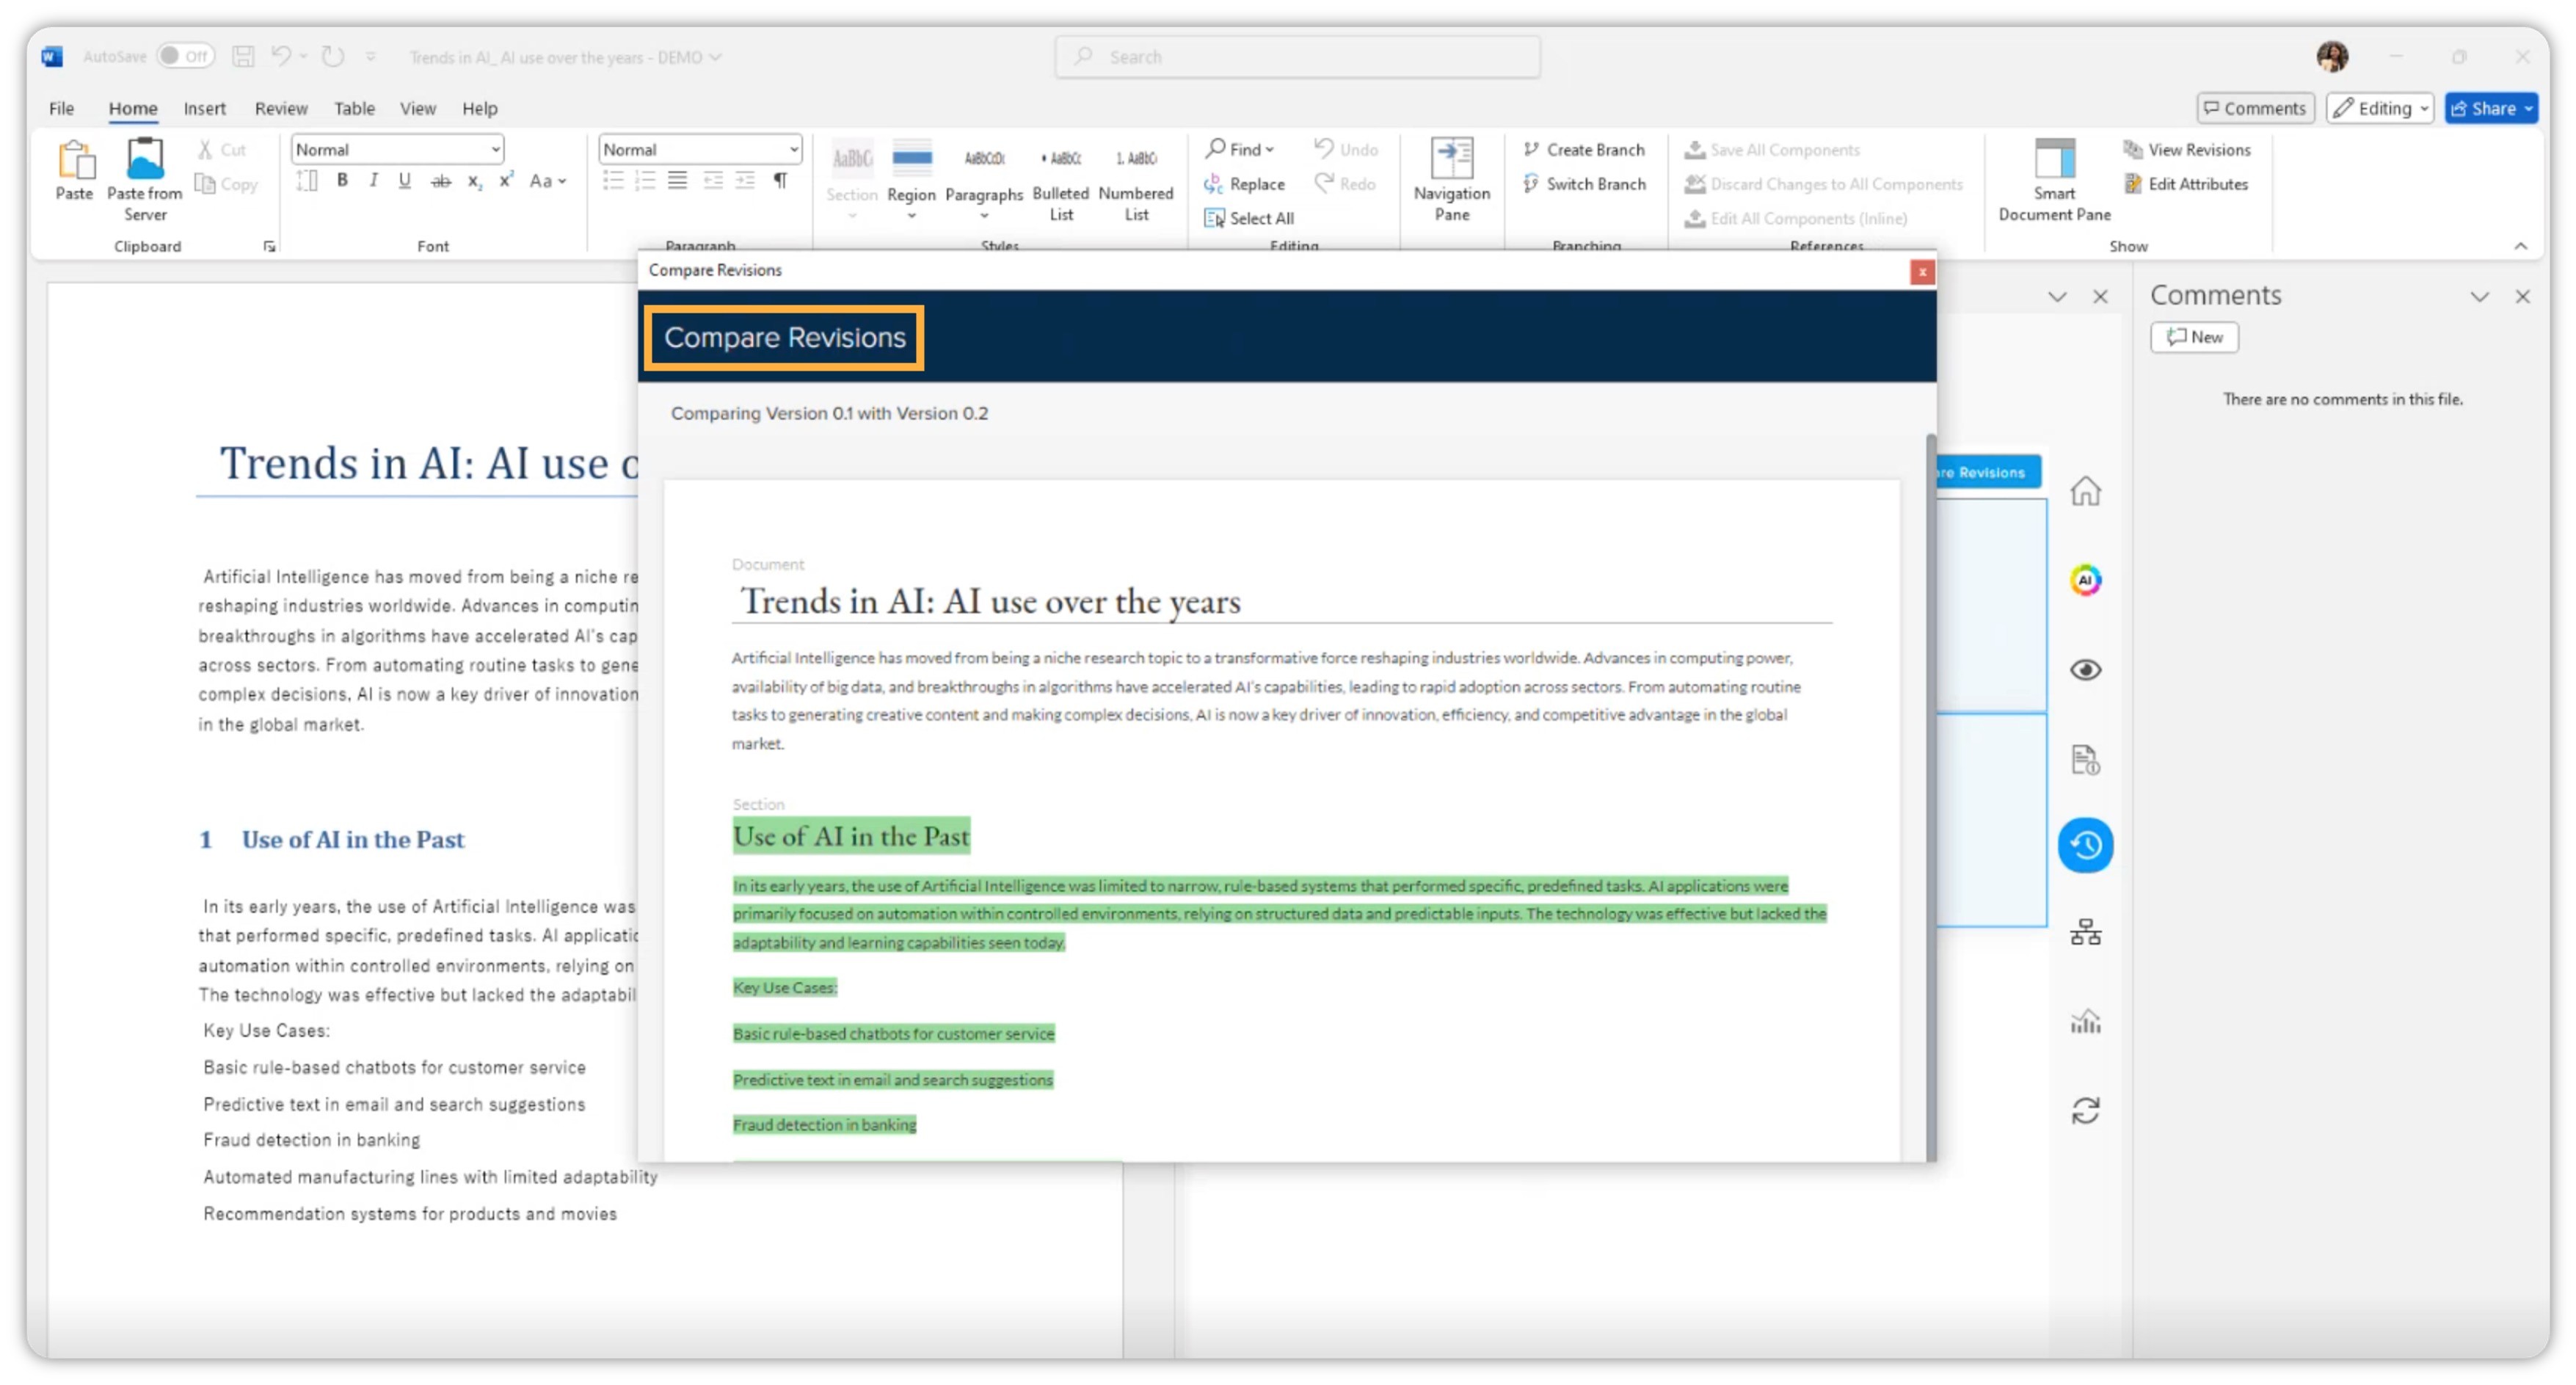
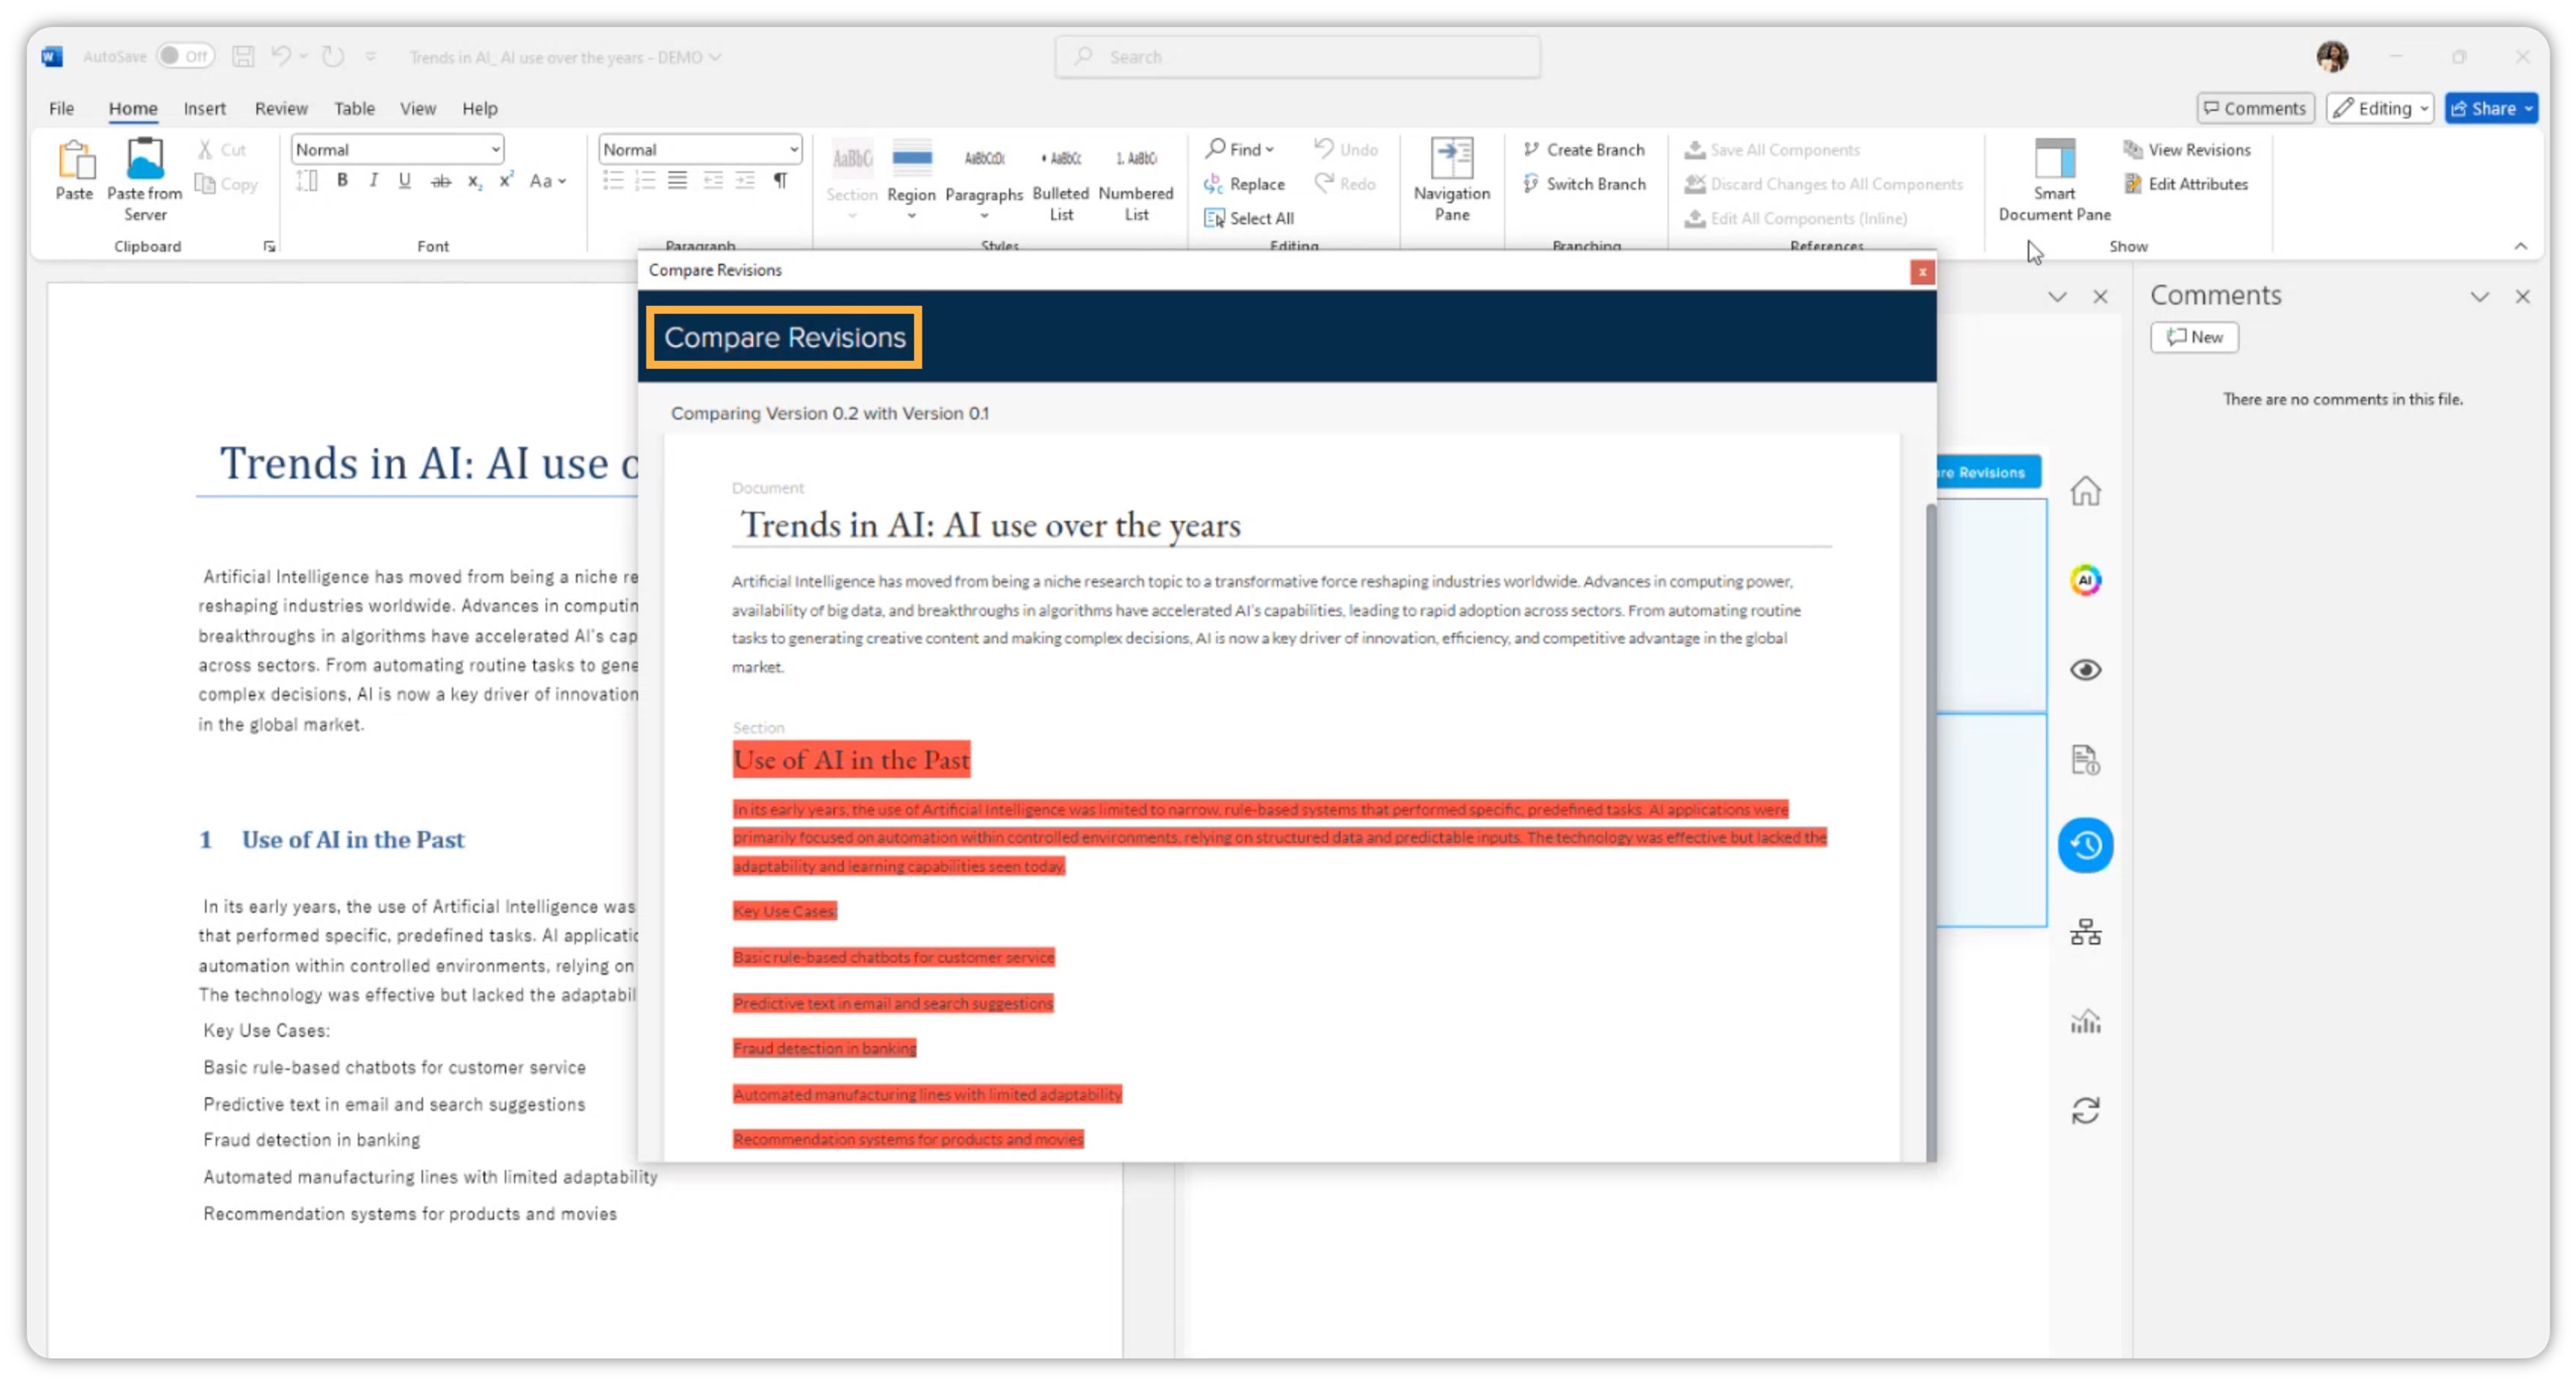
Changes are highlighted based on the order you select the versions:
-
If you select Older → Newer, then all the changes are shown in green (indicating additions or updates in the newer version).
-
If you select Newer → Older, then the changes are shown in red (indicating removals or differences when stepping back).
-
Content Automation Rules
Content Automation Rules lets you automate the population of inline sections in your documents using predefined, search-based rules. With this feature, you can automatically fetch and insert the most relevant components into a document based on metadata and saved search criteria—reducing manual effort and ensuring content consistency.
This feature helps you:
-
Automatically build documents with accurate, up-to-date content.
-
Save time by defining rules once in templates or documents.
-
Maintain flexibility with options for both automated and manual replacement.
Using Content Automation Rules
Follow the steps below to define and run automation rules for inline sections:
-
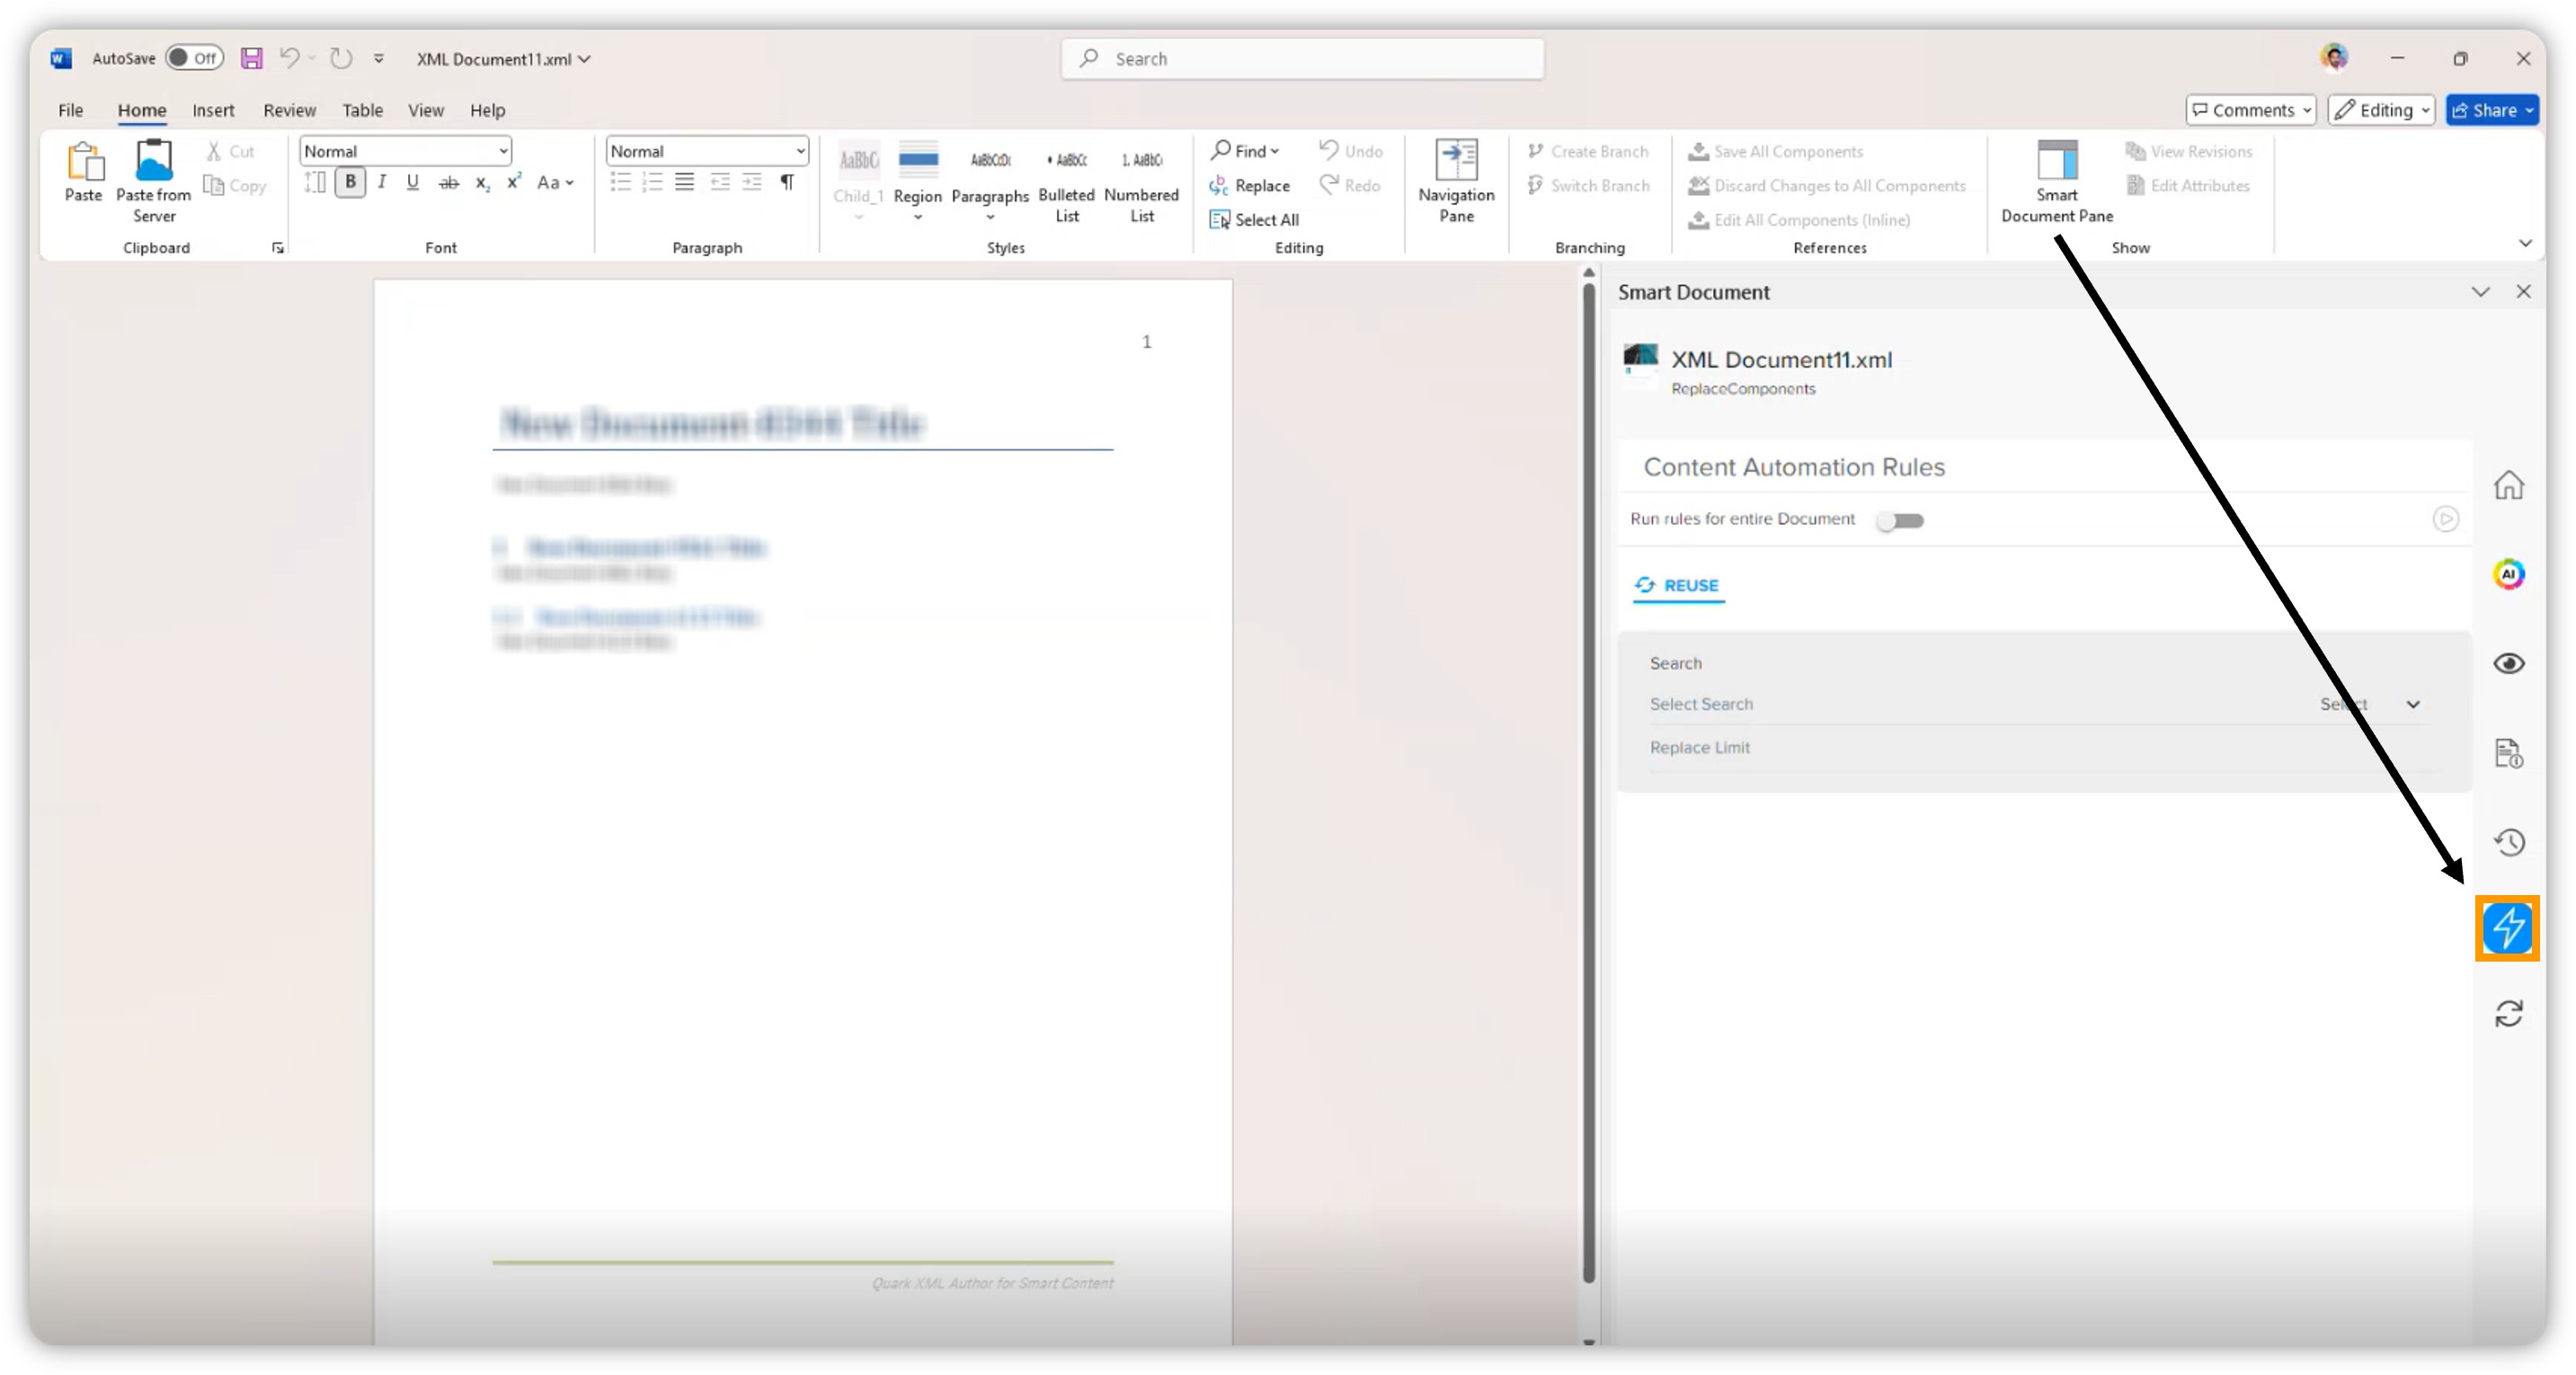
Go to the Smart Document Pane and click Content Automation Rules.
-
Use the toggle Run rules for entire document if you want to execute the content automation rules for all eligible sections in the document. This is optional.
-
In the document editor, click the section you want to replace.
The Reusetab in the Content Automation Rules pane appears only when a section is selected. This feature is available for inline sections only. -
Configure the Rule
-
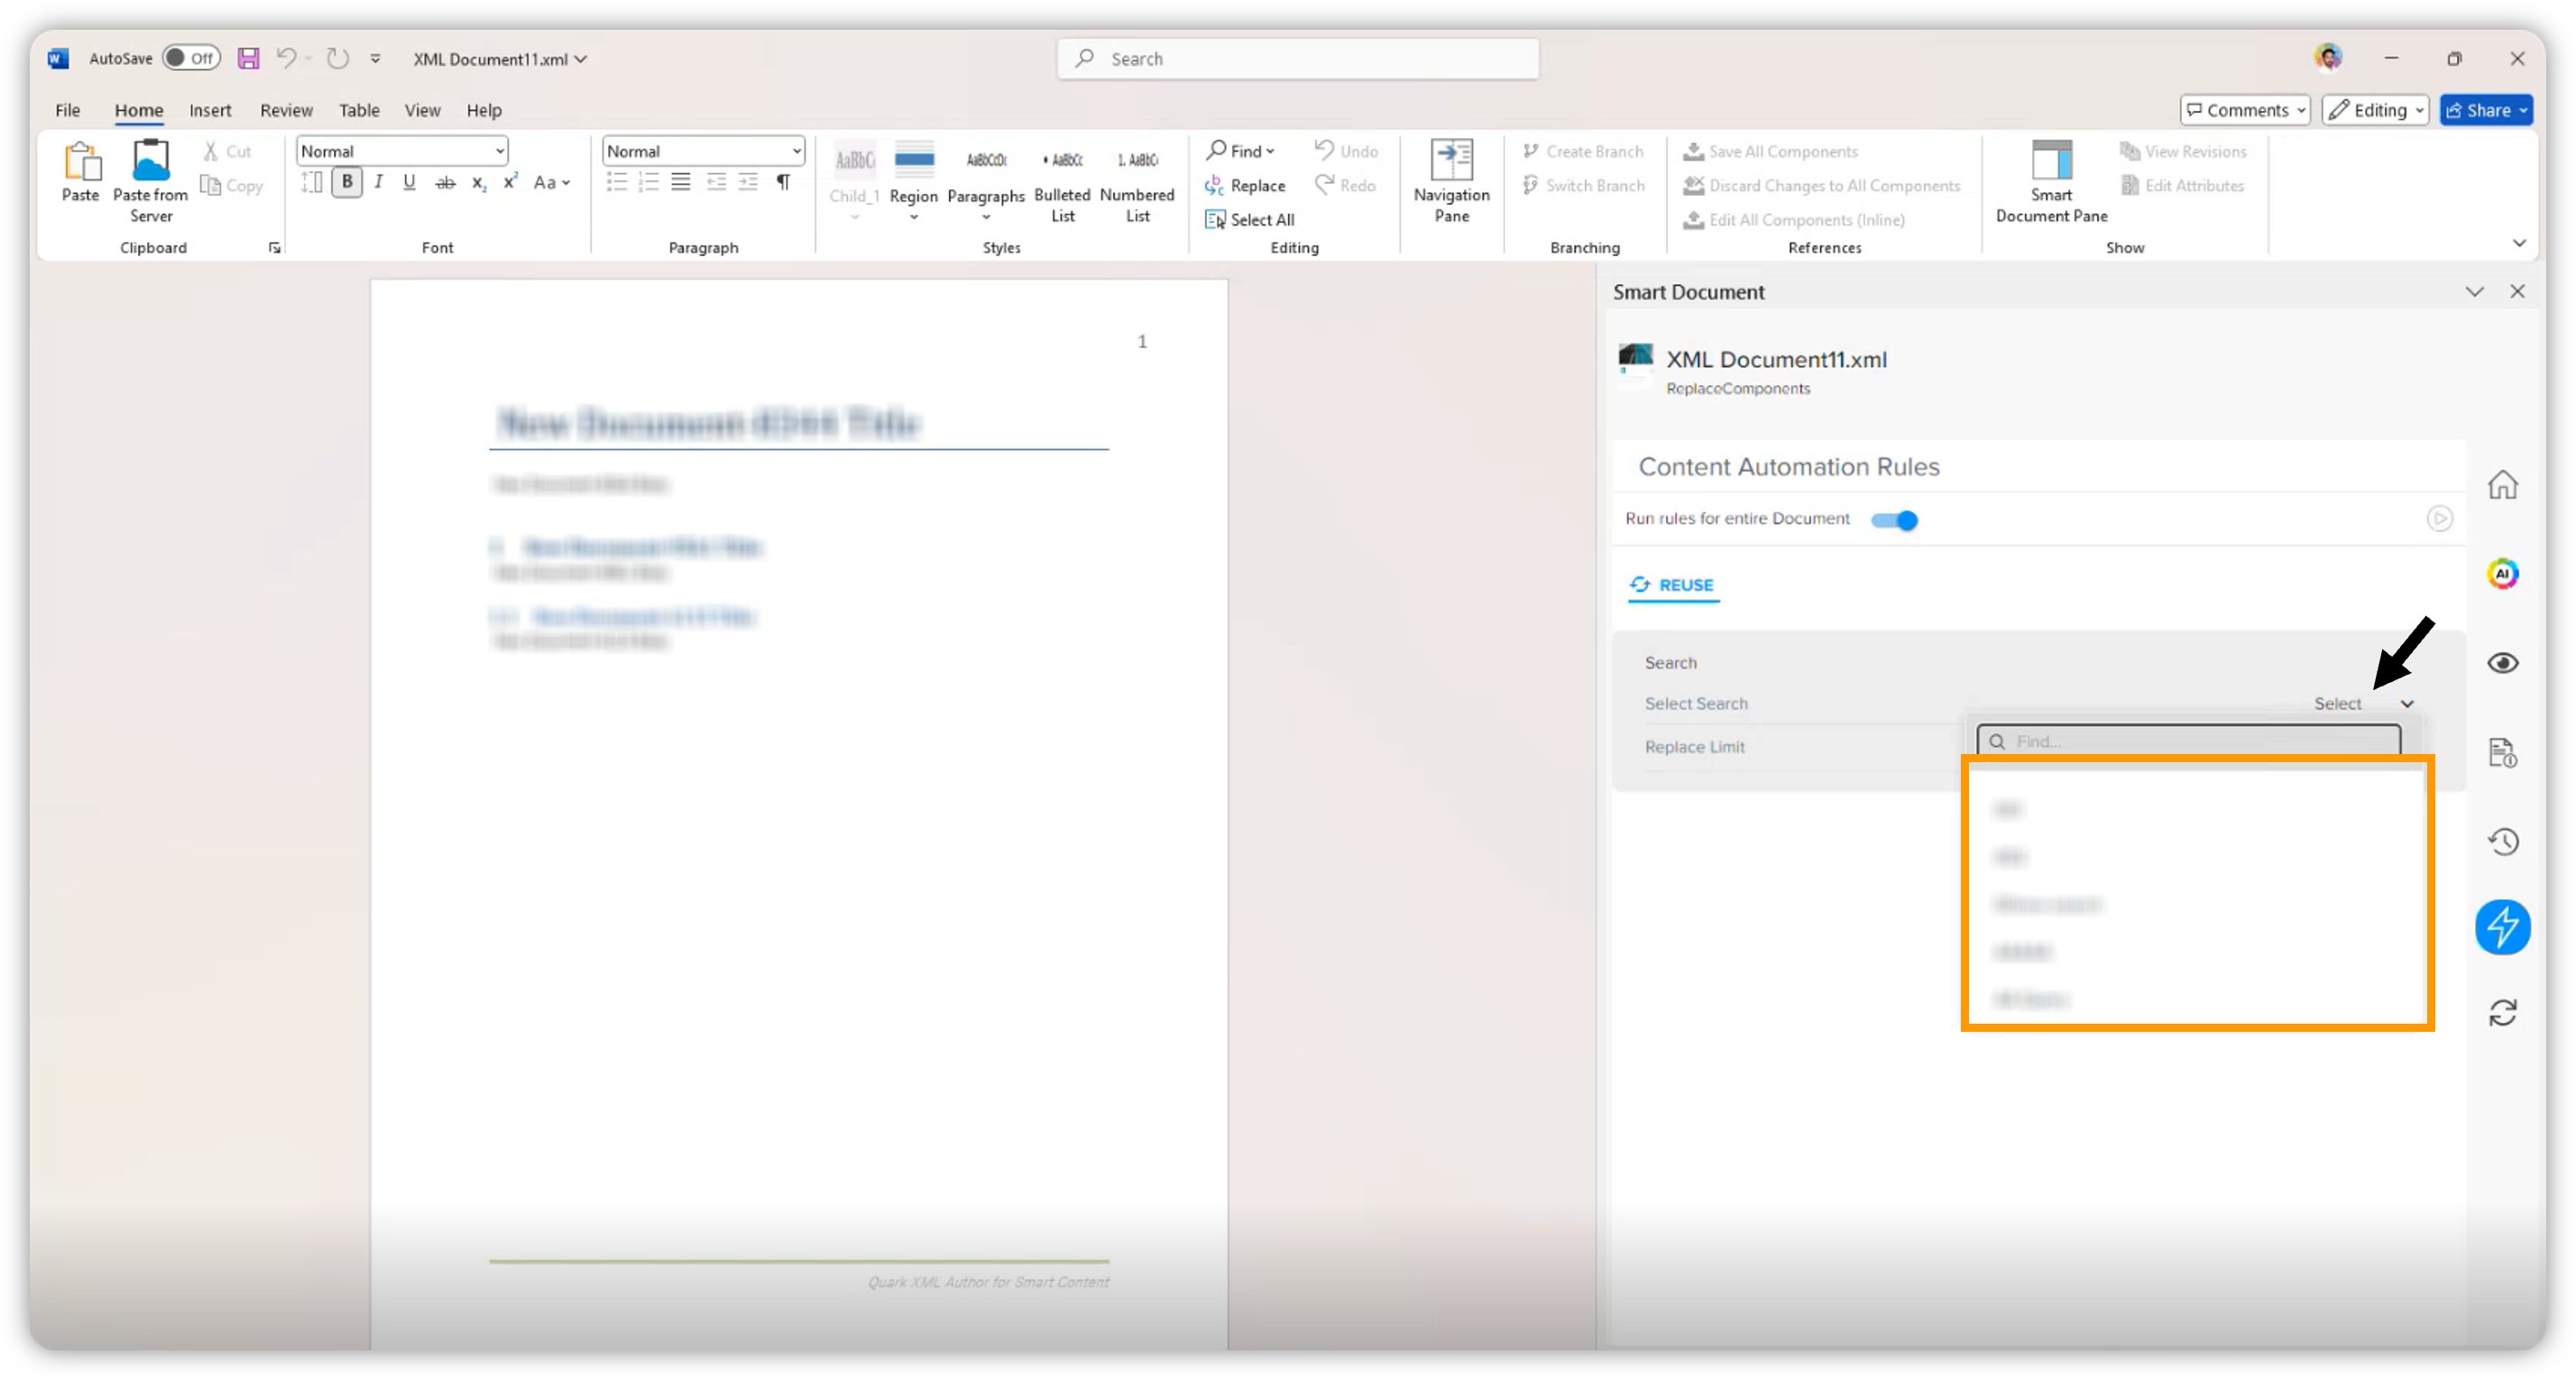
Select the desired search query from the dropdown list.
-
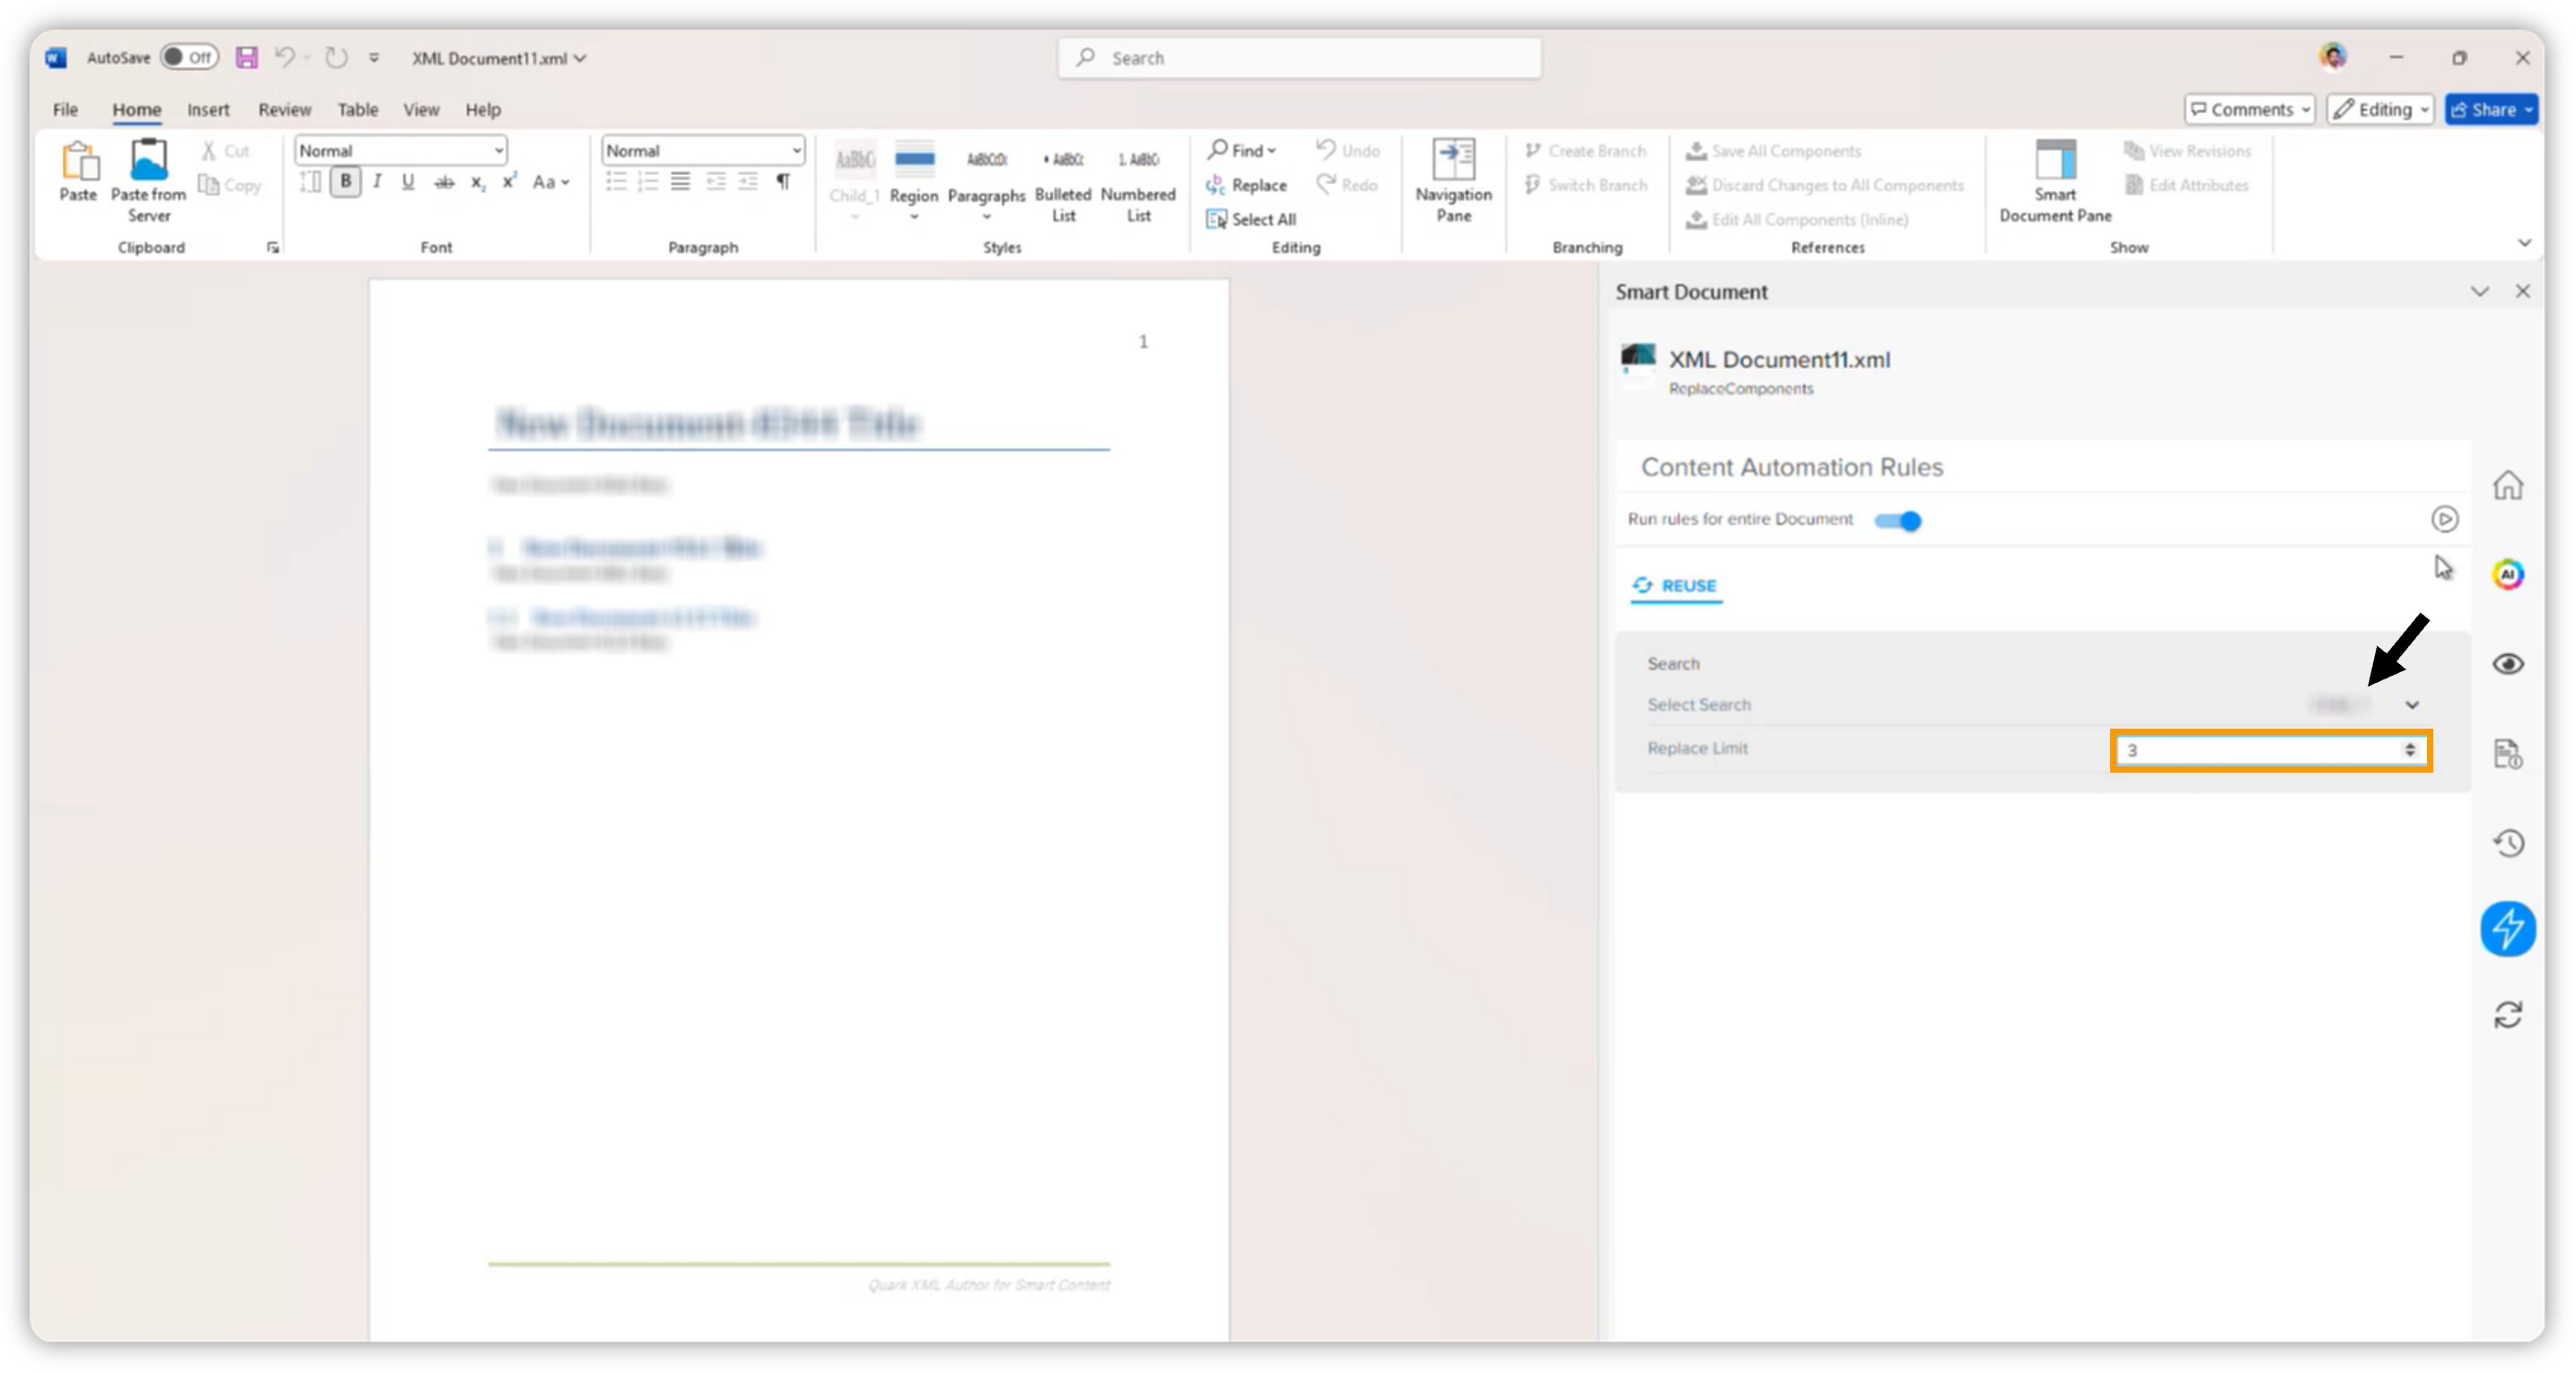
Define Replace Limit (for example, replace with top 1 or top 3 components).
-
-
Click Runto execute the rule for the selected section.
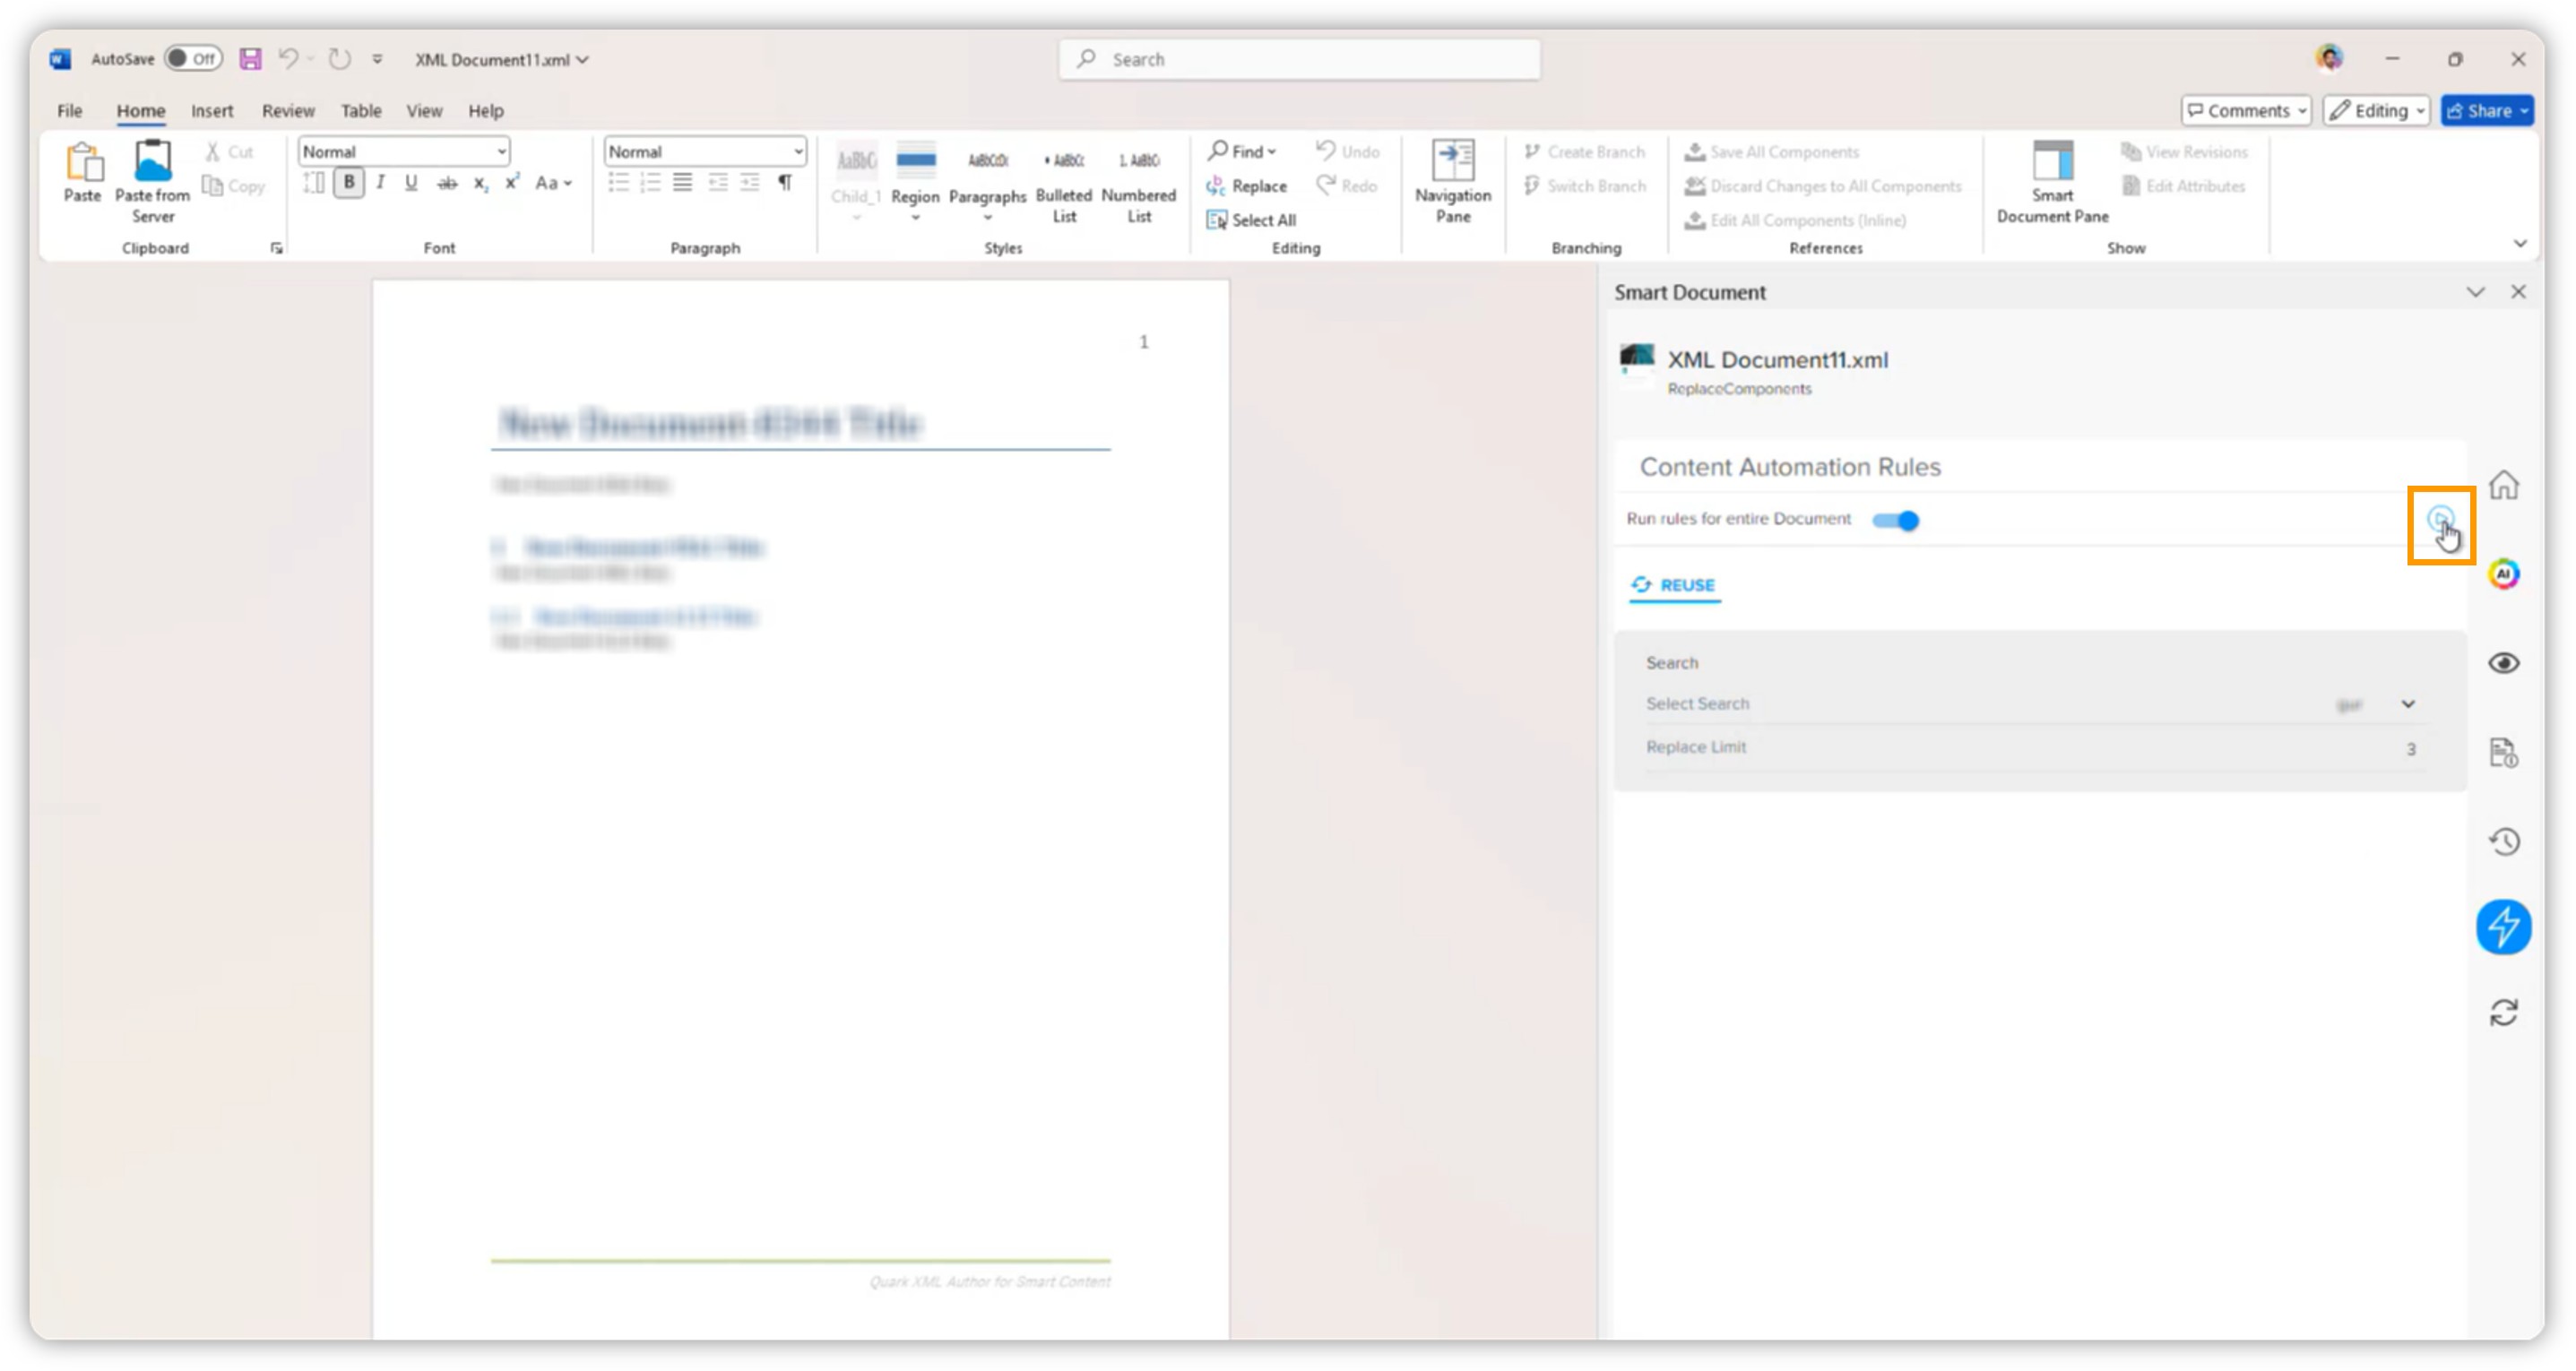
Within a few seconds, the rule will complete and automatically replace the section with the most relevant component(s) based on your defined criteria.
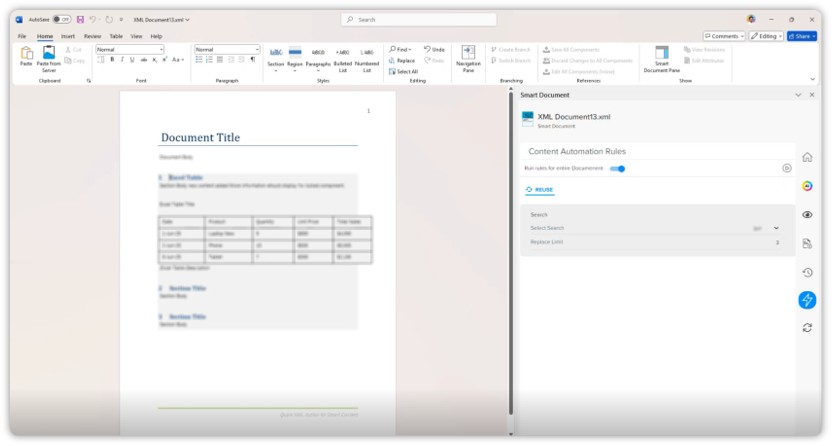
This is a fully automated process—just define your search query and run the rule; no manual replacement is needed.
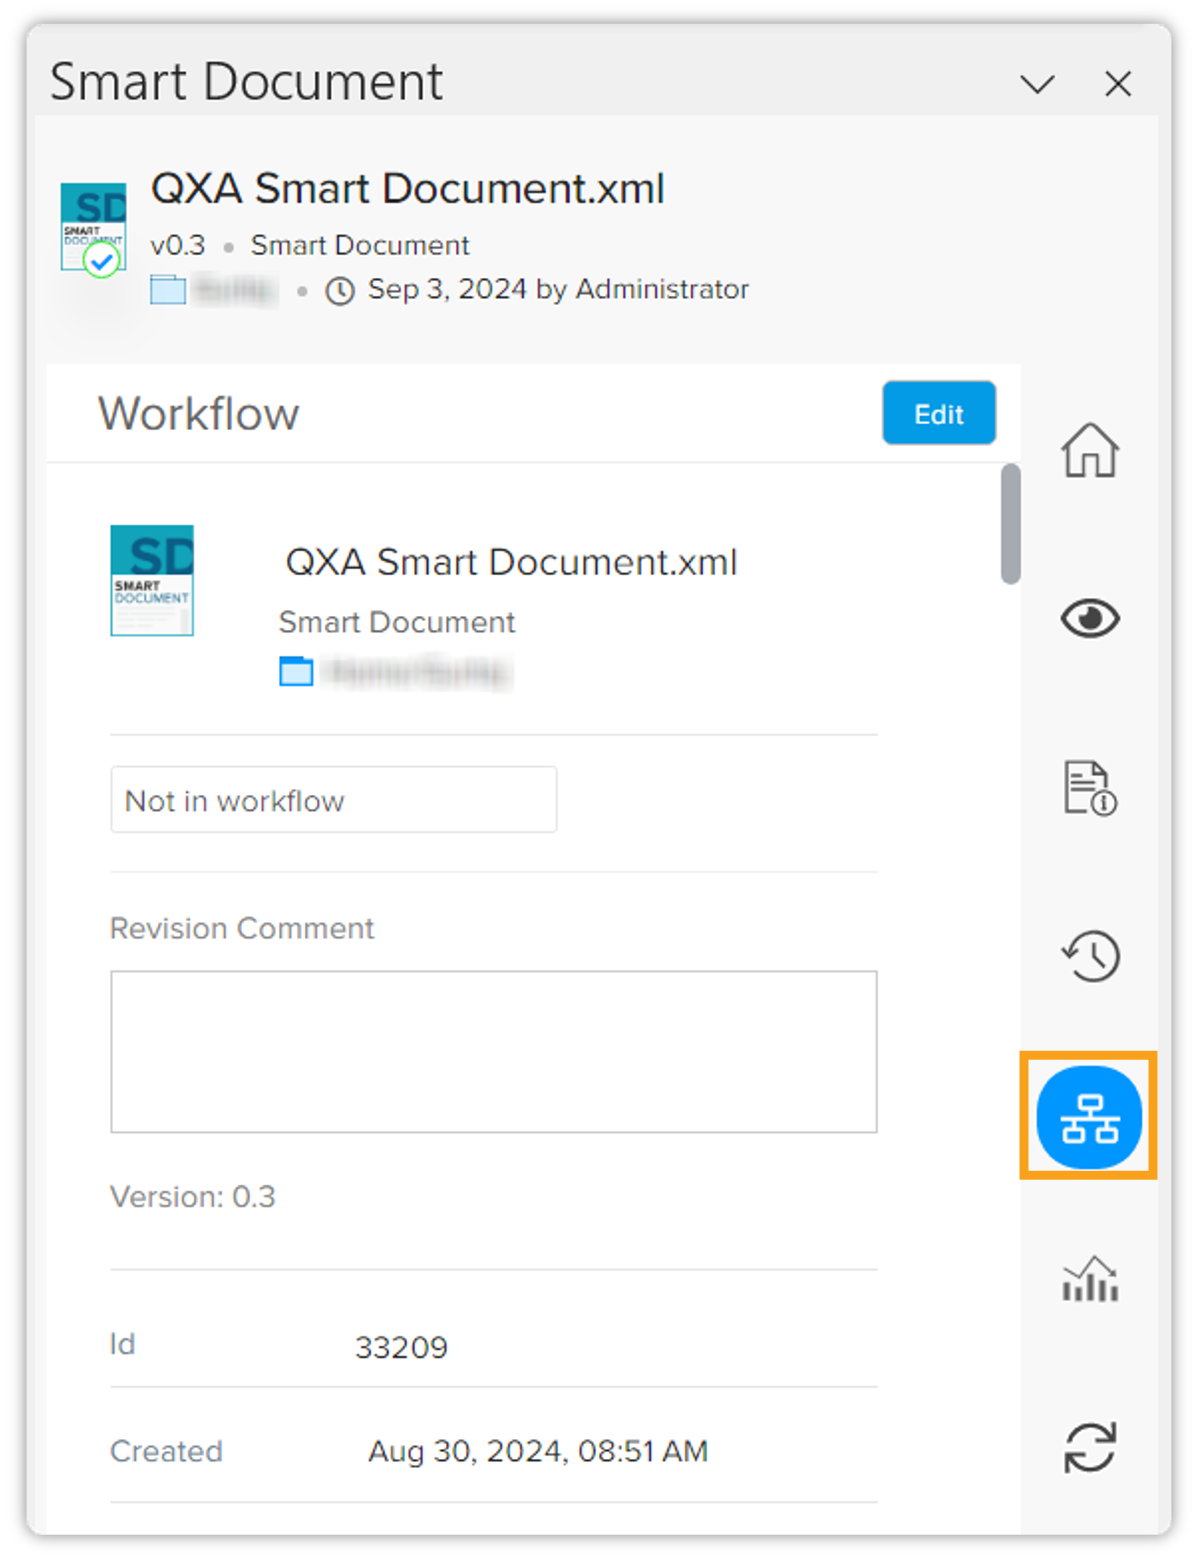
Workflow Tab
The Workflow tab displays information about the workflow and status of a document and allows you to make related edits.
Trends Tab
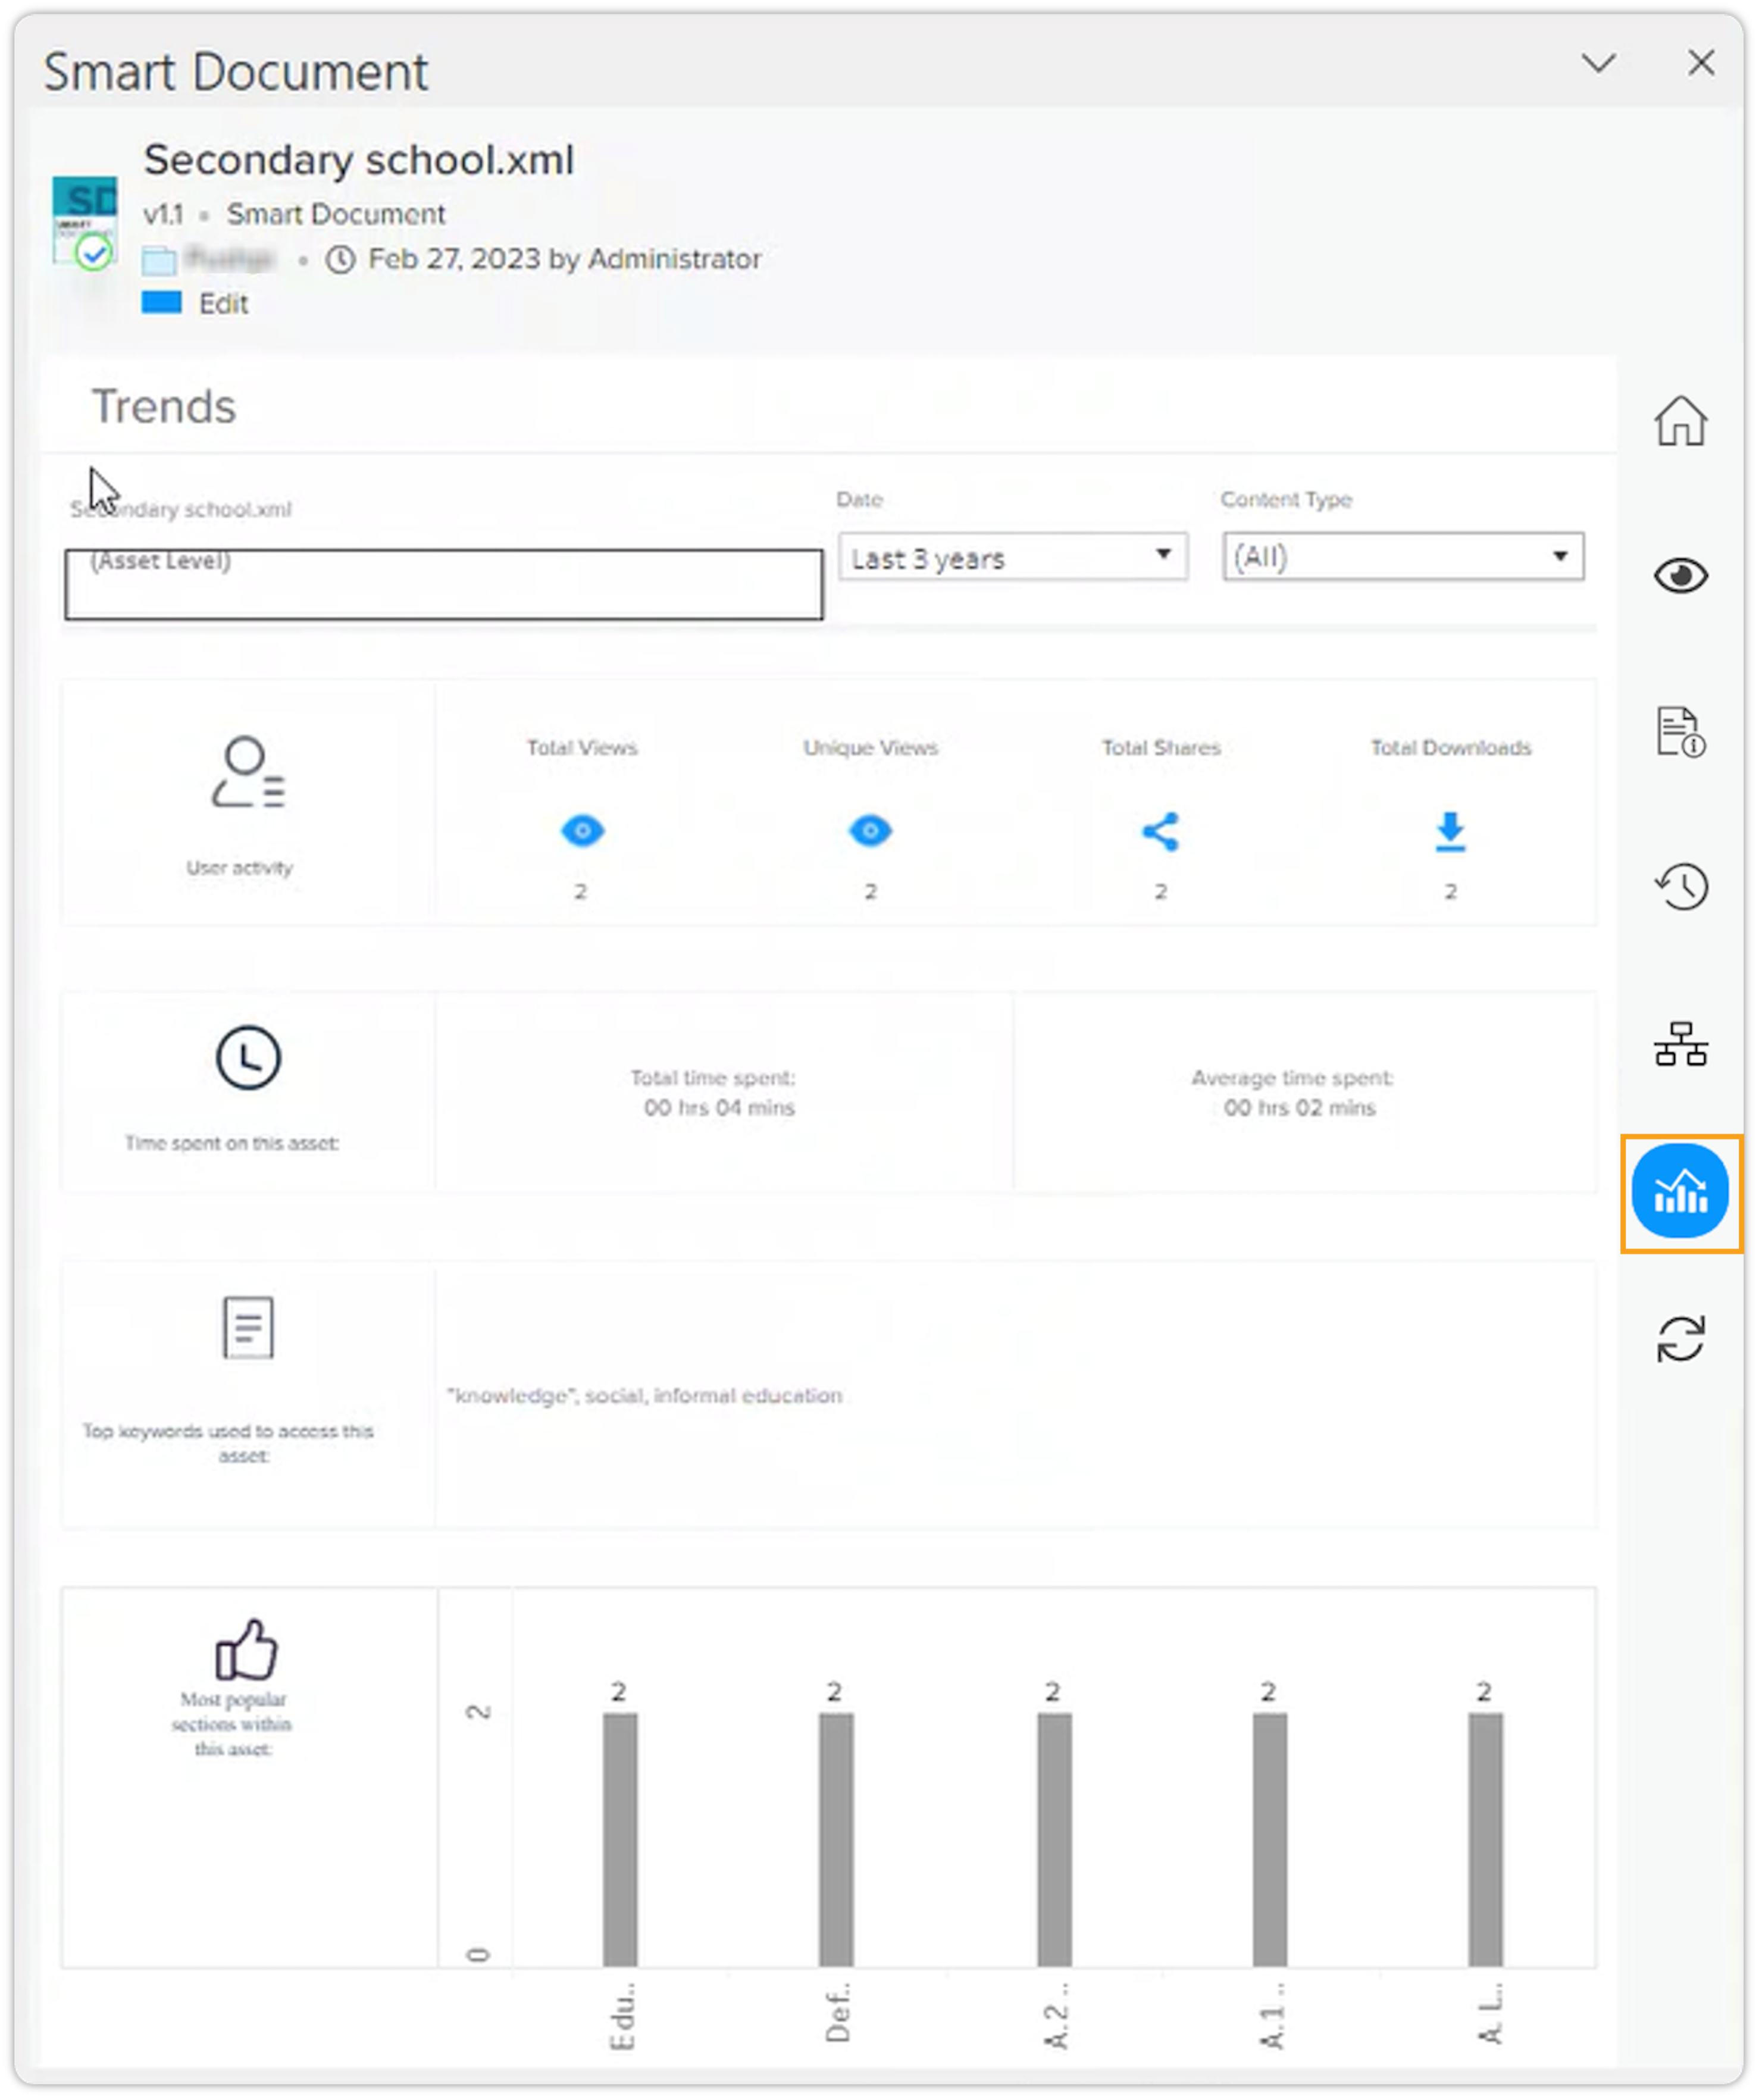
The Trends pane displays the following section and document-level engagement statistics:
-
User Activity: Displays the engagement counts such as the number of views, unique views, shares, and downloads.
-
Time spent on this asset: Total and average time spent on an asset (in hours and minutes).
-
Top keywords used to access this asset: The list of most popular keywords used in the searches to access the current asset.
-
Most popular sections within the asset: Number of views by sections.
Additionally, the Trends tab also allows you to filter the statistics by level (asset or section), time, and content type.
Refresh
The Refresh button (icon  ) updates the information available on the Smart Document Pane to reflect the most
recent changes.