Introduction to QuarkXPress JavaScript objects
This chapter covers all the JavaScript objects exposed by the QuarkXPress application and XTensions. Use these objects to invoke its feature from the JavaScript environment. There are mainly two global objects (app and fs) exposed for java scripting. Use the 'app' object to interact with the QuarkXPress application to perform various tasks. The following JavaScript types are exposed by the application:
-
Classes
-
Objects
-
Constants
Understanding the QuarkXPress object model
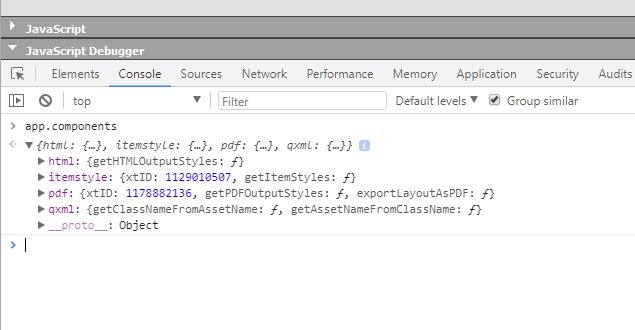
The application is built on an extensible architecture framework and consists of many XTensions and required components (i.e. RCs). So, java scripting support is also provided by these XTensions for its features. We will refer to these XTensions as components in the JavaScript environment. In QuarkXPress , very few components are exposing JavaScript support. Access any component in JavaScript using 'app.components'. Similarly, when you think about the artifacts produced using this application the very first item that comes to our mind is Project. The Project can have many layouts and each layout can have spreads and pages. Further, these pages can have boxes and finally these boxes hold the content.
Understanding the object model is the key to finding the object you want to work with, and your best guide to Java Scripting is your knowledge of QuarkXPress itself. Quickly see all the JavaScript objects exposed from QuarkXPress using the JavaScript debugger. Open the JavaScript debugger (Window > JavaScript Debugger) and select the Console tab. Type the following code on console and press Enter.
app; // Press enter key 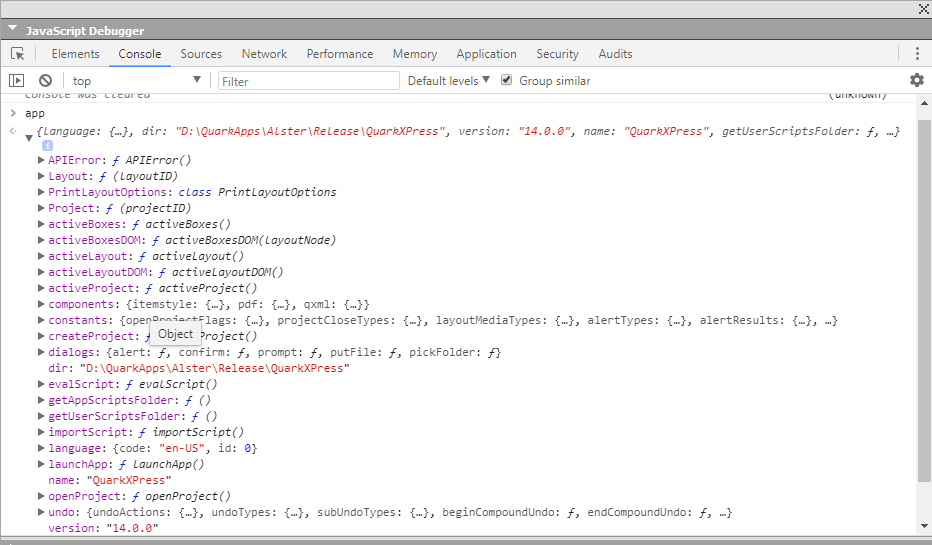
Working with application (app)
QX.js provides you an app module to interact with the QuarkXPress application. You already have seen an example of app object usage in the "helloworld" sample.
This chapter shows you how to do the following:
-
Retrieve active elements, including:
-
Project.
-
Layout & DOM.
-
Box(s) & DOM.
-
-
Perform basic file management tasks supported by QuarkXPress, including:
-
Creating new project.
-
Opening an existing project.
-
-
Open other type of documents, including:
-
Text files.
-
Java Script files.
-
PDF.
-
Images.
-
-
Perform basic scripting operations, including:
-
Executing any JavaScript.
-
Importing any JavaScript from any other location in the world.
-
Working with active elements
Most of the application's basic operations are done on the active element (current project, layout or box). This section shows how to do them using JavaScript.
Getting the current project
Everything in QuarkXPress is stored in the project and all user actions are done on the current project. So, there must be some way to get the current project.
Use the following script to get the current project:
let myProj = app.activeProject(); Getting current layout and DOM
Use the following script to get the active layout and DOM:
let myLayout = app.activeLayout();// Get the active layout
let myDom = myLayout.getDOM();
Use the following script to get the DOM of the active layout directly:
let myDom = app.activeLayoutDOM(); Getting box(s) selection and DOM
Use the following script to get the currently selected box or group box (i.e. multiple selection of boxes) and DOM:
let myBoxes = app.activeBoxes(); -
myBoxes represents the following JSON object:
{boxIDs: [], boxUIDs: []} -
boxIDs: an array ofboxIDs. Theboxidis temporary and meaningful until the project is opened. -
boxUIDs: an array ofboxUIDs. It is the unique ID of the box within a layout.
Use the following script to retrieve the DOM of multiple boxes:
let myBoxesDom = app.activeBoxesDOM(); -
myBoxesDomrepresents the NodeList of <qx-box> type elements.
Working with QuarkXPress Files
The QuarkXPress application supports working with Projects, Books and Libraries. But in this version, we are only supporting the QuarkXPress Project using JavaScript.
In this section, we will describe how to create and open a project using JavaScript. You already have seen the 'HelloWorld' example to create a simple project.
Use the following JavaScript to create a new project:
let myProj = app.createProject(); This creates a project with default parameter values (the name of the project will be 'Test1.qxp' and the layout name will be 'Layout 1'). The layout type will always be 'print' and all of the layout properties like orientation, page size, margins will have the default values. If you want to create a project with custom layout properties then you have to construct an object of type 'PrintLayoutOptions'.
The following JavaScript shows how to create a project with different layout dimensions:
let plo = new app.PrintLayoutOptions();
plo.autoTextBox = false; //
plo. colCount  = 3;
plo. doubleSided = false;
plo. gutterWidth = "10mm";
plo. pageCount = 10;
plo. pageDirection = false;
plo. pageHeight = "400mm";
plo. pageMargins = ["2mm", "2mm", "2mm", "2mm"];
plo.pageWidth = "300mm";
let myProj = app.createProject("abc.qxp", "print", app.constants.layoutMediaTypes.PRINT_MEDIA_TYPE, plo);
This script will create a project (named "qbc.qxp") and a print layout (named "print") with the given layout dimensions.
Use the following JavaScript to open a project from a file system:
let myProj = app.openProject("D:\\QXP\\abc.qxp"); When QuarkXPress opens the project, it runs verification steps to check its integrity. If the integrity check fails the user is prompted to take the necessary action. For example, if the fonts used in the project are missing, it will notify the user.
If you do not want any alerts thrown, then you can supply the appropriate flags. For more detail, refer to the API Reference Guide.
Use the following JavaScript to open a project with different flags:
 // Do not show missing font dialog
let openFlags = app.constants.openProjectFlags.SKIPMISSINGFONT;
let myProj = app.openProject("D:\\QXP\\abc.qxp", openFlags);
// Update all the modified images while opening the project
openFlags = app.constants.openProjectFlags.REIMPORT_ALL_PICS;
myProj = app.openProject("D:\\QXP\\abc.qxp", openFlags);
Working with external applications
Java Scripting in QuarkXPress allow you to view or edit any kind of files through JavaScript. This allows you to edit the referenced content in the native application.
Use the following JavaScript to open a pdf document from a file system:
let myPDF = "D:\\PDFS\\ebook.pdf";
app.launchApp(myPDF);
This script when executed, will open the 'ebook.pdf' in the registered application.
Working with re-usable JavaScript
Java Scripting in QuarkXPress allow you to re-use existing scripts. You can either import the script into your main script or execute the script to do a specific task. You can create a library of methods which you or other JavaScript developers can reuse. You can also create multiple tasks based JavaScript to create a more meaning workflow using these tasks based JavaScript.
Use the following JavaScript to import a JavaScript.
app.importScript("https://code.jquery.com/jquery-3.3.1.min.js"); //This will import the jQuery library in current execution context.
app.importScript("C:/DATA/myLib.js"); //This will import the myLib.js from file system
In the above example we are importing 'jquery-3.3.1.min.js' from CDN URL and 'myLib.js' from a local file system. You can also execute JavaScript from your main JavaScript.
Use the following JavaScript to execute a JavaScript.
let userScriptFolder = app.getUserScriptsFolder();
let myScript = userScriptFolder + '\\' + 'CreateProject.js';
app.evalScript('', myScript);
// Your script goes here...
In the above example, we already have a JavaScript which creates a print project with some custom settings. So, there is no need to re-write the script again to create a similar project, just reuse it.
Working with QuarkXPress XTensions
QuarkXPress is built on extensible architecture and comes with a lot of XTensions as part of a package or application bundle. There are many system integrators who are creating XTensions for QuarkXPress. In JavaScript we will reference these XTensions through components terminology, be it a core XTension or a required component.
Use the JavaScript Debugger to see the list of available components:.
Working with PDF
The pdf module represents the PDFFilter XTension of QuarkXPress application in the java scripting world. Use its properties and methods for PDF related operations. In this version very limited functionalities are exposed for JavaScript users.
The following basic operations are allowed through this module:
-
Know the number of pages in the PDF document.
-
Know the available PDF output styles in the application.
-
Export any print layout.
Getting PDF of a layout
You can generate a PDF for any print layout using the app.components.pdf module. It is recommended that you use the “Layout” module to generate the PDF.
Use the following JavaScript to export a layout as PDF:
let myProj = app.openProject("D:\\QXP\\HelloWorld.qxp");
let myLayout = app.activeLayout();
let myPDF = "HelloWorld.pdf";
app.components.pdf.exportLayoutAsPDF(myLayout.layoutID, myPDF);
In this script, you are supplying two parameters:
-
the layout identifier
-
the name of the PDF document to generate.
By default, the PDF is generated silently (i.e. all the possible UI is suppressed).
For example, if one or more images are missing it will not warn you and you cannot
view the progress for long PDF documents. You can control this behavior by supplying
OutputSuppressUIFlags.
Use the following script to suppress the progress:
app.components.pdf.exportLayoutAsPDF(myLayout1.layoutID, myPDF1, app.constants.outputSuppressUIFlags.kOutputUI_SuppressOutputWap |app.constants.outputSuppressUIFlags.kOutputUI_SuppressProgressWap); In this script, the PDF is generated based on the default output style. If you want, you can generate the PDF using custom PDF settings. Supply these settings through the desired PDF output style.
Use the following script to generate the PDF using an output style:
let outputStyle = "Press - High Quality/High Resolution";
app.components.pdf.exportLayoutAsPDF(myLayout1.layoutID, myPDF1, app.constants.outputSuppressUIFlags.kOutputUI_SuppressOutputWap, outputStyle );
In this script, we are passing the output style in the last parameter. This parameter can take either the name of the output style or it's ID. So, we can also write this script as:
let outputStyle = 3;//Press - High Quality/High Resolution;
app.components.pdf.exportLayoutAsPDF(myLayout1.layoutID, myPDF1, app.constants.outputSuppressUIFlags.kOutputUI_SuppressOutputWap, outputStyle );
As a "best" practice, you should call the "exportLayoutAsPDF" method on a "layout" object. So, when you invoke this method on a layout object, you do not need to provide the layout ID as the first parameter.
Here is the code snippet to do the same:
let myProj = app.openProject("D:\\QXP\\HelloWorld.qxp");
let myLayout = app.activeLayout();
let myPDF = "HelloWorld.pdf";
myLayout.exportLayoutAsPDF(myPDF);
Find the number of pages in the document
Use the following script to reveal the number of pages in the pdf document:
let pages = pdf.getPDFNumPages("D:\\QXP\\Helloworld.pdf");
console.log("Number of pages: " + pages);
Get a list of PDF output styles
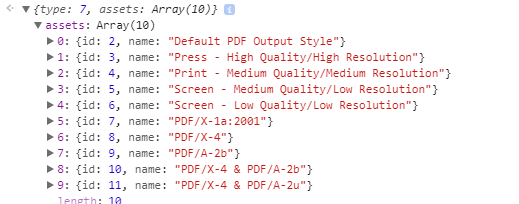
Output styles are assets and may be multiple types (PDF, EPUB, HTML etc). You can get all these output styles using the Project class, but getting a pecific type of output style is only possible through its component (i.e. creator).
Use the following script to get list of PDF output styles:
let styles = app.components.pdf.getPDFOutputStyles();
styles.assets.forEach(function(asset) {
  console.log("name:" + asset.name);console.log("id:" + asset.id);
});
In this script the method returns a JSON object (i.e. {type, assets[{}]}). The "type" represents the kind of asset and assets represent an array of objects. Each asset object consists of two values (name and id).