
Deploying Quark Publishing Platform Server to external server containers
You can deploy Quark Publishing Platform Server in an external Tomcat installation and in IBM WebSphere.
Setting up environment variables
To prepare for deployment, set the following environment variables.
If you are deploying Quark Publishing Platform Server as a service, you must set these as global system environment variables.
-
MAGICK_HOME:
[ImageMagick installation directory]\bin -
MAGICK_FILTER_MODULE_PATH:
%MAGICK_HOME%/modules/filters -
MAGICK_CODER_MODULE_PATH:
%MAGICK_HOME%/modules/coders
Configuring the JVM
Regardless of which application server you are using, you must increase the memory available to the JVM in Tomcat and IBM WebSphere as follows to accommodate Quark Publishing Platform Server:
-
Set the minimum Java heap memory to 2048MB.
-
Set the minimum PermGenSpace to 512MB.
Deploying in external Tomcat
Developed by the Apache Software Foundation, Apache Tomcat™ serves as the standard reference implementation for Java™ Servlet and JavaServer™ Pages technologies. Tomcat™ is a servlet container for managing Web applications.
When you install the standalone version of Quark Publishing Platform Server, the installation embeds an instance of Tomcat in the Quark Publishing Platform Server Java Virtual Machine (JVM™) to manage Quark Publishing Platform Web applications, such as Quark Publishing Platform Web Client.
However, if you are already running a Tomcat server for other Web applications, and you want the Quark Publishing Platform Web applications to use your existing Tomcat server, you can deploy Quark Publishing Platform Server in this instance of Tomcat. Deploying Quark Publishing Platform Server in your existing (that is, external) Tomcat server means you don't have to run a separate Quark Publishing Platform Server process on the server computer. If you want to deploy Quark Publishing Platform Server in your external Tomcat, you can use a separate build located in "Server (External Web Container)" in your software package.
Requirements and setup
Quark Publishing Platform Server requires JAVA 8 and Apache Tomcat 7.0.77 or above to be configured as a Web server. The computer on which Tomcat is running should be a 64-bit computer. You can add Quark Publishing Platform Server to an existing Tomcat installation.
Setup Tomcat running on Windows
The existing Apache Tomcat installation folder in the steps below is TOMCAT_HOME
To deploy Quark Publishing Platform in an external Tomcat installation created by the Tomcat installer or deployed with binaries:
-
Copy the
[QPP_BUILD]/qppfolder to the[TOMCAT_HOME]folder. -
Copy the contents of the
[QPP_BUILD]/webappsfolder to the[TOMCAT_HOME]/webappsfolder. -
If Tomcat is installed with the installer, in the
[TOMCAT_HOME]/qpp/publishing/AS-Busdoc.xslt,[TOMCAT_HOME]/qpp/publishing/BusDoc2QCD.xslt,[TOMCAT_HOME]/qpp/publishing/BusDoc2QXPS.xsltand[TOMCAT_HOME]/qpp/publishing/SmartDoc2QXPS.xsltfiles, update the following paths as given below:<xsl:include href="./qpp/publishing/xref-dita-anchors.xslt"/> <xsl:include href="./qpp/publishing/AS-StyleSheets.xslt"/> <xsl:include href="./qpp/publishing/AS-Transformations.xslt"/> <xsl:include href="./qpp/publishing/BusDocsWordTableStyles.xslt"/> -
If Tomcat is deployed with binaries, in the
[TOMCAT_HOME]/qpp/publishing/AS-Busdoc.xslt,[TOMCAT_HOME]/qpp/publishing/BusDoc2QCD.xslt,[TOMCAT_HOME]/qpp/BusDoc2QXPS.xsltand[TOMCAT_HOME]/qpp/publishing/SmartDoc2QXPS.xsltfiles, update the following paths:<xsl:include href="../qpp/publishing/xref-dita-anchors.xslt"/> <xsl:include href="../qpp/publishing/AS-StyleSheets.xslt"/> <xsl:include href="../qpp/publishing/AS-Transformations.xslt"/> <xsl:include href="../qpp/publishing/BusDocsWordTableStyles.xslt"/> -
In the
[TOMCAT_HOME]/qpp/publishing/SmartDoc2QXPS.xslt file, update the following paths:<xsl:include href="../qpp/publishing/SmartDocTransformations.xslt"/> <xsl:include href="../qpp/publishing/SmartDoc_xref_anchors.xslt"/> <xsl:include href="../qpp/publishing/SmartDoc_StyleSheets.xslt"/> -
In the
[TOMCAT_HOME]/qpp/conf/ServerApp.propertiesfile:-
Enter the
webServer.portvalue you configured for Tomcat (8080 for example). -
Set the
webServer.embeddedWebContainervalue to false.
-
-
In the
[TOMCAT_HOME]/qpp/conf/ManagerConfig.xmlfile:-
Enter the IP address or hostname of the QuarkXPress Server in the
nameelement of theconnectioninfosection. -
Enter the port for QuarkXPress Server in the
portelement.
Keep in mind that Tomcat and the QuarkXPress Server should not be running on the same port if QuarkXPress Server and Tomcat are running on the same machine.
-
-
In the
[TOMCAT_HOME]/qpp/conf/Qla.propertiesfile:-
Set the host name, port number, and serial number of your instance of the QLA Server.
-
-
To configure the database, in the
[TOMCAT_HOME]/qpp/conf/Database.propertiesfile edit/add the following values:-
For Oracle:
qpp.jdbc.driverClassName = oracle.jdbc.driver.OracleDriver qpp.jdbc.url = jdbc:oracle:thin:@<hostname><:portnumber><:oracle_sid> qpp.jdbc.userName = QppOracleDB qpp.jdbc.password = QppPassword -
For SQL Server:
qpp.jdbc.driverClassName = com.microsoft.sqlserver.jdbc.SQLServerDriver
qpp.jdbc.url =jdbc:sqlserver://<your-host-name>\\<instanceName>;databaseName=qppdb
qpp.jdbc.userName = QppMSSQLDB
qpp.jdbc.password = QppPassword
-
-
Edit the
[TOMCAT_HOME]/qpp/conf/PluginsContext.xmlfile by replacing the default entry of the HSQL Dao context with the required database Dao context:-
For Oracle:
<import resource="classpath:com/quark/qpp/common/dao/rdbms/oracle/OracleDaoContext.xml"/> -
For SQL Server:
<import resource="classpath:com/quark/qpp/common/dao/rdbms/sqlserver/SqlServerDaoContext.xml"/>
-
-
Set the following global environment variables on the machine:
-
MAGICK_HOME :
[Tomcat_Home]\[Installation path of Platform Server\ImageMagick\bin. -
MAGICK_FILTER_MODULE_PATH :
%MAGICK_HOME%/modules/filters. -
MAGICK_CODER_MODULE_PATH :
%MAGICK_HOME%/modules/coders.
-
-
Open the
[TOMCAT_HOME]/conf/catalina.propertiesfile and add the following line:Shared.Loader :${catalina.home}/qpp/conf,${catalina.home}/qpp/lib/*.jar, ${catalina.home}/qpp/publishing, ${catalina.base}/qpp/ext -
Open the
[TOMCAT_HOME]/conf/catalina.propertiesfile and search fororg.apache.catalina.startup.TldConfig.jarsToSkip=and update:org.apache.catalina.startup.TldConfig.jarsToSkip=a*.jar,b*.jar,c*.jar,d*.jar,e*.jar,f*.jar,g*.jar, h*.jar,i*.jar,k*.jar,l*.jar,m*.jar,n*.jar,o*.jar,p*.jar,q*.jar,r*.jar,s*.jar,t*.jar,u*.jar,v*.jar,w*.jar,x*. jar,y*.jar,z*.jar,ja*.jar,jc*.jar,jd*.jar,je*.jar,ji*.jar,jn*.jar -
If Tomcat is installed with the installer:
Launch the Tomcat monitor. In the JAVA tab, set
CATALINA_OPTSunder Java Options:-
If Platform Server is running with Oracle database:
Doracle.jdbc.J2EE13Compliant=true -
For integration of LDAP (or give absolute path):
Djava.security.krb5.conf=./qpp/conf/krb5.conf -
For Java PermGen memory space:
XX:MaxPermSize=256m
-
-
If Tomcat is deployed with binaries:
Open the
[TOMCAT_HOME]/bin/catalina.batfile and set the following parameters:-
JRE_HOME=C:\Program Files\Java\jdk1.8.0_131JAVA_OPTS=-server -Xmx2048m -XX:MaxPermSize=128m -
CATALINA_OPTS=-Doracle.jdbc.J2EE13Compliant=true -Djava.security.krb5.conf=../qpp/conf/krb5.conf
-
-
Launch the Tomcat monitor. In the JAVA tab, set the following parameters:
-
Initial memory pool=1024 MB. -
Maximum memory pool=2048 MB.
-
Server startup and verification
After you install Quark Publishing Platform Server with Tomcat and specify the port for Quark Publishing Platform Server access, you can start Quark Publishing Platform Server and verify your configuration. Quark Publishing Platform Server and Tomcat are tied together. To start and stop Quark Publishing Platform Server, you need to start and stop Tomcat.
To confirm Quark Publishing Platform Web Client access, in you browser's address field
enter: http://[machineName]:[webServerPort]/workspace
To confirm Quark Publishing Platform Web admin access, in you browser's address field
enter: http://[machineName]:[webServerPort]/admin
QuarkCopyDesk, QuarkXPress, Quark Publishing Platform Client, Quark Publishing Platform Web Client, and Quark Publishing Platform Script Manager use the Tomcat port to log on to Quark Publishing Platform server.
Disabling the maximum Post size for Apache Tomcat
The default maximum size of the Post parameter supported by tomcat is 2MB. If the Post parameter in the HTML of a smart document exceeds this 2MB limit, it causes a null pointer exception at the Server. The user is not disconnected but the HTTP request interceptor on the client side assumes that the unhandled exception is because of a server disconnection.
This issue can be fixed by setting a negative (or appropriate) value for the maxPostSize attribute. This negative value will disable the check for max Post size at the Tomcat
layer.
-
Open the "server.xml" file located in the
{install_path}/conffolder. -
Assign a negative value to the maxPostSize attribute of the <Connector> tag:
<Connector port="61400" redirectPort="61399" maxHttpHeaderSize="8192" maxThreads="500" minSpareThreads="25" maxSpareThreads="75" acceptCount="100" connectionTimeout="30000" disableUploadTimeout="true" maxPostSize="-1" enableLookups="false" URIEncoding="UTF-8" server="Quark Publishing Platorm Server"/> -
Restart the Quark Publishing Platform Server.
Deploying Quark Publishing Platform Server in multi-server deployment
A Quark Publishing Platform multi-server cluster is a set of Quark Publishing Platform Server installations that has been configured to use a common database, shared asset repository, and message queue. A multi-server cluster offers the following advantages:
-
It lets you serve a larger number of requests by adding hardware.
-
It lets you add active load balancing.
-
It provides redundant and reliable setup.
-
Failure of any specific instance in a cluster does not result in complete service outage. Only a fraction of active sessions are affected by an instance failure, and subsequent requests can be routed to an available active Quark Publishing Platform Server instance.
-
It is transparent to clients that communicate with the load-balancing HTTP server.
To load-balance requests, you must have an HTTP server and any HTTP load balancer that supports the "sticky session" feature. The following HTTP servers have been tested as load-balancing servers:
-
Microsoft IIS 7 with the latest version of the IIS Tomcat connector.
-
Apache 2.2 with the latest version of the JK Tomcat Connector for Apache 2.2.
-
Apache 2.2 with built in mod_proxy and mod_proxy_balancer DSO modules of the Apache 2.2.
-
HA PROXY on Redhat Linux 7.x
Only requests routed through an HTTP load balancer are load-balanced among different instances. Requests to a specific instance are always served by that instance, irrespective of its existing load.
RMI clients must connect directly to a specific server instance.
Configuring cluster server instances or nodes
The Quark Publishing Platform Server can be deployed as a standalone server or in an external Tomcat using the database on the initial computers, which are called nodes of the Platform multi-server cluster. The first step in setting up cluster servers is to set up a Quark Publishing Platform Server database for Oracle or MS SQL Server.
Platform Server deployed as a standalone server to work as nodes
On each Quark Publishing Platform Server computer:
-
Open the "ActiveMQ.xml" file located in the
qpp/conffolder. -
In the "ActiveMQ.xml" file, uncomment and add the network connectors to integrate the server instance's message queue with one or more server instances in the cluster, where
qpp-node-Nis the name of a computer where another instance of Quark Publishing Platform Server is deployed.There must be one connector for each node of the cluster except the node itself. In the following example, there is a cluster of three nodes.
Node 1 should contain the following entry:
<networkConnectors>
  <networkConnector
   dynamicOnly="true"
  duplex="false"
   name="node1-1"
  networkTTL="1"
   uri="static:(tcp://qpp-Node2:61401)"/>
 <networkConnector
   dynamicOnly="true"
  duplex="false"
   name="node1-2"
  networkTTL="1"
   uri="static:(tcp://qpp-node3:61401)"/>
</networkConnectors>
Node 2 should contain the following entry:
<networkConnectors>
  <networkConnector
   dynamicOnly="true"
  duplex="false"
   name="node2-1"
  networkTTL="1"
   uri="static:(tcp://qpp-Node1:61401)"/>
 <networkConnector
   dynamicOnly="true"
  duplex="false"
   name="node2-2"
  networkTTL="1"
   uri="static:(tcp://qpp-node3:61401)"/>
</networkConnectors>
Node 3 should contain the following entry:
<networkConnectors>
  <networkConnector
   dynamicOnly="true"
  duplex="false"
   name="node3-1"
  networkTTL="1"
   uri="static:(tcp://qpp-Node1:61401)"/>
 <networkConnector
   dynamicOnly="true"
  duplex="false"
   name="node3-2"
  networkTTL="1"
   uri="static:(tcp://qpp-node2:61401)"/>
</networkConnectors>
The name of the connectors (e.g. node1-1 and node1-2) should be unique throughout the cluster.
-
Open the "context.xml" file located in the
qpp/conffolder. -
Update the
<Context reloadable="false" crossContext="true" swallowOutput="true">line to<Context sessionCookiePath="/"reloadable="false" crossContext="true" swallowOutput="true">. -
Save the file.
-
In the "ActiveMQ.xml" file, uncomment the transport connector(s) to integrate the server instances’ message queues.
This should look like:
<transportConnector uri="tcp://localhost:${jms.openWirePort}?wireFormat.maxInactivityDuration=0" updateClusterClients="true" rebalanceClusterClients="true" updateClusterClientsOnRemove="true"/> <transportConnector uri="tcp://${server.machinename}:${jms.openWirePort}?wireFormat.maxInactivityDuration=0"/> -
Open the "web.xml" file of the workspace and admin webapps, located in the
WEB-INFfolder for each webapp and uncomment the SessionResetFilter to handle sessions in case of node failure.<filter> <filter-name>SessionResetFilter</filter-name> <filter-class>com.quark.web.security.servlet.SessionResetFilter</filter-class> <init-param> <param-name>jvmRoute</param-name> <param-value>qpp1</param-value> </init-param> <init-param> <param-name>sessionCookieName</param-name> <param-value>JSESSIONID</param-value> </init-param> <init-param> <param-name>sessionInitUrls</param-name> <param-value> /workspace/reconnectUser.qsp /workspace/login.qsp </param-value> </init-param> </filter> <filter-mapping> <filter-name>SessionResetFilter</filter-name> <url-pattern>/*</url-pattern> </filter-mapping> -
In the "ServerApp.properties" file located in the
[QPP Server]/conffolder, assign a unique value toserver.id.prefix, identifying the server instance. -
In the "ServerApp.properties" file located in the
[QPP Server]/conffolder, assign the IP of the machine to "server.machinename", identifying the server instance. -
In the "server.xml" file located in the
[server-path]/conffolder, assign a unique value to thejvmRouteattribute of the<Engine>tag.<Engine name="Catalina" defaultHost="localhost" jvmRoute="node1">The value of
jvmRoutein the "web.xml" file (the file being edited in step 4) and in the "server.xml" file should be the same. -
To allow the storage of session cookies at the application root, edit the "context.xml" file located in the
[server-path]/conf<Context sessionCookiePath="/" reloadable="false" crossContext="true" swallowOutput="true">This change is required for workflows involving SOAP based clients like Quark XML Author. For Web based applications like Quark Author Web Edition, the session cookie should be stored at the webapps path, so there is no change needed in the "context.xml" file. -
Rename the "services" folder, located at
{TOMCAT_HOME}/webapps/webServices/WEB-INF, to "services_old". -
Rename the "serviceArchivesMultiServer" folder, located at
{TOMCAT_HOME}/webapps/webServices/WEB-INF, to "services". -
In the "ServerStartup.bat" file located in the server installation folder, add the
-Dspring.profiles.active=multiserverto run the server in cluster mode:java -Xmx2048m -XX:MaxPermSize=256m -classpath "%JavaClassPath%" -Dspring.profiles.active=multiserver -Doracle.jdbc.J2EE13Compliant=true -Djava.security.krb5.conf=conf/krb5.conf -Djava.endorsed.dirs="endorsed" -Djavax.xml.stream.XMLInputFactory=com.ctc.wstx.stax.WstxInputFactory com.quark.qpp.Server PluginsContext.xml -
In the "wrapper.conf" file located in the server installation folder, uncomment the following under the Java Additional Parameters section:
wrapper.java.additional.7=-Dspring.profiles.active=multiserverRepeat the above steps for all Quark Publishing Platform nodes.
-
Clear your browser cookies before you start your work.
-
Perform the steps to flush caches across all server instances as described in the following section, "Configuring server caches flushing mechanism".
Configuring server caches flushing mechanism
Platform Server provides two mechanisms to flush caches across all server instances in case of an update:
-
Notification based - This mechanism clears the cache asynchronously. The Notification based cache flushing is accomplished by publishing of a message of type
CACHEwith propertyFLUSH_INTERCEPTOR. This is the default configured mechanism. -
REST request based - This mechanism clears the cache synchronously. The REST based mechanism makes an HTTP request to every peer node to trigger its cache flushing:
http://{peerNode}:61400/rest/service/xcache/flush/{interceptorName}. This mechanism is not the default configuration, but you may configure it if needed.
In order to configure REST based cache flushing mechanism, make the following changes:
-
Open the "CacheManager.xml" file found in
{install_path}/Server/lib/qpp-server-common-{version}.jar -
Comment the
asyncRemoteMessengerand uncomment thesynchronousRemoteInvoker. Inject this bean instead ofasyncRemoteMessengerinbaseCacheFlushingInterceptor.<bean id="synchronousRemoteInvoker" class="com.quark.qpp.common.caching.SynchronousRemoteInvoker"> <property name="remoteHosts" value="${server.peer.url}"/> <property name="httpContext" value="${server.cache.remoteFlush.context}"/> </bean> <!-- <bean id="asyncRemoteMessenger" class="com.quark.qpp.core.messaging.service.impl.AsyncRemoteMessenger"> <property name="messagePublisher" ref="messagePublisher"/> </bean> --> -
Find the
baseCacheFlushingInterceptorand inject thesynchronousRemoteInvokerbean in theflushinginterceptor:<bean id="baseCacheFlushingInterceptor" class="com.quark.qpp.common.caching.BaseCacheFlushingAdvice" abstract="true"> <property name="remoteInvoker" ref="synchronousRemoteInvoker"/> </bean> -
Save and close the file.
-
In the "ServerApp.properties" file located in the
[QPP Server]/conffolder, uncomment the following:# Uncomment following properties to configure QPP cluster with synchronous cache update # Set comma separate URIs of peer server instances which are part of Cluster except the node itself server.peer.url=http://{peerHostN 1}:61400,http://{peerHostN 2}:61400 # Http context which may be used to invoke cache flushing server.cache.remoteFlush.context=rest/service/xcache/flush -
For each node open the "rest-servlet.xml" file located in the
[QPP Server]/webapps/rest/WEB-INFfolder, uncomment the following:<!-- Following code should be uncommented for synchronous REST based cache flushing in clustered environment. This enables "RemoteFlushController" which handles HTTP requests from remote peers for flushing the cache. --> <context:component-scan base-package="com.quark.qpp.common.caching"/> -
Restart the server.
Platform Server deployed in external Tomcat
On each Quark Publishing Platform Server computer:
-
Deploy a standalone instance of Quark Publishing Platform Server in external Tomcat, using the database on the initial computer.
-
Open the "ActiveMQ.xml" file located in the
qpp/conffolder and add network connectors to integrate the server instance's message queue with one or more server instances in the cluster, whereqpp-node-Nis the name of a computer where another instance of Quark Publishing Platform Server is deployed:Add these network connectors the same way you added them in Step 2 of the section: "Platform Server deployed as a standalone server to work as nodes".
-
Uncomment the transport connector(s) in the "ActiveMQ.xml" file to integrate the server instances’ message queues with the IP address and name of the server instances in the cluster.
<transportConnector uri="tcp://localhost:${jms.openWirePort}?wireFormat.maxInactivityDuration=0" updateClusterClients="true" rebalanceClusterClients="true" updateClusterClientsOnRemove="true"/> <transportConnector uri="tcp://${server.machinename}:${jms.openWirePort}?wireFormat.maxInactivityDuration=0"/> -
In the "ServerApp.properties" file located in the
[QPP Server]/conffolder, assign a unique value toserver.id.prefix, identifying the server instance. -
In the "ServerApp.properties" file located in the
[QPP Server]/conffolder, assign the IP of the machine toserver.machinenameattribute, identifying the server instance. -
In the "server.xml" file located in the
{TOMCAT_HOME}/conffolder, assign a unique value to thejvmRouteattribute of the<Engine>tag.<Engine name="Catalina" defaultHost="localhost" jvmRoute="node1"> -
Edit the
tomcat_home/conf/context.xmlfile as follows:<Context sessionCookiePath="/"> -
Rename the "serviceArchivesMultiServer" folder, located at
{TOMCAT_HOME}/webapps/webServices/WEB-INF, to "services". -
Edit the "Catalina.bat" file located in the
{TOMCAT_HOME}/binfolder. Set the following runtime parameter to run the server in multi-server mode:Set
CATALINA_OPTS=-Dspring.profiles.active=multiserverIf apache tomcat is running as a "service" then add this parameter in the Apache tomcat monitor under the Java tab in the
Java optiontext field:-Dspring.profiles.active=multiserver -
Open the "web.xml" file of the workspace and admin webapps, located in the
{TOMCAT_HOME}/webapps/ WEB-INFfolder for each webapp and uncomment theSessionResetFilterto handle sessions in case of node failure as given below:<filter> <filter-name>SessionResetFilter</filter-name> <filter-class>com.quark.web.security.servlet.SessionResetFilter</filter-class> <init-param> <param-name>jvmRoute</param-name> <param-value>qpp1</param-value> </init-param> <init-param> <param-name>sessionCookieName</param-name> <param-value>JSESSIONID</param-value> </init-param> <init-param> <param-name>sessionInitUrls</param-name> <param-value> /workspace/reconnectUser.qsp /workspace/login.qsp </param-value> </init-param> </filter> <filter-mapping> <filter-name>SessionResetFilter</filter-name> <url-pattern>/*</url-pattern> </filter-mapping>The value of the
<param-value>qpp1</param-value>should be same as that in the " server.xml" file of Step 6. -
Repeat the above steps for all Quark Publishing Platform nodes.
Configuring IIS as an HTTP load balancer
To configure IIS 7 as an HTTP load balancer:
-
The first step is to deploy the Tomcat connector. For more details on how to do this, see http://tomcat.apache.org/connectors-doc/webserver_howto/iis.html. Create a new folder named "TomcatConnector," then put the "isapi_redirect.dll" file from the Tomcat Connector for IIS build.
-
Create a new file named "isapi_redirect.properties" in the same folder, and insert the following into the file:
extension_uri=/jakarta/isapi_redirect.dll log_file=C:\TomcatConnector\Log\isapi.log # Make sure the directory listed for log files in the # "isapi_redirect.properties" file exists log_level=info worker_file=C:\TomcatConnector\worker.properties worker_mount_file=C:\TomcatConnector\uriworker.properties -
Create a new file named "workers.properties" in the same folder, and insert the following into the file, where
qpp-node1andqpp-node2are the values of thejvmRouteattribute as specified in the "server.xml" file for each Quark Publishing Platform Server:worker.list=TomcatBalancer worker.TomcatBalancer.type=lb worker.TomcatBalancer.balance_workers=qpp-node1,qpp-node2 worker.TomcatBalancer.sticky_session=True worker.TomcatBalancer.sticky_session_force=True worker.TomcatBalancer.method=Request worker.TomcatBalancer.lock=Pessimistic worker.qpp-node1.type=ajp13 worker.qpp-node1.host=qpp-node1 # This should be the same as the port in the AJP connector defined # in the "server.xml" file for the Tomcat server in which Quark # Publishing Platform is deployed worker.qpp-node1.port=61398 worker.qpp-node1.lbfactor=3 worker.qpp-node2.type=ajp13 worker.qpp-node2.host=qpp-node2 # This should be the same as the port in the AJP connector defined # in the "server.xml" file for the Tomcat server in which Quark # Publishing Platform is deployed worker.qpp-node2.port=61398 worker.qpp-node2.lbfactor=3 -
Create a new file named "uriworker.properties" in the same folder, and insert the following into the file:
/admin/*=TomcatBalancer
/admin=TomcatBalancer
/workspace/*=TomcatBalancer
/workspace=TomcatBalancer
/webservices/*=TomcatBalancer
/webservices=TomcatBalancer
/rest/*=TomcatBalancer
/rest=TomcatBalancer
/messaging/*=TomcatBalancer
/messaging=TomcatBalancer
/qxpsmadmin/*=TomcatBalancer
/qxpsmadmin=TomcatBalancer
/favicon.ico=TomcatBalancer
/*=TomcatBalancer
/qxpsm/*=TomcatBalancer
/qxpsm=TomcatBalancer
/pluginwiris_engine/*=TomcatBalancer
/pluginwiris_engine=TomcatBalancer
This file contains the mappings of the URLs that need to be handled by IIS and forwarded to Quark Publishing Platform Servers.
-
Using the IIS management console, add a new virtual directory named "jakarta" to your IIS Web site, with the physical path of the directory where you placed the "isapi_redirect.dll" file.
-
Give the virtual directory execute permission. Select the virtual folder, double-click Handler Mappings, and then click Edit Feature Permissions in the Actions pane. Check Execute in the Edit Feature Permissions dialog box, and then click OK.
-
Add an ISAPI filter to the IIS Website. Select the Website, double-click ISAPI Filters, and then click Add in the Actions pane. In the Add ISAPI Filter dialog box, enter a name and the path of the "isapi_redirect.dll" file, and then click OK.
-
Configure the ISAPI and CGI Restrictions feature. Navigate to the Server Home screen, double-click ISAPI and CGI Restrictions, and then click Add in the Actions pane. In the Add ISAPI or CGI Restriction dialog box, enter a name and the path of the "isapi_redirect.dll" file, check Allow extension path to execute, and then click OK.
-
Enable Windows authentication. Navigate to your Website and double-click Authentication. Right-click Windows Authentication and choose Enable, disable the other authentication options, and then restart IIS.
-
To verify the installations, start Quark Publishing Platform Server on all nodes, then access each server using the computer name or IP address and port of the IIS server. The IIS server should serve and load-balance the request using the Tomcat connector. You can view the details in the log file identified in the "isapi_redirect.properties" file.
Configuring Apache Web Server as an HTTP load balancer
To configure Apache Web Server 2.2 with the latest version of the JK Tomcat Connector for Apache 2.2 as an HTTP load balancer:
-
The first step is to deploy the Tomcat connector. For more details on how to do this, see http://tomcat.apache.org/connectors-doc/miscellaneous/faq.html. Copy the "mod_jk.so" file from the Tomcat Connector download location to
{Apache_2.2_installation}/modules. -
Open the file
{Apache_2.2_installation}/conf/httpd.confin a text editor and insert the following content:LoadModule jk_module modules/mod_jk.so<IfModule jk_module> JkWorkersFile conf/workers.properties JkLogFile logs/mod_jk.log JkLogStampFormat "[%H:%M:%S] " JkRequestLogFormat "%T" JkLogLevel error JkOptions +ForwardKeySize +ForwardURICompat -ForwardDirectories <Directory /> AllowOverride All <Limit GET HEAD POST PUT DELETE OPTIONS> Order Allow,Deny Allow from all </Limit> </Directory> JkMount /workspace TomcatBalancer JkMount /workspace/* TomcatBalancer JkMount /webservices TomcatBalancer JkMount /webservices/* TomcatBalancer JkMount /admin TomcatBalancer JkMount /admin/* TomcatBalancer JkMount /rest TomcatBalancer JkMount /rest/* TomcatBalancer JkMount /messaging TomcatBalancer JkMount /messaging/* TomcatBalancer JkMount /qxpsm TomcatBalancer JkMount /qxpsm/* TomcatBalancer JkMount /qxpsmadmin TomcatBalancer JkMount /qxpsmadmin/* TomcatBalancer JkMount /pluginwiris_engine/* TomcatBalancer JkMount /pluginwiris_engine TomcatBalancer JkMount /proofreader TomcatBalancer JkMount /proofreader/* TomcatBalancer </IfModule> -
Create a file named
{Apache_2.2_installation}/conf/workers.propertiesand add the following content to it, whereqpp-node1andqpp-node2are the values of thejvmRouteattribute as specified in the "server.xml" file for each Quark Publishing Platform Server:worker.list=TomcatBalancer worker.TomcatBalancer.type=lb worker.TomcatBalancer.balance_workers=qpp-node1, qpp-node2 worker.TomcatBalancer.sticky_session=True # This should be commented out, if it is not, you cannot connect to the Apache Web server which # acts as the load balancer. worker.TomcatBalancer.sticky_session_force=True worker.TomcatBalancer.method=Request worker.TomcatBalancer.lock=Pessimistic worker.qpp-node1.type=ajp13 # This should be the IP address of the first QPP node worker.qpp-node1.host=Server 1 # 8009 is for external tomcat server # 61398 is for embedded tomcat with QPP worker.qpp-node1.port=61398 worker.qpp-node1.lbfactor=3 worker.qpp-node2.type=ajp13 # This should be the IP address of the first QPP node worker.qpp-node2.host=Server 2 # 8009 is for external tomcat server # 61398 is for embedded tomcat with QPP worker.qpp-node2.port=61398 worker.qpp-node2.lbfactor=3 -
Restart Apache 2.2.
-
To verify the installations, start Quark Publishing Platform Server on all nodes, then access each server using the computer name or IP address and port of the Apache server. The Apache server should serve and load-balance the request using the Tomcat connector. You can view the details in the log files at
{Apache_2.2_Installation}/logs.
Elasticsearch
A Multi-server deployment can leverage Elasticsearch to avoid regenerating the search index for each application node of the Platform multis-erver cluster.
Download and install Elasticsearch
-
Download Elasticsearch from the following location:
-
Extract the "elasticsearch(version).zip" file to the file location where you want Elasticsearch installed. (For example: c:\elasticsearch)
All Elasticsearch 5.x versions are supported.
To run Elasticsearch:
-
On Unix: Run
bin/elasticsearch.On Windows: Run bin\elasticsearch.bat.
-
Run
curl -X GET http://localhost:9200/
Configuring Platform server to leverage Elasticsearch
A multi-server deployment can leverage Elasticsearch to avoid regenerating the search index for each application node of the Platform multi-server cluster.
Perform the following steps on each Quark Publishing Platform Server computer:
-
Open the "ESIndexingConfig.properties" file located in the
[QPP Server]/conffolder. -
Specify where Elasticsearch is running:
#Comma delimited list of host:tcp_port entries pointing to Elasticsearch cluster nodes
es.cluster.nodes=platform2k12:9300
The default port for Elasticsearch is 9300.
-
Specify the name of the index to be used for attributes:
es.attribute.index.name=qps-attribute-index -
Specify the name of the index to be used for text:
es.text.index.name=qps-text-index -
In the "ESAttributeIndexSettings.json" file located in the
[QPP Server]/conffolder, specify the number of shards and replicas required for the index:{ "index": {"number of shards":5, "number of replicas":1 } ... }Please see the following tech notes for recommendations on specifying the number of shards and replicas:
Configuring Elasticsearch for a multi-server environment
When deployed in a multi-server environment, where each server is running its own instance of Elasticsearch, the cluster is run in a Master-Child concept. One instance of Elasticsearch is considered the Master (based on which node was deployed first) and all other instances are considered Child instances. If the Master instance is terminated, one of the Child instances becomes the Master.
To configure each Elasticsearch instance as part of a cluster, perform the following steps for each Elasticsearch deployment:
-
Open the "elasticsearch.yml" file located in the
{Elasticsearch_install_path}/configfolder. -
Specify the name of the cluster:
cluster.name: myESclustername -
Specify the name of this node:
node.name: nameofnode1 -
Specify the network host name:
network.host: mynetworkhost -
Identify the other nodes (instances of Elasticsearch) in your cluster:
discovery.zen.ping.unicast.hosts: ["nameofnode2", "nameofnode3"] -
On each Quark Publishing Platform Server computer, in the "ESIndexingConfig.properties" file located in the
[QPP Server]/conffolder, specify the name of the cluster:#name of the Elasticsearch cluster to which this instance of Elasticsearch client will connect to. es.cluster.name=myESclustername
Configuring Elasticsearch for a single server environment
Elasticsearch is the default search engine for a multi-server profile while Lucene is the default for a single server profile.
To configure Elasticsearch as the default search engine in a single server configuration perform the following steps:
-
Open the "ServerStartup.bat" file located in the server installation folder, and update the following in bold:
java -server -Xmx1536m -XX:MaxPermSize=256m -classpath "%JavaClassPath%" -Doracle.jdbc.J2EE13Compliant=true -Djava.security.krb5.conf=conf/krb5.conf -Djava.endorsed.dirs="endorsed" Dspring.profiles.active=multiserver com.quark.qpp.Server PluginsContext.xml -
Update the "wrapper.conf" file located in the server installation folder, to add the multiserver profile:
wrapper.java.additional.12=-Dspring.profiles.active=multiserverThese changes do not go into effect until after restarting the server or Windows service.
Run Elasticsearch
Running Elasticsearch requires at least Java 8 update 131 or later. The environment
variable JAVA_HOME should be set appropriately.
Elasticsearch can be started using one of the following methods:
-
Using a batch file:
To run Elasticsearch in the foreground as a new process, simply run the "elasticsearch.bat" located in the
/binfolder. -
As a service:
To run Elasticsearch in the foreground as a new process, simply run the "elasticsearch.bat" located in the
/binfolder.To run Elasticsearch as a service, run the "service.bat" located in the
/binfolder with the following commands:-
Install Elasticsearch as a service by executing the following command:
C:\elasticsearch-5.4.0\bin>service.bat install. -
After installation, start the Elasticsearch as a service by executing the following command:
C:\elasticsearch-5.4.0\bin>service.bat start -
Stop the Elasticsearch service by executing the following command:
C:\elasticsearch-5.4.0\bin>service.bat stop -
Remove the installed Elasticsearch service (and stop the service if started) by executing following command:
C:\elasticsearch-5.4.0\bin>service.bat remove -
Start a GUI for managing the installed service by executing the following command:
C:\elasticsearch-5.4.0\bin>service.bat manager
For more information, see www.elastic.co/guide/en/elasticsearch/reference/current/setup-service-win.html#setup-service-win
-
Providing an interface for Elasticsearch
Elasticsearch does not provide a user interface, so Quark offers a 3rd party plugin to provide one.
Elasticsearch-head is a web-based front-end for an Elasticsearch cluster. (https://github.com/mobz/elasticsearch-head#running-with-built-in-server).
To deploy and configure the Elasticsearch plugin:
-
Configure the properties file to allow cross origin:
Add the following to the
\config\elasticsearch.ymlfile:-
http.cors.enabled: true
-
http.cors.allow-origin: "*"
-
-
Download the plugin from https://github.com/mobz/elasticsearch-head.
-
Host the plugin as a Web App in any web container. This may be Platform Server or a separate external web container (e.g. Apache Tomcat).
-
Once the Web App is up and running, navigate to the plugin UI.
-
Using the plugin UI, connect to any running Elasticsearch instance, but first ensure that the Elasticsearch instance is running.
To utilize the plugin, perform the following steps for each Elasticsearch deployment:
-
Copy and paste the head plugin to the
{Elasticsearch_install_path}/pluginsfolder. -
To access this user interface:
{network host}:9300/_plugin/head/
Verify that Elasticsearch is running
-
Go to the Platform server installation folder.
-
Open the Platform server log file "QppServer.log" in the log folder.
-
Look for the following text:
"2018-09-24 17:12:12,646 INFO [com.quark.qpp.searchservice.indexing.ElasticSearchAssetIndexer][main][User(Id:0,
                                          Name:System)] - Elasticsearch based TextIndexer Registered.
Lucene
Lucene is the default search engine for a single-server profile while Elasticsearch is the default search engine for a multi-server profile.
To configure Lucene as the default search engine in a multi-server configuration, perform the following steps:
-
Navigate to the
[QPP Server]/libfolder. -
Uncompress "qpp-server-textIndexing-elasticsearch-14.2.jar".
-
Open "com\quark\qpp\textindexing\es\impl\ESTextIndexerContext.xml".
-
In tag, change
profile="multiserver"toprofile="!multiserver". -
Compress the jar back to "qpp-server-textIndexing-elasticsearch-14.2.jar".
-
Uncompress "qpp-server-textIndexing-lucene-14.2.jar"
-
Open "com\quark\qpp\textindexing\adapter\impl\LuceneTextIndexerContext.xml"
-
In tag, change
profile="!multiserver"toprofile="multiserver". -
Compress the jar back to "qpp-server-textIndexing-lucene-14.2.jar".
Settting up the Amazon S3 bucket as a Platform server repository
This section describes the steps necessary to use Amazon S3 as a repository adapter in Quark Publishing Platform.
Create an S3 bucket in AWS
To create an S3 bucket in AWS:
-
Log on to the AWS Console using a valid account and user.
-
On the AWS Management Console, under Storage, click S3.
-
Click Create bucket.
-
On the Name and Region pane, specify the bucket name and an appropriate region, and click Next.
-
On the Configure Options pane, check Keep all version of an object in the same bucket.
This is mandatory as Platform uses S3-provided versioning for asset version management. Also, be sure that you do NOT apply any Lifecycle rules on the bucket which will affect object versions. -
On the Set permissions pane, block all public access to this bucket, and click Next.
-
On the Review pane, review your selections and click Create bucket.
-
Select the newly created bucket and click Create Folder.
-
Create an Assets folder inside the bucket.
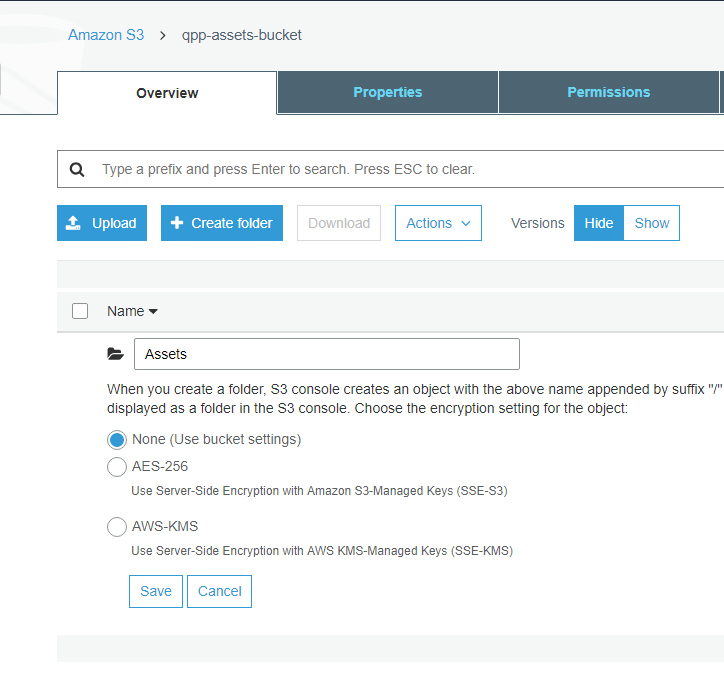 Optionally an appropriate server-side encryption can be used for data at rest.
Create a policy
Create a policy and assign the S3 bucket permissions to the EC2 instance where Platform Server is running.
The following S3 bucket permissions are required by Platform Server:
-
s3:PutObject
-
s3:GetObject
-
s3:GetObjectVersion
-
s3:DeleteObjectVersion
To create a policy and assign the permissions:
-
On the AWS Management Console, under Security, Identity, & Compliance, click IAM.
-
Select Policies from the Dashboard menu.
-
Click Create policy.
-
Select the JSON tab and create the policy using the following json:
{
"version": "2012-10-17",
"Statement": [
{
"Effect": "Allow",
"Action": [
"s3:GetObject",
"s3:GetObject",
"s3:GetObjectVersion",
"s3:DeleteObjectVersion",
],
"Resource": [
"arn:aws:s3:::qpp-assets-bucket/Assets/*"
]
}
]
}
-
On the Review policy pane, provide an appropriate name and description and click Create policy.
Create a role
Create a role and assign your newly created policy to this role:
-
Select Roles from the Dashboard menu
-
Click Create role.
-
Click AWS service and select EC2 as the service that will use this role.
-
Click Next: Permissions.
-
Under Attach permissions policies, check the box next to the policy you created in the previous step.
-
Click Next: Tags.
-
Click Next: Review.
-
On the Review pane, provide a Role name, review your selections and click Create role.
Assign role to EC2 instance
If you created a role using the instructions in the previous sections, attach the role to the Platform EC2 instance:
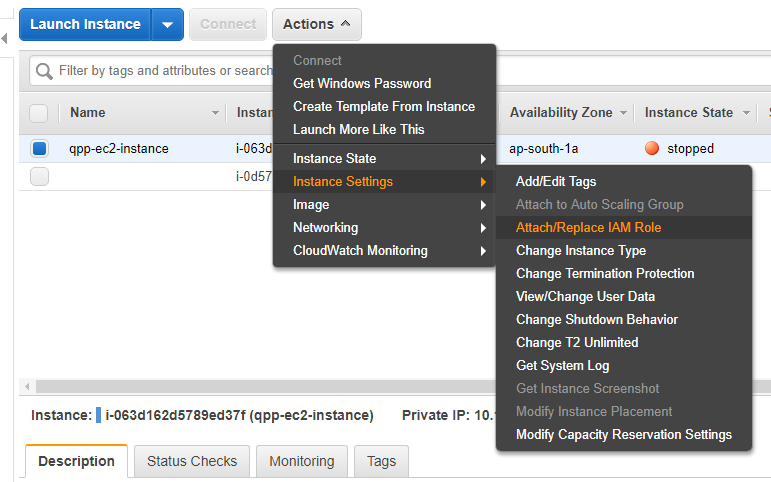
Register Amazon S3 as a repository adapter in Platform
-
Open Platform's web-based Admin client.
-
Under Administration > Storage, create the new repository by providing the appropriate bucket name, region and folder.
Choose an appropriate region from the list of all regions found here: