Quark Publishing Platform Web Client — Manual configuration
The following sections describe how to configure the advanced settings of Quark Publishing Platform Web Client.
Configuration overview
The workspace configuration is organized into two categories:
-
Application level settings
-
Document level settings
These are set in the "Workspace-Config.xml" configuration file in the [QPP Server]/ webapps /workspace/WEB-INF/classes folder.
Application level settings
The attribute elements of ApplicationSettings defines various application level settings:
-
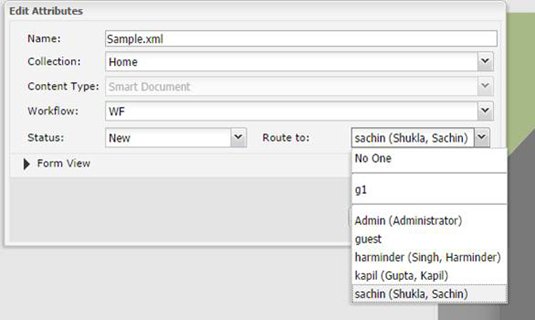
userNameFormatting: Specifies the format of the user name to be displayed in all dialogs:-
0to display log on name <username> -
1to display <First Name> <Last Name> -
2to display <Last Name>, <First Name>
-
-
layoutPreview: Specifies the look and feel of the preview window for assets belonging to the QuarkXPress content type:-
Trueto display the preview in a separate browser window -
Falseto display the preview in a javascript window instead of a browser.
-
-
viewrevision_expandAll: Specifies whether all revision comments need to be expanded in the view revisions dialog. -
supported_picture_extension: Specifies the possible file types allowed when importing a picture/text in the article/project editors. -
picture_editing_extension: Specifies the possible file formats allowed when editing pictures in the article/project editors. -
defaultPreviewScale: Specifies the default zoom preview setting to be used when editing articles/projects and viewing assets (live preview). Valid values for this parameter range from 0.1 to 5. -
ajaxTimeout: Specifies the time period for all background requests originating from browser after which the requests will be marked as timed out. The value is specified in milliseconds. -
showFormView: Specifies whether to show the form view panel in the Check In dialog. Set totrueto show the form view pane. -
topBannerJspPath: Specifies the path to the .jsp file to be included to show the top banner in the assignment page. -
logoFilePath: Specifies the path to the logo image shown in the top banner in the assignment page. -
enabledPublishingChannels: Defines the list of publishing channels that need to be honored when selecting an asset. -
enableDeliveryChannels: Defines whether delivery channels needs to be enabled or not. -
enabledDeliveryChannels: Defines the list of delivery channels that need to be honored when selecting an asset. This would get enabled when theenableDeliveryChannelsoption is set totrue. -
allowPublishedRenditionDownload: Defines whether to allow the download output displayed for the various previews using the publishing defined for the selected asset.
<ApplicationSettings>
  <Add key="viewrevision_expandAll" value="false"/>
  <Add key="supported_picture_extension" value="bmp;jpg;jpeg;tif;tiff;gif;"/>
  <Add key="picture_editing_extension" value="jpg;jpeg;tif;tiff;eps"/>
  <Add key="userNameFormatting" value="0"/>
  <Add key="layoutPreview" value="true"/>
  <Add key="defaultPreviewScale" value="0.8"/>
  <Add key="ajaxTimeout" value="300000"/>
  <Add key="showFormView" value="false"/>
  <Add key="topBannerJspPath" value="Header.jsp"/>
  <Add key="logoFilePath" value="images/login/topbanner-innerpage-left.png"/>
  <Add key="enabledPublishingChannels" value="qxpPdf;qxpEpub;qxpAppStudio;qxpAppStudioPackage;busDocPdf;busDocHtml;busDocQxp/>
  <Add key="enableDeliveryChannels" value="false"/>
  <Add key="enabledDeliveryChannels" value="checkInToSharepoint;checkInToFileNet;checkInToDocumentum;sendEmail;sendToFTPServer"/>
  <Add key="allowPublishedRenditionDownload" value="true"/>
</ApplicationSettings>
Multi-Channel preview
For each content type you will specify the publishing channels that should be available
to the user in the Preview tab of the assignment page. Publishing channels for preview are configured using
the <PreviewSettings> element:
-
displayName: Specifies the channel name displayed in the user interface (optional). If not given, thenoutputFormatis used. -
Id: Specifies the Publishing Channel Id as defined in the Platform Server. -
ContentType: Specifies the content type of the asset . -
ApplyToChildContentTypes: Specifies whether to include the child content types. -
outputFormat: Supported values:-
IMAGE_ARCHIVE: An image archive for the published output, which will be rendered inside a web page.
-
HTML_ARCHIVE: An HTML archive for the published output, which will be rendered as is, pointing to the file name present in the HTML Archive.
-
PDF_ARCHIVE: The published output PDF, which will be rendered as is.
-
-
downloadChannel: (optional) Used in case a different channel needs to be invoked for download of selected channel preview.
<PreviewSettings>
  <ChannelMappings>
    <ChannelMapping contentType ="Business Document" applyToChildContentTypes ="true">
      <Channels>
        <Channel id="busDocPdf" outputFormat="PDF_ARCHIVE" displayName="PDF"/>
        <Channel id="busDocHtml" outputFormat="HTML_ARCHIVE" displayName="HTML"/>
        <Channel id="busDocJpeg" outputFormat="IMAGE_ARCHIVE" displayName="IMAGE"/>
      </Channels>
    </ChannelMapping>
    <ChannelMapping contentType="Smart Content" applyToChildContentTypes="true">
      <Channels>
        <Channel id="smartDocPdf" outputFormat="PDF_ARCHIVE" displayName="PDF"/>
        <Channel id="smartDocHtml" outputFormat="HTML_ARCHIVE" displayName="HTML"/>
        <Channel id="smartDocJpeg" outputFormat="IMAGE_ARCHIVE" displayName="IMAGE"/>
      </Channels>
    </ChannelMapping>
  </ChannelMappings>
</PreviewSettings>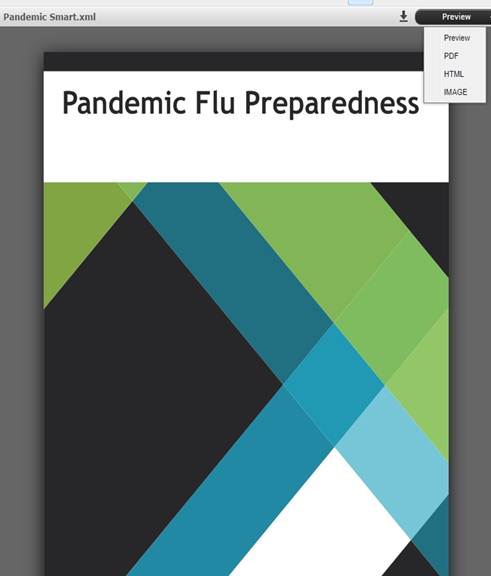
Attributes for General pane
The attributes for the General tab are configured using the <PreviewAttributes> element. The values specify the list of attributes to be displayed in the General tab for the selected asset.
<PreviewAttributes>
  <PreviewAttribute>Id</PreviewAttribute>
  <PreviewAttribute>Created</PreviewAttribute>
  <PreviewAttribute>Last modified</PreviewAttribute>
  <PreviewAttribute>Creator</PreviewAttribute>
  <PreviewAttribute>Last modifier</PreviewAttribute>
  <PreviewAttribute>Status</PreviewAttribute>
  <PreviewAttribute>Collection</PreviewAttribute>
  ........
</PreviewAttributes>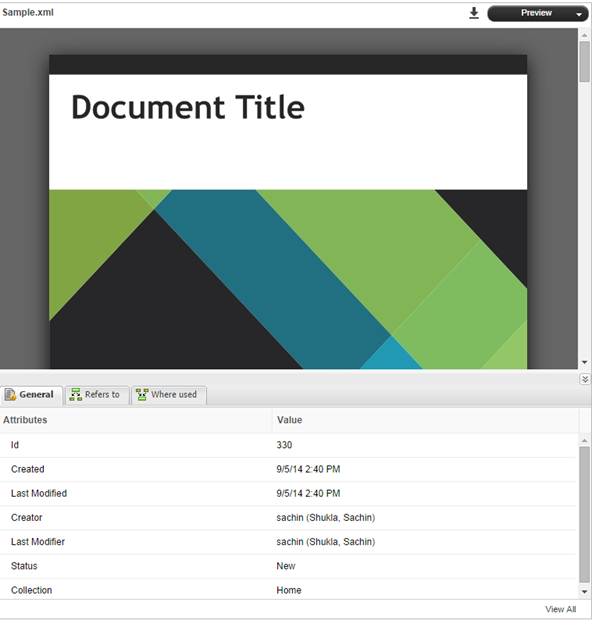
Role based Toolbar configuration
This section describes how to define the toolbar items for a desired role. Role based
configuration for toolbar items are configured using the <ToolbarConfig> element.
-
Role name: Specify the name of role whose configuration is to be defined. -
Item ID: Specify the id of the item whose appearance needs to be configured. -
showInToolbar: To hide the menu item in the toolbar, set this attribute to false. -
showInContext: To hide the menu item in the context menu, set this attribute to false. -
showInNewMenu: To hide the menu item in the New Asset menu, set this attribute to false. -
showInTemplateMenu: If the menu item is not to be shown in the New Asset from Template, set this attribute to false.
The following is the XML structure of the toolbar configuration:
<Role name ="[ROLE NAME]">
  <Item id ="[ITEM ID]"
    showInToolbar ="[true/false (defaults to true)]"
    showInContextMenu ="[true/false (defaults to true)]"
    showInNewMenu ="[true/false (defaults to true)]"
    showInTemplateMenu ="[true/false (defaults to true)]"/>
</Role>
<ToolbarConfig>
<Role name ="Guest">
<Item id ="new_qcd_menu_item"/>
<Item id ="new-search-btn"/>
<Item id ="duplicate-asset" showInToolbar="false"/>
<Item id ="delete-asset"/>
<Item id ="show-edit-attributes" showInContextMenu="false"/>
<Item id ="show-Asset_preview" showInToolbar="false"/>
........
</Role>
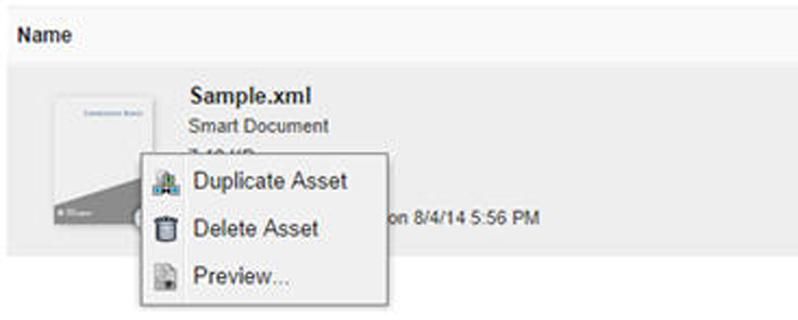
</ToolbarConfig> The Context menu for the Guest role will look like:
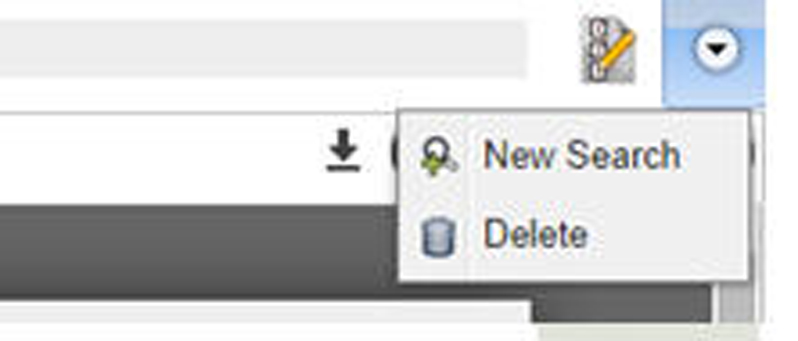
Toolbar items for the Guest role will look like:
Here is the list of item IDs:
-
checkin: Check in the Asset -
show-check-out: Check out the Asset -
cancel-checkout: Cancel Asset Check out -
get-asset: Get Asset -
new-search-btn: New Search (not available as Context Menu Item) -
show-Asset-Preview: Preview Asset -
show-edit-attributes: Edit Asset Attributes -
attachment-info: Show Attachment Information -
view-revisions: View Asset Revisions -
duplicate-asset: Duplicate Asset -
delete-asset: Delete Asset -
reindex-asset: Reindex Asset (not shown in Toolbar by default) -
publish-menu-btn: Publish an asset -
deliver-menu-btn: Deliver an asset -
restore: Restore assets -
archive-asset: Archive assets -
open-collection: Open the collection to which the asset belongs -
refresh-datadoc: Refresh a datadoc -
unlink-datadoc: Unlink a datadoc -
open-readonly: Open asset as read-only -
new_qcd_menu_item: Create new QuarkCopyDesk Article -
new_qxp_menu_item: Create new QuarkXpressProject from template
The showInToolbar and showInContextMenu attributes are only applicable for menu items displayed in the toolbar and the context
menus. For buttons configured in the ui-extension.xml file, showInToolbar is not applicable, as the configuration is meant for adding a toolbar button itself.
Additionally the button can be added to context menu, hence only showInContextMenu is applicable for ui-extension.xml buttons. The showInNewMenu and showInTemplateMenu attributes are only applicable for menu items in the New Asset menu dropdown, and are not applicable while setting up role based configuration for
ui-extension.xml menus in this section.
The rest of the configurable elements specified in "Workspace-config.xml" are for integration with Quark Author Web Edition. For more information, see Quark Author Web Edition Configuration Guide.
Restricting access to Web Client/Admin
To restrict the webapp so that the workspace and admin pages can only be accessed from within your own network, use a Tomcat Valve to restrict access based on an IP address range.
-
Open the "server.xml" file located in the
{install_path}/conffolder. -
Edit the context elements corresponding to the admin and workspace applications to engage a
RemoteAddrValve. The valve has to be configured to allow only intranet traffic. The final config would look something like the following:
 <Context path="/qxpsm" docBase="qxpsm">
  <Manager pathname="" />
</Context>
<Context path="/workspace"docBase="workspace">
  <Manager pathname="" />

  <Valve className="org.apache.catalina.valves.RemoteAddrValve" allow=" 10\.91\..*\..* "/>

</Context>
<Context path="/webservices"docBase="webservices">
  <Manager pathname="" />
</Context>
<Context path="/messaging" docBase="messaging">
  <Manager pathname="" />
</Context>
<Context path="/admin"docBase="admin">
  <Manager pathname="" />

  <Valve className="org.apache.catalina.valves.RemoteAddrValve" allow="  10\.91\..*\..*  " />

</Context>
<Context path="/rest"docBase="rest">
  <Manager pathname="" />
</Context>
The value of the allow attribute is a regex for matching IP addresses. Here the intranet IPs are assumed
to be in 10.91.x.x range. You need to update this value based on your network IP ranges.
Document save configuration
Attribute mapping and revision settings
The AttributeMapping element for each content type present in the workspace-config.xml file allows you to:
-
Specify the document attributes that should be mapped to Platform attributes.
-
Specify save configuration when a document is saved to the Platform Server.
<AttributeMapping>
  <ComponentTypes>
    <ComponentType name="Smart Section">
      <RevisionSettings>
        <RevisionSetting operation="SaveDocumentRevision">
          <SaveSilently>false</SaveSilently>
          <SaveAsMinorVersion>false</SaveAsMinorVersion>
        </RevisionSetting>
        <RevisionSetting operation="SaveDocument">
          <SaveSilently>false</SaveSilently >
          <SaveAsMinorVersion>false</SaveAsMinorVersion>
        </RevisionSetting>
        <RevisionSetting operation="ExportComponent">
          ......
        </RevisionSetting>
        <RevisionSetting operation="SaveComponent">
          ......
        </RevisionSetting>
      </RevisionSettings>
      <Attributes>
        <Attribute name="Text preview" xpath="/smart:section/smart:title" indexingOption="ALL_VERSIONS"/>
        <Attribute name="Global ID" xpath="/smart:section/@id" indexingOption="ALL_VERSIONS"/>
        <Attribute name="File extension" value="xml" indexingOption="ALL_VERSIONS"/>
        ......
      </Attributes>
    </ComponentType>
  </ComponentTypes>
</AttributeMapping>
Revision settings
The RevisionSettings element specifies the document versioning scheme (major or minor) and configuration
with regard to the Save dialog visibility while saving a document.
-
Operation: supported values are:-
SaveDocument: Saving a document to the server. Settings value referred to when a user clicks the Save and Close button in the Editor. -
SaveDocumentRevision: Saving a document revision to the server. Settings value referred to when a user clicks the Save button in the Editor. -
ExportComponent: Exporting a section of this component type from document of another component type and saving it as a document to the server. Settings value referred to when a user executes a Create Component operation in the Editor. -
SaveComponent: Saving a component as a new document version to the server. Settings value referred to when a component document is checked out inline in the main document and then checked in.
-
-
SaveSilently: Specifies whether the document is saved without showing the Save dialog or not. -
SaveAsMinorVersion: Specifies whether the document is saved as a minor version or not.
Attribute mapping
The Attributes element specifies the mapping of data from the document to the Platform Server attributes.
The values of the Platform attributes can be specified either as static text or an
XPath to the content in a document.
-
name: Specifies the name of the Platform Server attribute. -
value: Specifies the static attribute value. -
xpath: Specifies the XPath to be used for setting the Platform attribute value.You can either set XPath or a static value.
-
indexingOption: Supported values are:-
INITIAL_VERSION: Set this value to trigger indexing only for the first version of the document. This is the default value of theindexingOption. -
ALL_VERSIONS: Set this value to trigger indexing for every revision
-
-
inheritValueFromTemplate: Specifies whether the attribute value is inherited from the server template. The default value isfalse.
Attribute mapping configuration
If you want to configure some attributes so that attribute values are fetched from the document for the "Smart Document" content type:
-
Update the
Attributeskey for content type 'Smart Document':<Attributes> <Attribute name="Text preview" xpath="/smart:section/smart:title" indexingOption="ALL_VERSIONS"/> <Attribute name="Global ID" xpath="/smart:section/@id" indexingOption="ALL_VERSIONS"/> <Attribute name="Title" xpath="/smart:section/smart:title" indexingOption="ALL_VERSIONS"/> <Attribute name="File extension" value="xml" indexingOption="ALL_VERSIONS"/> <Attribute name="TextAttr" xpath="/smart:section/smart:body//smart:meta/smart:attribute[@name='disease']/smart:value" indexingOption="ALL_VERSIONS"/> <Attribute name="DateAttr" value="2014-08-14" indexingOption="ALL_VERSIONS"/> <Attribute name="NumberAttr" value="15" indexingOption="ALL_VERSIONS"/> <Attribute name="BooleanAttr" xpath="/smart:section/smart:body//smart:meta/smart:attribute[@name='transmission']/smart:value" indexingOption ="ALL_VERSIONS"/> <Attribute name="DateTimeAttr" xpath="/smart:section/smart:body//smart:meta/smart:attribute[@name='host']/smart:value" indexingOption ="ALL_VERSIONS"/> </Attributes>When a document of type "Smart Document" is checked in, the value of attributes like
Text previewandTitleare fetched from the document based on the XPath and get saved along with the document.
HTTP Security Headers
When it comes to ensuring the security of a SaaS platform like Quark Publishing Platform, implementing proper security headers is crucial. Security headers are HTTP response headers that allow a web server to communicate additional security measures to a web browser. They help protect against various types of attacks, such as cross-site scripting (XSS), clickjacking, and content injection.
Importance of HTTP security headers
The importance of HTTP security headers in web applications, including SaaS platforms, cannot be overstated. These headers play a fundamental role in strengthening the overall security posture of the application. Here are some key points regarding the importance of HTTP security headers:
-
Mitigating common web attacks: Security headers help mitigate common web application security risks such as cross-site scripting (XSS), clickjacking, MIME-sniffing, and other injection attacks. By implementing security headers, the SaaS platform can significantly reduce the risk of these attacks and enhance its resistance to exploitation.
-
Browser compliance: Security headers ensure that web browsers comply with specific security policies defined by the SaaS platform. This can include enforcing the use of secure connections (HTTPS), preventing resources from being loaded in unauthorized frames, and controlling the sources from which content can be loaded.
-
Enhancing user privacy: Certain security headers, such as Referrer-Policy, help protect user privacy by controlling the information that the browser includes with requests, including the URL of the referring page. This can prevent sensitive information from being leaked to unauthorized parties.
-
Regulatory compliance: Many industries and regions have regulatory requirements related to data security and privacy. Implementing security headers can assist SaaS platforms in meeting these compliance standards by demonstrating a commitment to security best practices.
-
Preserving trust and reputation: In today's digital landscape, users and customers expect strong security measures to be in place when interacting with web applications. By incorporating security headers, SaaS platforms can demonstrate their dedication to user security, which in turn helps preserve trust and reputation.
-
Proactive risk management: Security headers serve as a proactive risk management tool by providing an additional layer of defense against potential security threats. They help in the prevention of unauthorized access, data breaches, and other security incidents that could undermine the integrity of the SaaS platform.
-
Content security policy (CSP): CSP helps prevent cross-site scripting and data injection attacks by allowing site owners to define the sources of content that the browser should consider valid. This can include whitelisting trusted domains for scripts, stylesheets, or other resources.
List of HTTP security headers
Below is the list of essential HTTP security headers supported in Quark Publishing Platform –
-
X-Content-Type-Options: By setting the value of this header to "nosniff", you can prevent browsers from MIME-sniffing a response away from the declared content type, which can reduce the risk of certain types of attacks.
-
X-XSS-Protection: This header is designed to enable the browser's built-in Cross-Site Scripting (XSS) filter (X-XSS-Protection: 1; mode=block), which helps detect and block reflected XSS attacks.
-
X-Frame-Options: This header helps prevent clickjacking attacks by controlling whether a web page can be loaded within a frame or iframe. It can be set to DENY, SAME-ORIGIN, or ALLOW-FROM to specify which sites are allowed to frame the content. If not specified, the default value of DENY will be used.
These HTTP security headers are disabled by default in Quark Publishing Platform.
How to enable HTTP security headers in QPP
To enable the HTTP security headers in QPP, follow the steps given below –
-
Firstly, go to the location where the web.xml file is stored. For example,
-
For web admin platform, C:\Username\QPP\Qpp15\QPP\Development\WebApplications\WebAdmin\src\main\webapp\WEB-INF
-
For web editor platform, C:\Username\QPP\Qpp15\QPP\Development\WebApplications\WebEditor\src\main\webapp\WEB-INF
-
-
Open the web.xml file in your editor and search for the HTTP security header section.
-
By default, the HTTP security headers are disabled.
-
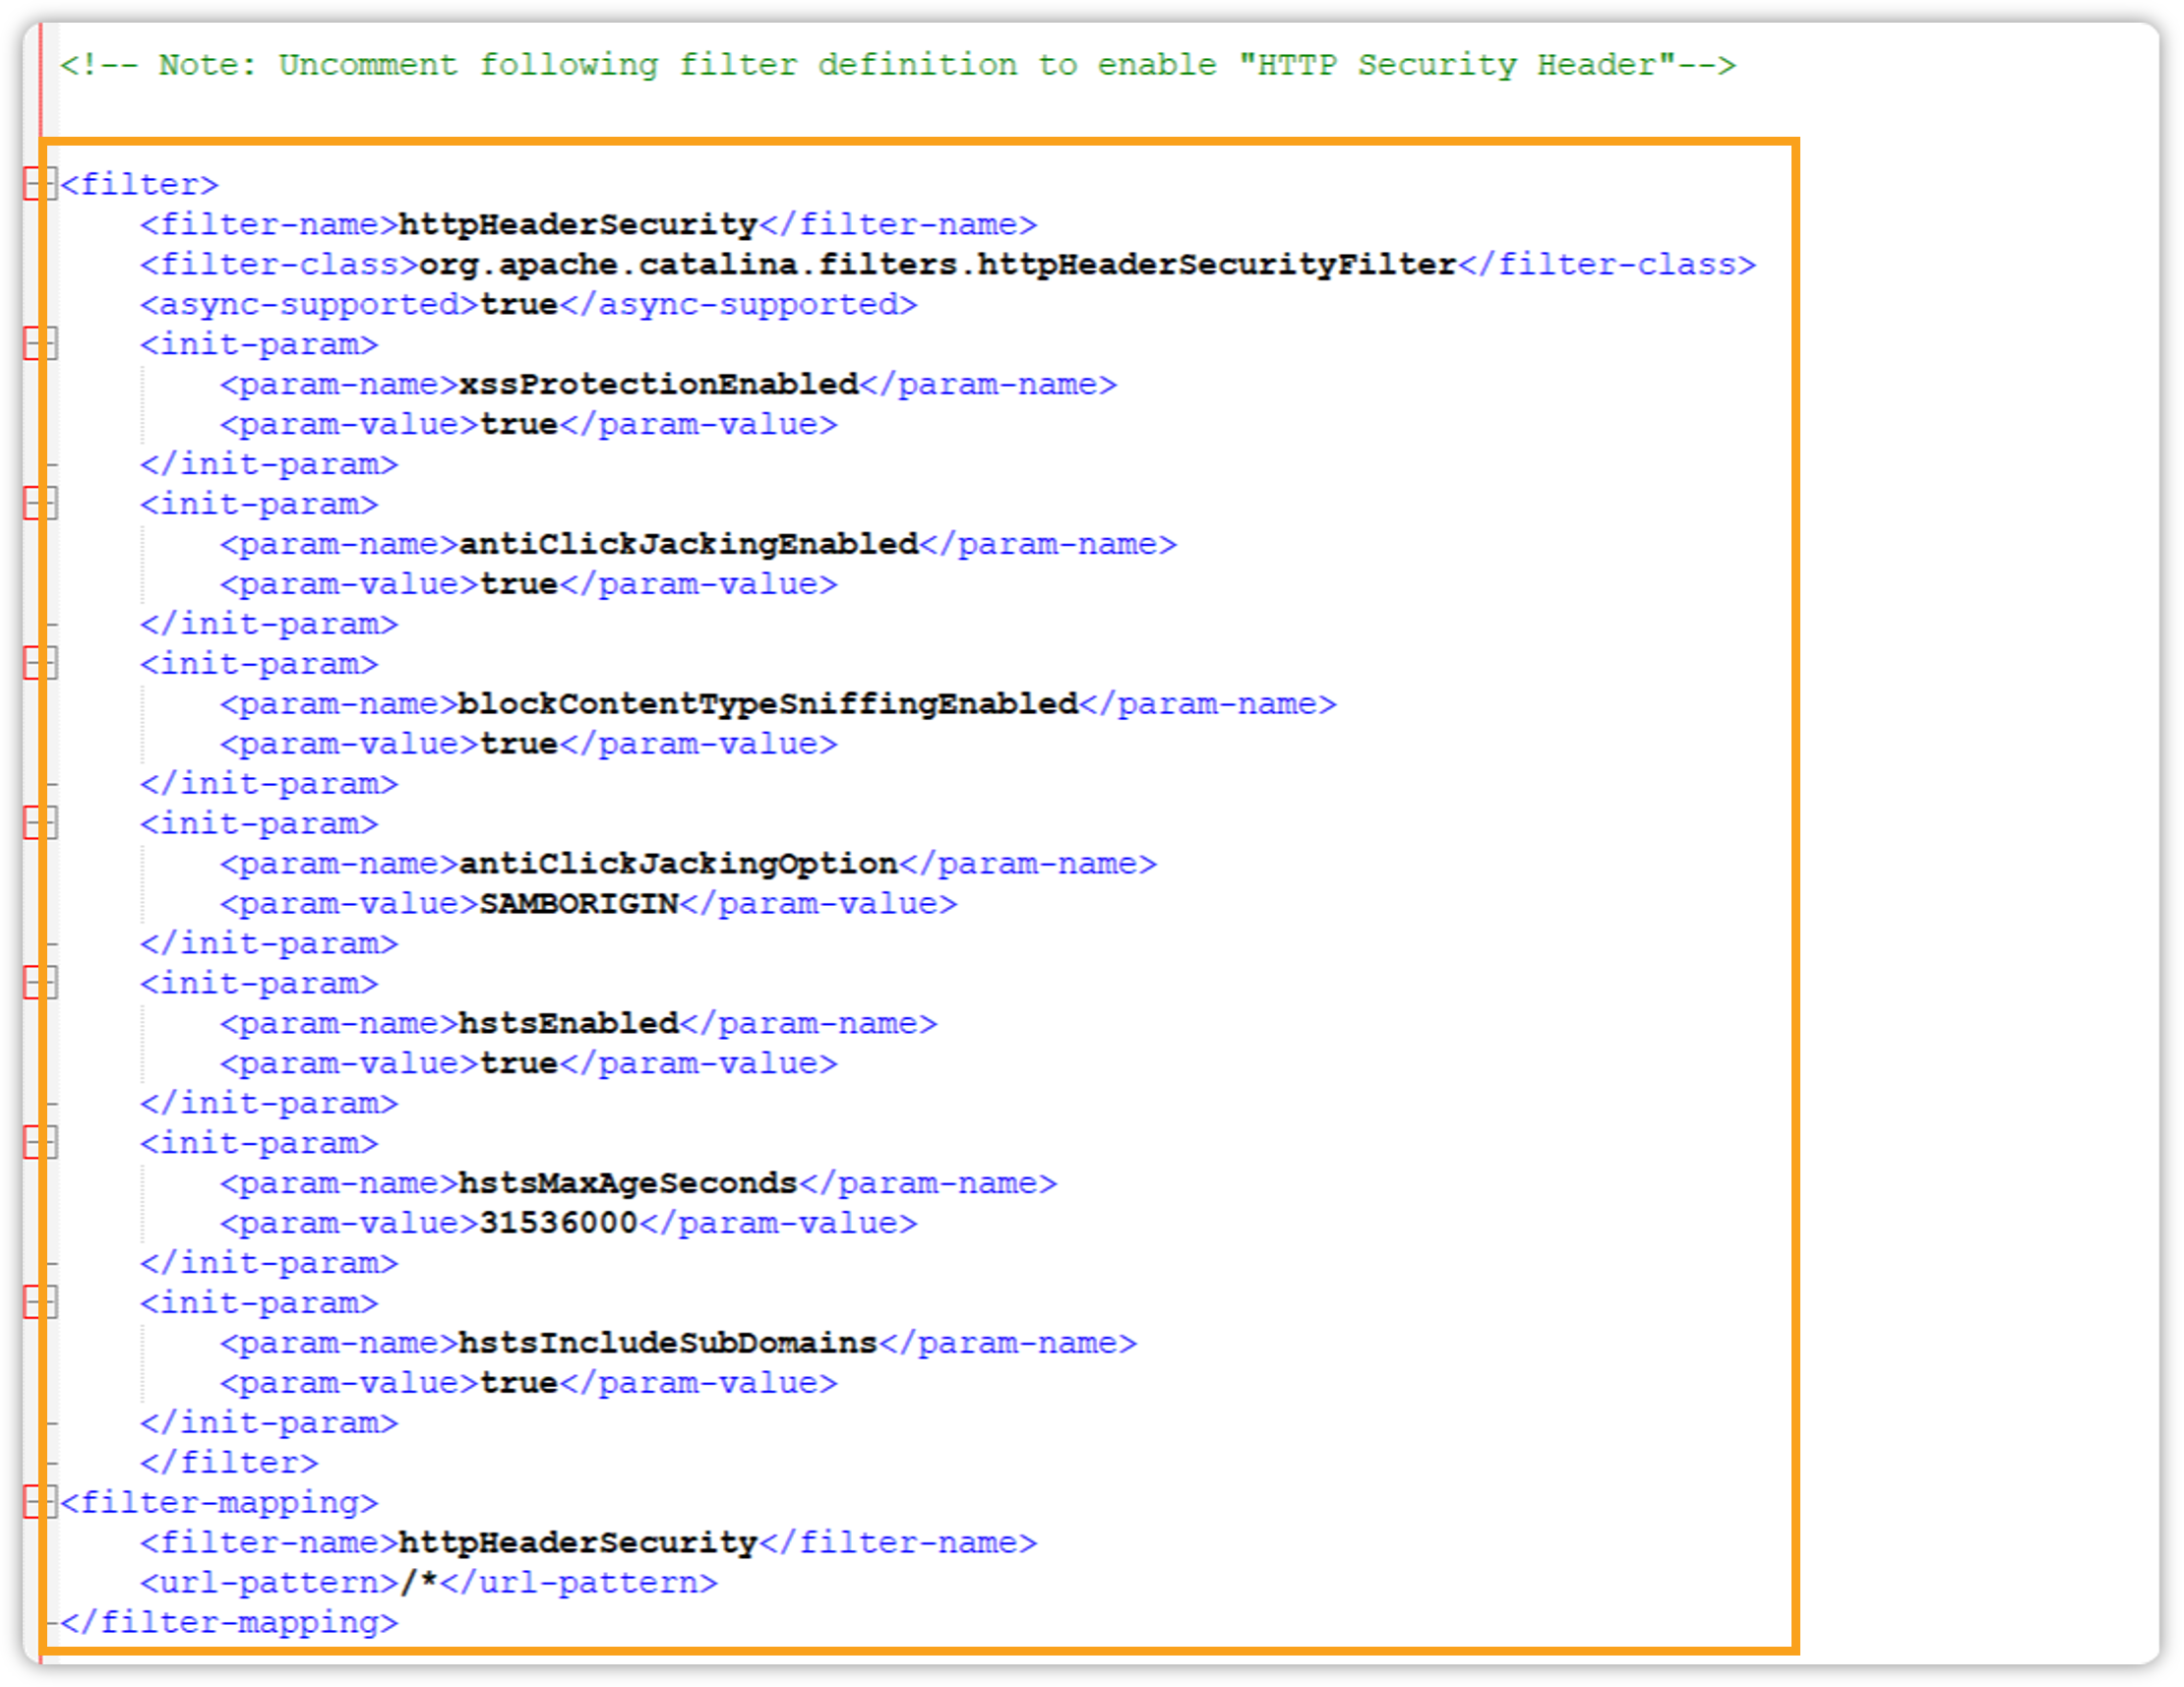
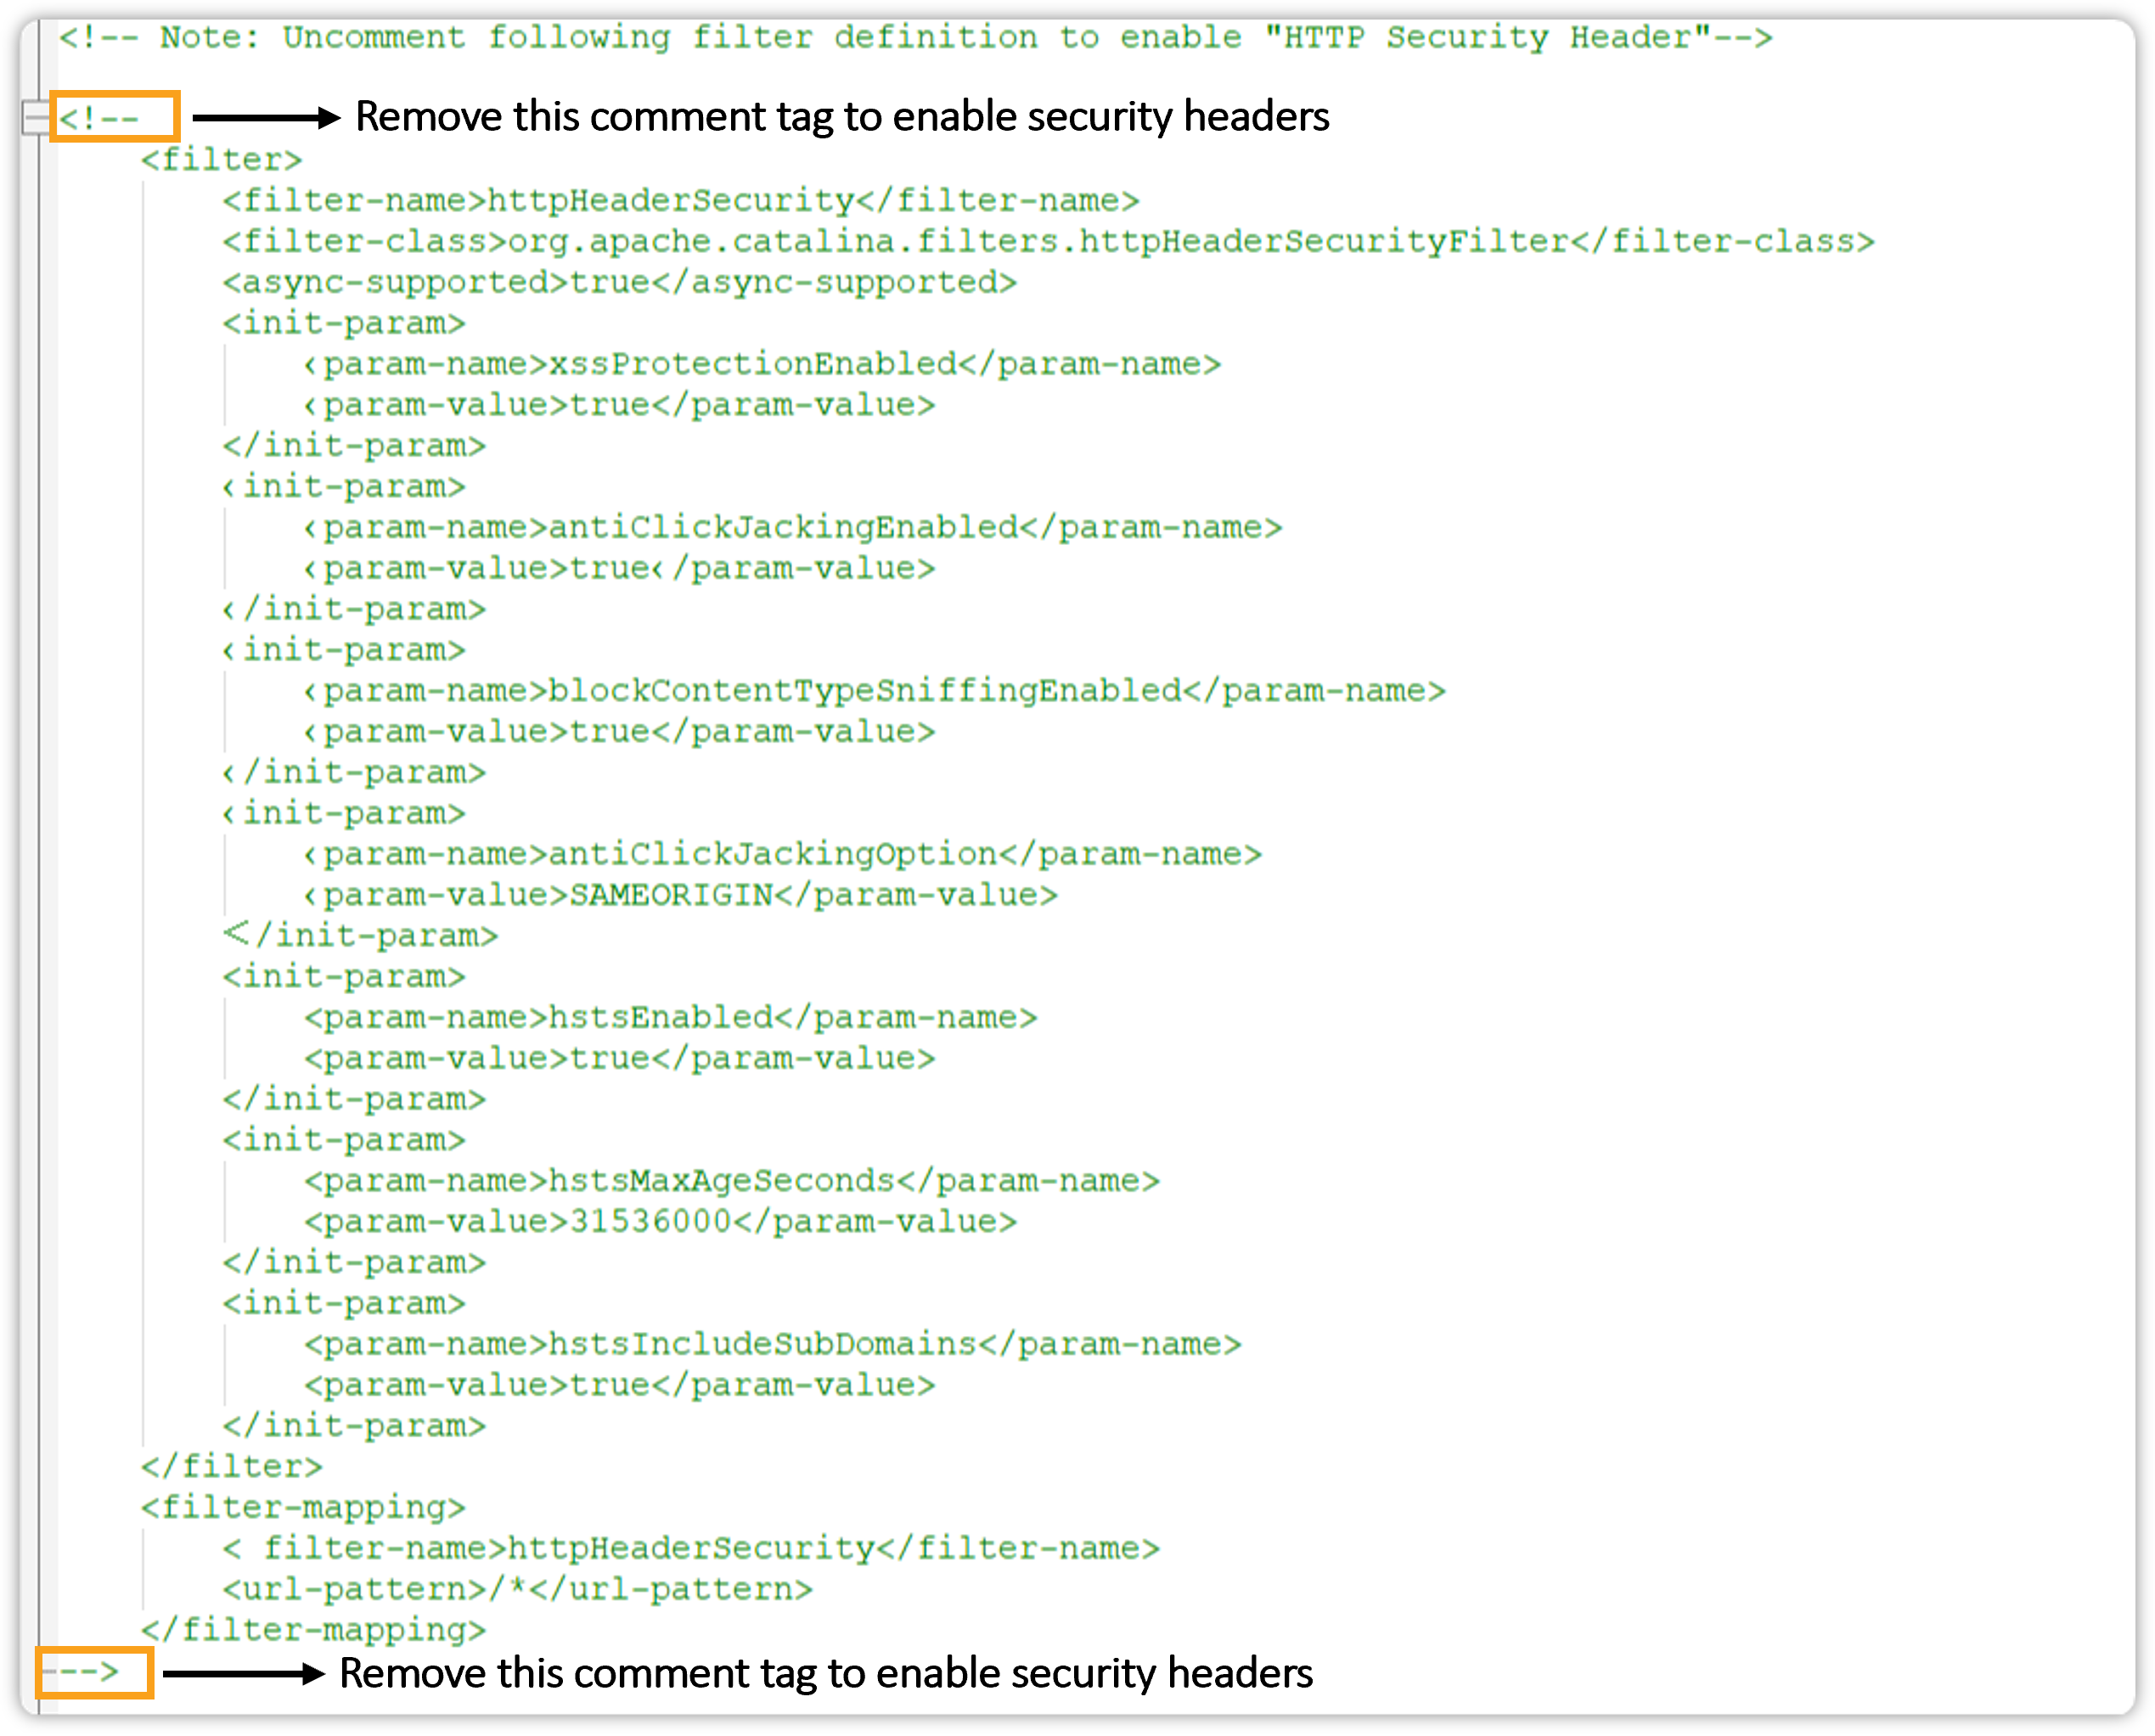
To enable the HTTP security headers, remove the comment tag <!--content to be hidden-->. Refer to screenshot below.
-
Once done, save the web.xml file.