Quark Publishing Platform Server — Manual configuration
You can change the default configuration after you install Quark Publishing Platform Server. In addition to setting parameters with JConsole while Quark Publishing Platform Server is running, you can adjust settings in different .xml files and .properties files. You can also adjust memory allocation for your JVM configuration.
Editing "ServerApp.properties"
To edit "ServerApp.properties":
-
Open the "ServerApp.properties" file in the
[QPP Server]/conffolder. -
Set the
jms.openWirePortvalue to the port number opened for JMS communication via the OpenWire protocol. Java clients such as Quark Publishing Platform Script Manager connect to this port to listen to server notifications. -
Set the
webServer.portvalue to the port number on which Tomcat listens for HTTP connections. Quark Publishing Platform Web Client and SOAP clients connect through this port. The value should be set to that specified for the HTTP connector in the Tomcat "server.xml" file. -
Set the
socketStreaming.portvalue to the port number to be used for file transfer (upload/download). -
To bind Quark Publishing Platform Server to a particular IP address, set the
server.machinenamevalue to that IP address and setserver.bindtoip=true. Or, if you have multiple network cards and you want to bind Quark Publishing Platform to all of their IP addresses, setserver.machinename=localhost,server.bindtoip=false, andserver.addtionalnames=[non-default-ip1],[non-default-ip2]. -
Set the
server.additionalnamesvalue to specify the global IP address where the firewall is exposed. -
Enter the
webServer.portvalue you configured for Tomcat (8080, for example). -
To allow users to log on to Quark Publishing Platform Server even when the directory server is not running, set
authentication.external.cacheTicket = true. -
To set the password case sensitivity, set the
server.password.case.sensitivevalue to false if case sensitivity is not considered for comparing passwords. This option is not valid if using LDAP for external authentication. -
To configure a session timeout, set the
session.maxIdlevalue to specify the session timeout in seconds. and set thesession.eviction.thread.delayvalue to specify the frequency of the session eviction thread in seconds. -
The Repository status updater is the background thread that runs at a specified frequency to test whether the underlying repository is active or not and to update the status of the same in server database. To configure the repository status updater's sleep interval, set the
repository.status.updator.sleepIntervalvalue to specify the interval in seconds after which the repository status update thread should run. -
If the
Realm verif. For Admin. Requestsis set in QuarkXPress Server, the username and password for QuarkXPress Server need to be set in this file. Set the following properties to configure the QuarkXPress Server:-
Set the
qxps.usernamevalue to specify the QuarkXPress Server username. -
Set the
qxps.passwordvalue to specify the QuarkXPress Server password. -
Set the
qxps.localevalue to specify the location of QuarkXPress Server.
-
Editing "PublishingPool.properties"
To edit "PublishingPool.properties":
-
Open the "PublishingPool.properties" file in the Server Installation
conffolder. -
Set the
publishingThread.pool.maxActivevalue to specify the maximum number of background publishing threads that can run simultaneously. -
Set the
publishingThread.pool.maxIdlevalue to specify the maximum number of idle threads in the pool. -
Set the
publishingThread.pool.minIdlevalue to specify the minimum number of idle threads in the pool. -
Set the
publishingThread.pool.maxWaitvalue to specify the time in milliseconds that the publishing request should wait while borrowing a thread from the pool. -
Set the
publishingThread.pool.minEvictableIdleTimeMillisvalue to specify the time in milliseconds for a thread to be in the pool before it can be evicted. -
Set the
publishingThread.pool.timeBetweenEvictionRunsMillisvalue to specify the time in milliseconds after which the evictor thread should run to remove idle threads.
Configuring Quark Publishing Platform Renderer for Quark Publishing Platform usage
To configure Quark Publishing Platform Renderer for Quark Publishing Platform usage:
-
Open the QXPSM Admin Client by navigating to the following URL in a Web browser:
http://[QPP server name]:[port]/qxpsmadmin. -
In the Manage Servers pane, click Add Servers and add the Quark Publishing Platform instance of Quark Publishing Platform Renderer. For more information, see A Guide to Quark Publishing Platform Renderer.
Editing "Qla.properties"
To edit "Qla.properties":
-
Open the "Qla.properties" file in the
[QPP Server]/conffolder. -
Enter the IP address or hostname of the QLA Server in the
QlaServer.machinename=field. -
Enter the port number of the QLA Server in the
QlaServer.port=field. -
If you have a backup QLA server, enter the IP address (or hostname) and port number in the
Backup.QlaServer.machinename=andBackup.QlaServer.port=fields. -
Enter the Quark Publishing Platform serial number in the
Qla.SerialNumber=field.The QLA Server Console and QLA Client applications display your Quark Publishing Platform serial number.
-
Save and close "Qla.properties."
Extended configuration files
Configuration files are split into base and ext for ease of deployment.
User specific custom beans, processes and publishing channels should be defined in .ext files in the Server Installation ext folder, to separate custom extensions and maintain them after a software upgrade.
-
ChannelConfig-ext.xml
-
content-mimetype-mappings-ext.xml
-
custom-xml-types-ext.xml
-
IndexingChannels-ext.xml
-
PluginsContext-ext.xml
-
ProcessConfig-ext.xml
-
PublishingConfig-ext.xml
Configuring user display name in the User Activity panel in admin web client
You can configure Quark Publishing Platform to display the user name in the User Activity panel in one of three ways:
-
[username] -
[username] ([first name] [last name]) -
[username] ([last name], [first name])
To change this setting, open the "WebAdminConfig.properties" file in the [QPP Server]/webapps/admin/WEB-INF/classes folder. Set the value of the userNameFormatting property to one of the following:
-
0to display as[username]. -
1to display as[username] ([first name] [last name]). -
2to display as[username] ([last name], [first name]).
Configuring Platform Server to be used for publishing with Quark XML Author - SharePoint Adapter
To configure Quark Publishing Platform Server to be used for publishing with Quark XML Author - SharePoint Adapter:
-
Open the "sharepoint.properties" file in the
[QPP Server]/publishingfolder. -
Set the
sharepoint.usernamevalue to be the login name of a user with access to SharePoint sites. -
Set the
sharepoint.userpasswordvalue to be the login password of the user specified above. -
Set the
sharepoint.userdomainvalue to be the domain of the user specified above. -
Set the
sharepoint.sitecollectionvalue to be the URL of a SharePoint Site Collection which contains documents required during publishing. -
Restart the Server.
Configuring Platform Server to be used for publishing with Quark XML Author - FileNet Adapter
To configure Quark Publishing Platform Server to be used for publishing with Quark XML Author - FileNet Adapter:
-
Open the "contentengine.properties" file in the
[QPP Server]/publishingfolder. -
Set the
filenet.stanzavalue to be the stanza for filenet content engine connection. You need to edit the parameter only when the filenet server is configured to use a stanza other than FileNet. -
Set the
filenet.usernamevalue to be the FileNet username. -
Set the
filenet.userpasswordvalue to be the value to be the FileNet password of the user specified above. -
Set the
filenet.connectionurivalue to be the Connection URI of the FileNet Content Engine WebService. -
Restart the Server.
JVM memory allocation on Windows
On Windows, you can specify JVM memory allocation in different locations, depending on how you start Quark Publishing Platform Server. On 64-bit operating systems, you can allocate more memory for the Quark Publishing Platform Java process. In either case, you should not allocate more than 50 percent of available memory.
Using Quark Publishing Platform Server Console or Quark Publishing Platform Server Windows service
-
Stop Quark Publishing Platform Server.
-
If you start Quark Publishing Platform Server with Quark Publishing Platform Server Console or Quark Publishing Platform Server Windows service, open the "wrapper.conf" file.
-
Search for the
wrapper.java.maxmemoryproperty. -
Adjust the value. On a 64-bit operating system, you can make the value larger.
-
Save your changes and restart Quark Publishing Platform Server.
Using "Serverstartup.bat"
-
Stop Quark Publishing Platform Server.
-
If you start Quark Publishing Platform Server with the "ServerStartup.bat" file in the Quark Publishing Platform Server installation folder, open "ServerStartup.bat".
-
Search for
java -server -Xmx2048m -XX:MaxPermSize=256m -classpath.2048m. represents 2048MB of RAM allocated to Quark Publishing Platform Server. -
On a 64-bit operating system, you can make the value larger.
-
Save your changes and restart Quark Publishing Platform Server.
Configuring Windows authentication or (SAML and waffle)
Windows users can log on to Quark Publishing Platform transparently with their Windows user credentials, without ever having to see a login dialog box. Quark Publishing Platform supports all Windows authentication schemes, including NTLM-v1/NTLM-v2 and Negotiate/Kerberos. The Platform also supports mixed-mode, so Windows authentication and Platform authentication can coexist.
You configure Windows authentication with a pluggable HTTP servlet filter. You can easily enable and disable authentication at deployment time by adding a security filter to each Web application‘s "web.xml" file.
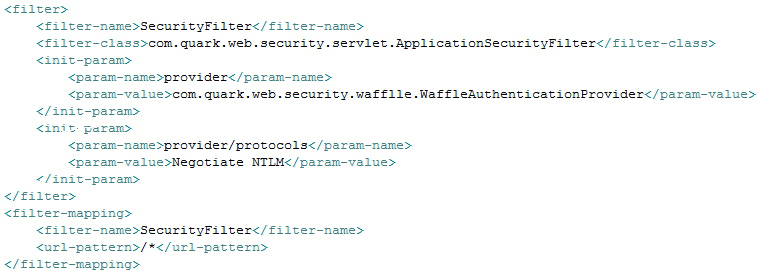
Each web application of Quark Publishing Platform can be configured to use different Windows authentication schemes as indicated below.
|
Web application |
NTLM only |
Negotiate/Kerberos only |
NTLM and Kerberos |
|
Workspace |
NTLM |
Negotiate |
NTLM Negotiate |
|
Admin |
NTLM |
Negotiate |
NTLM Negotiate |
|
Web services |
NTLM |
Kerberos |
NTLM Negotiate |
|
QXPSM |
N/A |
N/A |
N/A |
|
Messaging |
N/A |
N/A |
N/A |
|
REST |
N/A |
N/A |
N/A |
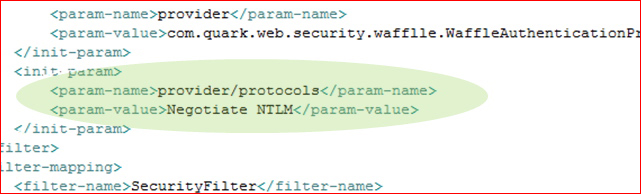
Steps to enable SSO in Platform Clients
For the Admin web app:
-
Go to
C:\Program Files\Quark\Quark Publishing Platform\Server\webapps\admin\WEB-INF -
Open the "Web.xml" file and uncomment the following snippet:
</p><p> <filter></p><p> <filter-name>SecurityFilter</filter-name></p><p> <filter-class>com.quark.web.security.servlet.ApplicationSecurityFilter</filter-class></p><p> <init-param></p><p> <param-name>provider</param-name></p><p> <param-value>com.quark.web.security.wafflle.WaffleAuthenticationProvider</param-value></p><p> </init-param></p><p> <init-param></p><p> <param-name>provider/protocols</param-name></p><p> <param-value>NTLM</param-value></p><p> </init-param></p><p> </filter></p><p> <filter-mapping></p><p> <filter-name>SecurityFilter</filter-name></p><p> <url-pattern>/*</url-pattern></p><p> </filter-mapping> </p><p> -
Save the file.
For Workspace and Desktop clients go to the respective web app, open the web.xml file and uncomment the same snippet.
-
For desktop clients:
C:\Program Files\Quark\Quark Publishing Platform\Server\webapps\webservices\WEB-INF -
For workspace:
C:\Program Files\Quark\Quark Publishing Platform\Server\webapps\workspace\WEB-INF
The Platform server should be running as a service with an account as Local System.
Steps to configure Web Client for mixed mode authentication
-
Go to
C:\Program Files\Quark\Quark Publishing Platform\Server\webapps\workspace. Make a copy of PreLogin.jsp and name it local.jsp. -
Go to
C:\Program Files\Quark\Quark Publishing Platform\Server\webapps\workspace\WEB-INF -
Open the "Web.xml" file and change the URL pattern mapping as shown below:
FROM:
<filter-mapping><filter-name>SecurityFilter</filter-name><url-pattern>/*</url-pattern></filter-mapping>TO:
<filter-mapping><filter-name>SecurityFilter</filter-name><url-pattern>/login.qsp</url-pattern></filter-mapping> -
Save the file.
-
Restart the server and access the corresponding web applications with the following URLs:
-
For access through native Platform user authentication use the URL :
http://localhost:61400/workspace/Login.jsp -
For access through Windows authentication use the URL:
http://localhost:61400/workspace/
The steps above can be repeated for Web Admin or other web apps as well.
-
Configuring the SAML
Integration with SAML based Identity Providers
Platform provides integration with SAML 2.0 based Identity Providers for web based SSO so that users from external Identity Providers can be authenticated using SAML 2.0 based login mechanism provided by the underlying Identity Provider.
Configuring Identity Provider with Platform
Specifying Identity Provider metadata
Open file <Server>/webapps/auth/WEB-INF/saml.xml and locate the following metadata bean:
<bean id="metadata" class="org.springframework.security.saml.metadata.CachingMetadataManager">
Identity Provider metadata can be provided in either of the following ways:
-
As HTTP URL of the Identity Provider metadata
Uncomment ExtendedMetadataDelegate bean which takes in HTTPMetadataProvider as the constructor argument and specify the url of the IdP metadata as shown below:
<bean class="org.springframework.security.saml.metadata.ExtendedMetadataDelegate">
<constructor-arg>
       <bean class="org.opensaml.saml2.metadata.provider.HTTPMetadataProvider">
                                        <constructor-arg>
<value type="java.lang.String">http://foo.com/idp-metadata.xml</value>
</constructor-arg>
</bean>
…
…
</bean>
-
As local XML file containing Identity Provider metadata
Paste the Identity Provider metadata xml file in folder <Server>\webapps\auth\WEB-INF\classes
Uncomment ExtendedMetadataDelegate bean which takes in FilesystemMetadataProvider as the constructor argument and specify the name of the metadata xml file as shown below:
<bean class="org.springframework.security.saml.metadata.ExtendedMetadataDelegate">
<constructor-arg>
<bean class="org.opensaml.saml2.metadata.provider.FilesystemMetadataProvider">
<constructor-arg>
<value type="java.io.File">classpath:idp-metadata.xml</value>
</constructor-arg>
</bean>
…
…
</bean>
Specifying SP entity Id of the metadata
Specify entity Id of the service provider in entityId property of the metadataGeneratorFilter bean as shown below.
<bean id="metadataGeneratorFilter" class="org.springframework.security.saml.metadata.MetadataGeneratorFilter">
<property name="entityId" value="https://platform/auth"/>
…
…
</bean>
Specifying entityBaseURL
Specify the "entityBaseURL" matching with the front-end URL of the platform's 'auth' webapp. This should be specified in bean metadataGeneratorFilter as shown below:
<property name="entityBaseURL" value="https://platform.server.com/auth"/>
This is the endpoint which receives authentication assertions from the identity providers.
Load balancer configuration
If there are multiple platform server nodes with a load balancer acting as front end ,the following configuration needs to be added.
Update contextProvider bean, implementation from SAMLContextProviderImpl, to SAMLContextProviderLB as shown below:
Comment out the following bean implementation
<bean id="contextProvider" class="org.springframework.security.saml.context.SAMLContextProviderImpl"
                                 />
Uncomment following bean implementation by specifying load balancer properties:
<bean id="contextProvider" class="org.springframework.security.saml.context.SAMLContextProviderLB">
<property name="scheme" value="https"/>
<property name="serverName" value="myserver.com"/>
<property name="serverPort" value="443"/>
<property name="includeServerPortInRequestURL" value="false"/>
<property name="contextPath" value="/auth"/>
</bean>
Additionally, ensure to specify the entityBaseURL matching the front-end URL of load balancer in the bean "org.springframework.security.saml.metadata.MetadataGenerator" as also explained above.
Mapping username of the authenticated user
After the user is authenticated by the underlying Identity Provider, SAML data sent in the response is used to map the username of the user in Platform. The SAML assertion provided by the by Identity Provider contains NameId and AttributeStatements. Implementation of bean “samlUserDetailsService” determines whether the usrname should be mapped from the NameId or one of the AttributeStatements.
For mapping username from the NameId, following implementation should be used:
<bean id="samlUserDetailsService" class="com.quark.qpp.auth.saml.SamlNameIdBasedUsernameMapping">
<property name="stripDomainName" value="false" />
</bean>
Whereas, for mapping username from one of the AttributeStatements, following implementation should be used by providing the name of the corresponding attribute:
<bean id="samlUserDetailsService" class="com.quark.qpp.auth.saml.SamlAttributeBasedUsernameMapping">
<property name="stripDomainName" value="false" />
<property name="attributeName" value="user.email.id"></property>
</bean>
Key management
SAML messages exchanges involve usage of cryptography for signing and encryption of data. Platform contains a default JKS key store samlKeystore.jks, declared in bean keyManager, with a sample private certificate usable for test purposes as shown below in file saml.xml.
<bean id="keyManager" class="org.springframework.security.saml.key.JKSKeyManager">
<!-- key store file -->
<constructor-arg value="classpath:samlKeystore.jks" />
<!—Password for keystore -->
<constructor-arg type="java.lang.String" value="nalle123" />
<constructor-arg>
<map>
<!-- private keys with alias-password value pairs -->
<entry key="apollo" value="nalle123" />
</map>
</constructor-arg>
<!-- Alias of the default certificate -->
<constructor-arg type="java.lang.String" value="apollo" />
</bean>
The keystore file samlKeystore.jks contains private key with alias “apollo” which can be used for initial testing, but for security it should be replaced with your own key by using ether of the following mechanisms:
-
Self-signed key
If your Identity Provider does not require keys signed by a specific certification authority, you can generate your own self-signed key using the Java utility keytool as shown below:
keytool -genkeypair -alias mykey -keypass changeit -keystore samlKeystore.jks
The keystore will now contain additional PrivateKeyEntry with alias mykey which can now be used in the keyManager as shown below:
<bean id="keyManager" class="org.springframework.security.saml.key.JKSKeyManager">
<constructor-arg value="classpath:samlKeystore.jks" />
<constructor-arg type="java.lang.String" value="nalle123" />
<constructor-arg>
<map>
<entry key="mykey" value="changeit" />
</map>
</constructor-arg>
<constructor-arg type="java.lang.String" value="mykey" />
</bean>
-
Certification Authority signed key
Keys signed by certification authorities are typically provided in .p12/.pfx format which can be converted and imported to Java keystore using the following command (substituting the passwords and .pfx name):
keytool -importkeystore -srckeystore ca-signed.pfx -srcstoretype pkcs12 -srcstorepass your_source_store_password -destkeystore samlKeystore.jks -deststoretype JKS -deststorepass your_destination_store_password
Enabling and using Single Sign-On in web clients
-
Enabling single sign-on in workspace web-client:
Update file <Server>webapps/workspace/WEB-INF/web.xml by enabling single sign-on as shown below:
<context-param>
<param-name>enableSingleSignOn</param-name>
<param-value>true</param-value>
</context-param>
-
Enabling single sign-on in admin web-client
Update file <Server>webapps/admin/WEB-INF/web.xml by enabling single sign-on as shown below:
<context-param>
<param-name>enableSingleSignOn</param-name>
<param-value>true</param-value>
</context-param>
Single sign-on UI in web-clients
After enabling it in the web.xml files, Single Sign-on button will appear on the logon screen of Web clients. For Identity Provider authentication, Single Sign-on button can be used without entering the username and password. Following is the screenshot of how Single sign-on button appears.
Editing "log4j.xml"
Adding user information to logged events
You can configure the log4j.xml file to populate each logged event with the user ID and user name:
-
Open the "log4j.xml" file in the
{QPP Server}/conffolder. -
Set the
conversionPatternparameter:<appender name="QpsServerAllFileAppender" class="org.apache.log4j.RollingFileAppender"> <param name="file" value="log/QppServer.log"/> <param name="maxFileSize" value="10MB"/> <param name="maxBackupIndex" value="10"/> <layout class="org.apache.log4j.EnhancedPatternLayout"> <param name="conversionPattern" value="%d %p [%c][%t] [User(Id:%properties{qpp.user.id},Name:%properties{qpp.user.name})] - % m%n"/> </layout> </appender>
Configuring logging levels
You can edit the "log4j.xml" file to adjust logging levels, and you can use JConsole to change logging levels after starting Quark Publishing Platform Server. You can also set different logging levels for exceptions.
Changing logging levels in "log4j.xml"
You can change the logging levels for Quark Publishing Platform Web Client and Quark
Publishing Platform Server. Options include ERROR, INFO, WARN, DEBUG, SQLTRACE, and TRACE.
-
ERROR= includes messages that indicate disrupted and failed requests. -
INFO= includes messages that indicate the state of services. -
WARN= includes non-critical service error messages. -
DEBUG= includes messages that indicate server resource usage. -
SQL_TRACE= includes messages according to activity related to SQL requests. -
TRACE= includes messages according to activity related to requests.
Refer to Java documentation for more information about logging levels.
To change logging levels:
-
Open the "log4j.xml" file in the
{QPP Server}/conffolder. -
To define the logging level for Quark Publishing Platform Web Client activity, scroll to
<logger name=com.quark.qpp.web.webeditor. The structure is as follows:<logger name="com.quark.qpp.web.webeditor" additivity="false"> <level value="INFO" /> <appender-ref ref="WebHubAsyncAppender" /> </logger> -
To define the logging level for Quark Publishing Platform Server activity, scroll to
<logger name=com.quark.qpp. The structure is as follows:<logger name="com.quark.qpp"> <level value="INFO" /> </logger> -
To define the logging level for other activity, scroll to the "<root>." The structure is as follows:
<root> <priority value="ERROR" /> <appender-ref ref="QppServerAsyncAppender" /> </root> -
Save and close "log4j.xml."
Changing logging levels after starting Quark Publishing Platform Server
-
With Quark Publishing Platform Server running, display the Platform Server Console.
-
Click JConsole to display a window for monitoring different aspects of Quark Publishing Platform Server performance.
-
Click the MBeans tab. Separate Quark Publishing Platform Server functions display in tree format on the left side of the MBeans tab.
-
Open Platform Server > Logging in the tree.
-
Click the Operations tab.
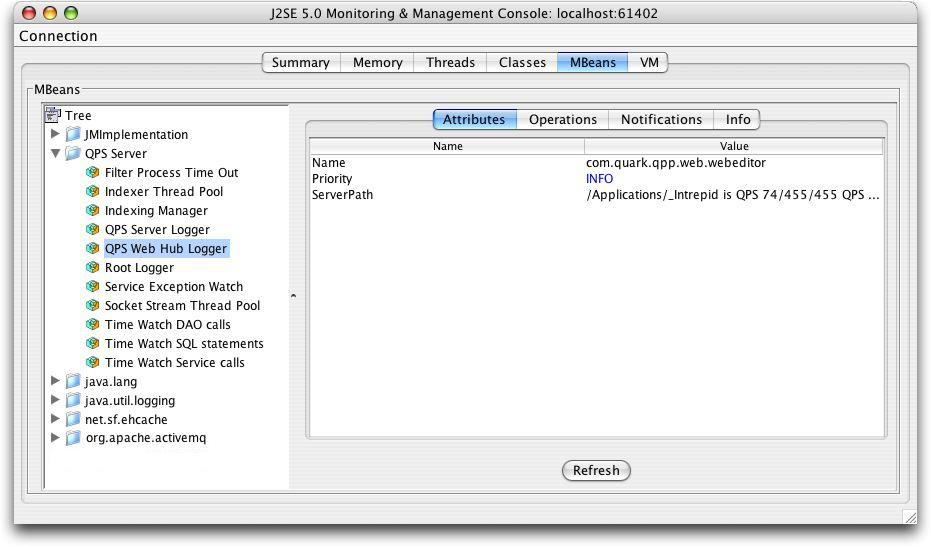
Use JConsole to adjust logging priority levels -
To edit the log level of Quark Publishing Platform Server or the Quark Publishing Platform Web Client, set the logging level in the text box and click the corresponding button.
The changes you make in JConsole take effect immediately, but when you restart Quark Publishing Platform Server, the settings in "log4j.xml" are applied.
Changing logging for exceptions
You can set logging for known and unknown exceptions by editing two values in the "ServerApp.properties" file.
-
Open the "conf" folder in your Quark Publishing Platform Server folder.
-
Open "ServerApp.properties" in a text editing application.
-
If you don't want to log Quark Publishing Platform exceptions in the Quark Publishing Platform Server log, set
server.logqppserviceexceptiontofalse. -
If you want to avoid logging unknown exceptions, set
server.logthrowabletofalse. -
Save and close "ServerApp.properties."
Logging Messages
Use the following appenders in log4j.xml to log various events to a separate log file
named MessagePublisher.log:
-
MessagePublisherAppender
-
MessagePublisherAsyncAppender
-
MessagePublisherFileAppender
Monitoring database health
User the following appenders in log4j.xml to log information helpful in monitoring database health in the "DatabaseMonitoring.log" file:
-
DatabaseMonitoringAppender
-
DatabaseMonitoringAsyncAppender
-
DatabaseMonitoringFileAppender
Modifying search notification evaluation settings
Quark Publishing Platform Server notifies all open Search Results palettes if the assets displayed in the palettes have been modified. You can edit several parameters to influence the strategy and resources used to evaluate conditions and deliver these query notifications. The optimal value for most parameters depends on the database and hardware you choose for your Quark Publishing Platform Server.
Only an experienced administrator should change the settings described below. Please consult Quark Enterprise Support for assistance.
-
Open the "conf" folder in your Quark Publishing Platform Server folder.
-
Open "Query.properties" in a text editing application.
-
Quark Publishing Platform Server uses two pools of threads to evaluate query notifications — the "Generic Notification Evaluator Thread Pool Configuration" and the "Simple Notification Evaluator Thread Pool Configuration." The "generic" thread pool evaluates query notifications using a database. The "simple" thread pool uses a simpler strategy to evaluate query notification without involving a database. Adjust the following properties in the "Generic Notification Evaluator Thread Pool Configuration" area:
-
To specify the maximum number of concurrent threads that operate in the background to evaluate notifications that require database access, adjust the
query.notification.generic.pool.maxActivevalue. Increase this value to improve performance when using hardware with several processors and extensive system memory. -
To specify the maximum number of idle threads in the pool, adjust the
query.notification.generic.pool.maxIdleproperty. -
To specify the minimum number of idle threads in the pool, adjust the
query.notification.generic.pool.minIdleproperty. -
To specify the minimum time that a thread can be idle before it can be removed from the pool, set the time in milliseconds for the
query.notification.generic.pool.minEvictableIdleTimeMillisproperty. -
To specify the number of milliseconds after which a background evictor thread should run to clean up idle threads, adjust the
query.notification.generic.pool.timeBetweenEvictionRunsMillisproperty.
-
-
Query notifications for certain asset changes can be evaluated efficiently using a simpler strategy that does not require database access. Adjust the following properties in the "Simple Notification Evaluator Thread Pool Configuration" area:
-
To specify the maximum number of concurrent threads that operate in the background, adjust the
query.notification.simple.pool.maxActivevalue. Increase this value to improve performance when using hardware with several processors and extensive system memory. -
To specify the maximum number of idle threads in the pool, adjust the
query.notification.simple.pool.maxIdleproperty. -
To specify the minimum number of idle threads in the pool, adjust the
query.notification.simple.pool.minIdleproperty. -
To specify the minimum time that a thread can be idle before it can be removed from the pool, set the time in milliseconds for the
query.notification.simple.pool.minEvictableIdleTimeMillisproperty. -
To specify the number of milliseconds after which a background evictor thread should run to cleanup idle threads, adjust the
query.notification.simple.pool.timeBetweenEvictionRunsMillisproperty.
-
-
To configure JMS topology for query notification, adjust the
query.notification.topicPerSessionproperty. To emulate the behavior of versions of Quark Publishing Platform prior to 8.1, set this value tofalse. -
The default display is used when executing a search for which a user specific display does not exist ( for example, when browsing a collection for the first time). To specify the default query display settings, adjust the following properties in the "Default Query display Settings" area:
To specify the default query display settings for asset queries, adjust the following properties:
-
To specify the columns to be displayed in asset queries, adjust the
query.display.default.assets.columnsvalue to contain a list of the columns you want displayed. -
To specify the display mode for asset queries (PLAIN, THUMBNAIL or SNIPPET), adjust the
query.display.default.assets.displaymodeproperty. -
To specify the explore mode for asset queries (PLAIN, PROJECT, PROJECT AND PAGE, RELATION, RELATED ASSETS, COLLECTIONS), adjust the
query.display.default.assets.exploremodeproperty. -
To specify the desired grouping of the assets, adjust the
query.display.default.assets.groupingproperty. -
To specify the desired sorting of the assets, adjust the
query.display.default.assets.sortingproperty.
To specify the default query display settings for collection queries, adjust the following properties:
-
To specify the columns to be displayed in collection queries, adjust the
query.display.default.collections.columnsproperty to contain a list of the columns you want displayed. -
To specify the display mode for collection queries (PLAIN or THUMBNAIL), adjust the
query.display.default.collections.displaymodeproperty. -
To specify the desired sorting of the assets in collection queries, adjust the
query.display.default.collections.sortingproperty.
-
-
Do not edit the values of other properties in the "Query.properties" configuration file.
-
Save and close "Query.properties."
-
Restart Quark Publishing Platform Server for these settings to take effect.
Database properties
You can manually specify the database connection URL, database user name, database user password, and database connection pool size.
To change database properties:
-
In the "Database.properties" file located in the
[QPP Server]/conffolder. -
Scroll to the
Database related configurationsection. -
To specify the driver class name, replace the
qpp.jdbc.driverClassNamevalue. For example, for an HSQL database, you would useqpp.jdbc.driverClassName=org.hsqldb.jdbcDriver. -
To specify the database connection URL, replace the path after
qpp.jdbc.url. -
To specify the database user name, replace the
qpp.jdbc.userNamevalue. -
To specify the database user password, replace the
qpp.jdbc.passwordvalue. -
To specify the database connection pool size, change the
qpp.jdbc.maxActivevalue. -
To specify the maximum and minimum numbers of connections that can be idle, change the
qpp.jdbc.maxIdleandqpp.jdbc.minIdlevalues. -
To specify the minimum time in milliseconds that a connection must be in the pool before it can be evicted, change the
qpp.jdbc.minEvictableIdleTimeMillisvalue. -
To specify the minimum time in milliseconds after which the evictor thread should run to remove an idle connection, change the
qpp.jdbc.timeBetweenEvictionRunsMillisvalue. -
To adjust the pooling of prepared statements, change the
qpp.jdbc.poolPreparedStatementsvalue. -
To specify the maximum number of connections to be made in the no-autocommit pool , change the
qpp.jdbc.maxActive_noAutoCommitvalue. -
Save and close "Database.properties."
If there is a firewall configured between the Platform Server and the Database server that can terminate TCP sessions when they are idle for a long time, the following configuration changes should be done in the "Database.properties" file .
-
Set the
qpp.jdbc.minIdlevalue to 0 -
Set the
qpp.jdbc.minEvictableIdleTimeMillisvalue to 60000 -
Set the
qpp.jdbc.timeBetweenEvictionRunsMillisvalue to 60000
Platform Server needs to be restarted for these settings to take effect.
Transformation properties
You can use transformation properties to modify the output of various predefined transformations.
Changes to the "Transformation.properties" file alter the external commands that are
invoked for transforming assets. Commands in this file can contain predefined macros
such as <temp>, <source>, <extension> and <output>.
To change transformation properties:
-
Open the "Transformation.properties" file located in the
[QPP Server]/conffolder. -
To specify a pattern that does not occur as a value (or part of a value) for any other property, specify a value for
transformer.spaceEncodingPattern. This pattern is used for escaping spaces in commands and other property values. -
To specify which file types ImageMagick is allowed to handle, enter a comma-separated, case-insensitive list of file extensions in
imTransformer.extensions. -
To specify the temporary file location to be used by ImageMagickTransformer, specify a path for
imTransformer.tempDir. -
To specify the ImageMagick command to be executed for generating output with ImageMagickTransformer, enter a value for
imTransformer.jpg.imCommand. -
To specify which file types the JawsTransformer is allowed to handle, enter a comma-separated, case-insensitive list of file extensions in
jawsTransformer.extensions. -
To specify the temporary file location to be used by JawsTransformer, specify a path for
jawsTransformer.tempDir. -
To specify the Jaws command to be executed for generating output with JawsTransformer, enter a value for
jawsTransformer.jpg.command. -
Save and close "Transformation.properties."
Session timeout
You can specify how long individual sessions can remain idle before they are timed-out, as well as the frequency of testing for idle sessions.
To specify timeout parameters:
-
Open the "ServerApp.properties" file located in the
[QPP Server]/conffolder. -
Scroll to the
session.maxIdle=entry. -
Enter the number of seconds a session can be idle before timing out.
-
To specify the frequency for Quark Publishing Platform Server to perform a background check for idle sessions, enter a number (measured in seconds) in the
session.eviction.thread.delayproperty. -
Save and close "ServerApp.properties."
Web Client timeout settings can be changed by adjusting the ajaxTimeout entry in the "Workspace-Config.xml" file (this entry is in milliseconds). This file
is located at {install_folder}/webapps/workspace/WEB-INF/classes
Repository status updater
You can specify a background thread that runs frequently to confirm the Quark Publishing Platform File Server status.
To specify the repository status update interval:
-
Open the "conf" folder in your Quark Publishing Platform Server folder.
-
Open "ServerApp.properties" in a text editing application.
-
Scroll to the
repository.status.updator.sleepInterval=entry. -
Enter a value to specify the number of seconds after which the repository status updater thread will run.
-
Save and close "ServerApp.properties."
Moving Quark Publishing Platform Renderer
If you need to move your Quark Publishing Platform Renderer to a different computer, you don't have to re-install Quark Publishing Platform Server. Instead, you can edit the "ManagerConfig.xml" file, as follows:
-
Open the "ManagerConfig.xml" file located in the
[QPP Server]/conffolder. -
Scroll to the
<connectioninfo>section at the bottom of "ManagerConfig.xml." -
Change the
nameentry value to the IP address or hostname of the new Quark Publishing Platform Renderer. -
Change the
portentry value to the port number you specified for the new Quark Publishing Platform Renderer. -
Save the "ManagerConfig.xml" file and launch Quark Publishing Platform Server.
-
To verify the change, search through the "QppServer.log" file for the line
Successfully registered with QXPS.
Alternatively, you can open the Quark Publishing Platform Renderer Manager client
with the URL http://[server]:[port]/qxpsmadmin and make these changes there.
Unless you check Realm verif. For Admin. Requests and enter a user name and password in the HTTP tab of the QuarkXPress Server Configuration dialog box, you can leave the <user> and <password> entries blank. This also applies to the username and password fields in the "ServerApp.properties"
file (qxps.username and qxps.password).
Integrating Quark Publishing Platform with LDAP Directory Servers:
Many system administrators use directory services to manage users on an enterprise network, such as Lightweight Directory Application Protocol (LDAP). Quark Publishing Platform administrators are not required to use LDAP, but if they rely on LDAP for other systems, then Quark Publishing Platform can be configured so that Quark Publishing Platform users can log on to Quark Publishing Platform Server with the same domain username and password they use for other systems on their enterprise network.
Quark Publishing Platform Server works with LDAP v3 supported by this implementation.
Managing LDAP profiles
Before you can import LDAP users/groups into Quark Publishing Platform, you must create an LDAP profile to bind to your LDAP Server. An LDAP profile lets you supply the LDAP-Server credentials along with other details that are necessary to allow import of LDAP users.
To create an LDAP profile:
-
Click User Profiles.
-
Click Manage LDAP Profiles. The Manage LDAP Profiles dialog box displays.
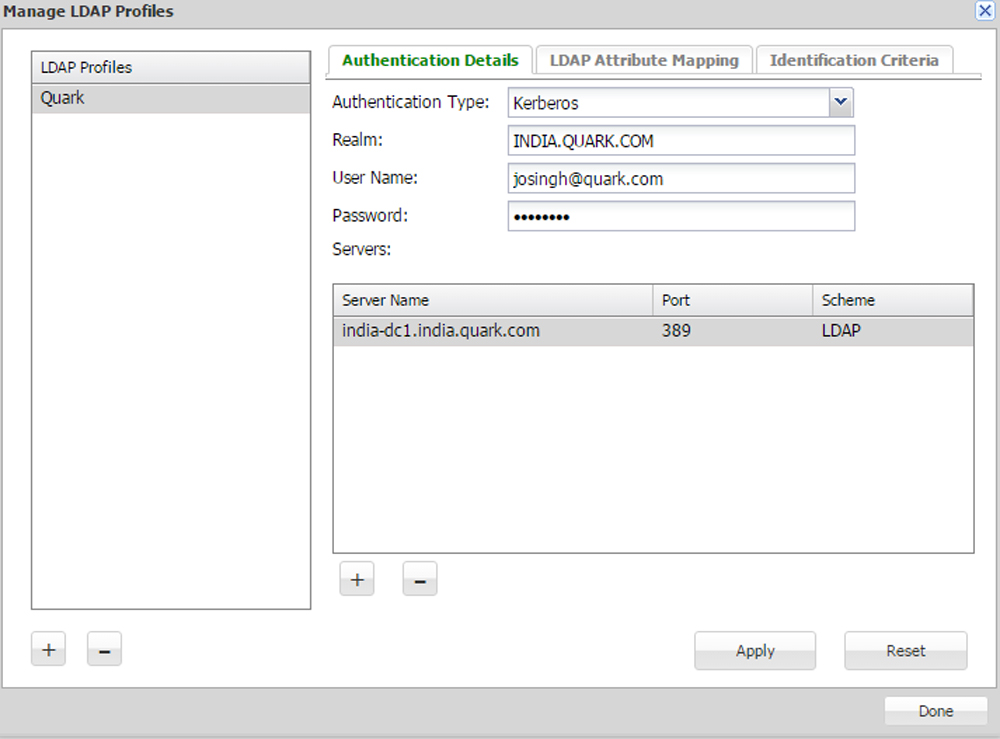
Manage LDAP Profiles dialog box -
Under the LDAP Profiles list pane, click the + button to create a new LDAP profile.
-
Enter a name for the LDAP profile.
-
Choose the LDAP server's authentication method from the Authentication Type drop-down menu. Valid values include Kerberos, Digest-MD5, and Simple.
Most of the LDAP servers running on Windows like Microsoft Active Directory LDAP Server use Kerberos authentication, but LDAP servers running on Linux/Solaris like Open Ldap Server or IBM Directory Server use Simple Authentication. -
Enter the realm name in the Realm field.
Each profile must have a unique realm name.
-
Enter the user name and password of a user who has read access to the Directory Server (that is, the designated name in the Directory Server). This user authentication will be used to retrieve the list of users from the Directory Server.
-
To add an LDAP server to the profile, click the + button under the Servers list.
-
Enter the Server Name, Port and Scheme for the new server.
-
Click Apply.
The Identification Criteria tab displays requesting that you fill in the value for Base DN (A base dn is the point from where a server will search for users). For more information, see "Identification criteria".
-
Click Done.
Ldap Attribute Mapping:
Before you can import LDAP users into Quark Publishing Platform, you must map the LDAP attributes to Quark Publishing Platform user's attributes.
To map LDAP user attributes:
-
Click User Profiles.
-
Click Manage LDAP Profiles. The Manage LDAP Profiles dialog box displays. Select the LDAP Attribute Mapping tab.
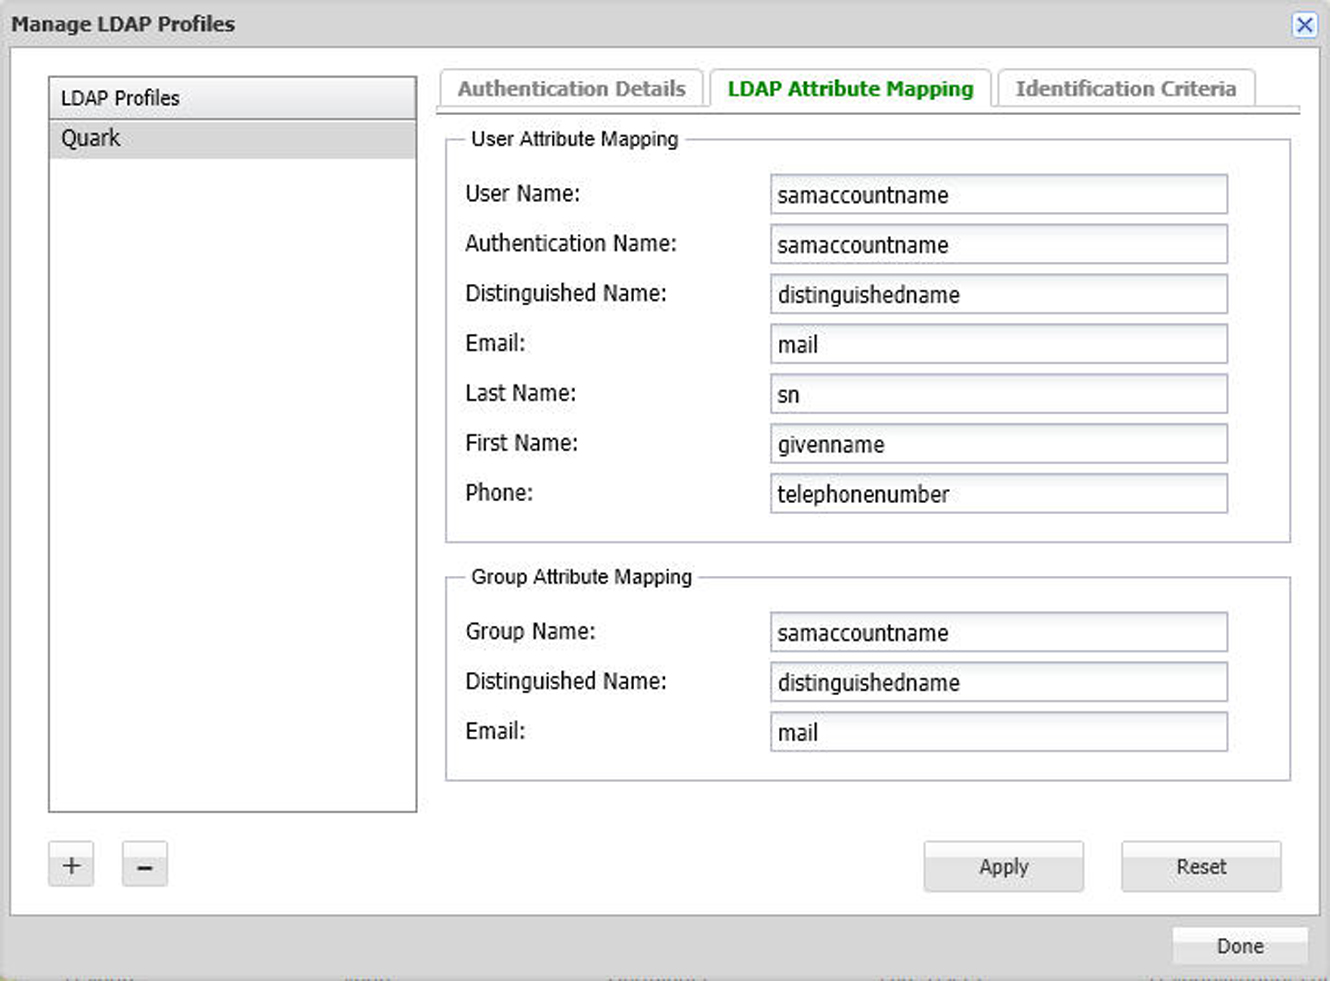
The following 3 attributes are mandatory and should be mapped with your existing LDAP Server attributes as explained below:
-
User Name : This is the name of the attribute that contains the user name that you see in Quark Publishing Platform Server after import and is used to log on to Platform.
For example, in Microsoft windows active directory, the attribute name is samaccountname. In Other LDAP servers like Open LDAP Server , IBM Directory Server this value is uid. -
Authentication Name: This is the name of the attribute that contains the user name used for authentication in your LDAP server.
-
Distinguished Name: This is the name of the attribute that contains the distinguished value or unique identifier of the user in the LDAP server.
For example, in Microsoft Windows Active Directory the name of the attribute is distinguishedname and it holds the value of user as : cn=Joginder Singh,ou=users,dc=example,dc=com. In some other LDAP servers like IBM Directory Server and Open Ldap server on linux/solaris , the attribute used is :uid or uid.
To map LDAP Group Attributes:
-
Group Name: This is the name of the attribute that contains the name of the group in your LDAP server.
-
Distinguished Name : This is the name of the attribute that contains the complete list of distinguished names of the groups in your LDAP server.
For example, in Microsoft Windows Active Directory the name of the attribute is distinguishedname and it hold the value of group as : CN=Managers,ou=groups,dc=example,dc=com. In some other LDAP servers like IBM Directory Server and Open Ldap server on linux/solaris , the attribute used is CN -
Email : This is the name of the attribute that contains the value of email in your LDAP server.
Identification criteria:
Use the identification criteria tab to define the attributes and filters that enable you to define the search criteria and provide more efficient and effective searches. The identification criteria allows you to describe the base dn for any active directory in your organization. A base dn is the point from where a server will search for users.
To describe the LDAP identification criteria:
-
Click User Profiles.
-
Click Manage LDAP Profiles. The Manage LDAP Profiles dialog box displays. Select the Identification Criteria tab.
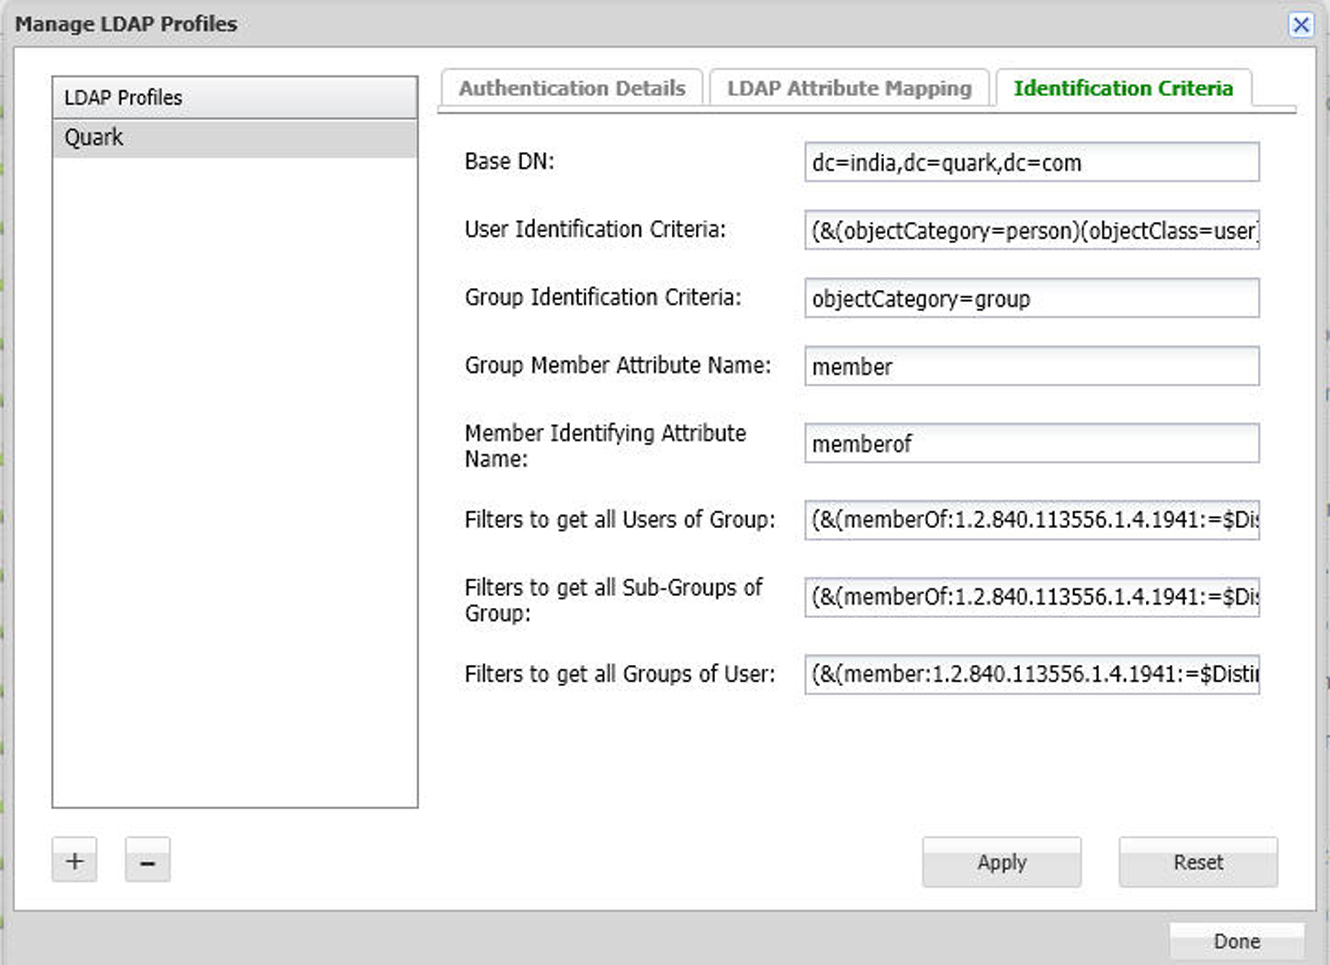
LDAP Attribute Mapping tab of the Manage LDAP Profiles dialog box -
Select the LDAP profile whose identification criteria you want to set.
-
Fill out the fields:
-
Enter the base string in the Base DN field. This string represents the search base used to search for users in the LDAP Server computer's hierarchy. The Base DN field is mandatory.
-
The User Identification Criteria field allows you to filter for specific users in your active directory. The default string represents the search base used to search for all users in the Active Directory. This field allows you to search for categories like Person, eliminating machines from showing up in your searches. The User Identification Criteria field is optional.
-
The Group Identification Criteria field allows you to search for specific groups in your active directory. The default string represents the search base used to search for all groups in the Active Directory. The Group Identification Criteria field is optional.
-
The Group Member Attribute Name field denotes the common attribute of the set of users in a group. The Group Member Attribute Name field is optional.
-
The Member Identifying Attribute Name field is used to denote membership in a group. The Member Identifying Attribute Name field is optional.
-
The Filters to get all Users of Group field allows you to specify the criteria needed to search for all the users of a particular group. The Filters to get all Users of Group field is optional.
-
The Filters to get all Sub-Groups of Group field allows you to specify the criteria needed to search for all the sub-groups of a particular group. The Filters to get all Sub-Groups of Group field is optional.
-
The Filters to get all Groups of User field allows you to specify the criteria needed to search for all the groups of a particular user. The Filters to get all Groups of User field is optional.
-
-
Click Apply.
Importing LDAP users and groups:
To import users and groups from your LDAP service:
-
Click User Profiles.
-
Click Import Users and Groups From LDAP. The Import Users and Groups from LDAP dialog box displays.
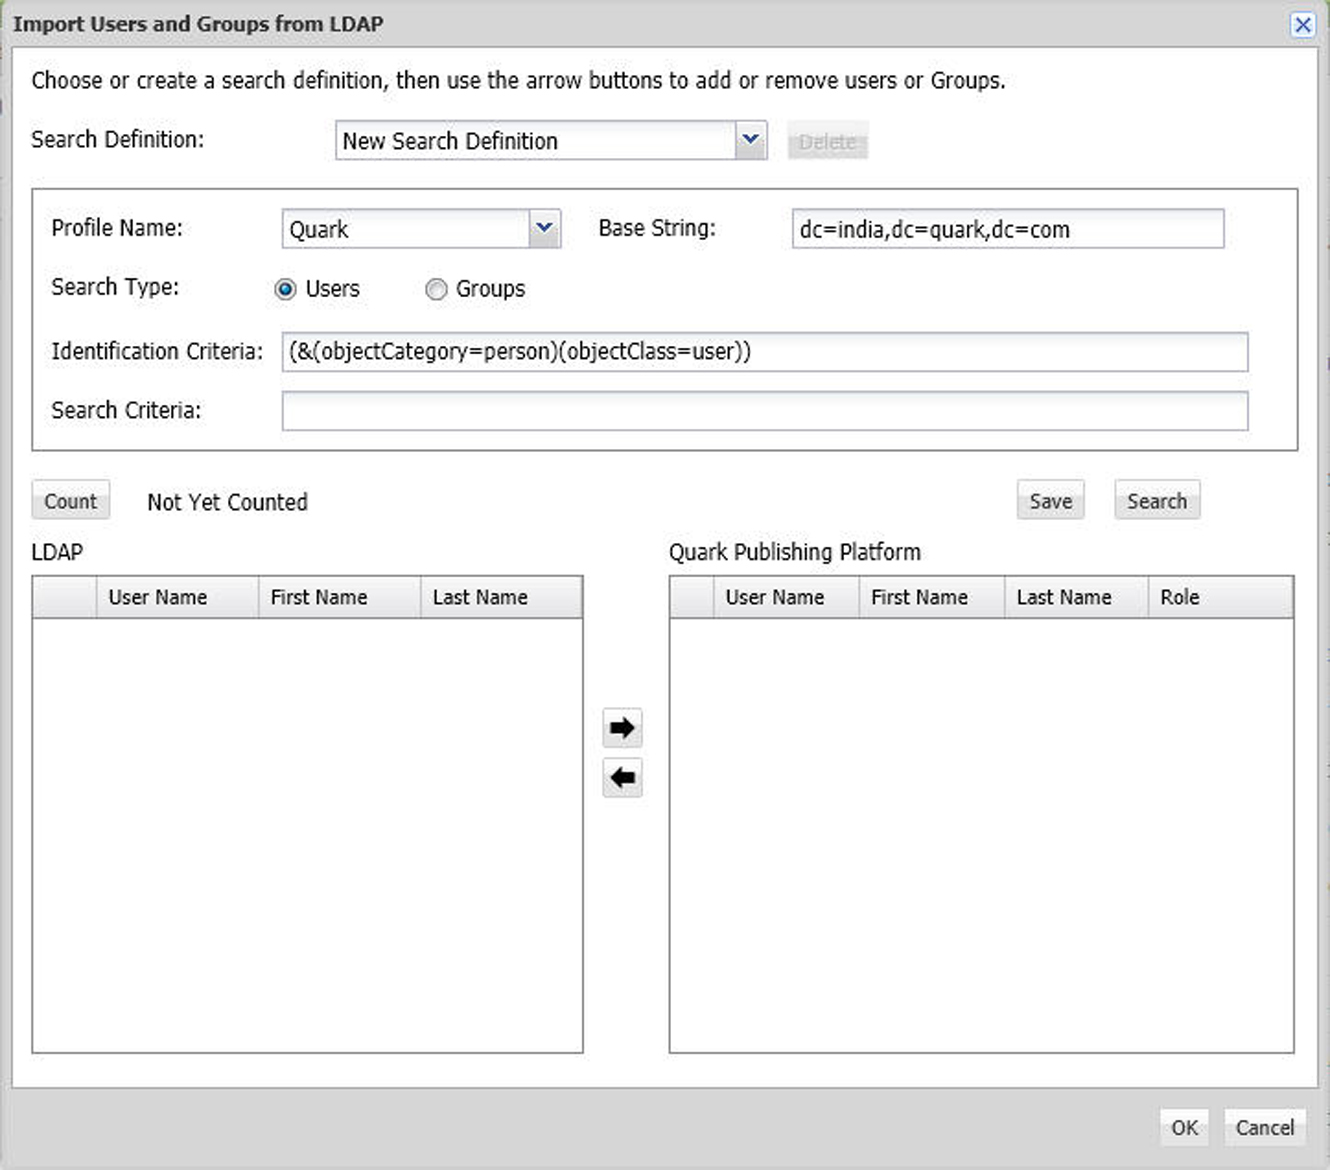
Use the Import Users and Groups From LDAP dialog box to add users or groups to your Quark Publishing Platform list. -
The search controls at the top of the dialog box let you specify which users or groups you want to be able to import. To create a search:
-
Choose the name of the appropriate LDAP profile from the Profile Name drop-down menu.
-
Choose to search Users or Groups.
-
Enter the search criteria in the Search Criteria field. For example, to import all LDAP users that meet the criteria
samaccountname=*, entersamaccountname=* -
Enter the base string in the Base String field. In this string,
ouis an abbreviation for "organizational unit" anddcis short for "domain component." This string represents the search base used to search for users in the Active Directory server computer's hierarchy. -
Click Save to save the search and provide a name for the search in the dialog box that displays.
-
-
Choose the search to execute. The matching users or groups are listed on the left.
-
Select one or more names from the LDAP Users/Groups list on the left and click the right arrow to add the selected users or groups to the Quark Publishing Platform list of users or groups on the right.
The Assign Role dialog box displays.
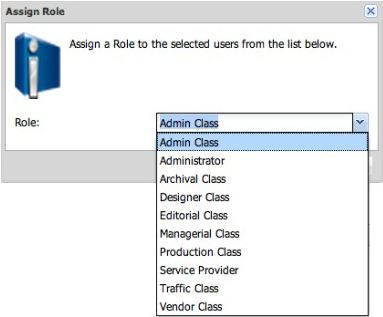
Use the Assign Role dialog box to assign a role to a Quark Publishing Platform user or group. -
Choose a role from the Role drop-down menu in the Assign Role dialog box and then click OK.
You can change the search criteria, execute more searches, and continue to add users/groups until you click OK in the Import Users from LDAP dialog box.
-
Click OK. The users or groups in the list on the right are imported.
If you duplicate a Quark Publishing Platform user or group that you imported from your LDAP service, the duplicated user or group is not connected to your LDAP service (that is, it's like creating a new user or group).
You cannot have two Quark Publishing Platform users or groups with the same name. If you attempt to add a user or group name that is the same as an existing name, you will not be allowed to add the duplicate name.
When you import a group, all users in that group will be imported. If the group you imported contains sub-groups, the sub-group and all users within that sub-group will also be imported. When you assign a Role to a group, all users in that group will be assigned that role. If you import a group from LDAP, you cannot add users to that group using Quark Publishing Platform, you must add users to these groups using active directory.
A Quark Publishing Platform administrator must have the "Manage LDAP Users" privilege for the Import Users from LDAP functionality to be available.
Synch behavior of LDAP users and groups
To configure the LDAP synchronization time delay:
-
Open the "ServerApp.properties" file located in the
[QPP Server]/conffolder. -
Set the value for
ldap.synchronization.thread.delay=totrue. -
Save and close "ServerApp.properties."
Each synch with the active directory, either manual or automated, synchronizes all users and groups imported via LDAP from the active directory server to Platform Server.
Synch of existing groups
If a group exists in the active directory, then the following actions occur during the synch process:
-
Group metadata is updated (e.g. email addresses…).
-
Subgroups are updated.
-
Metadata for existing subgroups is updated.
-
Missing users of existing subgroups are imported.
-
Missing subgroups along with users are imported.
-
Missing users are imported.
Synch of deleted groups
When an imported group is deleted from the active directory server, then this group will be ignored during the synch process and will remain in the same state without any metadata update.
Synch of existing users
If a user exists in the active directory, then user infomation like first name, last name, email address, and phone number will be updated.
Synch of deleted users
If an imported user is deleted from the active directory server, then this user will be ignored during the synch process and will remain in the same state without any metadata update.
Connecting LDAP user passwords with Quark Publishing Platform Server
If you configure Quark Publishing Platform according to the instructions below and the connection between Quark Publishing Platform Server and Directory Server breaks, users can still log on to Quark Publishing Platform Server with their Directory Server credentials.
When a user logs on to Quark Publishing Platform Server successfully for the first time, encrypted user credentials are stored in Quark Publishing Platform. These credentials can then be used for subsequent log on operations when there is no connection between Quark Publishing Platform Server and Directory Server.
To specify that the LDAP user password can be retrieved, encrypted, and stored in the Quark Publishing Platform Server database:
-
Open the "ServerApp.properties" file located in the
[QPP Server]/conffolder. -
To allow users to log on to Quark Publishing Platform Server when the connection between Quark Publishing Platform Server and Directory Server is broken, change the value for
authentication.external.cacheTicket=totrue. The default setting forauthentication.external.cacheTicket=isfalse(that is, disabled). -
To indicate that it is required to evaluate the "CollectionInfo#isAccessibleChildrenAvailable()" flag at runtime for every collection in context, the value of
collections.evaluateAccessibleChildrenFlag=should betrue(default). -
Once an element is fetched from the LDAP server, it will be cached in the Platform Server and provided from the cache for a specified number of seconds, and fetched again after that time. To specify time to live (in seconds) for LDAP cache elements, set the value for
ldap.cache.timetolive=. -
To specify the LDAP synchronization time delay (in seconds), set the value for
ldap.synchronization.thread.delay=totrue. If LDAP synchronization is not required, set the value to -1. -
Save and close "ServerApp.properties."
Restricting Workspace Browser palettes
To restrict the number of Workspace Browser windows a user can have open at one time:
-
Open the "Query.properties" file located in the
[QPP Server]/conffolder. -
Specify a value for the
query.maxWatchedQueryCountPerSessionparameter. -
Save and close "Query.properties".
Changing query results settings
-
To limit the number of results that will be returned for an Assignments based search, specify a positive non-zero value for the
query.maxAssignmentFetchCountparameter. -
To limit the number of results that will be returned for a User based search, specify a positive non-zero value for the
query.maxRowFetchCountparameter.
Setting up custom content type detection
By default, Quark Publishing Platform is configured to recognize Quark formats, common picture formats, common content formats (Microsoft Office, plain text, RTF, PDF, HTML), XML, XHTML, DITA documents, and BusDoc documents. However, you can configure Quark Publishing to automatically attempt additional, custom content types. To do so:
-
To recognize a particular content type by examining a file's MIME type, make sure that MIME type is listed in the "tika-mimetypes.xml" file. If the MIME type is not included in this file, you can add it to the "custom-mimetypes" file. You can identify file types by file extension, by magic bytes, or (for XML files) by the root element. For example:
<mime-type type="application/dita+xml; format=busdoc">
  <sub-class-of type="application/dita+xml;format=topic"/>
  <_comment>Business Documents</_comment>
</mime-type>
You can assign different MIME types to structurally similar but semantically different XML files. You can differentiate XML file types based on processing instructions applied inside that XML. Add a MIME type entry to the "custom-xml-types-ext.xml" file present in "ext" folder of the Platform server, to do so. For example:
<mime-type type="application/dita+xml; format=busdoc"  sub-class-of="application/dita+xml; format=topic">
  <pi name="Xpress">productLine="busdoc"</pi>
</mime-type>
For more information, see http://tika.apache.org.
-
Configure a Quark Publishing Platform content type based on the identified MIME type. To do so, add a mapping entry to the "content-mimetype-mappings-ext.xml" file present in "ext" folder of the Platform server. Assets with the specified custom MIME type will be checked in with the specified custom content type. For example:
<content-type name="Business Document"> <mime-type>application/dita+xml; format=busdoc</mime-type> </content-type> -
Add a corresponding mapping entry to the "Indexing Channels-ext.xml" file present in "ext" folder of the Platform server. For example:
<mapping contenttype="Ratings Document" channel="ratingsPreviewChannel">
  <parameter name="channelParam1">param value</parameter>
  <parameter name="channelParam2">param value</parameter>
</mapping>
Specifying a default PDF output style
Quark Publishing Platform Web Client users can retrieve copies of QuarkXPress projects or QuarkCopyDesk articles as PDFs. The settings for these PDFs are defined exclusively in the default PDF output style for QuarkXPress Server. To specify the default PDF output style, update the default Job Jackets file as described in "Job Jackets dialog box" in A Guide to QuarkXPress Server. The default PDF style can also be mentioned in the Publishing Channel used to take the PDF. The default channel for taking PDF from QuarkXPress projects is "qxpPdf".
Controlling delivery channel display settings in Web Client
Delivery channels are not visible by default. To make them available, set the property
displaydeliverychannels to true in the file QPP_HOME\webapps\workspace\WEB-INF\classes\Workspace-Config.xml:
<property name="enableDeliveryChannels" value="true" />Changing case-sensitivity for Quark Publishing Platform passwords
To specify case-sensitivity for Quark Publishing Platform user passwords:
-
Open the "ServerApp.properties" file located in the
[QPP Server]/conffolder. -
If you want to specify case-sensitivity for user passwords, set
server.password.case.sensitivetotrue. Otherwise, enterfalse. -
Save and close "ServerApp.properties."
The default setting for server.password.case.sensitive is true. Quark Publishing Platform administrators should inform users if case-sensitive passwords
are required.
Managing filters and index service settings
Quark Publishing Platform Server uses four filters for generating previews, and you can change the values in the ".properties" files for each filter. These files include:
-
The "AsposeFilterServiceConfig" file provides previews and thumbnails of Word, RTF,EXCEL,POWER POINT and plain text files.
-
The "QxpsFilterServiceConfig.properties" file provides previews and thumbnails of QuarkXPress projects and QuarkCopyDesk articles.
-
The "IMFilterServiceConfig.properties" file provides previews and thumbnails of most image files.
-
The "JawsFilterServiceConfig.properties" file provides previews and thumbnails of certain image files — PDF files, EPS files, and Adobe® Illustrator® files.
-
The "XADocFilterServiceConfig.properties" file provides previews and thumbnails of XML files.
The following commands are common to all four filters:
-
<FILTER_NAME>filter.generateAttributes: Set this totrueto generate filter-specific attributes. -
<FILTER_NAME>filter.generatePreview: Set this totrueto generate previews. -
<FILTER_NAME>filter.generateThumbnail: Set this totrueto generate thumbnails. -
<FILTER_NAME>filter.generateText: Set this totrueto extract text and enable full-text search. -
<FILTER_NAME>filter.previewWidth: Set this to specify the width of previews (measured in pixels). -
<FILTER_NAME>filter.previewHeight: Set this to specify the height of previews (measured in pixels). -
<FILTER_NAME>filter.thumbnailHeight: Set this to specify the height of thumbnails (measured in pixels). -
<FILTER_NAME>filter.thumbnailWidth: Set this to specify the width of thumbnails (measured in pixels). -
<FILTER_NAME>filter.previewPages: Set this to specify the number of preview pages to generate. -
<FILTER_NAME>filter.processTimeOut: Set this to specify the number of milliseconds after which an incomplete index preview process will terminate.
Index service settings
You can specify parameters for asset indexing. As a separate background process that runs inside Quark Publishing Platform Server,
indexing can consume significant system resources. By editing the "Indexing.properties"
file as described below, you can manage index processes (called "indexing thread pools")
by adjusting the number of concurrent thread pools and the time intervals between
thread pools.
To manage timing and threads for asset indexing:
-
Open the "Indexing.properties" file located in the
[QPP Server]/conffolder. -
To specify the maximum number of concurrent indexing threads that operate in the background, adjust the
indexingThread.pool.maxActive=value. -
To specify the amount of time (in milliseconds) to wait for an available thread from the pool, adjust the
indexingThread.pool.maxWait=value. A value of-1indicates waiting indefinitely. -
To specify the maximum number of idle threads in the pool, adjust the
indexingThread.pool.maxIdle=value. -
To specify the minimum number of idle threads in the pool, adjust the
indexingThread.pool.minIdle=value. -
To specify the number of milliseconds a thread can be in the pool before it is evicted, adjust the
indexingThread.pool.minEvictableIdleTimeMillis=value. -
To specify the number of milliseconds after which the evictor thread should run to evict idle threads, adjust the
indexingThread.pool.timeBetweenEvictionRunsMillis=value. The evictor thread runs in the background.When the "evictor" thread is run, it releases all idle threads from the pool beyond
indexingThread.pool.maxIdlevalue. However, the number of idle threads specified asindexingThread.pool.minIdlevalue are maintained in the pool. -
To index assets not previously indexed when Quark Publishing Platform Server starts, enter
truefor theindexing.indexPendingAssetsOnStartup=value. -
Save and close "Indexing.properties."
ASPOSE filter
The ASPOSE filter handles text files, Microsoft Word, Excel and PowerPoint documents, RTF files and plain text files. Adjust the ASPOSE filter settings:
-
Open the "AsposeFilterServiceConfig.properties" file located in the
[QPP Server]/conffolder. -
asposefilter.previewType=png. Supported preview types are png and jpg. -
asposefilter.generatePreview=true. -
asposefilter.generateThumbnail=true. -
asposefilter.generateTableImages=false. -
asposefilter.generateChartImages=false. -
asposefilter.thumbnailHeight=entry. -
asposefilter.thumbnailWidth=entry. -
asposefilter.previewDpi=entry. -
asposefilter.reditionPreviewDpi=entry. -
To specify the time the process should wait before exiting, if indexing is not done, enter a value in the
asposefilter.processTimeOut=entry (in milliseconds). -
To specify the maximum number of pages for which preview should be generated, enter a value in the
asposefilter.previewPages=entry. -
To set the preview page layout margin settings for RTF, XML, HTML, HTM and TXT type files enter values in the following:
-
asposefilter.text.topMargin=entry. -
asposefilter.text.bottomMargin=entry. -
asposefilter.text.rightMargin=entry. -
asposefilter.text.leftMargin=entry.
-
-
Save and close "AsposeFilterServiceConfig.properties."
Configure ASPOSE filter for PDF preview
The Platform Server provides two filter implementations for the indexing of PDF Documents:
-
Jaws Filter
-
Aspose Filter
By default the JAWS Filter is configured for PDF document indexing. In order to configure the ASPOSE Filter for PDF document indexing, do the following:
-
Open the "AsposeFilterServiceConfig.properties" file located in the
[QPP Server]/conffolder. -
Look for and uncomment the following:
<!-- <supported-file-type> <mac-os-type/> <file-extension>pdf</file-extension> <mime-type/> <creator-code/> </supported-file-type> <supported-file-type> <mac-os-type/> <file-extension/> <mime-type>application/pdf</mim-type> <creator-code/> </supported-file-type> <supported-file-type> <mac-os-type/> <file-extension/> <mime-type>application/x-pdf</mime-type> <creator-code/> </supported-file-type> --> -
Open "JawsFilterServiceConfig.properties." in a text editing application.
-
Look for and comment out the following supported file type:
<supported-file-type> <mac-os-type/> <file-extension>pdf</file-extension> <mime-type/> <creator-code/> </supported-file-type> -
Save and close "AsposeFilterServiceConfig.properties."
-
Save and close "JawsFilterServiceConfig.properties."
APS filter
Adjust the APS filter settings:
-
Open the "ApsFilterServiceConfig.properties" file located in the
[QPP Server]/conffolder. -
apsfilter.generatePreview=true. -
apsfilter.generateThumbnail=true. -
apsfilter.generateAttributes=true. -
apsfilter.generateText=true. -
To specify the time the process should wait before exiting, if indexing is not done, enter a value in the
apsfilter.processTimeOut=entry (in milliseconds). -
To specify the maximum number of pages for which preview should be generated, enter a value in the
apsfilter.previewPages=entry. -
Save and close "ApsFilterServiceConfig.properties."
Configure processing of MS Office documents
Adjust the MS Office filter settings:
-
Open the "OfficeServiceConfig.properties" file in the
[QPP Server]/conffolder. -
Set the
office.defaultImageFormatproperty to specify the default output format type. Default format is PNG. -
Set the
office.defaultHorizontalResolutionproperty to specify the default horizontal resolution of previews. -
Set the
office.defaultVerticalResolutionproperty to specify the default vertical resolution of previews. -
Set the
office.onePagePerSheetproperty to true and all content of the sheet will output to only one page. -
Set the
office.showHiddenWorksheetsproperty to control the visibility of hidden worksheets. -
To set the option to remove or hide the hidden columns/rows from the output formats HTML, XHTML, SMARTTABLE and CALS, set the following properties:
-
office.defaultHiddenColumnDisplayType=entry. The allowed values for this option arehideorremove. -
office.defaultHiddenRowDisplayType=entry. The allowed values for this option arehideorremove.
-
-
Set the
office.defaultHorizontalResolutionoffice.ppt.document.defaultImageFormatproperty to set the default image format for PowerPoint document output. -
Set the
office.defaultHorizontalResolutionoffice.ppt.document.image.defaultHorizontalScalingFactorproperty to set the default horizontal scaling factor for PowerPoint document output. This property is applicable for JPEG, GIF, PNG and BMP image formats. -
Set the
office.defaultHorizontalResolutionoffice.ppt.document.image.defaultVerticalScalingFactorproperty to set the default vertical scaling factor for PowerPoint document output. This property is applicable for JPEG, GIF, PNG and BMP image formats. -
Set the
office.defaultHorizontalResolutionoffice.ppt.component.defaultImageFormatproperty to set the default image format for PowerPoint document’s slide output. -
Set the
office.defaultHorizontalResolutionoffice.ppt.component.image.defaultHorizontalScalingFactorproperty to set the default horizontal scaling factor for PowerPoint document’s slide. This property is applicable for JPEG, GIF, PNG and BMP image formats. -
Set the
office.defaultHorizontalResolutionoffice.ppt.component.image.defaultVerticalScalingFactorproperty to set the defaultvertical scaling factor for PowerPoint document’ slide. This property is applicable for JPEG, GIF, PNG and BMP image formats.. -
Set the
office.defaultHorizontalResolutionoffice.visio.document.defaultImageFormatproperty to set the default image format for Visio document output. -
Set the
office.defaultHorizontalResolutionoffice.visio.document.image.defaultResolutionproperty to set the default resolution of the image for Visio document output. This property is applicable for JPEG, GIF and PNG image formats. -
Set the
office.defaultHorizontalResolutionoffice.visio.component.defaultImageFormatproperty to set the default image format for Visio document’s page output. -
Set the
office.defaultHorizontalResolutionoffice.visio.component.image.defaultResolutionproperty to set the default resolution of the image for Visio document’s page. This property is applicable for JPEG, GIF and PNG image formats.
Throttling mechanism for Parallel request by OfficeService and ChartingService
To configure the OfficeService and ChartingService to do parallel requests change the two properties files :
-
"ChartingPool.properties"
-
"OfficePool.properties"
Configuring "ChartingPool.properties"
-
Open the "ChartingPool.properties" file located in the
[QPP Server]/conffolder -
Set the
chartingThread.pool.maxActiveproperty to specify the maximum number of threads that can be active at any given moment. -
Set the
chartingThread.pool.whenExhaustedActionproperty to specify what should be done if the pool size has already been reached.-
Set to
0to return immediately throwing aNoSuchElementexception. -
Set to
1to block for some time depending on value ofmaxWaitfor an available thread. -
Set to
2to increase the size of the pool and return a new thread instance.
-
-
Set the
chartingThread.pool.maxWaitproperty to specify the amount of time in milli-seconds for which to wait for an available thread. Set to-1to wait indefinitely. -
Set the
chartingThread.pool.maxIdleproperty to specify the maximum no of idle threads in the pool. -
Set the
chartingThread.pool.minIdleproperty to specify the minimum no of idle threads in the pool. -
Set the
chartingThread.pool.minEvictableIdleTimeMillisproperty to specify the minimum time in milli-seconds for a thread to be in the pool before it can be evicted. -
Set the
chartingThread.pool.timeBetweenEvictionRunsMillisproperty to specify the time in milli-seconds after which the evictor thread should run to remove idle thread. Set to-1to indicate Never.
Configuring "OfficePool.properties"
-
Open the "OfficePool.properties" file located in the
[QPP Server]/conffolder -
Set the
officeThread.pool.maxActiveproperty to specify the maximum number of threads that can be active at any given moment. -
Set the
officeThread.pool.whenExhaustedActionproperty to specify what should be done if the pool size has already been reached.-
Set to
0to return immediately throwing aNoSuchElementexception. -
Set to
1to block for some time depending on value ofmaxWaitfor an available thread. -
Set to
2to increase the size of the pool and return a new thread instance.
-
-
Set the
officeThread.pool.maxWaitproperty to specify the amount of time in milli-seconds for which to wait for an available thread. Set to-1to wait indefinitely. -
Set the
officeThread.pool.maxIdleproperty to specify the maximum no of idle threads in the pool. -
Set the
officeThread.pool.minIdleproperty to specify the minimum no of idle threads in the pool. -
Set the
officeThread.pool.minEvictableIdleTimeMillisproperty to specify the minimum time in milli-seconds for a thread to be in the pool before it can be evicted. -
Set the
officeThread.pool.timeBetweenEvictionRunsMillisproperty to specify the time in milli-seconds after which the evictor thread should run to remove idle thread. Set to-1to indicate Never.
QuarkXPress Server Filter
To adjust QuarkXPress filter settings:
-
Open the "QxpsFilterServiceConfig.properties" file located in the
[QPP Server]/conffolder. -
Set the
qxpsfilter.useSpreadForArticles=value totrueto specify that previews for articles are generated for each spread. -
Set the
qxpsfilter.useSpreadForProjects=value totrueto specify project previews with spreads. -
By default, XML deconstruction is enabled. The default setting for the
qxpsfilter.generateDeconstructedXML=entry istrue.To disable XML deconstruction, set the entry tofalse. -
By default, Full Text Search (FTS) is enabled. The default setting for the
qxpsfilter.generateText=entry istrue. To disable FTS, set the entry tofalse.A
truevalue forqxpsfilter.generateDeconstructedXMLalso enables FTS for QuarkXPress projects and QuarkCopyDesk articles. Text generation is dependent on XML generation. If you setgenerateDeconstructedXMLtofalse, Quark recommends also settingqxpsfilter.generateTexttofalse. -
To specify the scale of preview images, adjust the
qxpsfilter.previewScale=value. The default value of1indicates previews at 100 percent. The values of2,3, and6are 200 percent, 300 percent, and 600 percent, respectively. -
To specify the scale of thumbnail images, adjust the
qxpsfilter.thumbnailScale=value. The default value of1indicates previews at 100 percent. The values of.5,2,3, and6are 50 percent, 200 percent, 300 percent, and 600 percent, respectively. -
To specify image quality for JPEG previews, adjust the
qxpsfilter.jpegQuality=value. Enter1for the highest quality,2for high quality,3for medium quality, and4for lowest quality. -
Save and close "QxpsFilterServiceConfig.properties."
JAWS filter settings
The JAWS filter is part of the ImageMagick® Filter Service Configurations for EPS, PDF, and Adobe® Illustrator® files. To specify settings for the JAWS filter:
-
Open the "JawsFilterServiceConfig.properties" file located in the
[QPP Server]/conffolder. -
To specify the resolution for thumbnails and previews (measured in dots-per-inch), adjust the
jawsfilter.resolution=value.The
jawsfilter.resolution=value is the fallback resolution used to scale the preview image to the specified size when the proper resolution cannot be calculated. -
Save and close "JawsFilterServiceConfig.properties."
XML Author filter settings
The XML Author filter is part of the configuration for XML files. XADocFilter is used to generate Previews and Thumbnails of XML files. To specify settings for the XML Author filter:
-
Open the "XADocFilterServiceConfig.properties" file located in the
[QPP Server]/conffolder. -
To specify the amount of time a process will wait for indexing (with XADocFilter) to complete, adjust the
xaDocfilter.processTimeOut=value. -
To specify the preview height and width, adjust the
xaDocfilter.previewHeight=value and thexaDocfilter.previewWidth=value. -
To specify the maximum number of pages for which a preview should be generated, adjust the
xaDocfilter.previewPages=value. -
Save and close "XADocFilterServiceConfig.properties."
ImageMagick, Jaws, and DITA OT directories
By default, ImageMagick, Jaws, and the DITA Open Toolkit are included with Quark Publishing Platform. However, if you have existing installations of ImageMagick or Jaws, perform the following tasks:
-
Open the "ServerApp.properties" file located in the
[QPP Server]/conffolder. -
Scroll to the
IMAGE_MAGICK_HOME=entry. -
Enter the path to your existing ImageMagick bin folder.
-
Scroll to the
JAWS_HOME=entry. -
Enter the path to your existing Jaws bin folder.
-
Scroll to the
DITA_HOME=entry. -
Enter the path to your existing DITA Open Toolkit folder.
-
Save and close "ServerApp.properties."
Full text indexing configuration
To configure FTSIndex filter settings:
-
Open the "LuceneTextIndexingConfig.properties" file located in the
[QPP Server]/conffolder. -
By default, the storage location for index files is in the Quark Publishing Platform installation folder. However, you can change the location by changing the
lucene.index.dir=parameter to indicate the folder in which you want to store index files. -
Specify the language (class) used most frequently for text indexing and query term analysis by changing the
lucene.analyzerClass=parameter. The default setting —StandardAnalyzer— recognizes English semantics for Full Text Search. But if the majority of the text in your workflow is not English, you can specify another language to search more accurately according to that language's semantics. The languages are listed in the "LuceneTextIndexingConfig.properties" file."LuceneTextIndexingConfig.properties" contains information for each parameter, as well as links to the Apache documentation.
-
To specify the number of changes after which an index compaction should be performed, set a value for
lucene.maxModificationWithoutOptimisation. -
Save and close "LuceneTextIndexingConfig.properties."
Charting Service
To configure the properties for the Charting service modify the below properties:
-
Enter the default output format (PDF/HTML/IMAGE/JSON) in the
charting.defaultOutputFormatparameter. -
Enter the default values for the image output properties in the following parameters:
-
charting.defaultImageFormat=png -
charting.defaultWidth=600 -
charting.defaultScale=
-
-
Enter the path to the default HTML template:
charting.defaultHTMLTemplateURI=classpath\:DefaultHTMLTemplate.html
Integrating QLA with Quark Publishing Platform
To reconfigure Quark® License Administrator (QLA) primary and backup server settings with Quark Publishing Platform:
-
Open the "Qla.properties" file located in the
[QPP Server]/conffolder. -
Enter the current IP address or hostname of the computer where you installed QLA in the
QlaServer.machinename=parameter. -
Enter the port number in the
QLAServer.port=parameter. -
If you have a backup QLA server, enter the correct IP address or hostname and port values in the
Backup.QlaServer.machinename=andBackup.QlaServer.port=parameters. -
In the
Qla.SerialNumber=parameter, enter the QLA serial number for Quark Publishing Platform Server. The QLA Server Console and QLA Client applications display your serial number.The serial number is updated in "Qla.properties" based on the validation code that you provided when you installed or updated Quark Publishing Platform Server.
-
Save and close "Qla.properties."
Dynamic configuration
The Configuration service is used to manage publishing configuration:
-
Adding/updating new publishing channels
-
Adding/updating new publishing process
-
Adding/updating new MIME types for content type
The Configuration service is responsible for the following:
-
Managing the configuration files.
-
Capturing updates.
-
Reinitializing corresponding bean definitions, avoiding restarts.
-
Using the reinitialize API to avoid restarts even after changing the configuration files manually on the server .
In a multi-server environment, each node in a cluster must have access to a single .ext folder and the shared location must be appended to the classpath system environment variable.
Creating a custom XML mime-type
https://http://localhost:61400/rest/service/config/xmlmimetypes?
op=create&mimetype=application/xml;
format= researchreport&parentmimetype=application/xml;
format= smartcontent&xpath =/*[local-name()='section']/@type=' researchreport
Mapping the XML mime-type to a content type in Platform
https://http://localhost:61400/rest/service/config/xmlmimetypes?
op=mapcontenttype&contenttype=Research Report&mimetypes=application/xml;
format=researchreport
Creating Publishing Channels
https://http://localhost:61400/rest/service/config/publishingchannels?
op=create&publishingchannellist=<publishingChannelList><publishingChannelInfoid="researchReportPdf"
Defining Publishing Channels for Asset indexing
 https://http://localhost:61400/rest/service/config/publishingchannels?
contenttype=Research Report&loginname=Admin&loginpassword=Admin
Enabling IPTC support
IPTC values in a picture file can be recognized and included in the picture's attribute
list. To enable or disable IPTC functionality, open the file \Server\conf\IMFilterServiceConfig.properties and set the imfilter.generateIPTCAttributes property to true or false. You can also specify preview/thumbnail resolution by setting a value for imfilter.resolution.
Failover setup
This topic describes one way you can configure a Quark Publishing Platform installation for failover.
The key to a setup like this is to use a virtual IP address for the Quark Publishing Platform Server computer.
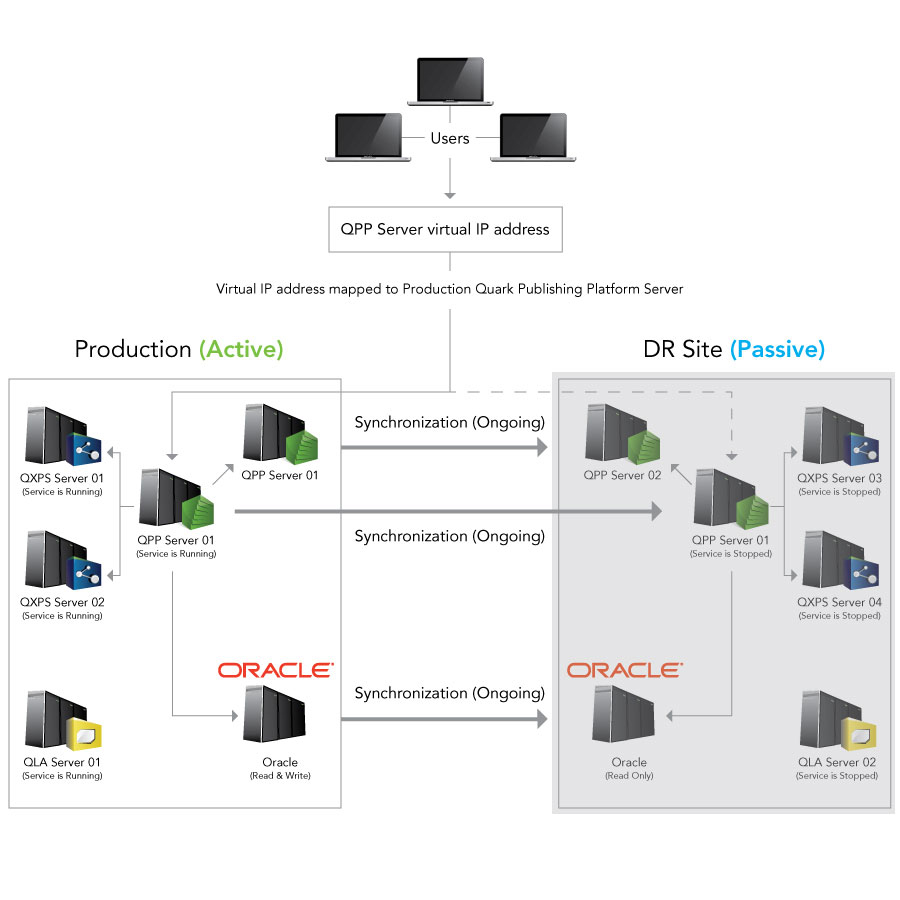
During normal operations, the Production site is up and running and the virtual IP address is mapped to that server. The DR (disaster recovery) site is in dormant mode, with all Quark Services stopped. The following things are being synchronized from the Production servers to the DR server:
-
Quark Publishing Platform repository folder(s)
-
Quark Publishing Platform database
-
QPP Server/conffolder -
QPP Server/Indexfolder
Synchronization of the Quark Publishing Platform File Server folder(s) and Quark Publishing Platform Oracle database must be done at the same time and at the same intervals to maintain data integrity.
If the Production site goes down, synchronization stops and the virtual IP address is re-mapped to the DR site. End users should not notice the change because they are still using the same virtual IP address.
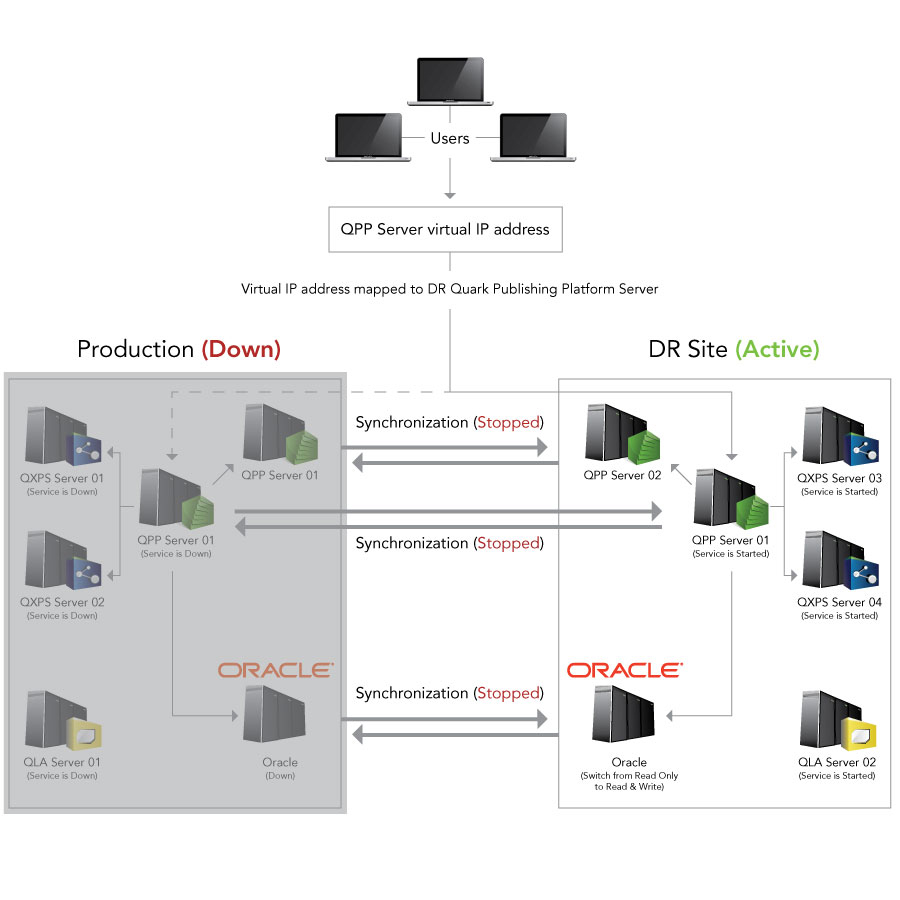
At this point, an administrator should perform an orderly shutdown of the DR site, then restart synchronization from the DR site to the Production site.
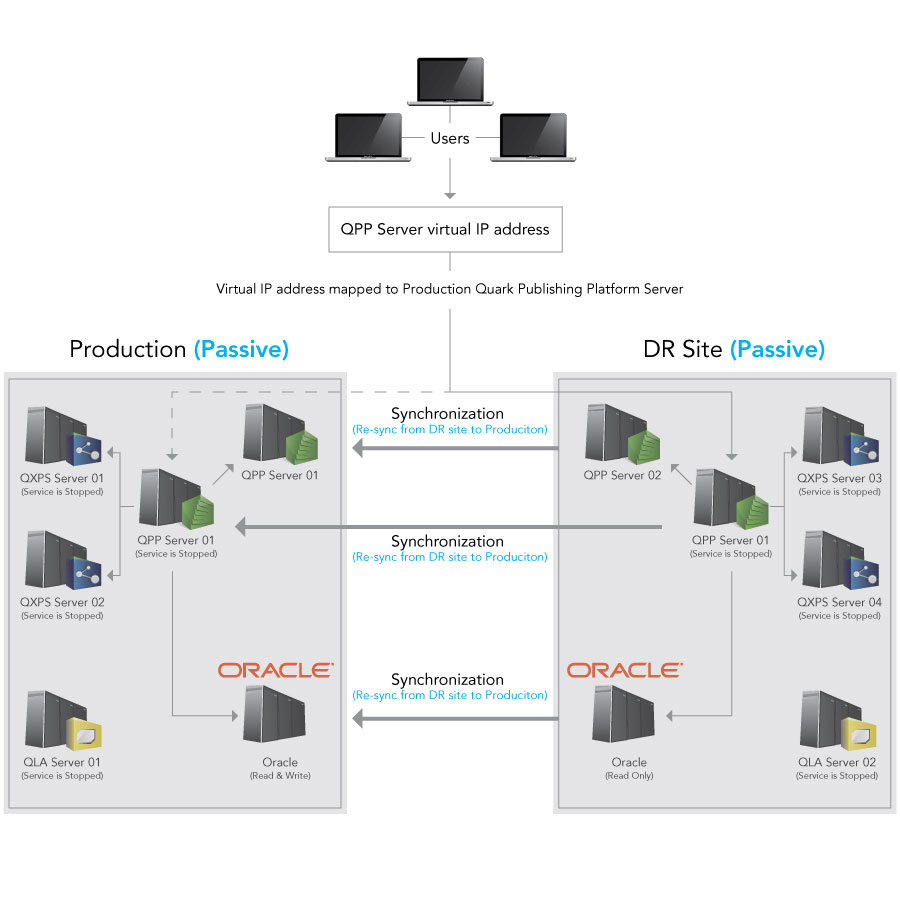
When synchronization is complete between the DR site and the Production site, remap the virtual IP address to the Production site, reverse the synchronization so that changes are pushed from the Production server to the DP site, and then launch all of the Quark Publishing Platform components.
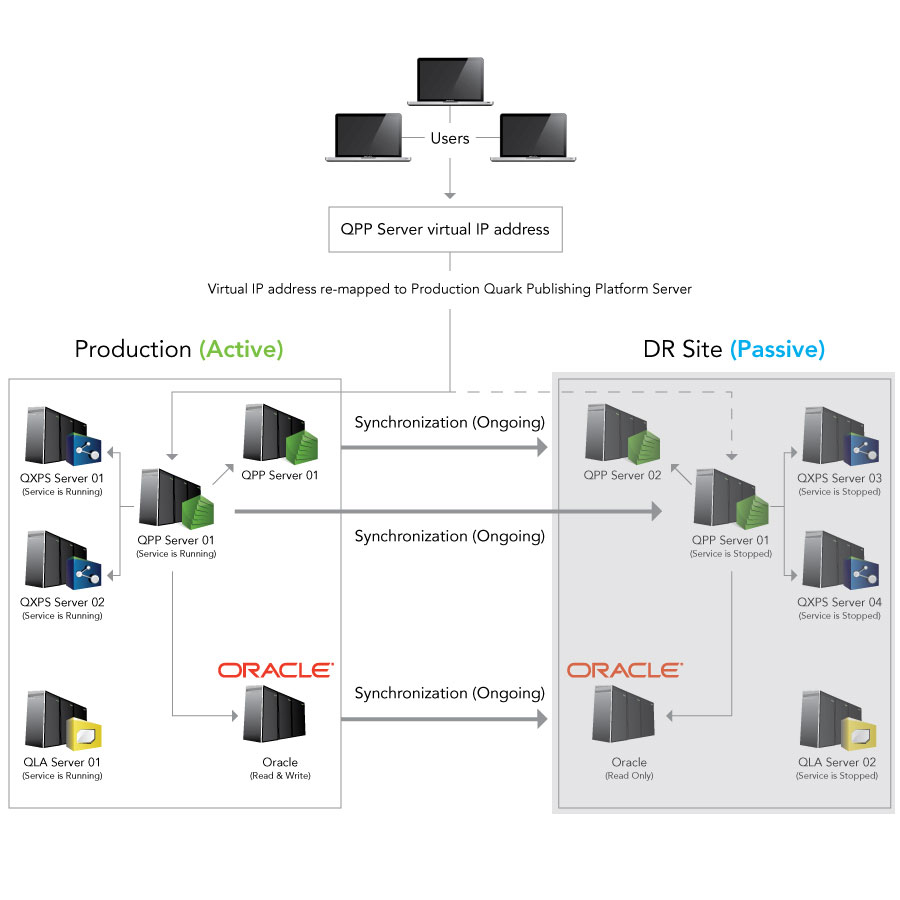
Encrypting a plain text password
In Quark Publishing Platform 10.1 and later, you can encrypt all of your passwords that are in plain text. For example, if you are using an SQL Server or Oracle as a database in the Platform Server then your database user password is stored in plain text in the "database.properties" file. You can encrypt this password.
To encrypt plain text passwords:
-
Open the command prompt and navigate to the Platform server installation folder.
-
Launch the "encrypt.bat" file with your password (
encrypt.bat password) to retrieve its encrypted value. -
Copy the generated encrypted value of the password and use this encrypted value in any of properties file (for example, "database.properties").
-
Open the "lib" folder in your Quark Publishing Platform Server folder.
-
Open "qpp-server-app-13.2.jar" and navigate to
\com\quark\qpp\appinside the jar file. -
Open "ServerStartupContext.xml " in a text editing application and under the
securePlaceholderConfignode, add an entry for each of the properties file that you used the encrypted value in. Remove this entry from theplaceholderConfignode if it exists. -
Save the file, update the jar and restart the server.
You can use any of the algorithms mentioned in the "ServerStartupContext.xml" file and you can modify the key used to encrypt the password (default is QUARK).
Enabling forced log off during inactivity
Configuring WebAdmin to enable forced log off
Forced Log off can be enabled by engaging a predefined Servlet Filter in the "Web.xml"
file in the [QPP Server]/webapps/admin folder:
-
session-idle-time: Specifies the time (in seconds) of inactivity after which a user will be forced to log off of WebAdmin. -
exclude-url-patterns: Specifies URL patterns which are not considered user activity. -
pre-expiry-mag-time: Specifies the time (in seconds) before pending inactivity bases log off, a warning or countdown message will be shown.
<filter>
  <filter-name>SessionTimeoutCookieFilter</filter-name>
  <filter-class>com.quark.web.activity.servlet.SessionTimeoutCookieFilter</filter-class>
  <init-param>
        <param-name>session-idle-time</param-name>
        <param-value>60</param-value>
  </init-param>
  <init-param>
        <param-name>exclude-url-patterns</param-name>
        <param-value>/admin/keepAlive.qsp</param-value>
  </init-param>
  <init-param>
        <param-name>pre-expiry-mag-time</param-name>
        <param-value>40</param-value>
  </init-param>
</filter>
<filter-mapping>
  <filter-name>SessionTimeoutCookieFilter</filter-name>
  <url-pattern>/*</url-pattern>
</filter-mapping>
Forced log off can also be enabled in the "Admin-Home.jsp" file in QPP Home/webapps/admin/jsp folder:
<!-- Uncomment for "Forced Logoff on Inactivity" -->
  <script type="text/javascript" src="resources/js/SessionTimer.js></script>
  <link type="text/css" href="resources/js/SessionTimer.css re;="stylesheet></link>
function logoutDueToInactivity () {
window.location.href = "logout.qsp";
};
<%-- Initialise inactivity monitor --%>
SessionTimer.init(logoutDueToInactivity);Configuring Workspace to enable forced log off
Forced log off can be enabled by engaging a predefined Servlet Filter in the "Web.xml"
file in the [QPP Server]/webapps/workspace folder:
-
session-idle-time: Specifies the time (in seconds) of inactivity after which a user will be forced to log off of WebAdmin. -
exclude-url-patterns: Specifies URL patterns which are not considered user activity. -
pre-expiry-mag-time: Specifies the time (in seconds) before pending inactivity bases log off, a warning or countdown message will be shown.
<filter>
  <filter-name>SessionTimeoutCookieFilter</filter-name>
  <filter-class>com.quark.web.activity.servlet.SessionTimeoutCookieFilter</filter-class>
  <init-param>
        <param-name>session-idle-time</param-name>
        <param-value>300</param-value>
  </init-param>
  <init-param>
        <param-name>exclude-url-patterns</param-name>
        <param-value>/workspace/keepAlive.qsp/workspace/assetHeaderUpdate.qsp</param-value>
  </init-param>
  <init-param>
        <param-name>pre-expiry-mag-time</param-name>
        <param-value>60</param-value>
  </init-param>
</filter>
<filter-mapping>
  <filter-name>SessionTimeoutCookieFilter</filter-name>
  <url-pattern>/*</url-pattern>
</filter-mapping>
Forced log off can also be enabled in the "User-Home.jsp" file in QPP Home/webapps/workspace/jsp folder:
<!-- Uncomment for "Forced Logoff on Inactivity" -->
  <script type="text/javascript" src="resources/js/SessionTimer.js></script>
  <link type="text/css" href="resources/js/SessionTimer.css rel="stylesheet></link>
<%-- Initialise inactivity monitor --%>
SessionTimer.init(UserHomeUI.logout);The countdown message will be shown with remaining seconds. The user can prevent the forced log off by clicking Continue Session.
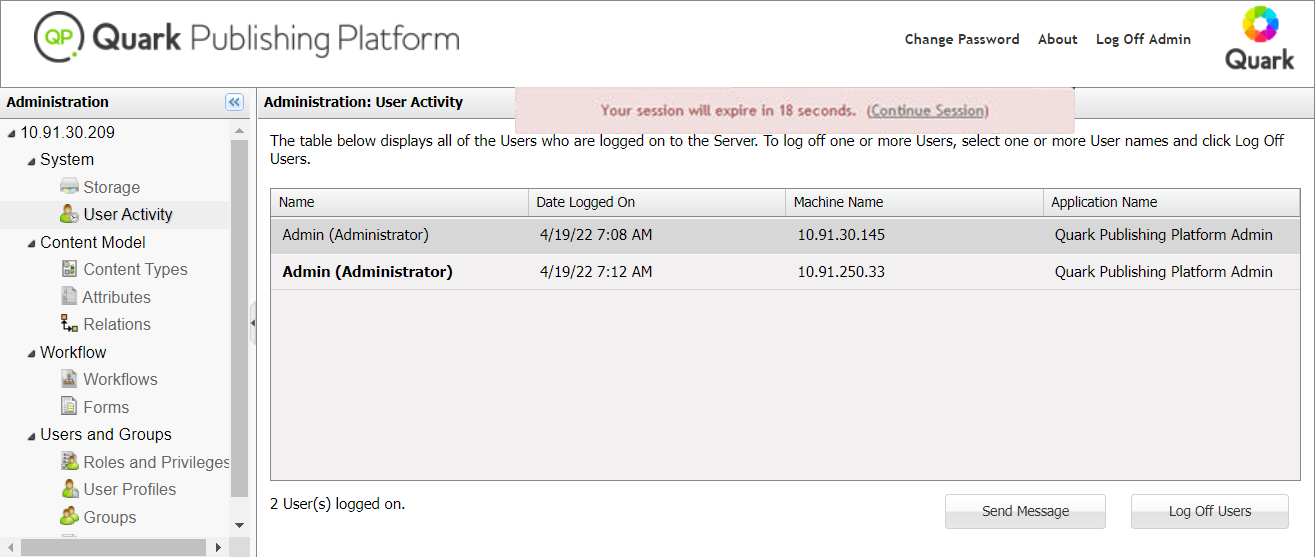
Configuring messaging
To configure Quark Publishing Platform Server to display Asset Workflow Changed messages when any listed attribute is changed on the related asset:
-
Open the "AssetWorkflowChangedMessageAttributes.xml" file located in the
[install_path]/Server/conf/folder. -
Set the attributes IDs or names to trigger the
Asset Workflow Changedmessage when any listed attribute is changed on the related asset.<!-- List of attribute ids or names to be considered for "ASSET WORKFLOW CHANGED MESSAGE" The "ASSET WORKFLOW CHANGED MESSAGE" will be published if there is any changes in the attributes of the mentioned asset/> <util:list id="assetWorkflowAttributes"> <value>name</value> <value>Status</value> <value>Workflow</value> <value>Routed to</value> </util:list> </beans>
Configuring clipboard service
Use the "ClipboardConfig.xml file" to configure the clipboard service. This file contains format conversion detail.
-
ClipboardFormat: Represents a clipboard data format with the format name and its mime-type. -
ClipboardFormats: Represents all possible clipboard data formats. -
ChannelMapping: Represent a binding of the publishing channel with the given clipboards data format. The given channel will be used to generate the clipboard data format specified in the attributeclipboardformat. -
ChannelMappings
<ClipboardConfig>
    <ClipboardFormats>
        <ClipboardFormat>
            <name>svg</name>
           <mimeType>image/svg+xml</mimeType>
        </ClipboardFormat>
         …
         …
    </ClipboardFormats>
    <ChannelMappings>
        <ChannelMapping id="fetchExcelTable" contenttype="Microsoft Excel Table"  clipboardformat="svg">
            <param name="OUTPUT_FORMAT">image</param>
            <param name="OUTPUT_FORMAT_PROPERTIES">imageformat=svg</param>
        </ChannelMapping>
        …
        …
    </ChannelMappings>
</ClipboardConfig>
Enable tracing and printing of JVM information
se the following debugging options in the "wrapper.conf" file located in the server installation folder, to enable tracing and printing of the JVM information:
-
wrapper.java.additional.7=-XX:+HeapDumpOnOutOfMemoryError: Dumps heap to a file whenjava.lang.OutOfMemoryErroris thrown. -
wrapper.java.additional.8=-XX:HeapDumpPath=.\log\: Sets the path to directory or filename for heap dump. -
wrapper.java.additional.9=-XX:ErrorFile=.\log\hs_err_pid%p.log: If an error occurs or JVM crashes, save the error data to this file.
Configuring location of the publishing rescue folder
Configure the path used to store the QuarkXPress Server publishing rescue folder, where publishing data is to be saved in the case of any publishing failure. If a path is not specified, a default rescue folder named "PublishingRescueFolder", will be created in the current working directory.
There are two ways to confiure the path:
-
Edit the "PublishingUtilContext.xml" file (
[install-path]/Server/publishing) to configure the path.This method requires a server restart.<propertyname="rescueFolderPath" value="C:\Program Files\Quark\Quark Publishing Platform\Server\MyCustomPublishingRescueFolder"/> -
Use JConsole as shown below:
No server restart is required with this method.