
Starter Documents and Templates
For each document class you define, a "Starter Document" must be created that contains the basic root element of the document. We call them "Starter Document" rather than "template" to distinguish these files from the Word Templates that must also be created for each document class. Both files are discussed in this chapter.
This must be done for each language culture in which you are creating solutions.
Starter Document
The Starter Document is an XML document, and so must begin with an XML declaration. The XML declaration may also be followed by a Processing Instruction (PI) node that identifies values for certain items of document metadata.
The PI node must be named Xpress, and takes the following format:
<?Xpress attribute="value" attribute2="value2"?>
It would, of course, have as many or as few attributes as your organization's needs require. Later, as the document is edited and revised, your content management system may insert additional attributes. Quark XML Author will retain whatever attributes and values are placed in this node, but will only look for and process the value of one attribute: accessMode. If this attribute is not present, the AccessMode will default to Author, but if the AccessMode is present, Quark XML Author will open the document in whatever mode is specified by its value.
Quark XML Author provides two built-in PI attributes: productLine and accessMode. Both are optional. The first can be used to identify the document class, and its value must match the value of a productLine attribute in an AppConfig file namespace node. The latter, accessMode, would define the level of access for the document as a whole. See section 5.54 for more information on access modes.
Document Content
The Starter Document's root node is the root node defined in the XAS. Within that root node, any required elements must also be defined, and any of their required child elements must also be defined, and so on. For example, if a Chapter root node required a Title and at least one Section, which in turn must contain at least one Paragraph, you would need to define all four of these elements, and the starter document might look something like the example shown below.
<?xml version="1.0" encoding="UTF-8" ?>
<Chapter>
  <Title>Your Title Here</Title>
  <Section>
    <Paragraph>Default first paragraph</Paragraph>
  </Section>
</Chapter>
Of course, this is a very simple structure that doesn't take into account attributes—any mandatory attributes for these elements would also need to be added, with default values supplied.
Namespace
In addition to any attributes that may be required by the schema, the root element may also have default or prefix namespace attributes.
DOCTYPE declarations
Quark XML Author provides the following support for DTD DOCTYPE declarations within Quark XML Author documents.
External
Externally referenced DOCTYPES are fully supported. We support addition of an externally referenced doctypes in documents not for validation purposes. There are 2 reasons for including DocType declarations in an XML document from an XML Author perspective:
-
Using entity declarations that might be declared in those DTDs.
-
Using default values for attributes that might be used in those DTDs
Internal
Quark XML Author supports a subset of the full language specification for internal DOCTYPE declarations.
-
A declaration must be valid in terms of XML syntax.
-
Comments are not allowed within the DOCTYPE declaration.
-
Only the !ENTITY definition is supported. Definitions such as !ELEMENT or !ATTLIST are not supported.
-
If Quark XML Author encounters an unsupported DOCTYPE declaration, the system will prompt the user with error message stating that the document can't be opened.
The Quark XML Author parsing logic does support additional aspects of DOCTYPE declaration. If you have a question about whether your declaration is supported, please contact technical support.
Microsoft Word Templates
In Microsoft Word, the ribbon interface is defined by the <Ribbon> node in the AppConfig and DocConfig files, rather than via Word templates. The global template is not used. The document-level template (.dotx file) is necessary to contain paragraph styles that the document class will use, but no special tool is needed to create this Word template.
If your Styles button is not available, see Enabling the Styles button in standard Word.
Preparing to Use TemplateManager
For each culture, the below tasks must be performed before using TemplateManager:
-
Prepare AppConfig.xml. Menus and CommandBars defined in AppConfig.xml will be used to create Xpress.dot.
-
Prepare a DocConfig file for each document class. Menus and CommandBars defined in the DocConfig files will be used to create the document class Word templates.
-
Close all instances of Word running on the computer. If Outlook is configured to use Word as the email editor, you must also close Outlook.
-
Removing temporary files
-
Place TemplateManager.exe and its support files in the Quark XML Author application folder. The support files are:
-
CollectControls.exe
-
Quark.XA.TemplateUtil.exe
-
Quark.XA.TemplateUtliLib.dll
-
Set the Microsoft Office culture to the culture of the configuration.
-
To Launch TemplateManager
-
Removing temporary files again
Removing temporary files
To ensure that all temporary template information is removed:
IMPLEMENTER
-
Close all winword processes.
-
Go to %AppData%\Microsoft\Templates\
-
Del Normal.dot
-
Del ~*.dot
-
-
Again, close all winword processes
-
Go to Application installation folder\
-
Del Wxyz.dot
-
Del ~xyz.dot
-
END USER
-
Close all winword processes.
-
Go to %AppData%\Microsoft\Templates\
-
Del Normal.dot
-
Del ~*.dot
-
-
Go to …\Program Files\Microsoft Office\Templates\{folder#}
-
Del ~*.dot
-
-
Go to …\Program Files\Quark XML Author\{language}
-
Del ~*.dot /s
-
-
Go to …\Program Files\Quark XML Author\{language}\{solution name (i.e. BUSDOCS)}
-
Del ~*.dot /s
-
Here {folder#} equals the desired language:
-
1033 = English
-
3082 = Spanish
-
1041 = Japanese
-
1036 = French
If you are upgrading from a previous version of Quark XML Author, you may also want to verify that Normal.dot does not include legacy, unused menu items. If it does, rename Normal.dot and then open and close Word so that it creates a default Normal.dot file.
Once you have performed all these tasks, you are ready to run TemplateManager and create the Quark XML Author templates for a given culture. Afterwards, be sure to "Removing temporary files" as the final step.
CollectControls.exe
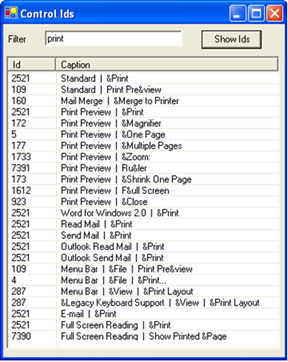
This utility is used to find the ControlIds for various functions in Word for use in the docConfig.
-
Specify the function in Filter.
-
Click Show Ids.
The IDs for the specified function are displayed.
For example, for 'print', the following figure shows the IDs available. If you want Print on the File menu, the ID is 4.
Launch TemplateManager
To launch TemplateManager:
-
Set the Microsoft Office culture to the culture of the configuration.
-
Right-click on TemplateManager.exe. In the shortcut menu, click Run as administrator.
-
In the Select Language dialog, select the language of the culture and configuration.
-
Click OK. The XML Author Template Utility application displays.
-
Select the Application Config tab.
Application Config Tab
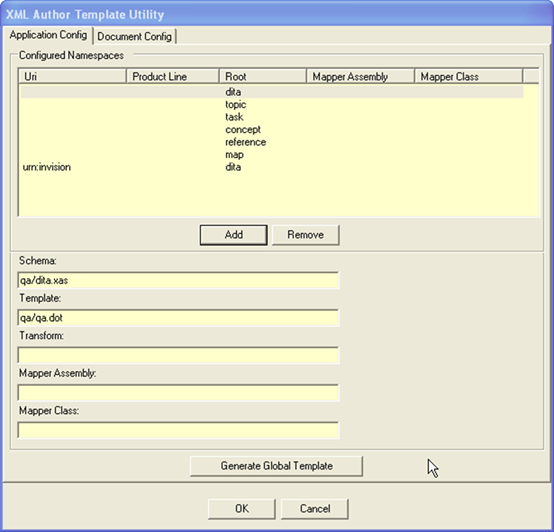
The Application Config tab is displayed. The Configured Namespaces list is populated with each pre-configured namespace in the AppConfig Namespaces node.
Edit Pre-Configured Namespace
To edit a pre-configured namespace, select it in the list. Make any changes necessary in the following fields: Schema, Template, Transform, Mapper Assembly, and Mapper Class. Click OK to commit the changes to the AppConfig file.
Add a Namespace
You can add new namespace configurations to the AppConfig file on the Application Config tab. Click Add to display the Add Namespace window.
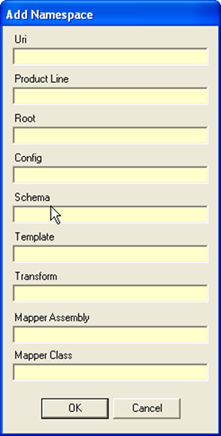
Complete the form and click OK. Changes are not be committed to the AppConfig file until you click OK on the main window.
Remove a Namespace
To remove a namespace, select it in the list and click Remove. A confirmation message will be displayed. Click Yes to delete the namespace. Click No to cancel the operation.
Create Xpress.dot
Once you have made any namespace changes necessary, click Generate Global Template. A window will be displayed that lists the changes being made (Figure 15‑4) to Normal.dot and Xpress.dot will be created. Word will open with the Xpress.dot template active. Click OK to save the template and close the Activity window. If are editing Xpress.dot, you'll have to close the template manually; otherwise, the template closes automatically.
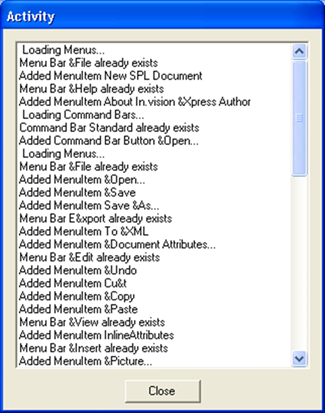
New and reprogrammed menu items and toolbar buttons specified in AppConfig will be placed at the bottom of menus and the far right of toolbars. Open Xpress.dot in Word, select Tools > Configure, and move these items to the proper locations. For example, if you have replaced Word's Open functionality with Quark XML Author's functionality, you'll need to move the Open button on the Standard toolbar back to its customary place. When done, save and close Xpress.dot.
Document Config Tab
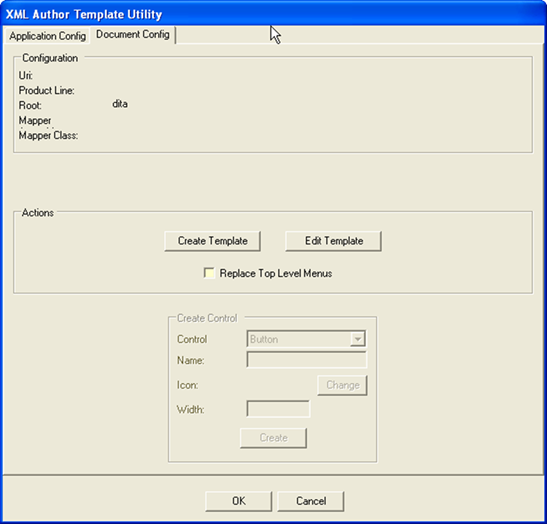
Use the Document Config tab to create and modify document class templates. To work with a document class, select the appropriate namespace in the Configured Namespace list on the Application Config tab, then click the Document Config tab.
Create Template
To create the document template, check the Replace Top Level Menus checkbox and click Create Template. The template will be created with the name specified in the namespace declaration and will be placed in the directory specified. Word will open the template. Save and close the template.
Edit Template
To edit an existing template, click Edit Template. The template will open. Use the Create Control panel to create new controls. Make sure the Name matches the resourceId name for the control in the configuration file. When you click Create, the new control will be added to a temporary toolbar. Move it to the proper location before saving and closing the template.
Final Step
Remove temporary files again. See Removing temporary files.
Setting the Proofing Language
You can set the default proofing language of the XML Author template to account for different cultures. For example, you may need to change the language from US English to United Kingdom English.
-
Open the template in a package editor (for example oXygen), or you can rename the template to .zip and extract the file you want to change.
-
Open word/styles.xml.
-
Change the lang@val to the desired language. For example, in the figure below, set lang@val to "en-GB".
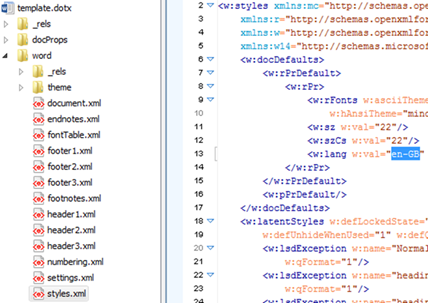
Screenshot: Setting the Proofing Language
Word: New templates
For Word solutions, when you create a new template, extraneous style information causes an issue in Quark XML Author smart paste feature. This causes the paste feature, to use global styling information instead of local styling information.
To remove the style information:
-
Use the Word Save As feature to save the .dotx Word Template file as a .dot Word 2003 Template file.
-
Use the Word Save As feature to save the .dot Word 2003 Template file back to a .dotx Word Template file.
The extraneous style information is removed from the template.
Technical details
This section provides the technical details on the “new template” issue described in the preceding section.
This issue is happening because there is an overriding default paragraph property being applied at the document level. The following is a snippet of the styling node from a sample dotx:
<pkg:part pkg:name="/word/styles.xml" pkg:contentType="application/vnd.openxmlformats-officedocument.wordprocessingml.styles+xml">
<pkg:xmlData>
  <w:styles xmlns:r="http://schemas.openxmlformats.org/officeDocument/2006/relationships" xmlns:w="http://schemas.openxmlformats.org/wordprocessingml/2006/main">
            <w:docDefaults>
              <w:rPrDefault>
                        <w:rPr>
                          <w:rFonts w:asciiTheme="minorHAnsi" w:hAnsiTheme="minorHAnsi" w:eastAsiaTheme="minorHAnsi" w:cstheme="minorBidi" />
                          <w:sz w:val="22" />
                          <w:szCs w:val="22" />
                          <w:lang w:val="en-US" w:eastAsia="en-US" w:bidi="ar-SA" />
                        </w:rPr>
              </w:rPrDefault>
              <w:pPrDefault>
                        <w:pPr>
                          <w:spacing w:after="200" w:line="276" w:lineRule="auto" />
                        </w:pPr>
              </w:pPrDefault>
            </w:docDefaults>
            <w:latentStyles w:defLockedState="0" w:defUIPriority="99" w:defSemiHidden="1" w:defUnhideWhenUsed="1" w:defQFormat="0" w:count="267">
A default paragraph property is being applied to any paragraph that doesn’t have a pPr.
The following explanation is from the OpenXML SDK documentation:
docDefaults (Document Default Paragraph and Run Properties)
This element specifies the set of default paragraph and run properties which shall be applied to every paragraph and run in the current WordprocessingML document. These properties are applied first in the style hierarchy; therefore, they are superseded by any further conflicting formatting, but applied if no further formatting is present.
If this element is omitted, then the document defaults shall be application defined by the hosting application.
Consider the following definition for the document defaults for a WordprocessingML document:
<w:docDefaults>
  <w:pPrDefault>
    <w:pPr>
      <w:jc w:val="center"/>
    </w:pPr>
  </w:pPrDefault>
  <w:rPrDefault>
    <w:rPr>
      <w:b/>
    </w::rPr>
  </w:rPrDefault>
</w:docDefaults>
The child elements of docDefaults specify a default paragraph property of centered text and a default run property of bold text. Consider what happens when this formatting is applies to the following fragment from the main document part of the same document:
<w:body>
  <w:p>
    <w:r>
      <w:t>Hello world!</w:t>
    </w:r>
  </w:p>
</w:body>
This paragraph contains no formatting properties; therefore, using the style hierarchy, the document default paragraph and run properties are applied as specified within the docDefaults element, and the resulting paragraph is centered as specified in the jc element as well as bold as specified via the b element.
Here is an example of the OpenXML that we paste for an intra-para paste:
<w:p>
    <w:r>
      <w:rPr />
      <w:t xml:space="preserve">two </w:t>
    </w:r>
</w:p>
The OpenXML does not contain a pPr node. This is done so that the content being pasted "inherits" the styling of the target paragraph. But apparently having this default pPr in the docDefaults node overrides that and applies this global styling which is undesirable. The solution is to remove the highlighted pPr node from the dotx which is accomplish by the workaround described in the preceding section.
Enabling the Styles button in standard Word
Occasionally and for reasons unrelated to Quark XML Author, the standard Word Styles button can become unavailable.
To enable the Styles button:
-
Close all instances of Word if it's open.
-
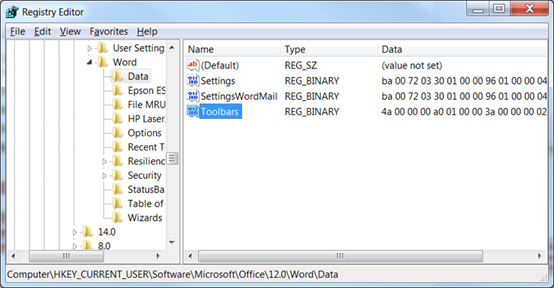
Launch Regedit.
-
In Regedit, go to the following location: \HKEY_CURRENT_USER\Software\Microsoft\Office\12.0\Word\Data
-
At that location, delete "Toolbars".
-
Close Regedit.
-
Open Word.
The Styles button is available.