Detailed Overview of Layout Options in Document Creation
The Layout Options encompass eight distinct level of layout options: Document-level, Section-level, Paragraph-level, Region-level, Table-level, Figure-level, Image-level, and Tagging-level layout options. Each of these levels offers specific layout options that cater to different aspects of document design. While some options are common and available across all categories, providing you with a consistent experience, others are unique to particular levels, allowing for more tailored adjustments.
Document-level Layout Options
Document-level layout options allow you to define how content is presented within a document. Properly configured layout options enhance readability, ensure consistency, and improve the overall aesthetics of the document.
Various layout options that can be configured to achieve the desired output are listed below:
Types of Layout Options at the document-level
Hide Title
The Hide Title option hides the document title from appearing in the final output, allowing the content to be presented without a title if necessary.
Use case
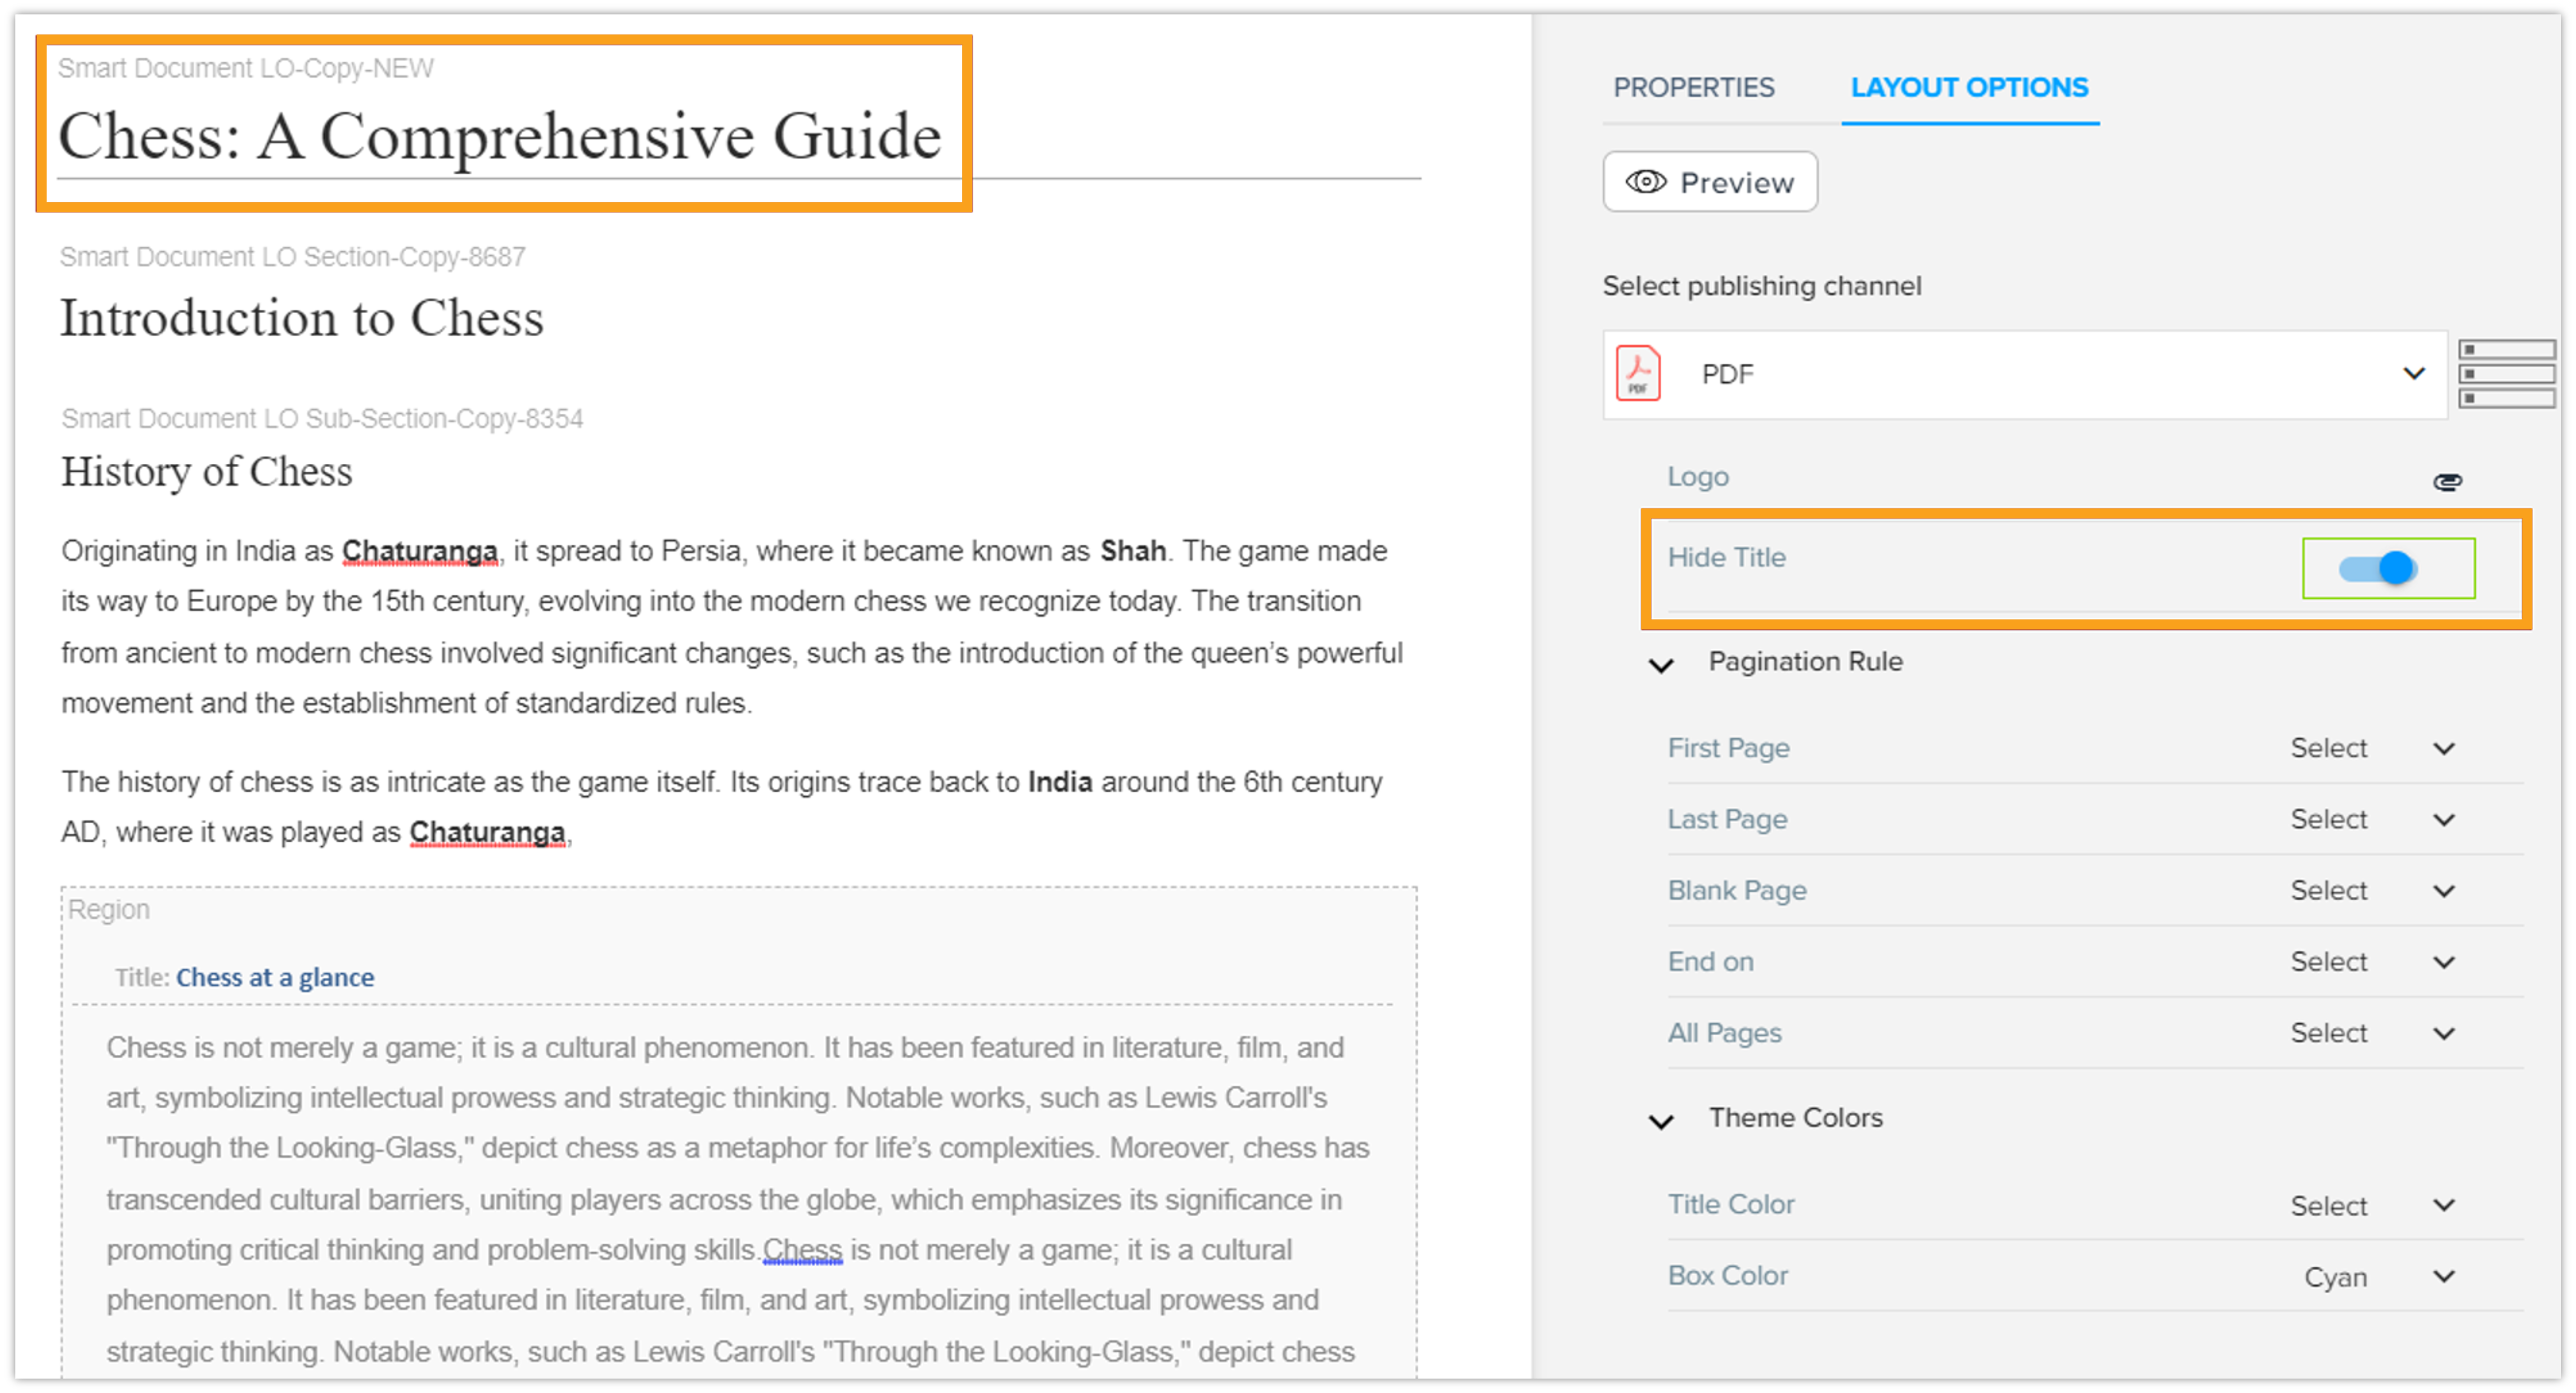
In a scenario where a document's title is only needed for internal use but shouldn't appear in the final published version, the Hide Title option at the document level can be used. By enabling Hide Title, the title will be omitted from the published document.
Example
-
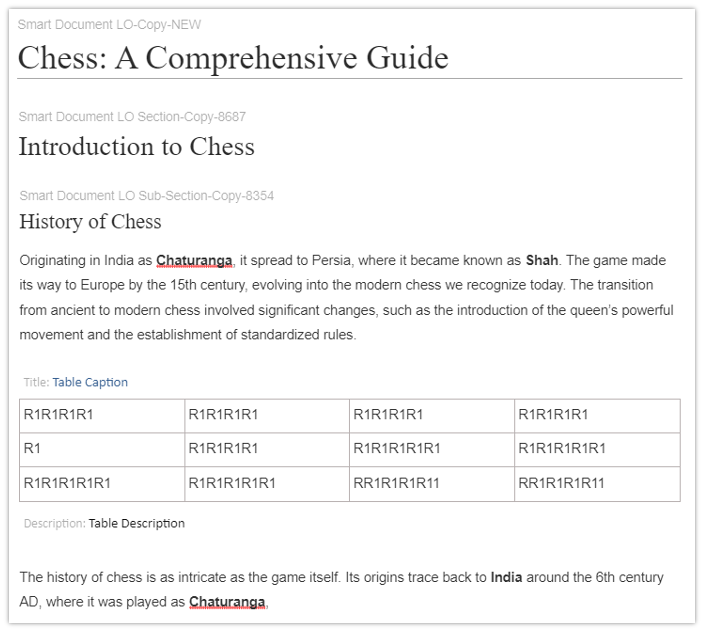
Authored Document with Visible Title:
-
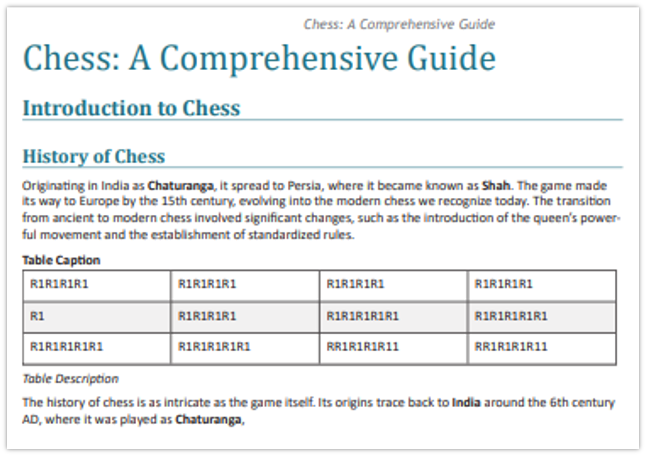
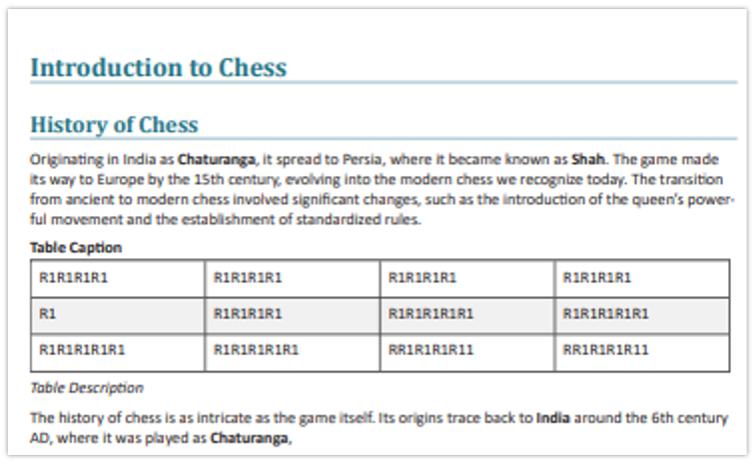
Published Output before hiding the title:
-
Applying Hide Title at Document Title:
-
Published Output with hidden title:
Pagination Rule
The Pagination Rule specifies how content is arranged across pages. This feature uses predefined templates which manage content according to the chosen template.
The following templates are available:
-
A-Front-Cover
-
A-Back-Cover
-
B-One Col-First
-
B-One Col-Rest
-
B-One Col-Last
-
B-One Col-Back
-
B-Blank
-
C-Two Col-First
-
C-Two Col-Rest
-
C-Two Col-Last
-
C-Two Col-Back
-
C-Blank
-
D-Three Col-First
-
D-Three Col-Rest
-
D-Three Col-Last
-
D-Three Col-Back
-
D-Blank
-
A-Front-Cover-LS
-
A-Back-Cover-LS
-
B-One Col-First-LS
-
B-One Col-Rest-LS
-
B-One Col-Last-LS
-
B-One Col-Back-LS
-
B-Blank-LS
-
C-Two Col-First-LS
-
C-Two Col-Rest-LS
-
C-Two Col-Last-LS
-
C-Blank-LS
-
D-Two Col-Back-LS
-
D-Three Col-First-LS
-
D-Three Col-Rest-LS
-
D-Three Col-Last-LS
-
D-Three Col-Back-LS
-
D-Blank-LS
-
E-TOC
-
F-Default-First
-
F-Default-Rest
-
F-Default-Last
-
F-Default-Blank
The following options are available under this feature:
-
First Page: Configure how the first page of the chosen content appears based on the selected template.
-
Last Page: Configure how the last page of the chosen content appears based on the selected template.
-
Blank Page:
-
If "End on" is specified as even and the chosen content ends on an odd page, a blank page will be inserted.
-
Conversely, if "End on" is specified as odd and the chosen content ends on an even page, a blank page will be inserted to meet the "End on" criteria.
-
If "End on" is even and the content ends on an even page, nothing happens; the same applies to odd.
-
If a blank page is not defined, QXP adds a default page.
-
-
End on: Indicates where the chosen content should land (on an even or odd page).
-
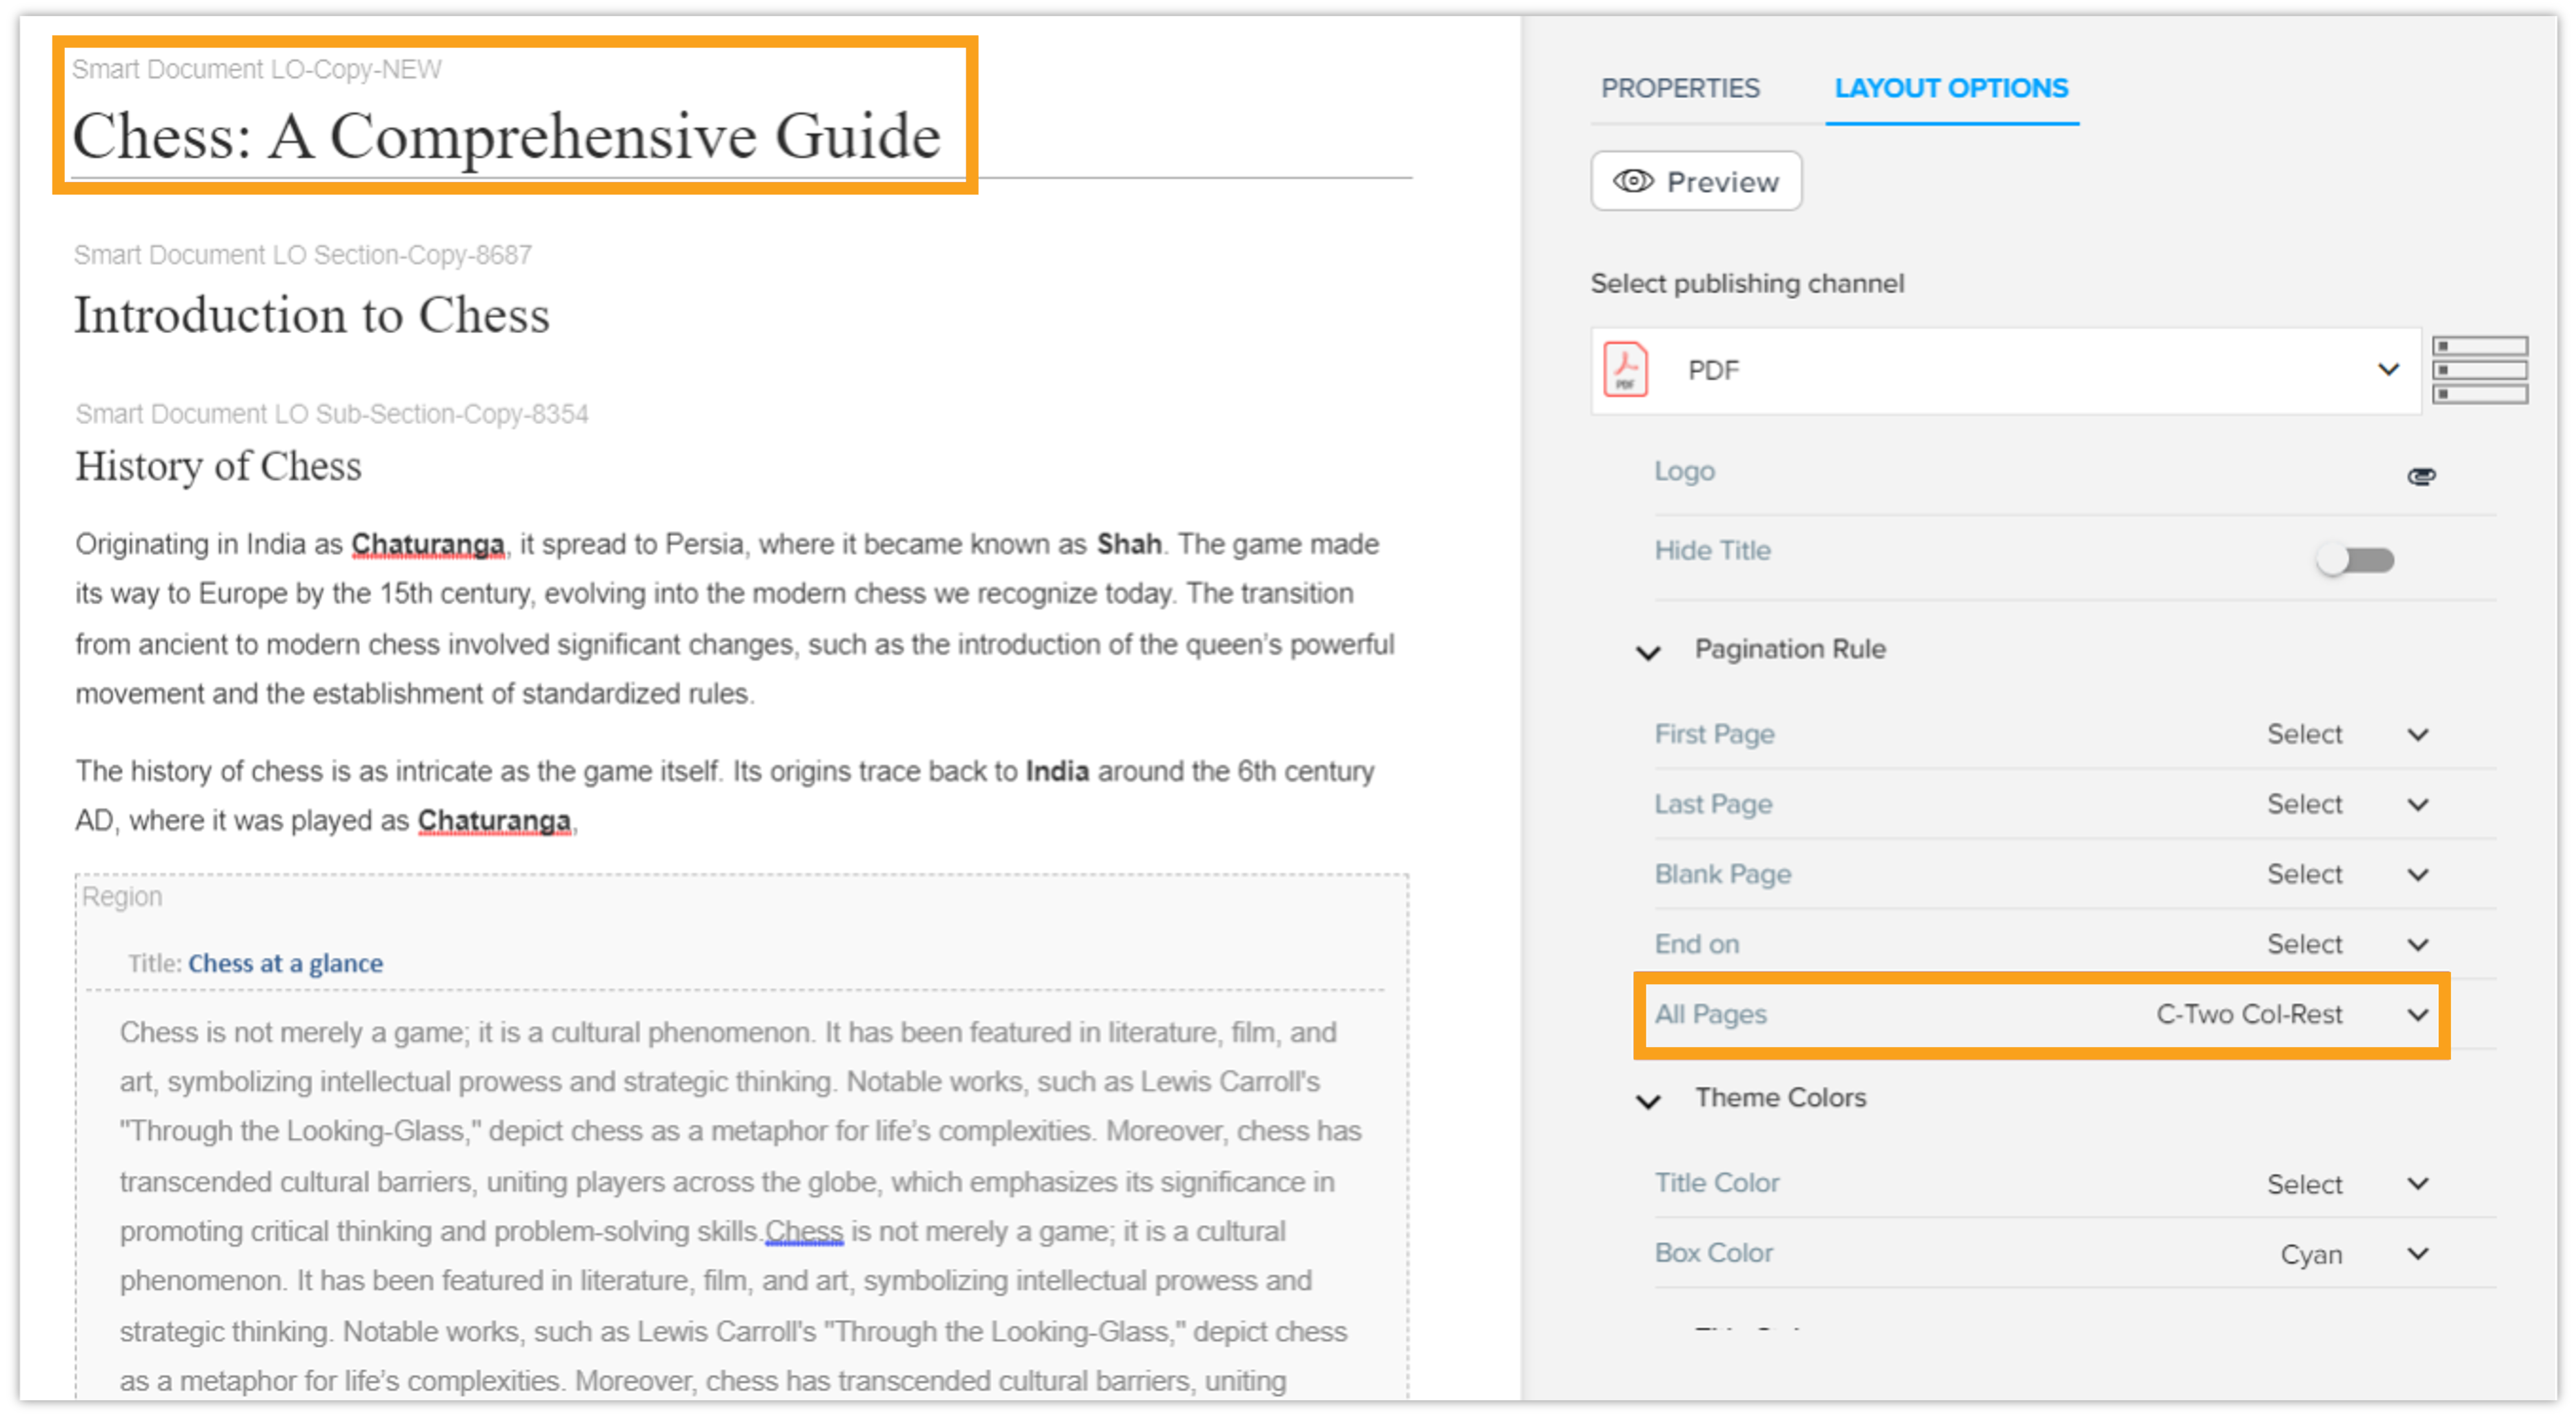
All Pages: This option allows you to apply the selected template to all pages of the chosen content. But, if any of the above options is configured for the chosen content, then they have greater precedence than All Pages.
Use case
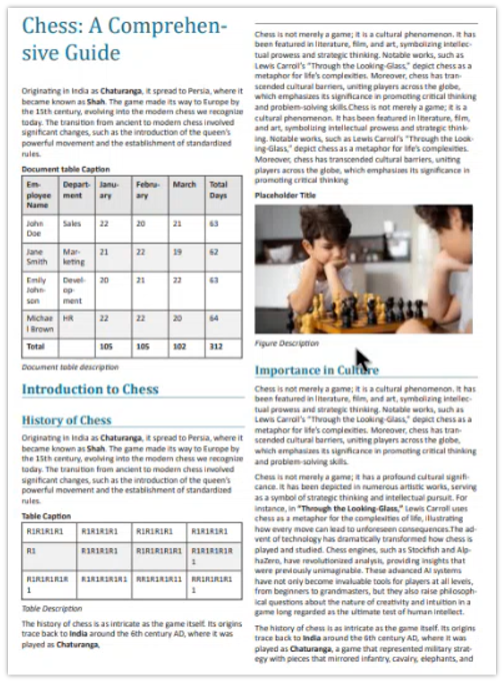
Suppose a publishing company working on a magazine, and they want certain articles to appear in a two-column format for readability and visual appeal. The C-Two Col-Rest template is applied to the body of the article. By using this pagination rule, the content will be automatically split into two columns for the chosen content.
Example
-
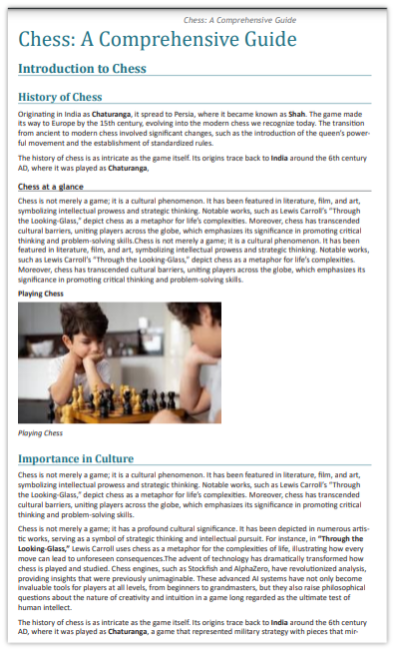
Published Output before applying Pagination Rule C-Two Col-Rest:
-
Applying Pagination Rule C-Two Col-Rest for all pages at Document Level:
-
Published Output after applying Pagination Rule C-Two Col-Rest:
Theme Colors
Theme colors allow you to customize the color scheme of your documents.
-
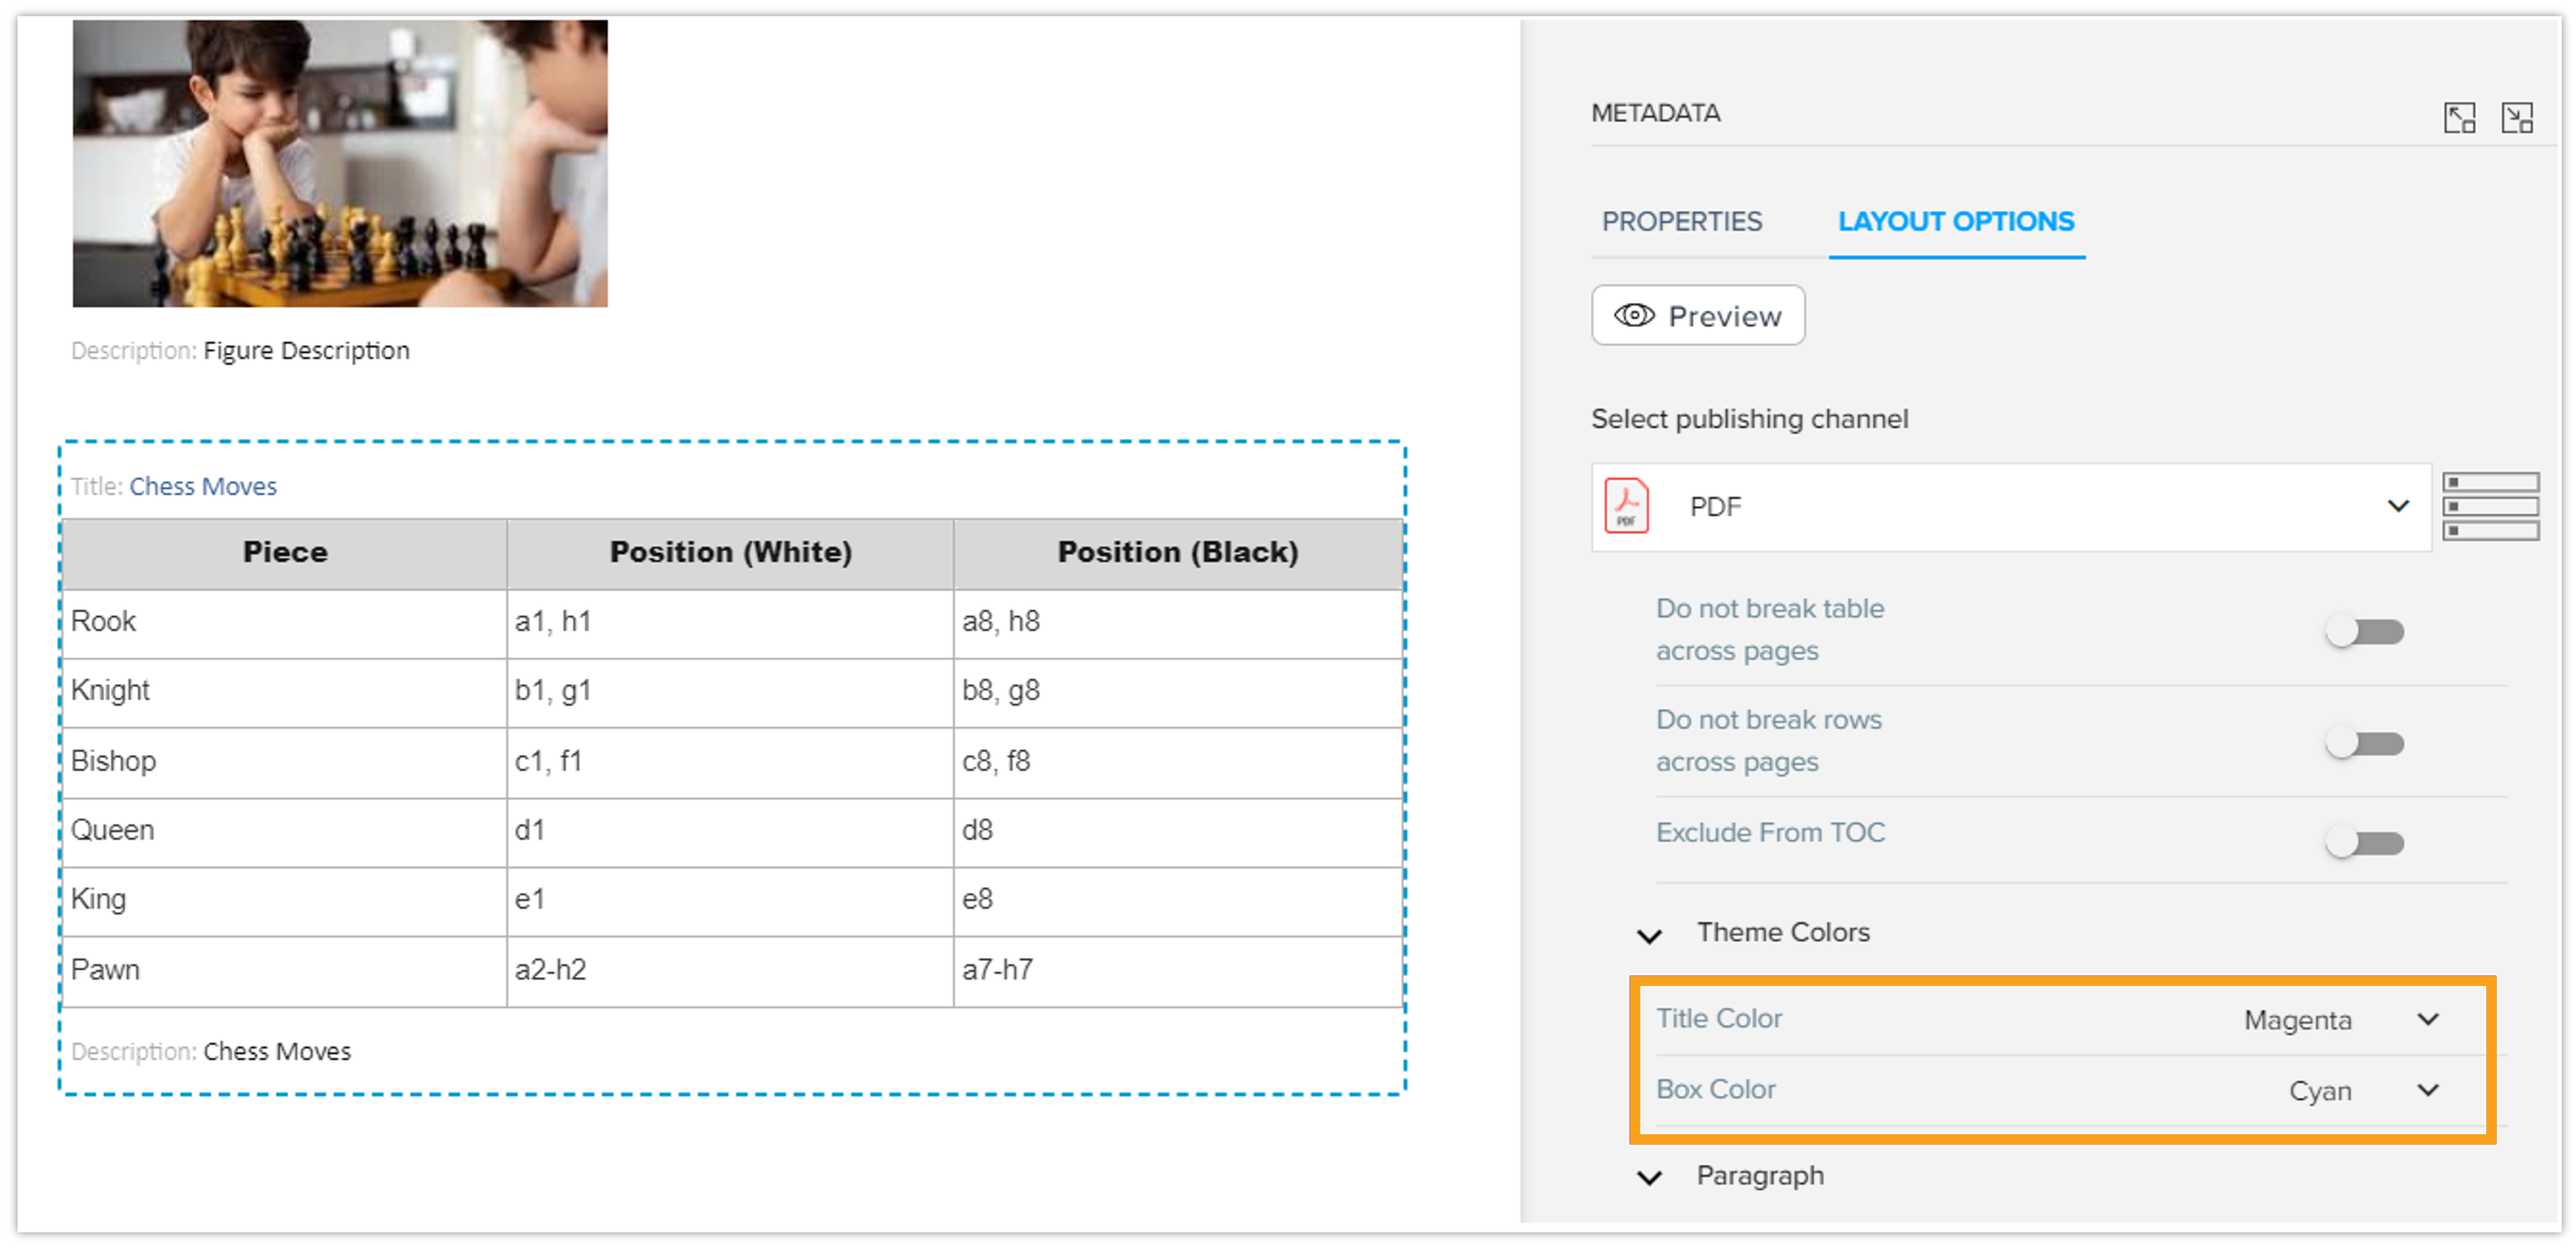
Title Color: You can customize the title color by selecting from predefined values, or they can specify a custom hex color code to personalize the title's appearance.
-
Box Color: The box color option allows you to choose the background color for different types of boxes under the chosen content. Like the title color, you can select from predefined color options or input a custom hex color code for greater flexibility in design. For example, the hex code 4B0082 provides a Dark Purple color.
Use case
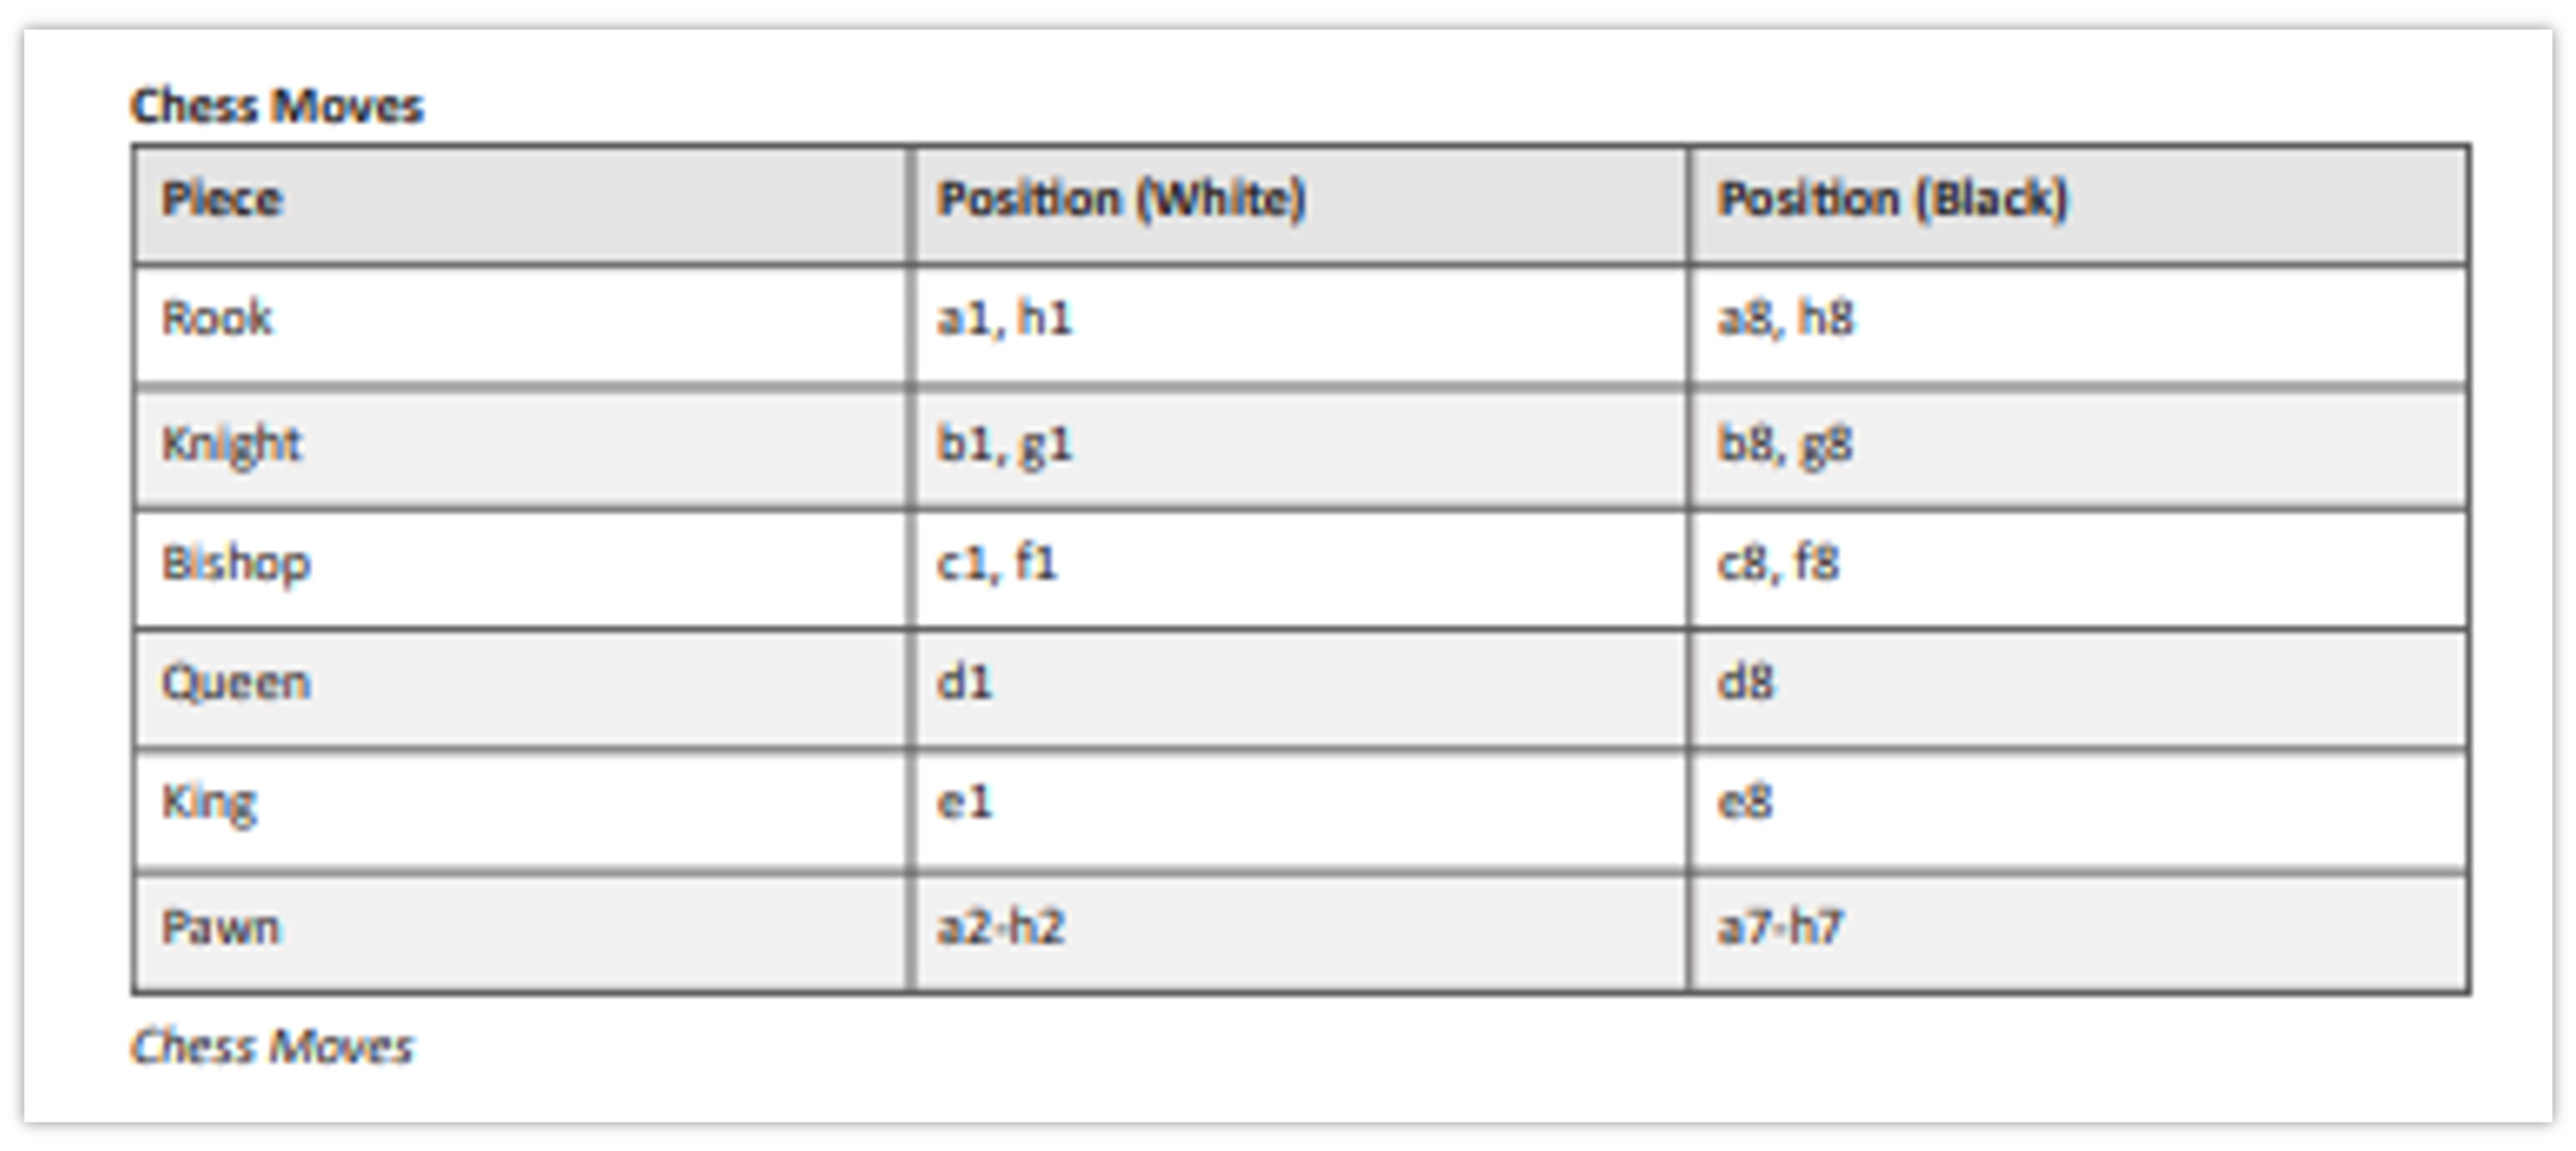
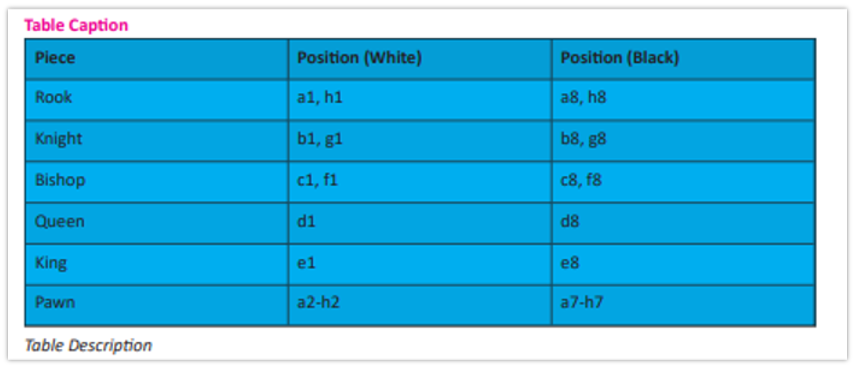
A design team is creating a company newsletter and wants to maintain a consistent brand look. They set the Box Color to Cyan and Title Color to Magenta. When tables are added to the newsletter, they automatically inherit this color for their borders and background, ensuring visual consistency and reinforcing the brand identity throughout the document.
Example
-
Published output before applying Theme Colors:
-
Applying Theme Colors:
-
Published output after applying Theme Colors:
Title Style
Title style allow for the customization of titles throughout the document, ensuring they stand out and align with user preferences.
-
Stylesheet: You can select a pre-defined stylesheet that defines the font, size, color, and other styling details for titles.
-
Number of Columns: This option allows you to select how titles are displayed across columns, with options for single, double, or three columns.
-
Span or Split: You can choose whether the title should span across multiple columns or be split into multiple segments.
Use Case
In many documents, consistent formatting of titles across sections is crucial for maintaining a professional appearance and improving readability. The Title Style layout option allows you to define and apply a uniform style to all titles within a document or specific sections. This feature ensures consistency in font size, color, and alignment, creating a polished look.
Example
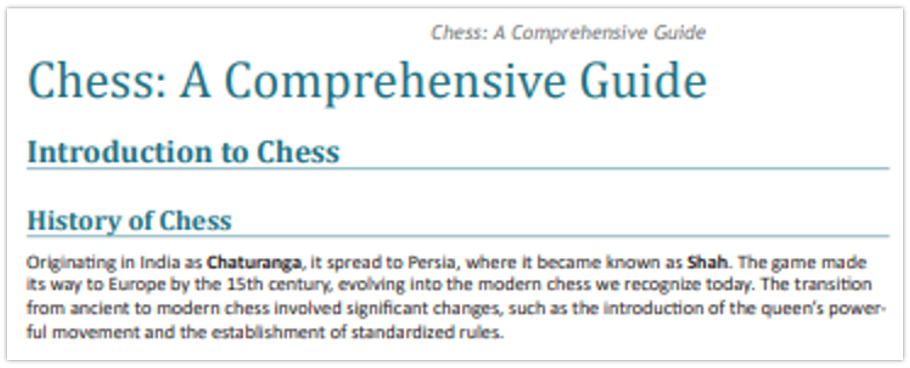
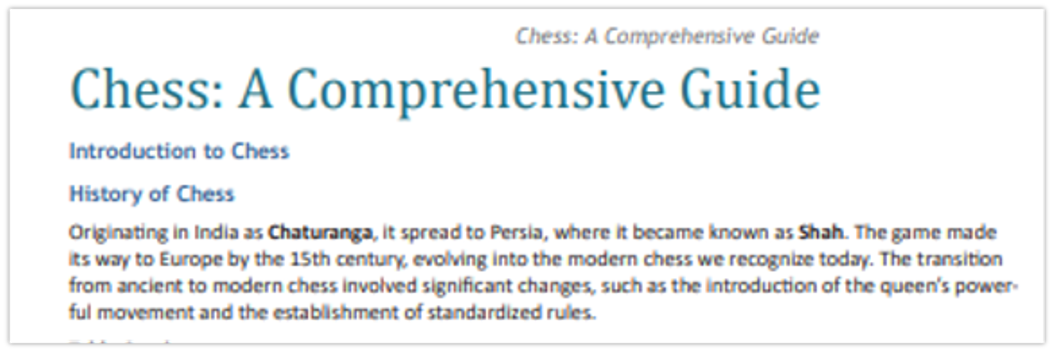
Apply Document Title style for document title and use Body Heading style for section and subsection titles.
-
Published output before applying Title Styles:
-
Published output after applying Title Styles:
Paragraph
Paragraph settings enable detailed customization of paragraph formatting within the document.
-
Stylesheet: Like titles, you can select a pre-defined stylesheet to define the appearance, including font choice, size, and color.
-
Character Spacing: This option allows you to define the spacing between characters in paragraphs.
-
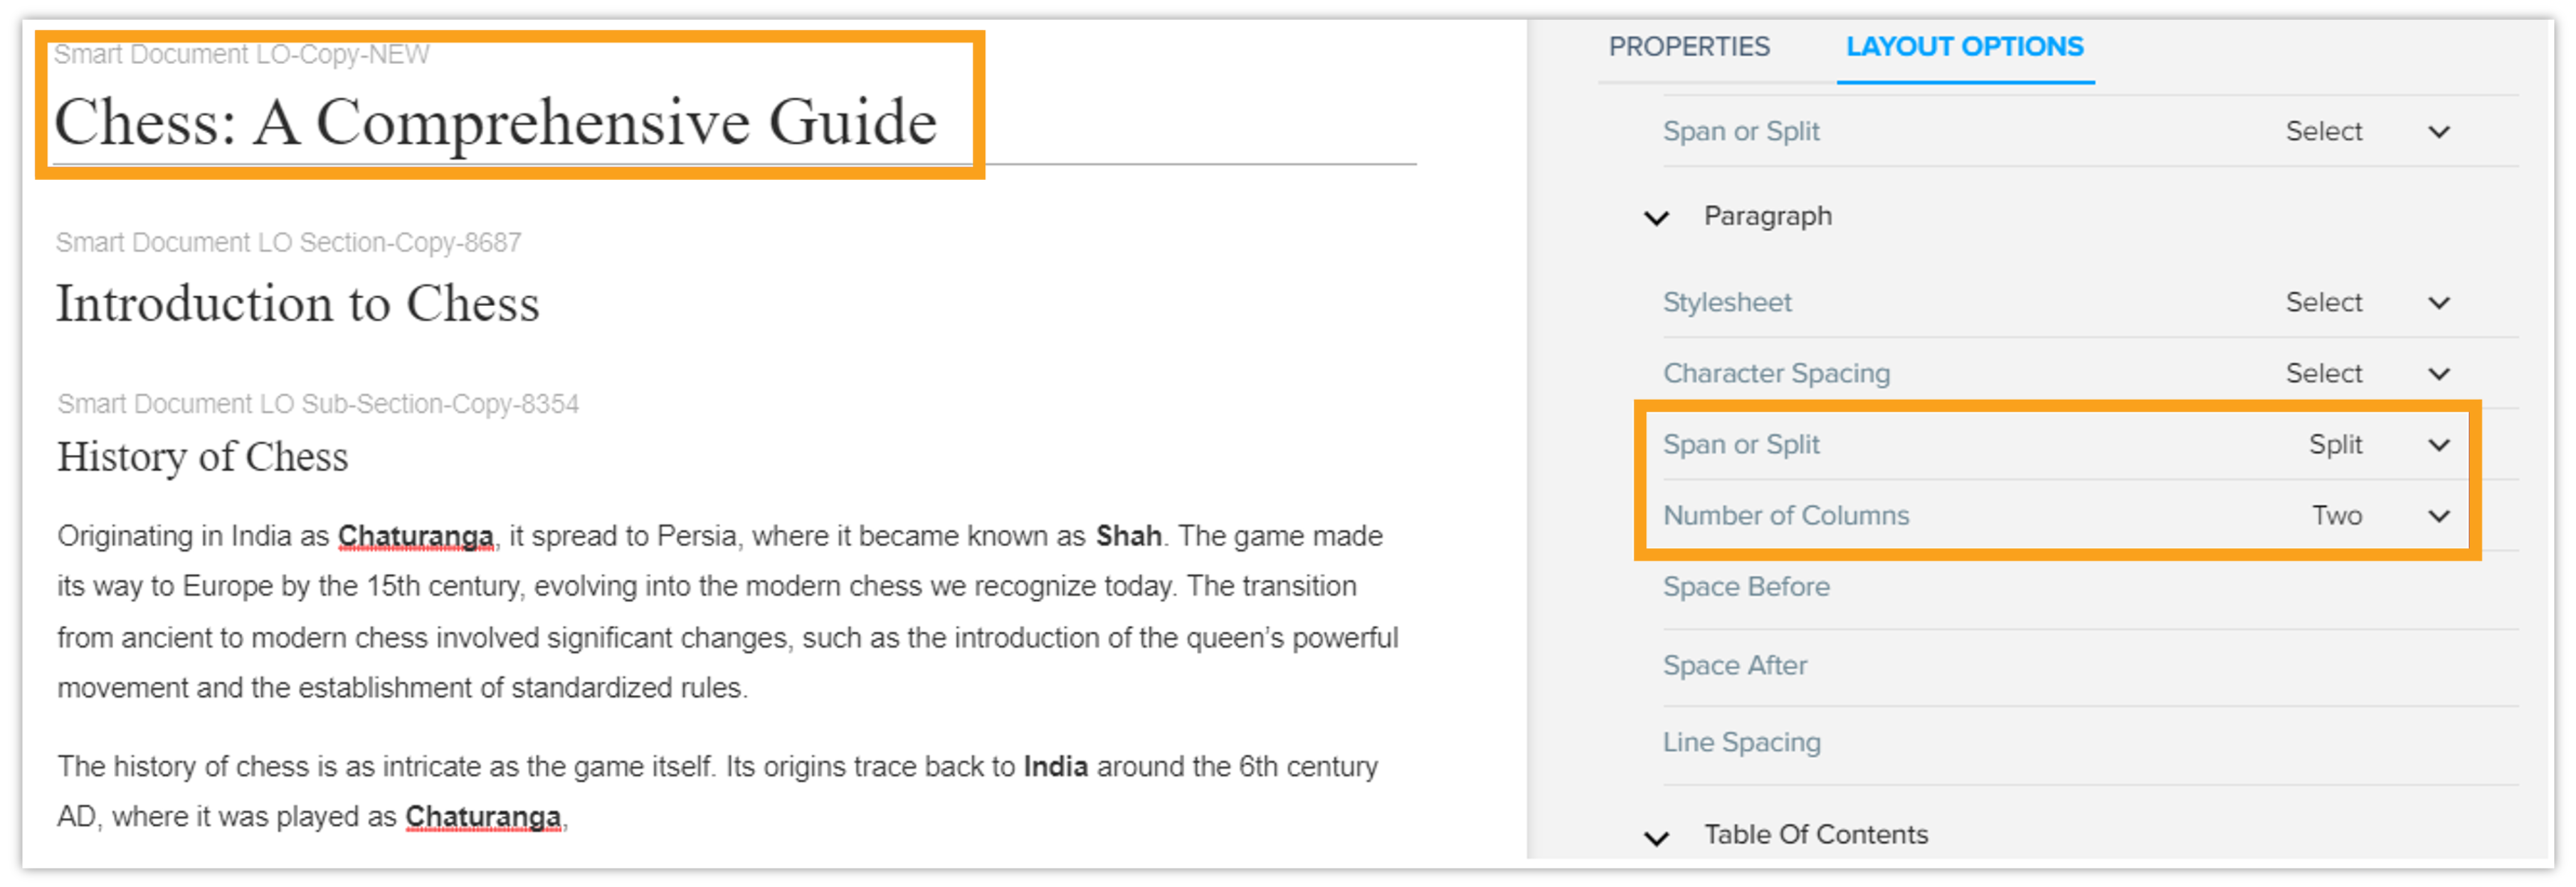
Number of Columns: You can choose how paragraphs are arranged across columns, with options for single, double, or three-column layouts.
-
Span or Split: Like title settings, paragraphs can either span multiple columns or be split into sections.
-
Space Before: This setting defines the amount of space that should precede a paragraph.
-
Space After: You can specify the amount of space that follows a paragraph.
-
Line Spacing: Line spacing options allow you to determine the distance between lines of text within a paragraph.
Use Case
A marketing team is designing a promotional brochure for a new product launch. They want the title to stand out in a single column, while the product description paragraphs are arranged in a two-column format for improved readability and efficient use of space.
Example
-
Applying paragraph Split in two columns:
-
Published Output after applying to all paragraphs to split in two columns:
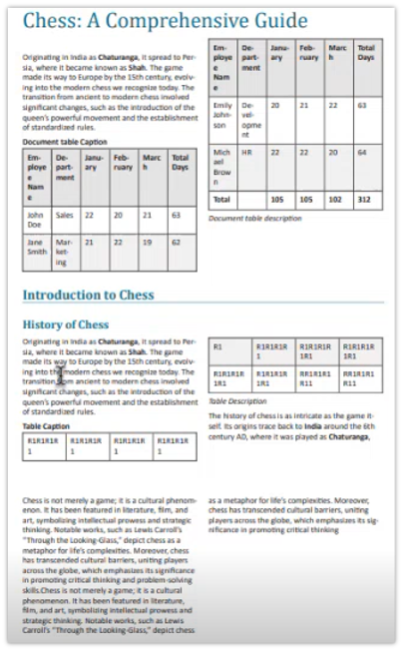
Table of Contents (TOC)
The table of contents (TOC) settings govern how the TOC is displayed and integrated into the document.
-
Show TOC in Publishing: This option allows you to determine whether the table of contents will be displayed when the document is published, ensuring it aligns with your needs.
-
TOC Title: You can customize the title that appears at the top of the TOC, allowing for specific wording to match the document's theme or purpose.
Use Case
A publishing team is working on a comprehensive report that includes multiple sections and chapters. To enhance navigation for readers, they decide to include a Table of Contents (TOC). They set the Show TOC in Publishing option to true, ensuring that the TOC will be included in the final output.
Additionally, they fill in the TOC Title field, providing a clear and concise heading for the TOC. This allows readers to easily locate specific sections of the report, improving the overall user experience.
Example
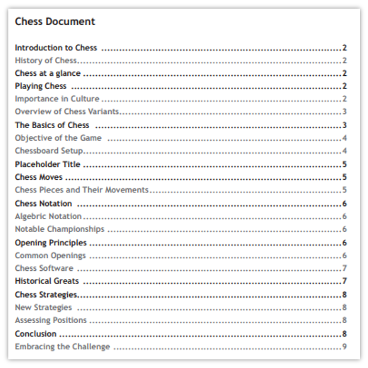
Set Show TOC in Publishing option to true and keep TOC Title as Chess Document. The published output will look like this:
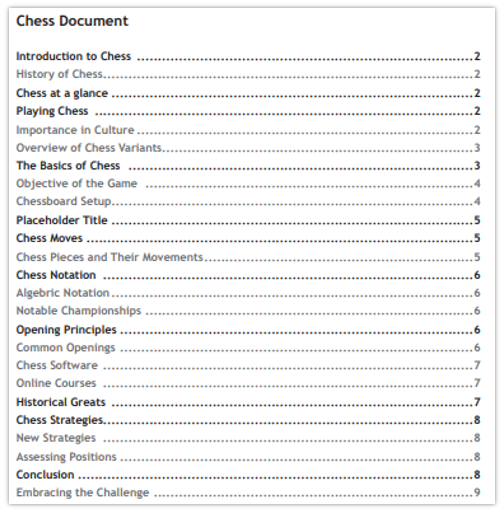
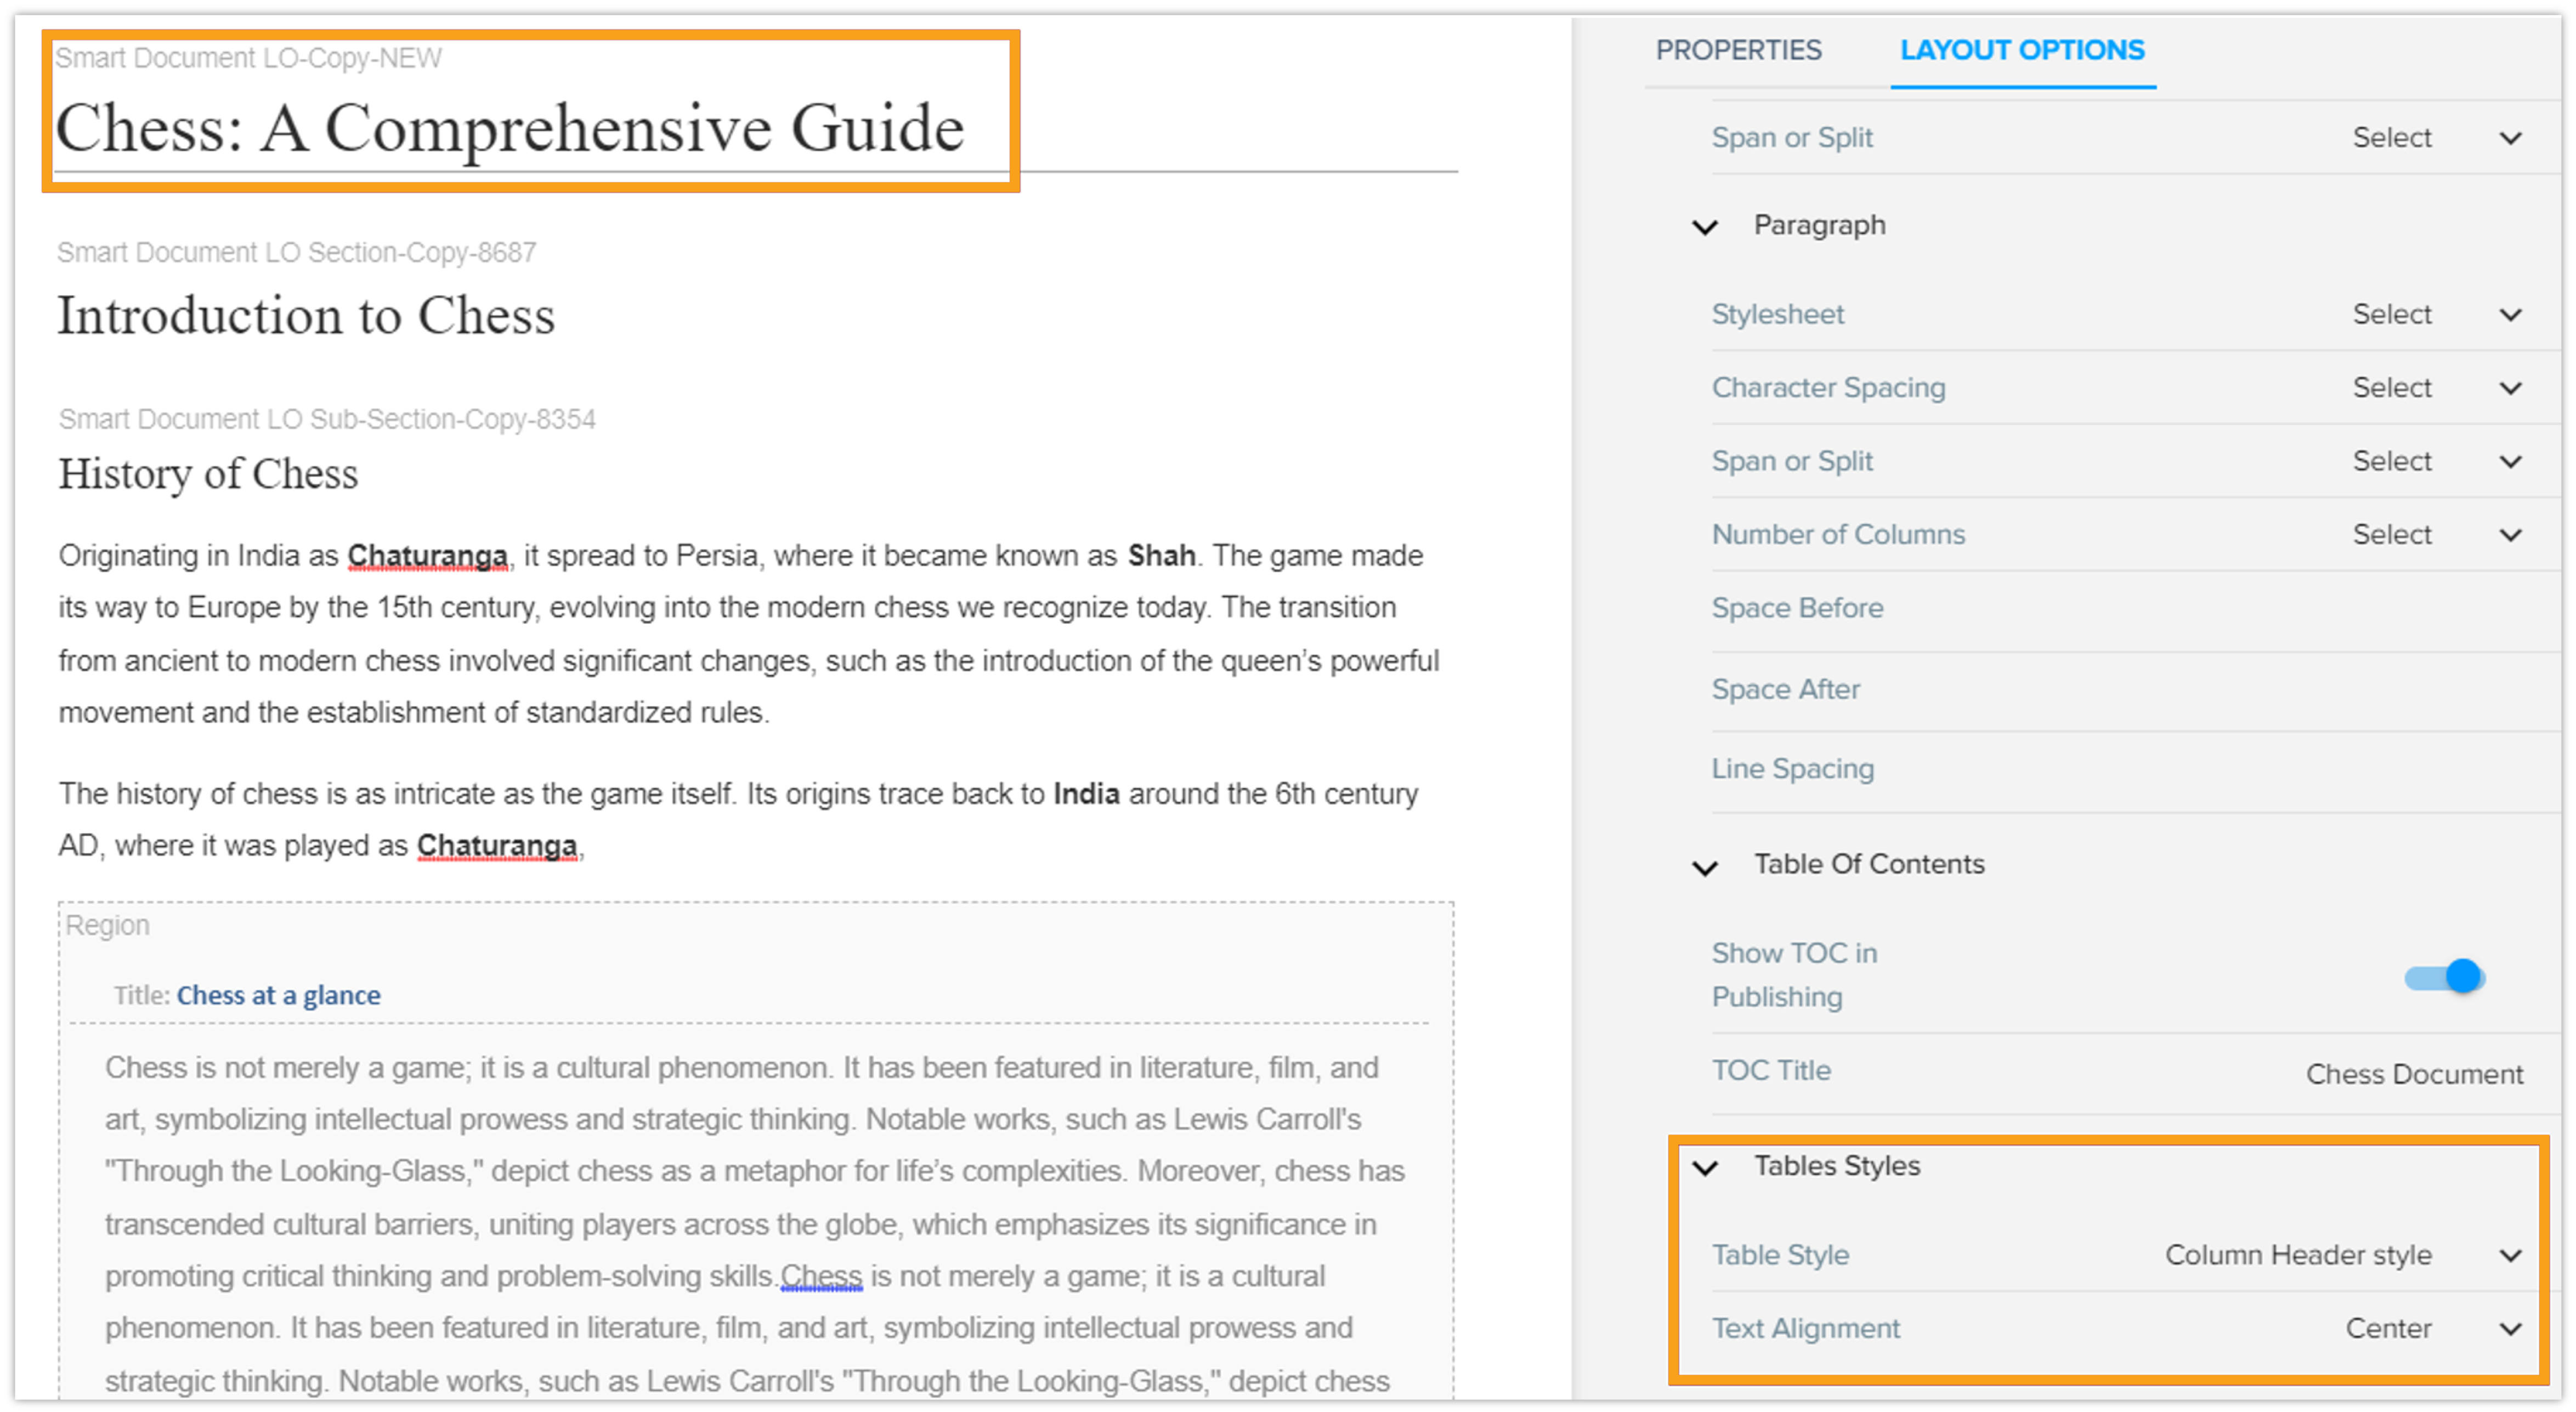
Table Style
Table styles define the appearance of tables within the document, including layout and alignment.
-
Table Style: This setting allows you to select a predefined style for tables, impacting borders, shading, and other visual elements.
-
Text Alignment: You can specify how text is aligned within tables, with options for left, center, or right alignment, ensuring clarity and organization of data.
Use Case
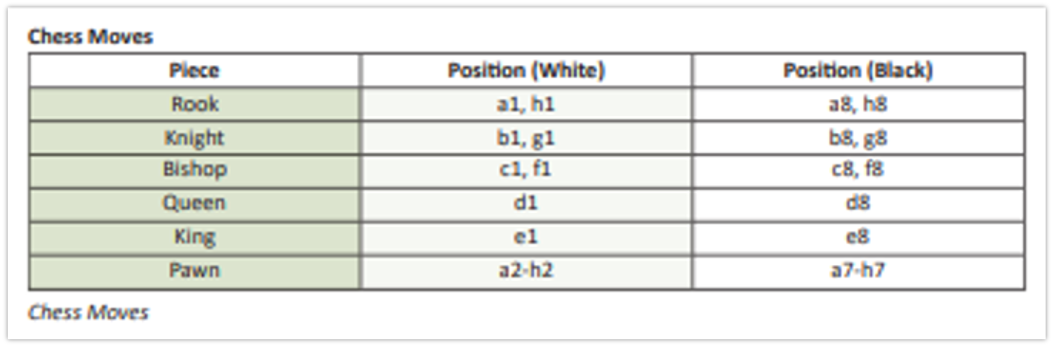
A company is preparing an annual report and includes several tables to present financial data. To enhance clarity, the team applies the Column Header Style to make the headers stand out with bold text and shading. Additionally, they set the Text Alignment to Center, ensuring all data in the table is neatly aligned for easy reading and professional presentation.
Example
-
Applying Table Style:
-
Published output after applying table style:
Section-level Layout Options
At the section-level, you have access to many of the layout options that are also available at the document-level, but in addition to these, there are several specialized options designed to give the control over the presentation of the content. These options allow you to control the visibility, formatting, and placement of specific sections.
Types of Layout Options at the section-level
Exclude from TOC
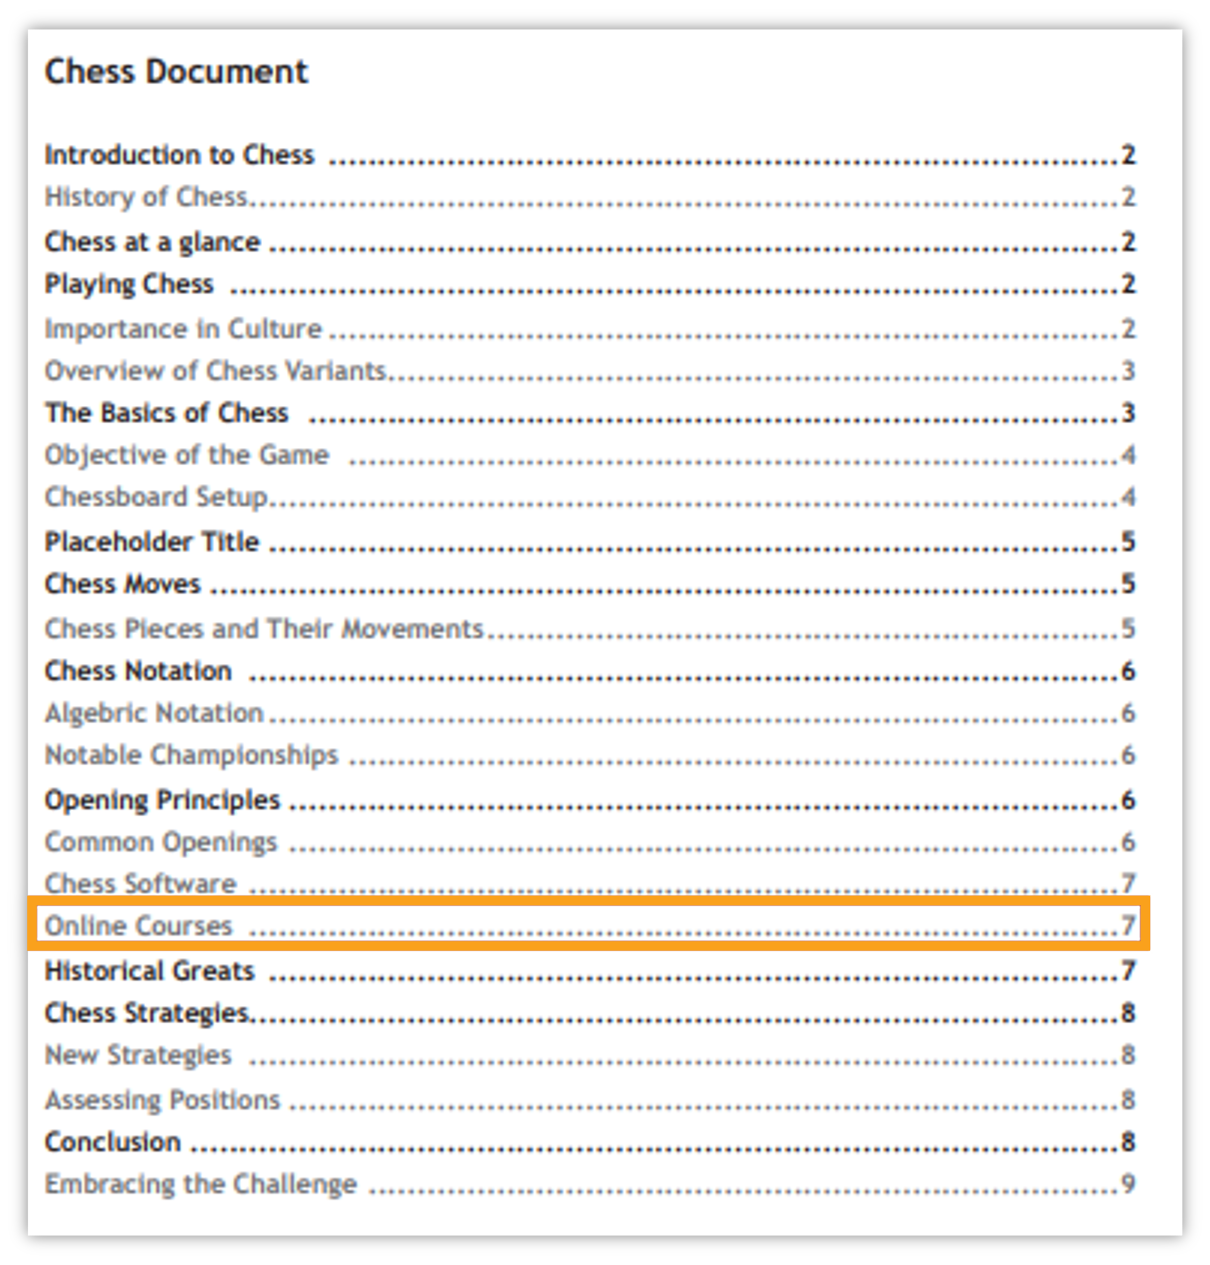
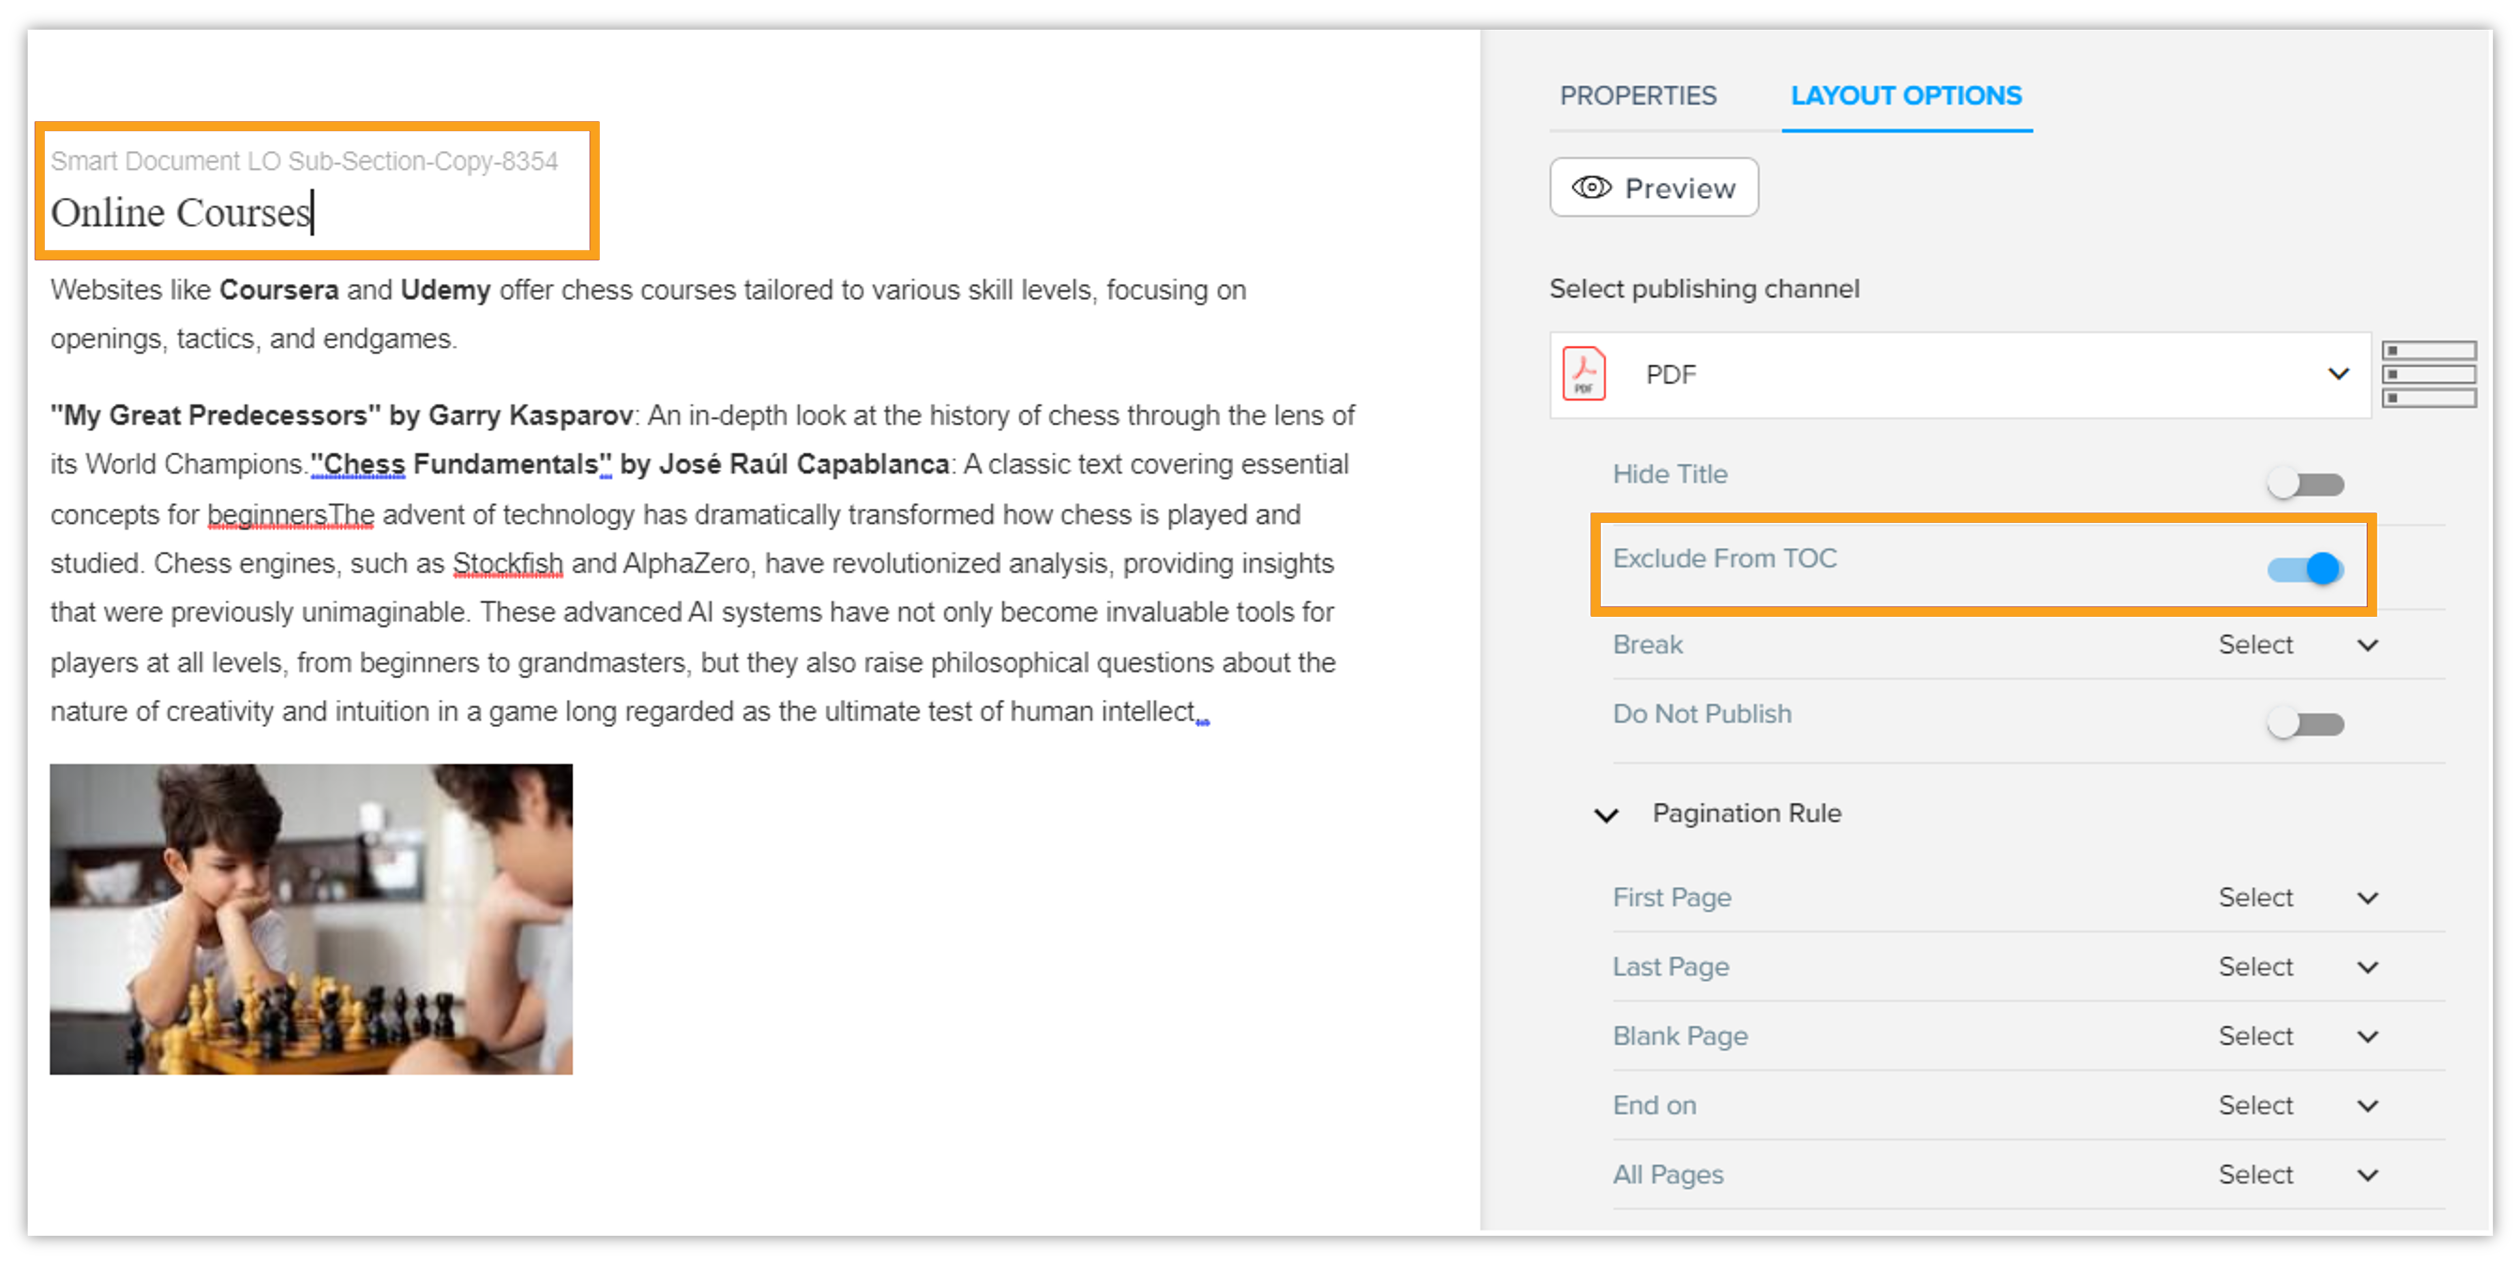
This option allows you to exclude the selected section or subsection from appearing in the Table of Contents (TOC). This is useful for sections that you want to be part of the document but not indexed in the TOC.
Use case
You might want to exclude Online Courses from the TOC to keep the focus on core content.
Example
-
Published output before excluding from TOC.
-
Excluding Online Courses sub-section from the TOC.
-
Published output after excluding from TOC.
Break
The Break Layout option gives control over how content is divided or placed within the document. The available options are:
-
Column Break: Forces the section to start in the next column.
-
Column Break (Balanced): Distributes the content evenly between columns before starting the next section.
-
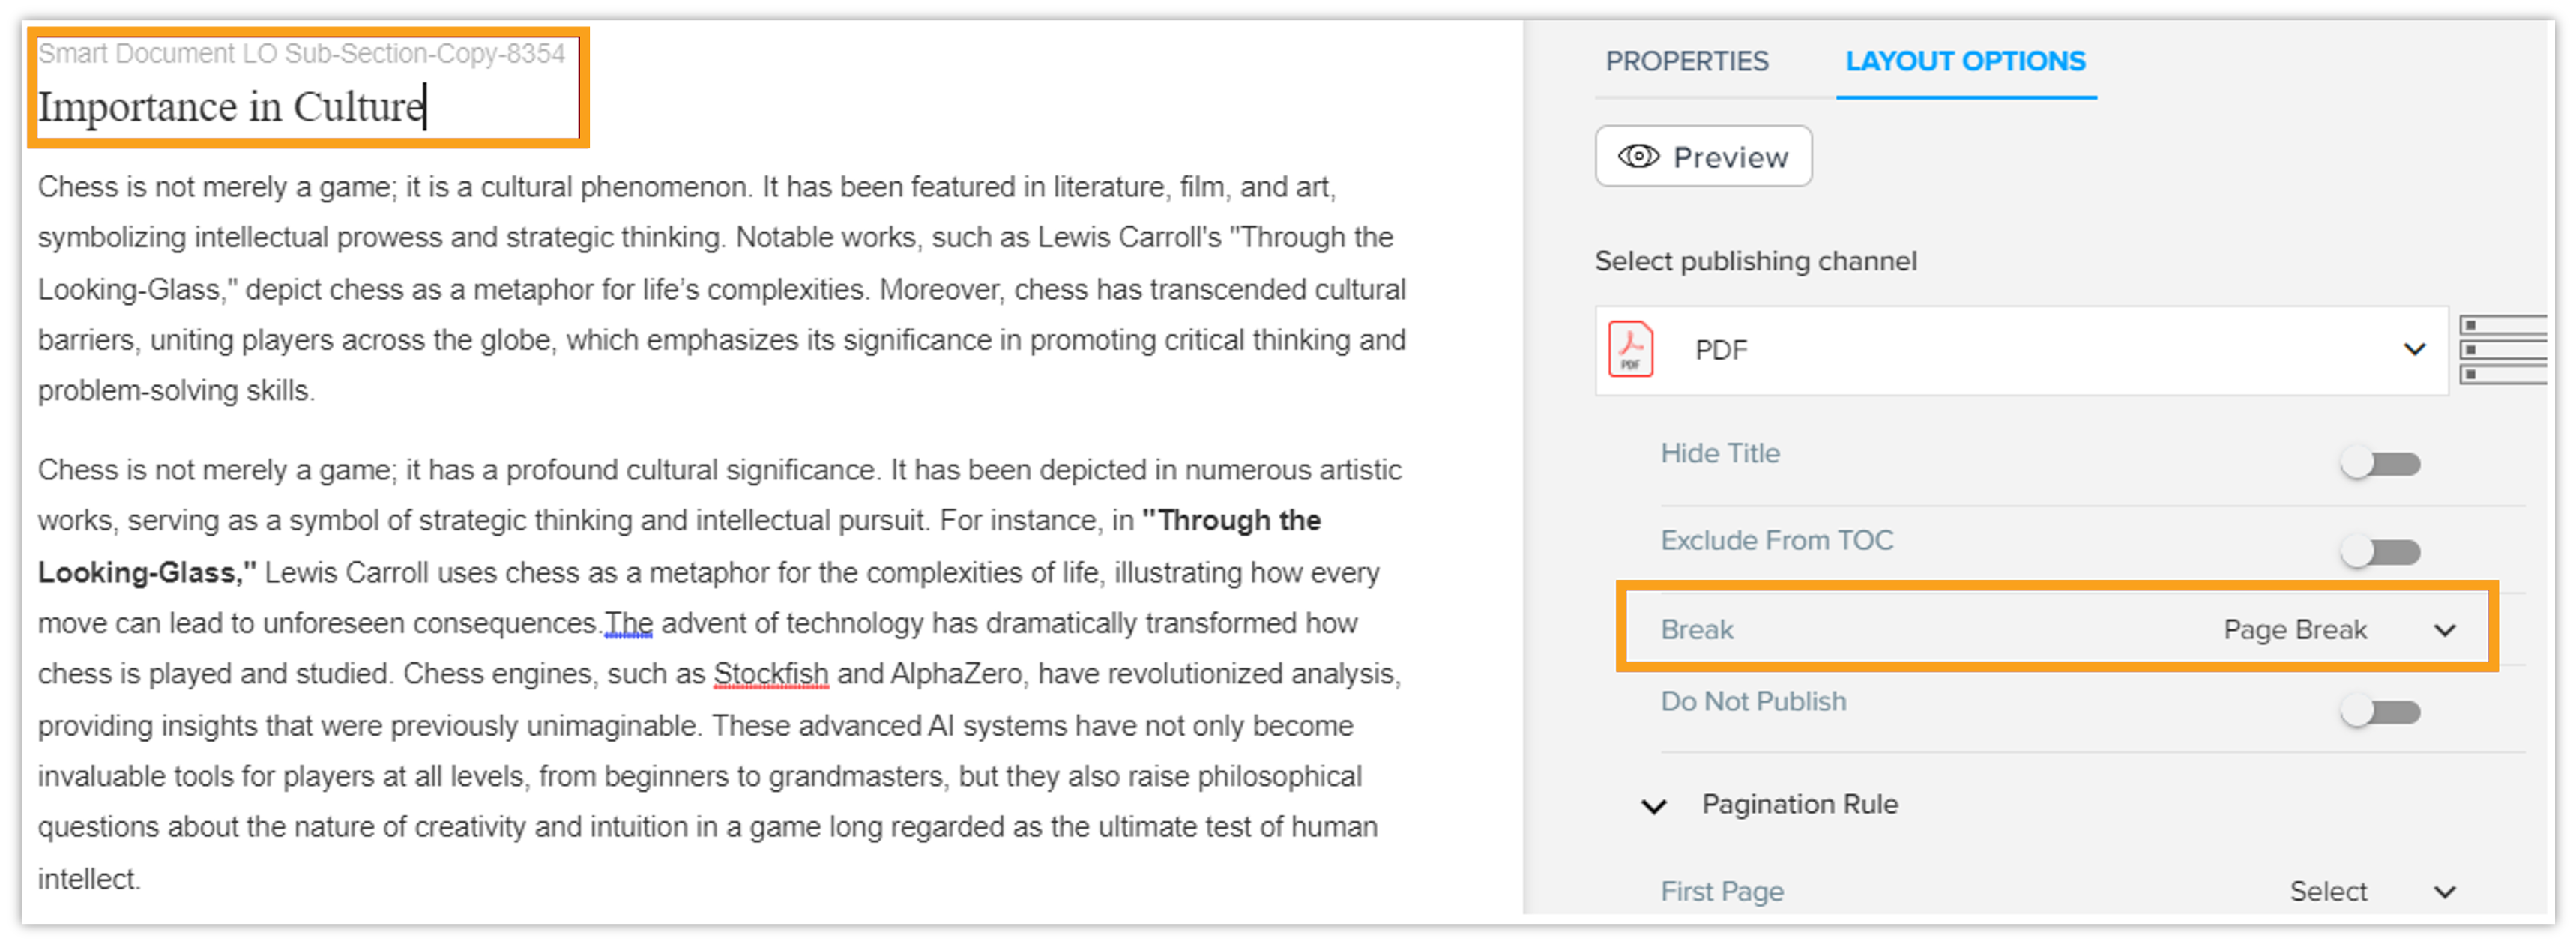
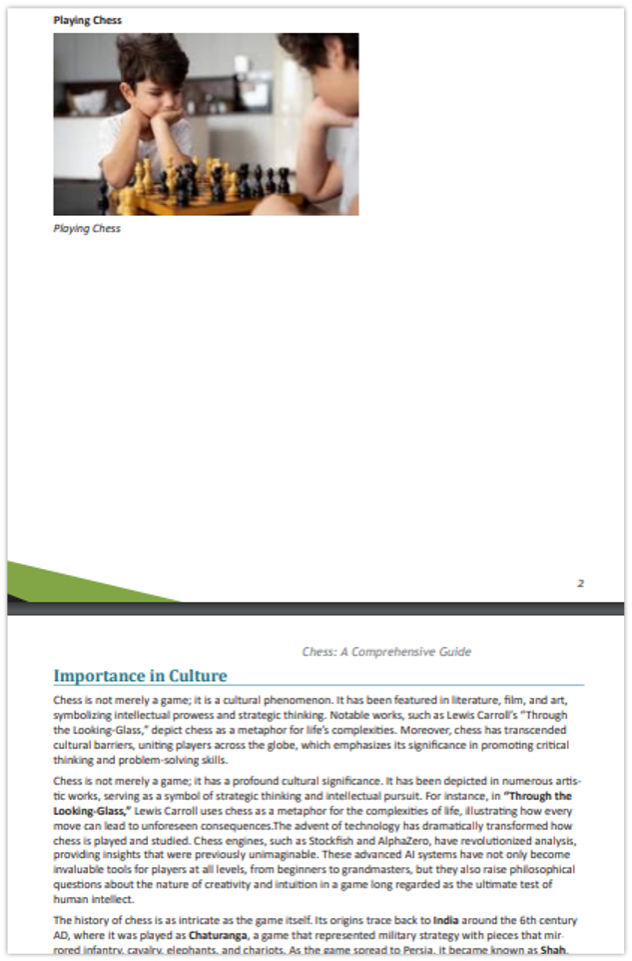
Page Break: Ensures that the section begins on a new page.
-
Section Break: Forces the content to begin on a new page or a new column depending on the layout settings.
Use case
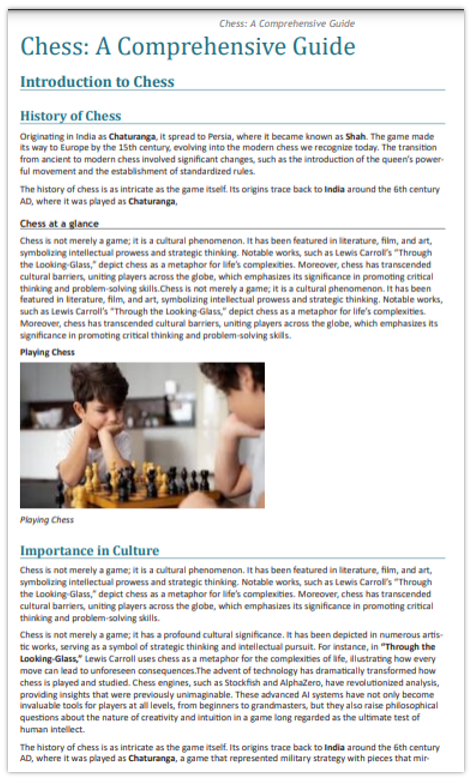
If a new chapter or section needs to start on a fresh page, you can insert a Page Break to ensure that the new content begins on the next page.
Example
-
Published output before applying Page Break:
-
Applying Page Break at Importance in Culture sub-section:
-
Published output after applying Page Break:
Do Not Publish
This option allows you to mark a section as "not to be published". It can be used for content that is useful during editing or review phases but should not be visible in the final output.
Use case
If you have a draft section in a document that is still under review and shouldn't be published in the final output, you can select the "Do Not Publish" checkbox for that section. This way, it remains in the document for future revisions but won't appear in the published version.
Example
-
Published output before applying Do not Publish:
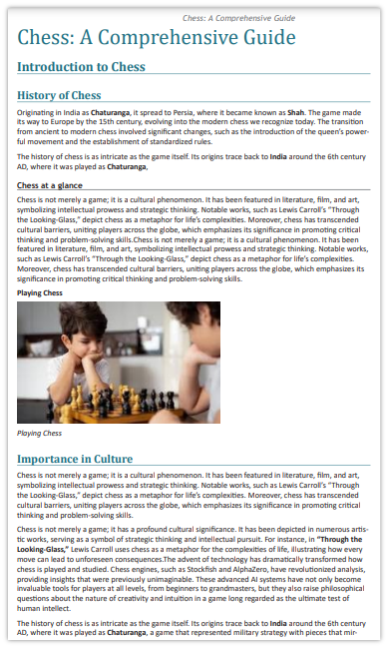
-
Applying Do not Publish at History of Chess sub-section:
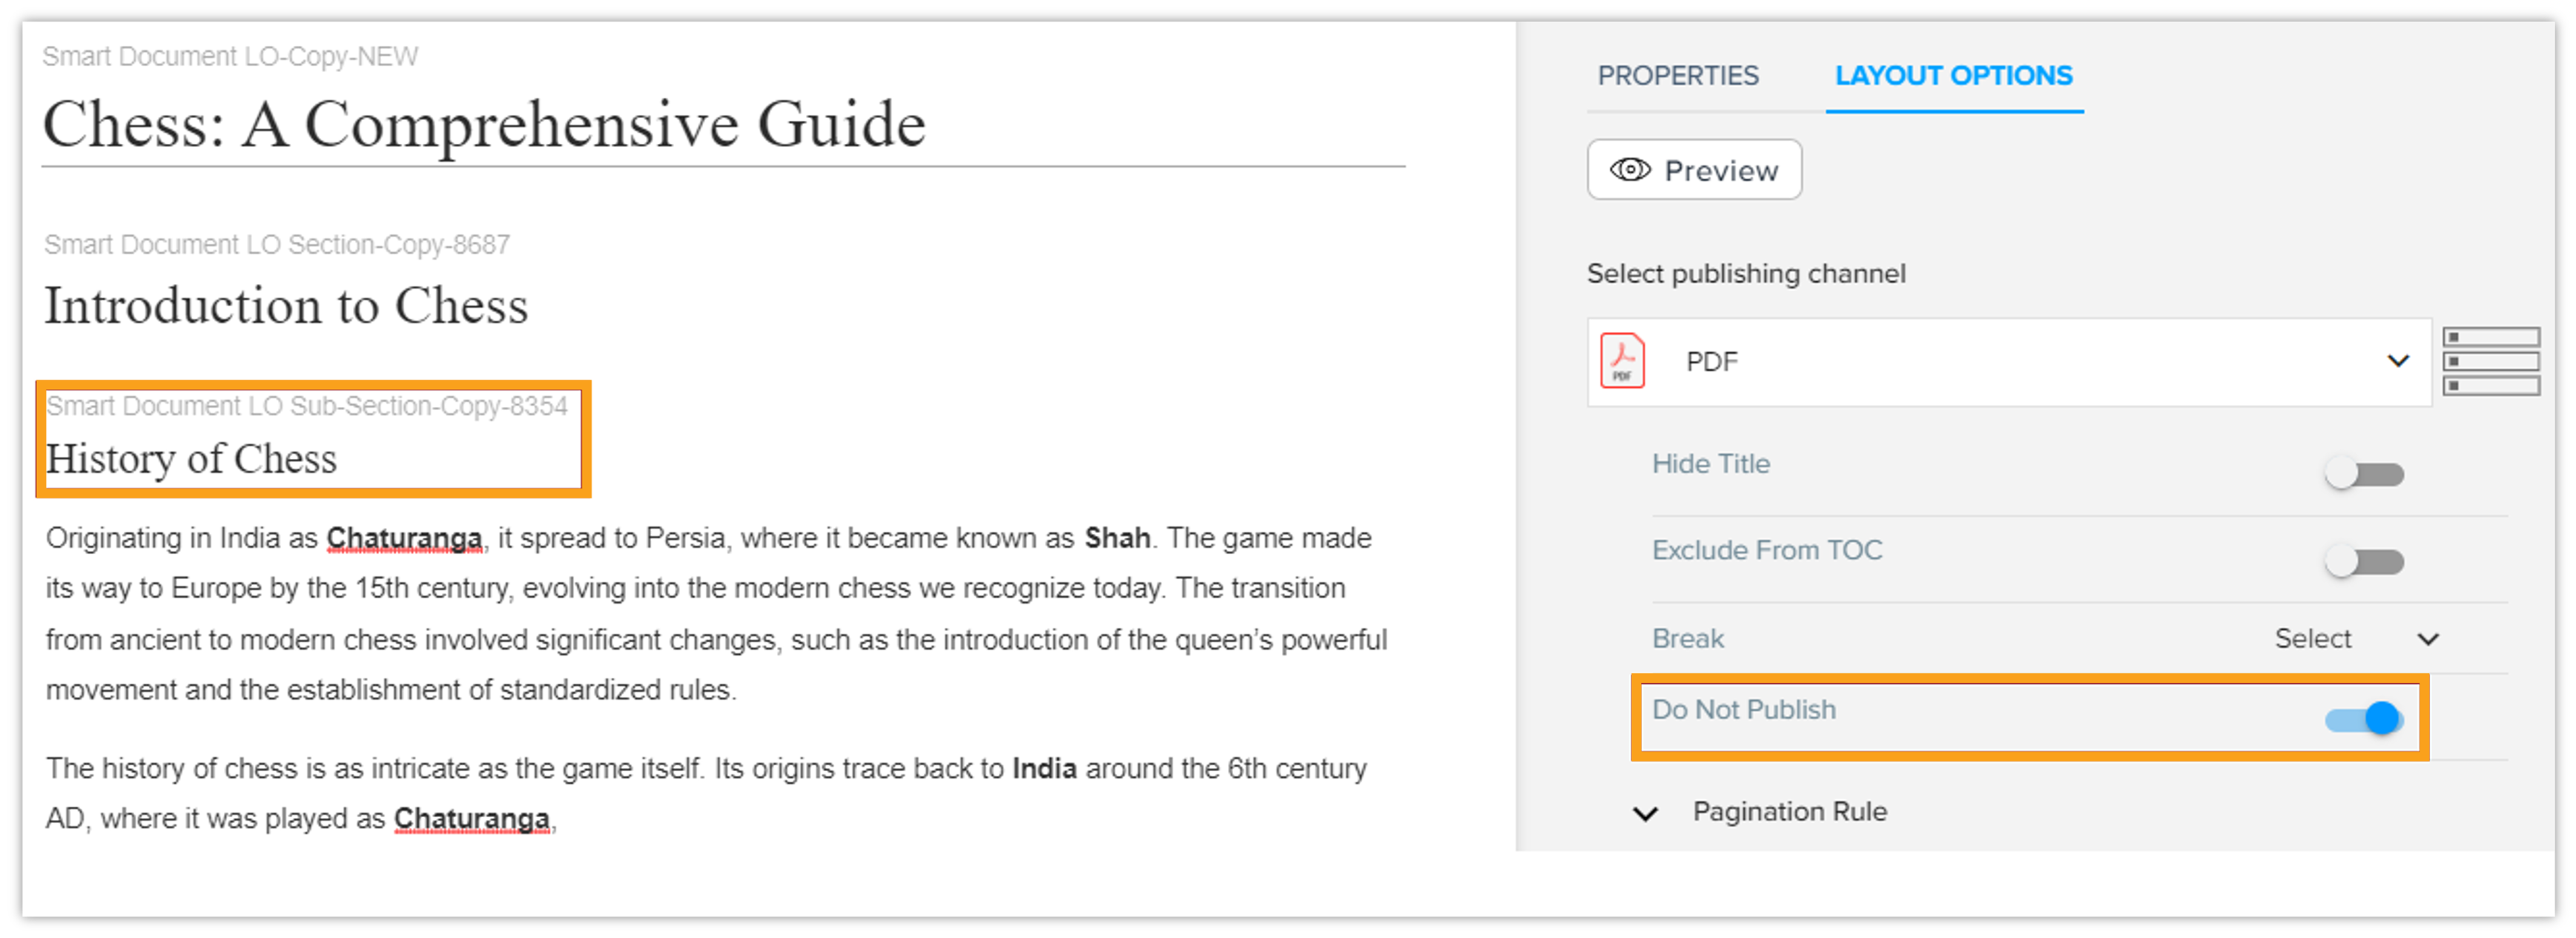
-
Published output after applying Do not Publish:
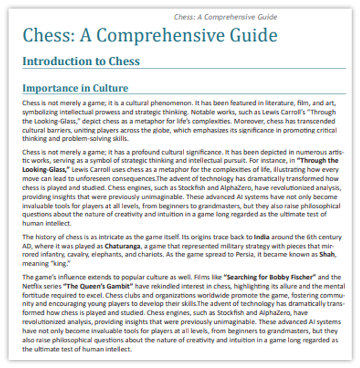
Hide Title
For detailed information, please refer to Hide Title.
Pagination Rule
For detailed information, please refer to Pagination Rule.
Theme Colors
For detailed information, please refer to Theme Color.
Title Style
For detailed information, please refer to Title Style.
Paragraph
For detailed information, please refer to Paragraph.
Table Style
For detailed information, please refer to Table Style.
Paragraph-level Layout Options
Paragraph layout options can be established at the document level, providing a consistent style across all paragraphs in the document. This is beneficial for maintaining uniformity and adhering to organizational standards.
In scenarios where specific paragraphs require different formatting from the overall document settings, you can apply paragraph layout options individually. This flexibility allows for precise control over document aesthetics.
Steps to apply layout options to a specific paragraph
-
Select the Paragraph: Click on the paragraph you wish to modify.
-
Increase the scope to the paragraph level.
-
Open Layout Options: In the toolbar, you'll see an option to edit paragraph layout settings. Click this option.
-
Choose Specific Layout Options: From the drop-down menu, select the desired layout options tailored for that paragraph.
-
Save Changes: Confirm the changes by clicking Apply.
Use case
Consider an academic research paper where the main text is consistently formatted with a Body Paragraph stylesheet to ensure readability and coherence. Within this paper, there's a significant long quote from a renowned scholar that should be highlighted by using Paragraph Stylesheet Body Long Quote to emphasize its importance.
Example
-
Click on the paragraph you want to apply Paragraph Layout options and increase the scope to the paragraph-level.
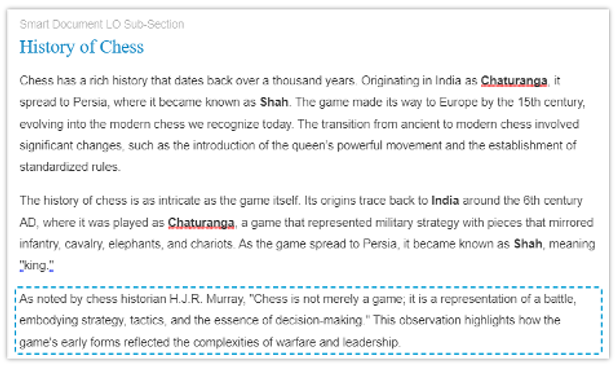
-
Now apply the paragraph layout option at the document-level.
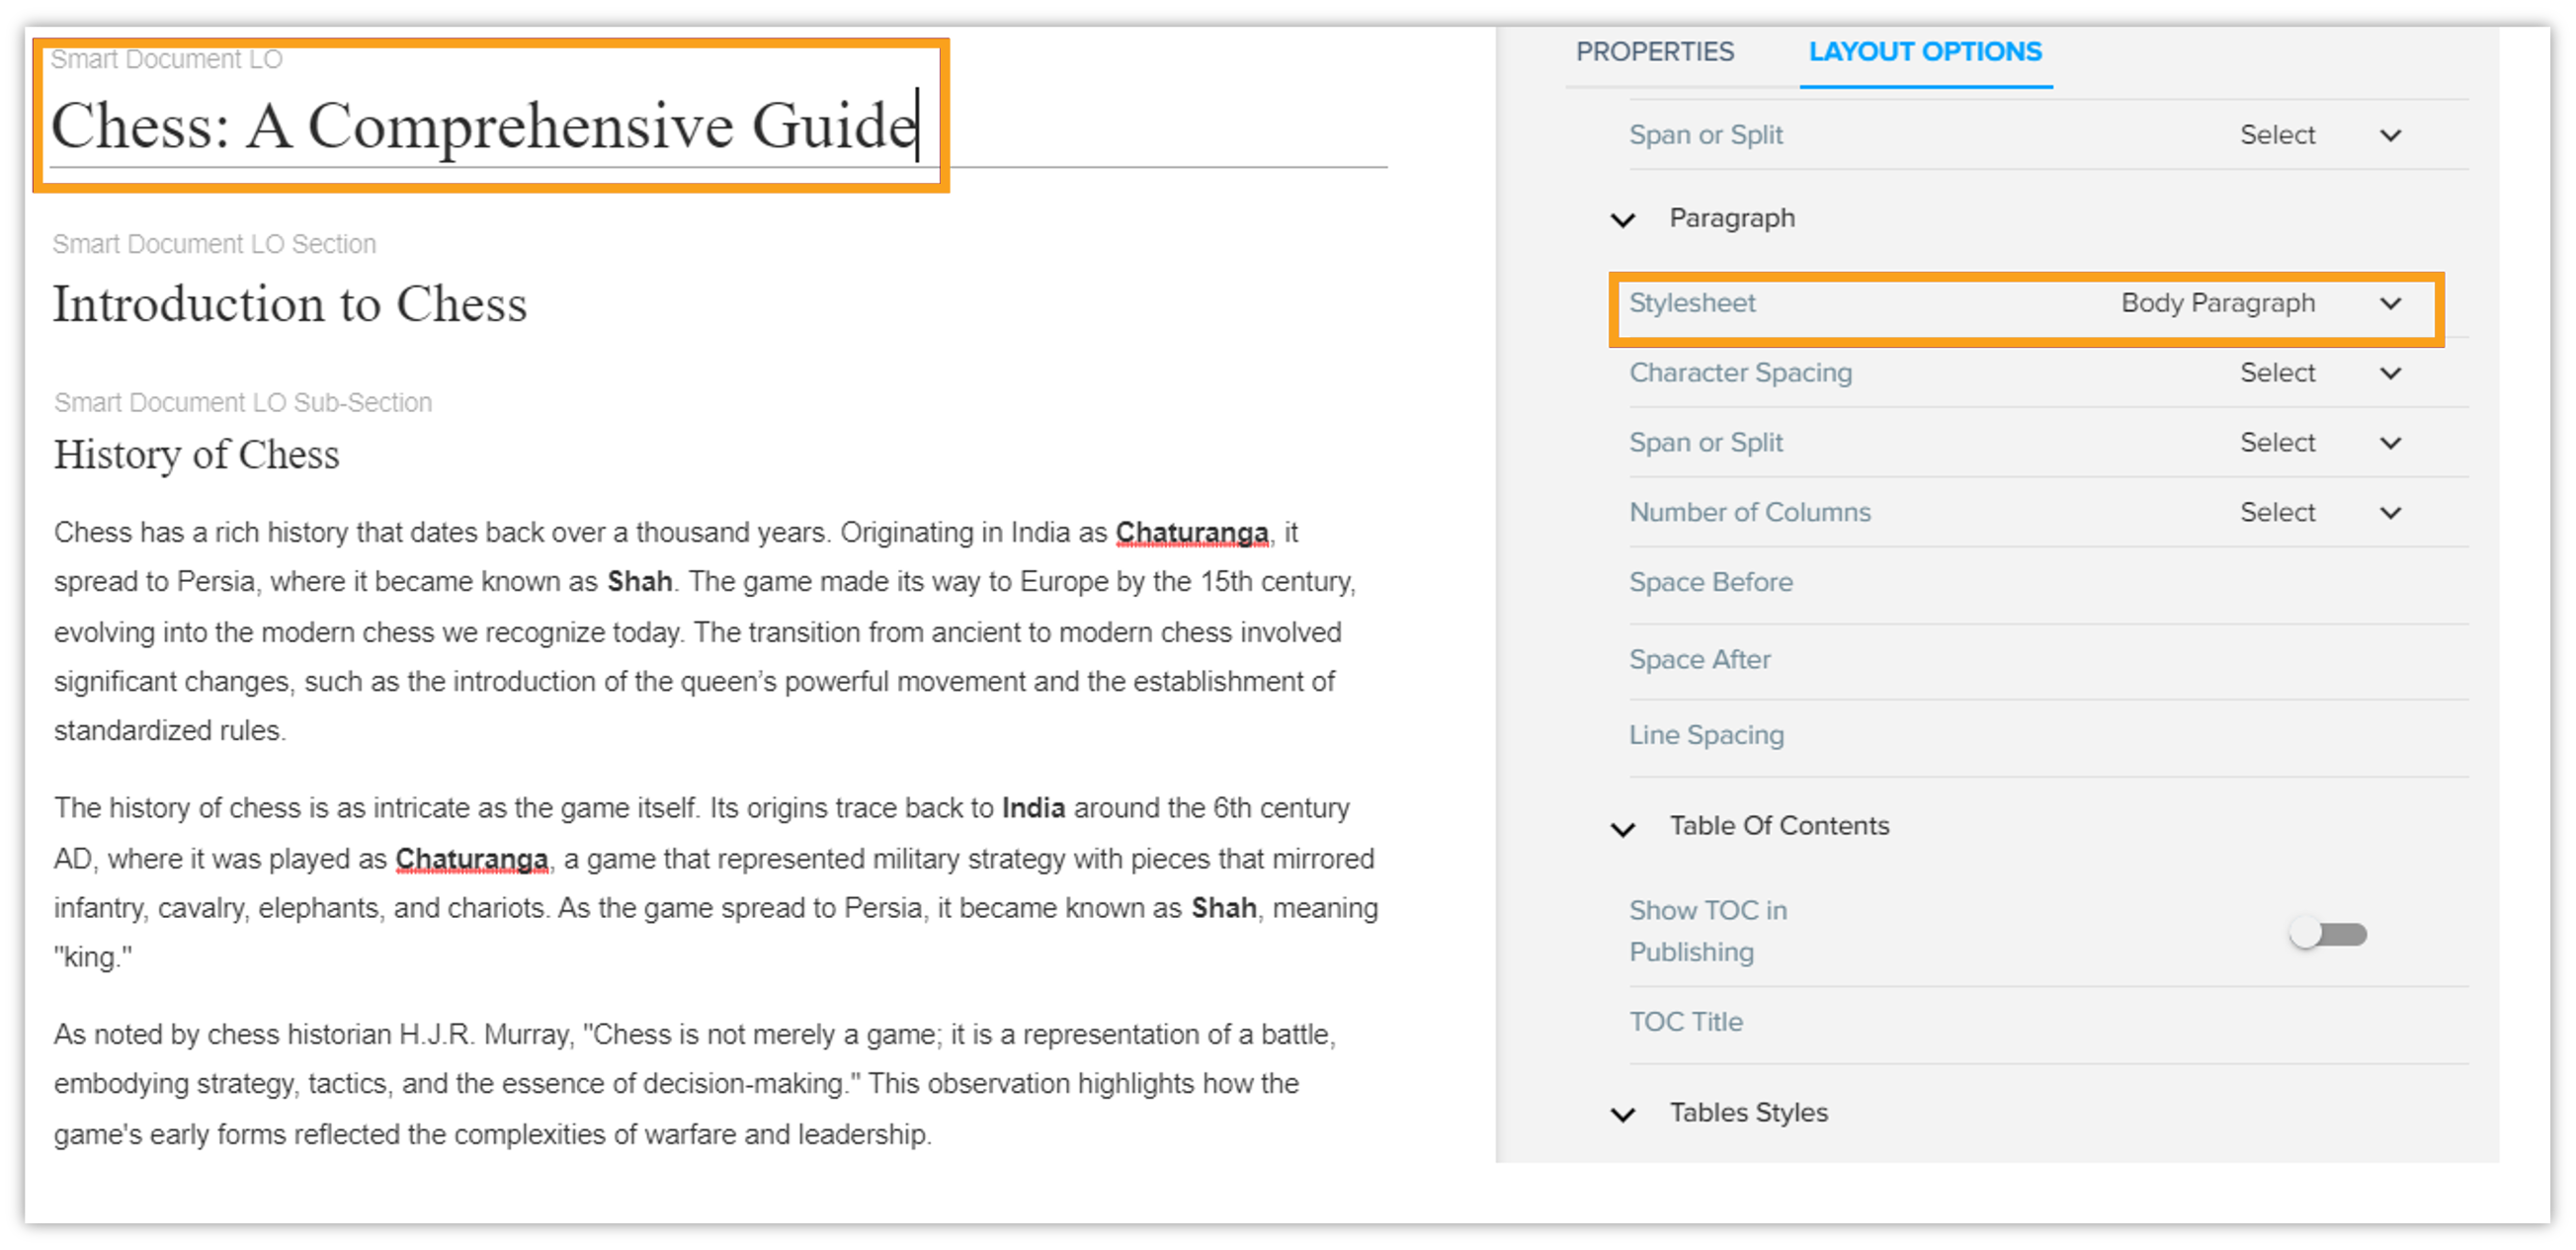
-
Apply the paragraph layout option at a particular paragraph.
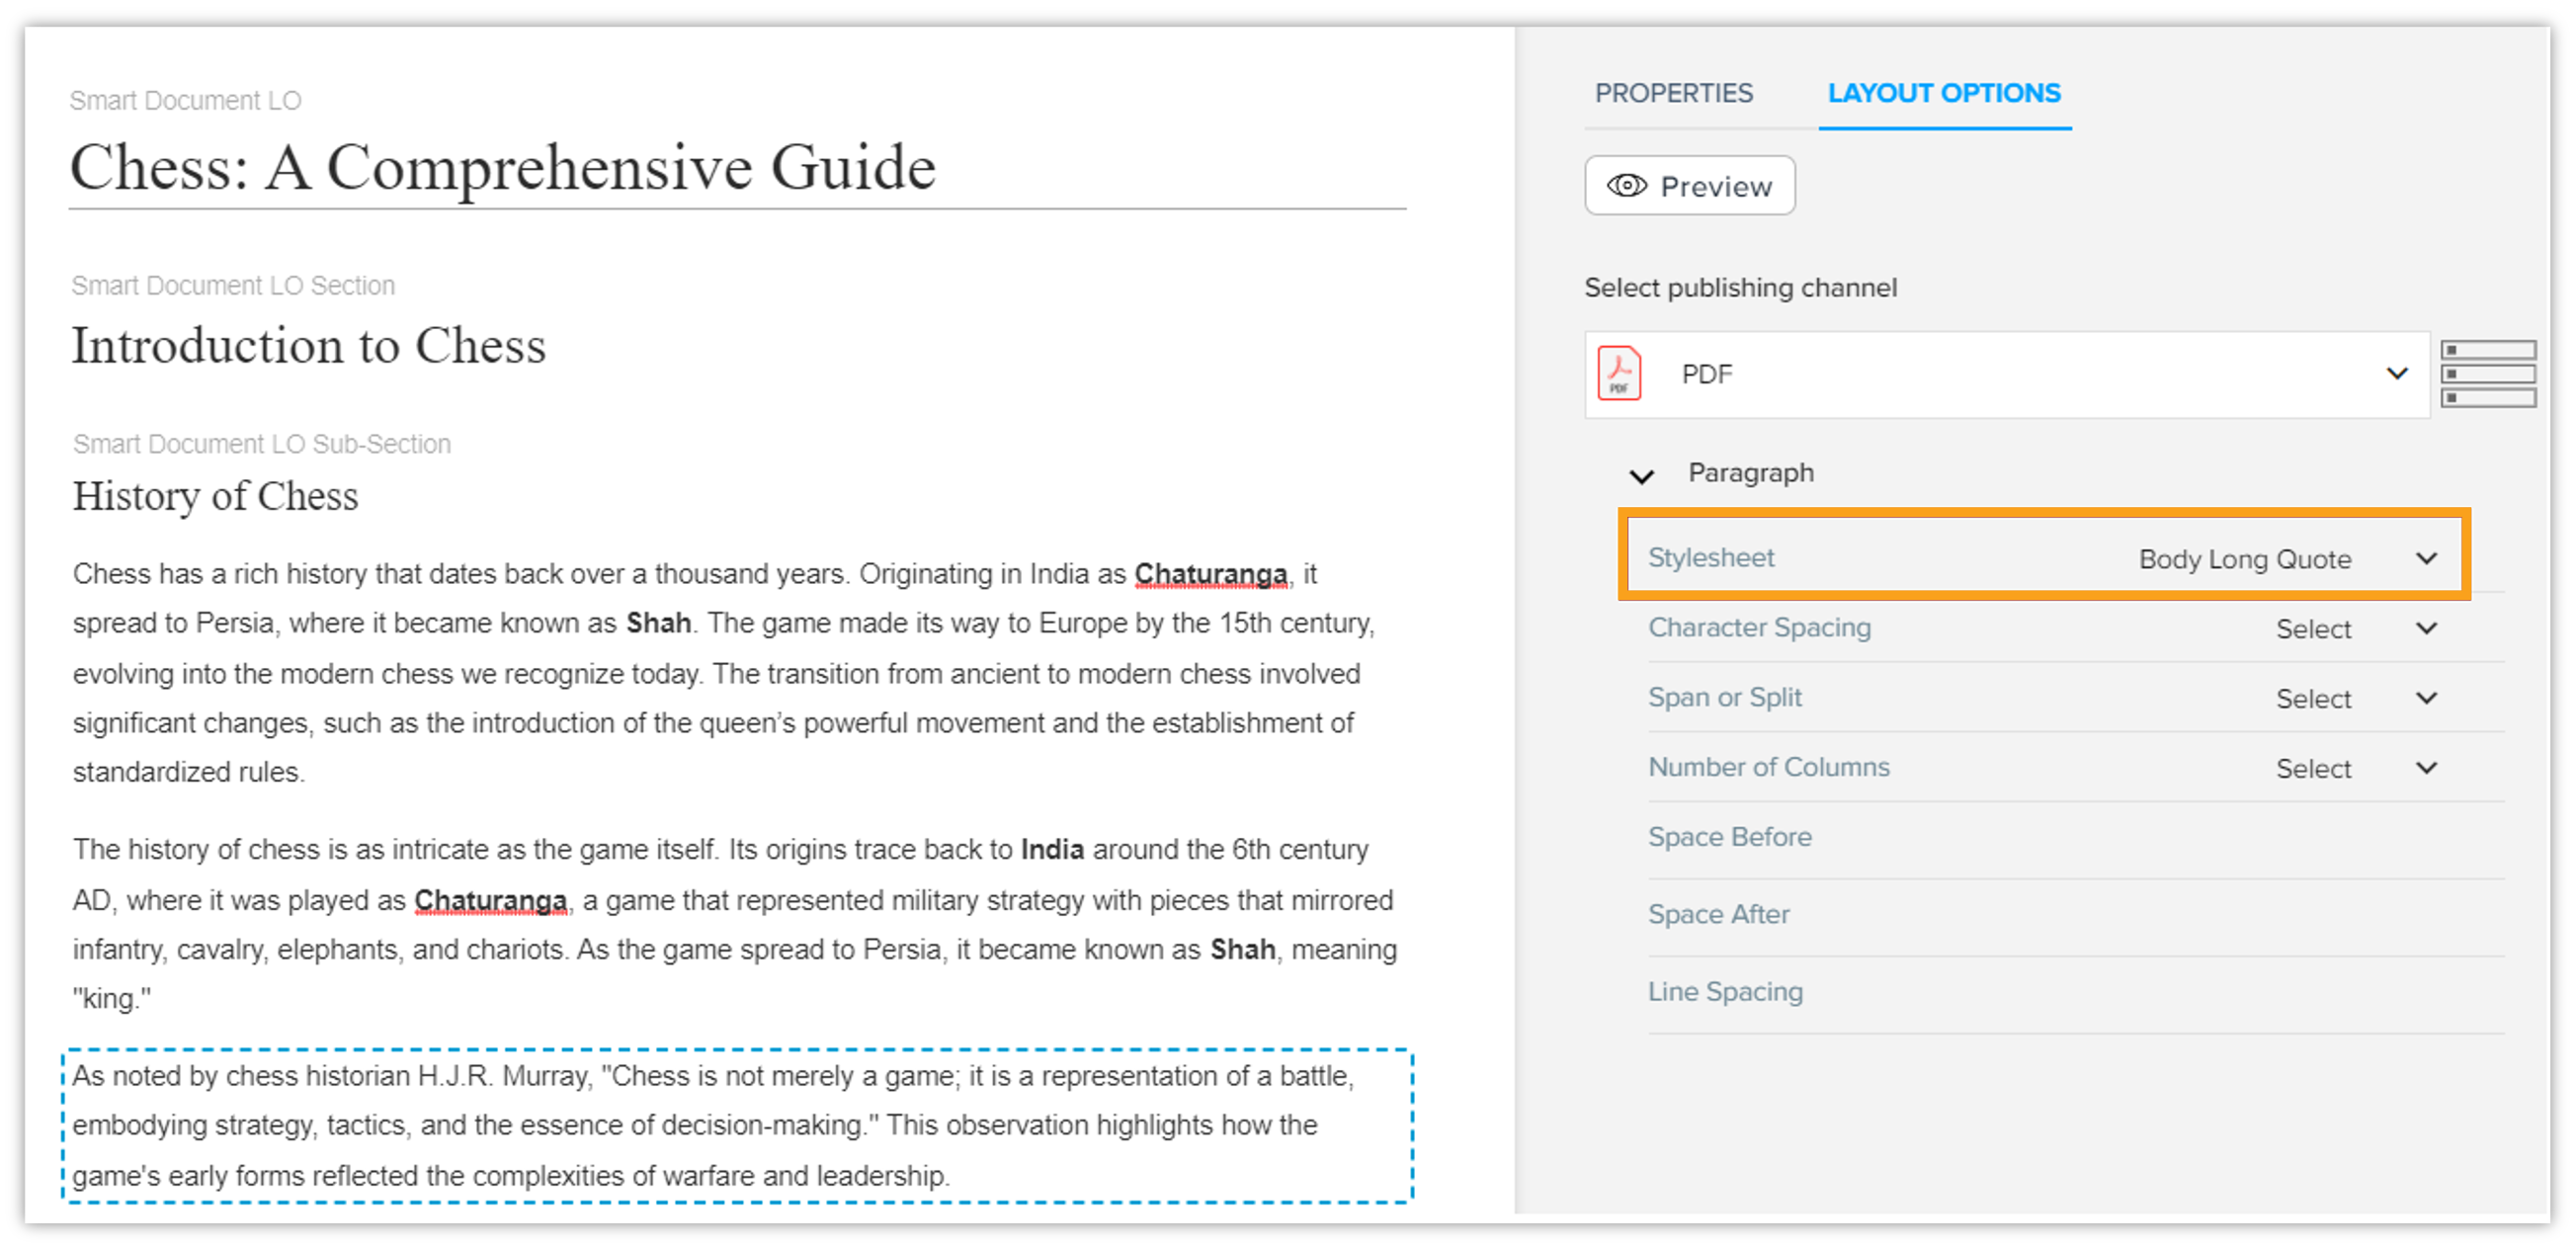
-
-
Preview of the document is given below after applying Body Paragraph at document level and Body Long Quote at the paragraph-level.
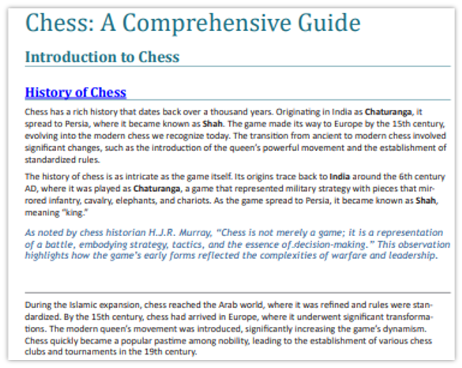
Region-level Layout Options
At the region-level, you have access to many of the layout options that are present at the document level and section level. Regions are meant to provide more flexible placement and formatting of content within a document, allowing you to control how specific areas of content appear visually.
In addition to the standard layout options, region-level layout controls include some unique options that help you define how content is presented in specific regions.
Types of layout options at the region-level
Hide Title
For detailed information, please refer to Hide Title.
Exclude from TOC
For detailed information, please refer to Exclude from TOC.
Break
For detailed information, please refer to Break.
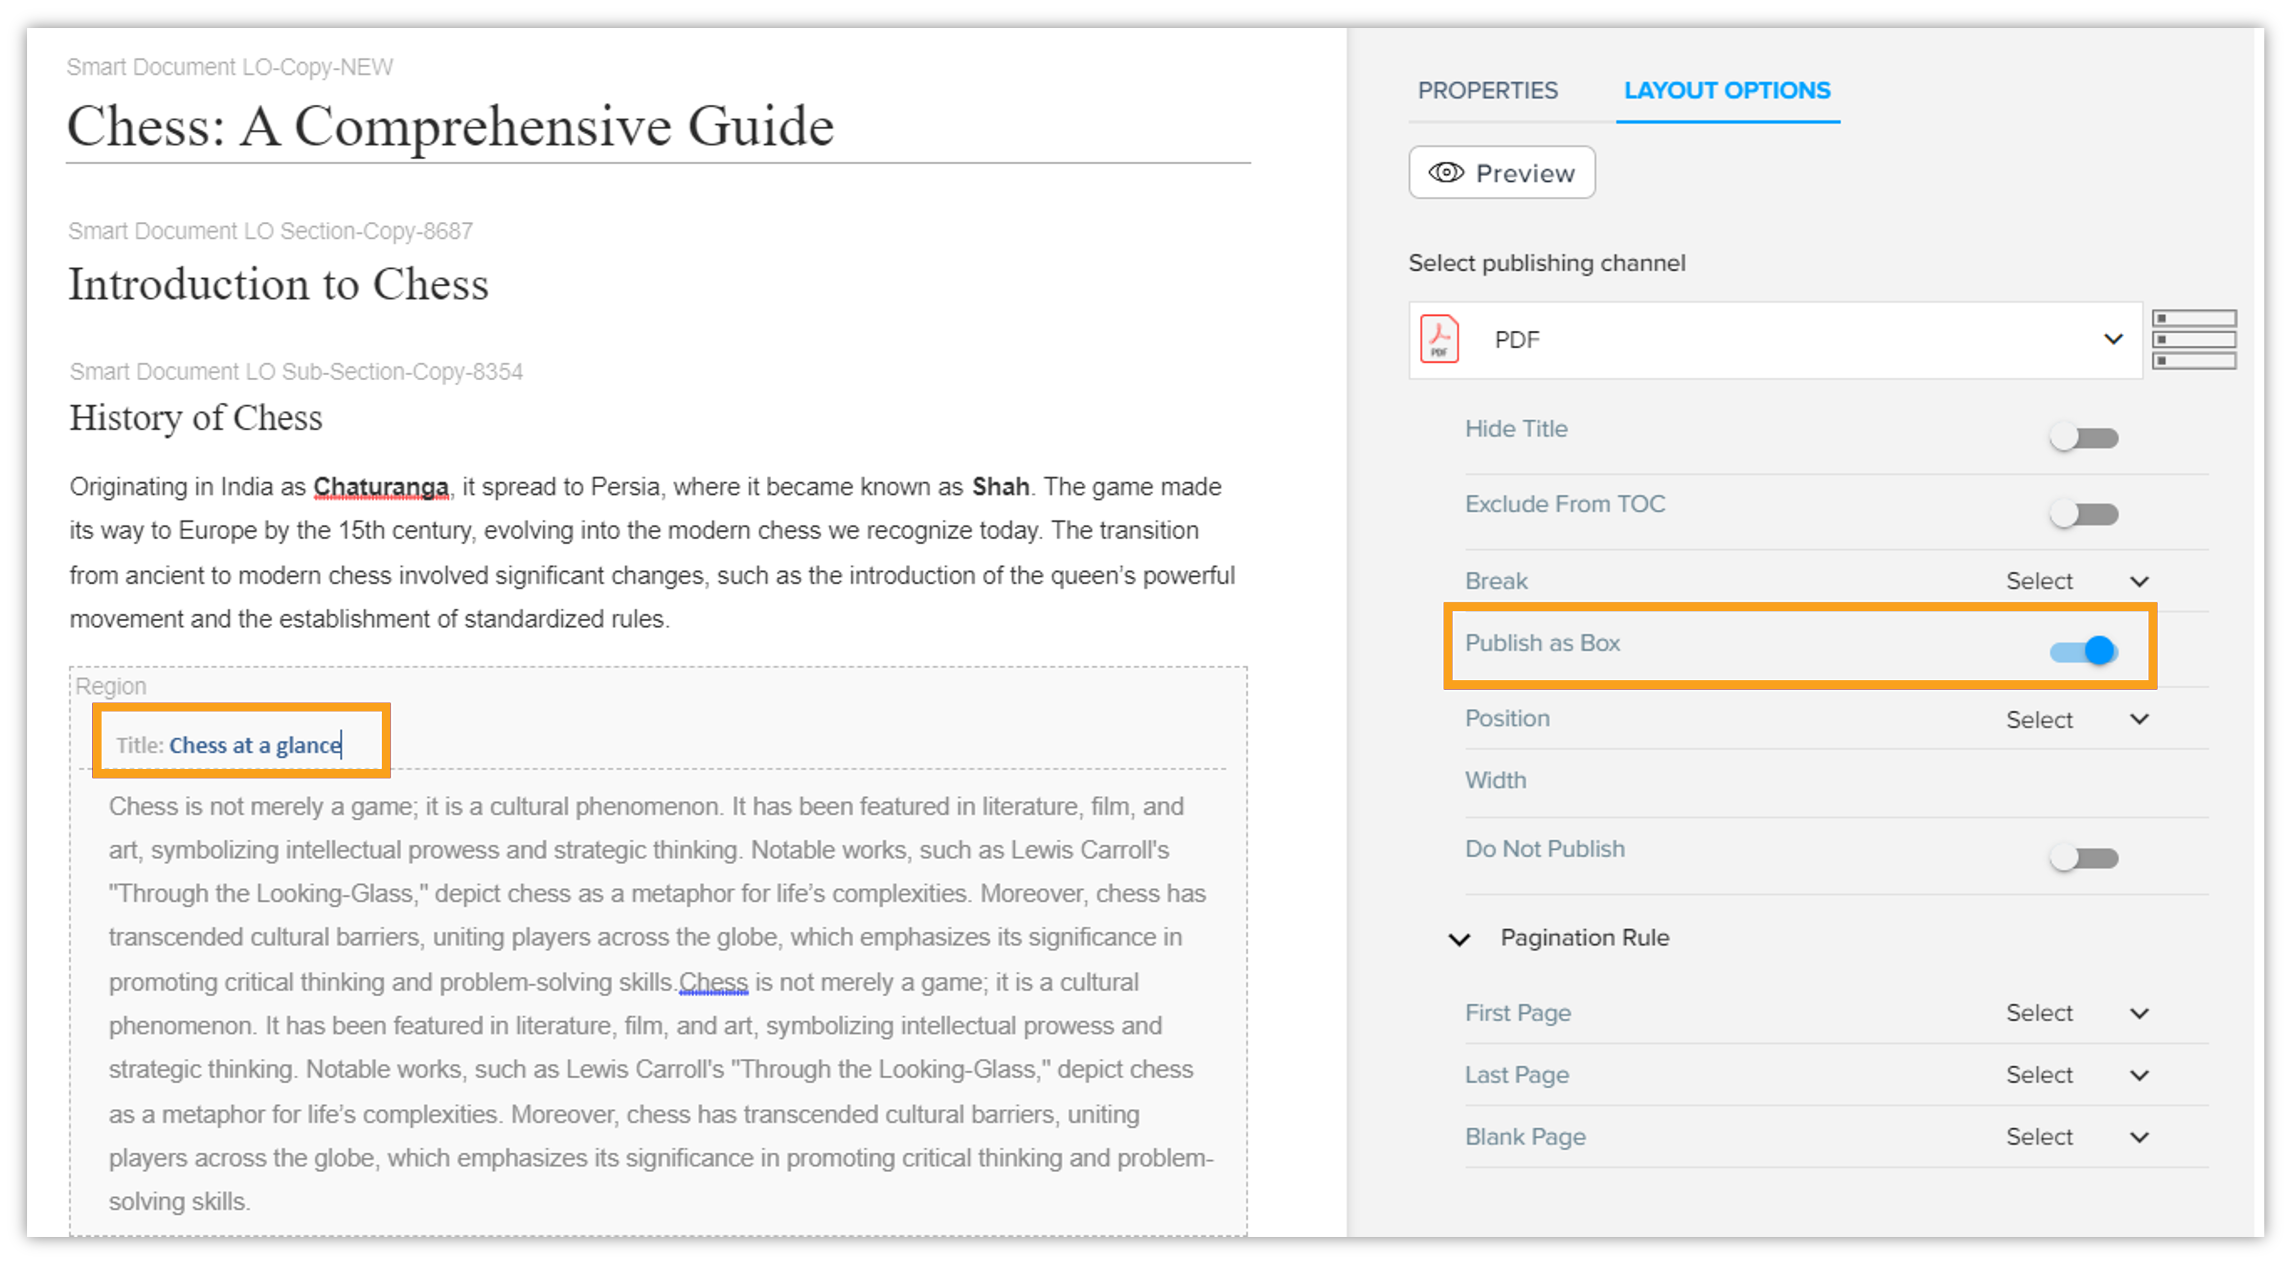
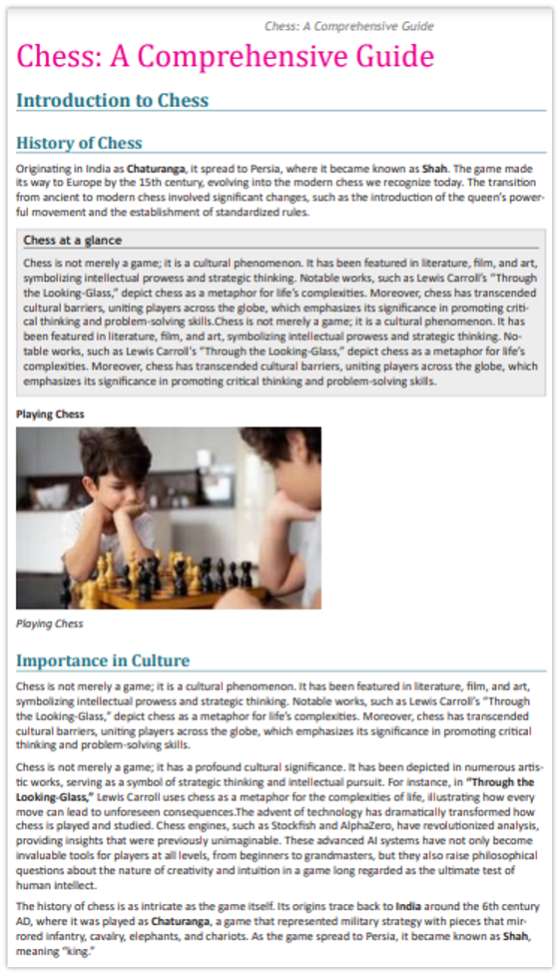
Publish as Box
This option allows you to wrap the content of the region inside a box, which visually separates it from the rest of the content with a default background image. This is useful for highlighting specific information within the page.
Use case
In many documents, there may be a need to highlight certain information, such as a key summary, a note, or a featured fact, making it stand out visually from the rest of the content. The "Publish as Box" layout option at the region level allows you to achieve this by enclosing content in a styled box, giving it a distinct appearance that attracts the reader's attention.
Example
-
Published output before applying Publish as Box:
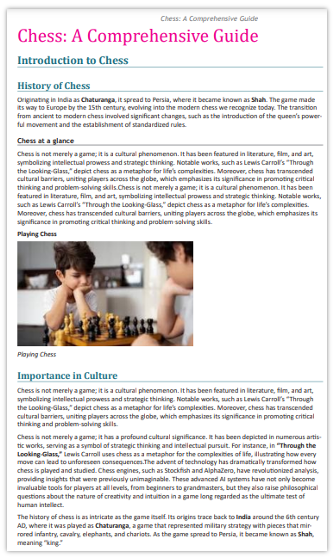
-
Applying Publish as Box at the region-level:
-
Published output after applying Publish as Box:
Position
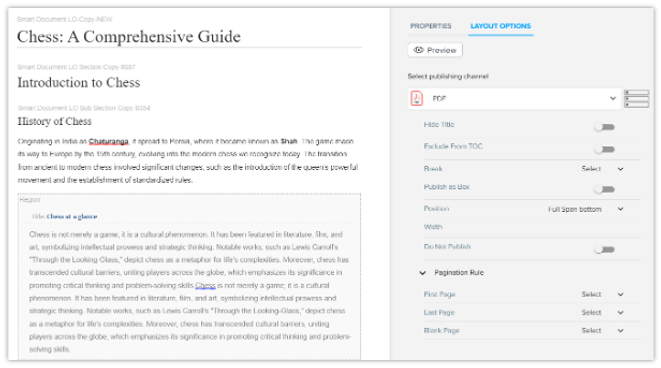
These options control where the region is placed on the page. You can select from several predefined positions to organize the flow of the document in a visually appealing way. The available positions are:
-
Left: Aligns the region to the left side of the page.
-
Right: Aligns the region to the right side of the page.
-
Left Top: Places the region at the top-left corner of the page.
-
Left Bottom: Places the region at the bottom-left corner of the page.
-
Right Top: Places the region at the top-right corner of the page.
-
Right Bottom: Places the region at the bottom-right corner of the page.
-
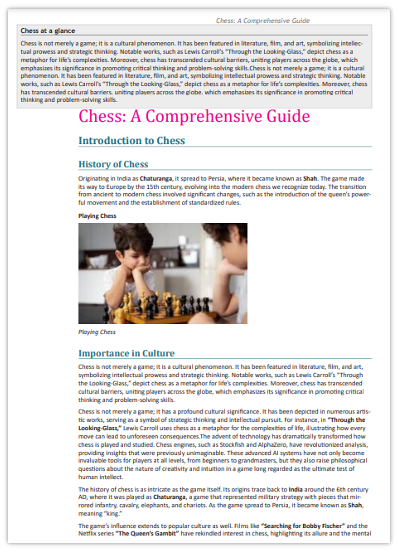
Full Span Top: Stretches the region across the full width of the page at the top.
-
Full Span Bottom: Stretches the region across the full width of the page at the bottom.
-
Default: Resets the region to its default position based on the document's flow and formatting.
Use case
In complex document layouts, you may want to control exactly where specific regions appear on a page to improve readability and design flow. The Position layout option at the region level provides flexibility to place a region in various locations on the page, such as left, right, top, bottom, or spanning across sections. This positioning allows important information to stand out without interrupting the main content.
Example
-
Published output before applying Position on region:
-
Applying Position Full Span Top on region:
-
Published Output after applying Position Full Span Top on region:
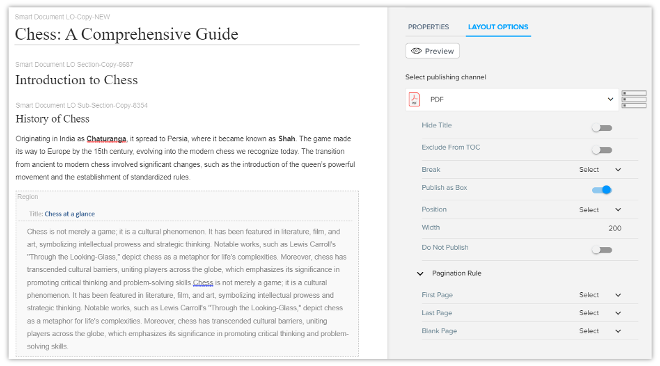
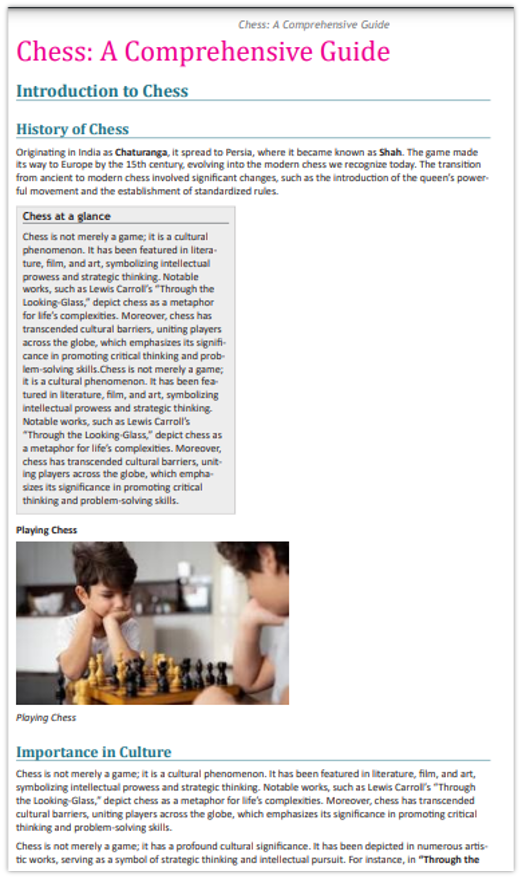
Width
The Width option allows you to control the horizontal space that the region takes up on the page. You can set this to a fixed width or allow the region to adjust based on its content.
Use case
In complex document layouts, you may want to control exactly where specific regions appear on a page to improve readability and design flow. The Position layout option at the region level provides flexibility to place a region in various locations on the page, such as left, right, top, bottom, or spanning across sections. This positioning allows important information to stand out without interrupting the main content.
Example
-
Applying Width on region:
-
Published output after applying Width on region:
Do Not Publish
For detailed information, please refer to Do not publish.
Pagination Rule
For detailed information, please refer to Pagination Rule.
Theme Colors
For detailed information, please refer to Theme Color.
Title Style
For detailed information, please refer to Title Style.
Paragraph
For detailed information, please refer to Paragraph.
Table Style
For detailed information, please refer to Table Style.
Table-level Layout Options
Table-level layout options provide precise control over how tables are formatted and presented within a document. These options ensure that tables are handled appropriately, both in terms of pagination and styling. Below is a detailed explanation of each available option at the table-level:
Types of layout options at the table-level
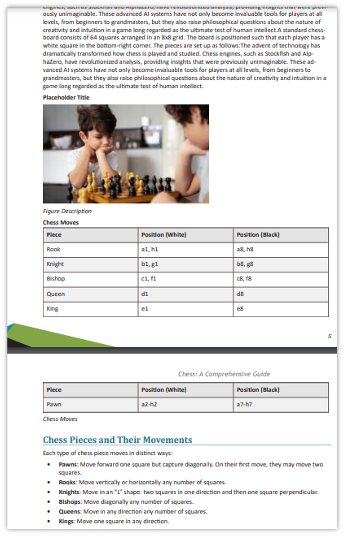
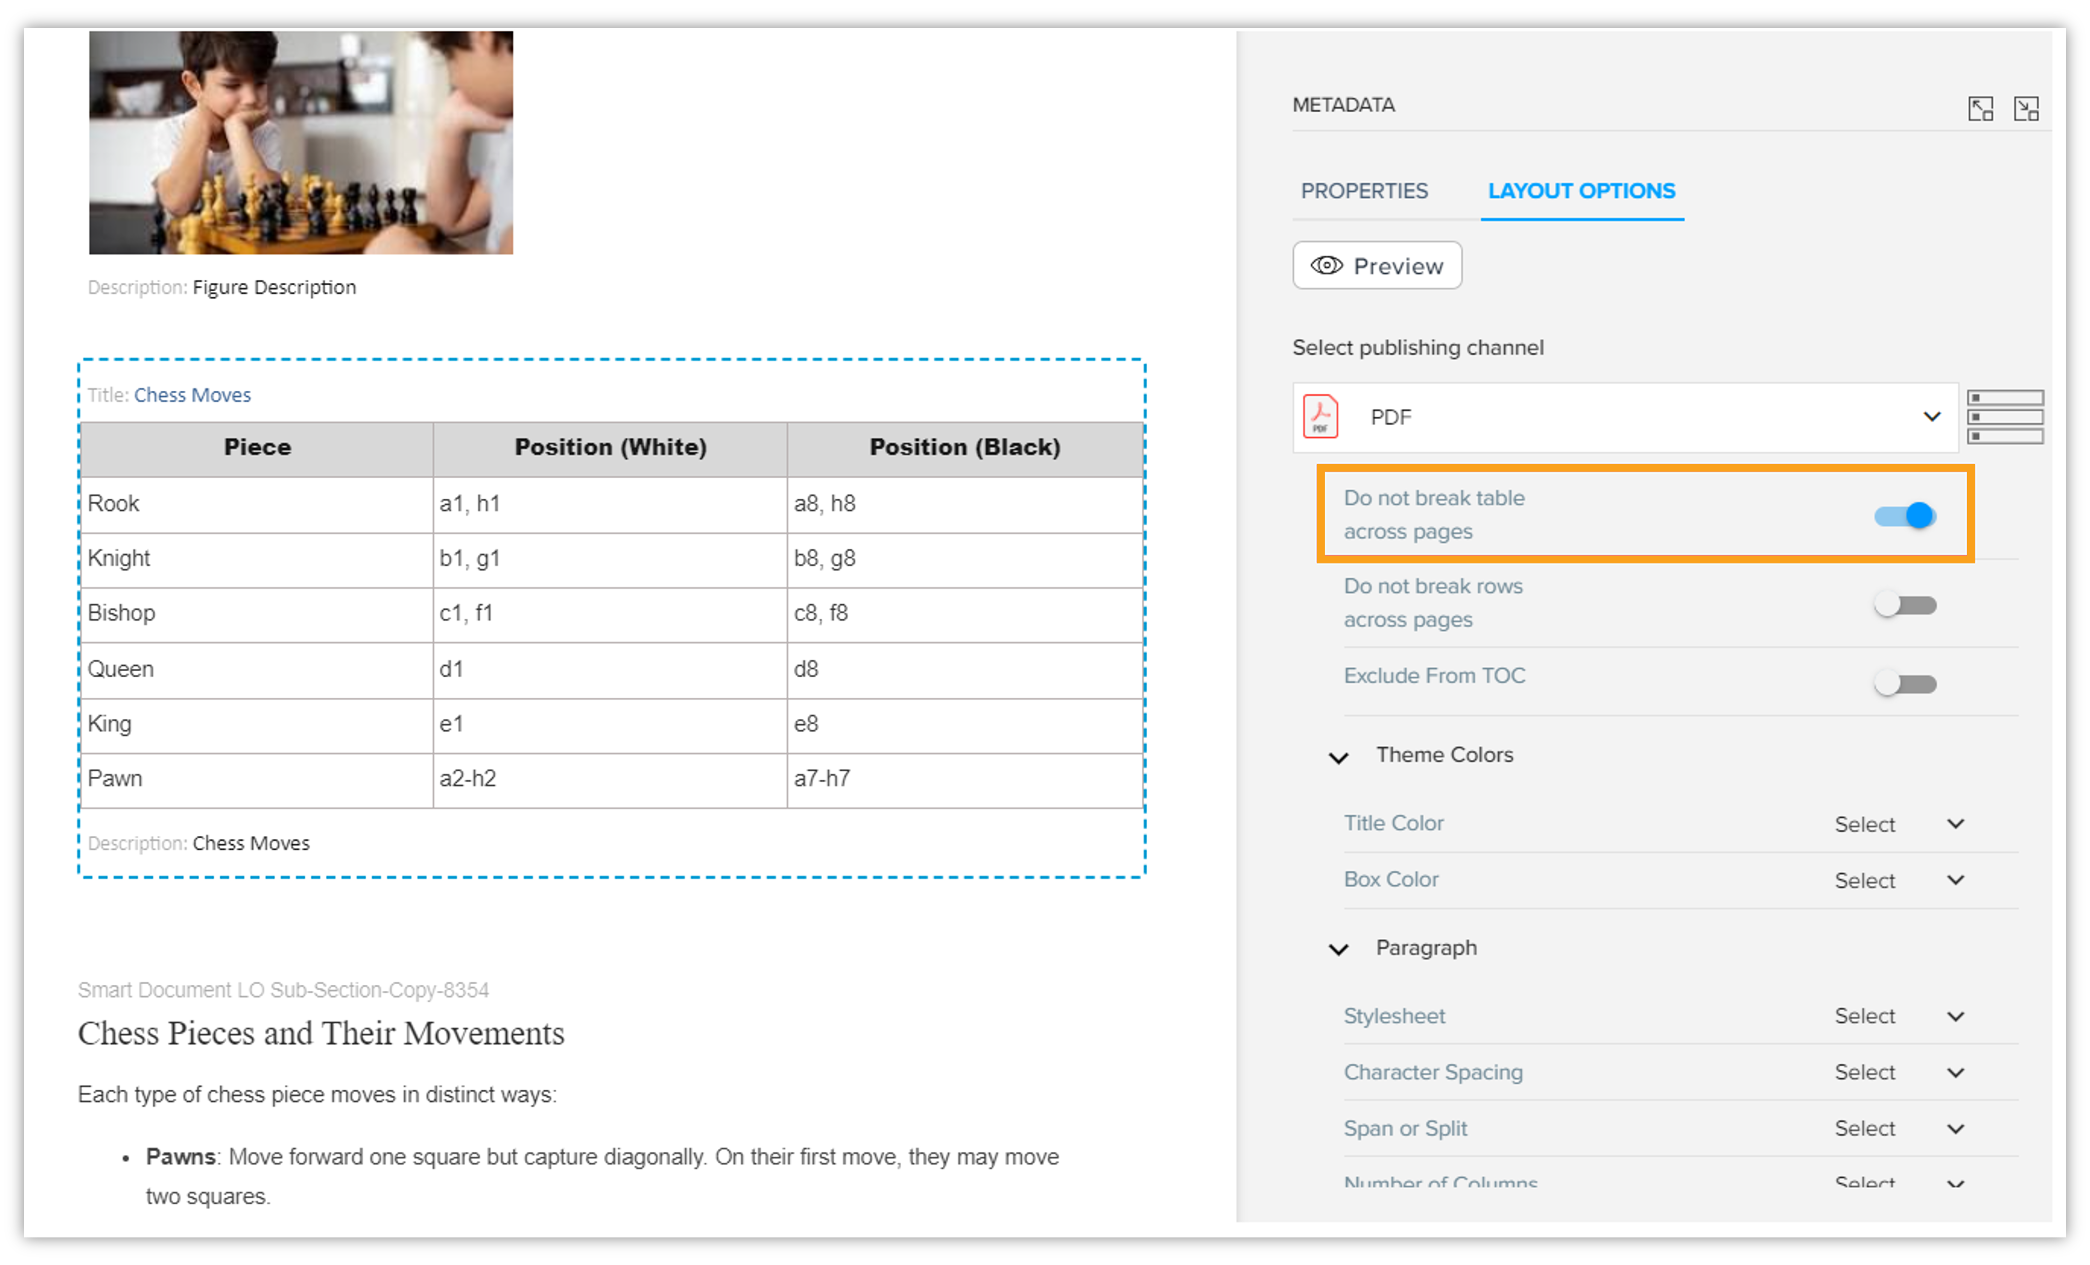
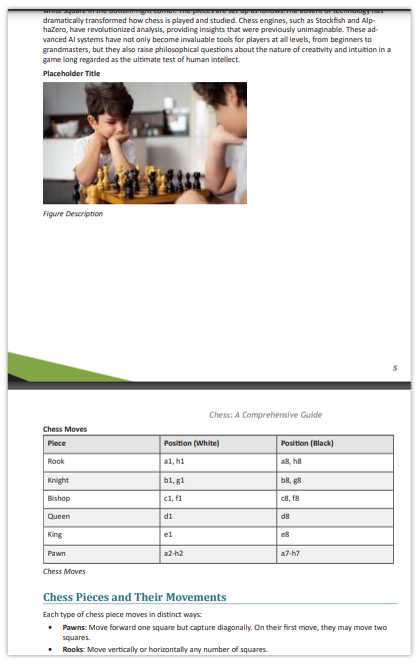
Do not break table across pages
This option prevents the table from being split across two pages. If the content exceeds the available space on one page, the entire table will move to the next page, ensuring the table is presented in its entirety on a single page.
Use case
When tables contain data that needs to be viewed as a complete set, such as financial summaries or detailed comparisons, using the "Do Not Break Table Across Pages" option ensures the table remains on a single page. This option enhances readability and keeps related data together, which is especially useful for documents like reports, where separating rows across pages could disrupt the flow and clarity of information.
Example
-
Published output before applying Do not break table across pages:
-
Applying Do not break table across pages:
-
Published output after applying Do not break table across pages:
Do not break rows across pages
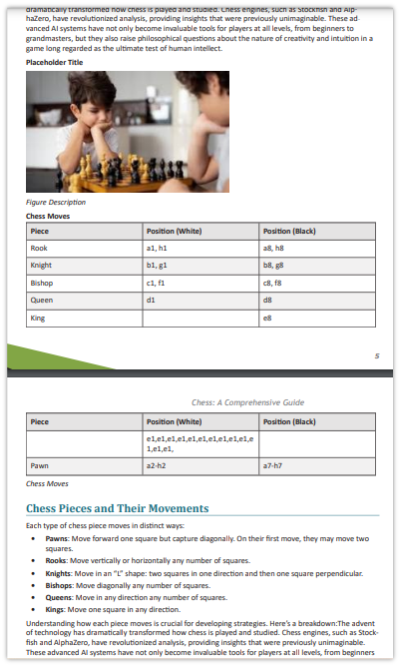
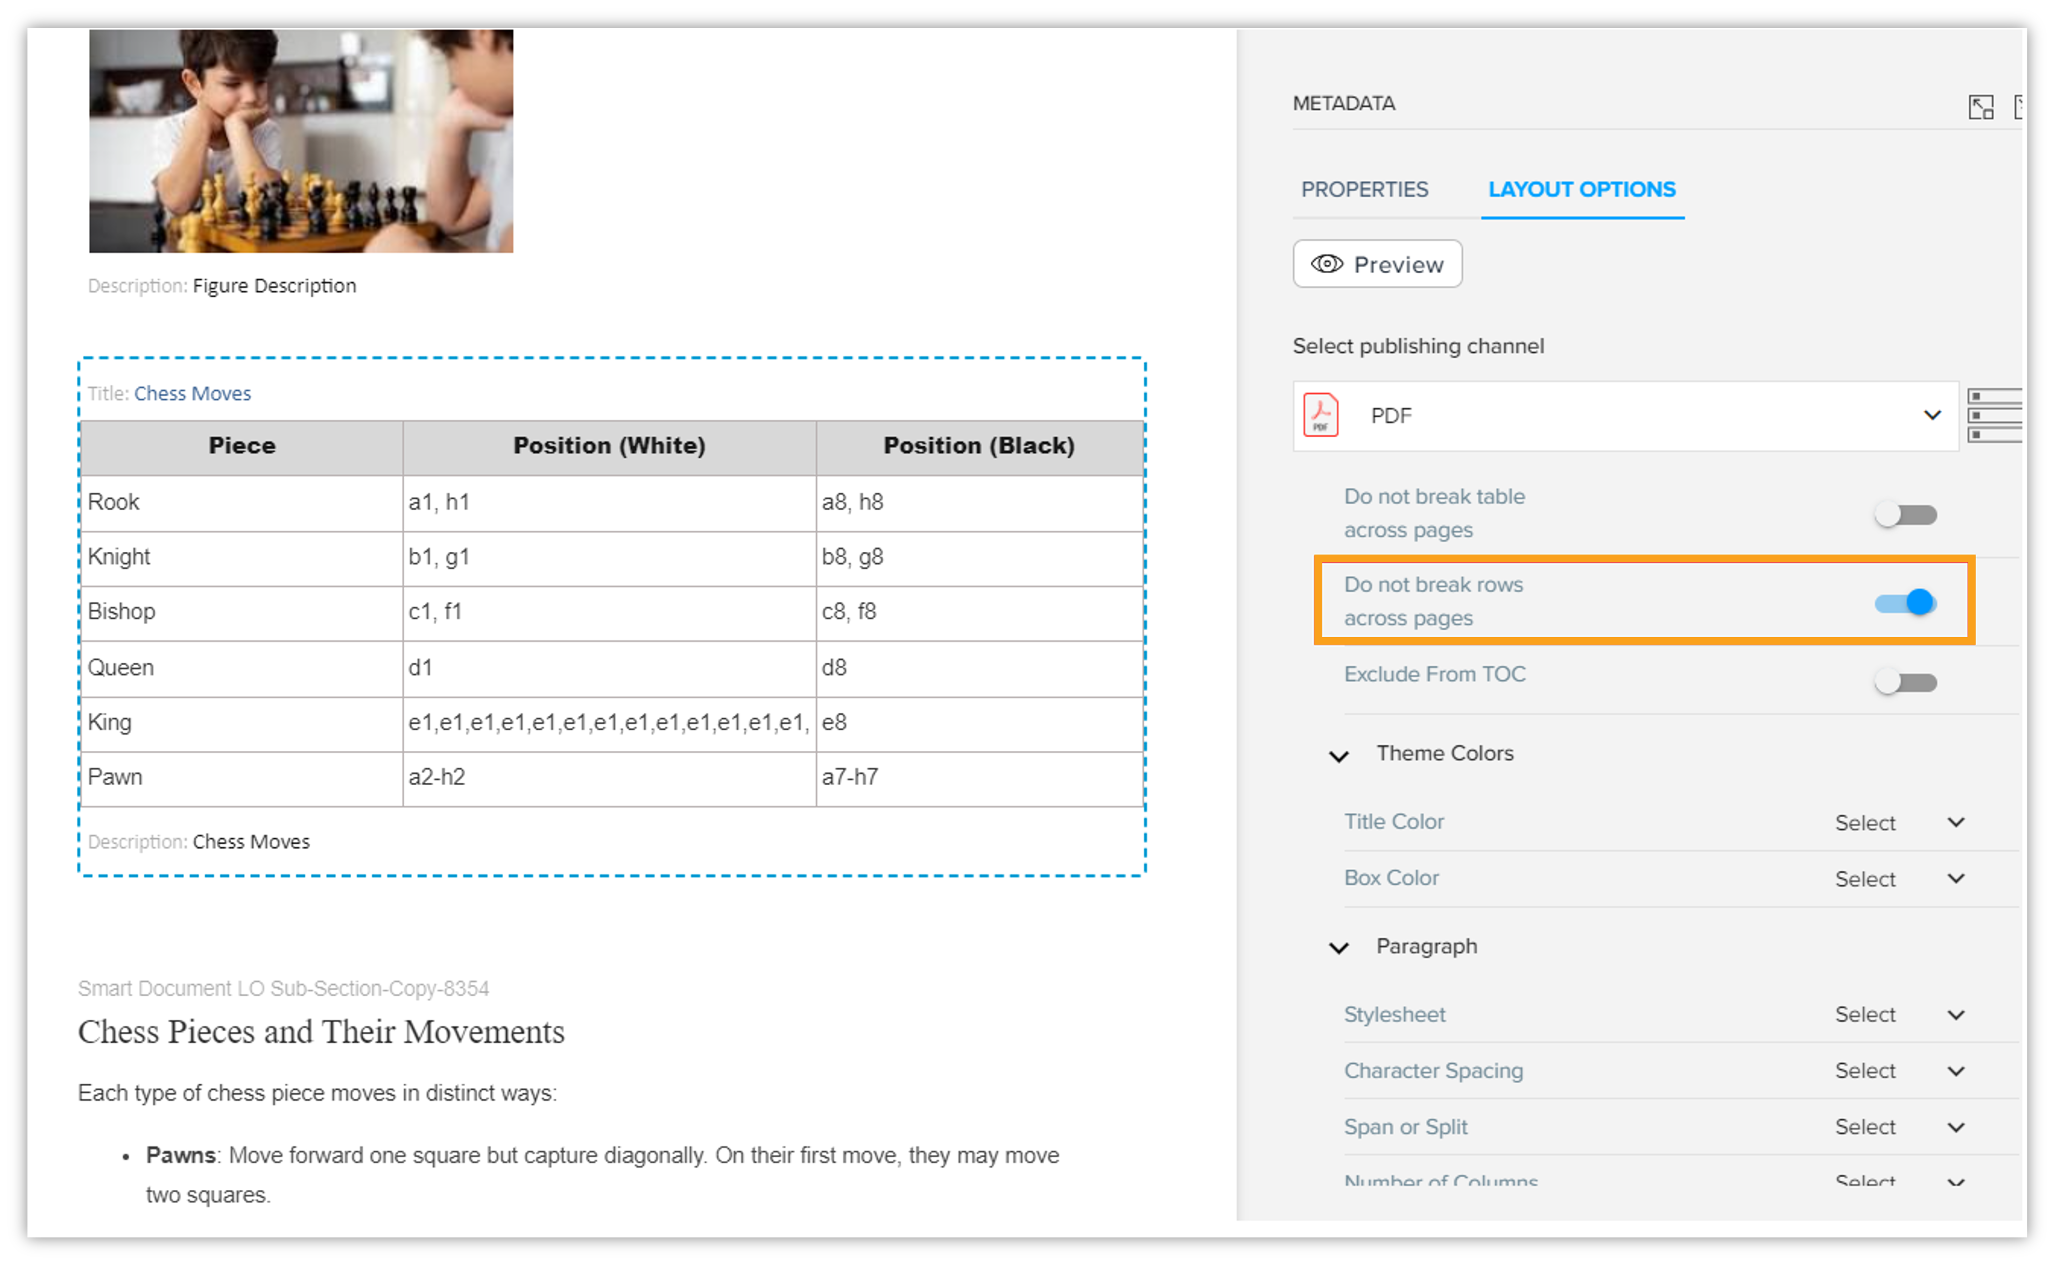
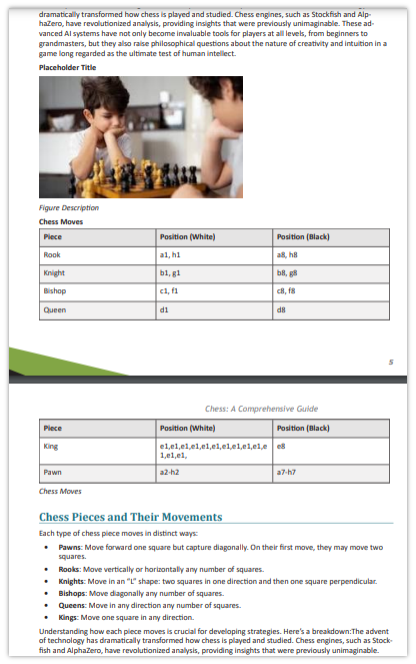
This option ensures that individual rows within a table are not broken across multiple pages. If a row is too large to fit at the bottom of one page, it'll be moved to the next page, preventing split rows and maintaining readability.
Use case
In tables where individual rows contain extensive data, such as descriptions or multi-line entries, enabling Do Not Break Rows Across Pages keeps each row's content together on the same page. This prevents rows from splitting across pages, ensuring that information remains organized and easier to read.
Example
-
Published output before applying Do not break rows across pages:
-
Applying Do not break rows across pages:
-
Published output after applying Do not break rows across pages:
Exclude from TOC
For detailed information, please refer to Exclude from TOC.
Caption Style
Captions are an important element in tables, providing context and explanations for the table's content. The caption style options allows you to configure how the caption is styled and positioned:
-
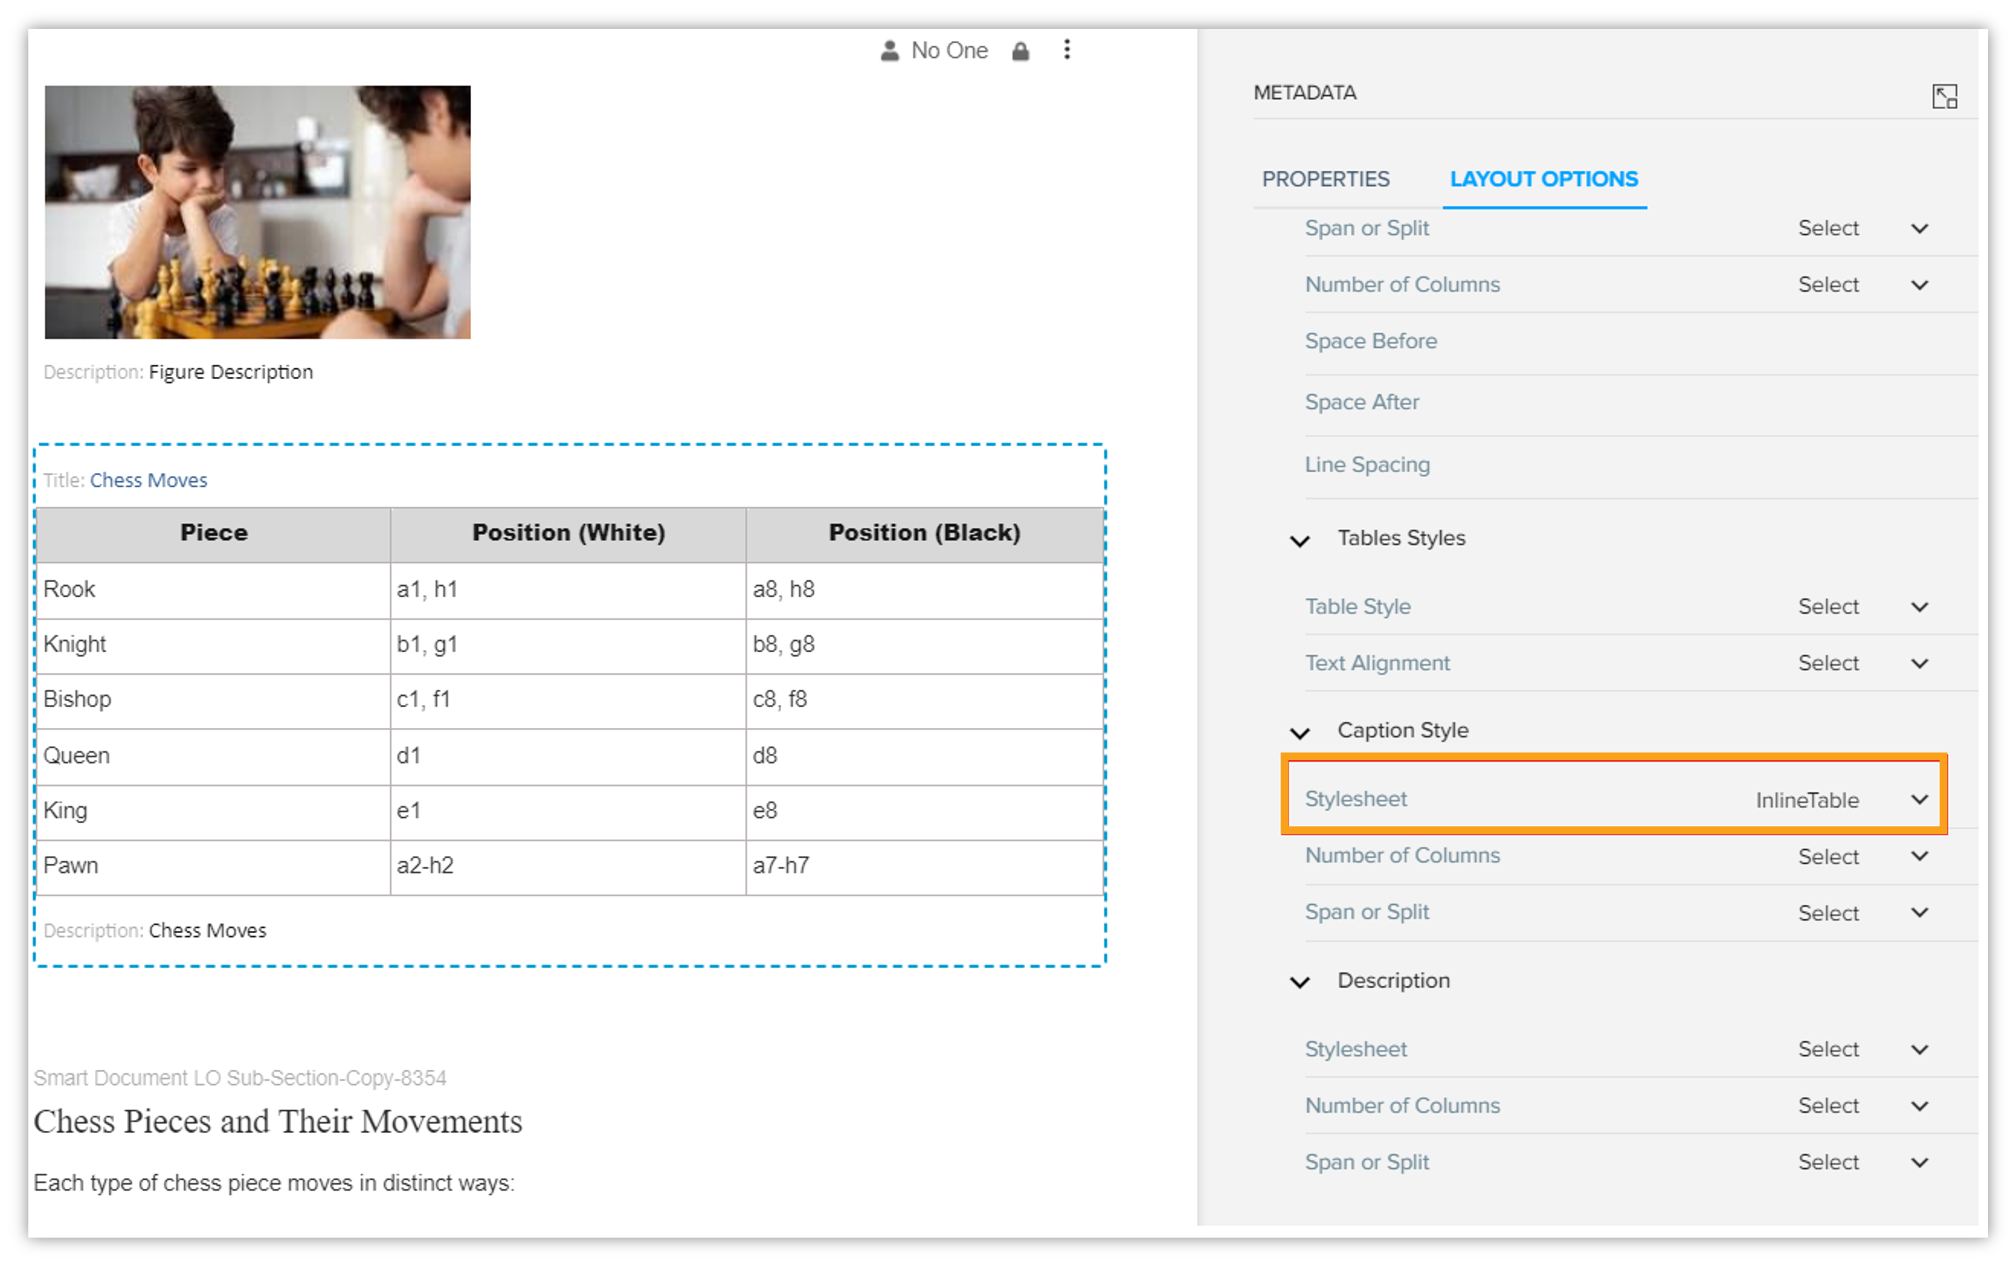
Stylesheet: You can apply a predefined stylesheet to the caption, controlling its font, size, color, and other styling aspects.
-
Number of Columns: This option allows you to specify how many columns the caption will span in the document.
-
Span or Split: This setting controls whether the caption spans the entire available space or is divided into multiple parts (split). This is useful for controlling the visual alignment and distribution of captions, especially in complex tables.
Use case
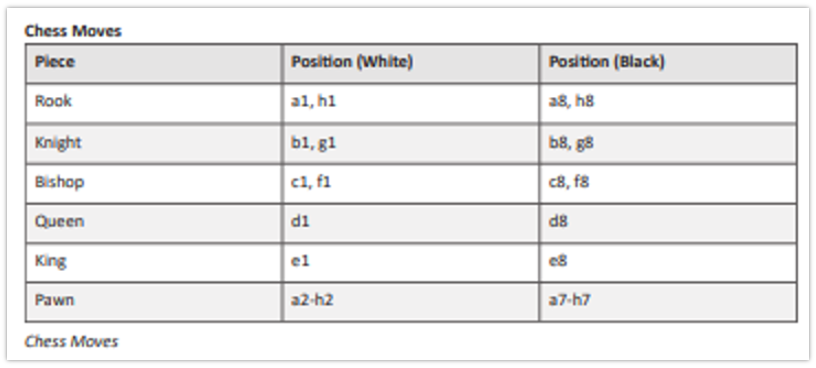
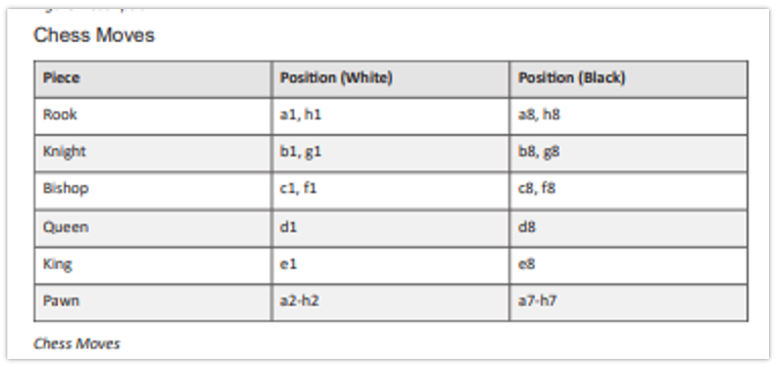
The Caption Style setting at the table level allows you to customize the appearance of table captions, such as titles or descriptions, giving them a unique style that enhances readability and aligns with the document's design. This setting is ideal for emphasizing table descriptions or titles, especially in documents where tables contain critical data.
Example
-
Published output before applying caption style:
-
Applying caption style:
-
Published output after applying caption style:
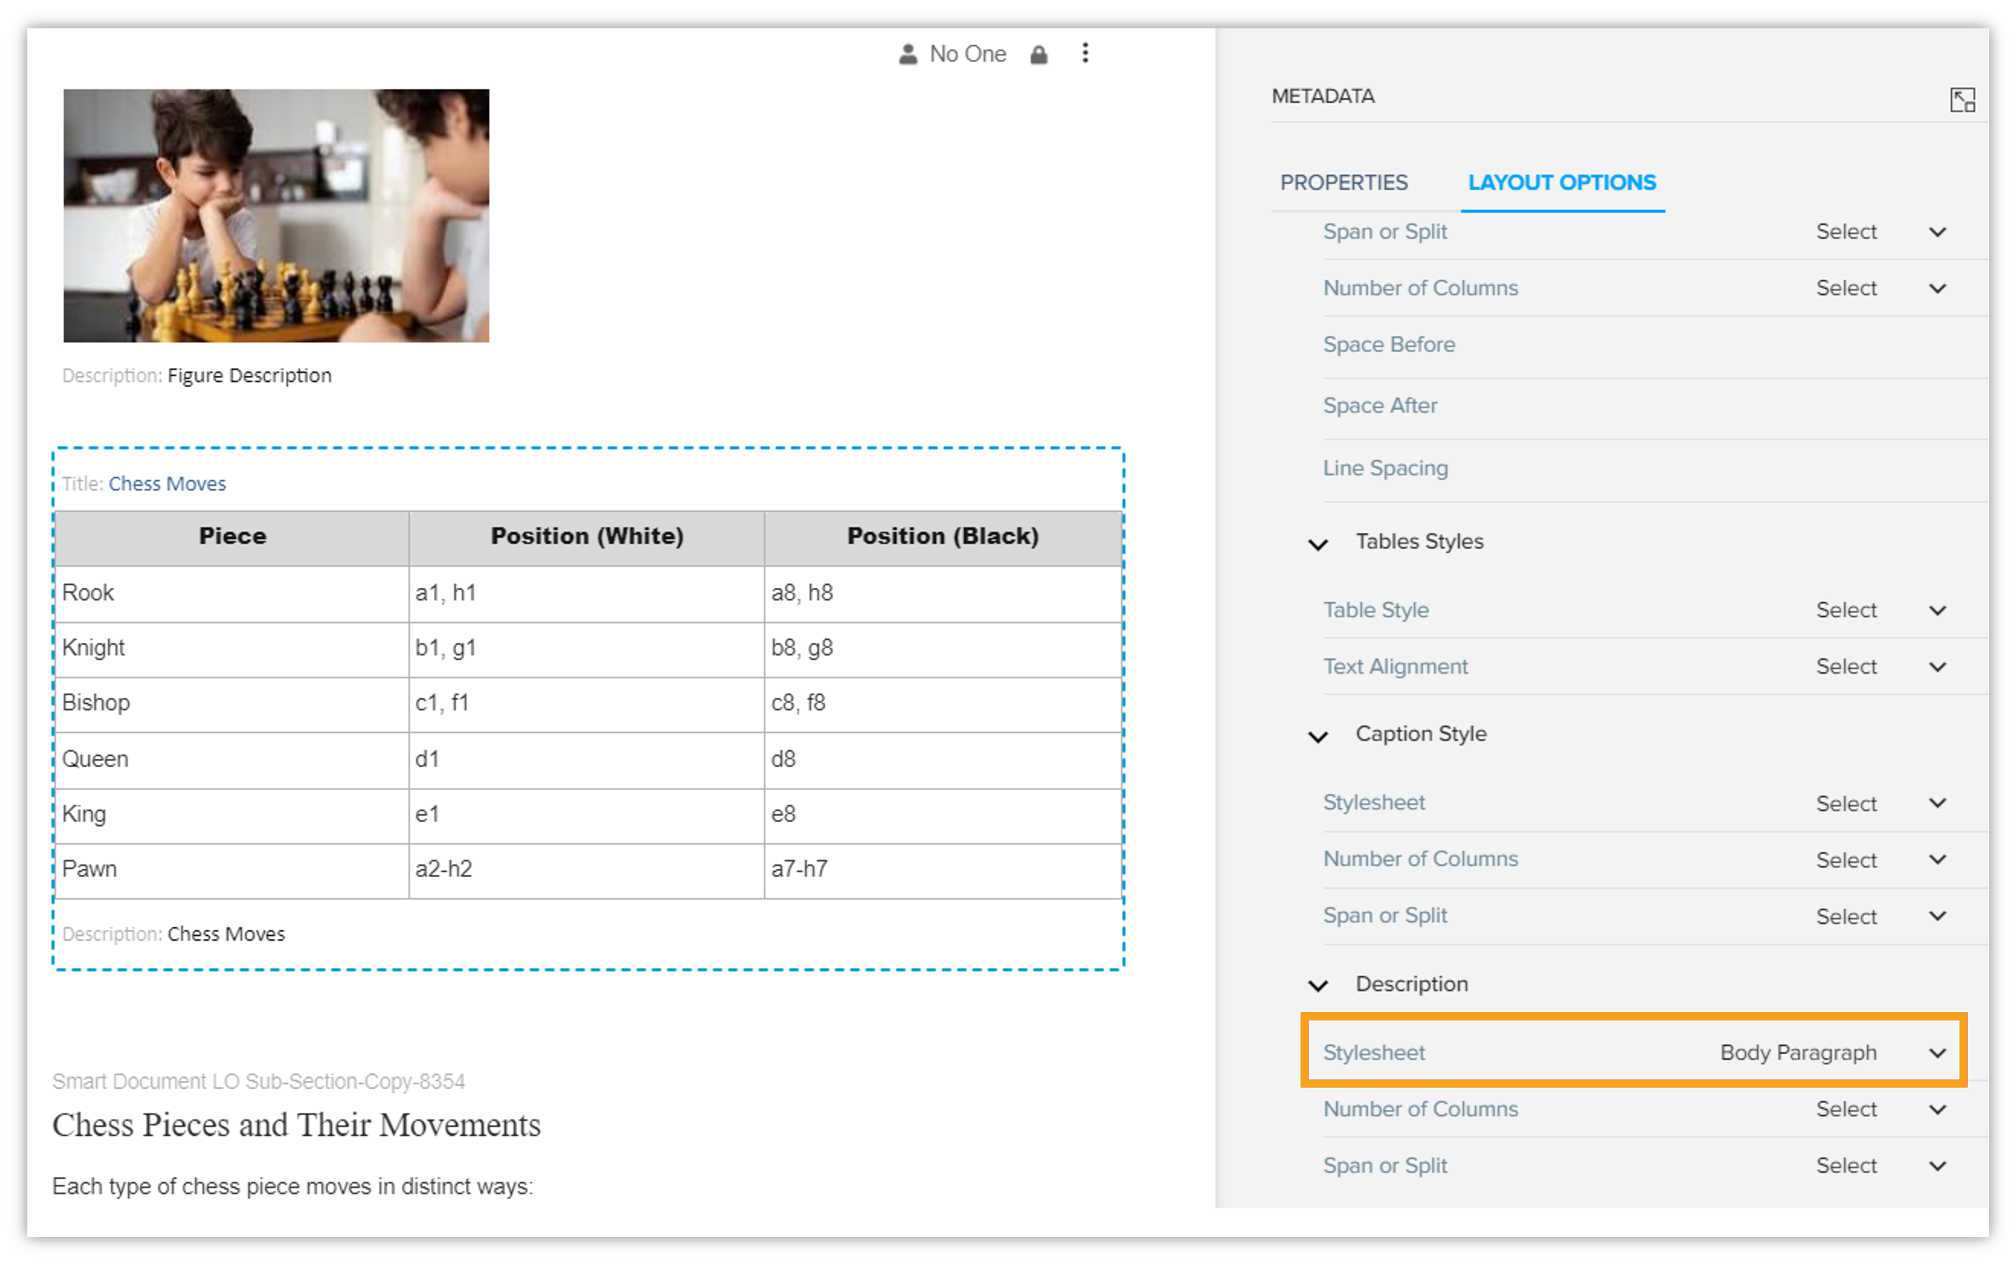
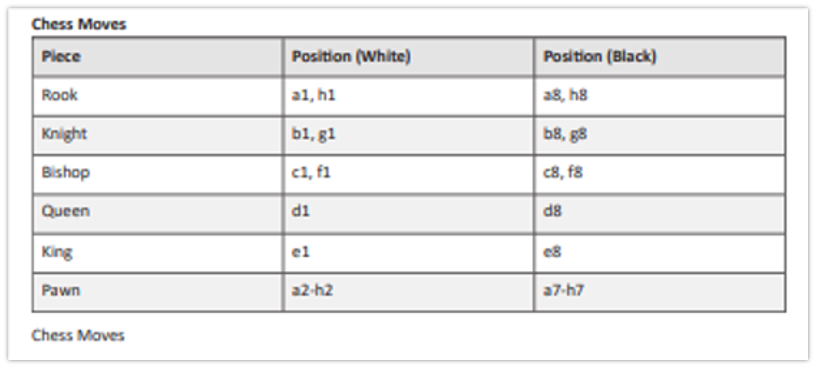
Description
Descriptions provide additional context for the table’s content and can be styled similarly to captions. The following options are available for descriptions:
-
Stylesheet: Like captions, descriptions can have a predefined stylesheet applied, controlling their appearance to match the rest of the document’s style.
-
Number of Columns: This option allows you to specify how many columns the description will span in the document.
-
Span or Split: This option works in the same way as for captions, determining whether the description spans the entire available space or is split across different columns.
Use case
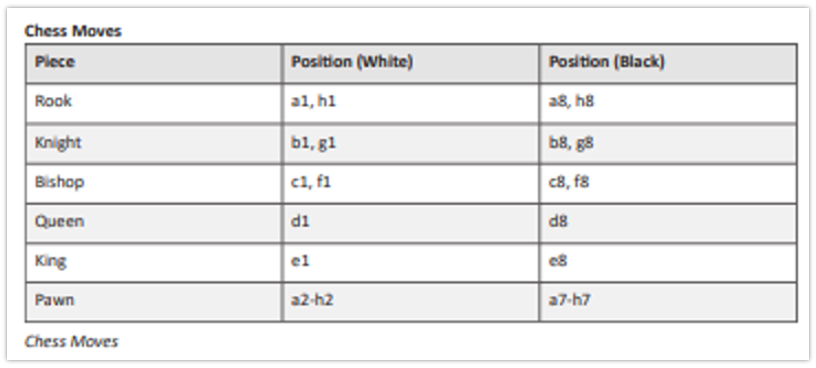
The Description option at the table-level is beneficial when tables need additional context or explanations directly below or beside them. This layout option allows for styling descriptive text consistently, aligning it with document standards and enhancing readability.
Example
-
Published output before applying description style:
-
Applying description style:
-
Published output after applying description style:
Theme Colors
For detailed information, please refer to Theme Color.
Paragraph
For detailed information, please refer to Paragraph.
Table Style
For detailed information, please refer to Table Style.
Figure-level Layout Options
When working with figures in a document, you can control your layout and styling in a way that ensures they're presented effectively. Figure layout options provide a set of customizable settings that allow you to manage how figures along with their captions and descriptions, are formatted and displayed in the document. These options include both structural and stylistic controls.
Types of layout options at the figure-level
Exclude from TOC
For detailed information, please refer to Exclude from TOC.
Caption Style
For detailed information, please refer to Caption Style.
Description
For detailed information, please refer to Description.
Image-level Layout Options
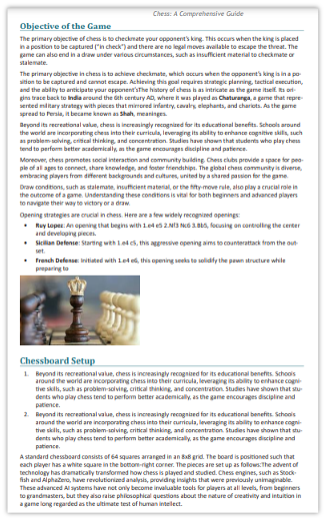
Images play a crucial role in conveying information visually within a document. To ensure that images are displayed appropriately across different types of content, it's important to manage their size and positioning. Image layout options allow you to define the specific height and width of an image to maintain consistency and readability throughout the document.
Types of layout options at the image-level
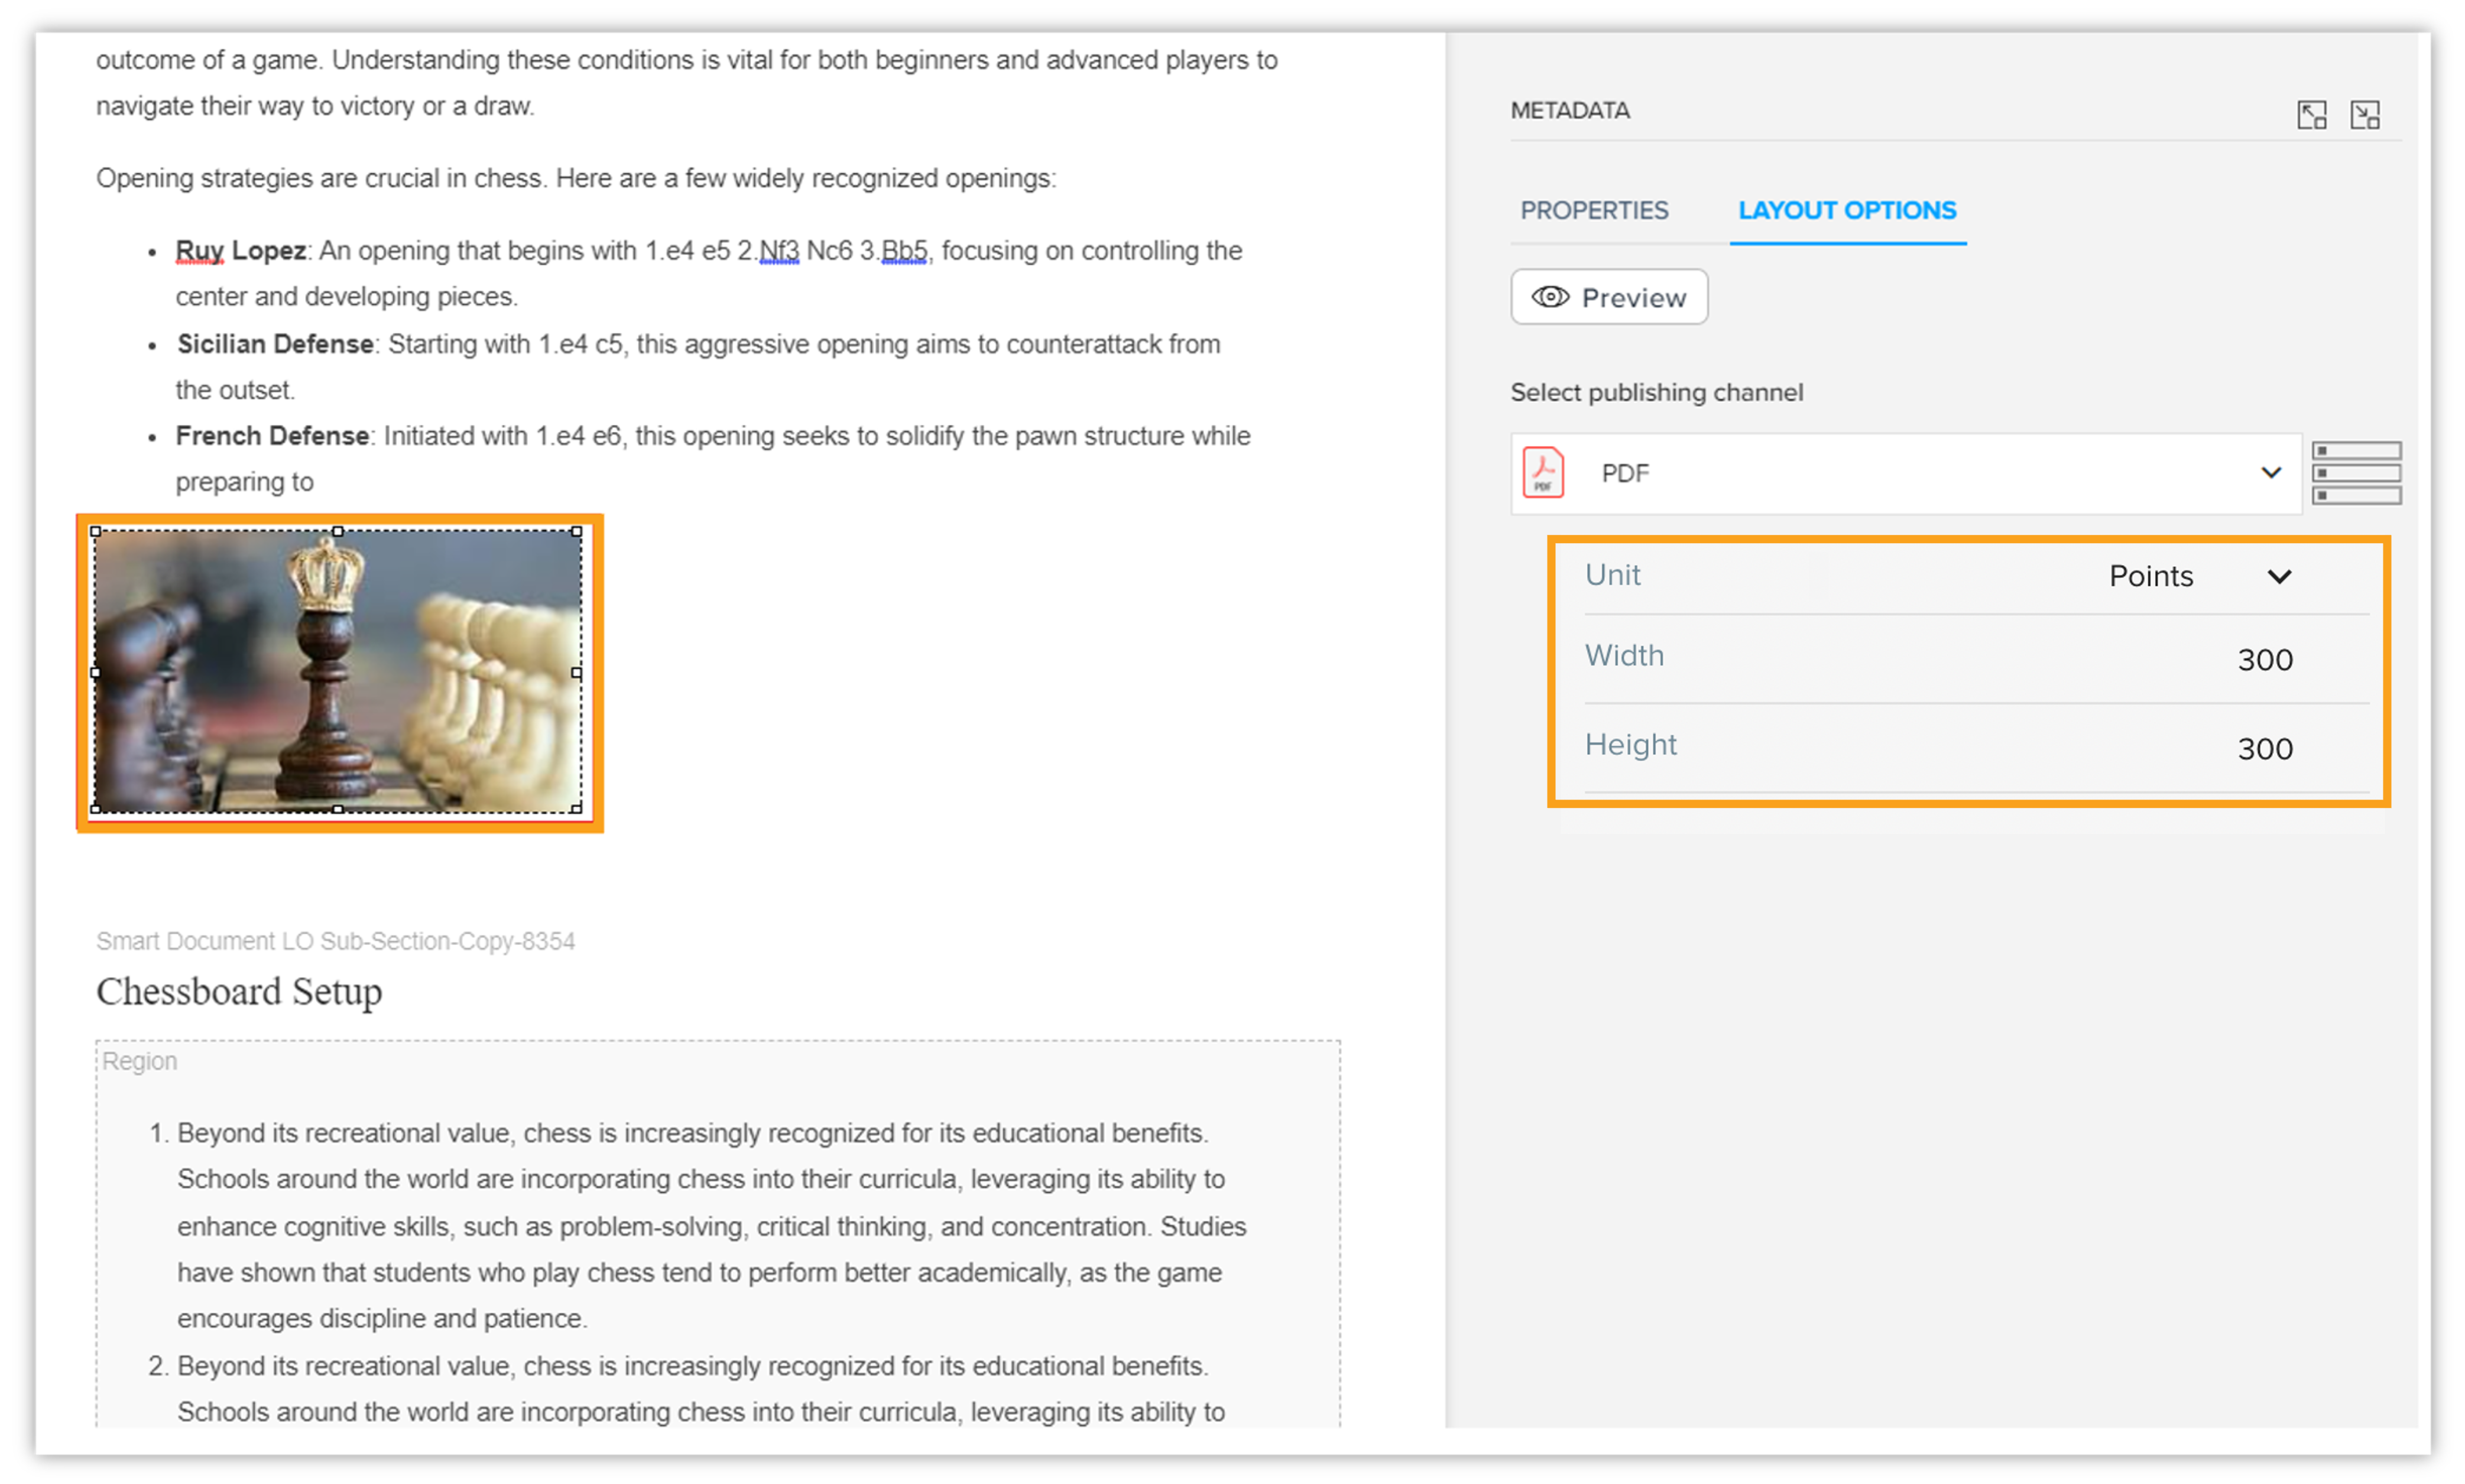
Unit
The Unit option allows users to define the measurement for Width and Height in their preferred format. Users can choose between 'points' for fixed sizing or 'percentage' for responsive layouts. This flexibility ensures that designs can be tailored to meet specific visual requirements.
Width
This Width option lets you control the width of the image. Setting a fixed width ensures that the image doesn’t exceed the designated space in the document, especially in cases where space is limited, or the layout must be tightly controlled.
Height
Like width, the Height option allows you to set the height of the image. You can specify a precise height to ensure that the image fits within the document's design or layout. This is particularly useful when working with multiple images that need to have uniform dimensions or when a specific aspect ratio needs to be maintained.
Use case
The Image layout optionsare crucial for controlling how images are displayed within a document, ensuring that they align with the overall design and layout requirements. These options allow you to customize the width and height of images to enhance readability.
Example
-
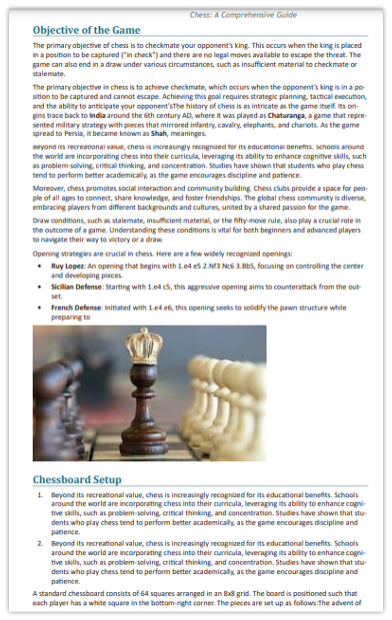
Published output before applying Image layout options:
-
Applying Image layout options:
-
Published output after applying Image layout options:
Tagging-level Layout Options
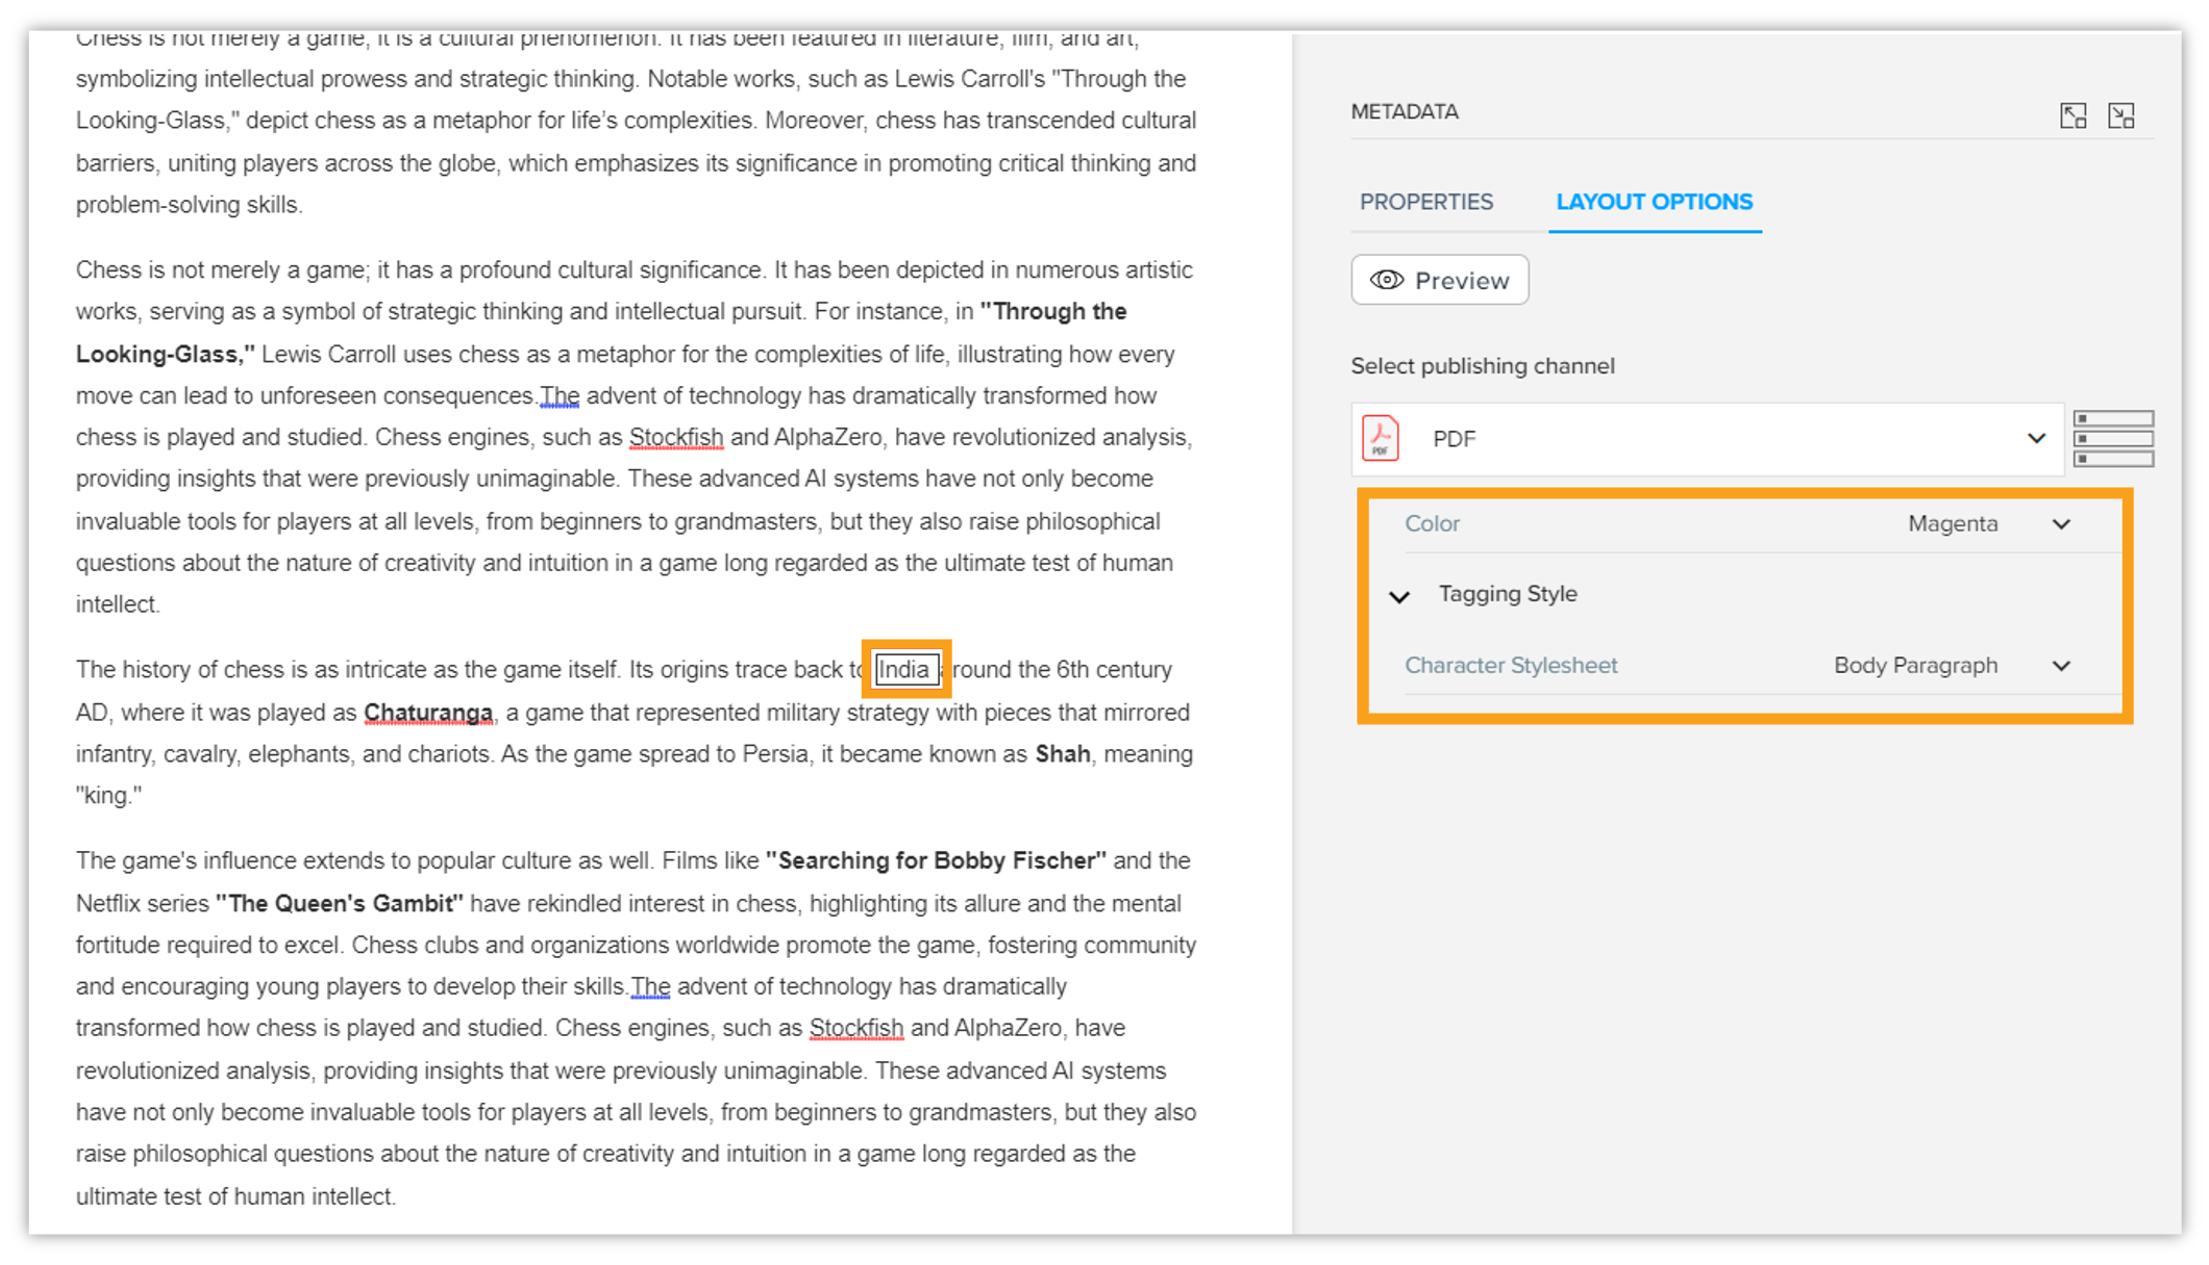
The Tagging layout options provide customization tools specifically for text styling within tags. These options enable you to adjust colors and apply character stylesheets, making it easier to highlight or differentiate tagged elements in documents. Below are the key layout options available within Tagging Layout Options.
Types of layout options at the tagging-level
Colors
This option allows you to apply custom text colors to tagged elements, enabling enhanced visual organization and emphasis based on color-coding. You can select a color from a predefined palette or set a custom hex color value. This feature is useful when specific tags require immediate recognition or when organizing document content by color.
Character Stylesheet
The Character Stylesheet option allows you to apply specific character styles to tagged content. This stylesheet can define font type, size, weight, and other character-specific formatting details to maintain consistency across all tagged elements within the document.
Use case
The Tagging layout options allow you to apply custom styles and colors to text elements within a document, enhancing its visual hierarchy and readability. These options are particularly useful for highlighting important information or categorizing content.
Example
-
Applying Tagging layout options:
-
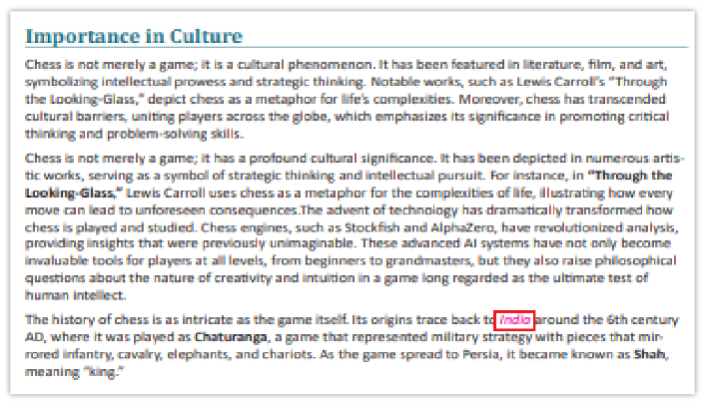
Published output after applying Tagging layout options: