
My Assignments
The My Assignments tab lists all the assets that have been assigned to you for review or the assets that you have created. There are several options on the My Assignments page, which for the sake of simplicity are categorized as file operations (top-of-the-bar operations and quick menu operations) and generic page operations.
File Operations
The My Assignments page has the following file operations that appear when you select an asset:
Top-of-the-bar Operations
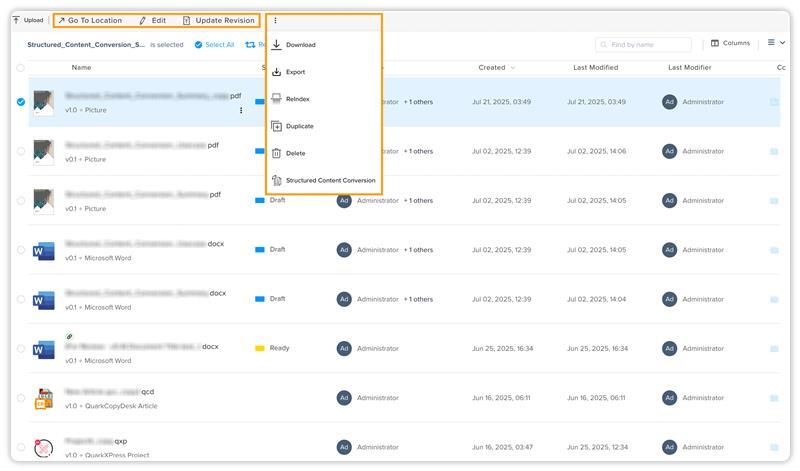
-
Go to Location: Opens the location where the selected asset is stored on the server on the Browse page.
-
Edit: Checks out the selected asset and opens the asset in the content editor of QPP for you to make edits.
-
Update Revision: Allows you to replace the version saved on the server with an updated version saved on your local machine.
-
Download: Downloads the selected asset to your local machine.
-
Export: Allows you to export/download a CSV file of the asset to your local machine.
-
Reindex: Re-indexes the file on the system (refreshes and reloads the file on the server).
-
Duplicate: Creates a copy of the file on the server.
-
Discard: Removes the checkout status of an asset.
-
Delete: Deletes the file from the server.
-
Structured Content Conversion: Converts your unstructured documents into structured format.
Quick Menu Operations
These options provide a few quick operations on the selected file, whose icons appear when you hover over a file. These options are as follows:
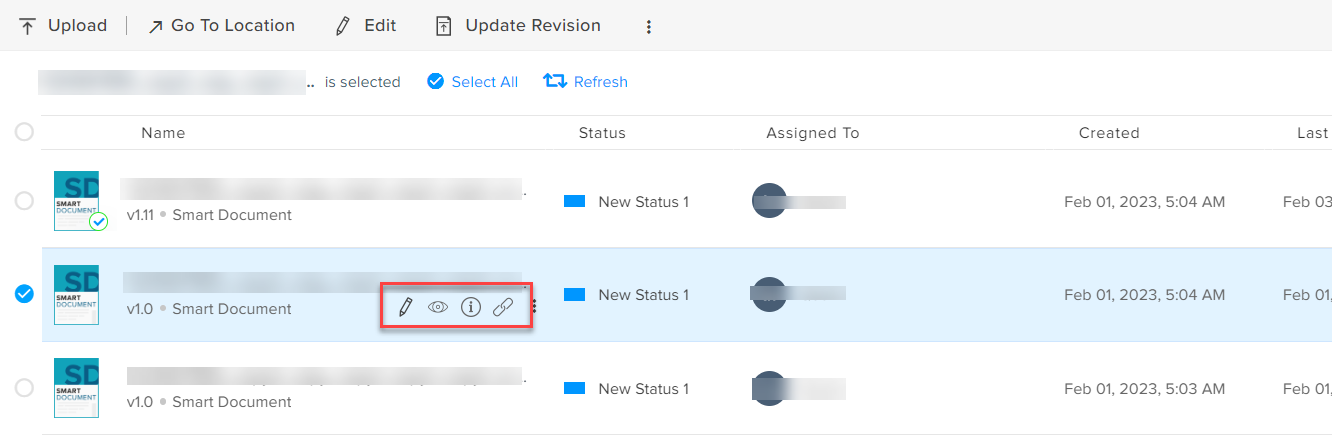
-
Edit (icon
 ): Checks out the selected asset and opens the asset in the content editor of QPP for
you to make edits.
-
Preview (icon
 ): Opens the Asset Details pane (on the right-hand side of the page) to display the preview of the selected asset.
-
Attributes (icon
 ): Opens the Asset Details pane to display the properties (metadata) of the selected asset.
-
Link (icon
 ): Opens the Asset Details pane to display the links and references in the selected asset.
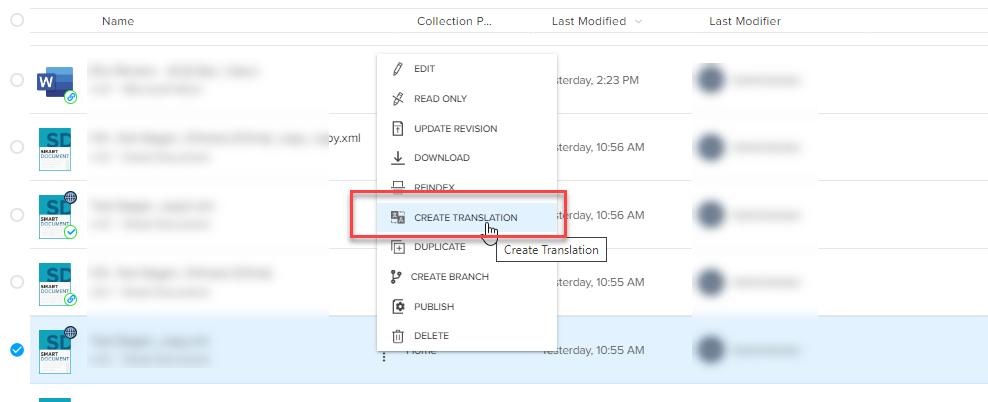
Additionally, the kebab menu icon next to the quick menu icons expands a context menu that contains the same set of operations as in the top-of-the-bar, except the operations Rename and Create Translation, which is visible only when a translation configuration is enabled for the document.
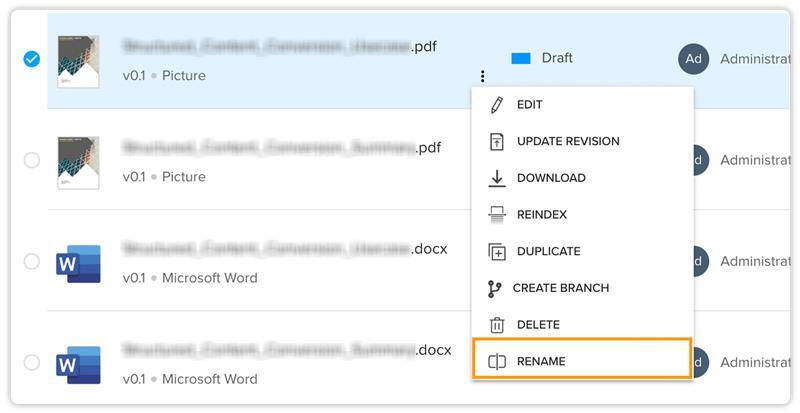
To rename an asset
-
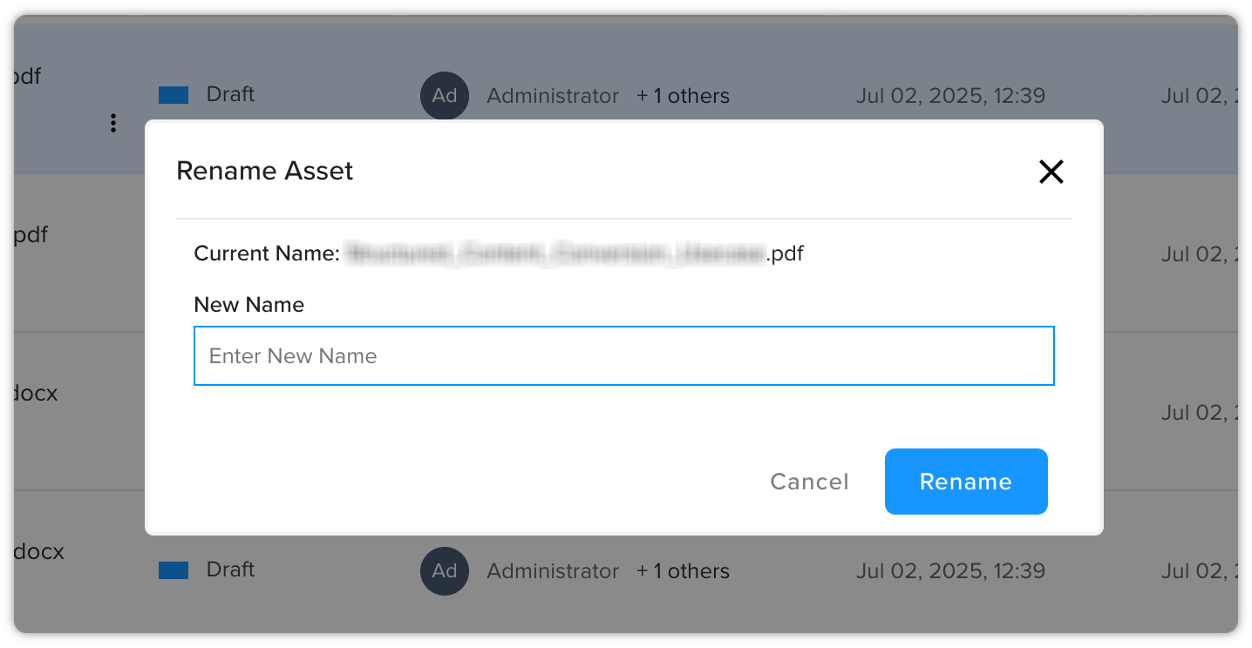
To rename a document on My Assignments page, simply hover over the desired document and click the kebab menu and then click Rename.
-
This will open the Rename Asset dialog box where you need to enter a new name for your asset. Click Rename.
Create Translation
The Create Translation kebab menu option allows you to create a translation for a document based on the translation configurations available for the document. Creating a translation here means assigning the tasks of translation to another user (who is responsible for creating translations in your organization). The process is as follows:
-
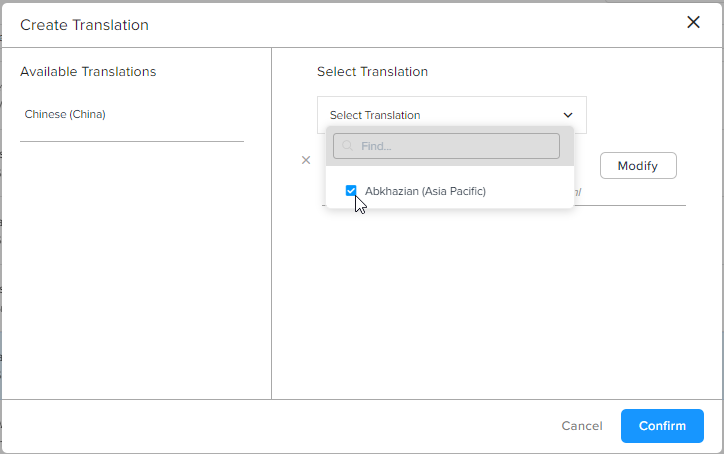
Click Create Translation in the expanded kebab menu of a listed document to open Create Translation dialog.
-
In Create Translation dialog, select a translation configuration based on which you want to translate your document.
-
Click Confirm to initiate the translation task.
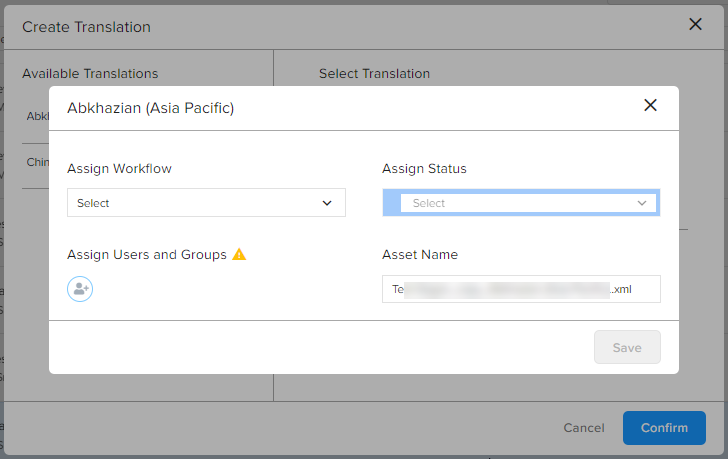
The Create Translation dialog also displays the list of available translations in the left pane to prevent you from creating a copy of the same translation. However, if the source document contains some updates and you want to create the same translation again, select the same translation configuration and then select the option Override Changes to translate the updated component only or select the option Override All to translate the entire document again.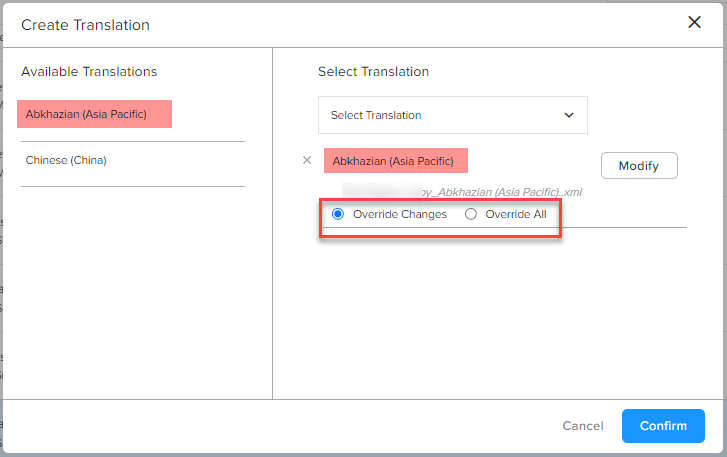 Also, if you want to modify the configuration (workflow status and assigned user/group), select the button Modify and then make changes as required.
Structured Content Conversion
The Structured Content Conversion feature automatically converts unstructured PDF and DOCX documents into structured content elements, such as titles, paragraphs, lists, tables, images, and hierarchical sections, fitting them perfectly into your predefined content models. For more detailed information on content models and their properties, refer to the Content Models section.
Initiating Structured Content Conversion
You can perform structured content conversion on both single and multiple files.
-
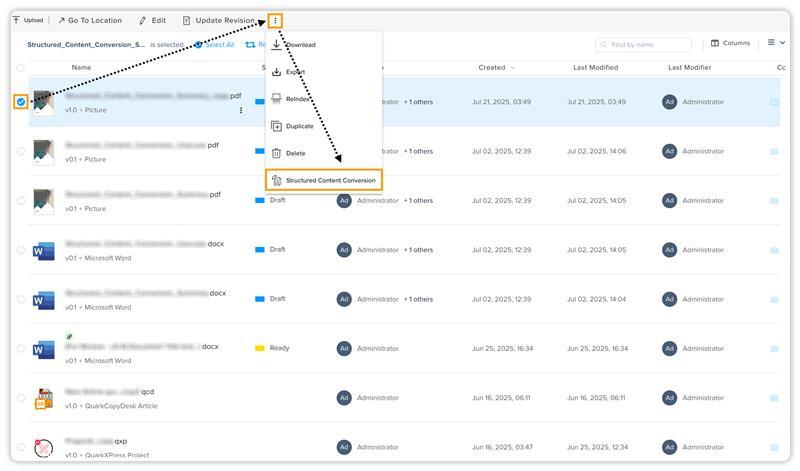
For a single file:
-
Click the desired file within the system.
-
Click the Kebab menu (three vertical dots) icon in the Top-of-the-bar Operations.
-
Select Structured Content Conversion from the dropdown menu.
-
-
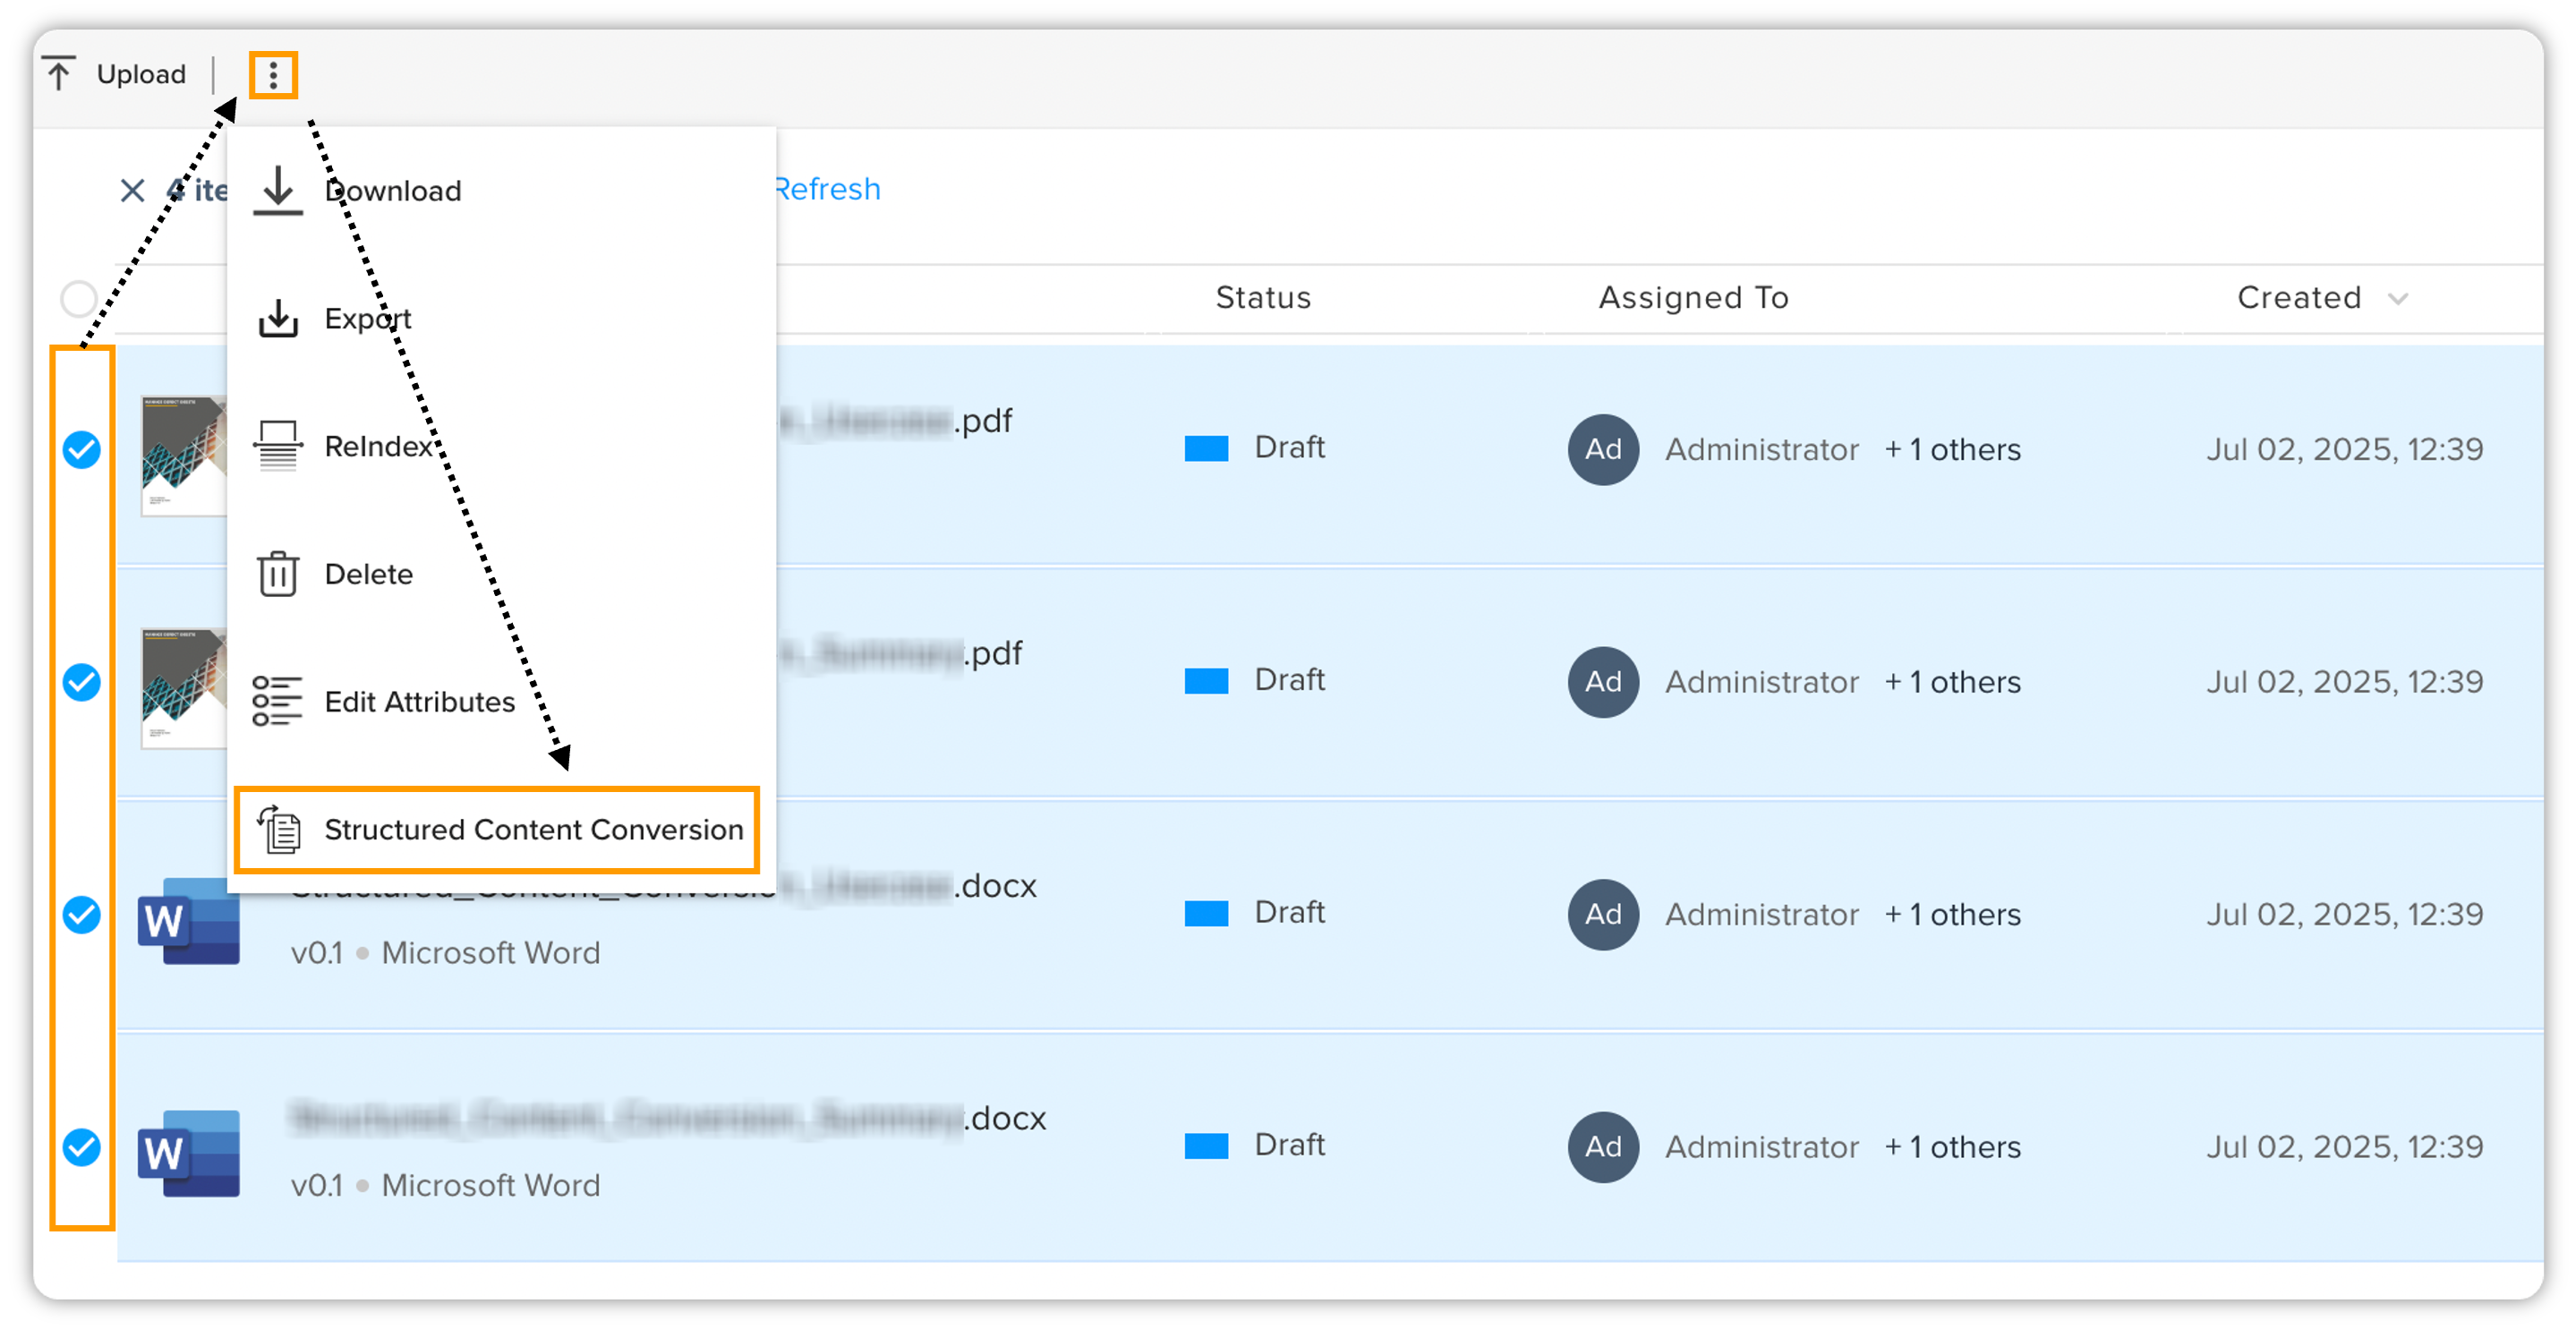
For Multiple files:
-
Select the files you wish to convert.
-
Click the Kebab menu (three vertical dots) icon in the Top-of-the-bar Operations.
-
Select Structured Content Conversion from the dropdown menu.
-
Review and Convert Documents
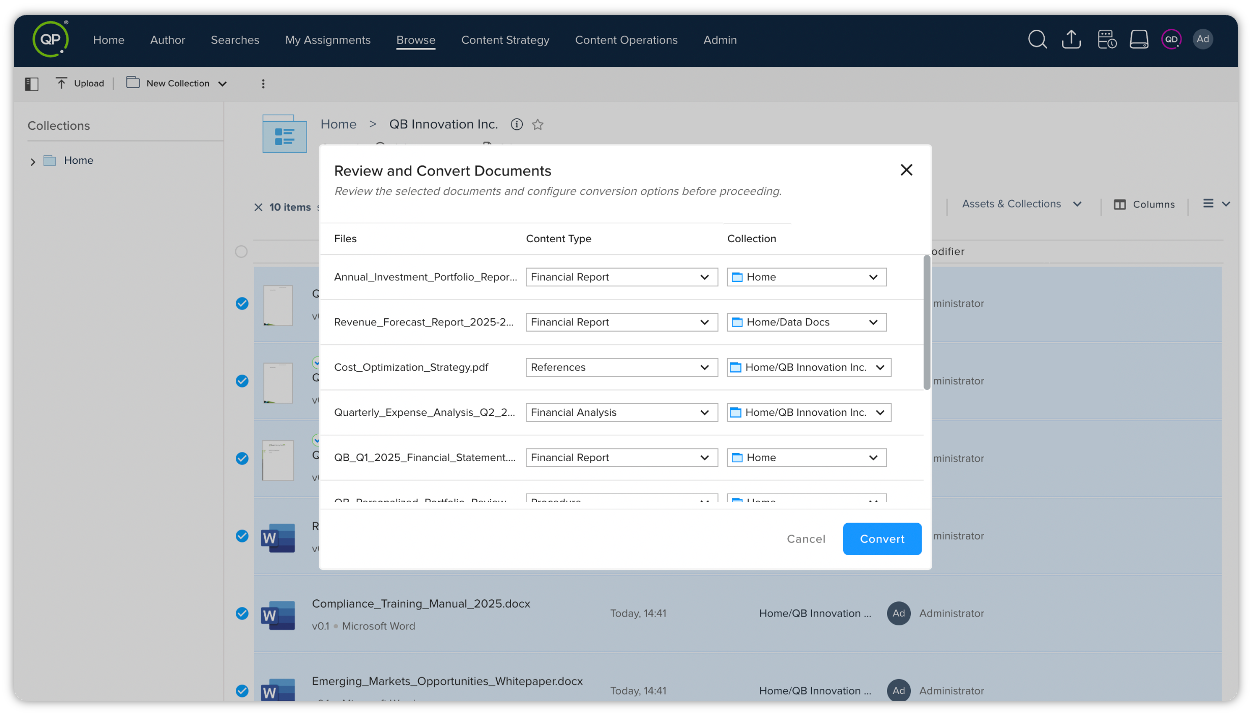
Once you click Structured Content Conversion, the Review and Convert Documents pop-up window will appear.
-
Your selected files will be listed in this window.
-
The system will automatically begin detecting the content type for each document. This process typically completes within a few seconds.
-
Review the detected content types displayed for each file. If necessary, you can modify the suggested content type before proceeding. Additionally, you can also change the collection path, i.e. where you want to save those converted documents.
-
Once you are satisfied with the detected content types, click the Convert button.
Monitoring Conversion Progress
-
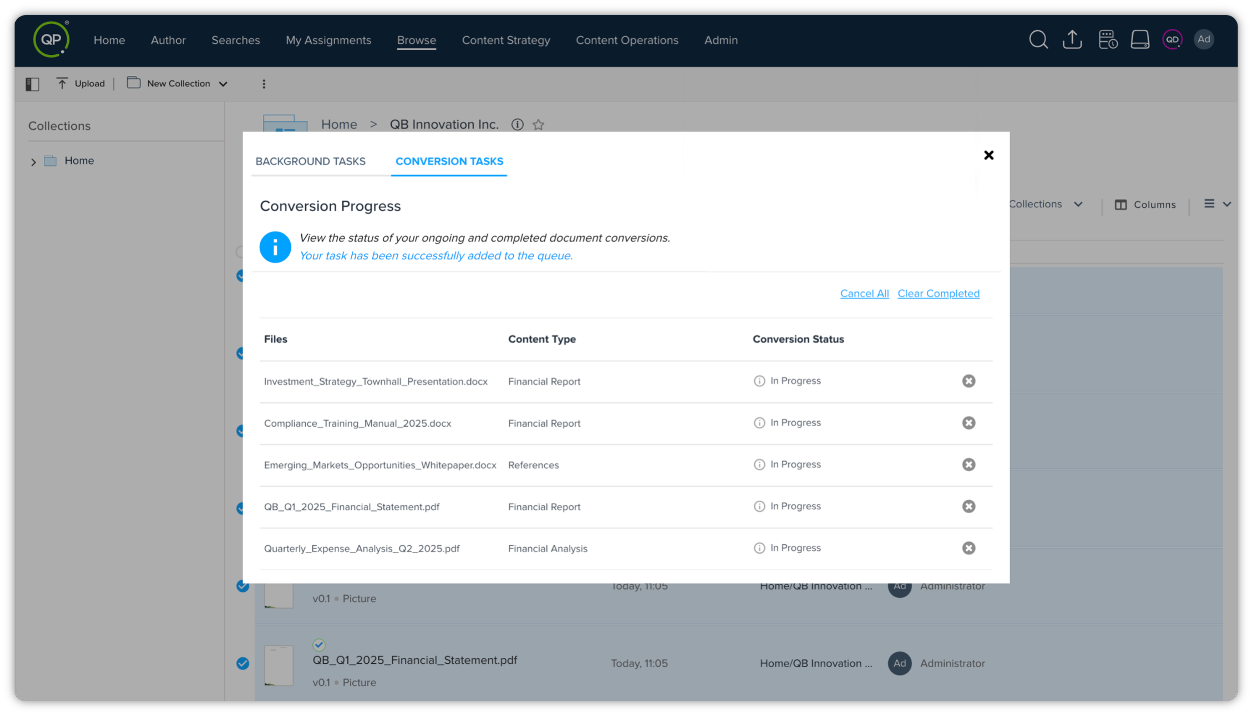
Upon clicking Convert, the system will initiate the conversion process. A new screen will appear, displaying the conversion progress.
-
Navigate to the Conversion Tasks tab on this screen to view the status of your ongoing conversions.
-
Refer to the Conversion Status column to track whether a specific conversion is completed.
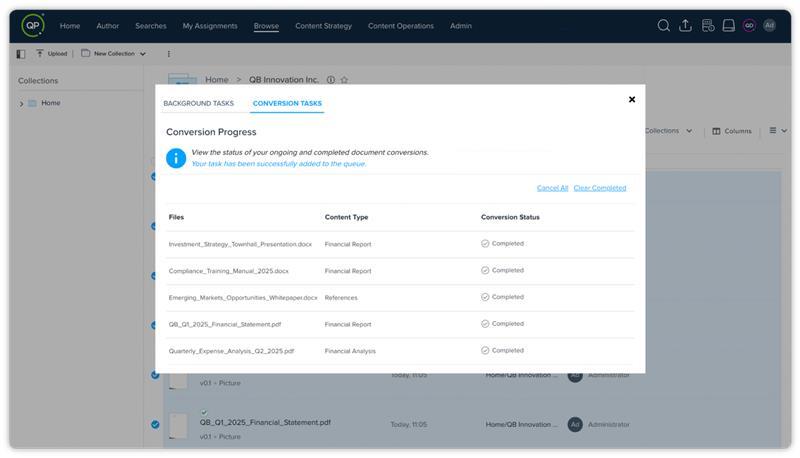
Once the documents are successfully converted, you can go to the location where they are saved and open them in Quark Author.
Known Limitations
The Structured Content Conversion feature delivers substantial automation for transforming unstructured documents into structured formats for regulated and complex content. While the feature will continue to evolve in upcoming releases, a few known limitations exist in specific document types or complex formatting scenarios in the current release:
-
Table: Certain documents with borderless tables may result in merged table content or incorrect table structures.
There will be no content loss, and a human-in-the-loop can review and update table formatting. -
Nested Lists or Numbered Lists: Nested list indentation is currently resolved as first-level items and would require a human-in-the-loop to review and correct the indentation.
-
Content Flow in Multi-Column Layouts: Complex layout structures like multi-column or overlapping layouts may lead to sequencing of content elements.
This should be reviewed by SMEs, as PDFs often do not contain enough information for the AI to accurately deduce the sequence. -
Specialized Document Elements: Current processing does not fully support citations, formulas, or specific layout nuances (e.g., table notes, hyperlinks).
These are scheduled as part of the product roadmap. -
Edge Case Formatting Variations: In rare instances, images used as bullet icons or placed inside table cells may not convert. Similarly, certain content may be inaccurately detected as table of contents, leading to skipping of content. Some edge cases page headers/footers, and main body content may not always be precise.
Some specialized formatting cases may affect how specific content is processed. For example:
-
Small icons or images within tables may be excluded during conversion in certain scenarios.
-
While list content is imported successfully, nested lists are currently flattened to the first level. Recognition of complex or custom bullet marks may result in those items being treated as standard paragraphs.
-
Manually formatted elements resembling a Table of Contents — such as glossaries or one-line summaries at the beginning of a document — may not be consistently recognized and could be excluded from the structured output.
These are scheduled as part of the product roadmap.
-
These limitations are observed only in a small subset of documents with highly specialized formatting or content structures.
Generic Page Operations
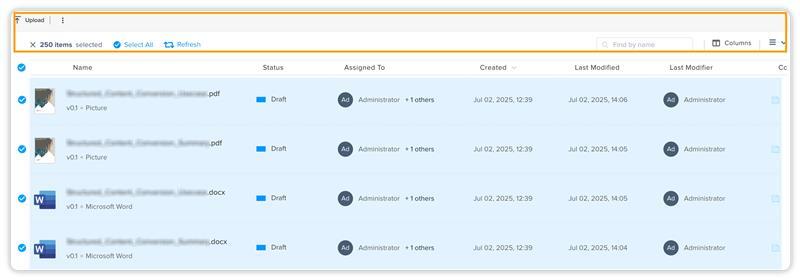
On My Assignments page, you can perform the following operations.
-
Upload: Allows you to upload a file/folder from your local machine to the server.
-
Select All: Allows you to select all the listed assets.
-
See the total number of assignments.
-
Refresh: Allows you to refresh the results to include any recently assigned asset.
-
Search for an assigned asset by name.
-
View Options: Allows you to switch the view between list and grid, which is 'list' by default.
Icons
Some files in the repository can have an icon next that represents some specific state or properties associated with the file.
The following table lists these icons and what do they represent:
|
Icon |
Name |
Description |
|
|
Component |
Represents that the file is being used as a component in another document. |
|
|
Checkout |
Represents that the file is check-out and is enabled for editing. |
|
|
Branch |
Represents that the file has branches and which branch is currently selected. |
|
|
Translation |
Represents that the file has translations available, which on hover also displays the languages in which the translations are available. |




Asset Details Pane
The Asset Details pane displays key information about the selected assets and several operations you can perform on it. You can invoke the Asset Details pane from any of the listing pages in the following two ways:
-
Select the file name of the listed asset
-
Double-click on the blank area of a listed asset
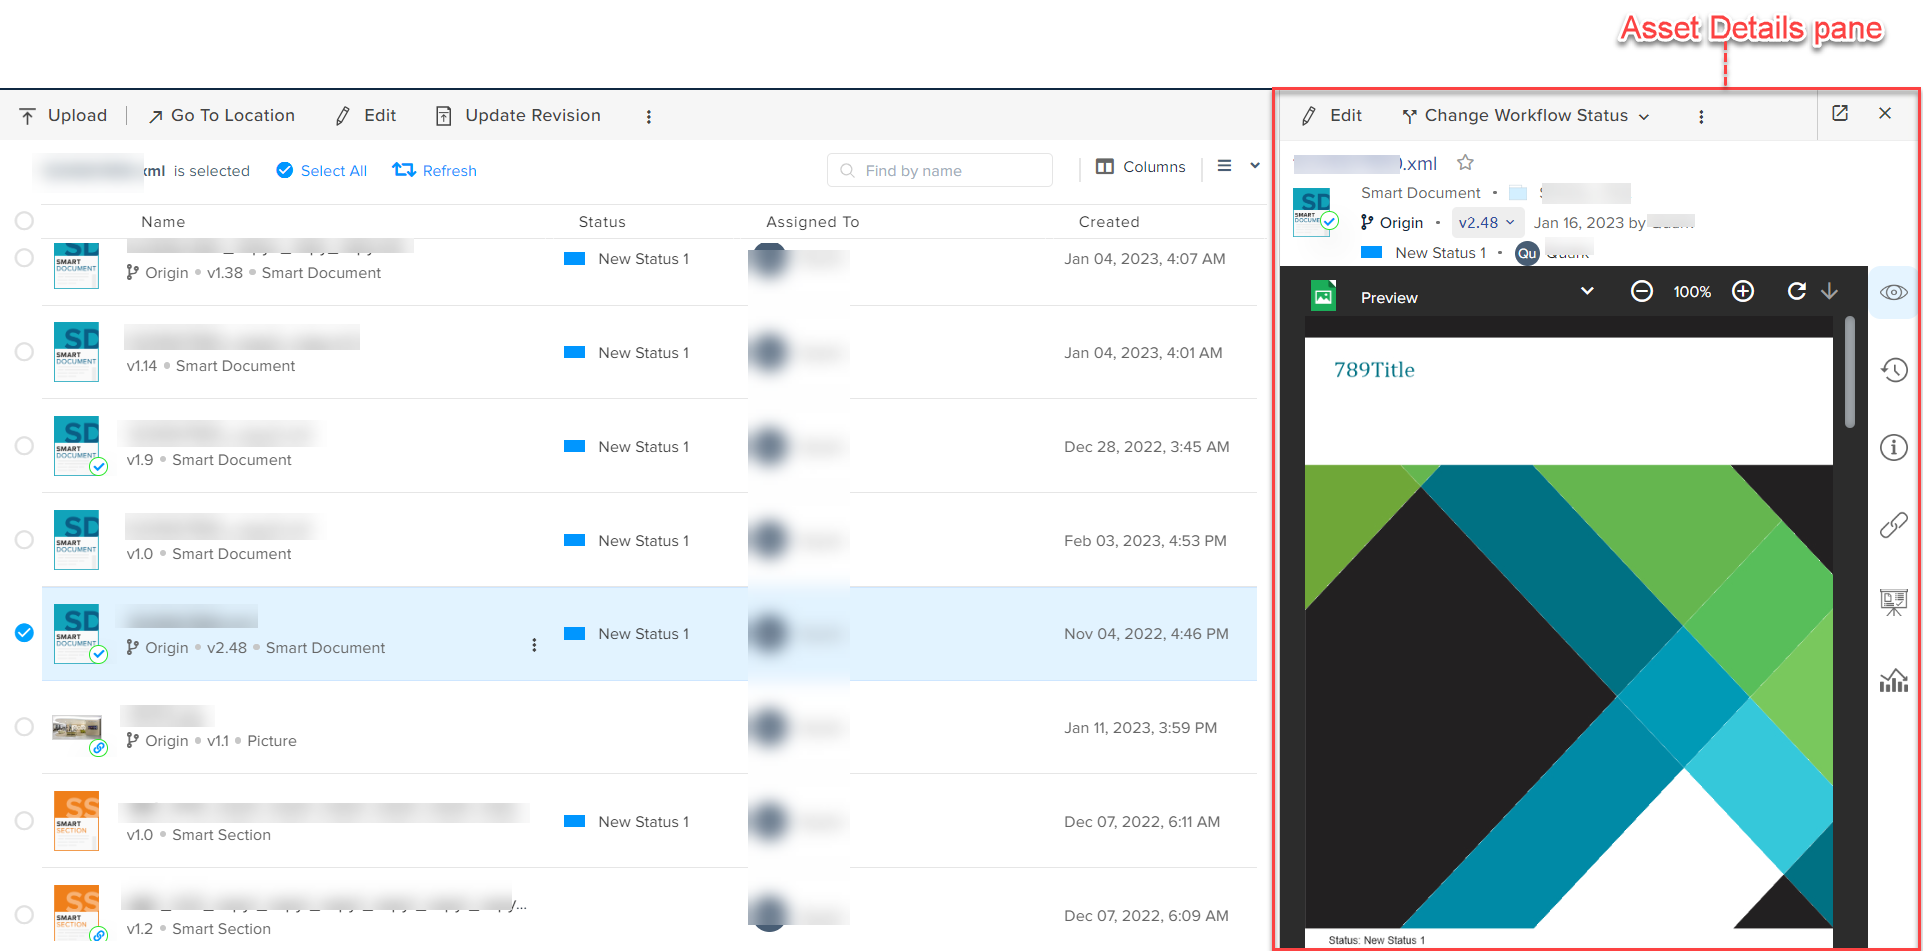
The following are the operations and key information items on the Asset Details pane, which for the sake of simplicity are classified as file information, file operations, and tabs:
File Information
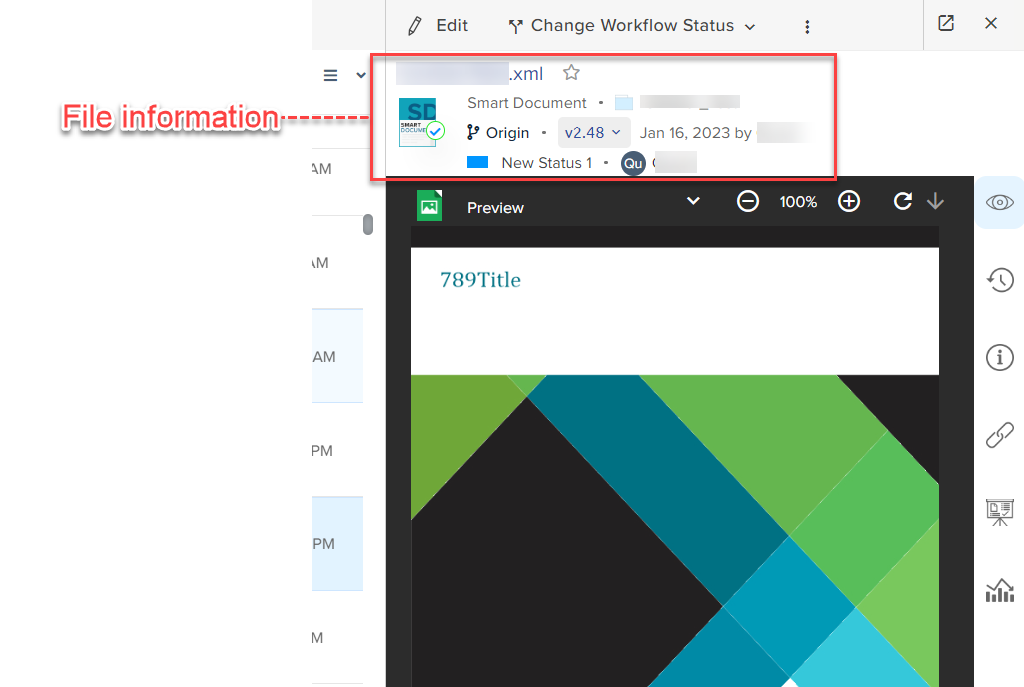
This section of the Asset Details pane displays the following generic information about an asset:
-
Asset name
-
 icon to mark the asset as a favorite
-
Content type of the asset
-
Collection folder
-
Branch
-
Version
-
Date of creation
-
Workflow status the asset is in
-
Author
File Operations
The Asset Details pane provides the options for the following file operations, some of which you have to invoke through the kebab icon:
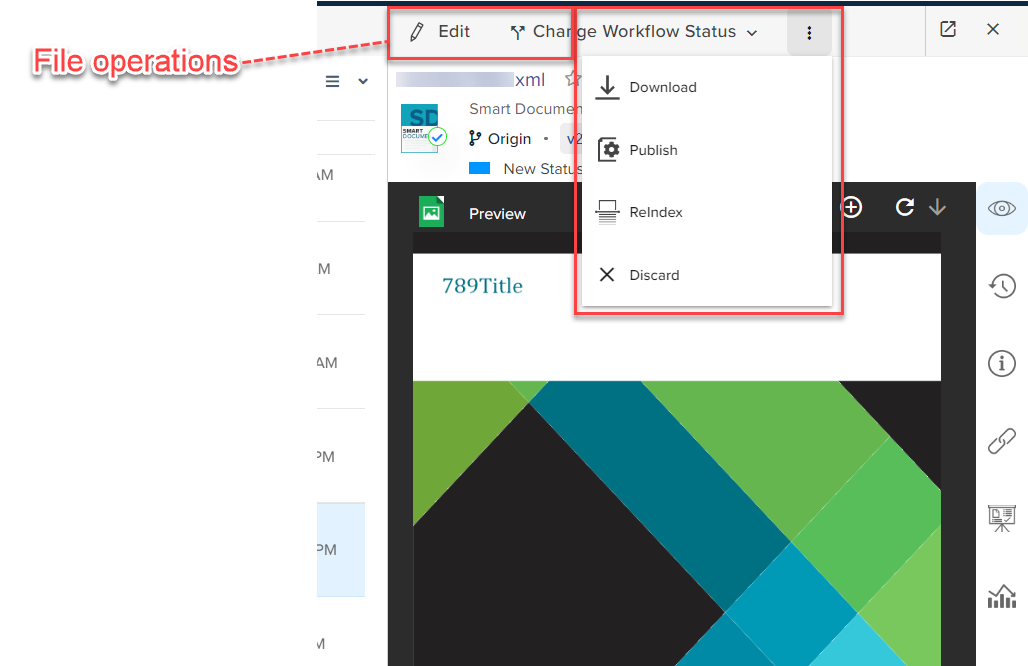
-
Edit: Checks out the selected asset and opens the asset in the content editor of QPP for you to make edits.
-
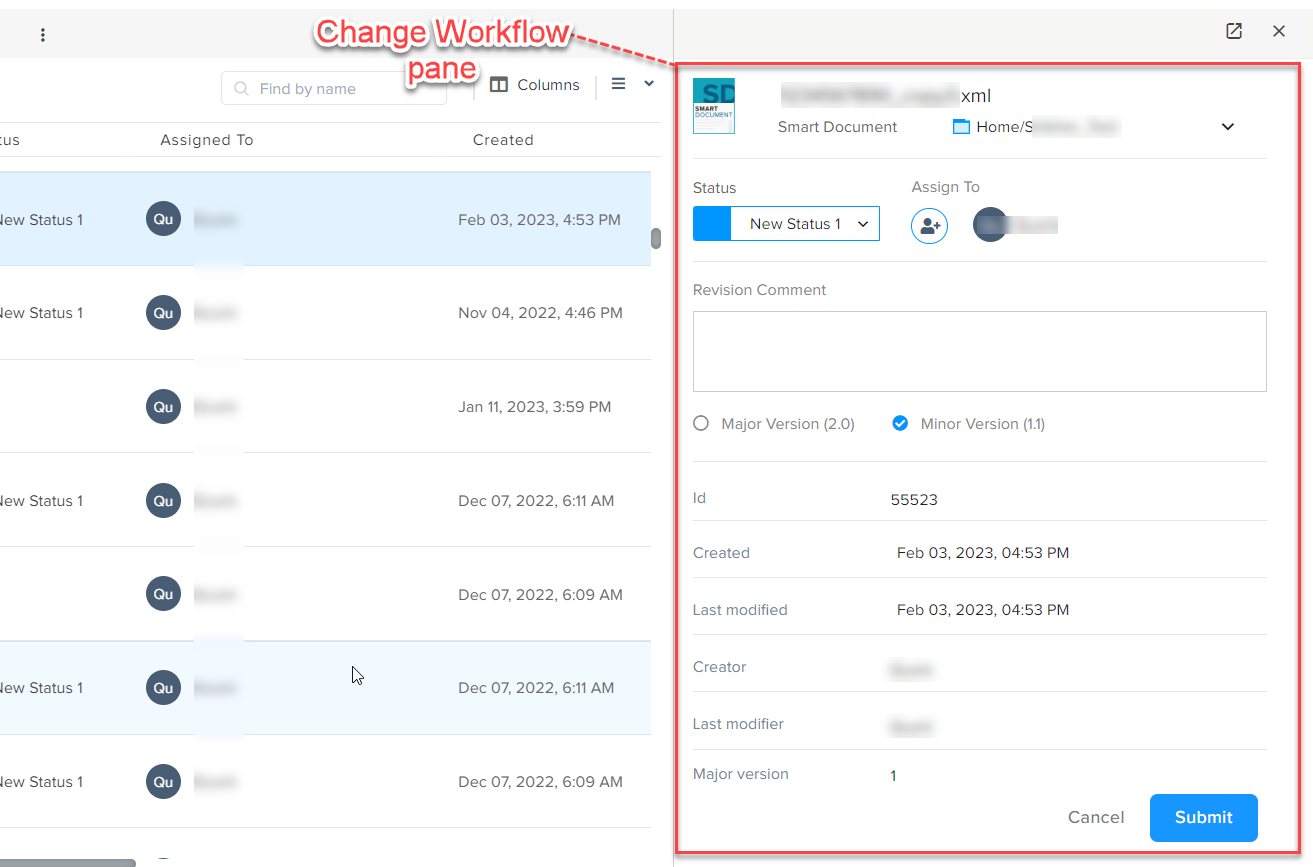
Start Workflow/Change Workflow Status: Opens the Change Workflow pane to allow you to change the workflow.
-
Download: Downloads the asset file.
-
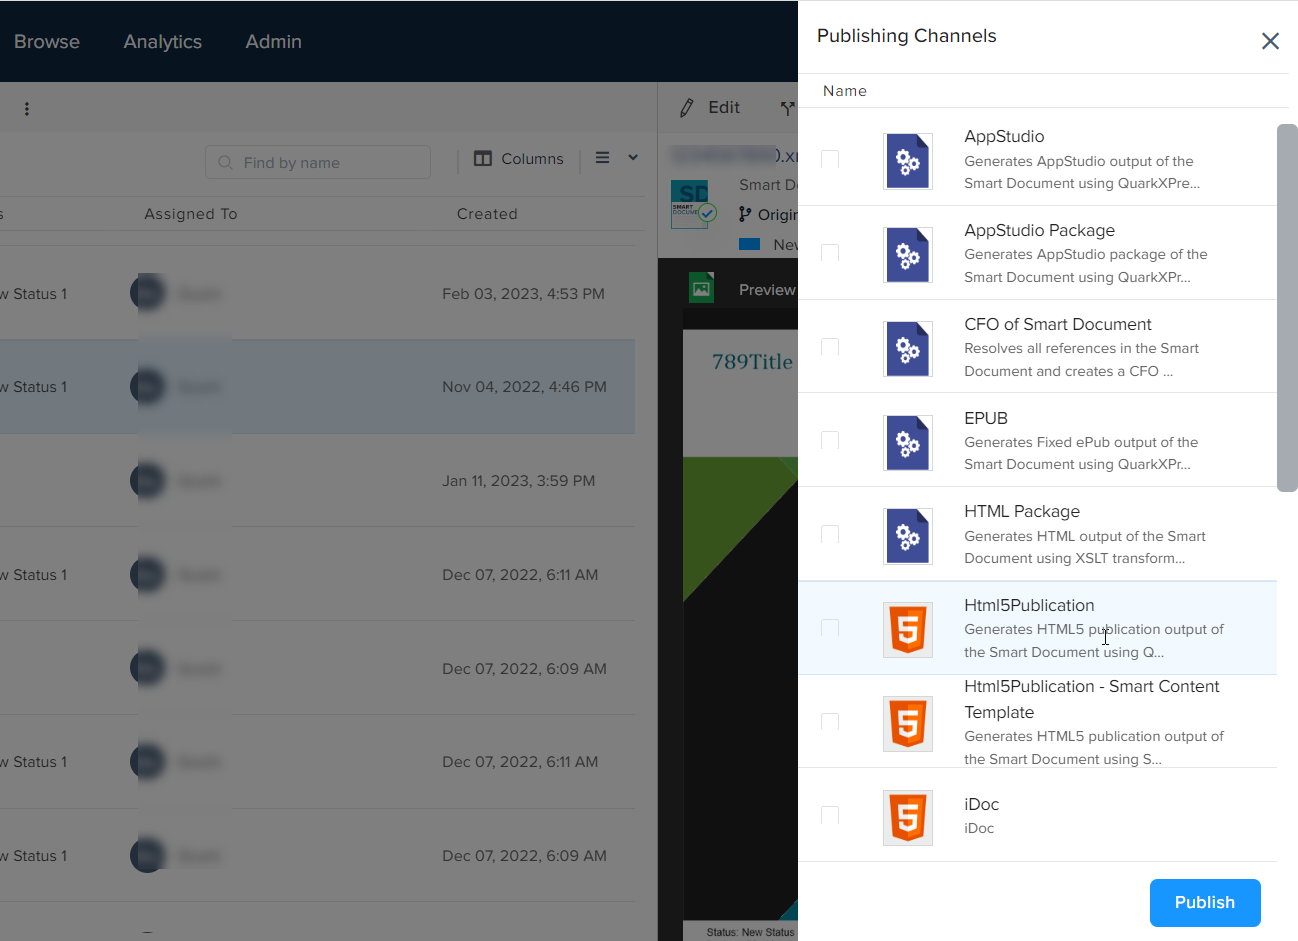
Publish: Opens the Publishing Channels pane to allow you to select a publishing channel to take an output.
-
Reindex: Re-indexes the asset and reflects the latest changes.
-
Discard: Cancels the checkout status and checks in the asset to the server.
Tabs (Panes)
The Asset Details pane has the following tabs:
-
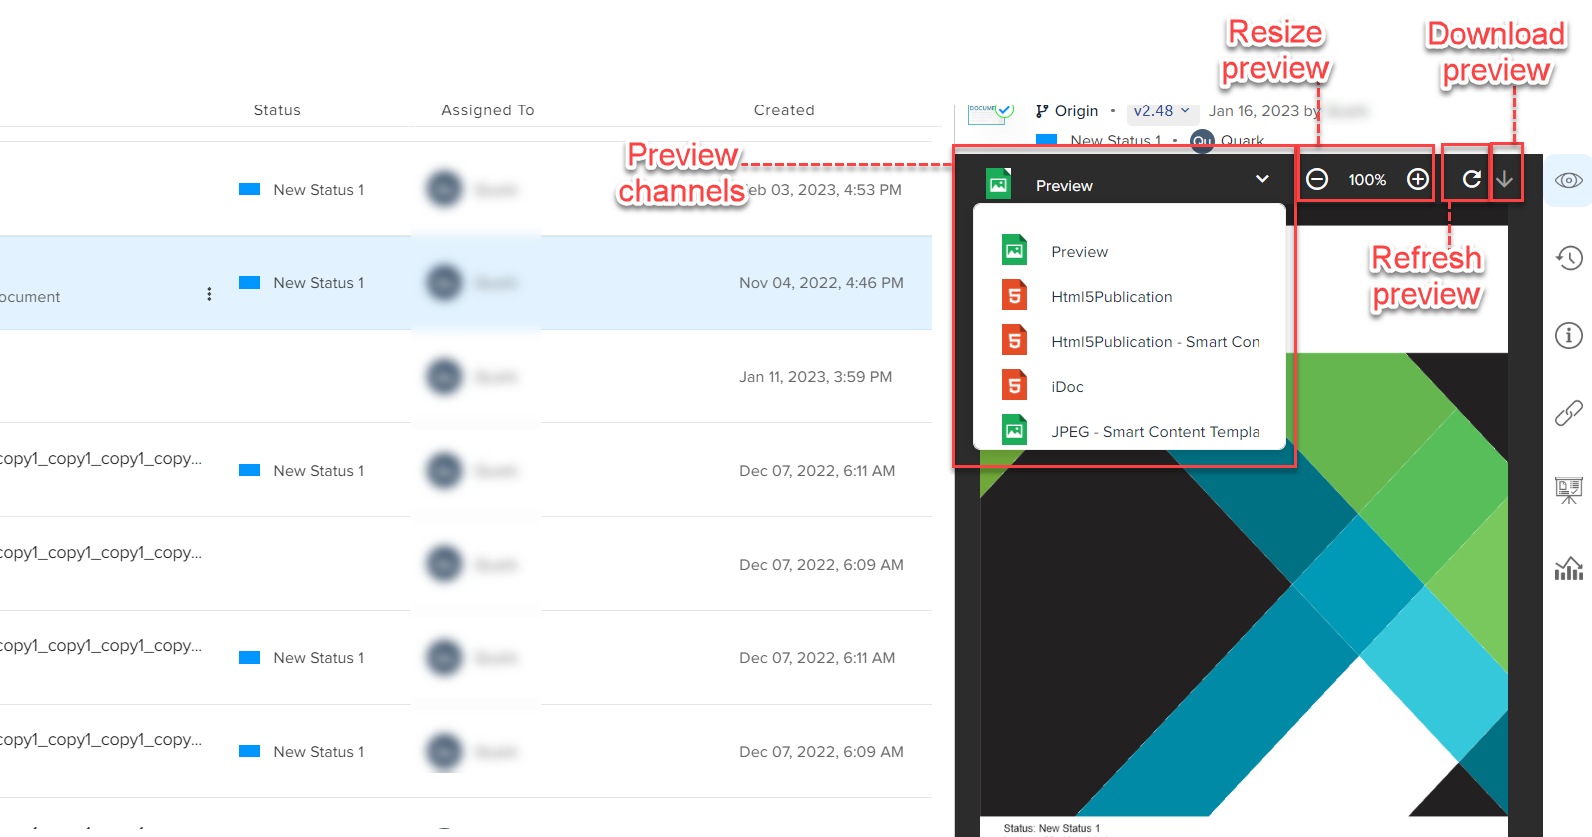
Preview: This allows you to preview a document in several formats (channels) and also provides a few related options such as resizing (zoom-in, zoom-out) the preview, downloading a preview, and refreshing the preview.
-
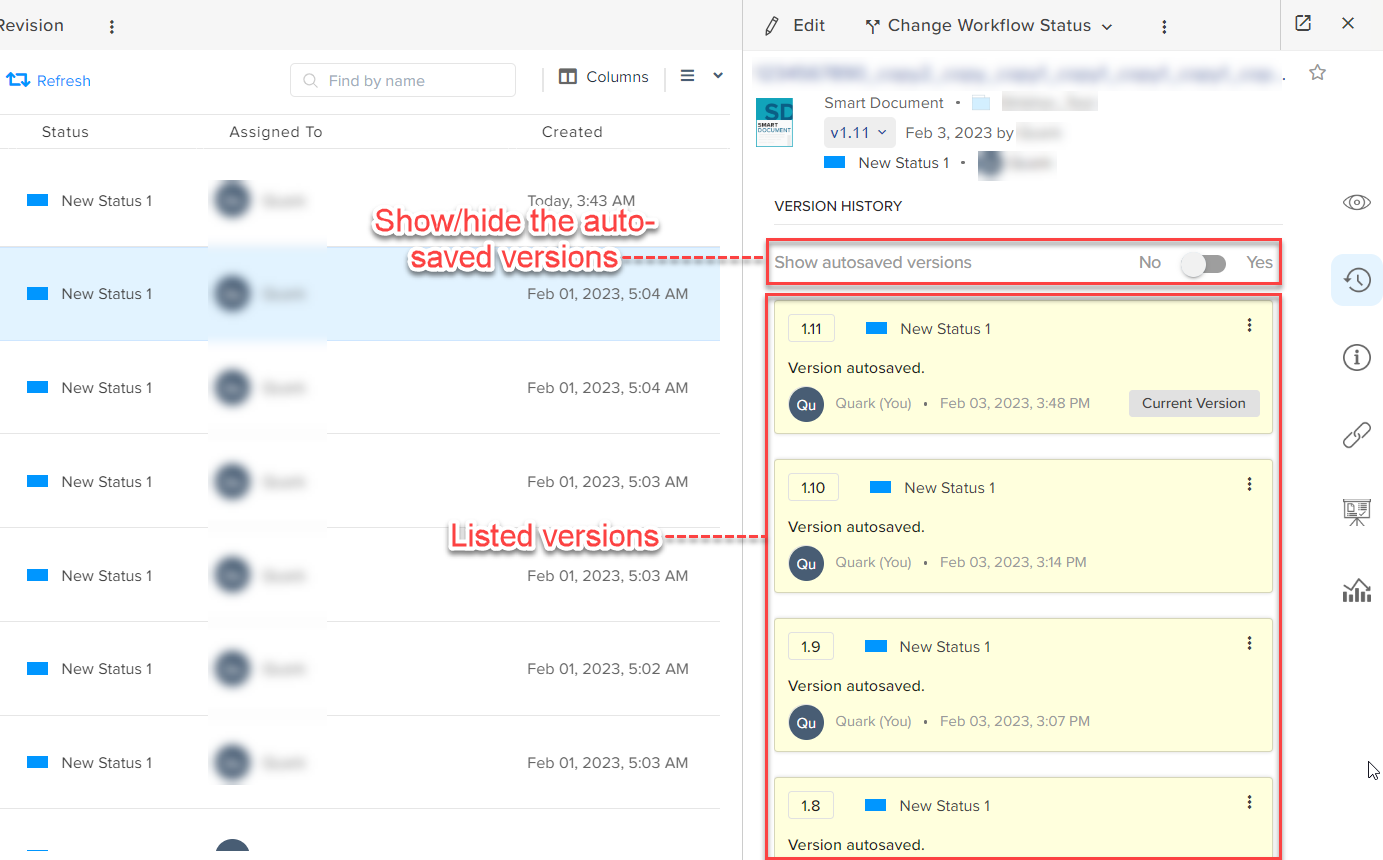
History: Displays all the versions of a document with the options to display the autosave versions. You can also revert to an earlier version in the same manner as described in the section Author > App Panes > History.
-
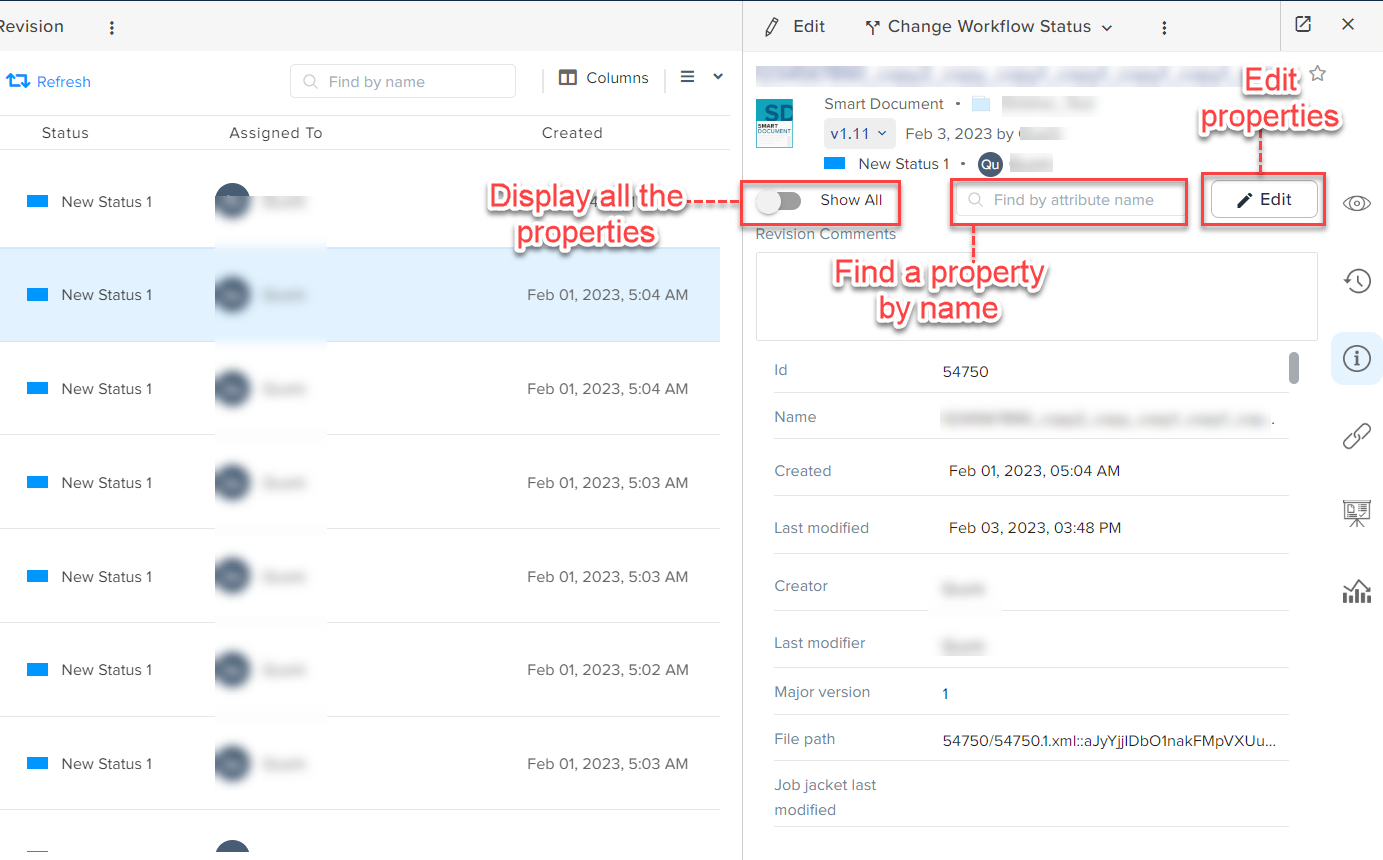
Properties: Displays all the properties (metadata) of a document with the options to edit properties, to display all the properties associated with a document, and to search for a specific property by name.
You can check document statistics without opening the document in Quark Author. This provides a faster and more convenient way to view key statistics, such as Word Count, Character Count, Paragraph Count, and Character Count Without Space, directly from My Assignment interface.
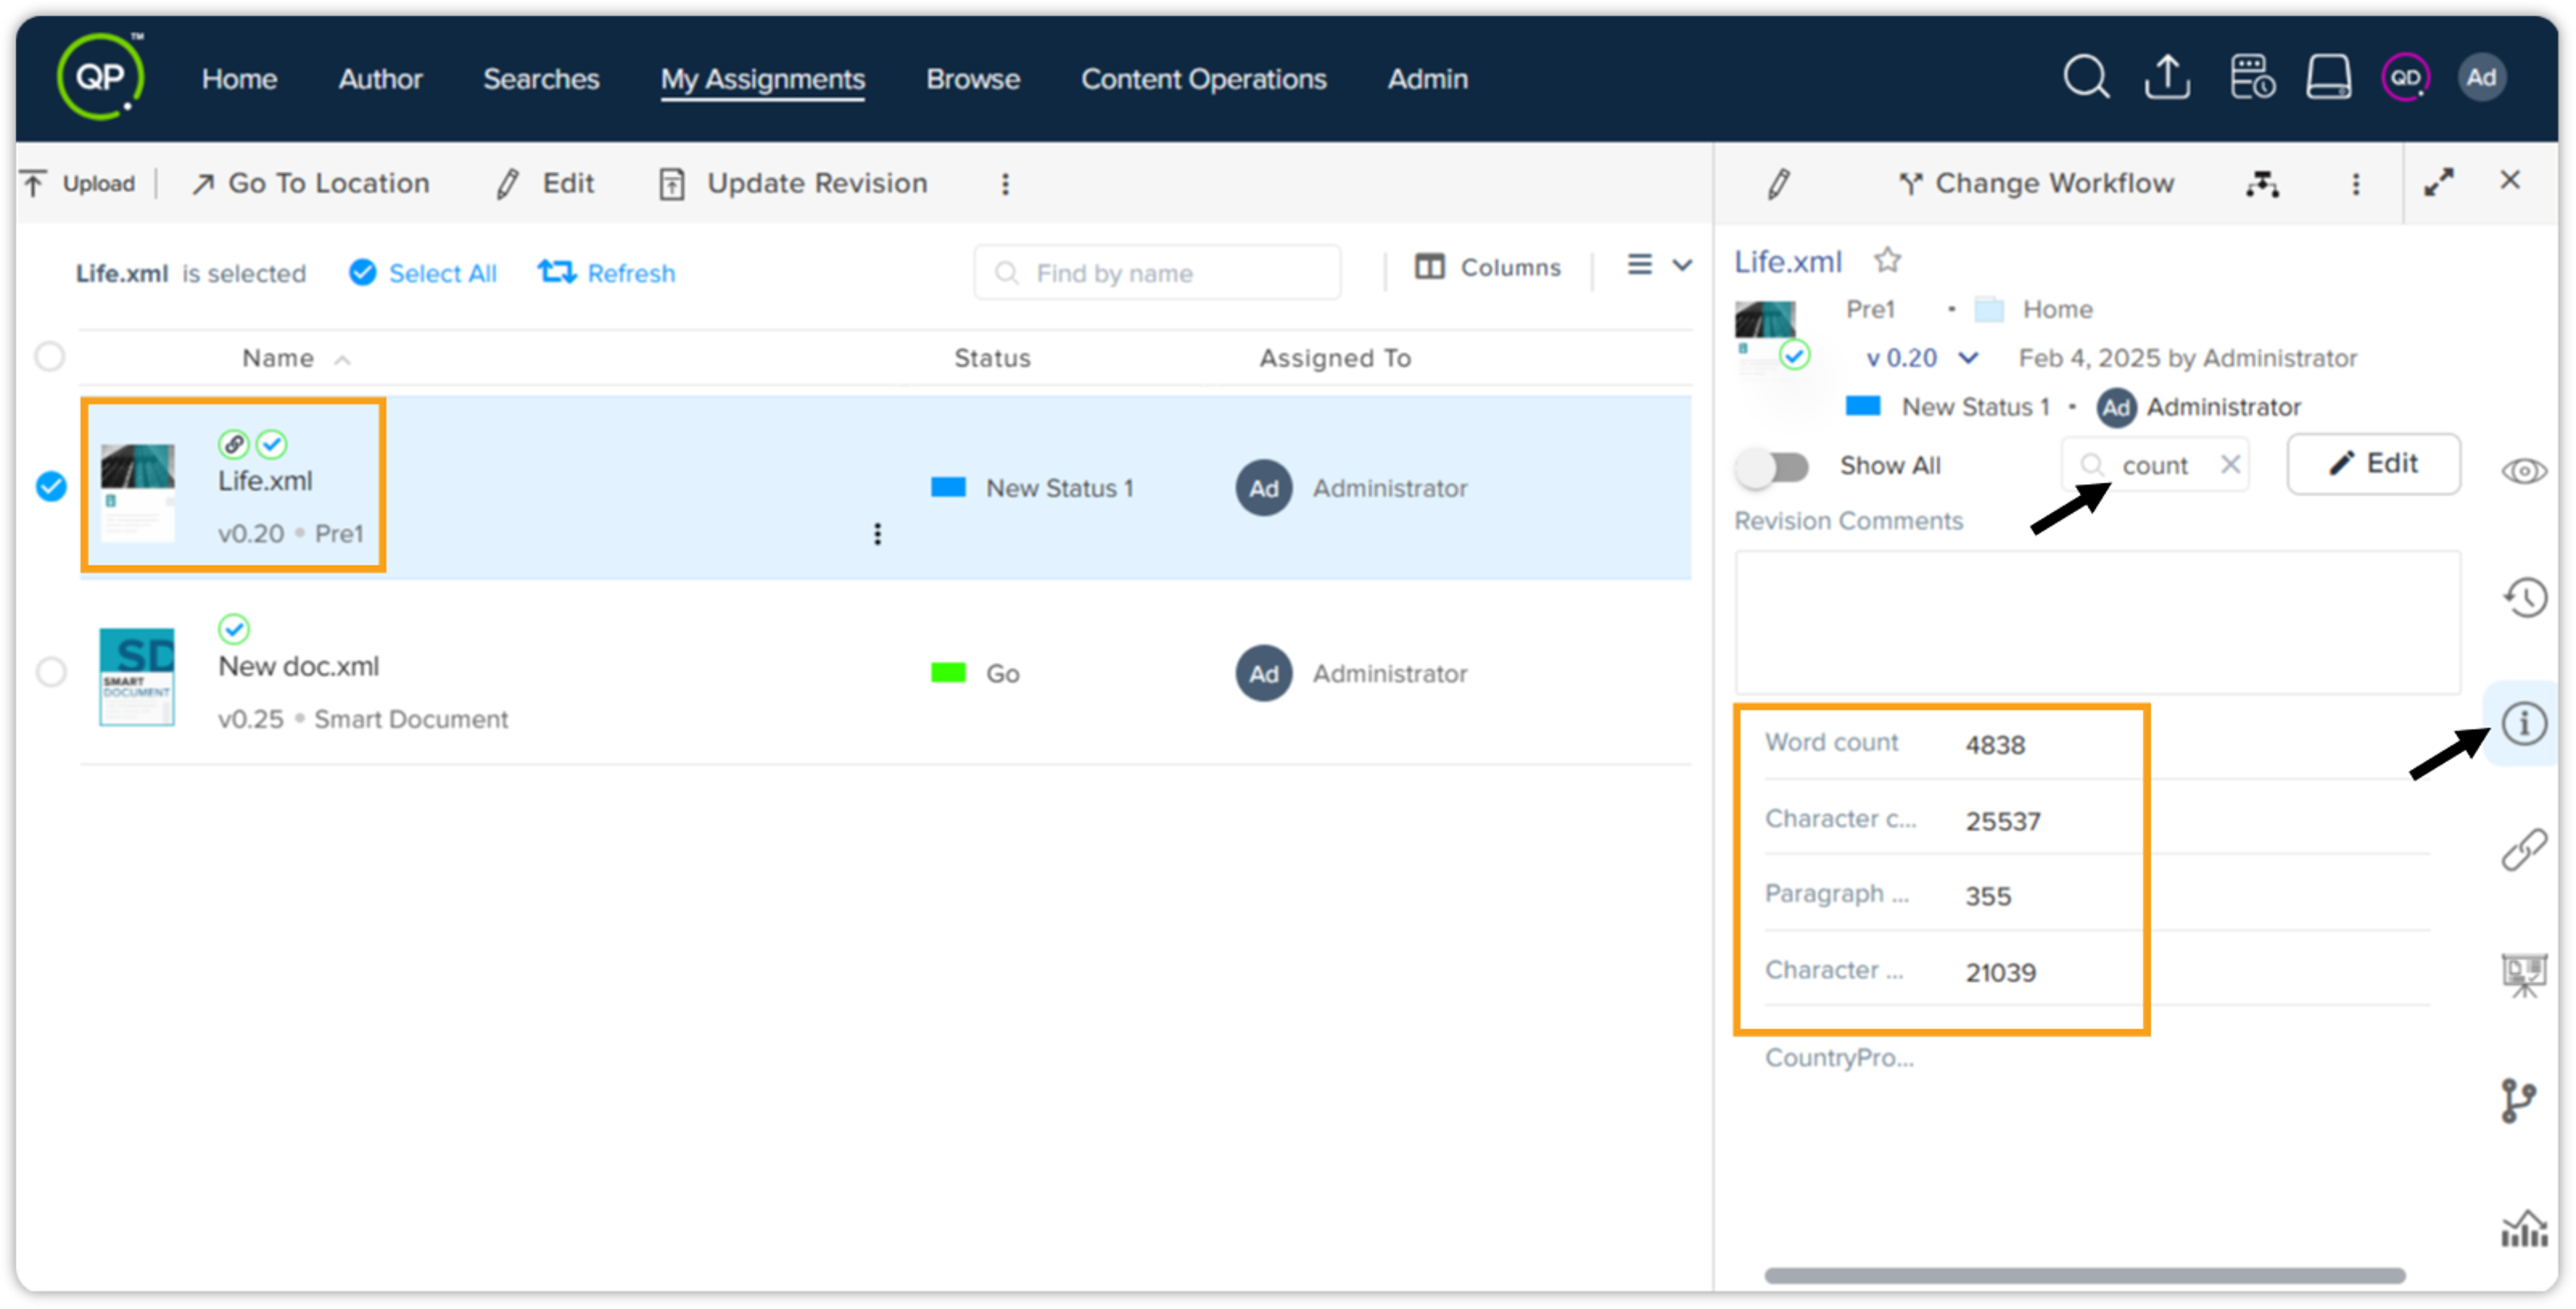 These key statistics can also be viewed from the Browse and Search windows.
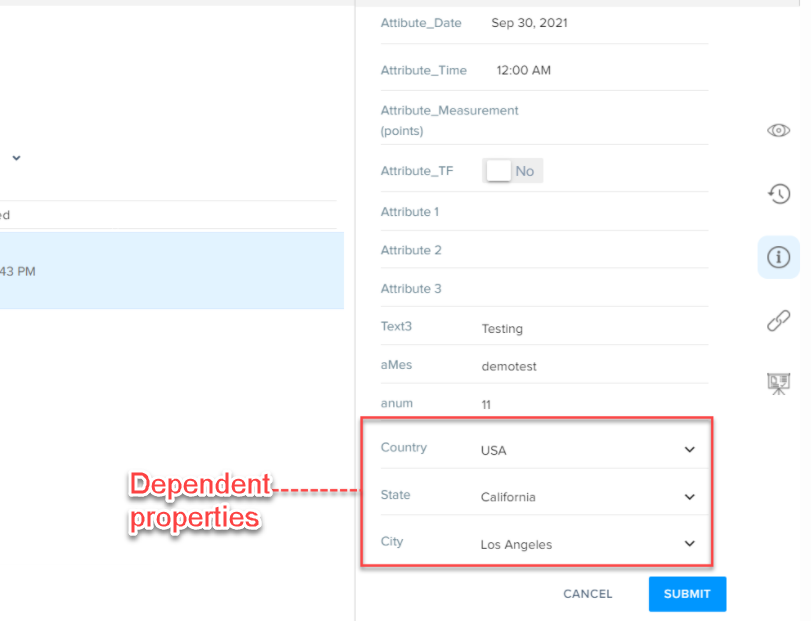
When you select the button Edit, QPP opens the Edit Asset pane in which all the properties are editable. You can edit the properties you want to change and then select the button Submit to implement the changes.
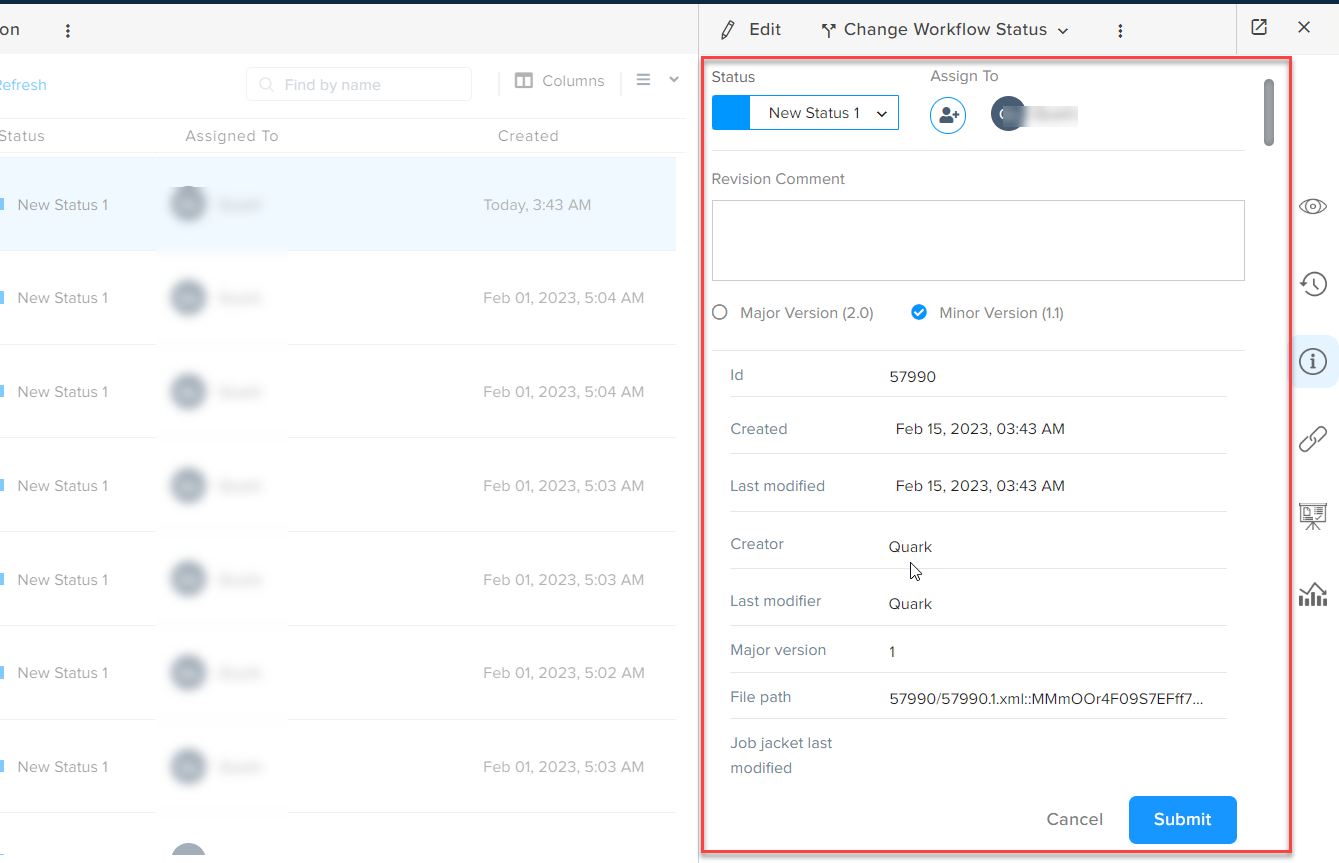 Some properties are dependent on another property. For example, when you select a value in the property Country, QPP automatically lists the states/prefectures from the selected country. The dependencies between properties can be hierarchical or peer-to-peer.
 You can configure QPP to not create a new version of an asset when you change asset properties, such as workflow status, Assigned To, and so on. For more information, see Appendix.
Additionally, you can edit common properties for several assets at once through the following process:
-
Select the assets for which you want to change some common properties/attributes.
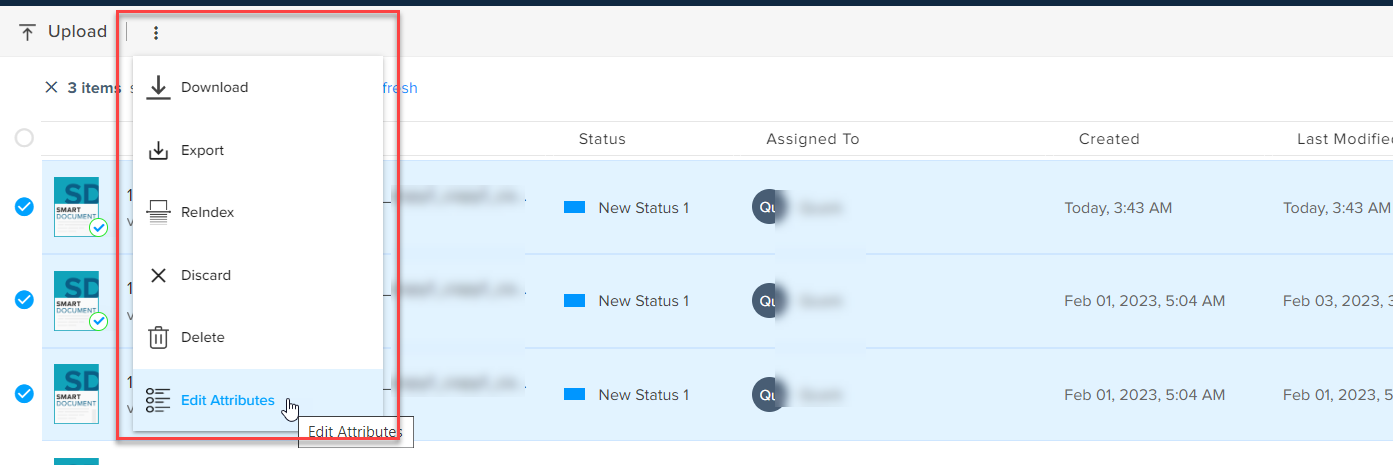
-
Expand the kebab menu in the top bar and then select the option Edit Attributes to open the Asset Attributes pane on the right side of the screen.
-
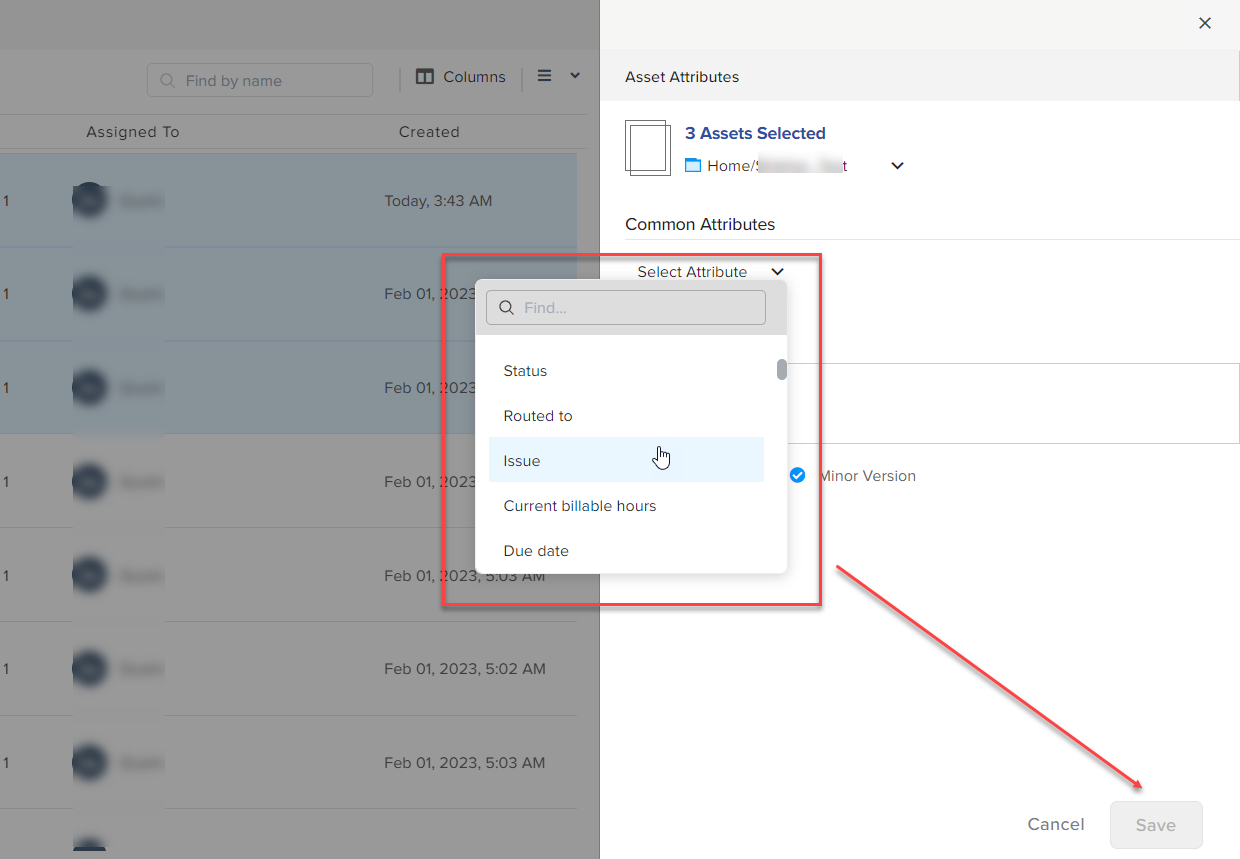
In the Asset Attributes pane, select the attribute you want to change from the Select Attribute drop-down menu.
-
Change the attribute's value and then select the button Save.
-
-
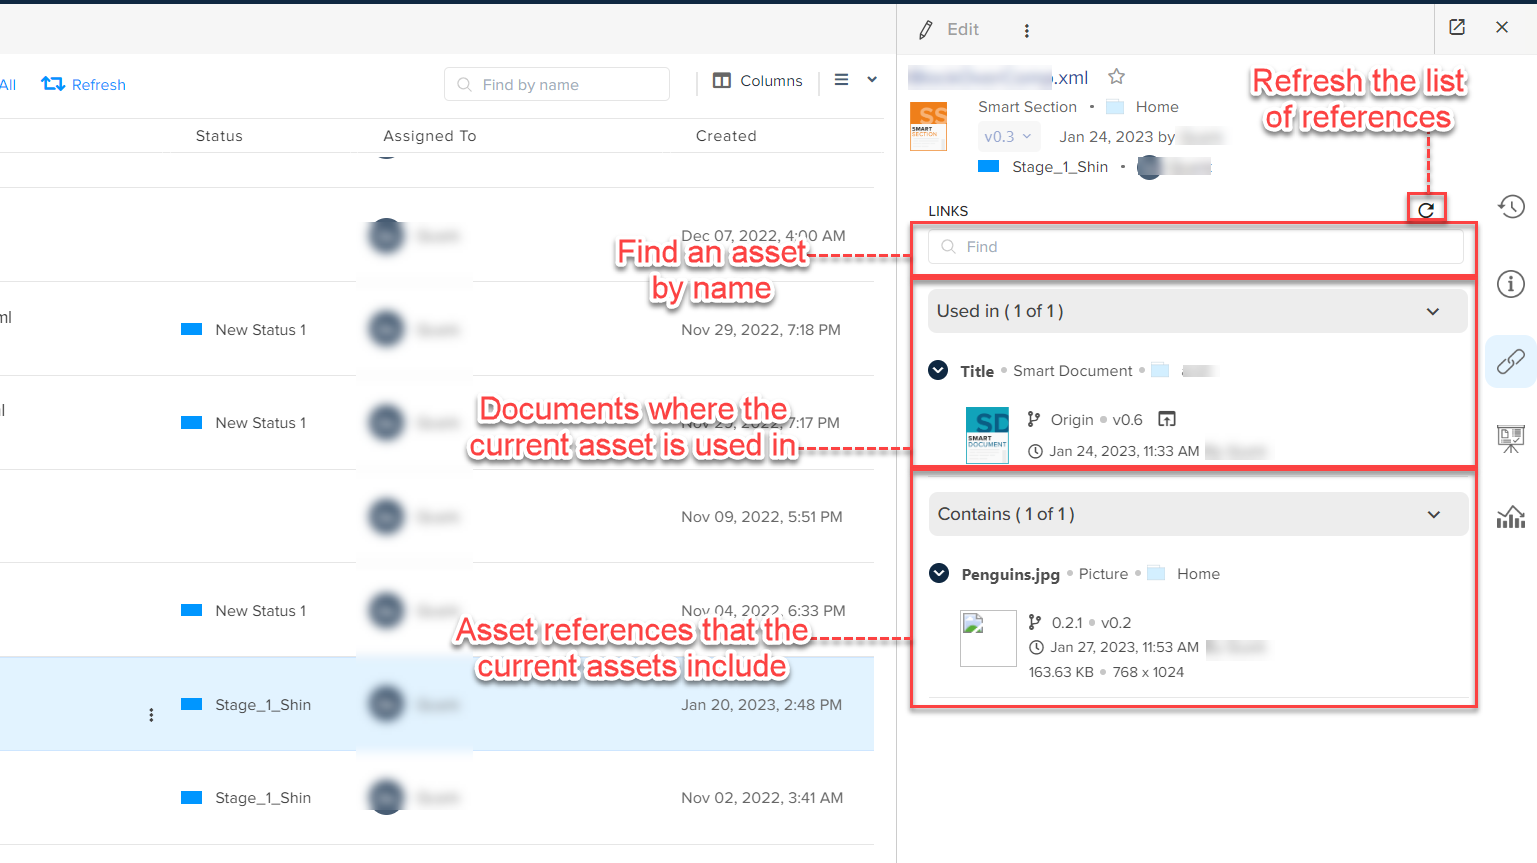
Link: The Link pane contains the following two paginated tabs:
-
References: Displays all the referenced elements from the server in a document and elements within the document that are referenced in other documents. You can also search for a linked or referenced component by name and directly open a linked or referenced asset by clicking on the name of the asset.
-
Translations: Displays all the translations available for a document.
-
-
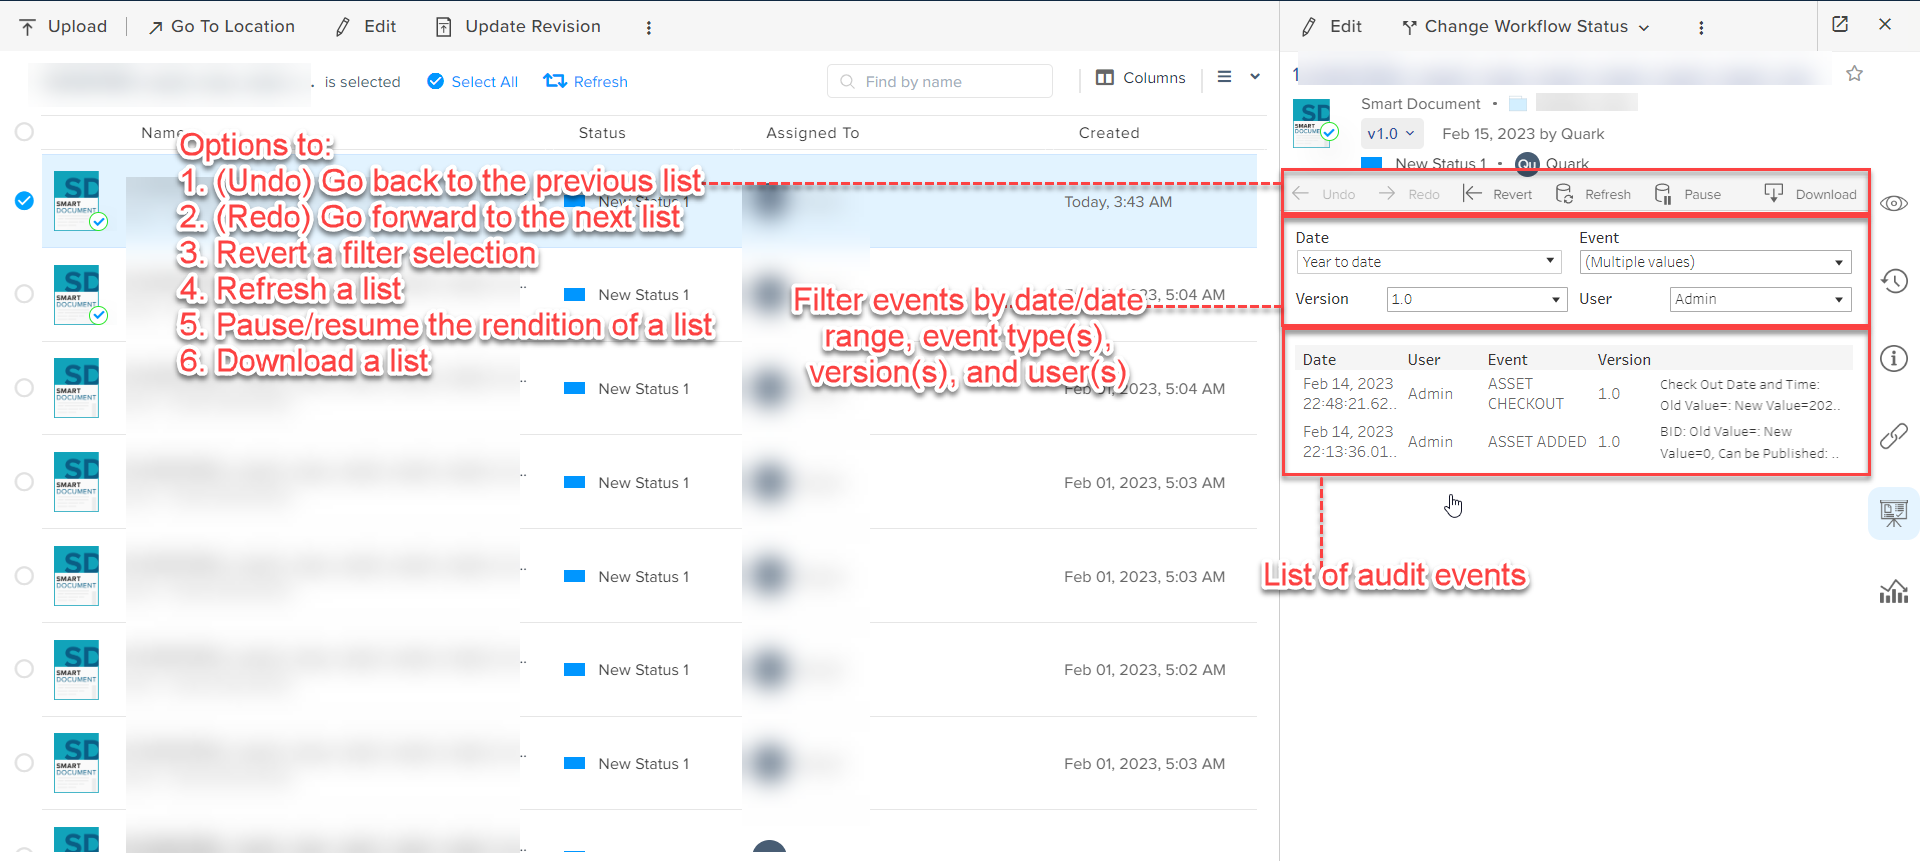
Audit: Displays all the events related to an asset, such as when you open an asset, close an asset, change property, and so on. Through the Audit pane, you can filter the results for events by date range, event type(s), version(s), and user(s). Additionally, there are options to go back forward between audit lists, revert a selection, refresh the list, and download the list as an image, data, Crosstab, PDF, PowerPoint, or Tableau Workbook file.
When you select the button Download, a popup to select the format.
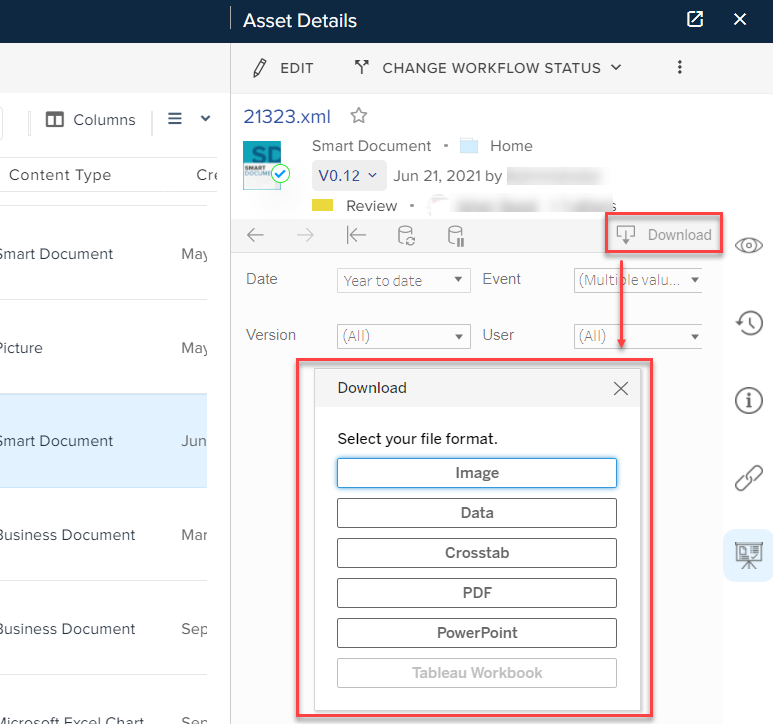 Some options in the Audit tab are Tableau-specific.
-
Trends: The Trends pane displays various section and document-level engagement statistics.