Admin
In our Quark Publishing Platform, the Admin tab provides a comprehensive array of options to customize and optimize your experience.
An administrator (user with administrative privileges) can change the system level and content level settings and reconfigure all the properties within QPP to manage the workflow for all the internal processes of the platform.
The Admin tabs are as follows:
Admin Homepage
The Admin Home tab contains several statistics to check the productivity of the platform, license information, and quick links to access the other Admin tabs.
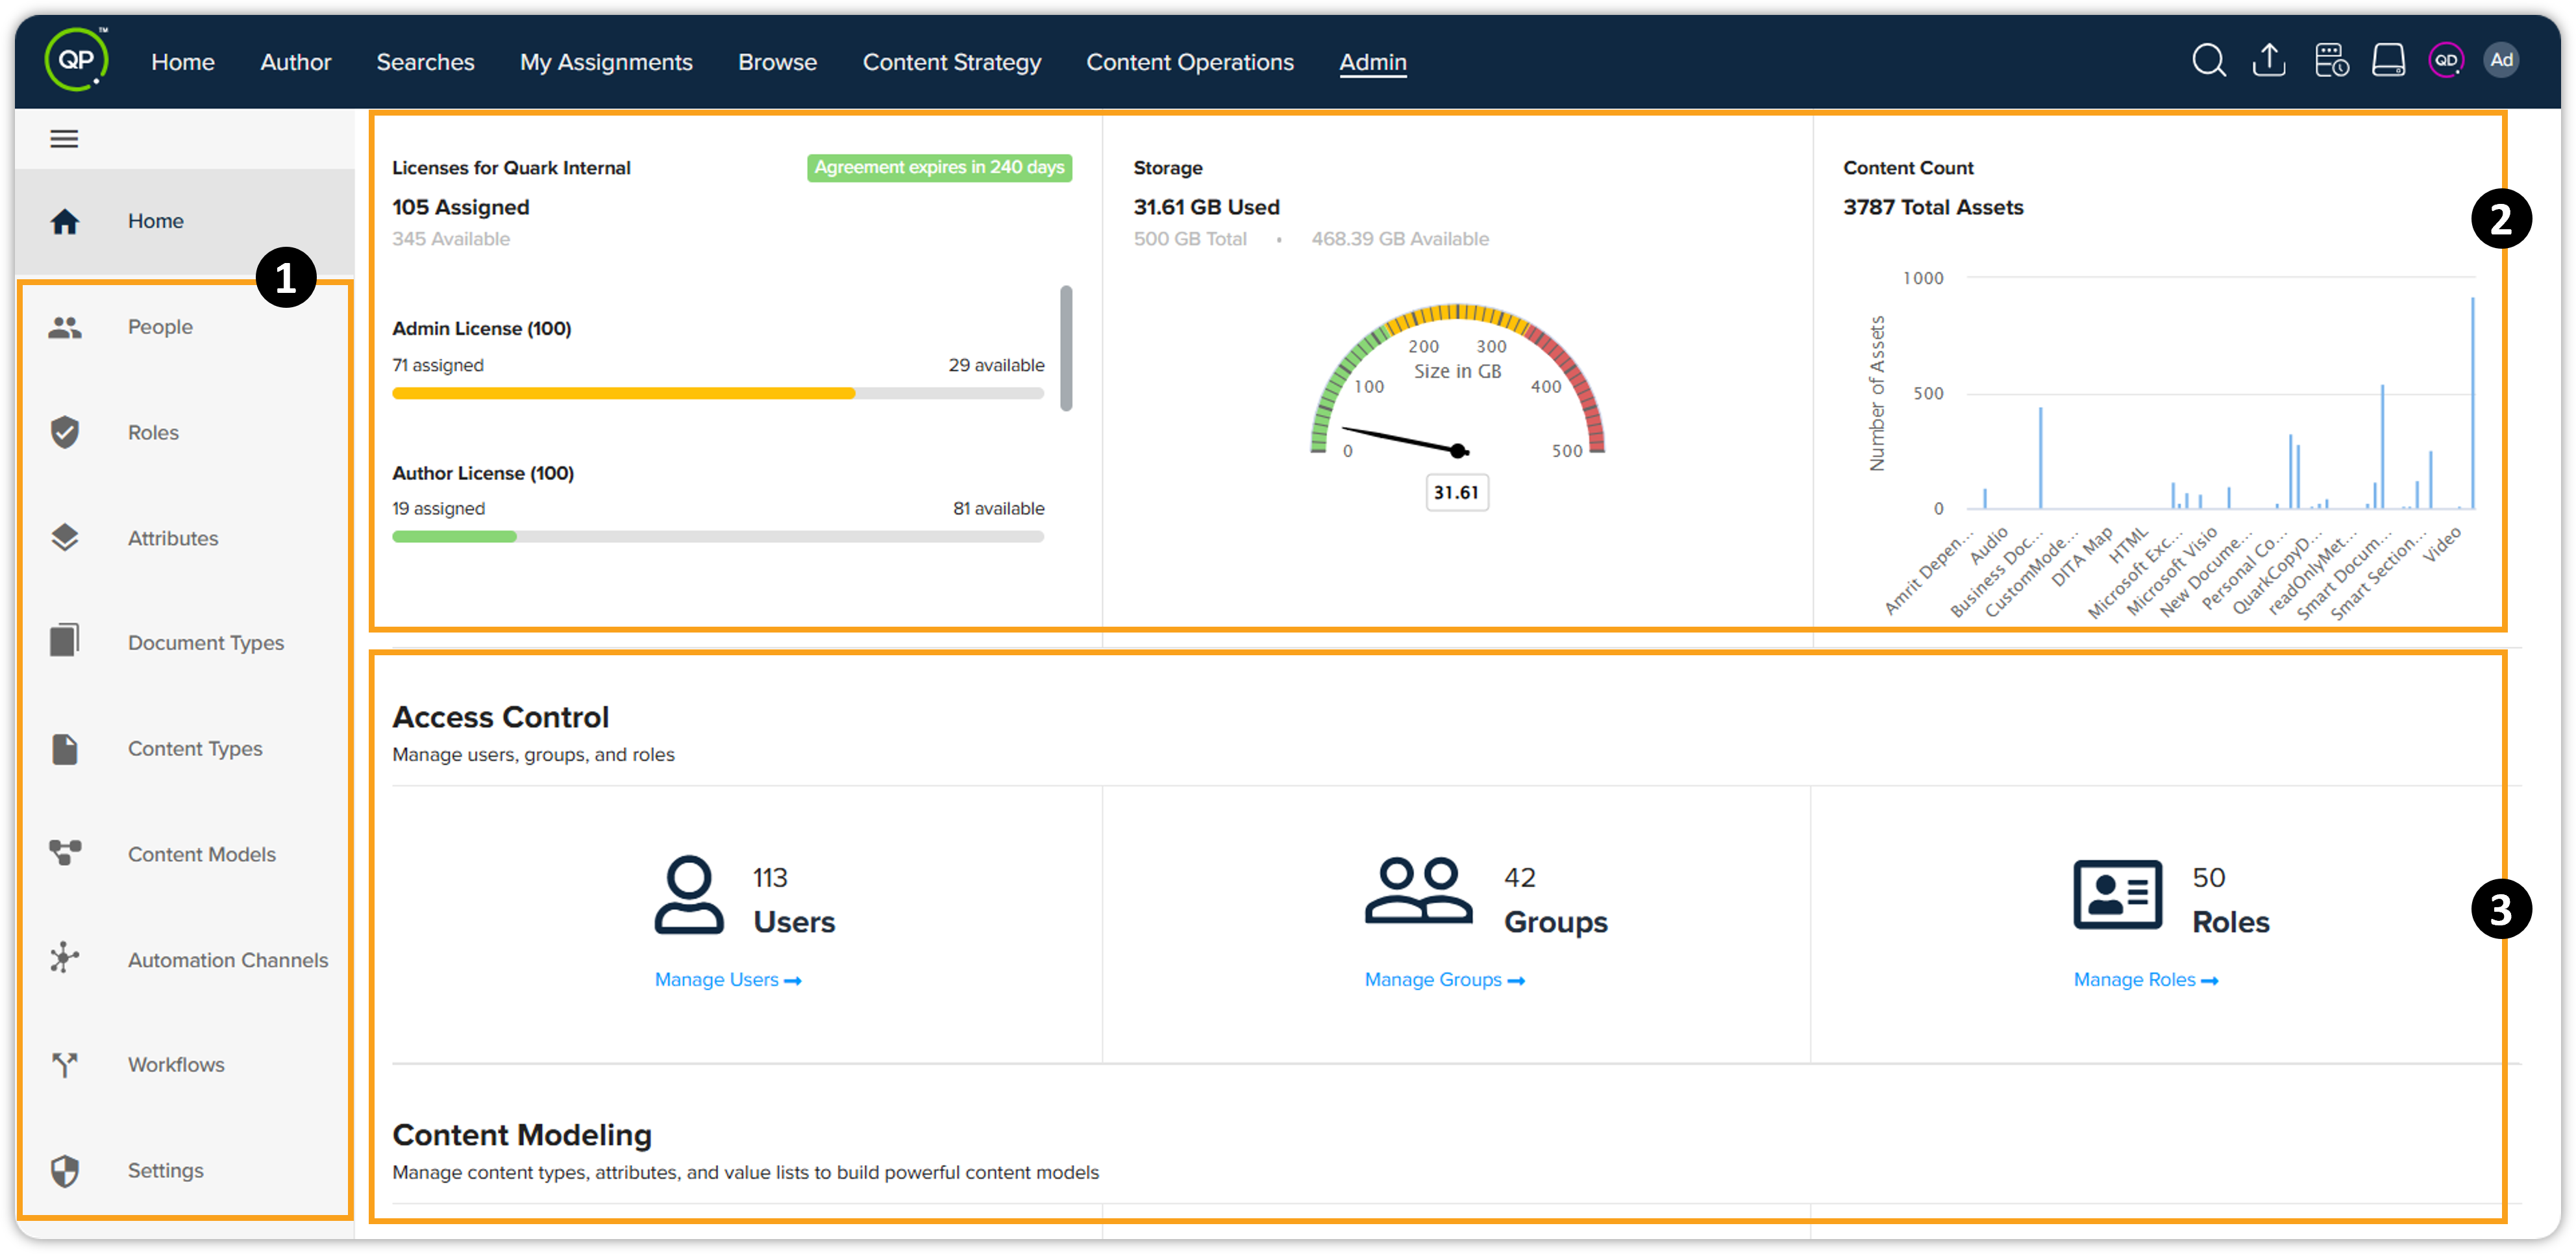
-
Admin tabs
-
Statistics related to your QPP server
-
Quick links to the sub-tabs within the Admin tab
 at the upper-left corner of the screen allows you to expand (see icons and names)/collapse
(see icons only) the left pane
tabs.
The Admin Home tab sections are as follows:
Statistics
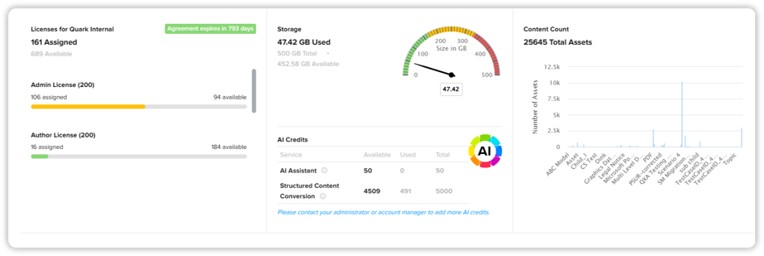
This section displays the following statistics:
-
The number of server licenses: Displays the real-time number of the total server licenses along with the remaining expiration period.
-
List of all the following types of server licenses assigned and available:
-
Admin
-
Author
-
Consumer
-
Contributor
-
Docurated
-
-
Storage: Displays the amount of bandwidth that has been allocated to a particular account and the amount of data that is currently being stored in the current account out of the allocated storage.
-
AI Credits: Displays the AI Credits for AI Assistant and Structured Conversion Credits for improved usage tracking. Admins can monitor remaining quotas, validate usage patterns, and receive alerts when credits are low or exhausted.
The AI Credits section appears only when at least one of the following services is subscribed:
-
AI Assistant
-
Structured Content Conversion
If only one service is active, usage information is shown for that service only. -
-
Content Count: Displays a graph for the count of total assets on the server by content type. You can hover over a graph bar to see the statistics for a specific content type.
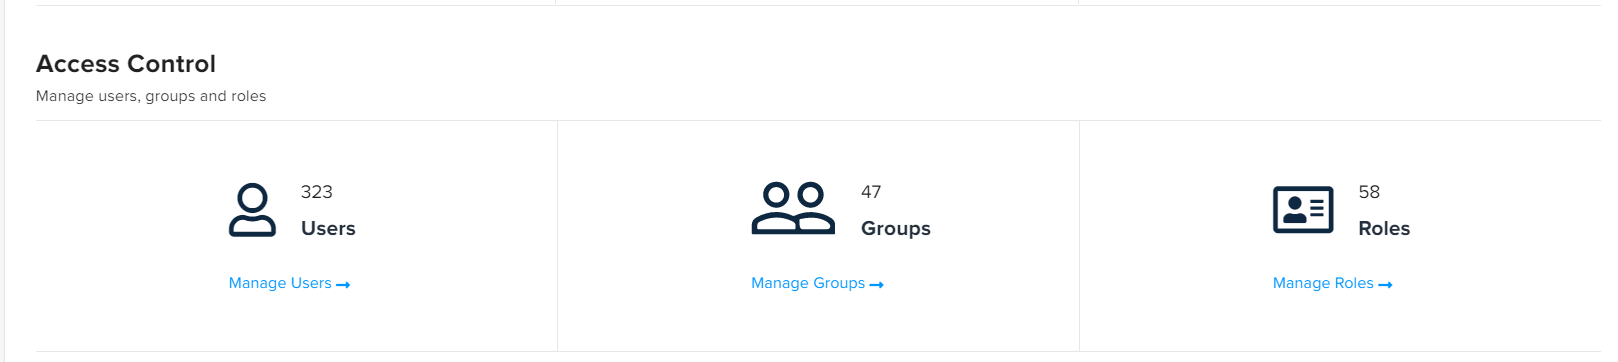
Access Control
The Access Control section displays the total number of users, user groups, and type of roles (privileges) that are defined on a server and provides quick links to the following Admin pages:
Content Modeling
The Content Modeling section displays the total number of content types, attributes, and value lists that are defined on a server and provides quick links to the following Admin pages:
-
Attributes tab of the Attributes page
-
Value Lists tab of the Attributes page
-
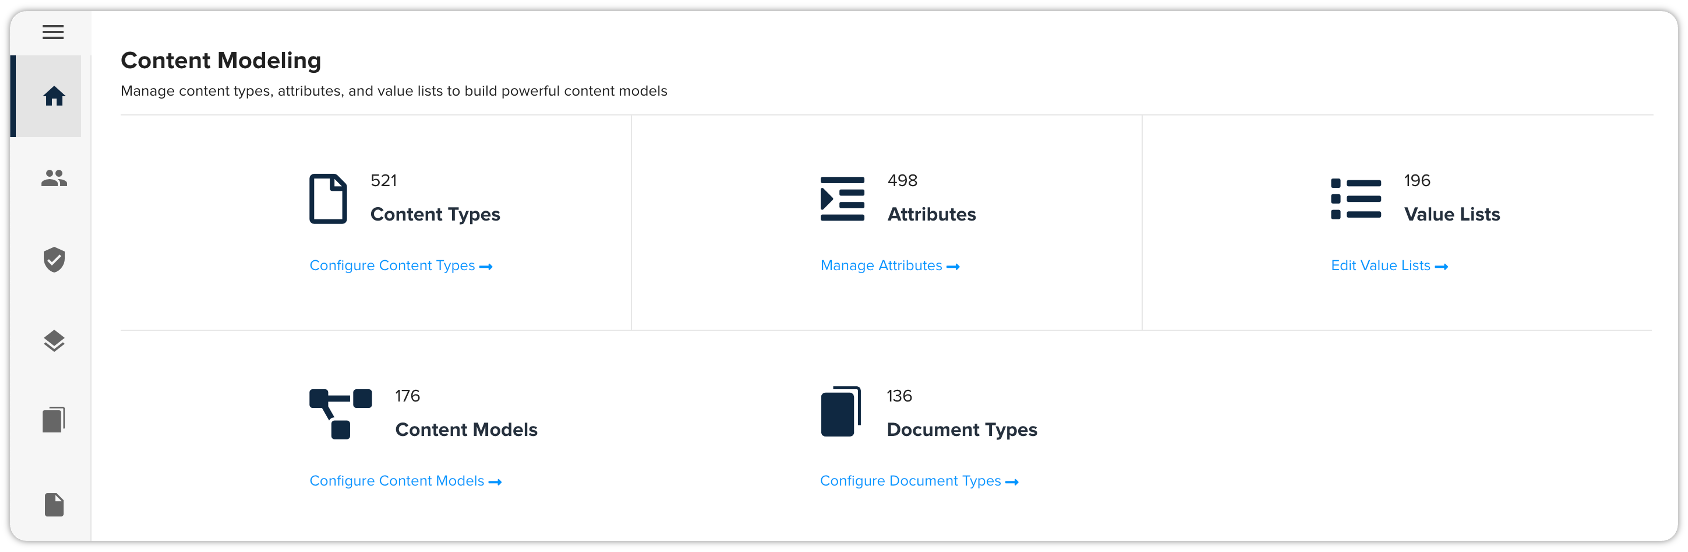
Automation Channels
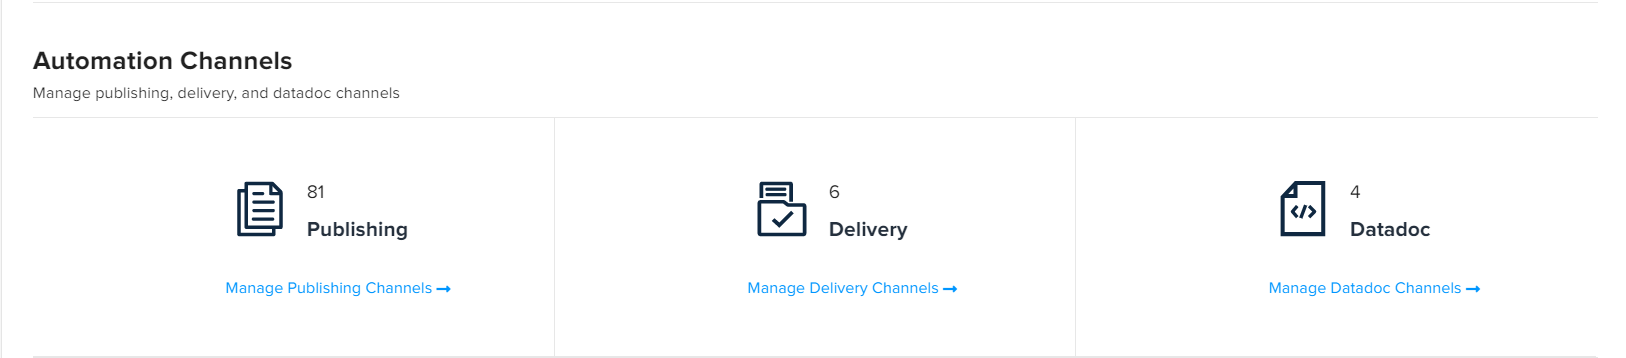
The Automation Channels section displays the total number of automation channels (classified by type: publishing, delivery, and data doc) available on a server and provides quick links to the following Admin pages:
-
Publishing Channels tab of the Automation Channels page
-
Delivery Channels tab of the Automation Channels page
-
Data Doc Channels tab of the Automation Channels page
Workflow Management
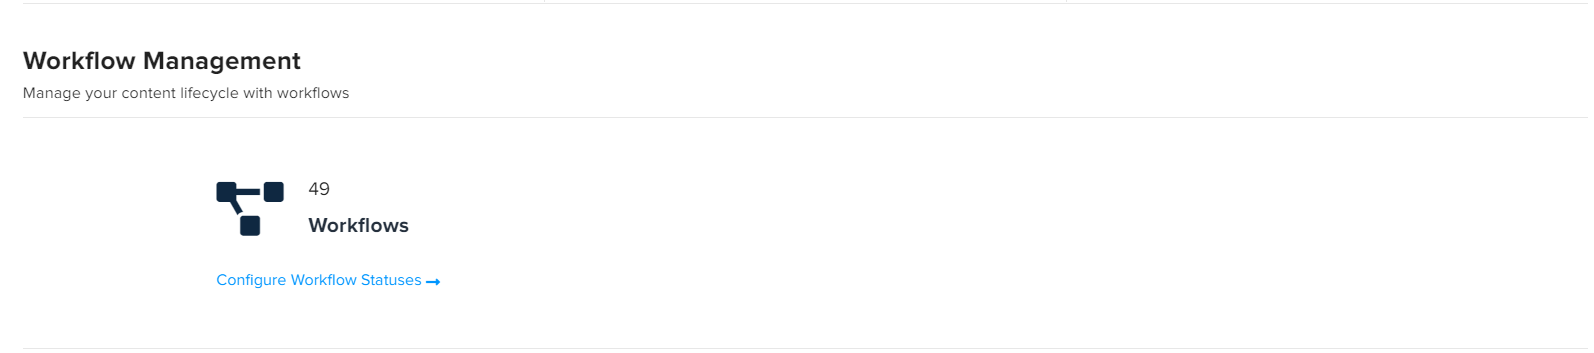
The Workflow Management section displays the total number of workflow statuses that are defined on a server and provides a quick link to the Workflow page.
System
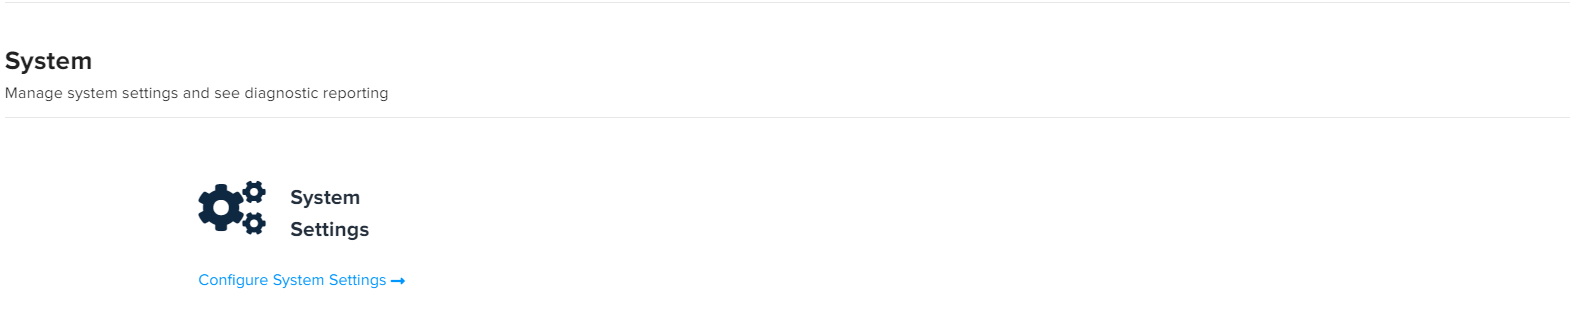
The System section provides a quick link to the System Settings page.
People
The People page allows you (the administrator) to create, edit, delete and modify users and user groups. There are several information items and options on the People page, which for the sake of simplicity are categorized as user information, users and groups operations, and generic page operations.
Users Information
The People page has the following user information items:
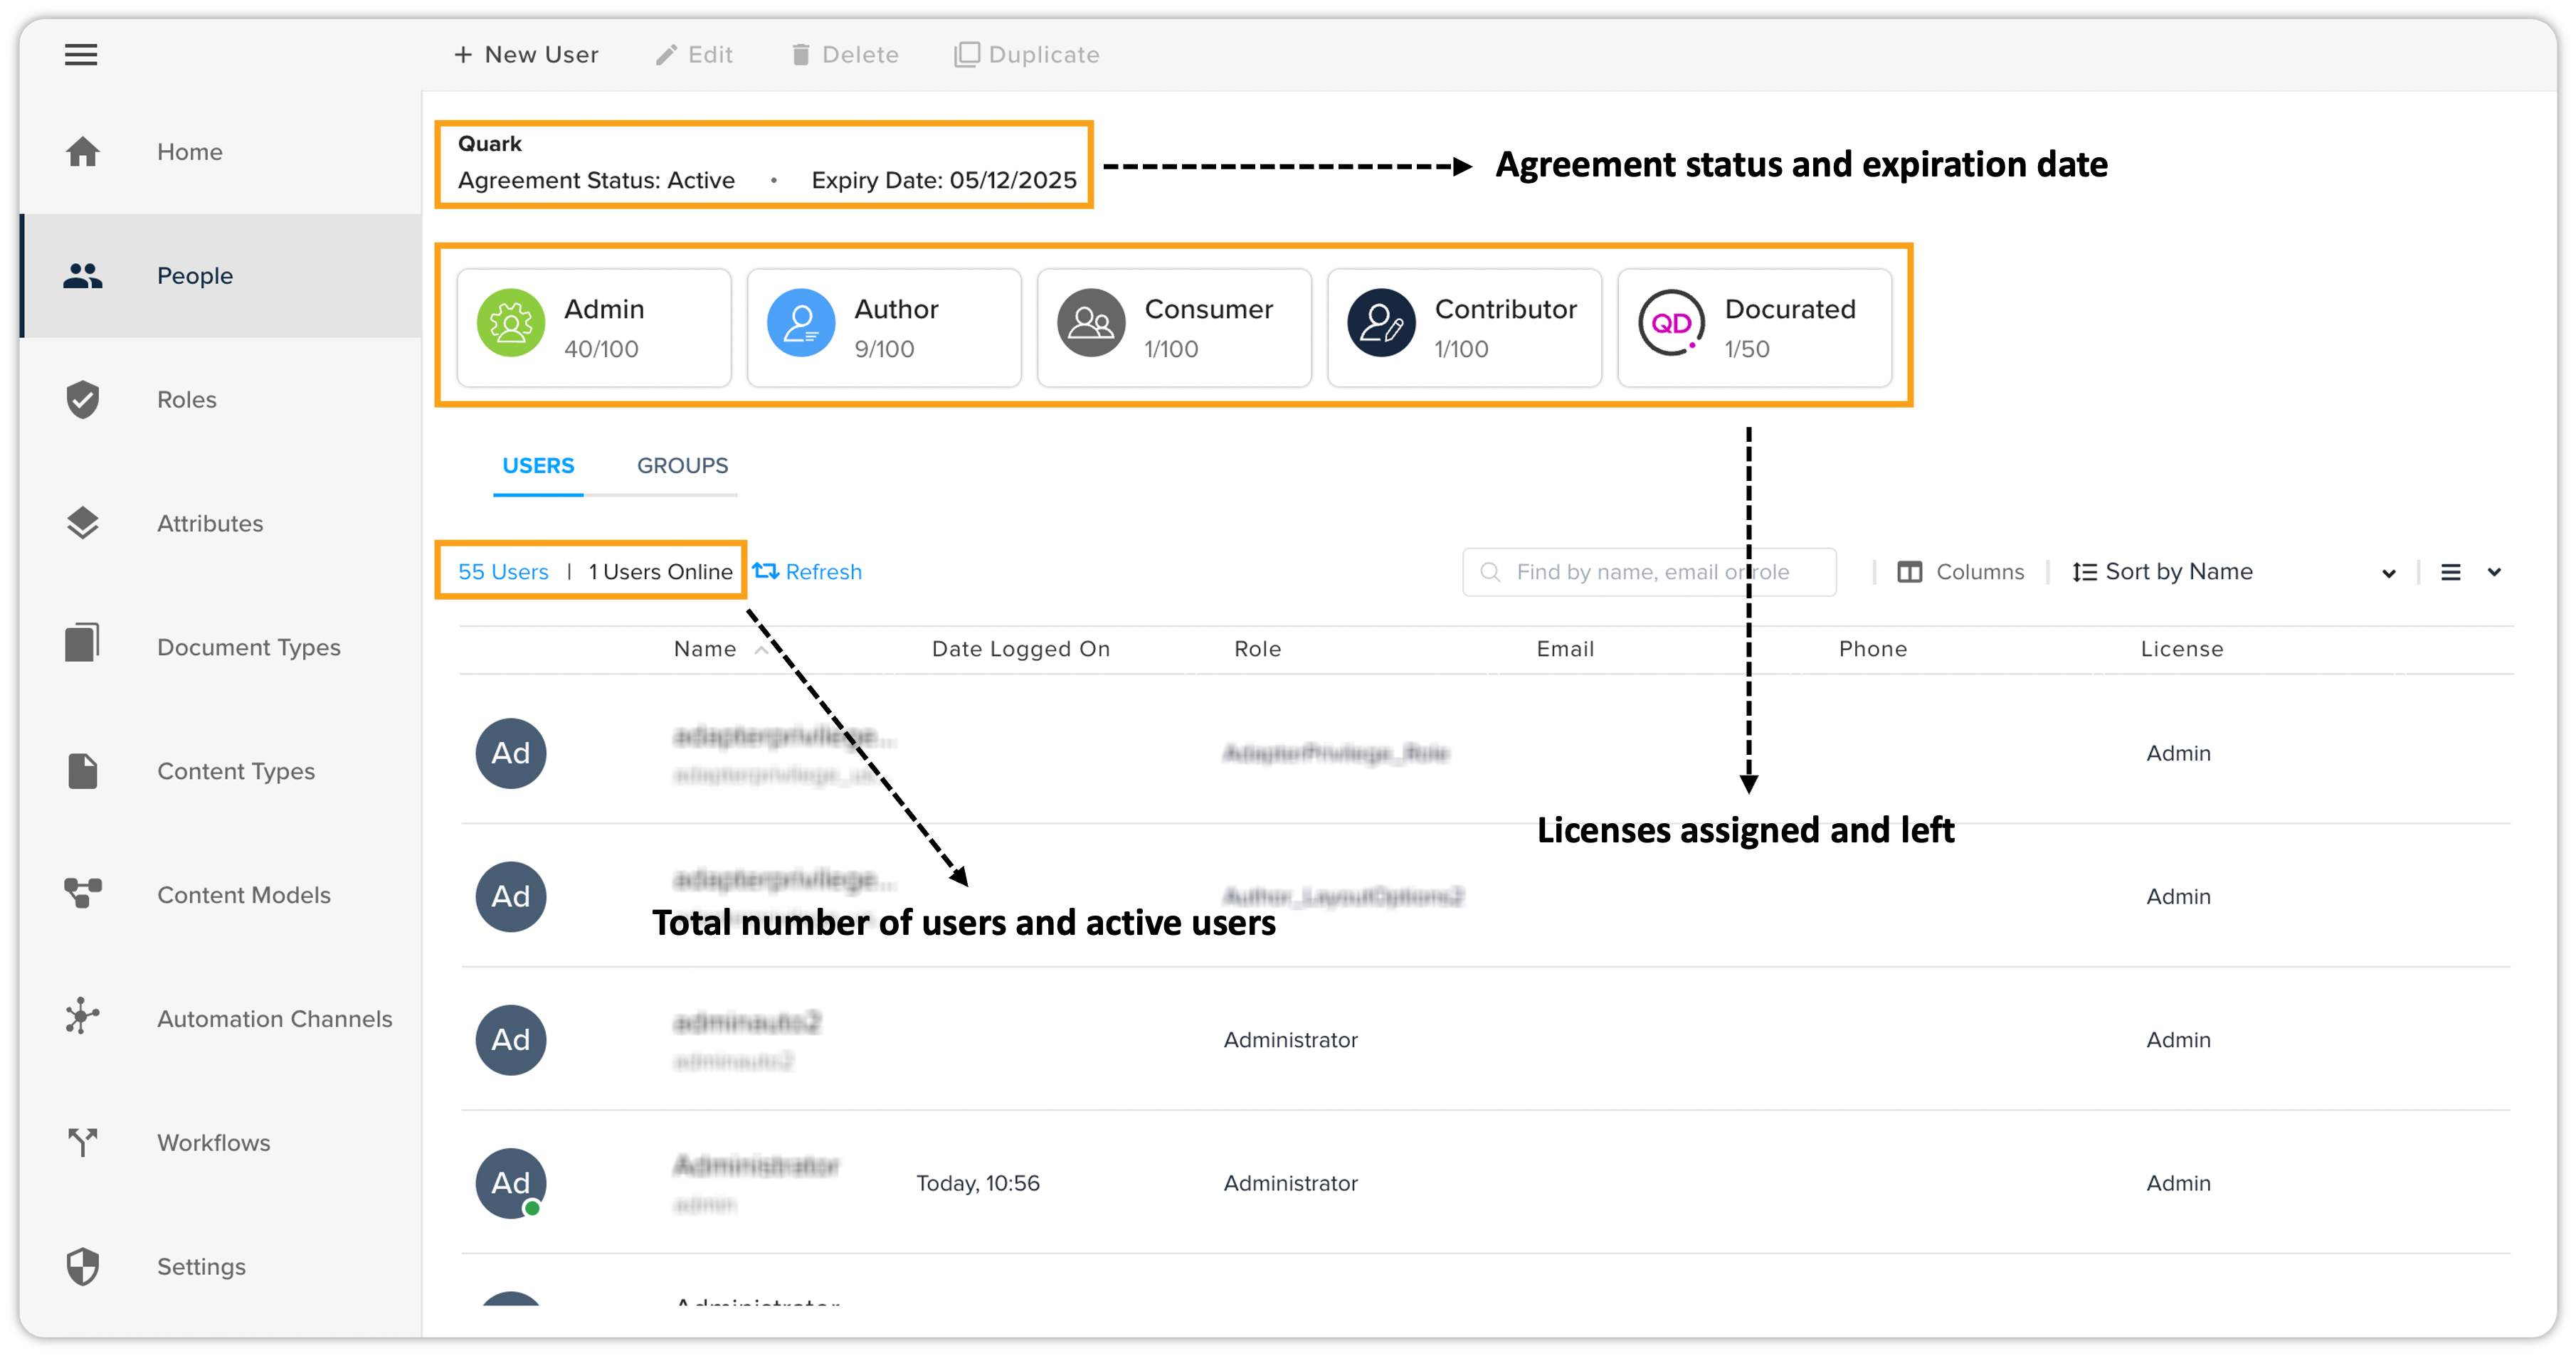
-
Agreement Status: Displays your license status.
-
Expiry Date: Displays the expiry date of your license if the status is active.
-
Licenses Overview: Total number of assigned and free licenses for all license types.
-
Total Users: The total number of users on the server, which you can click to see.
-
Active Users: The number of active users on the server, which you can click to see.
Users and Groups Operations
These operations are top bar actions, which become active when you select a user/group from the list, based on the tab you are in. These operations are as follows:
User Operations
The user operations are as follows:
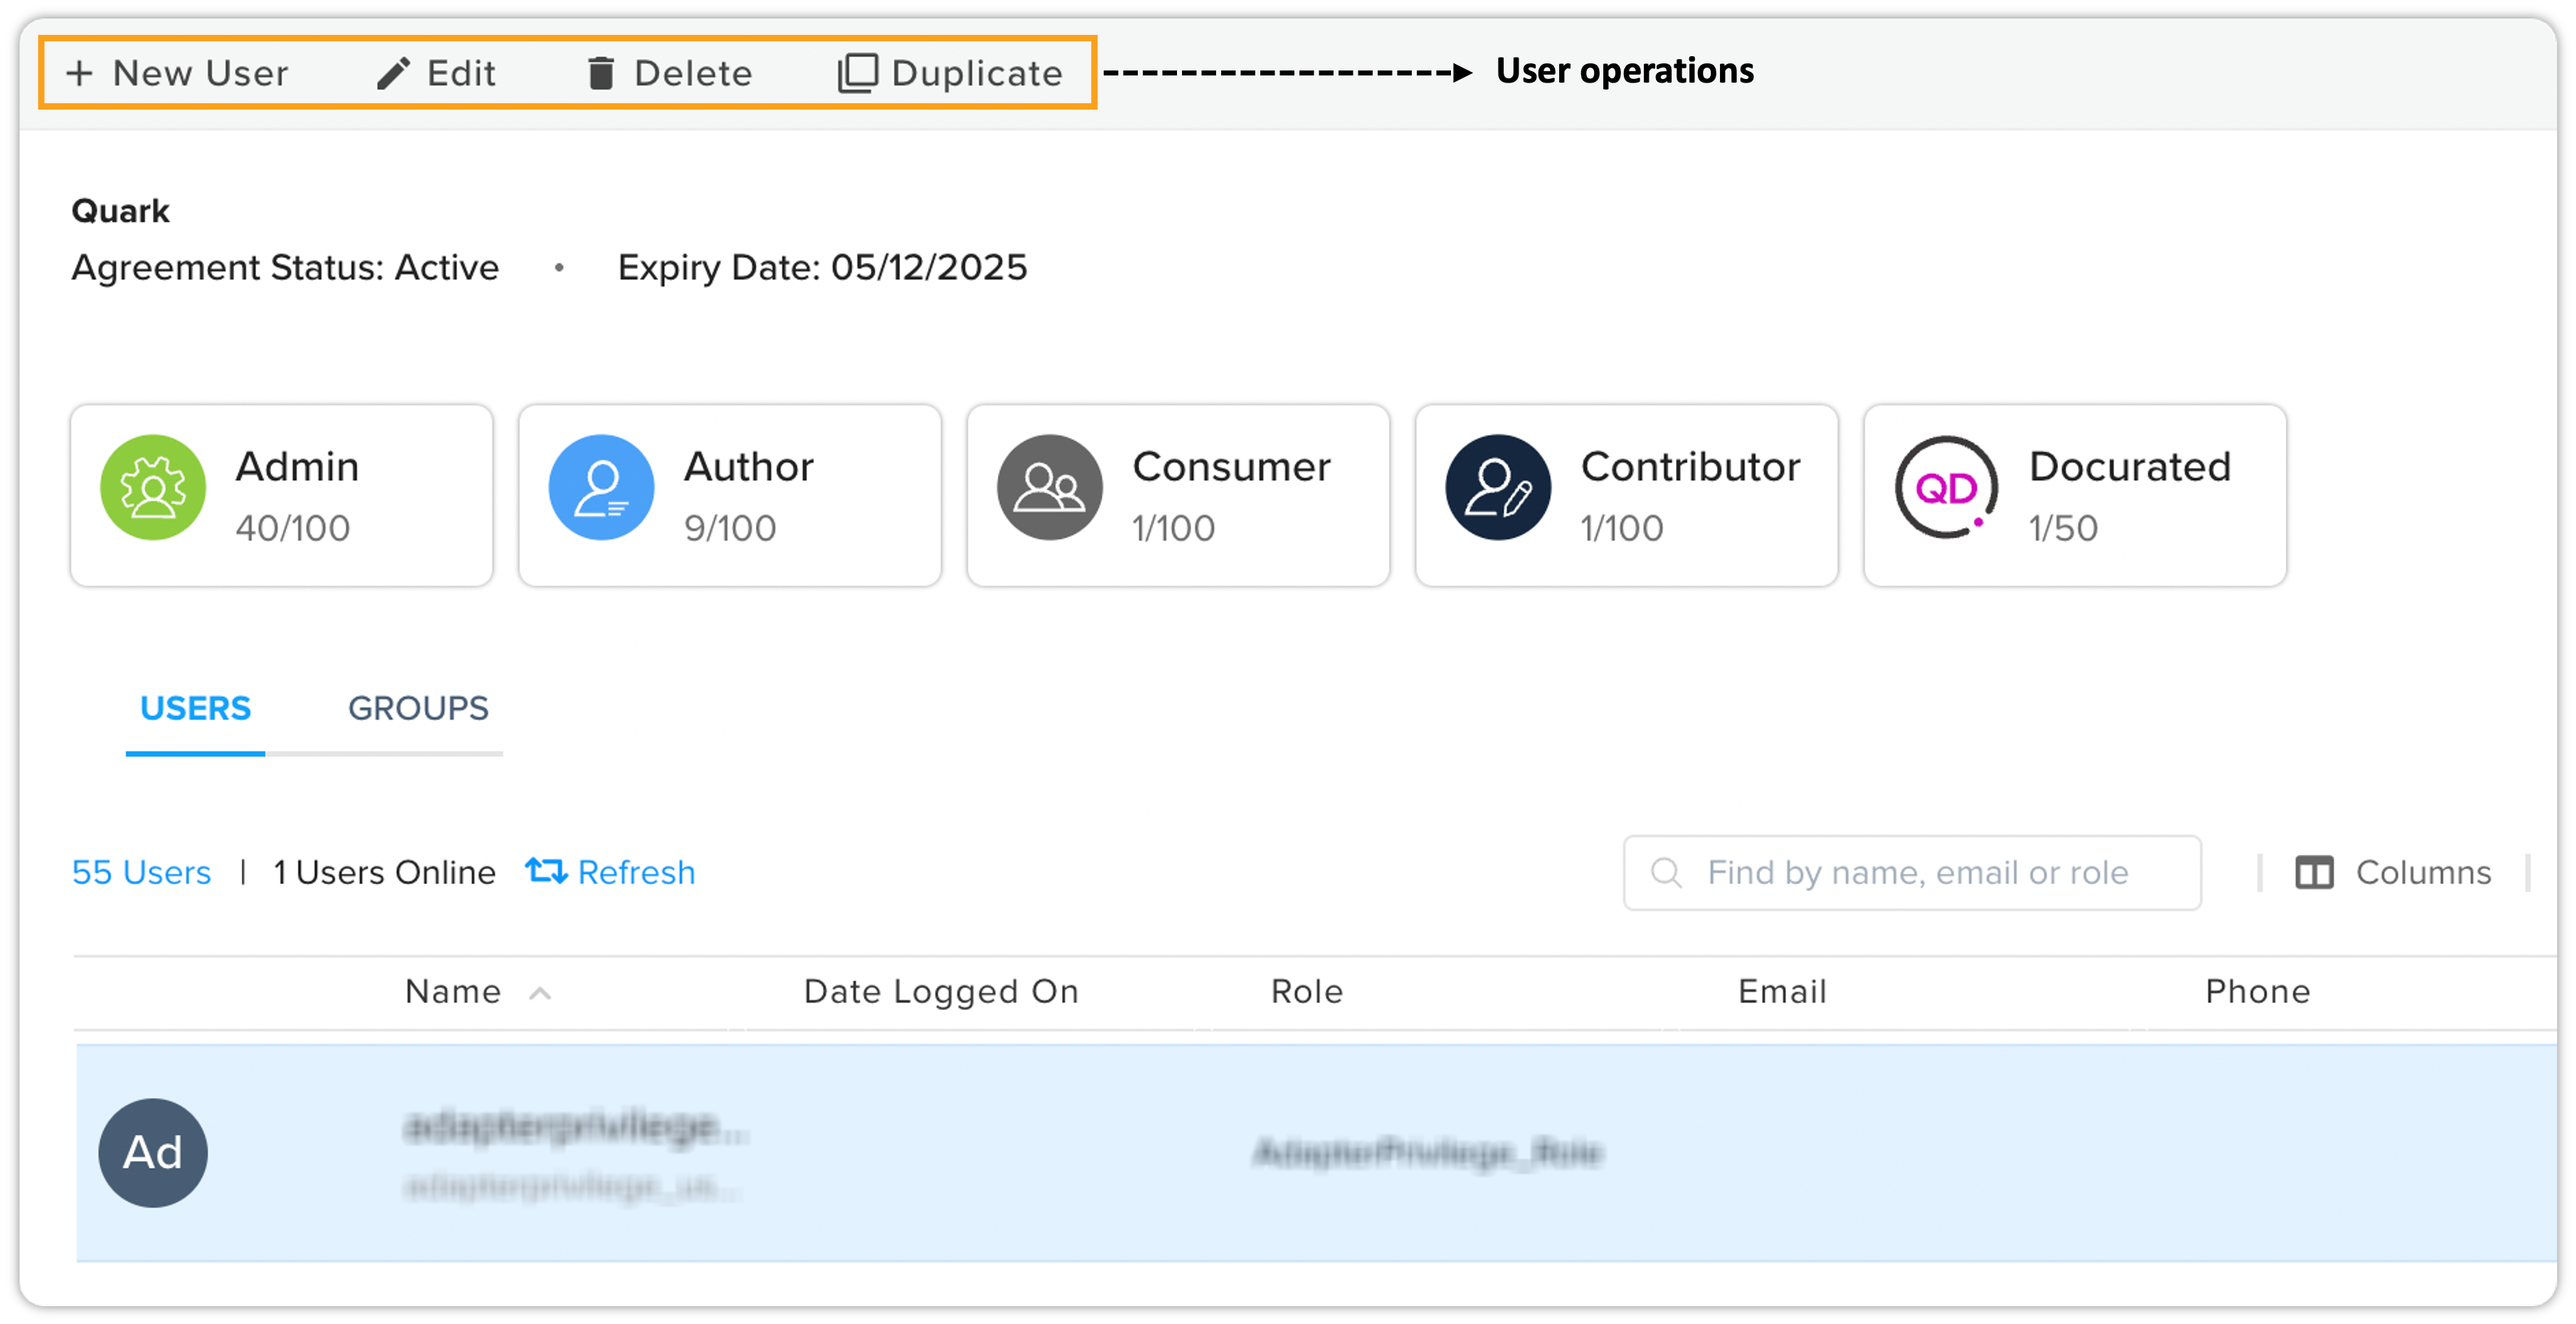
-
+ New User: Allows you to add a new user to the server (described ahead).
-
Edit: Allows you to edit the properties and privileges of an already available user.
-
Delete: Deletes a user.
-
Duplicate: Duplicates a user.
To add a new user:
-
Under the Users tab of the People page, select the button + New User in the top of the bar actions to open the Add User pane.
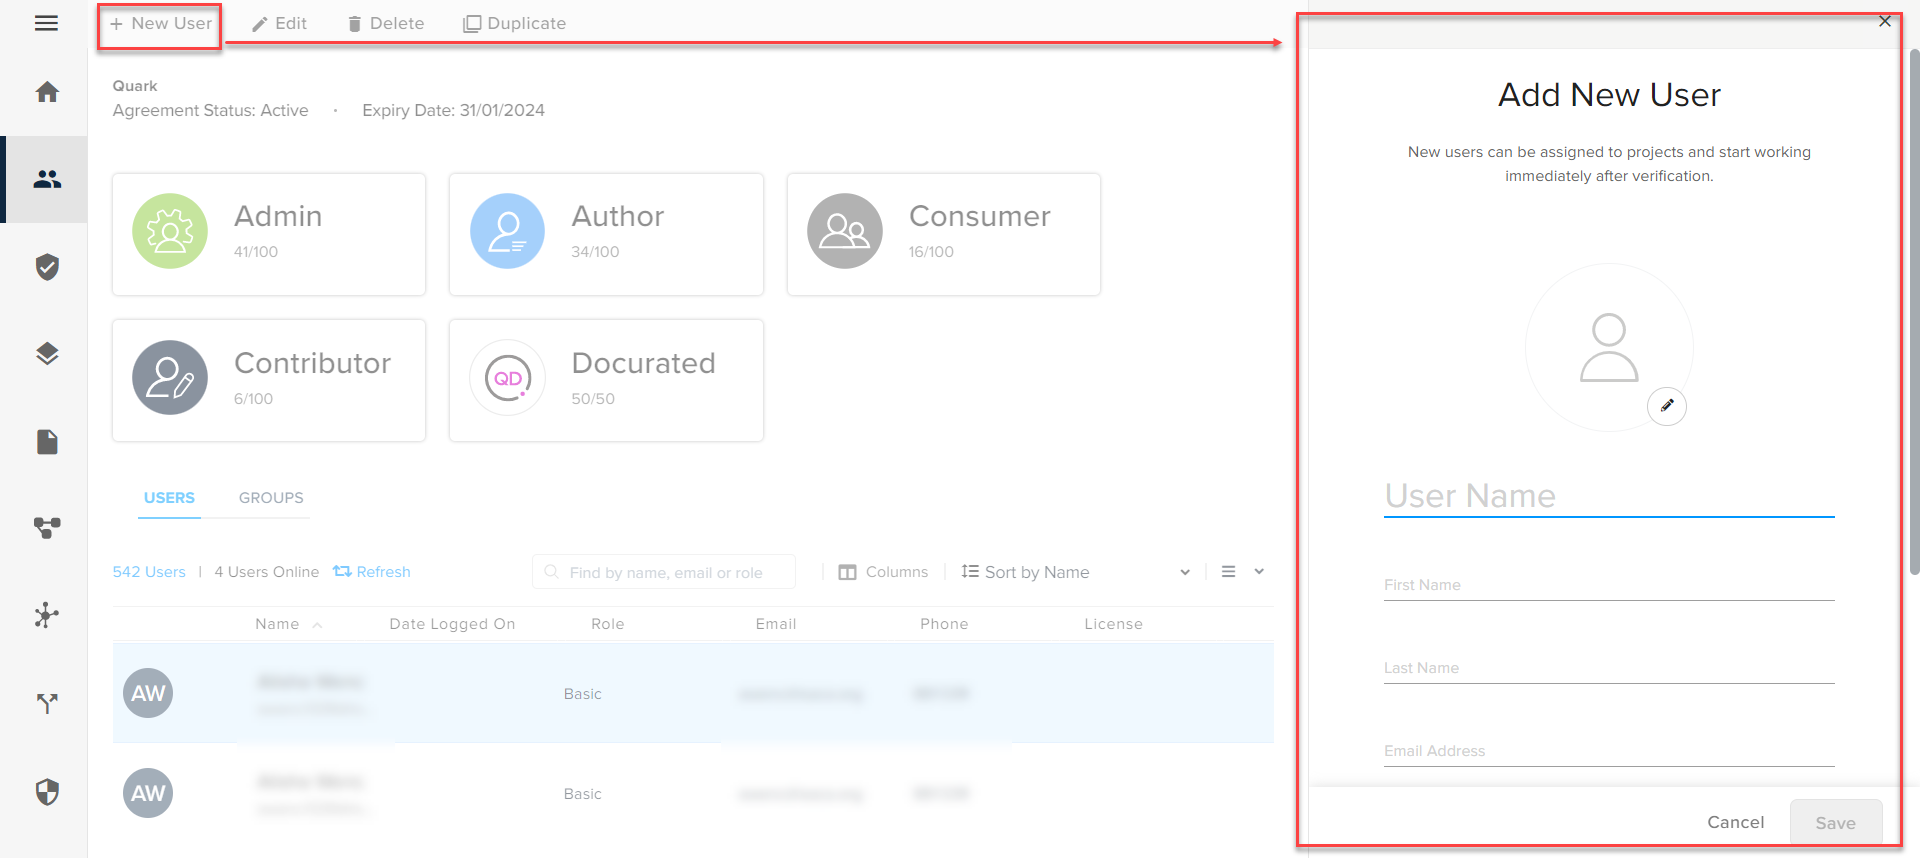
-
In the Add User pane, add an image, enter a username, first name, last name, email, phone, and then select a license type and privilege for the user.
-
Select the button Save to create the user.
Once you have created a user, QPP displays the user overview in a pane, from where you can also manage the user and the user's groups.
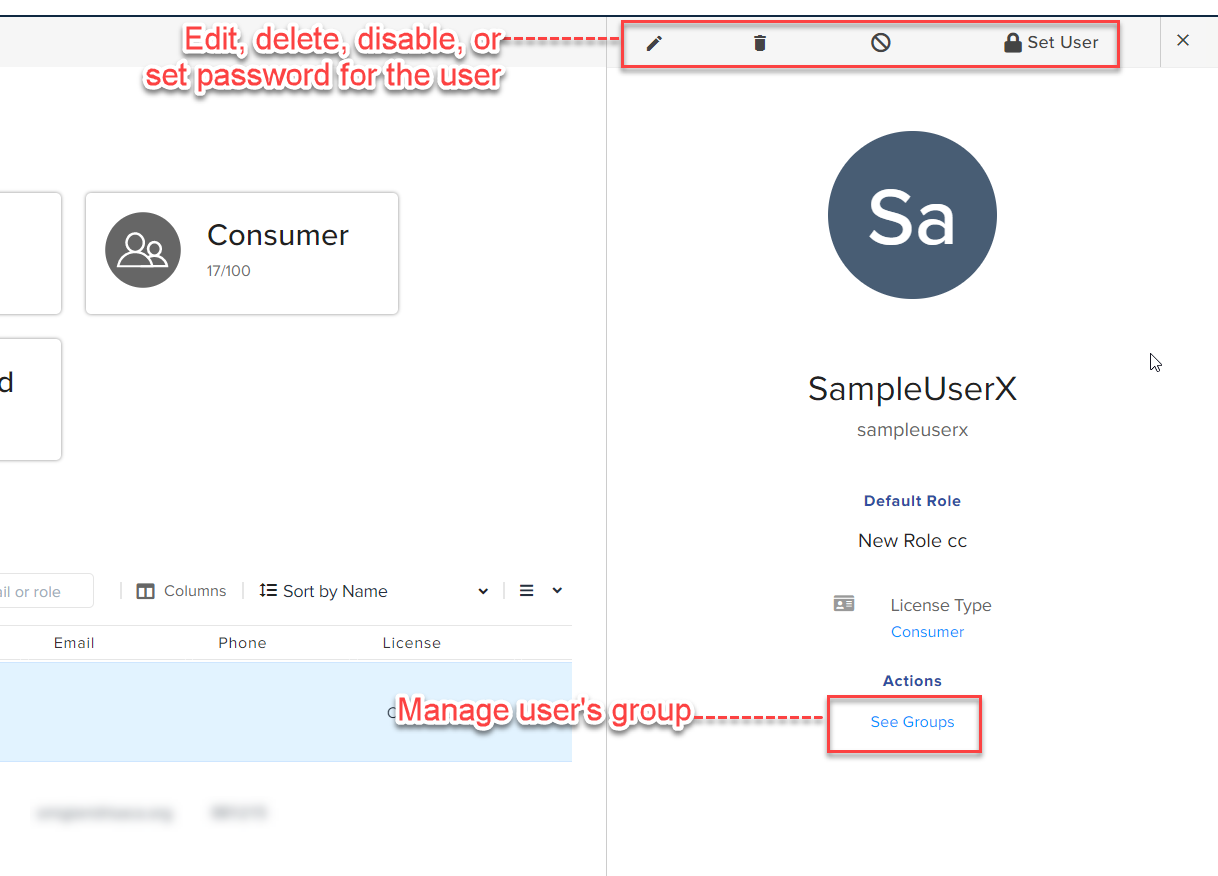
To manage groups for a user:
-
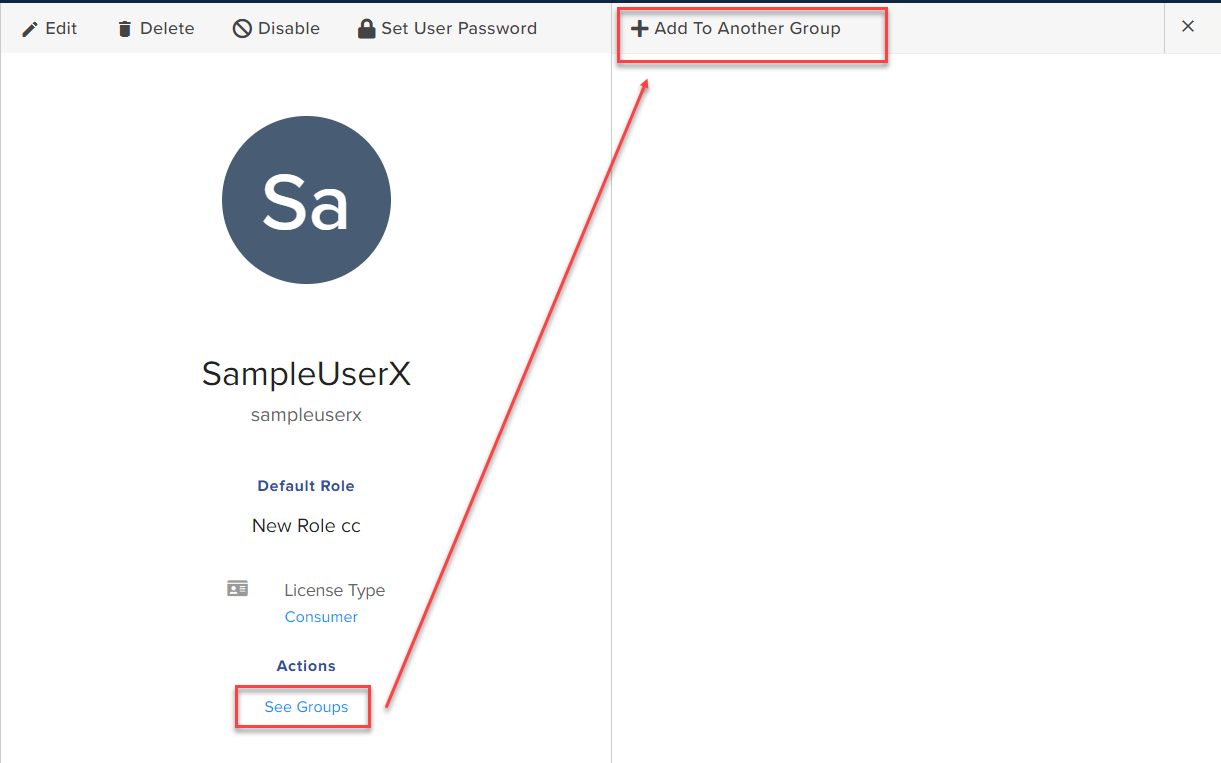
In the User Details pane, select the link See Groups to open the Manage Groups pane.
-
In the Manage Groups pane, select the button Add to Another Group.
-
Search and select the group, click Add and then click Done to add the user to the selected group.
Group Operations
The group operations are as follows:
-
Add New Group: Allows you to add a new group to the server (described ahead).
-
Edit: Allows you to edit the properties and privileges of an already available user.
-
Delete: Deletes a group.
-
Duplicate: Duplicates a group.
To add a new group:
-
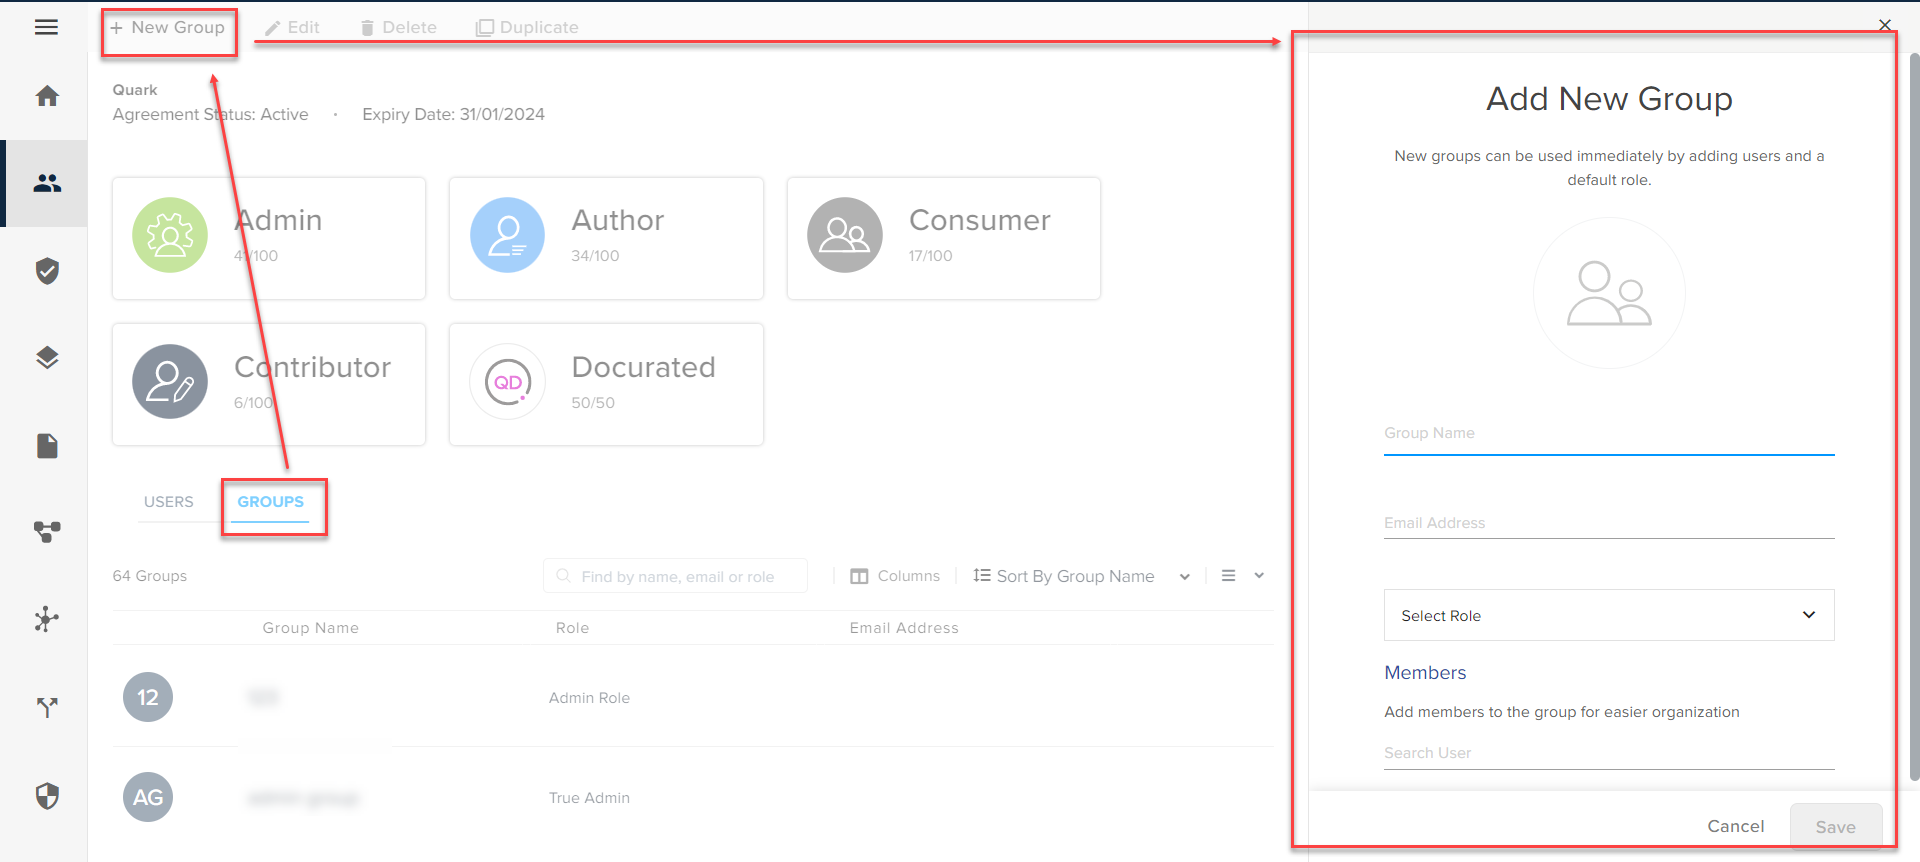
Under the Groups tab of the People page, select the button + New Group in the top of the bar actions to open the Add Group pane.
-
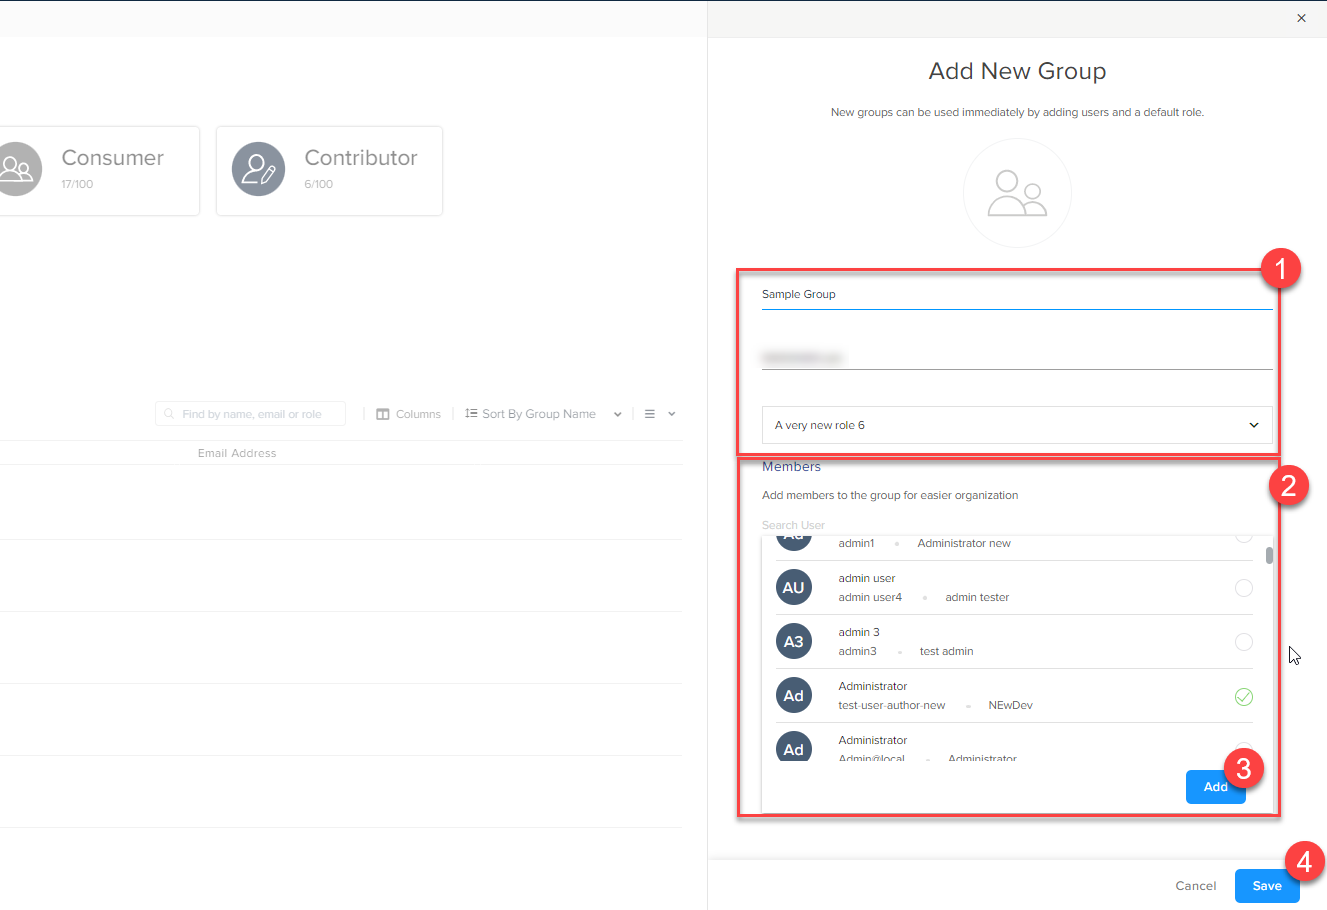
In the Add Group pane, add an image, enter group name and email address, select a privilege, and search and select a member to add to the group.
-
Select the button Add to add the selected user and then select the button Save to create the group.
-
QPP displays the overview of the newly created group in the same pane with the options to edit and delete the group.
Generic Page Operations
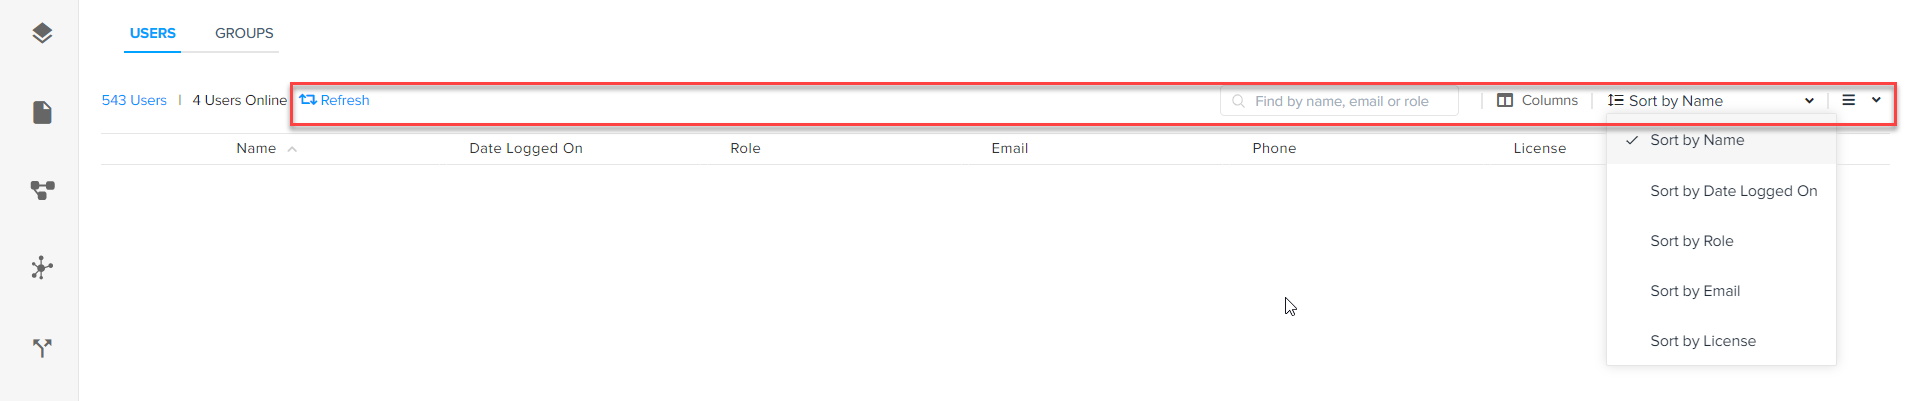
The People page has the following generic page operations:
-
Refresh: Refreshes the list to reflect any recent changes.
-
Find by Name: This search tool allows you to search for a user or group by name.
-
Column Options: Allows you to select which columns to display against file listing.
-
Sort Options: Allows you to sort the list by Name, Date Logged On, Role, Email, or License type.
-
View Options: Allows you to switch the view from list to the grid and vice versa.
Roles
The Roles pane allows you to create/manage roles by setting various content and application-level privileges within those roles. Roles allow you (administrator) to manage which permissions are to be given to specific users or groups on the server.
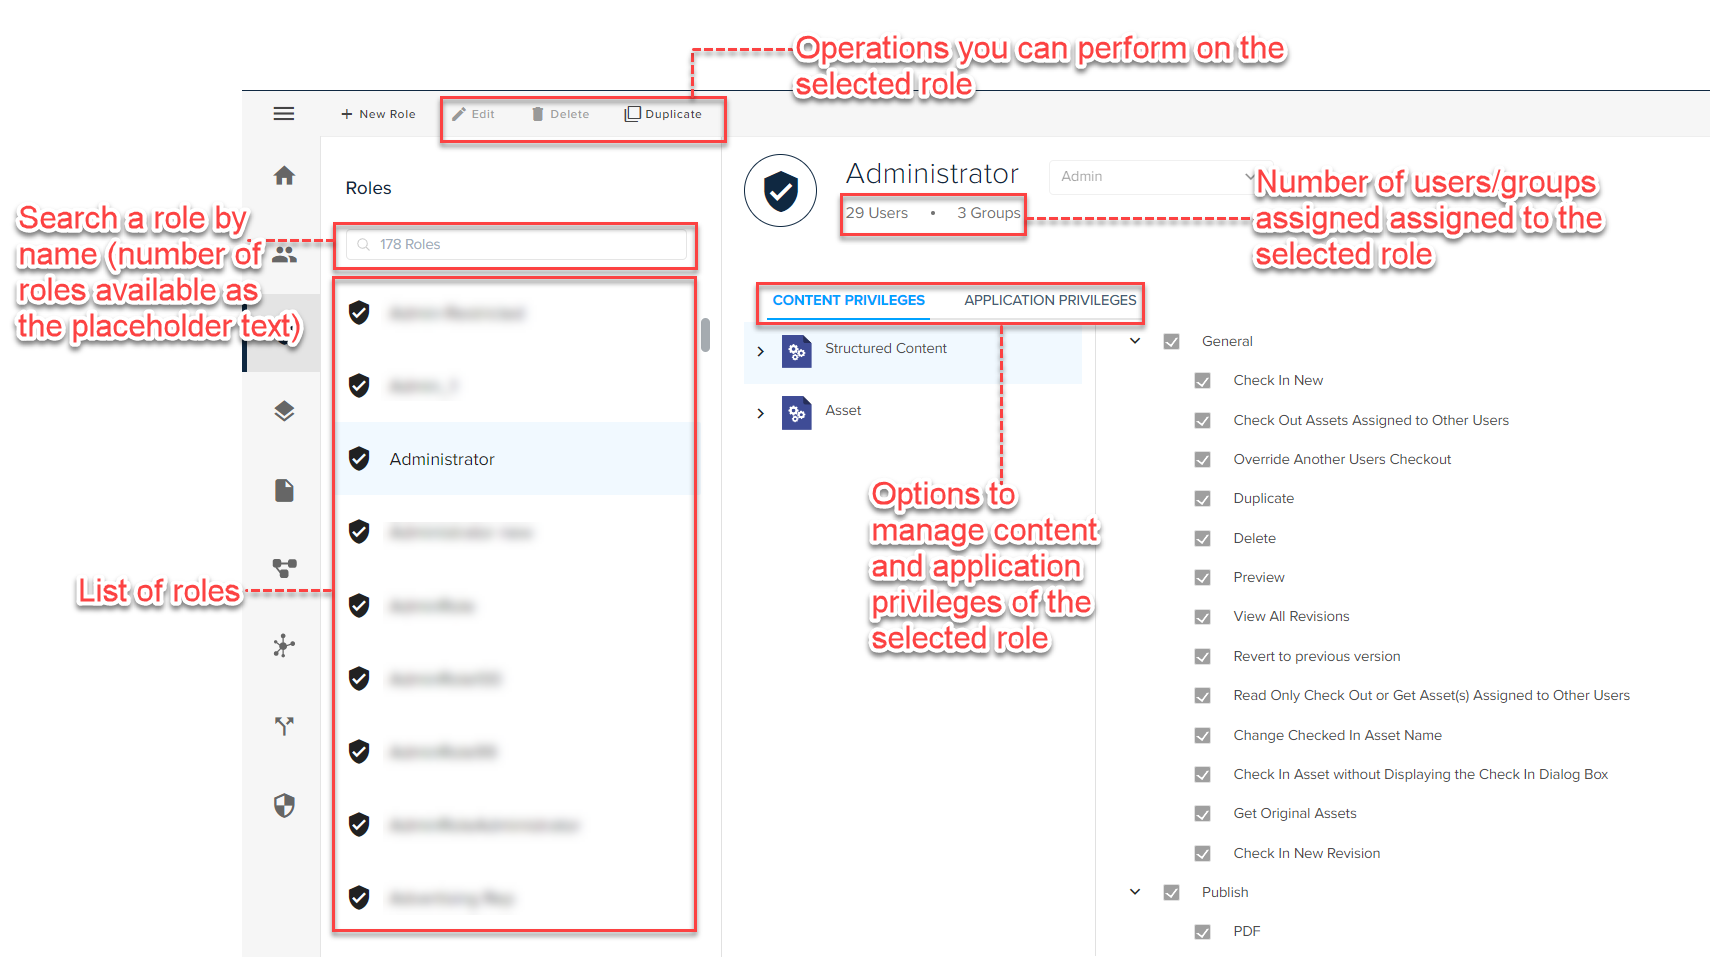
The left pane of the Roles pane displays the roles that are available on the server. On top of the list, there is a search bar, which by default displays the total number of roles on the server.
When you select a role from the list, QPP activates the roles operations such as edit, delete, and duplicate on the top bar, displays the number of users and groups that have been assigned the selected role, and the privileges under the selected role on the right-hand-side part of the page.
Roles Operations
The top bar displays a few roles operations, which are as follows:
-
Add New Role: Allows you to create a new role (described ahead).
-
Edit: Allows you to edit a role already available on the server.
-
Delete: Deletes a role.
-
Duplicate: Allows you to create a copy of a role.
To add a new role:
-
Select the button + New Role from the top bar actions.
-
Select a content type.
-
Set the content and application privileges as required.
-
Select the button Save.
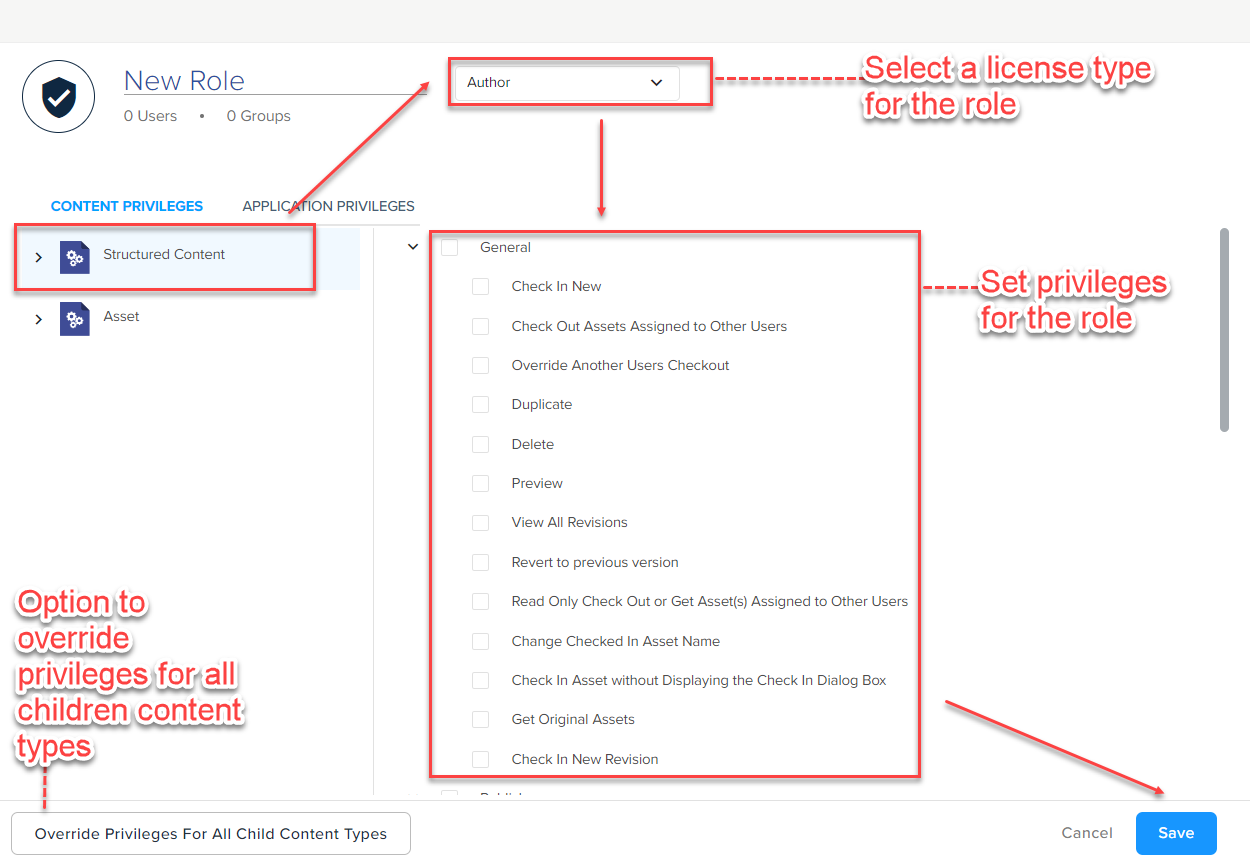
When you set privileges for a content type, QPP also lets you set the same privileges for all the children of that content type without having to apply the same privileges to each child content type individually. You can apply the content privileges to all the children content types through the button Override Privileges for All Child Content Types.
Privileges
Privileges define a set of protocols for a user or group to perform specific operations on the server. When you specify privileges for a role, it defines the instructions available to each member of that role. For example, when users of a certain role don't have the privilege to perform a specific task, QPP doesn't display the command for that task.
For detailed information, refer to QPP License Types and Privileges.
Additionally, you can define privileges for specific types of content and assets.
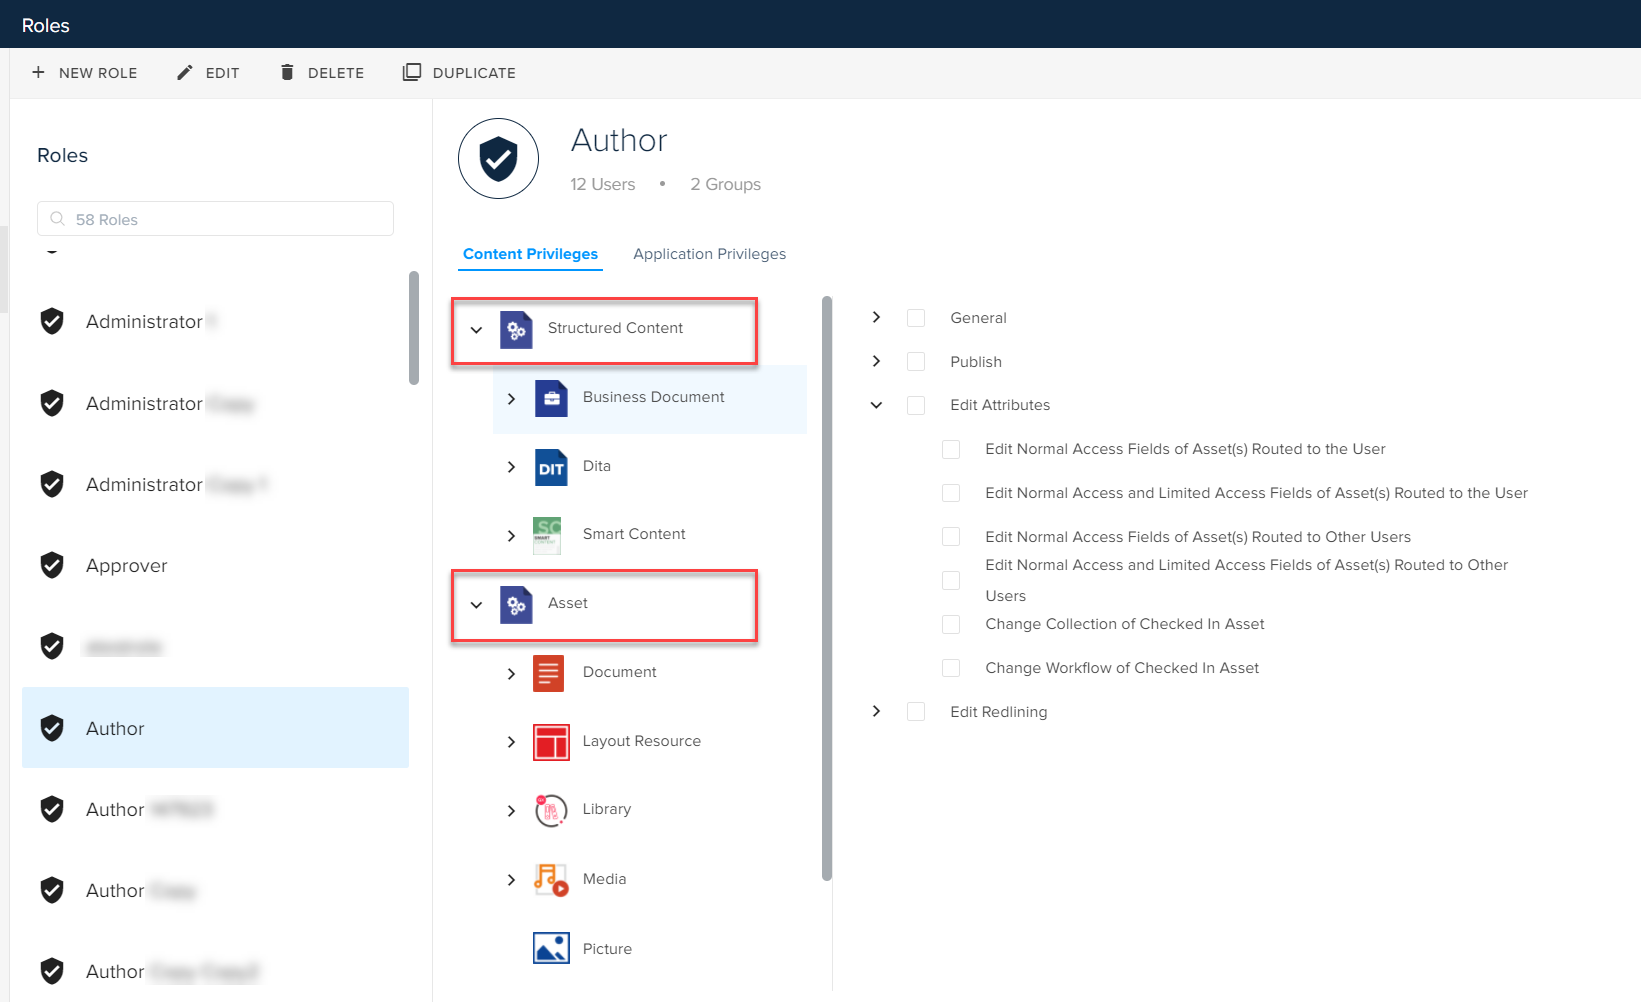
Privileges are categorized as follows:
Content Privileges
Content privileges define the degree and type of access that a user can have for different content types. Content privileges are categorized as follows:
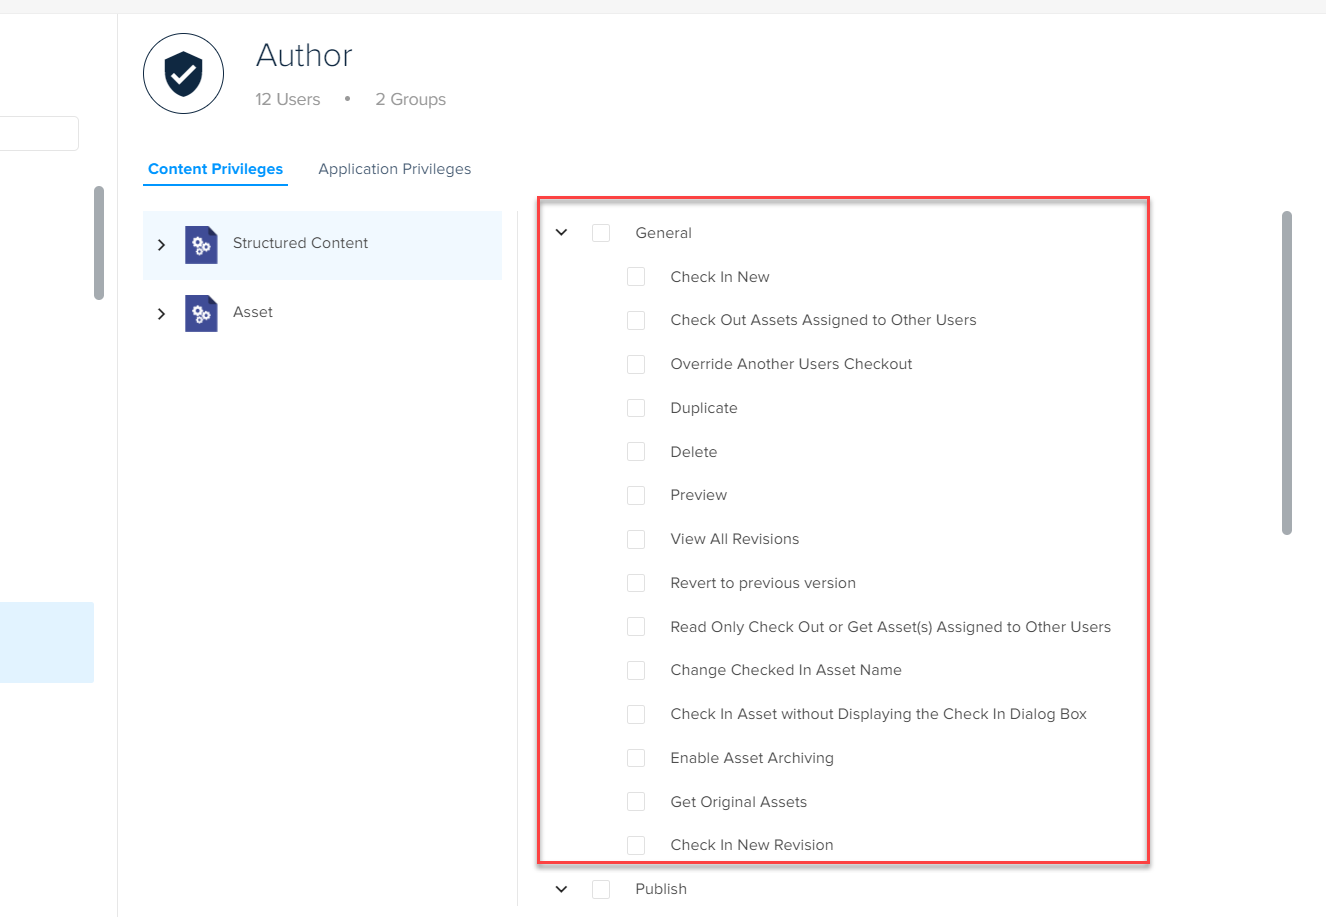
General
These privileges are related to generic actions, which are as follows:
-
Check In New: Allows you to create or check in new assets to the server.
-
Check Out Assets Assigned to Other Users: Allows you to check out assets that have already been assigned to other users.
-
Override Other Users Check out: Allows you to cancel check out by other users.
-
Duplicate: Allows you to duplicate assets.
-
Delete: Allows you to delete assets.
-
Preview: Allows you to preview assets.
-
View All Revisions: Allows you to view all the revisions of an asset within the collection you have access to.
-
Revert to the Previous Version: Allows you to revert to a previous version of an asset.
-
Read-only Check Out or Get Asset(s) Assigned to Other Users: Allows you to get a read-only copy of an asset, without checking out the asset.
-
Change Checked-in Asset Name: Allows you to change the names of checked-in assets that are assigned to other users.
-
Check-In Asset without Displaying the Check-In Dialog Box: Allows you to bypass the Check-In dialog by pressing Option/Alt on the keyboard while clicking the option Check-In Asset.
-
Enable Asset Archiving: Allows you to archive assets on the server.
-
Get Original Assets: Allows you to get the original version of assets from the server.
-
Check In New Revision: When left unchecked, restricts you with insufficient privileges from creating a new version of an asset even when an author has routed the asset to the reviewer.
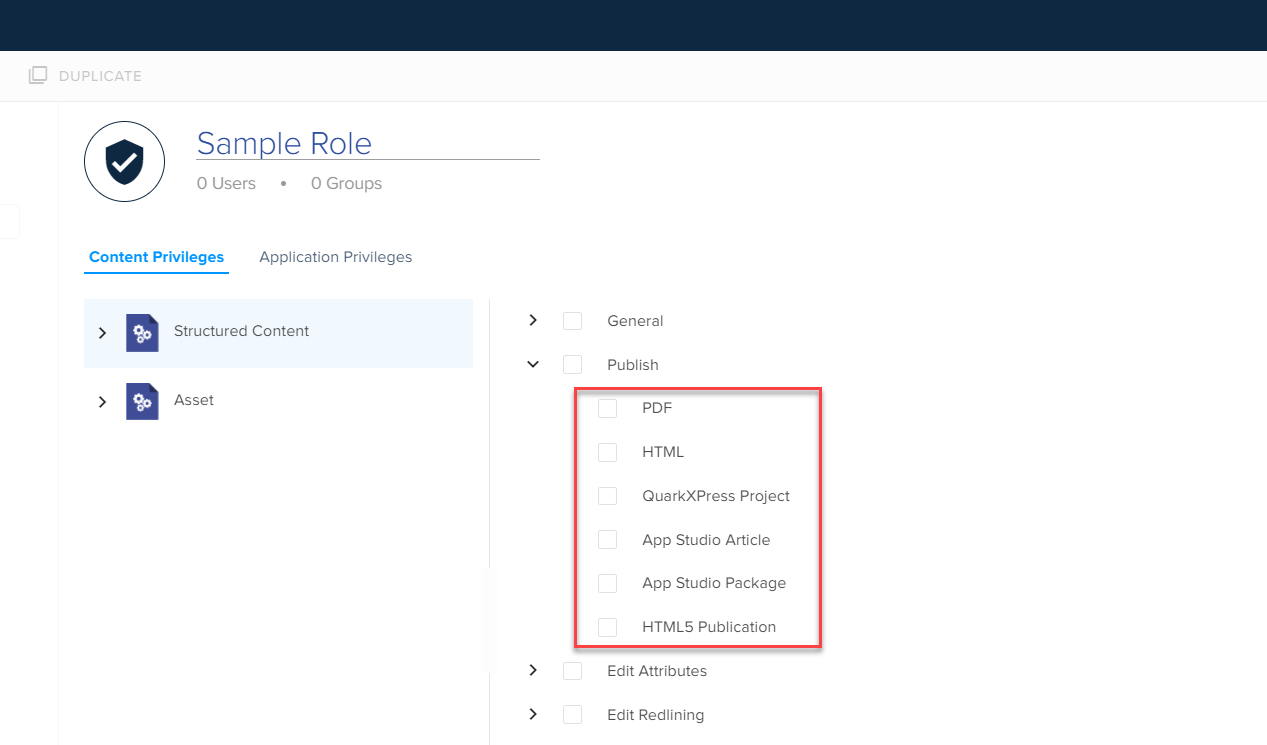
Publish
These privileges are related to the publishing channels available on the server such as PDF, HTML, and so on.
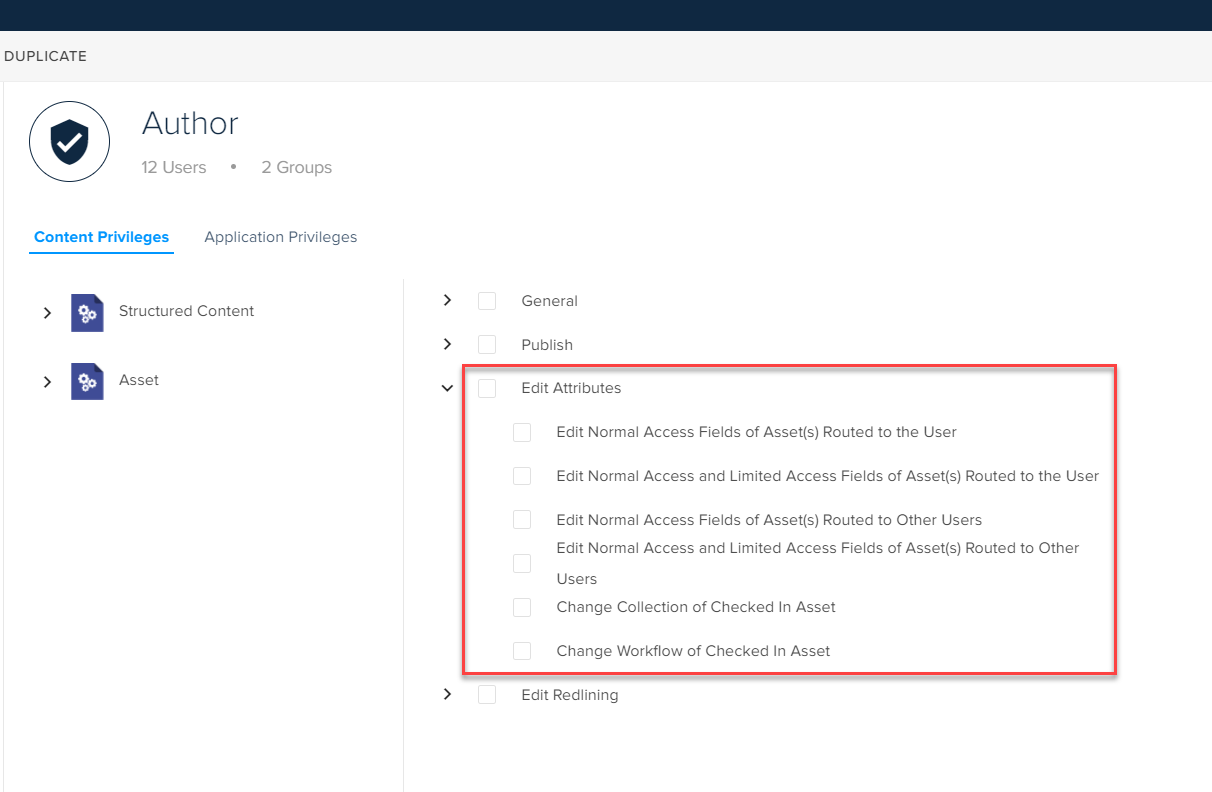
Edit Attributes
These privileges define the level of access related to editing assets, which are as follows:
-
Edit Normtal Access Fields of Asset(s) Routed to the User: Allows you to edit Normal Access attributes for the assets routed to the user.
-
Edit Normal Access and Limited Access Fields of Asset(s) Routed to the User: Allows you to edit Normal Access and Limited Access attributes for the assets routed to the user.
-
Edit Normal Access Fields of Asset(s) Routed to Other Users: Allows you to edit Normal Access attributes for the assets that are routed to other users.
-
Edit Normal Access and Limited Access Fields of Asset(s) Routed to Other Users: Allows you edit Normal Access and Limited Access attributes the assets that are routed to other users.
-
Change Collection of Checked-In Asset: Allows you to move a checked-in asset to a different collection on the server.
-
Change Workflow of Checked-In Asset: Allows you to change the workflow of checked-in assets.
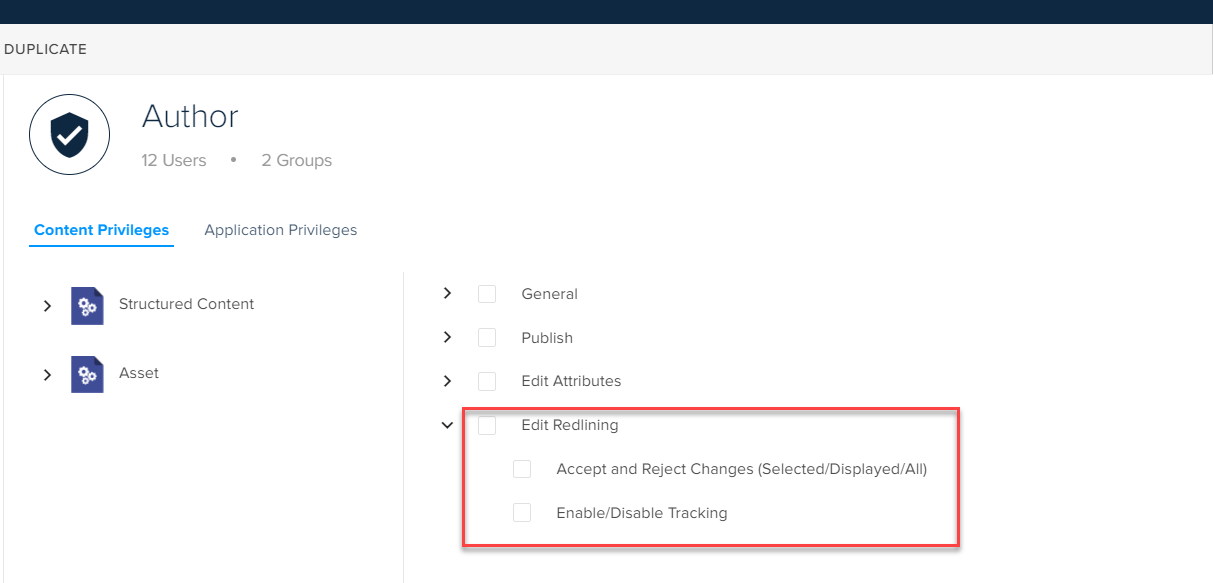
Edit Redlining
These privileges define the permissions related to reviews and track changes, which are as follows:
-
Accept and Reject Changes (Selected/Displayed/All): Allows you to accept and reject redlining (track) changes.
-
Enable/Disable Tracking: Allows you to turn on/off the red line tracking.
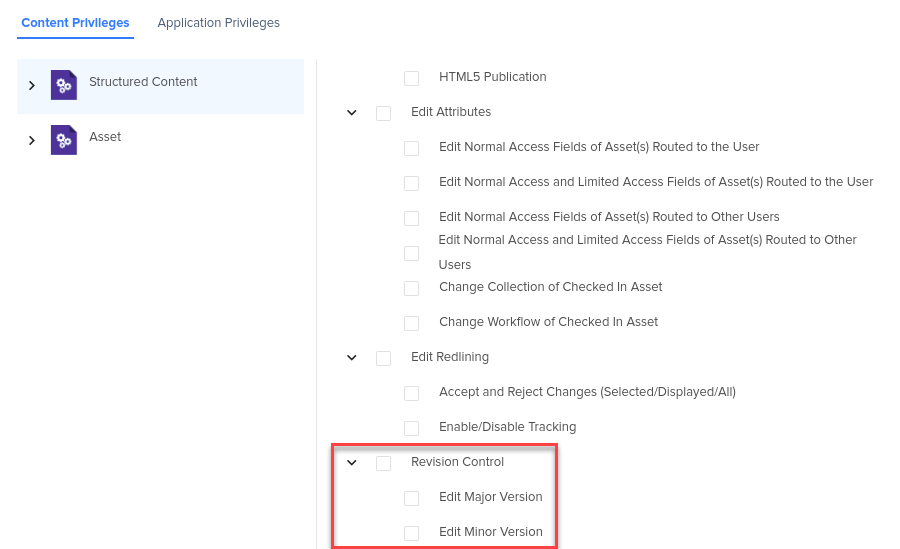
Revision Control
These privileges define the permissions related to whether a user can assign a major/minor version to a document.
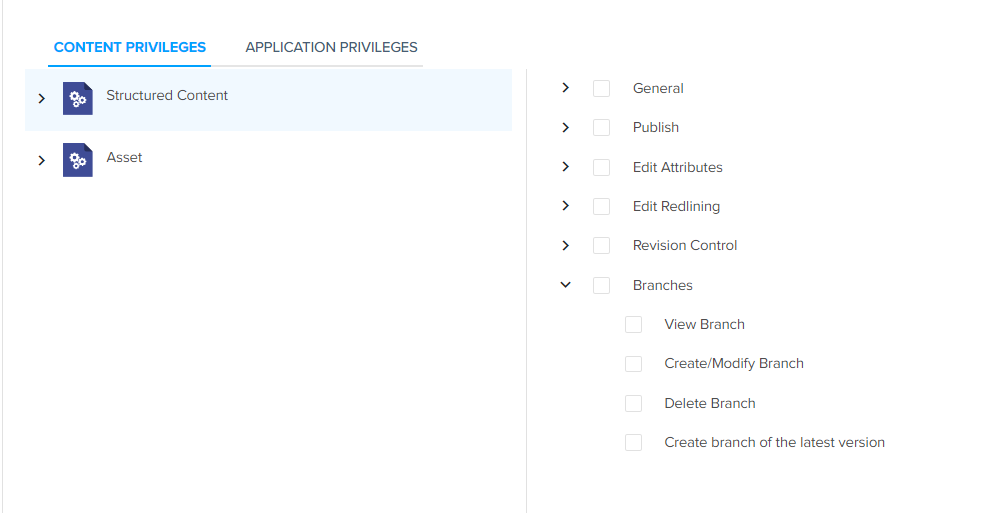
Branches
These privileges define the permissions related to branching, which are as follows:
-
View Branch: Allows you to view the branches of an asset.
-
Create/Modify Branch: Allows you to create a branch of an older version of an asset and switch to a different branch.
-
Delete Branch: Allows you to delete branches of an asset.
-
Create a branch of the latest version: Allows you to create a branch of the latest version of an asset.
Application Privileges
Application privileges define the degree and type of access that you can have to different application features.
Application privileges are categorized as follows:
API Permissions
This privilege allows a user to perform actions on the platform by executing APIs instead of using the options on the user interface.
Administration
These privileges are related to workflow and file management, which are as follows:
-
Attributes: Allows you to view, create/modify, and delete asset attributes.
-
Redlining: Allows you to accept/reject changes and enable/disable red line change tracking.
-
Users and Groups: Allows you to view, create/modify, and delete new users and groups.
-
Drop-down Menu Attribute Lists: Allows you to view, create/modify, and delete lists within drop-down menu attributes.
-
Roles: Allows you to view, create/modify, and delete roles.
-
Replication:
-
Workflows: Allows you to view, create/modify, and delete workflows.
-
Content Types: Allows you to view, create/modify, and delete content types.
-
Automation Channels: Allows you to view, create/modify, and delete automation channels.
-
Forms: Allows you to view and modify forms.
-
Relations: Allows you to view, create/modify, and delete relationships between assets.
-
Content Models: Allows you to view, create/modify, and delete content models.
Analytics
These privileges allow you to decide which of the following analytics you want to display to a user:
-
General Analytics
-
Asset Trends
-
Asset Audit Details
Author
This privilege allows you to display/hide the Author tab for a user.
Docurated
This privilege allows you to display/hide the Docurated logo for a user.
Workspace
These privileges are related to the file manager of the QPP server, which are as follows:
-
Collections: Allows you to create, delete, duplicate, move, copy, browse, and modify collections.
-
Collection Templates: Allows you to create, delete, duplicate, move, and copy collection templates.
-
Searches: Allows you to create/modify, share/unshare, and delete searches. It also lets you enable enhanced search displays.
-
Live Preview: Allows you to view a live preview of rendered XML documents in the References/Preview pane of Quark Publishing Platform and Quark XML Author Adapter.
Attributes
The Attributes pane allows you to create and configure attributes of assets, article components, collection types, and layout types. The user interface of the Attributes page contains a few top bar actions (such as add and delete attribute/value list), lists the attributes (along with type, creator, modifier, and dates) and value-lists available on the server in their respective tabs, and some generic page operations.
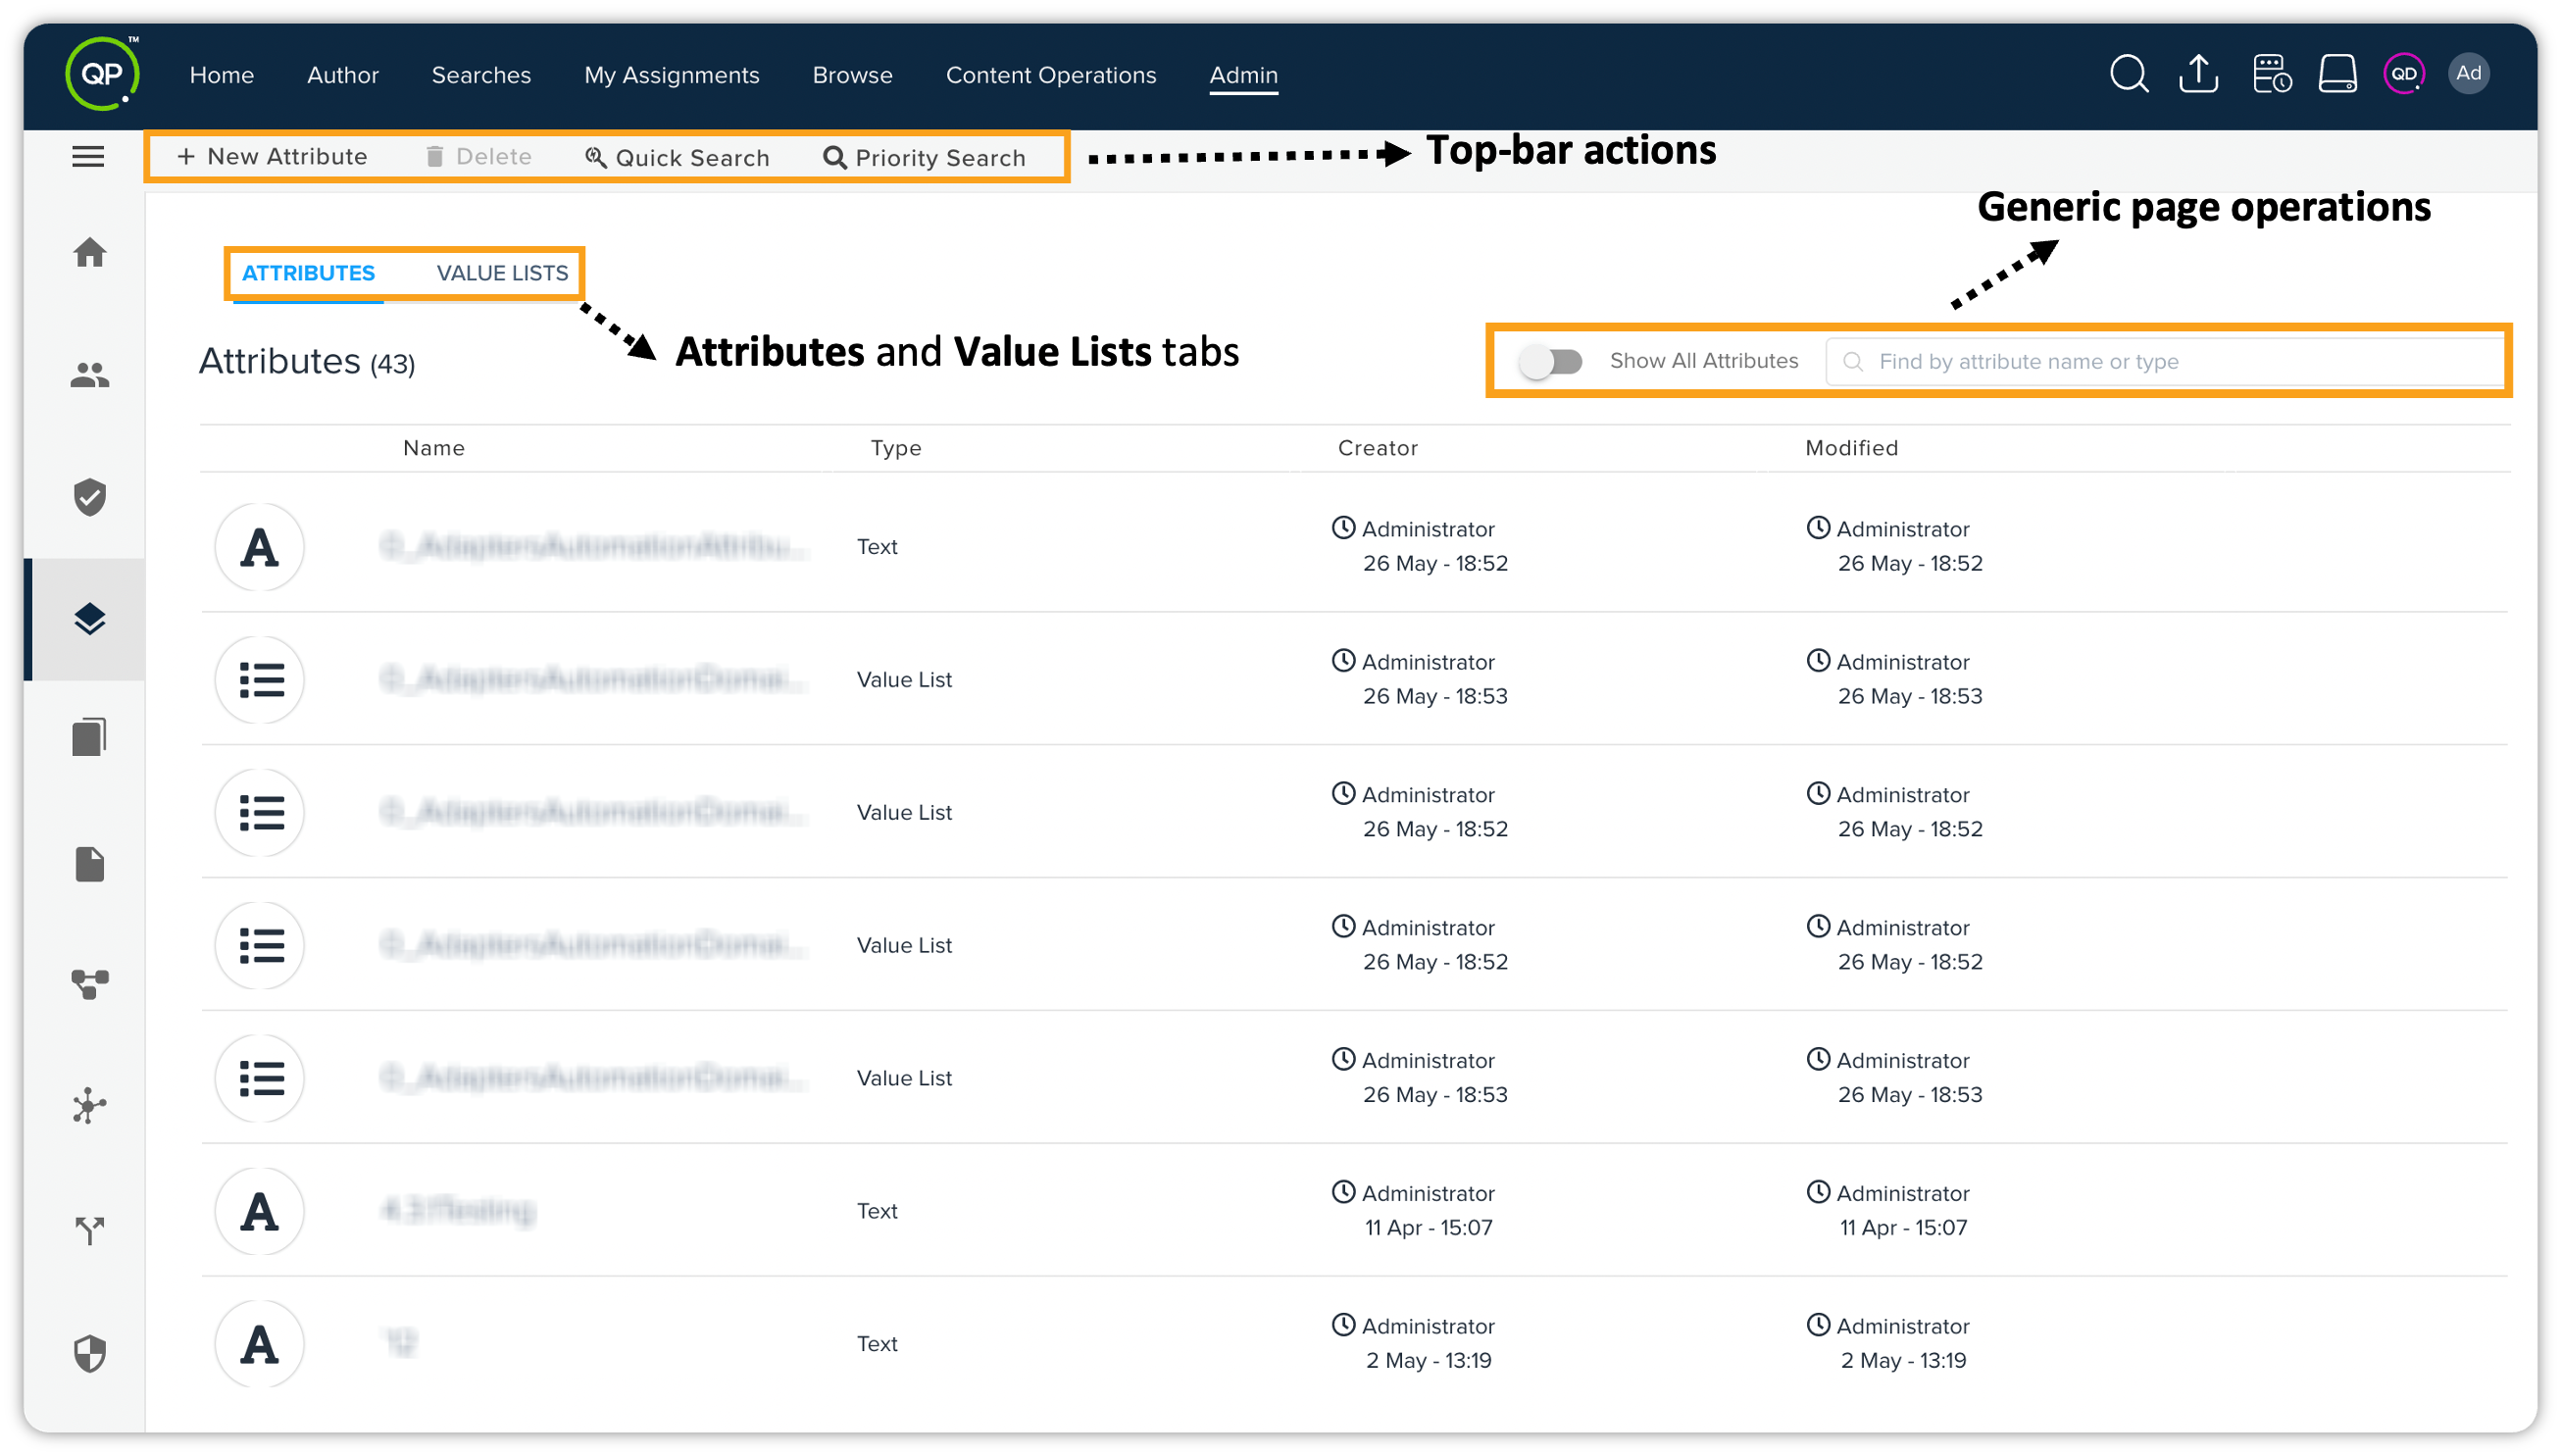
Attributes Tab
All content types and assets have a unique set of attributes on QPP. The Attributes tab allows you to manage these attributes that include some system-generated information such as the time and date of an asset's creation and previous modification, some platform-specific properties such as Checked Out By, and some custom properties that you may define based on your workflow requirements; for example, a workflow status for image approval.
There are eight types of properties that QPP supports, which are as follows:
-
Text: Any text properties wherein you also have to define the maximum text length.
-
Date: A date property wherein you have to define format and date range.
-
Time: A time property wherein you have to define valid time ranges.
-
Date and Time: A combined date and time property, wherein you have to define valid ranges.
-
Boolean: A Boolean property for which you can set the value as true or false.
-
Numeric: A number property wherein you have to define a number range.
-
Measurement: A measurement property, such as file size, wherein you have to define a measurement range.
-
List: A dropdown property with several list values.
-
Json: A powerful and flexible way to model complex, structured metadata directly within the platform. You can define nested objects and arrays to store multifaceted data.
Create a New Attribute
To create a new attribute, follow the steps shown below:
-
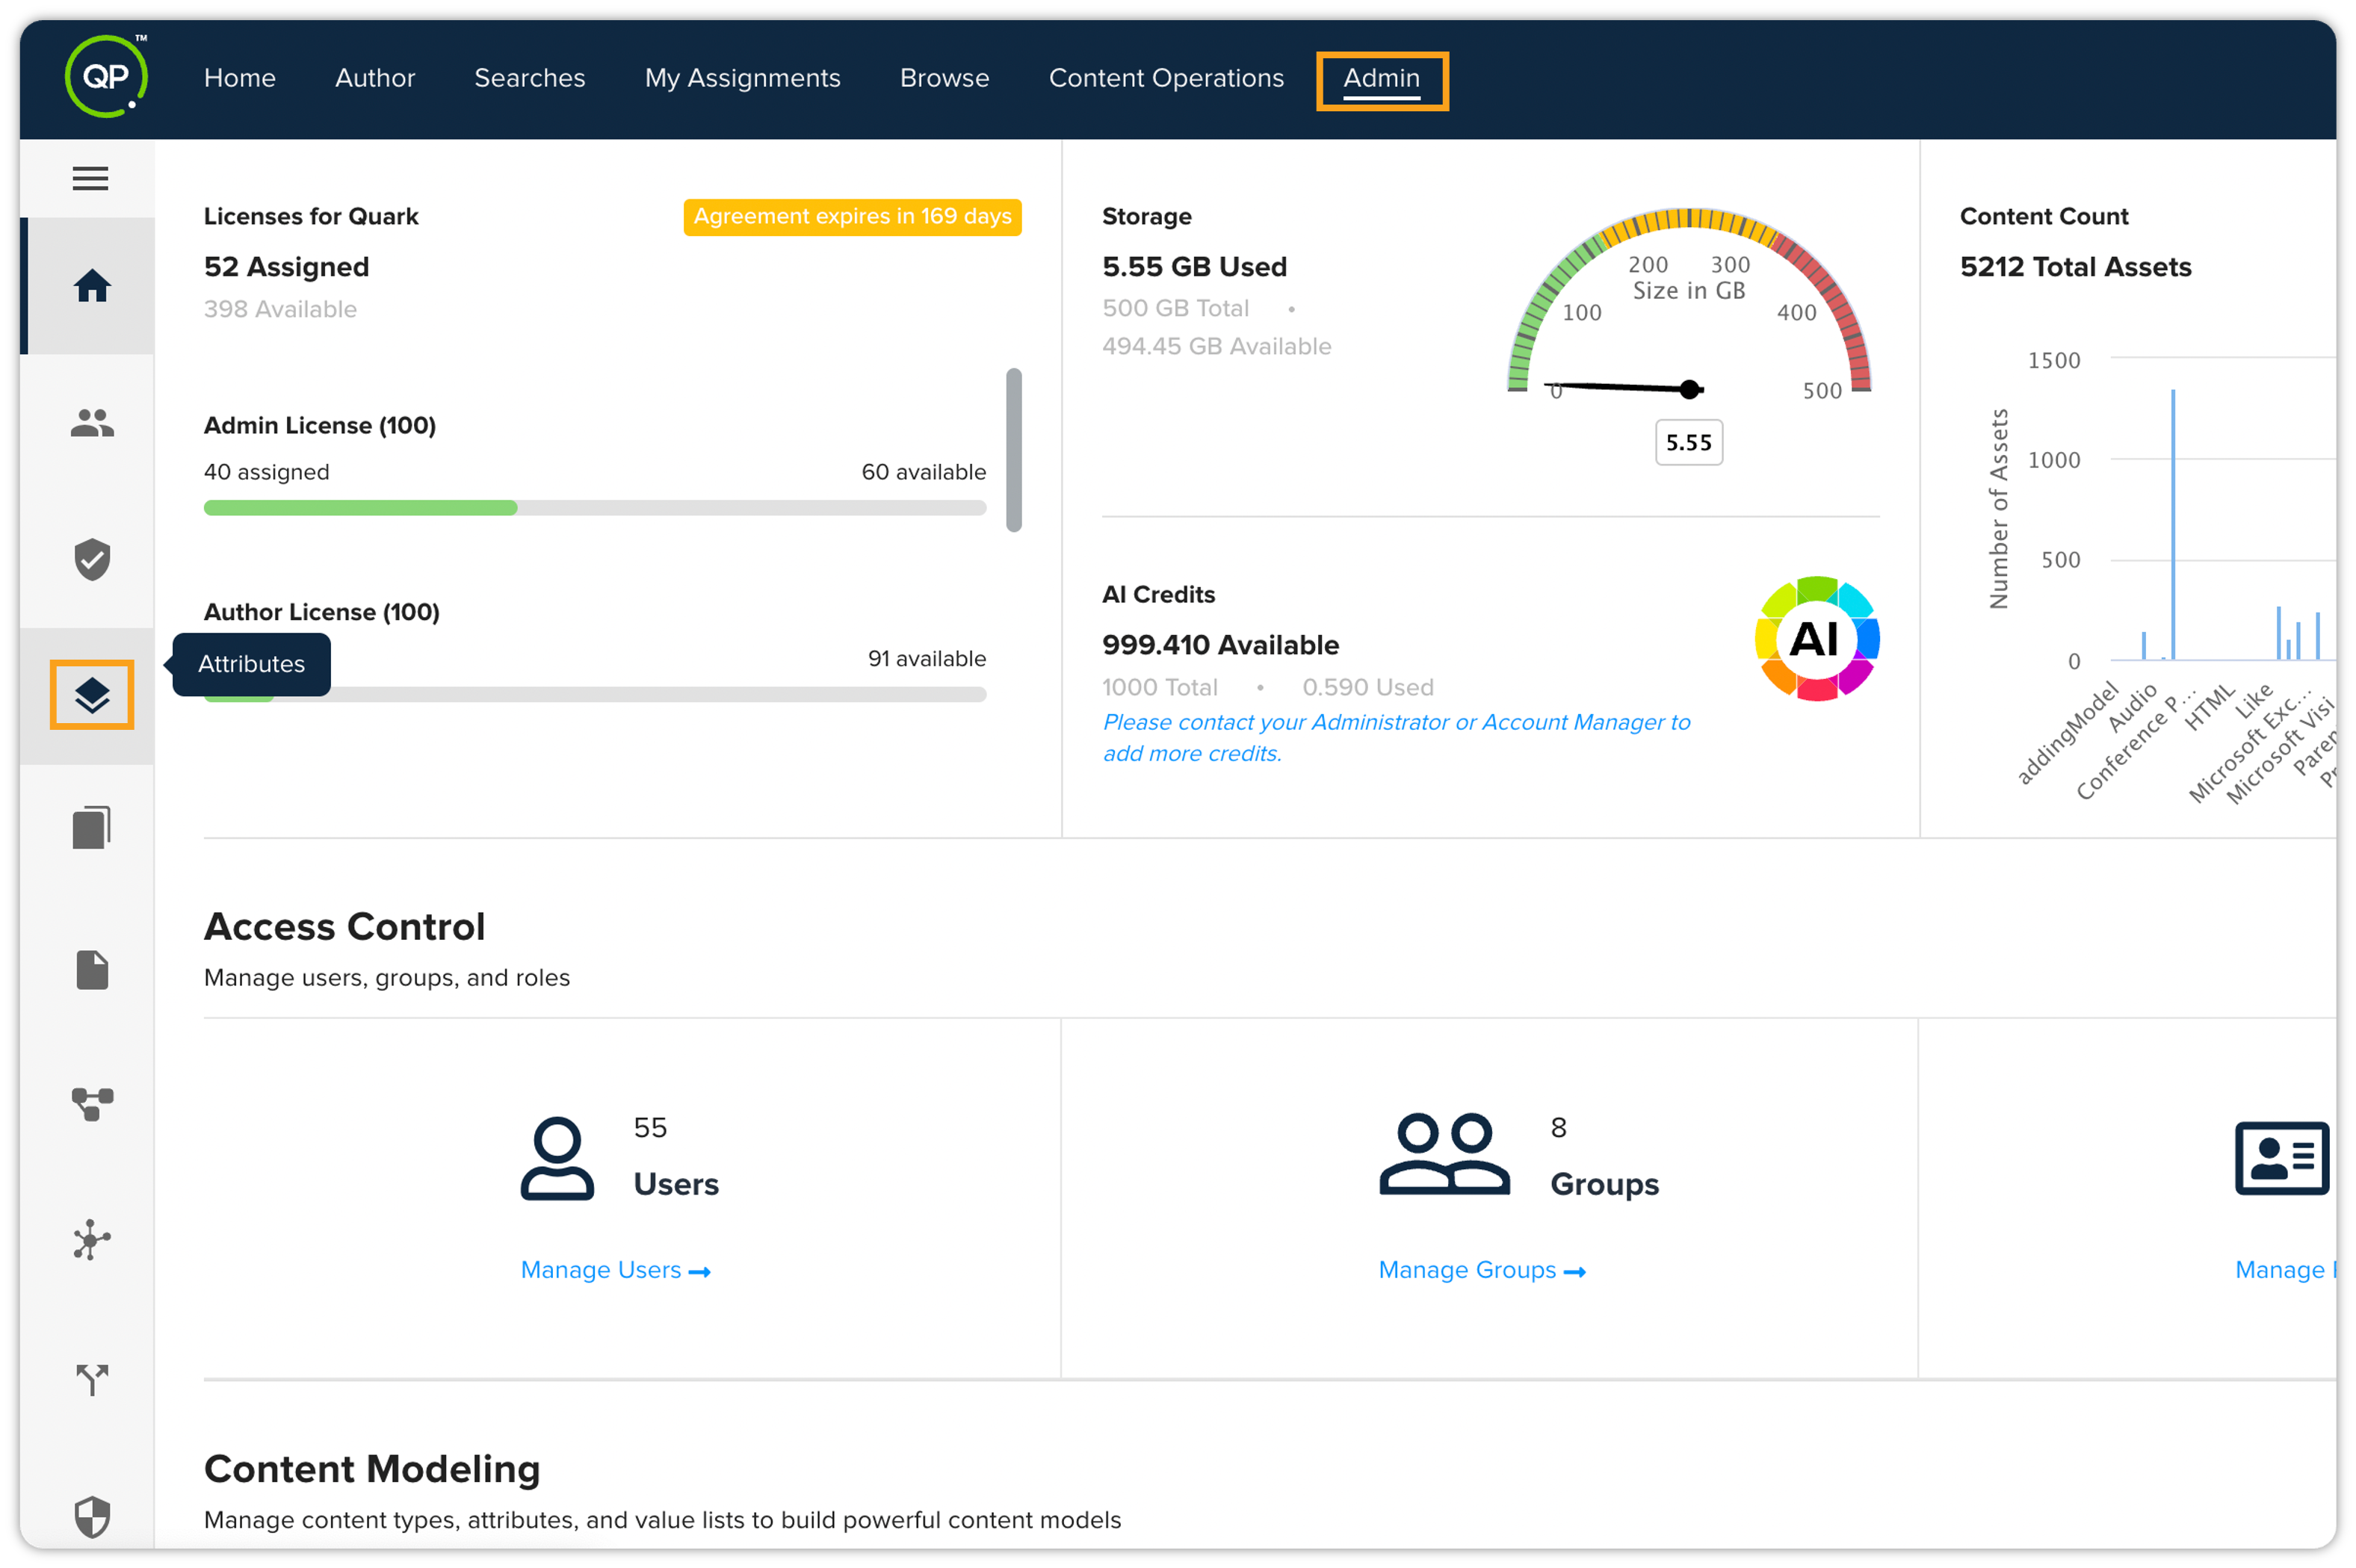
On the home page of QPP, click the Admin tab and then click Attributes in the list pane on the left, which is displayed vertically.
-
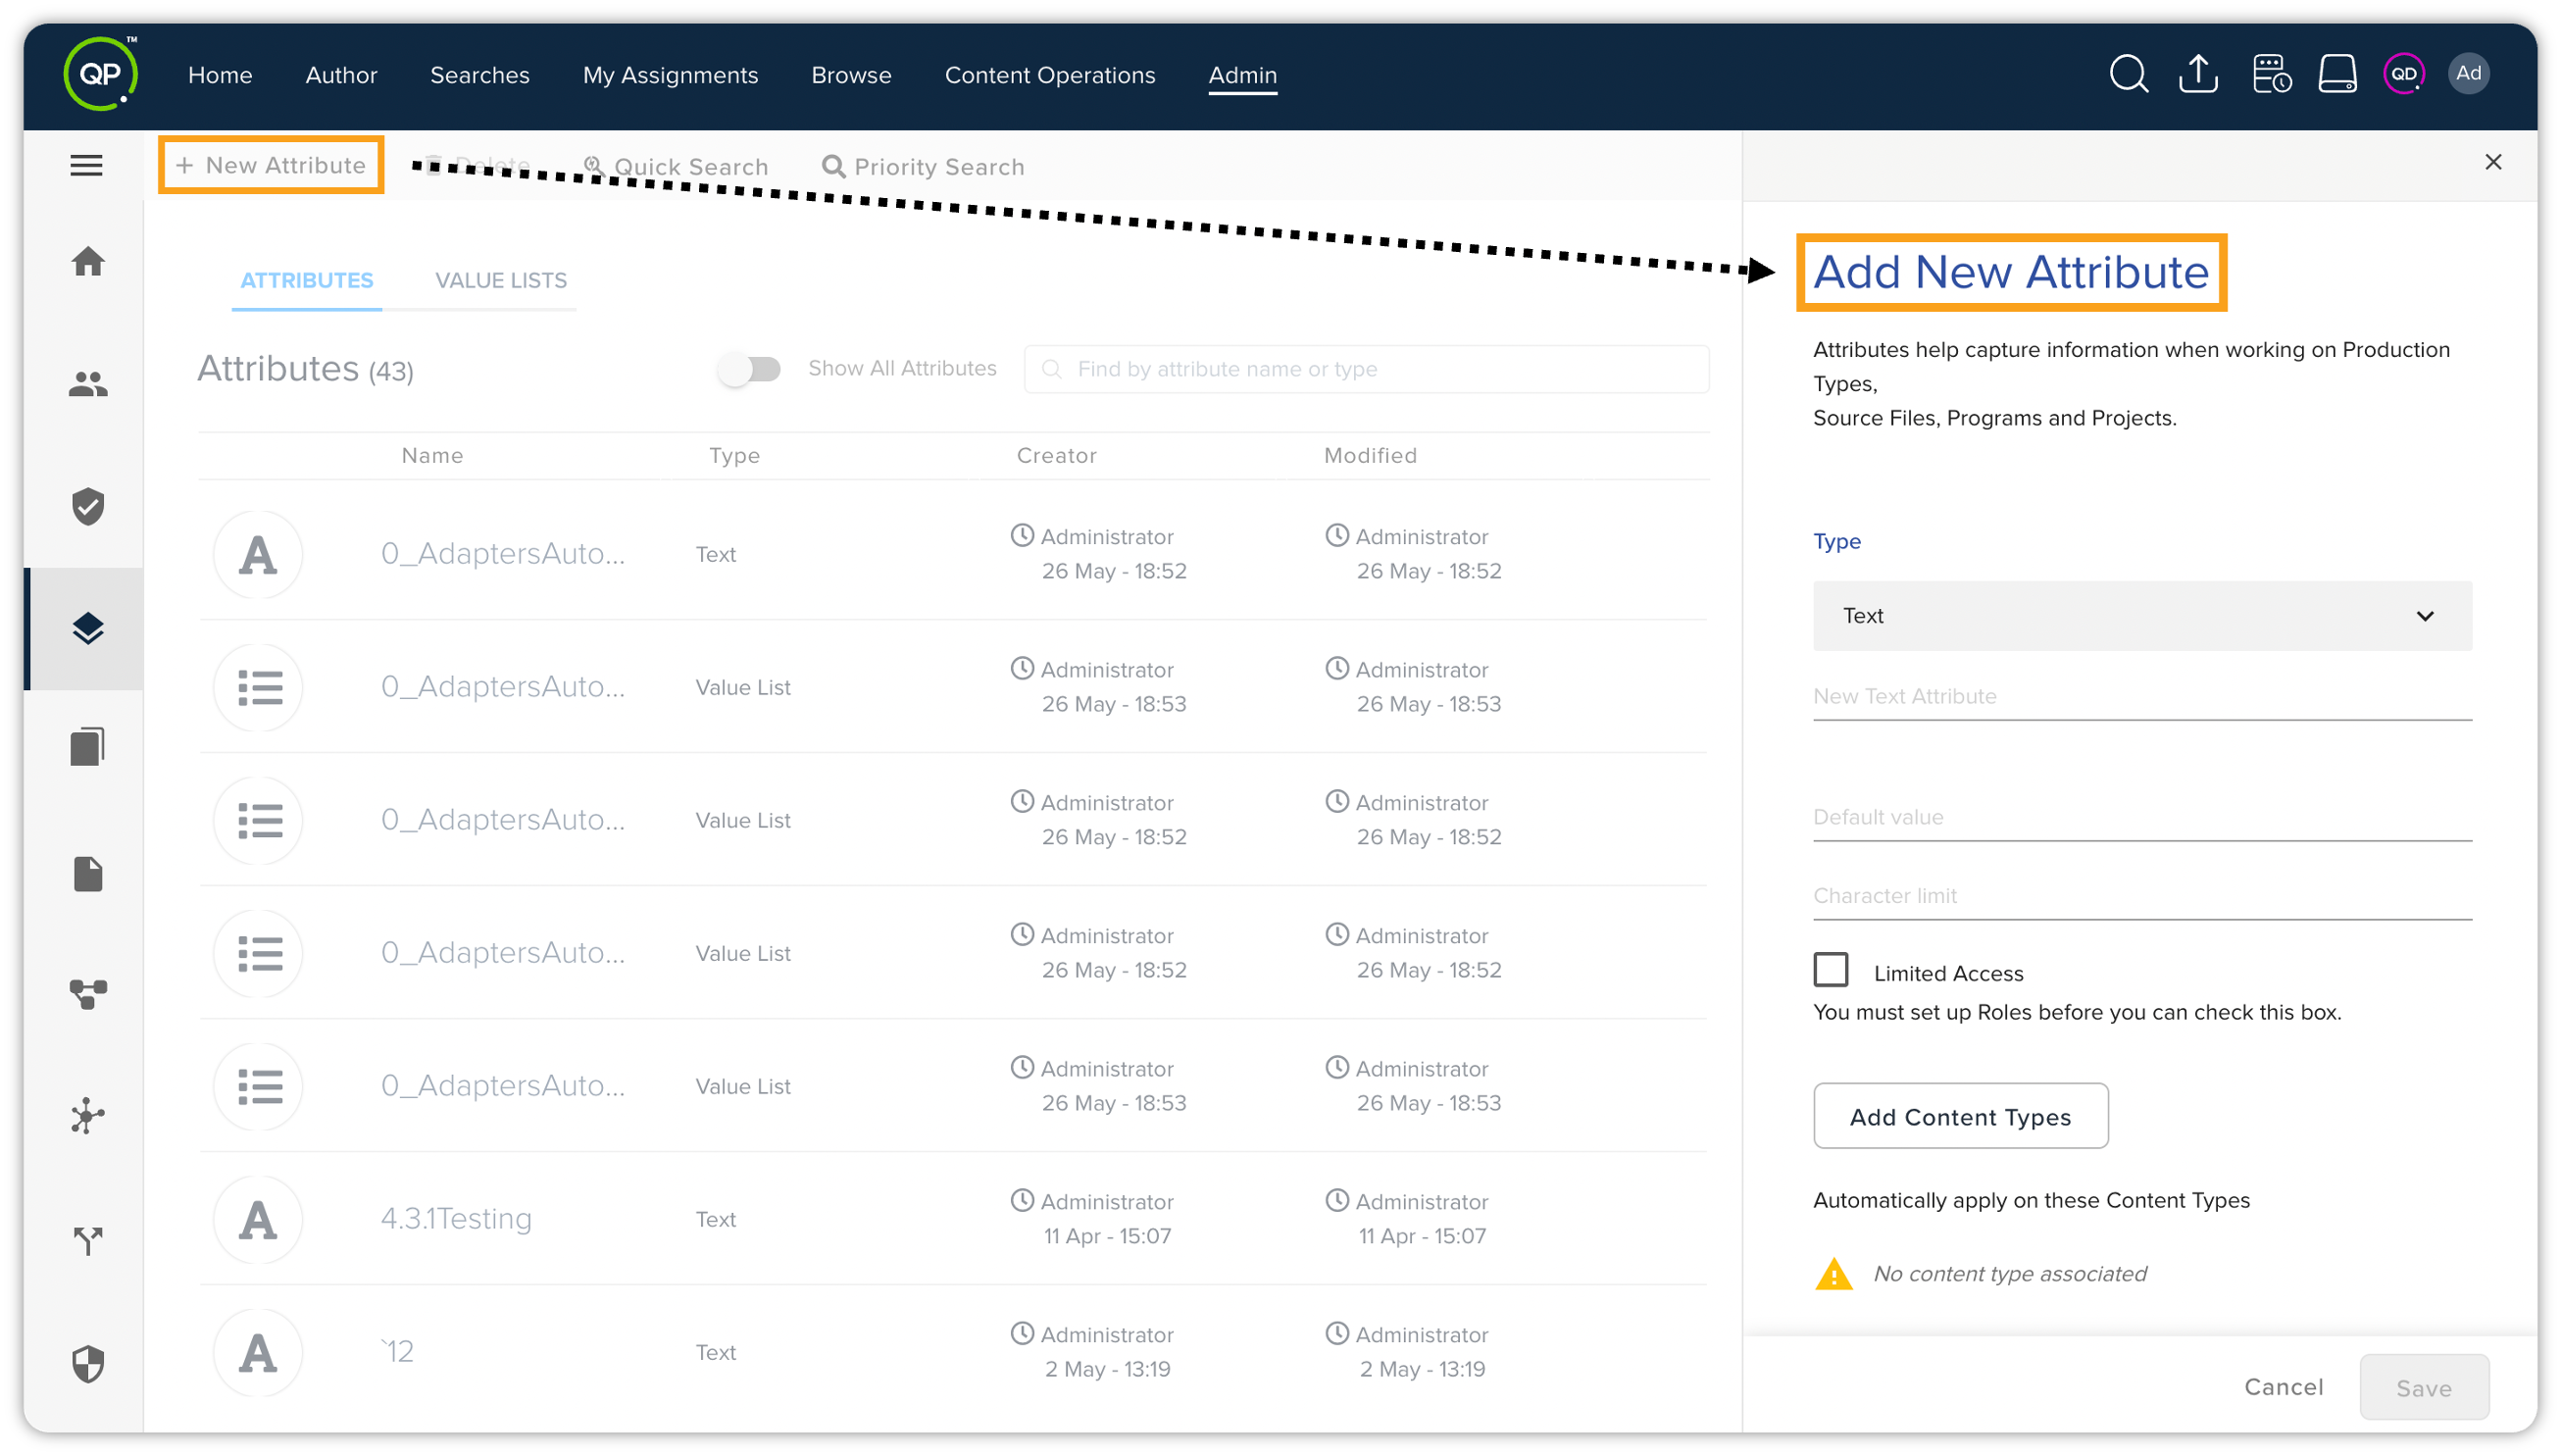
On the Attributes tab, click + New Attribute to open the Add New Attribute pane.
-
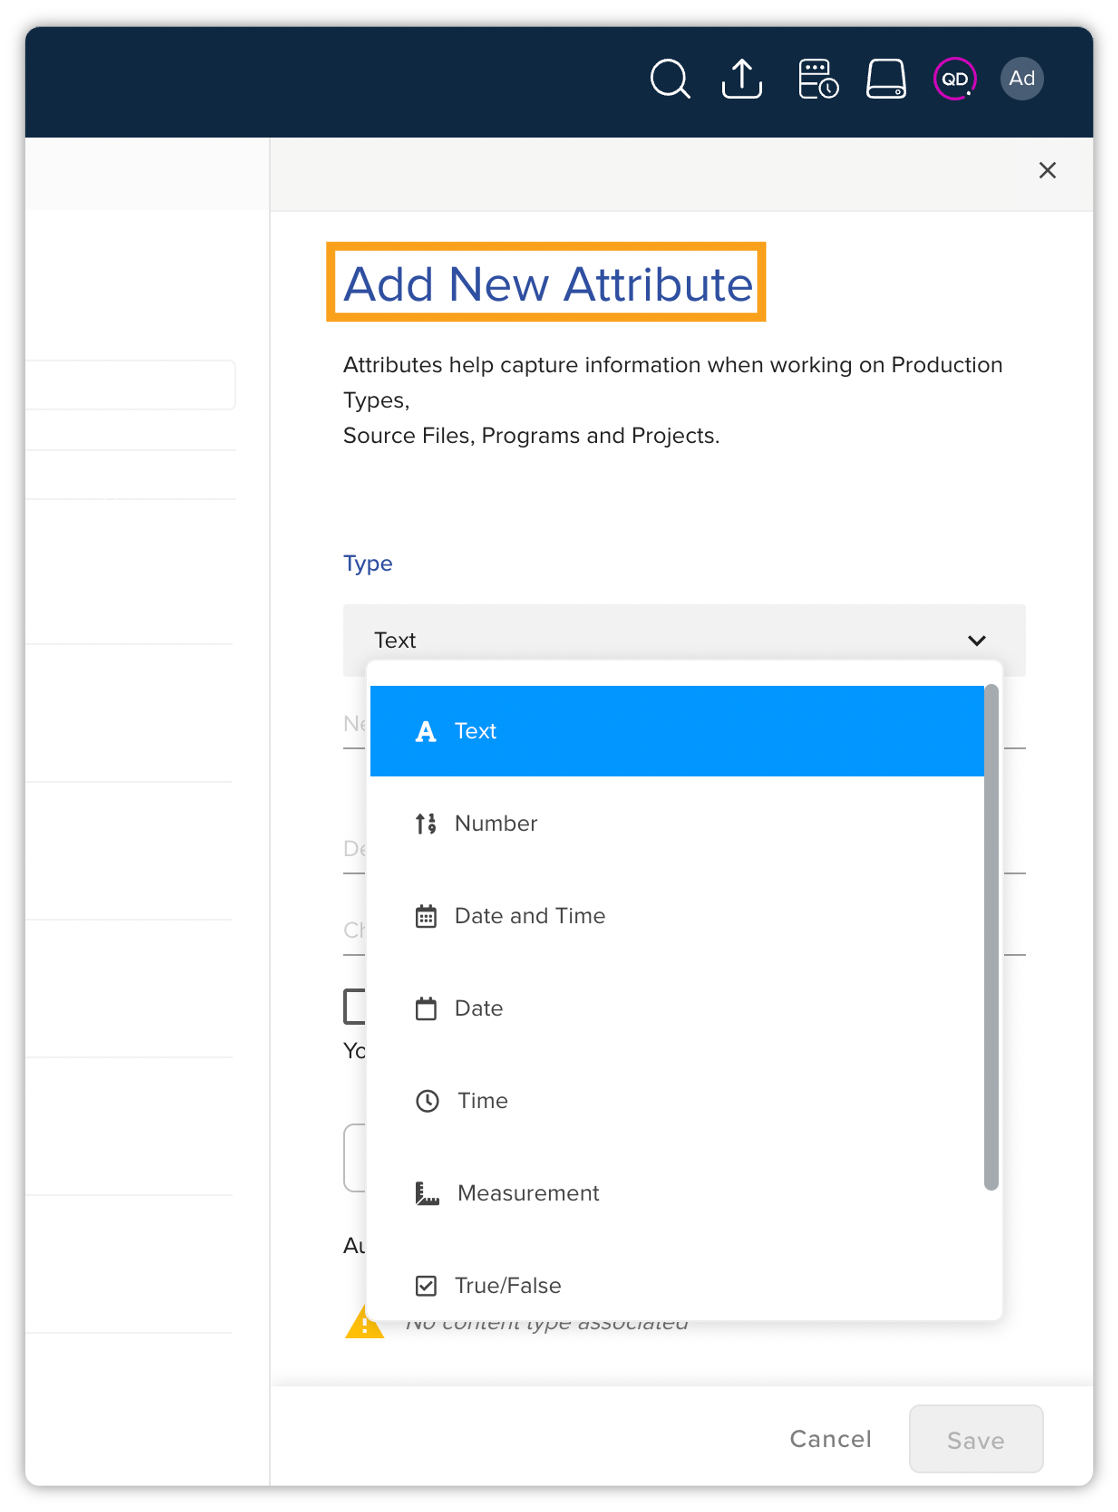
In the Add New Attribute pane, select an attribute type from the Type dropdown menu.
-
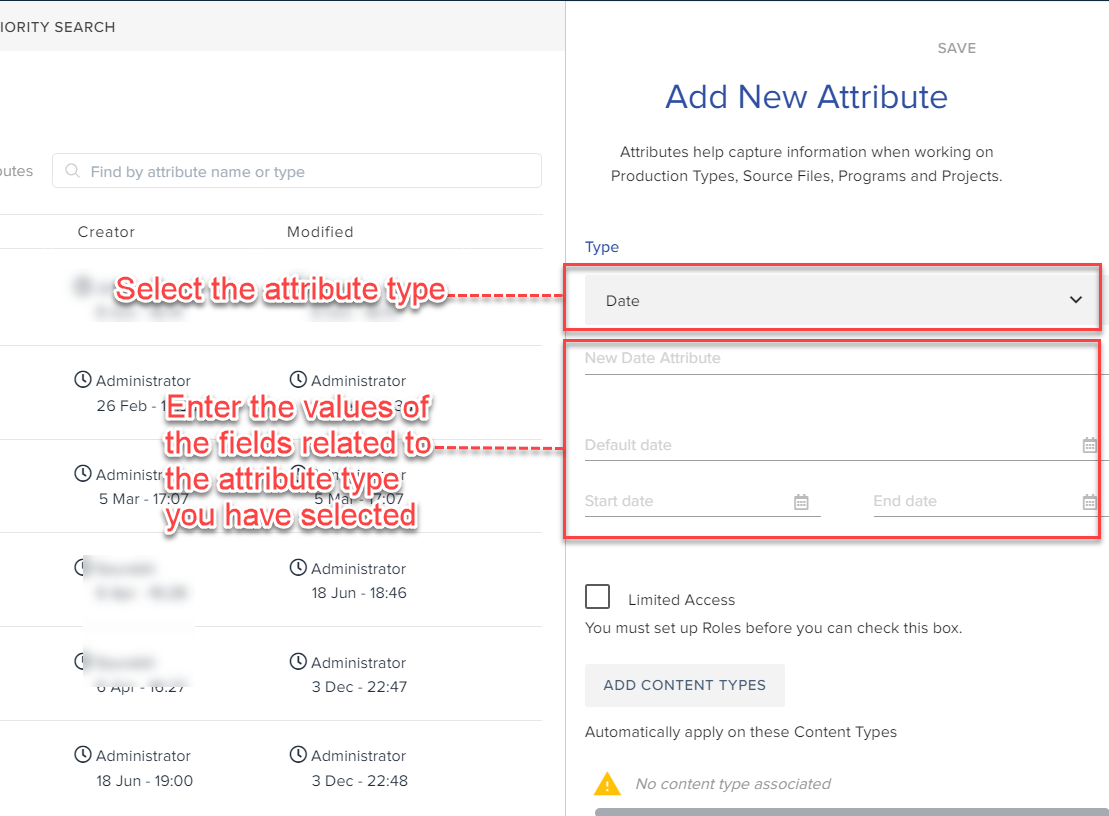
Enter the required fields related to the type of attribute you have selected.
-
Select whether the attribute will have limited or normal access.
-
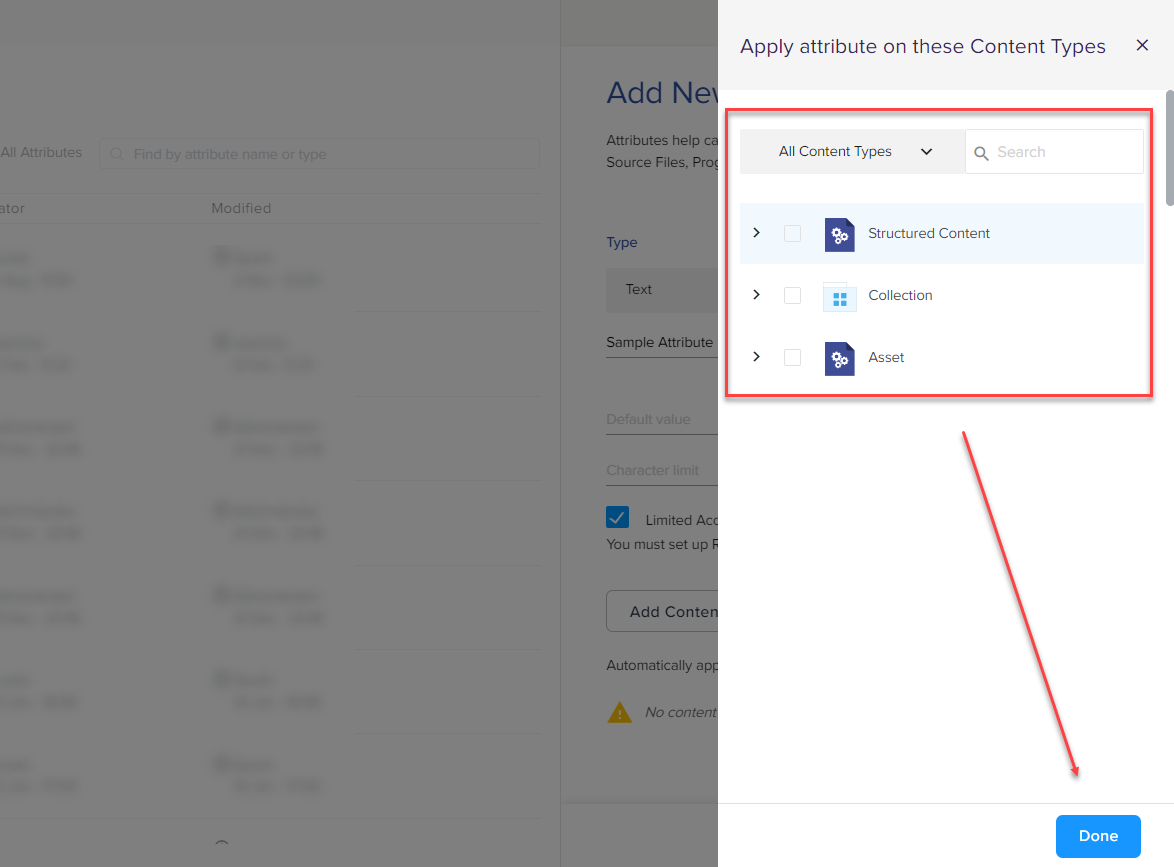
Click Add Content Types to open a pane from where you can select a content type for the attribute and then click Done.
-
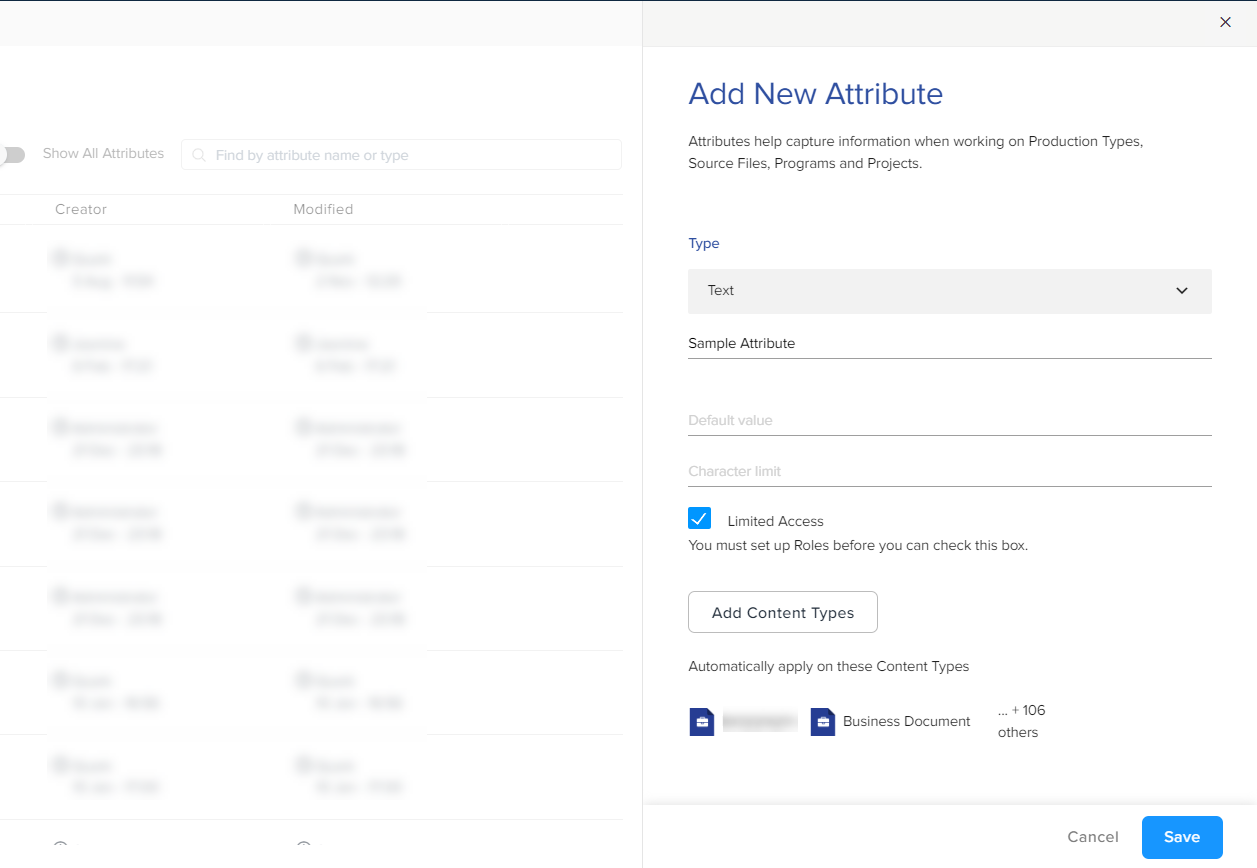
Select Save.
Create a JSON Attribute
To create a JSON attribute, follow these steps:
-
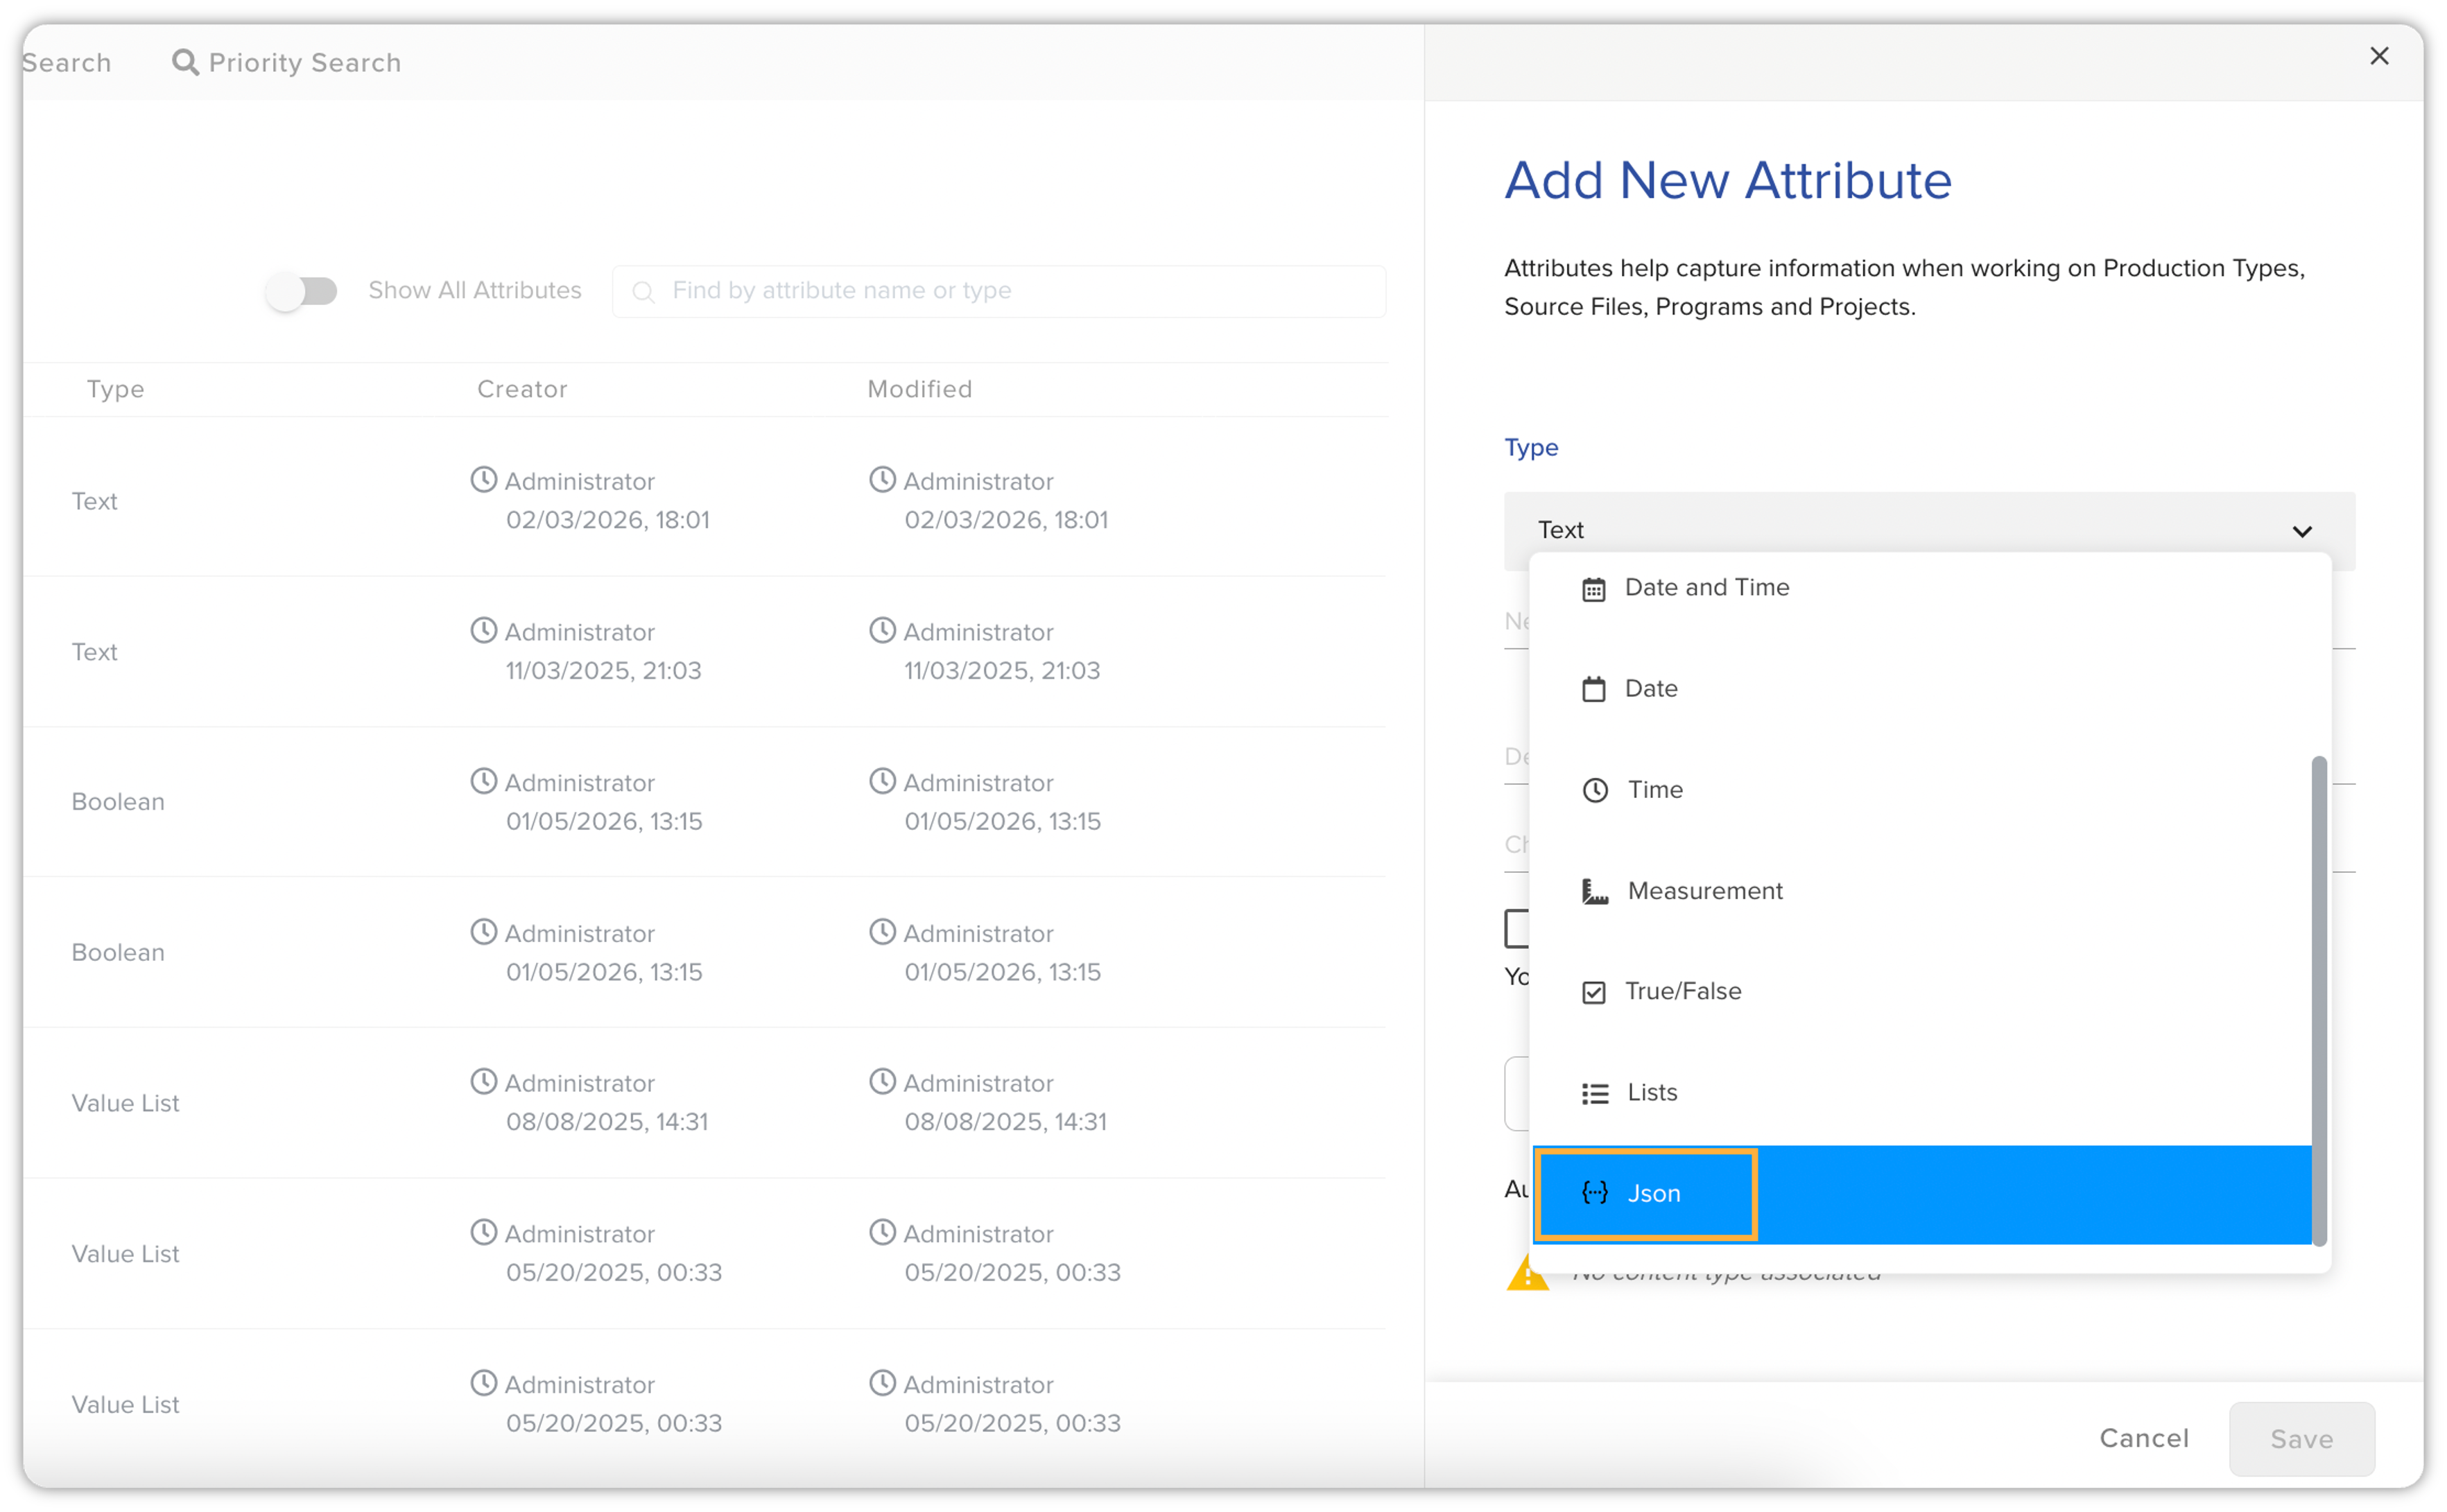
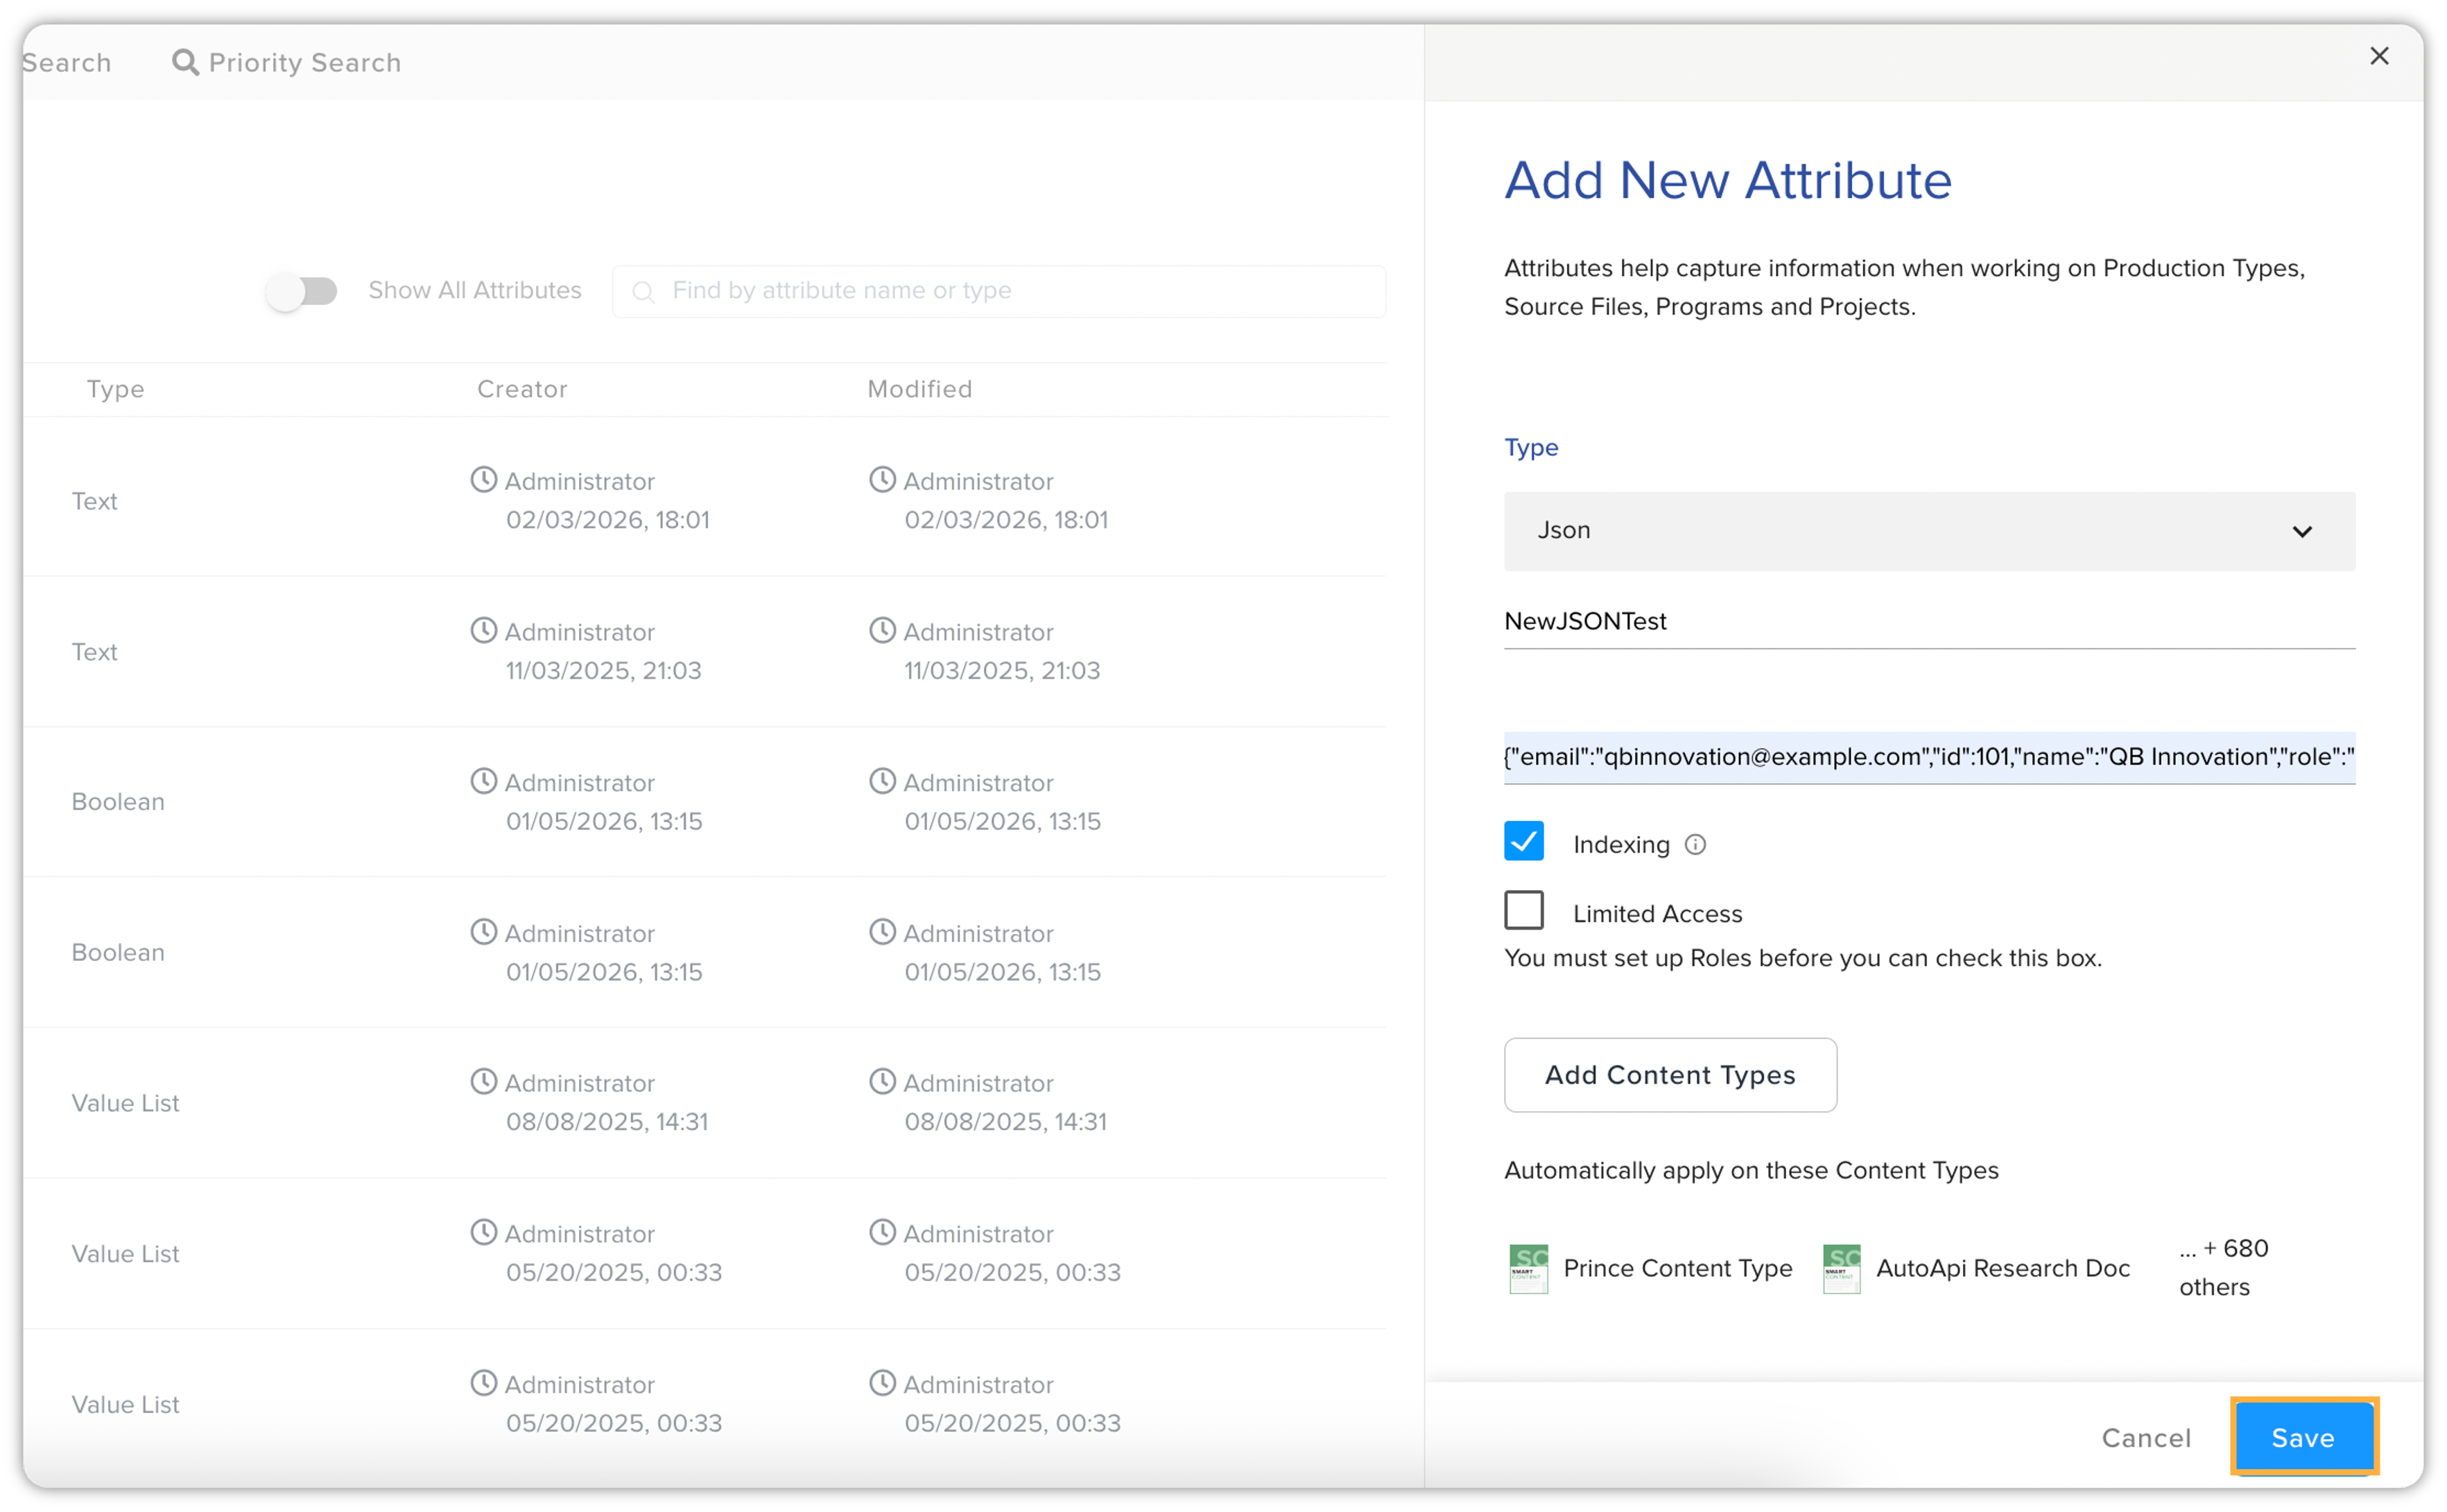
On the Add New Attribute pane, select Json from the dropdown.
-
Enter a unique name for your Json attribute and provide the default Json object (e.g., {"email": "user@example.com", "id": 101}).
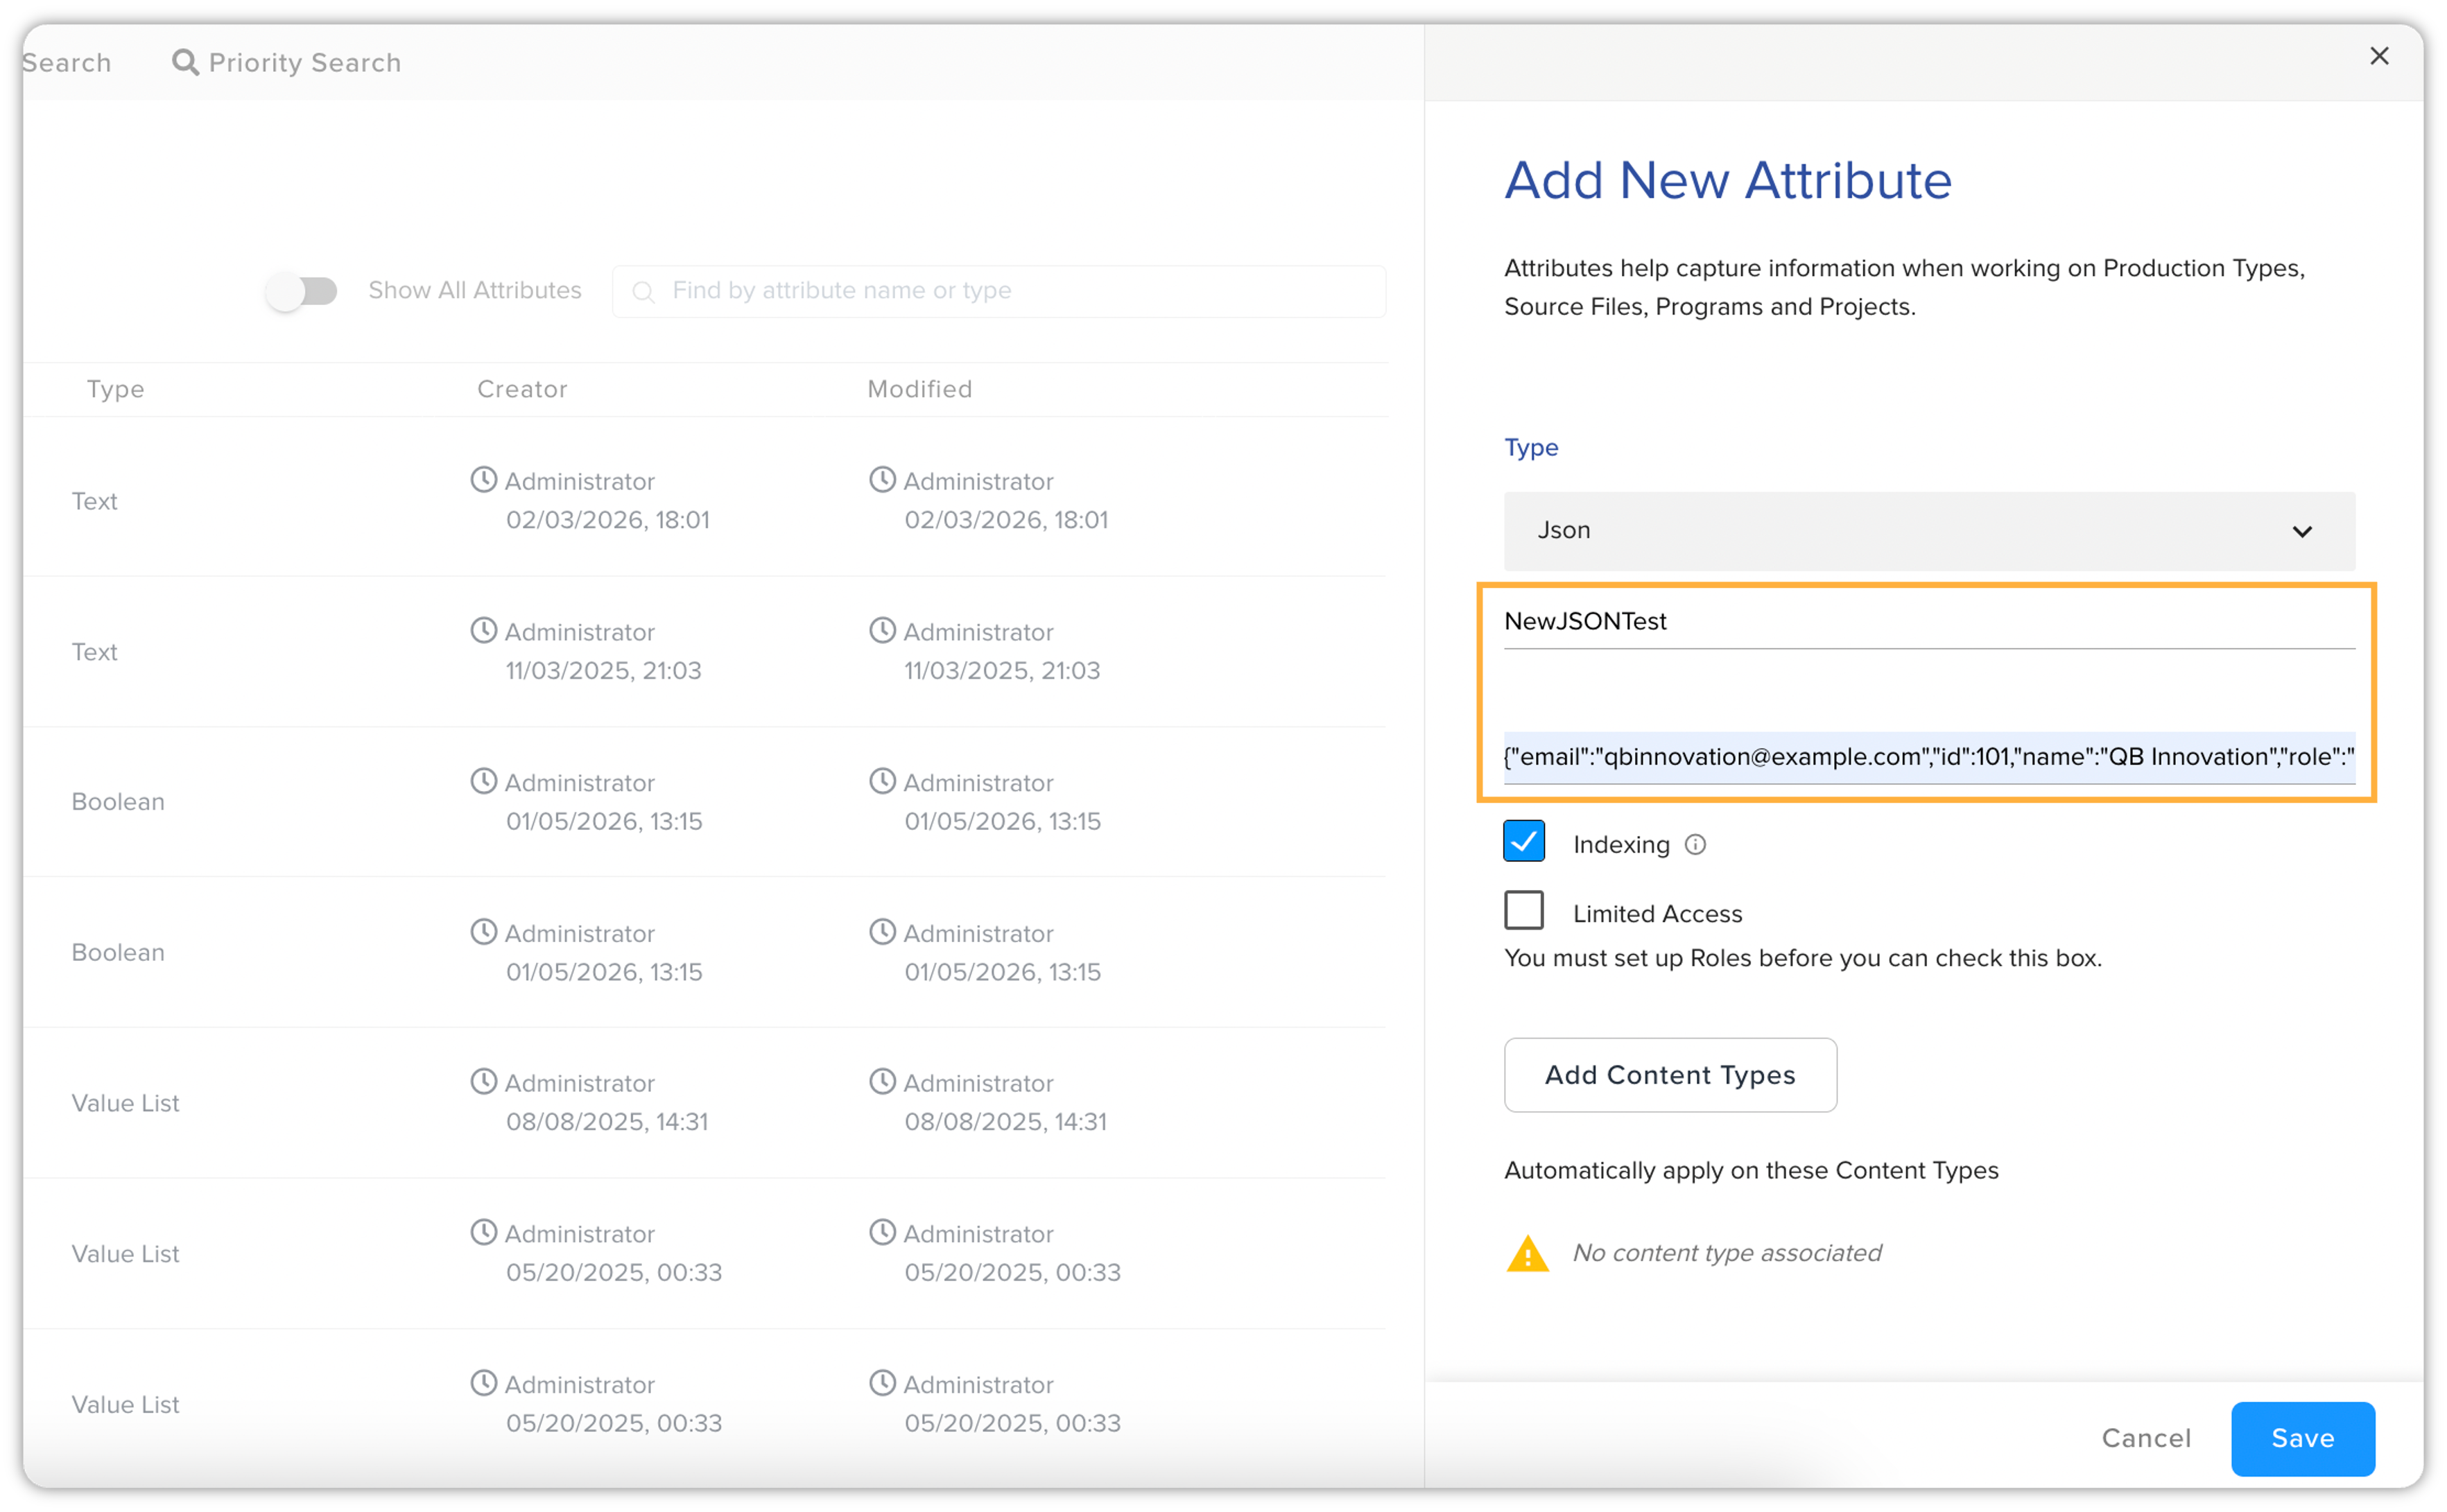 The platform strictly validates JSON syntax. If the input is malformed (e.g., missing a quote or a bracket), an "Invalid Value" alert will appear. You must provide a valid Json structure to proceed.
-
Choose whether to enable the Indexing checkbox.
Indexing: Enable this to allow Key-Level Searching. When checked, you can query specific fields within the Json (e.g., jsonName.key). When unchecked, only a general text search across the entire attribute is supported. -
Select the Limited Access checkbox if you wish to restrict this attribute to specific roles. If selected, you must specify which roles have permission to view or edit it; otherwise, the attribute will be accessible to all users.
-
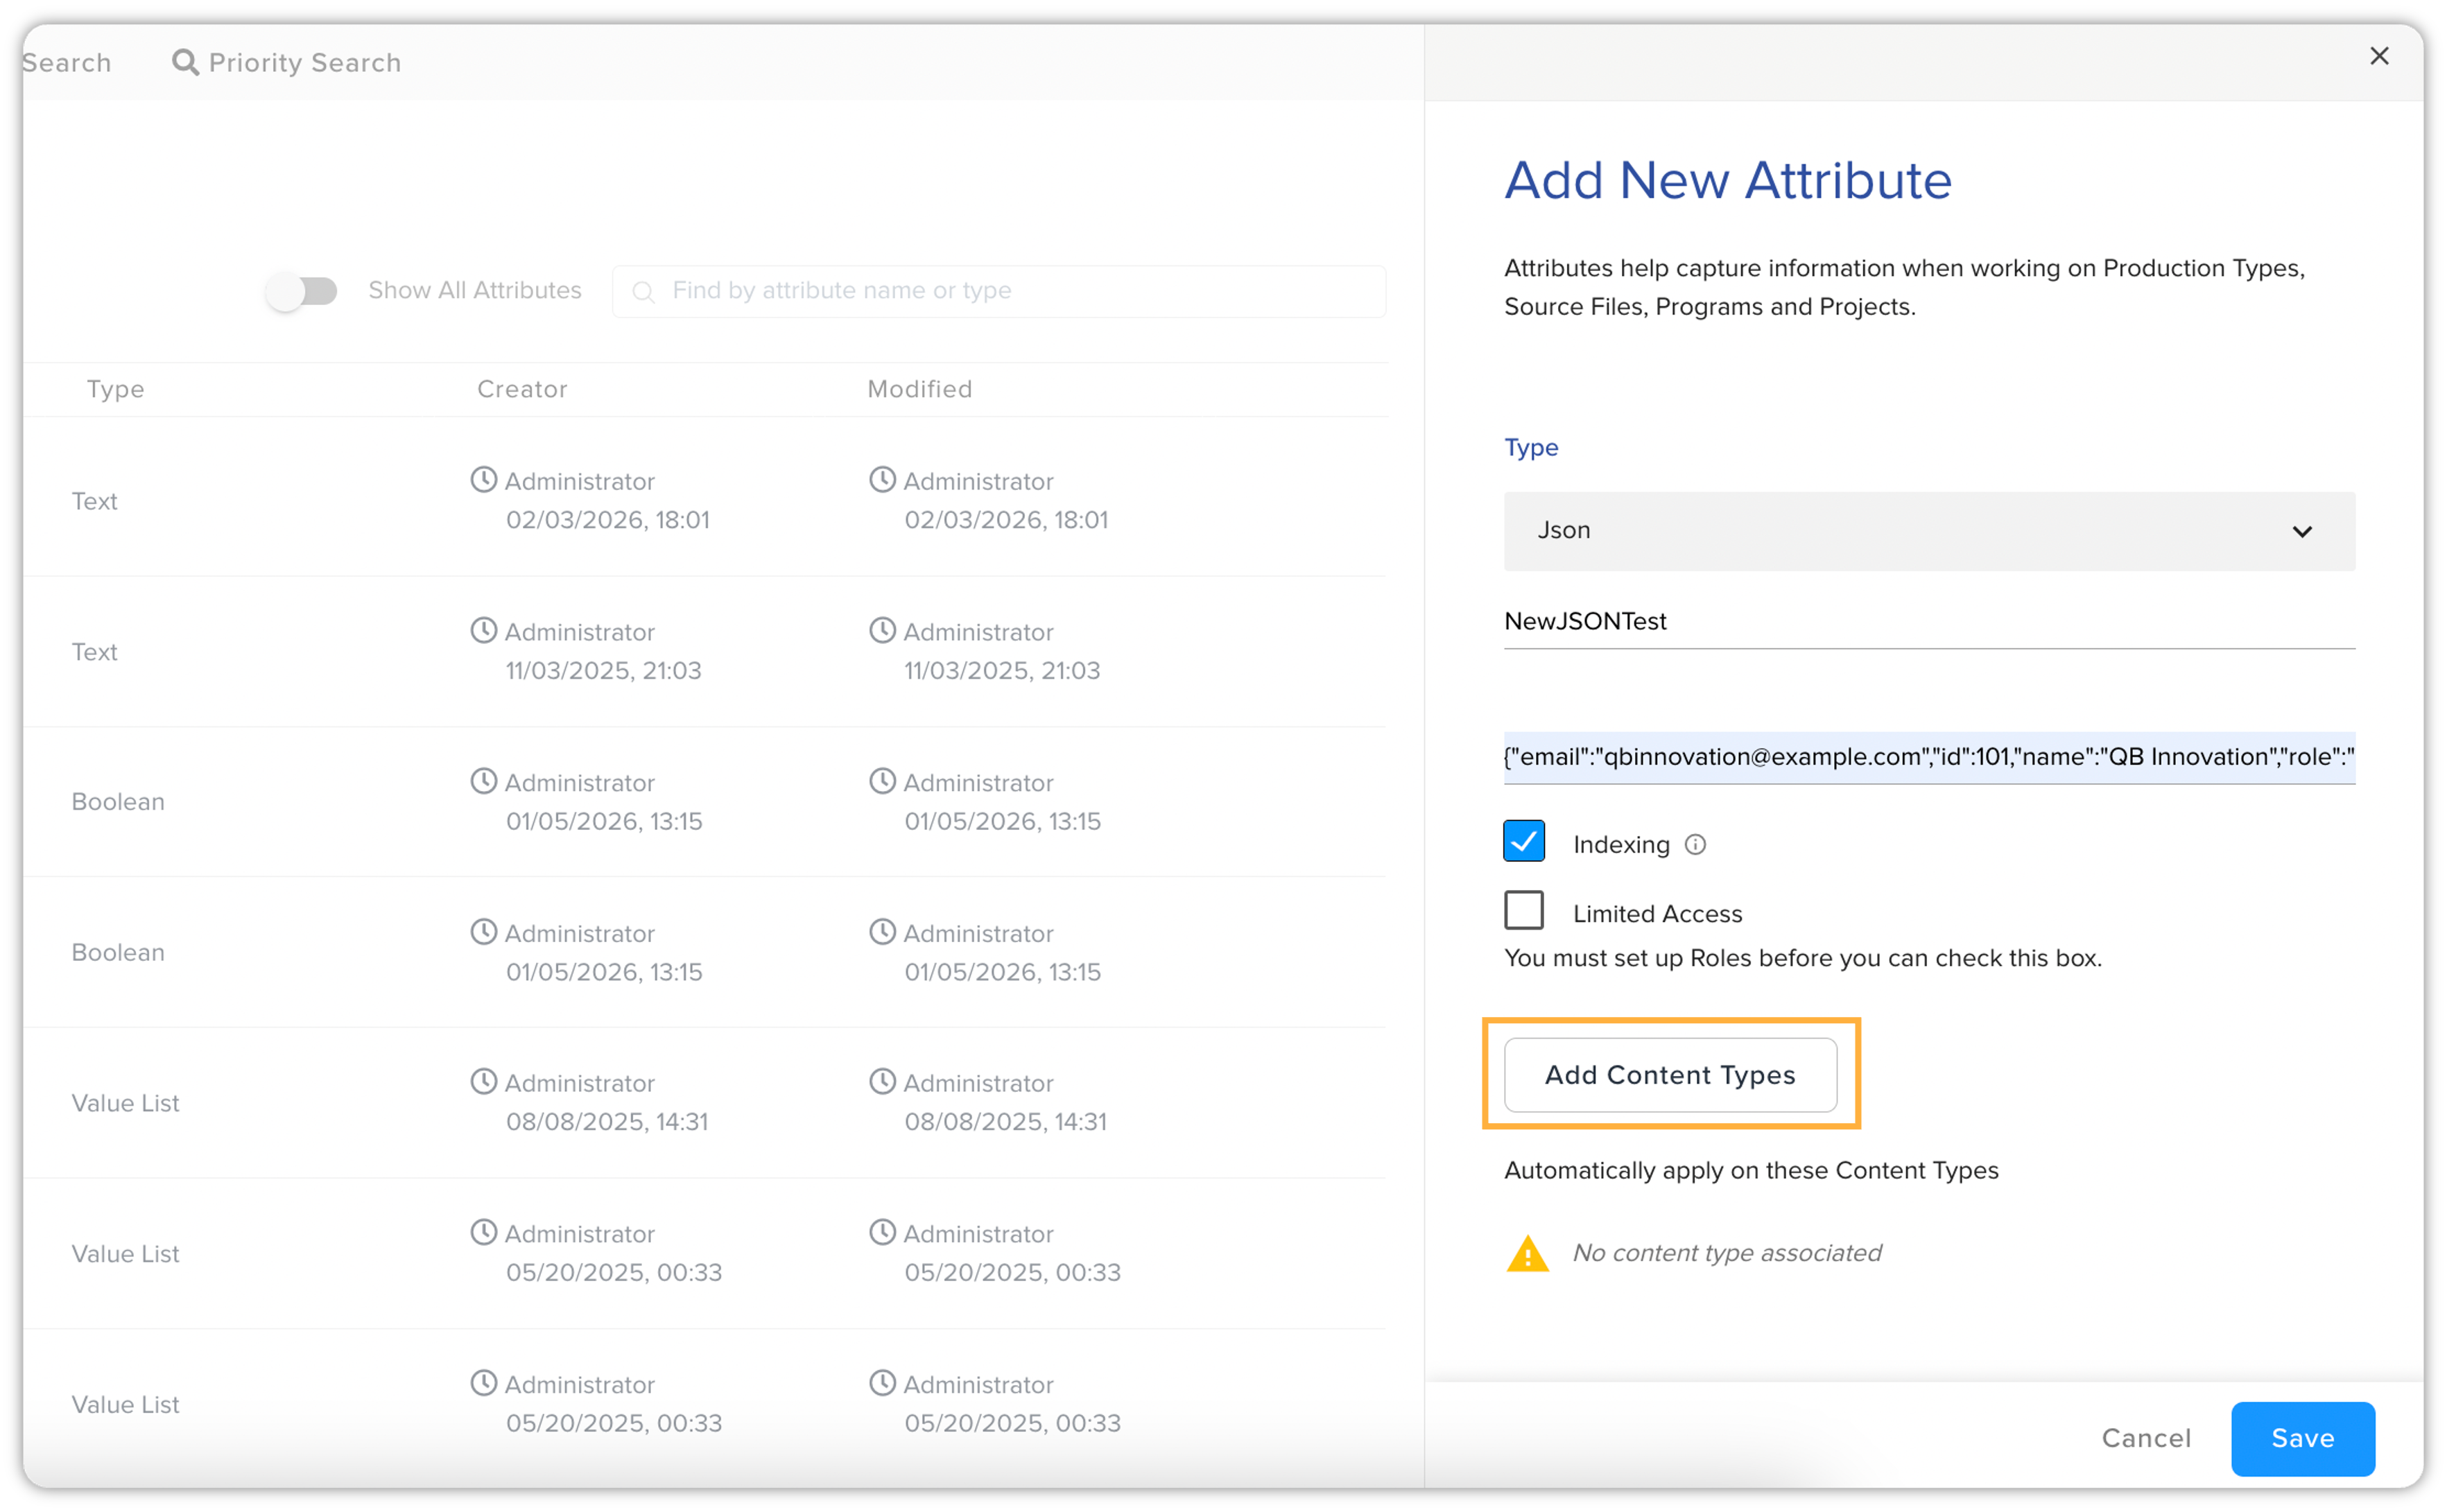
Use the Add Content Types option to link the Json attribute with the desired content types.
-
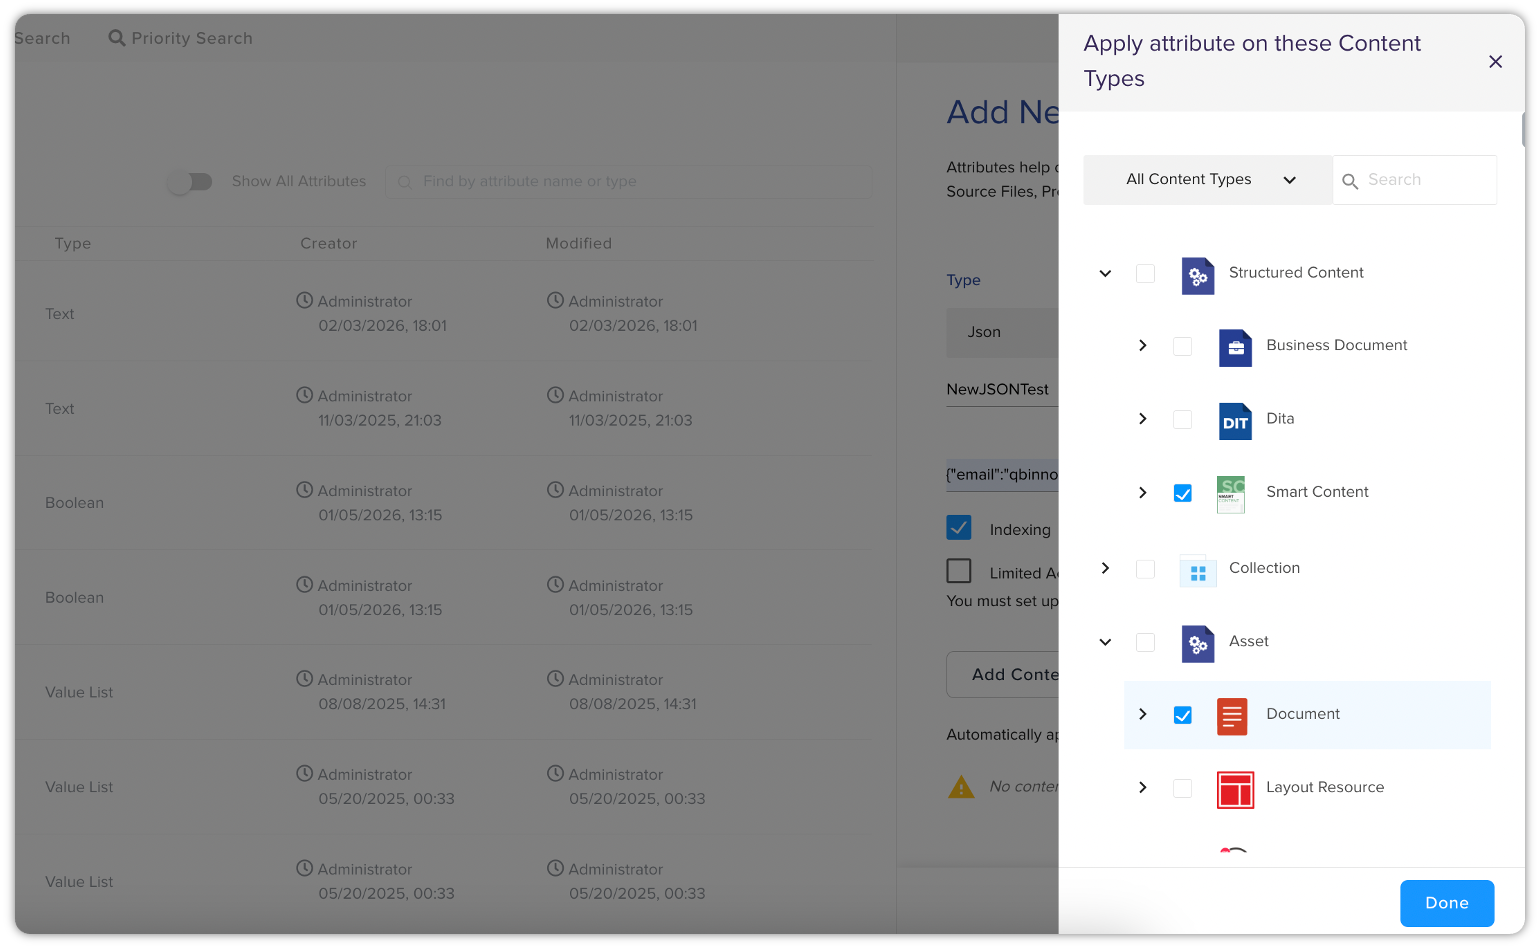
Select the content types from the list, click Done.
-
And then click Save to create the attribute.
While Json attributes provide powerful data modeling and search capabilities, please note that they are not currently visible in the following areas of the QPP UI:
-
Columns chooser in browse views
-
Search Filter dropdowns
-
Basic search
-
Advanced search
-
Filter builders
-
Attribute Properties Pane in Author UI/Workspace or QXA editor
Value Lists Tab
The value lists are the default list of arguments/values of an attribute. Based on the type of attribute, you can define a single or a list of values for an attribute. QPP displays these values when you create a new asset.
Create a Value List
To create a new value list, follow the steps shown below:
-
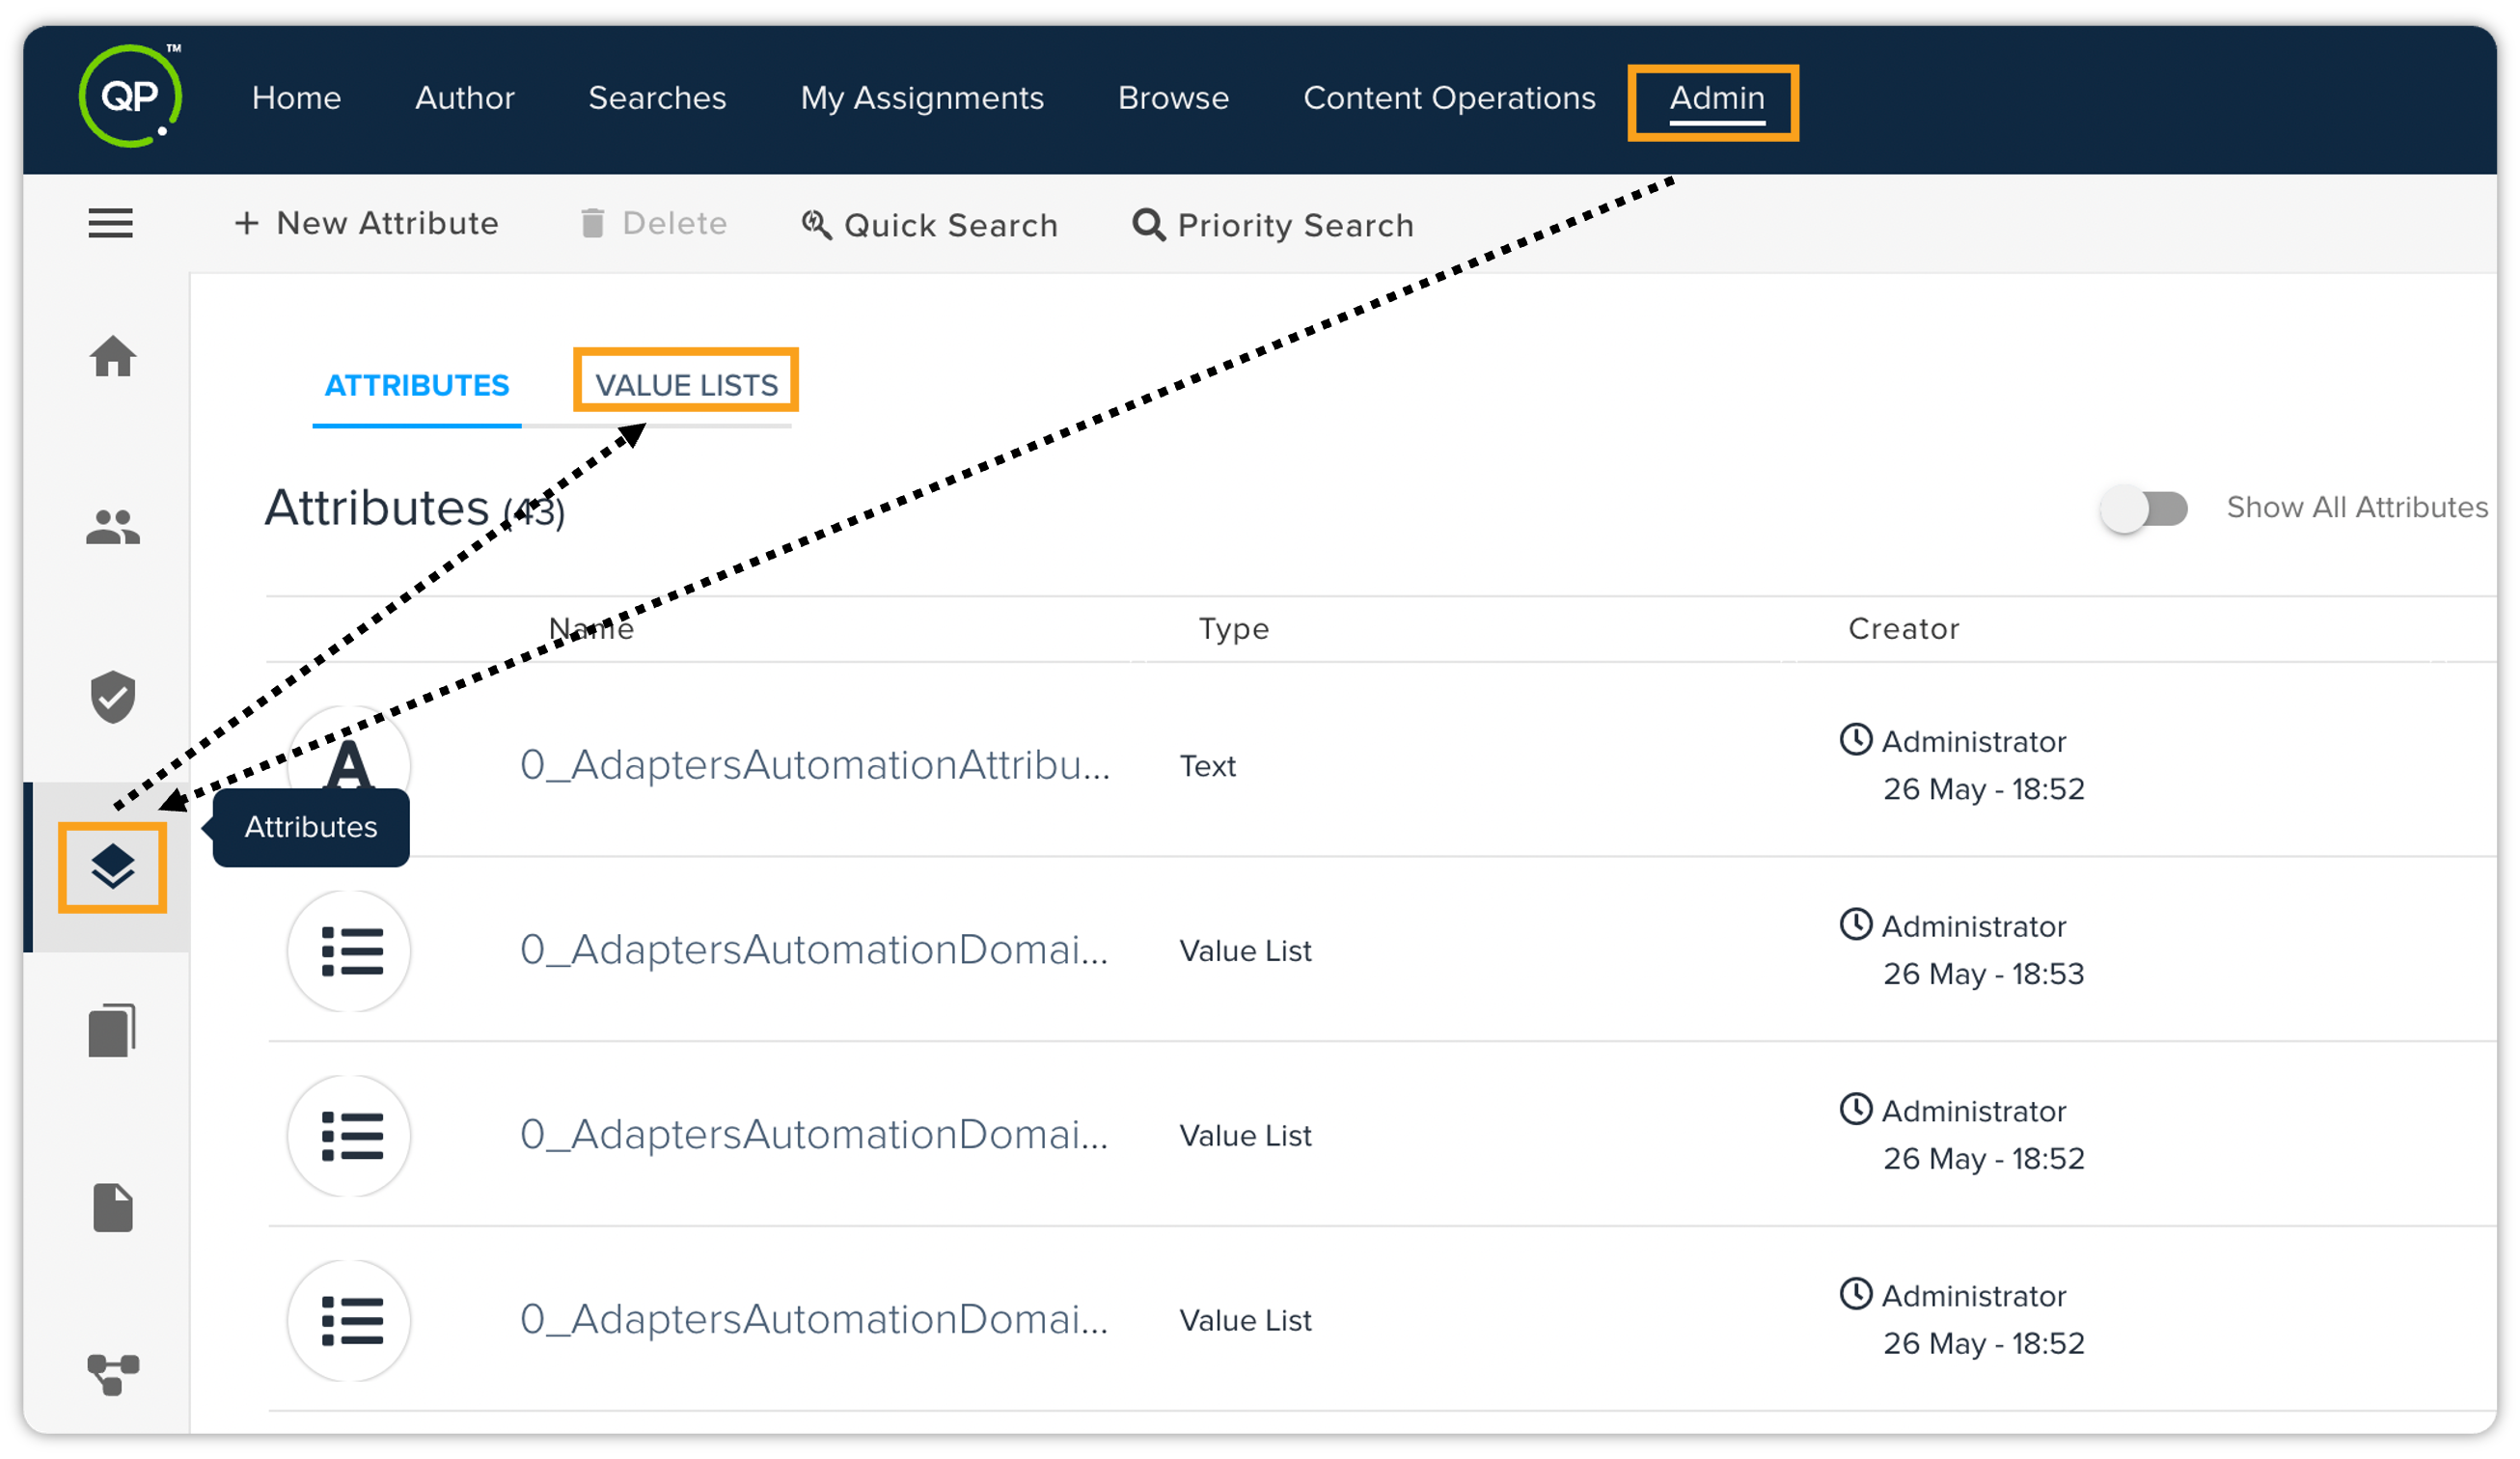
On the home page of QPP, click the Admin tab, click Attributes in the list pane on the left, which is displayed vertically, and then click Value Lists.
-
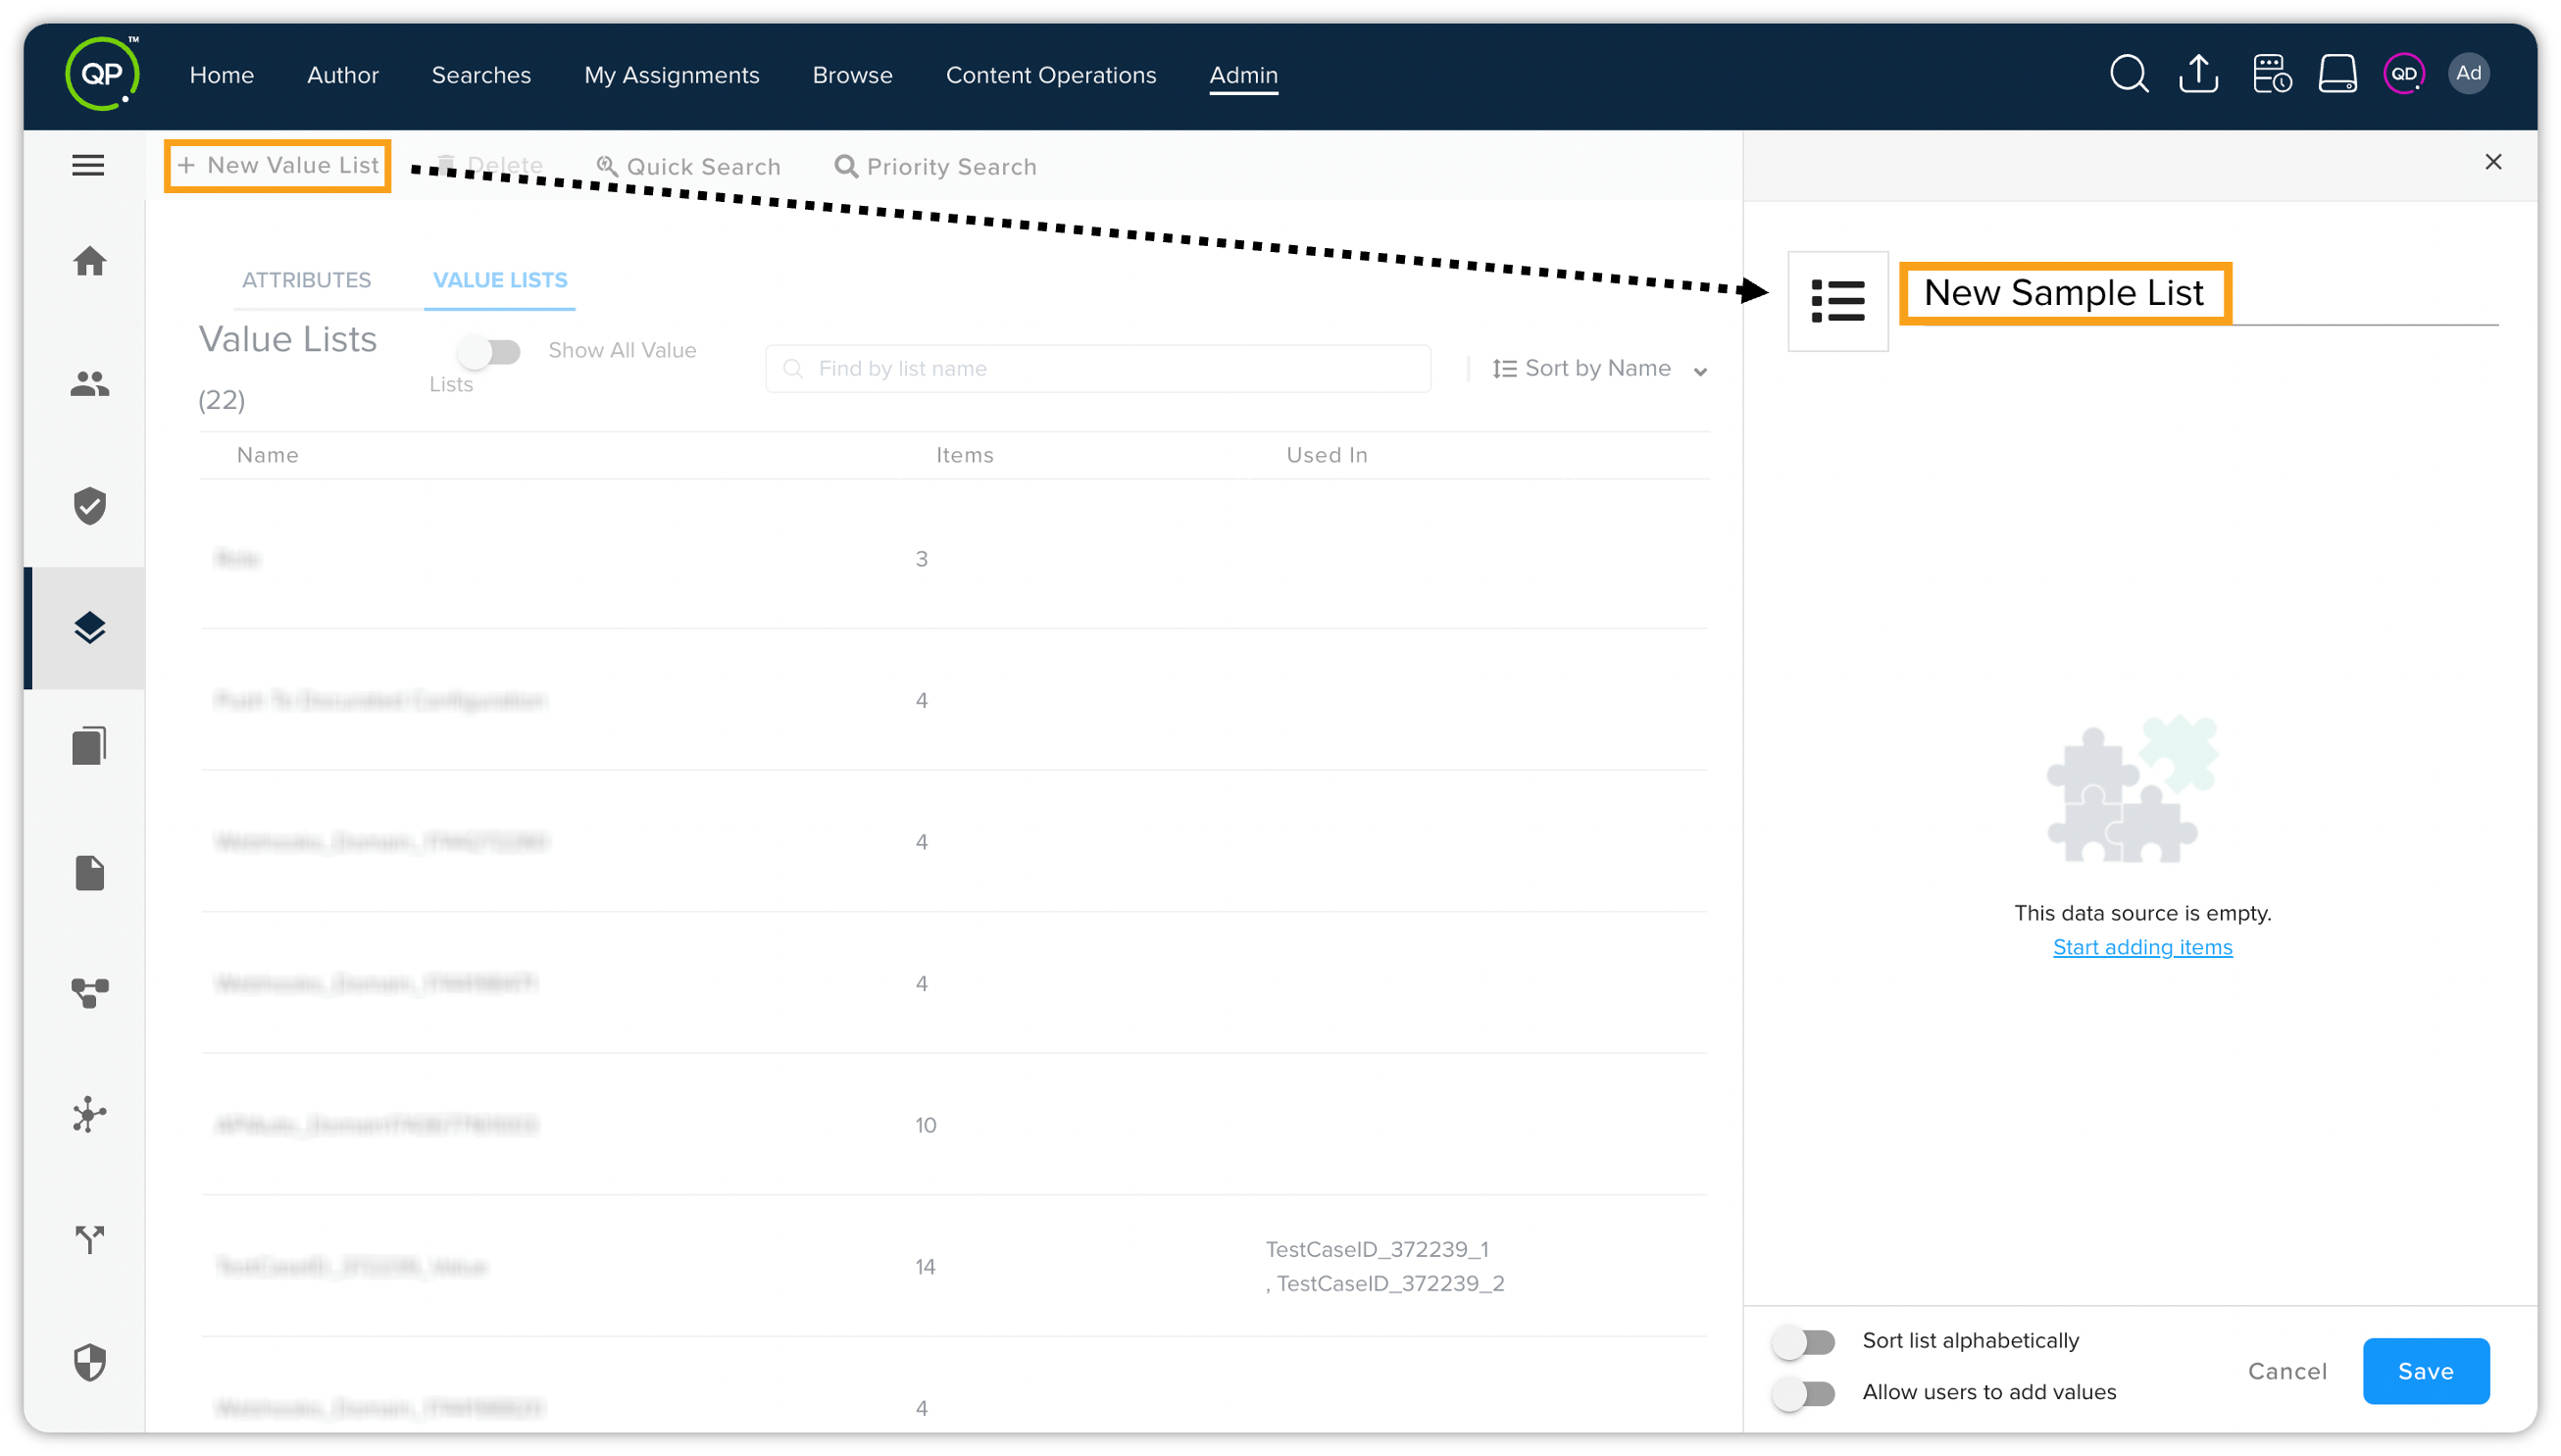
Click + New Value List to open the Add Value List pane.
-
In the Add Value List pane, add a name to the list and add list items. To add a list item, enter a name then select the button + Add next to the list item name.
-
Select Save.
Edit a Value List
To edit a value list:
-
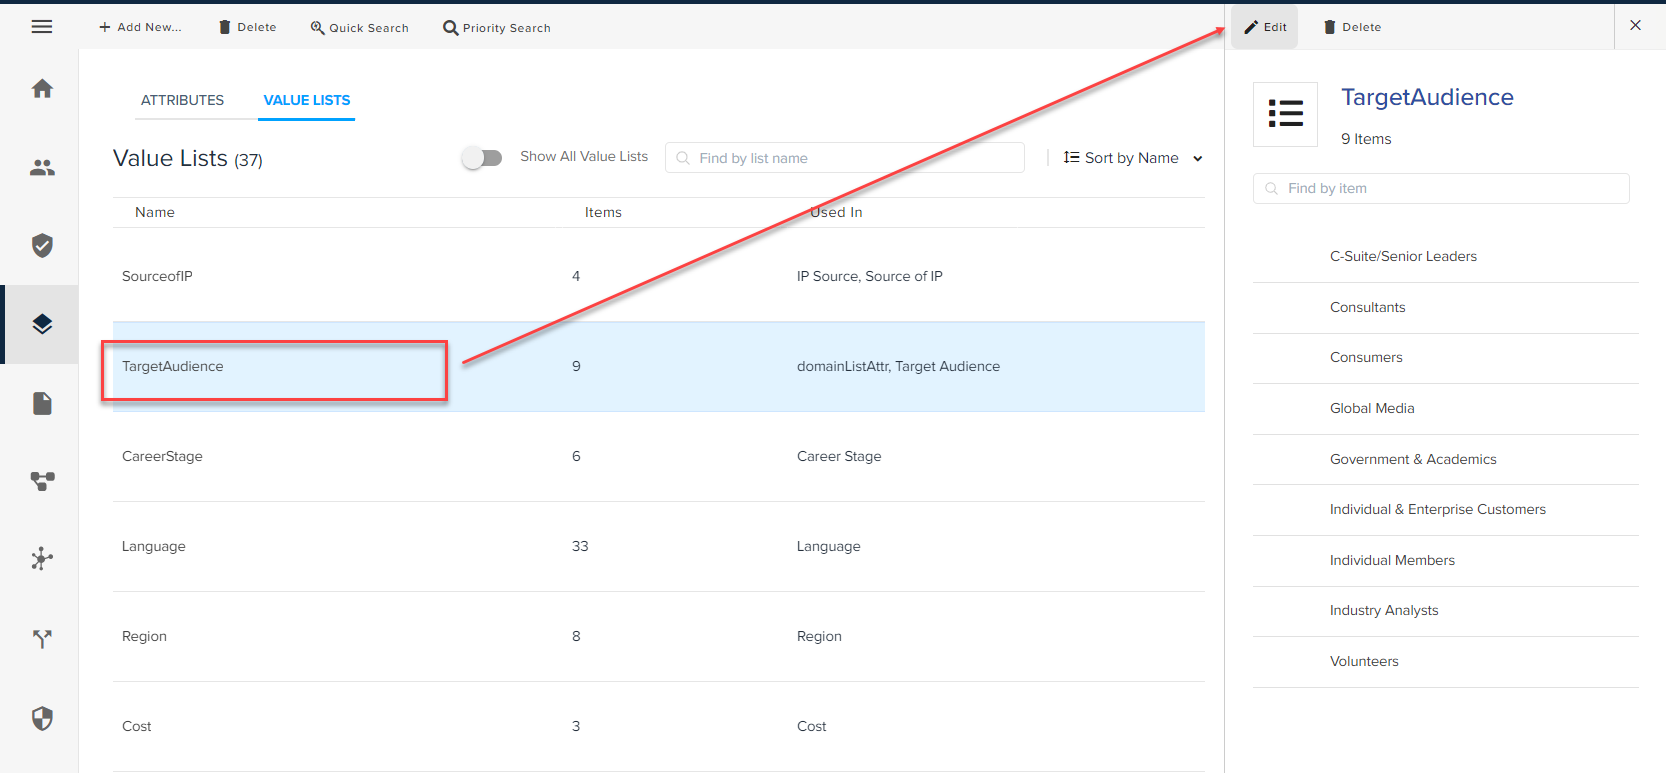
Double-click on an item listed under the Value Lists tab to open the Value List Details pane.
-
In the Value List Details pane, select the button Edit to open the Edit Value List pane.
-
Make your edits (rename list, add a list item, remove a list item, or rename a list item).
-
Select Save.
Quick Search
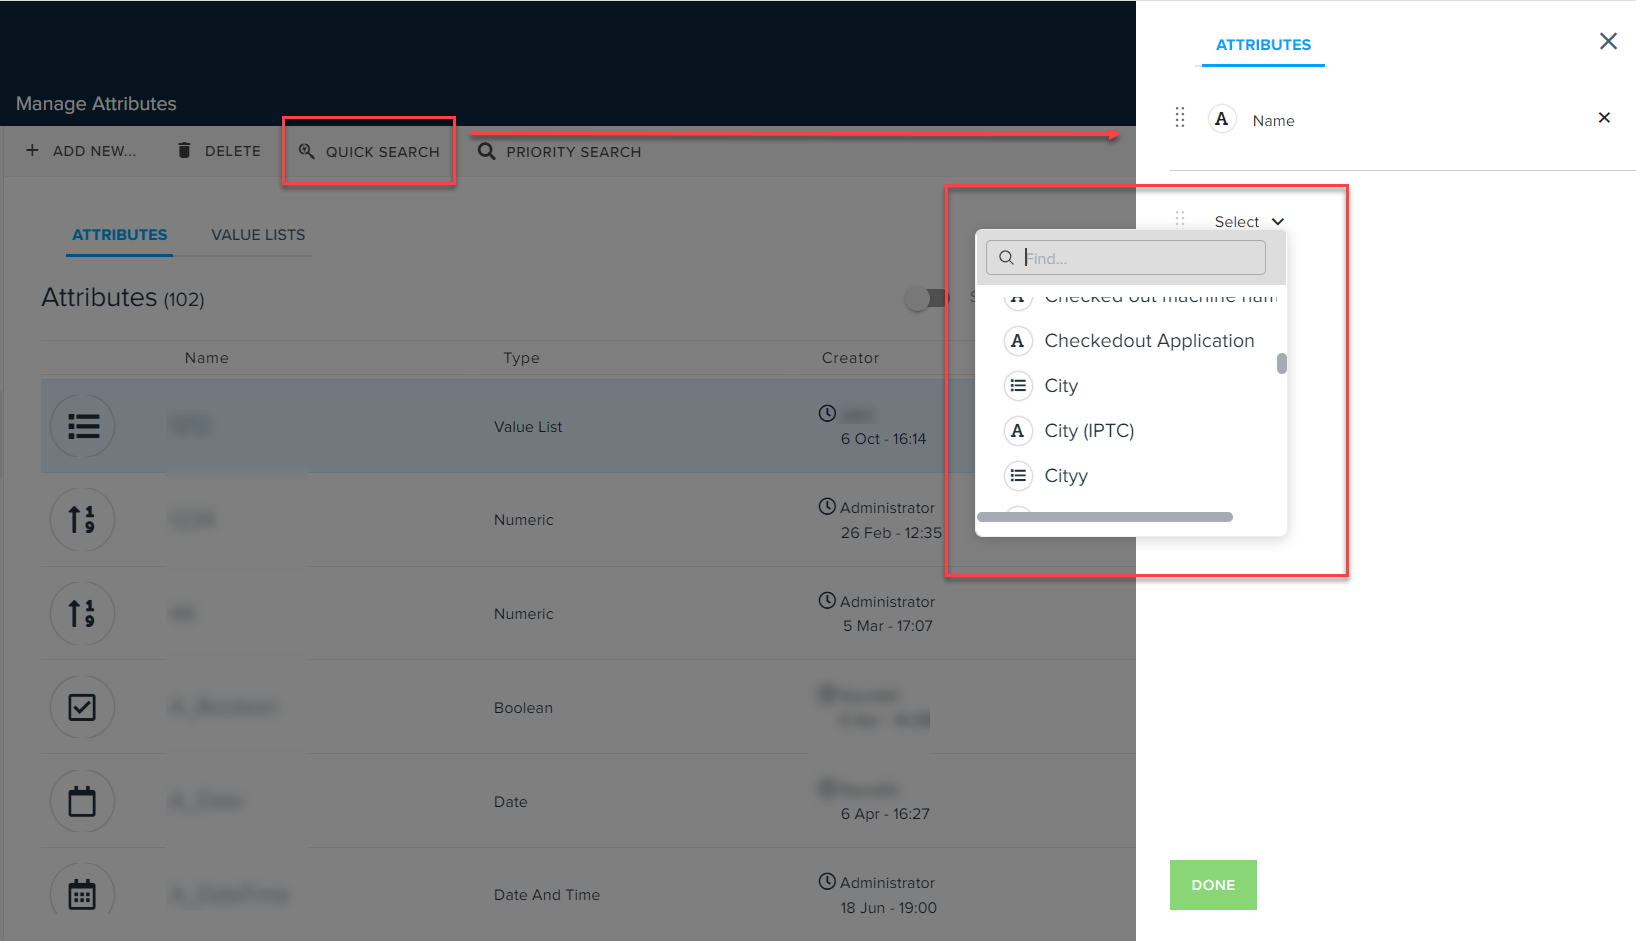
The Quick Search operation allows you to manage attributes for QPP quick search functionality. For example, when you add asset name as a value quick search attribute, QPP quick search tool searches for the entered text query as the name of asset.
By default, QPP only allows keyword searches in the quick search toolbar.
To add an attribute to the quick search functionality:
-
Select the button Quick Search in the top bar actions to open the Attributes pane.
-
In the Attributes pane, expand the Select dropdown menu, which lists the attributes available on the server. You can also search for an attribute by name within the dropdown menu.
-
Select an attribute to add the attribute.
-
Select Done.
 next to the attribute name in the list.
Priority Search
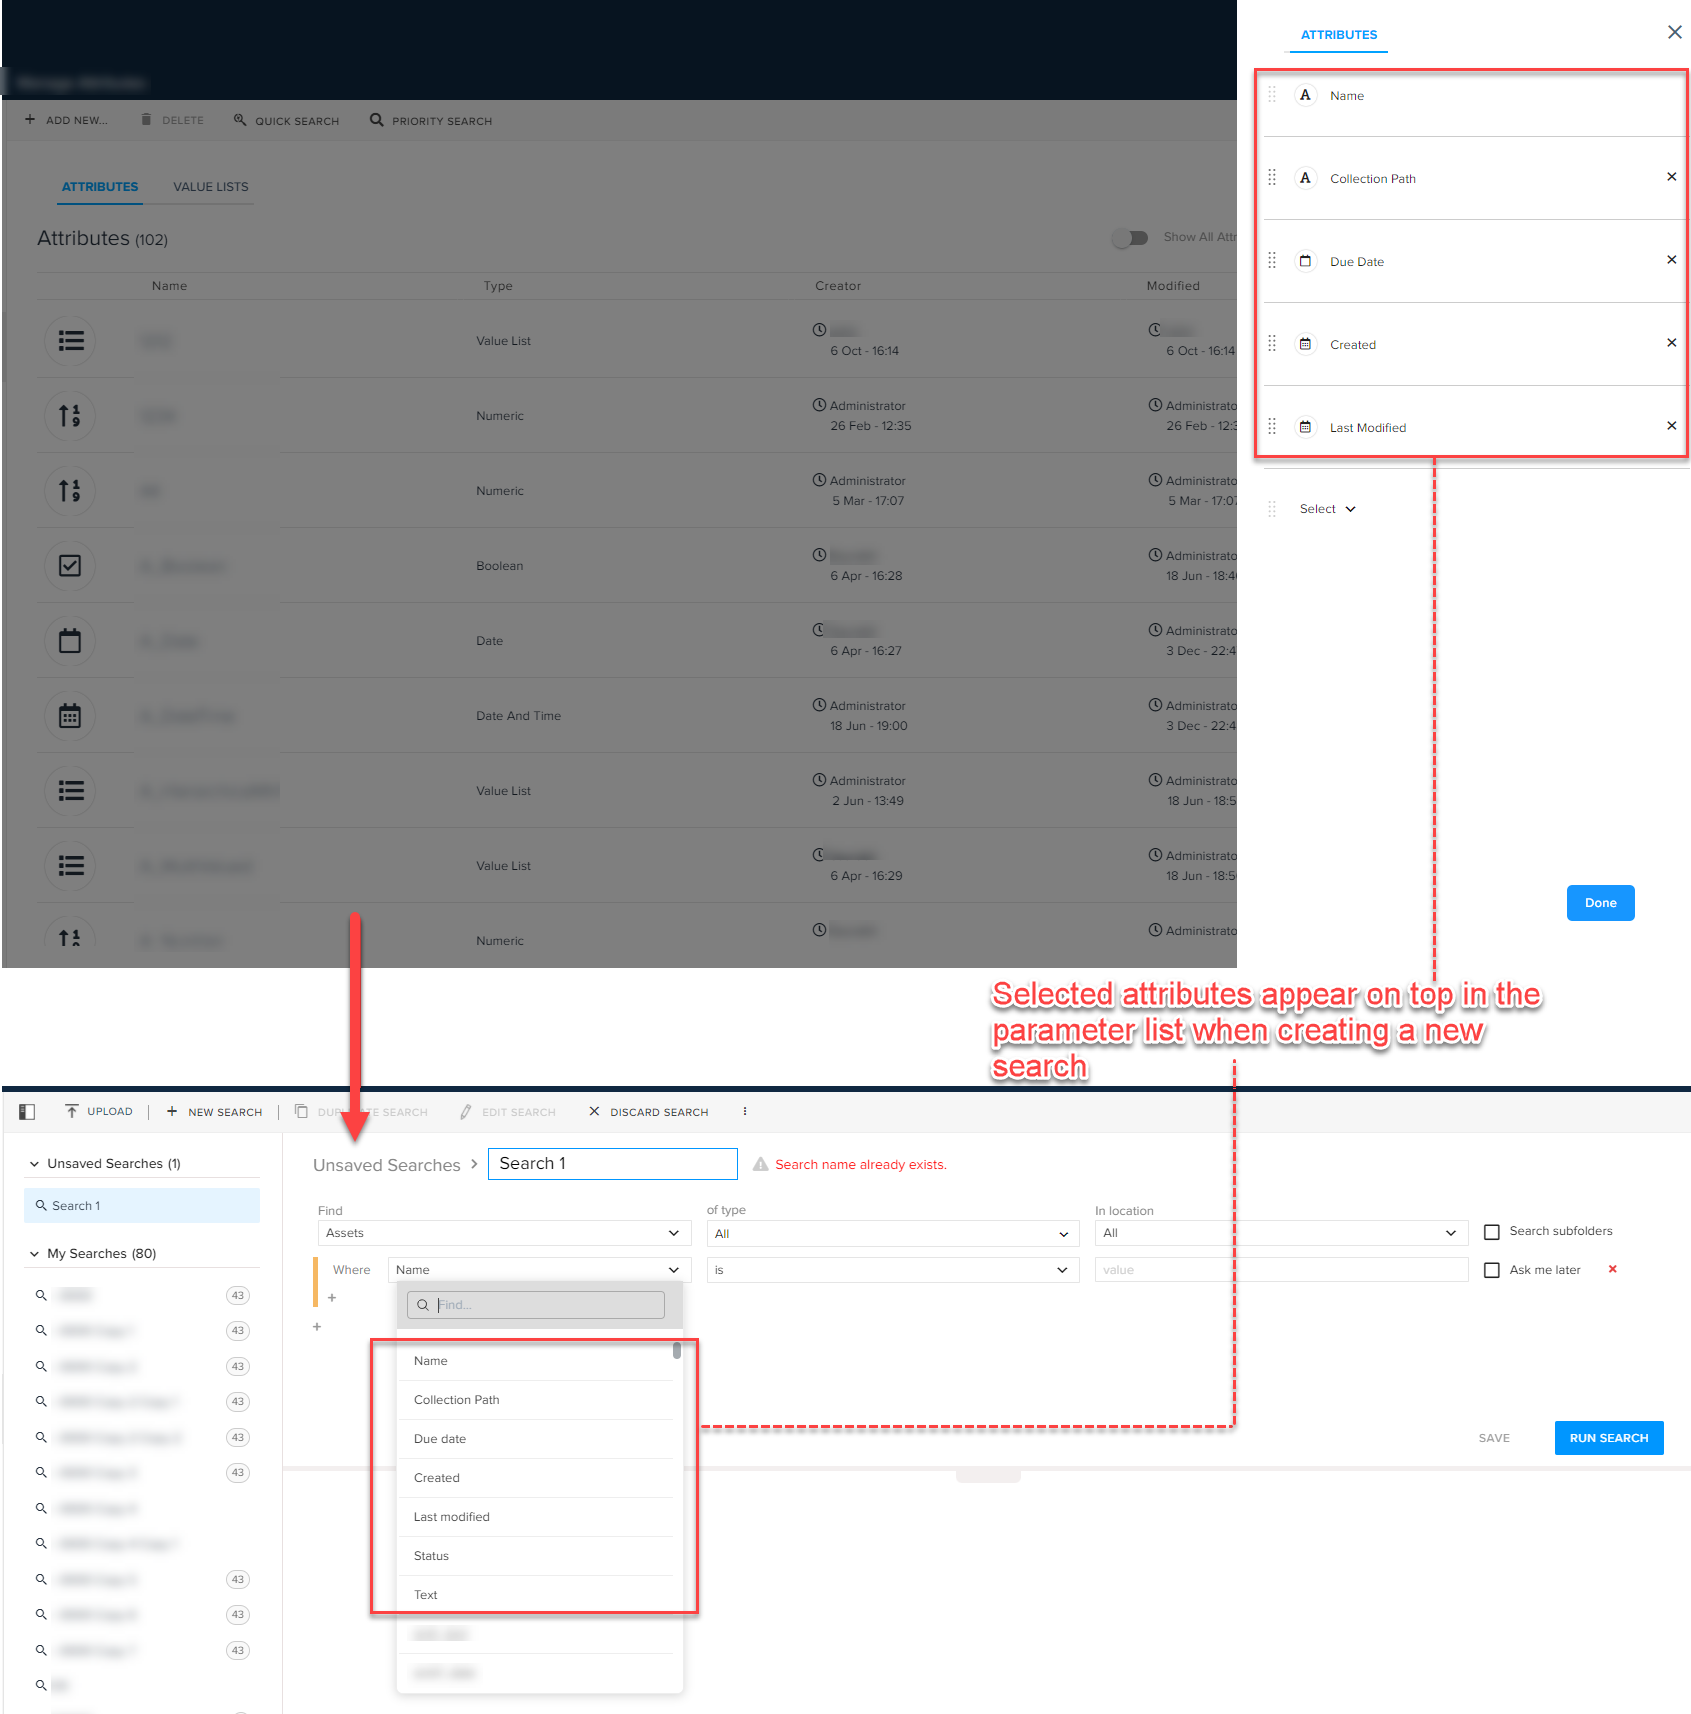
The Priority Search operation allows you to set the relevant attributes to appear on top of the parameter list when creating a new search query.
Generic Page Operations
The Attributes page has the following generic page operations:

-
Show All Attributes/Value Lists: By default, the Attributes page only displays the attributes added by you to the platform and doesn't display the default system attributes. Through the Show All Attributes/Value Lists slide button you can choose to display/hide the system attributes.
-
Find an Attribute/Value List by Name: You can search for an attribute/value list by name through a search toolbar.
-
Sort by Name: Allows you to sort the list by attribute/value list name.
Document Types
The Document Types pane allows you to create new document types and manage them from one place. Document Type is a content type which has a model and/or metadata configured and has one or more publishing channels associated with it. It can be structured document which can represent Standard Operating Procedures, Fund Fact Sheets, Research Reports, Service Manuals, Product Datasheets, Product Labels, Pitch Decks, etc.
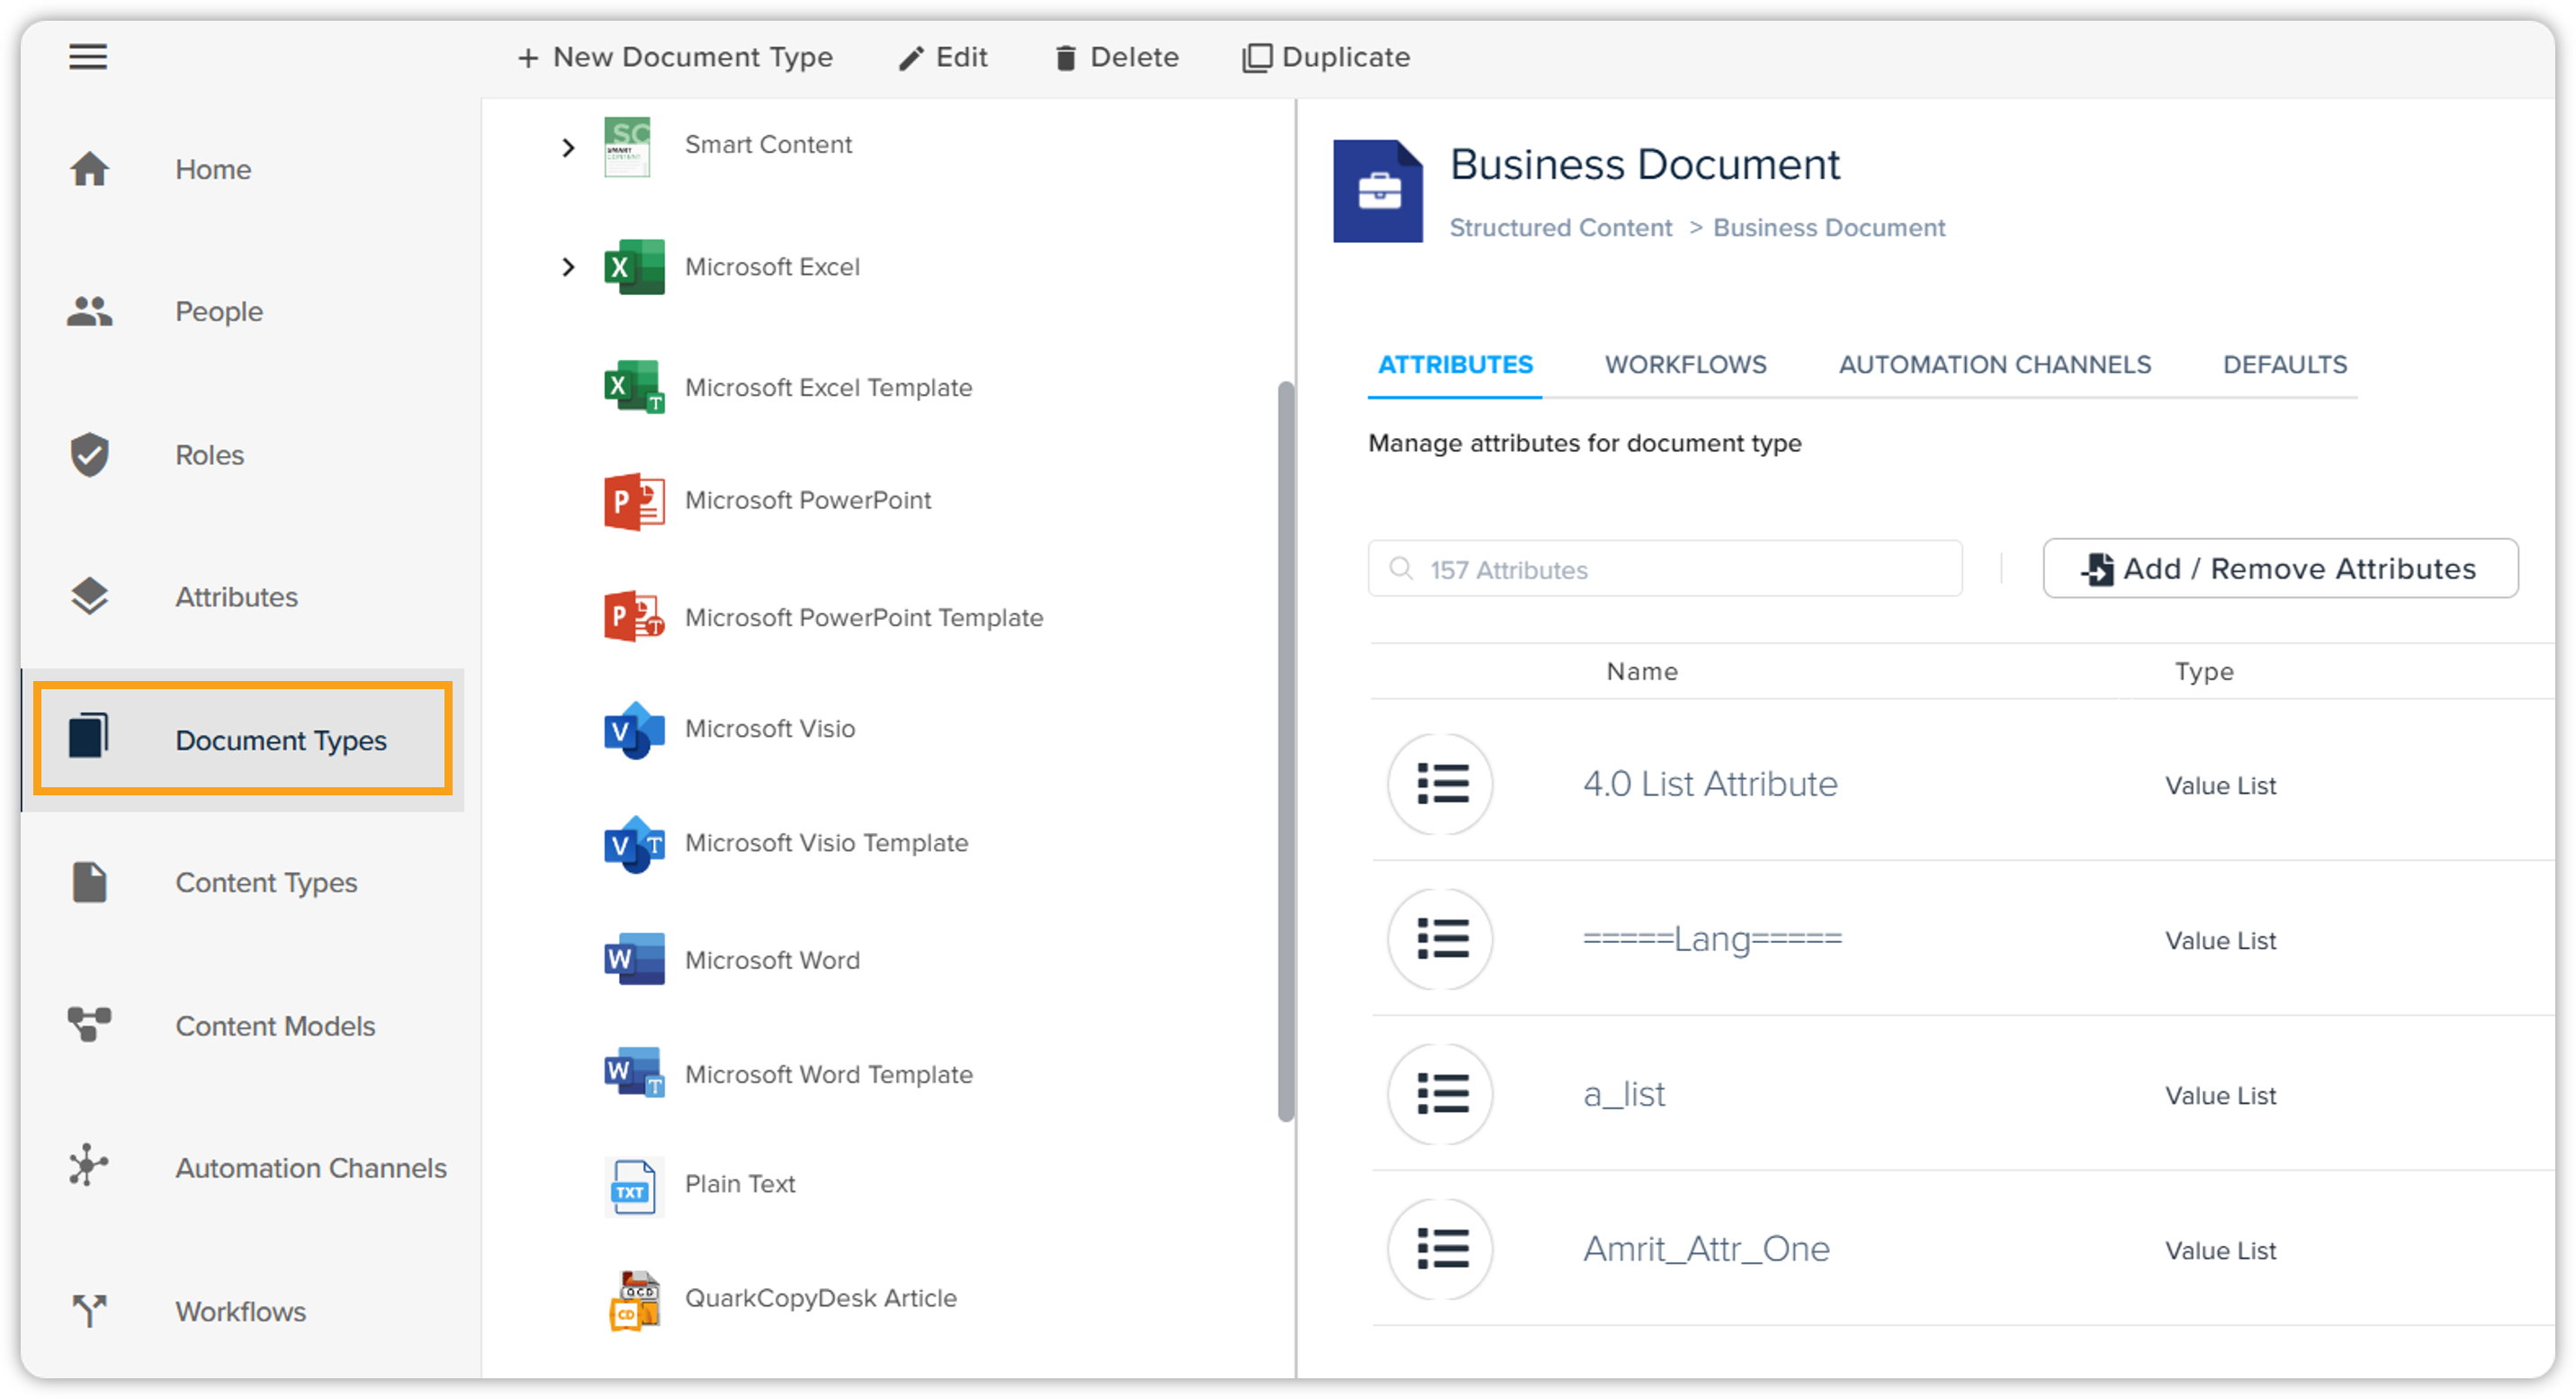
You'll see a list of all document types that exist in QPP along with the associated workflows, attributes, content models, translations, and publishing and delivery channels.
The Document Types module shares the same functionalities as the Content Types module. For detailed information on how to manage, create, edit, delete, and duplicate types, as well as other available options, please refer to the Content Types section.
Content Types
The Content Types pane allows you to manage different content types supported by QPP. Apart from different content types that are native to the QPP platform, the platform also supports content types that are native to several other Quark applications, such as Quark App Studio, QuarkXPress, and QuarkXPress CopyDesk.
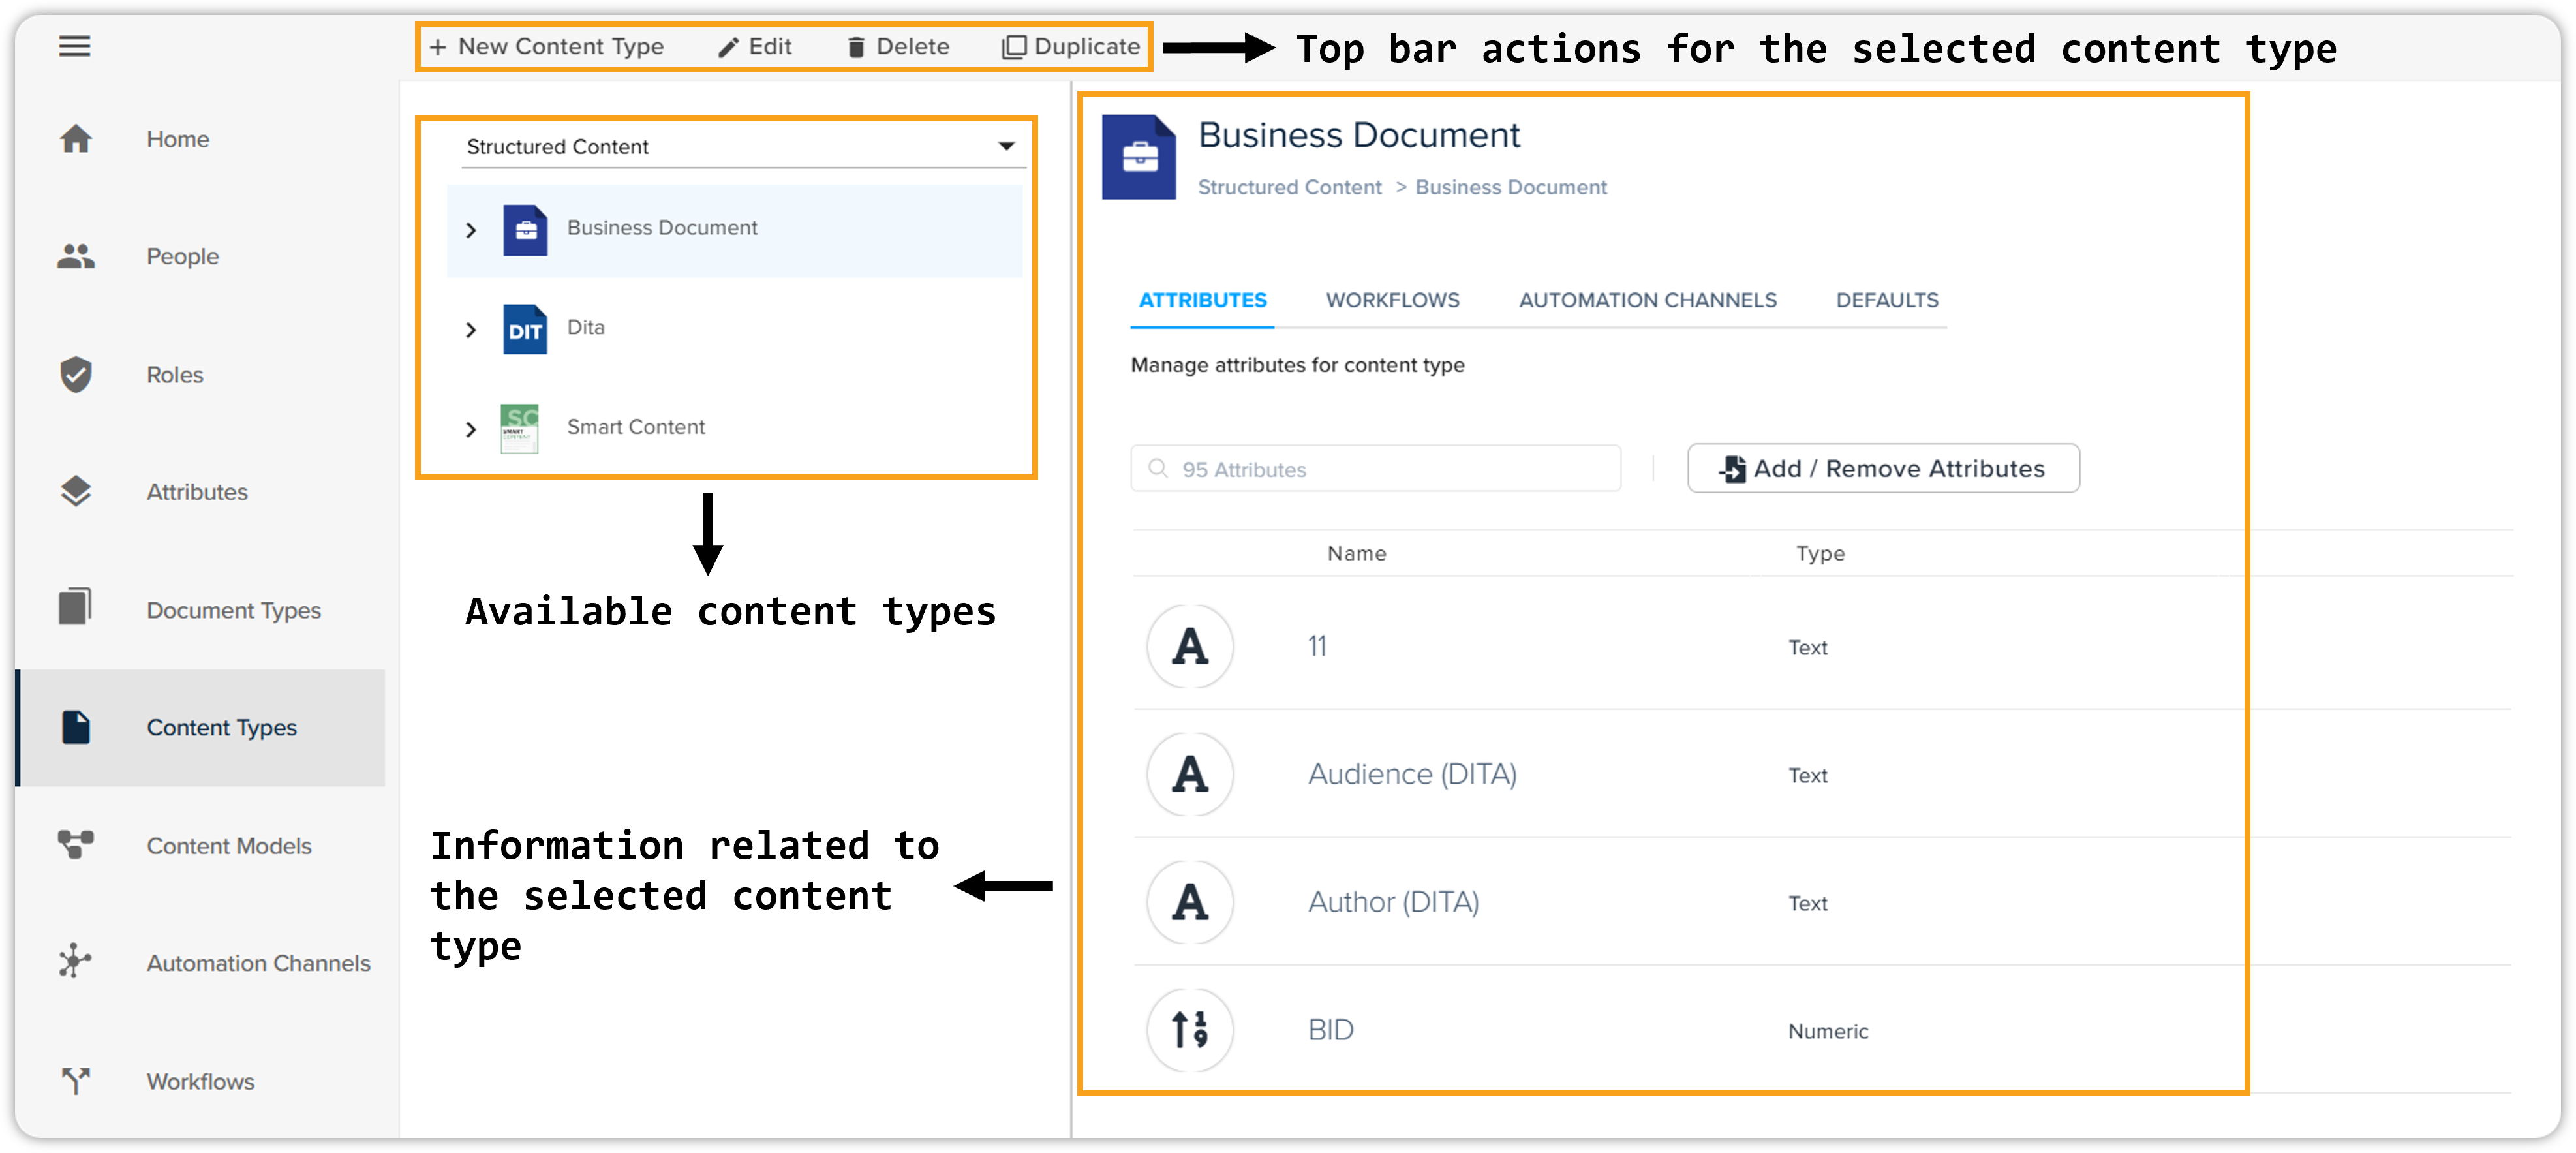
The Content Types page has two sections, which for the sake of simplicity are named as the content types frame (or left frame) and properties frame (or right frame). The left frame lists all the available content types on the server and the right frame displays the attributes, workflows, and automation channels related to the content type selected in the left frame.
Additionally, there are a few top bar actions to create a new content type and to manage the content type you have selected in the left frame.
Content Types Categories
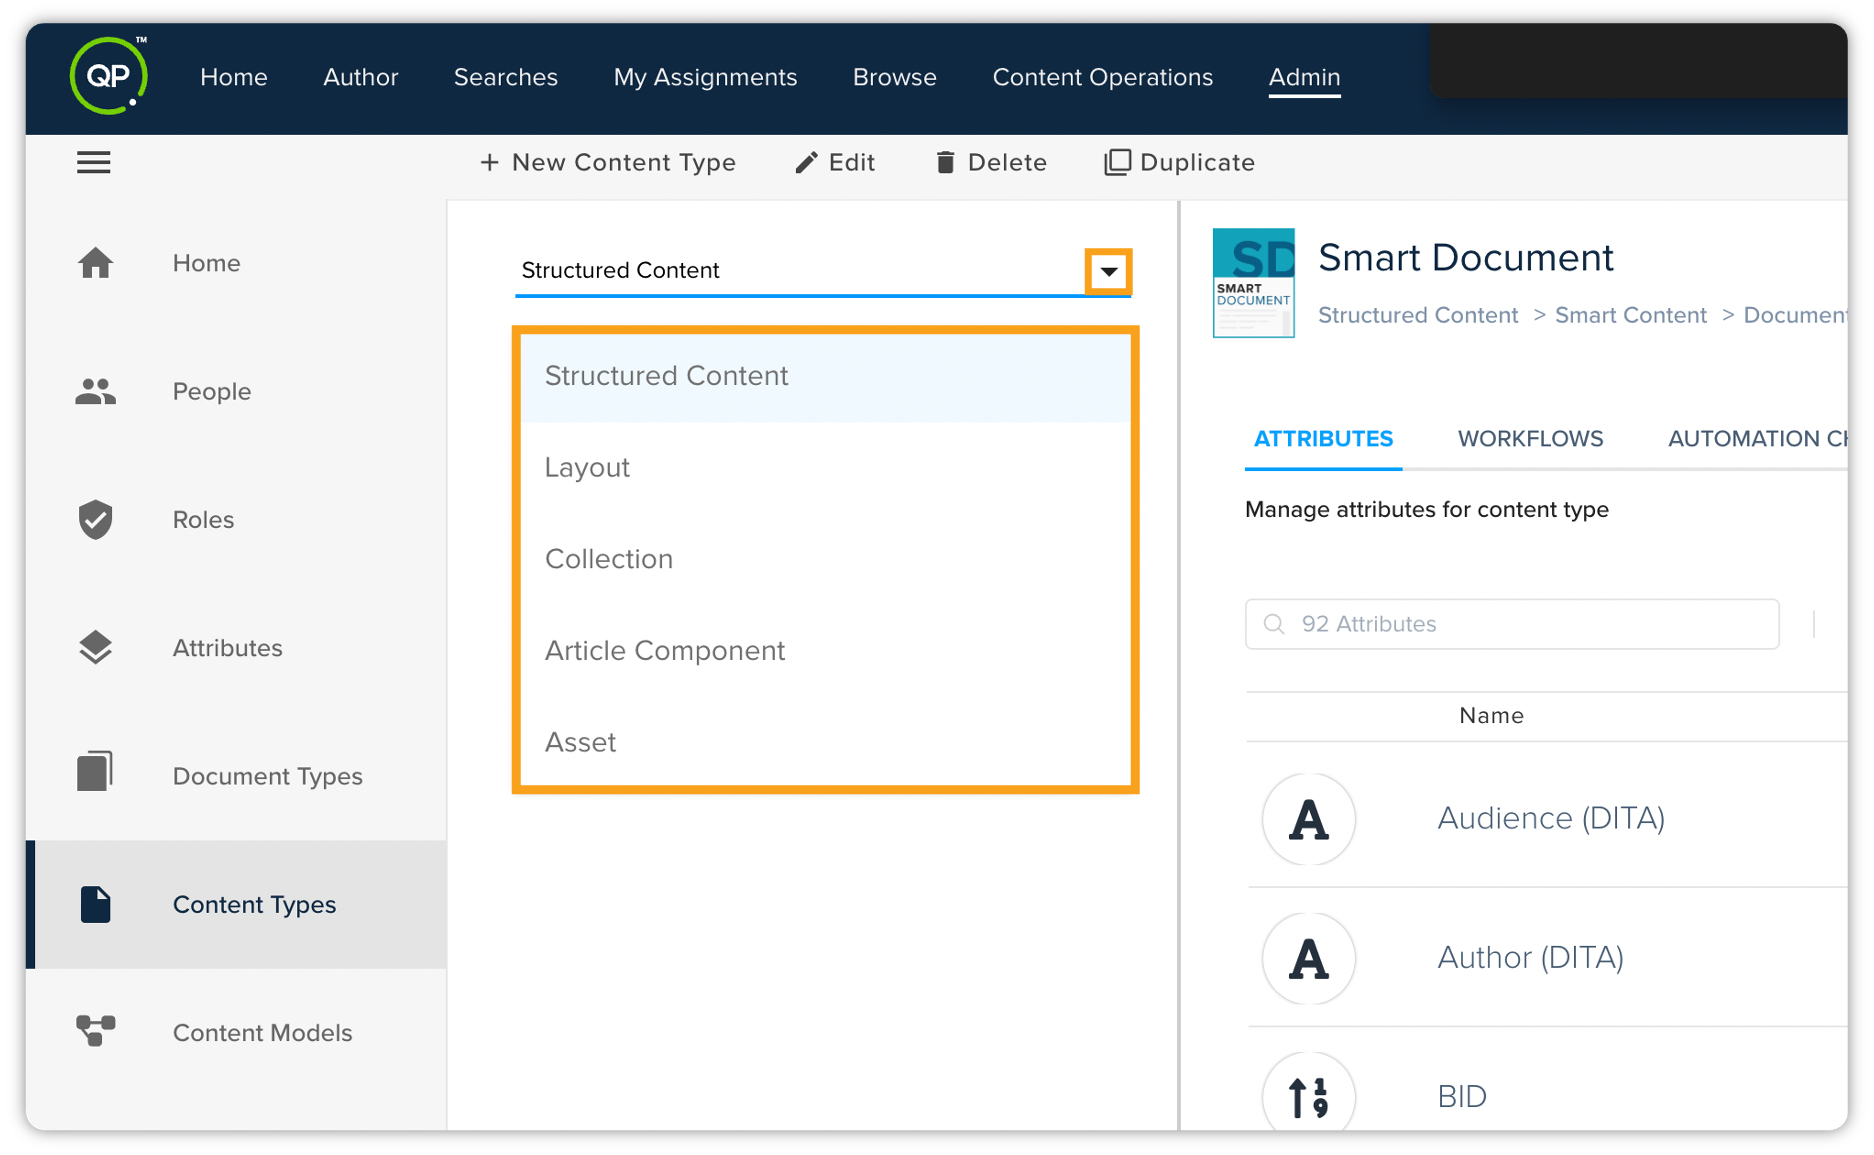
The left frame lists all the content types categorically. The following are the content types categories and subcategories available in QPP, which you can expand through the dropdown menu at top of the left frame:
|
Category |
Subcategories |
Remarks |
|
Structured Content |
|
Content types that are primarily related to the Quark Author. |
|
Layout |
|
Content types that are primarily related to the Quark App Studio and QuarkXPress. |
|
Collection |
Indefinite categories based on the folder structure requirements of an organization. |
Collection content types are used across all Quark applications. |
|
Article Component |
|
Content types that are primarily related to the QuarkXPress CopyDesk. |
|
Asset |
|
Asset content types are used across all Quark applications. |
Create a New Content Type
To create a new content type for structured content, follow the steps shown below:
-
On the home page of QPP, click the Admin tab and then click Content Types in the list pane on the left, which is displayed vertically.
-
On Content Types page, the Structured Content category is selected by default. Click the dropdown icon to view other available categories.
-
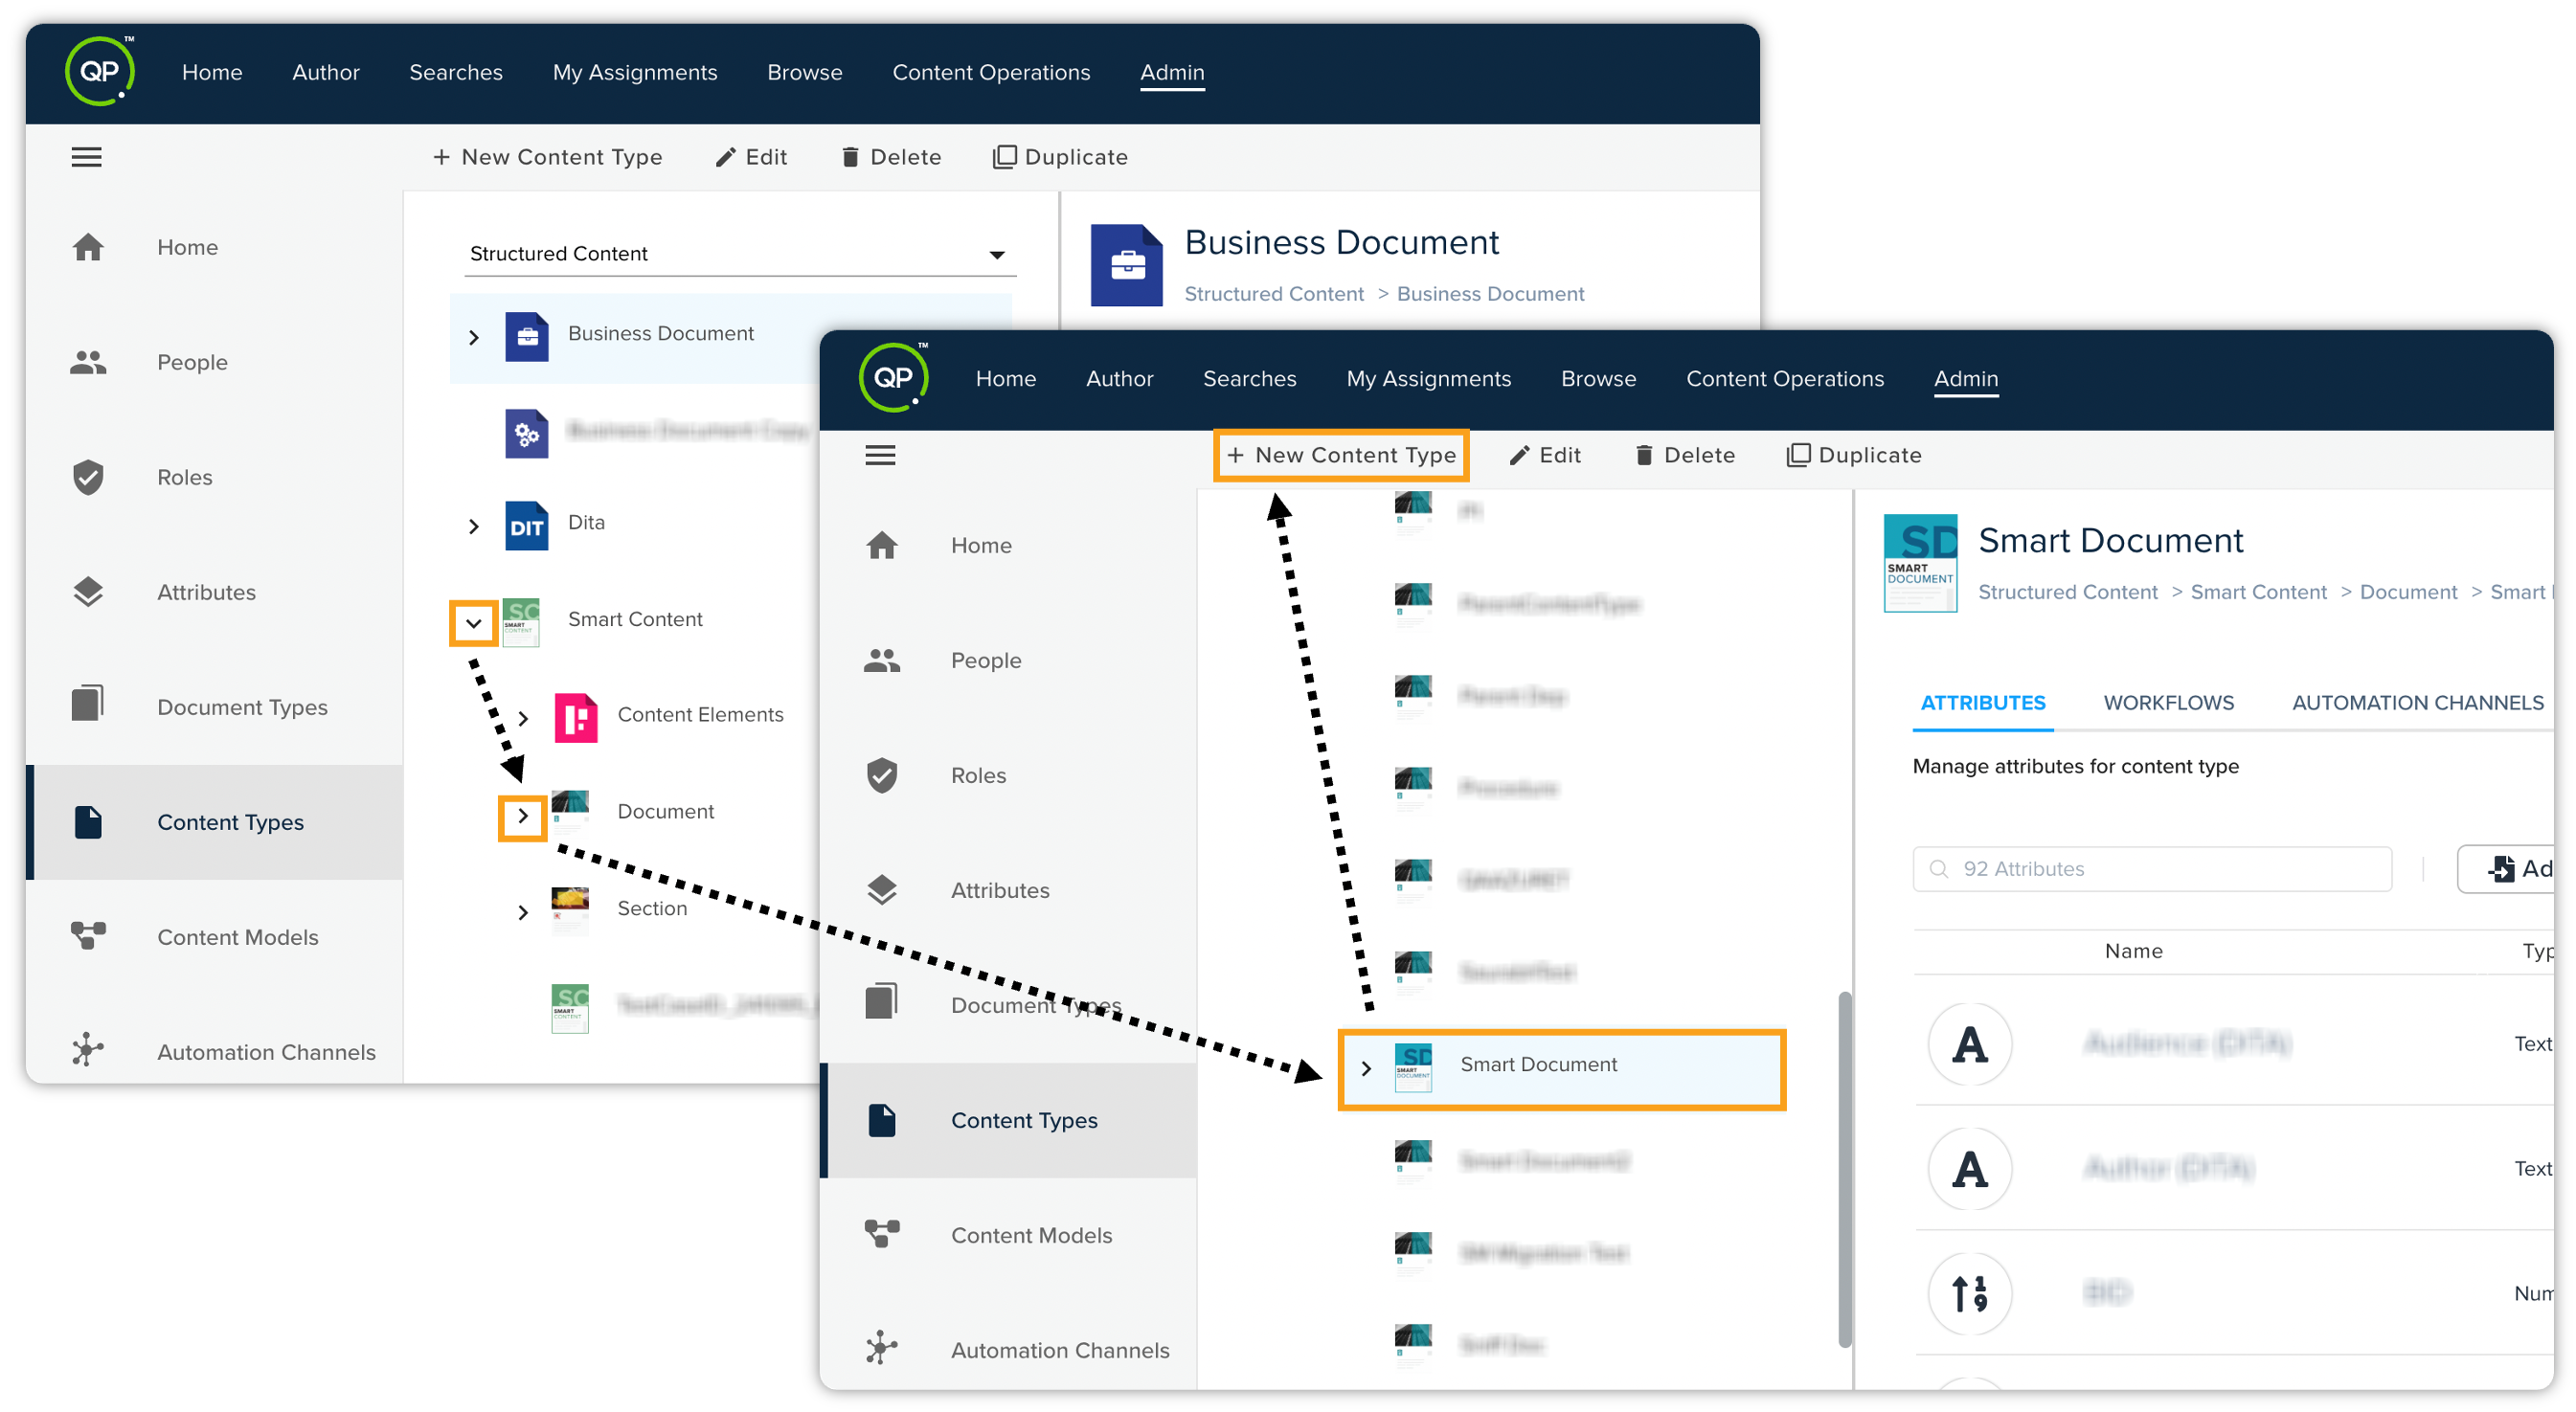
First, select the content type you want to create. Let's say you want to create a Smart Document. To do that, navigate to Smart Content > Document > Smart Document.
-
In the top bar actions, click + New Content Type to open the Add New Content Type pane.
-
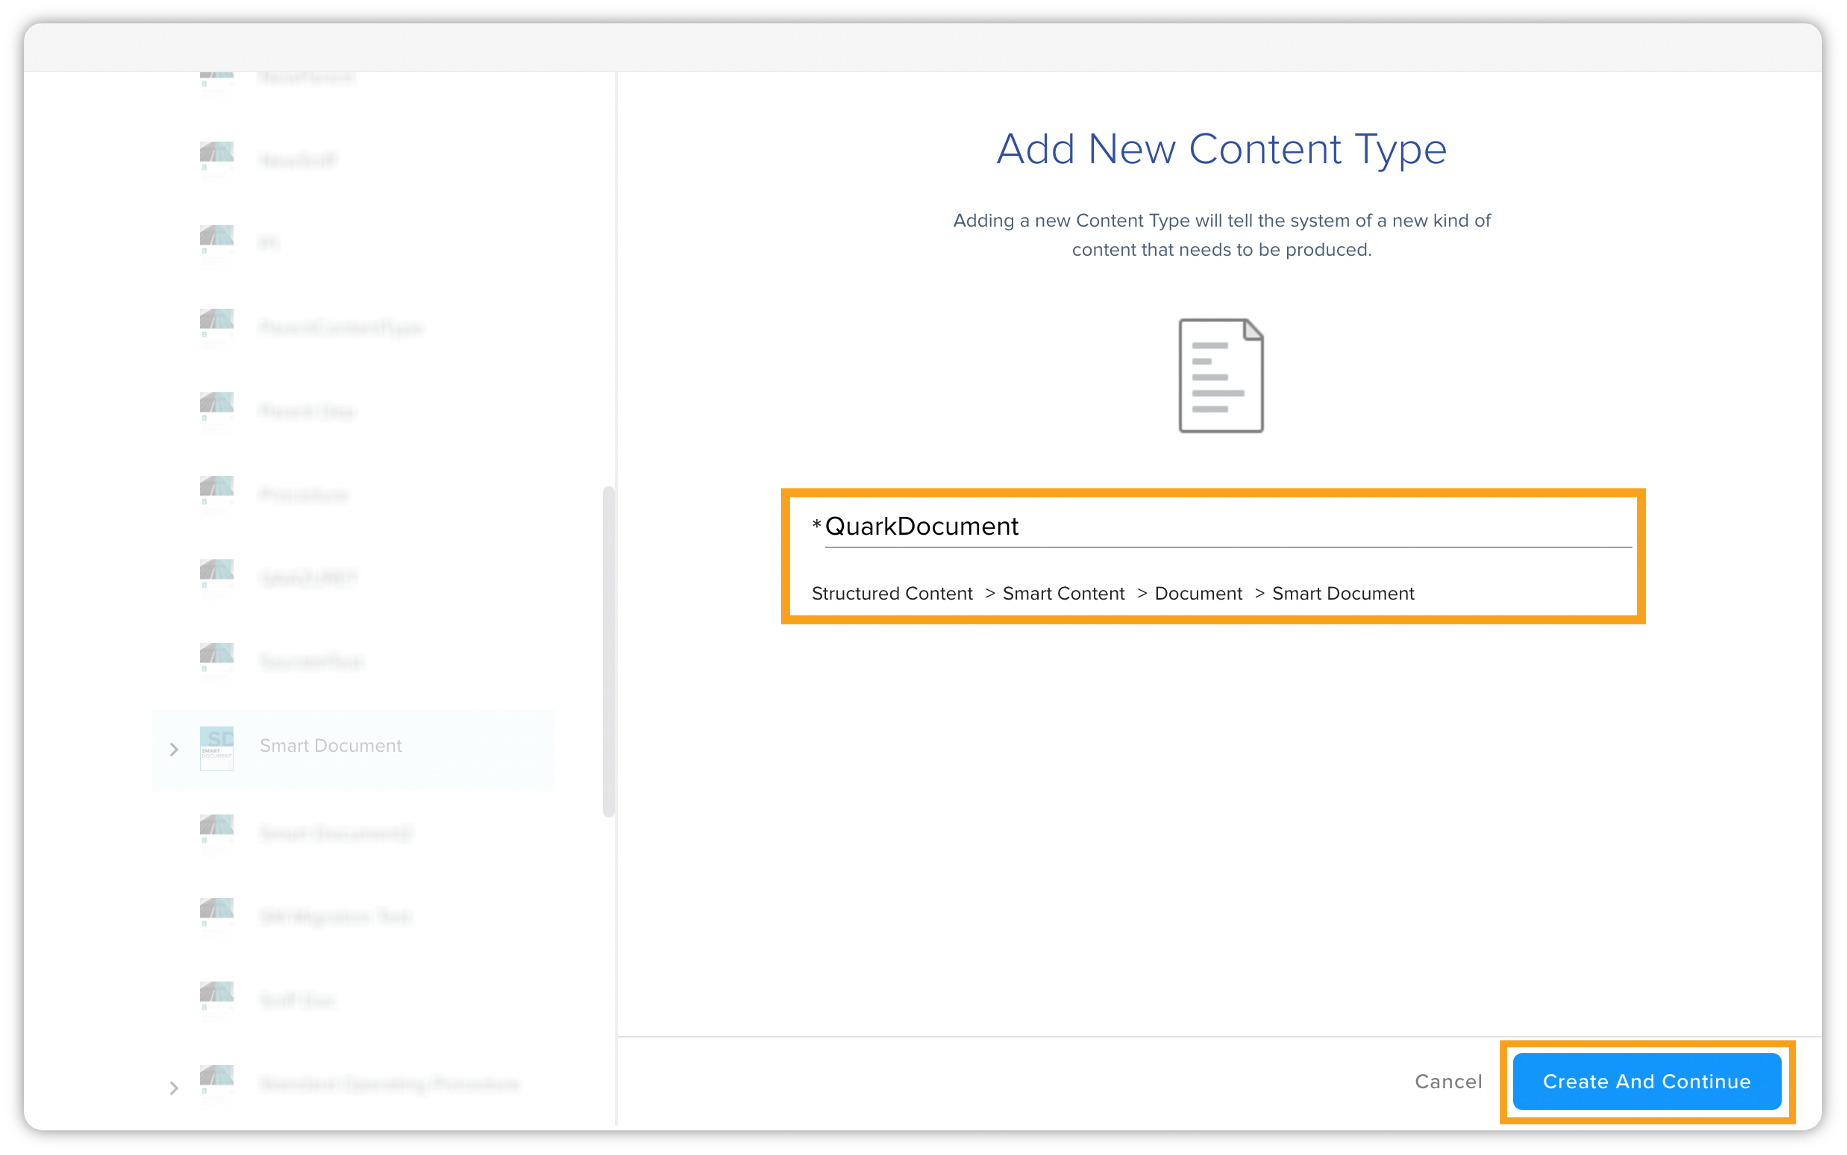
On the Add New Content Type pane, enter the name of the content type and then select the button Create And Continue.
-
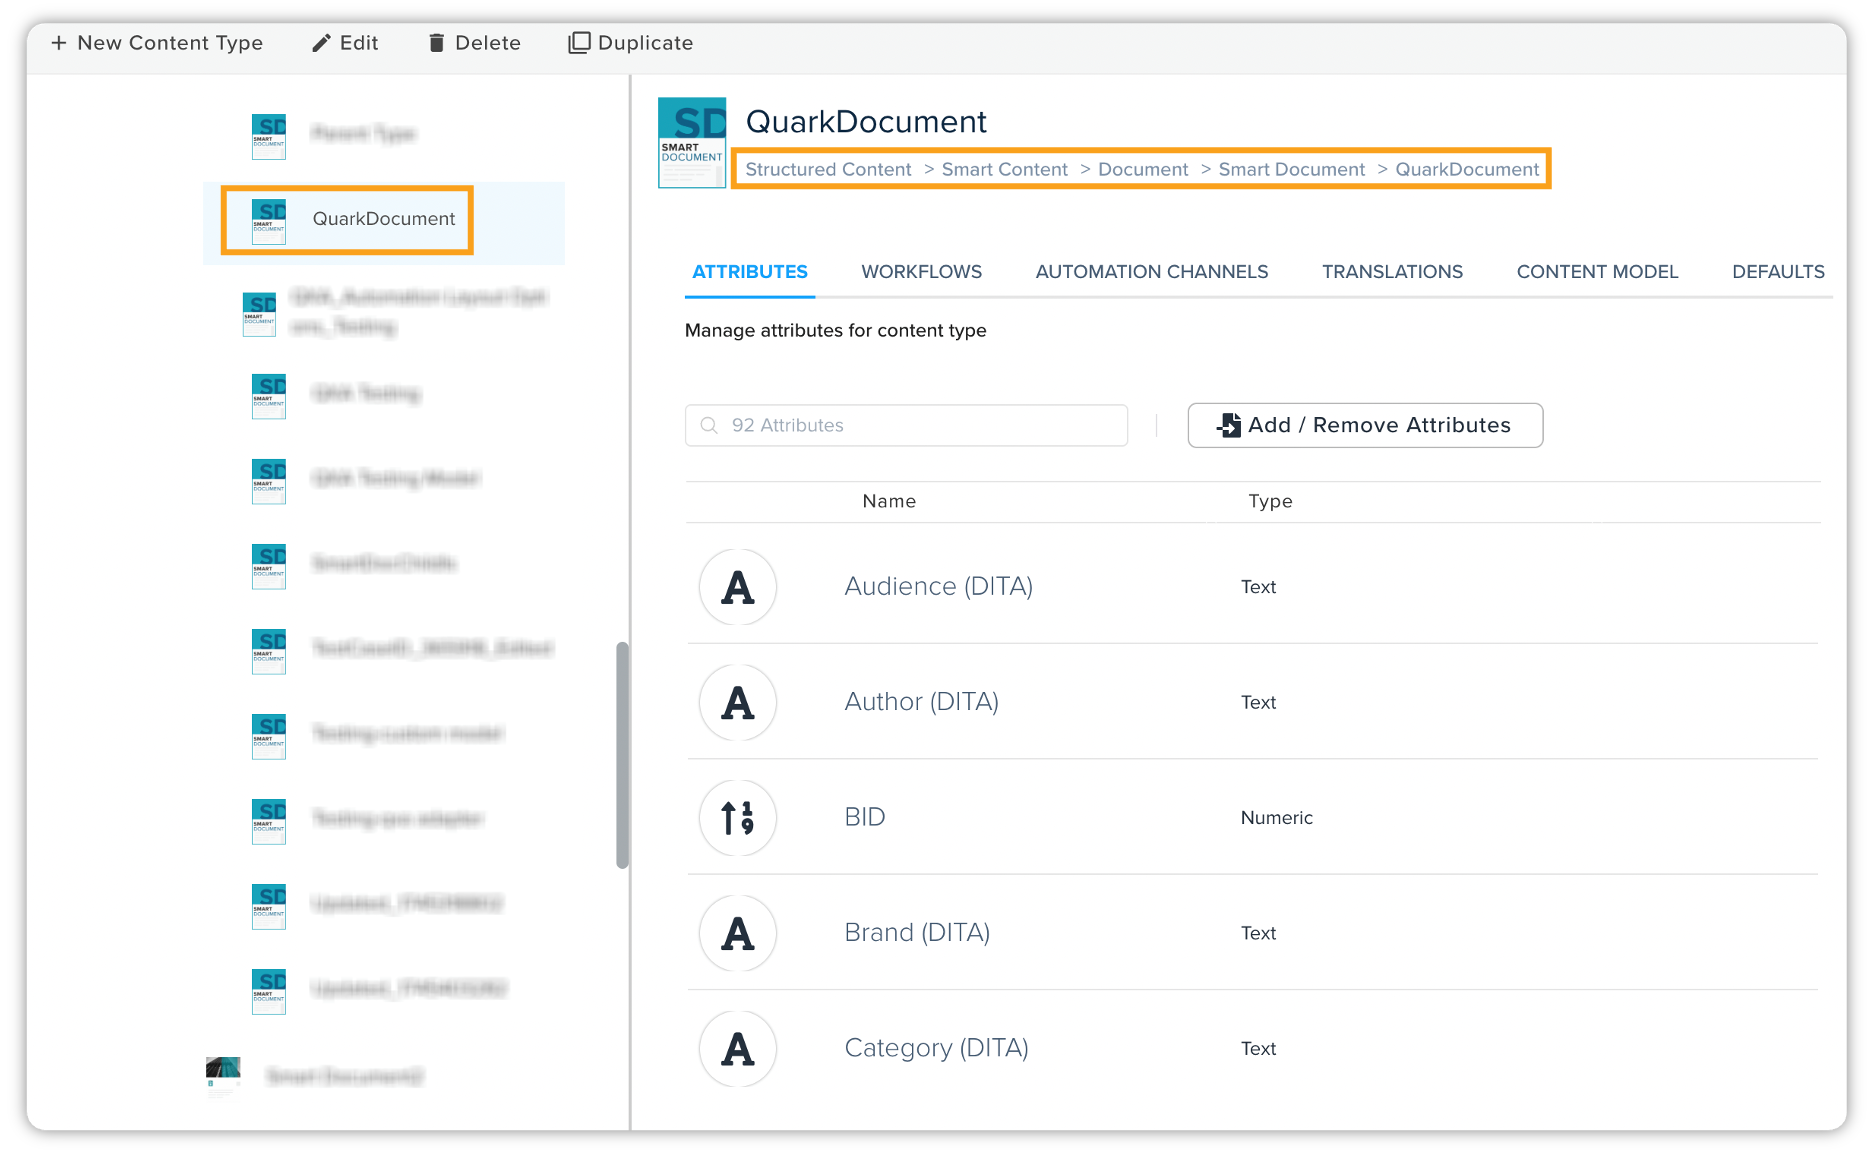
QPP creates a new content type and assigns the same properties (attributes, workflows, automation channels, translations, content models, and default) as the parent content type. The newly created content type will automatically inherit all the properties from its parent content type and, if applicable, its sub-parent content type.
Other Content Types Operations
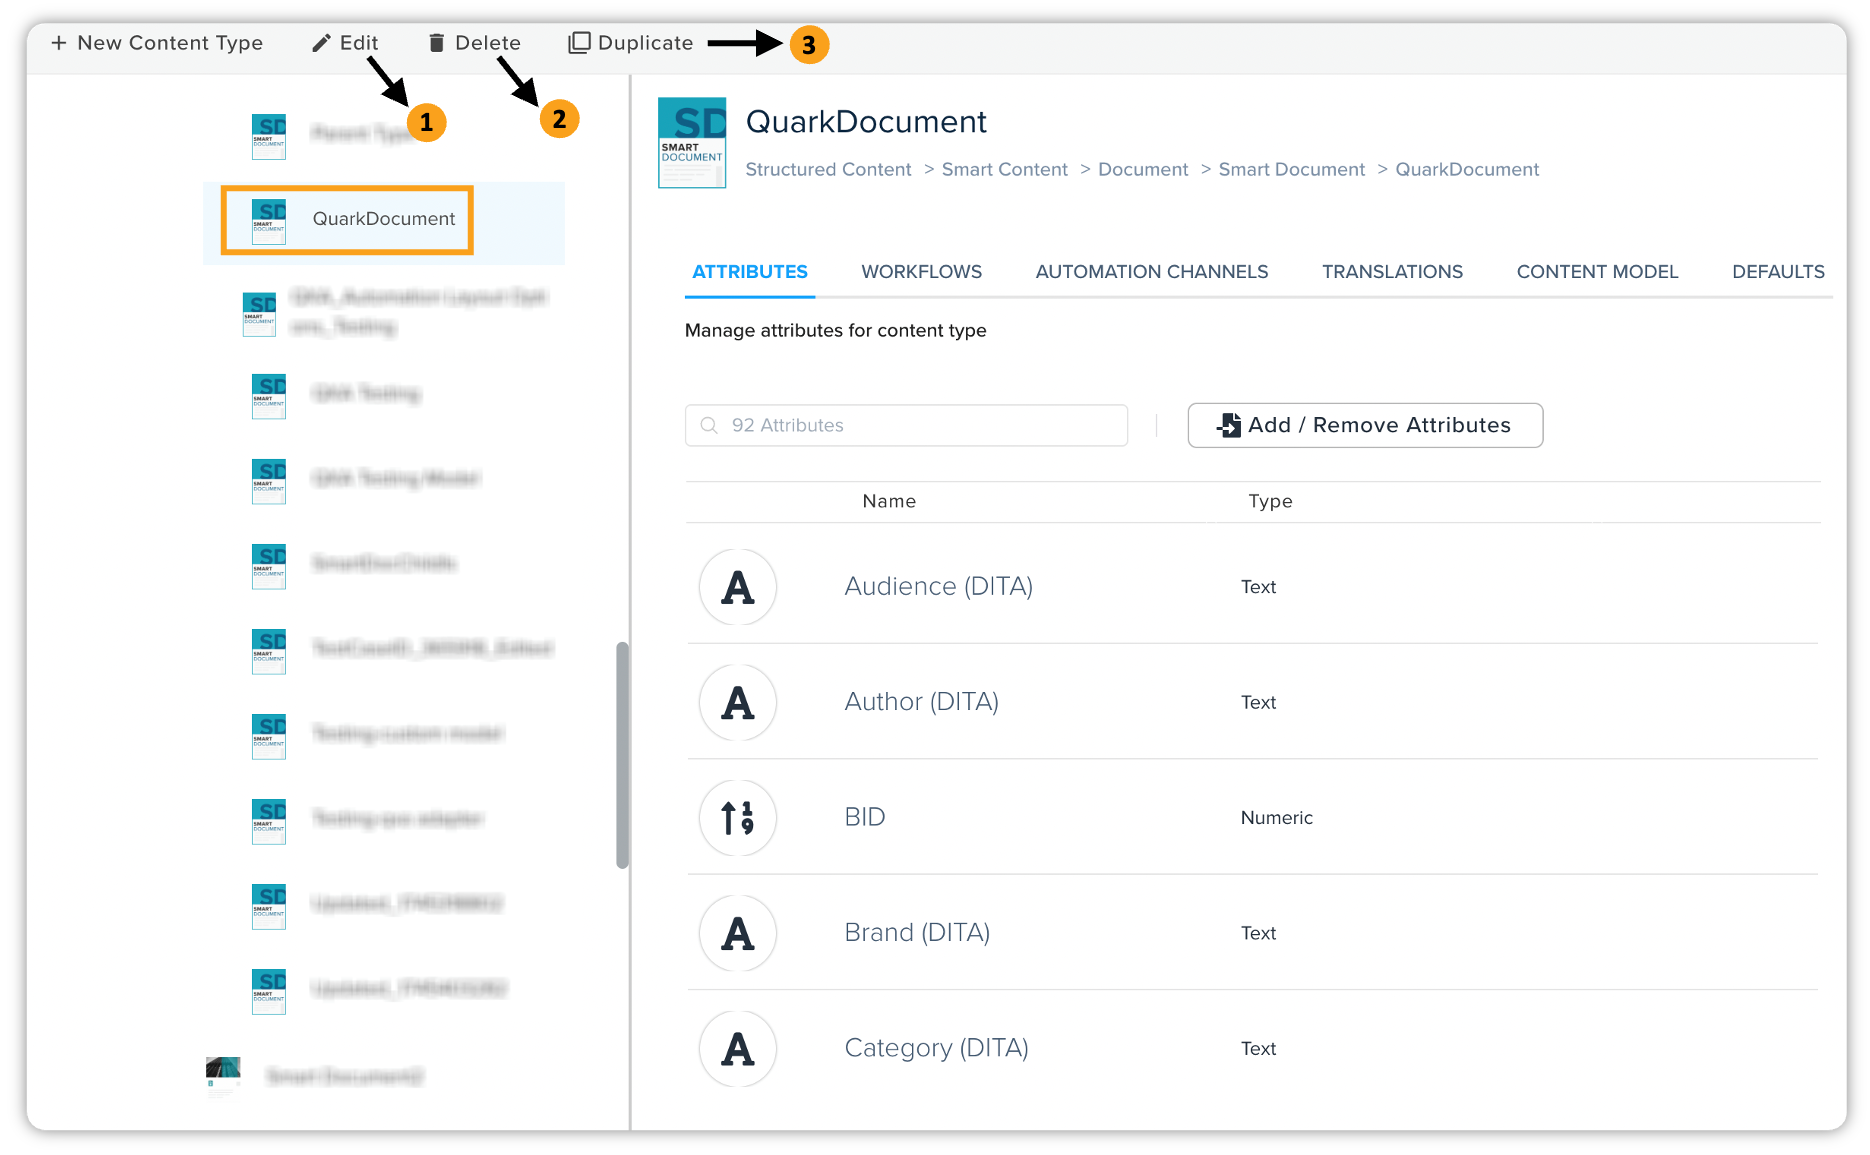
The top bar actions have the following additional content type operations:
-
Edit: Allows you to edit the name and category of a content type.
-
Delete: Allows you to delete a content type (including all children content types).
-
Duplicate: Allows you to duplicate a content type (excluding all children content types).
Properties Pane
The right side of the window lists the attributes, workflows, automation channels, and translations in respective tabs related to the content type that you have selected in the right frame.
You can manage attributes, automation channels, and translations from within the properties frame; however, you can manage workflows only through the Workflow page.
Manage Attributes
The Attributes tab lists all the attributes related to the selected content type. The tab also has a quick search tool to search for an attribute by name, which, by default, displays the total number of attributes related to the selected content type.
To manage (add/remove) attributes, follow the steps shown below:
-
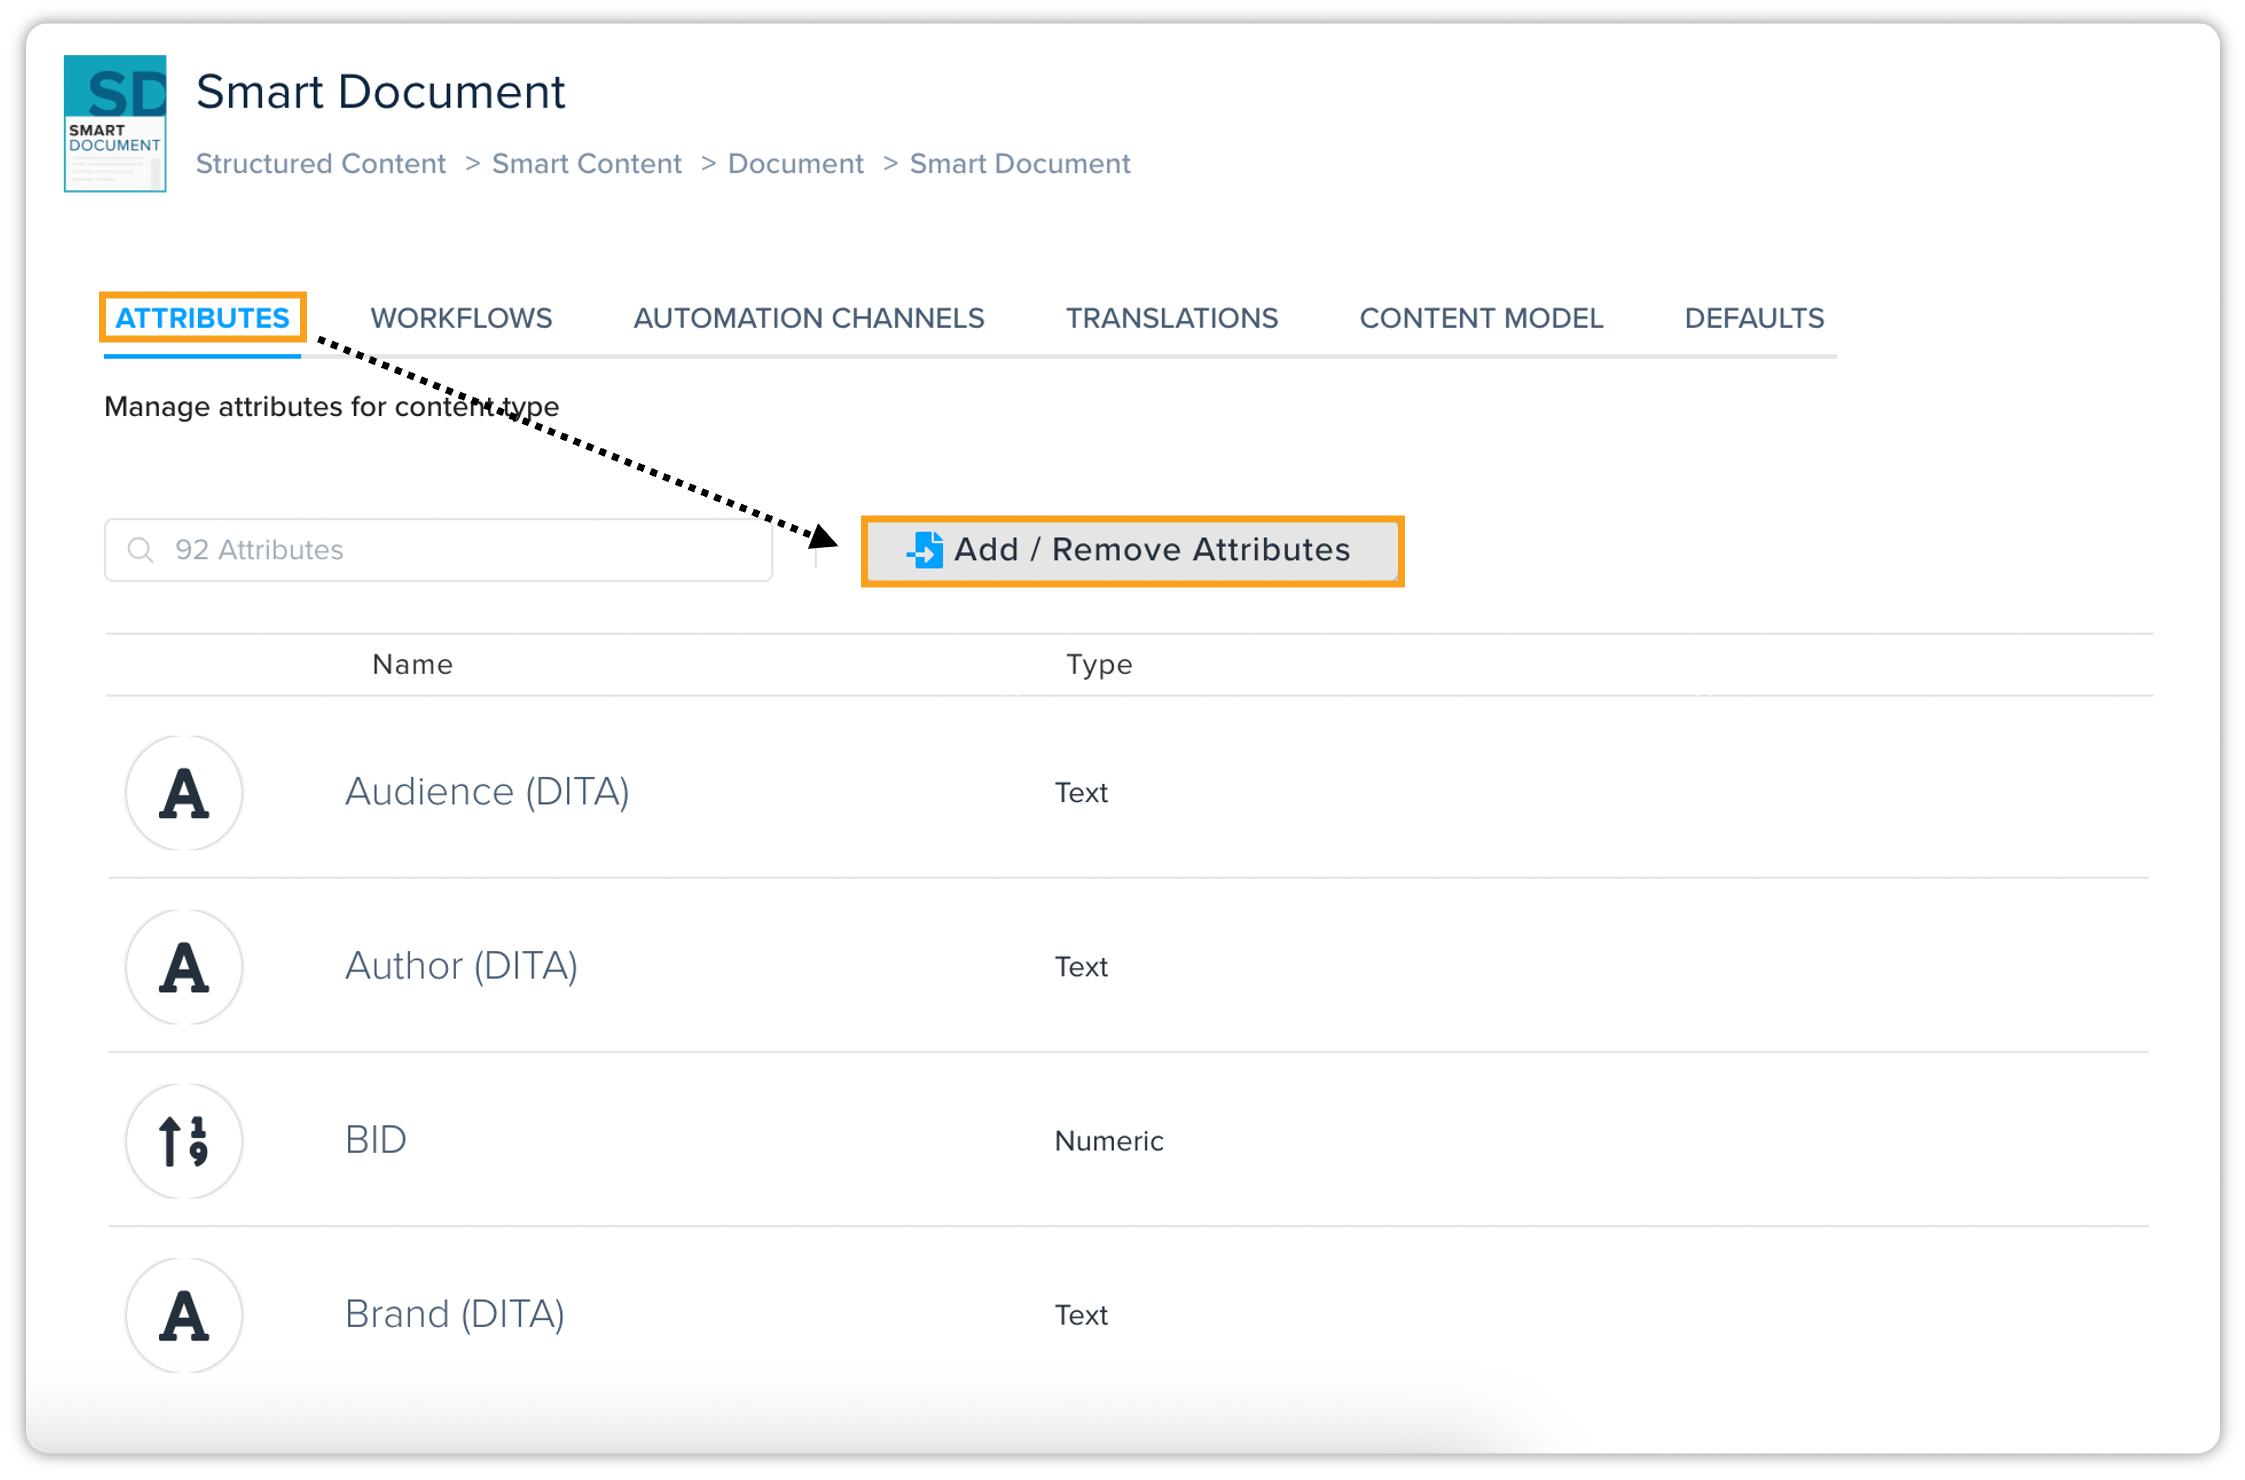
On the Attributes tab, click Add/Remove Attributes to open the Add Attributes to Content Type pane.
-
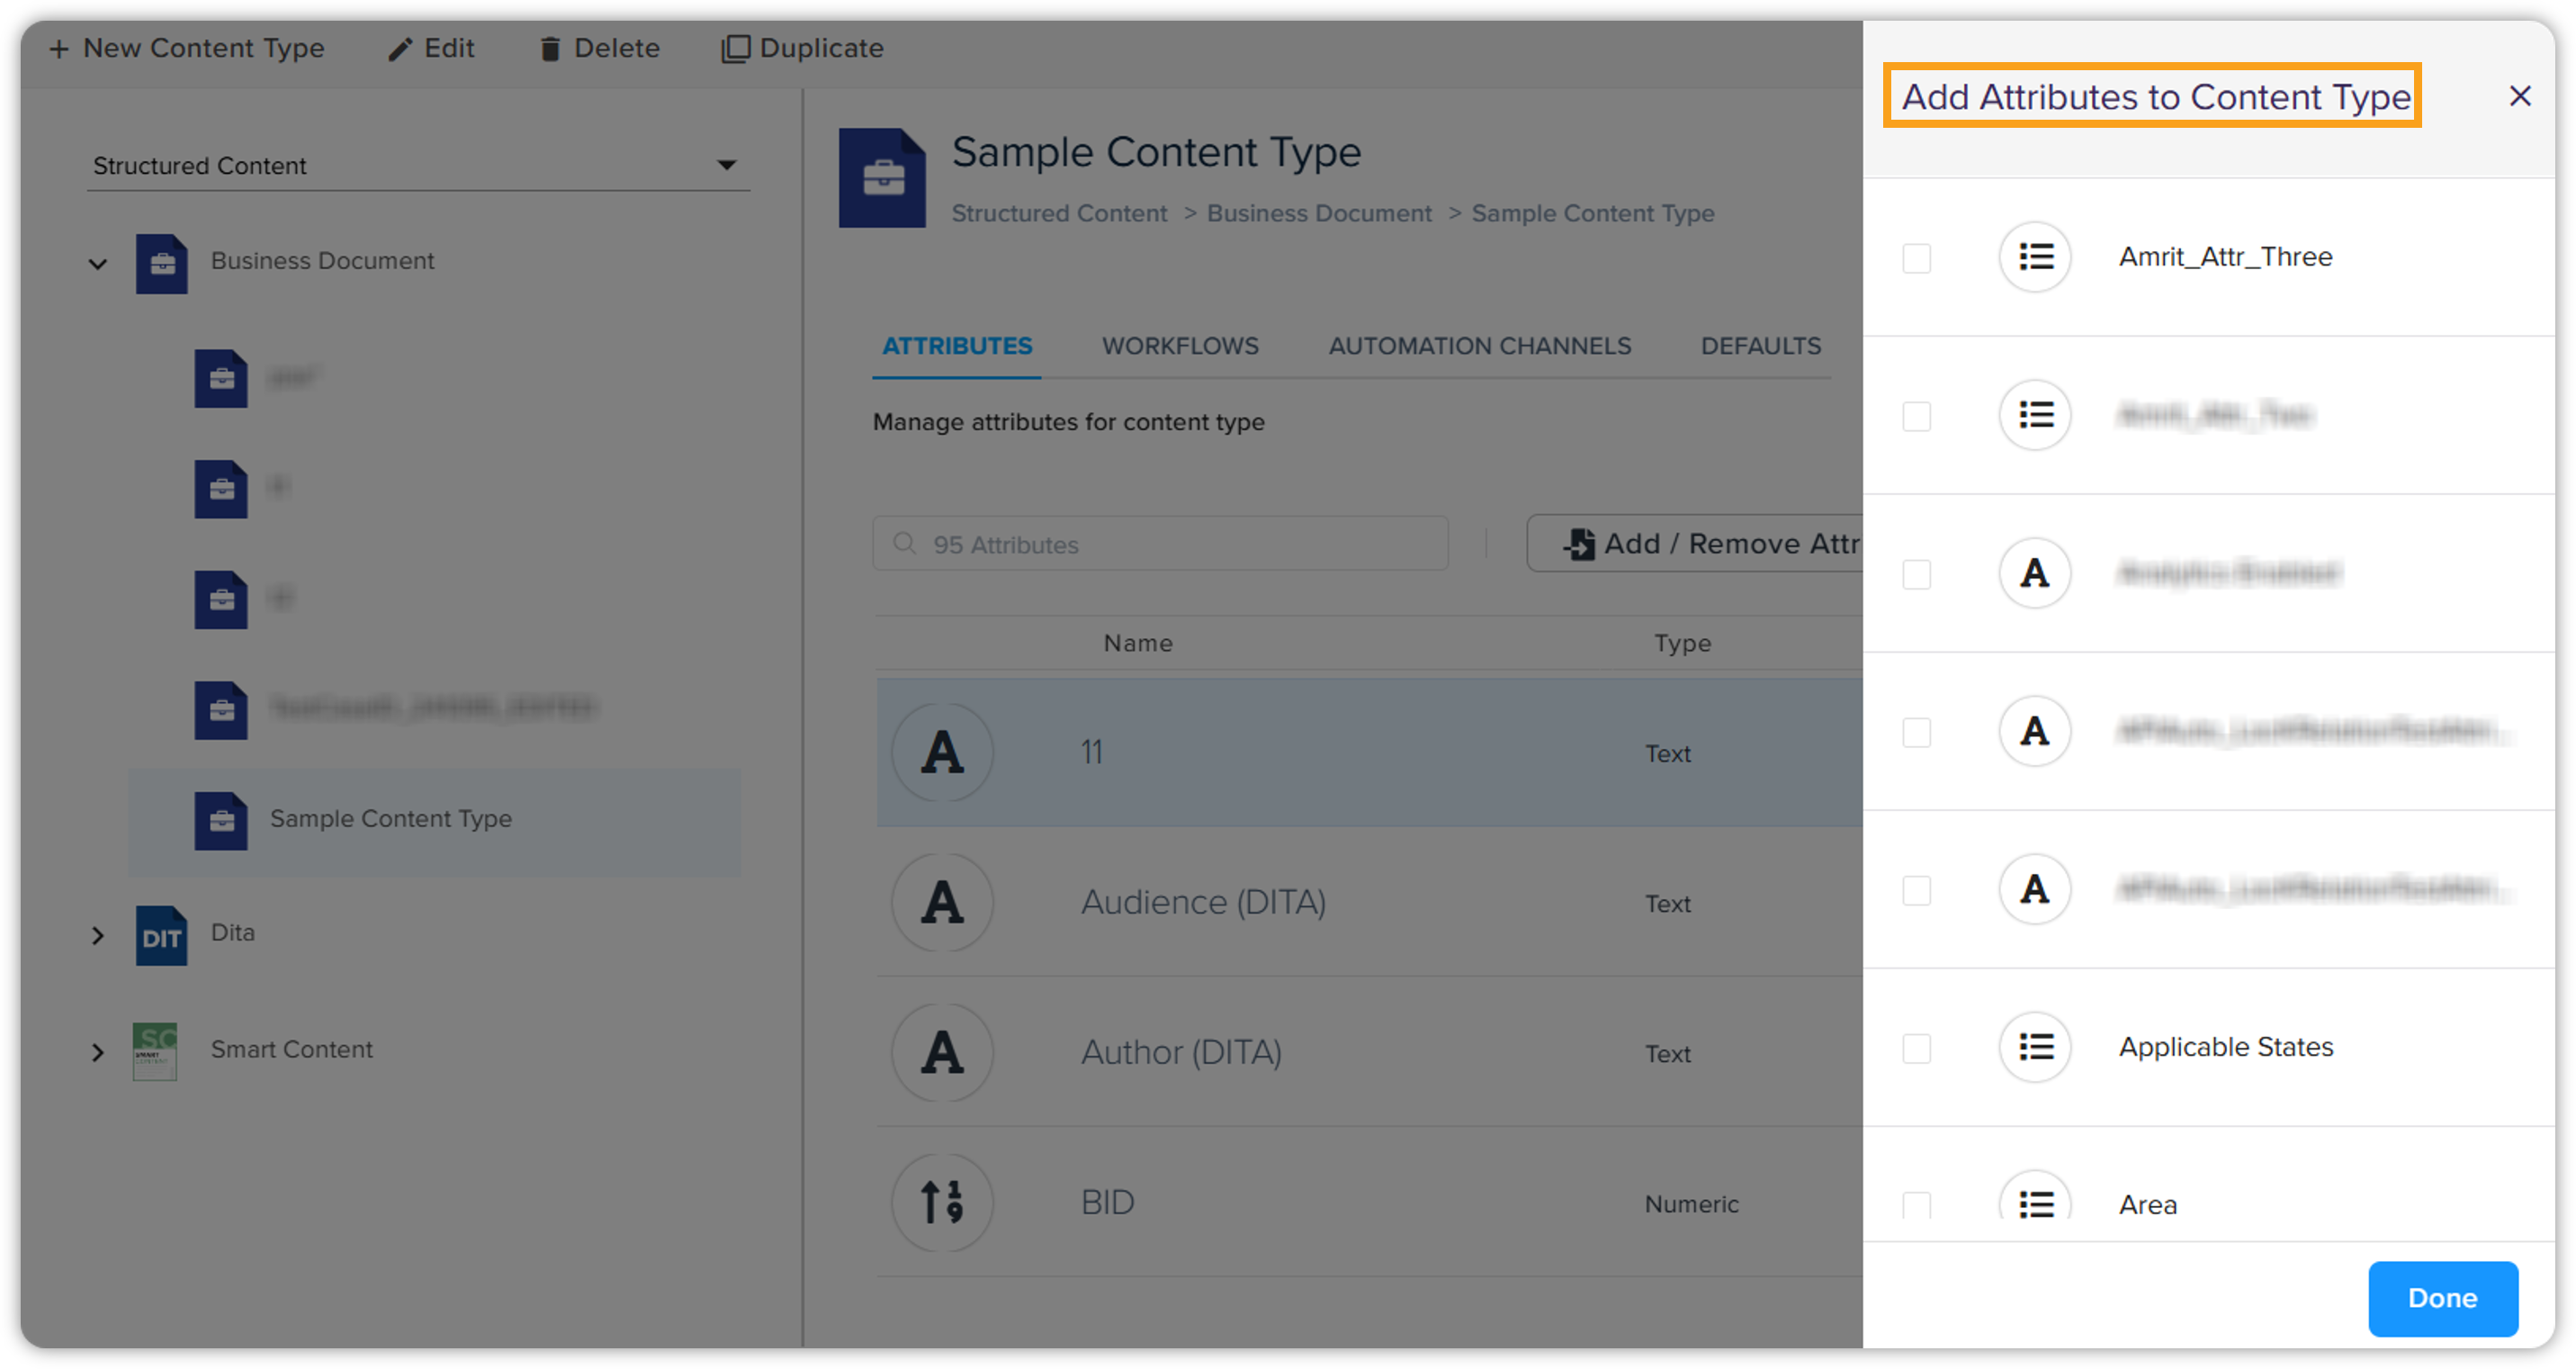
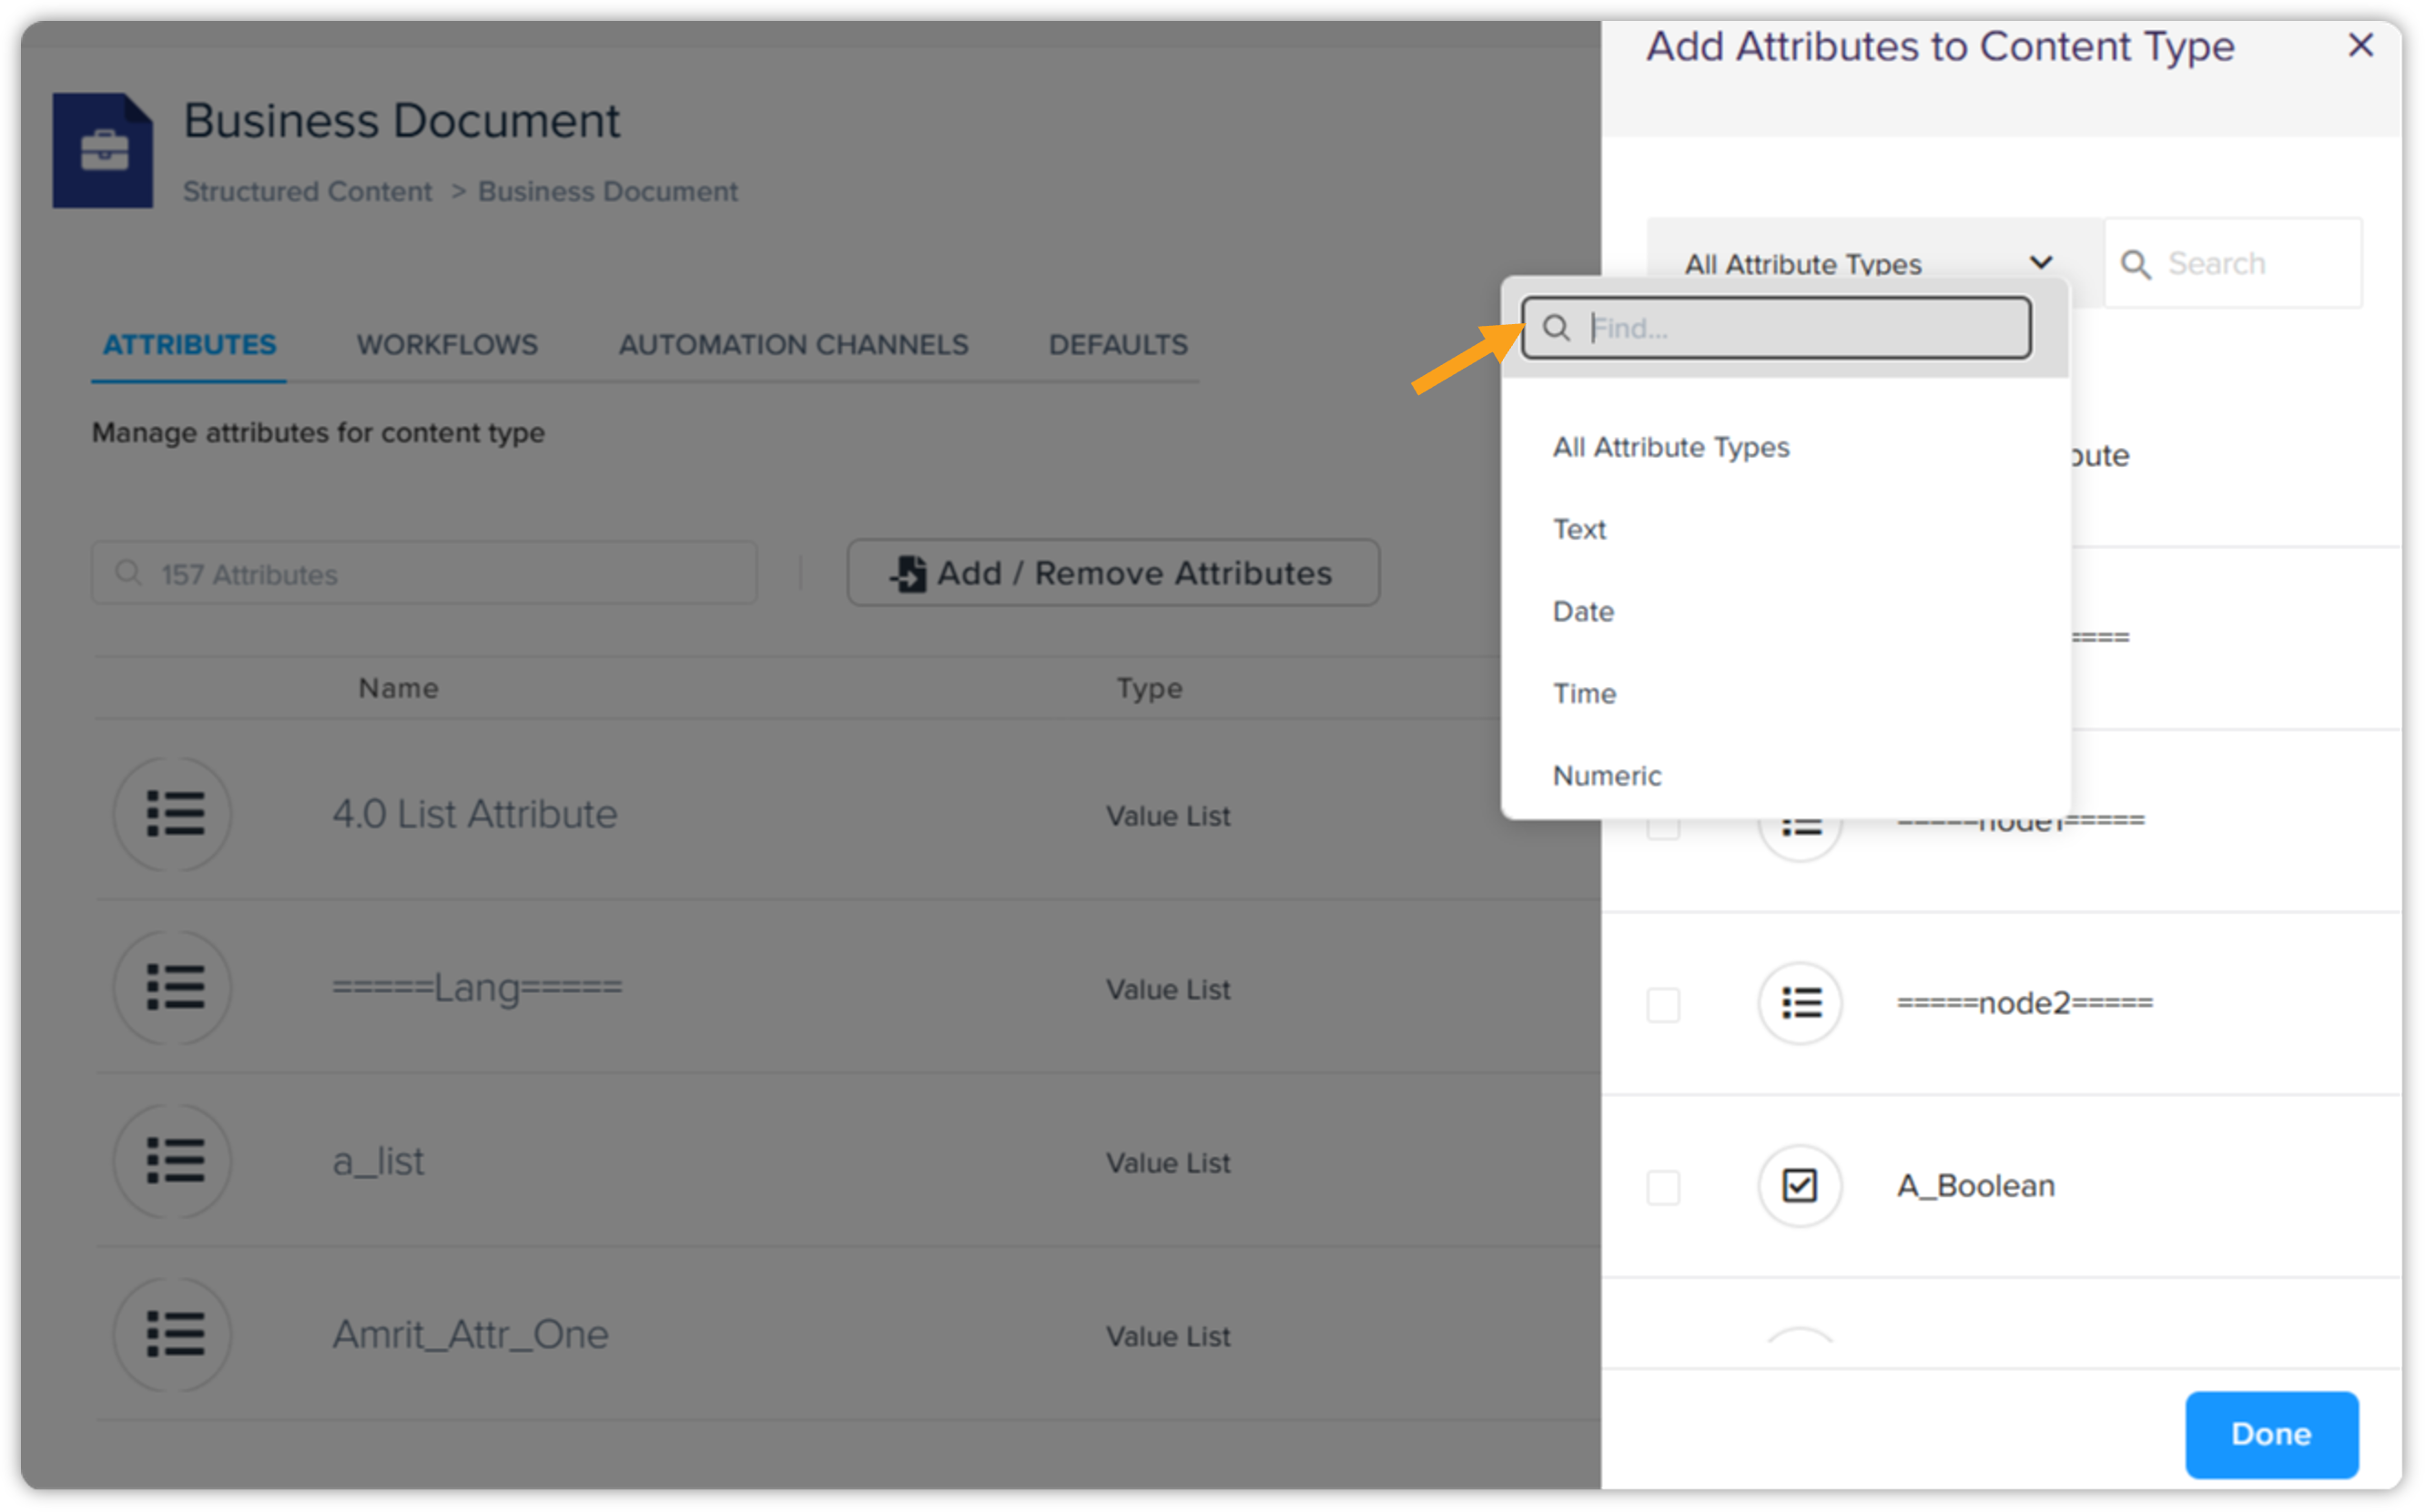
In the Add Attributes to Content Type pane, select or deselect the checkbox against a listed attribute to add/remove the attribute for the selected content type.
-
Click Done.
Manage Workflows
The Workflows tab allows you to view and manage workflows associated with the selected content type.
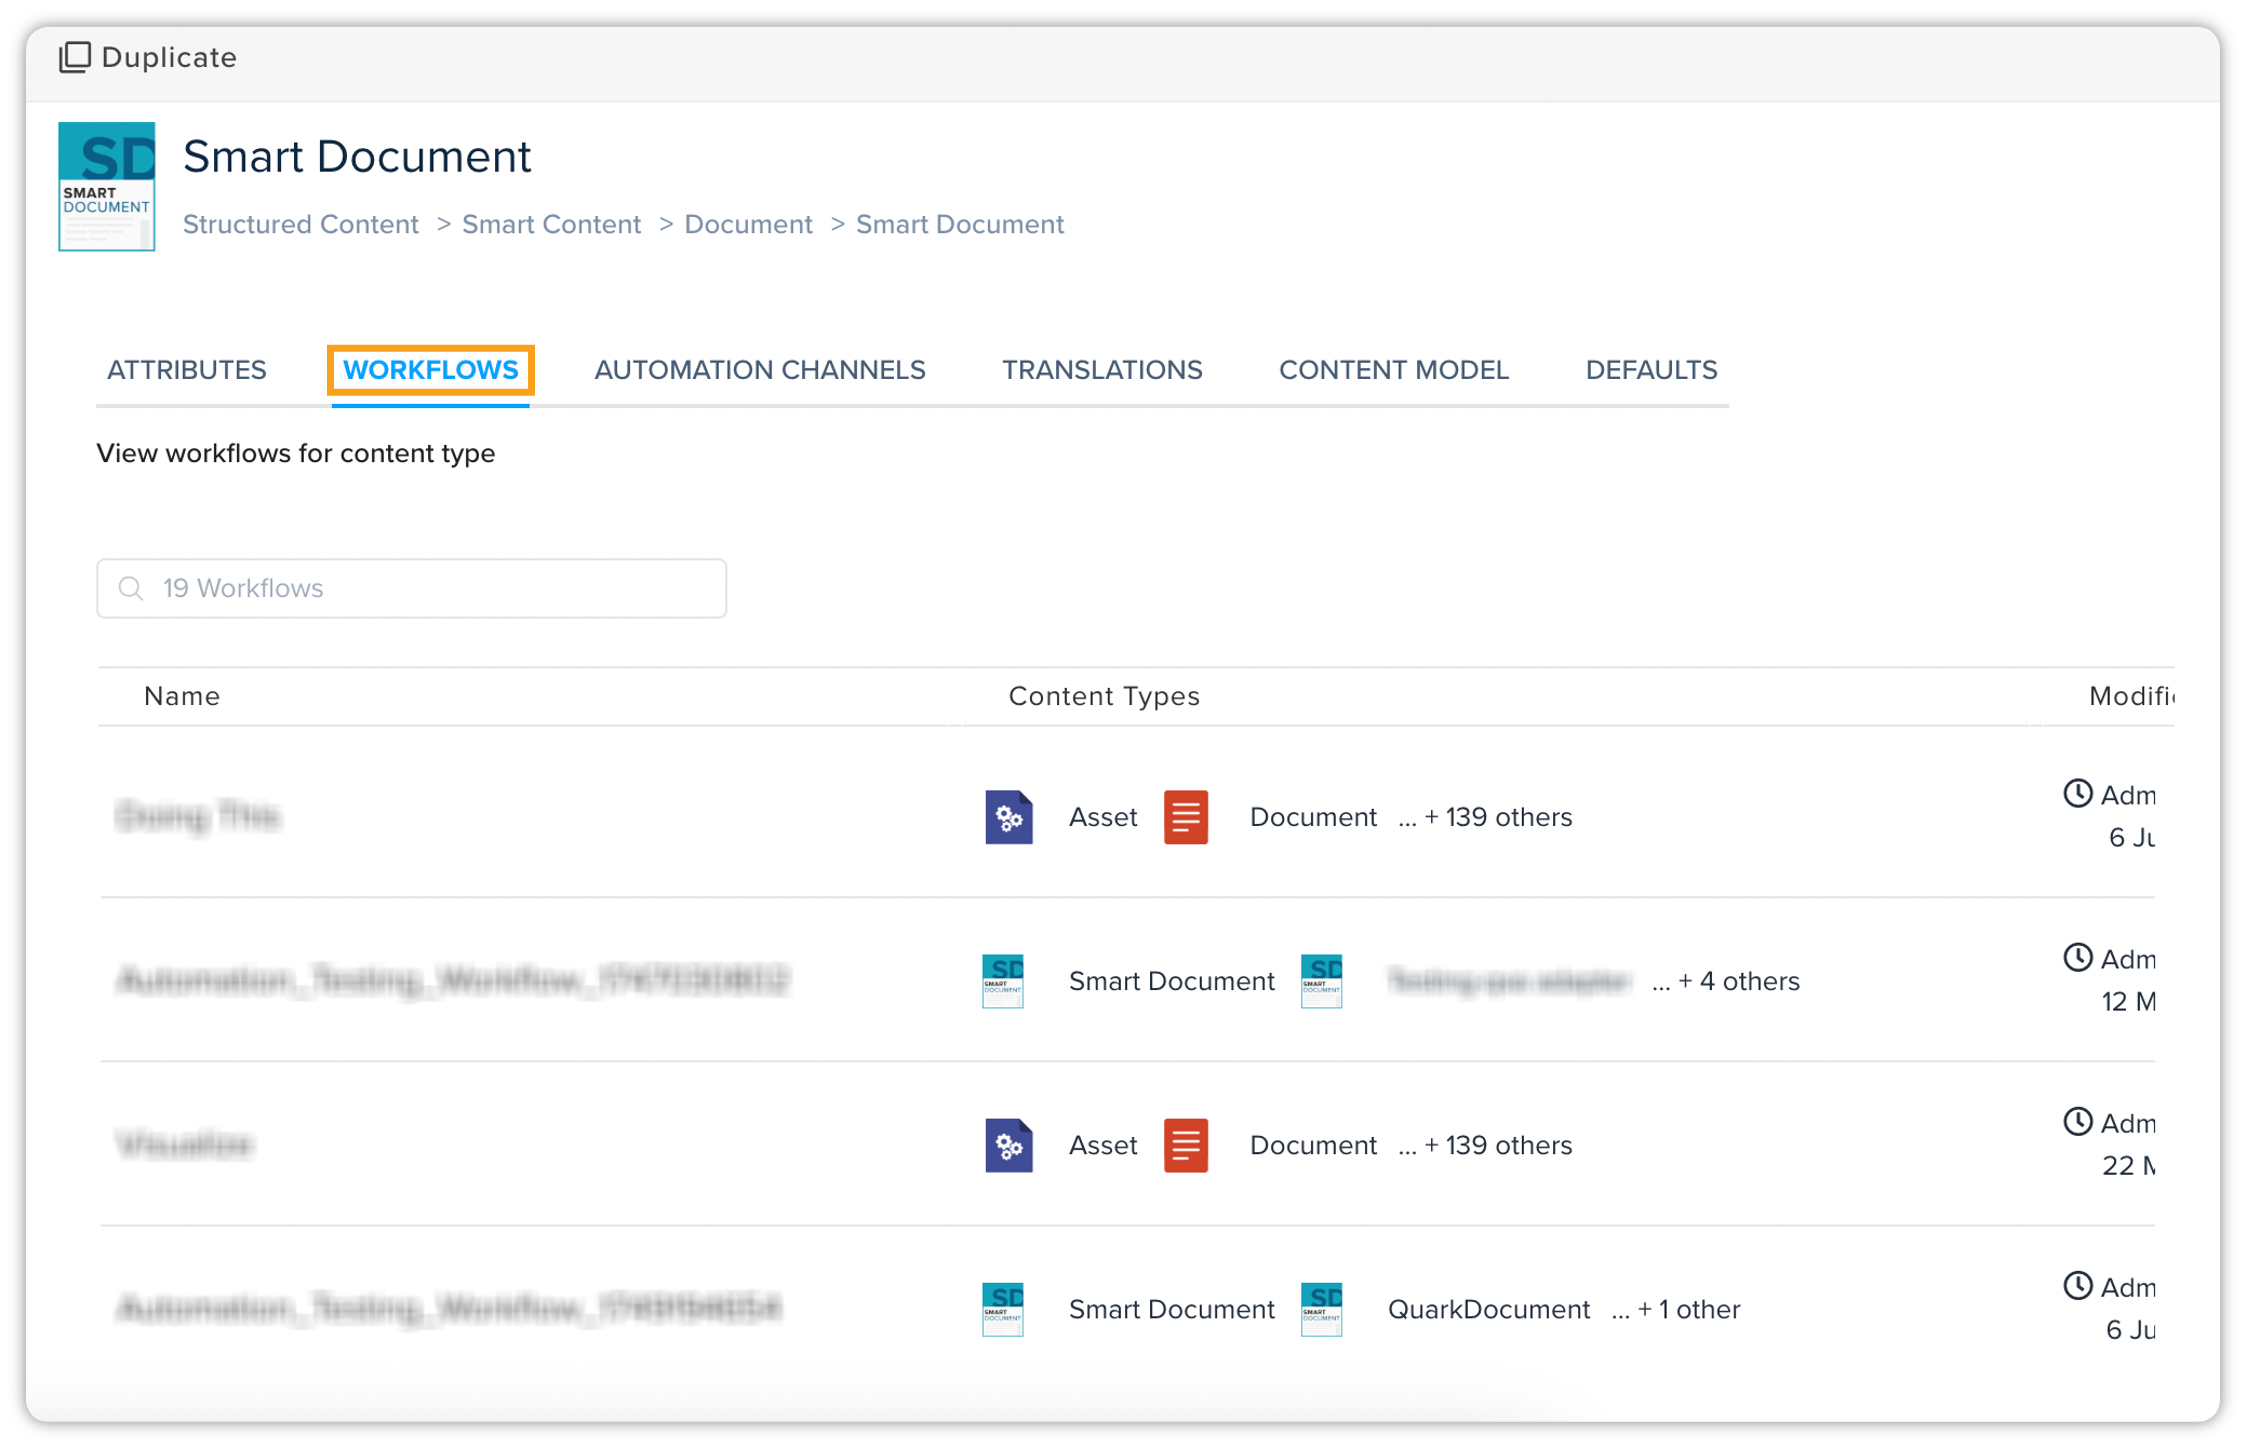
-
List of Existing Workflows: This pane displays all the existing workflows and their associated content types.
-
Search Functionality: You can search for the desired workflows by simply entering their names in the search bar.
-
View Workflow Button: Click this button to open the workflow diagram in an overlay window.
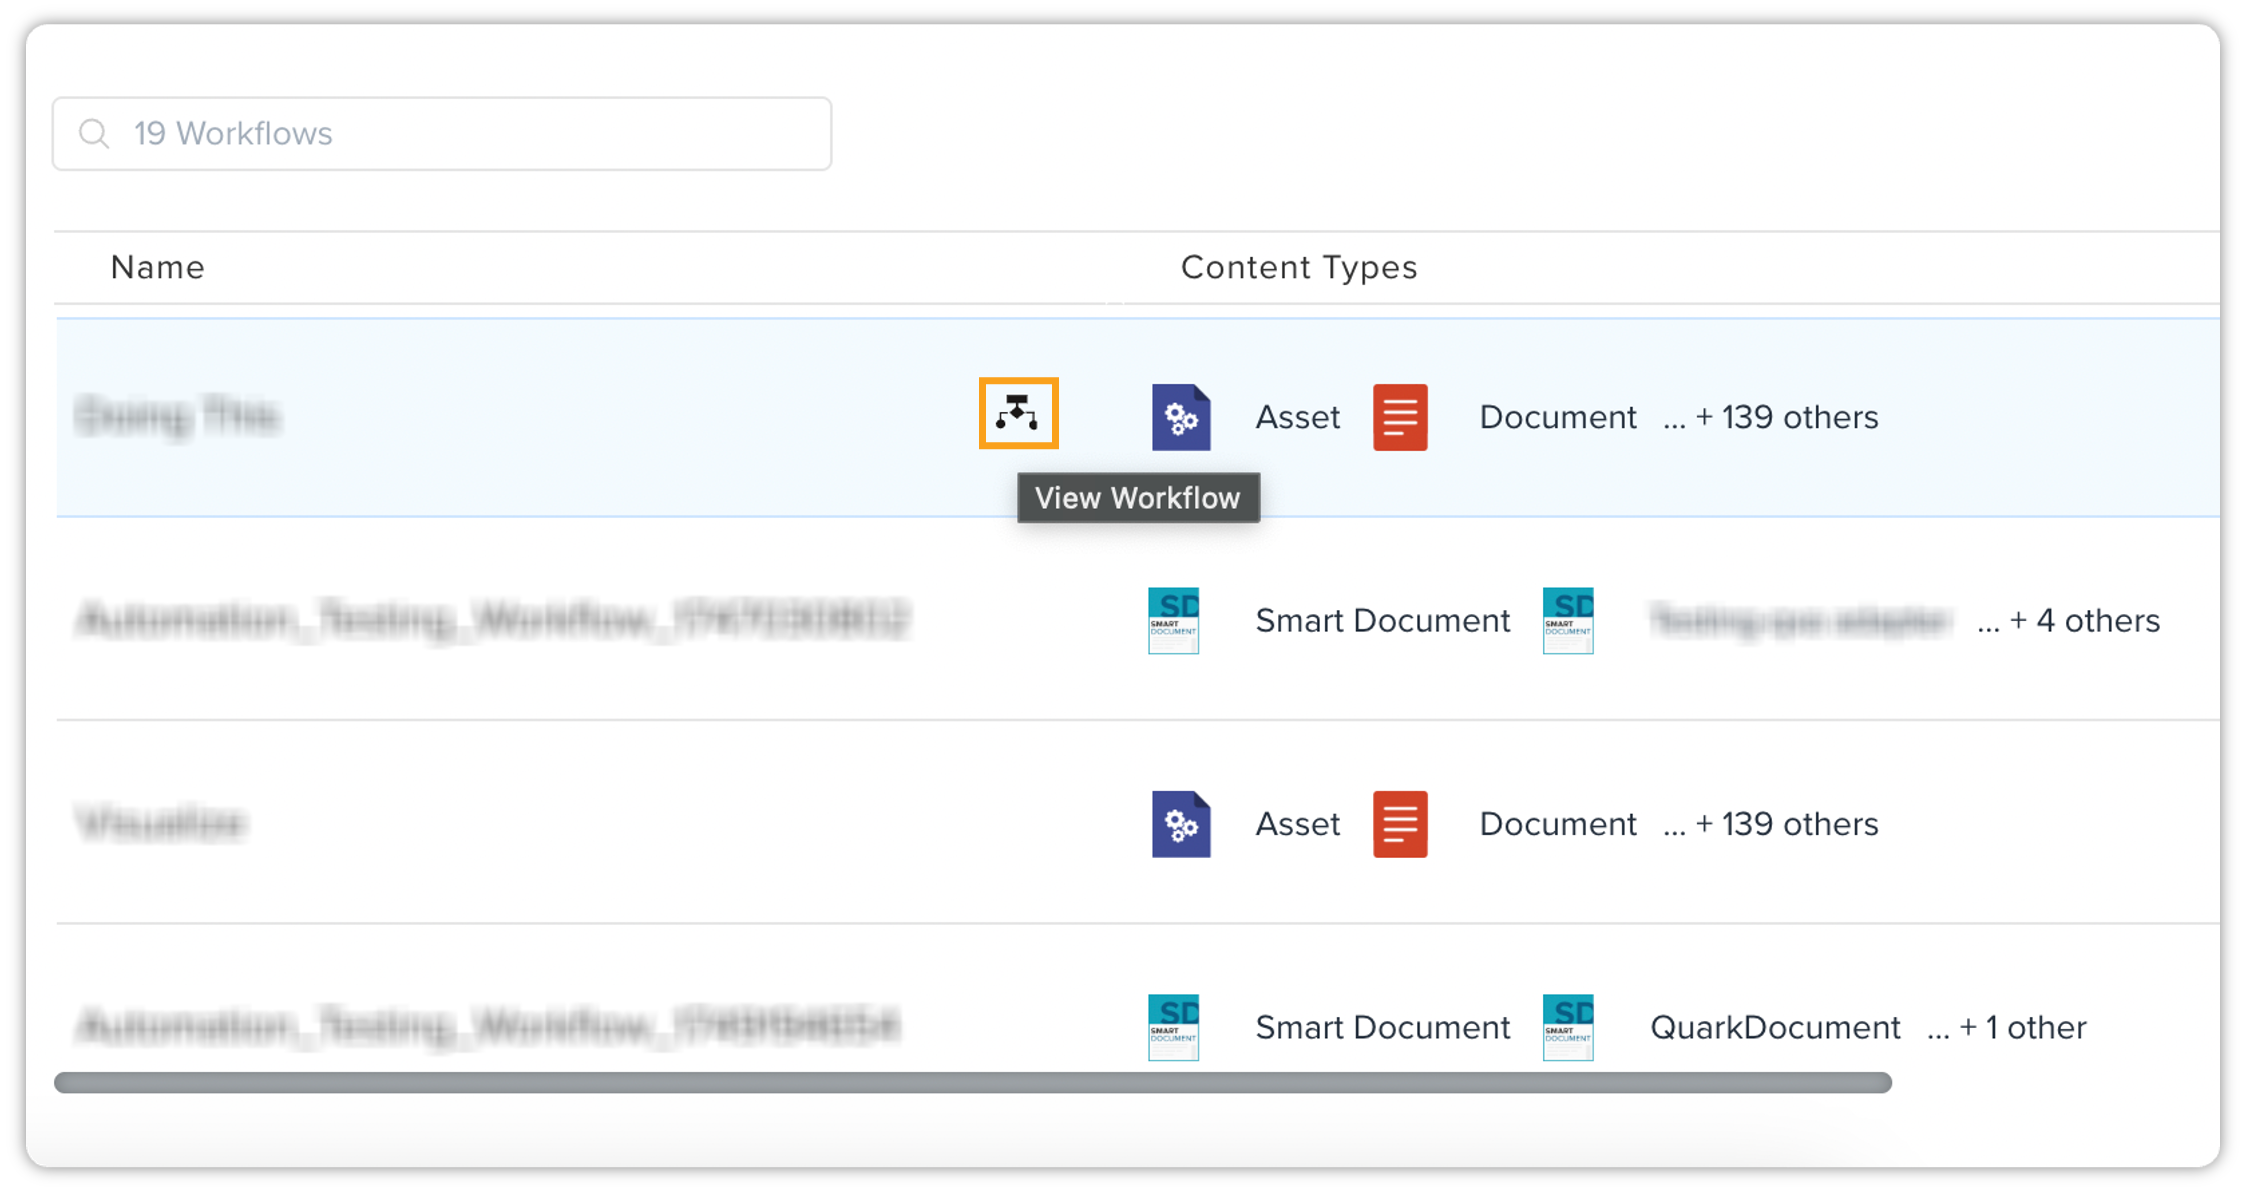
Workflow Actions
Once the workflow diagram is open, you can perform the following actions:
-
Export Workflow: You can export the workflow diagram in PNG and/or SVG format.
-
Display Analytics: Enable the Display Analytics option to view analytics related to the workflow.
-
Mini-Map: Utilize the mini-map for easy navigation within the workflow diagram.
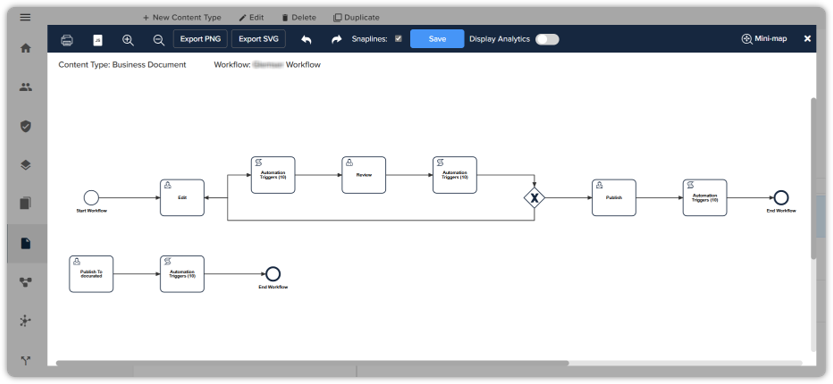
Manage Automation Channels
The Automation Channels tab lists all the automation channels (publishing and delivery channels) related to the selected content type. The tab also has a quick search tool to search for a channel by name, which, by default, displays the total number of channels related to the selected content type.
To manage channels:
-
Click the button Add/Remove Channels to open the Add Channels to Content Type pane.
-
In the Add Channels to Content Type pane, select/deselect the publishing channels from the tab Publishing and then select/deselect the delivery channels from the tab Delivery.
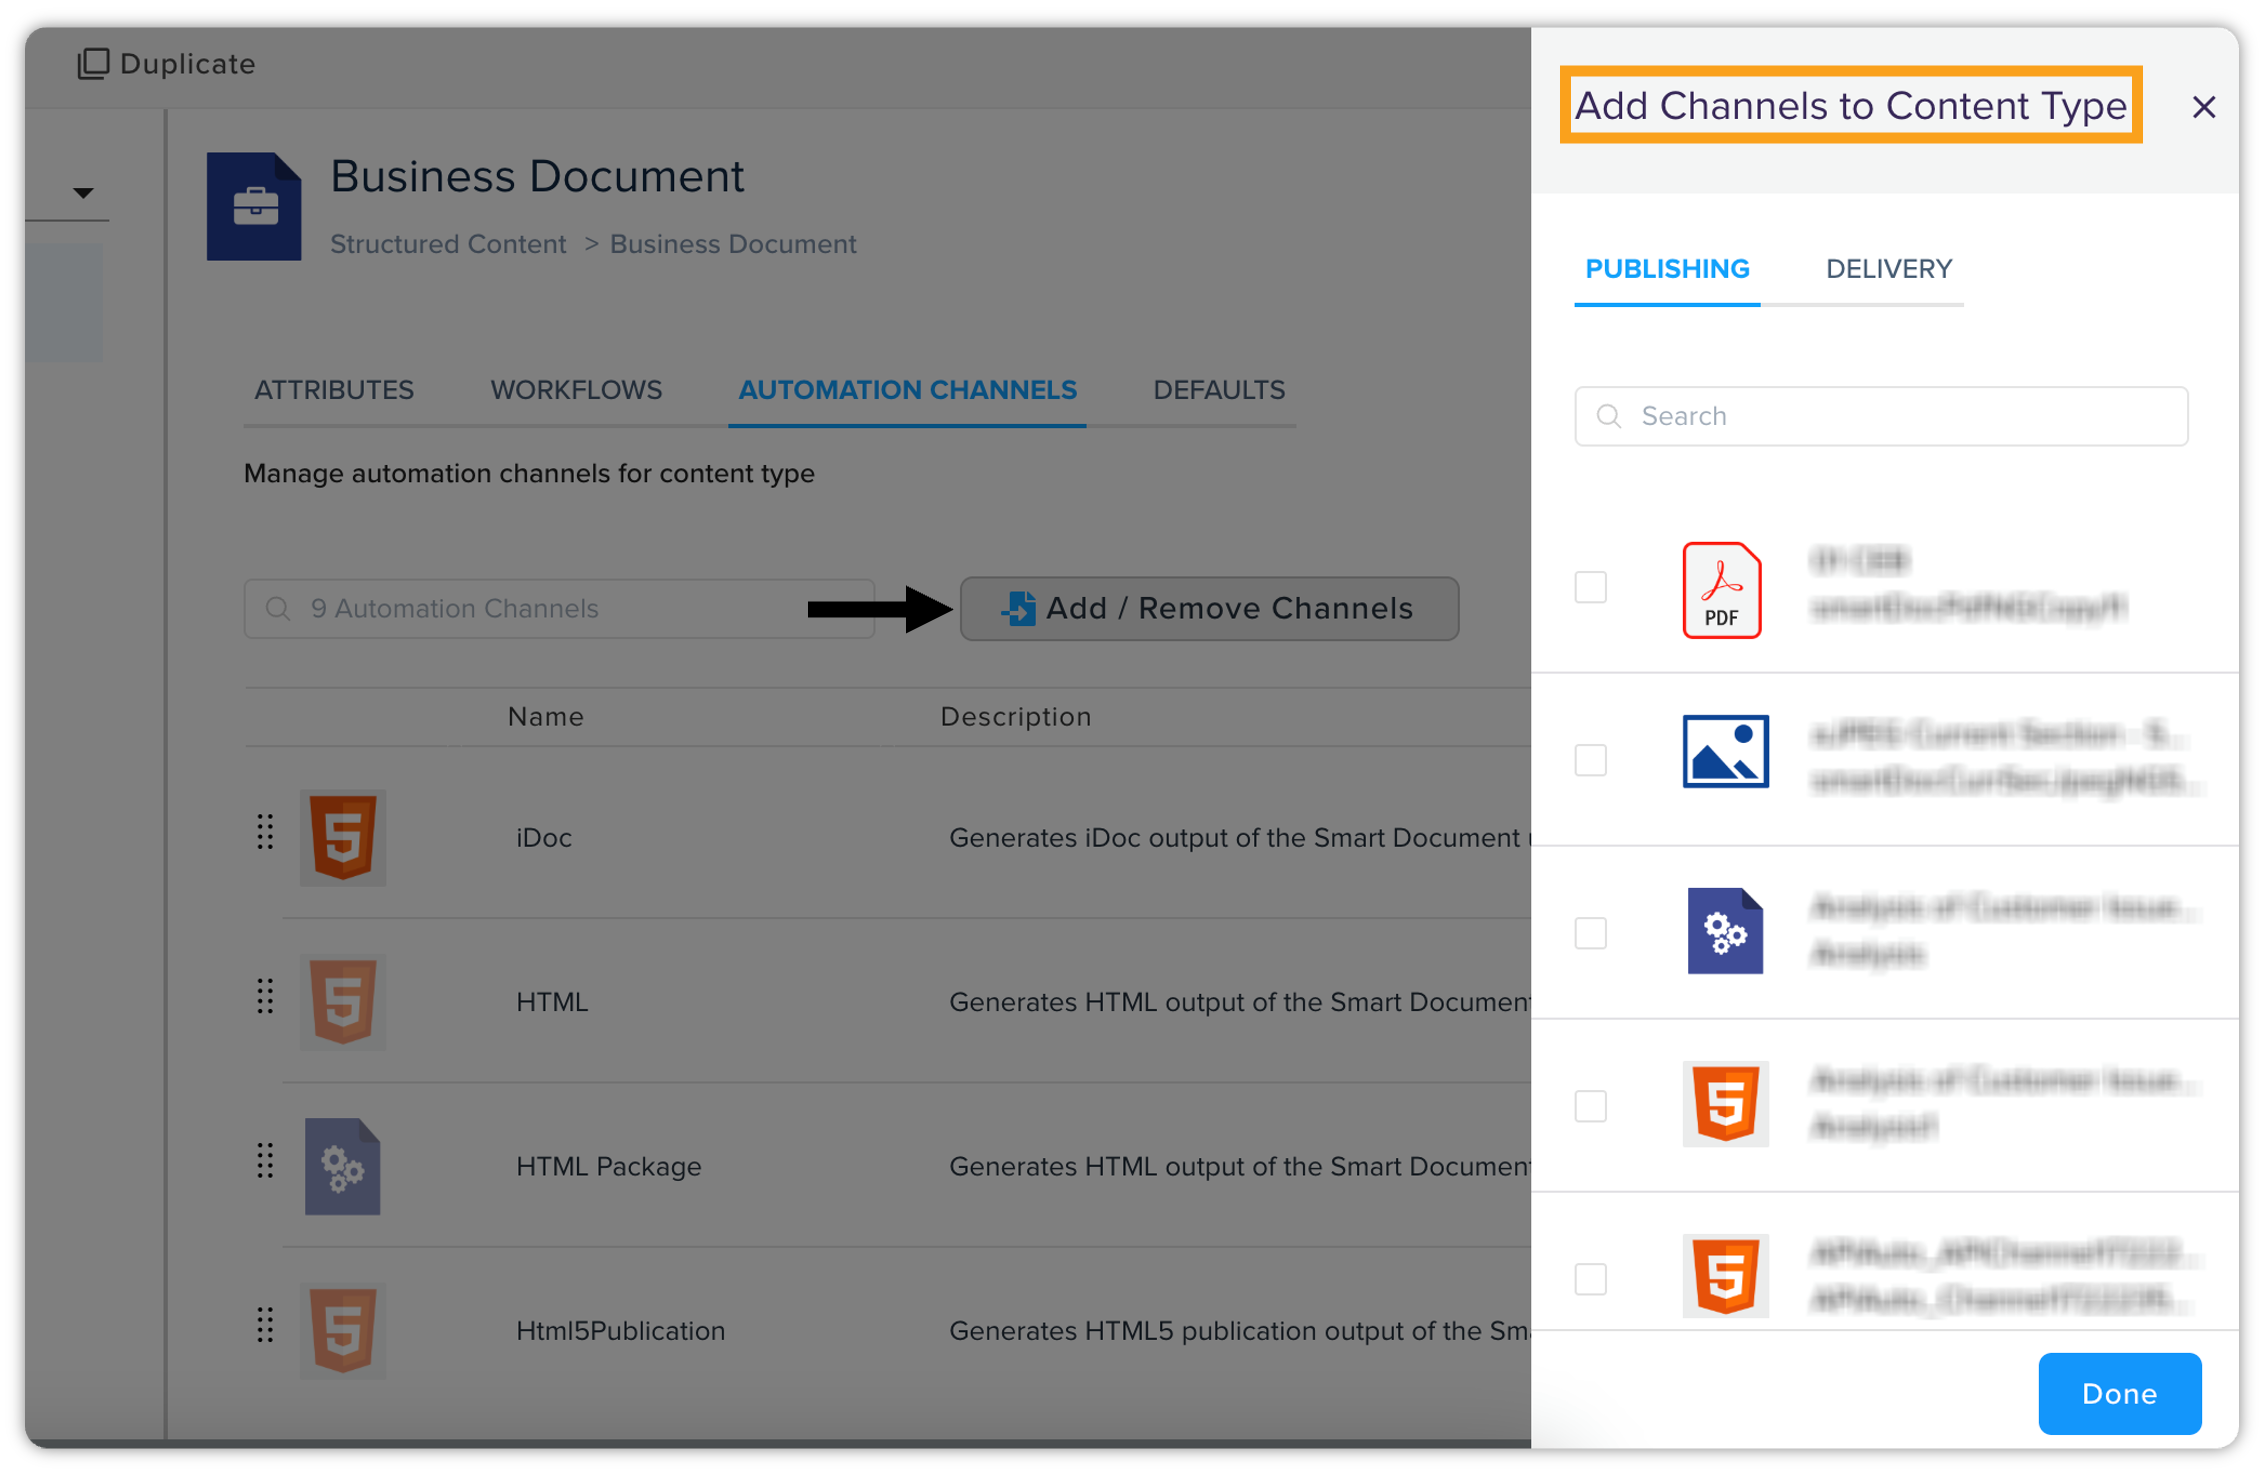 In the Add Channels to Content Type pane, you can also search for a channel by name.
-
Select Done.
Enabling/Disabling Preview Channels
The state of individual automation channels can be toggled using the Enable Preview and Disable Preview buttons. These buttons dynamically appear based on the channel's current state.
-
If a preview channel is currently disabled, the Enable Preview button will be visible.
-
If a preview channel is currently enabled, the Disable Preview button will be visible.
To change the state of a preview channel:
-
Select the desired automation channel from the list.
-
Click the appropriate button (Enable Preview or Disable Preview) to toggle the channel's state.
Default
The Default tab allows you to set default properties for the selected content type. Note that the default settings can only be set once but can be edited later.
-
Default Collection Path: Set a default collection path for the content type. This path ensures that documents are auto-saved based on the configured path.
-
Default Workflow: Set a default workflow for the content type. This promotes standardization in content creation.
-
Default Status: Set a default status for the content type. This status is applied automatically when new content is created.
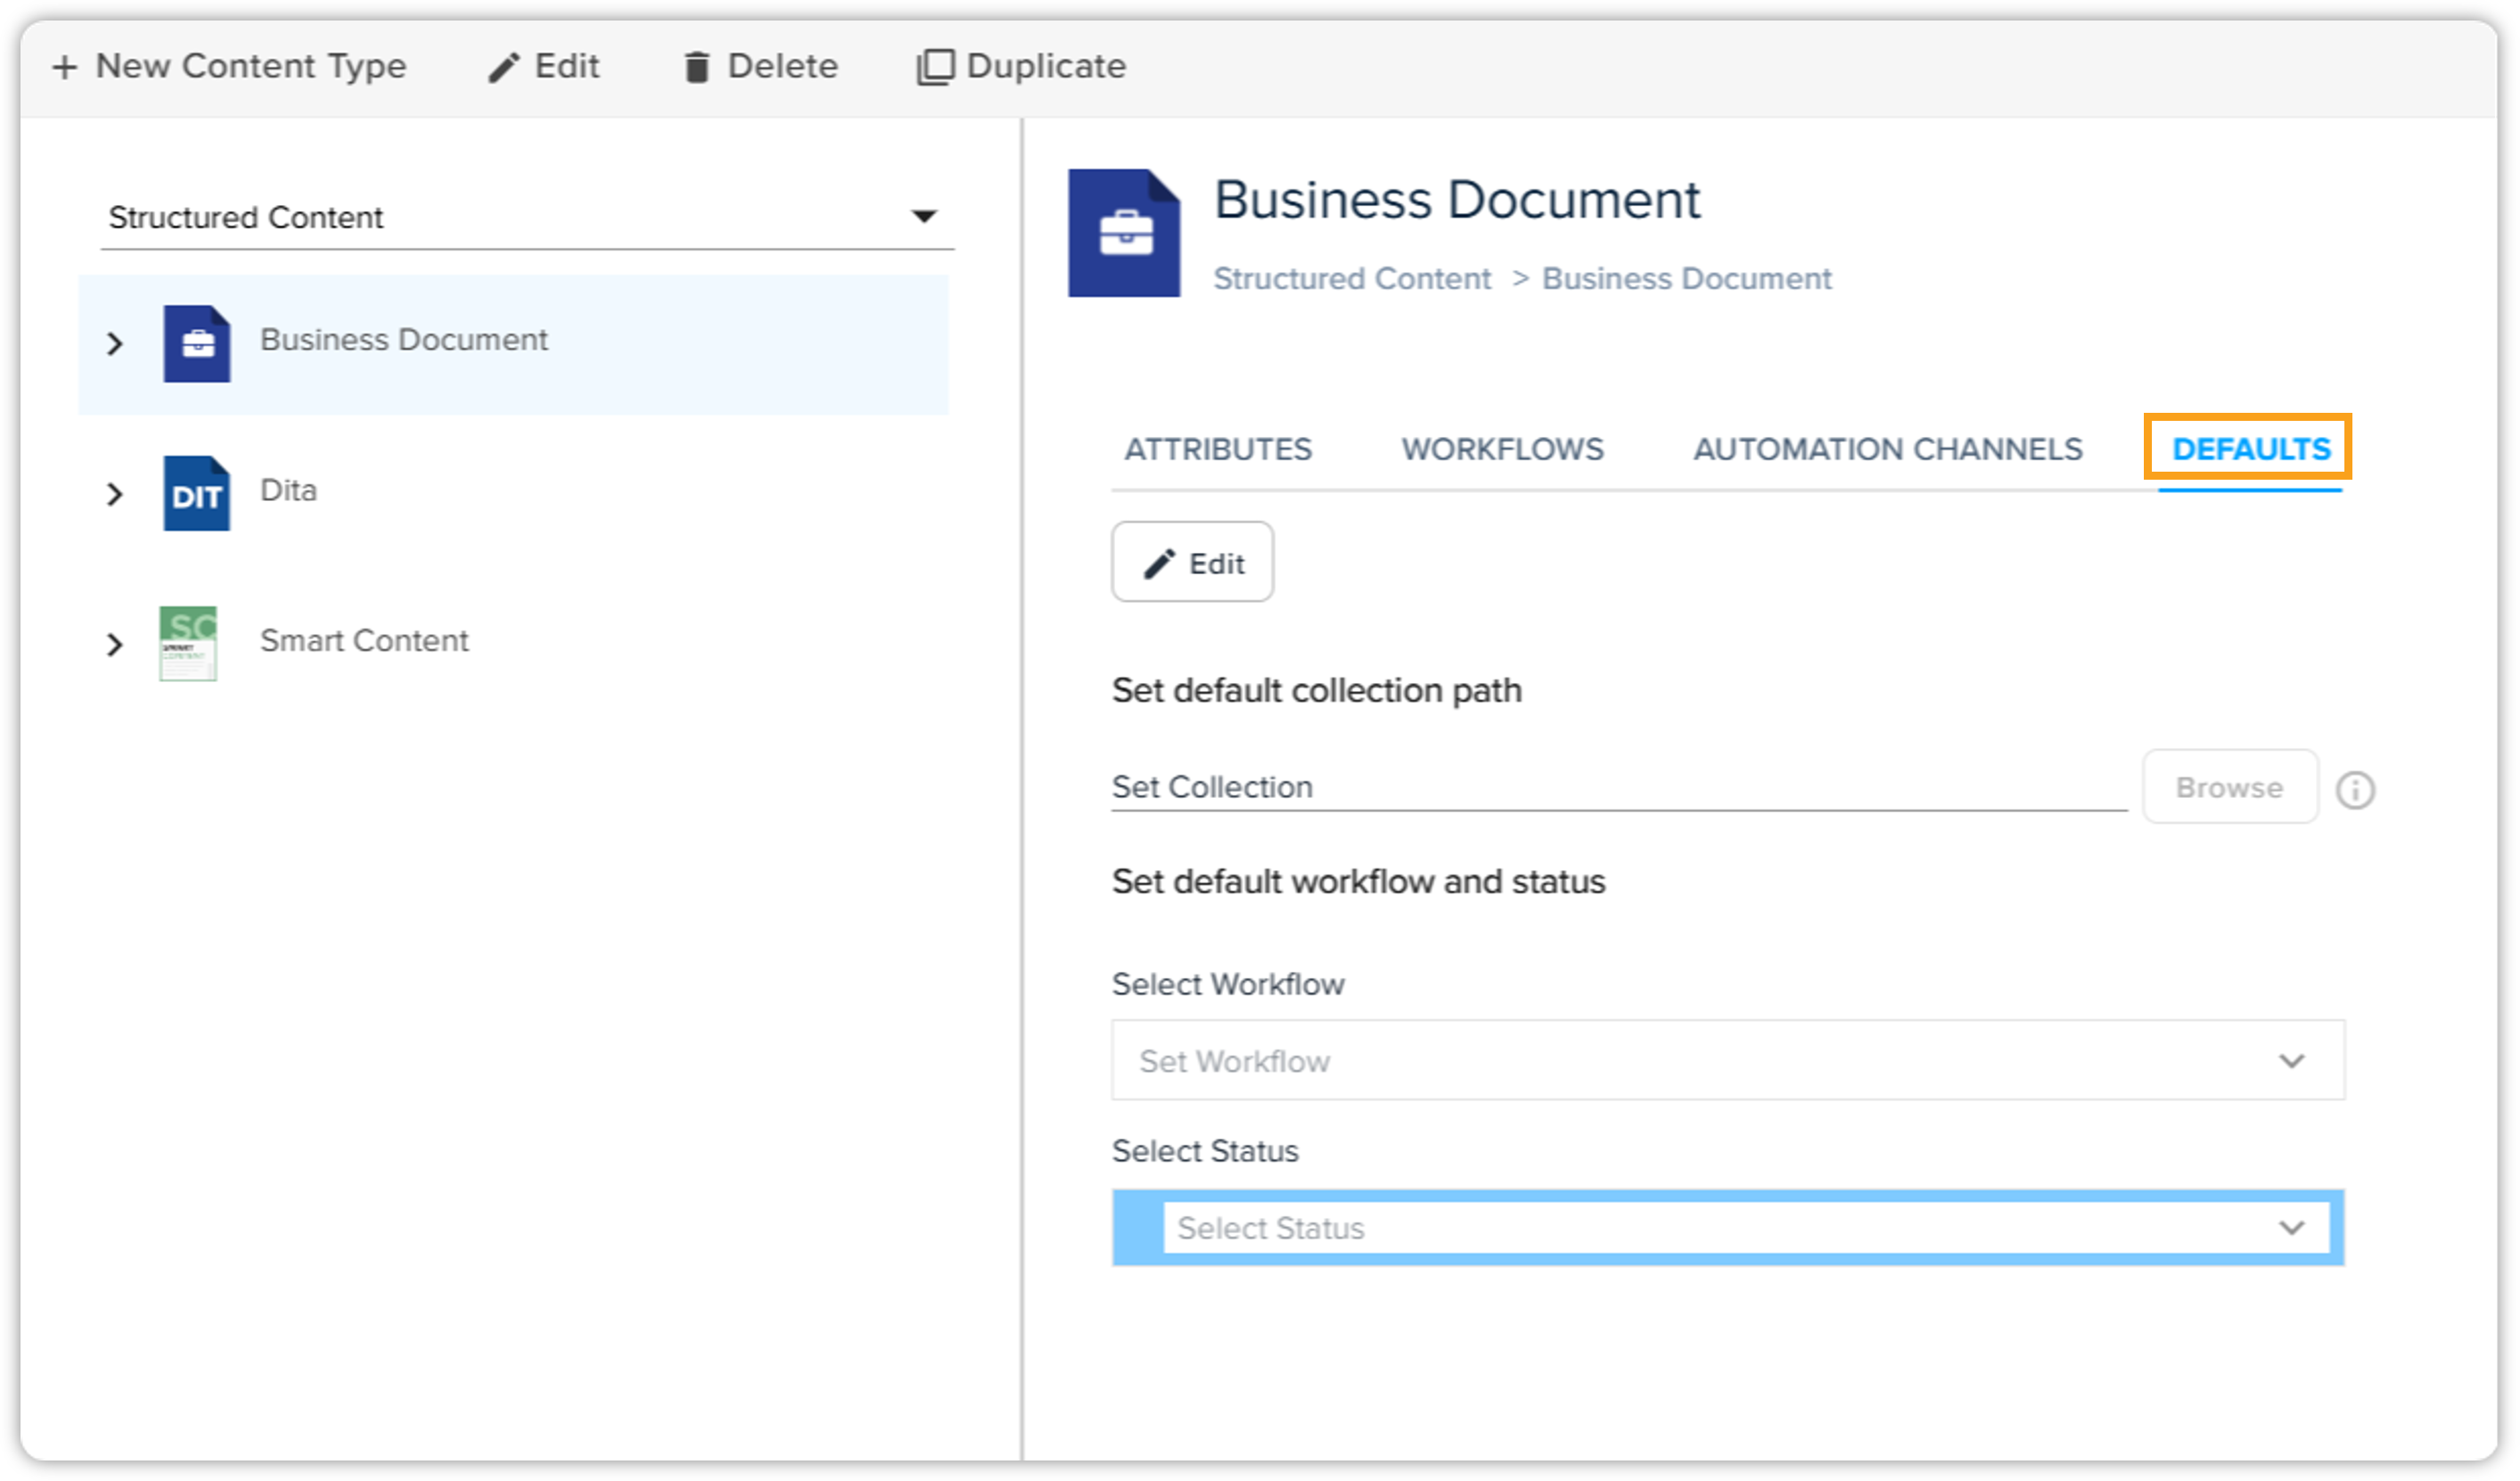
Editing Default Properties
You can edit the default settings they have set earlier. This flexibility allows for adjustments as per the evolving needs of content management.
Manage Translations
The Translations tab lists all the languages you have configured for translation for the selected content type. The tab also has a quick search tool to search for a language by name, which, by default, displays the total number of languages configured for translation related to the selected content type.
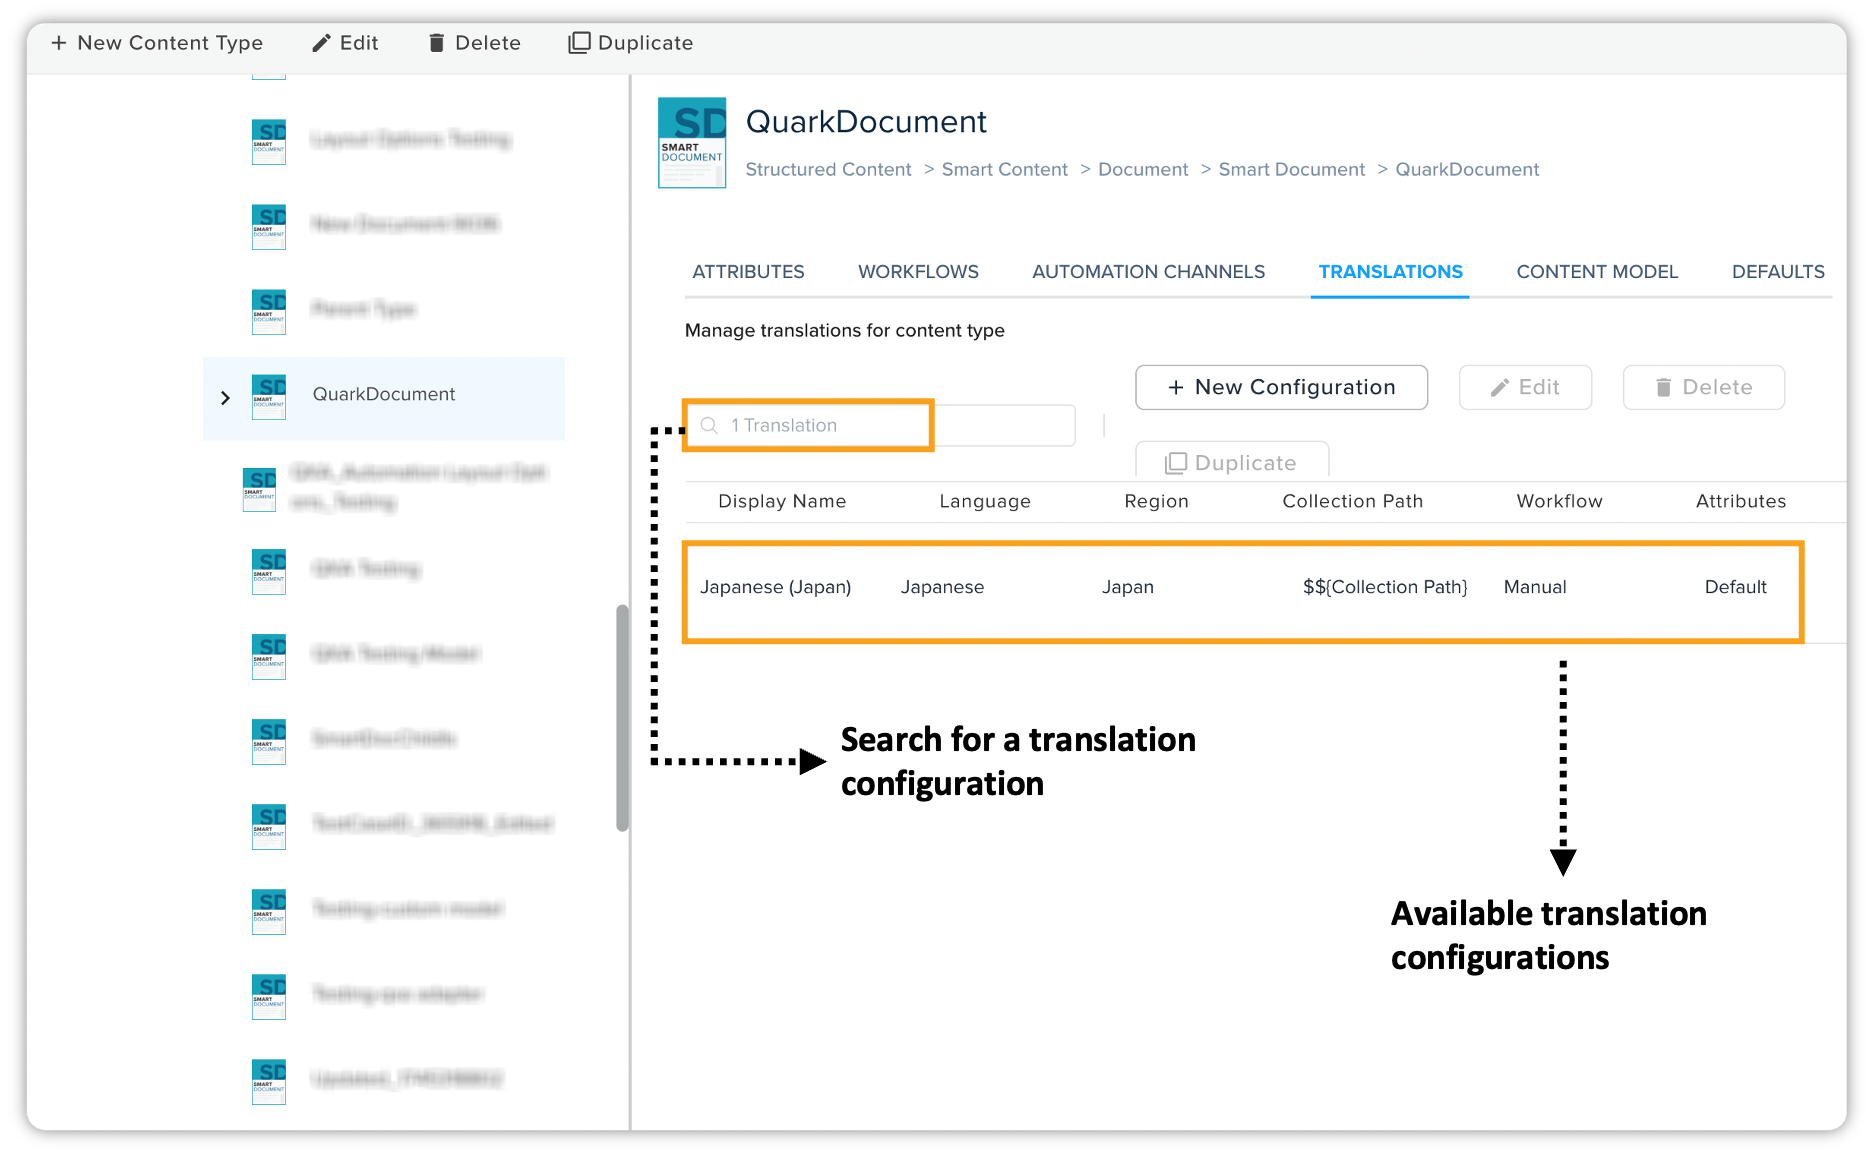
Additionally, the tab has the following language operations, which get enabled when you select a language from the list (except + New Configuration):
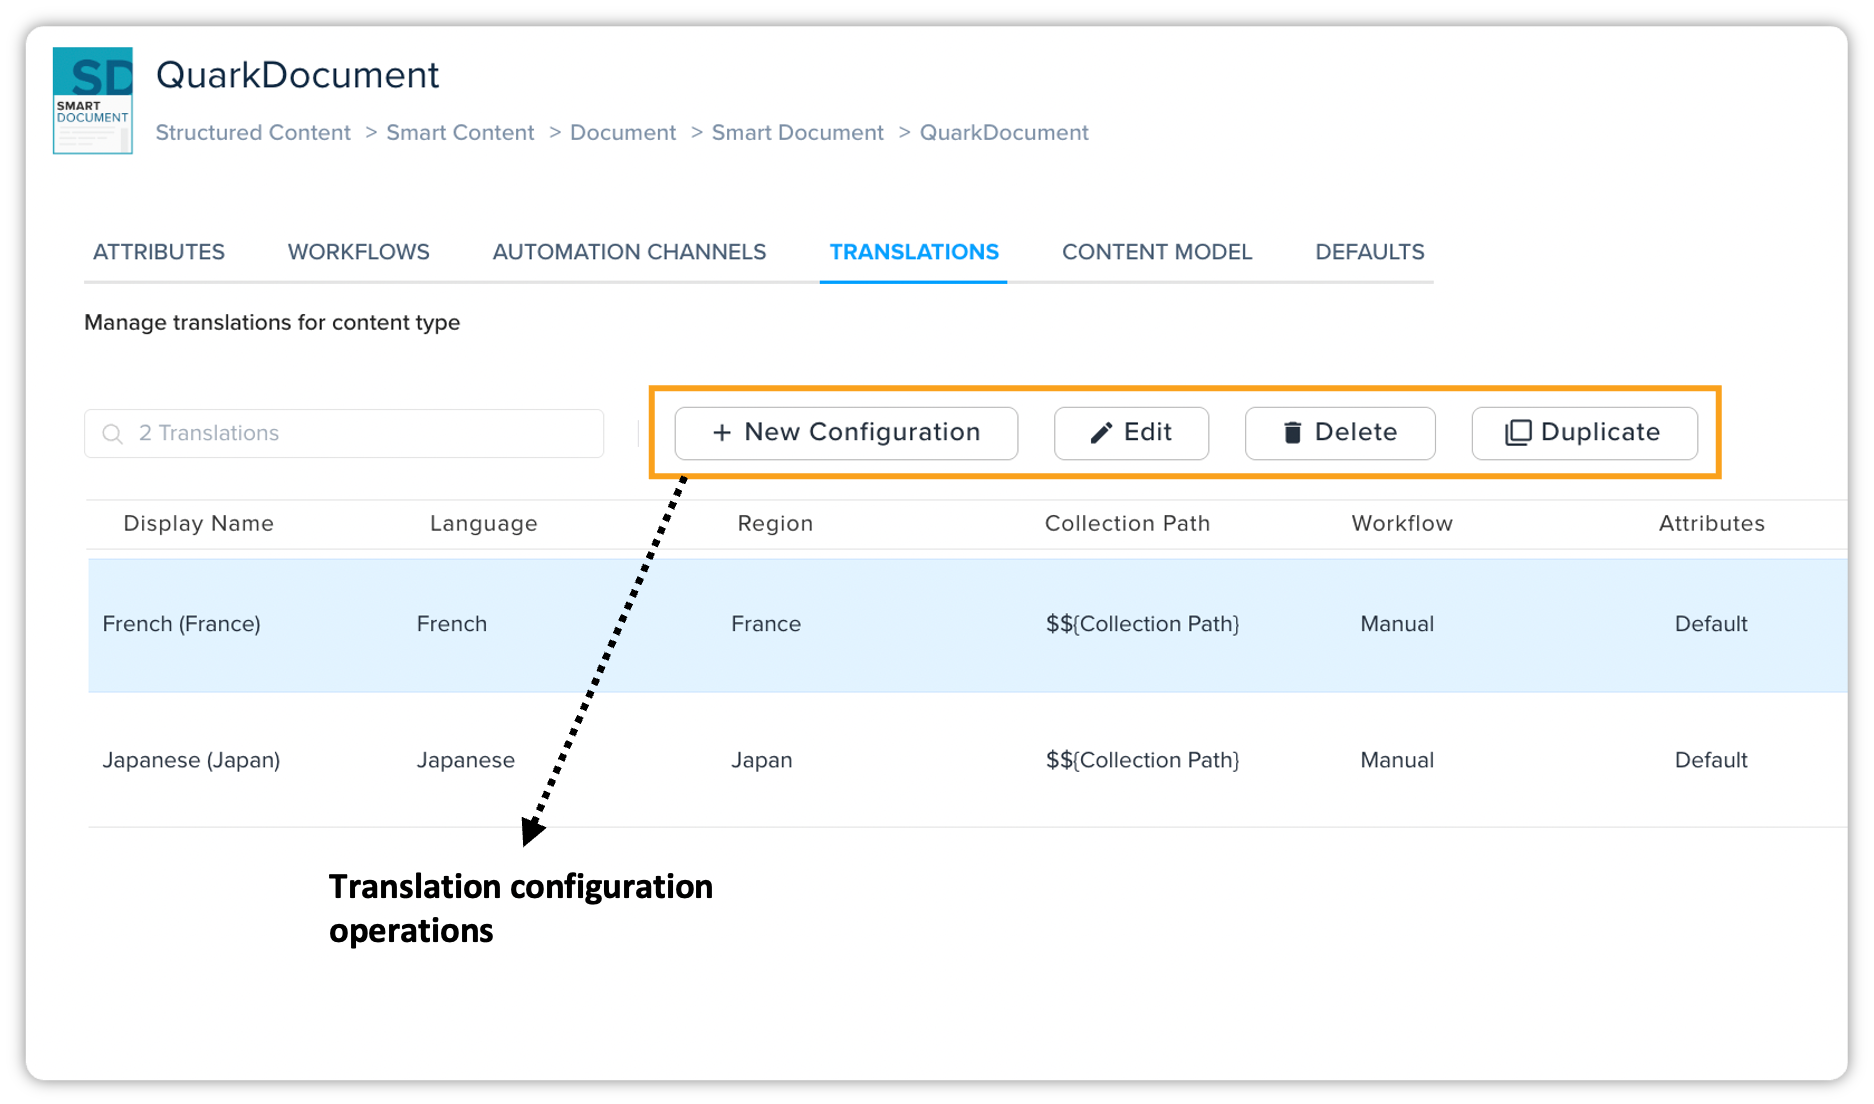
-
Edit: Allows you to edit the configuration for the selected language.
-
Delete: Deletes the selected language configuration.
-
Duplicate: Creates a copy of the selected language configuration.
-
Apply to all children content types: Applies the language configuration to all the children of the selected content type.
Add Language Configuration
To add a translation configuration, follow the steps shown below:
-
On the home page of QPP, click the Admin tab and then click Content Types in the list pane on the left, which is displayed vertically.
-
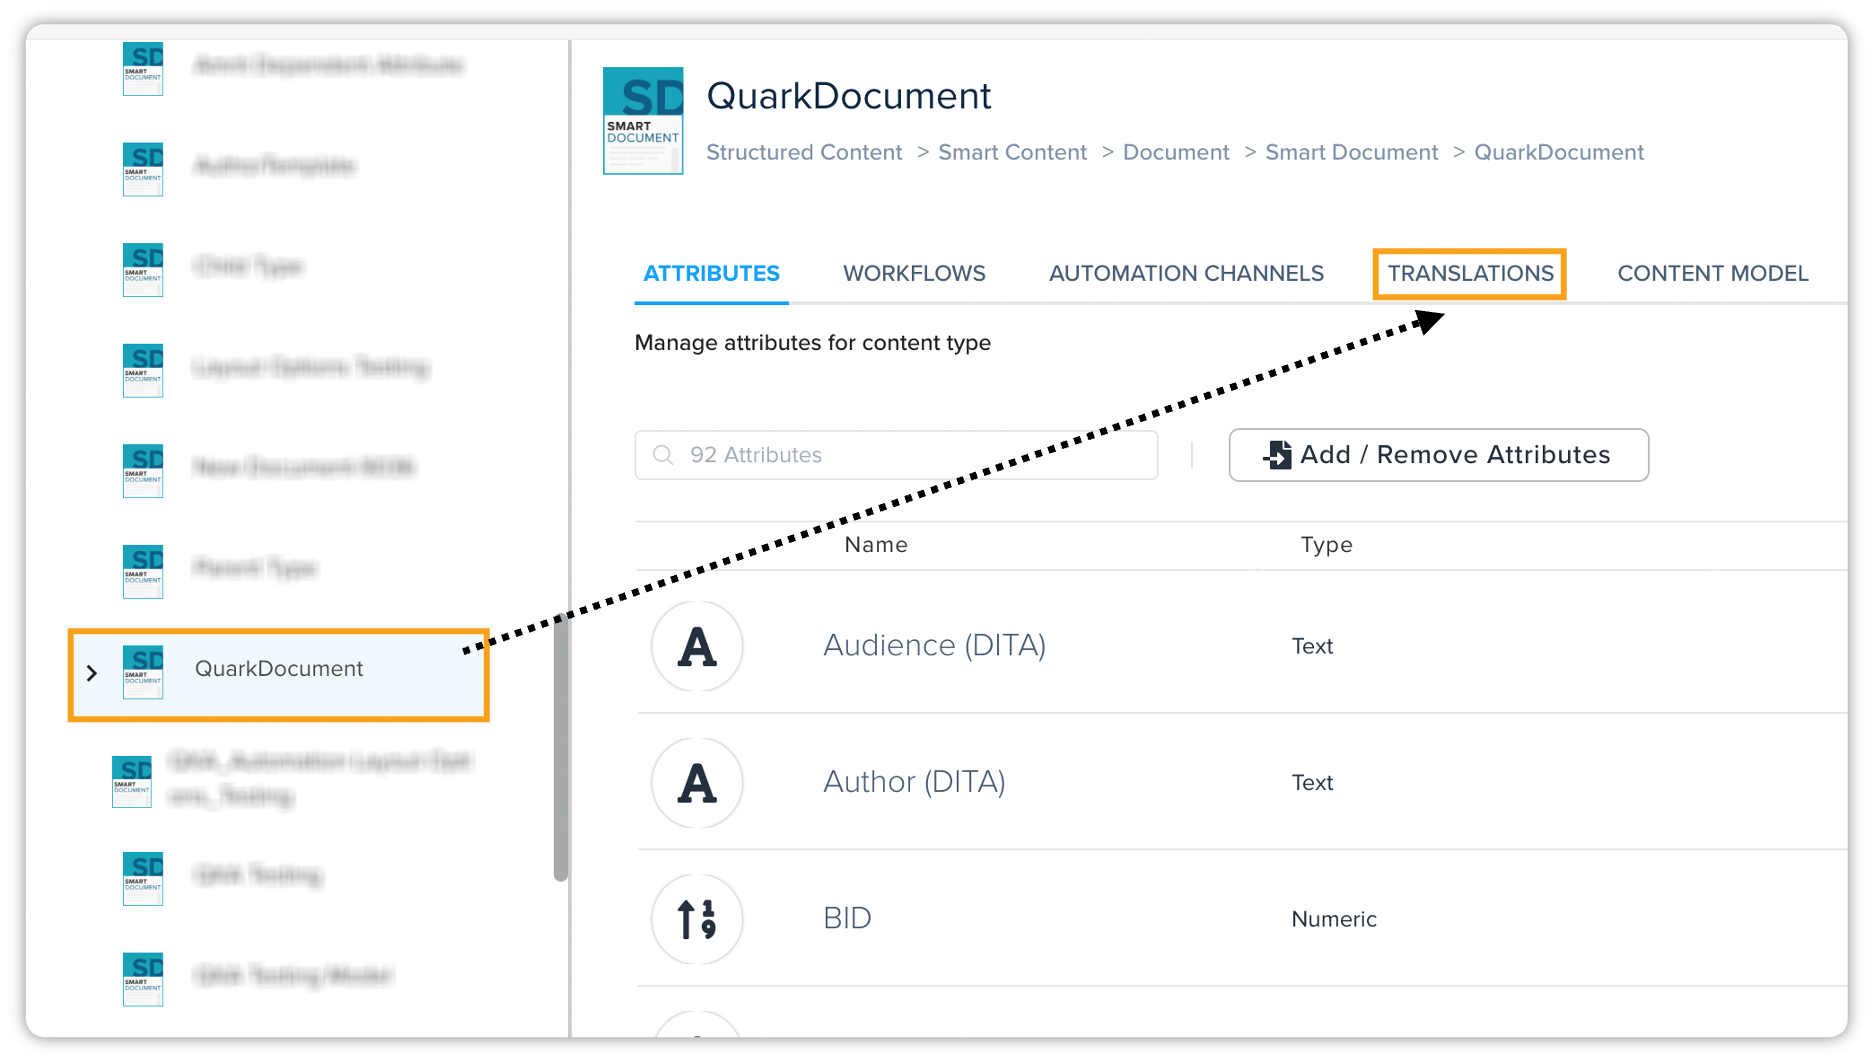
In the Content Types window, select the content type for which you have configured translation to enable the Translationstab (Smart Document in this case).
-
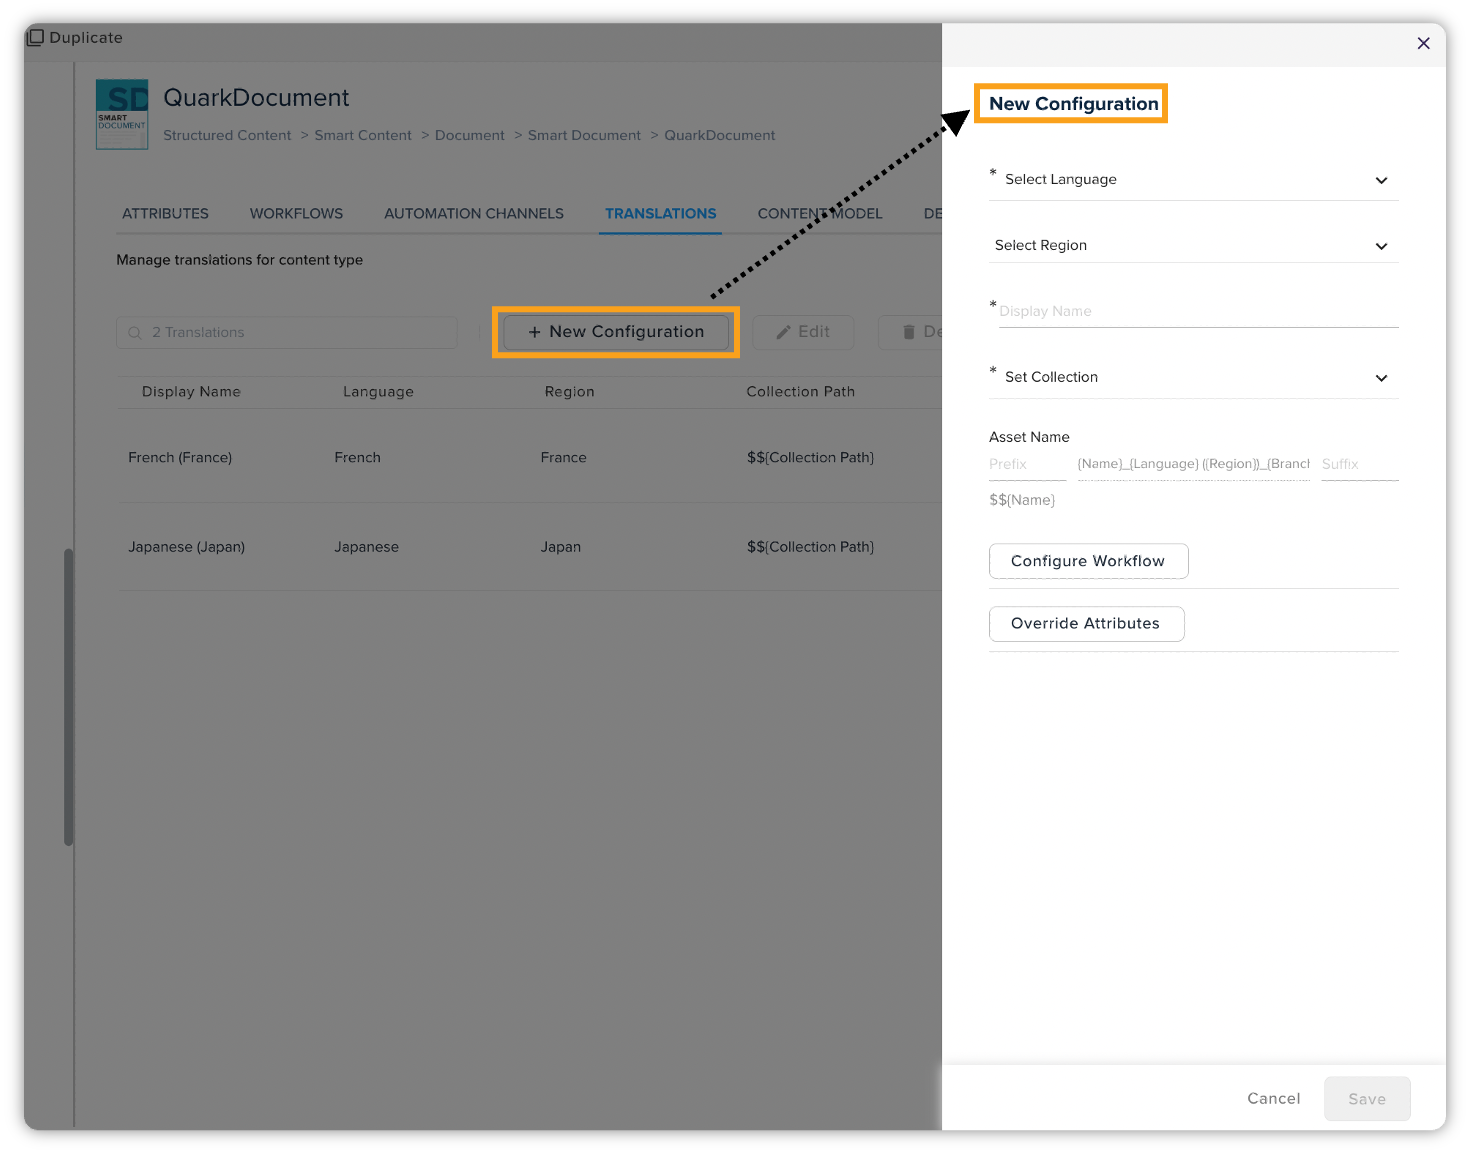
In the Translations tab, click + New Configuration to open the New Configuration pane.
-
In the New Configuration pane, provide the following information:
-
Select Language: Select a language from the available list of languages.
-
Select Region (optional): Select a region from the available list of regions. Selecting a region is important if you want to create multiple translation configurations for the same language; for example, Spanish (Western Europe) and Spanish (Latin America).
You can add languages and regions from the left pane tab Settings. For more information, see the section Settings. -
Display Name: Add the name of the translation configuration.
-
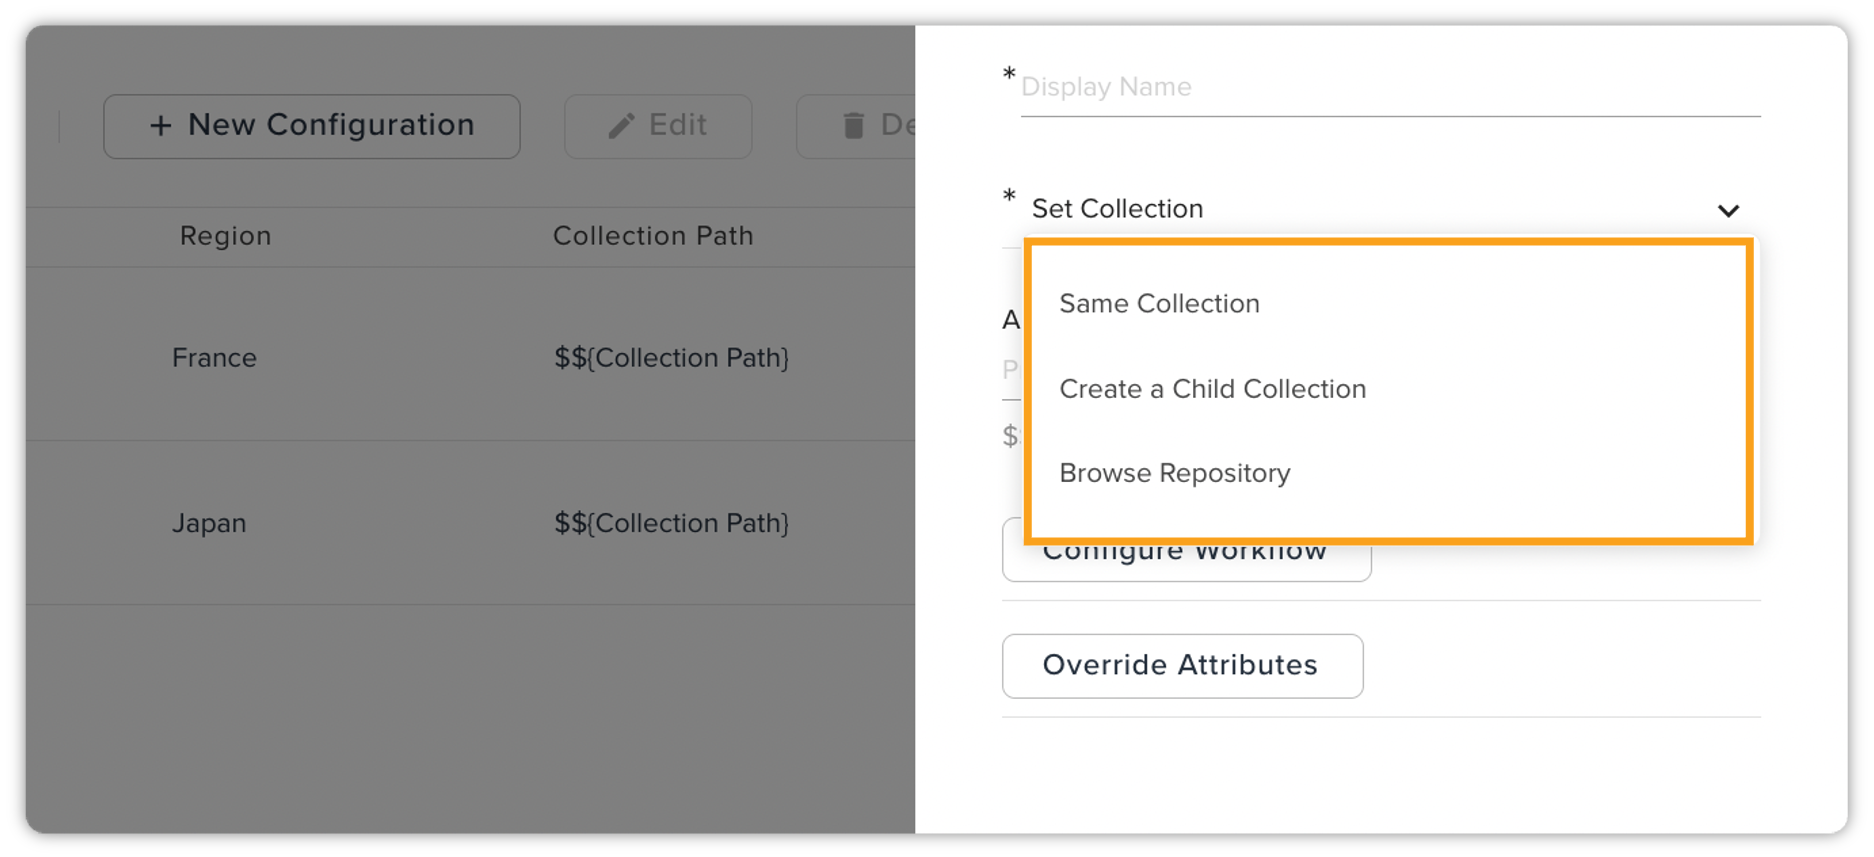
Set Collection: Select a collection path to store the translated files on the repository from the following three options:
-
Same Collection: Store the translated files in the same collection that contains the source document.
-
Create a Child Collection: Store the translated files in a sub-collection of the collection that contains the source document. For this option, you have to provide the name of the sub-collection.
-
Browse Repository: Browse to select a collection on the repository to store the translated files.
-
-
Asset Name: Provide the prefix and suffix values that you want to add to the name of translated documents based on the current translation configuration.
By default, QPP assigns translated documents' names based on this format: "Name of original document_Language_Region_Branch". -
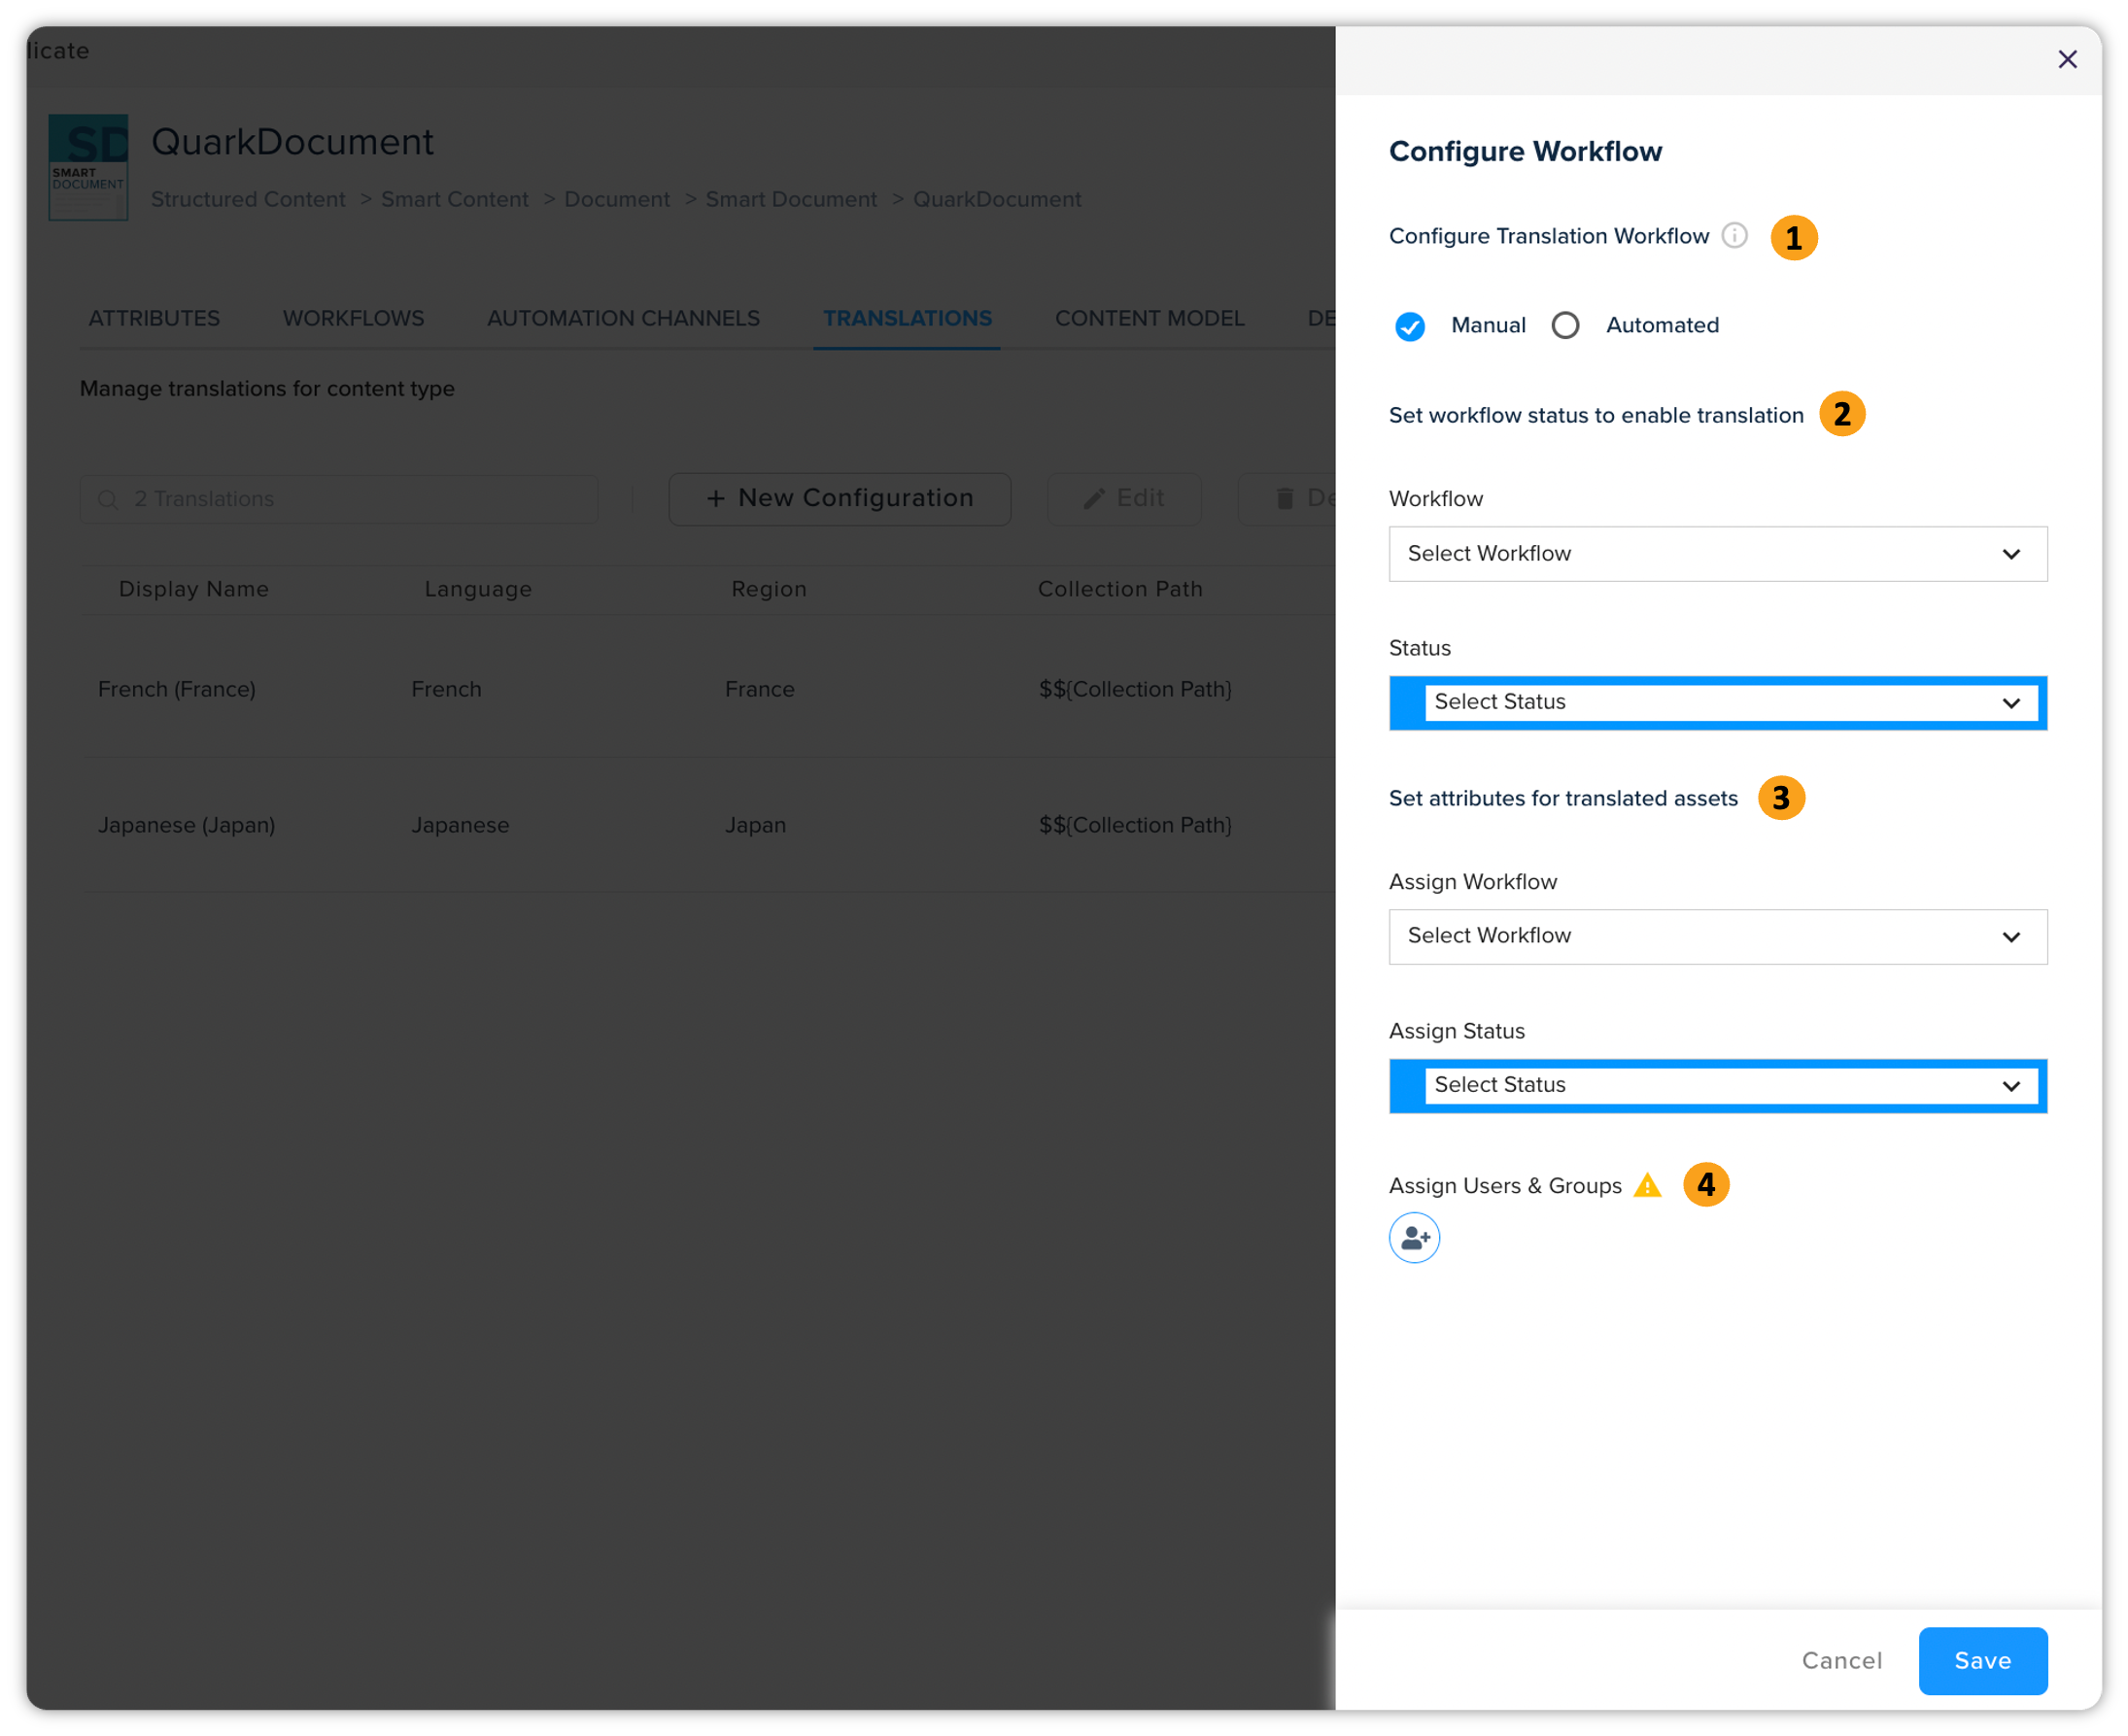
Configure Workflow: Click Configure Workflow to open the Configure Workflow pane and provide the following information:
-
Select the radio button Manual (if you want to set the Workflow-status to enable the translation and assign a user for each document individually) or Automated (to let QPP automatically trigger translation when documents reach the set workflow status).
-
Set the Workflow-status to enable translation (for Manual) or to allow QPP to automatically trigger translations (for Automated).
-
Set the Workflow-status for the translated documents.
-
Assign the task to translate the asset to a user or a group through the icon button Assign Users and Groups.
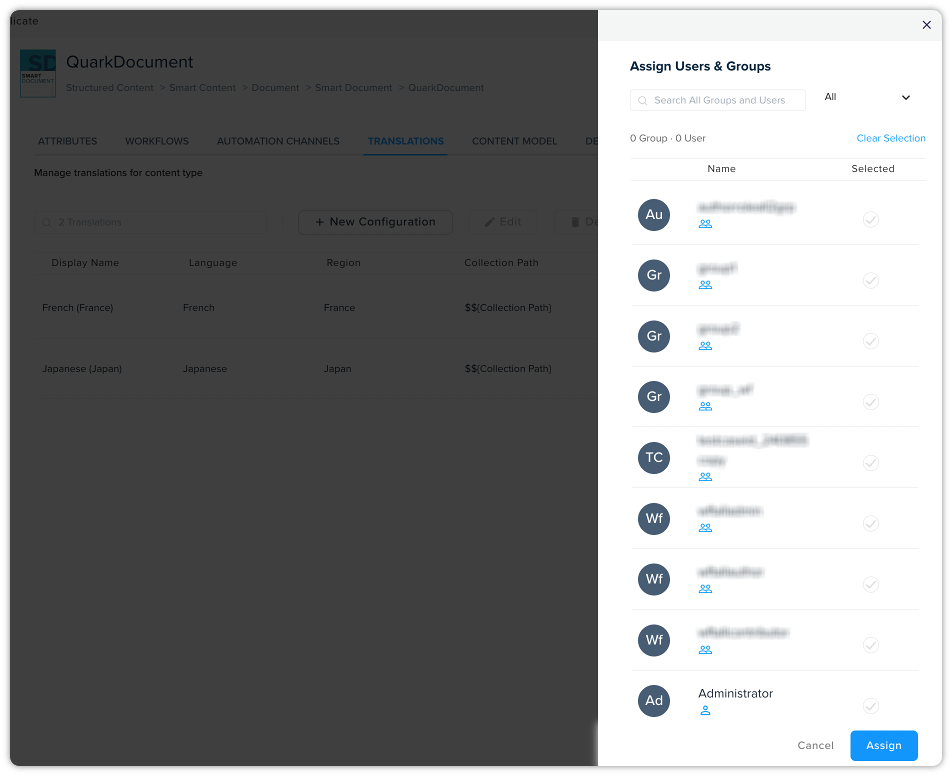 Only users with Author or Admin licenses can initiate a translation and a translation task can only be assigned to a user with a Contributor license.
-
-
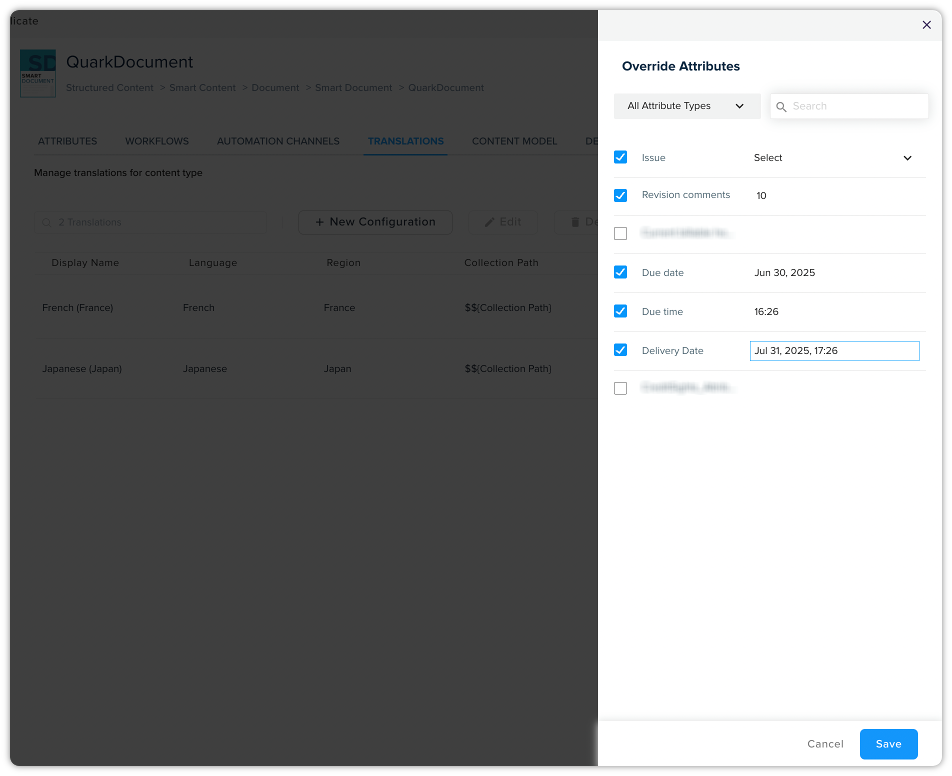
Override Attributes: By default, QPP maps the attributes of a source document to a translated document as are. If you want to override any of the attributes, select the button Override Attributes to open the Override Attributes pane and perform the following steps:
-
Select the attribute(s) whose value(s) you want to override.
-
Provide the value(s).
-
Select the button Override.
-
-
Click Save.
-
Content Models
The Content Models page allows you to add and manage content models on your QPP Server. The Content Models page has three tabs: Elements, Properties, Layout Options, and Models, which allow you to add and manage content elements, content properties, layout options, and content models, respectively.
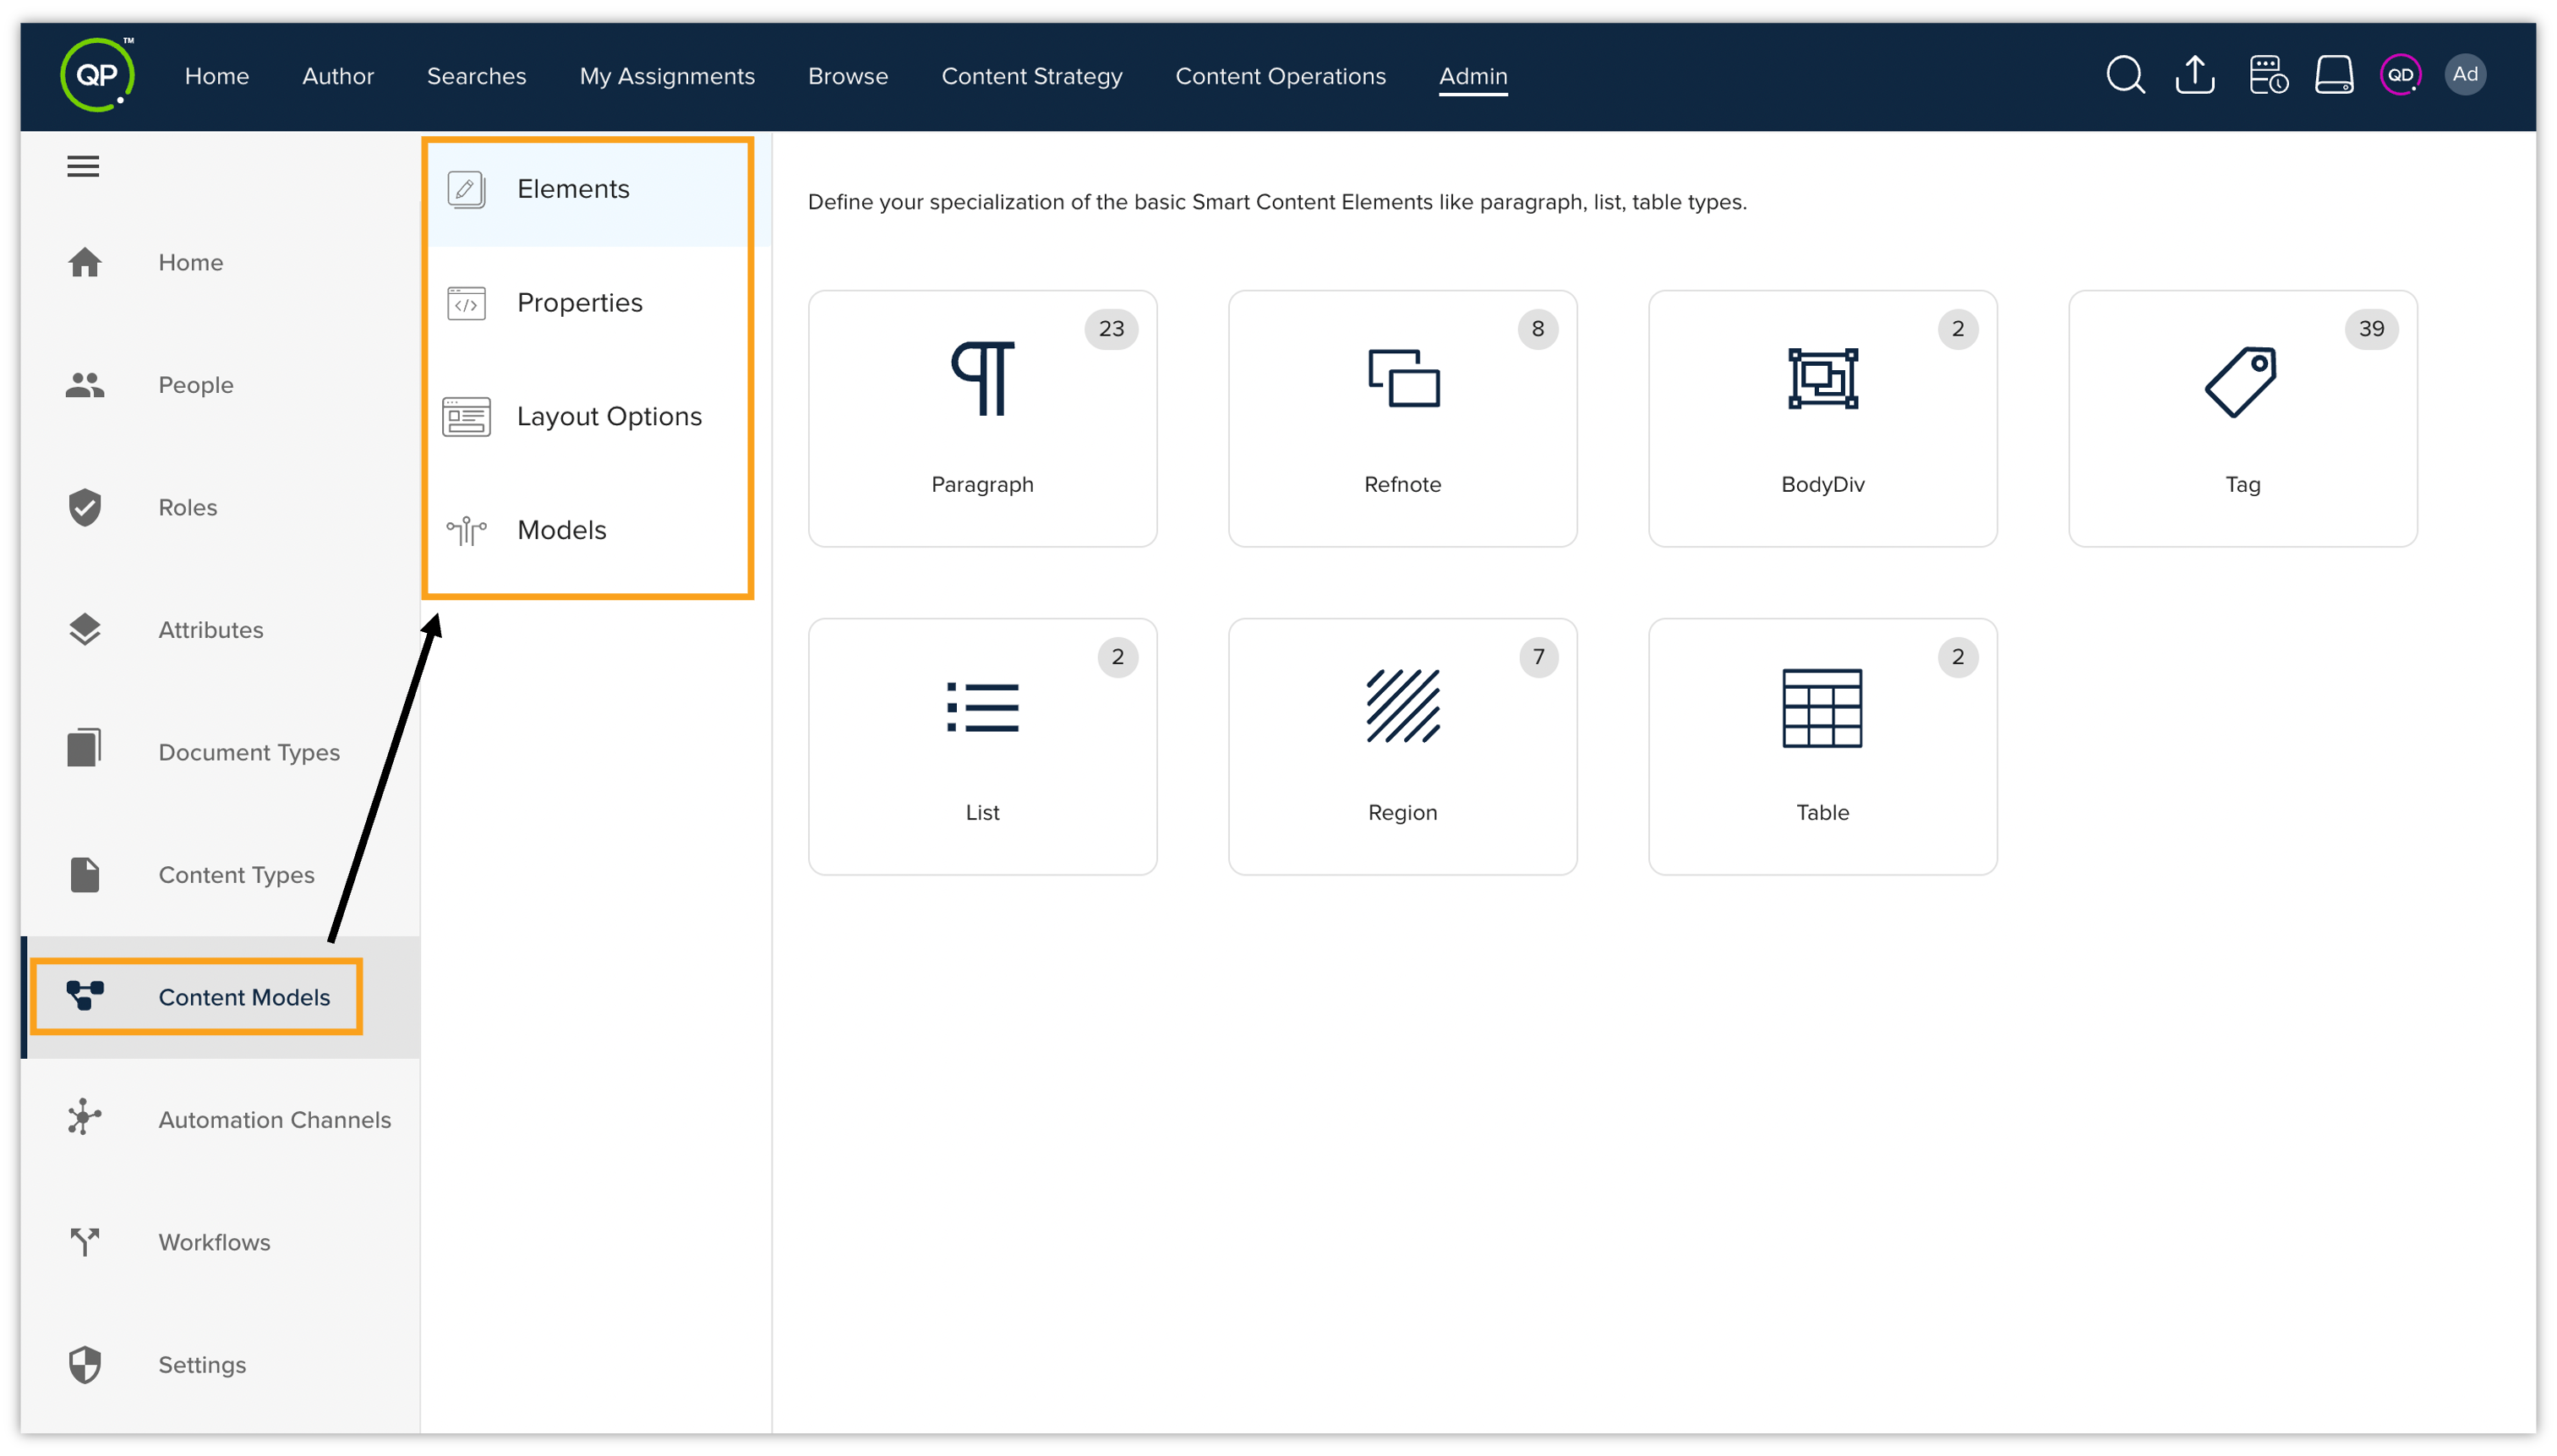
Elements
The Elements tab allows you to add and manage smart content elements such as paragraphs, tables, lists, regions, and so on, which can be used across different content models. There are seven predefined types of smart content elements, which are as follows:
-
Paragraph (heading, quote, and so on)
-
Reference Notes (endnotes, footnotes, and so on)
-
BodyDiv
-
Tag
-
List (numbered list, bulleted list, and so on)
-
Region (boxes, callouts, and so on)
-
Table
Add an Element
To add an element, follow the steps shown below:
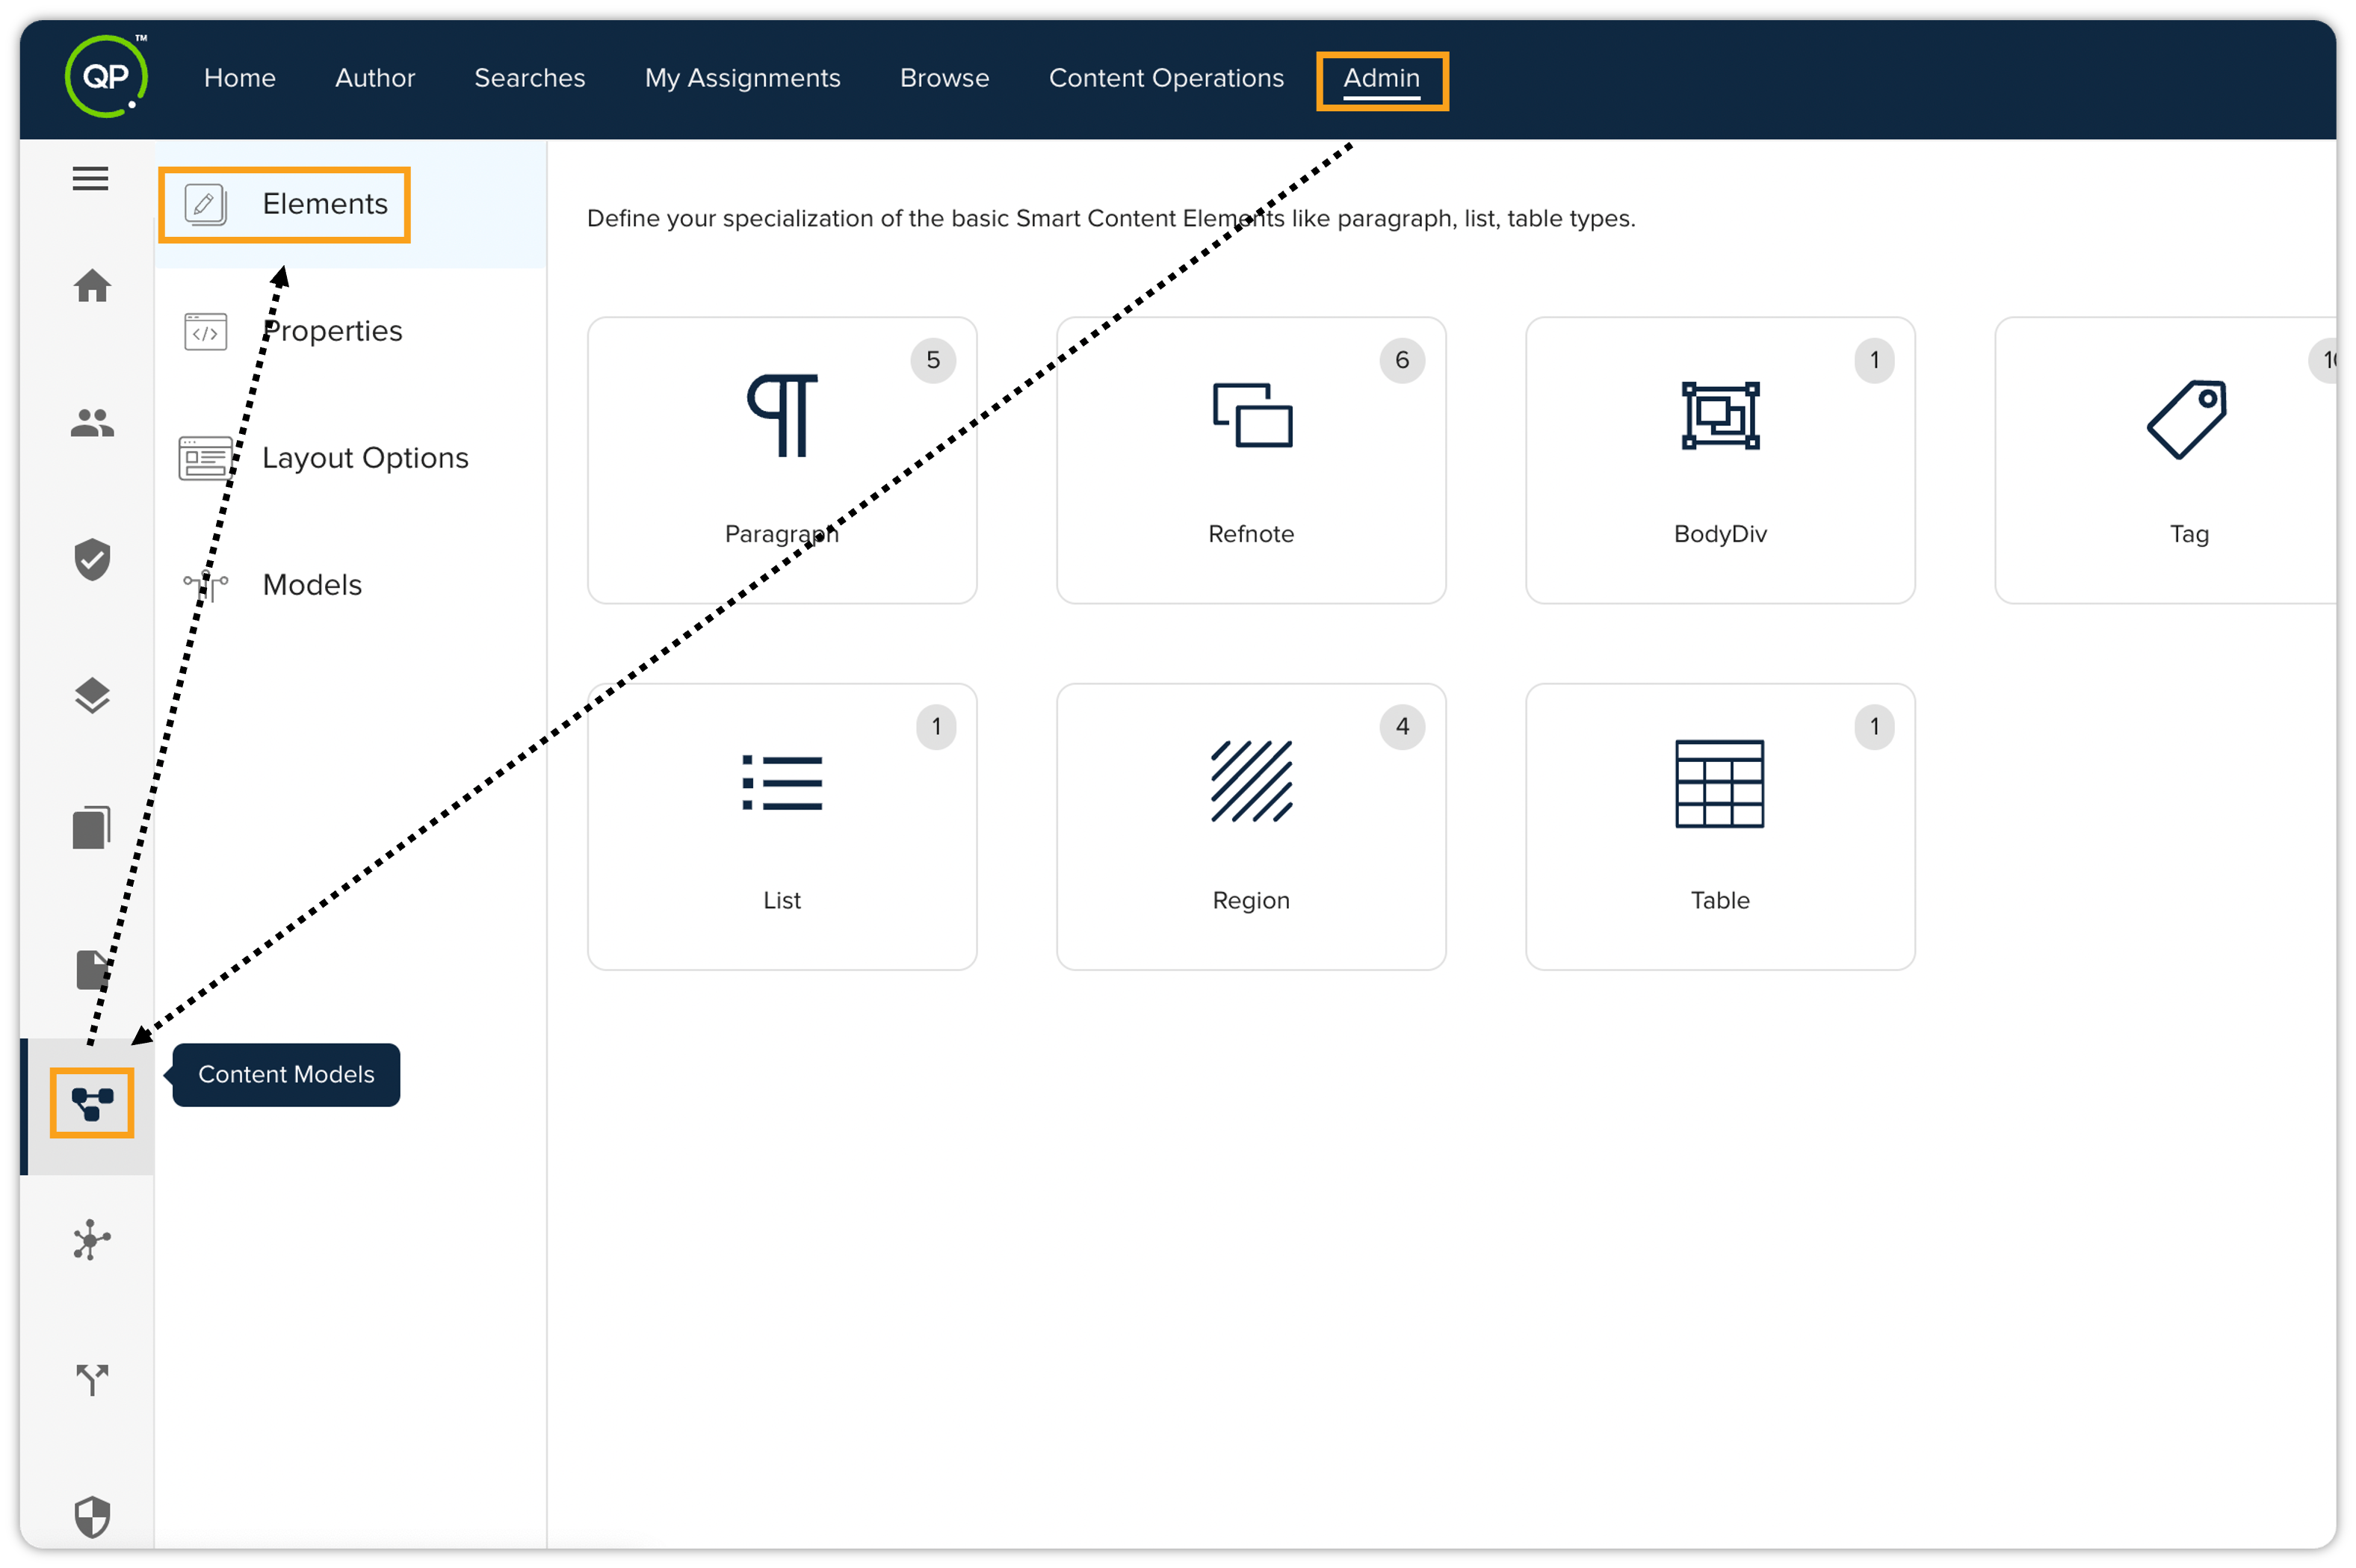
-
On the home page of QPP, click the Admin tab, click Content Models in the list pane on the left, which is displayed vertically, and then click Elements.
-
In the Elements tab, select one of the smart content element types, for example Paragraph, to open the Element Types pane. The Element Types pane also lists the elements that have already been added to that smart content element type.
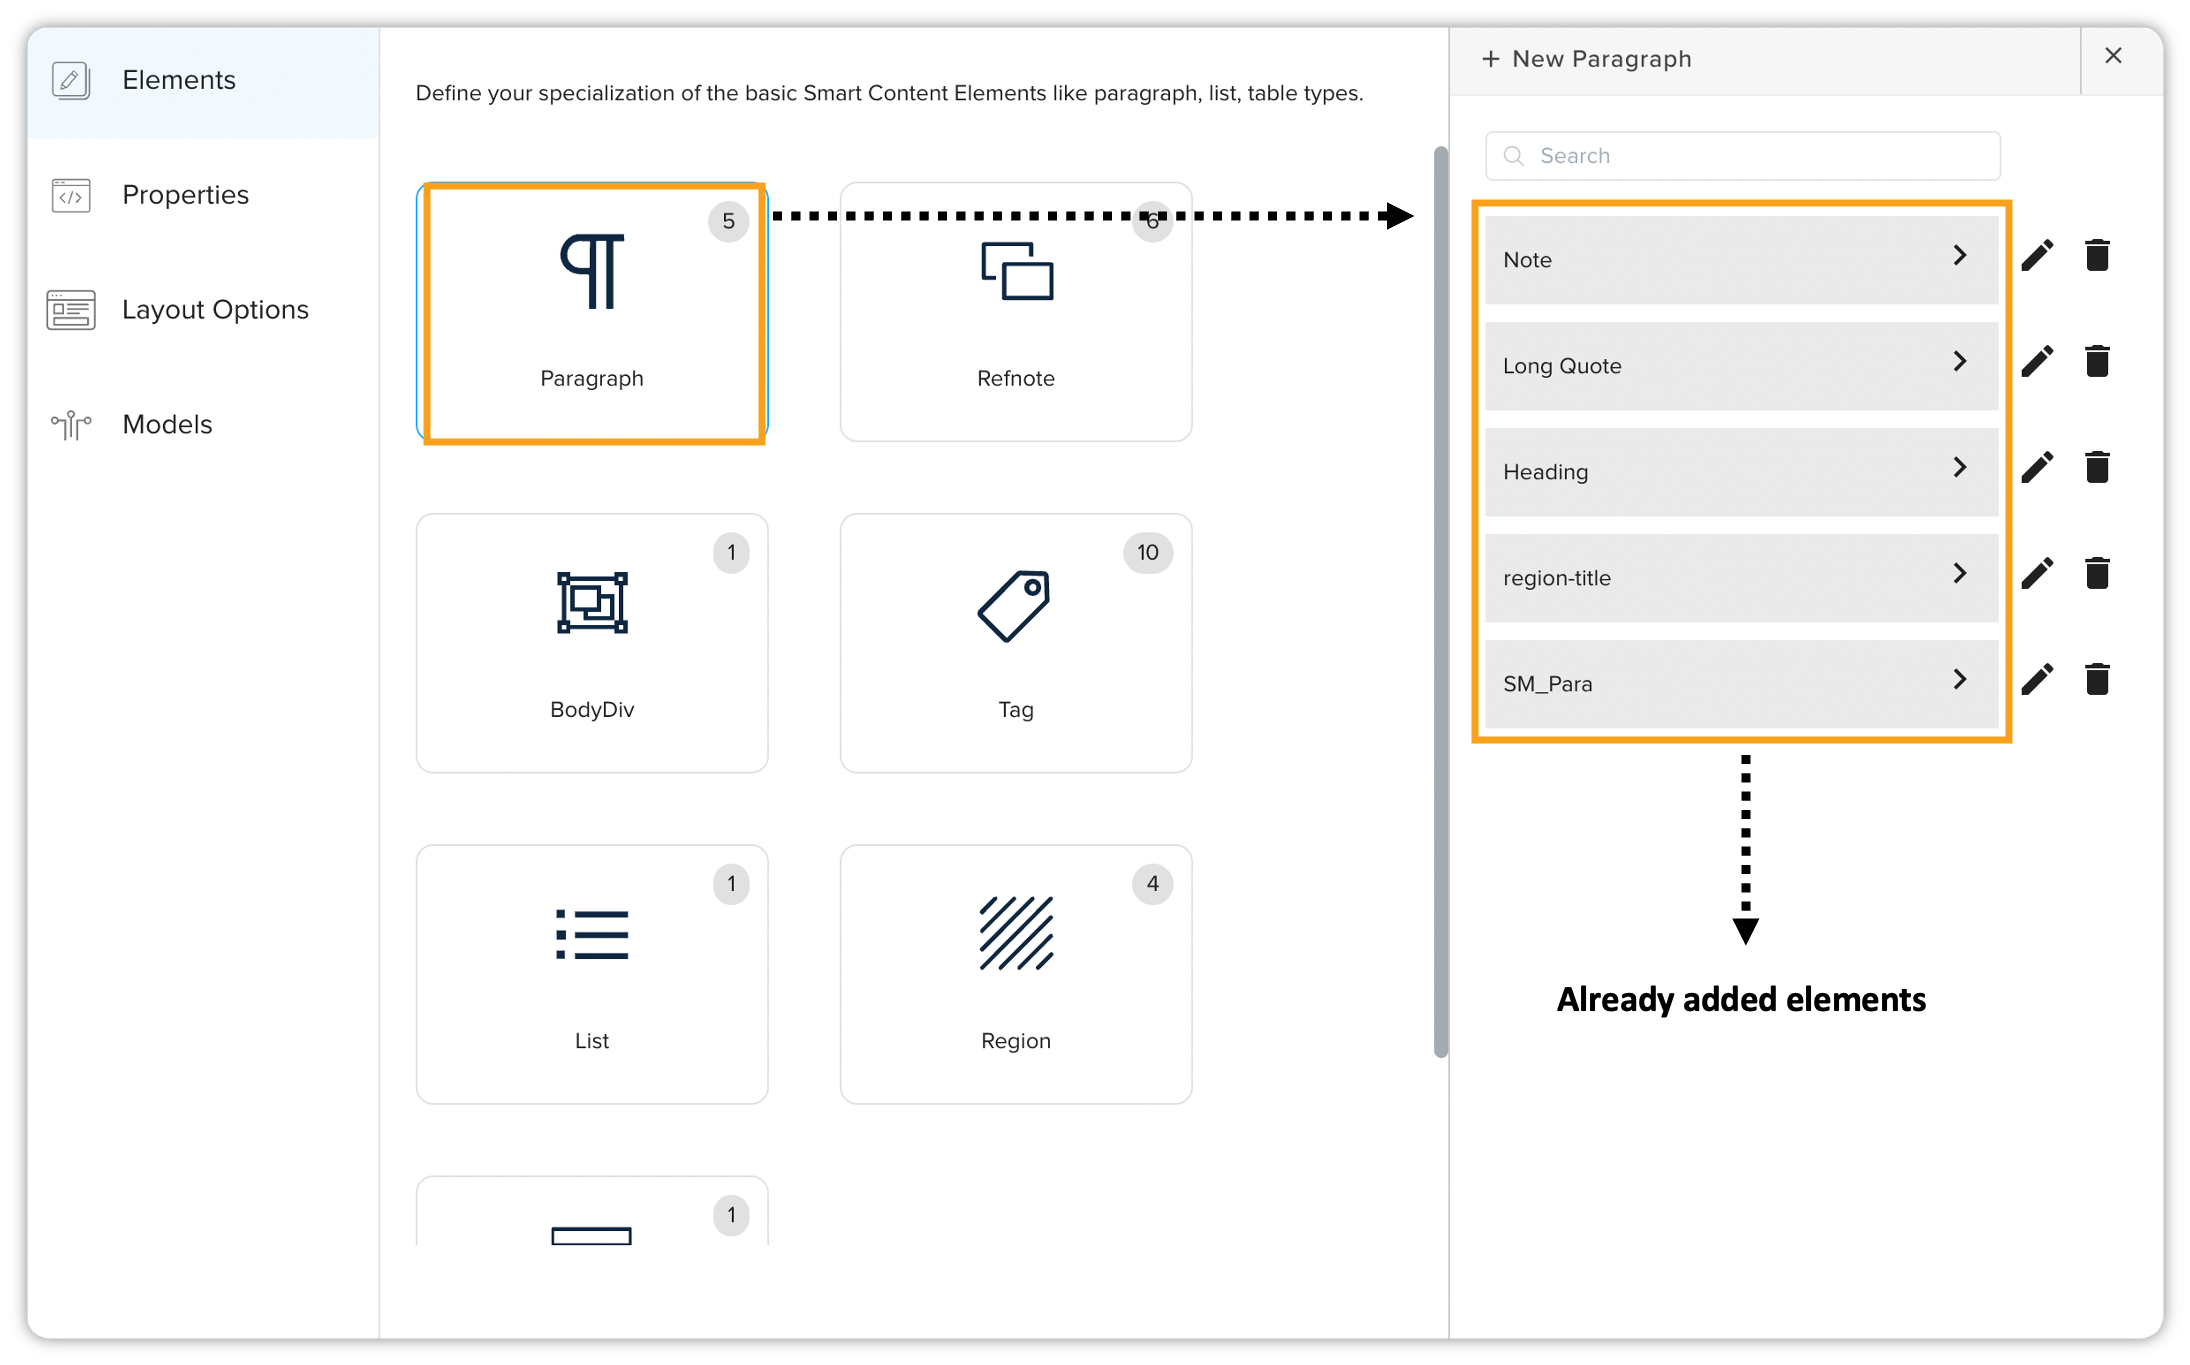
-
In the Element Types pane, click + New Paragraph to expand the name and type fields for the new element.
The label of the button for adding a new element dynamically changes based on the currently selected element type. If a "Paragraph" element is selected, the button reads + New Paragraph. If a "Region" element is selected, the button reads + New Region. -
Enter the name of the element.
While you enter the name of an element, QPP automatically generates a value for the field type, which is same as the name with spaces replaced with hyphen.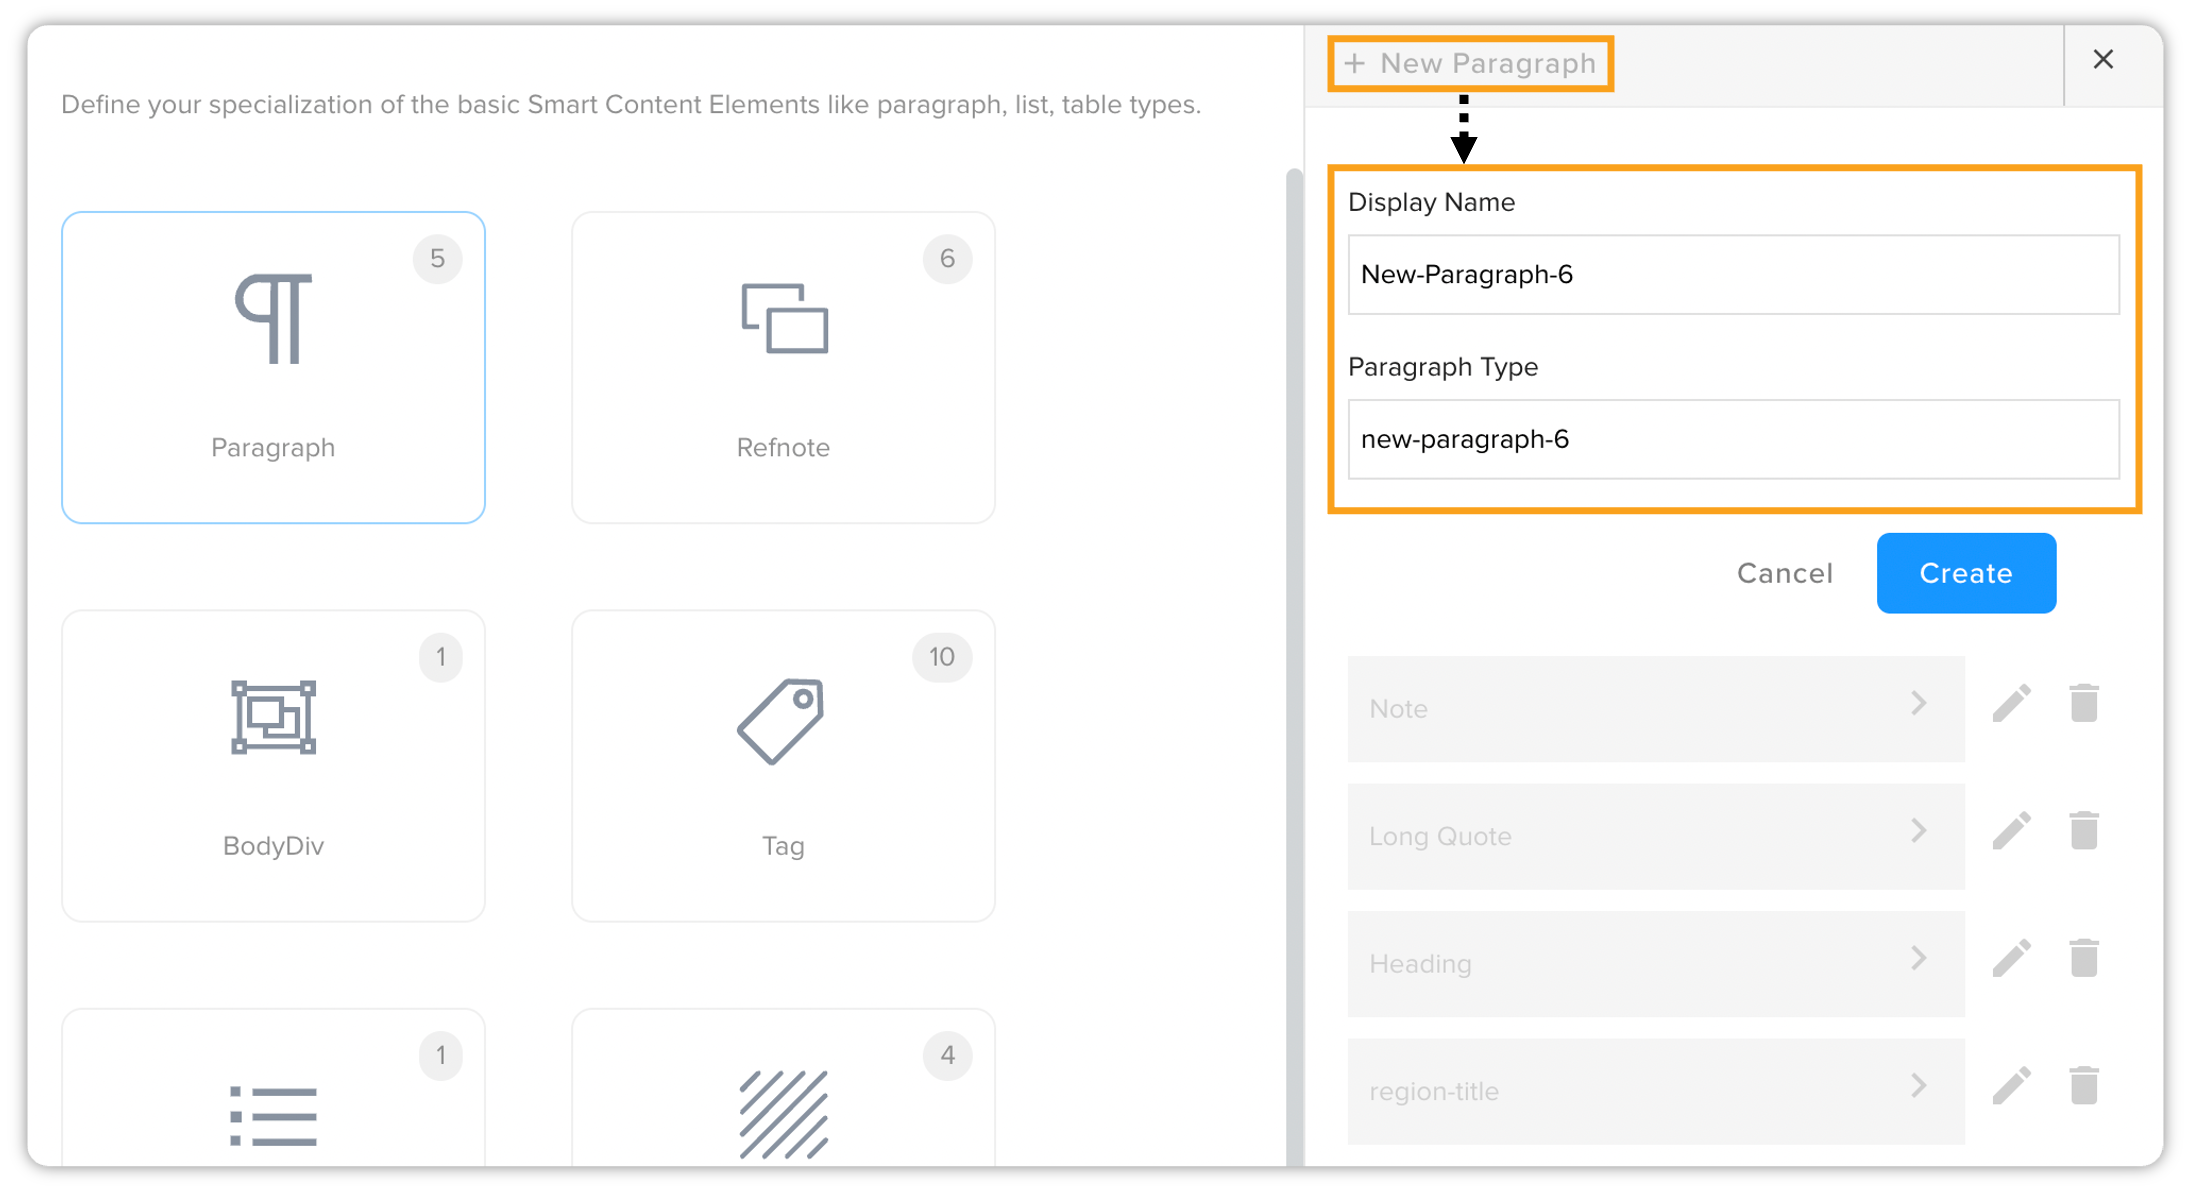
-
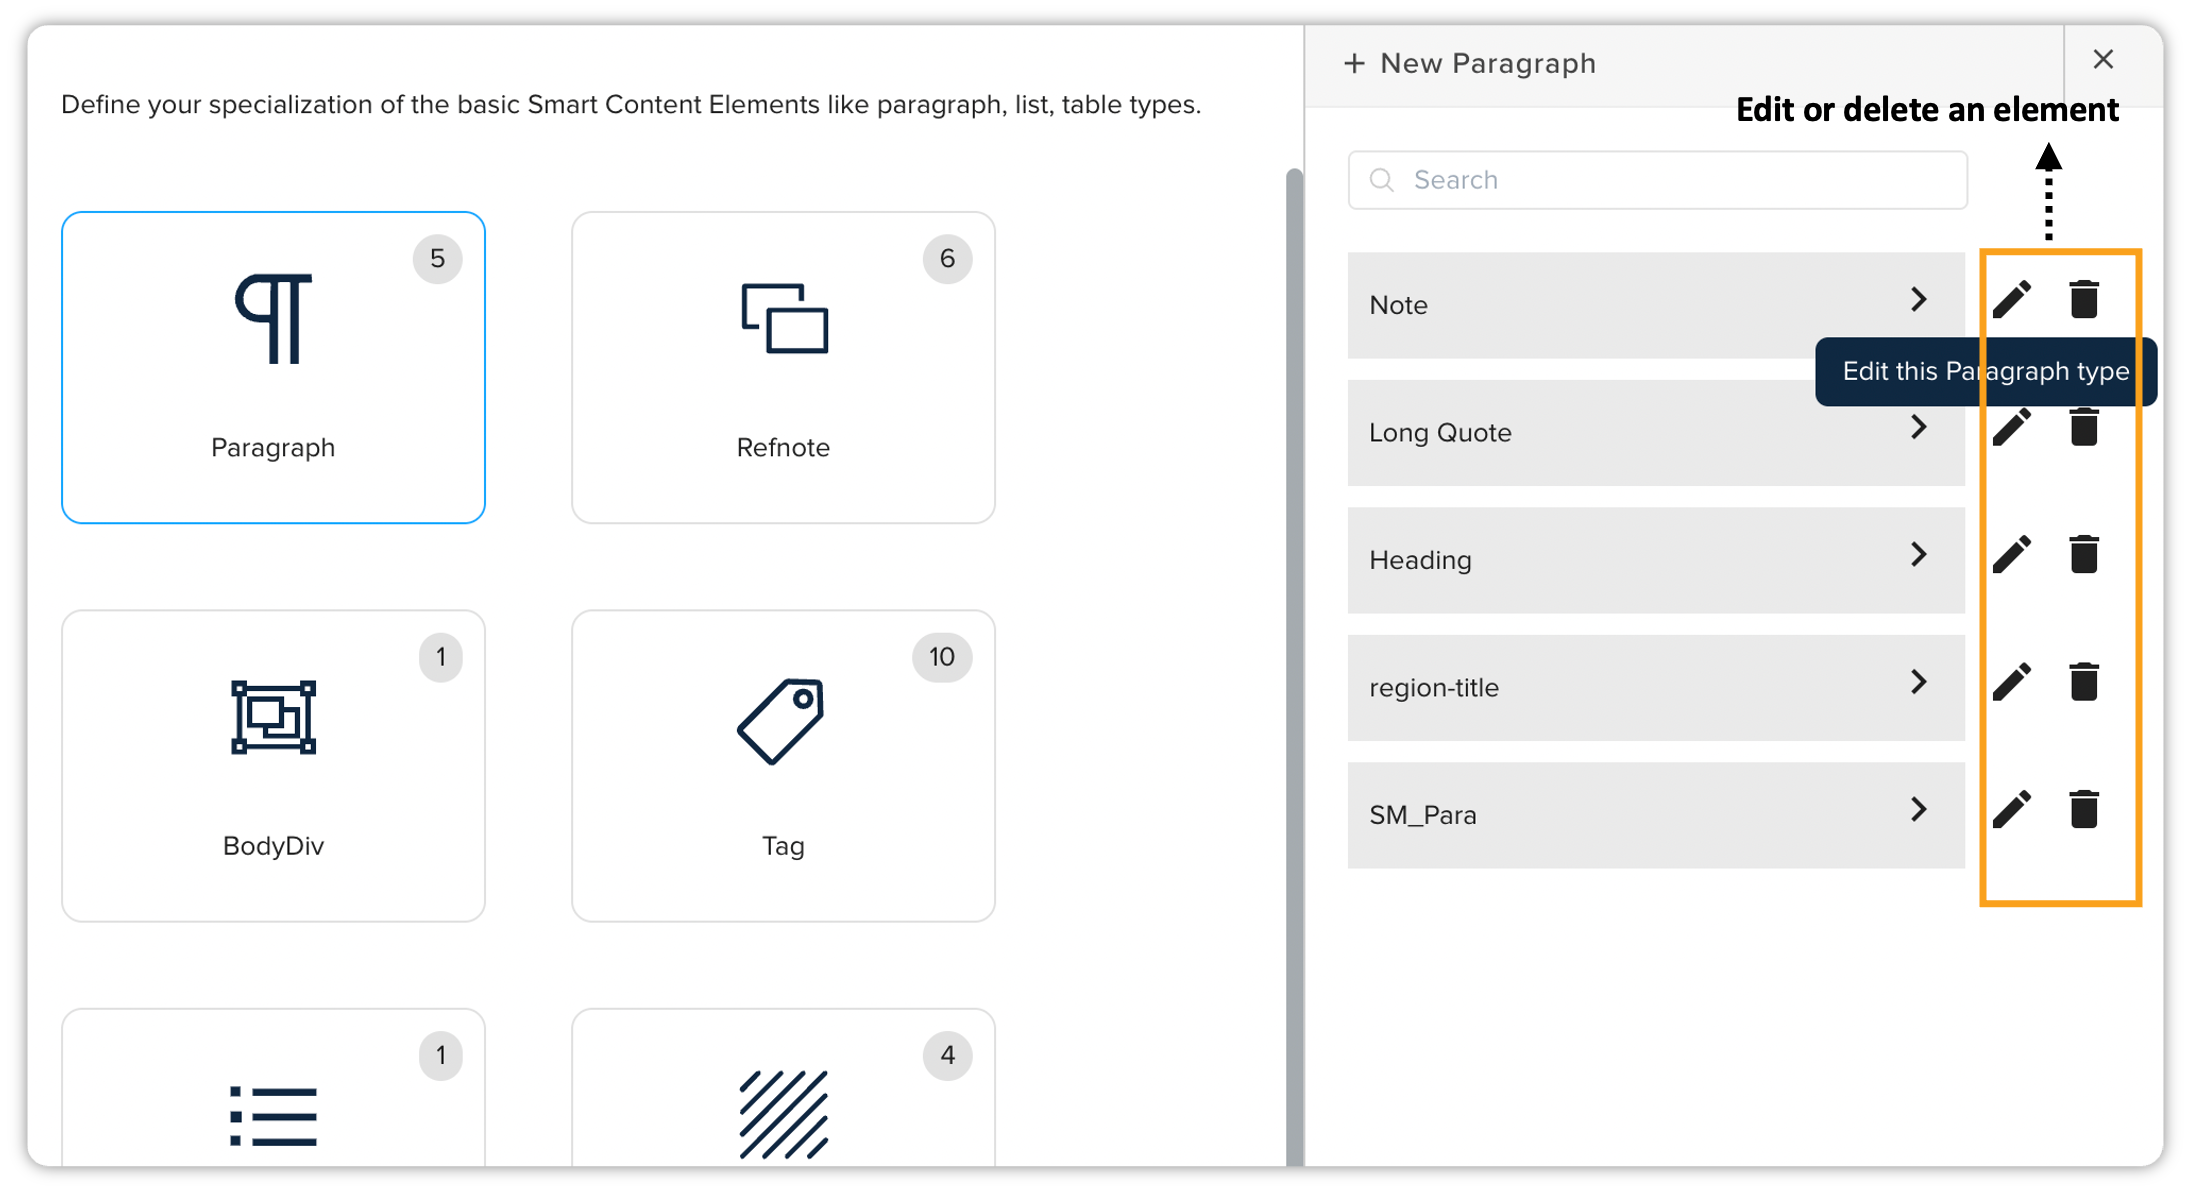
Click Create.
Properties
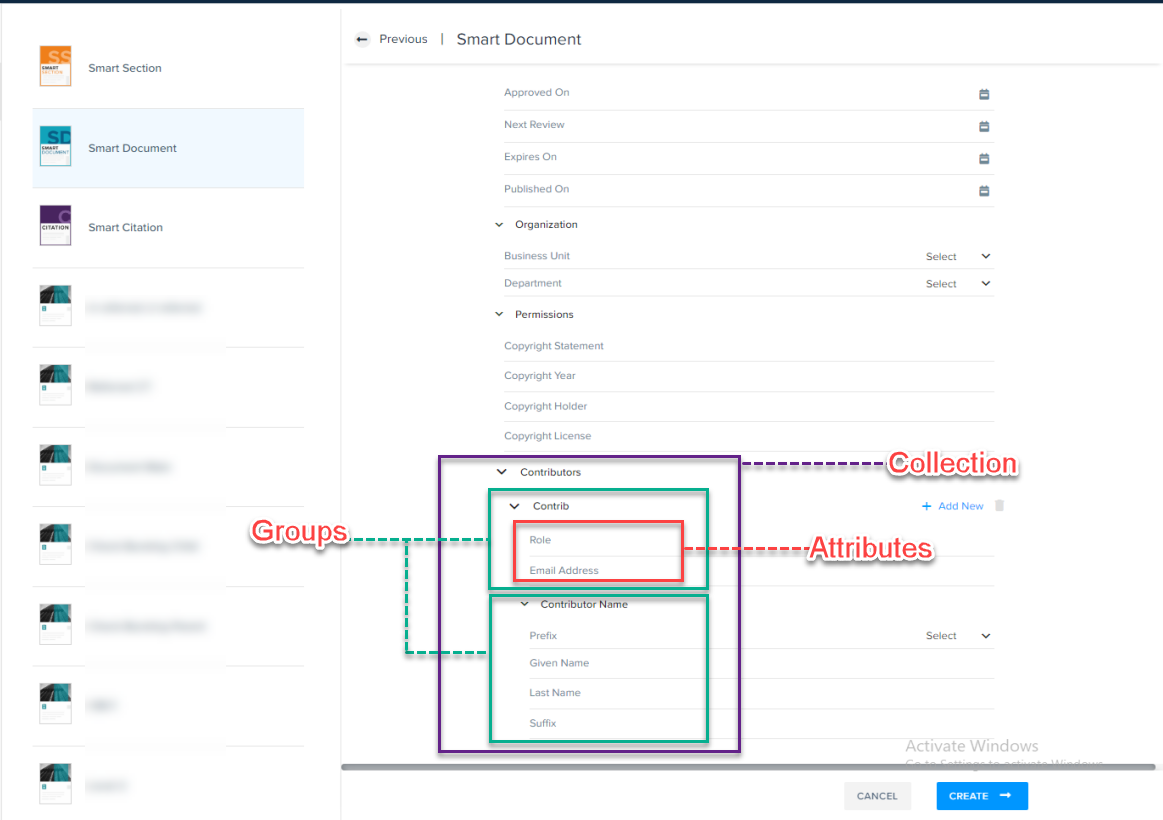
The Properties tab allows you to add and manage properties, which can be used for different smart content types across all the available content models. There are three types of properties you can add and manage:
-
Attribute: Defines a basic property with single or several values.
-
Group: Defines a complex property by combining several attributes.
-
Collection: Defines a yet more complex property by combining several attributes and groups.
When you create a new document/component (for example, a smart document), the attributes, groups, and collection are as highlighted in the screenshot below:
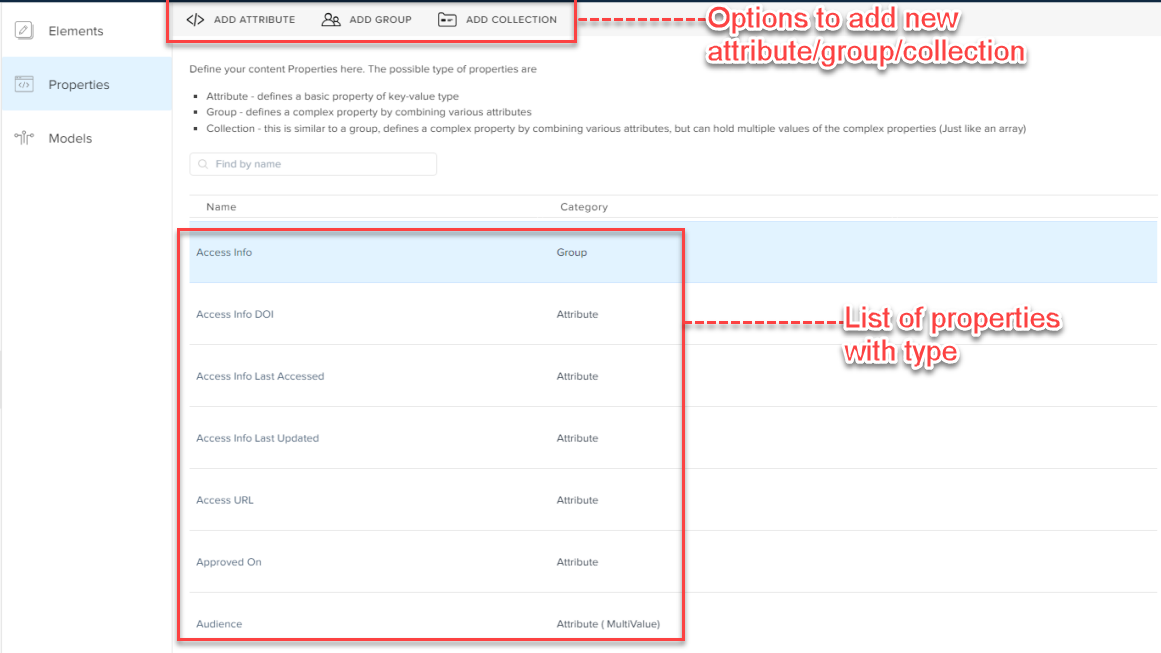
The Properties page lists all the properties that are defined on a server along with the property type (attributes, groups, or collections) and provides options to add a new attribute, group, and collection.
Add an Attribute
To add an attribute:
-
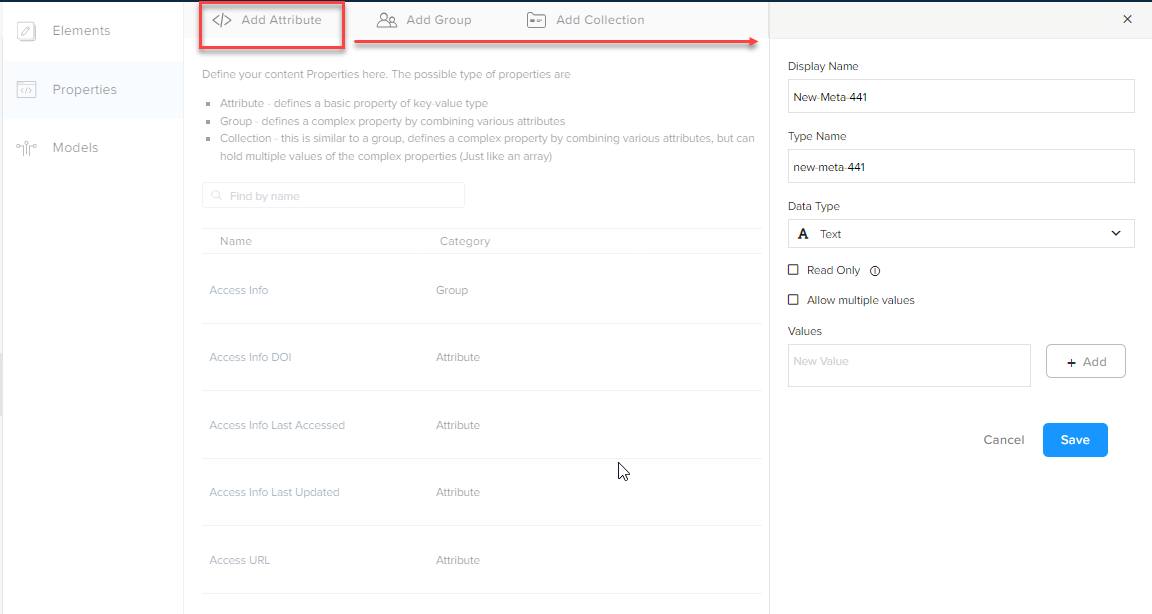
In the Properties tab, click Add Attribute to open the Add Attribute pane.
-
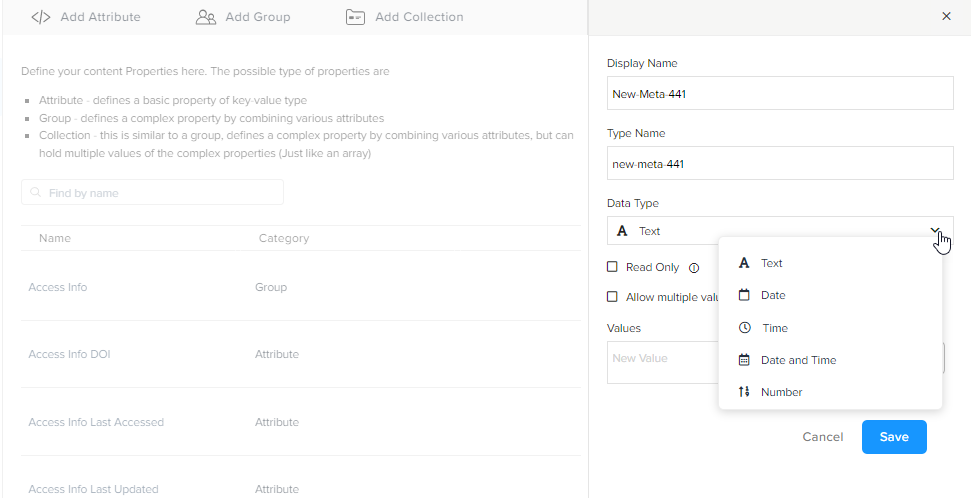
In the Add Attribute pane, enter the following details:
-
Display Name (while you enter the name, QPP automatically generates a value for the field Type Name)
-
Data Type (such as text, date, number, and so on)
-
Read Only (restricts an author to assign the value only once for this property for an asset)
-
Value (values, if you have selected the checkbox Allow Multiple Values)
-
-
Click Save.
Add a Group
To add a group:
-
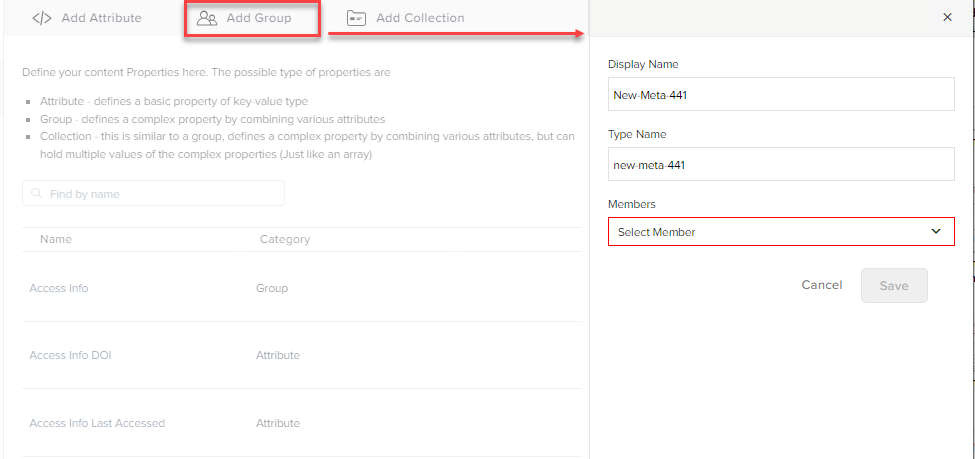
In the Properties tab, click Add Group to open the Add Group pane.
-
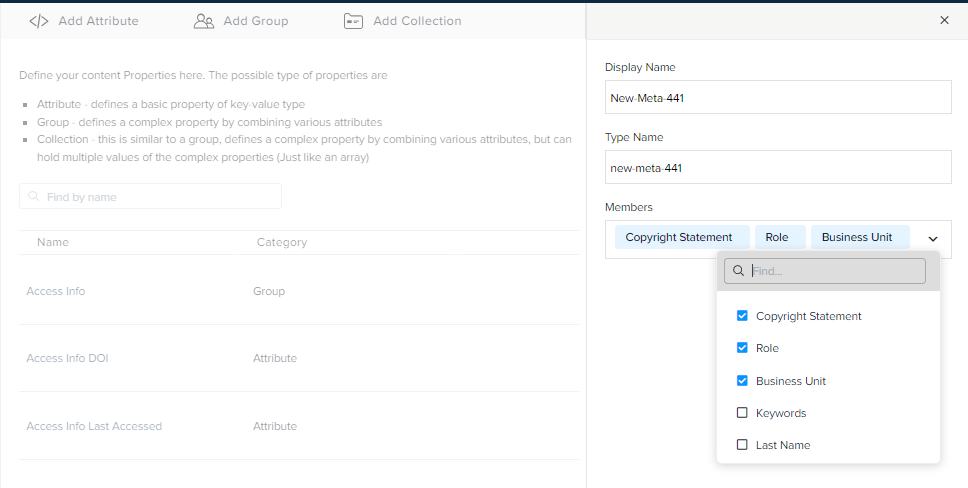
In the Add Group pane, enter the following details:
-
Name (while you enter the name, QPP automatically generates a value for the field Type)
-
Members (which are attributes that you can add to a group)
-
-
Click Save.
Add a Collection
To add a collection:
-
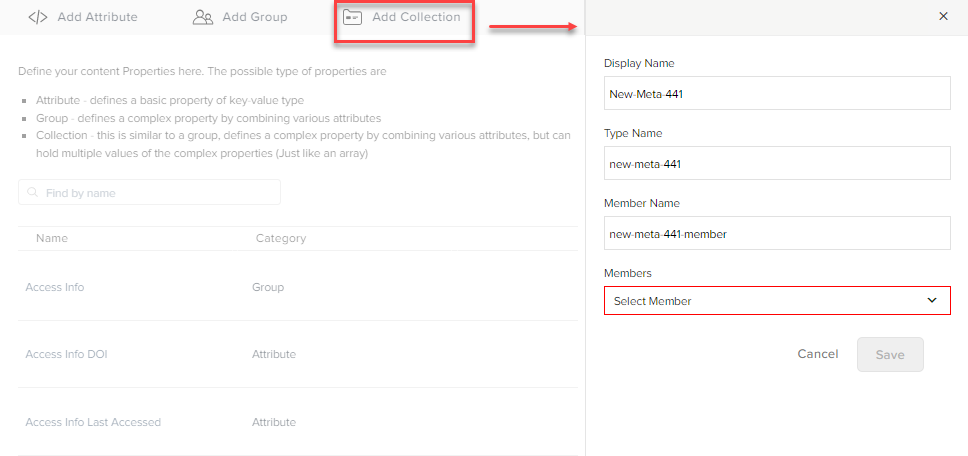
In the Properties tab, click Add Collection to open the Add Collection pane.
-
In the Add Collection pane, enter the following details:
-
Name (while you enter the name, QPP automatically generates a value for the field Type)
-
Member Name (which is the label for the group of attributes in a collection that don't belong to an already defined group)
-
Members (which are attributes and groups that you can add to a collection)
-
-
Click Save.
Property Details
You can also view the details of the property by clicking a property name in the list of properties under the Properties tab.
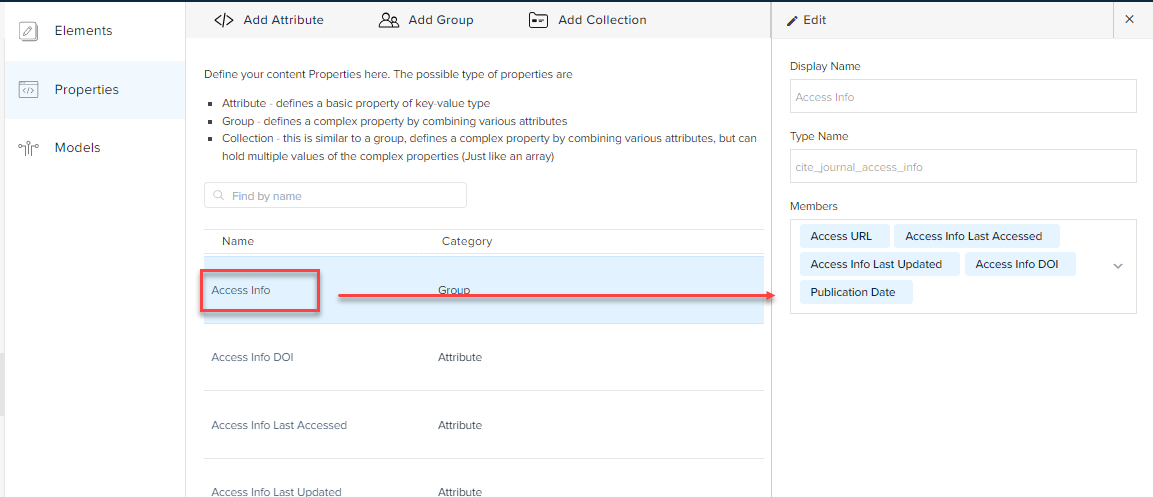
You can also edit a property through the Property Details pane by clicking the button Edit.
Layout Options
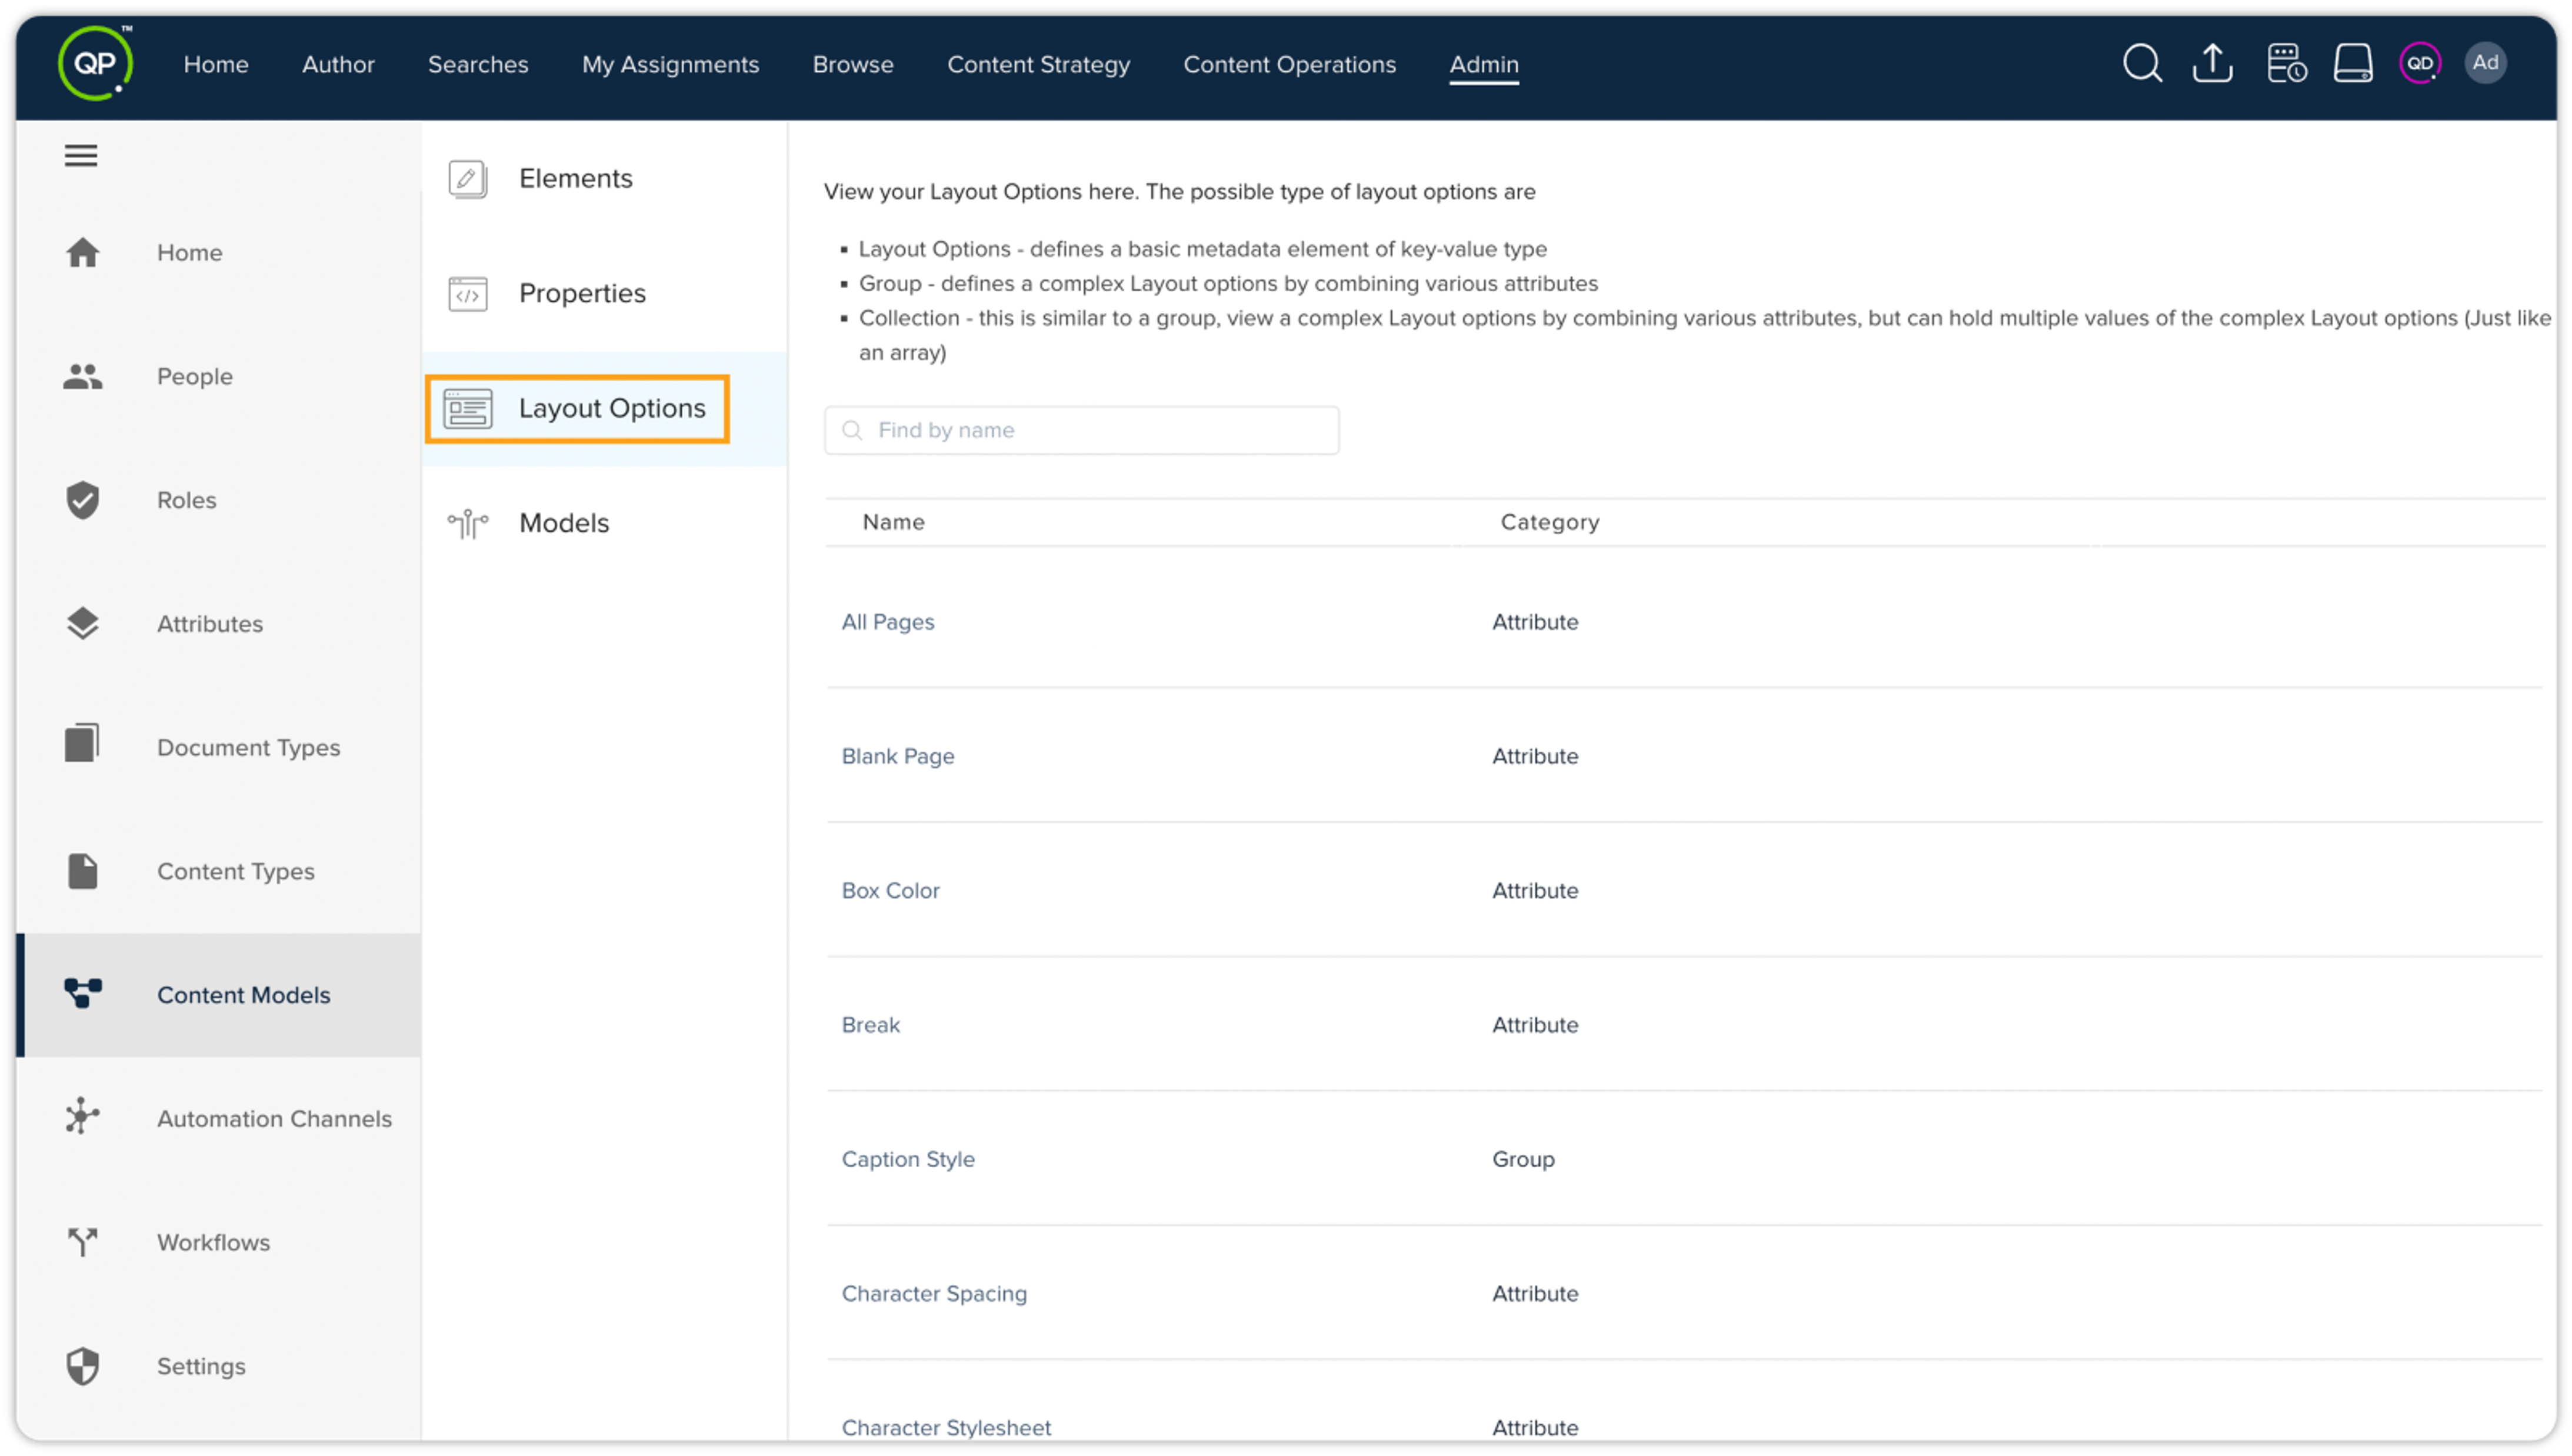
The Layout Options tab contains a comprehensive list of all out-of-the-box (OOTB) layout options available on the QPP platform. Currently, the tab is view-only, allowing you to browse the available options and utilize the search feature to quickly find your desired layout.
Variables
The Variables tab provides a powerful way to standardize, reuse, and ensure accuracy in your published content. This feature helps you define and manage variables centrally within the content model. You then have the flexibility to assign specific values to these variables at both document and section levels.
To create a Variable
To create new variables in Quark Publishing Platform, follow these steps:
-
From the Quark Publishing Platform homepage, go to the Admin tab, and then click Content Models in the vertical list on the left side.
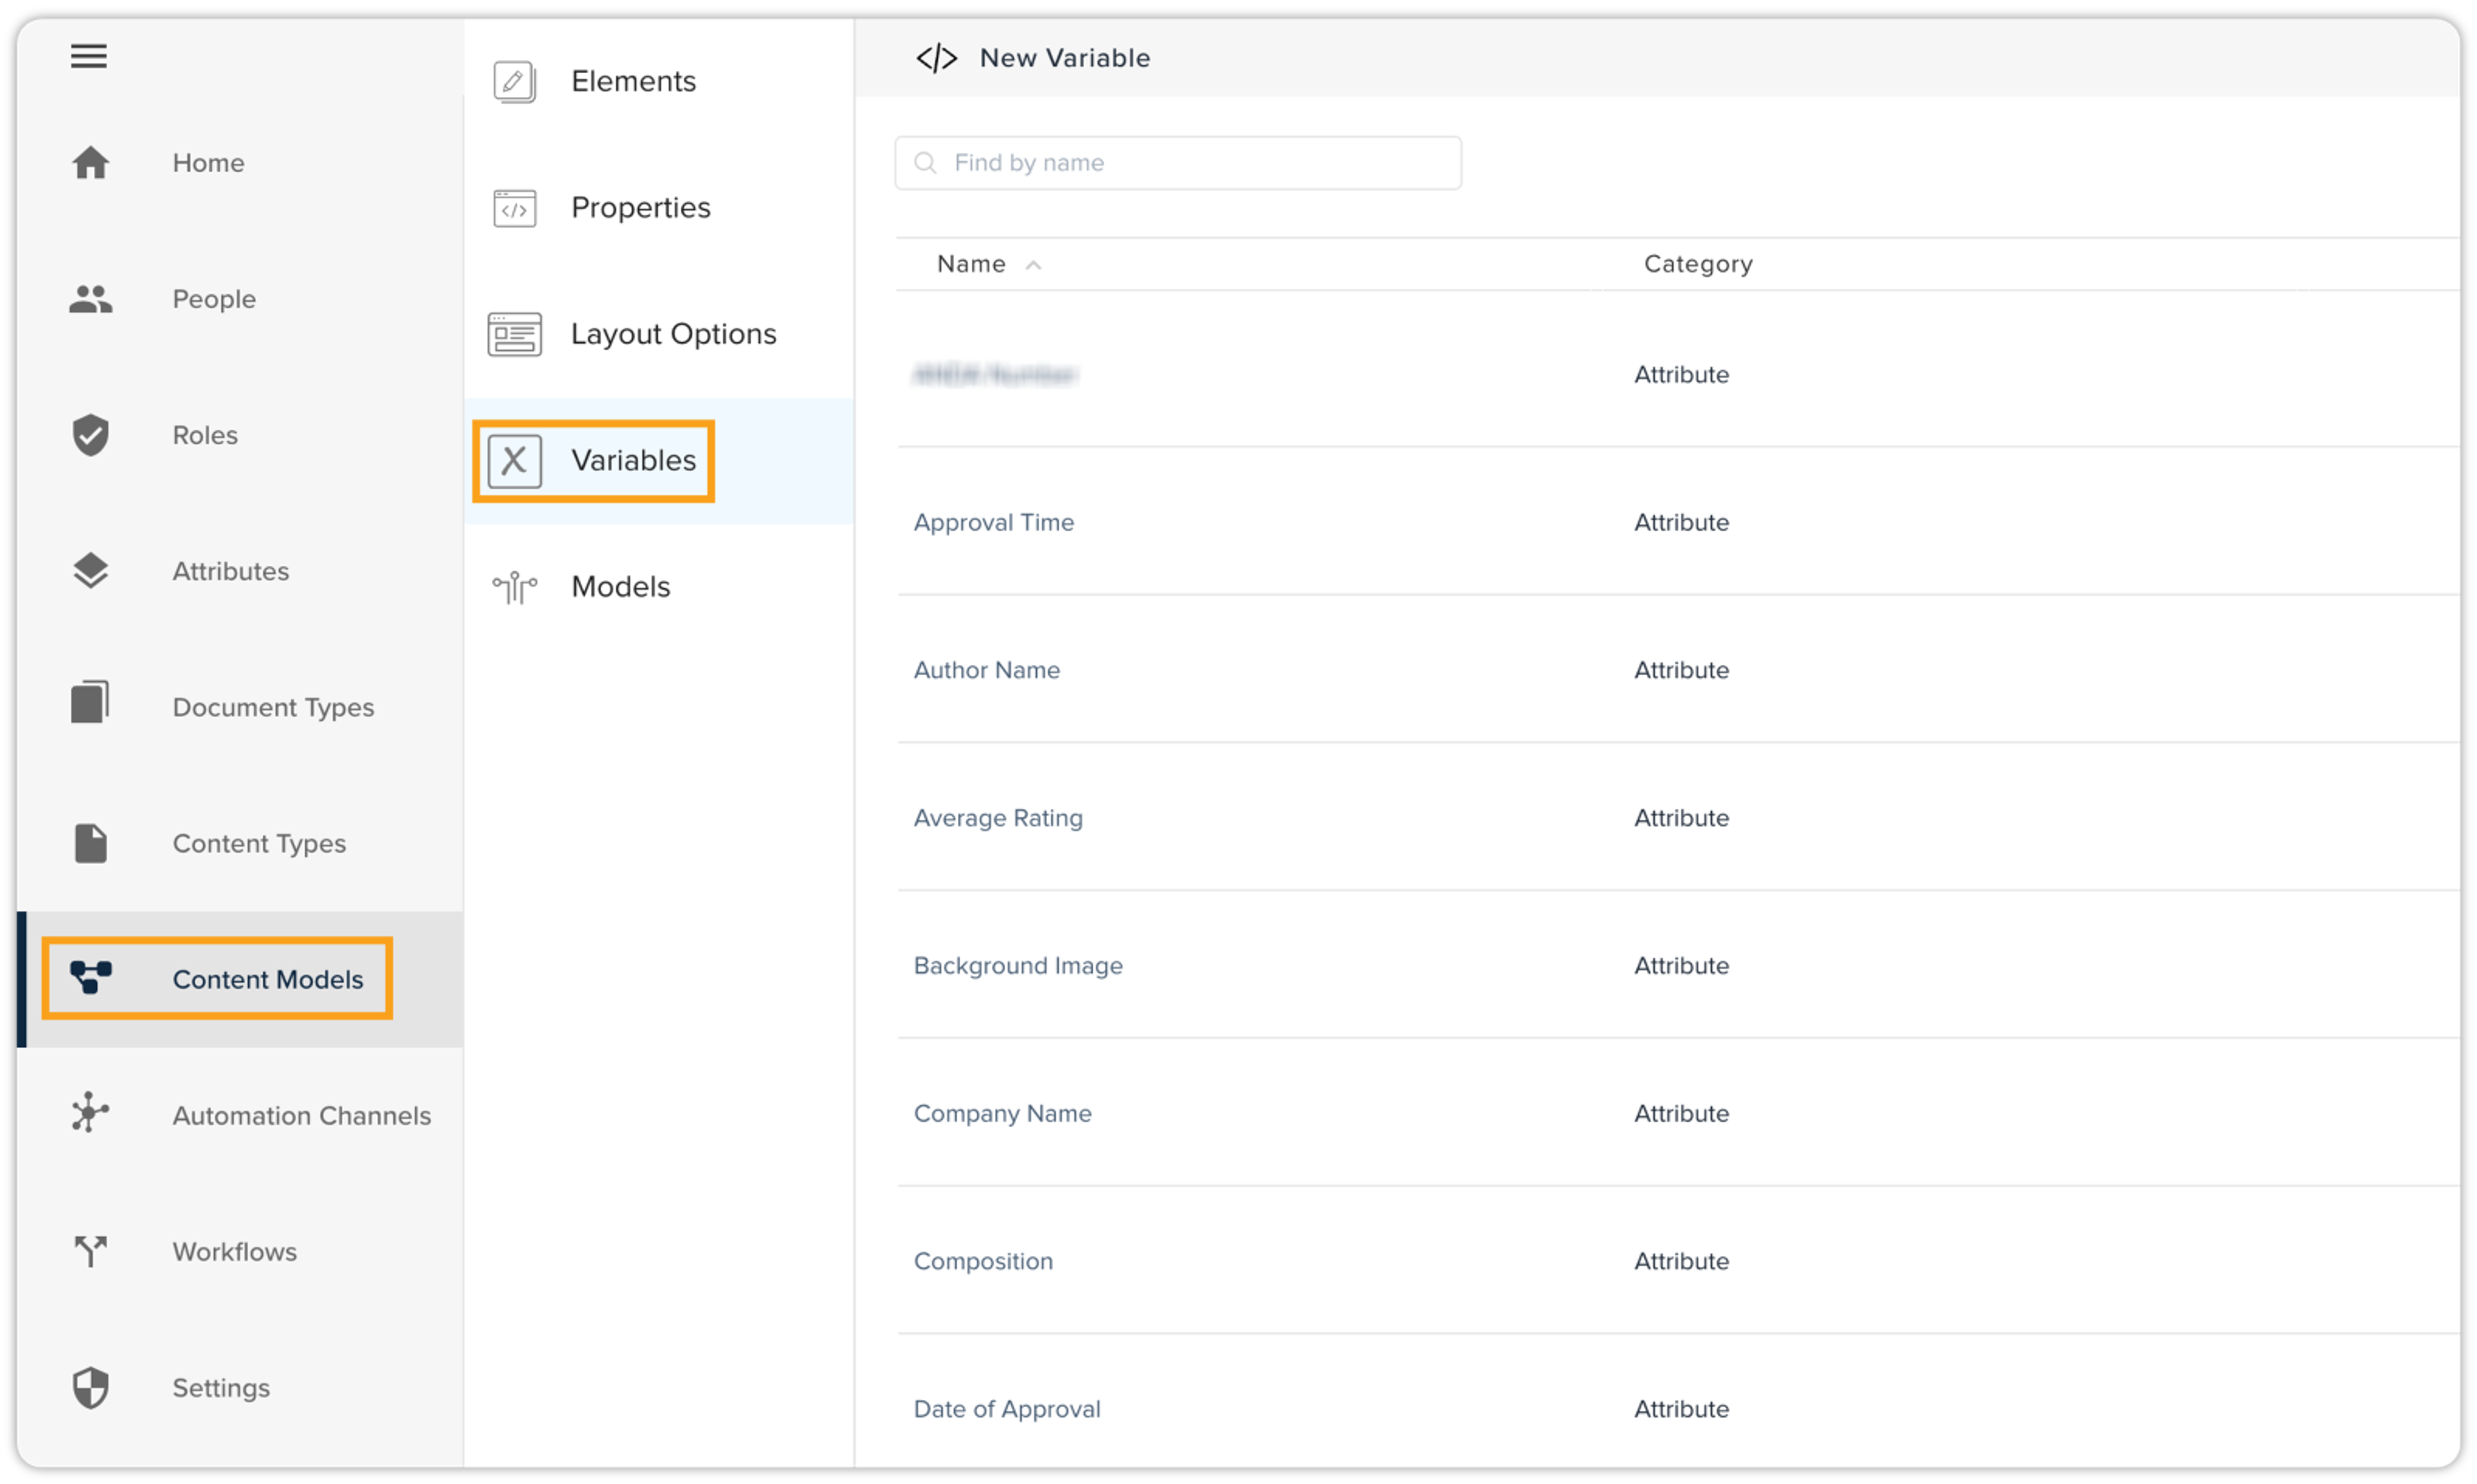
-
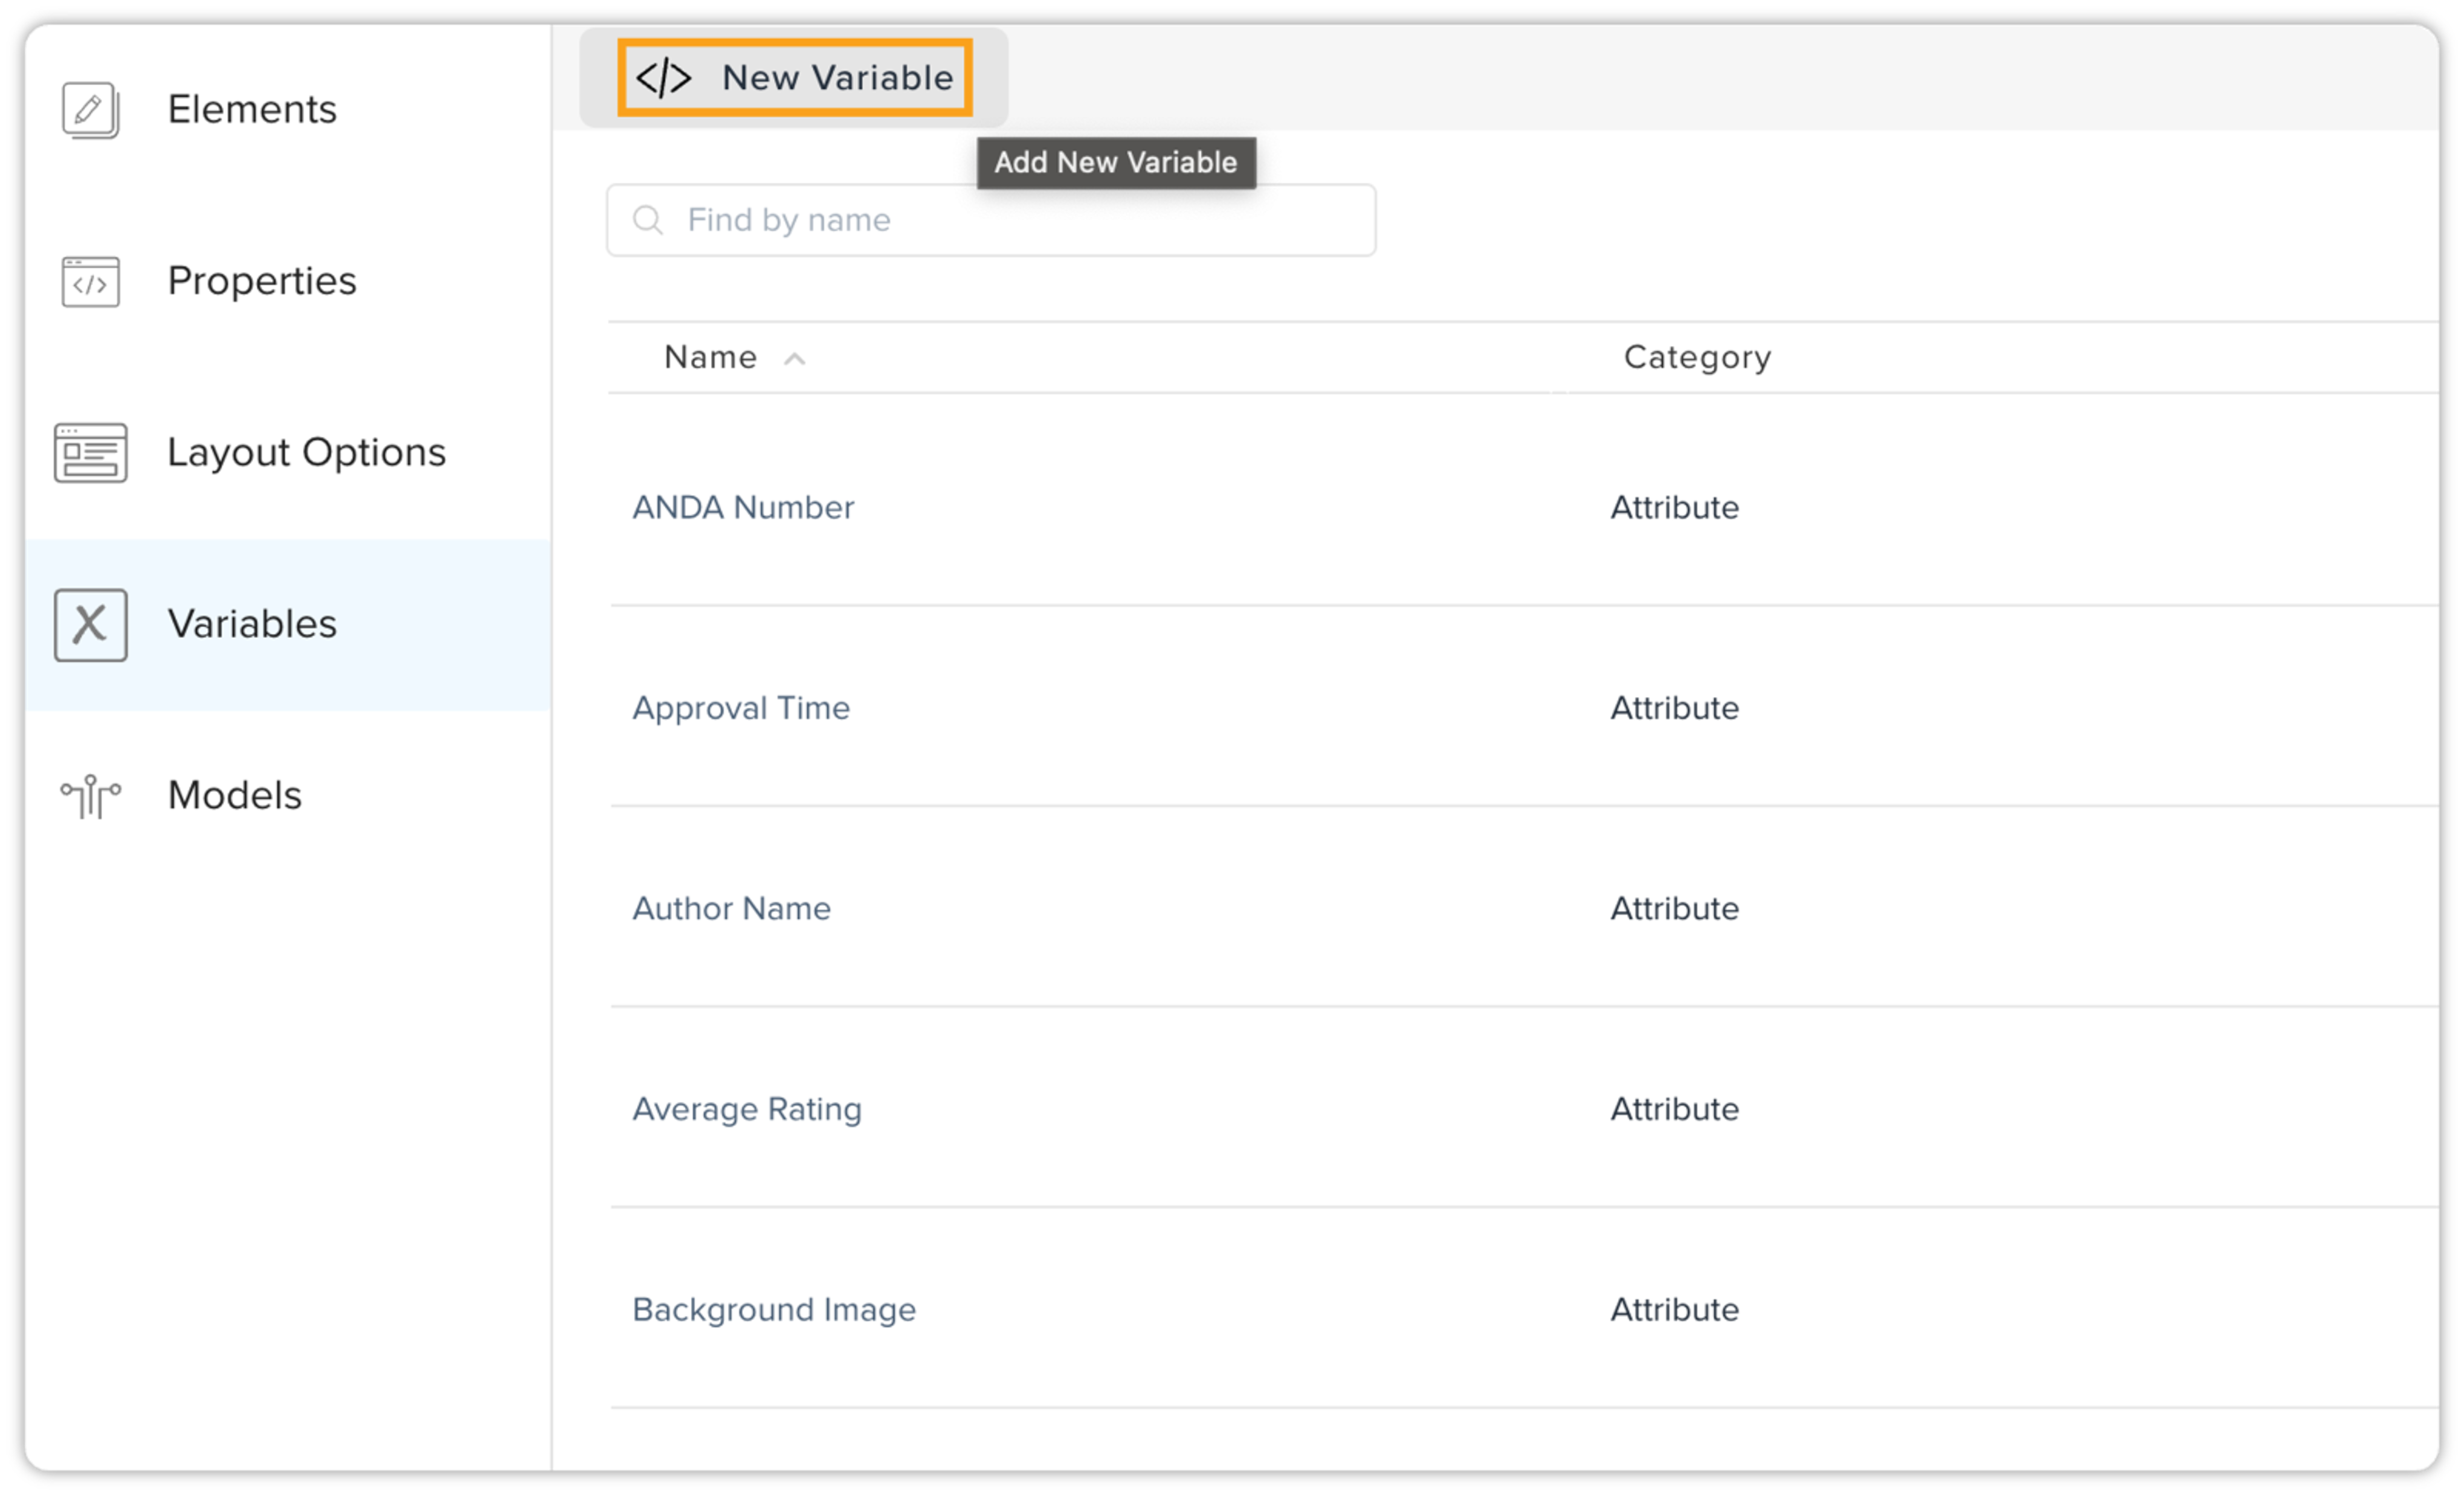
On the Content Models page, click the Variables tab. Here, you will see a list of all previously created variables.
-
To create a new variable, click New Variable. This action will open a third pane on the right side of the screen.
-
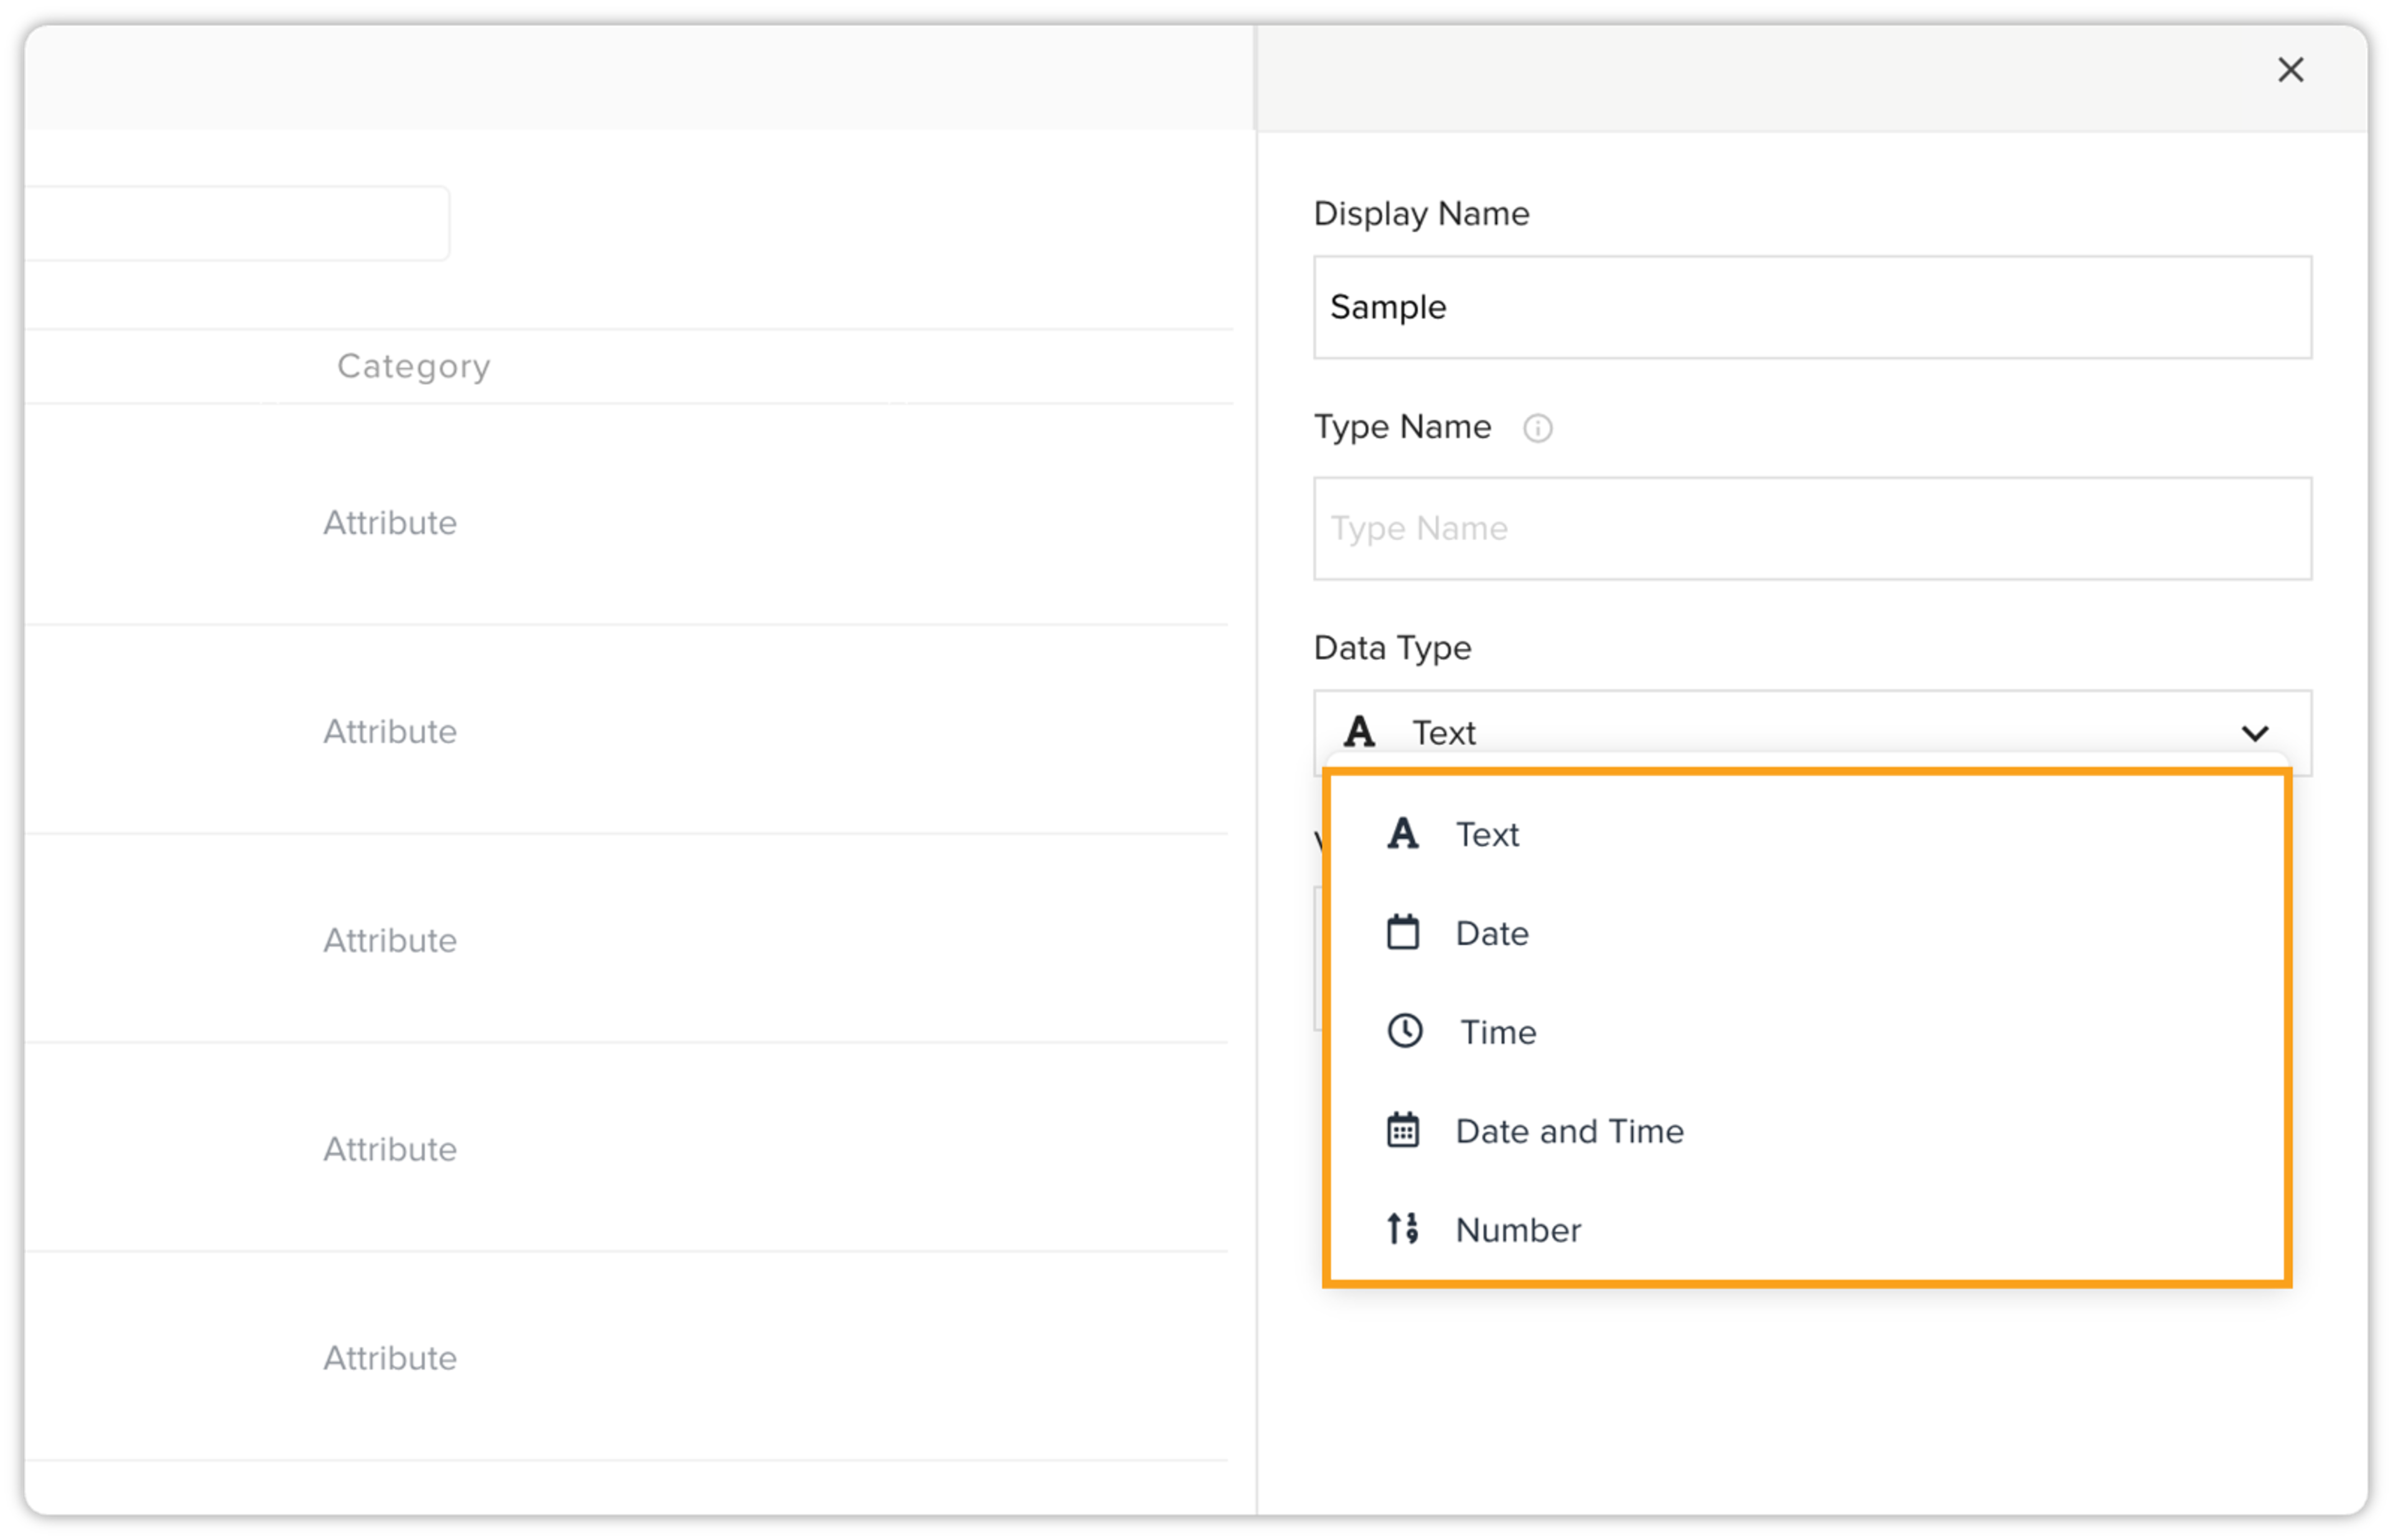
In the third pane, provide the following details for your new variable:
-
Display Name: Enter a descriptive name for your variable.
-
Data Type: Select the appropriate data type from the dropdown list (e.g., text, date, number, boolean) for this variable.
-
Value: Enter the initial value for the variable.
-
-
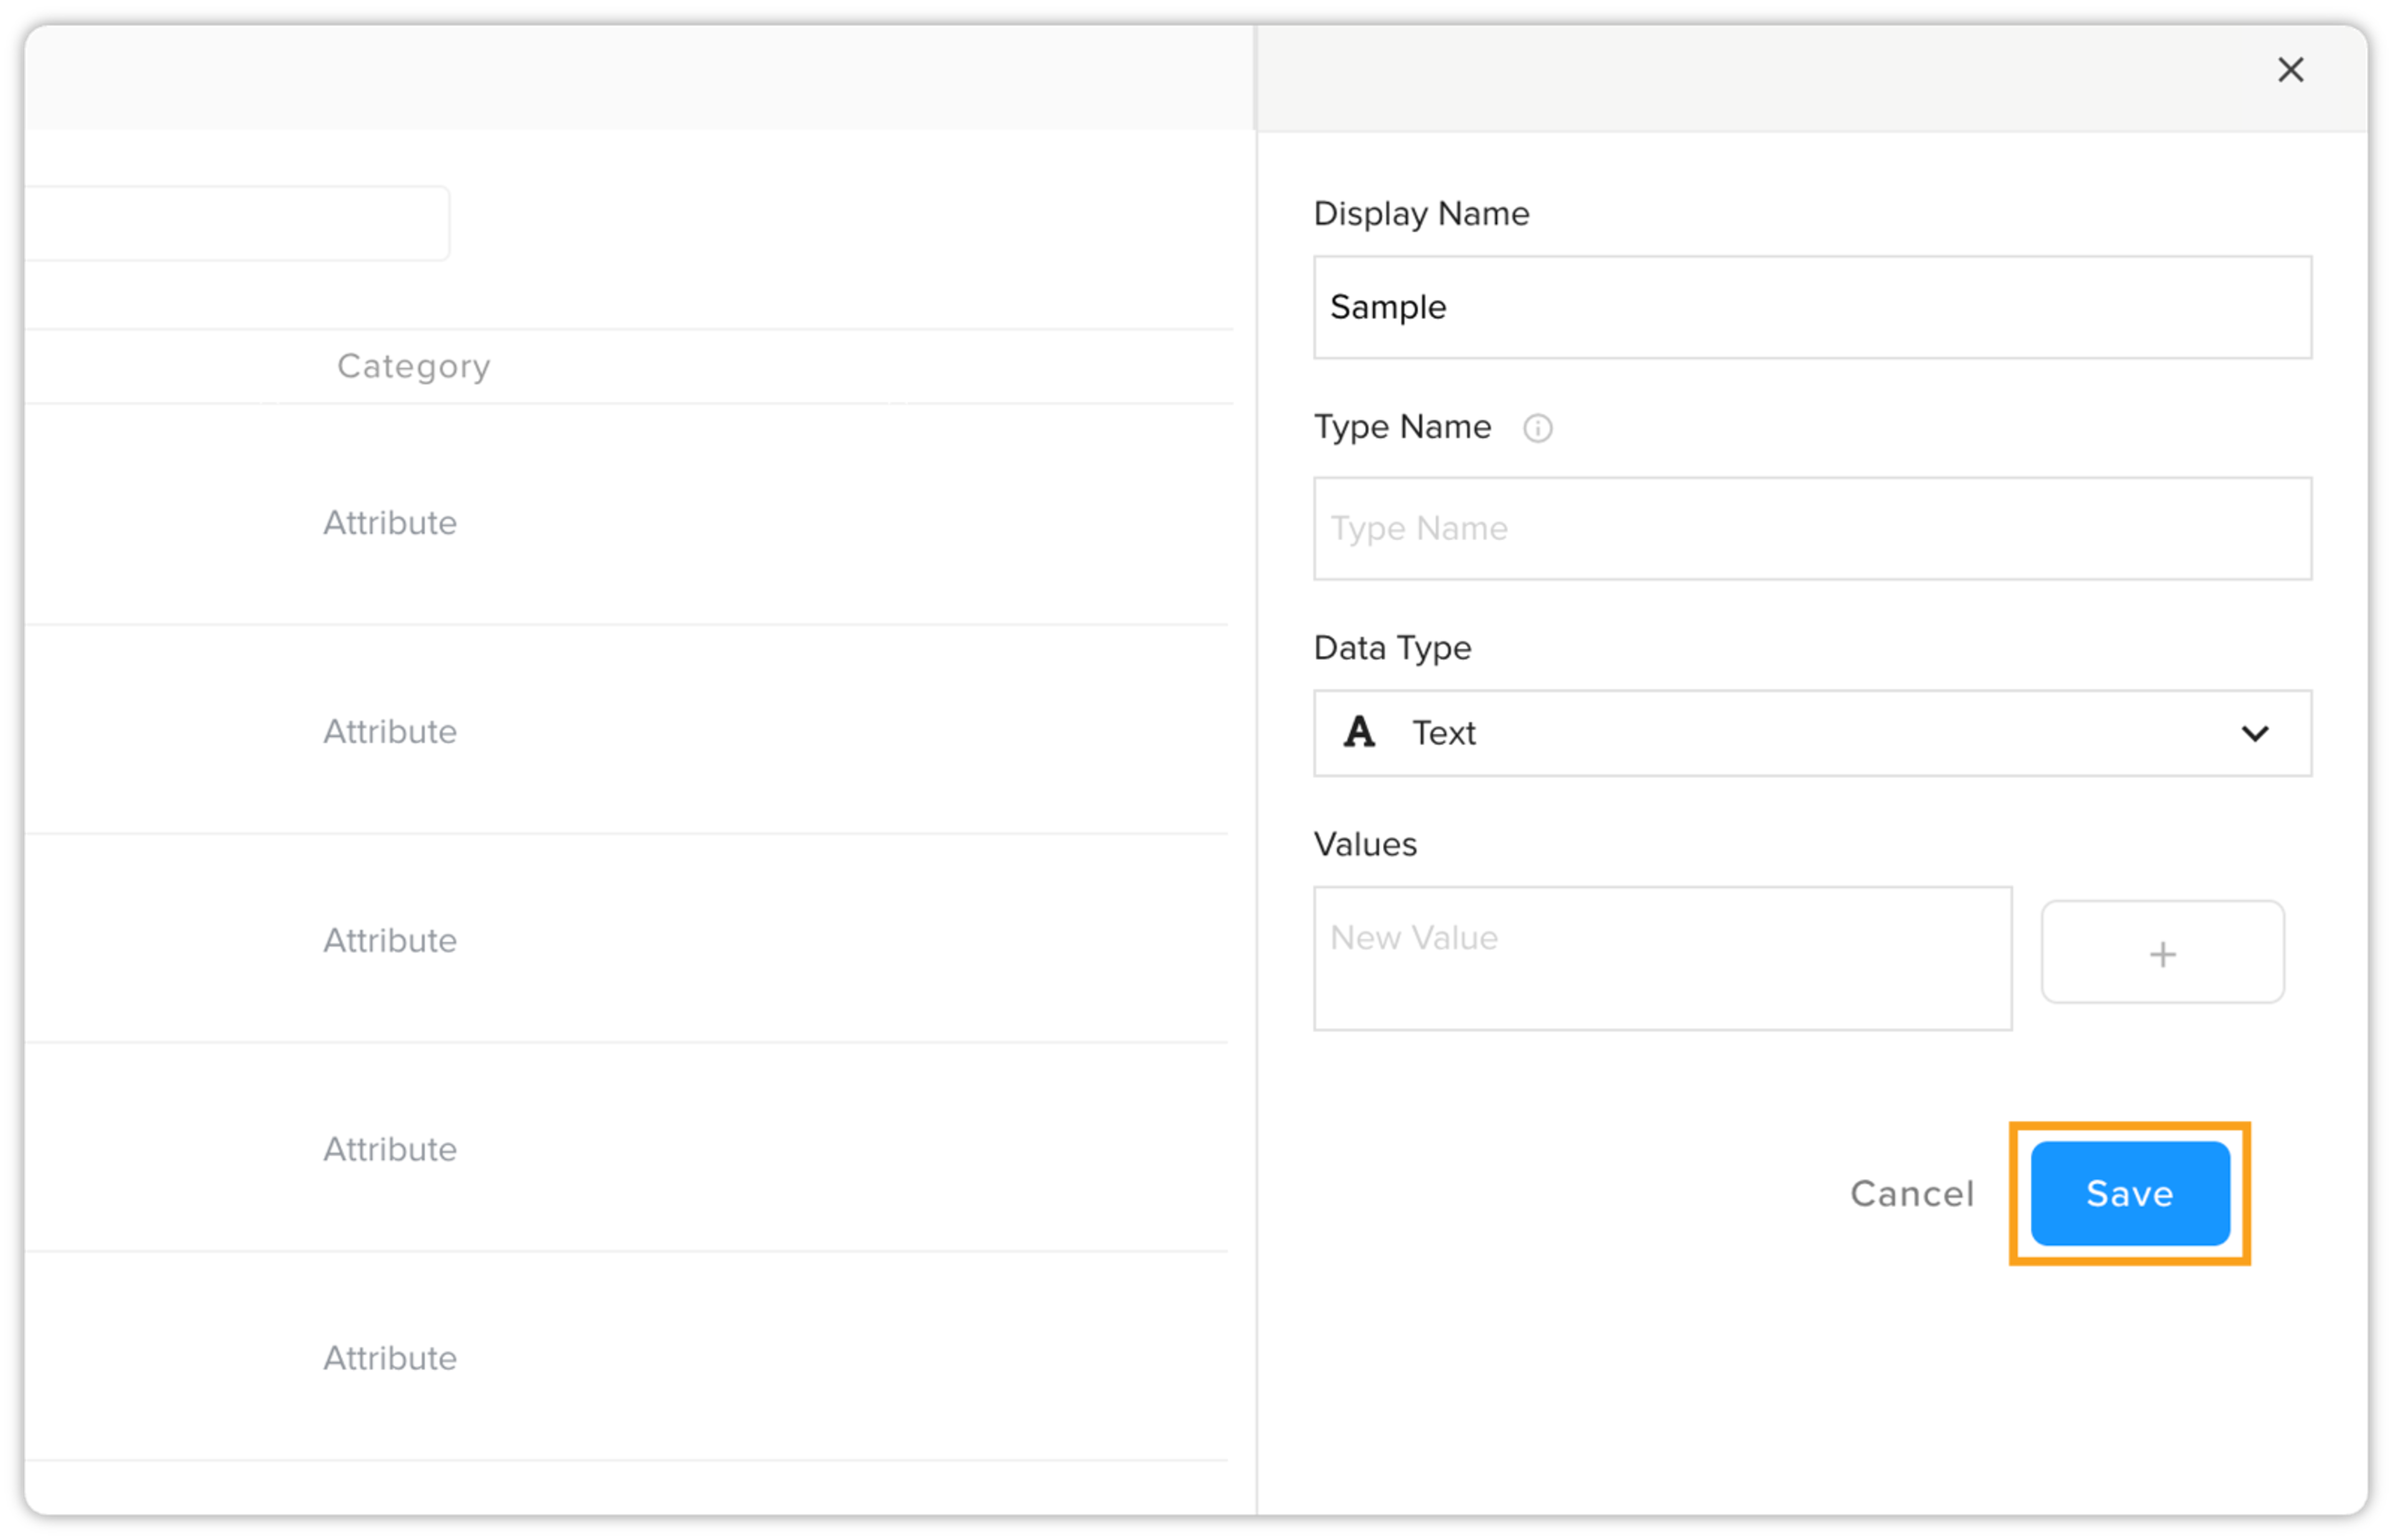
Click Saveto create the variable.
To edit an existing variable, simply double-click the variable from the list, then click Edit in the third pane, and make your desired changes.
Models
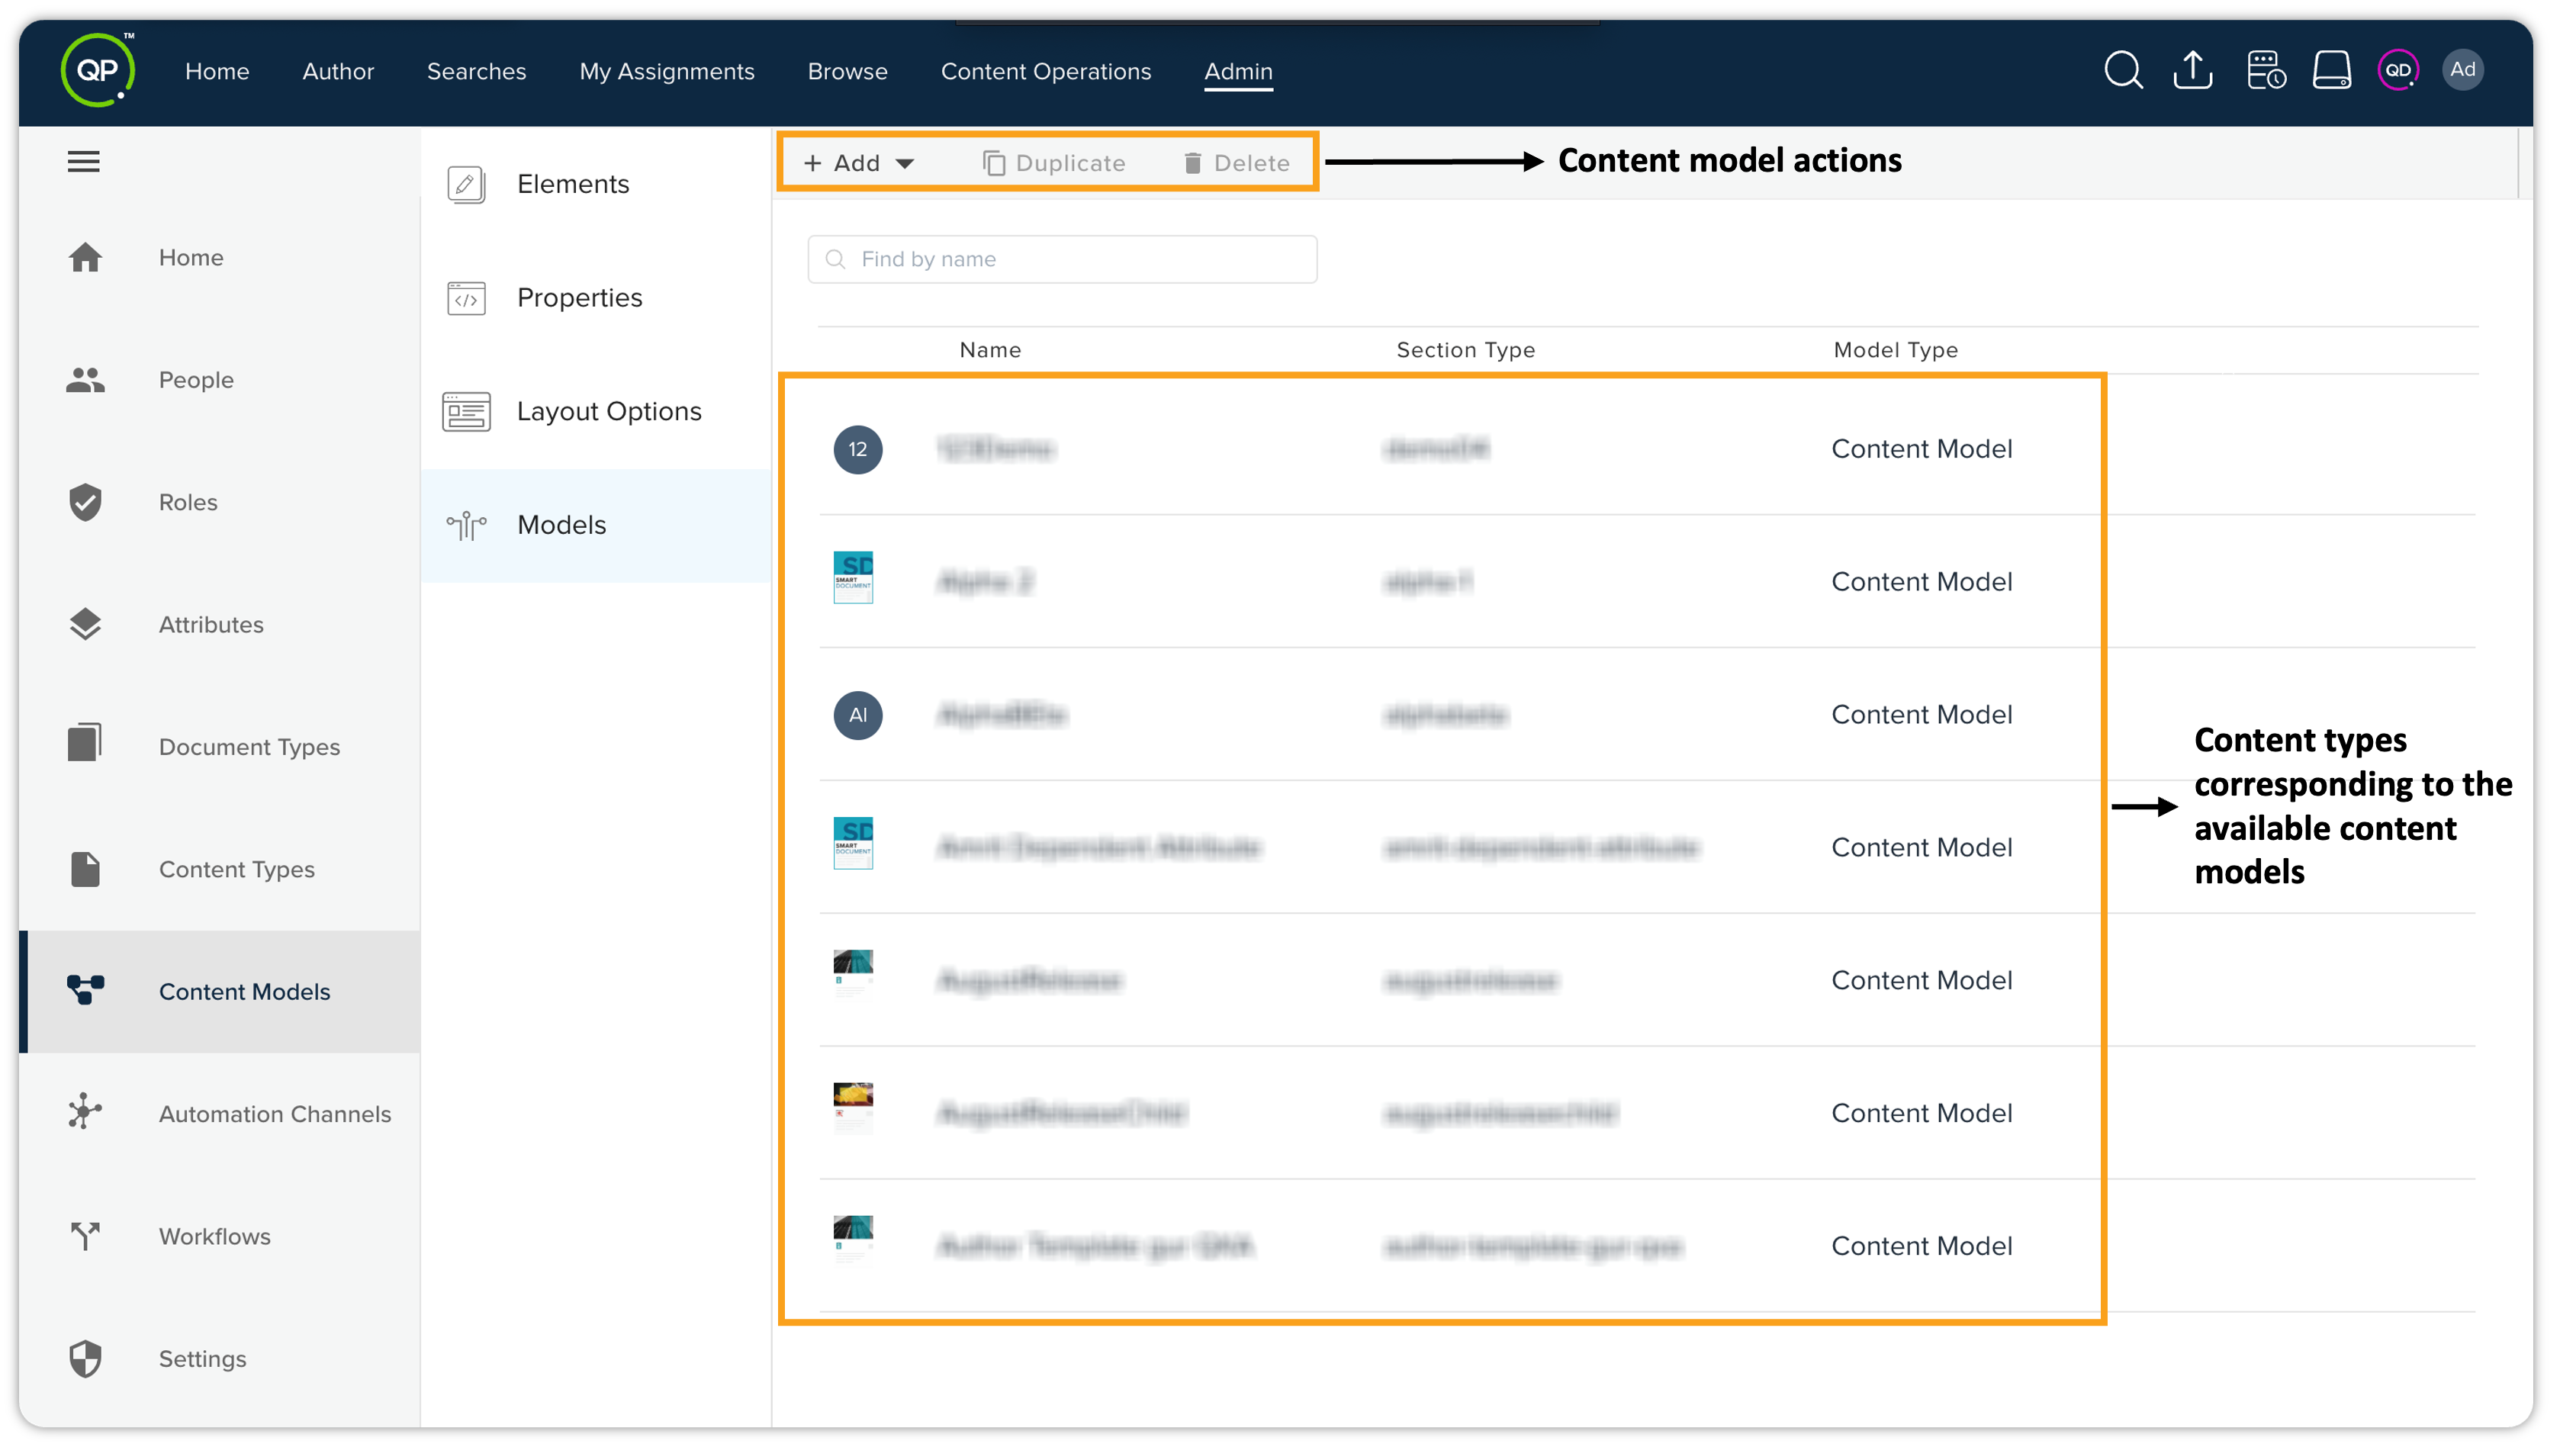
The Models tab allows you to add and manage content models. The Models tab displays the list of content models already available on your server. Additionally, there are a few top bar actions to add a new content model or to duplicate or delete the selected model from the list.
Add a Content Model
To add a content model, follow the steps shown below:
-
On the home page of QPP, click the Admin tab, click Content Models in the list pane on the left, which is displayed vertically, and then click Models.
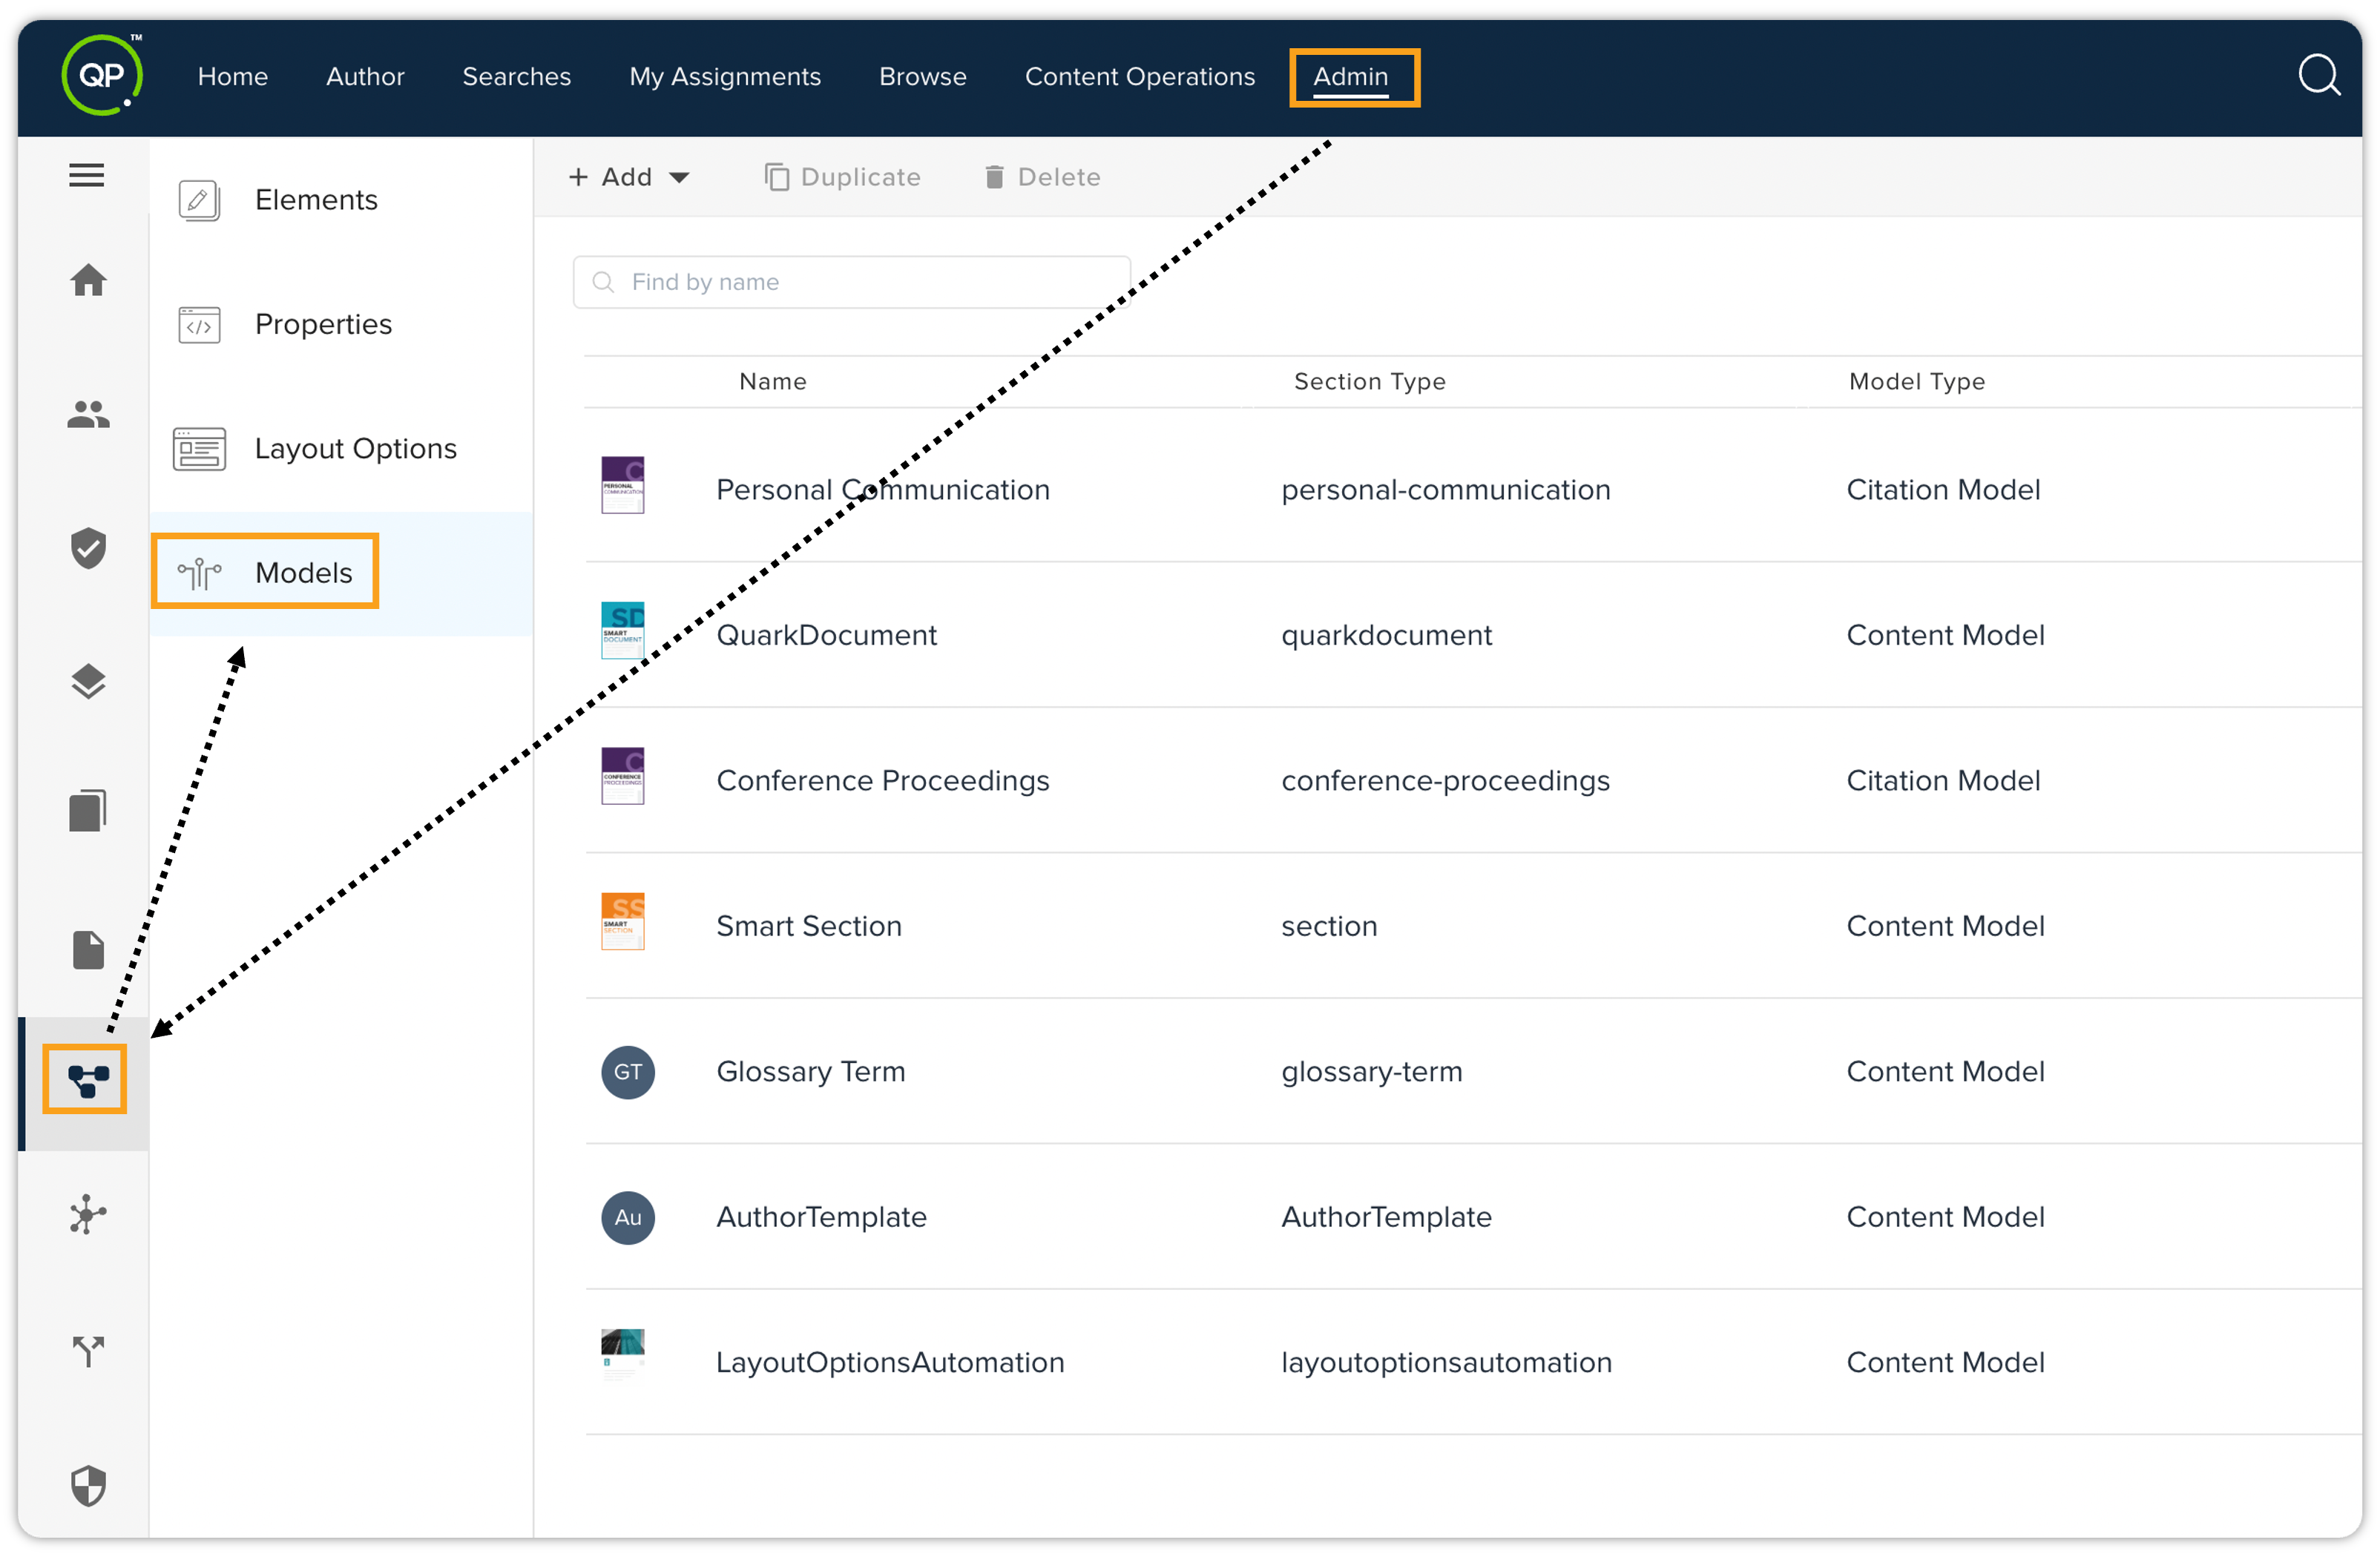
-
Click the drop-down arrow next to + Add button in the top bar actions, and then click on New Content Model to open the pane in which you can create a new content model.
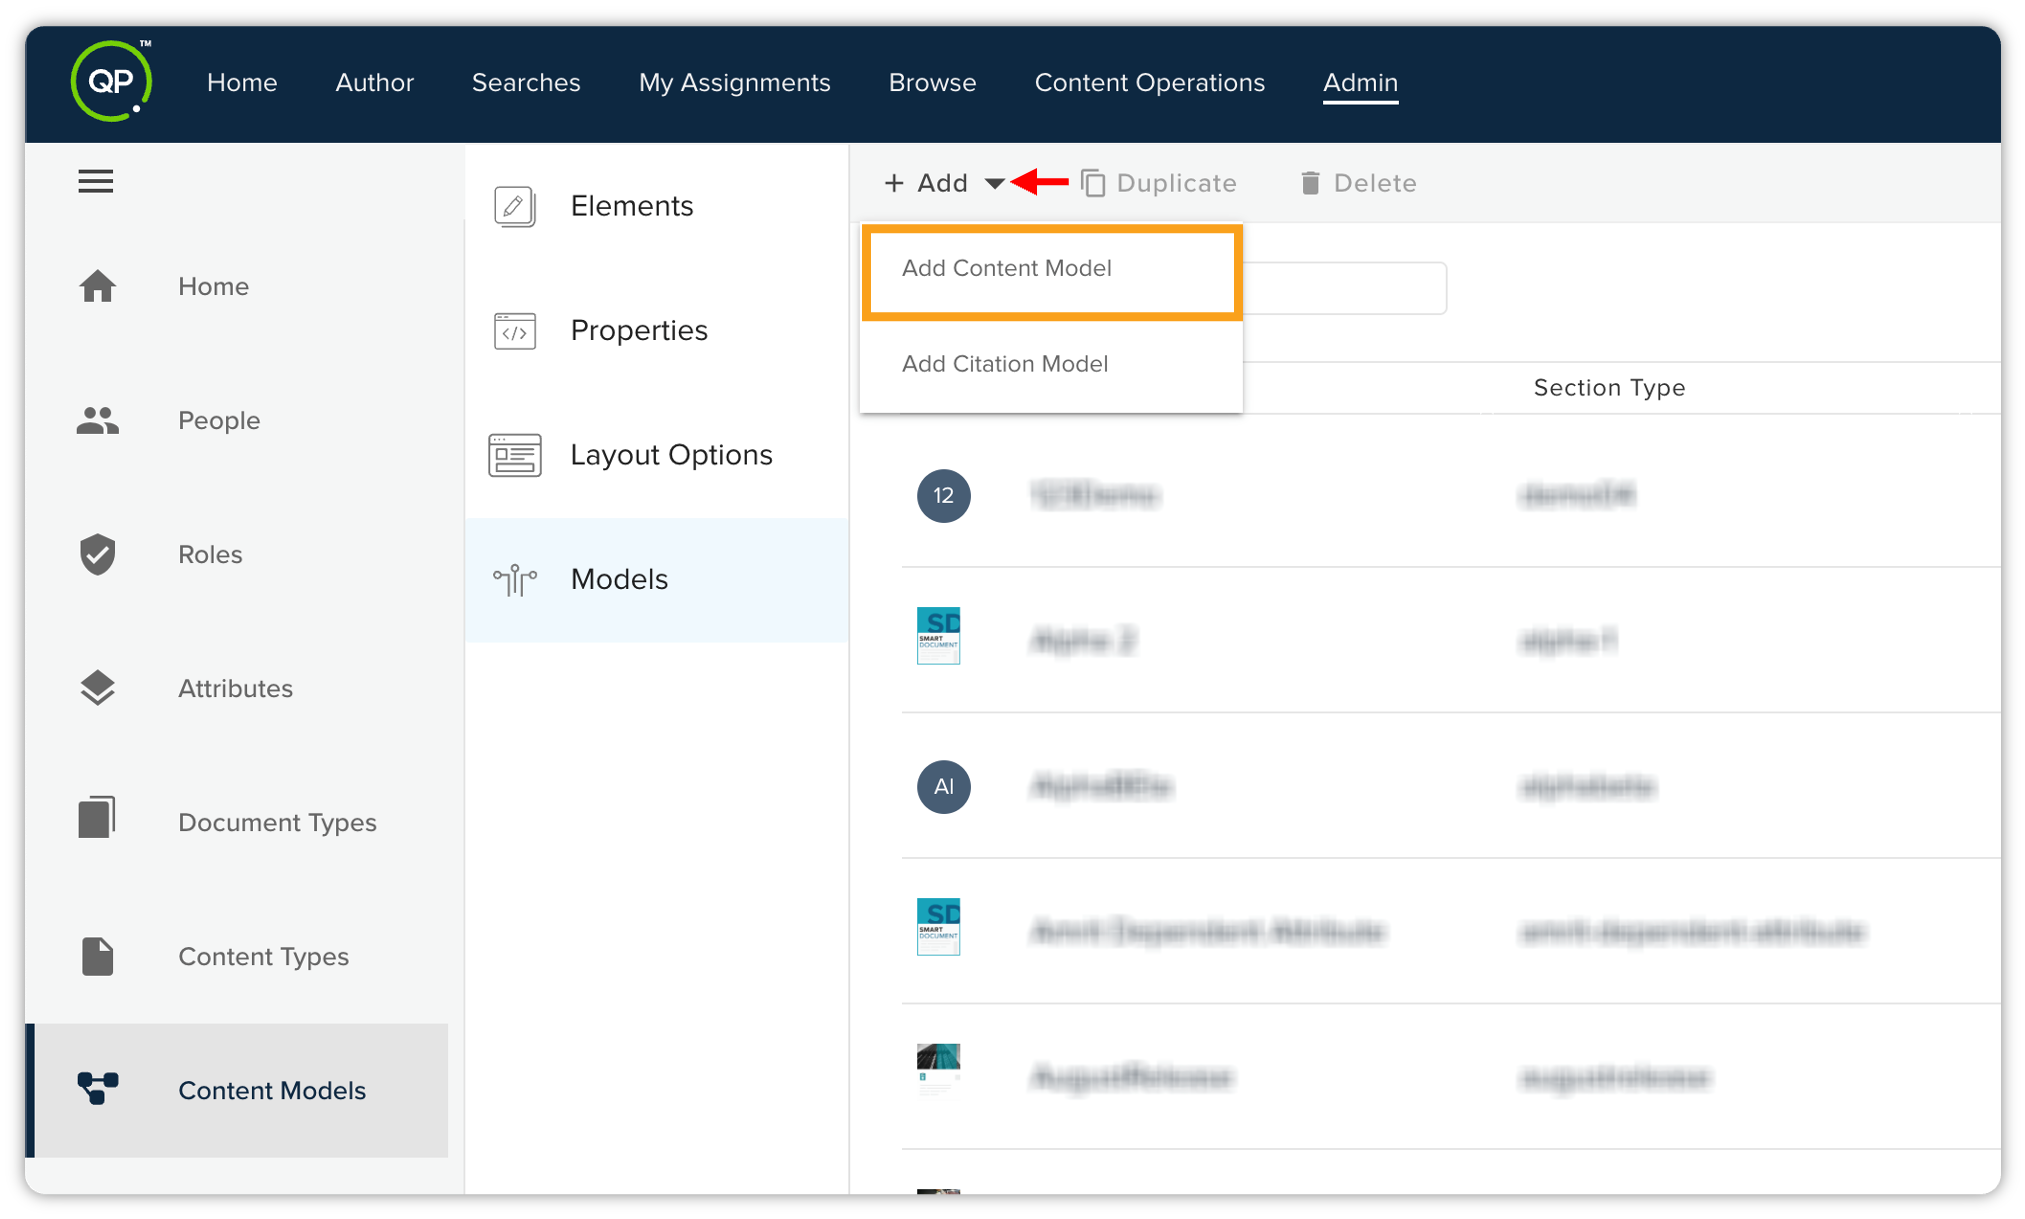
-
A new window will be opened where you need to enter the following information:
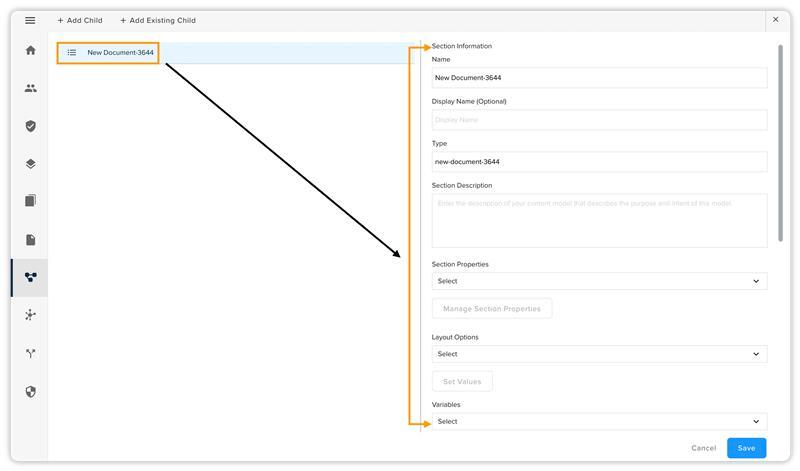
-
Name: The content model name.
-
Display Name: If you want to display a different name for the content model on the user interface.
-
Type: QPP automatically generates a value for this field based on the value you provide in the field Name. QPP uses this value instead of the name to refer to a content model at the back end.
-
Section Description: Enter a detailed explanation for your new content model. This field supports allowing for multi-paragraph explanations to provide full context. As you define or modify inline sections within your content model, you can also add unique descriptions to each. This allows for granular clarification of the specific content expected within that particular section.
Used subsequently by the Structured Content conversion for identifying the intent of the section and or document. -
Section Properties: Select metadata (for example, Creation Date, Modification Date, Business Unit, Authors, and so on) for the documents based on the content model.
-
Manage Section Properties: Refer to Manage Section Properties section for detailed information.
-
Layout Options: The Layout Options enable you to customize the layout for your newly created content model. This feature presents two choices: Document Layout Options and Section Layout Options.
-
Set Values: After selecting one of these options, you can specify the necessary values to tailor the layout to your preferences. This flexibility ensures that you can create content models that meet your design needs and effectively convey your intended message.
-
-
Variables: Select the variables you wish to add to this particular content model.
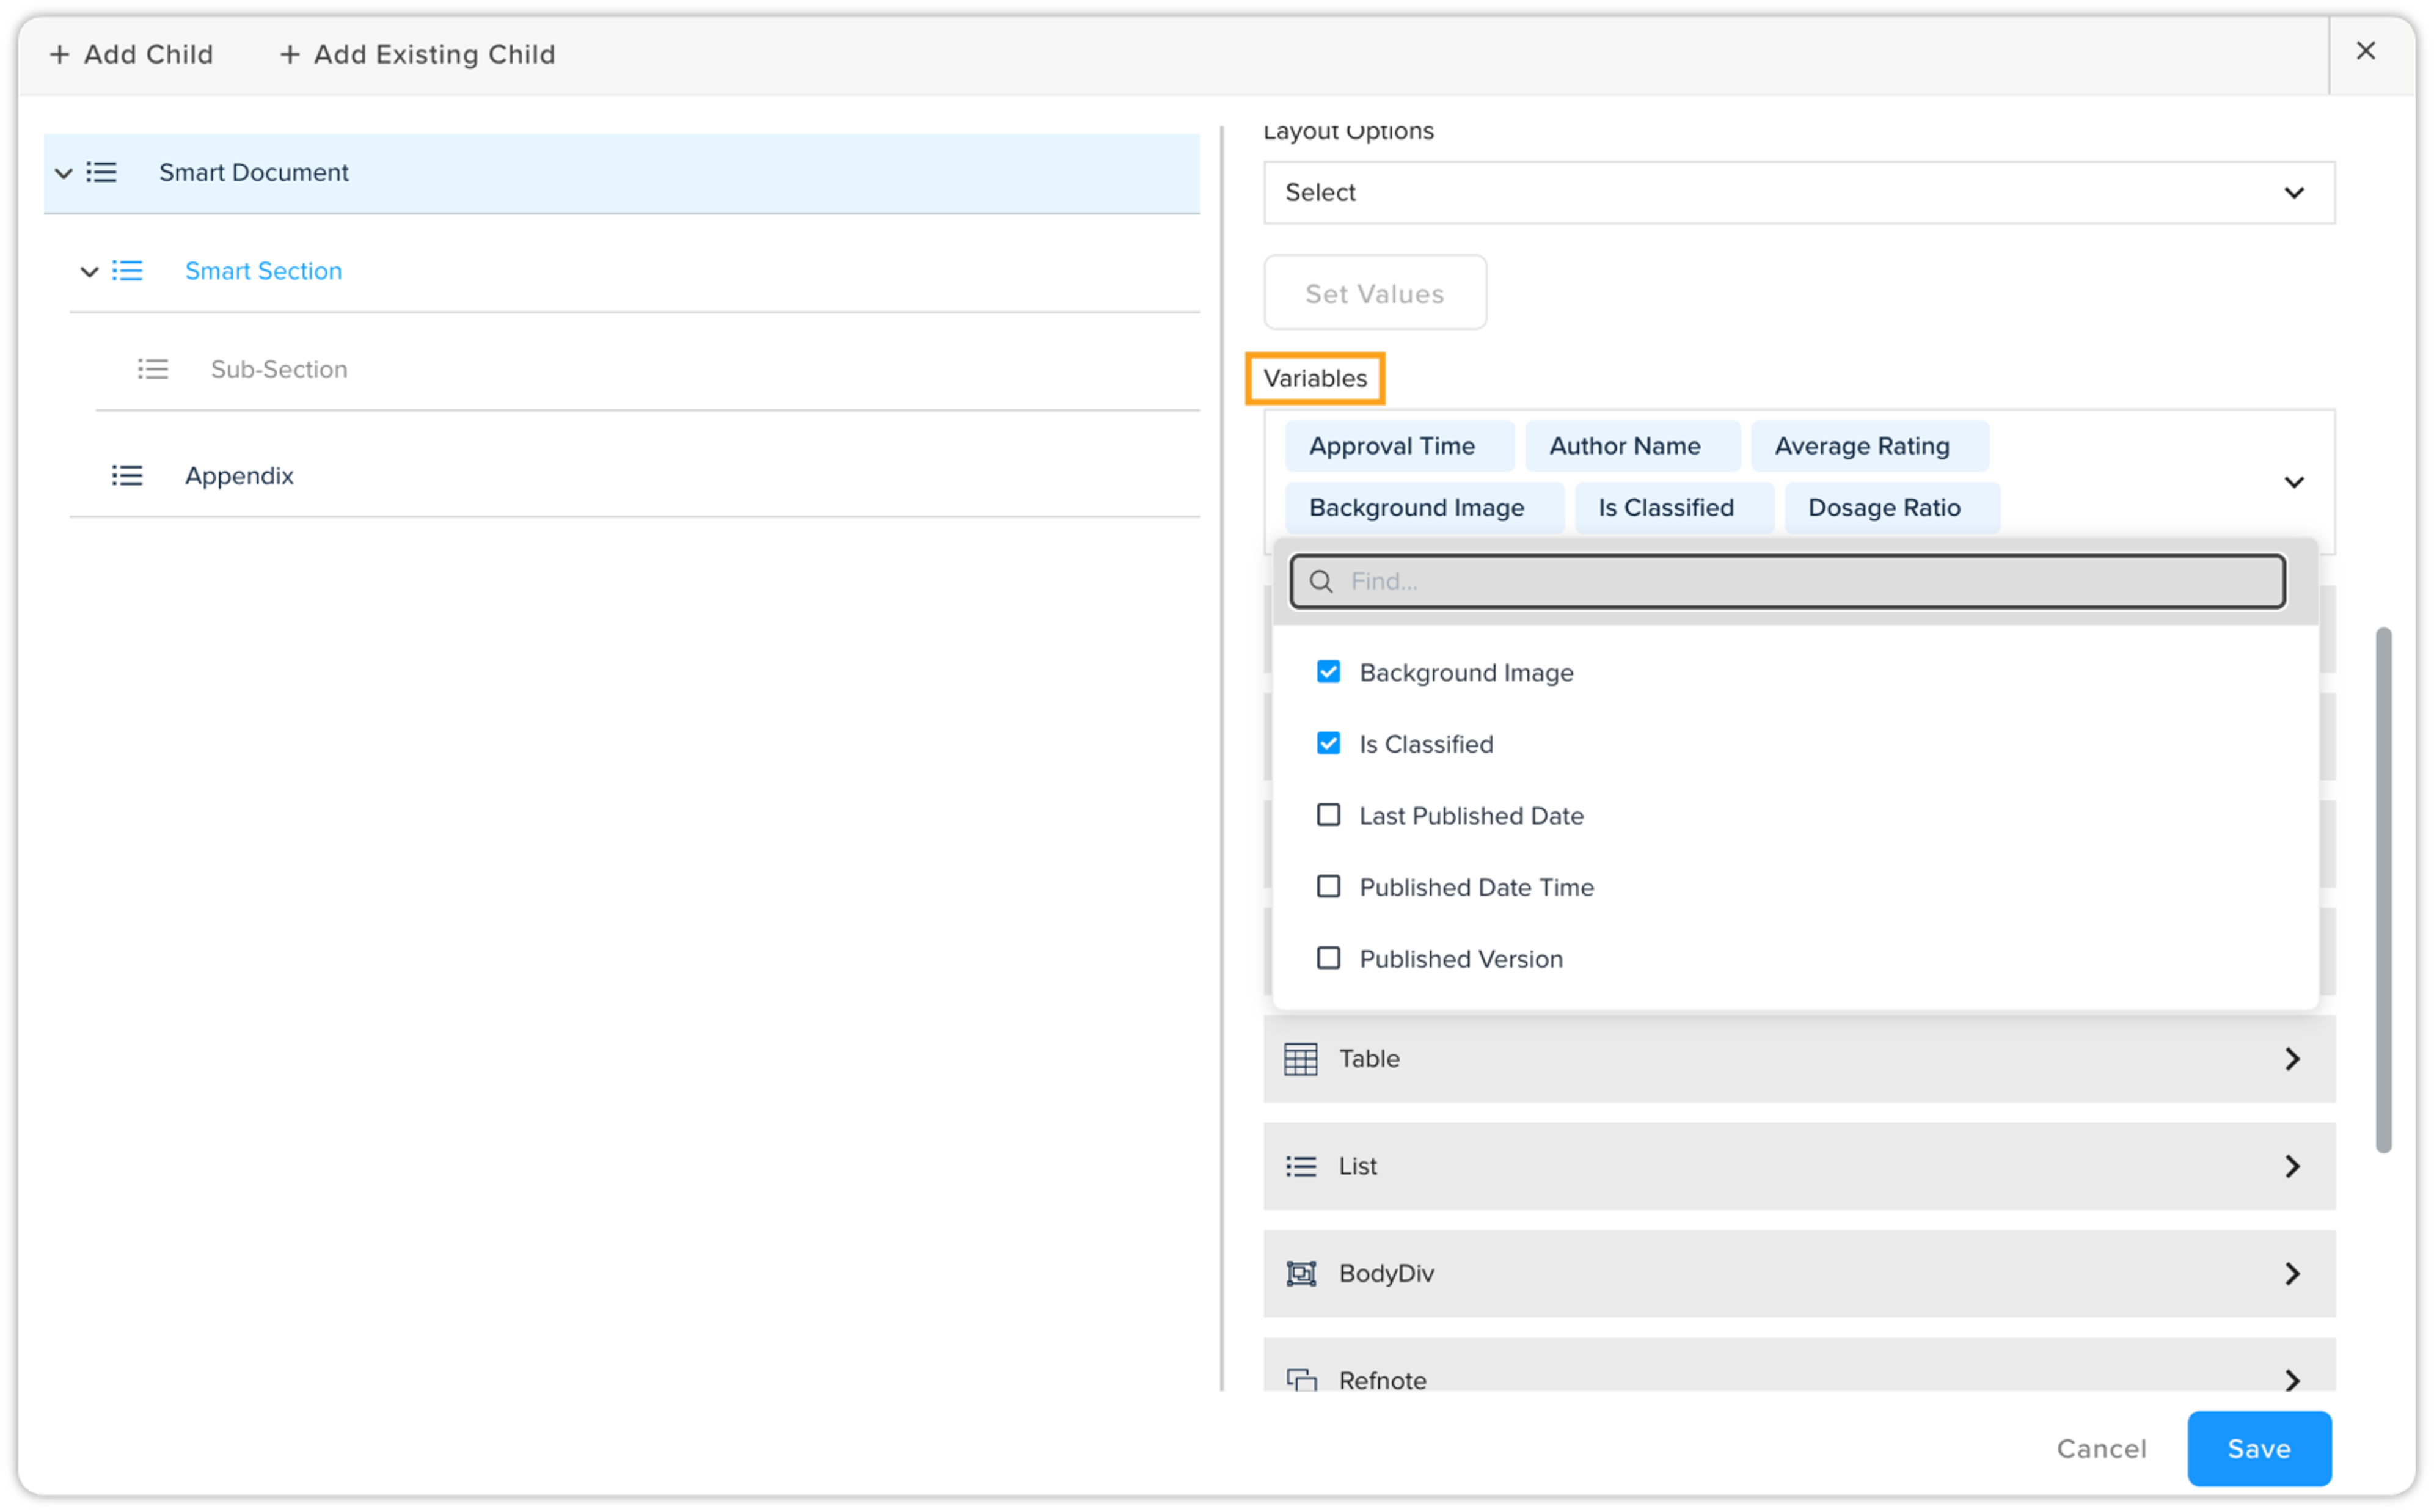 Documents and sections that use variables are part of a content type, which in turn is associated with a content model. Therefore, variables added to a content model will automatically apply to its associated content types. This means any new documents created using that content type, as well as previously existing documents of that content type, will have these variables available.
-
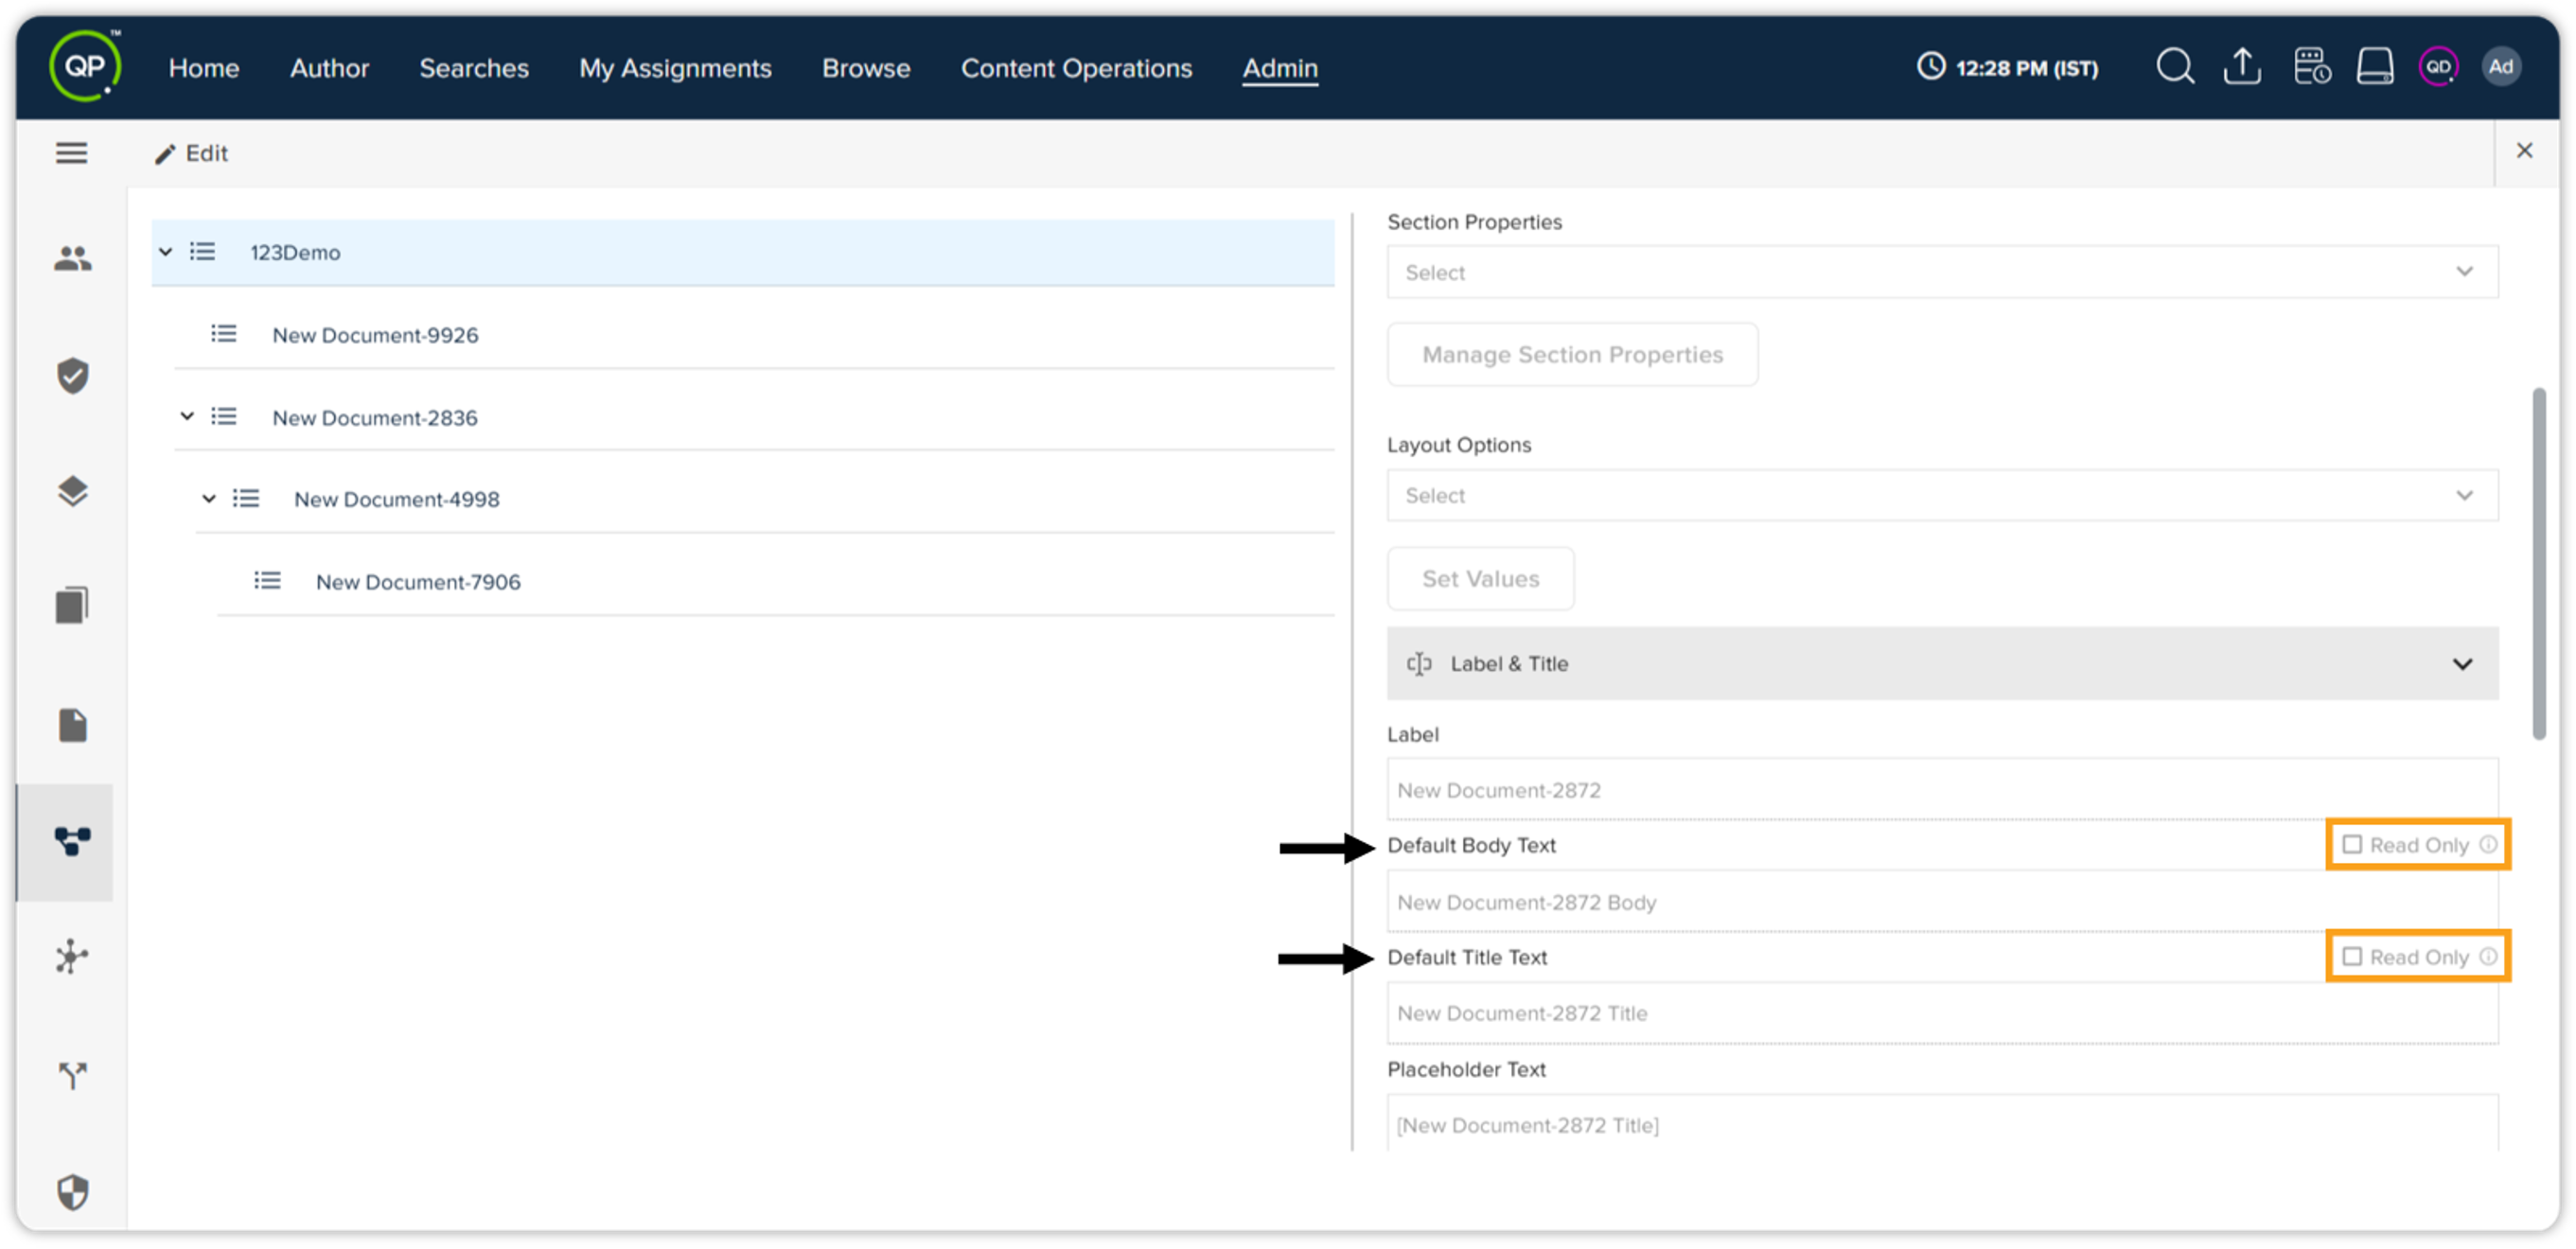
Label & Title: Under this field, you can define the default title, body, and placeholder text for the document. Also, you can designate specific sections like Default Body Text and Default Title Text as "read-only" while creating a new content model or editing an existing one. Click the checkboxes to lock these sections to prevent any modifications.
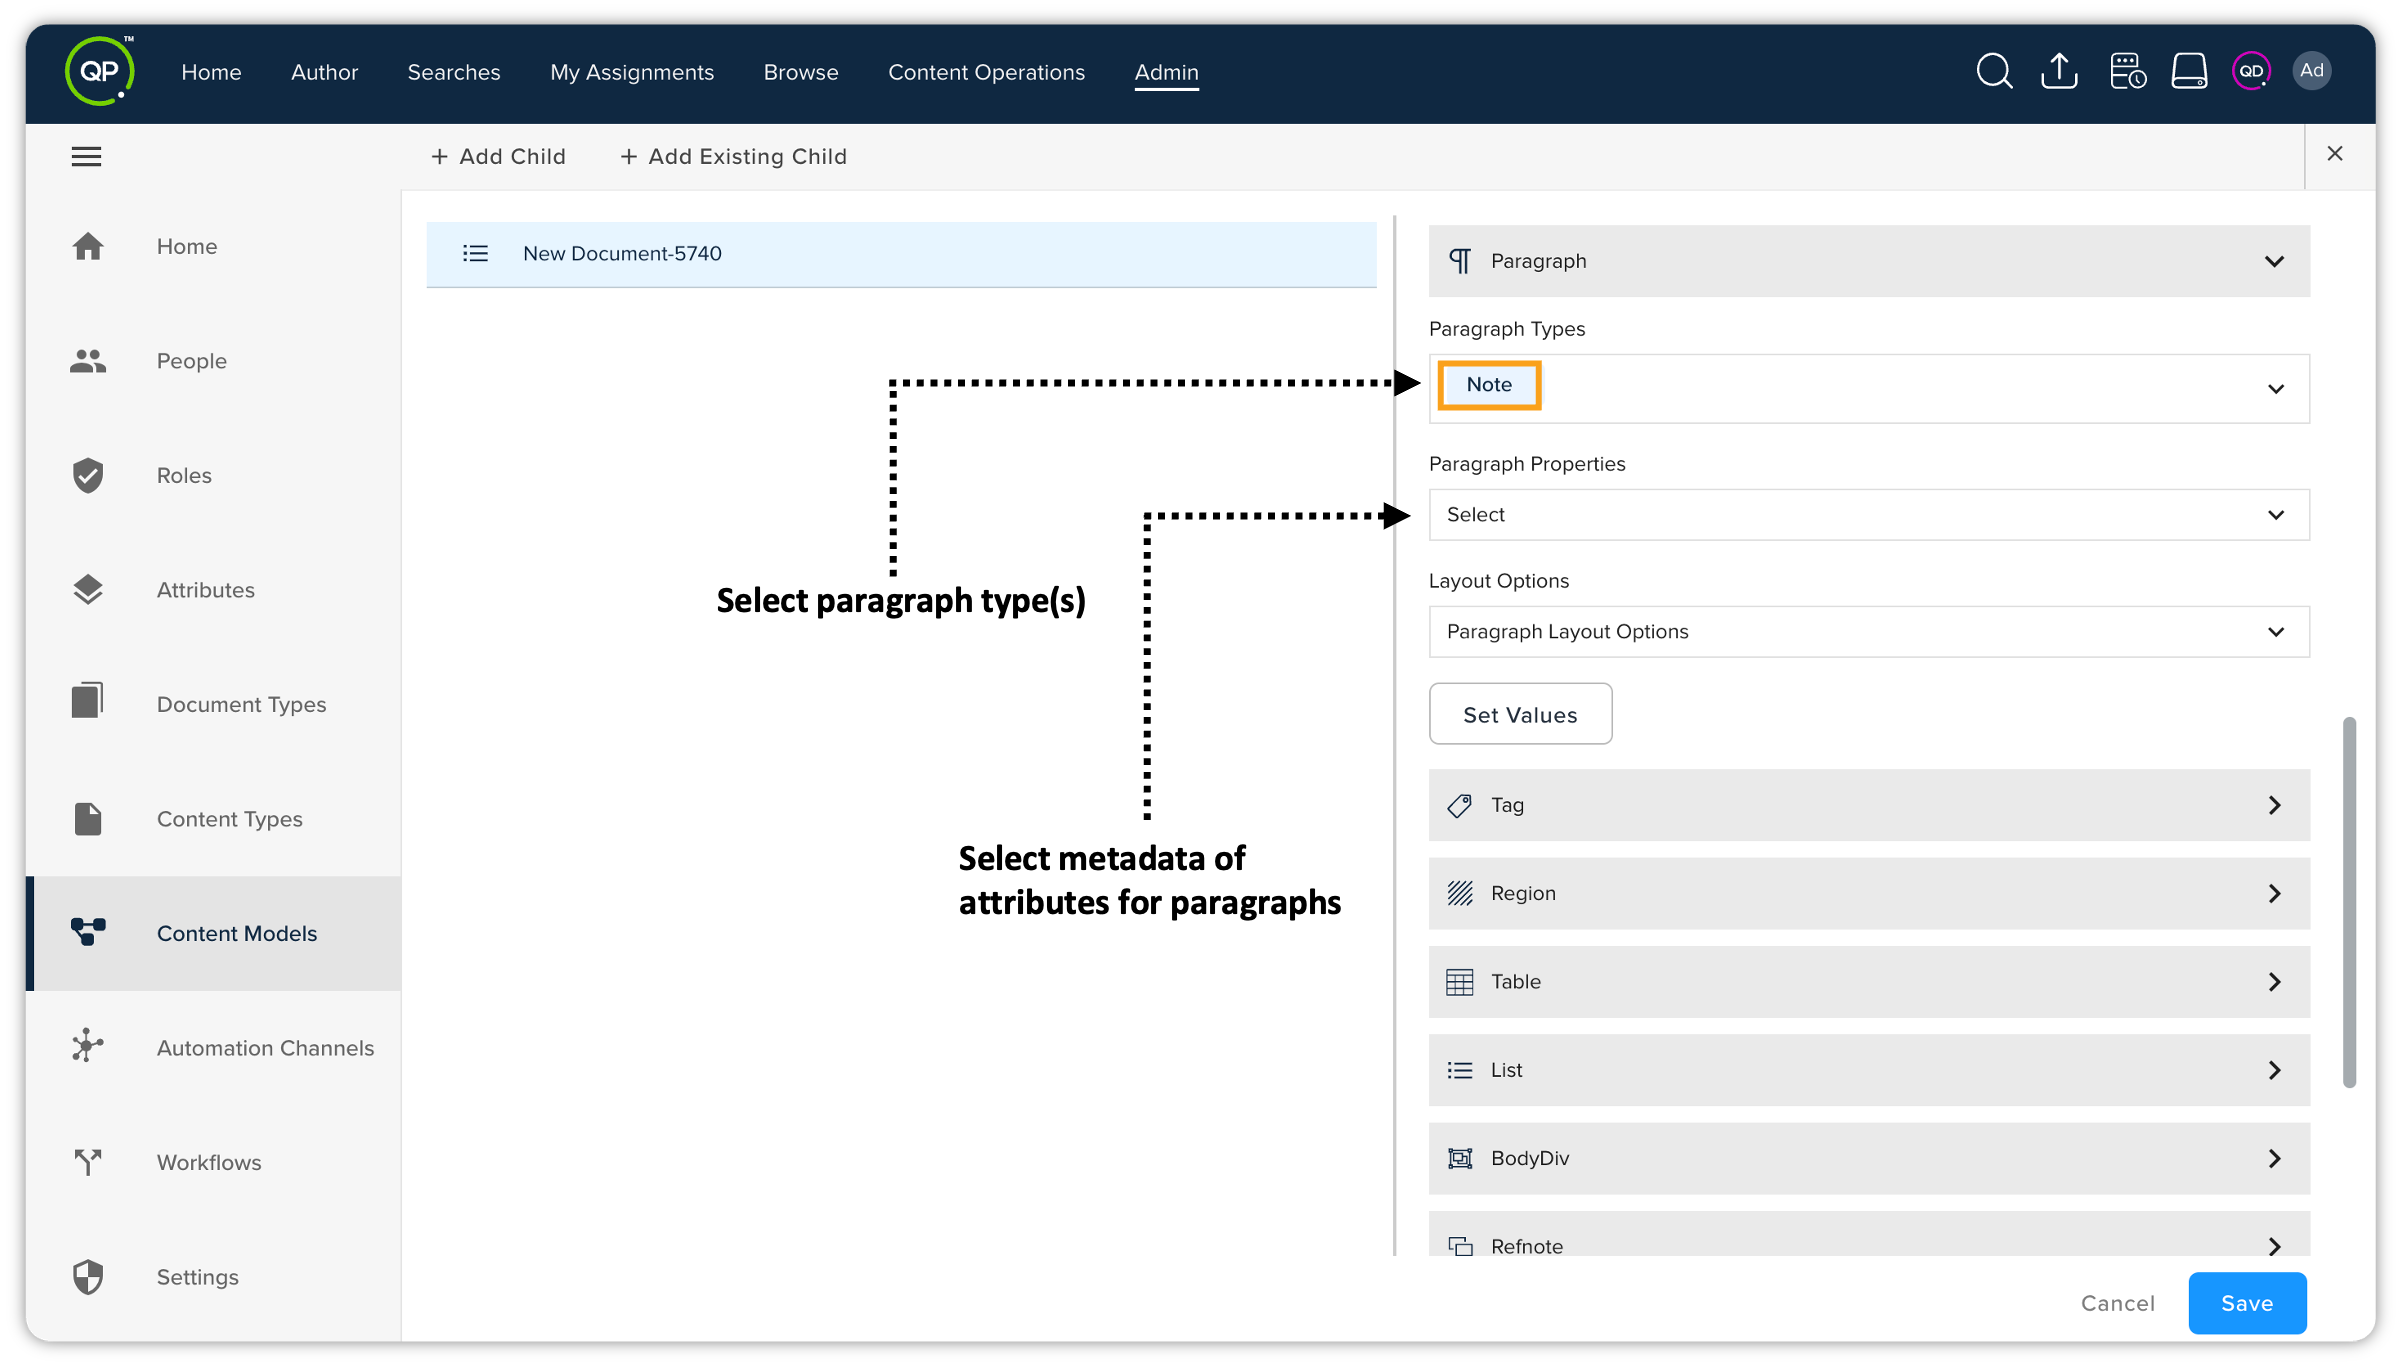
 The rest of the fields (Paragraph, Tag, Region, Table, and so on) are the building blocks of a document, which are available for all content models by default. For each of these building blocks, you can define a set of metadata, which is separate from the document. Additionally, based on the type of the building block, you can define other properties as well. For example, for paragraphs, apart from metadata, you can also define the type of paragraphs that you want to include in your content model.
-
-
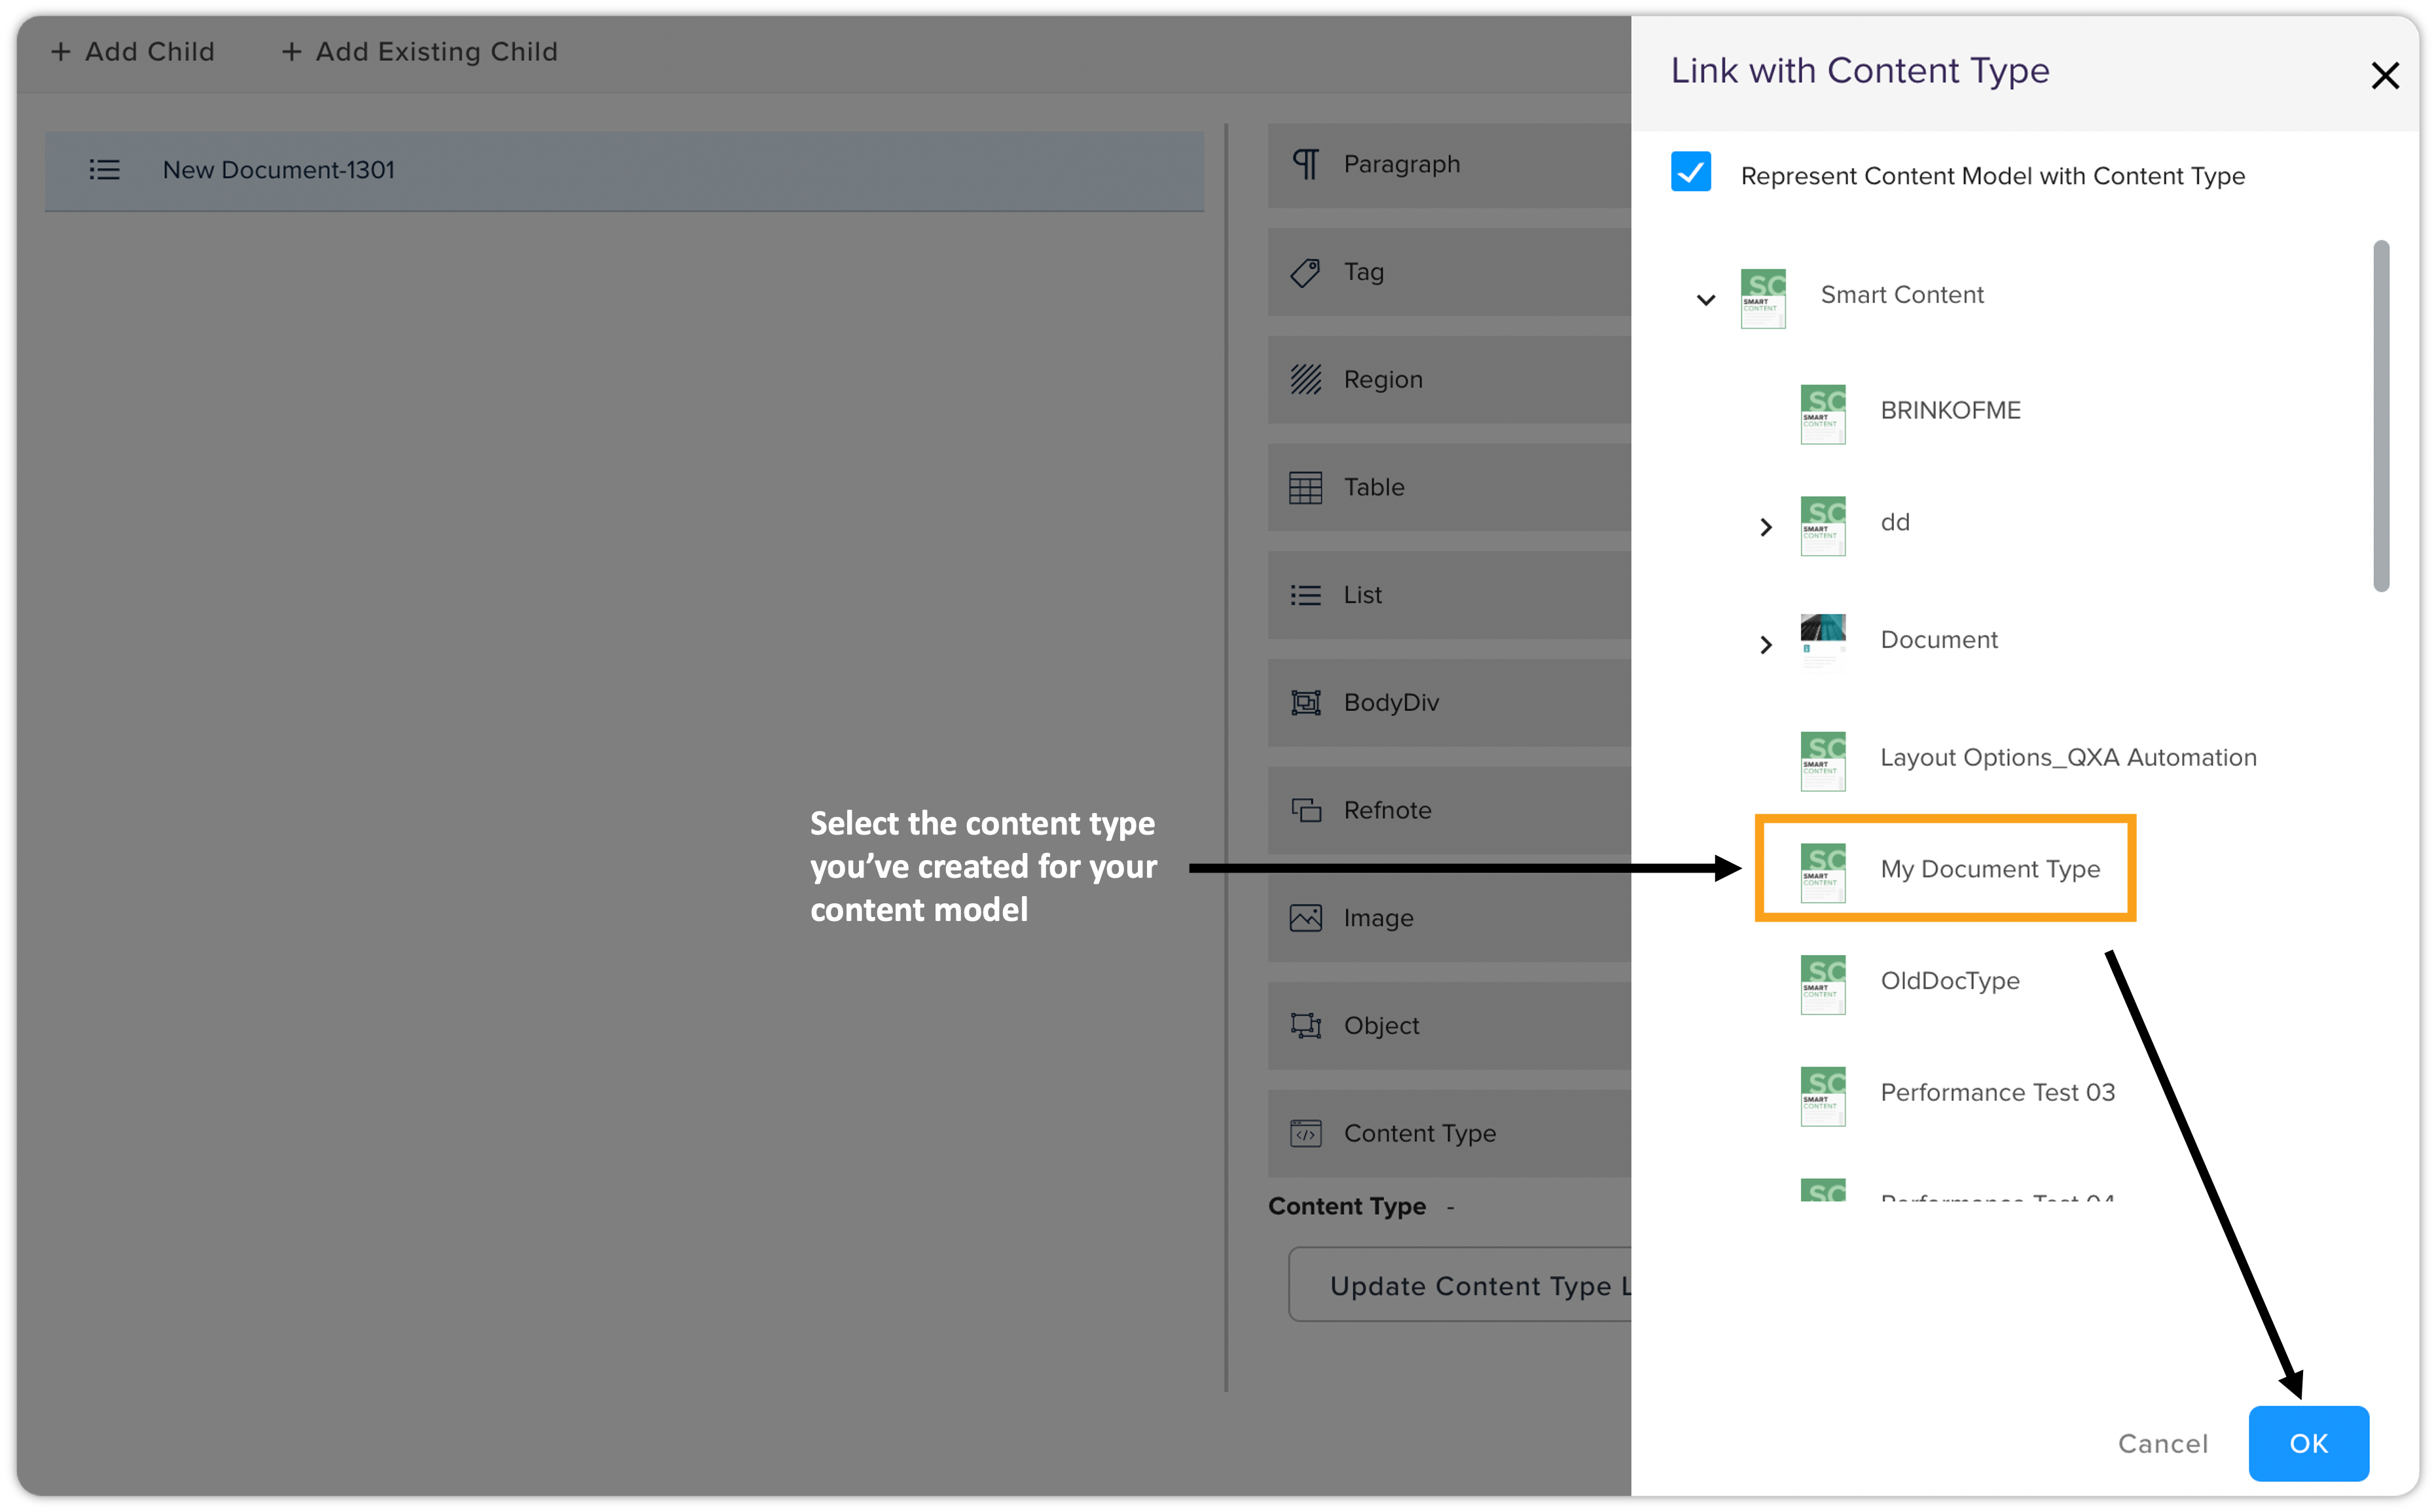
Scroll down to the Content Type option, and link the content model to a content type through the following steps:
-
Select the button Update Content Type Link to open the pane Link with Content Type.
-
In the pane Link with Content Type, select the checkbox Represent Content Model with Content Type to expand the list of content types.
-
Select a content type and then select the checkbox Create Content Type Under <selected content type>.
-
Click OK to close the pane.
-
-
Now click Save to save the content model.
You have the option to add structural sections as children to your content model. These sections can be added at two stages:
-
While creating the content model — during the initial setup.
-
After the content model is saved — you can still add structural sections later, even after it already exists.
Add Structural Sections to your Content Model
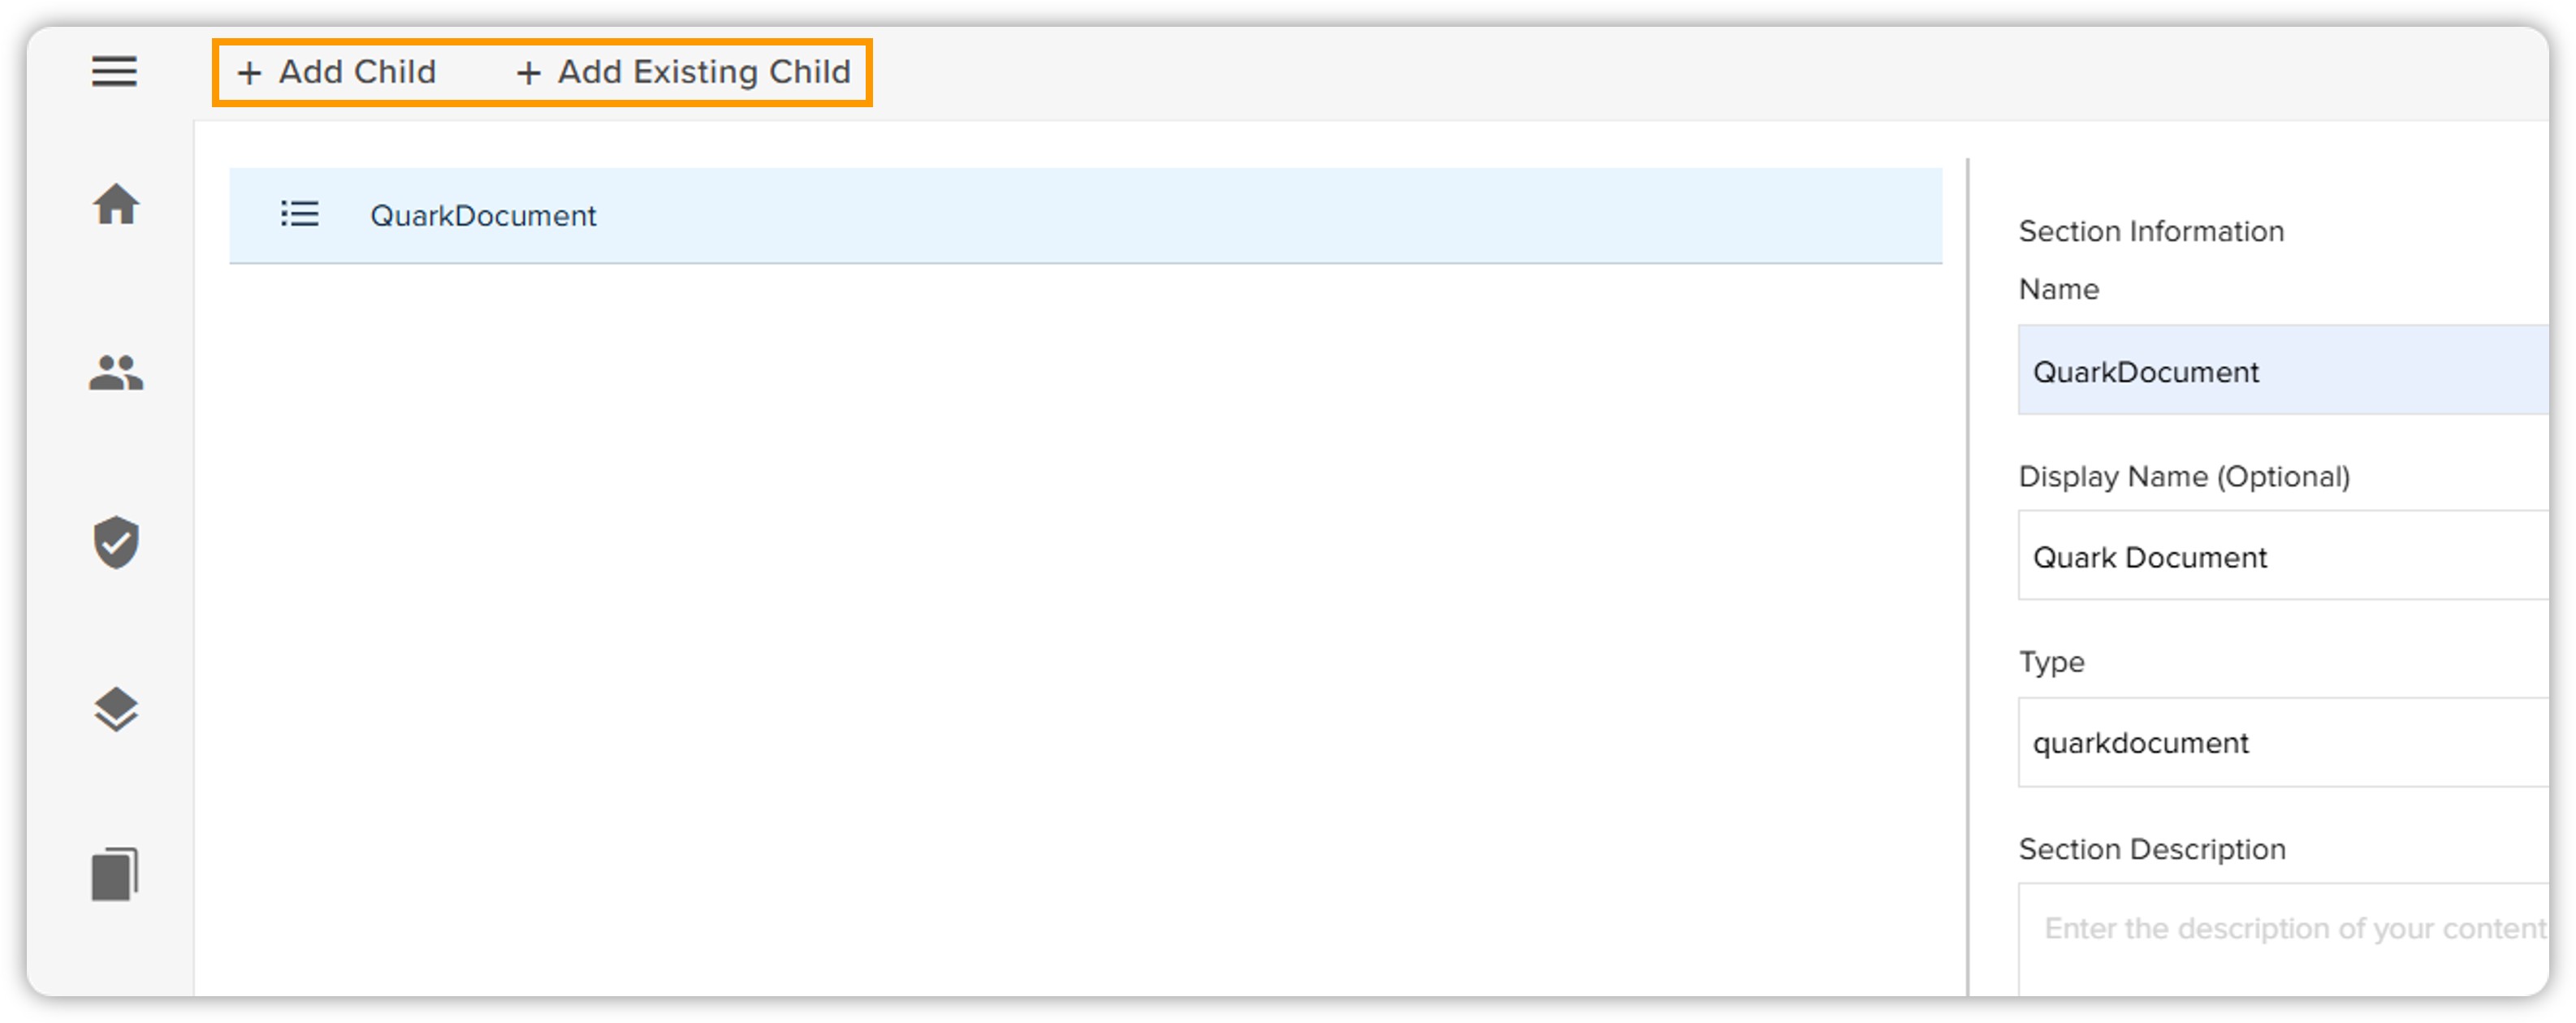
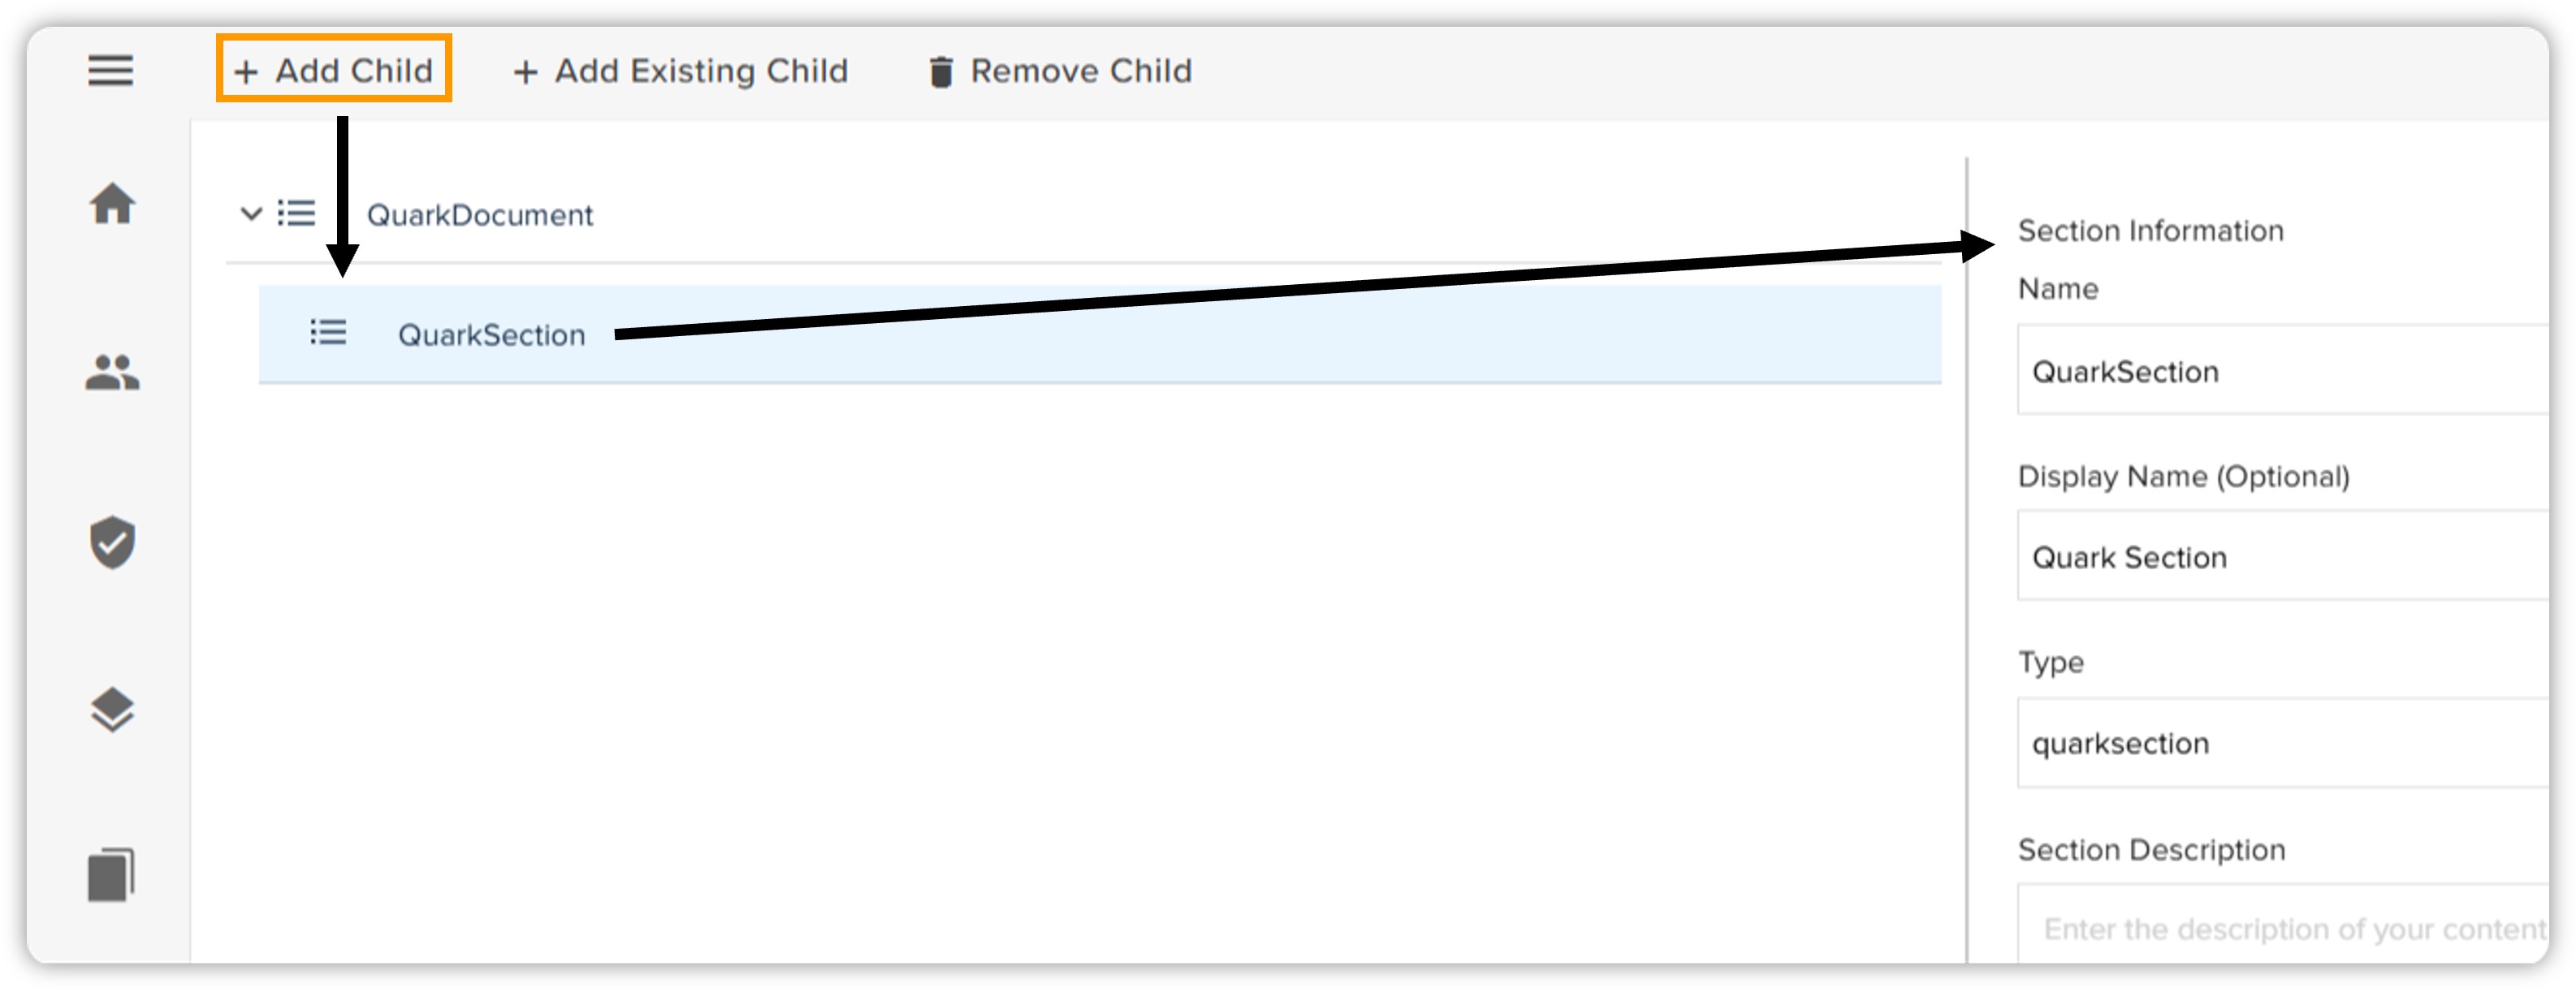
You can add the structural sections as children of your model from the top bar action. There are two options: Add Child and Add Existing Child.
-
This option allows you to add a new child to your content model.
-
Just click the option and a new child will be added, and then you need provide the section information for this child, as you've provided for your content model earlier.
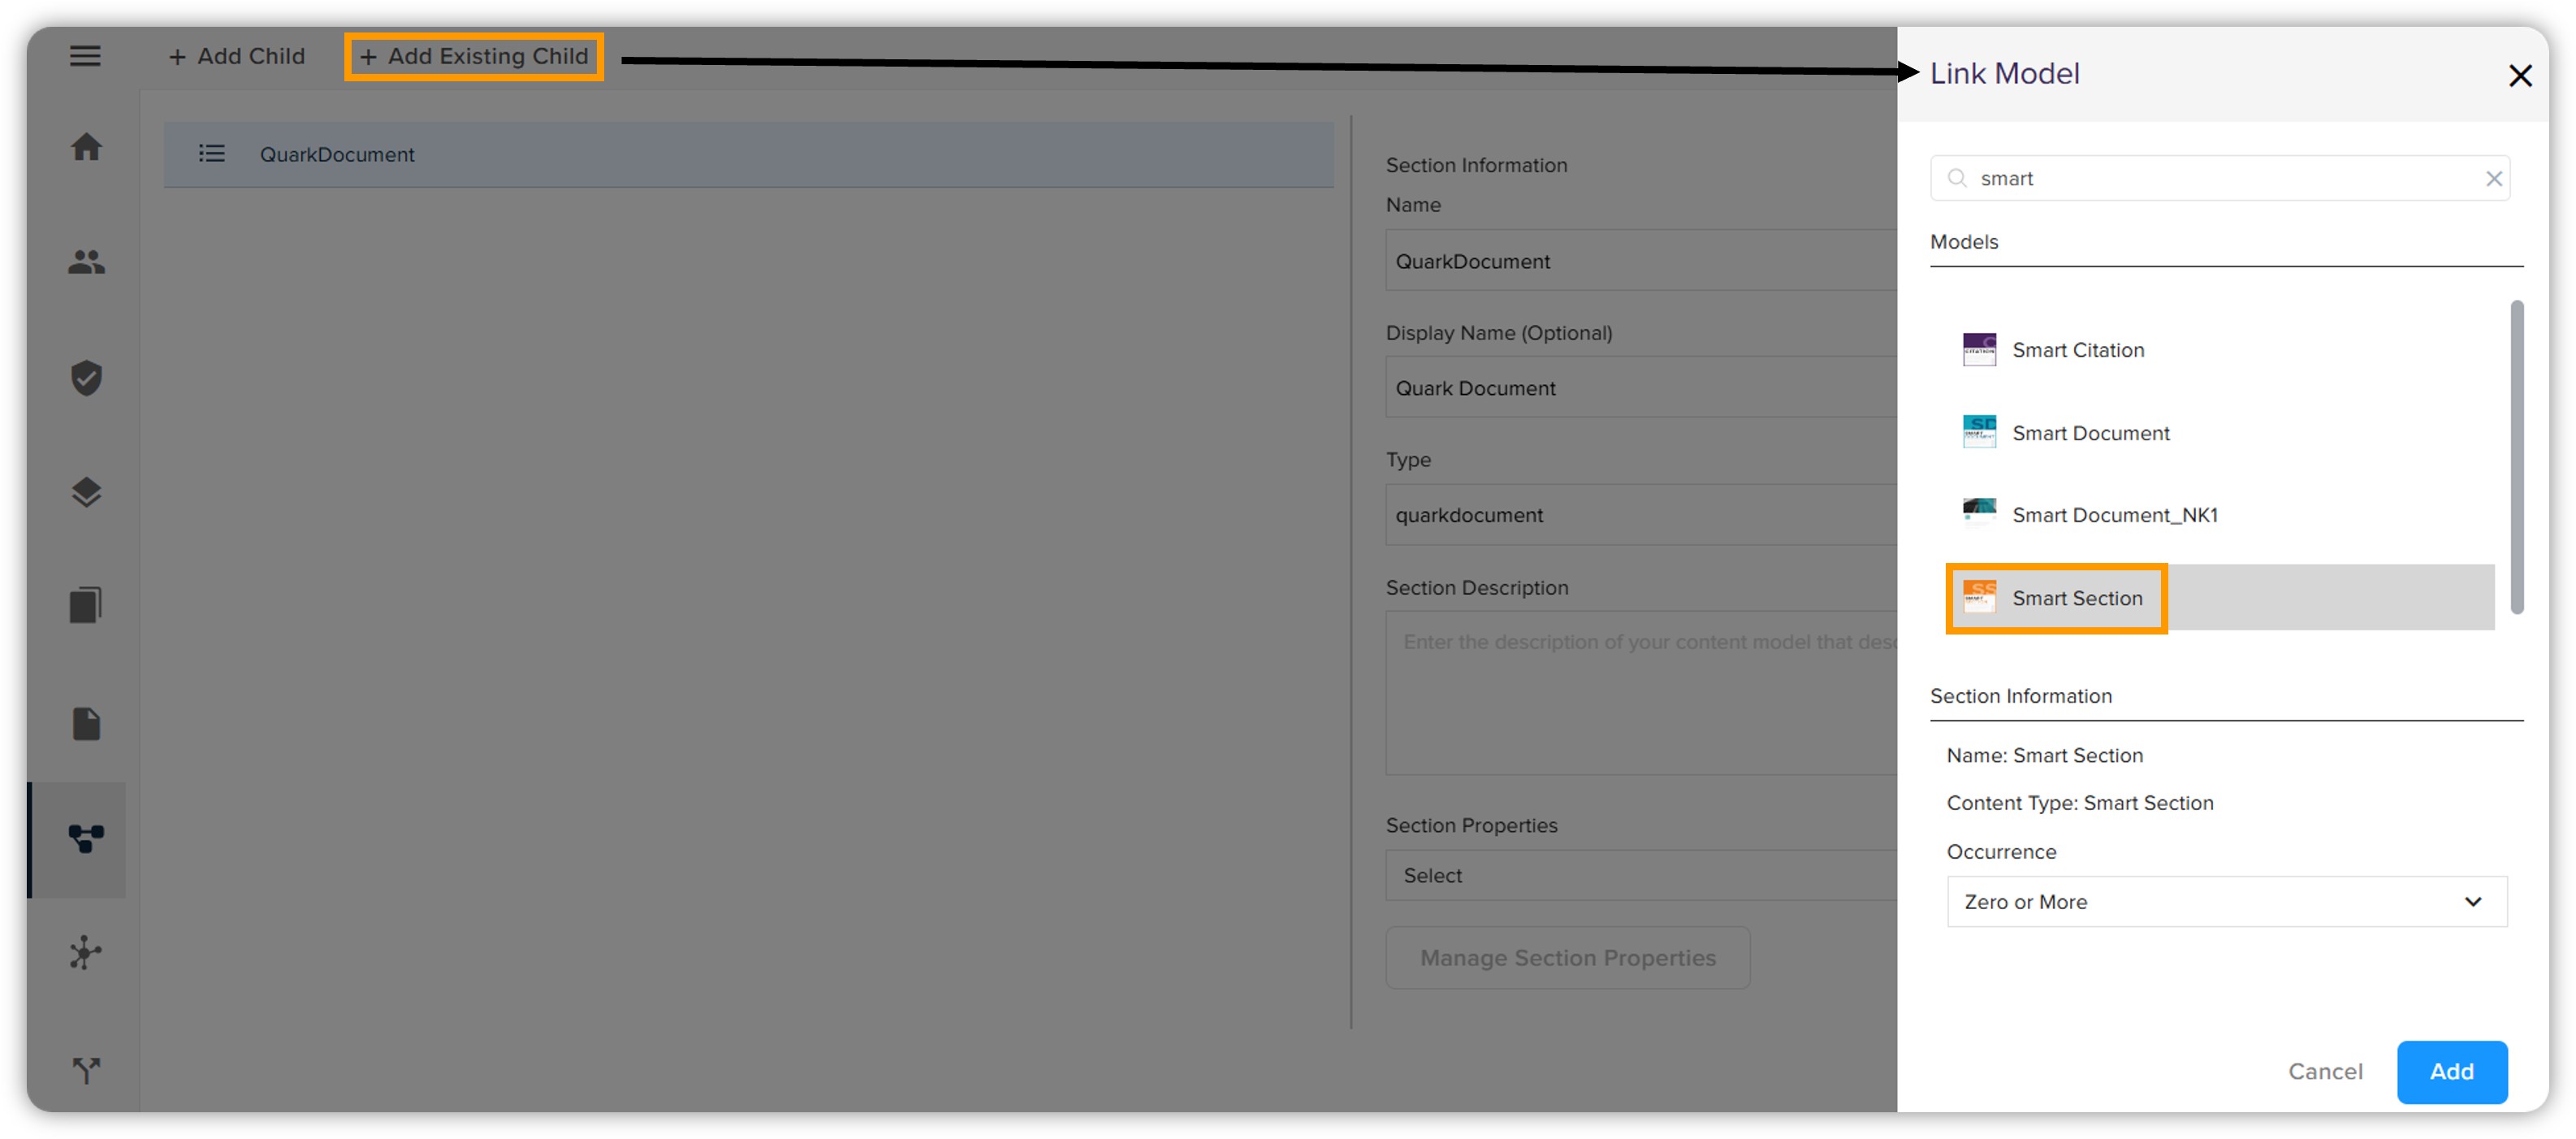
-
This option allows you to link a model to your content model as a child.
-
You can choose from the OOTB models or the ones you have created. Let's add the Smart Section model here.
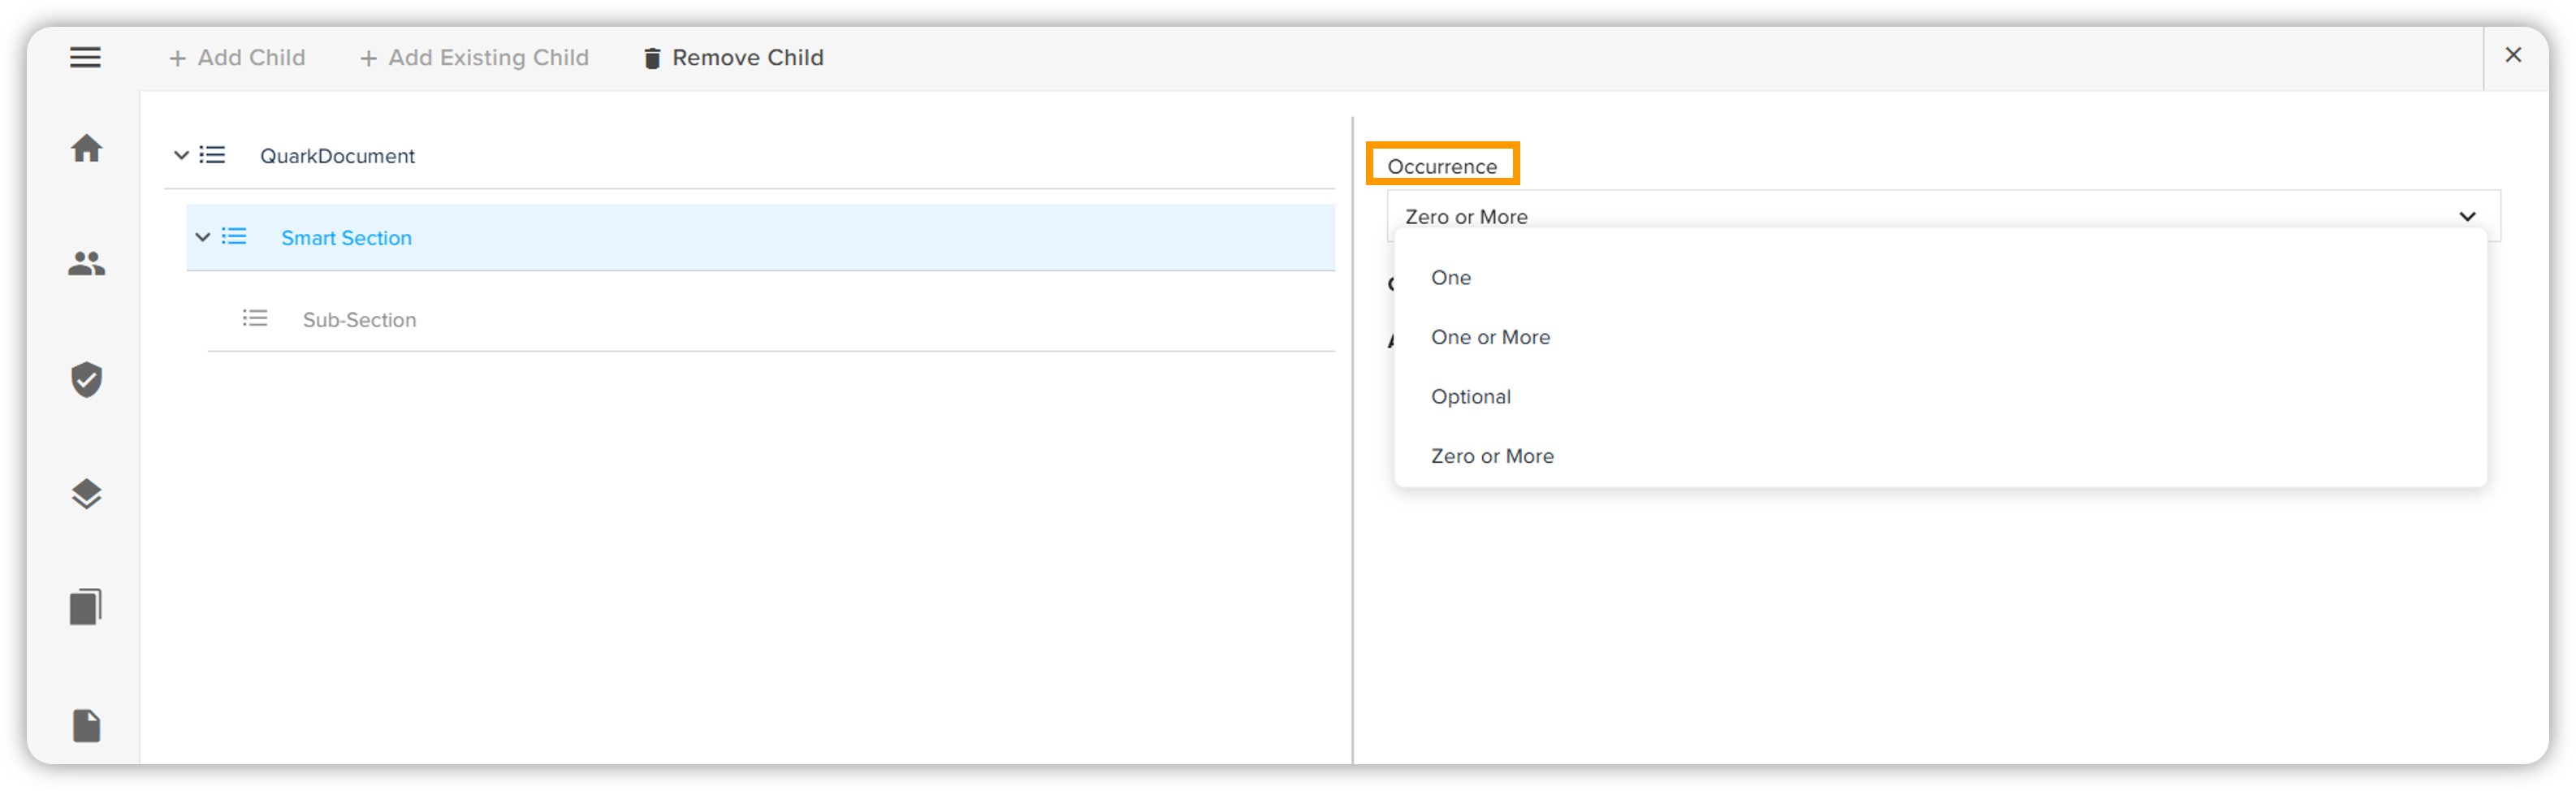
-
The model is successfully added to your content model.
-
On the right side of the window, you will see the Occurrence option in which you can define how many times the section can appear in the structure.
-
The Auto Burst On Save option automatically transforms inline sections into reusable content components whenever you save a document. Toggle the switch to the right to enable the Auto Burst On Save option.
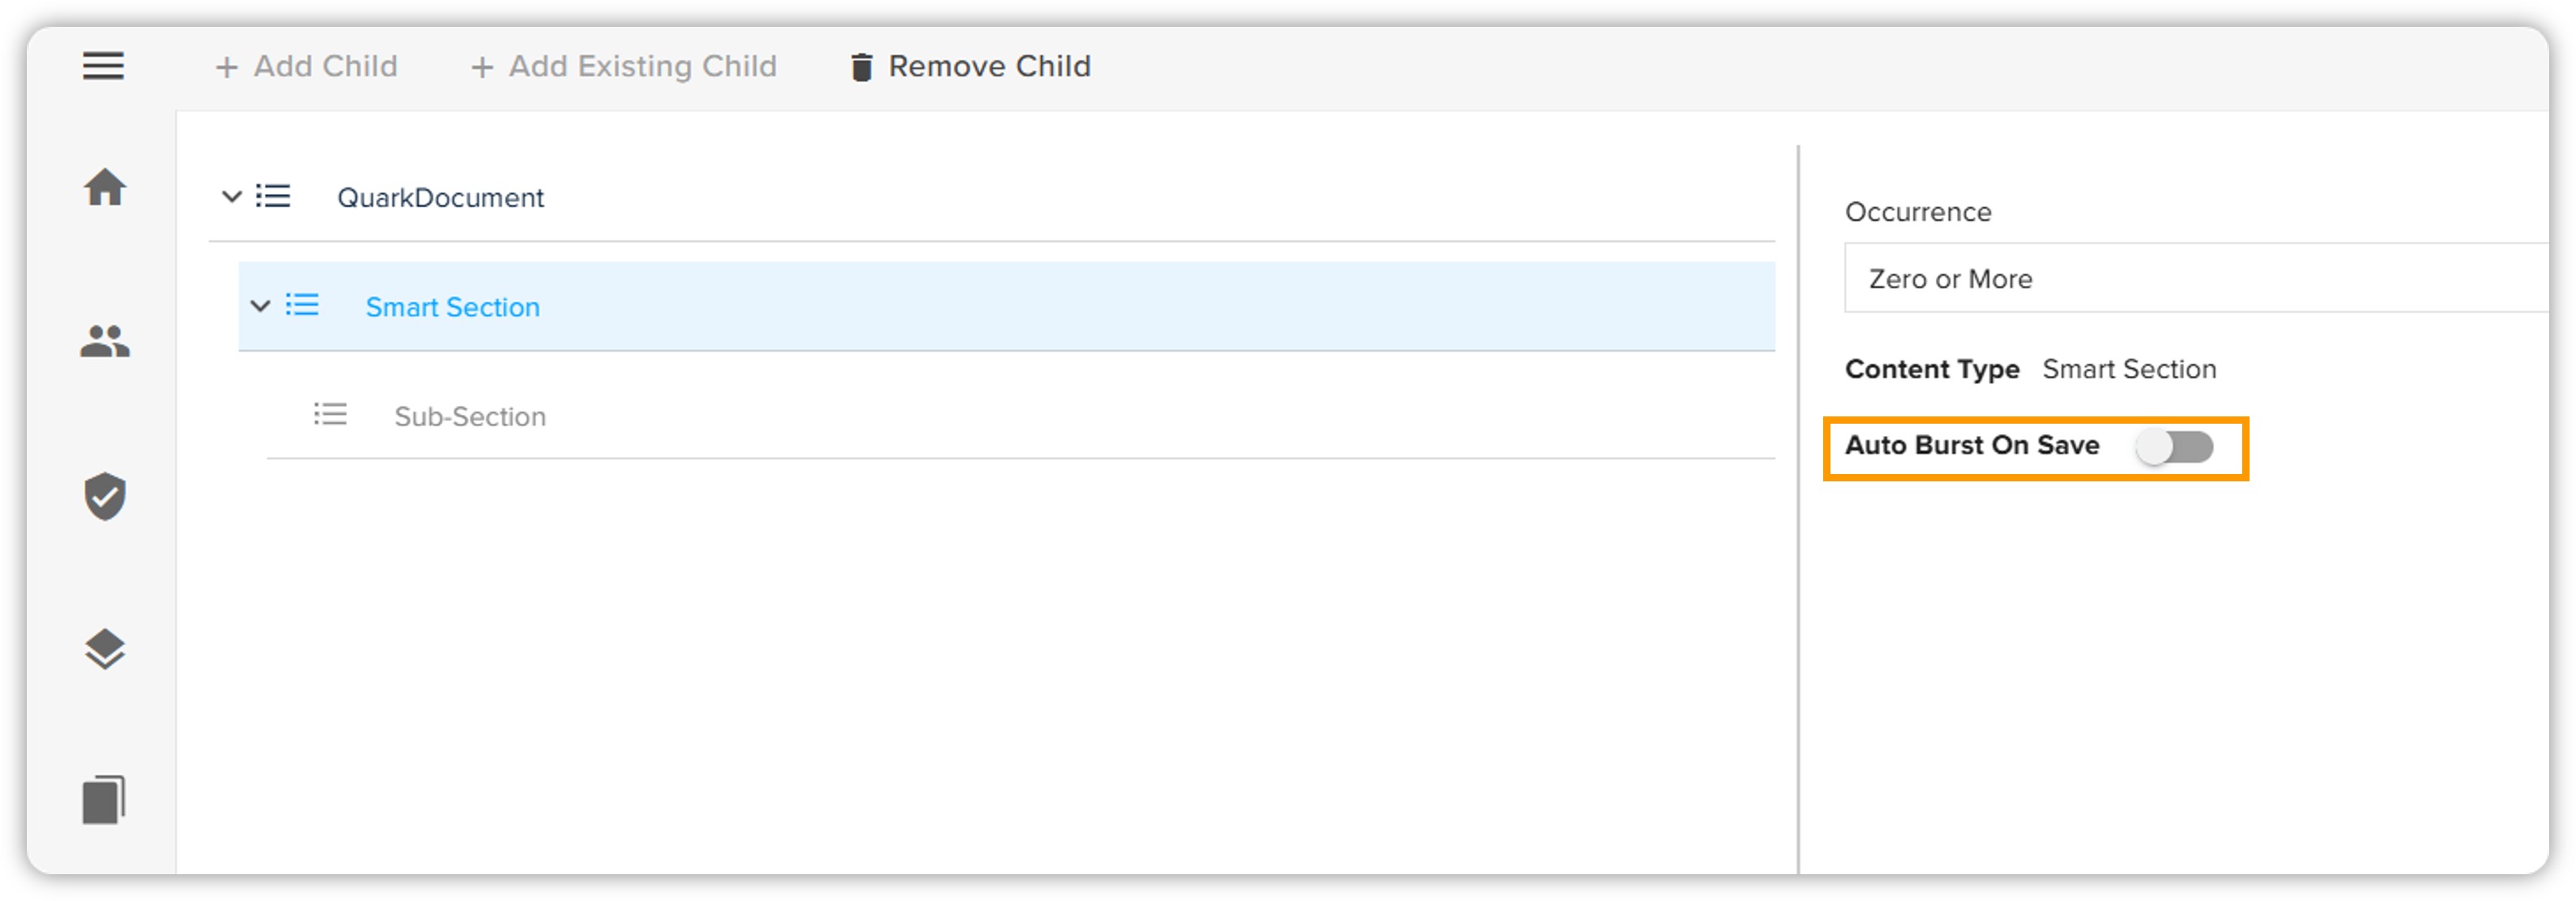
Additionally, you can also delete a child you have added through the button Remove Child.
Manage Section Properties
The Manage Section Properties option feature empowers administrators to control the visibility and requirements of metadata fields within content models, providing an easy method to protect sensitive information directly through the user interface.
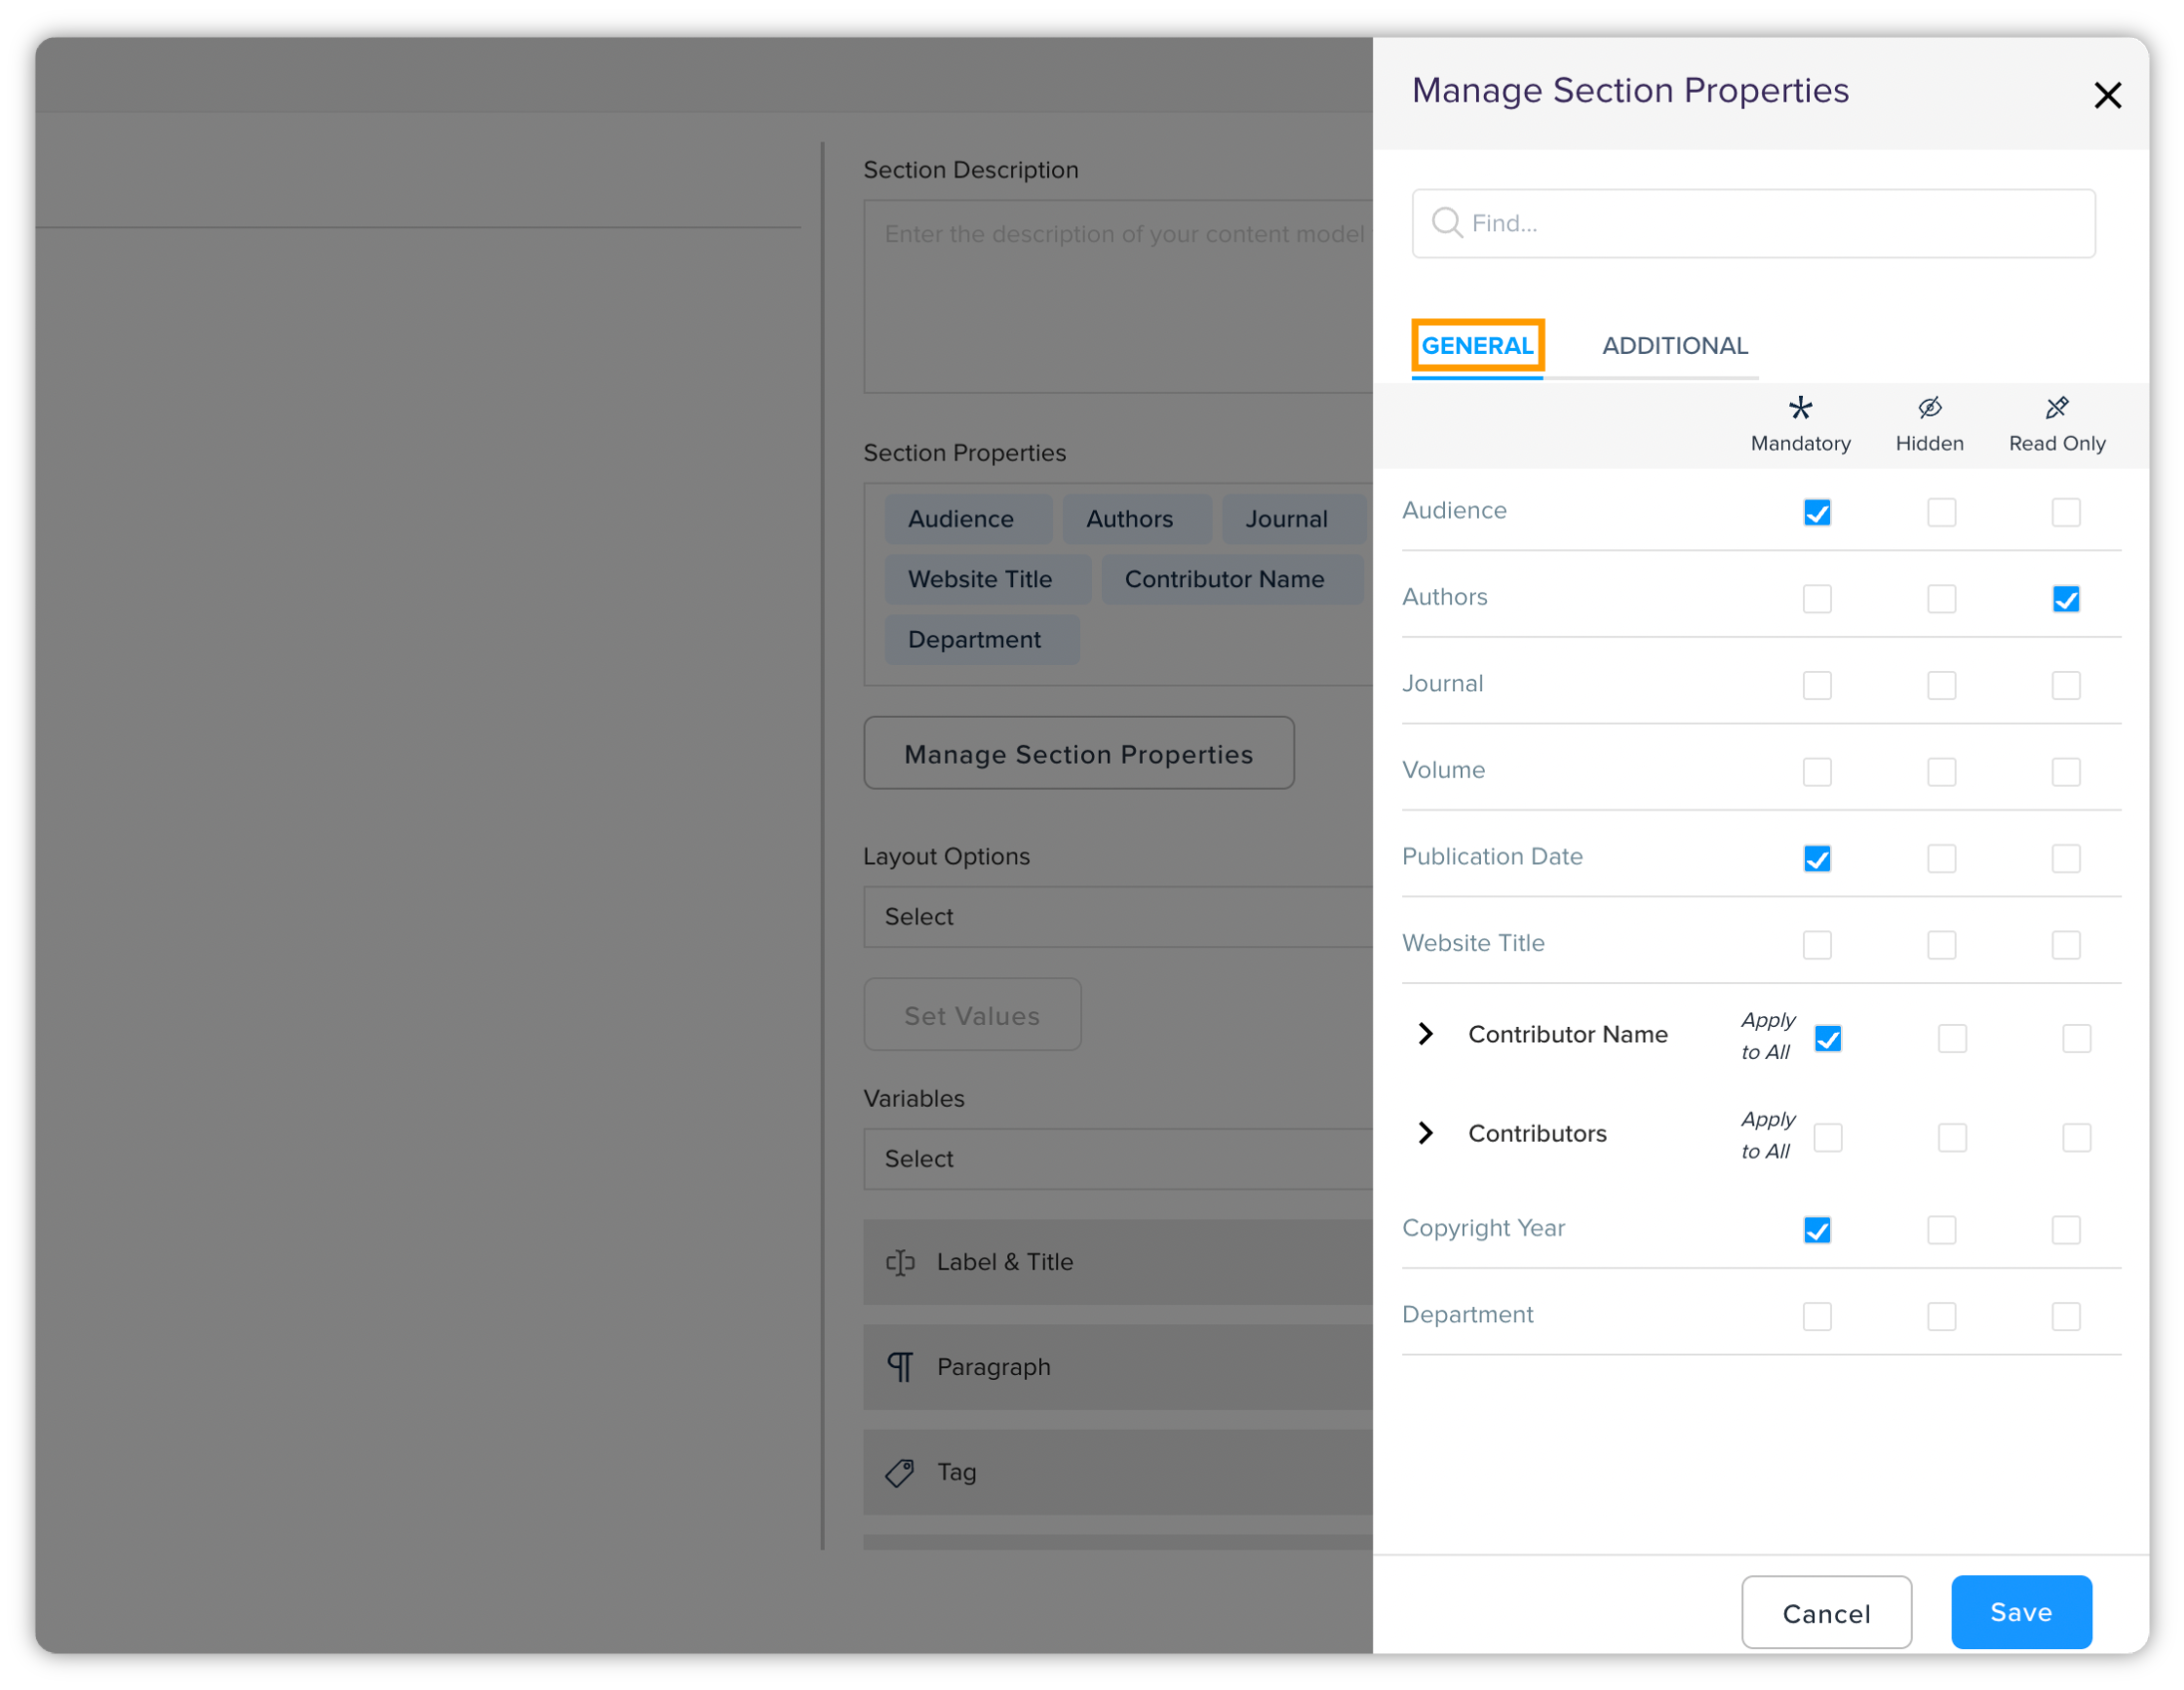
Upon clicking Manage Section Properties, a new pane will be opened presenting two tabs: General and Additional.
Here you can manage your section properties in the following ways:
-
Mandatory: Select this option to ensure that the field is required for users to complete before saving the document.
-
Hidden: Choose this option to prevent the field from being displayed to users, thereby protecting any sensitive information contained within.
-
Read Only: Use this option to allow users to view the content of the field without enabling them to make any changes.
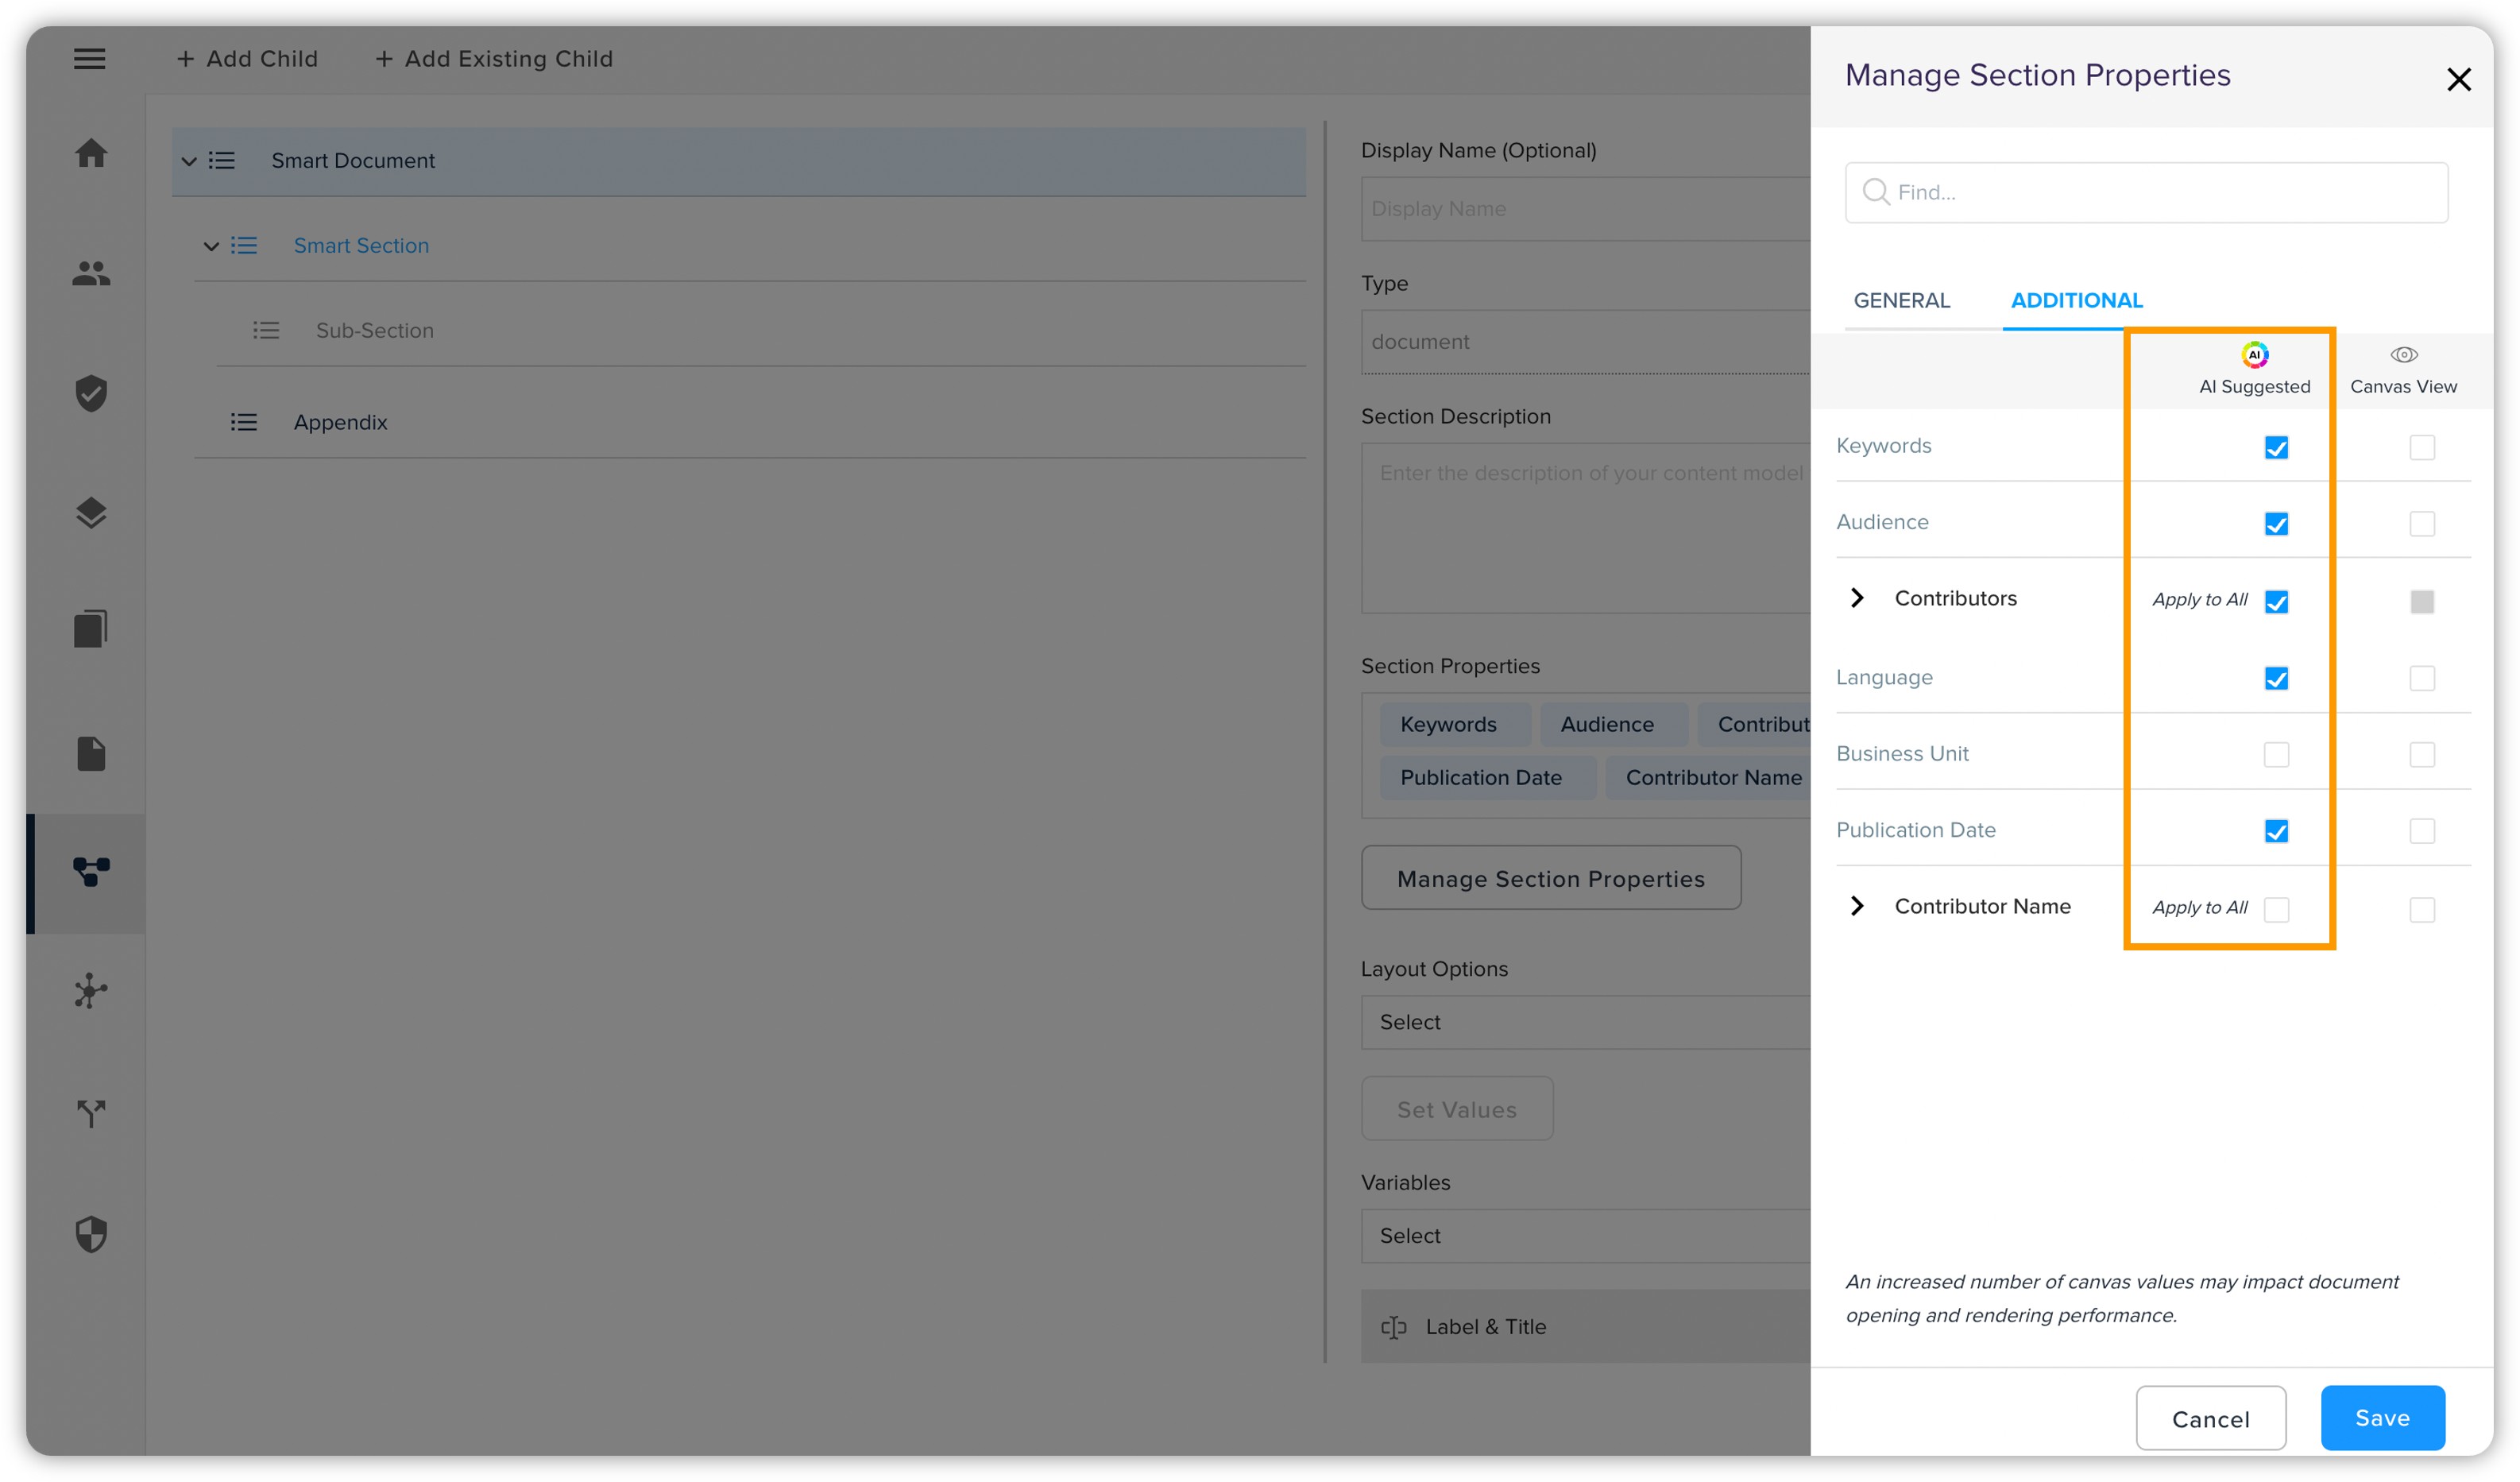
In this tab, you will find a list of section properties with two options: AI Suggested and Canvas View.
-
AI Suggested: To designate a property to be filled by AI or an automated conversion process, simply check the box next to its name. Saving your changes will ensure that integrated AI systems or conversion processes recognize and act on these designated properties, streamlining your content creation workflows.
-
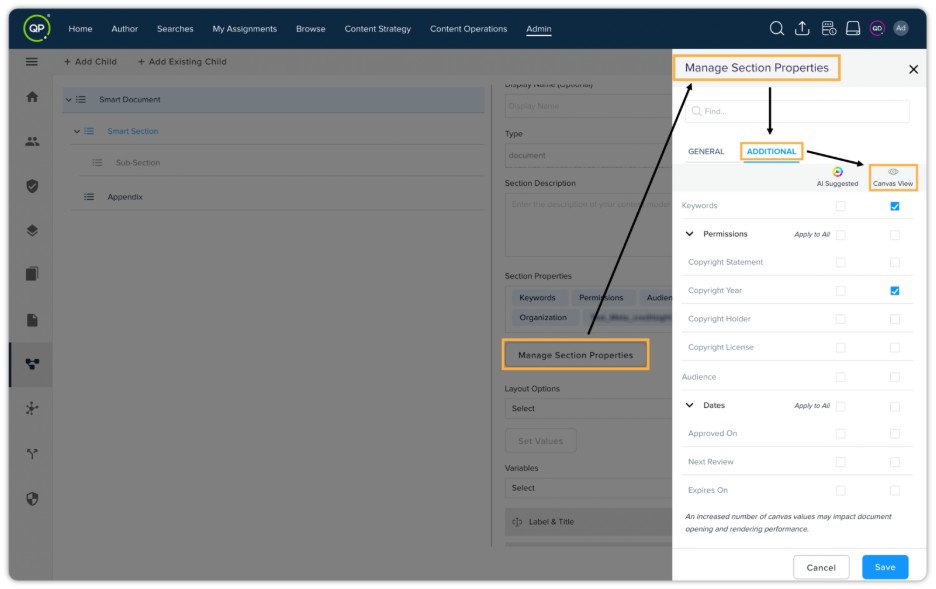
Canvas View: You can choose which section properties or metadata attributes should be visible directly in the editor canvas. This helps you reference key information while authoring or editing content, without leaving your workflow.
-
On the Manage Section Properties pane, go to the Additional tab.
-
Next to each property, you'll see a Canvas View checkbox.
-
Check the box for each property you want to make visible directly in the editor canvas.
-
You can enable or disable Canvas View individually for every available section property.
-
Click Save.
After saving your configuration, the selected properties will appear upfront in the editor canvas of Quark Author.
Add a Citation Model
QPP provides support for the following commonly used citation types:
-
Journal Article
-
Personal Communication
-
Web Page
-
Government Document
-
Press Release
-
Conference Proceedings
This allows you to seamlessly import citations from other sources to a QPP Server repository. However, if your documents contain a citation other than the above-mentioned citation types, QPP also allows you to add a new citation type in the same way you add a content model.
To add a new citation model:
-
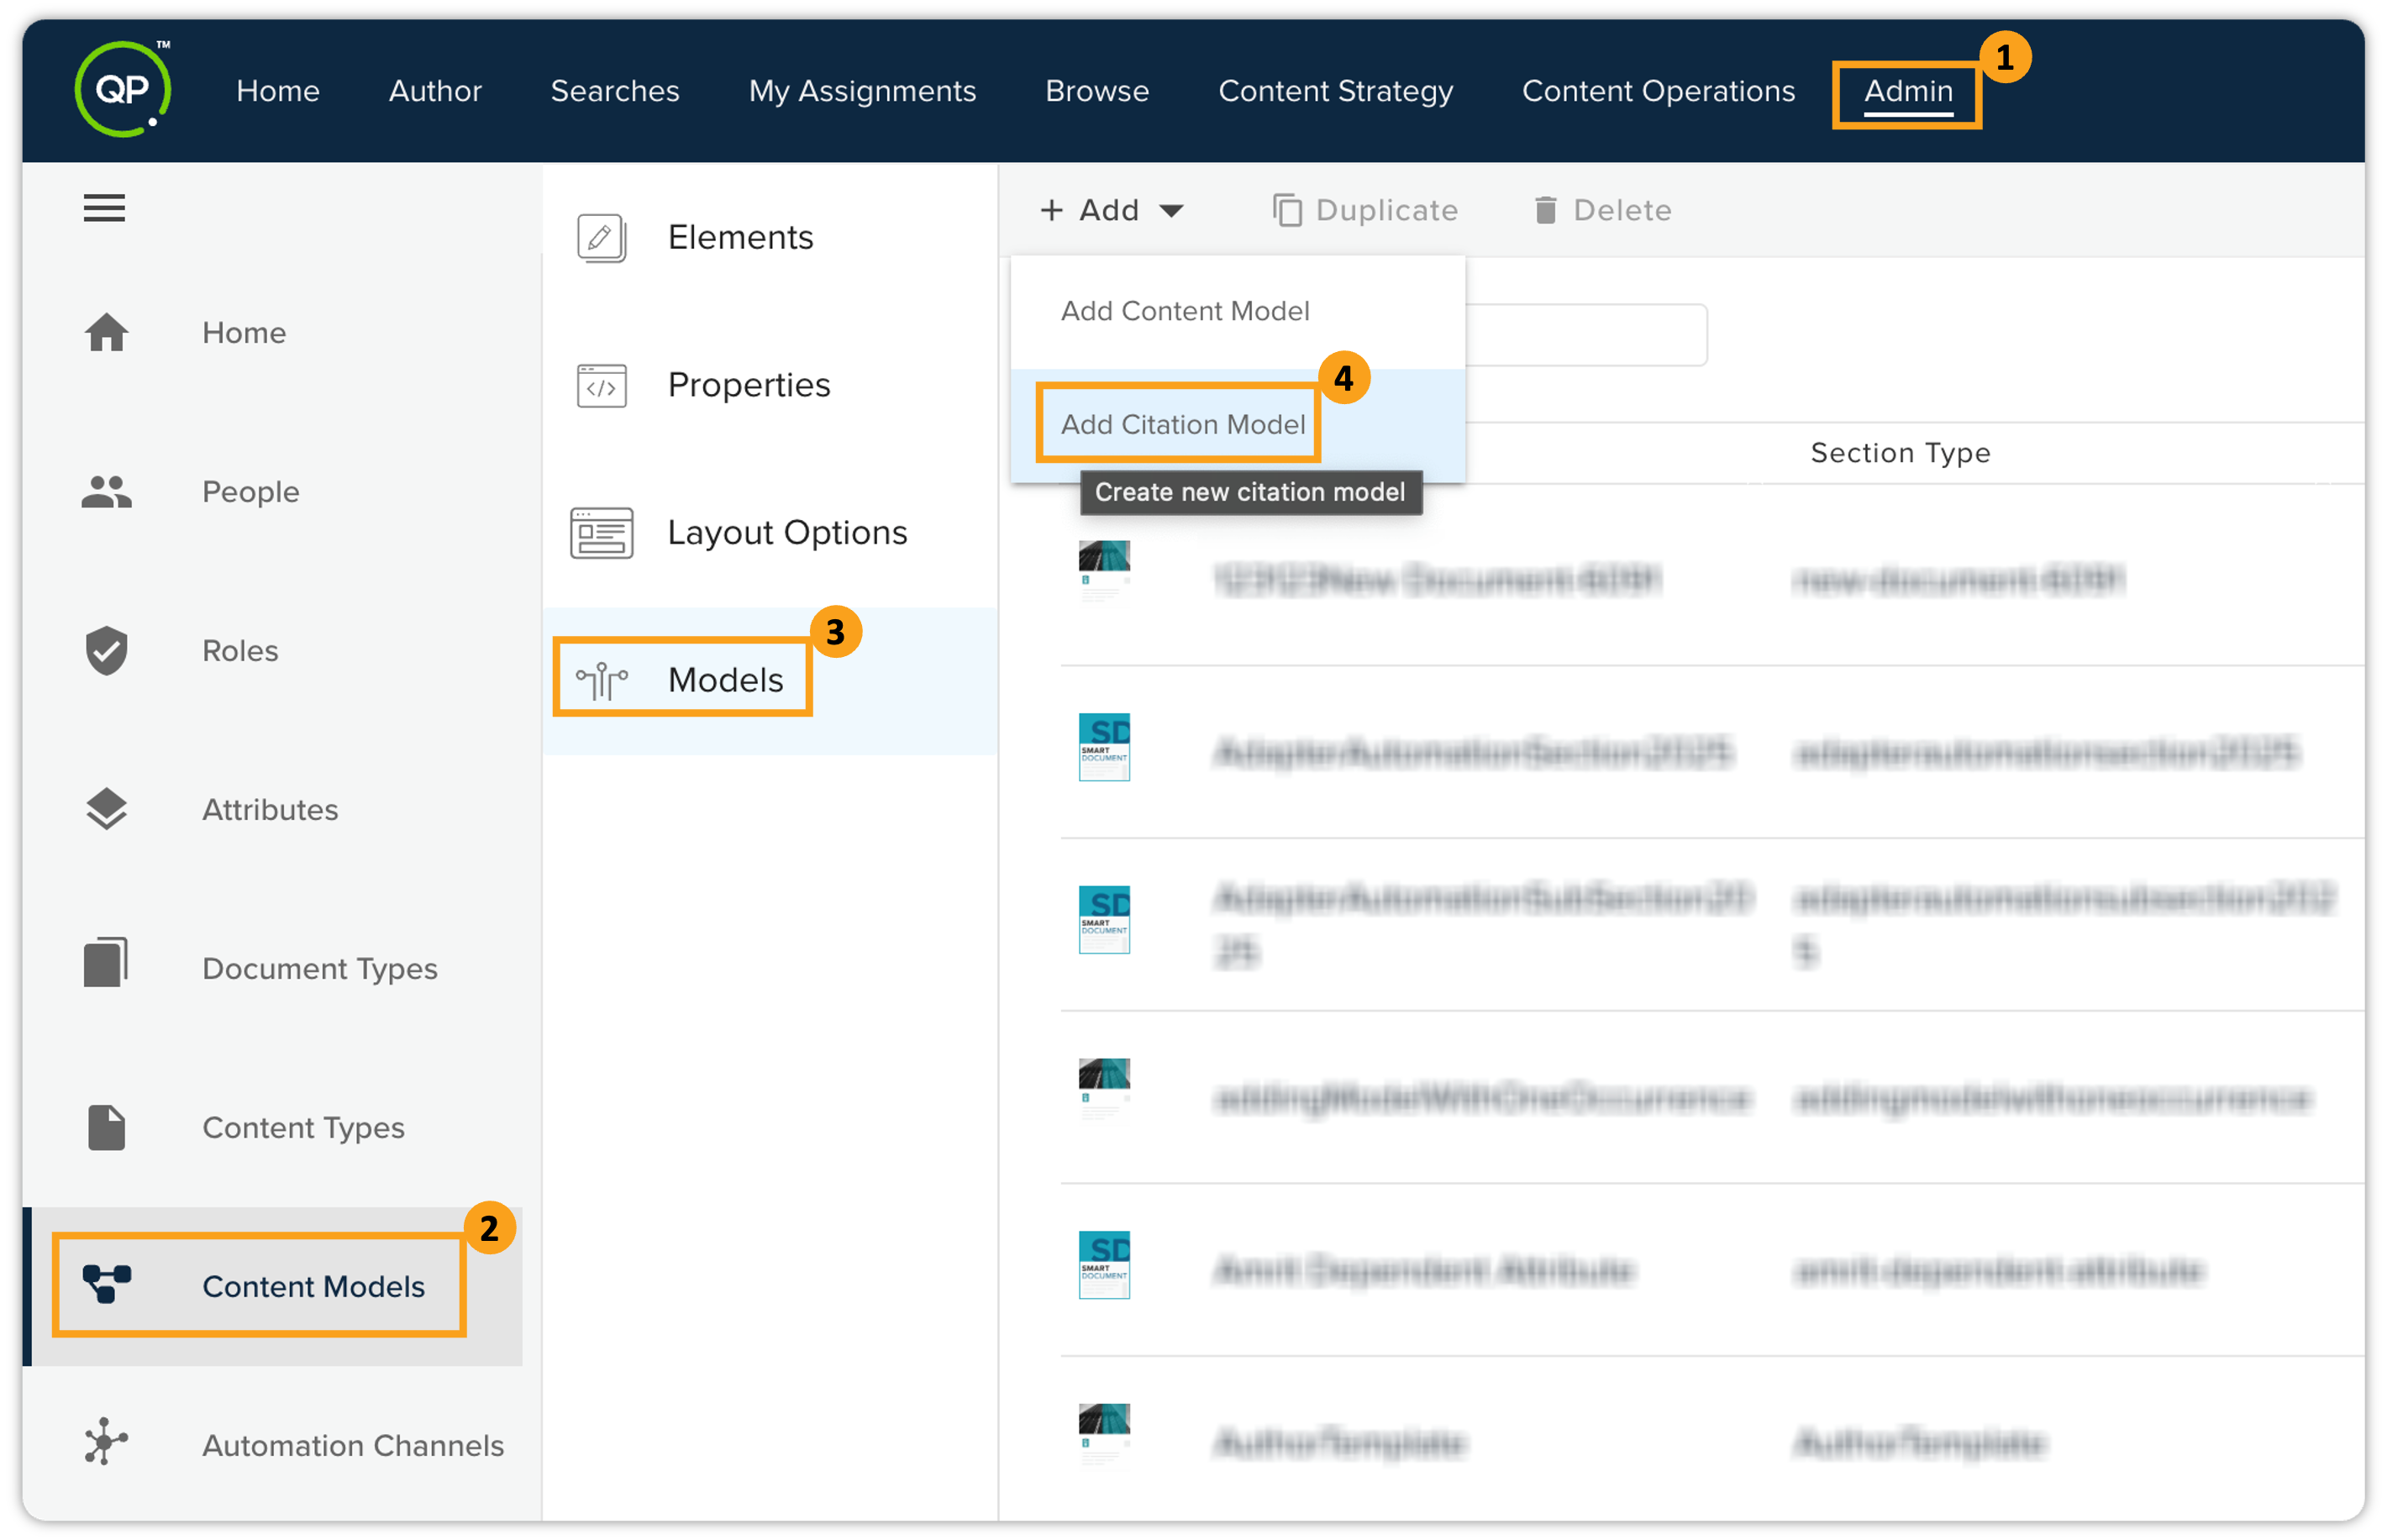
Go to the Admin tab > Content Models > Models.
-
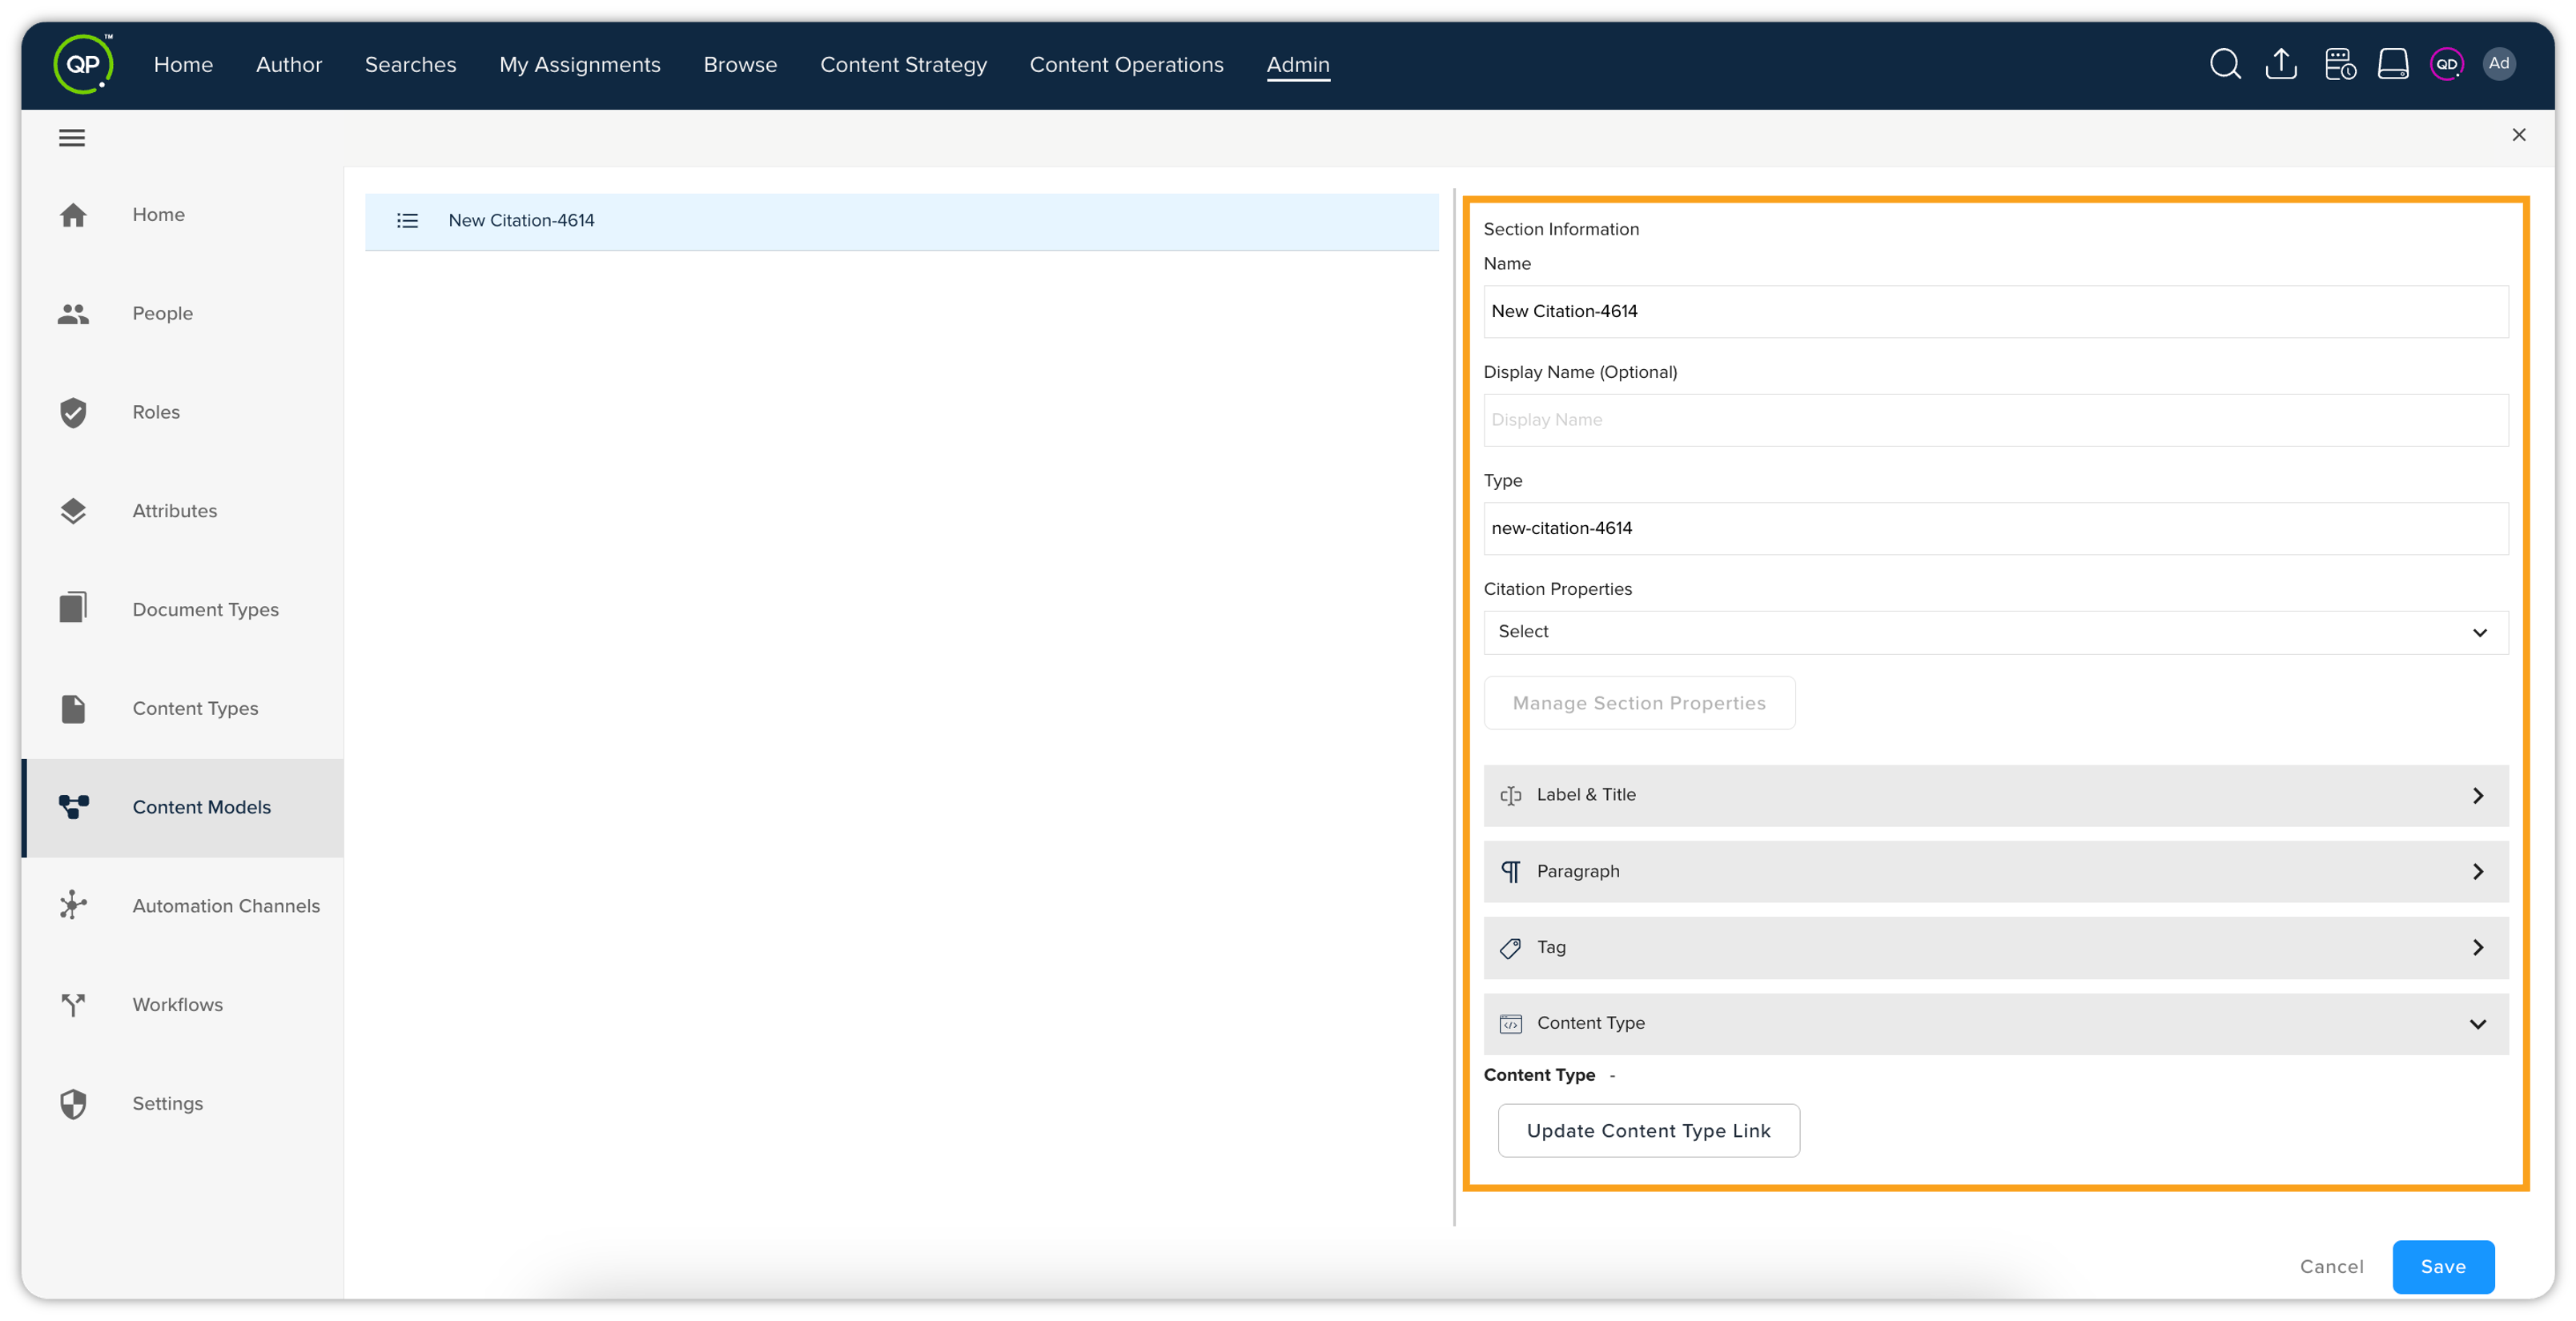
Then click + Add button in the top bar actions, and then select the option Add Citation Model to open the third pane in which you can create a new content model.
-
In the third pane, that appears on the left side of the window, enter the following information to create a new citation model.
-
Name: The citation model name.
-
Display Name: If you want to display a different name for the citation model on the user interface.
-
Type: QPP automatically generates a value for this field based on the value you provide in the field Name. QPP uses this value instead of the name to refer to a citation model at the back end.
-
Section Properties: Metadata (for example, Creation Date, Modification Date, Business Unit, Authors, and so on) for the citations based on the citation model.
-
Label & Title: Define the default title, body, and placeholder text for the citation.
-
Paragraph: Define the type of paragraphs that you want to include in your citation model and the metadata you want to use with the paragraph.
-
Tag: Select a tag type.
-
-
Link the citation model to a content type through the following steps:
-
Select the button Update Content Type Link to open the pane Link with Content Type.
-
In the pane Link with Content Type, select the checkbox Represent Content Model with Content Type to expand the list of content types.
-
Select a citation content type and then select the checkbox Create Content Type Under <Selected content type>.
-
Select the button OK to close the pane Link with Content Type.
-
-
After providing all the details, click Save.
Automation Channels
The Automation Channels page allows you to add and manage automation channels on your QPP Server. Automation channels automate the process of content publishing, content delivery, and content management.
There are three types of automation channels that you can define and manage:
-
Publishing Channels: PDF, HTML, JPEG, or any other file format in which you want to publish your content.
-
Delivery Channels: Email, FTP server, or any other means through which you want to deliver your content.
-
Data Doc: Data Doc channels extract a specific type of elements from a file into a specific format; for example, extract a specific sheet in an Excel file as a PNG. You can automate processes related to a Data Doc channel through scripts. For example, you can automate the process to generate PNG of a specific Excel sheet every 24 hours.
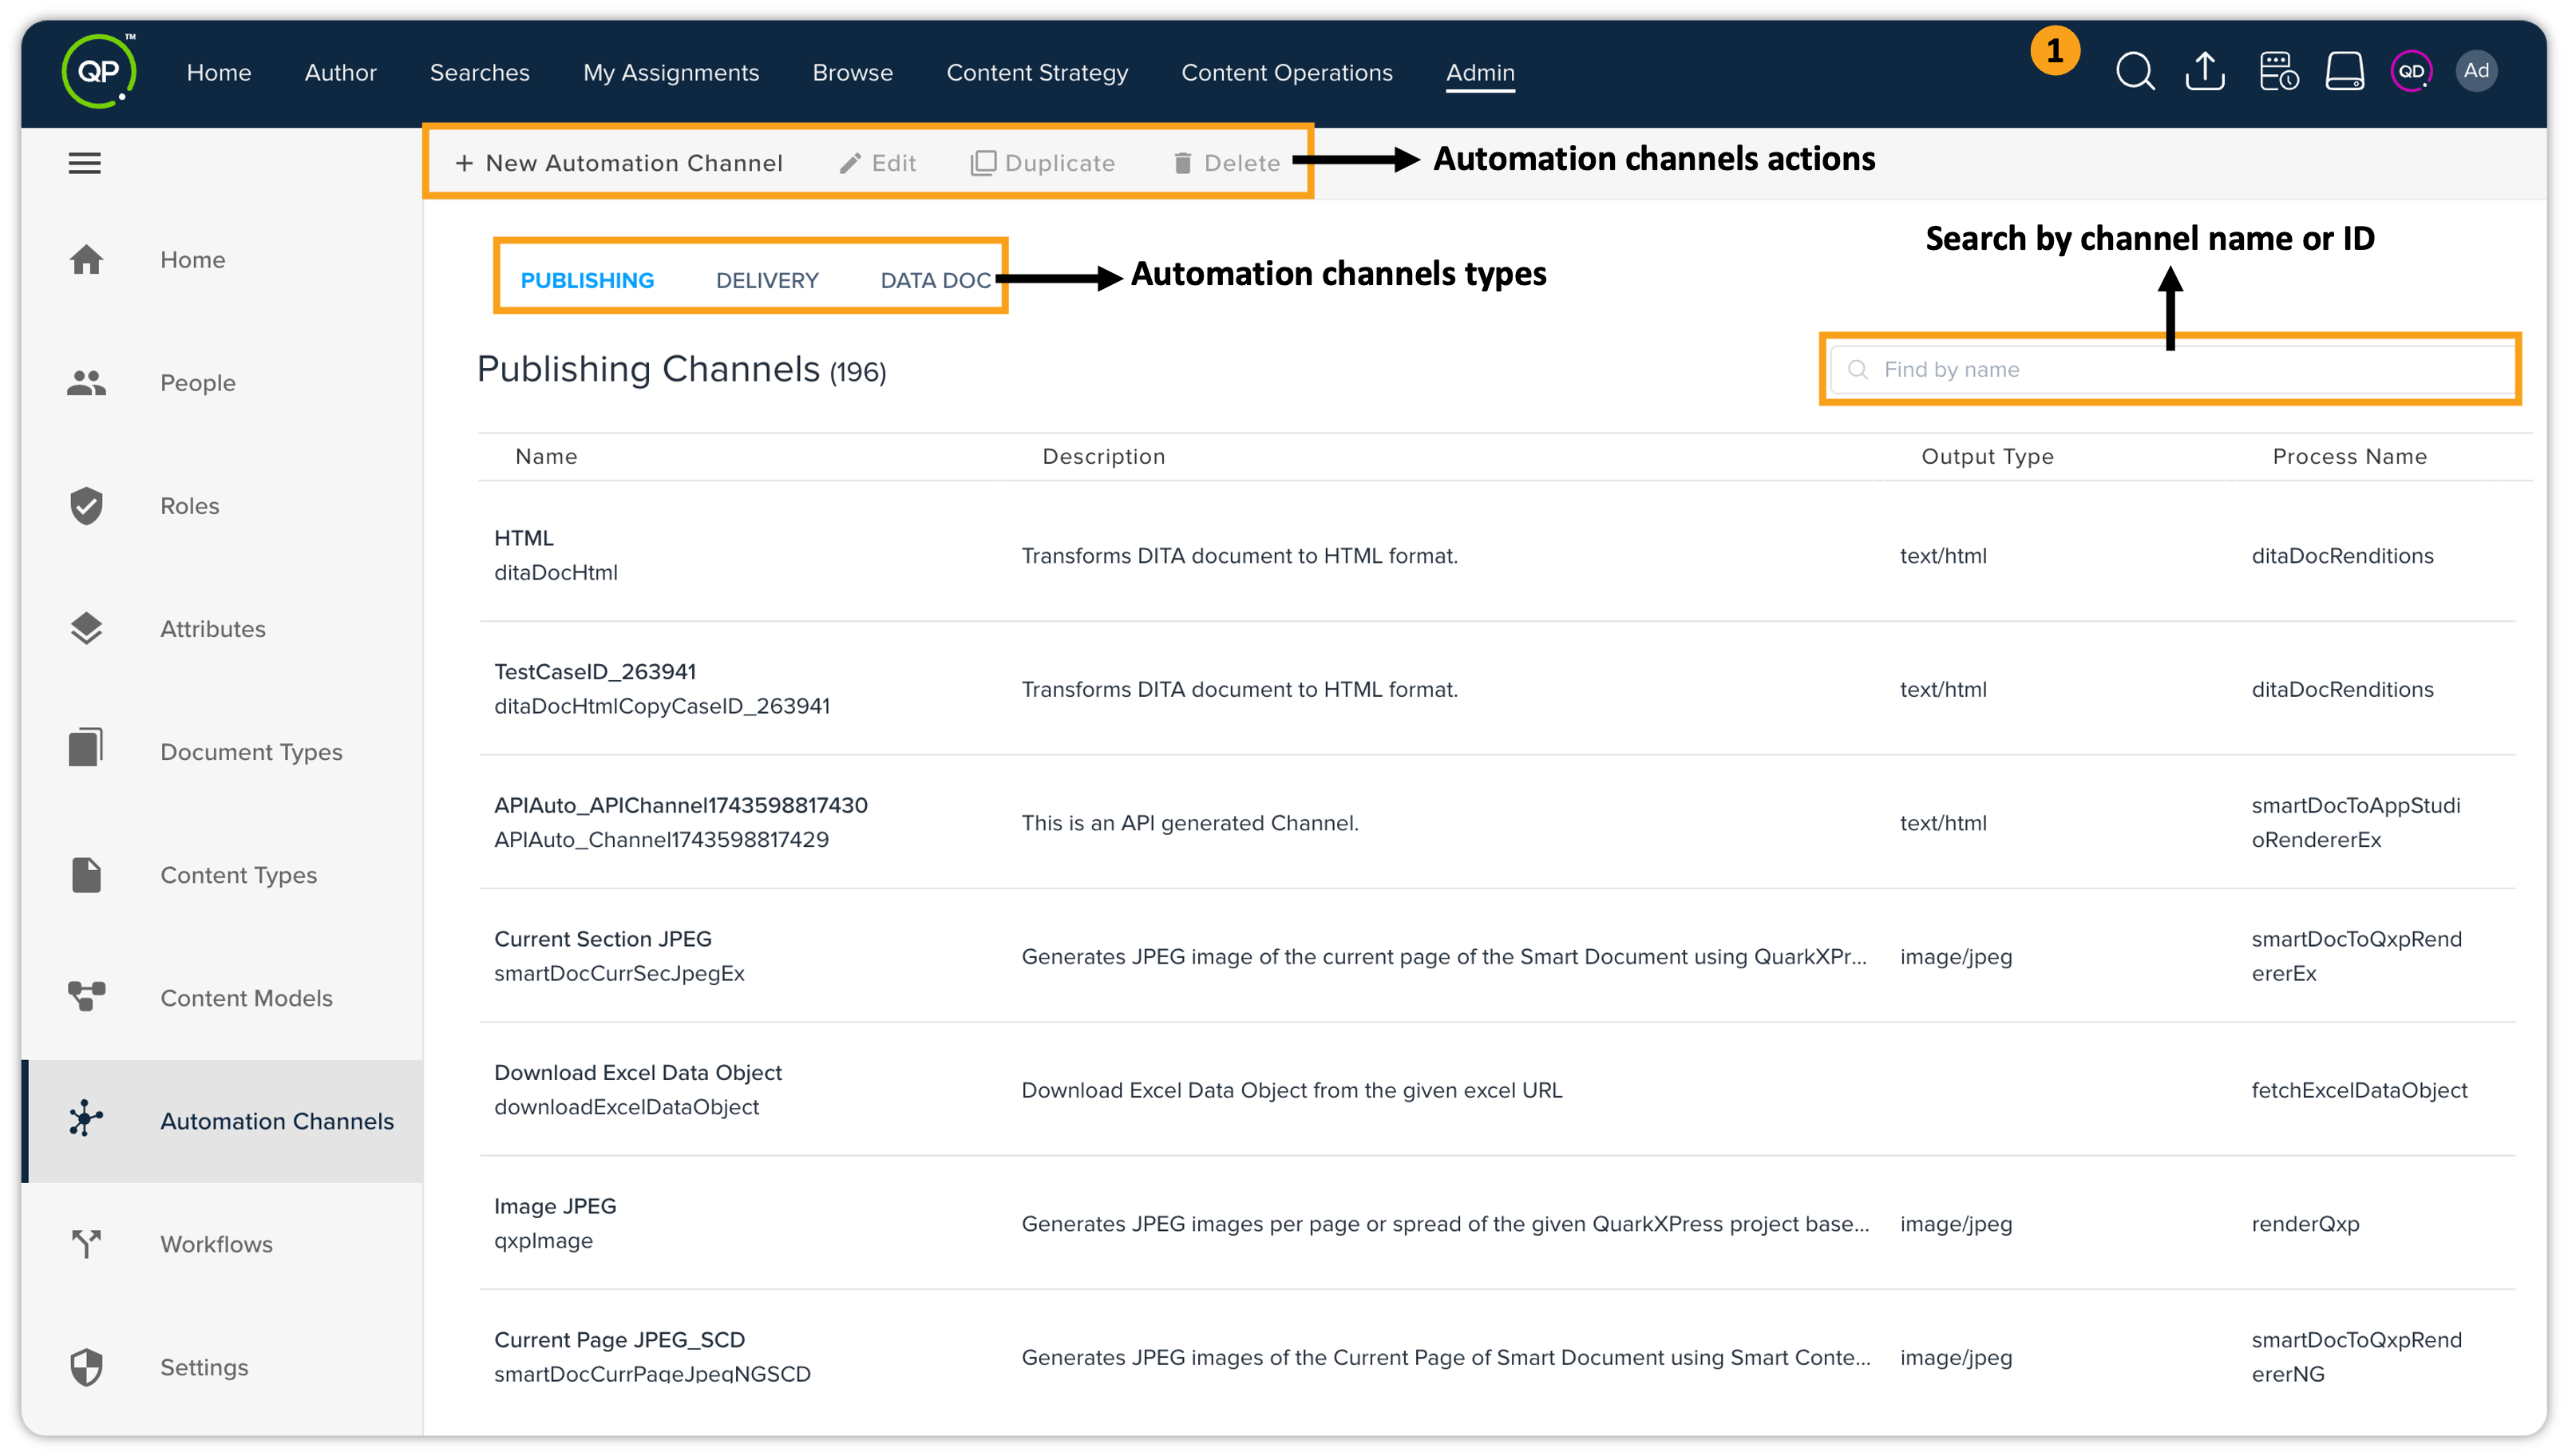
The Automation Channels page lists all three types of default and custom (the ones your organization has added) automation channels in their respective tabs and top bar actions to add, edit, duplicate, and delete automation channels. The page also contains a search bar through which you can search for an automation channel by channel name or channel ID.
To view the specifications of an automation channel, select the name of the channel in the list. This opens the Asset Channel Details pane which also provides an option to edit the channel specifications.
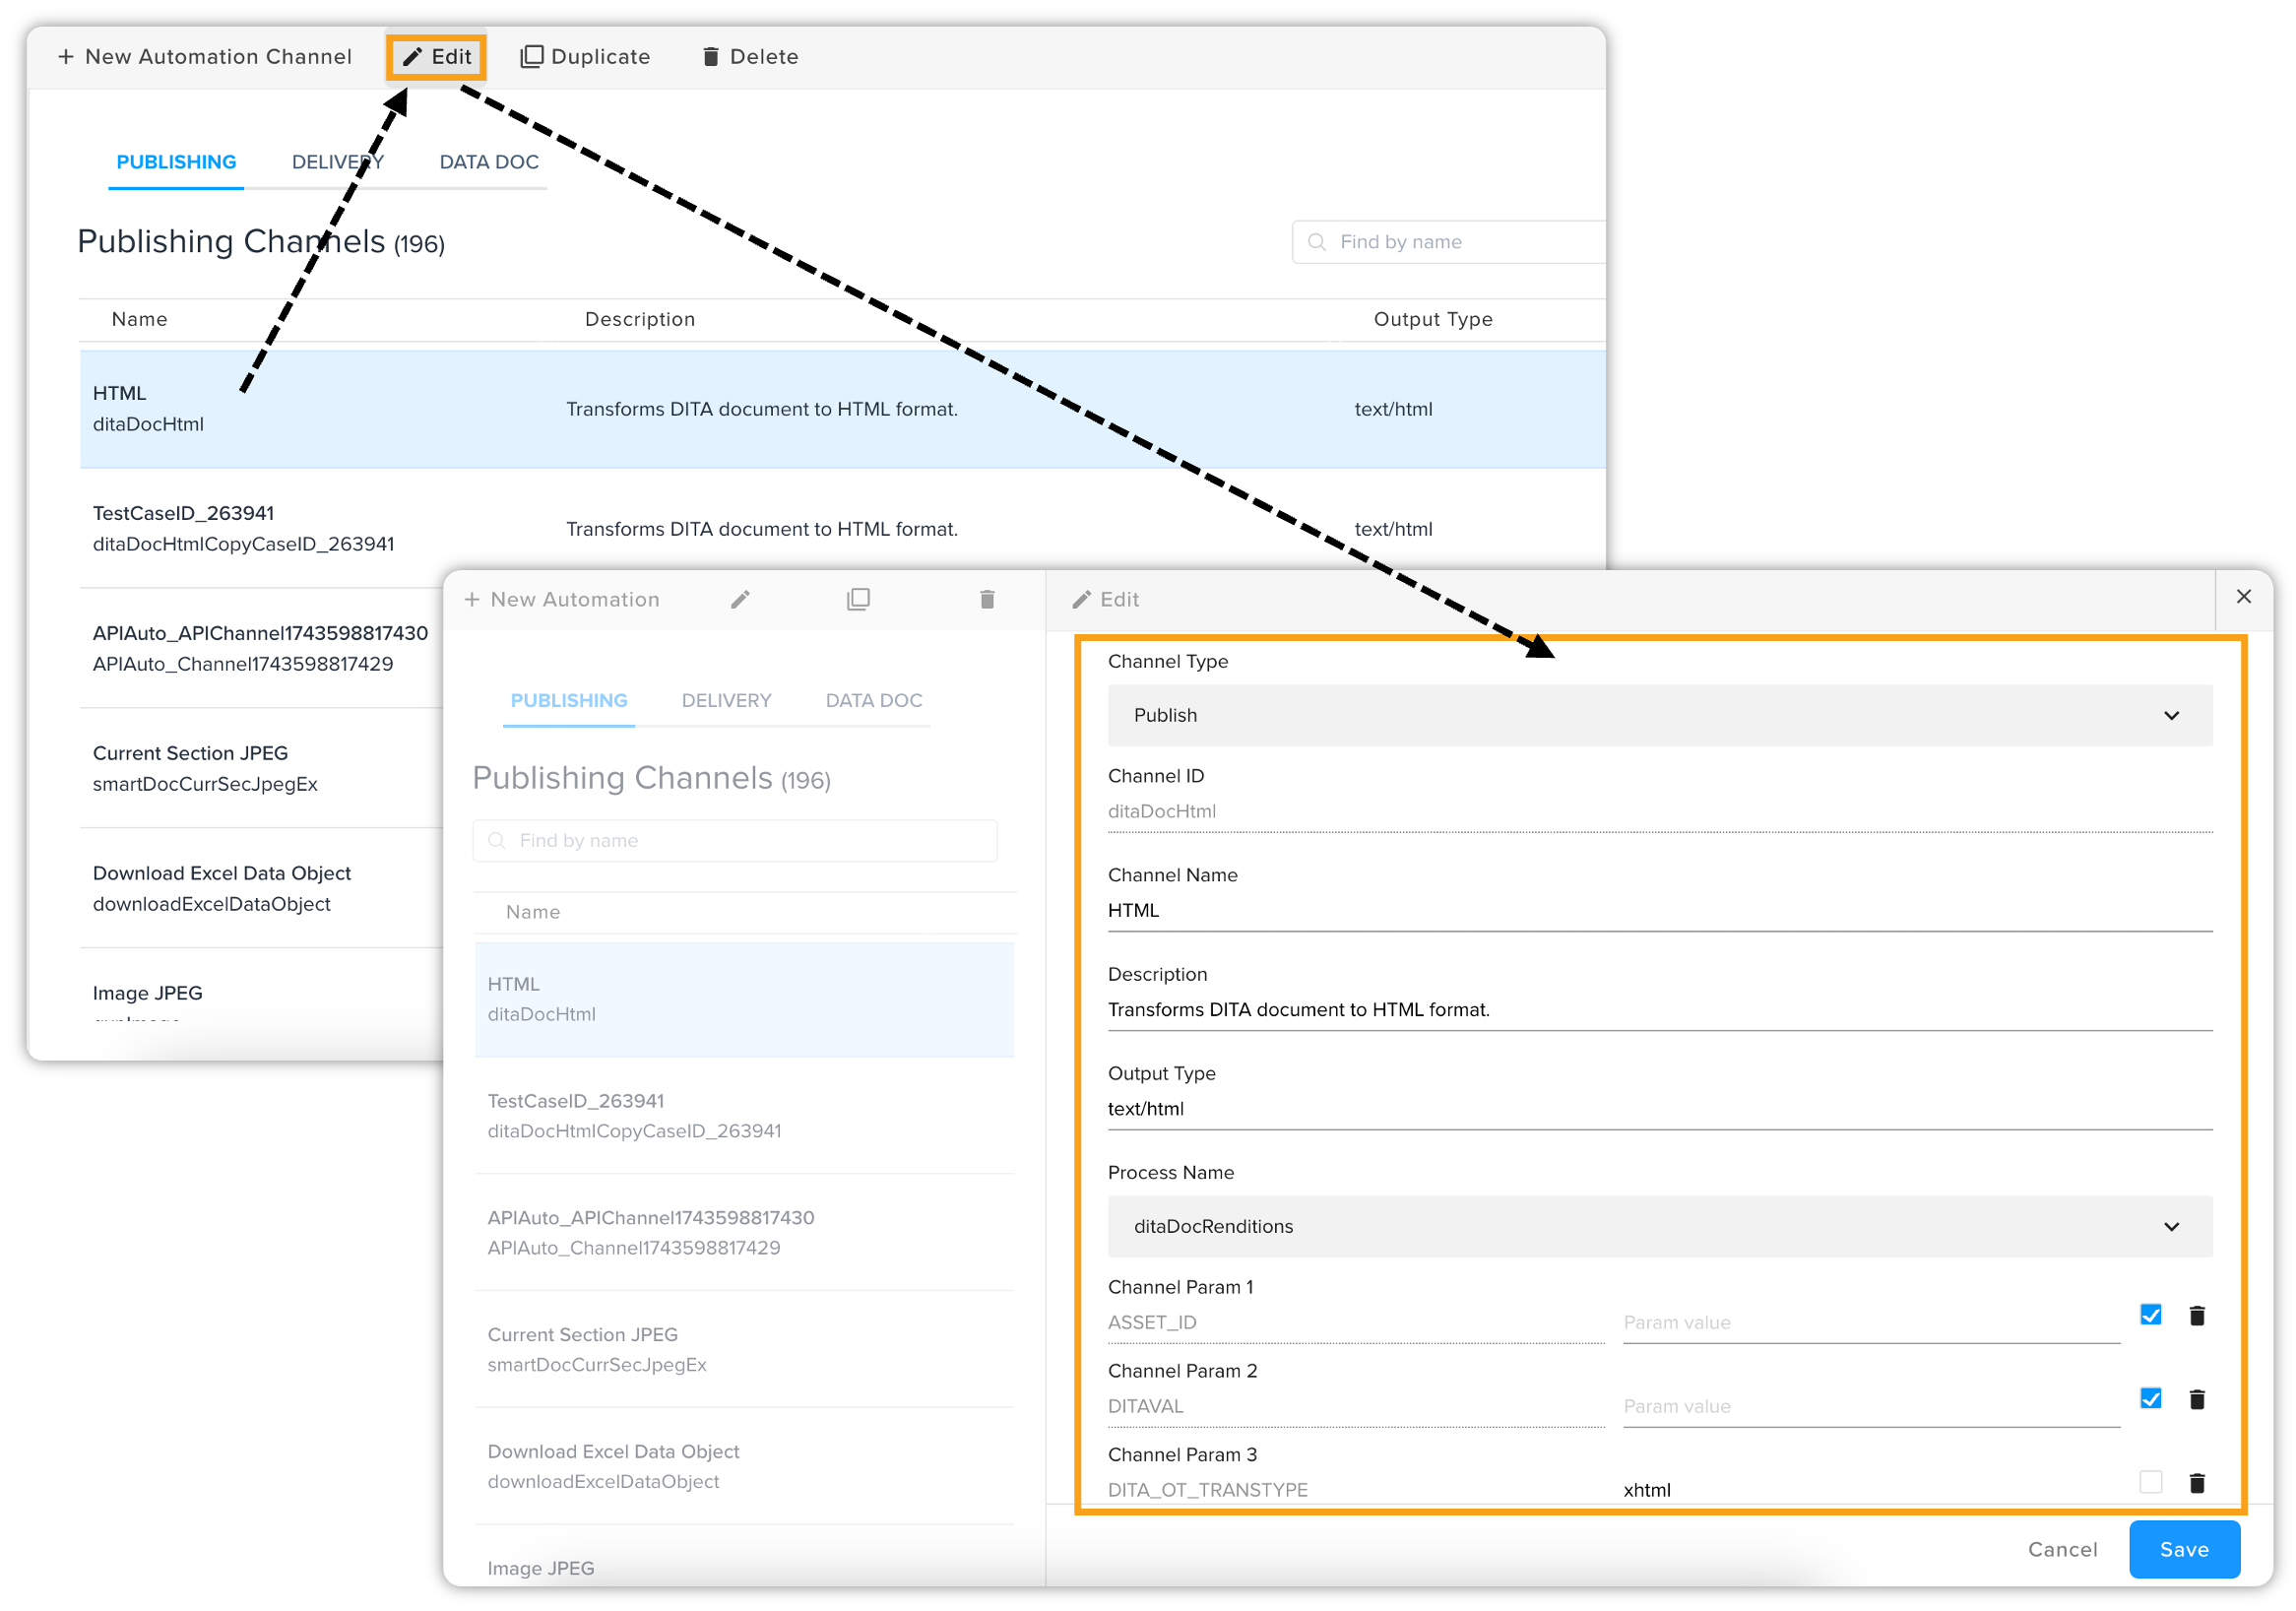
The process to edit an automation channel is similar to the process to add an automation channel, which is described in the next section.
Add an Automation Channel
To add an automation channel, follow the steps shown below:
-
On the home page of QPP, click the Admin tab and then click Automation Channels in the list pane on the left, which is displayed vertically.
-
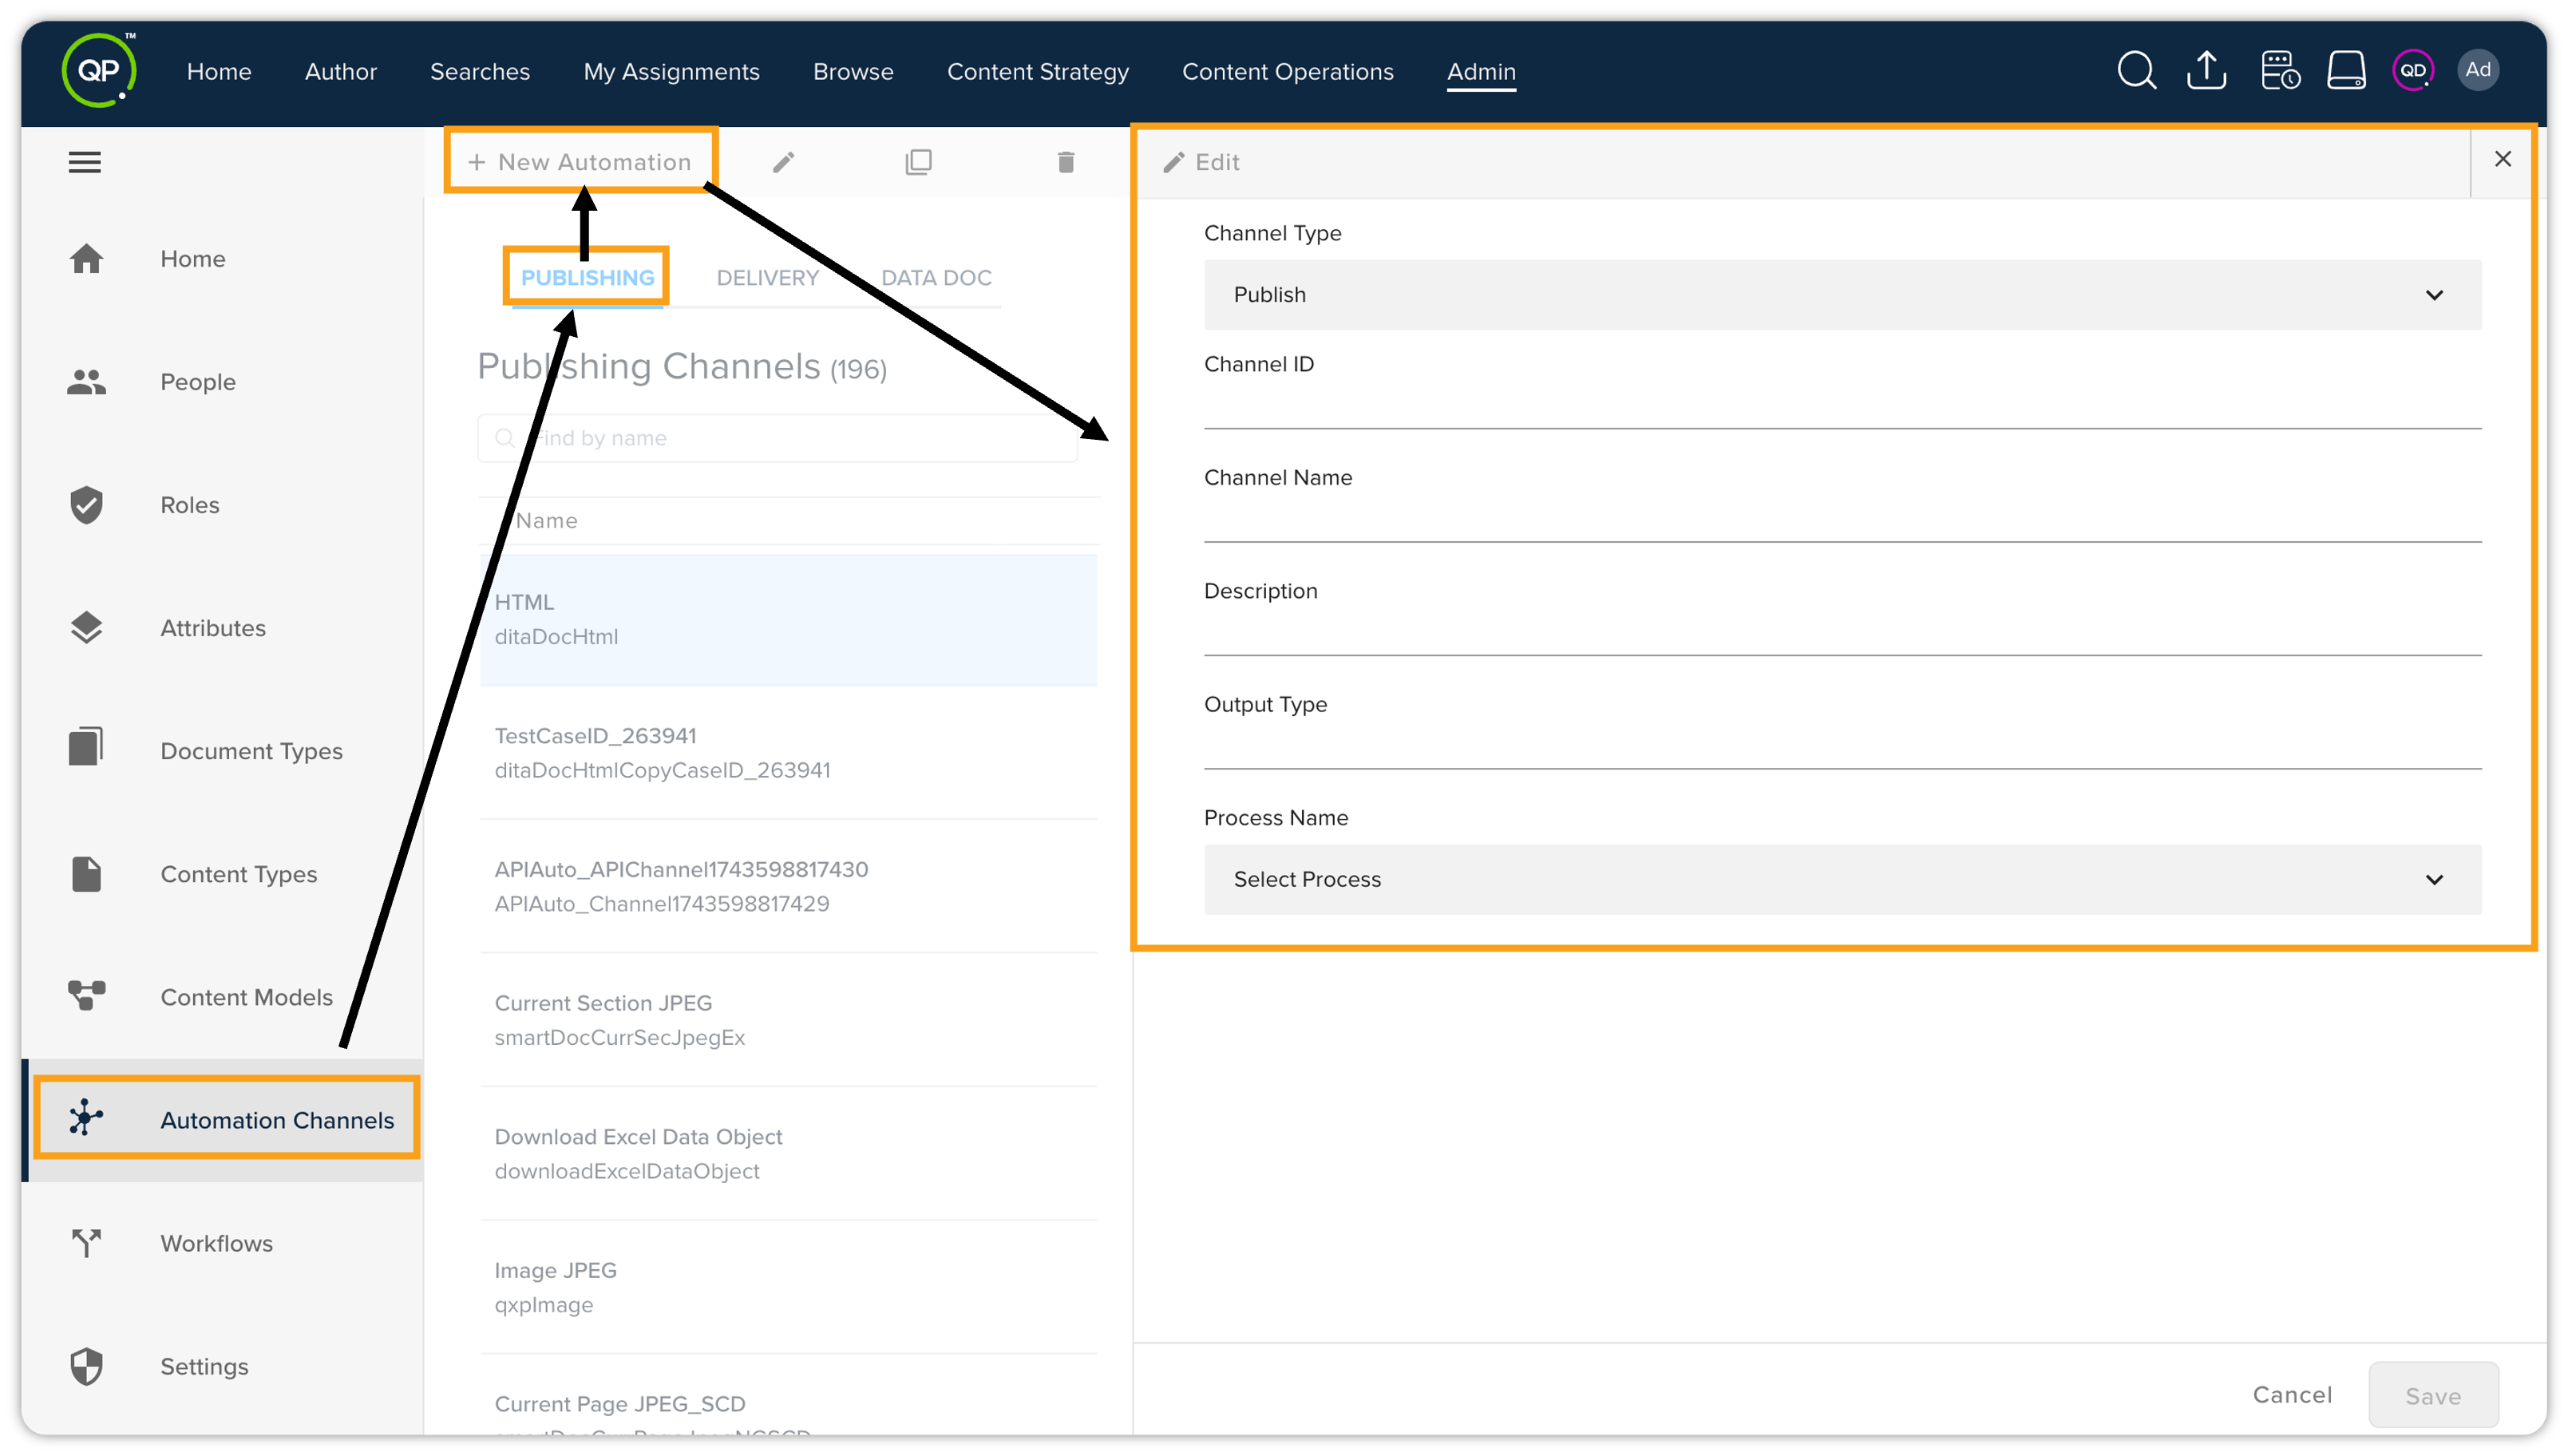
In the top bar actions, click + New Automation.
-
In the Add New Automation Channel pane, provide the following information:
-
Channel Type: Select a channel type Publishing, Delivery, or Data Doc from a dropdown list.
-
Channel ID: Enter a unique channel id, which by convention, also defines the function of the channel. For example, a channel that transforms DITA documents into HTML format should have the Channel ID DitaToHTML.
-
Channel Name: Enter a name for your automation channel.
-
Description (optional): Provide a description of your automation channel around its function.
-
Output Type (optional): Provide the file formats your automation channel can produce; for example, text, image, JPEG, HTML, and so on.
-
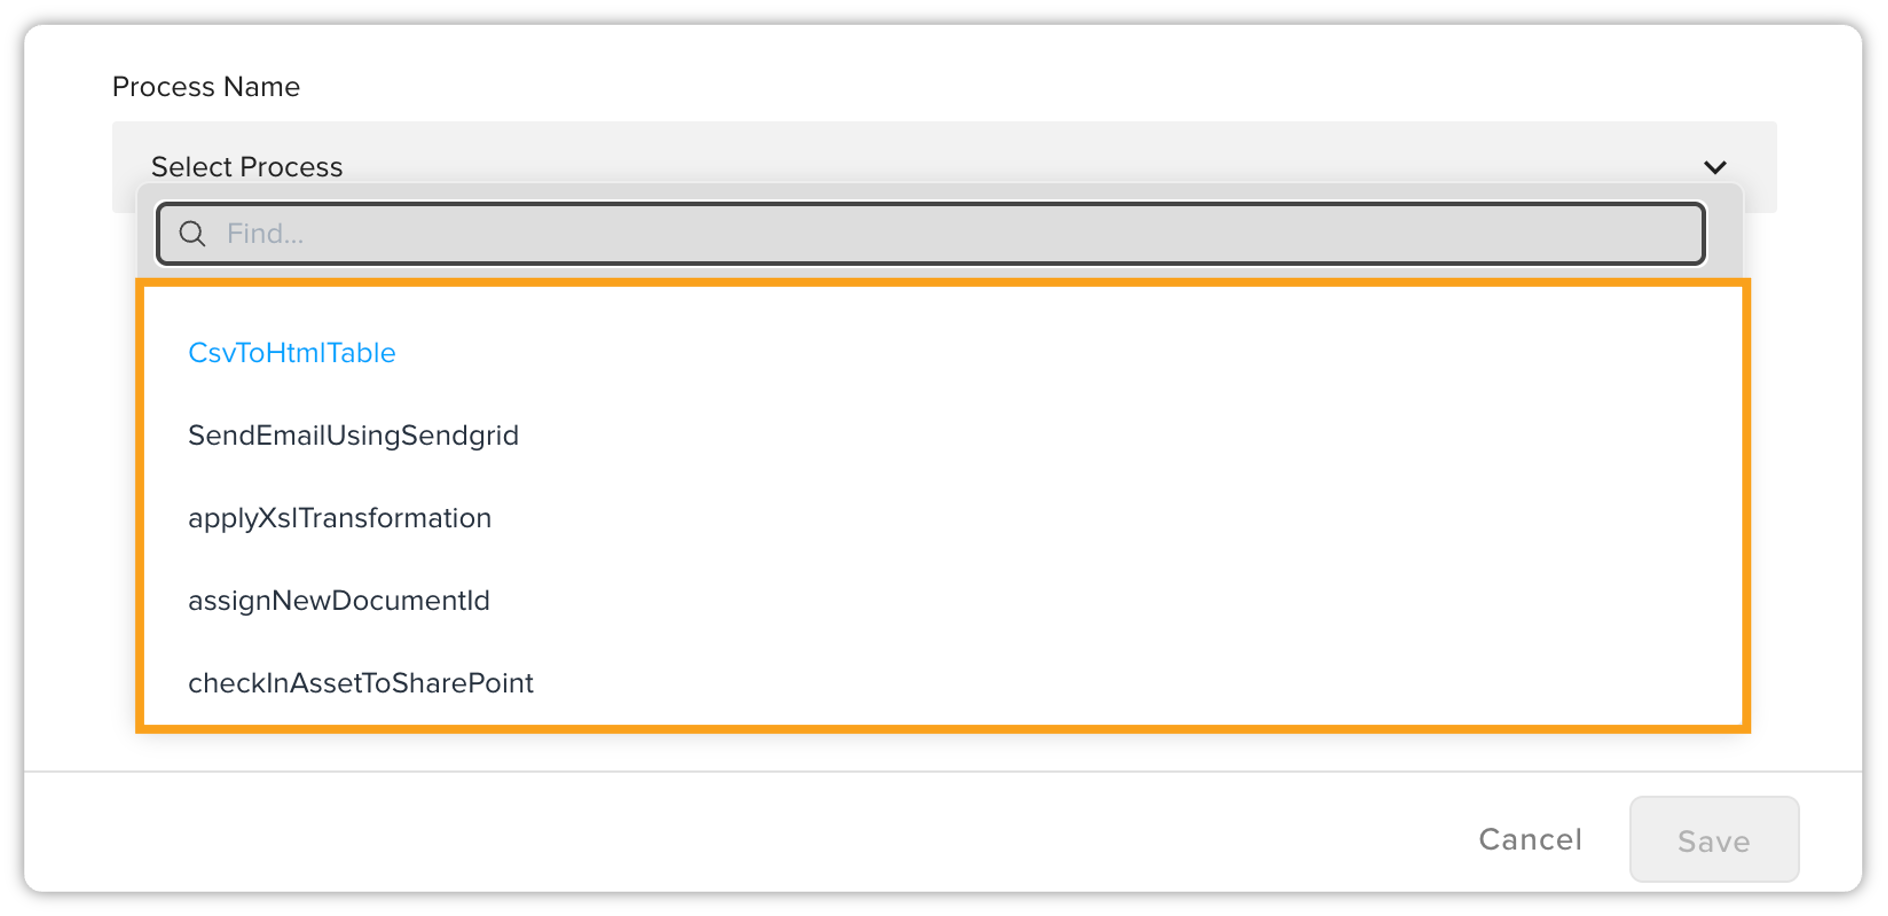
Process Name: Select a pre-defined process from a dropdown.
-
-
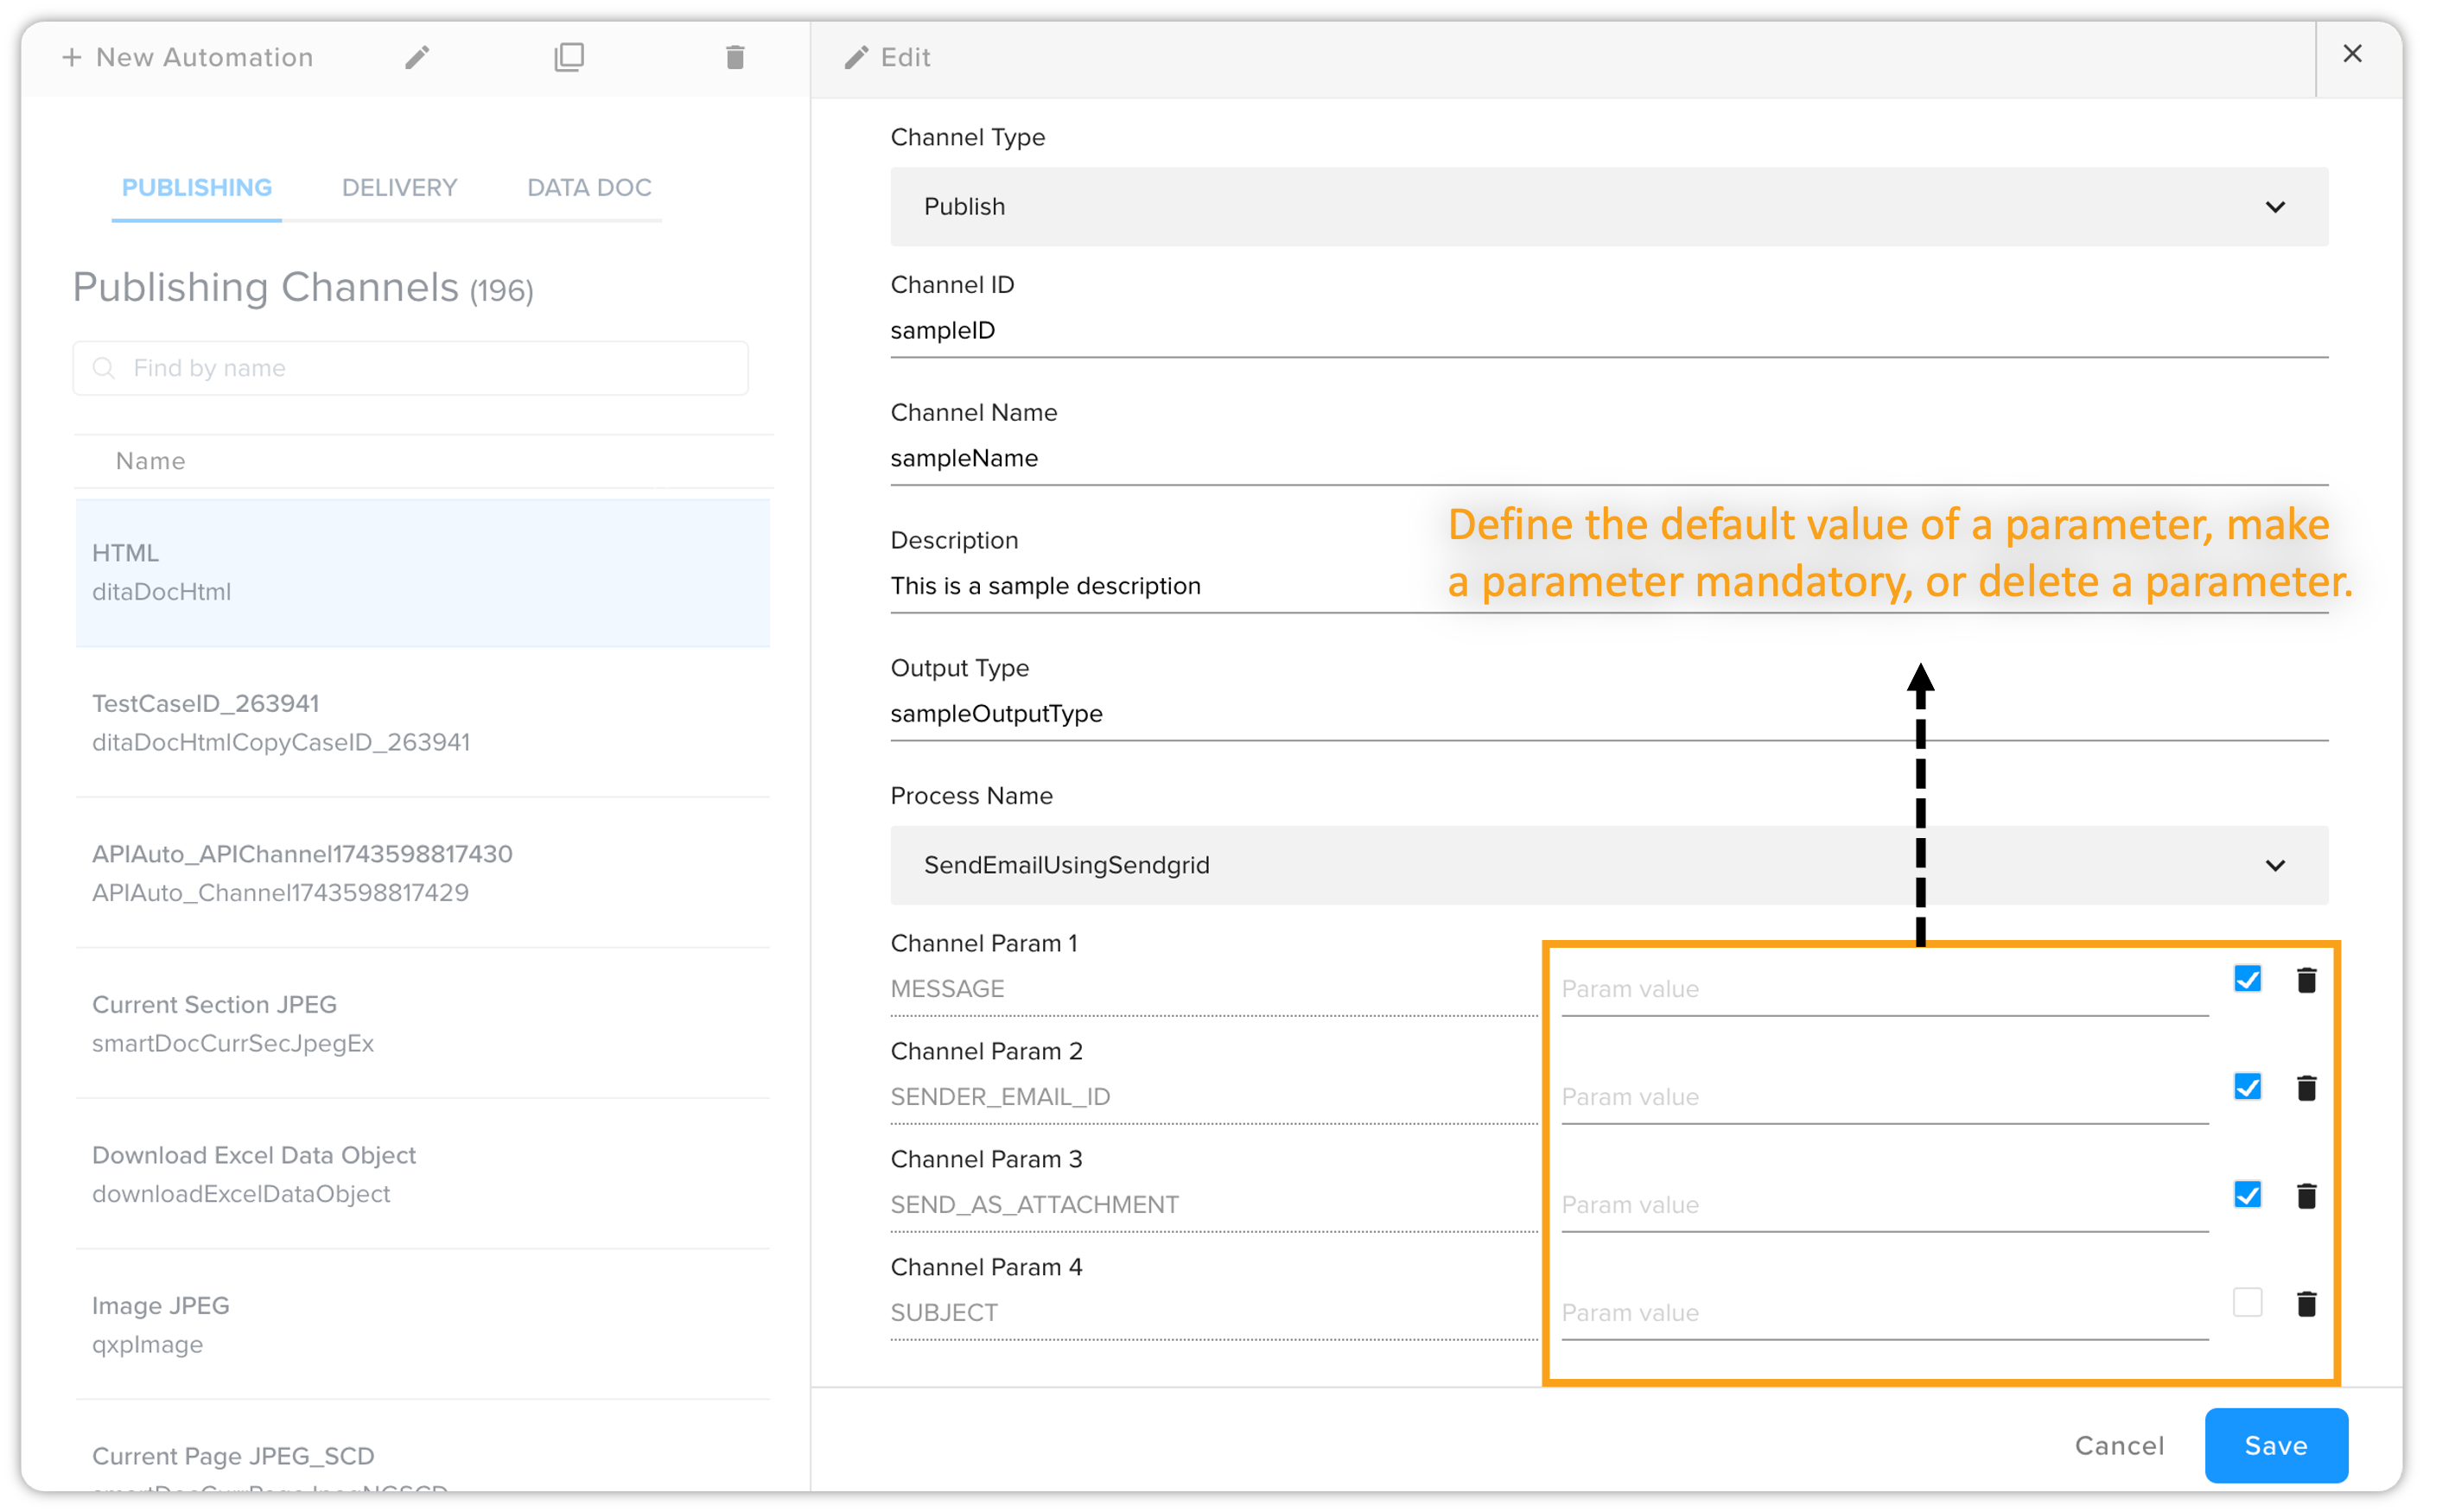
Upon selecting the process, the Add New Automation Channel pane displays a list of parameters related to that process, which you need to define for your automation channel. You can provide a default value for a parameter, make a parameter mandatory to define (through the checkbox), or delete a parameter.
-
Select the button Save.
Workflows
The Workflows page allows you to manage workflows for a Quark server. A workflow consists of a set of stages or statuses that define the life cycle of a content type based on the content publishing and content management requirements of an organization. For example, a business document may have workflow statuses: Draft, Review, Approve, Publish, and Deliver.
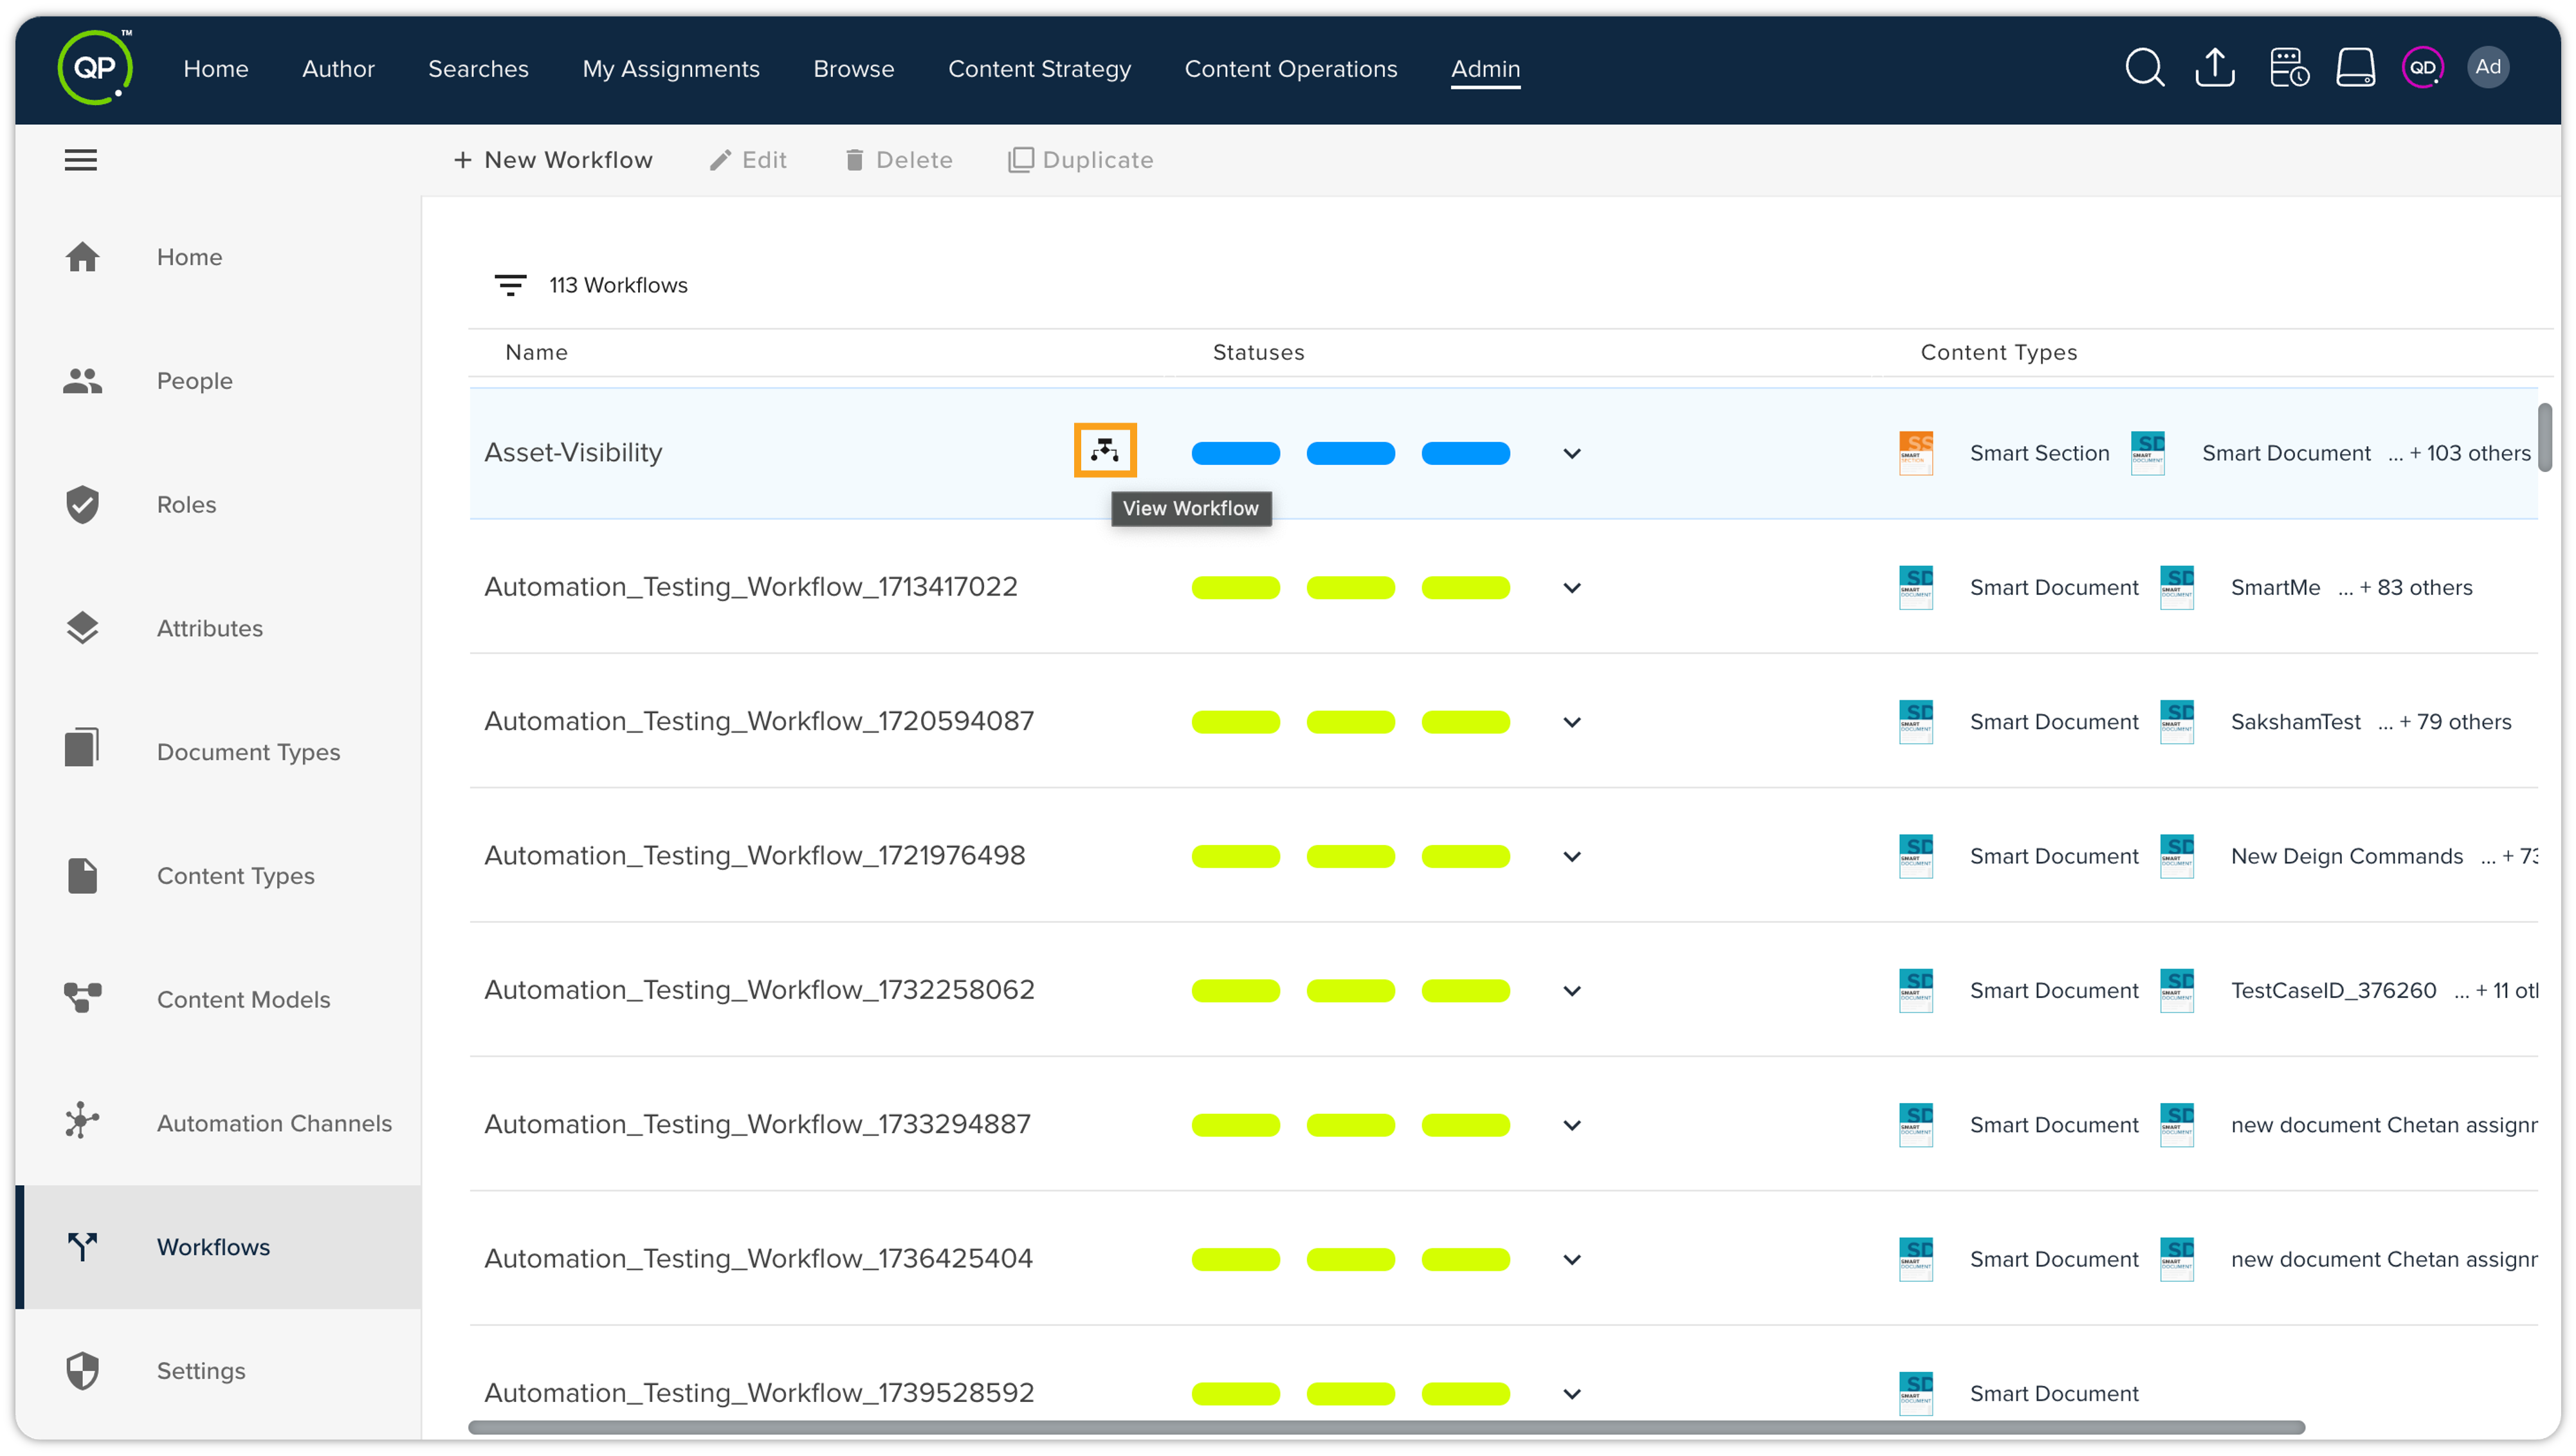
The Workflows page displays a list of workflows available on the server along with the color-coded status and the content types on which a workflow has been applied. On top of the list, the page also displays the total number of available workflows. Besides, there's a View Workflow icon that appears upon hovering over the workflow.
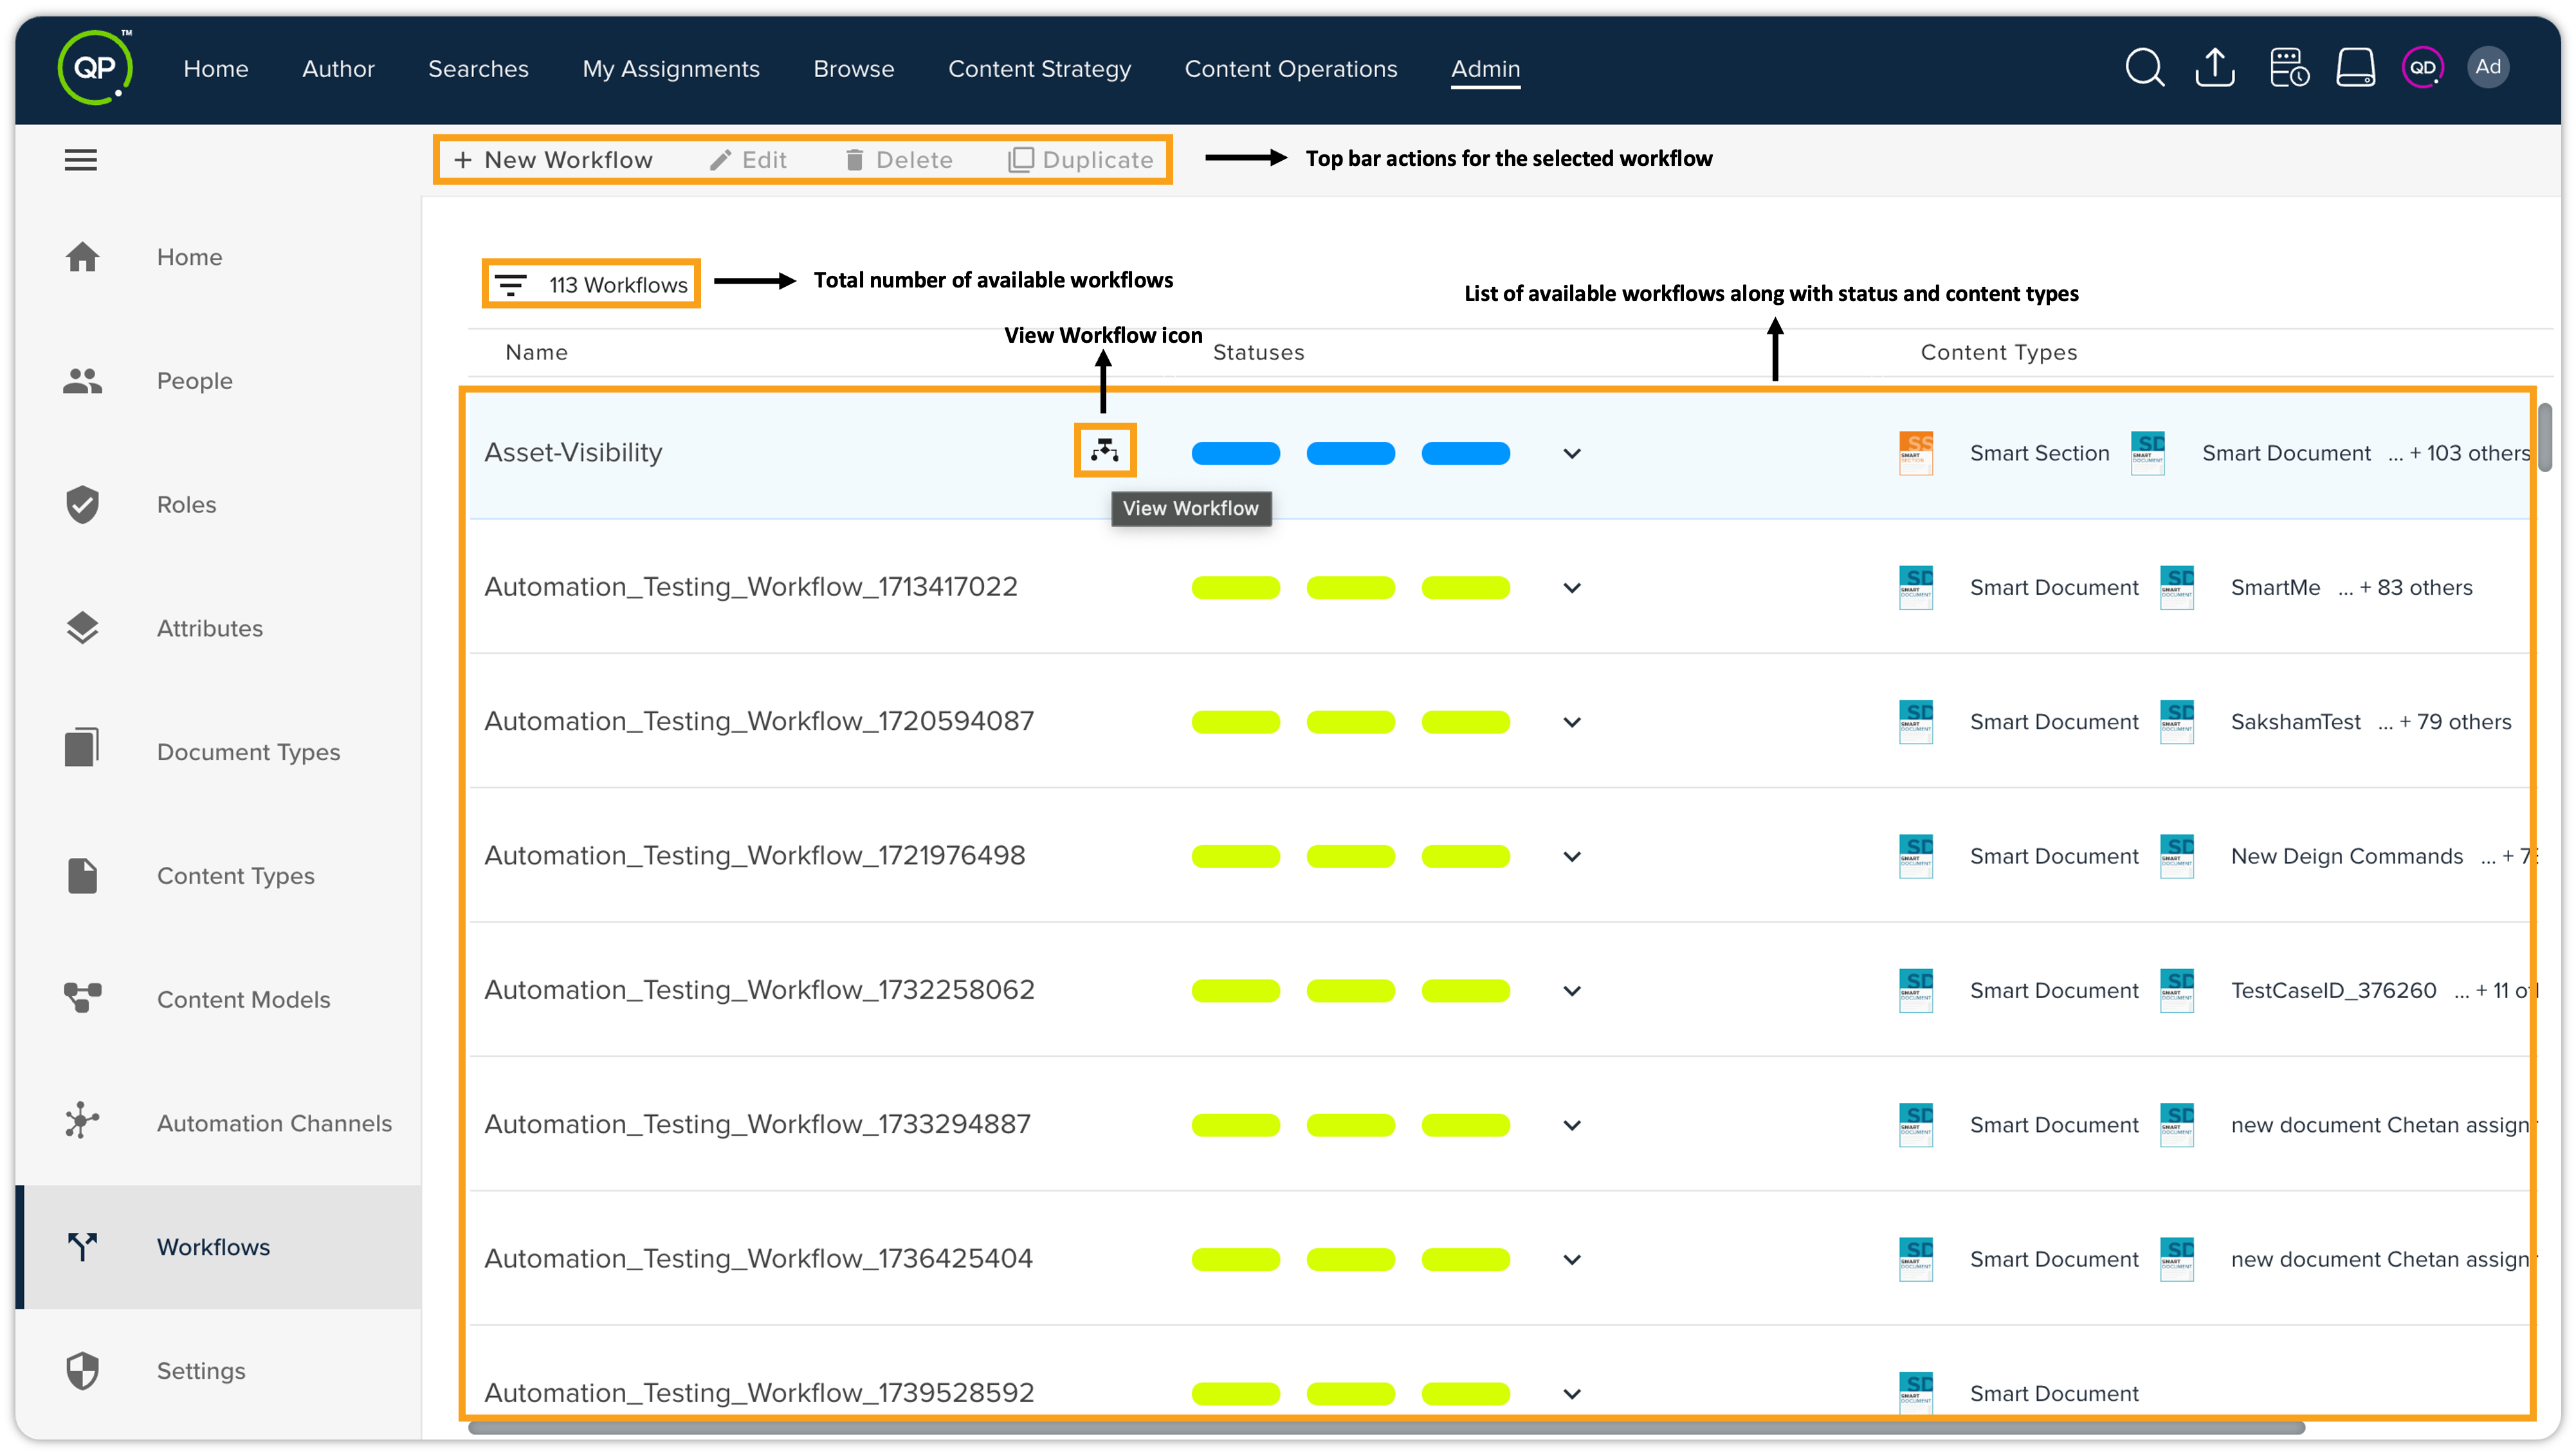
 and expand the list of content types by clicking + XX others against a workflow under the columns Content Types.
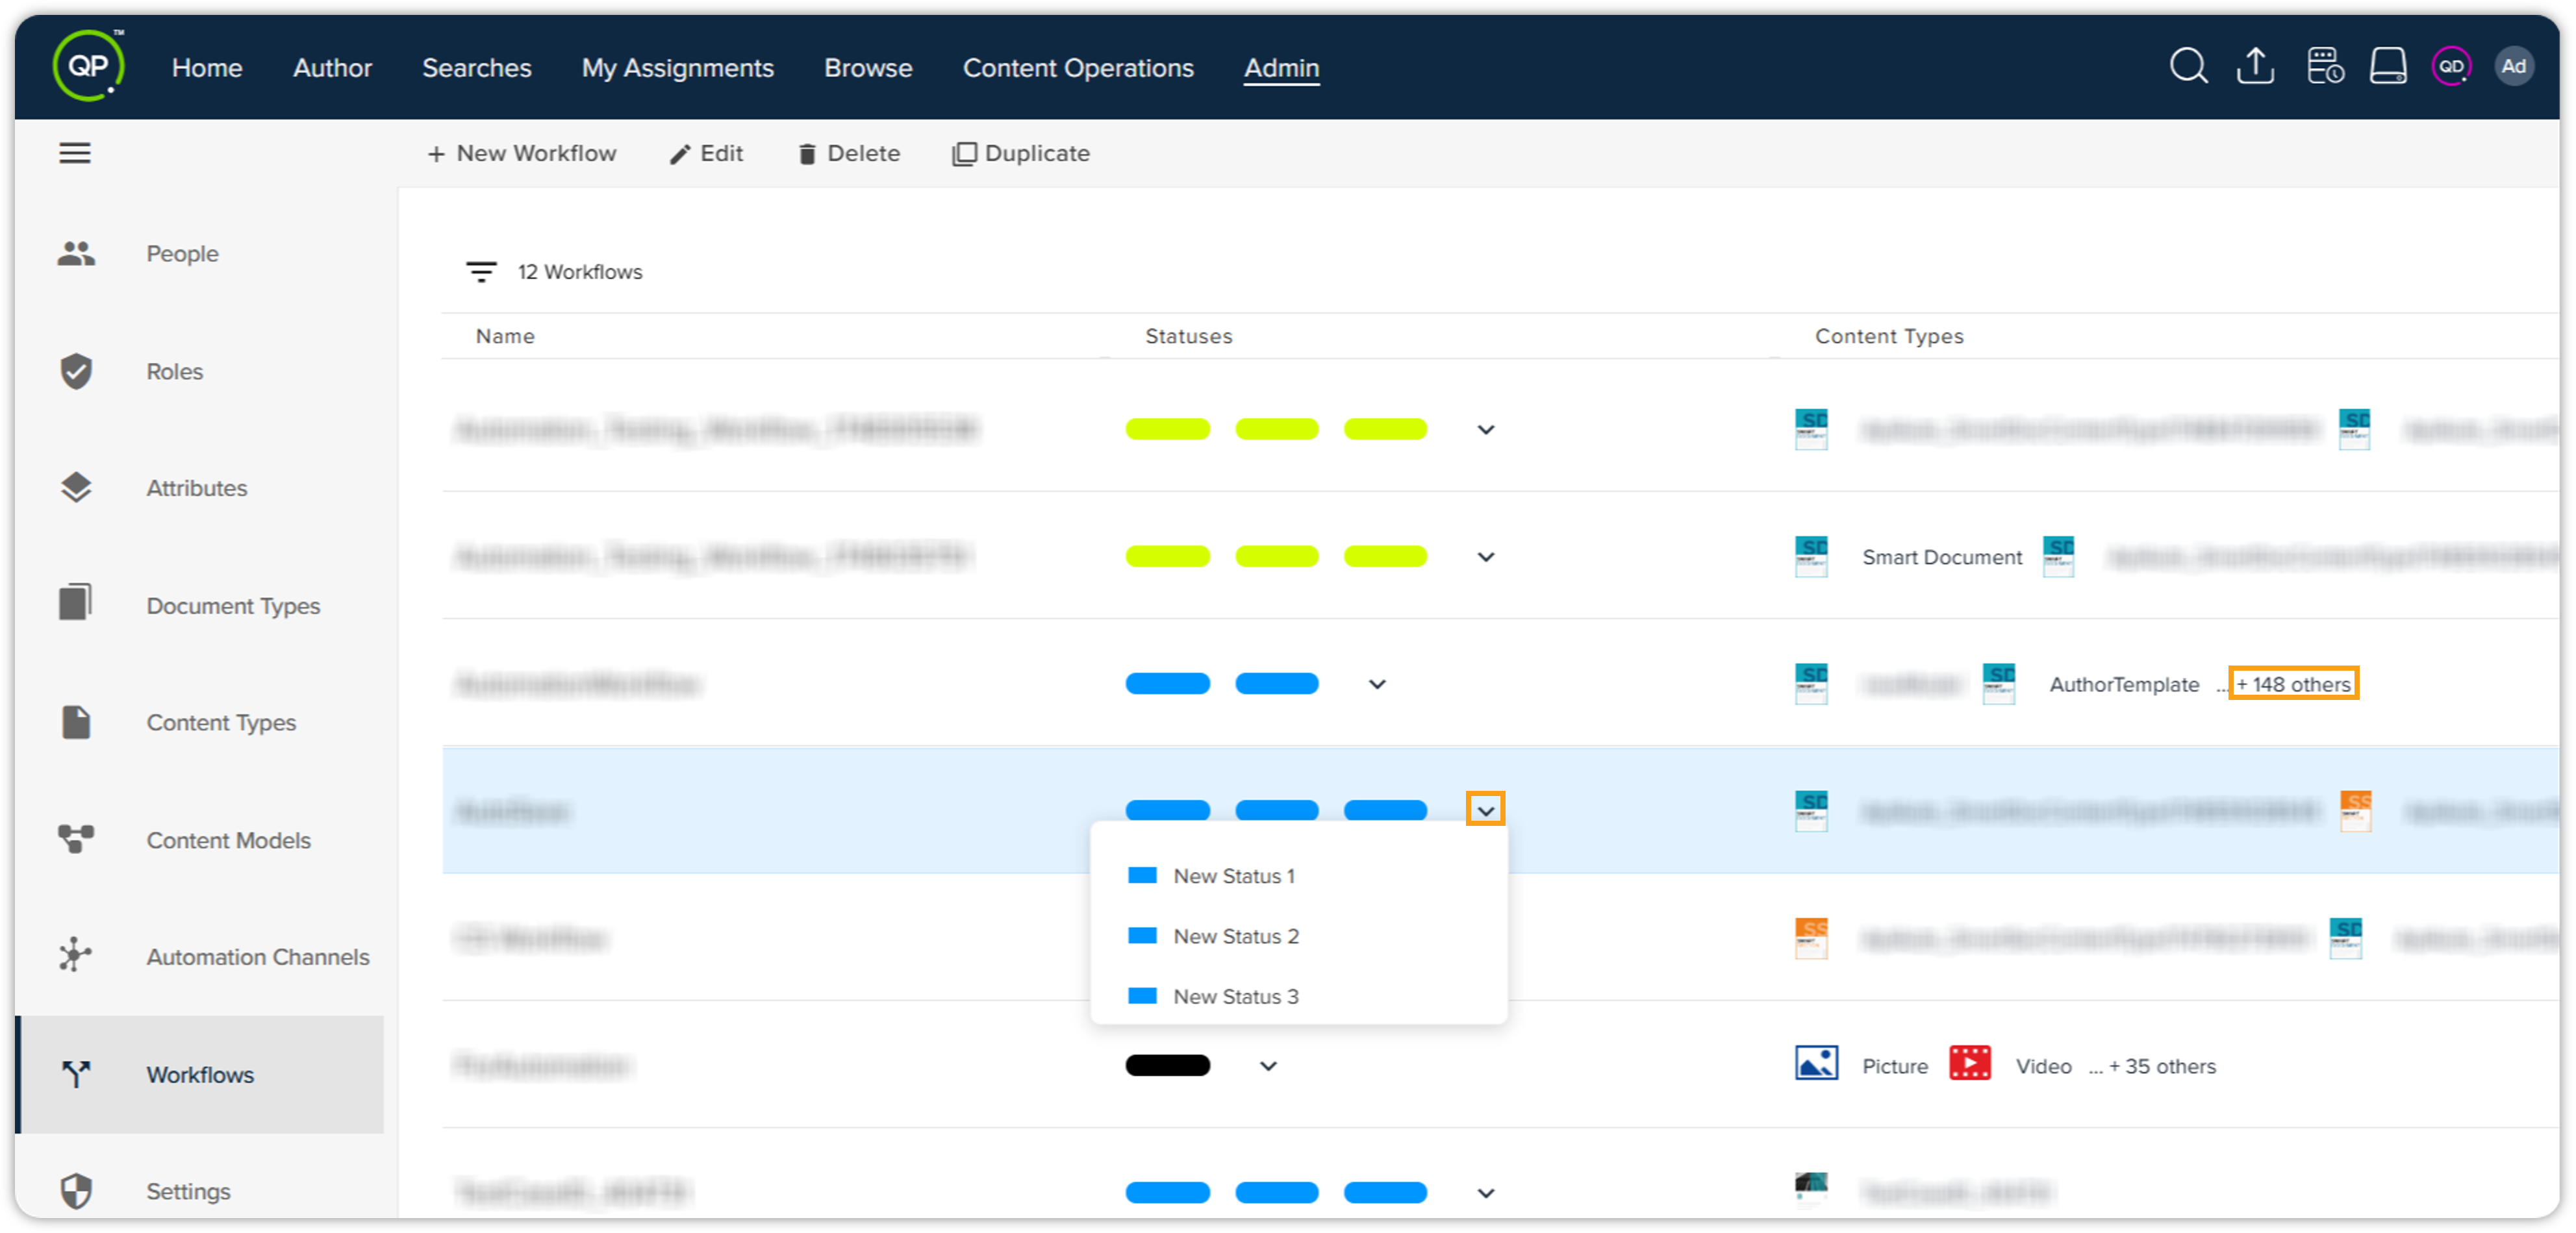
Additionally, there are the following top bar actions:
-
Add New Workflow: Allows you to add a new workflow to the server.
-
Edit: Allows you to edit the specifications of the selected workflow in the list.
-
Delete: Allows you to delete the selected workflow in the list.
-
Duplicate: Duplicates the selected workflow in the list.
Add New Workflow
To add a new workflow, follow the steps shown below:
-
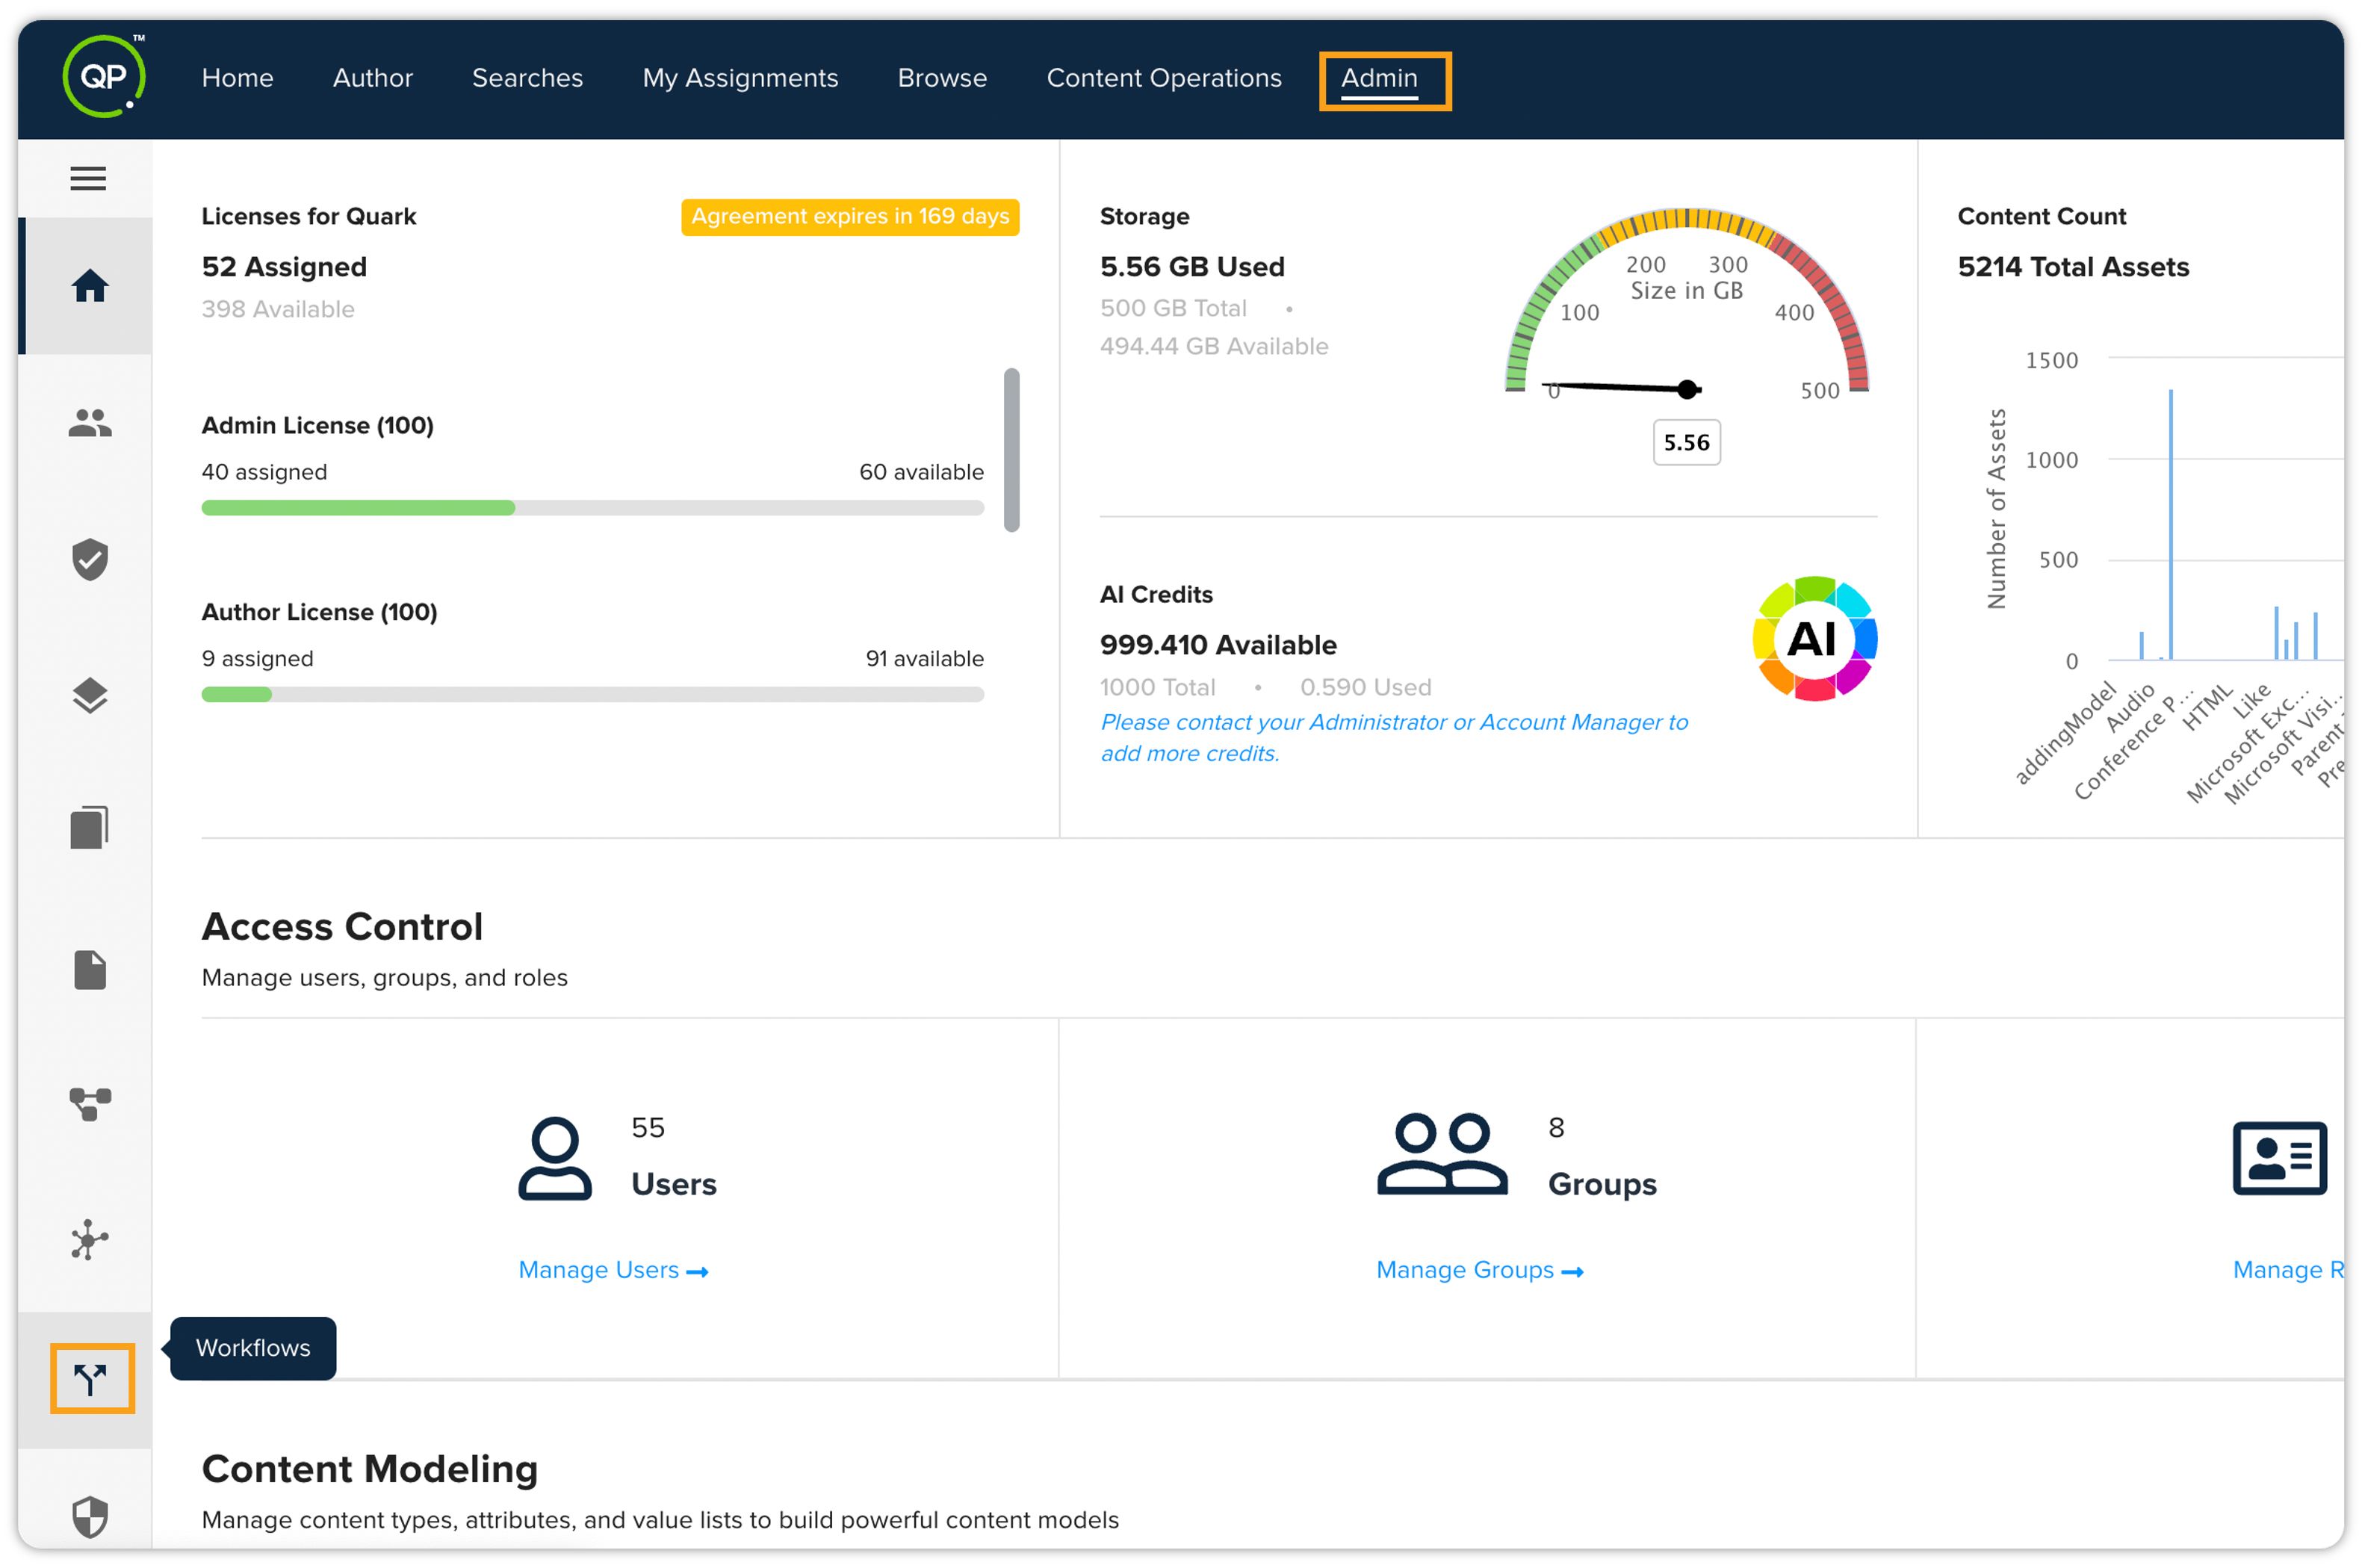
On the home page of QPP, click the Admin tab and then click Workflows in the list pane on the left, which is displayed vertically.
-
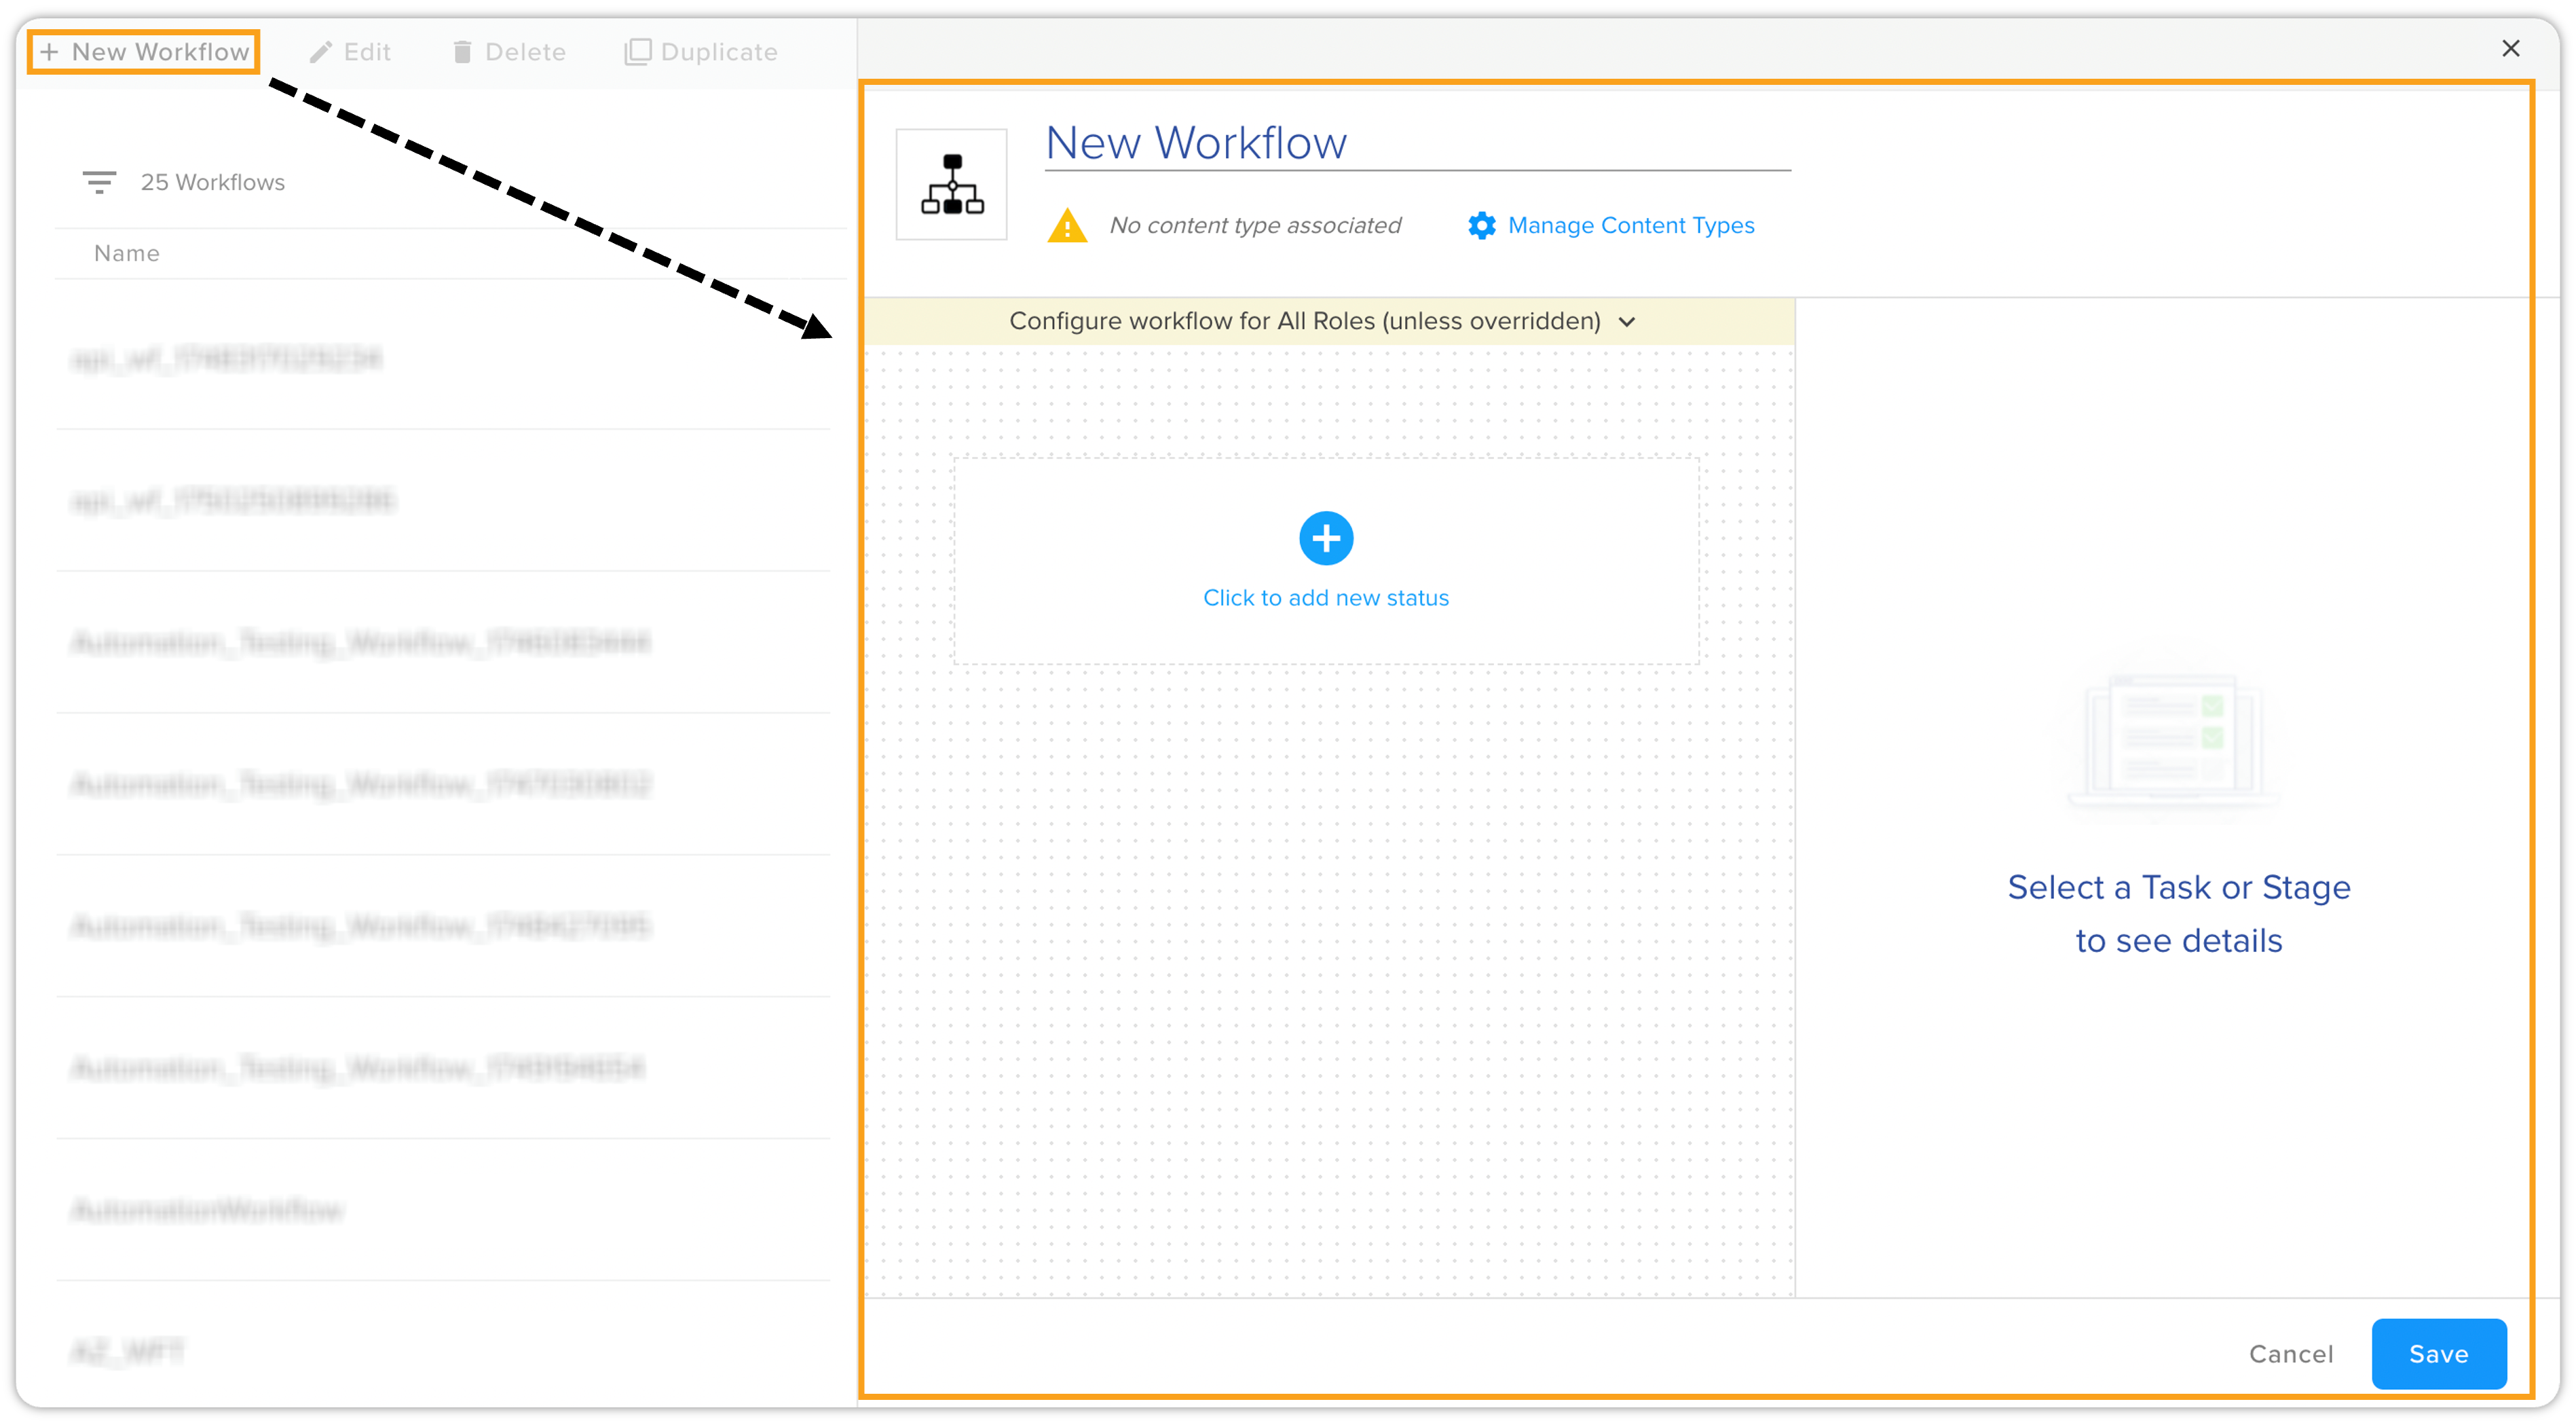
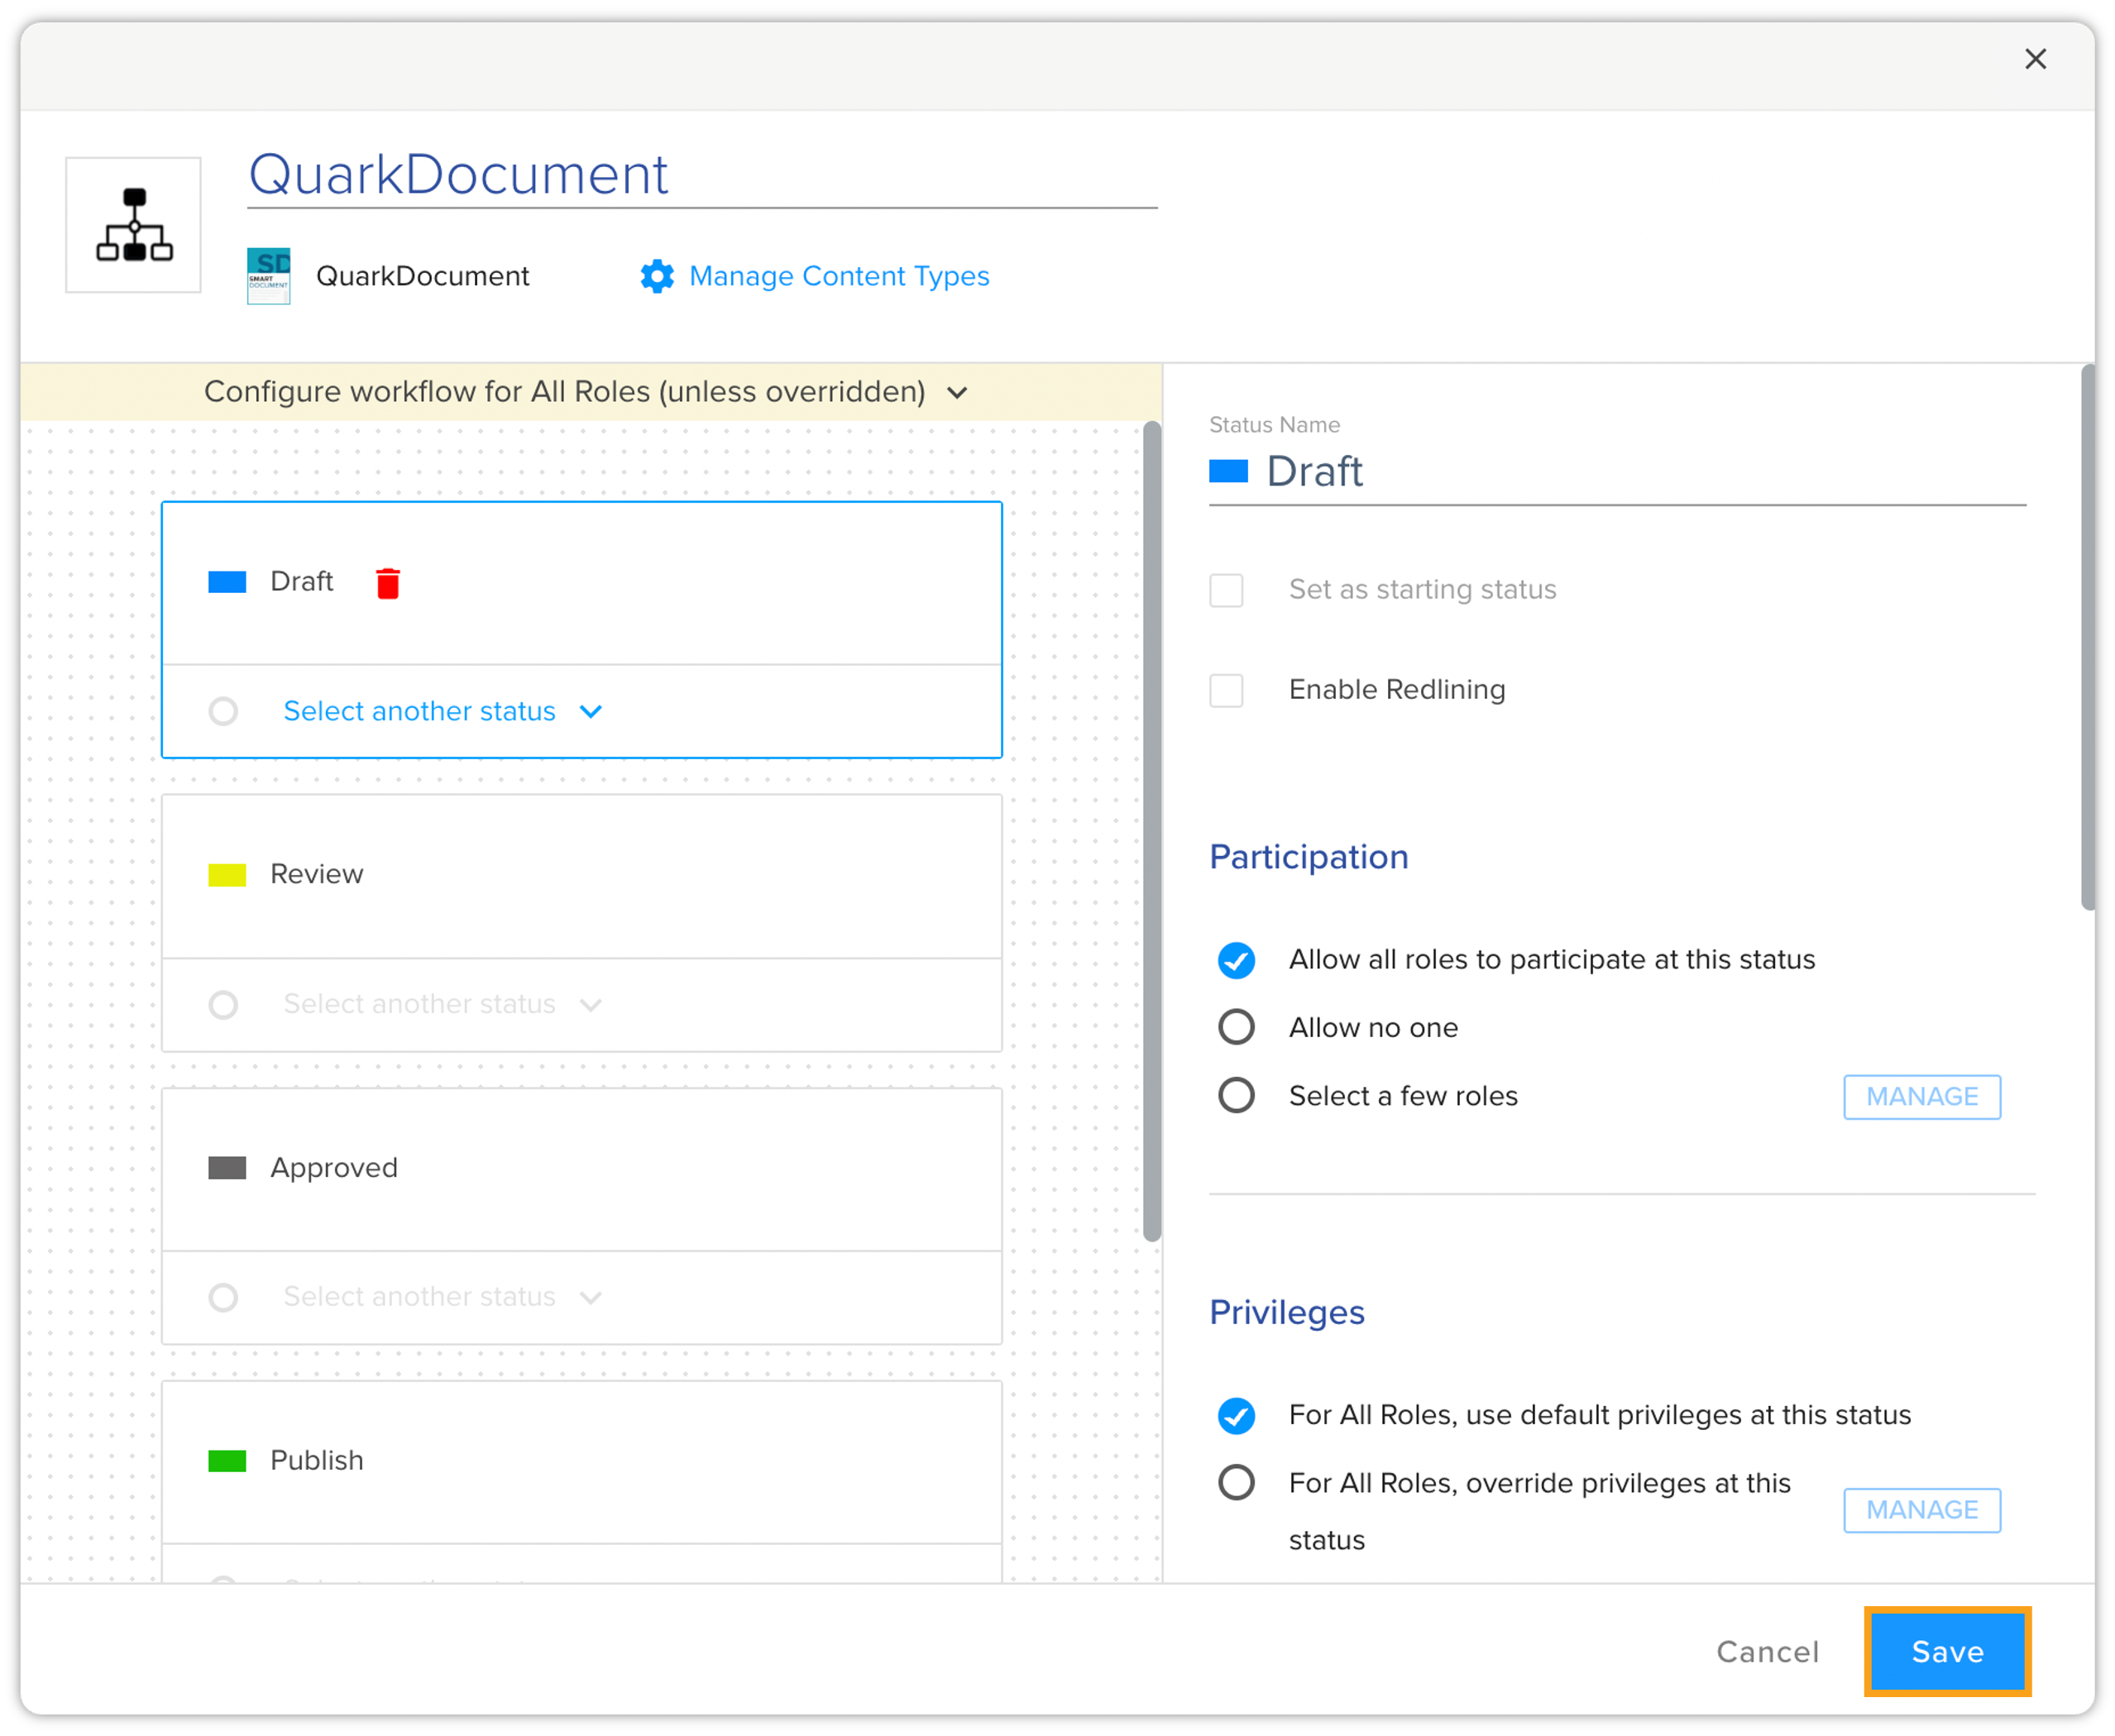
Click + New Workflow in the top bar actions to open the Manage Work Steps pane.
-
In the Manage Work Steps pane, enter a unique name for the workflow.
-
Now you need to add a content type with the workflow you are creating. Click Manage Content Types to open the pane Add Content Types to Workflow in which you can select the content types that you want to add to the workflow and then click Done.
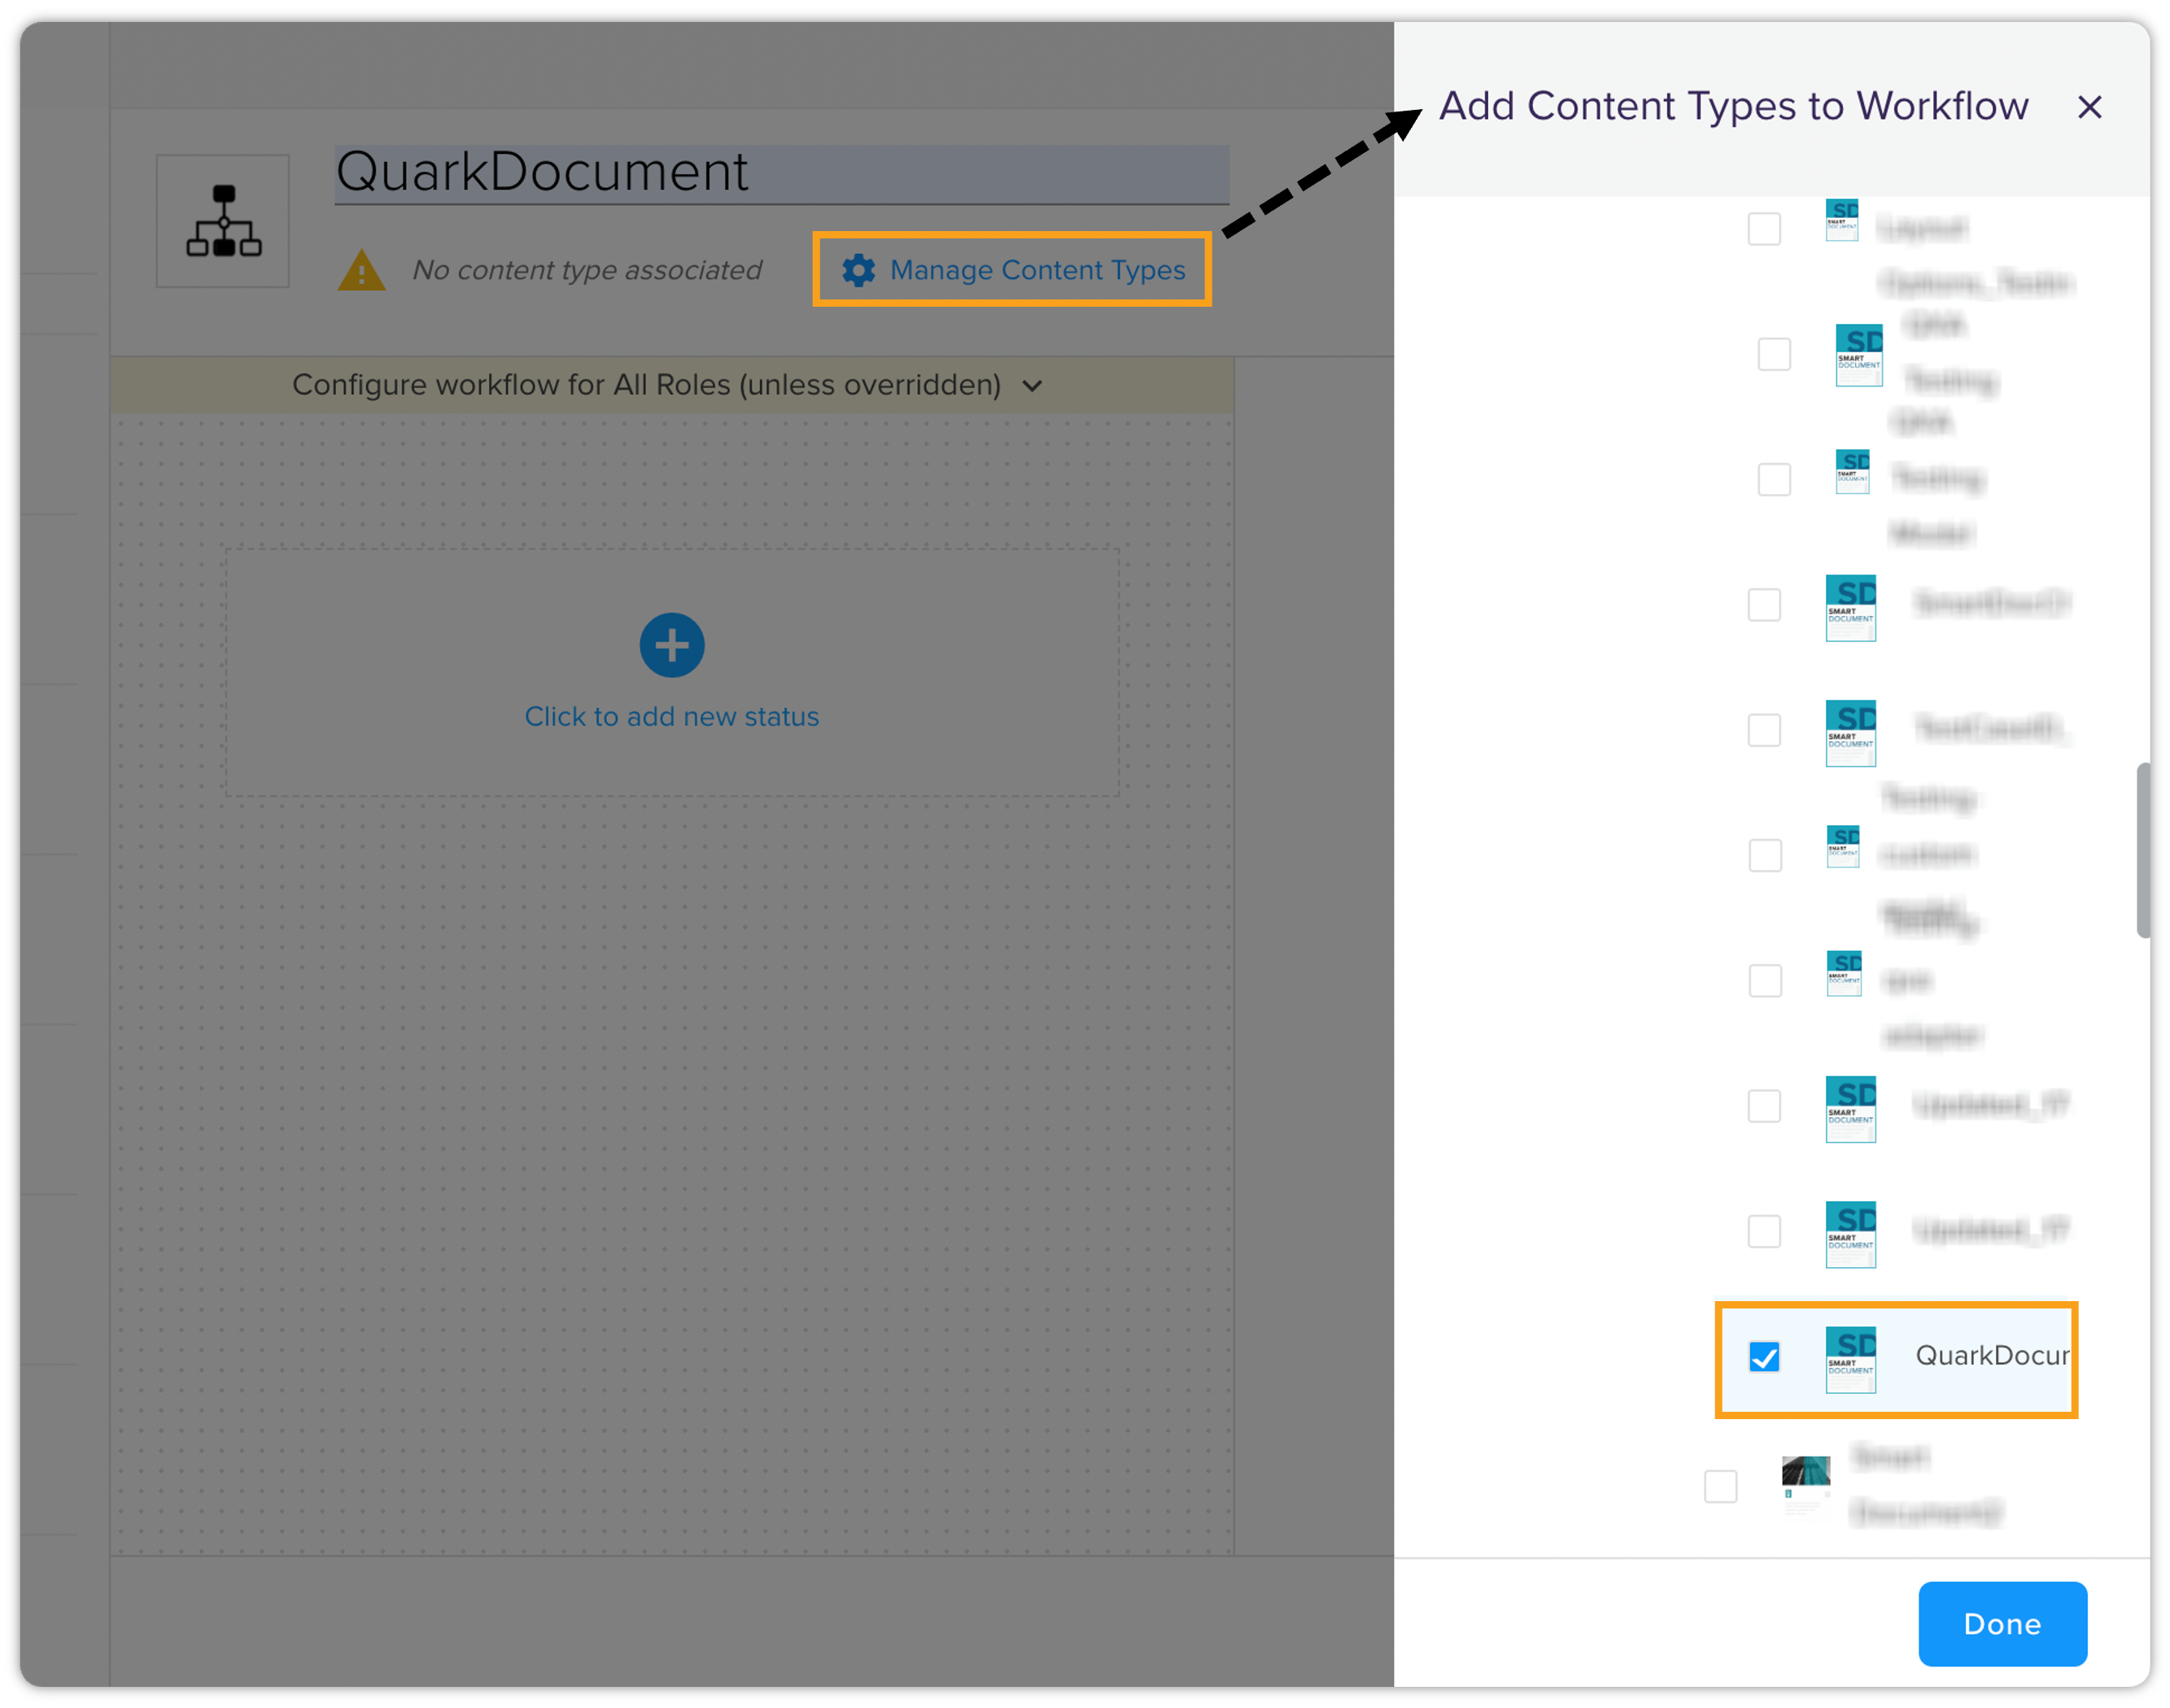 You can see the added content types right below the Workflow name in the Manage Work Steps pane.
-
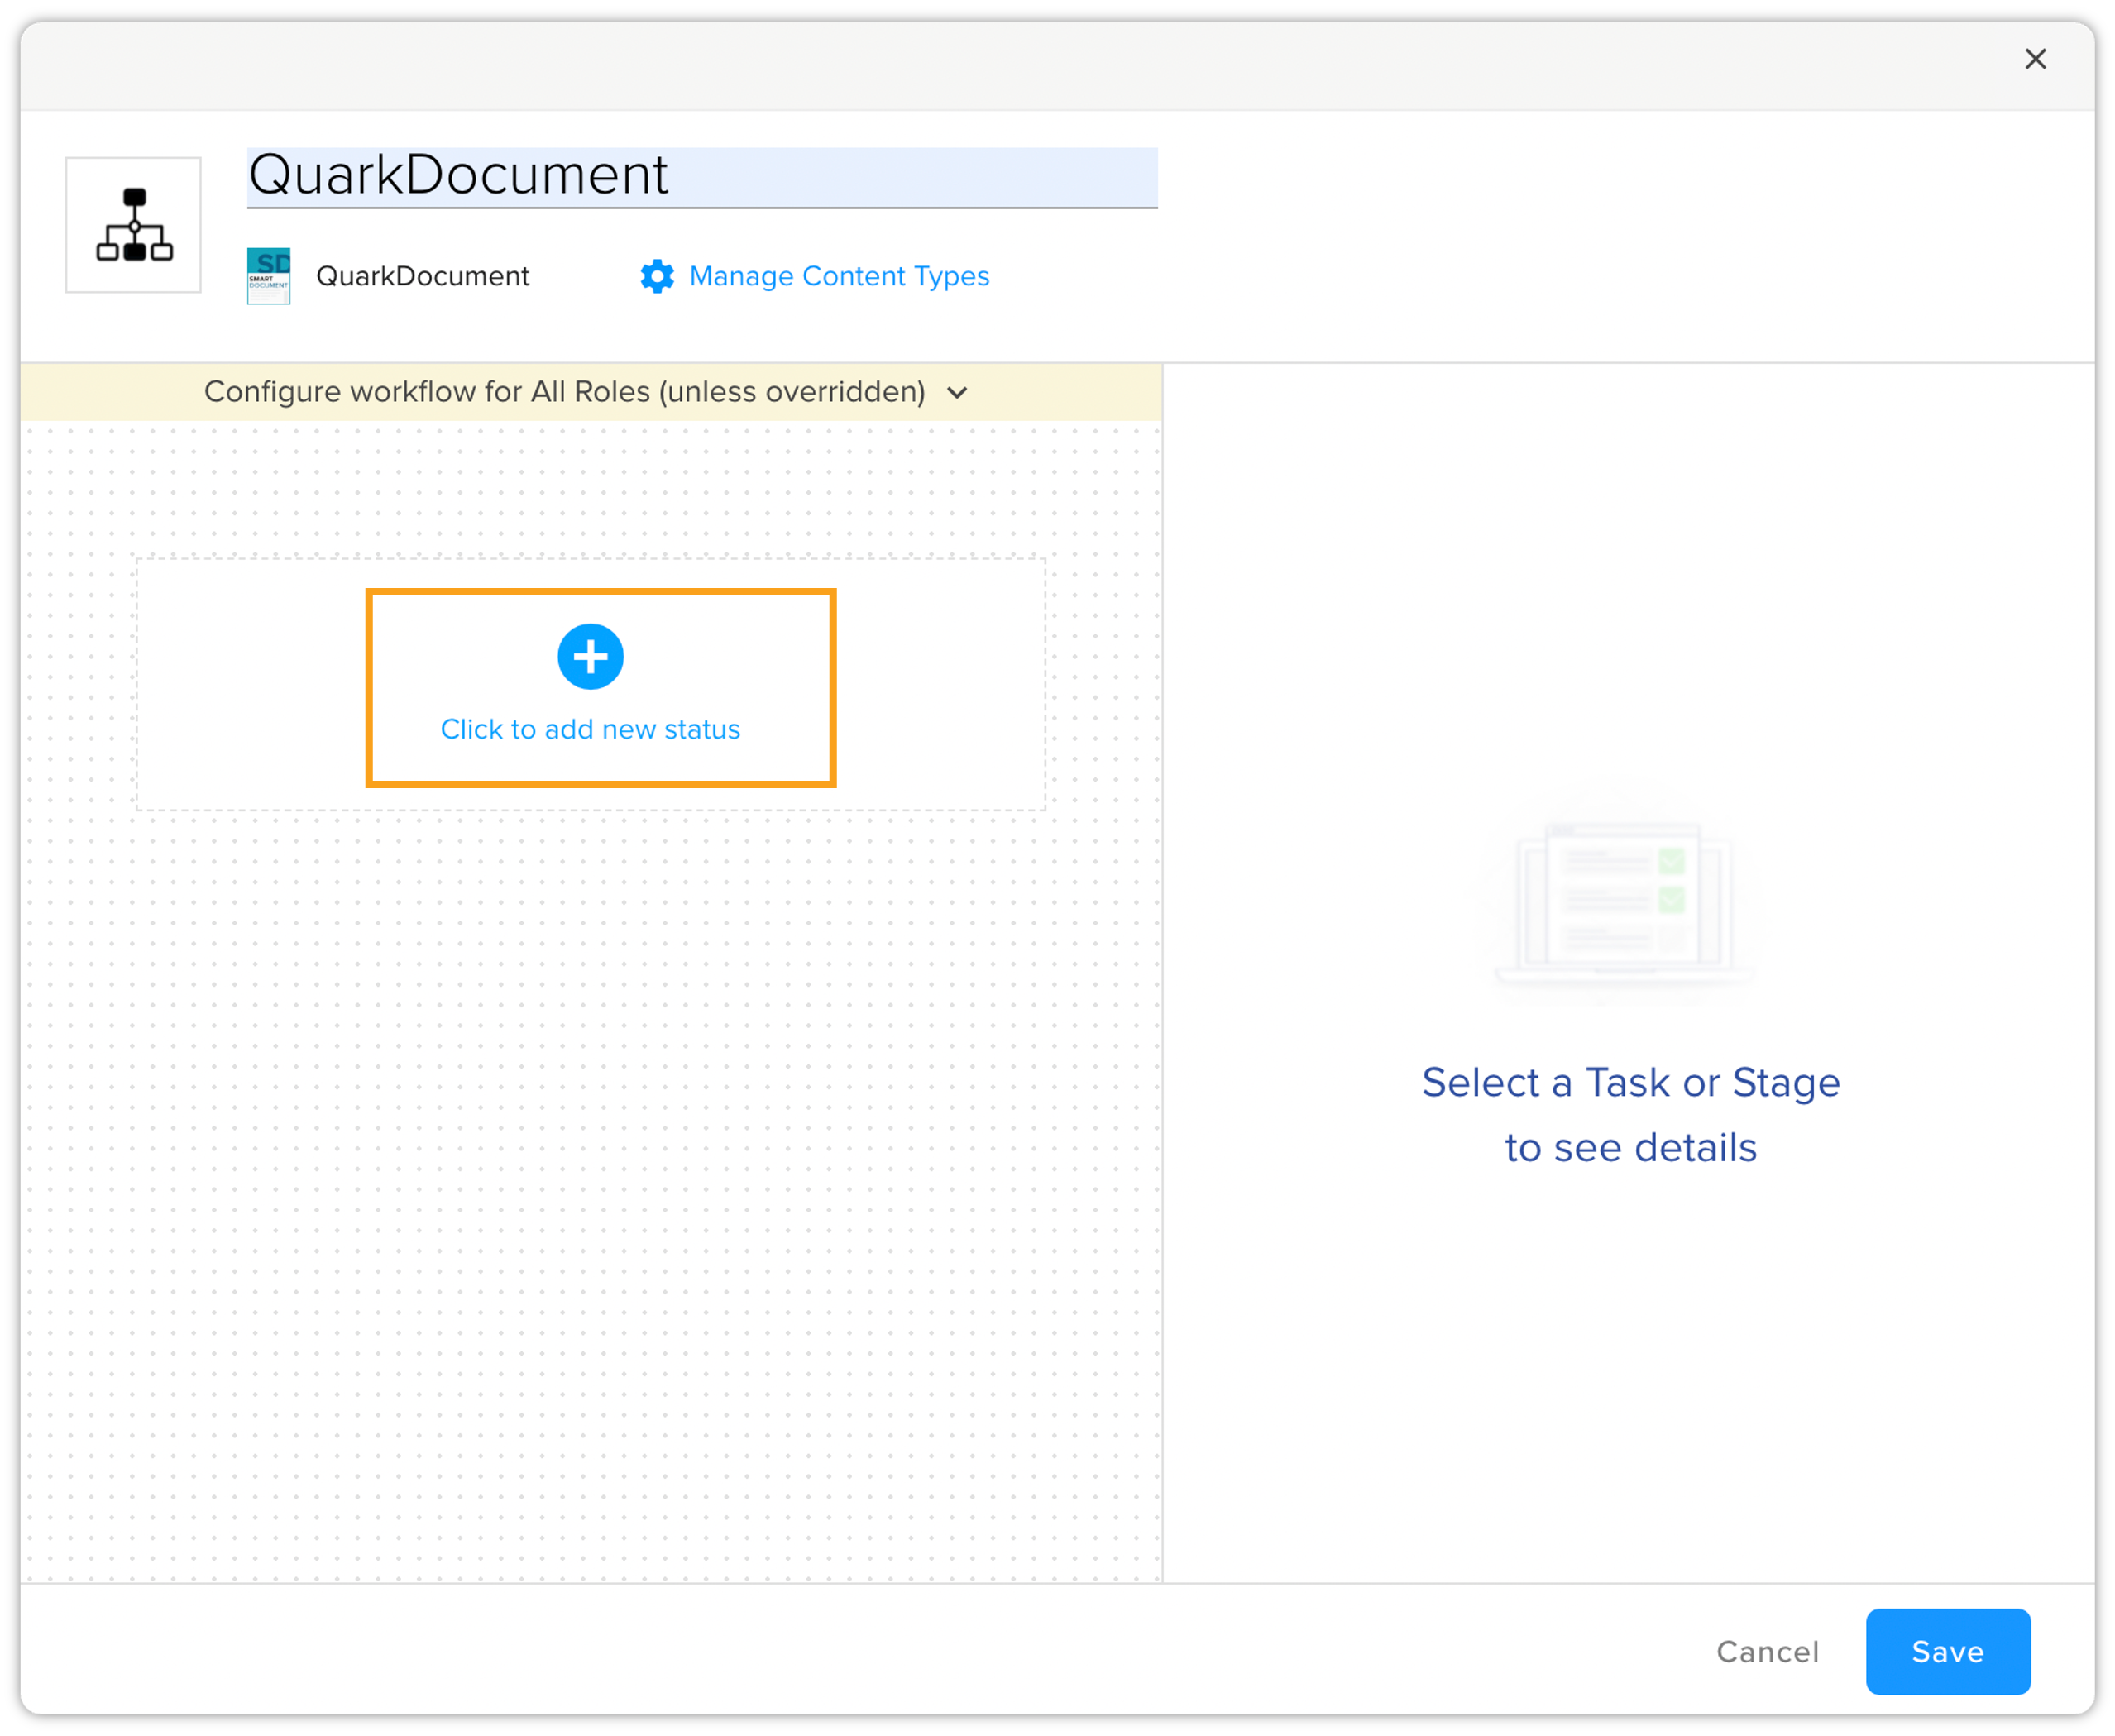
Click + Click to add new status to add a new status to the workflow (added as a new status card in the left frame).
-
This will open the Manage Work Steps pane containing the information related to new status. Here you can set a name and other properties to manage the flow of a status.
-
Click Save.
Manage Workflow Statuses
You can manage workflow statuses while creating or editing a workflow. The following are the status settings that you can manage:
General Settings
In the general settings, you can manage the following:
-
Status Name: A text field wherein you can edit/update the name of the status.
-
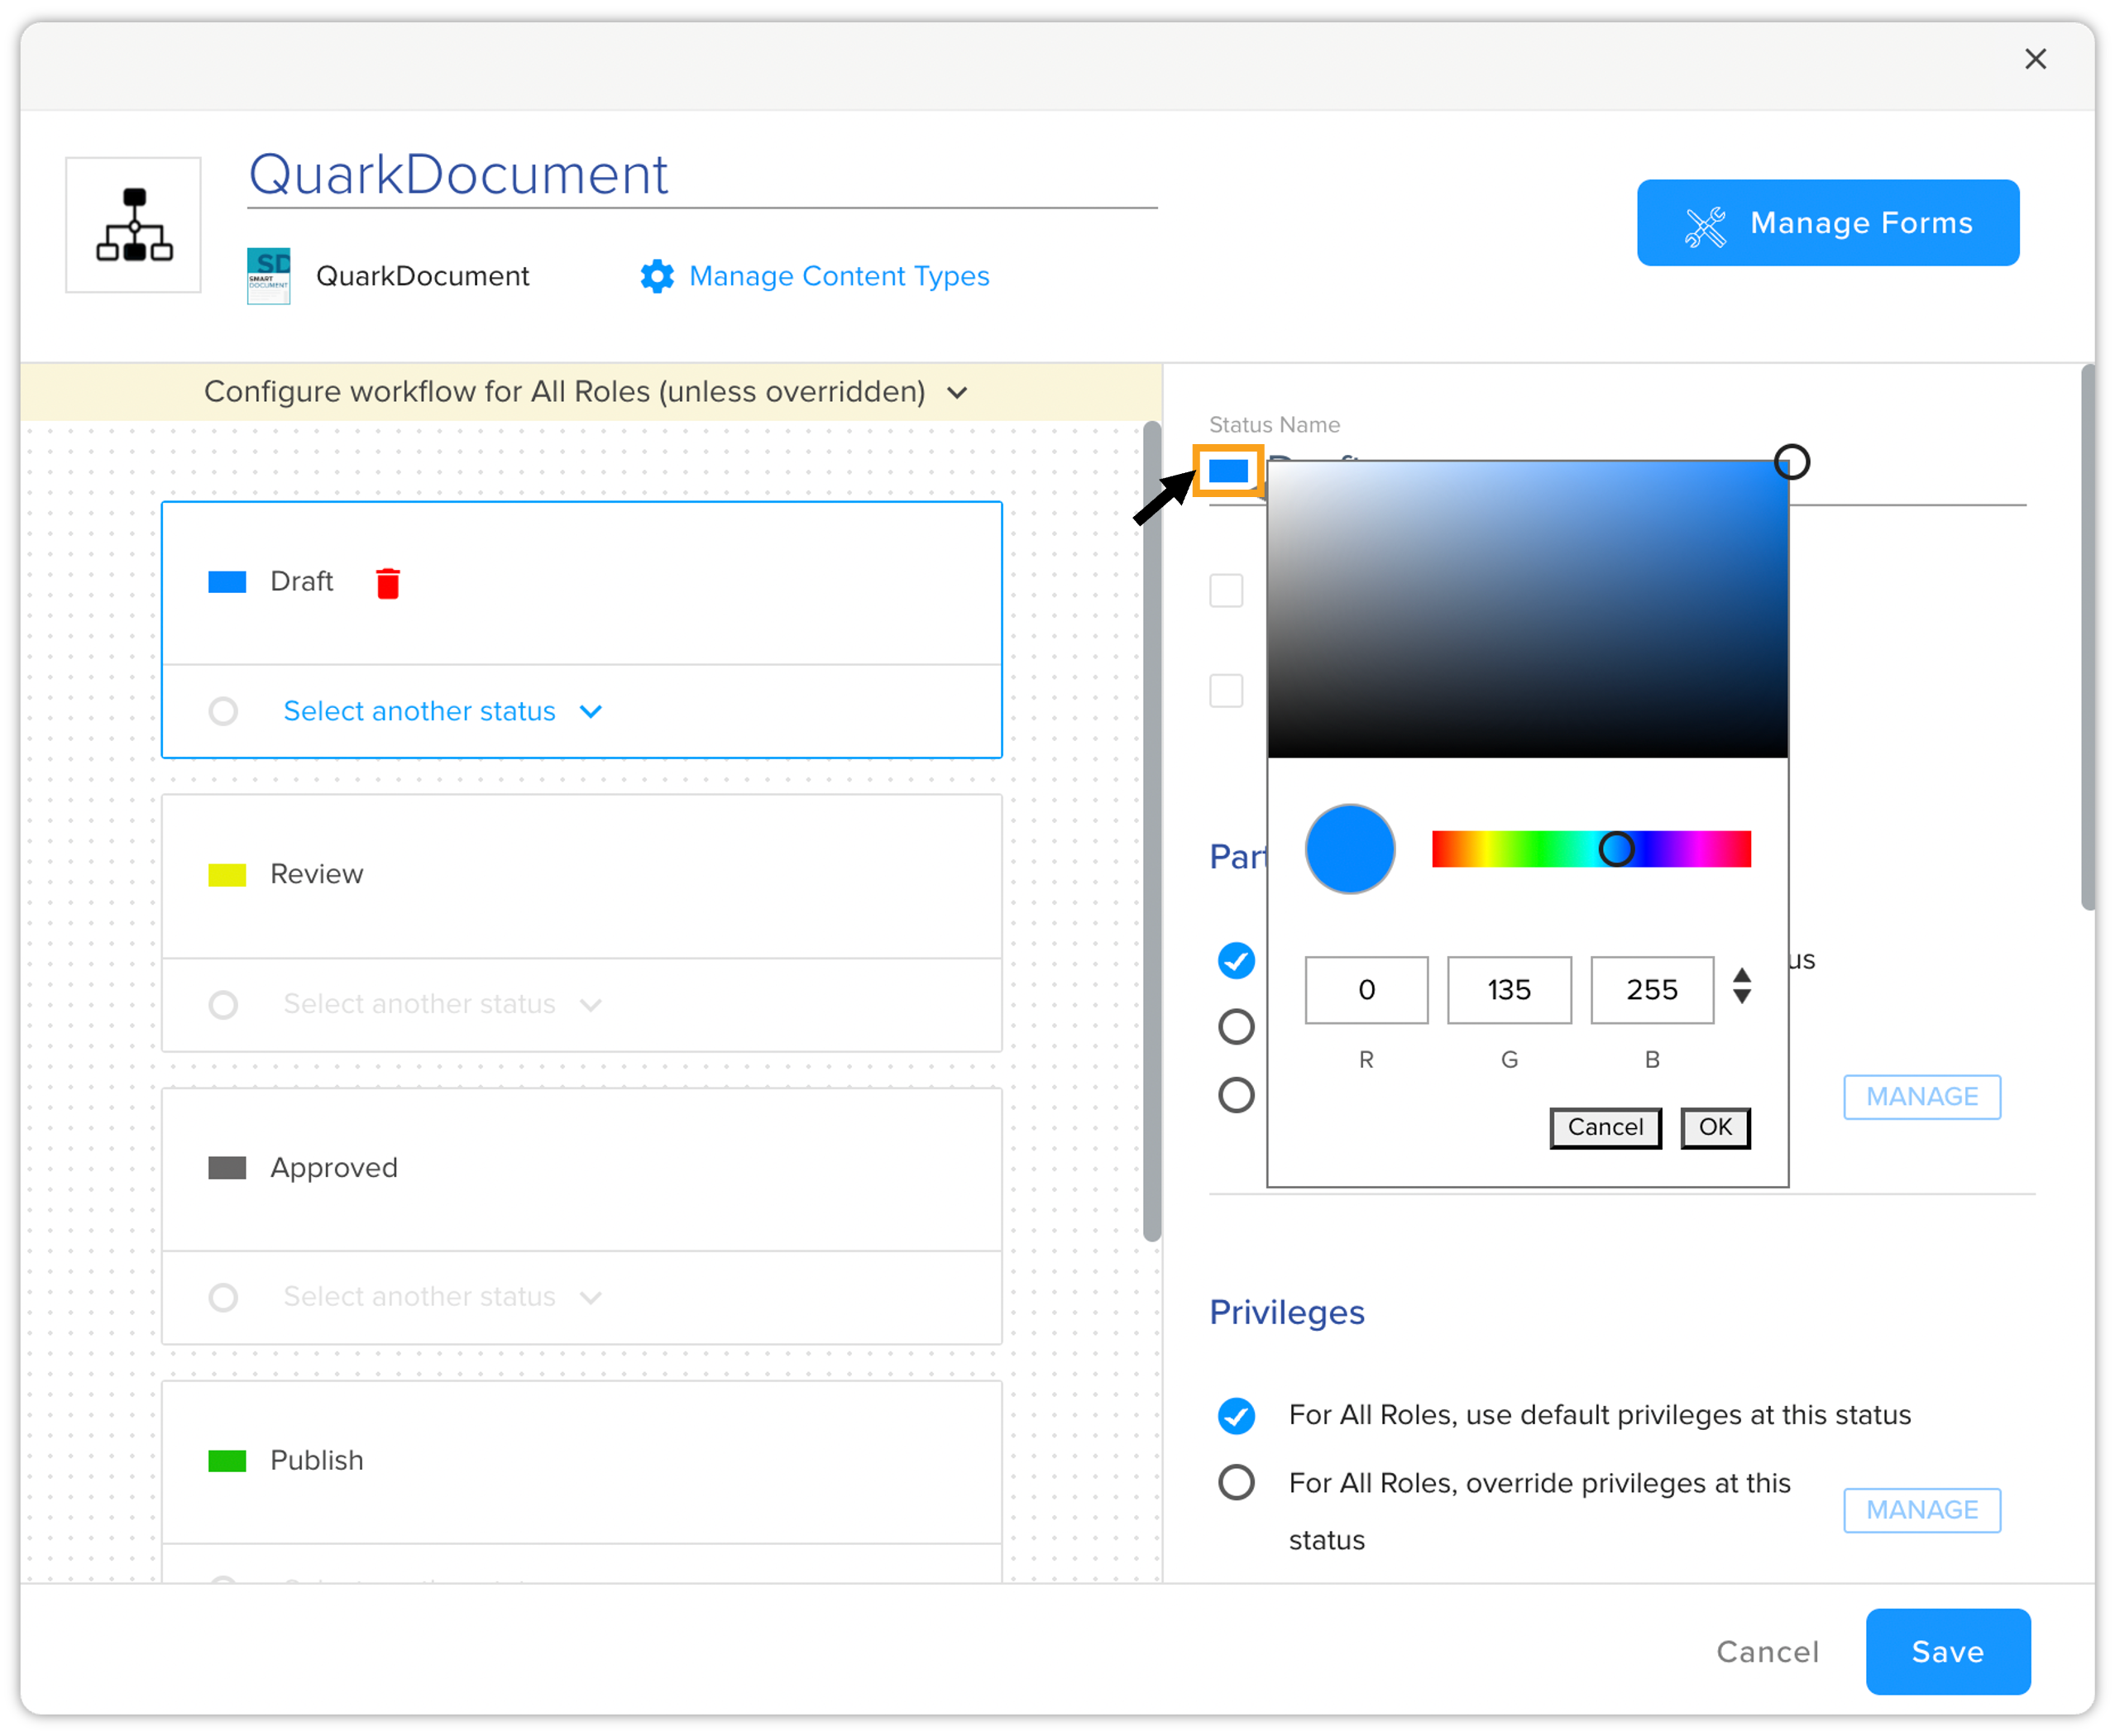
Color code: A color bar left to the name of a status, which you can select to open the color pallet and then select a unique color for the status.
-
Set as starting status: A check box that allows you to set or remove a status as a starting status (or one of the starting statuses), which a user can assign to a new document as the first workflow status.
You can only set a status as a starting status when at least one more status is already available for the same workflow and after you have created a transition relation between them. -
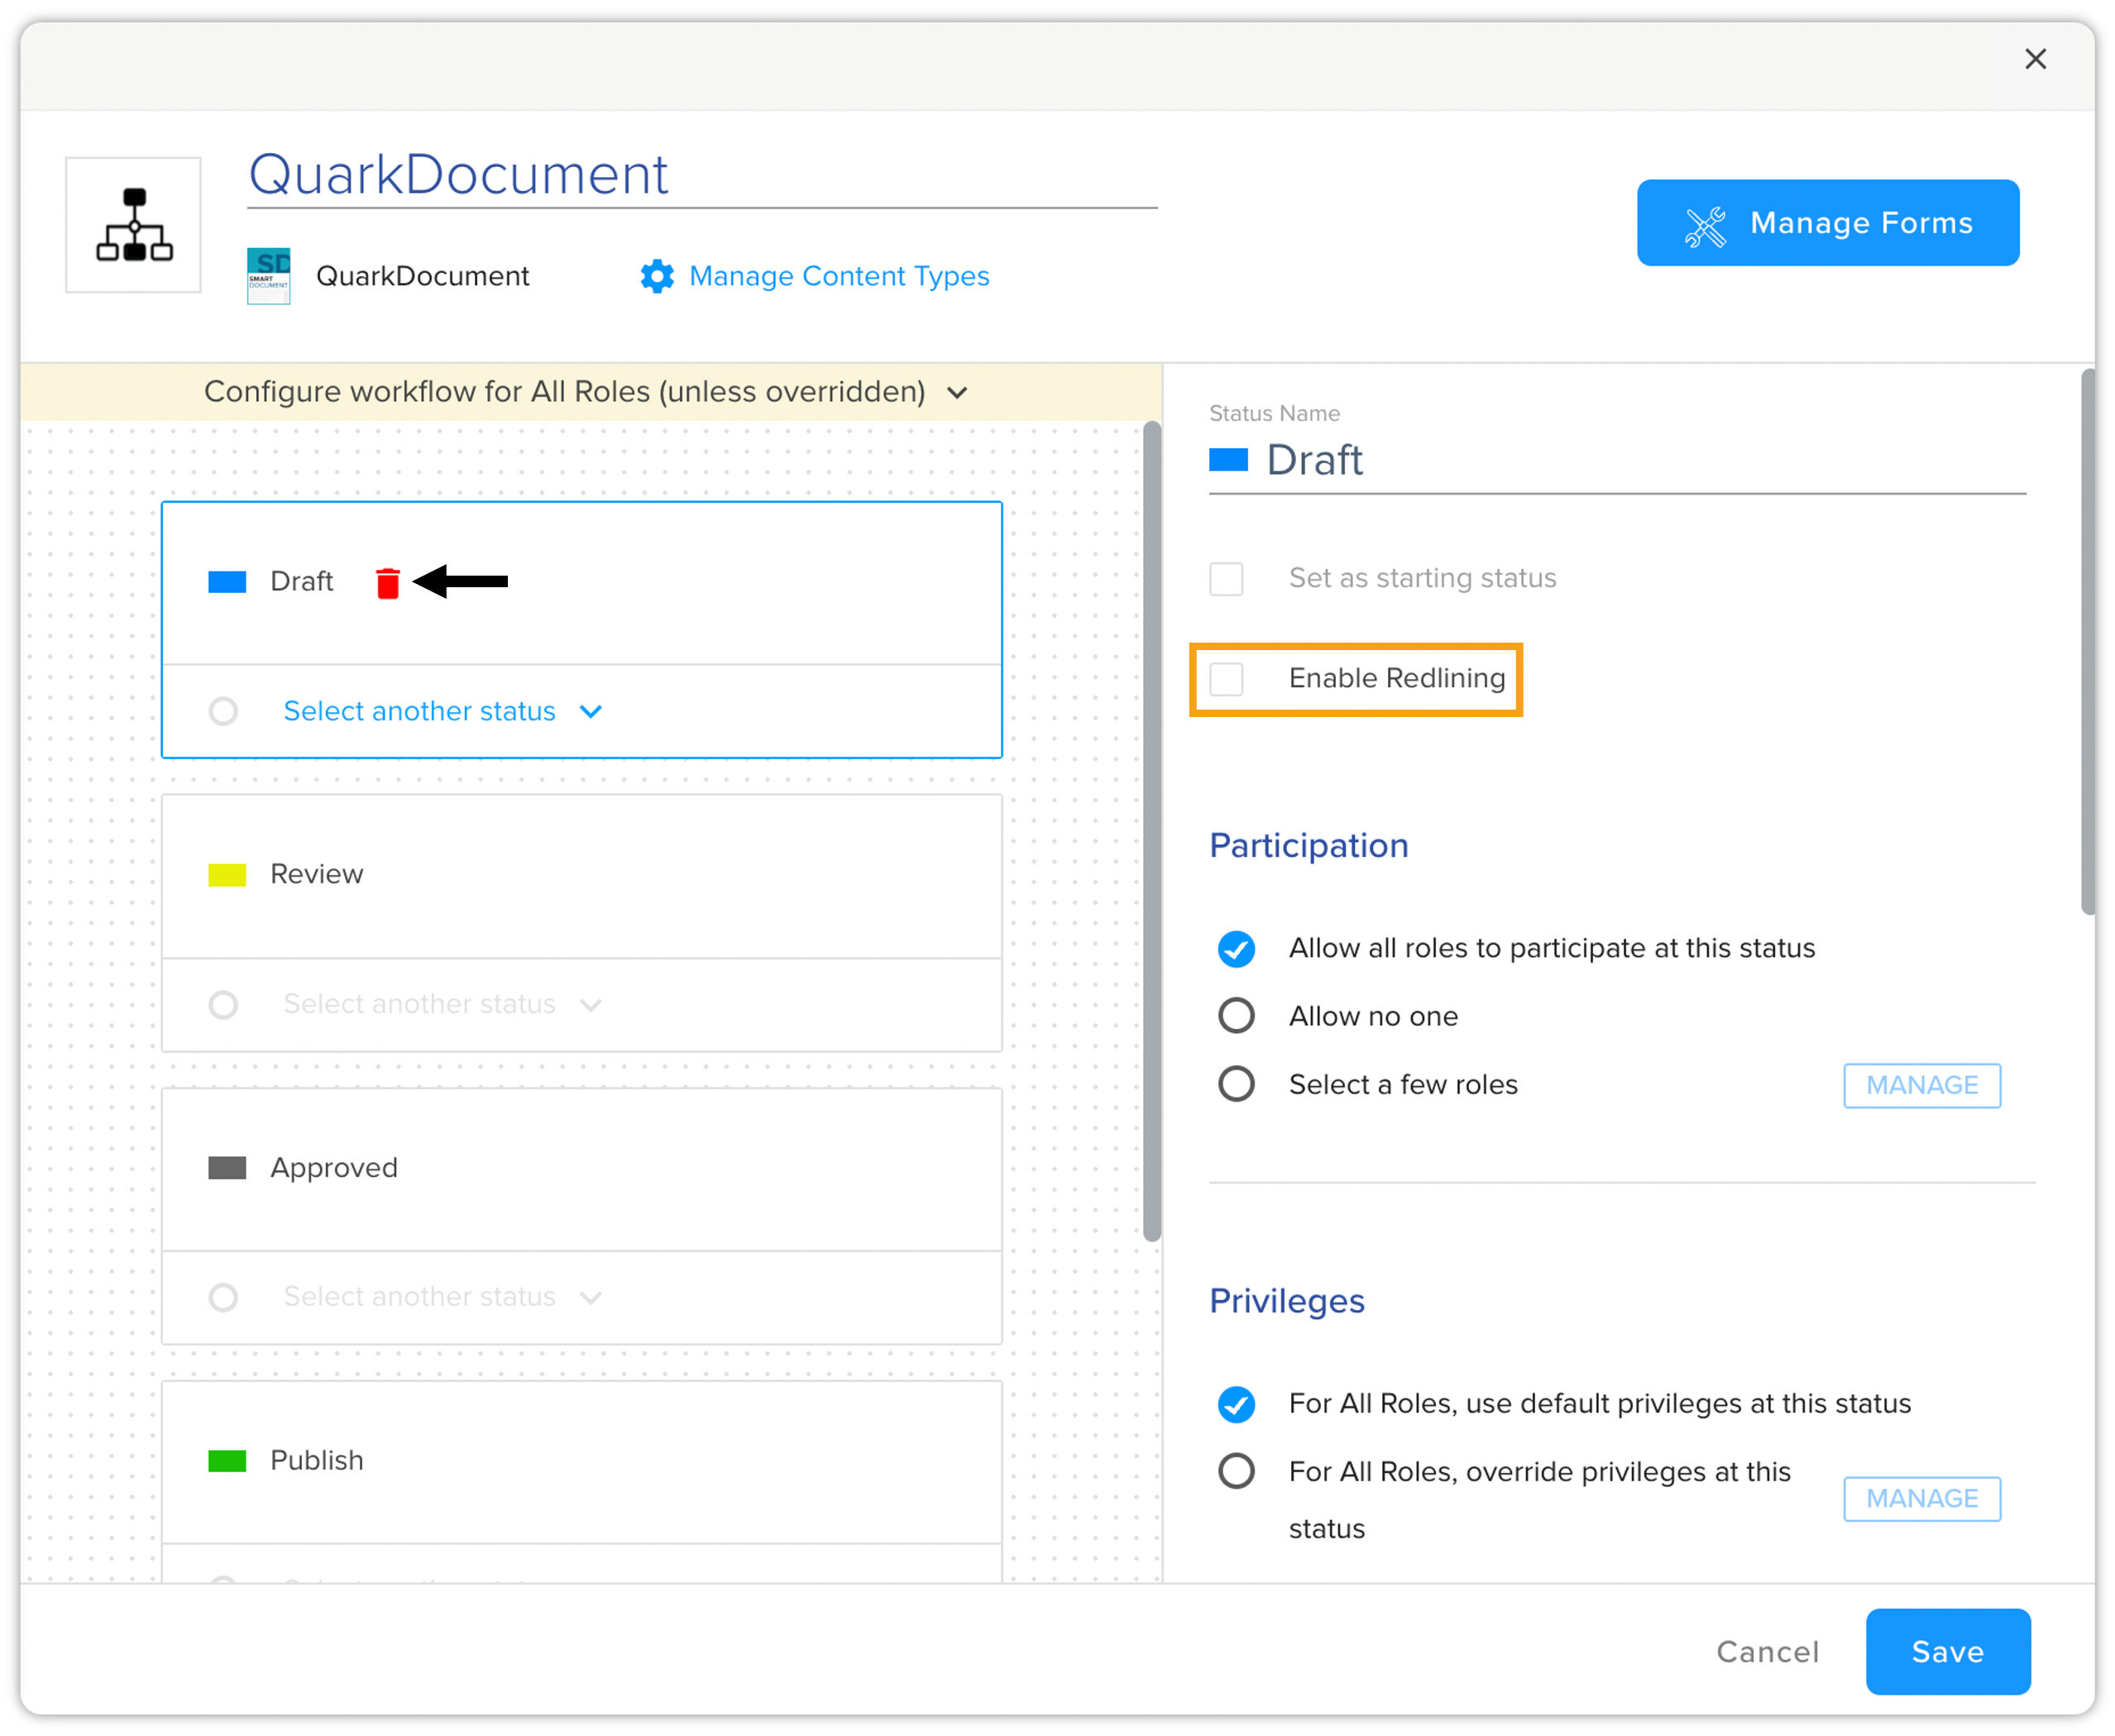
Enable Redlining: A check box that allows/disallows tracking changes in a document.
-
Delete Status: You can delete a status by clicking the delete icon
 within the status card.
Transitions
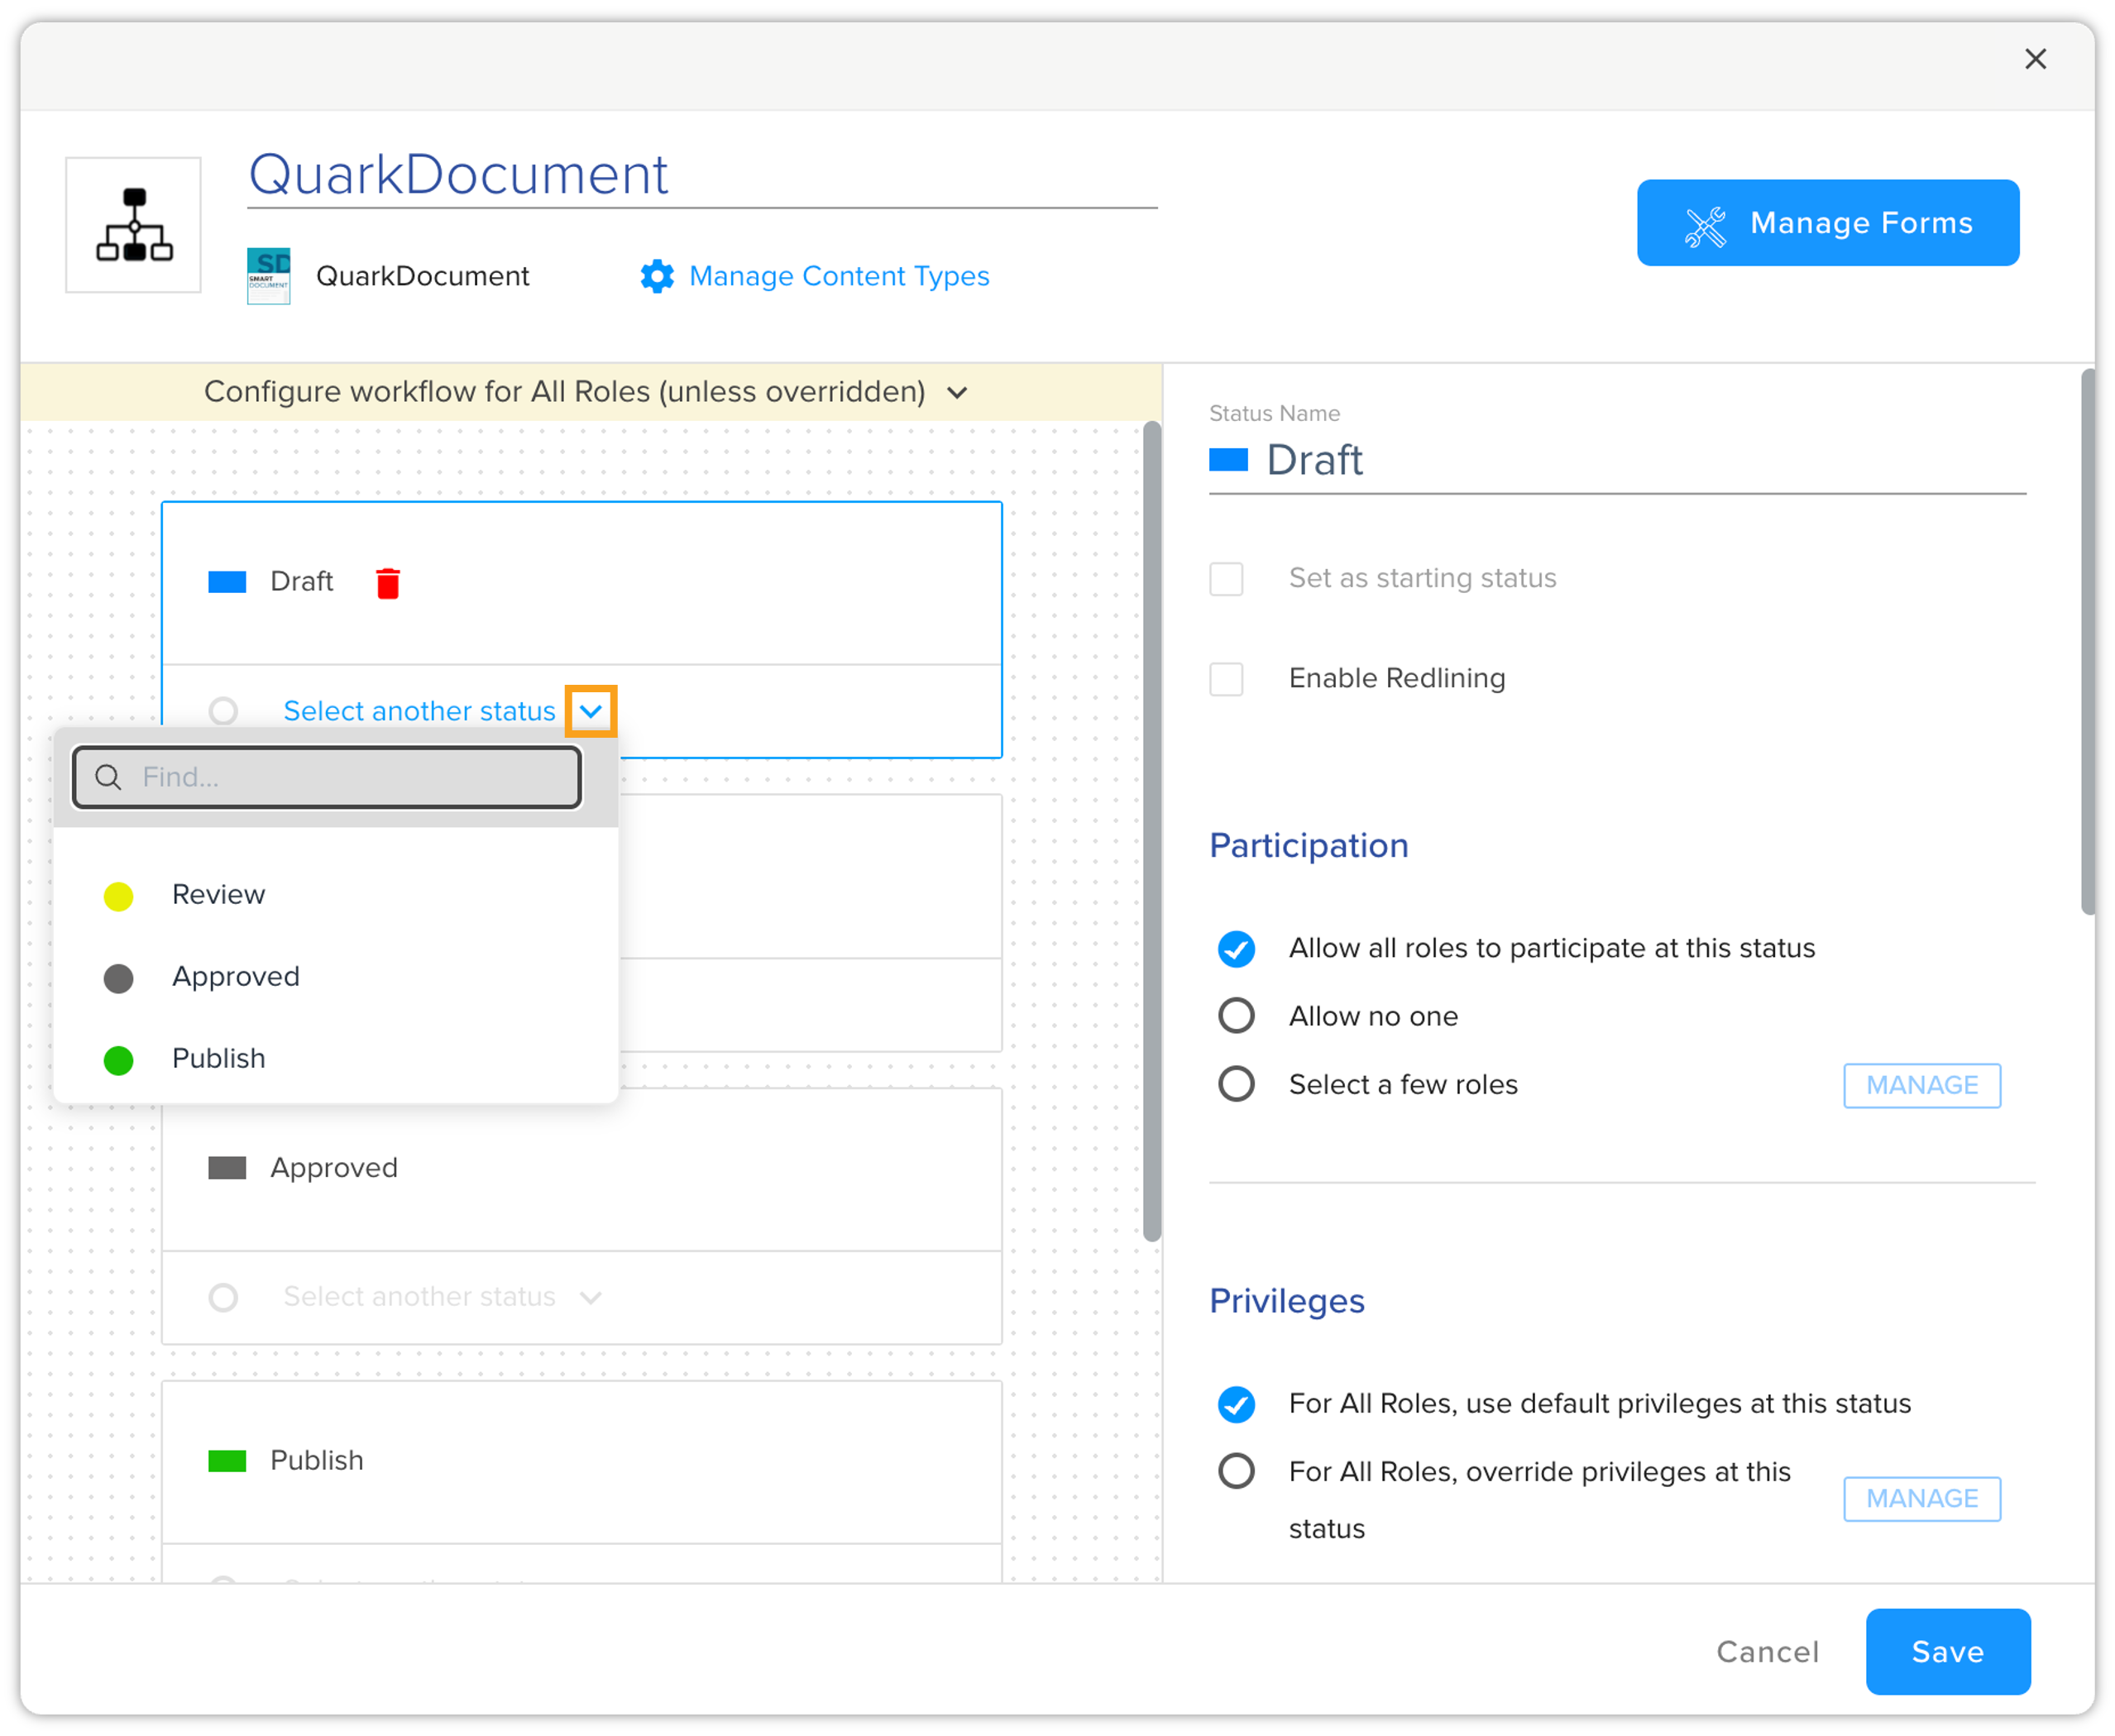
You can set transitions between two or more statuses to define a structured flow between the statuses.
To set a transition for a status:
-
Select the status for which you want to set transition.
-
Select the Select another status dropdown menu to see the list of the other statuses in the workflow.
-
Select the status(es) that you want to transition to from the current status.
-
After you have set transition for a status, QPP adds a Transitions button to the status card to expand or hide the transitions related the status.
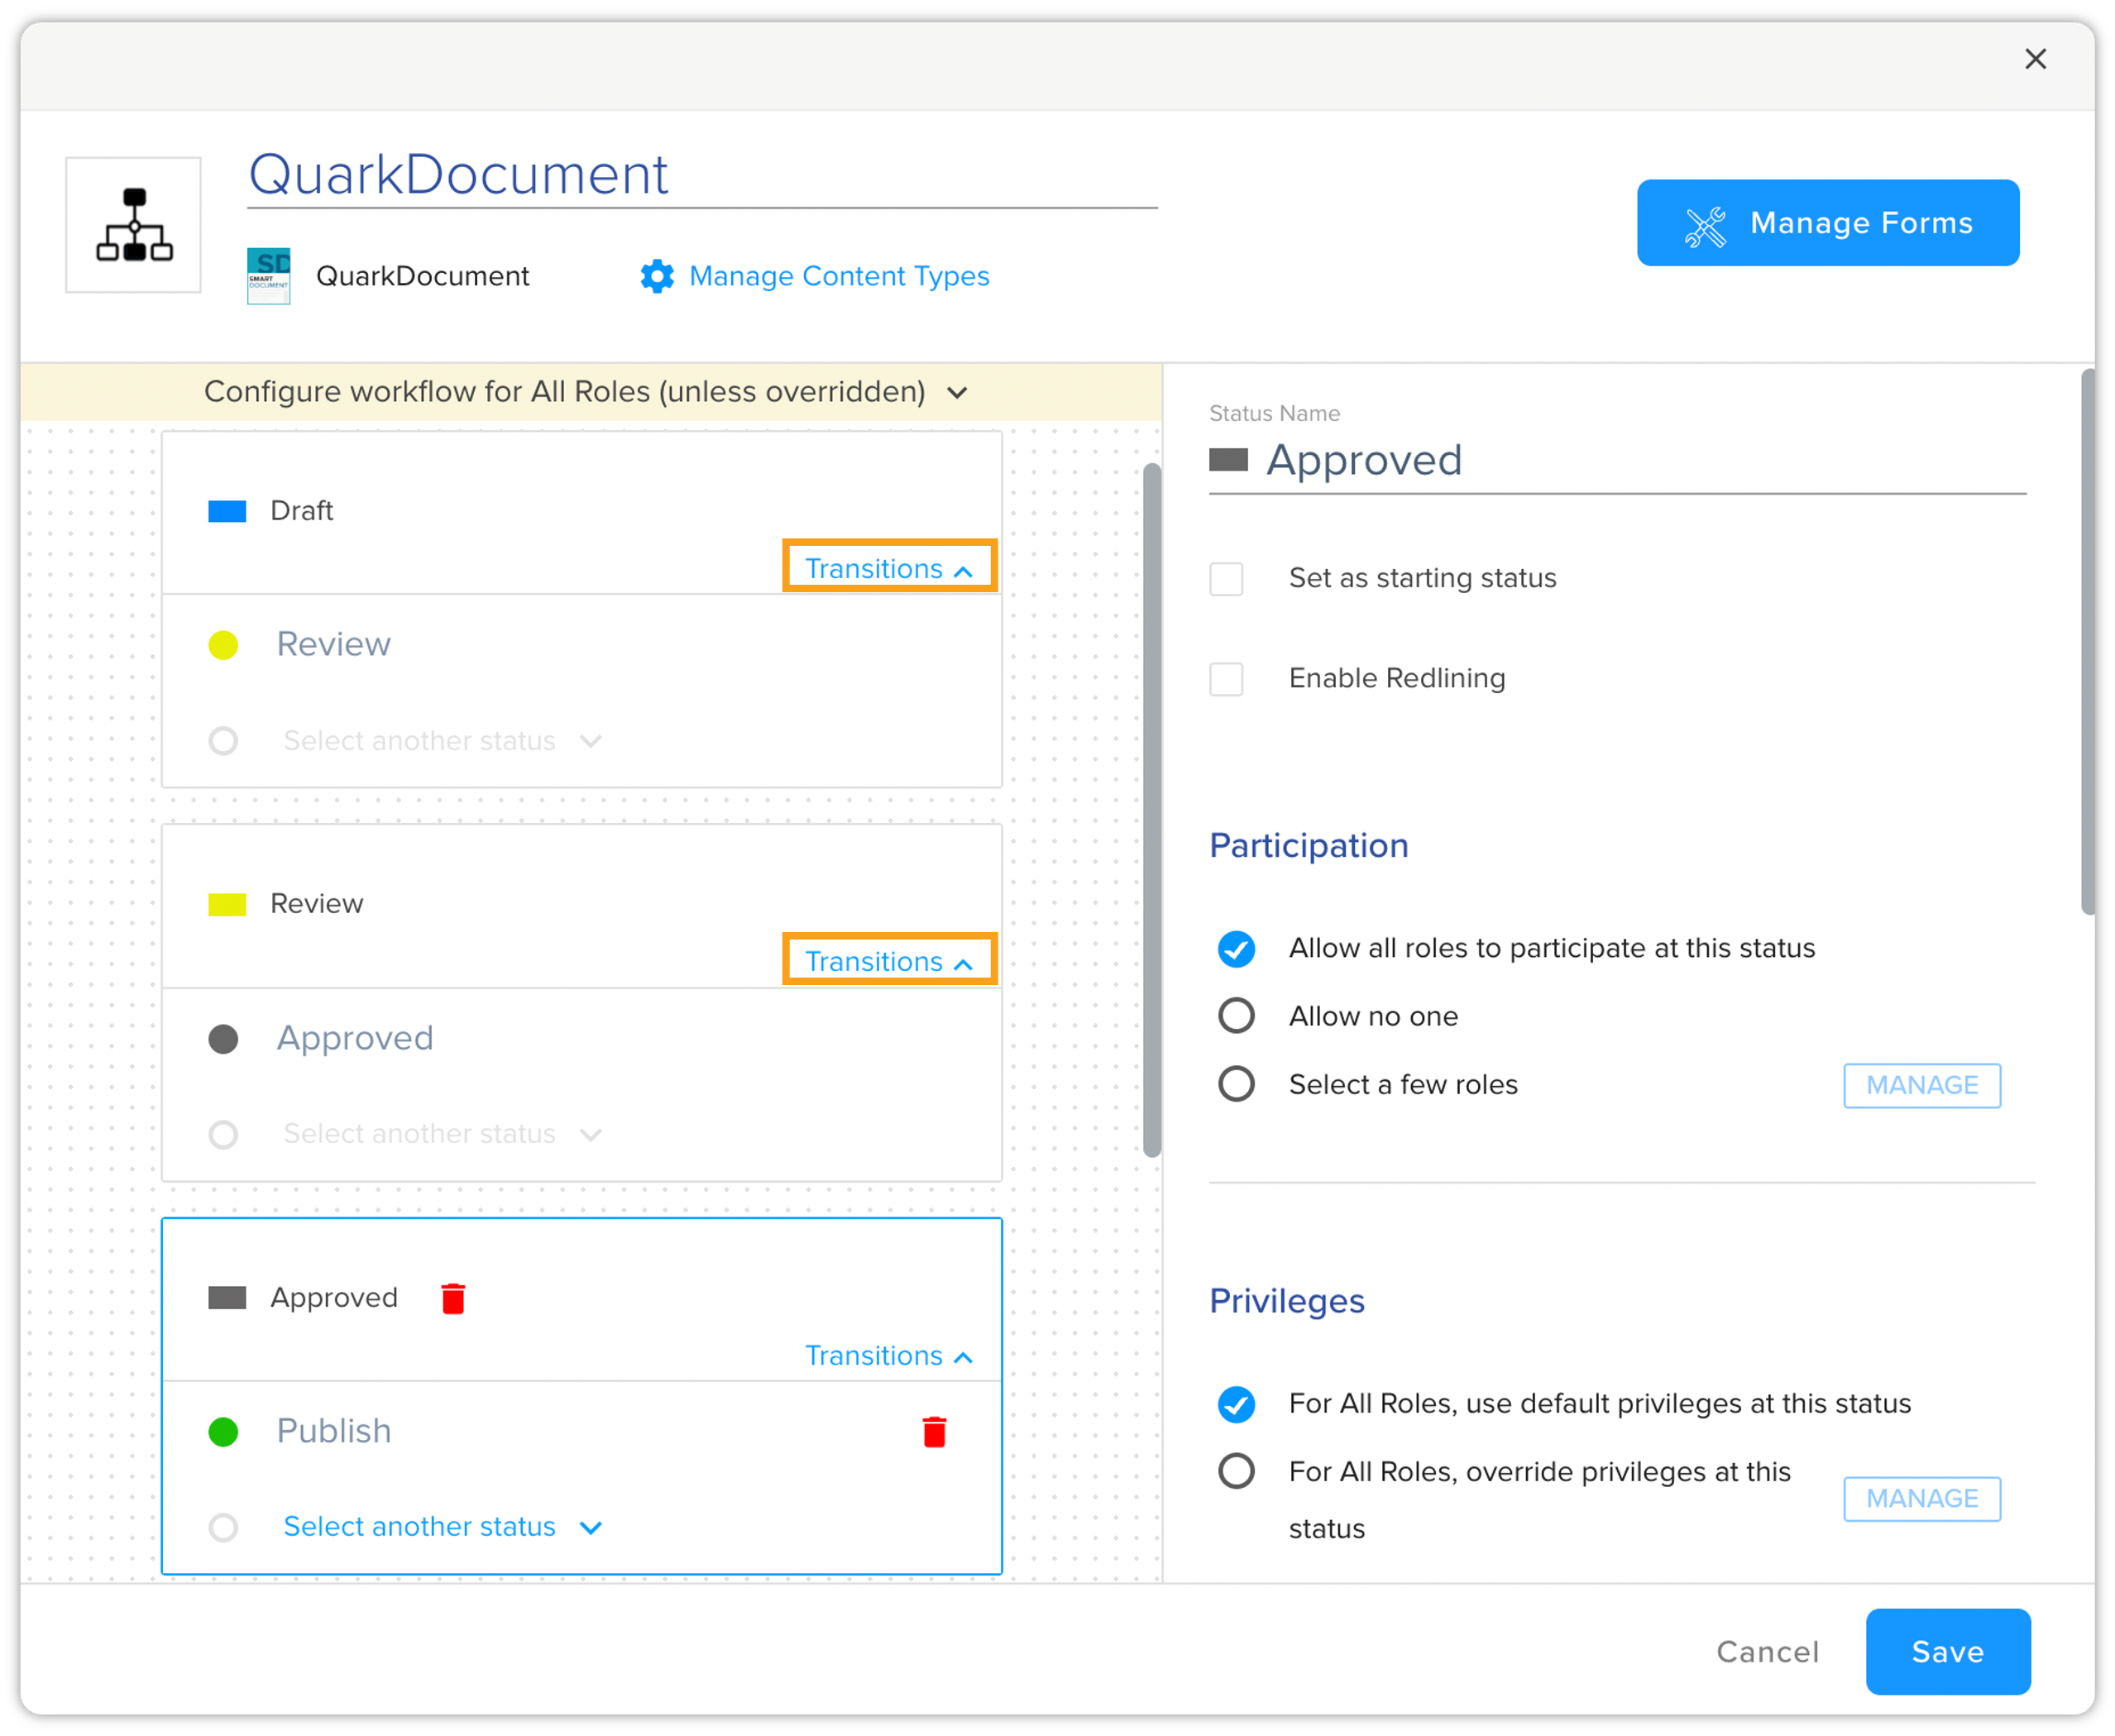
next to the transition status. Participation
The settings in the Participation section allows you to decide who can set this status for your documents.
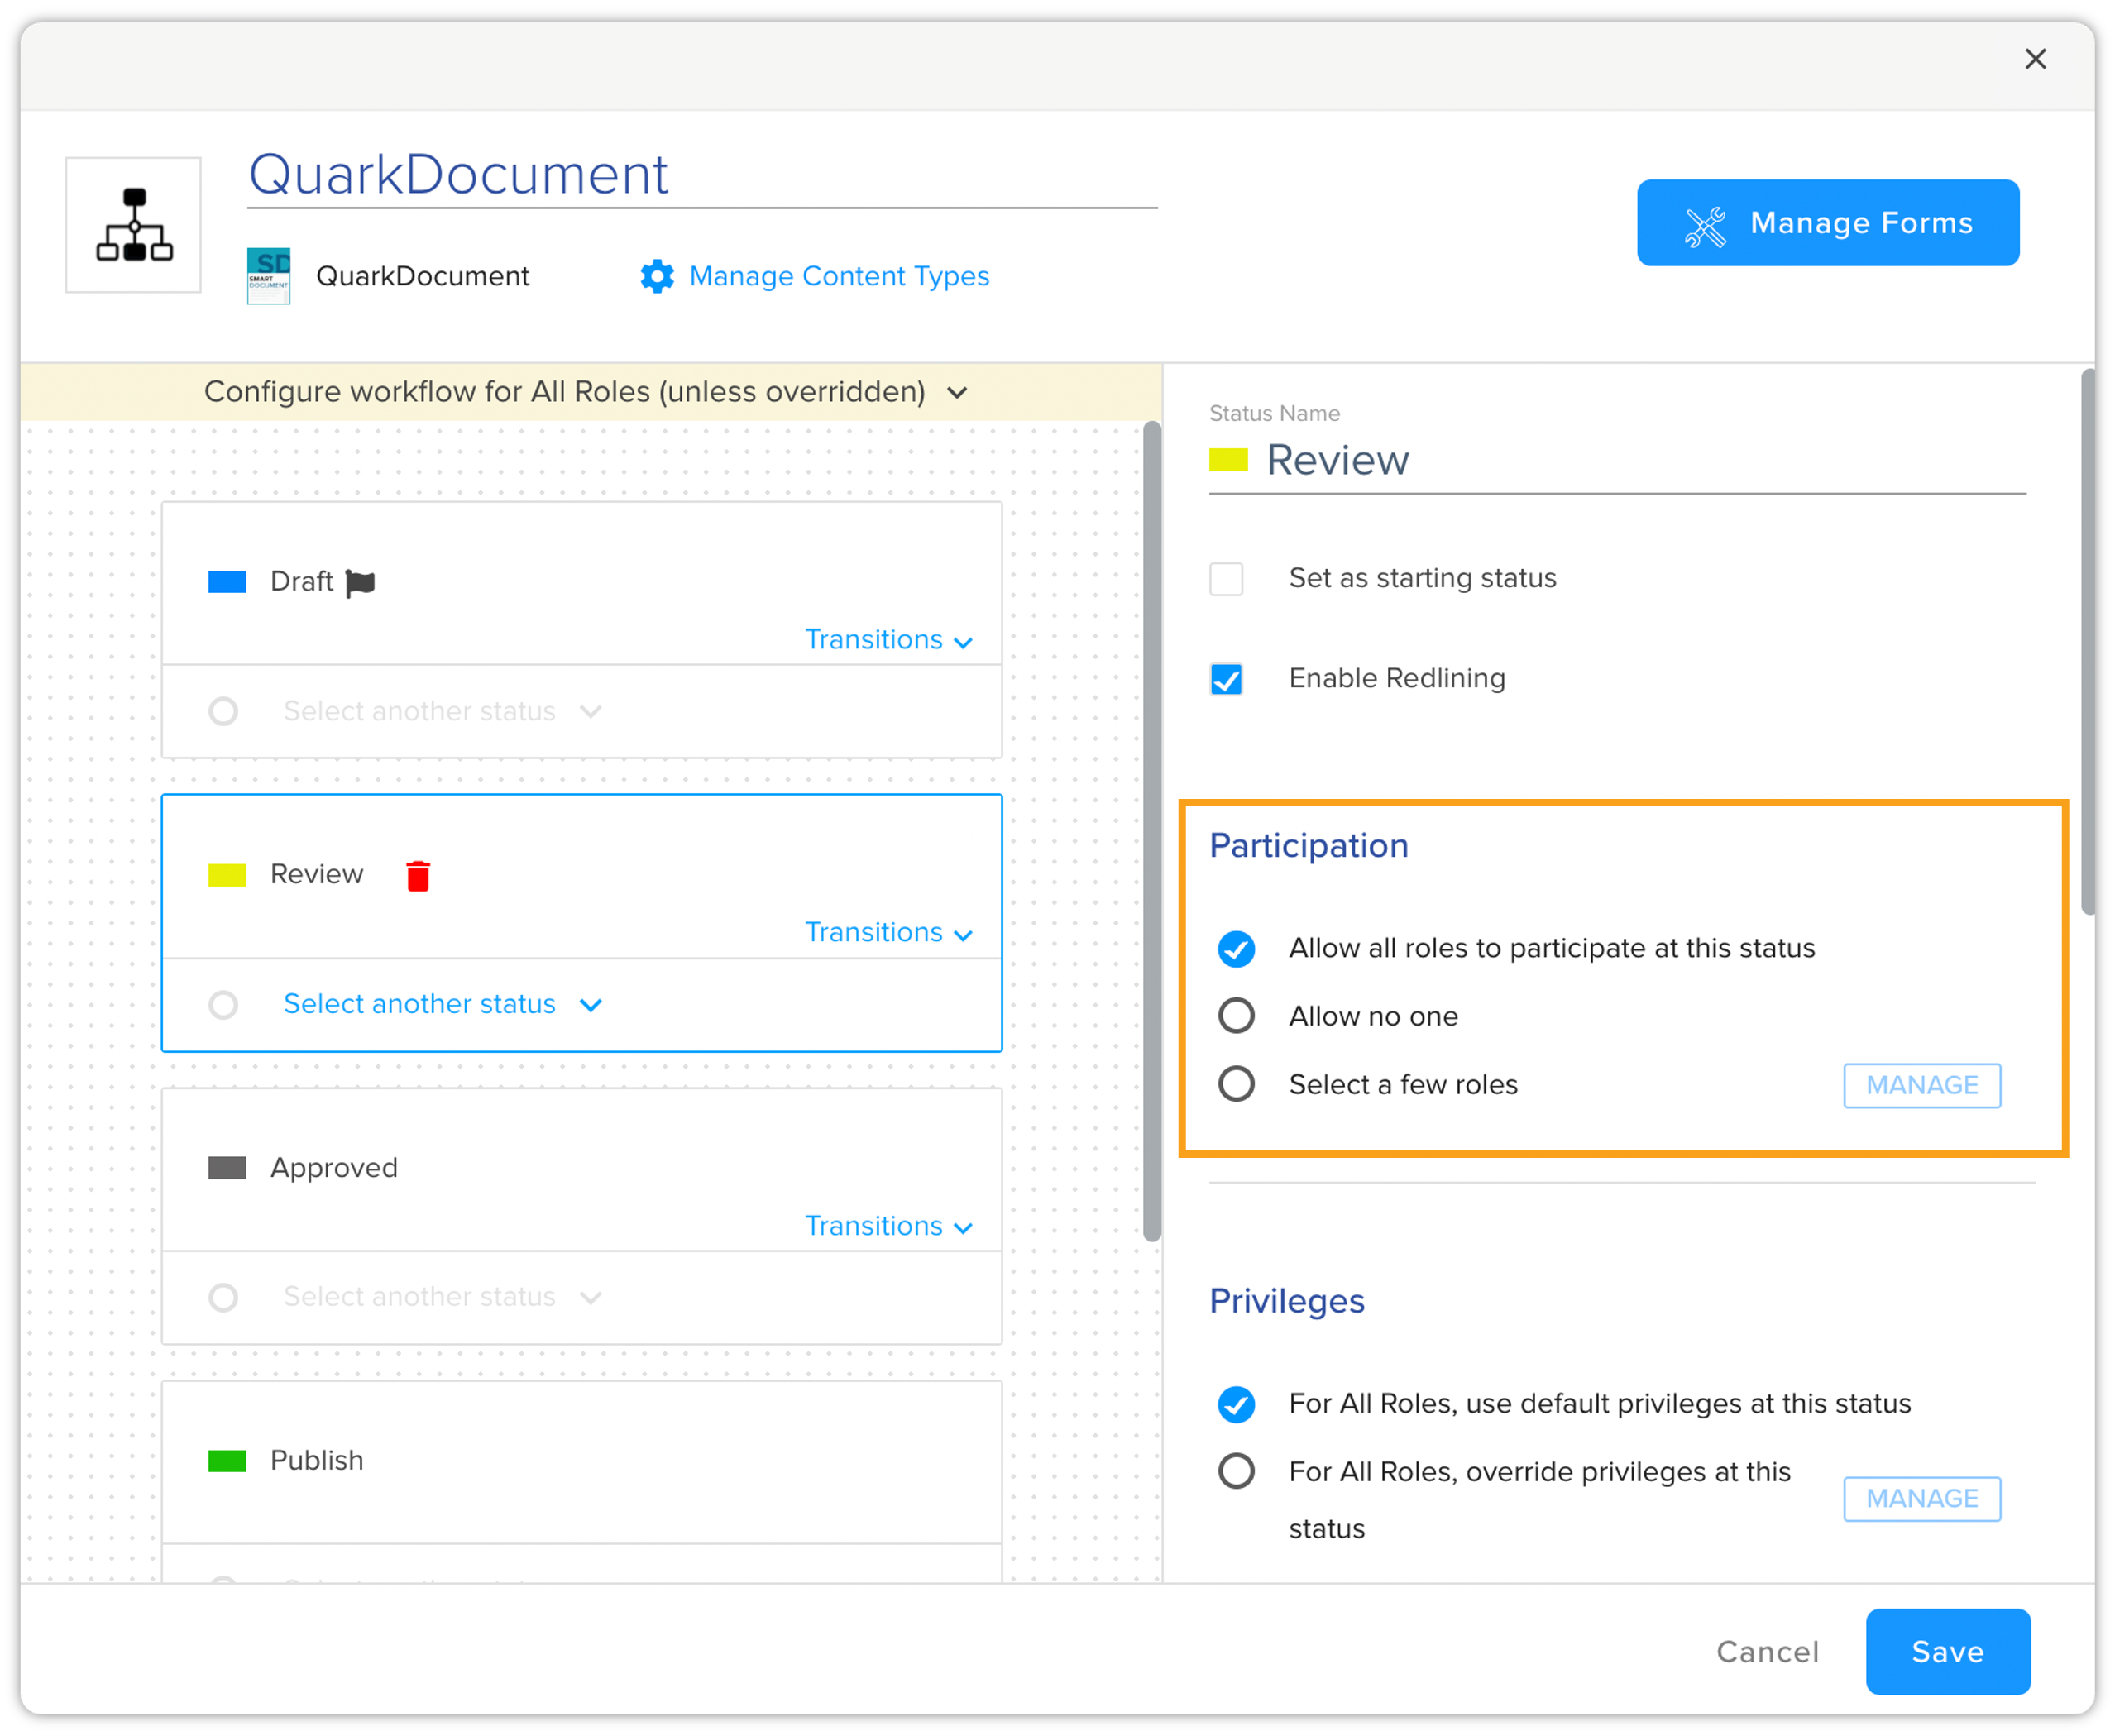
There are three options:
-
Allow all roles to participate at this status: Usually the default selection that allows everyone with a certain role the access to a status.
-
Allow no one: This option helps prevent any manual override to content automation flow.
-
Select a few roles: Allows you to grant access to a status to only a certain set of users. You can manage the list of users by clicking Manage, which gets enabled when you click the Select a few roles radio button.
The Manage button opens a pane with a list of roles from which you can select the ones you want to grant access to a status.
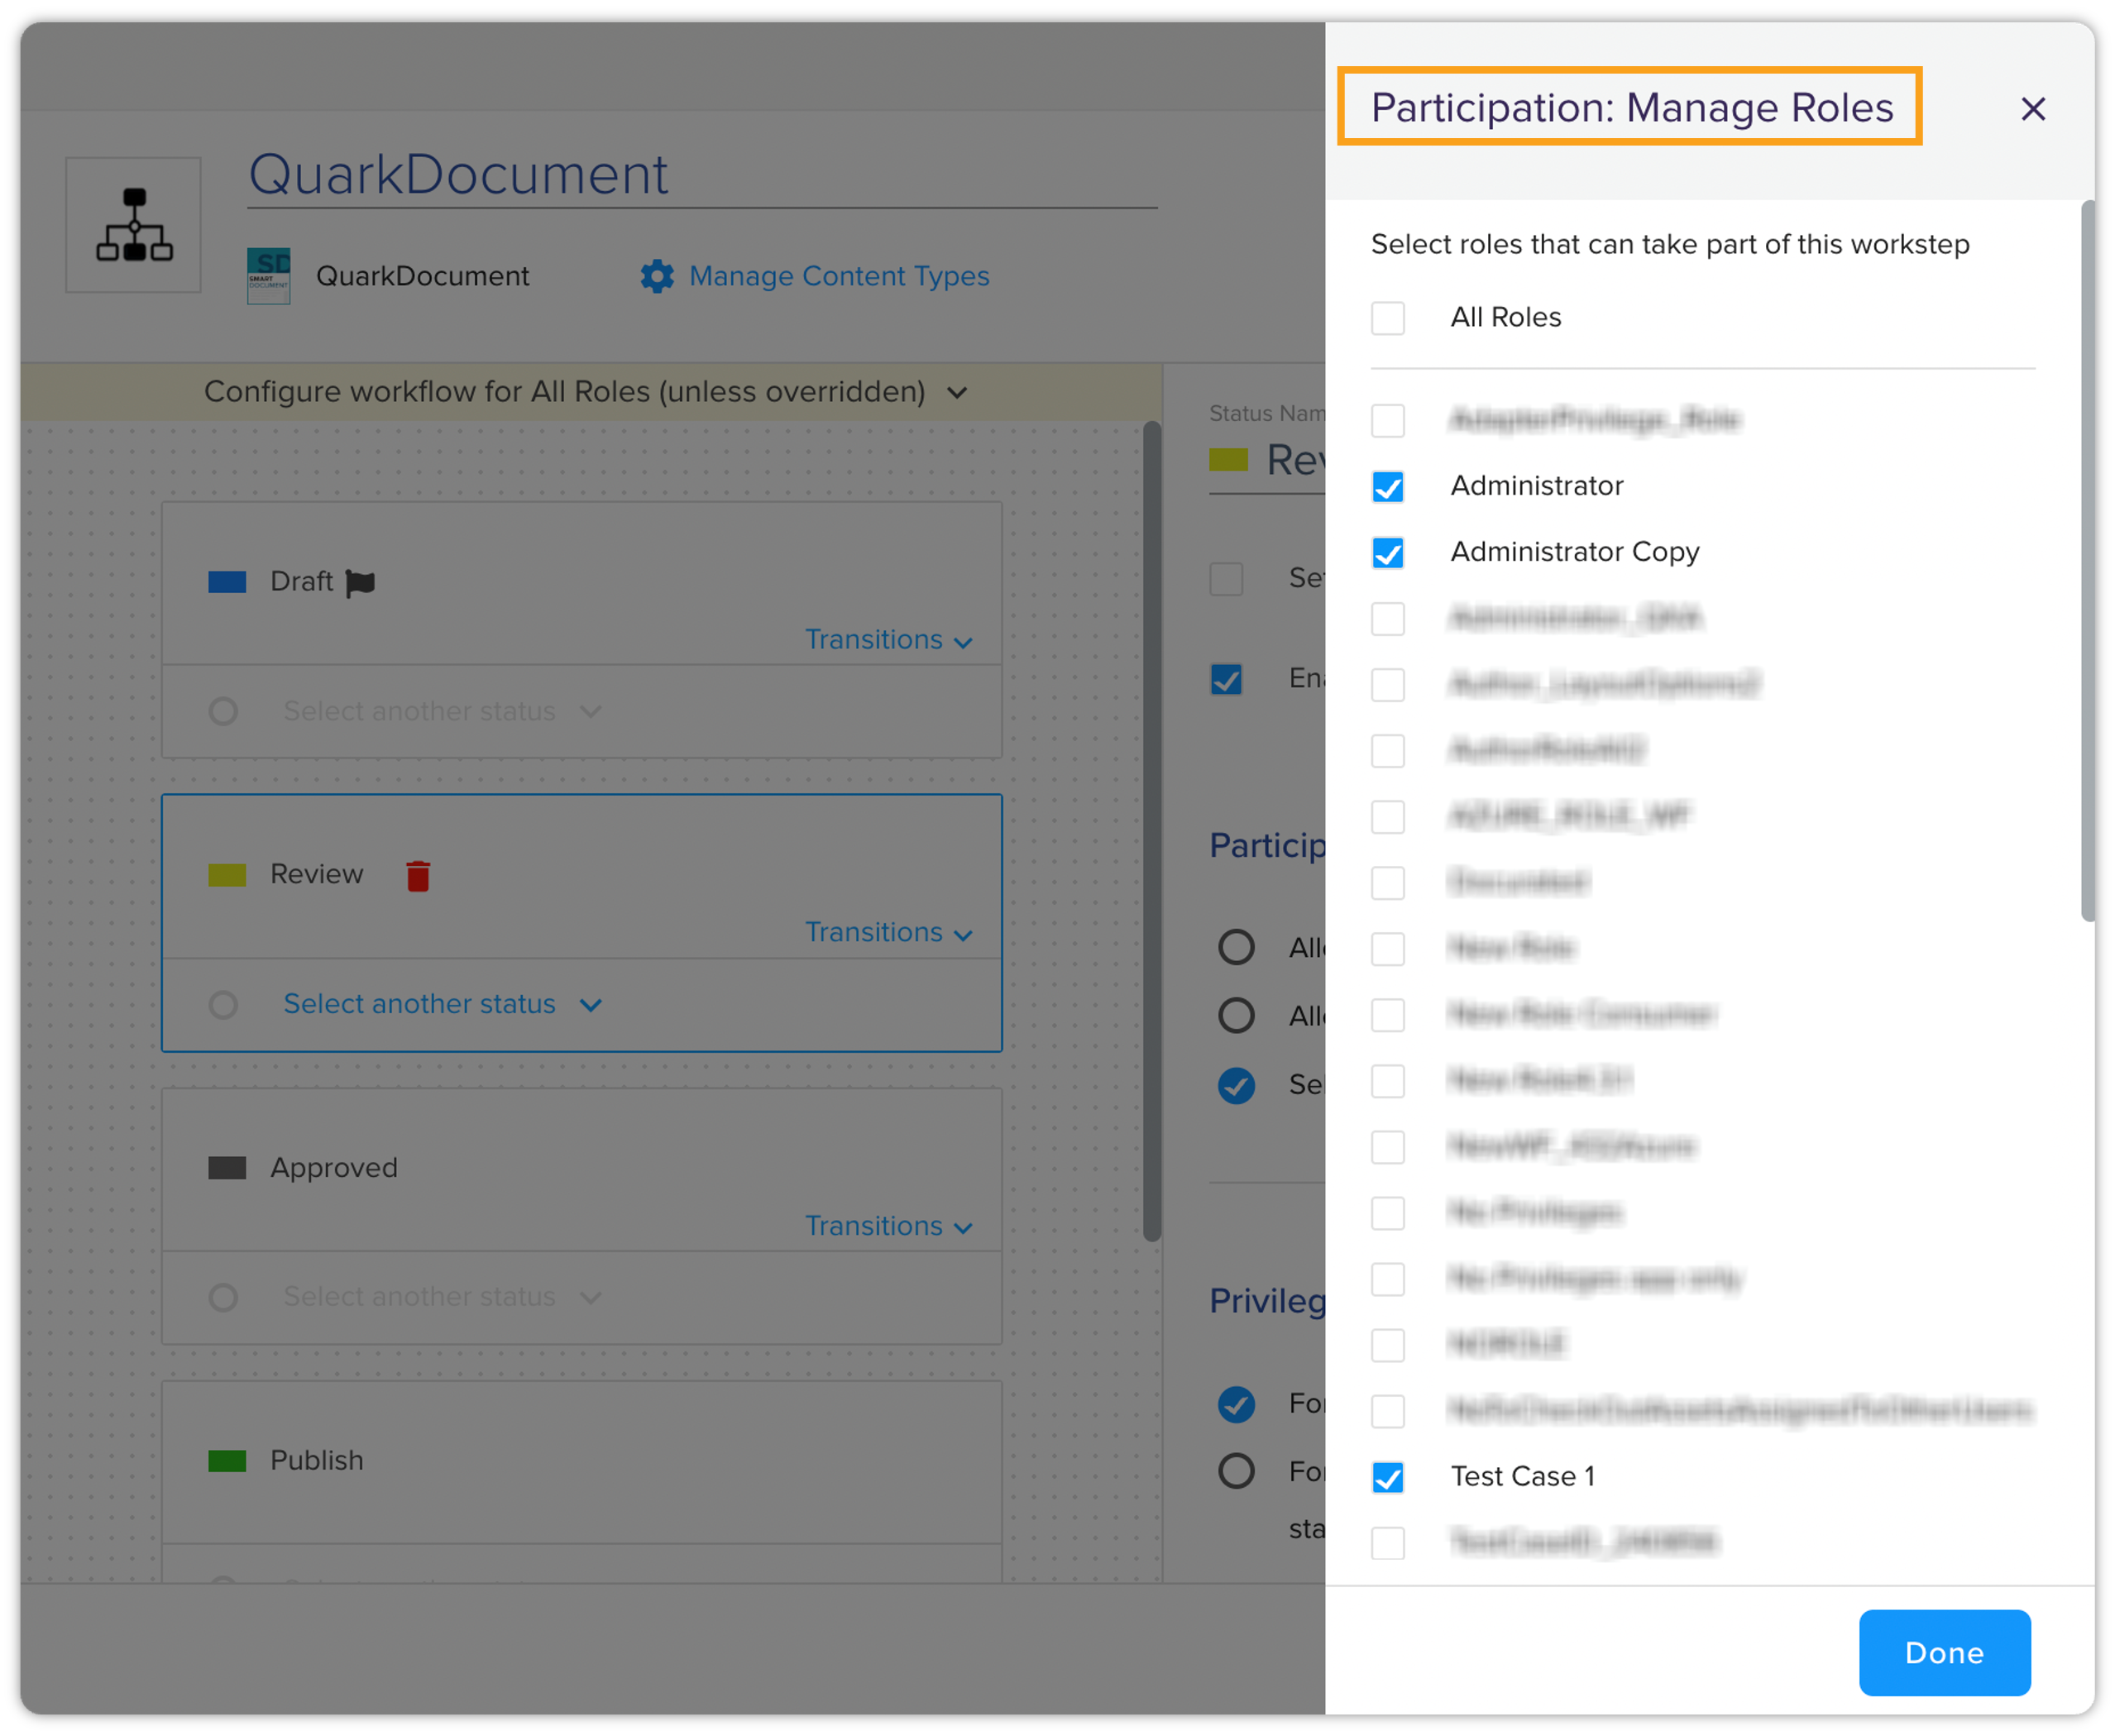
QPP also displays the selected roles within the Participation section.
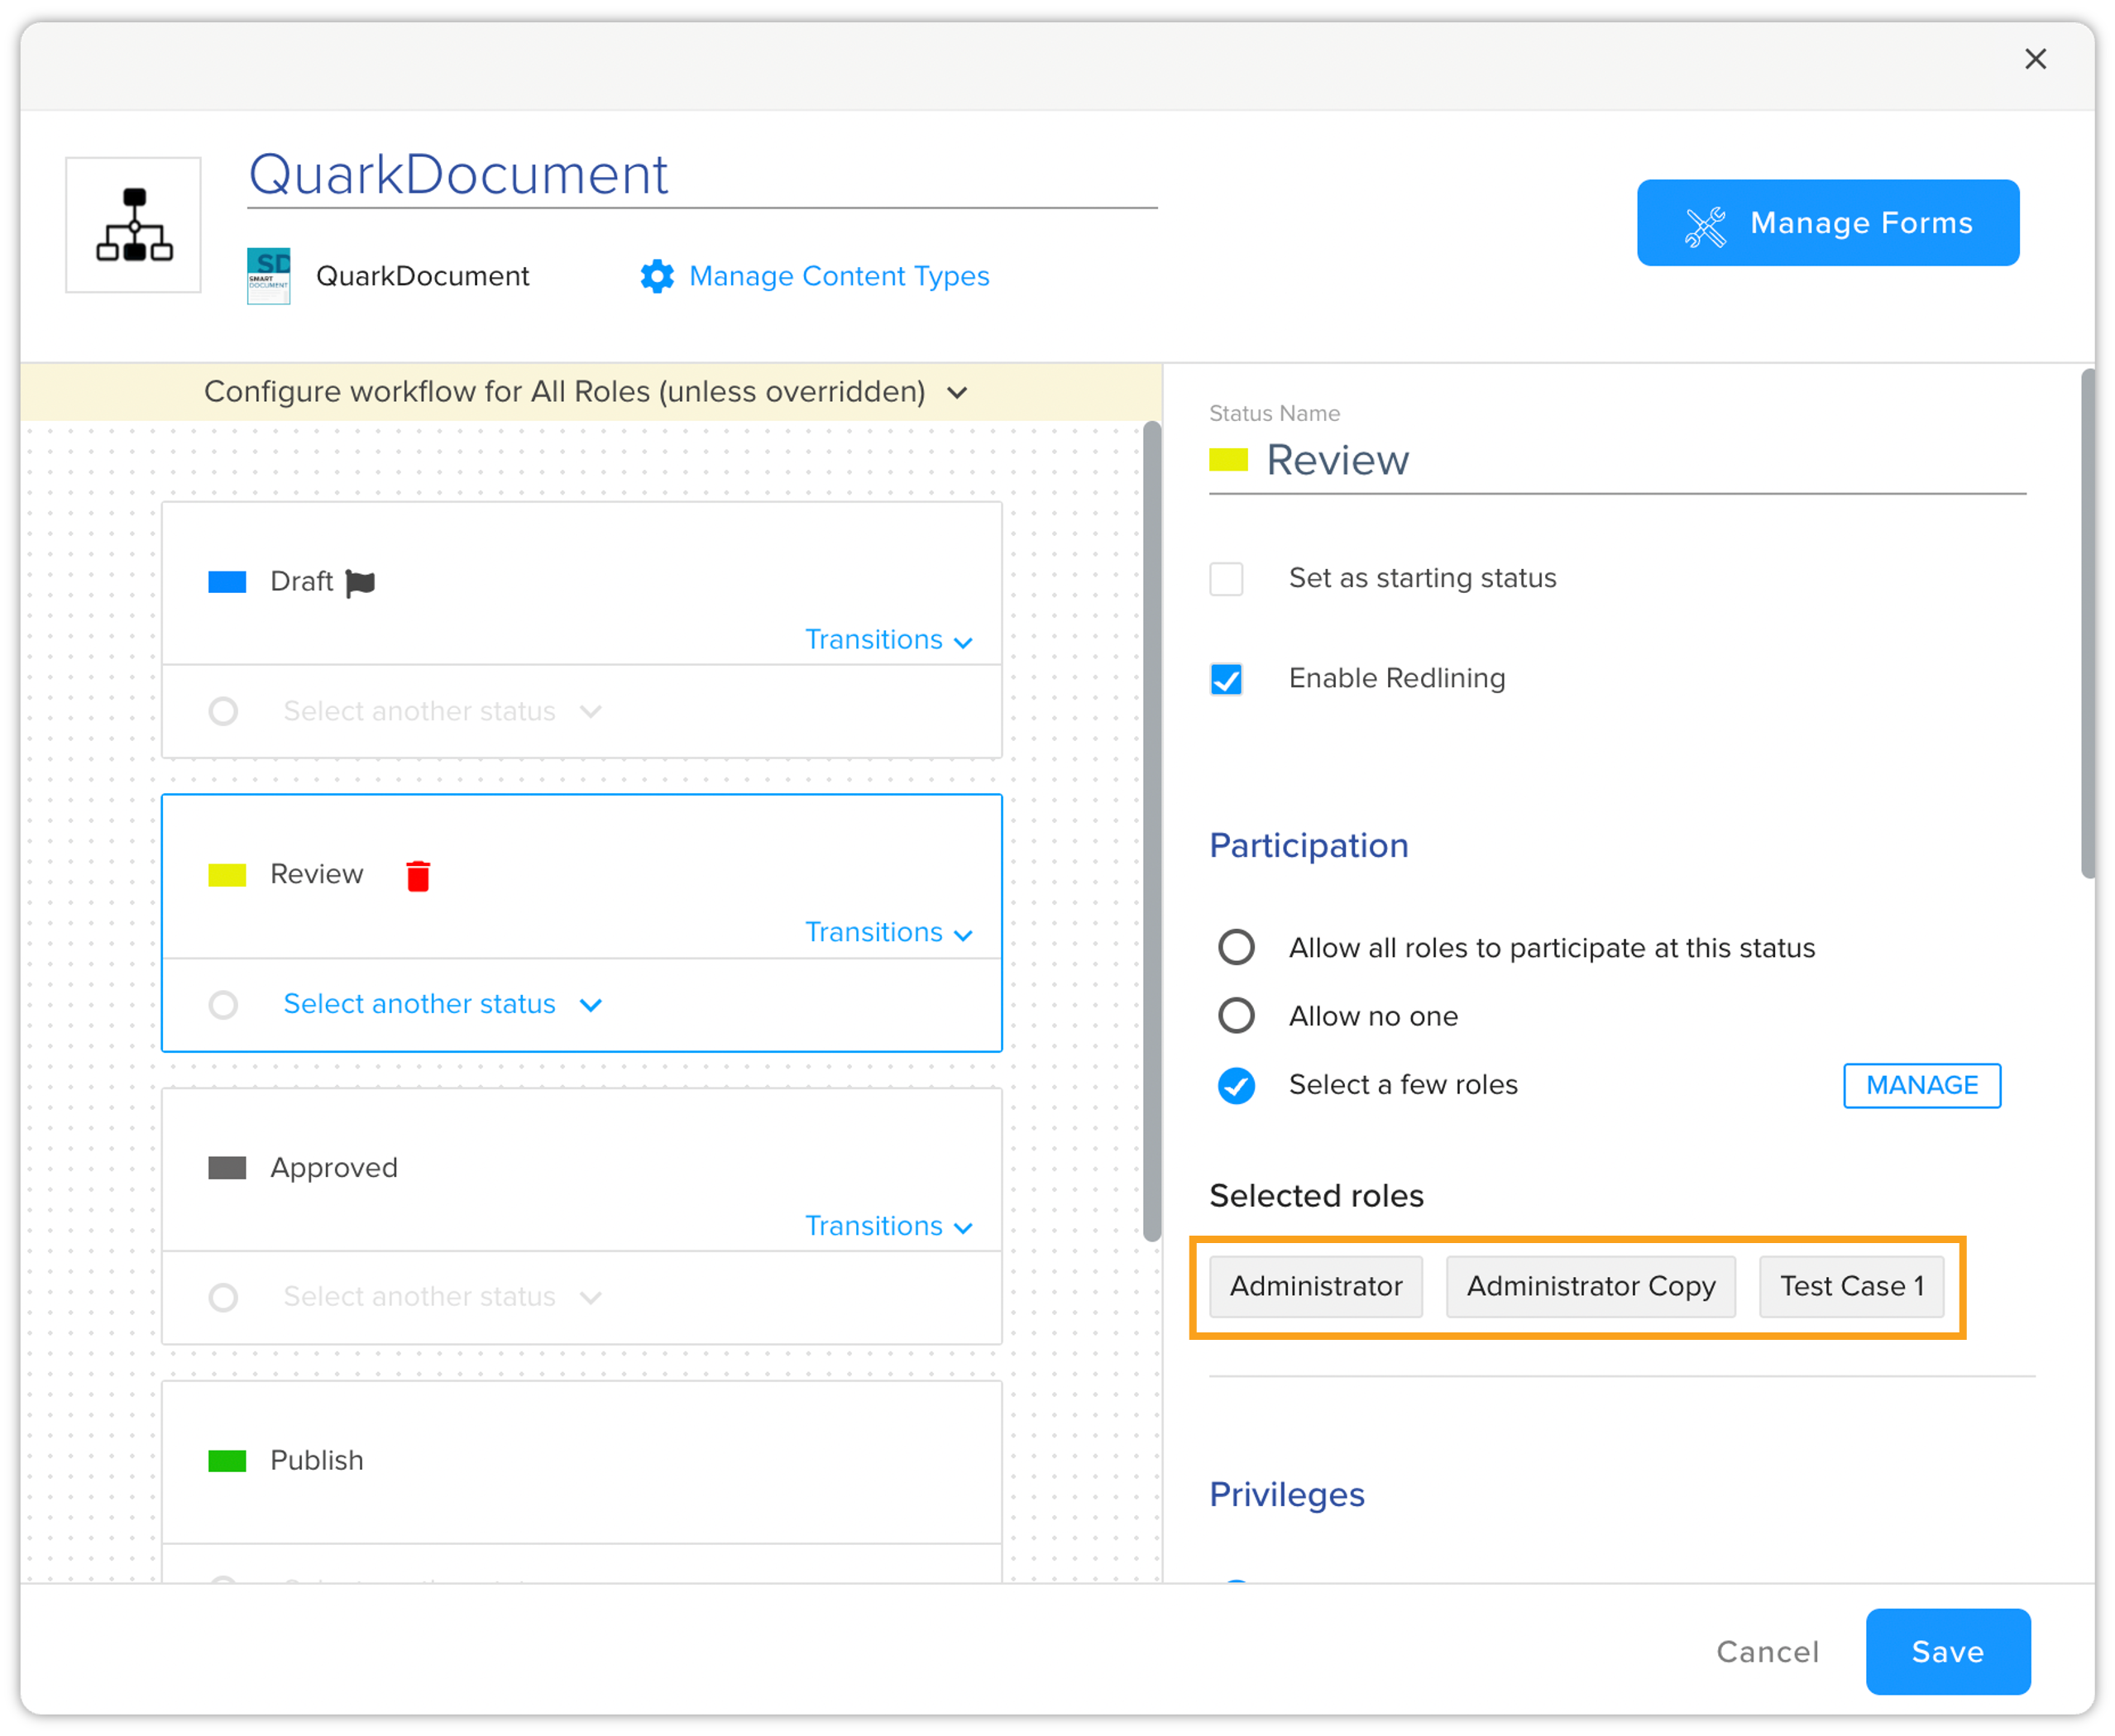
Privileges
The settings in the Privileges section allows you to set default or custom privileges for the selected roles. Essentially, the section allows you to override privileges; for example, when you override the check out privilege for a role that means a user with that role can cancel the checkout of document by another user.
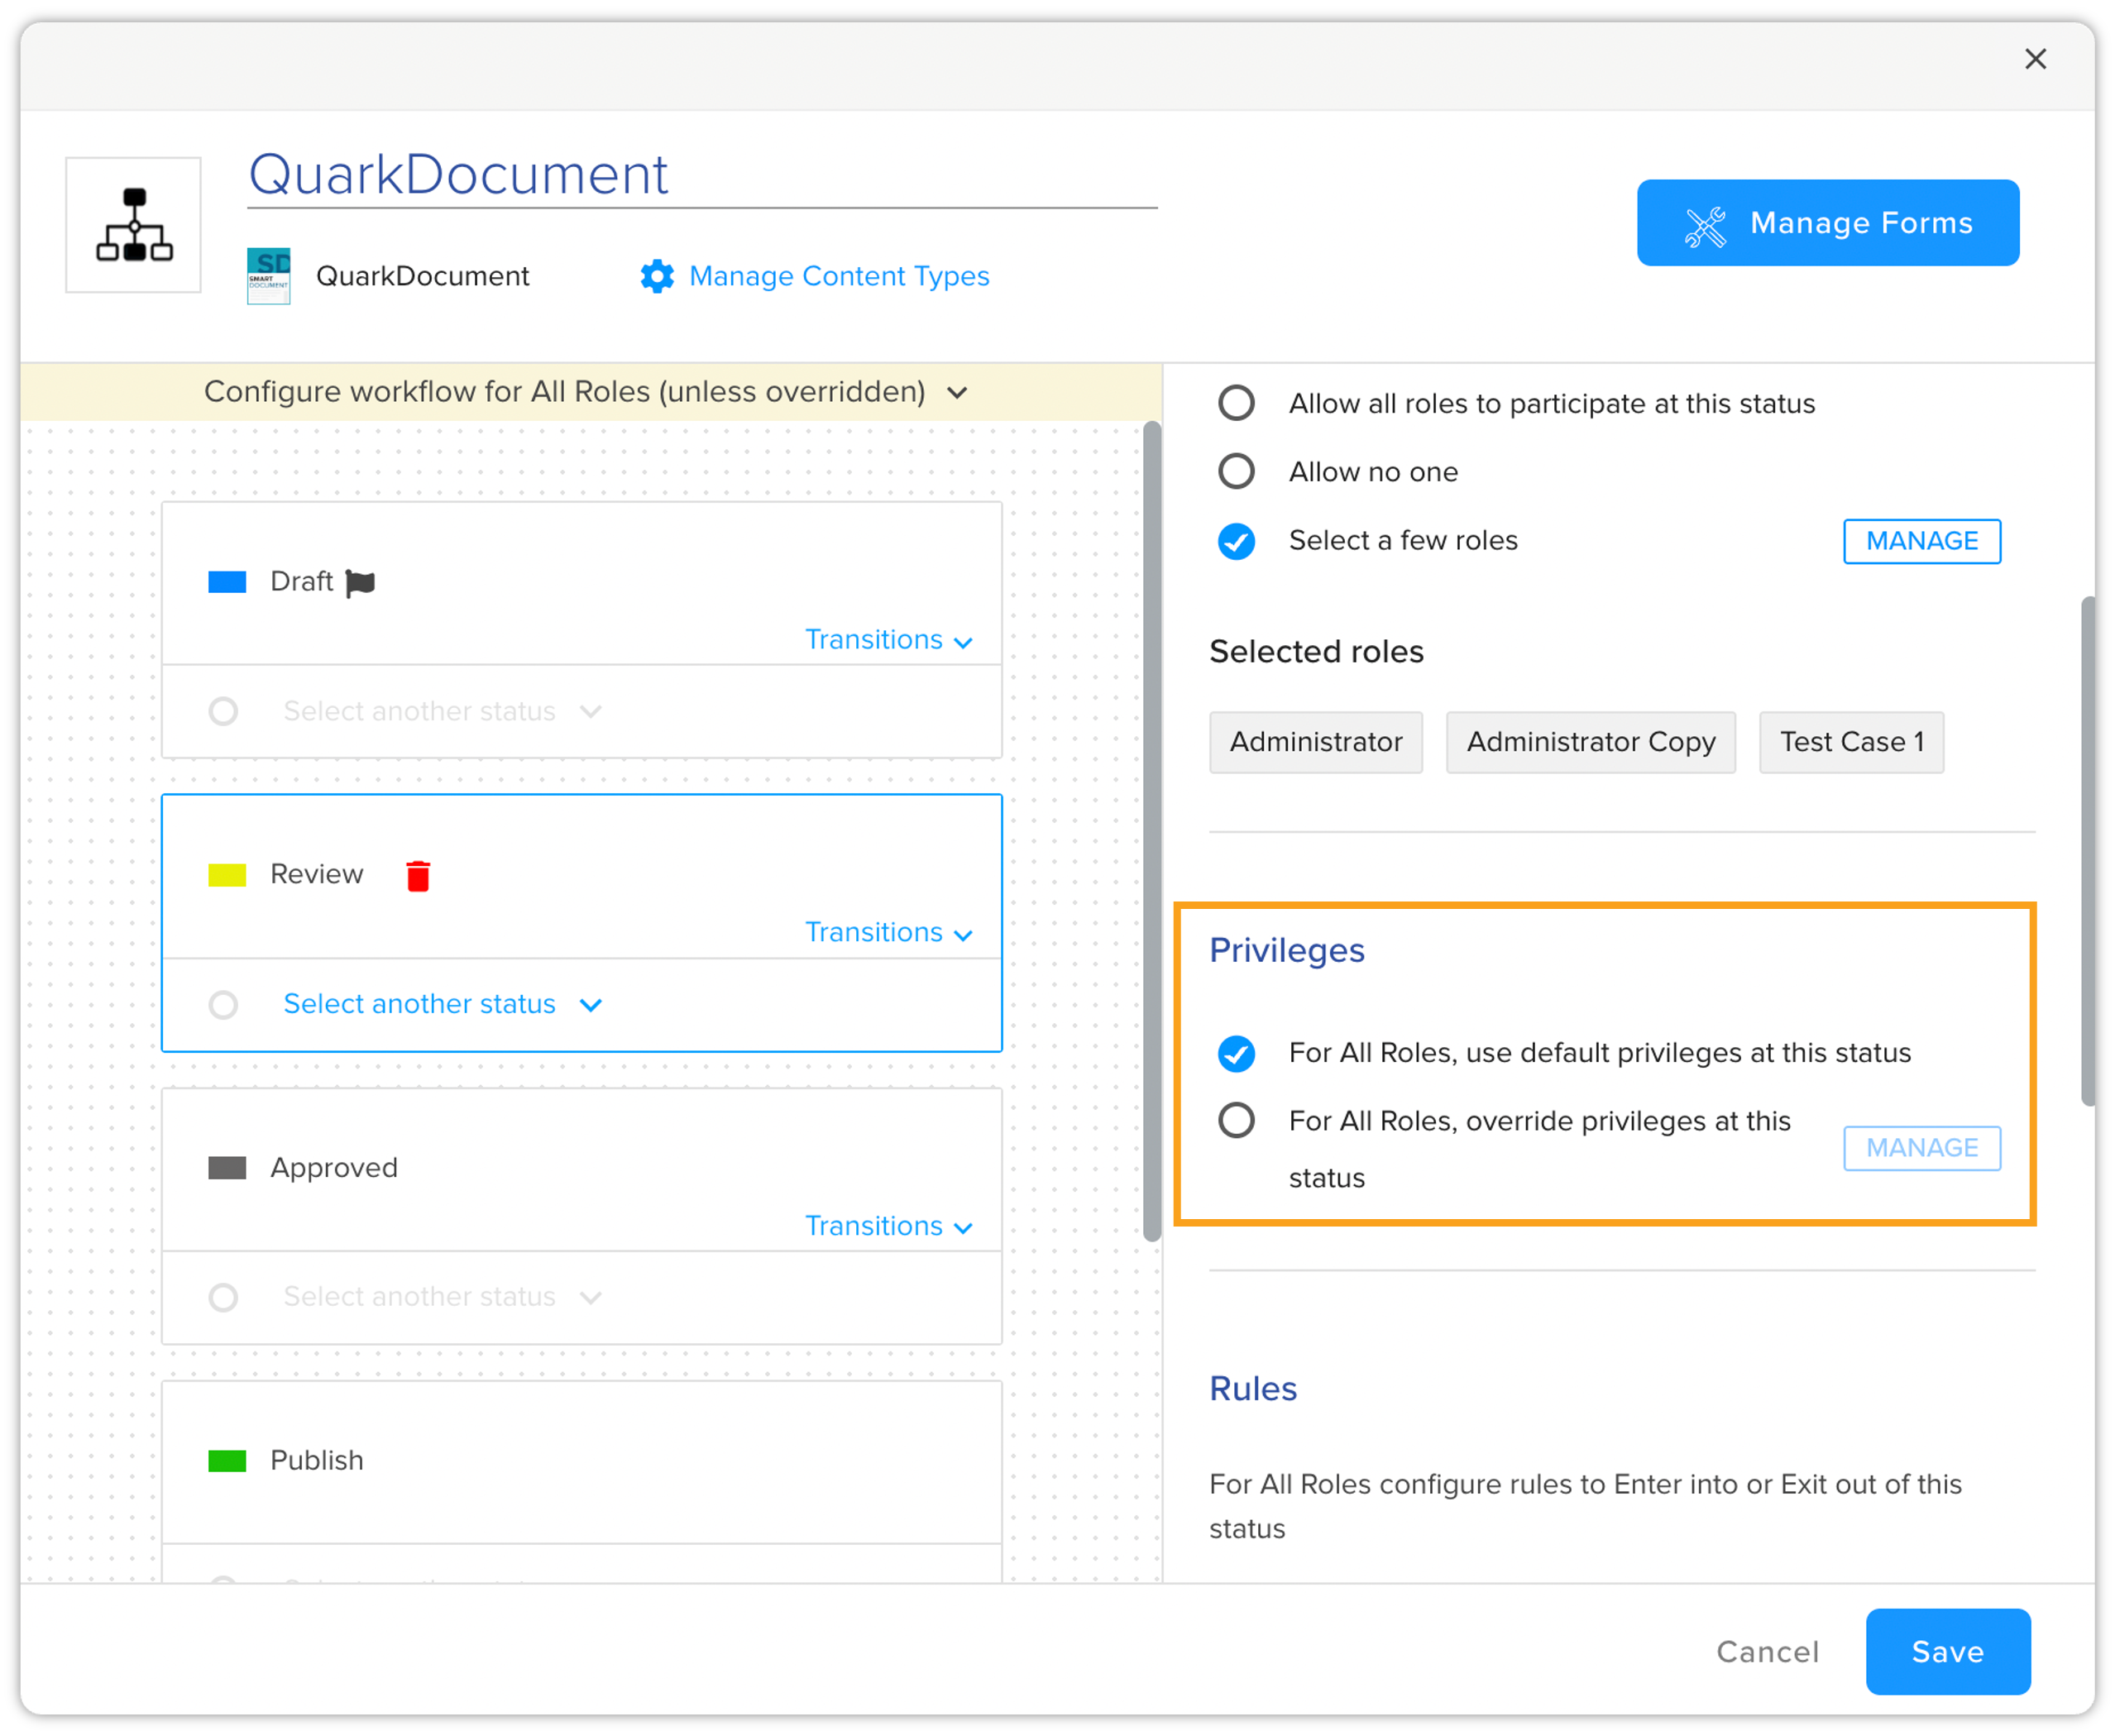
These settings are as follows:
-
For All Roles, use default privileges at this status: Allows you to use the default settings as defined in the selected roles for a status.
-
For All Roles, override privileges at this status: Allows you to override certain default privileges for certain content types in the selected roles for a status. You can manage the list of privileges click clicking the button Manage, which gets enabled when you select the For All Roles, override privileges at this status radio button.
To override privileges for a status:
-
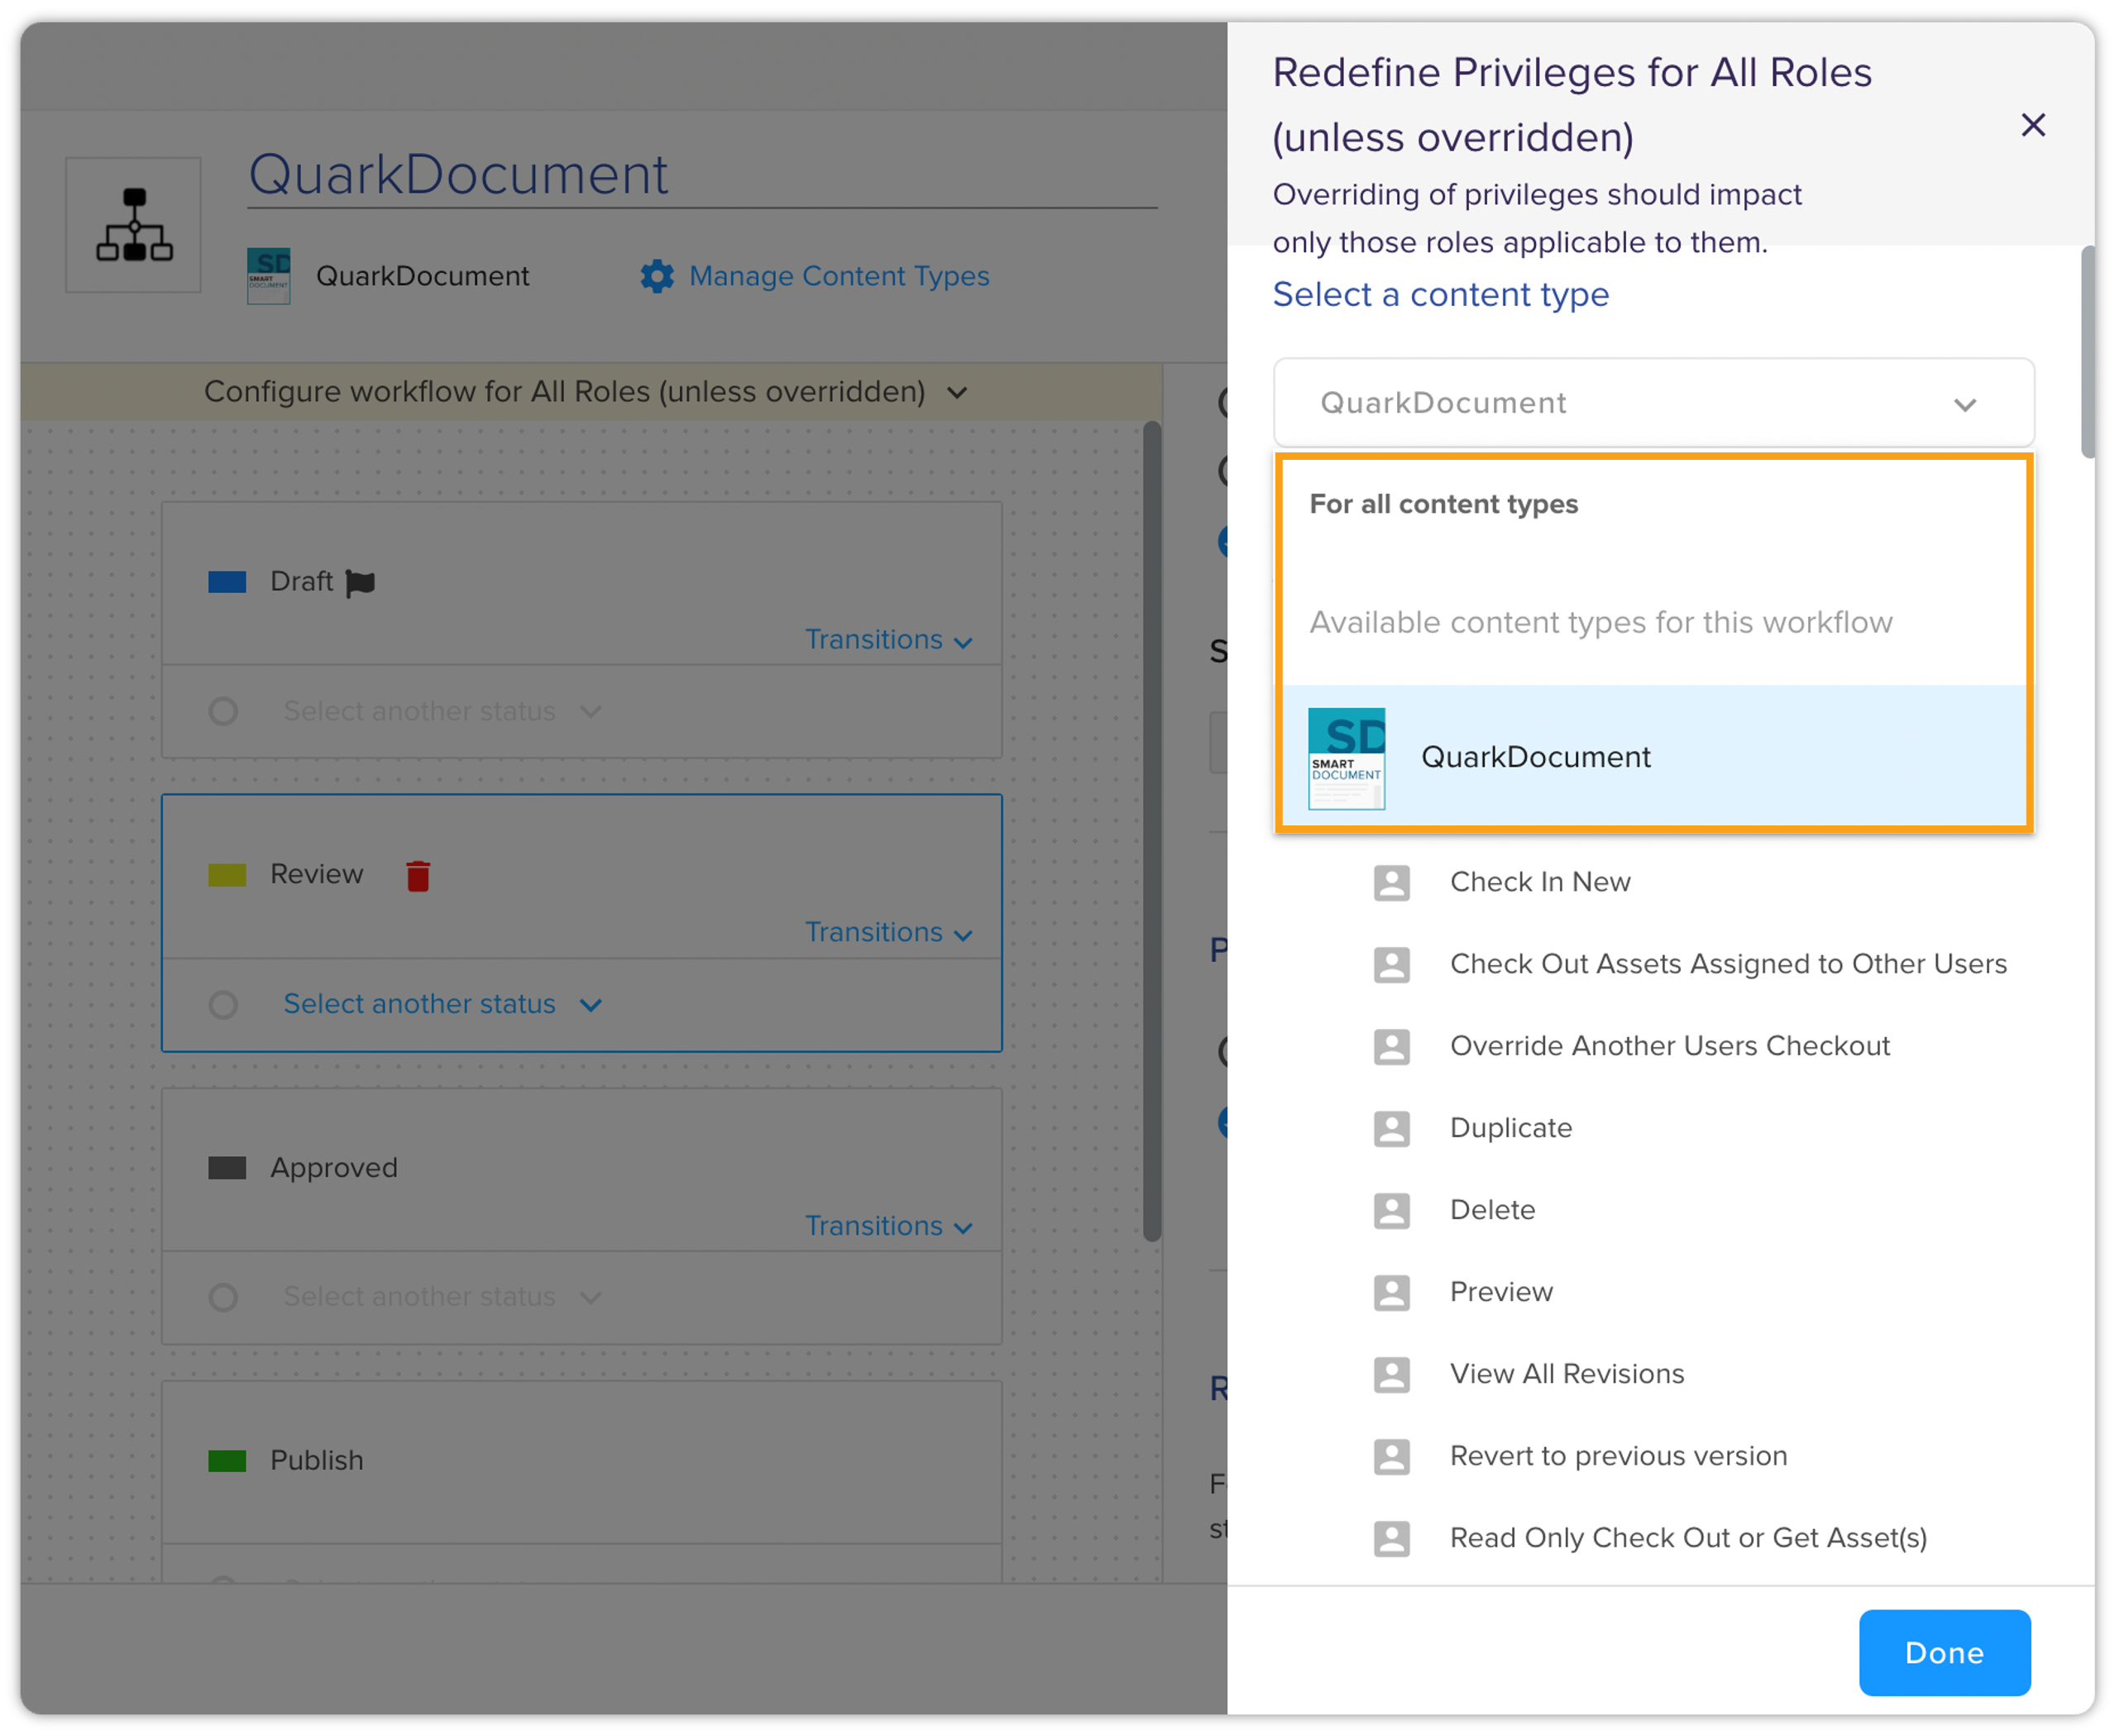
Click Manage to open the Redefine Privileges for All Roles pane.
-
In the pane, select the desired content type(s). By default, all content types are selected.
-
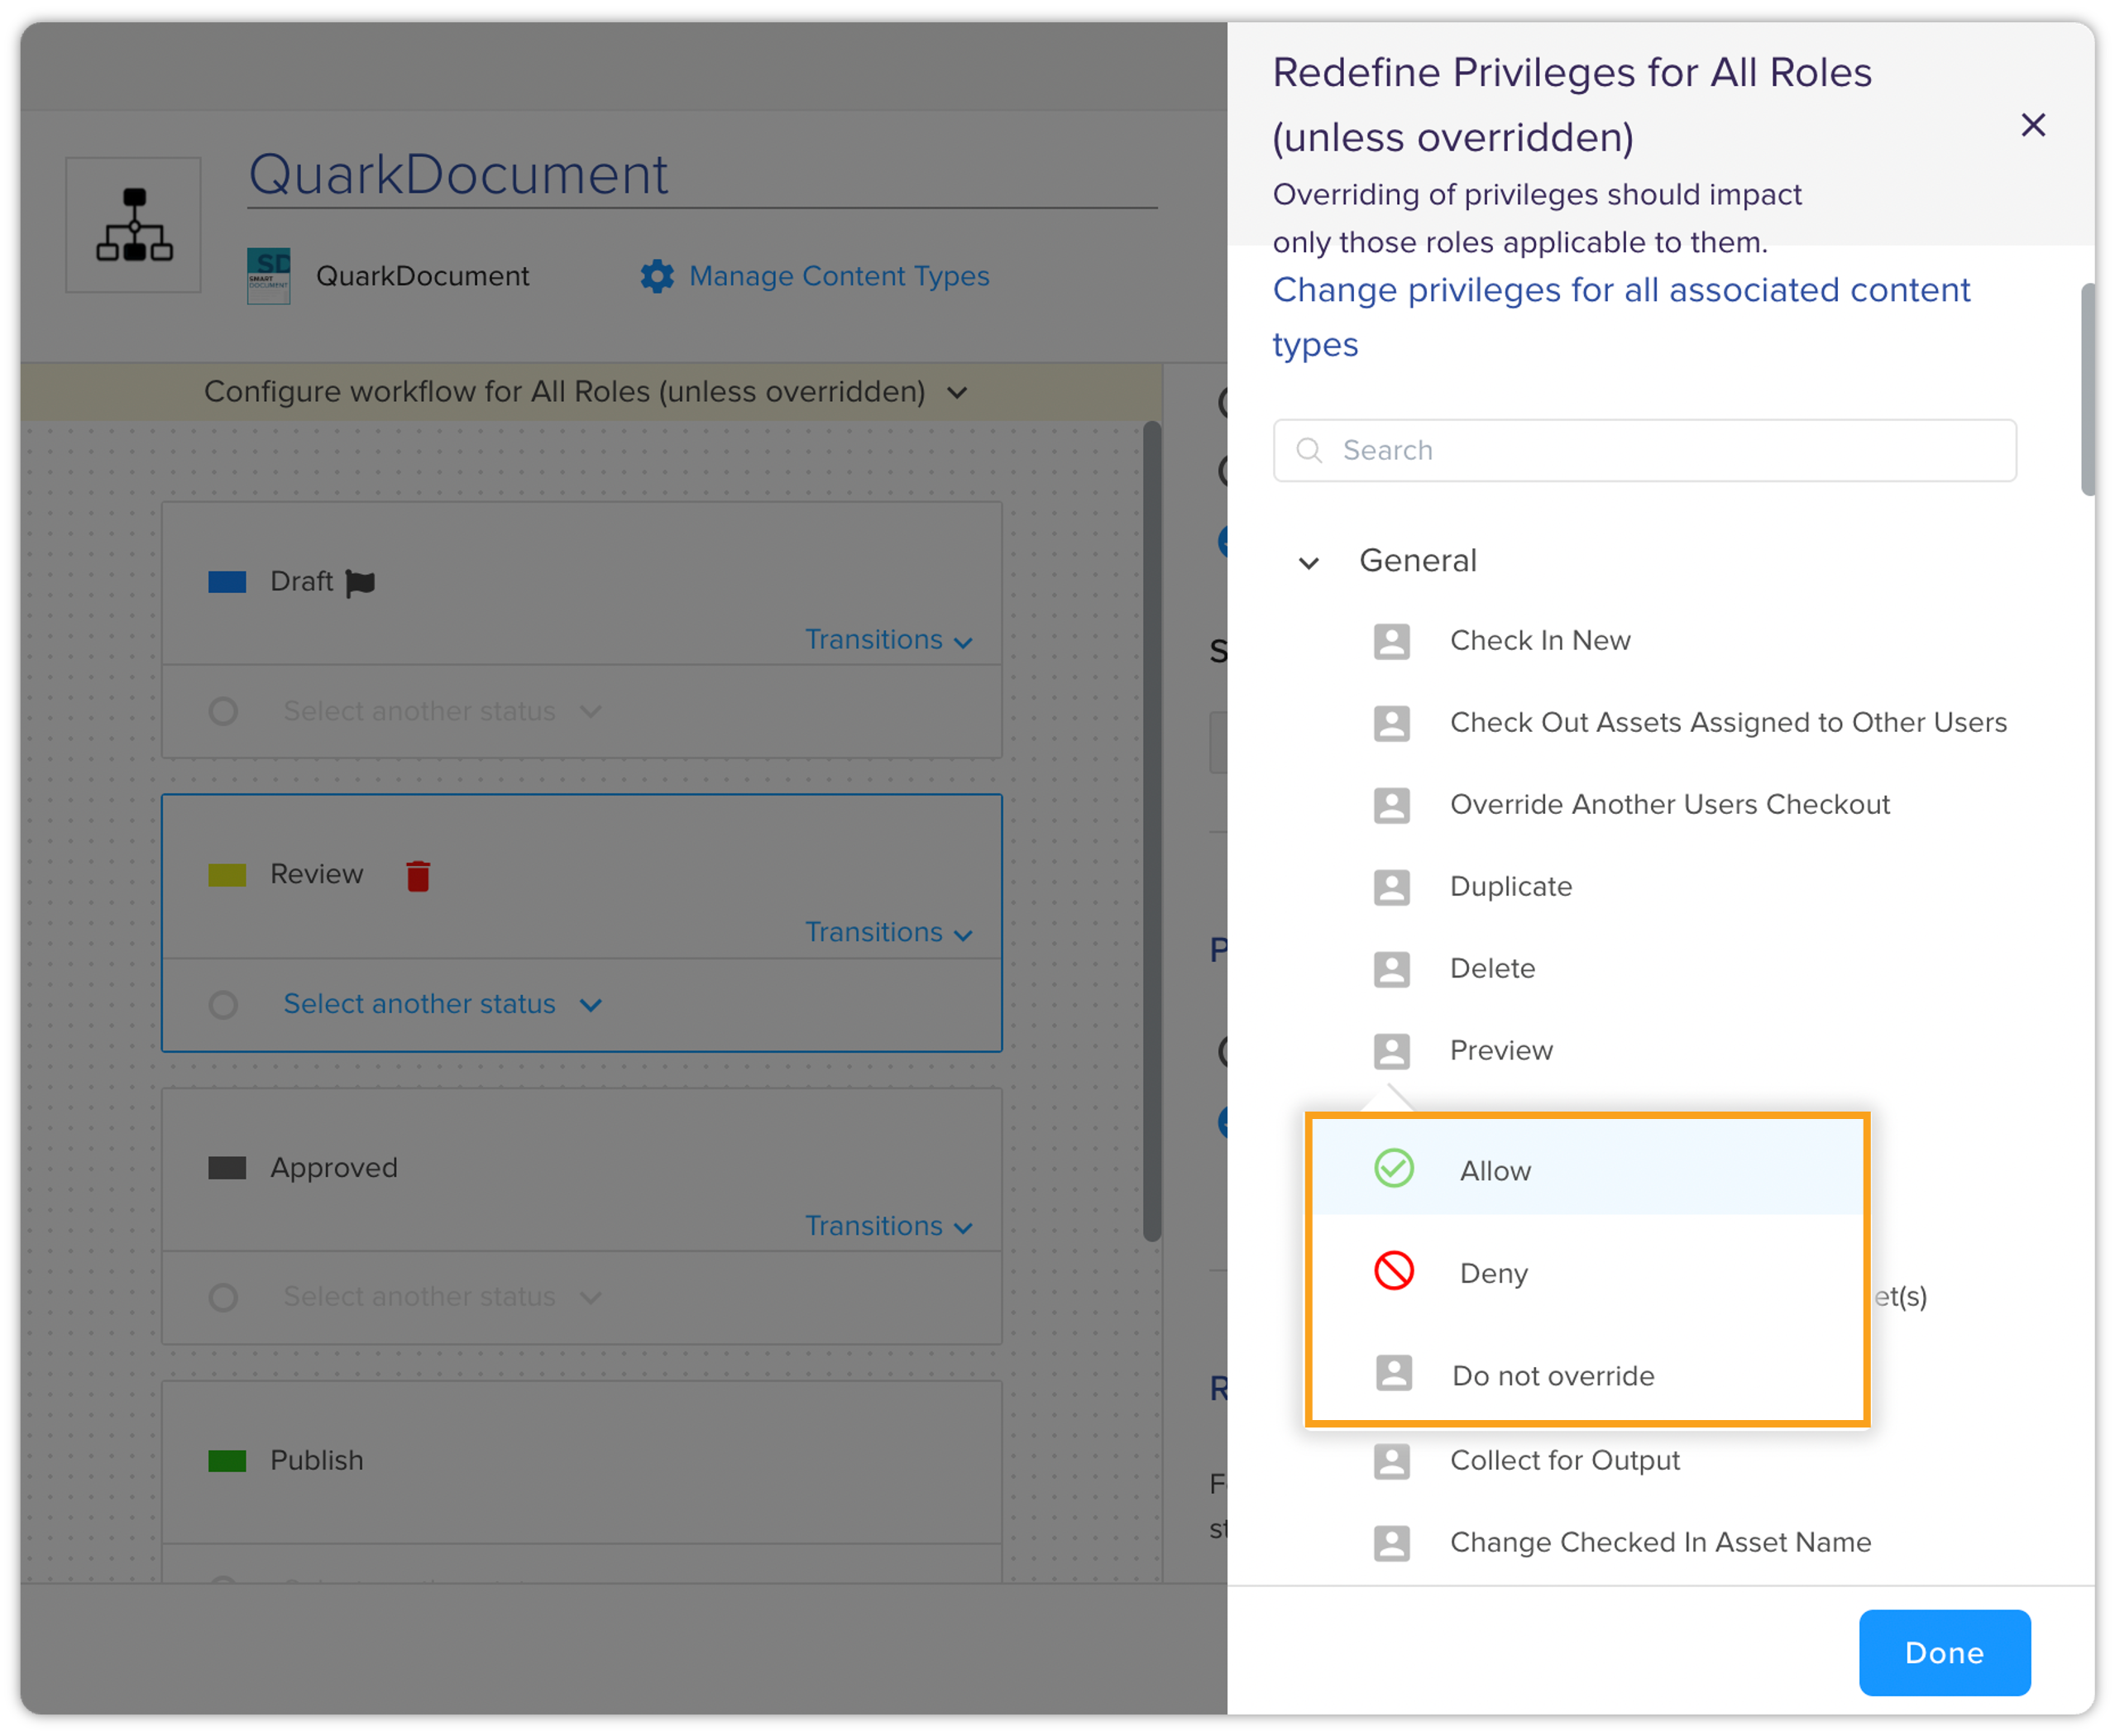
Select the role icon next to the listed privilege that you want to override. This opens a dialog with the following three options:
-
Allow: Allows to override the privilege for the selected role and content types for a status.
-
Deny: Denies overriding the privilege for the selected role and content types for a status.
-
Do Not Override: The default privilege settings.
-
-
Click Done to apply override privilege settings.
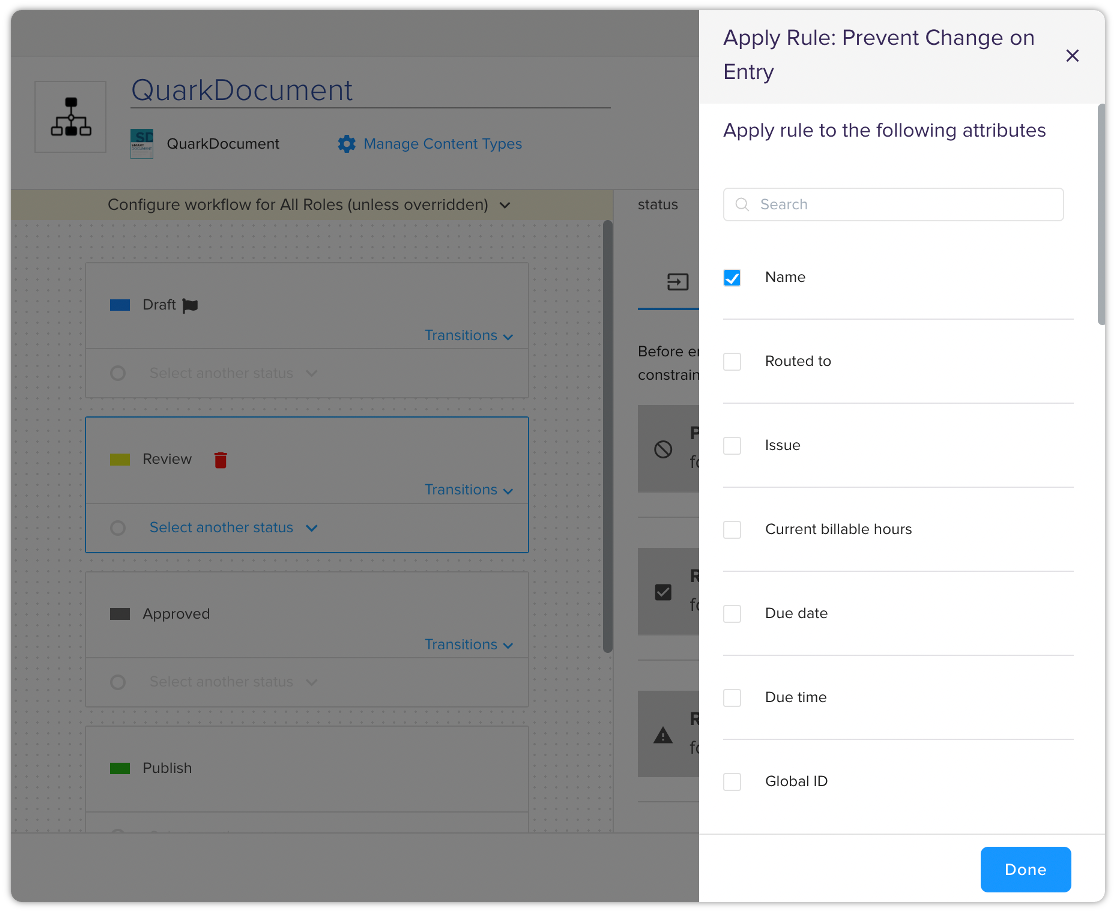
Rules
The settings in the Rules section allows you to set constraints related to the attributes on the transition from one workflow status to another. The section allows you to set constraints on both ends — while entering a status and while exiting a status for which there are separate tabs: Before Entering and Before Exiting.
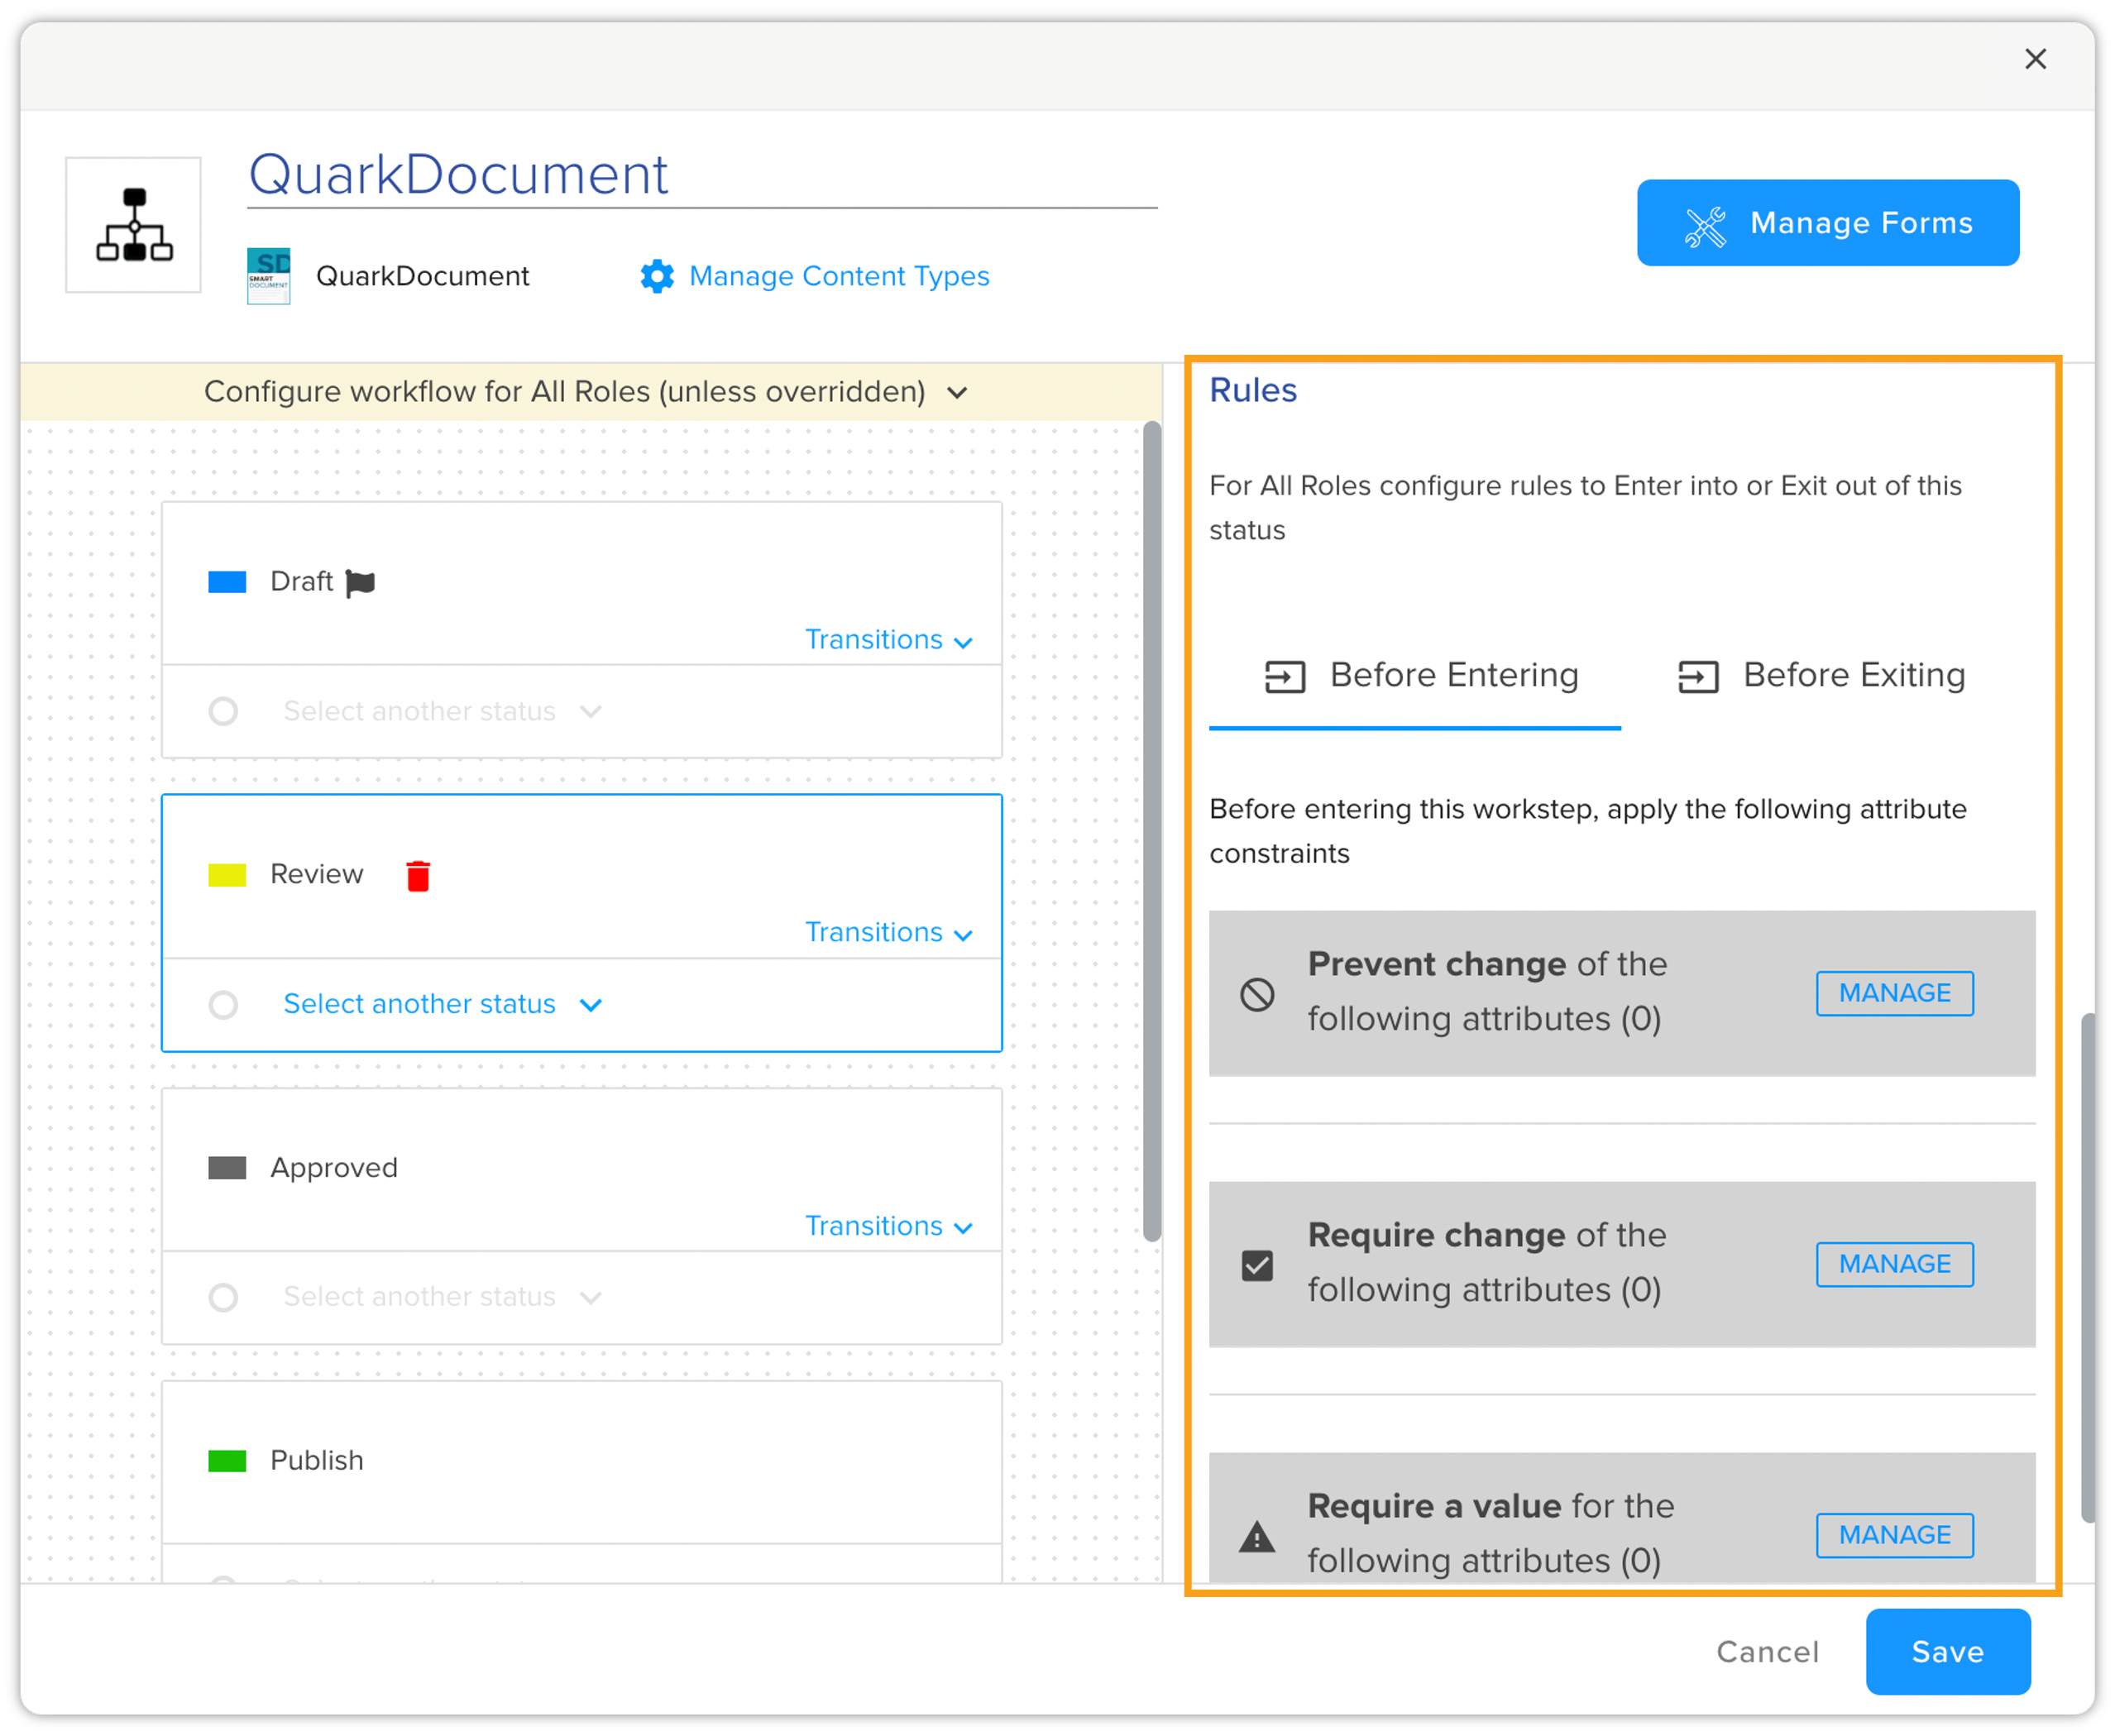
You can apply the following types of attribute constraints on the status transition (before entering or before exiting a status):
-
Prevent change of the following attributes: Prevents a user from changing the value of the selected attributes to successfully transition between statuses.
-
Require change of the following attributes: Makes a user to change the value of the selected attributes to successfully transition between statuses.
-
Require a value of the following attributes: Makes a user to provide the value of the selected attributes to successfully transition between statuses.
You can select the attributes on which you want to apply transition constraints on by clicking the button Manage, which opens a pane with a list of attributes.
View Workflow
The View Workflow option allows you to visualize and interact with specific workflows associated with your content. This feature enhances understanding and management of content processes, enabling better collaboration and efficiency.
Accessing the View Workflow Option
To access the workflow for a particular piece of content, follow these steps:
-
Hover over the desired workflow entry to reveal additional options.
-
Click on the View Workflow icon that appears.
-
Upon clicking the View Workflow icon, a prompt window will appear asking you to select the content type.
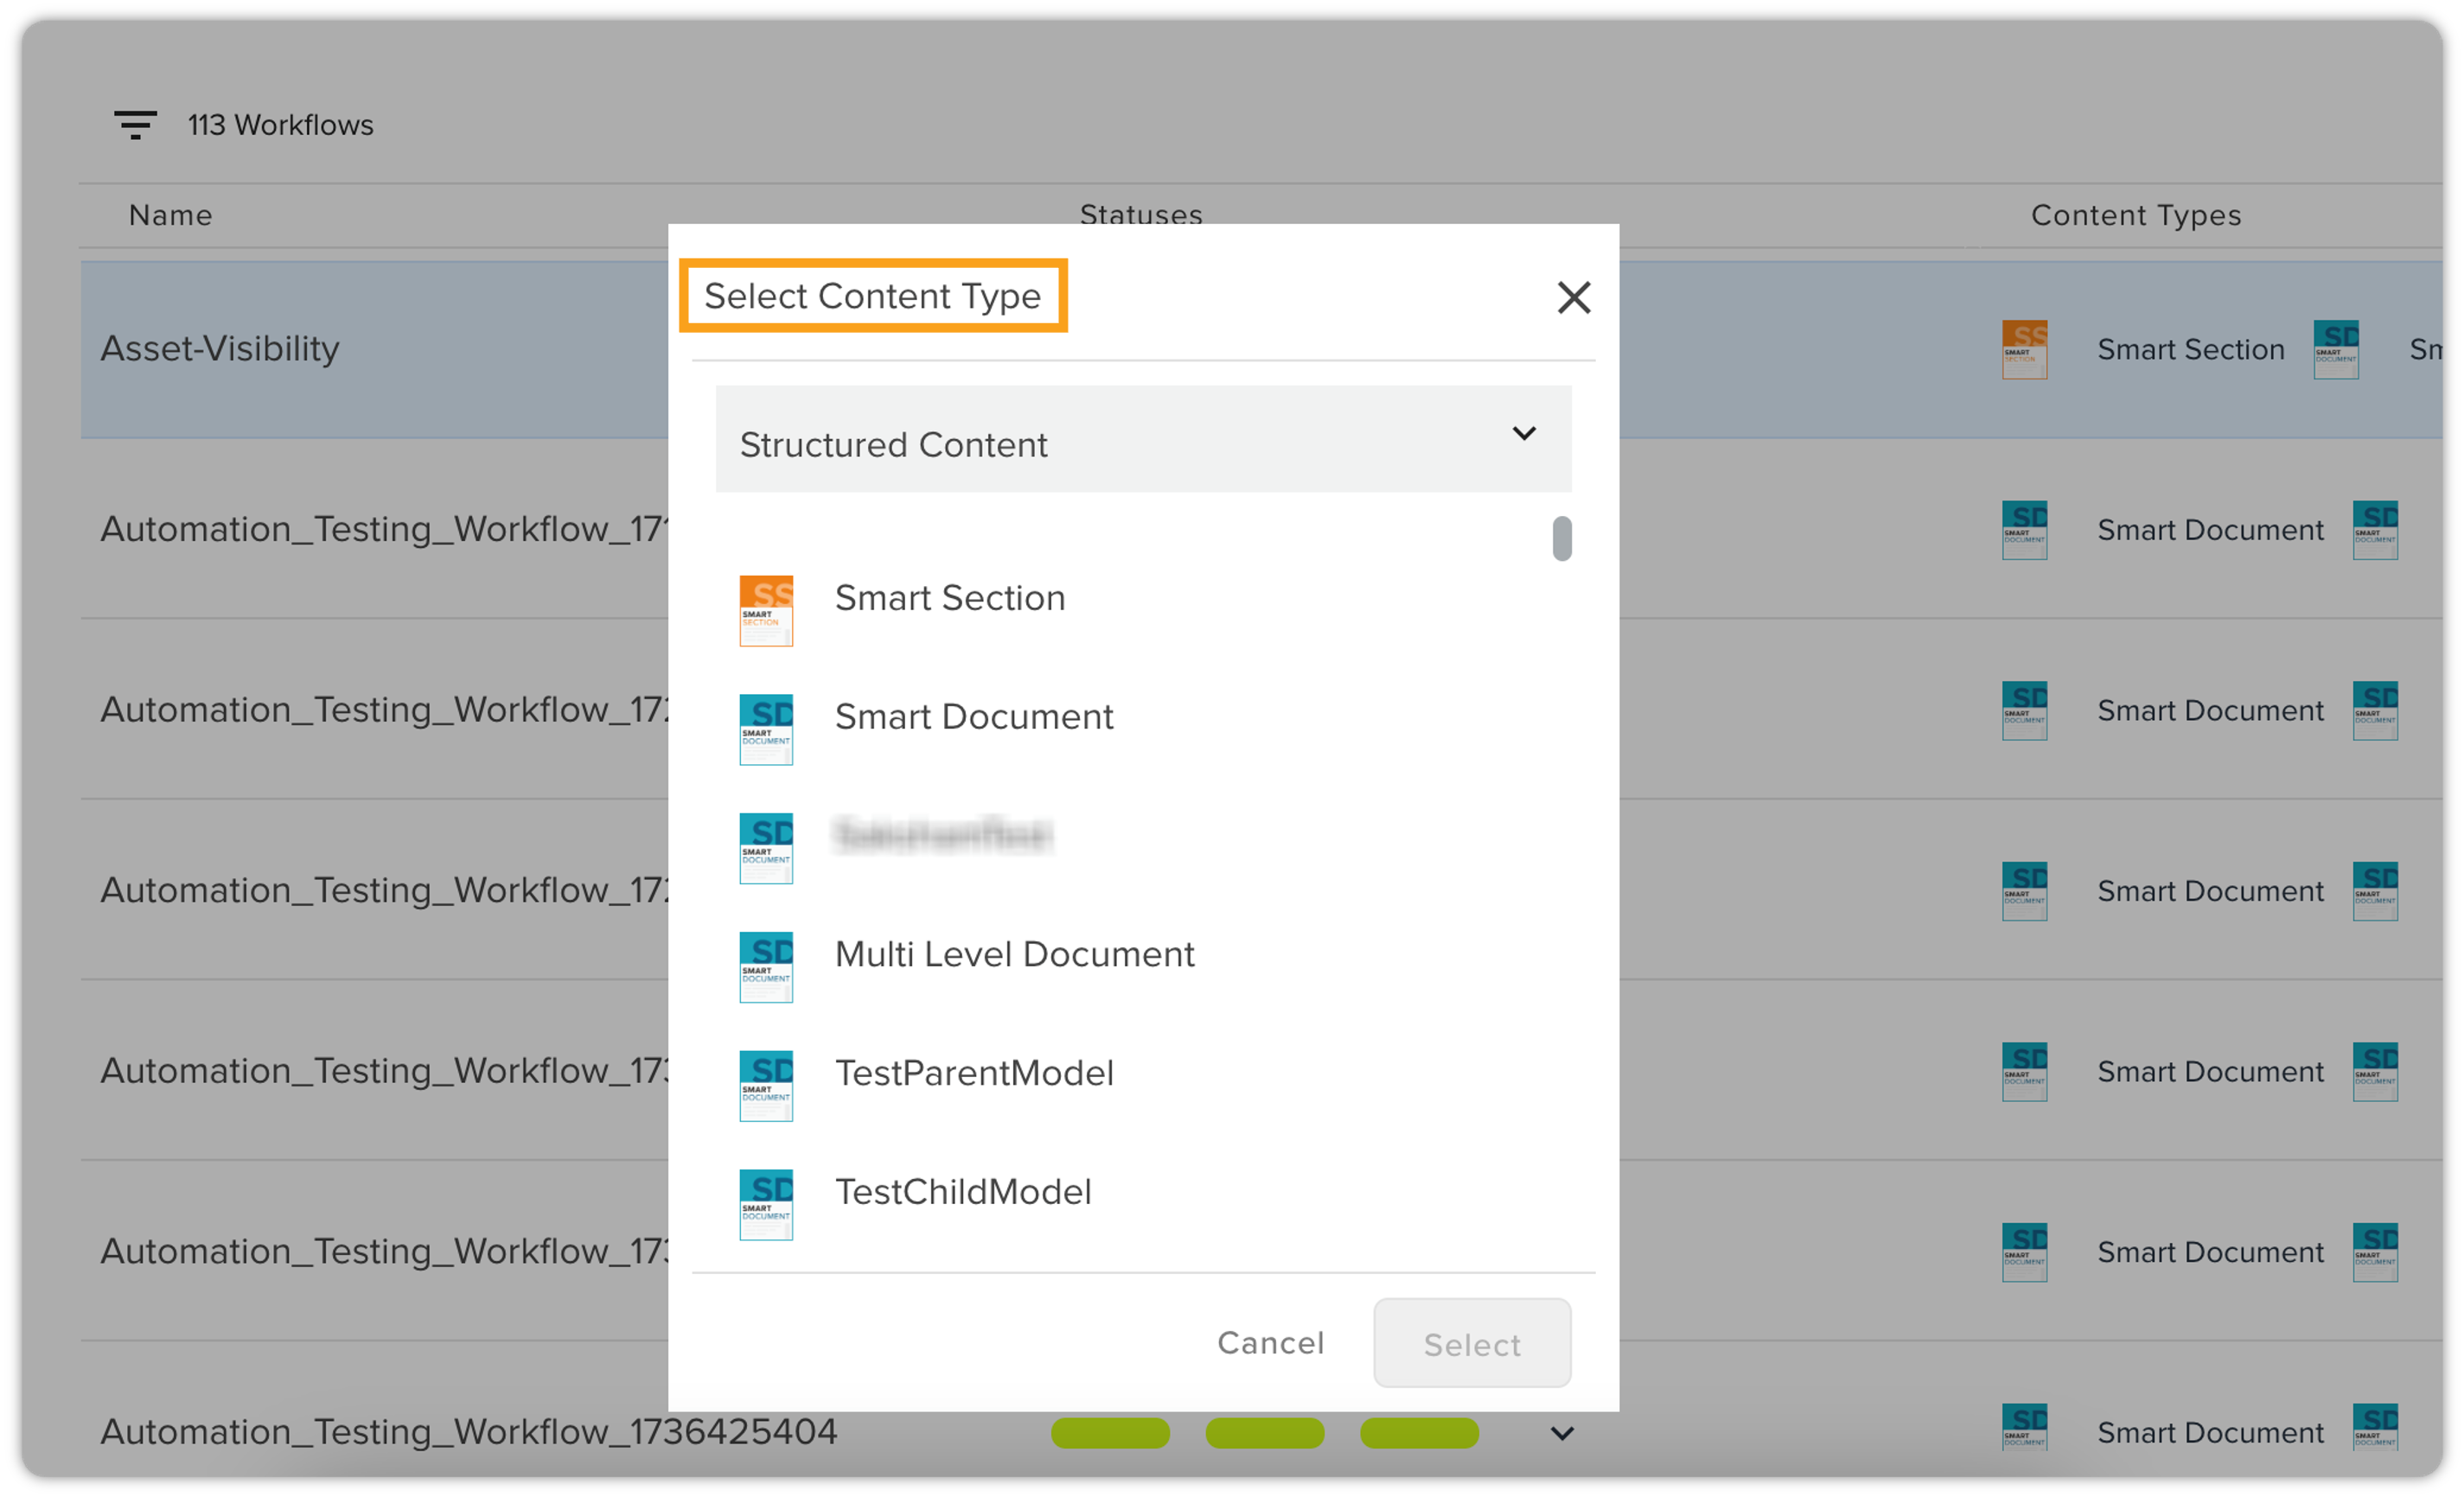
-
Choose the appropriate content type for which you want to view the workflow. This step is essential to ensure that the correct workflow associated with the specified content type is displayed.
Workflows Window Features
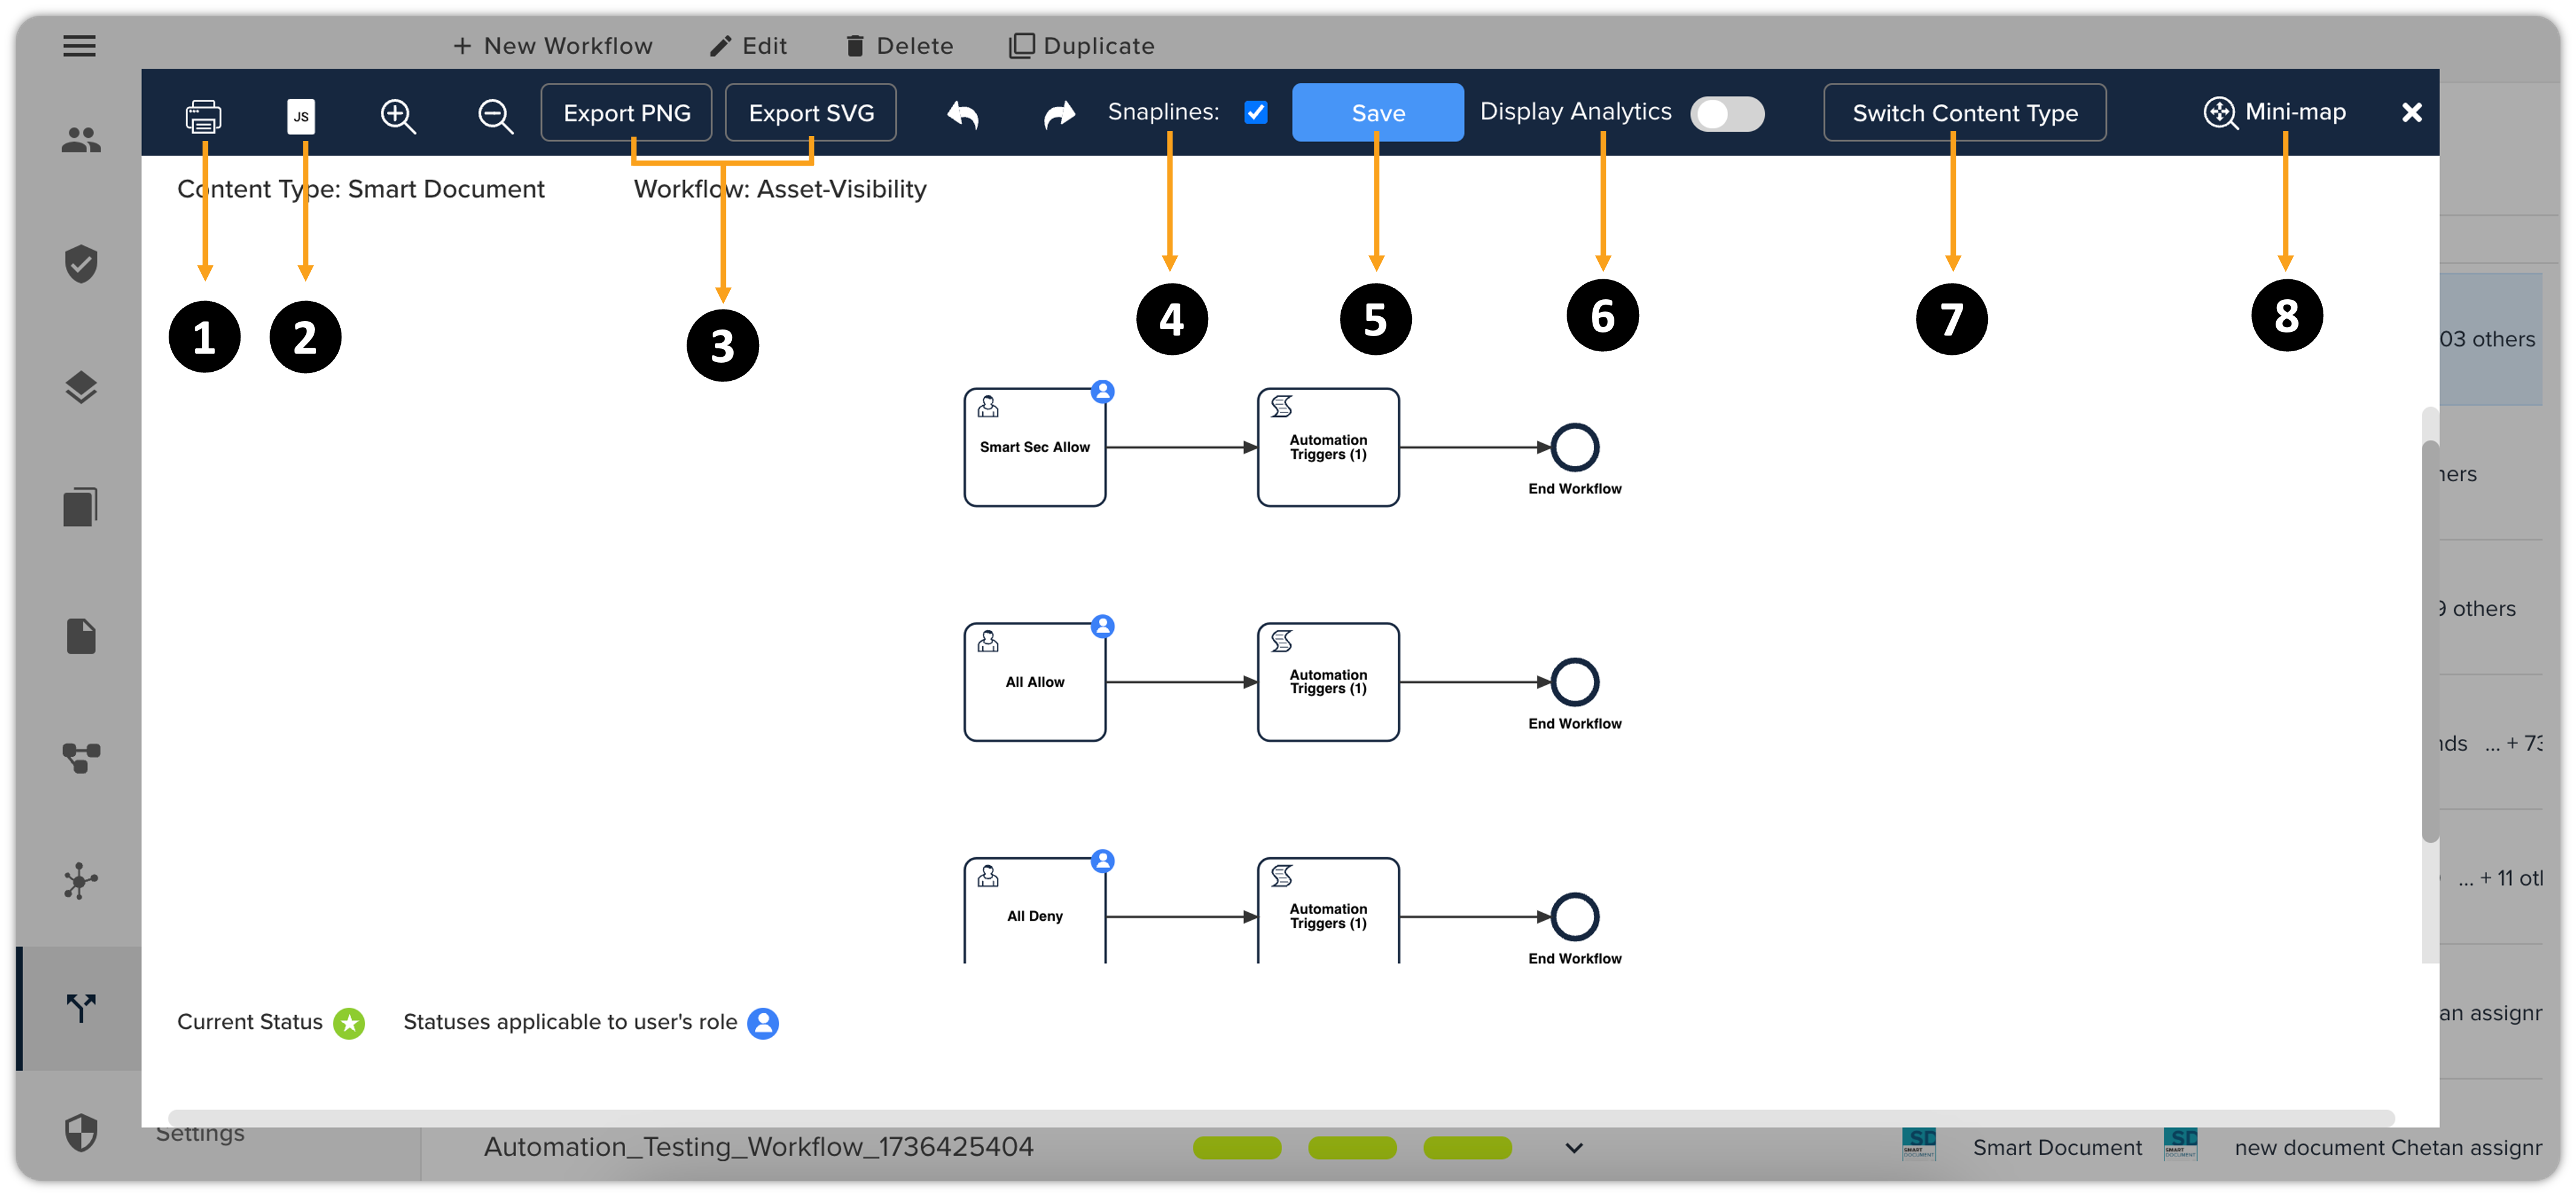
Once you select the content type, the workflows window will pop up on your screen. Here you can see a graphical representation of the workflow, showcasing the sequence of tasks, decision points, and overall flow from one step to another. This visualization helps you understand how your specific tasks fit into the larger process.
Besides, the Workflow window provides several functionalities that enable you to take relevant actions:
-
Printing the Workflow: Print the displayed workflow for offline reference or team discussions.
-
Downloading the Workflow: Export the workflow as a JSON file for integration with other tools or for development purposes.
-
Exporting the Workflow: Export the workflow as image files in PNG or SVG format for use in presentations or reports.
-
Snaplines Functionality: Enable or disable Snaplines in the workflow for an improved visual layout, helping to organize workflow elements clearly.
-
Saving Changes: After making any modifications to the workflow, ensure to save your changes to retain the updated version.
-
Analytics Toggle: Use the toggle button to display analytics related to the workflow, providing insights into task performance and efficiency.
-
Switching Content Type: Easily switch between different content types to view corresponding workflows without exiting the workflow window.
-
Minimap View: Access a minimap view of the workflow for easier navigation, especially useful for complex workflows with many tasks.
The Analytics option in the workflows window showcases two main types of analytics that provide valuable insights into workflow performance and document processing:
-
Average Time Measurement: This feature calculates the average time spent in each status across all documents for the selected workflow and content type. By deriving the mean duration, this metric offers a comprehensive view of status duration, enabling teams to assess workflow efficiency and identify areas for improvement.
-
Actual Time Tracking: This functionality allows you to view the actual time spent in each status for a specific document within the selected workflow and content type. This real-time tracking capability provides granular visibility into the processing timeline of individual documents, helping teams understand delays and optimize document handling.
Settings
The Settings section within the Admin tab offers a range of functionalities, including security management through SAML, multilingual support for global outreach, seamless integration with OAuth 2.0, AI-enabled content creation with AI Assistant (previously known as Quarky Copilot), streamlined asset collection with Docurated, and customizable platform preferences.
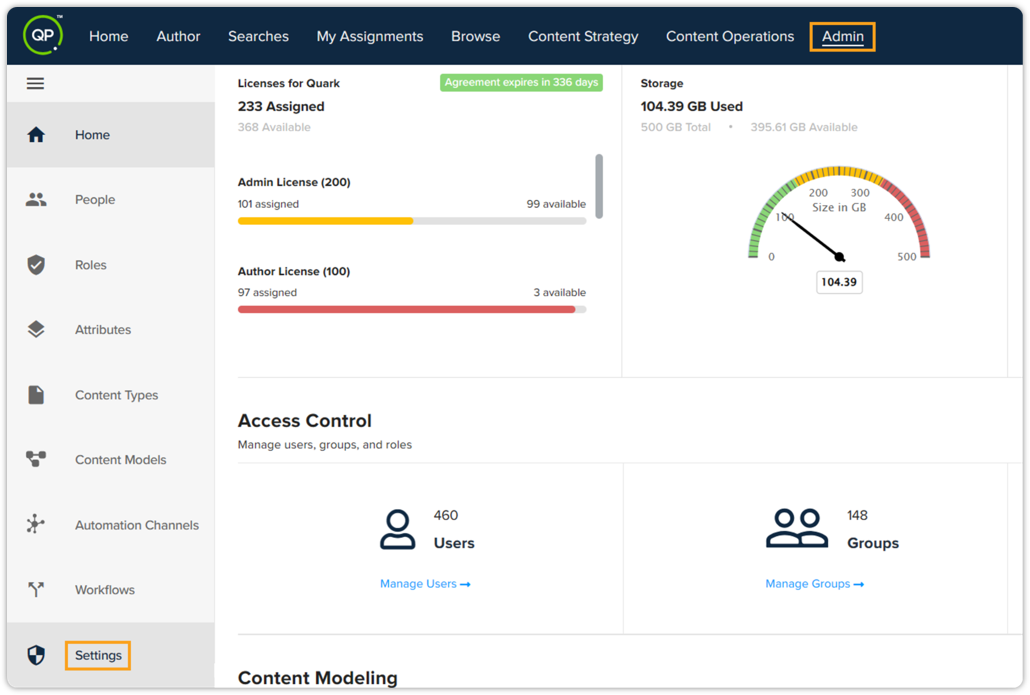
The settings are as follows:
SAML
Under the SAML tab, you can manage the following settings:
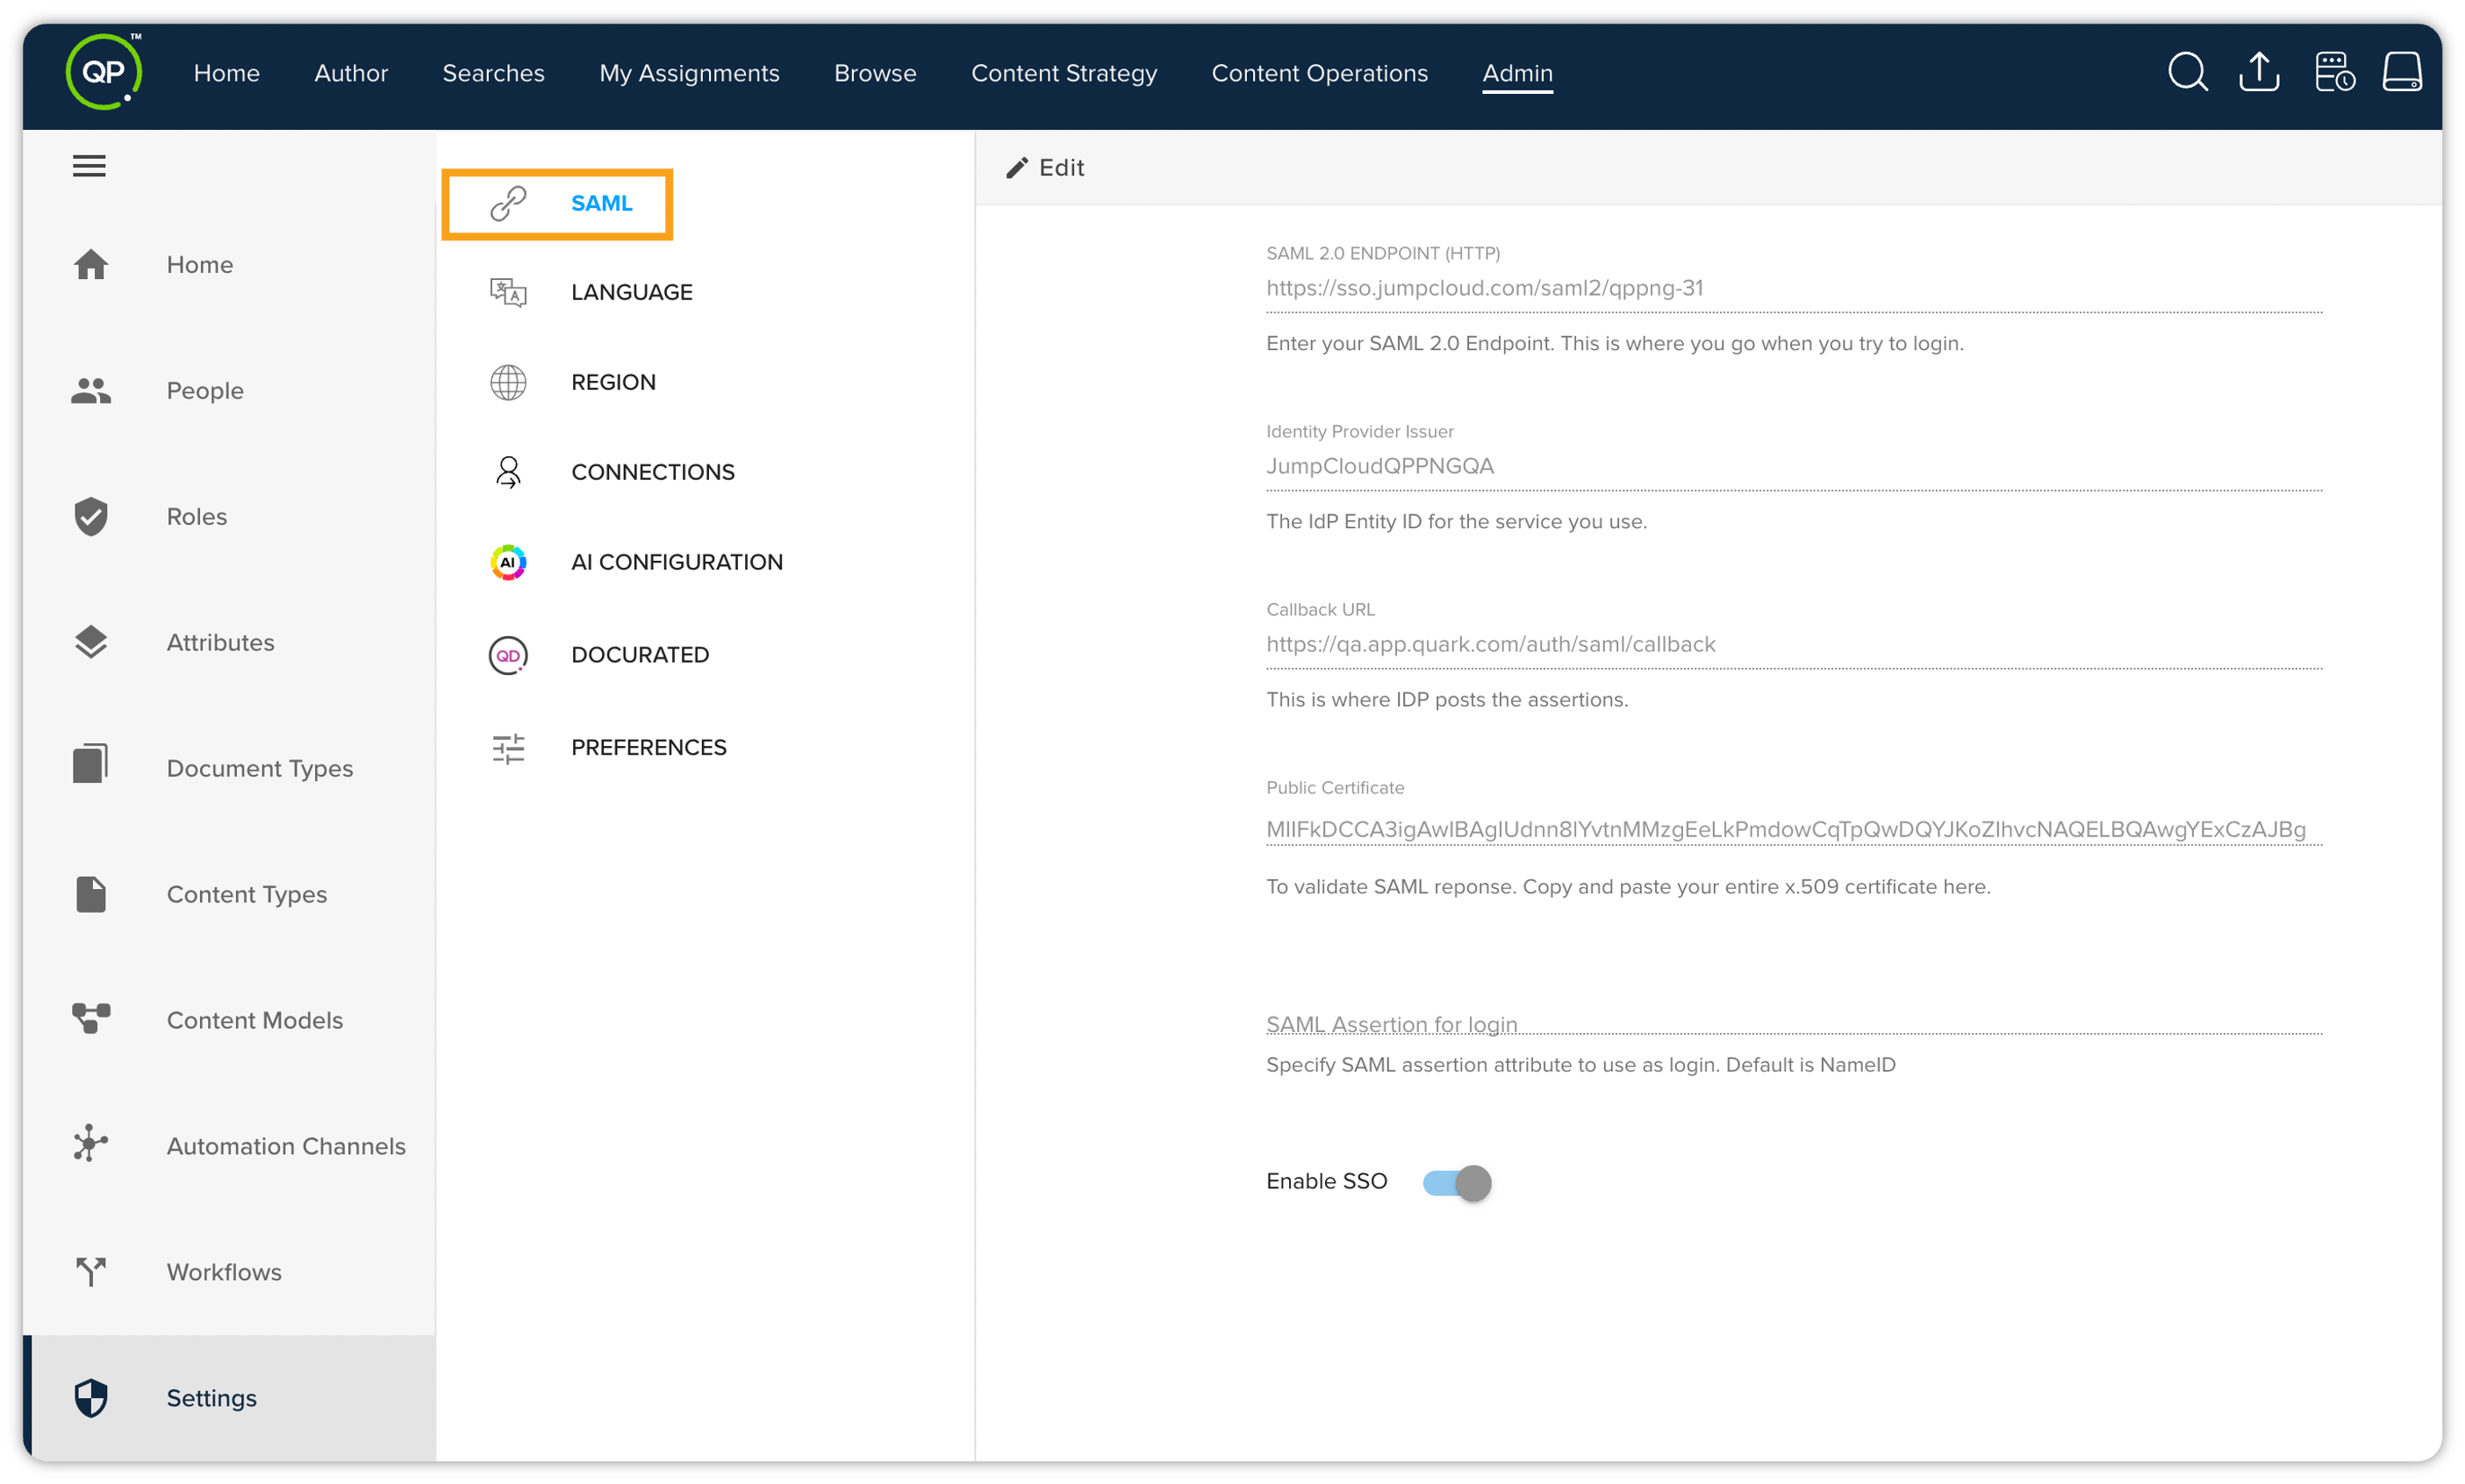
-
SAML 2.0 ENDPOINT (HTTP): Allows you to add your IDP (Identification Provider) address that gets a response from the server.
-
Identity Provider Issuer: A unique key that allows you to identify the identity provider on the server.
-
Callback URL: Allows the system to send requests to access Quark applications from a machine.
-
Public Certificate: Allows the system to receive encrypted data from the server and then decrypt data at the user end.
-
SAML Assertion for login: Allows you to choose attributes that are used universally within an organization.
Language
Under the Language tab, you can manage the languages for translation configuration. The tab displays the default set of languages available in QPP for translation, as well as the languages that you have added. The tab also contains the options to add, edit, and delete a language.
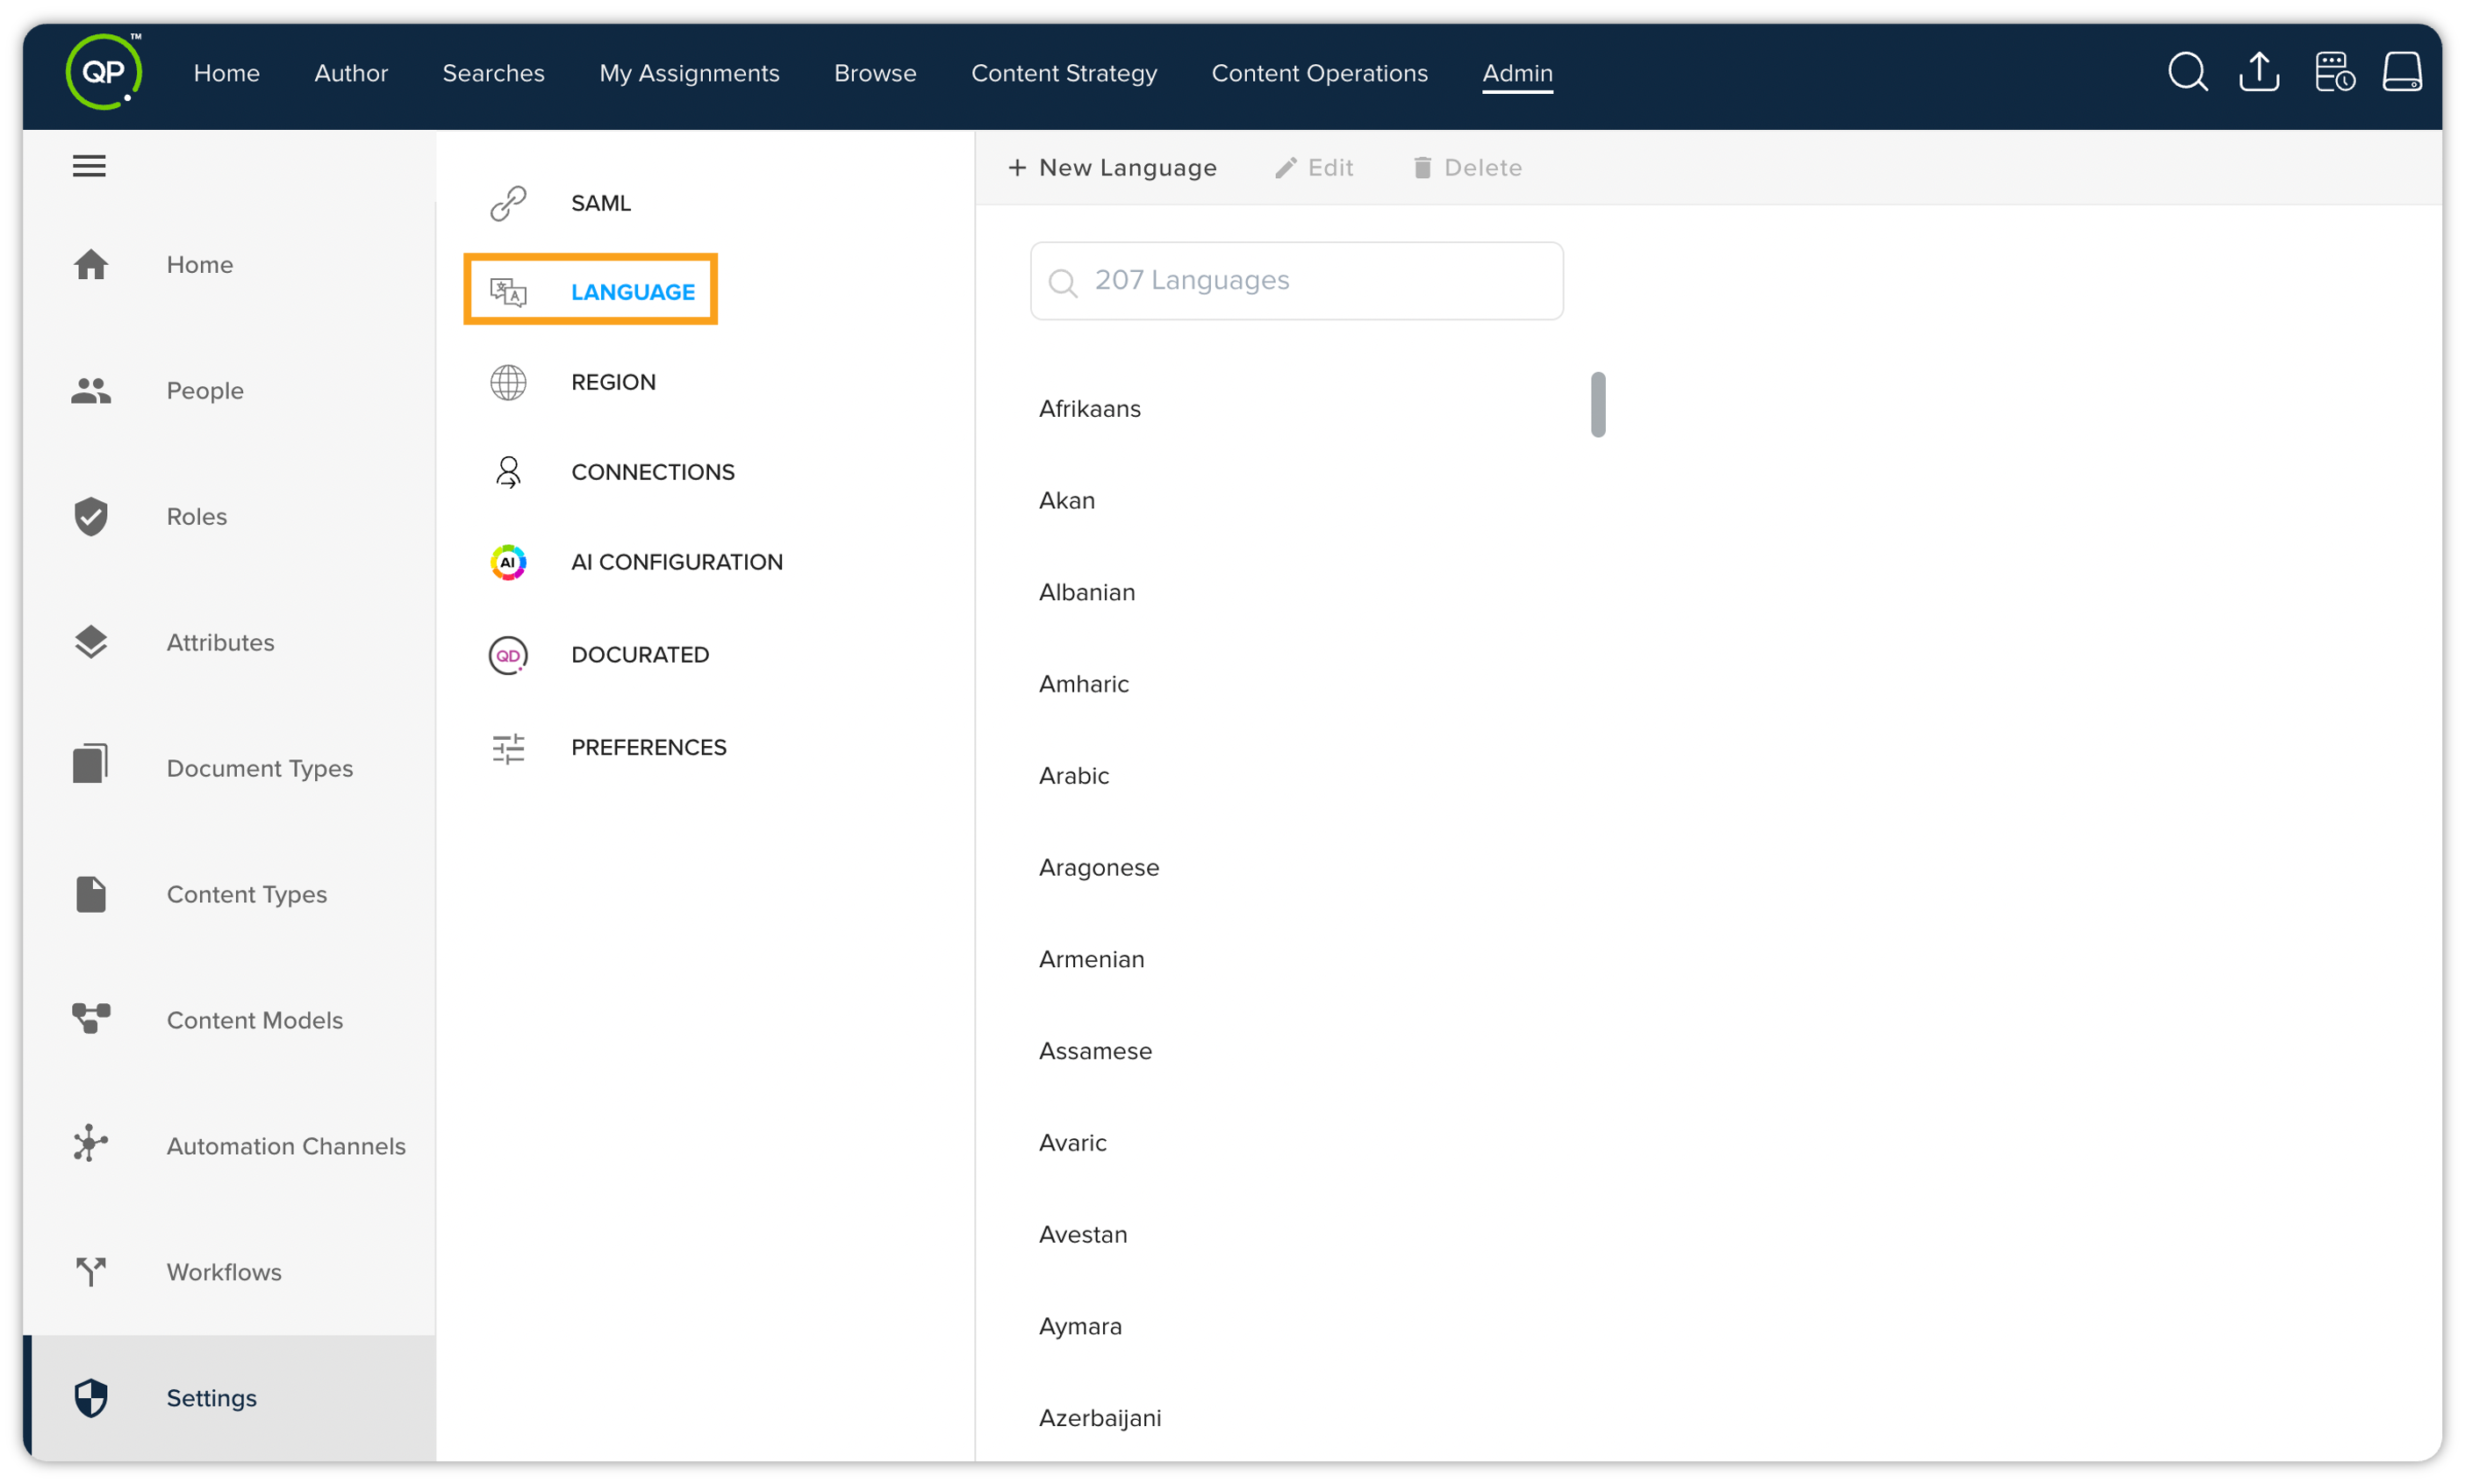
To add a language:
-
In the Language tab, select the button + New Language to open the Add New Language pane.
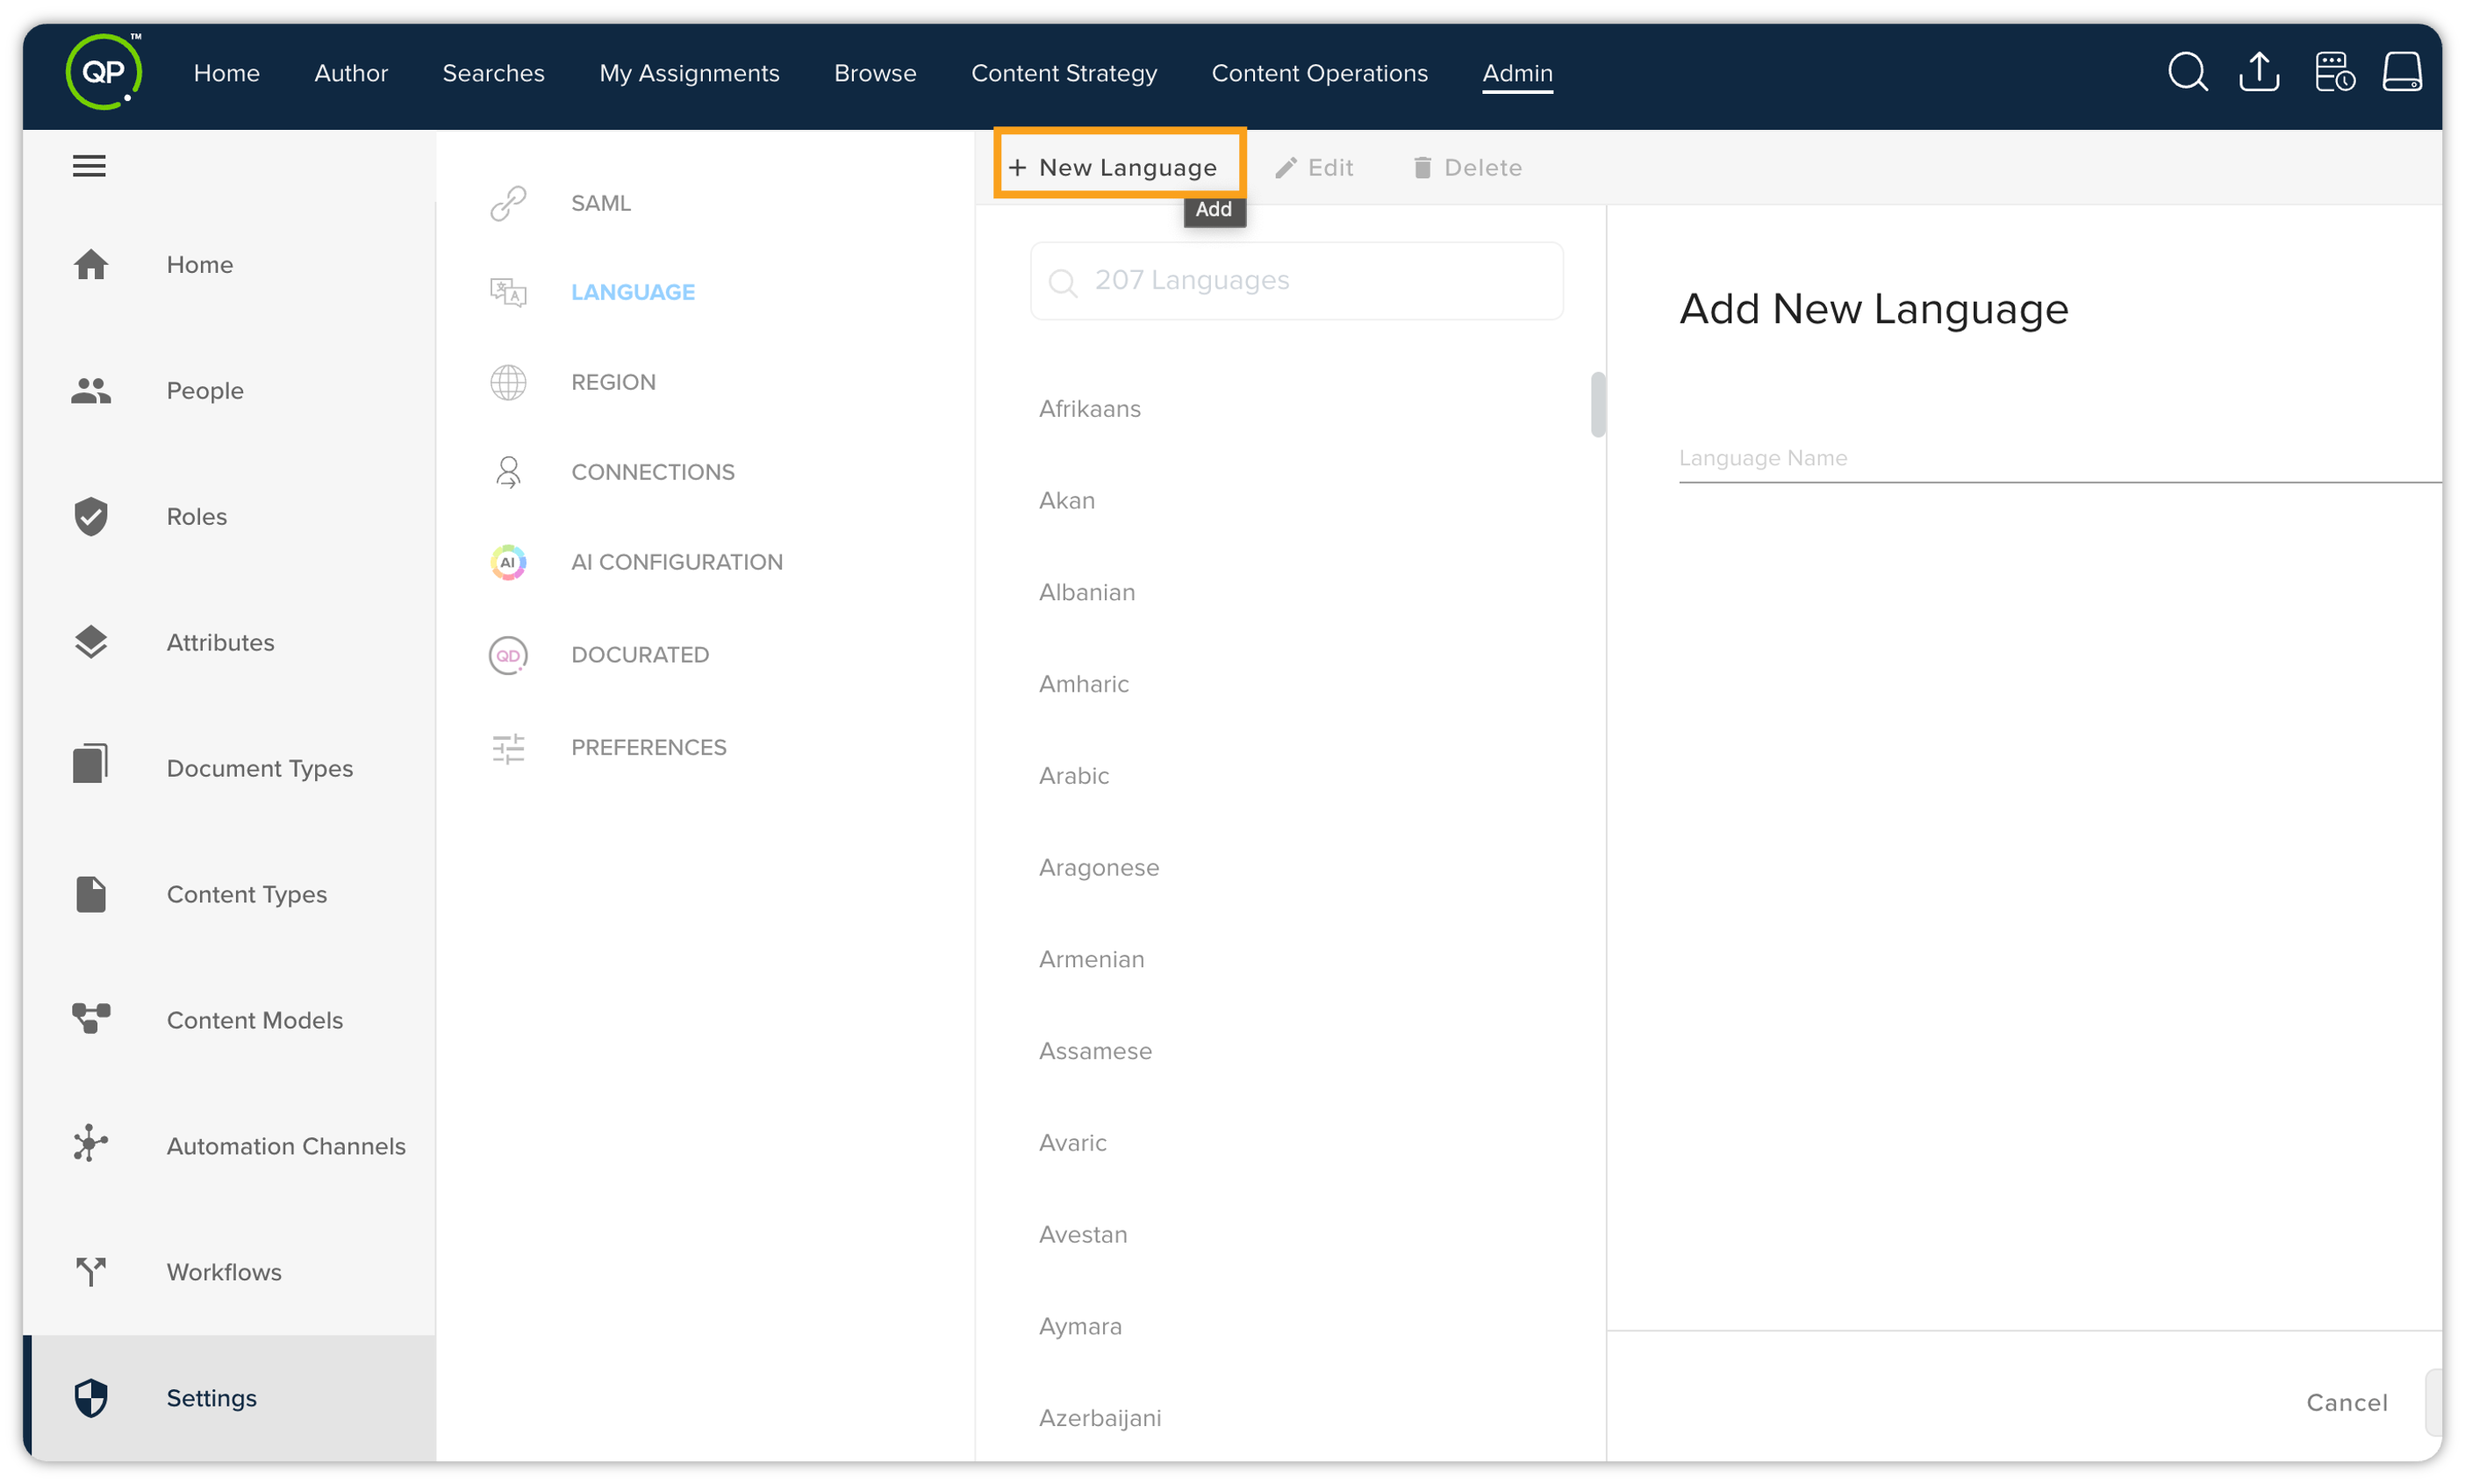
-
In the Add New Language pane, provide the name of the language.
-
Select the button Save.
Region
Within the Region tab, you can manage the regions for translation configuration. While configuring a translation you can associate multiple regions with a language (for example, English UK and English US) and vice versa. The tab displays the default set of regions available in QPP for translation, as well as the regions that you have added. The tab also contains the options to add, edit, and delete a region.
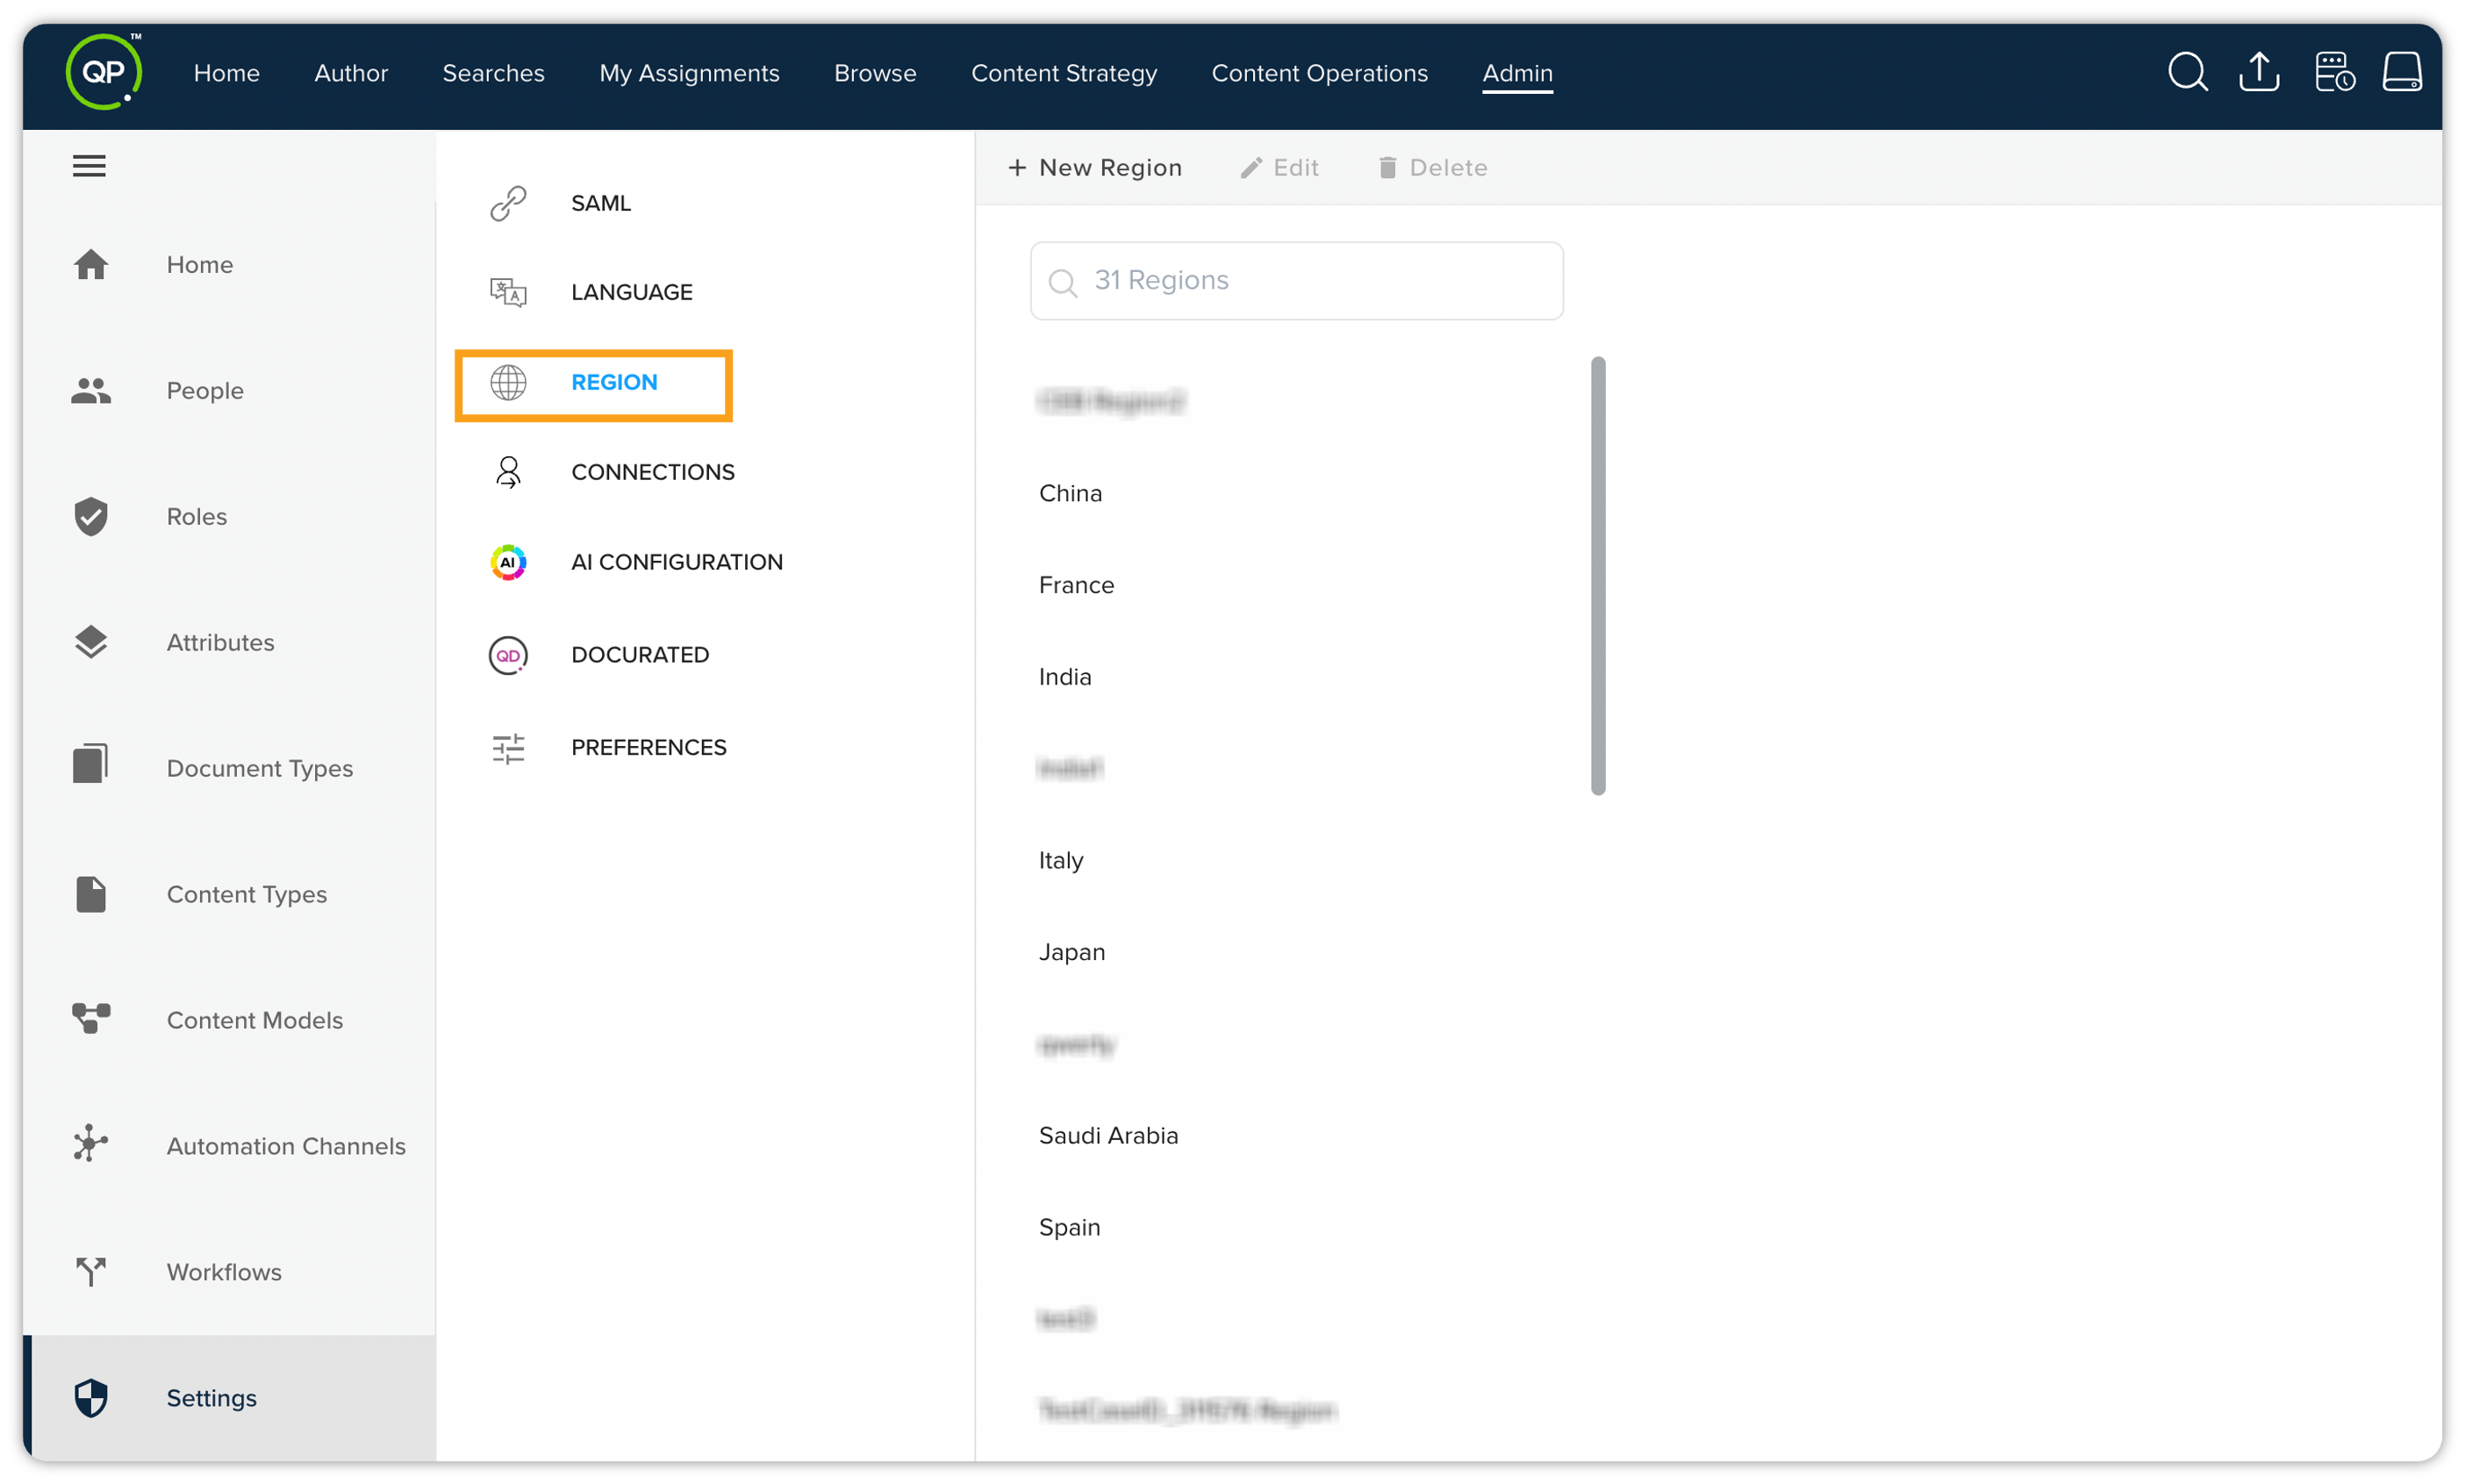
To add a language:
-
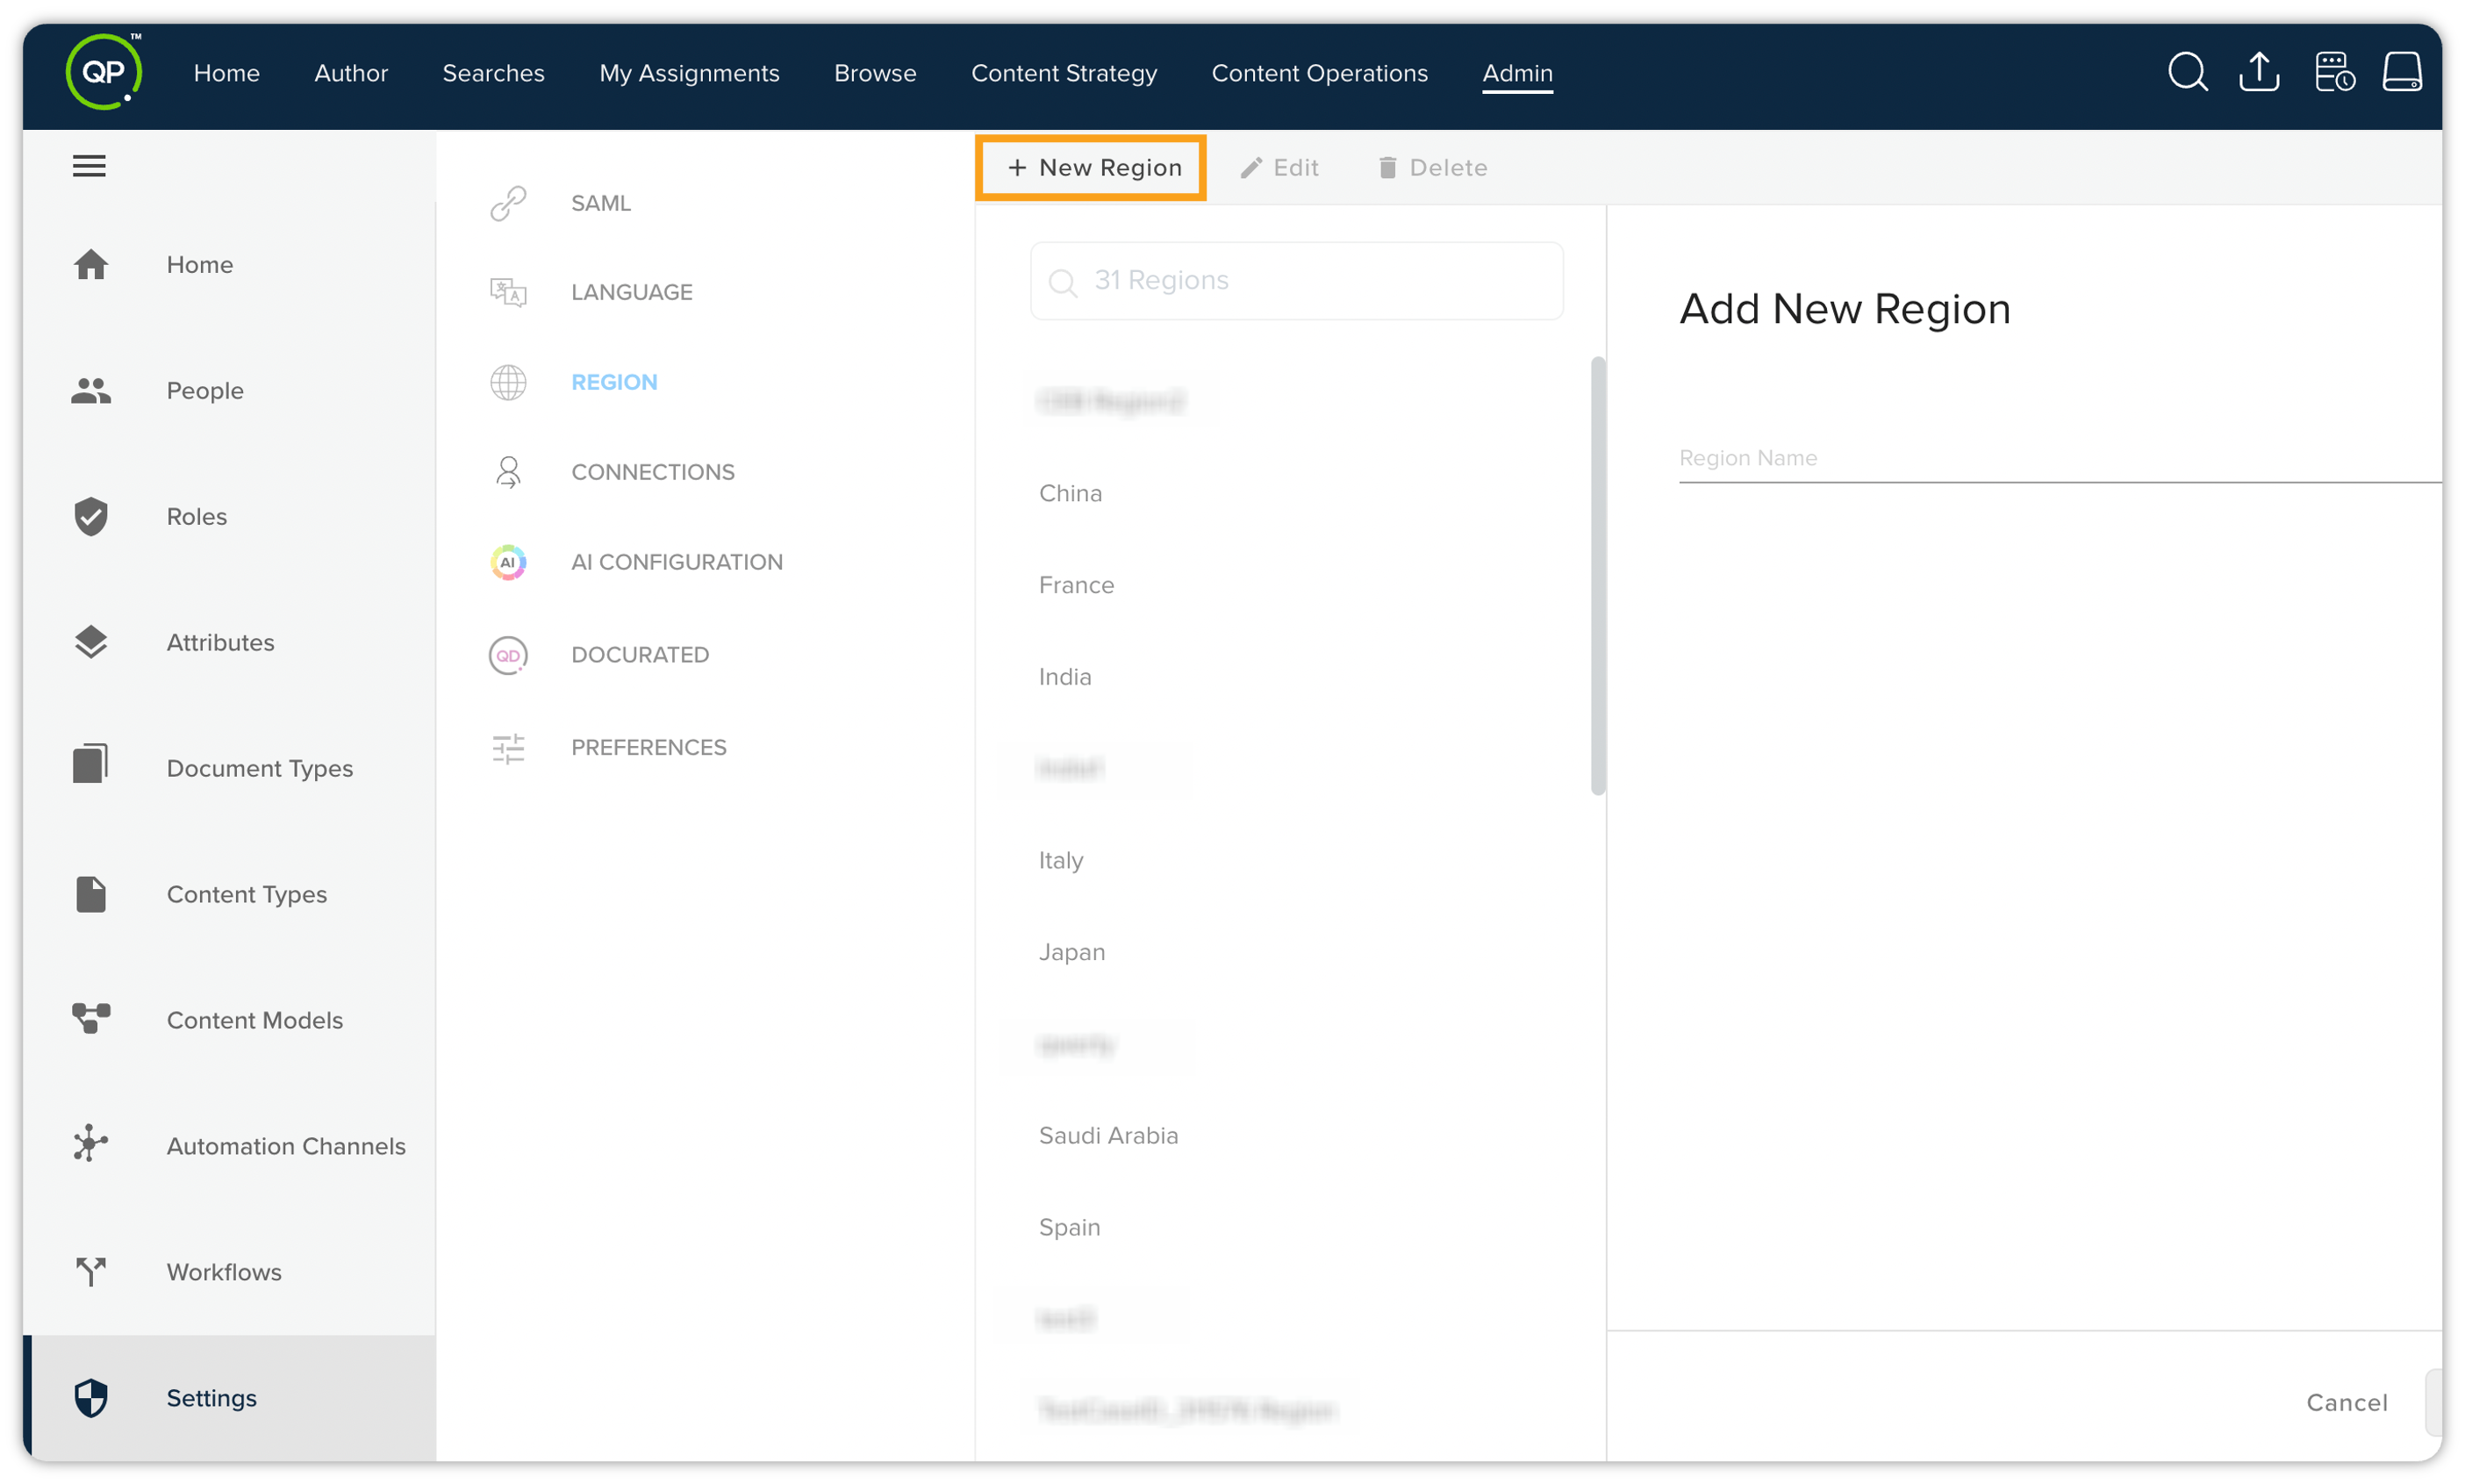
In the Region tab, select the button + New Region to open the Add New Region pane.
-
In the Add New Region pane, provide the name of the region.
-
Select the button Save.
Connections
The Connections functionality helps you integrate the QPP platform with OAuth 2.0, a standardized authentication protocol. This will significantly enhance the security and flexibility of API authorization and authentication, providing a robust framework for secure access to our platform's resources.
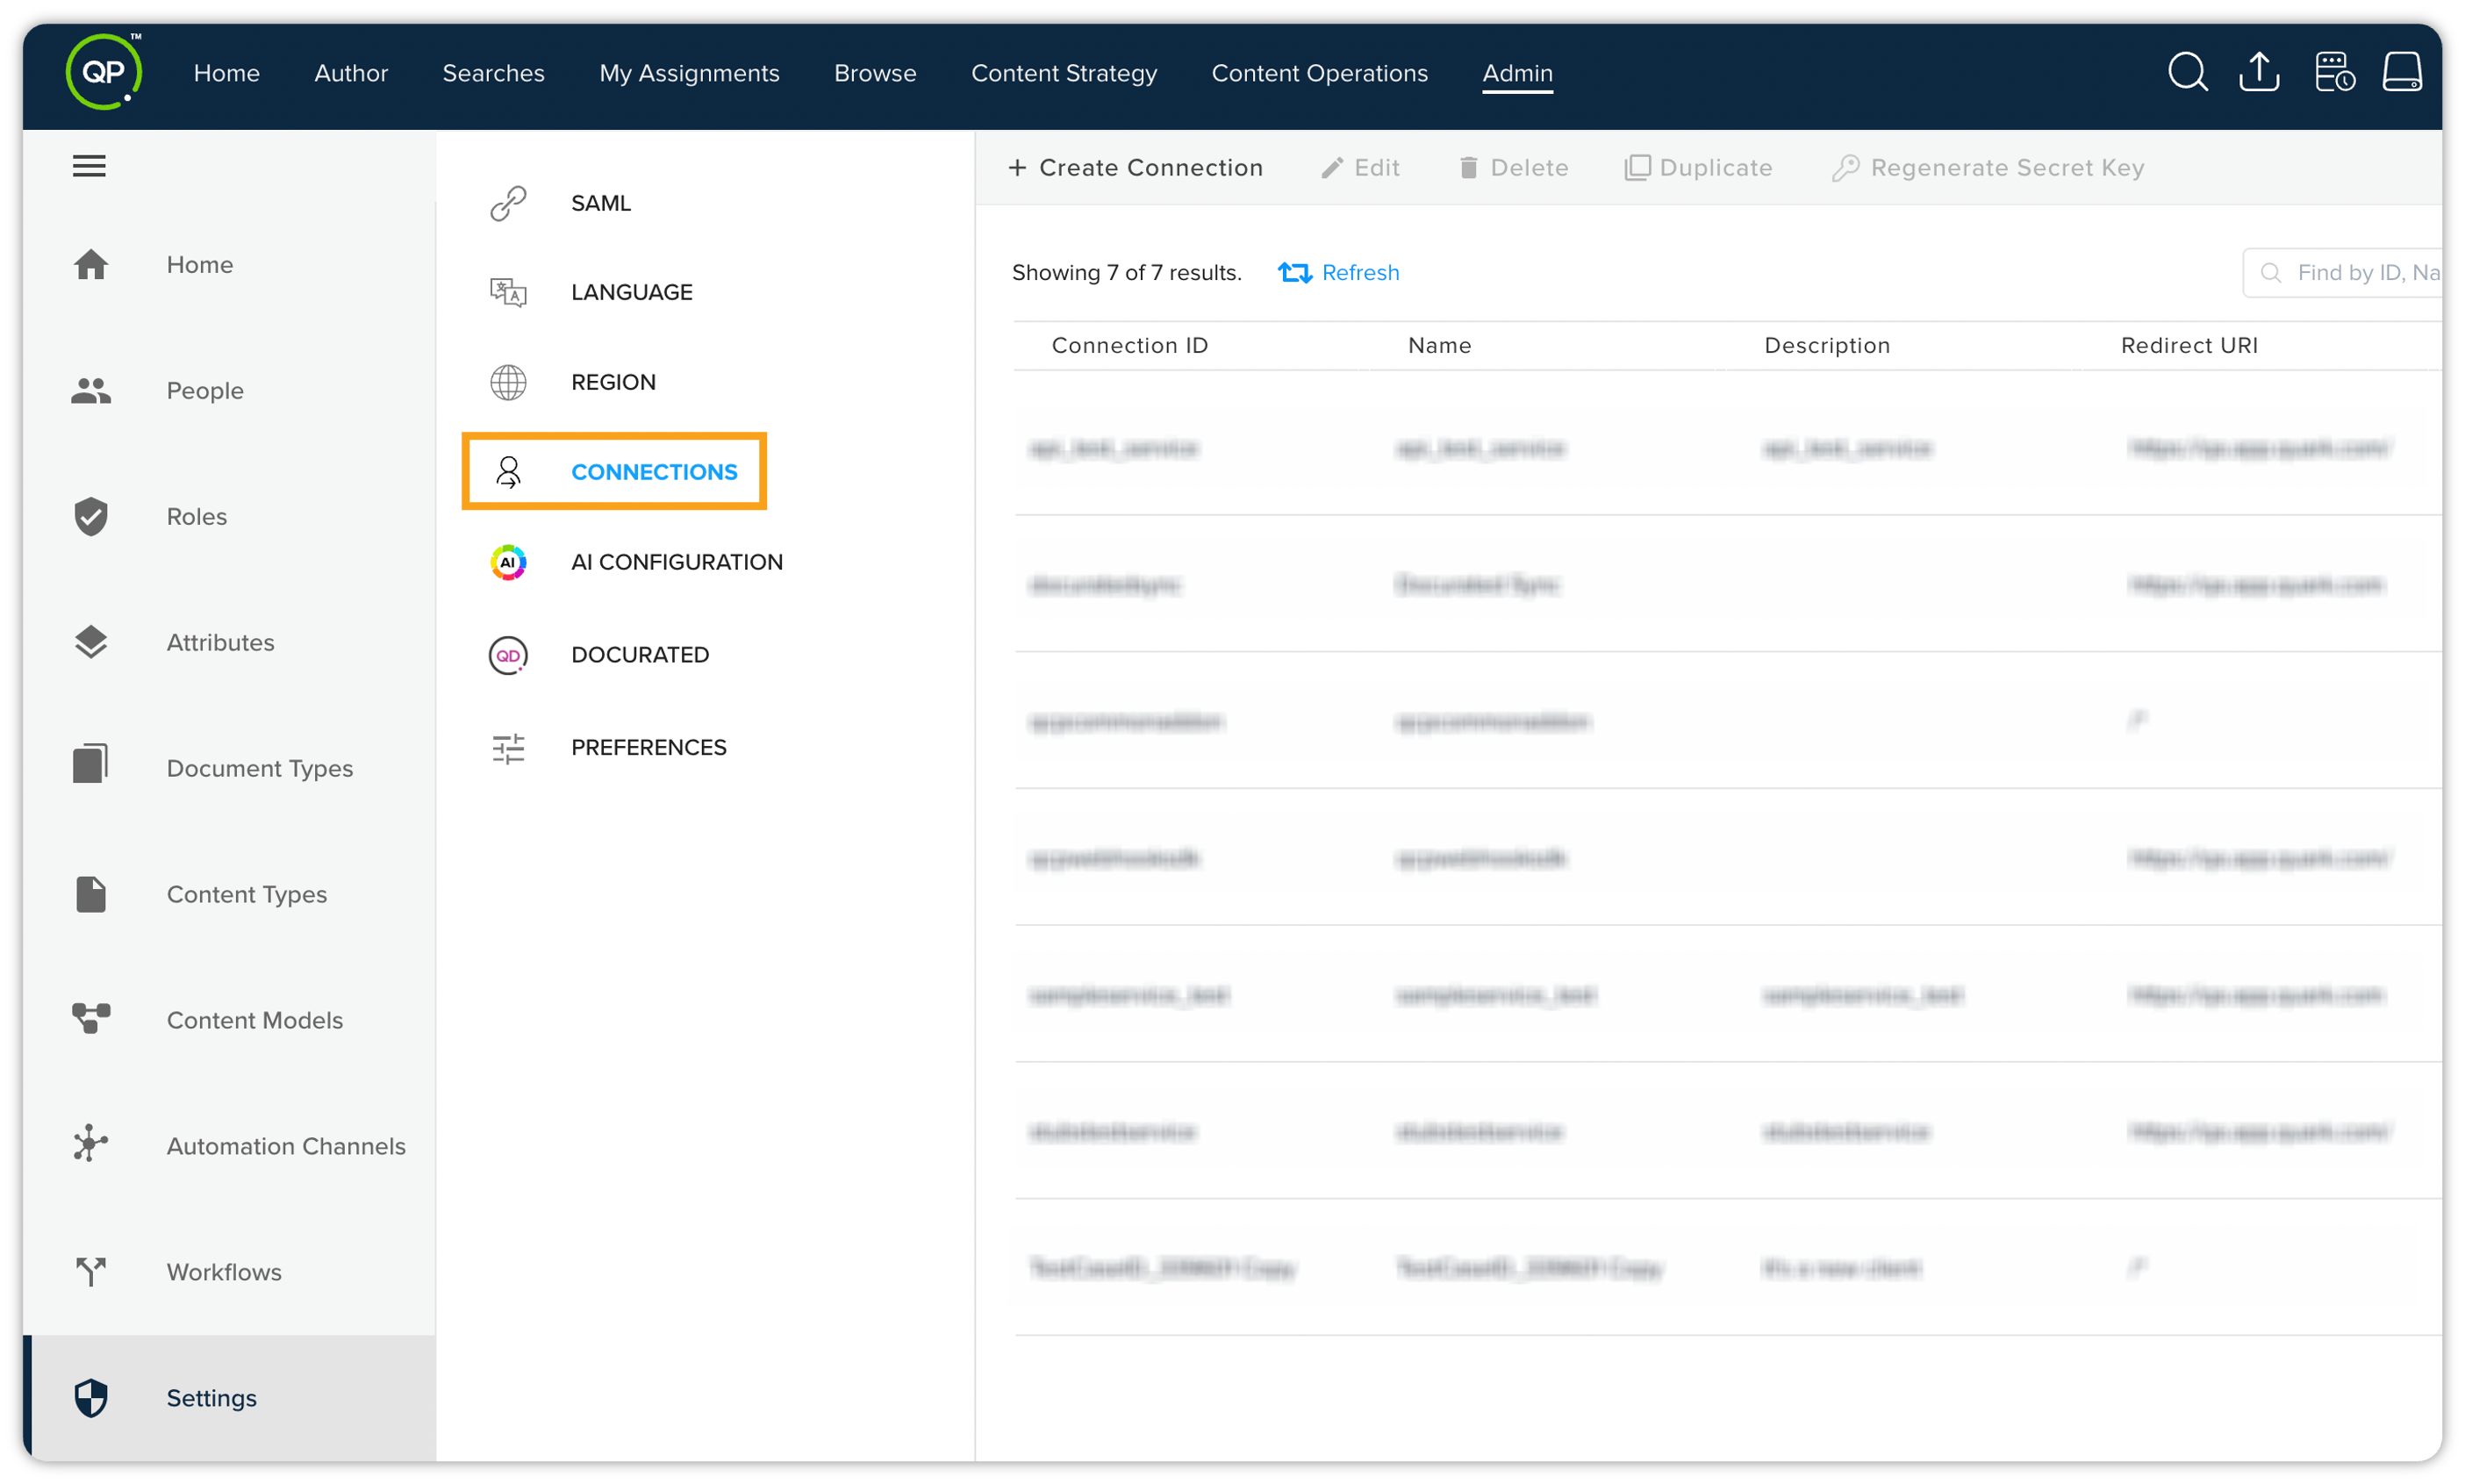
Key aspects of using OAuth 2.0 –
-
Enhanced security: The implementation of OAuth 2.0 reinforces security measures by allowing for delegated access without exposing user credentials, minimizing the risk of unauthorized access.
-
Industry compliance: Compliance with OAuth 2.0 standards ensures compatibility with a wide range of third-party applications and services, facilitating interoperability and enhancing the overall user experience.
Users with Admin license type can easily register a third-party application with the QPP system so that the third-party application can be integrated with the QPP APIs. No additional implementation will be required anymore.
Overview of Connections
The Connections screen in QPP provides users with a convenient interface to manage integration with OAuth 2.0.
List of Connections
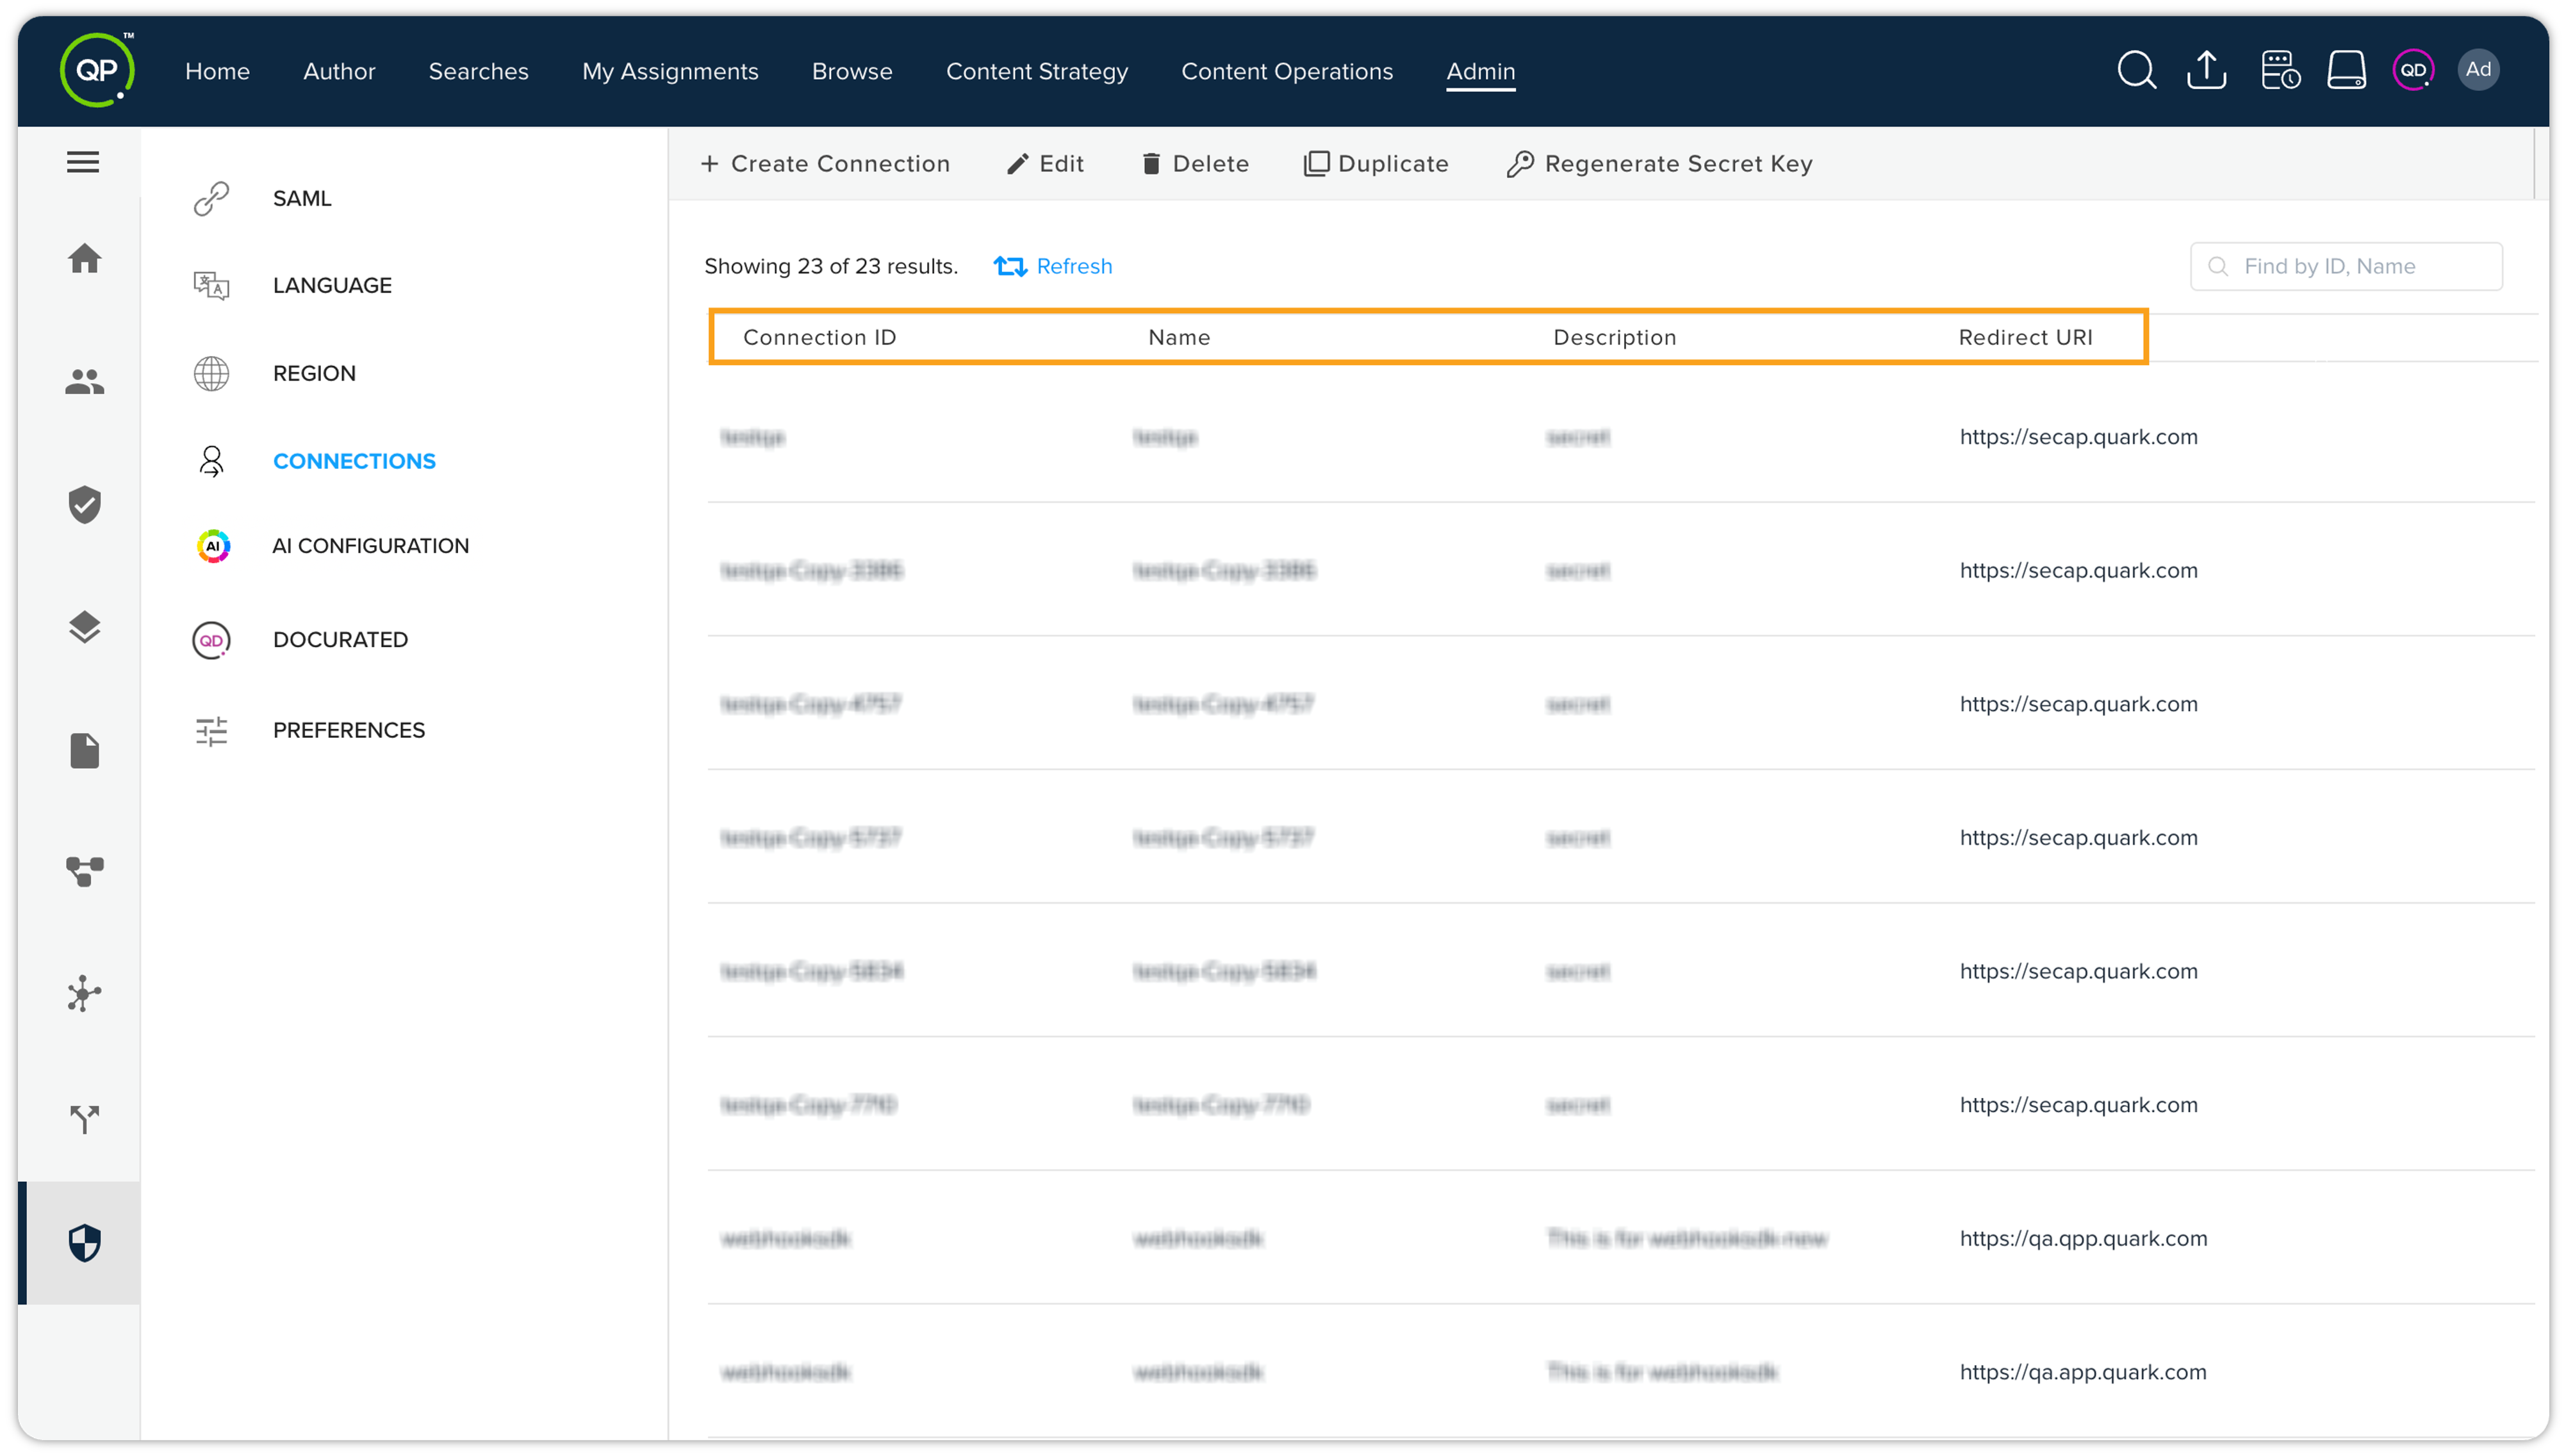
The Connections screen presents a tabular format listing all the connections that have been created. Each connection is represented by multiple columns, including –
-
Connection ID: Unique identifier for each connection.
-
Name: The name of the connection for easy identification.
-
Description: Brief description of the connection's purpose.
-
Redirect URI: The URI to which the user is redirected after authorization.
This allows you to have an overview of all the existing connections at a glance, making it easier to manage and navigate through them.
Available Options
-
Creating New Connection: You have the option to create a new connection using the dedicated button. This streamlines the process of integrating new services with QPP. To do that, simply click on Create button (highlighted in the screenshot).
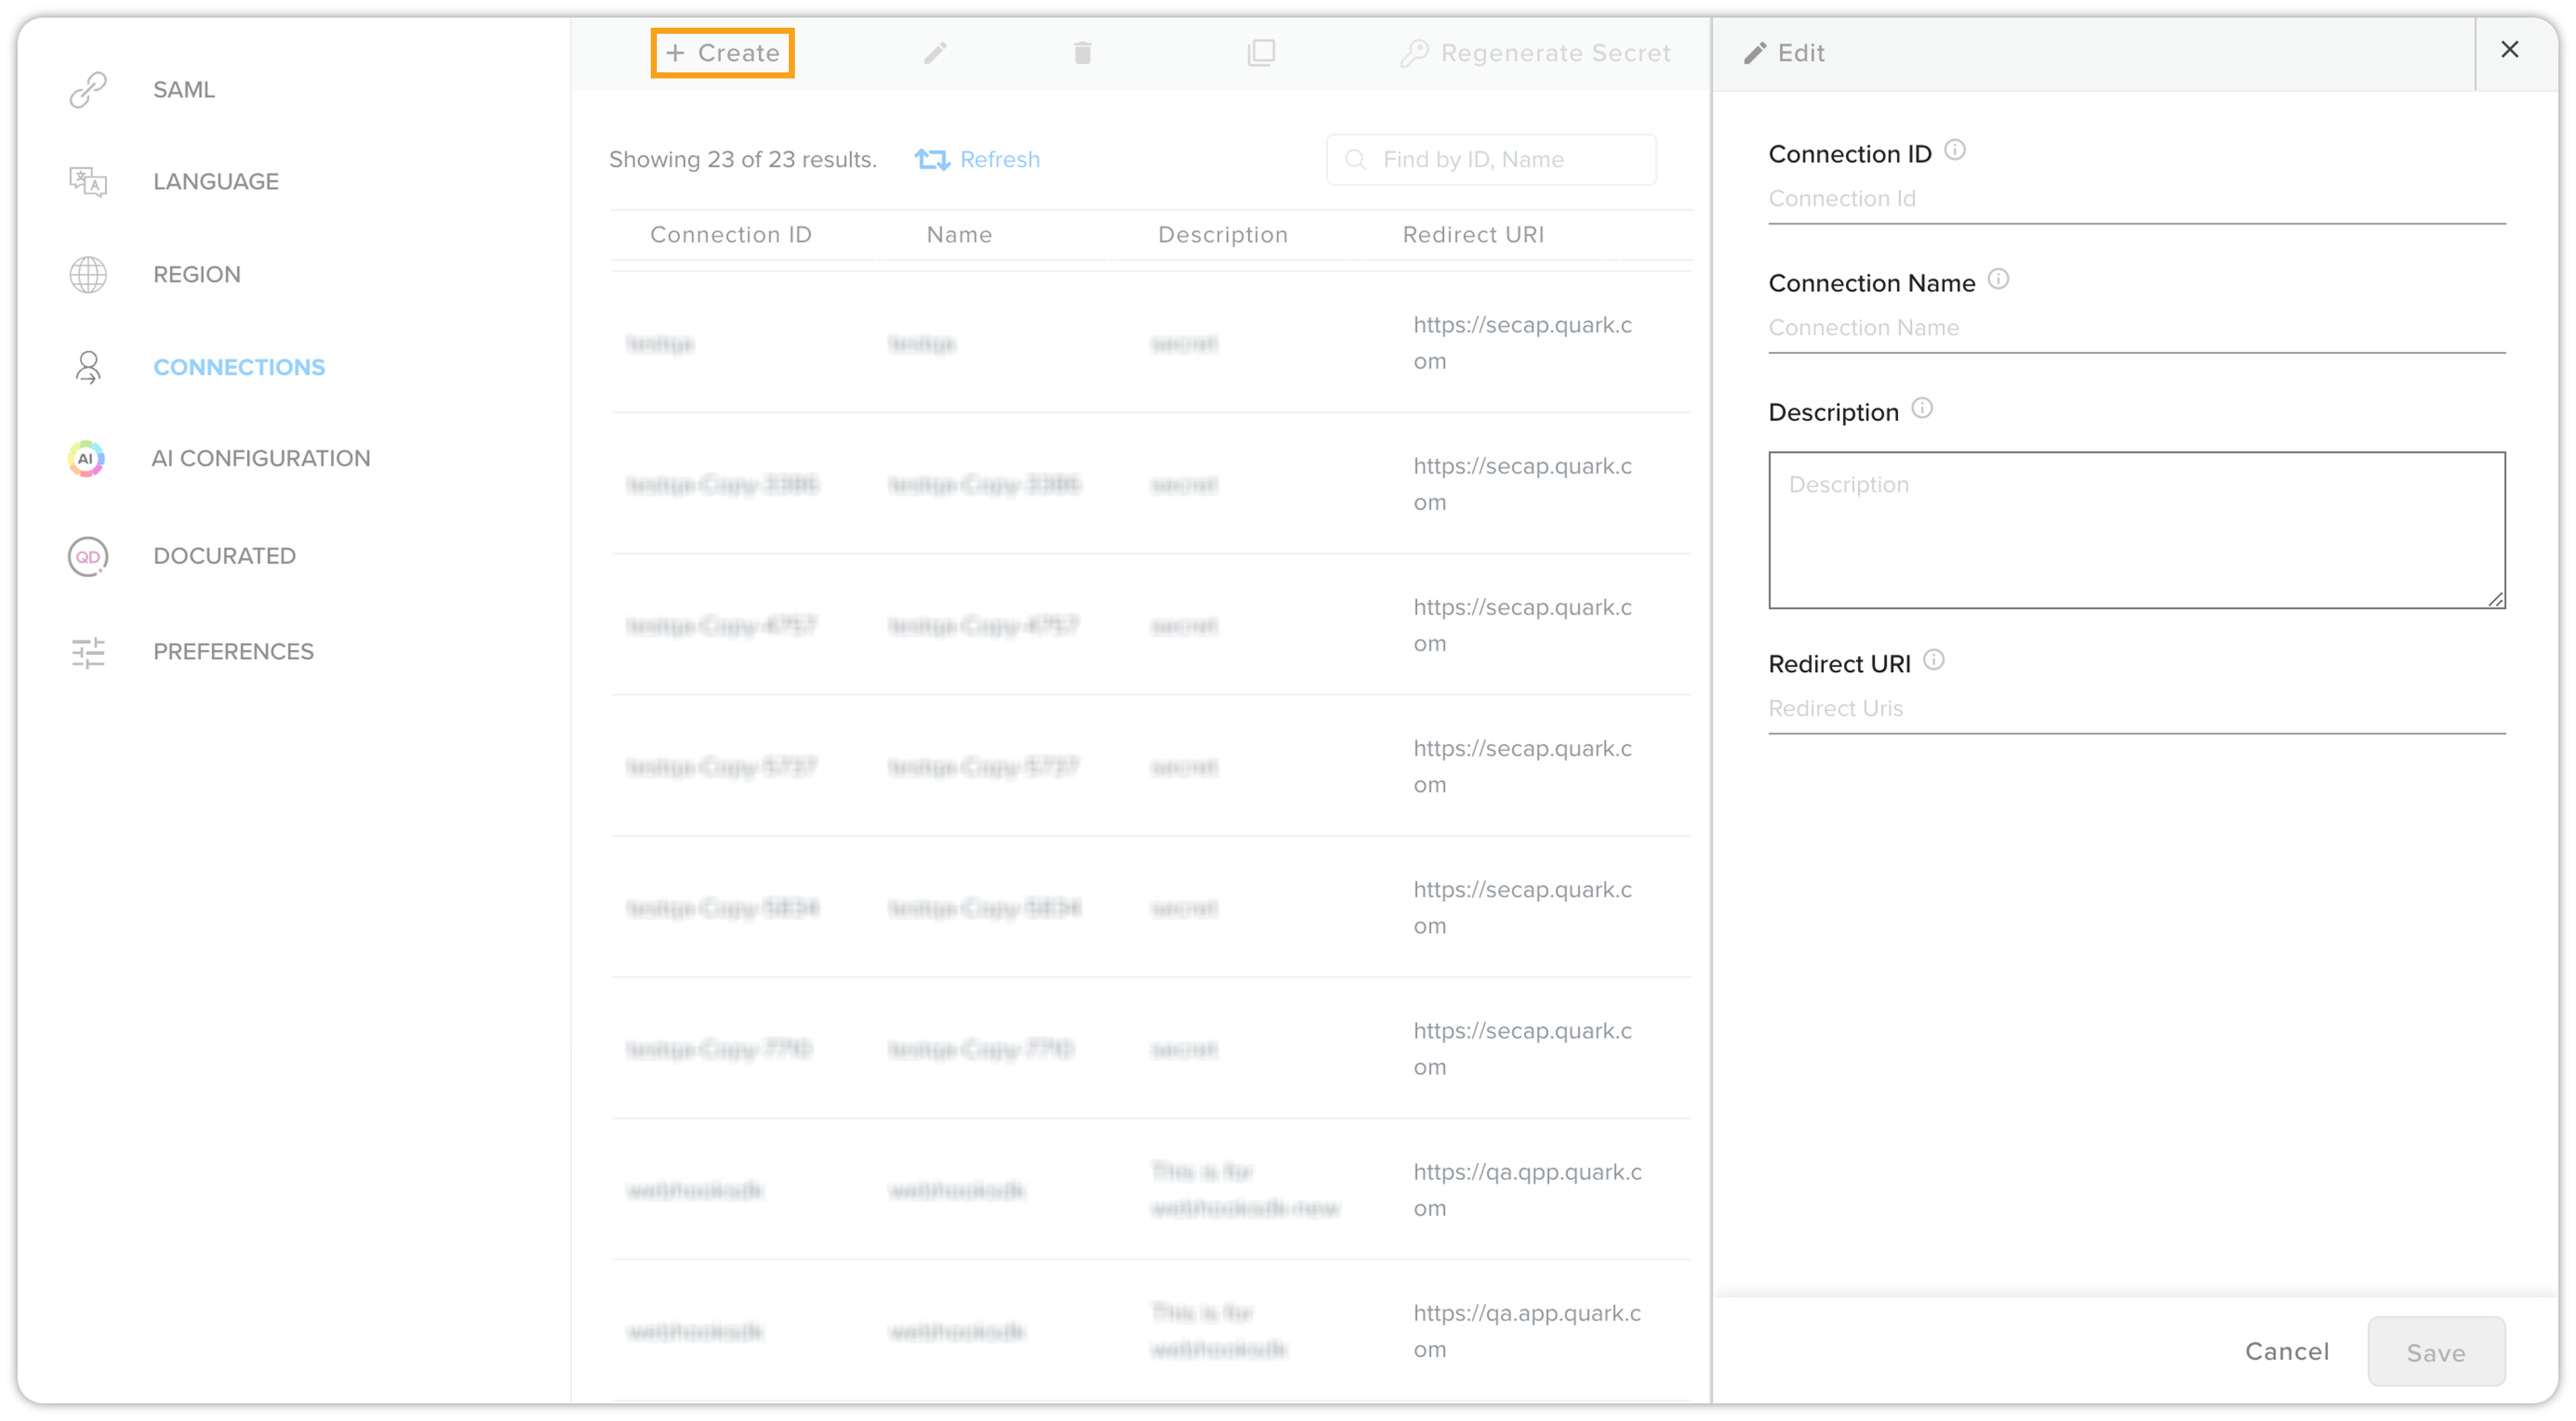 Fill in the required fields to create a new connection. Use the tooltip to enter the correct information.
-
Editing an existing connection: For any existing connection, you can edit its details and configurations as per the requirements. This ensures flexibility and customization for each integration. To do that, select a connection and then click on Edit.
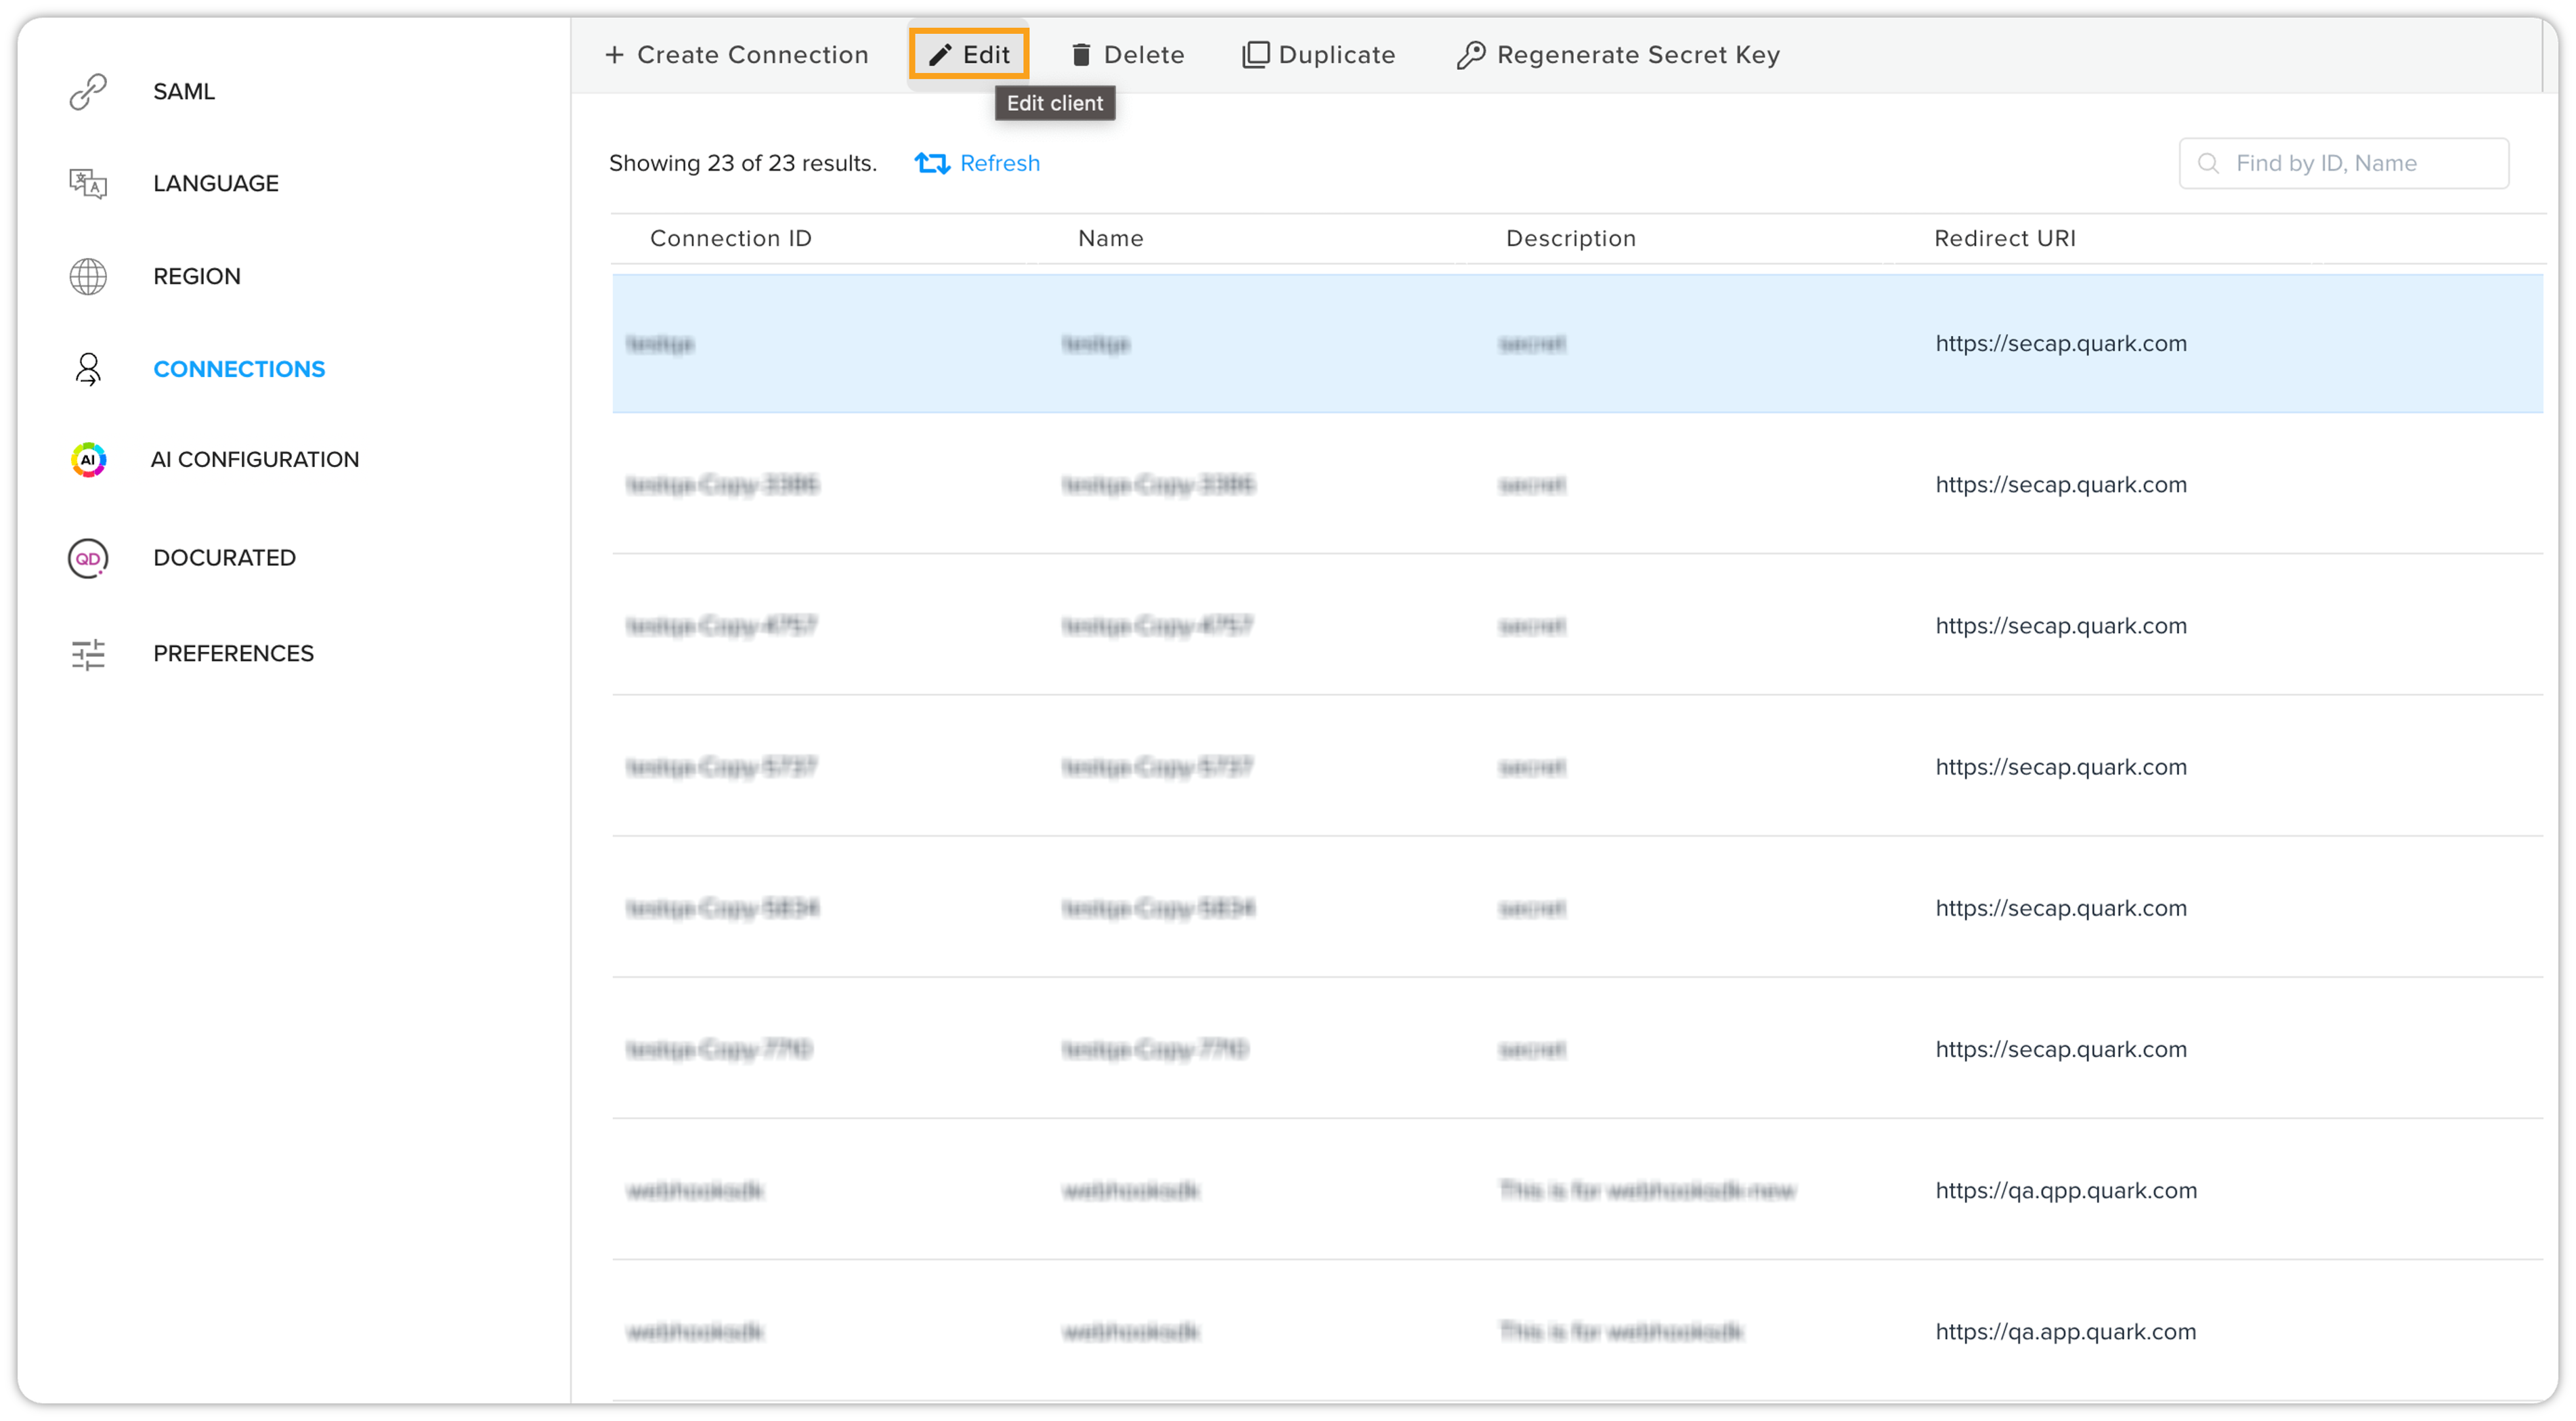
-
Deleting a connection: If a connection is no longer needed, you can remove it from the list by deleting it. This helps in maintaining a tidy and relevant list of connections. To do that, select a connection and then click on Delete.
-
Duplicating a connection: The option to duplicate a connection allows you to replicate an existing configuration, saving time and effort in setting up similar connections.
-
Regenerating the secret key: For security purposes, you can regenerate the secret key associated with a connection, adding an extra layer of protection to the integration.
-
Refresh option: The Refresh option on the Connections screen enables you to update the list of connections in real-time without the need to navigate away from the page.
-
Search functionality: You can search for specific connections by entering their names or IDs in the search bar. This makes it convenient to locate and manage connections efficiently.
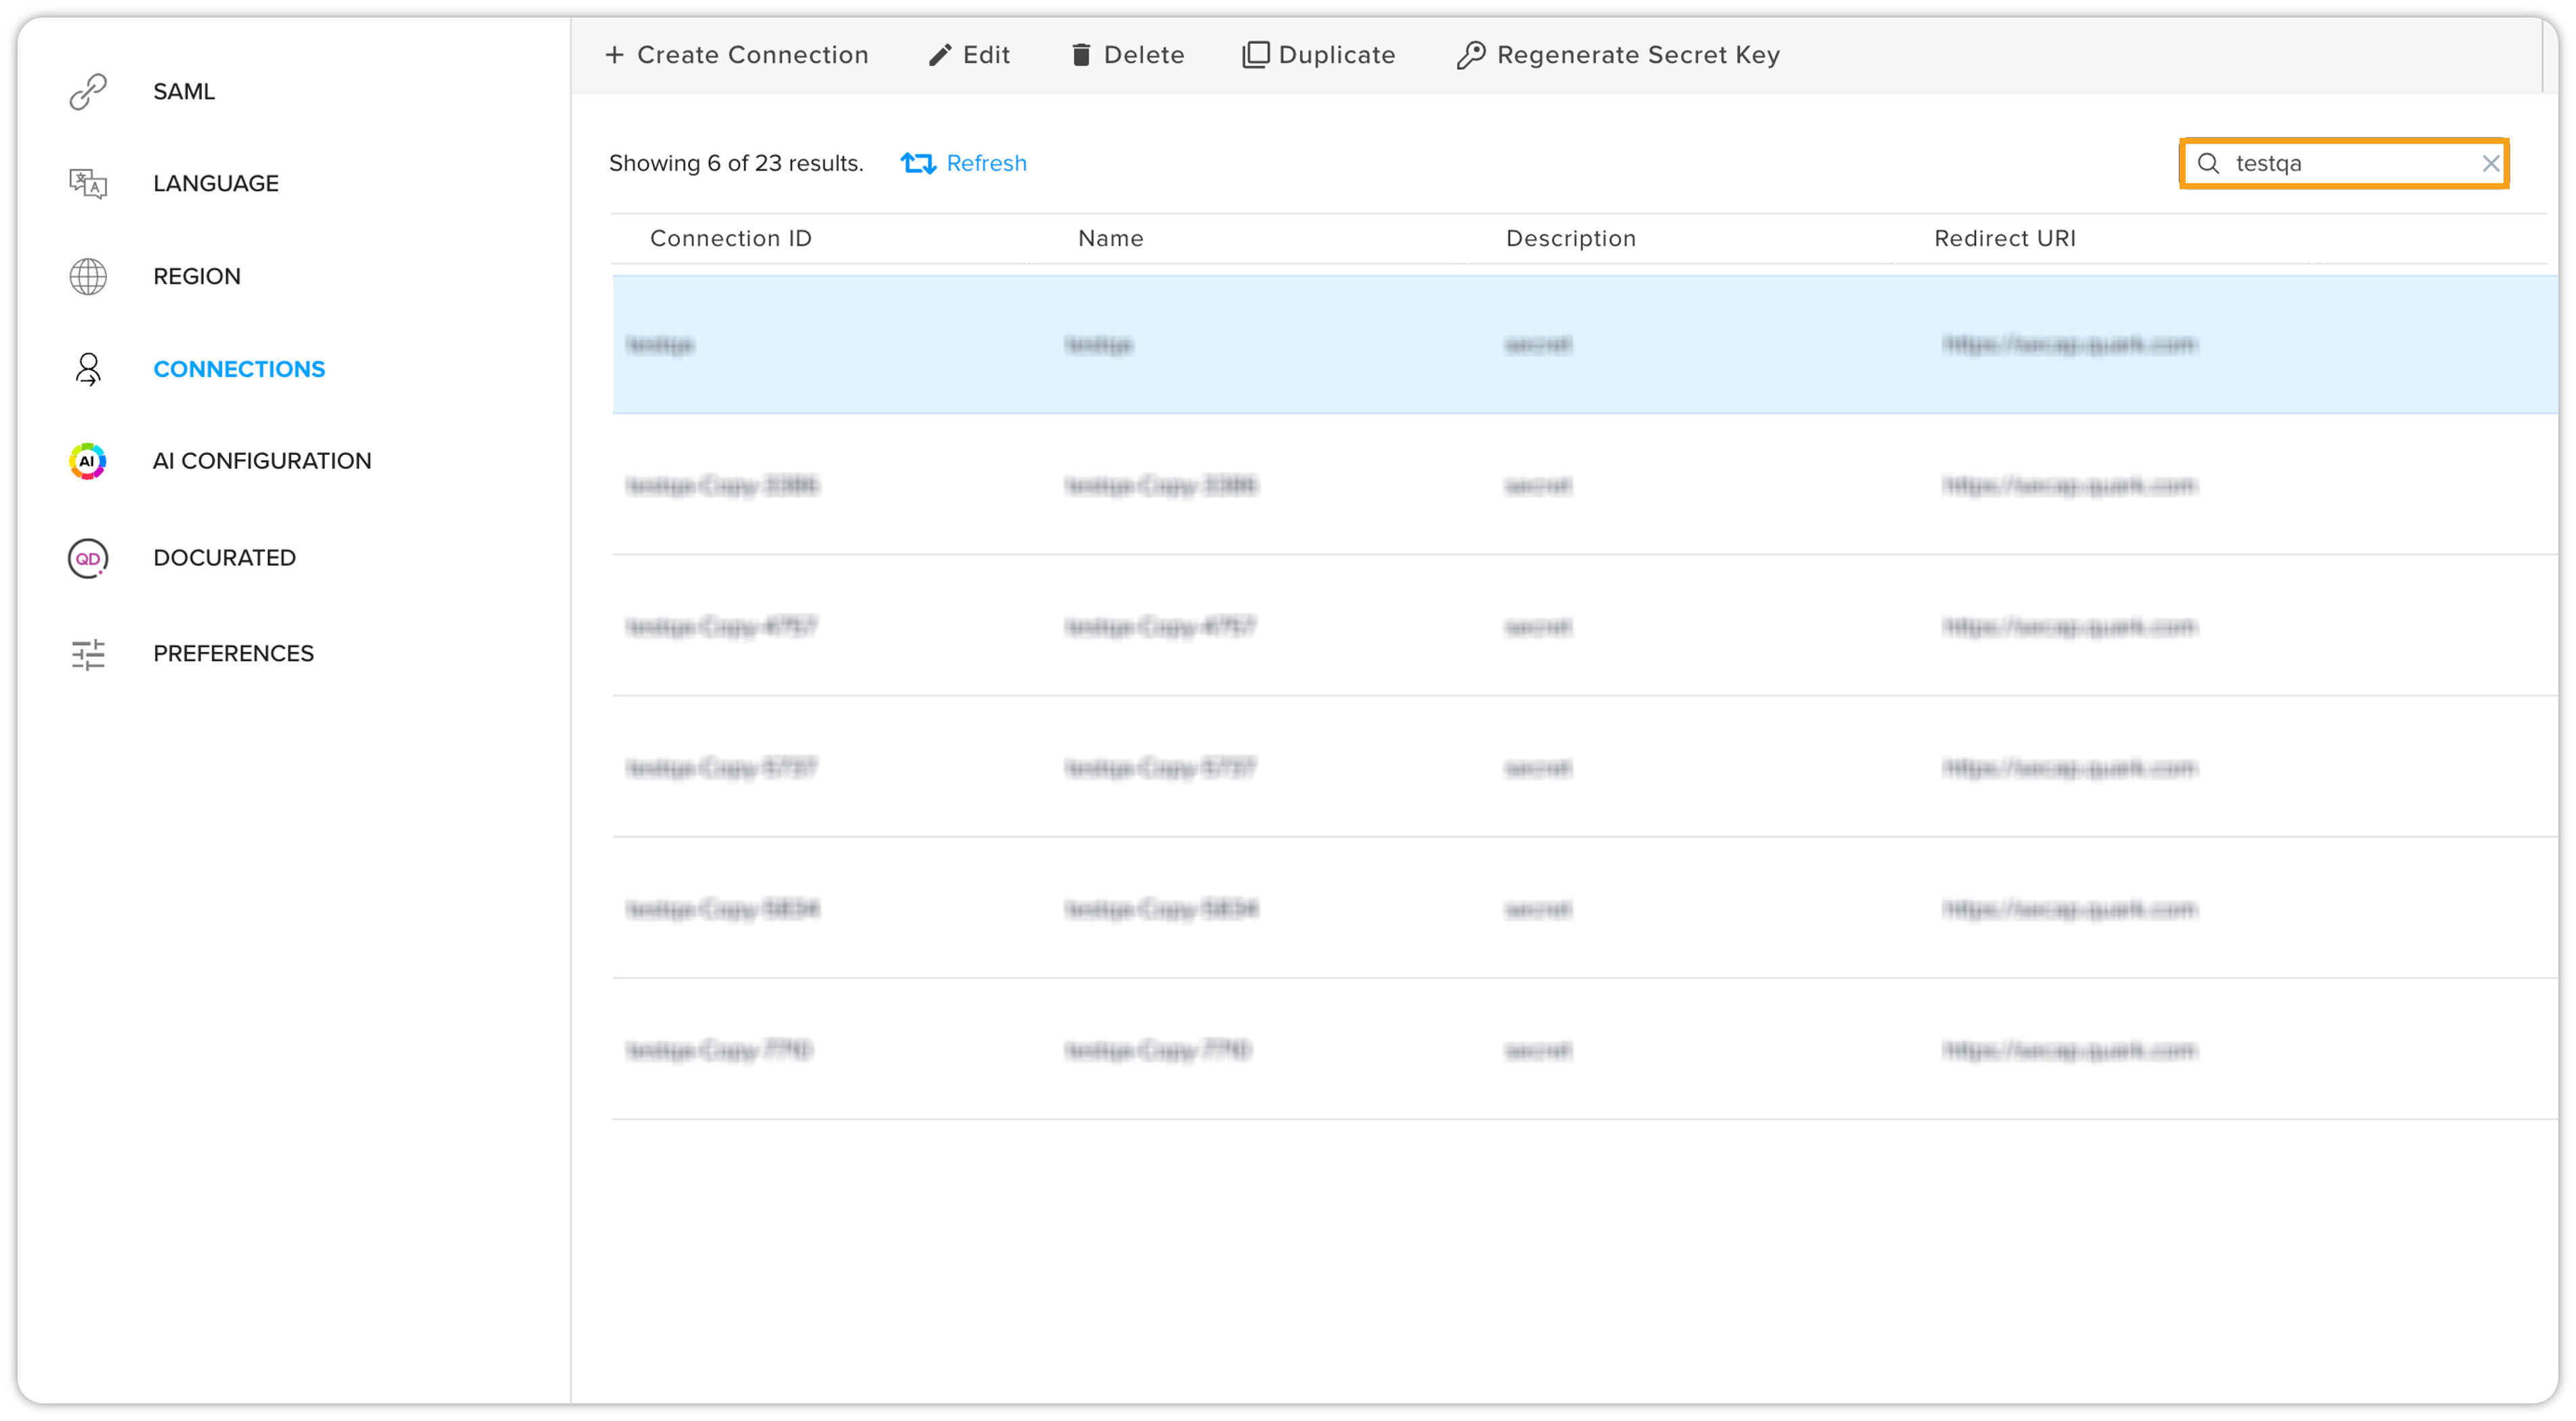
AI Configuration
Before you can start using AI Assistant, previously known as Quarky Copilot, you must configure AI services. AI services configuration refers to the settings and parameters that determine how an AI system operates and functions. Proper configuration of AI services is critical to ensuring that it delivers accurate, reliable, and effective results. It can also help to optimize platform performance, improve scalability, and ensure that the platform is aligned with the values and objectives of the organization or individual that is using it.
How to set up AI Service configuration
Configuring AI services in the Quark Publishing Platform is extremely easy. Please note that users with the admin license type can only configure AI services. Any admin user can easily configure AI Assistant AI services with the desired parameters. To do that, follow the steps shown below –
-
On the AI Assistant screen, click on the New Configuration tab.
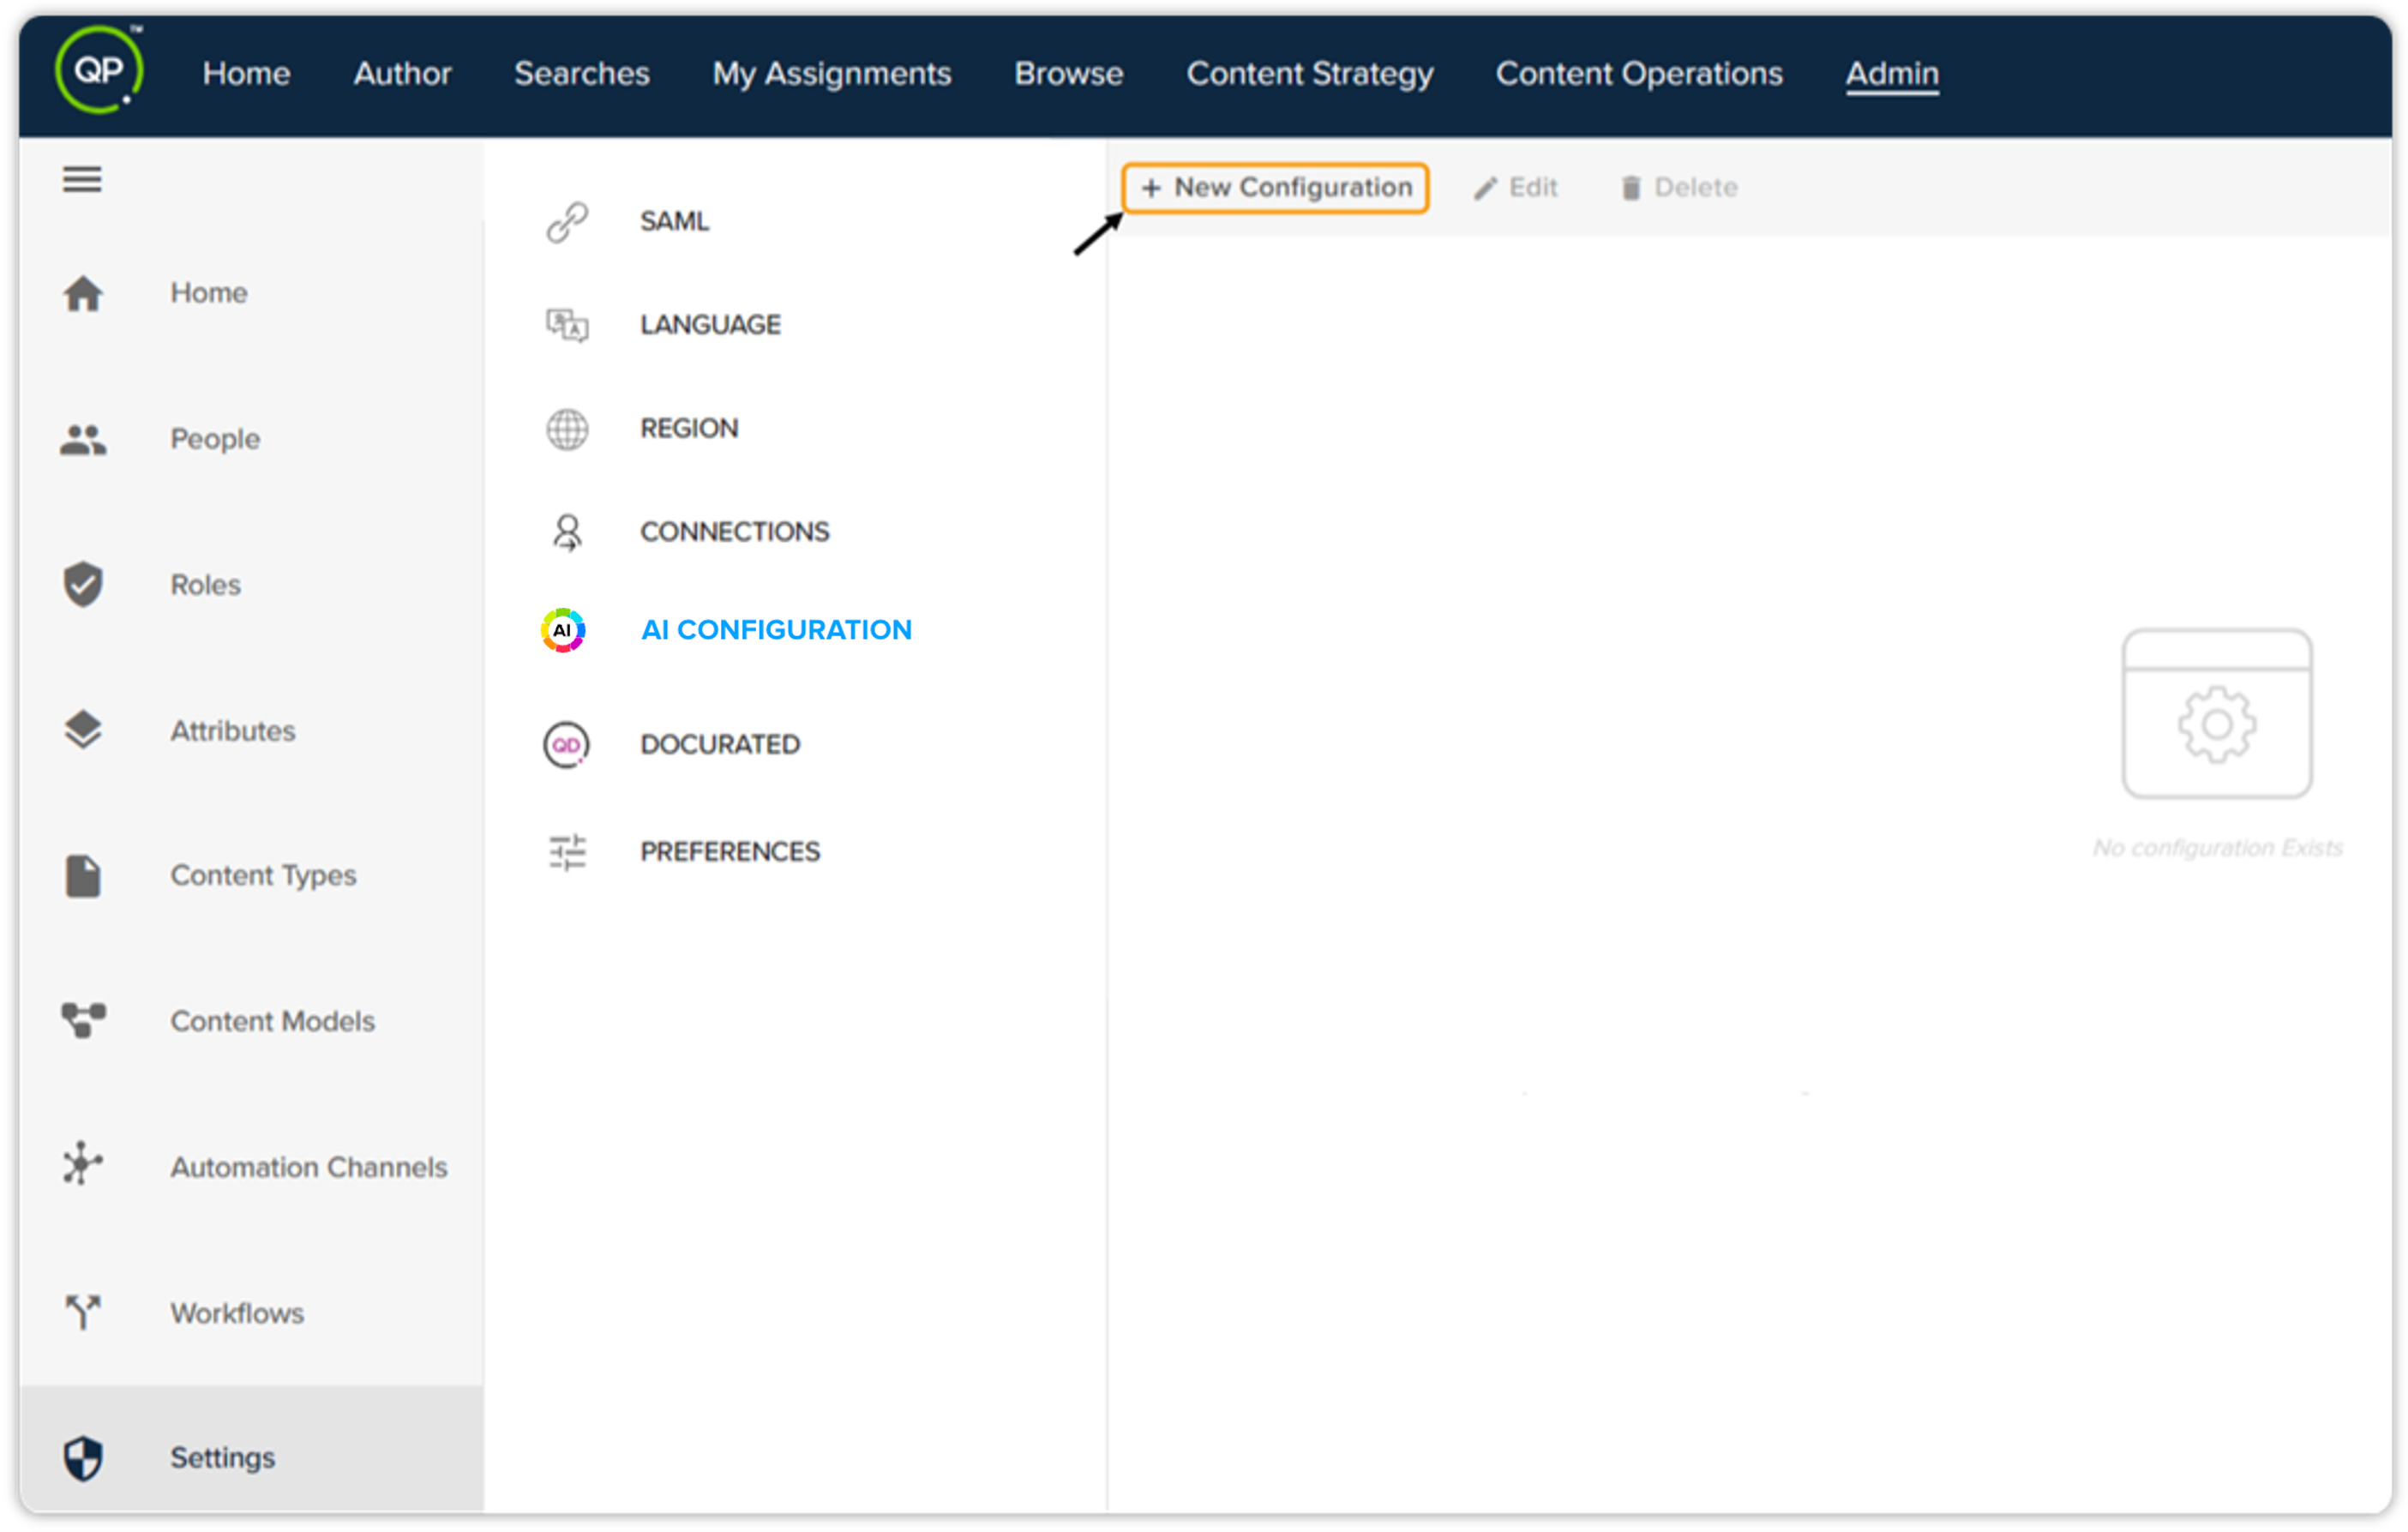
-
The AI Assistant — AI Service Configuration form will open where you need to fill in the required fields.
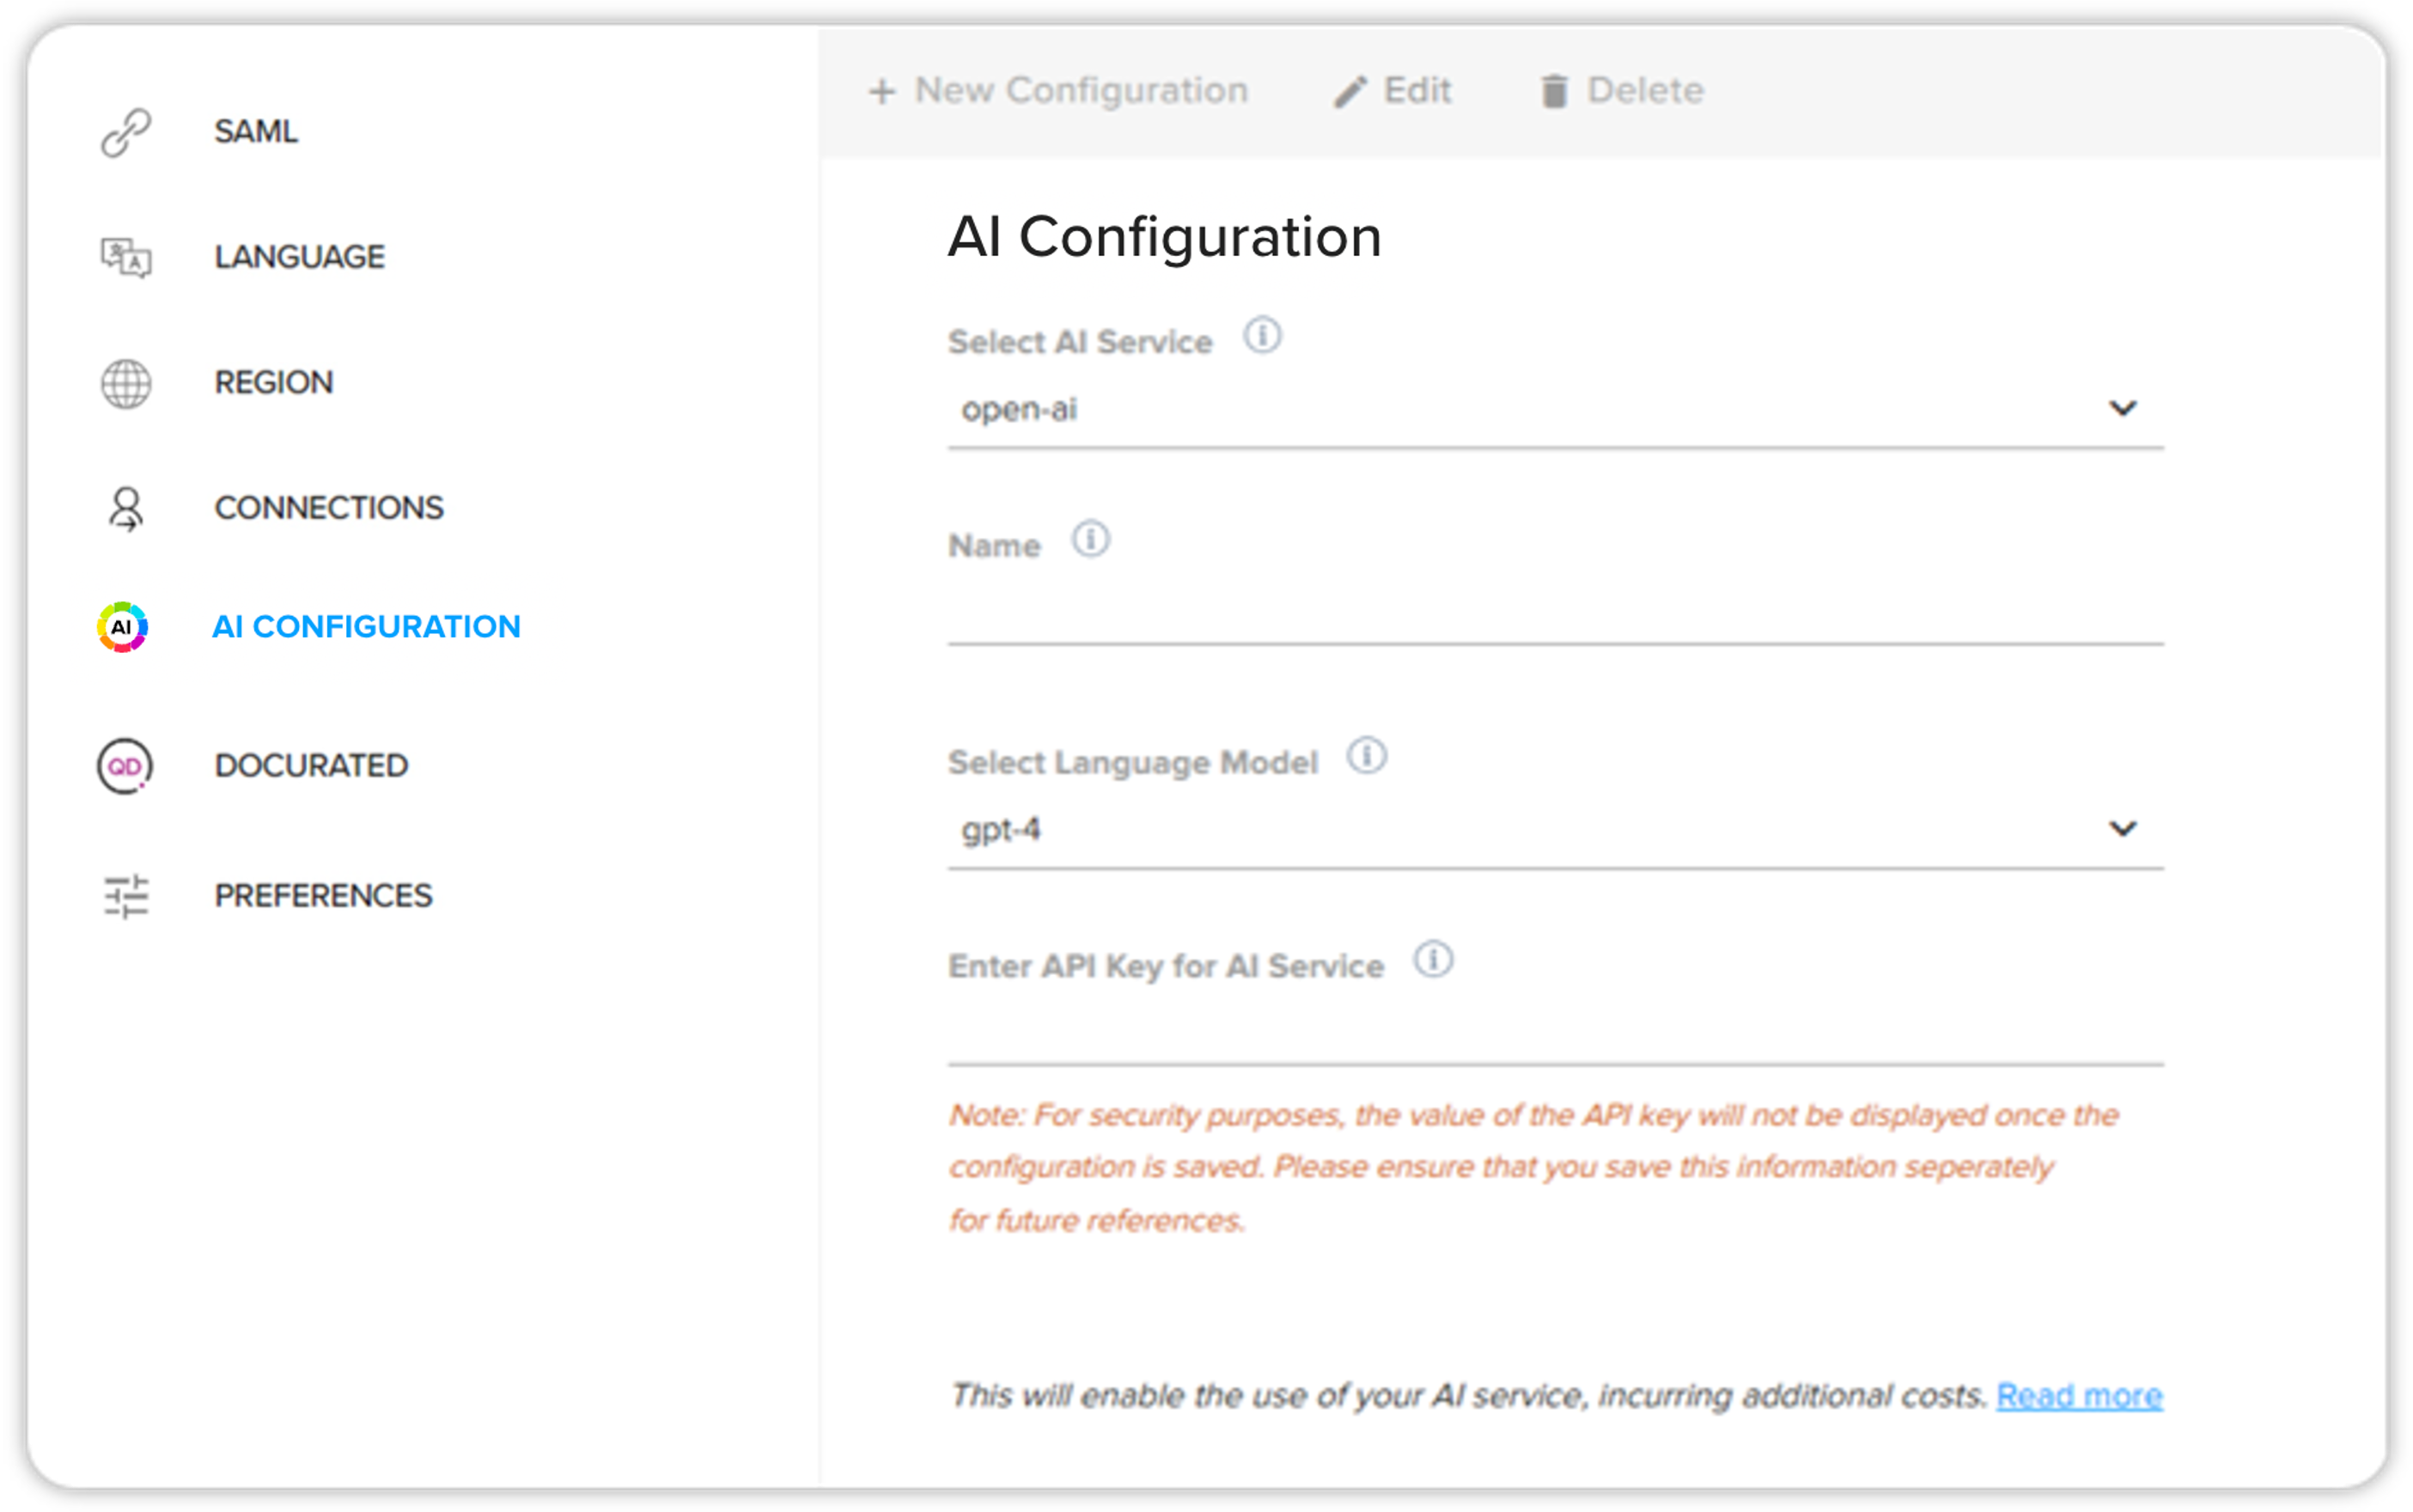
-
AI Assistant provides you with two AI service types that you can choose from — Open AI and Azure Open AI.
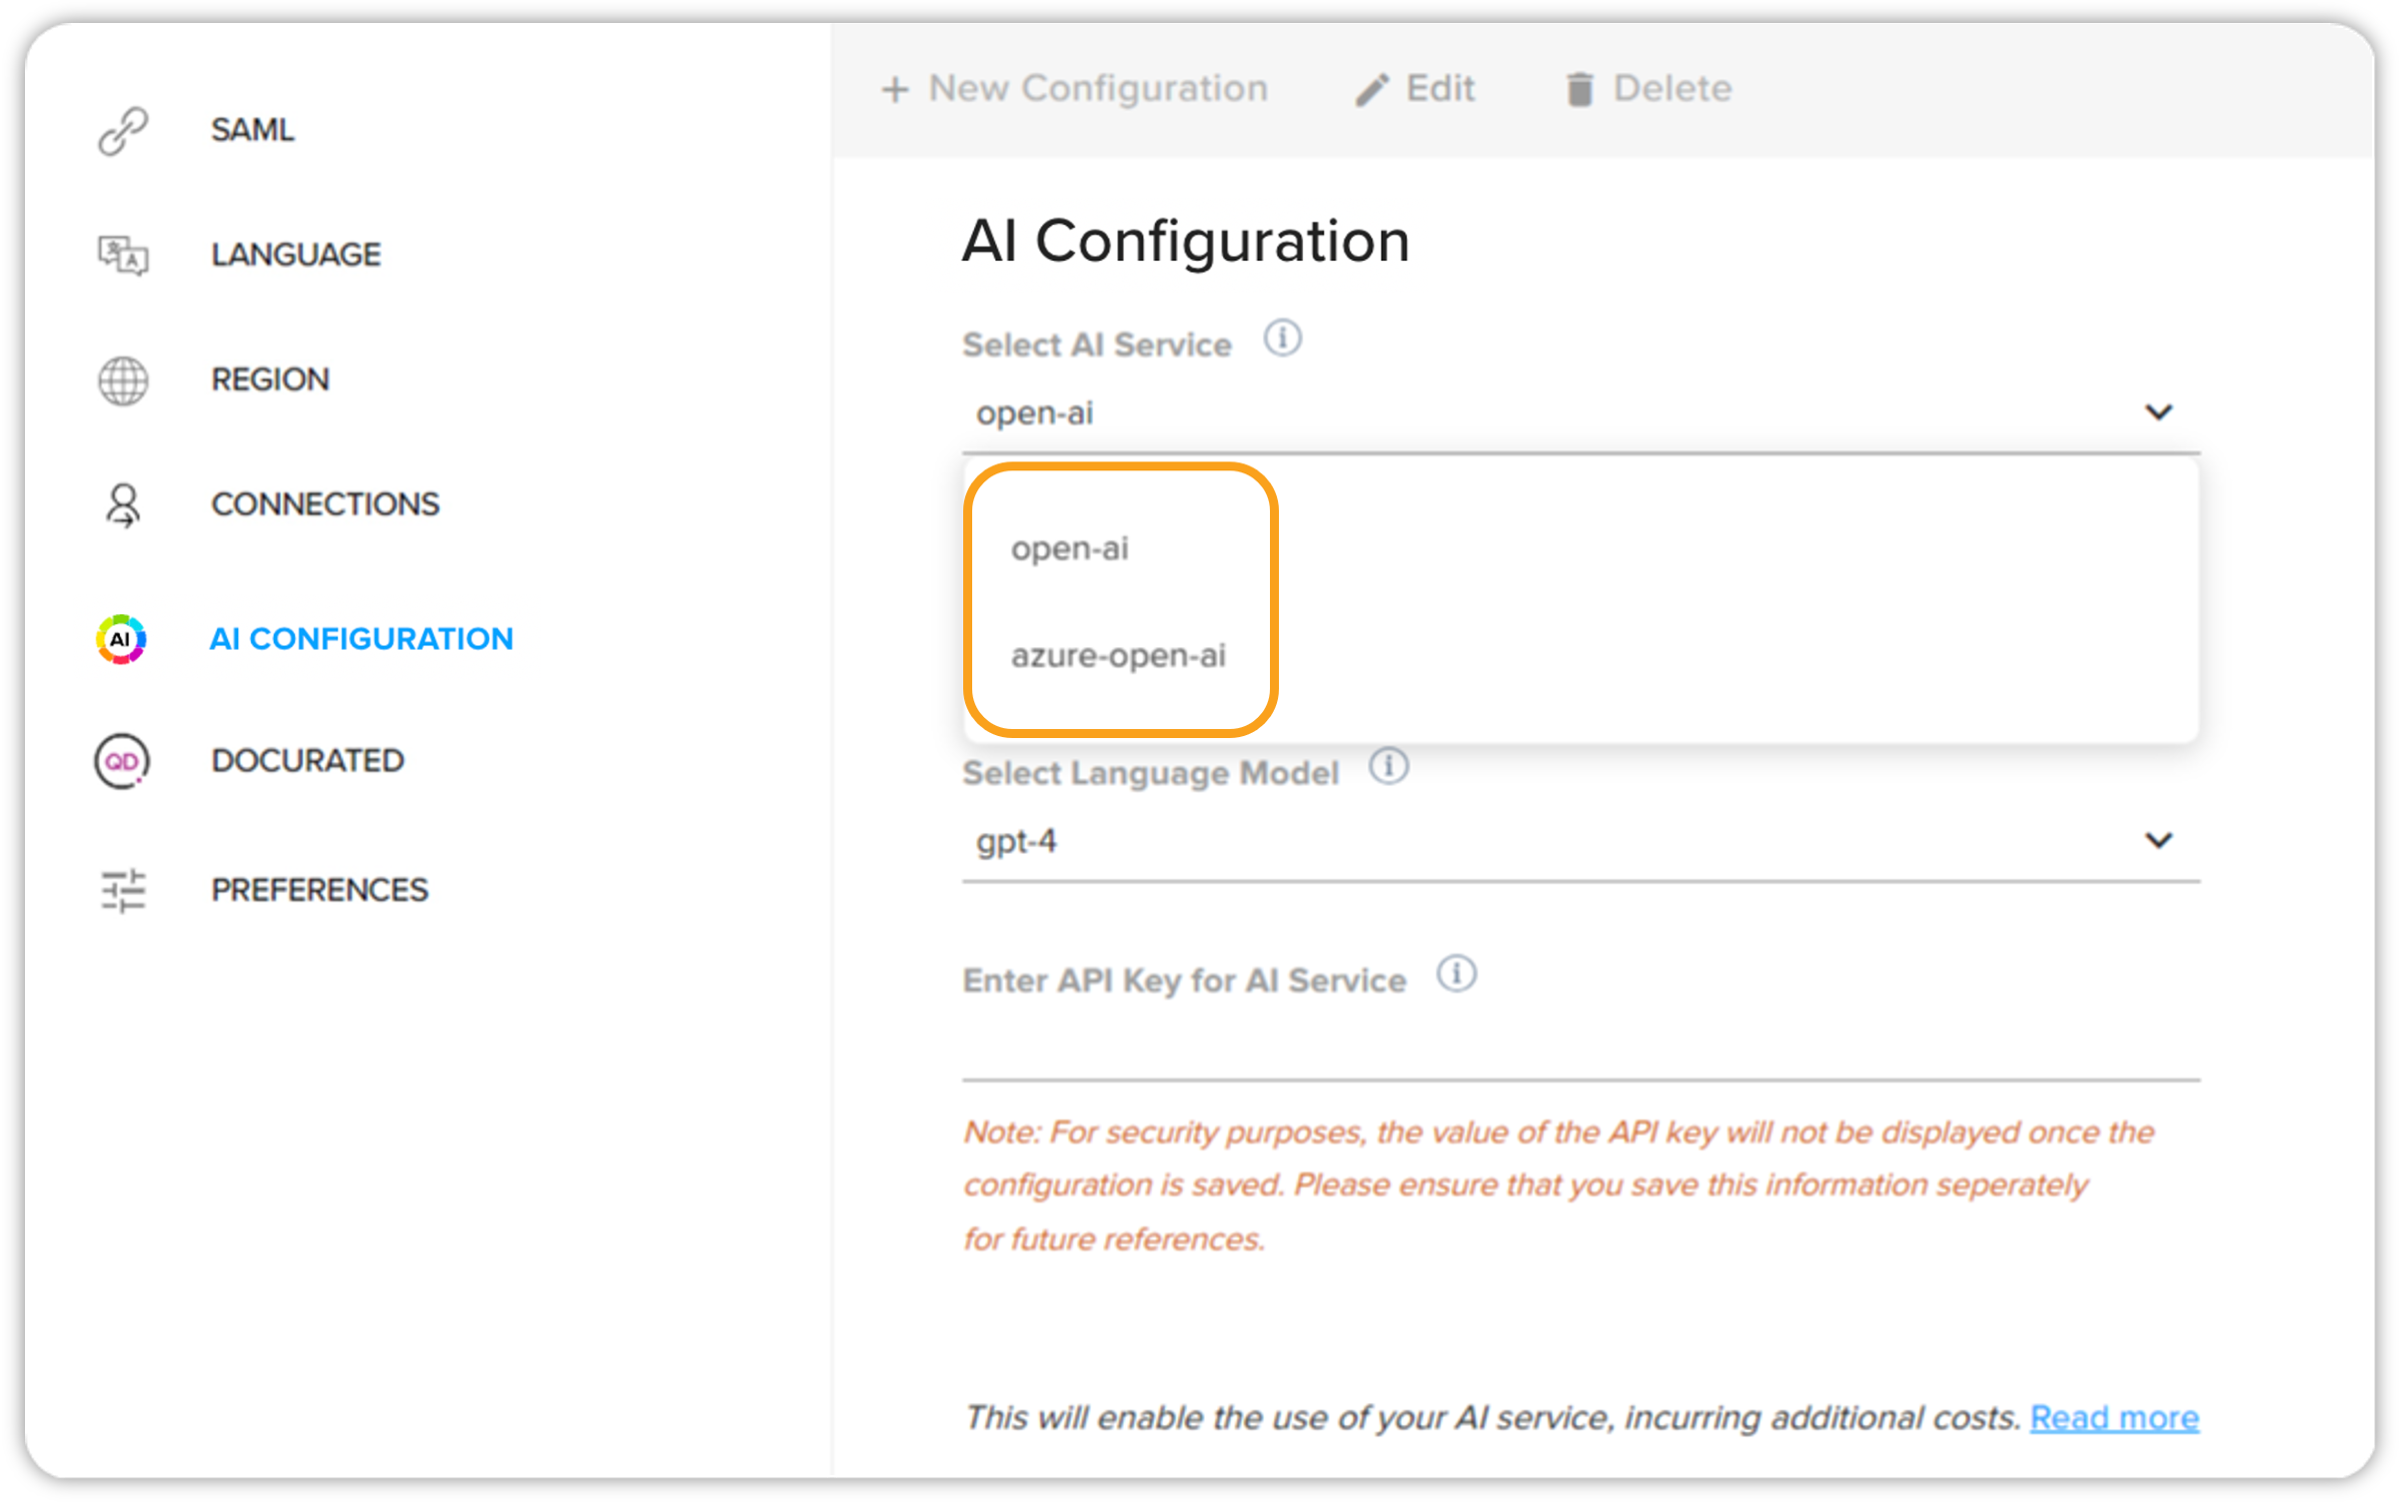
Connect AI Service via Open AI
-
Select Open AI as your AI service provider.
-
Enter a name for the AI service you’re configuring.
-
Select the desired NLP model for the AI service.
-
Now enter the API key for your AI service. Please note that the entered key can be seen only once. Make sure you save the information related to the API key as it won’t be visible again.
-
Click the read more link to read the disclaimer before you can save your AI service configuration.
-
Finally, click Save to save the AI service configuration.
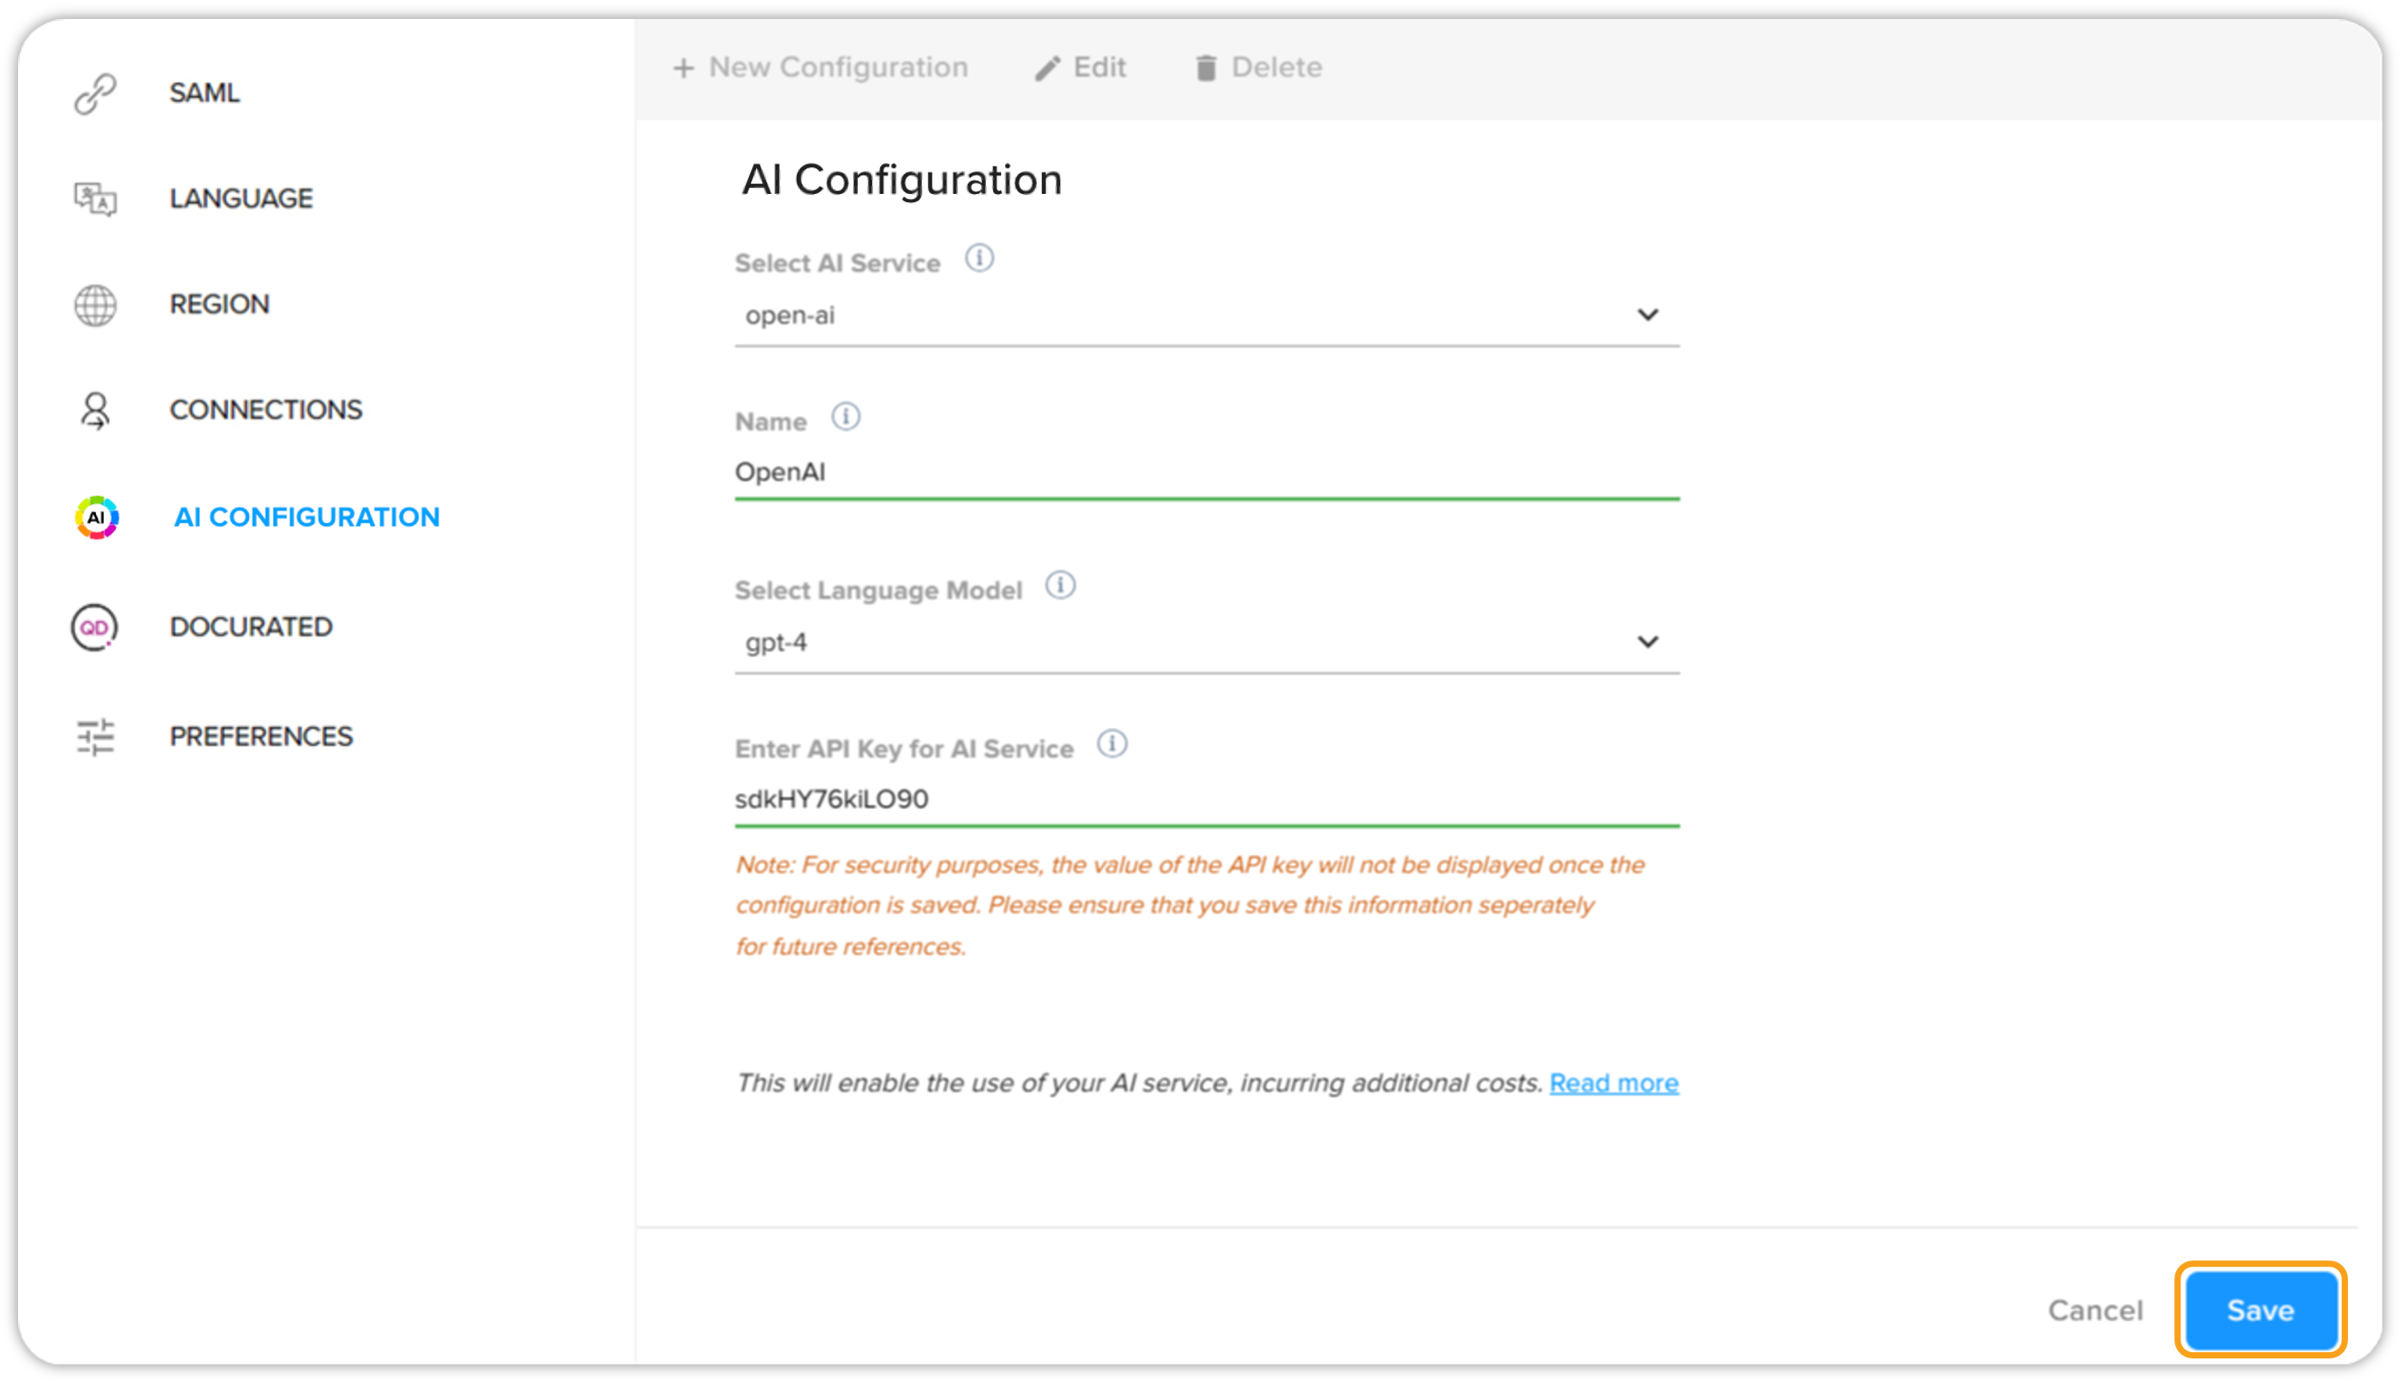
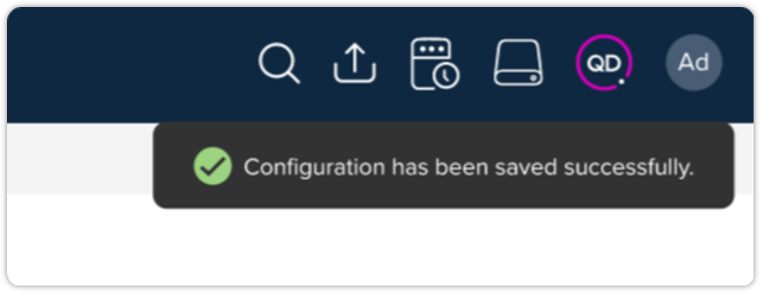
After a few seconds, you will receive an in-platform notification telling you about the successful configuration of your AI service.
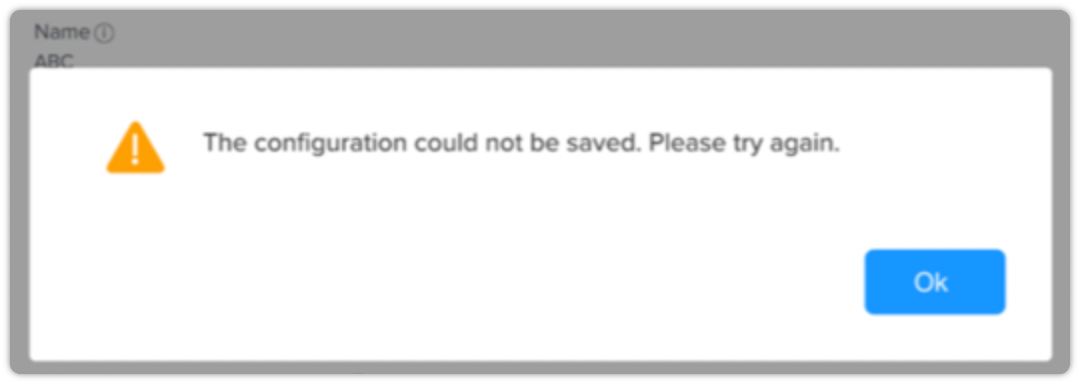
If there is any issue with the information you provided for your AI service, you will receive a notification saying — The configuration could not be saved.
Configure AI Service via Azure Open AI
-
Select Azure Open AI as your AI service provider.
-
Enter a name for the AI service you’re configuring.
-
Select the desired NLP model for the AI service.
-
Enter the API base detail, API version, and deployment name for the AI service.
-
Now enter the API key for your AI service. Please note that the entered key can be seen only once. Make sure you save the information related to the API key as it won’t be visible again.
-
Now enter the URL of the user account.
-
Click the read more link to read the disclaimer before you can save your AI service configuration.
-
Finally, click Save to save the AI service configuration.
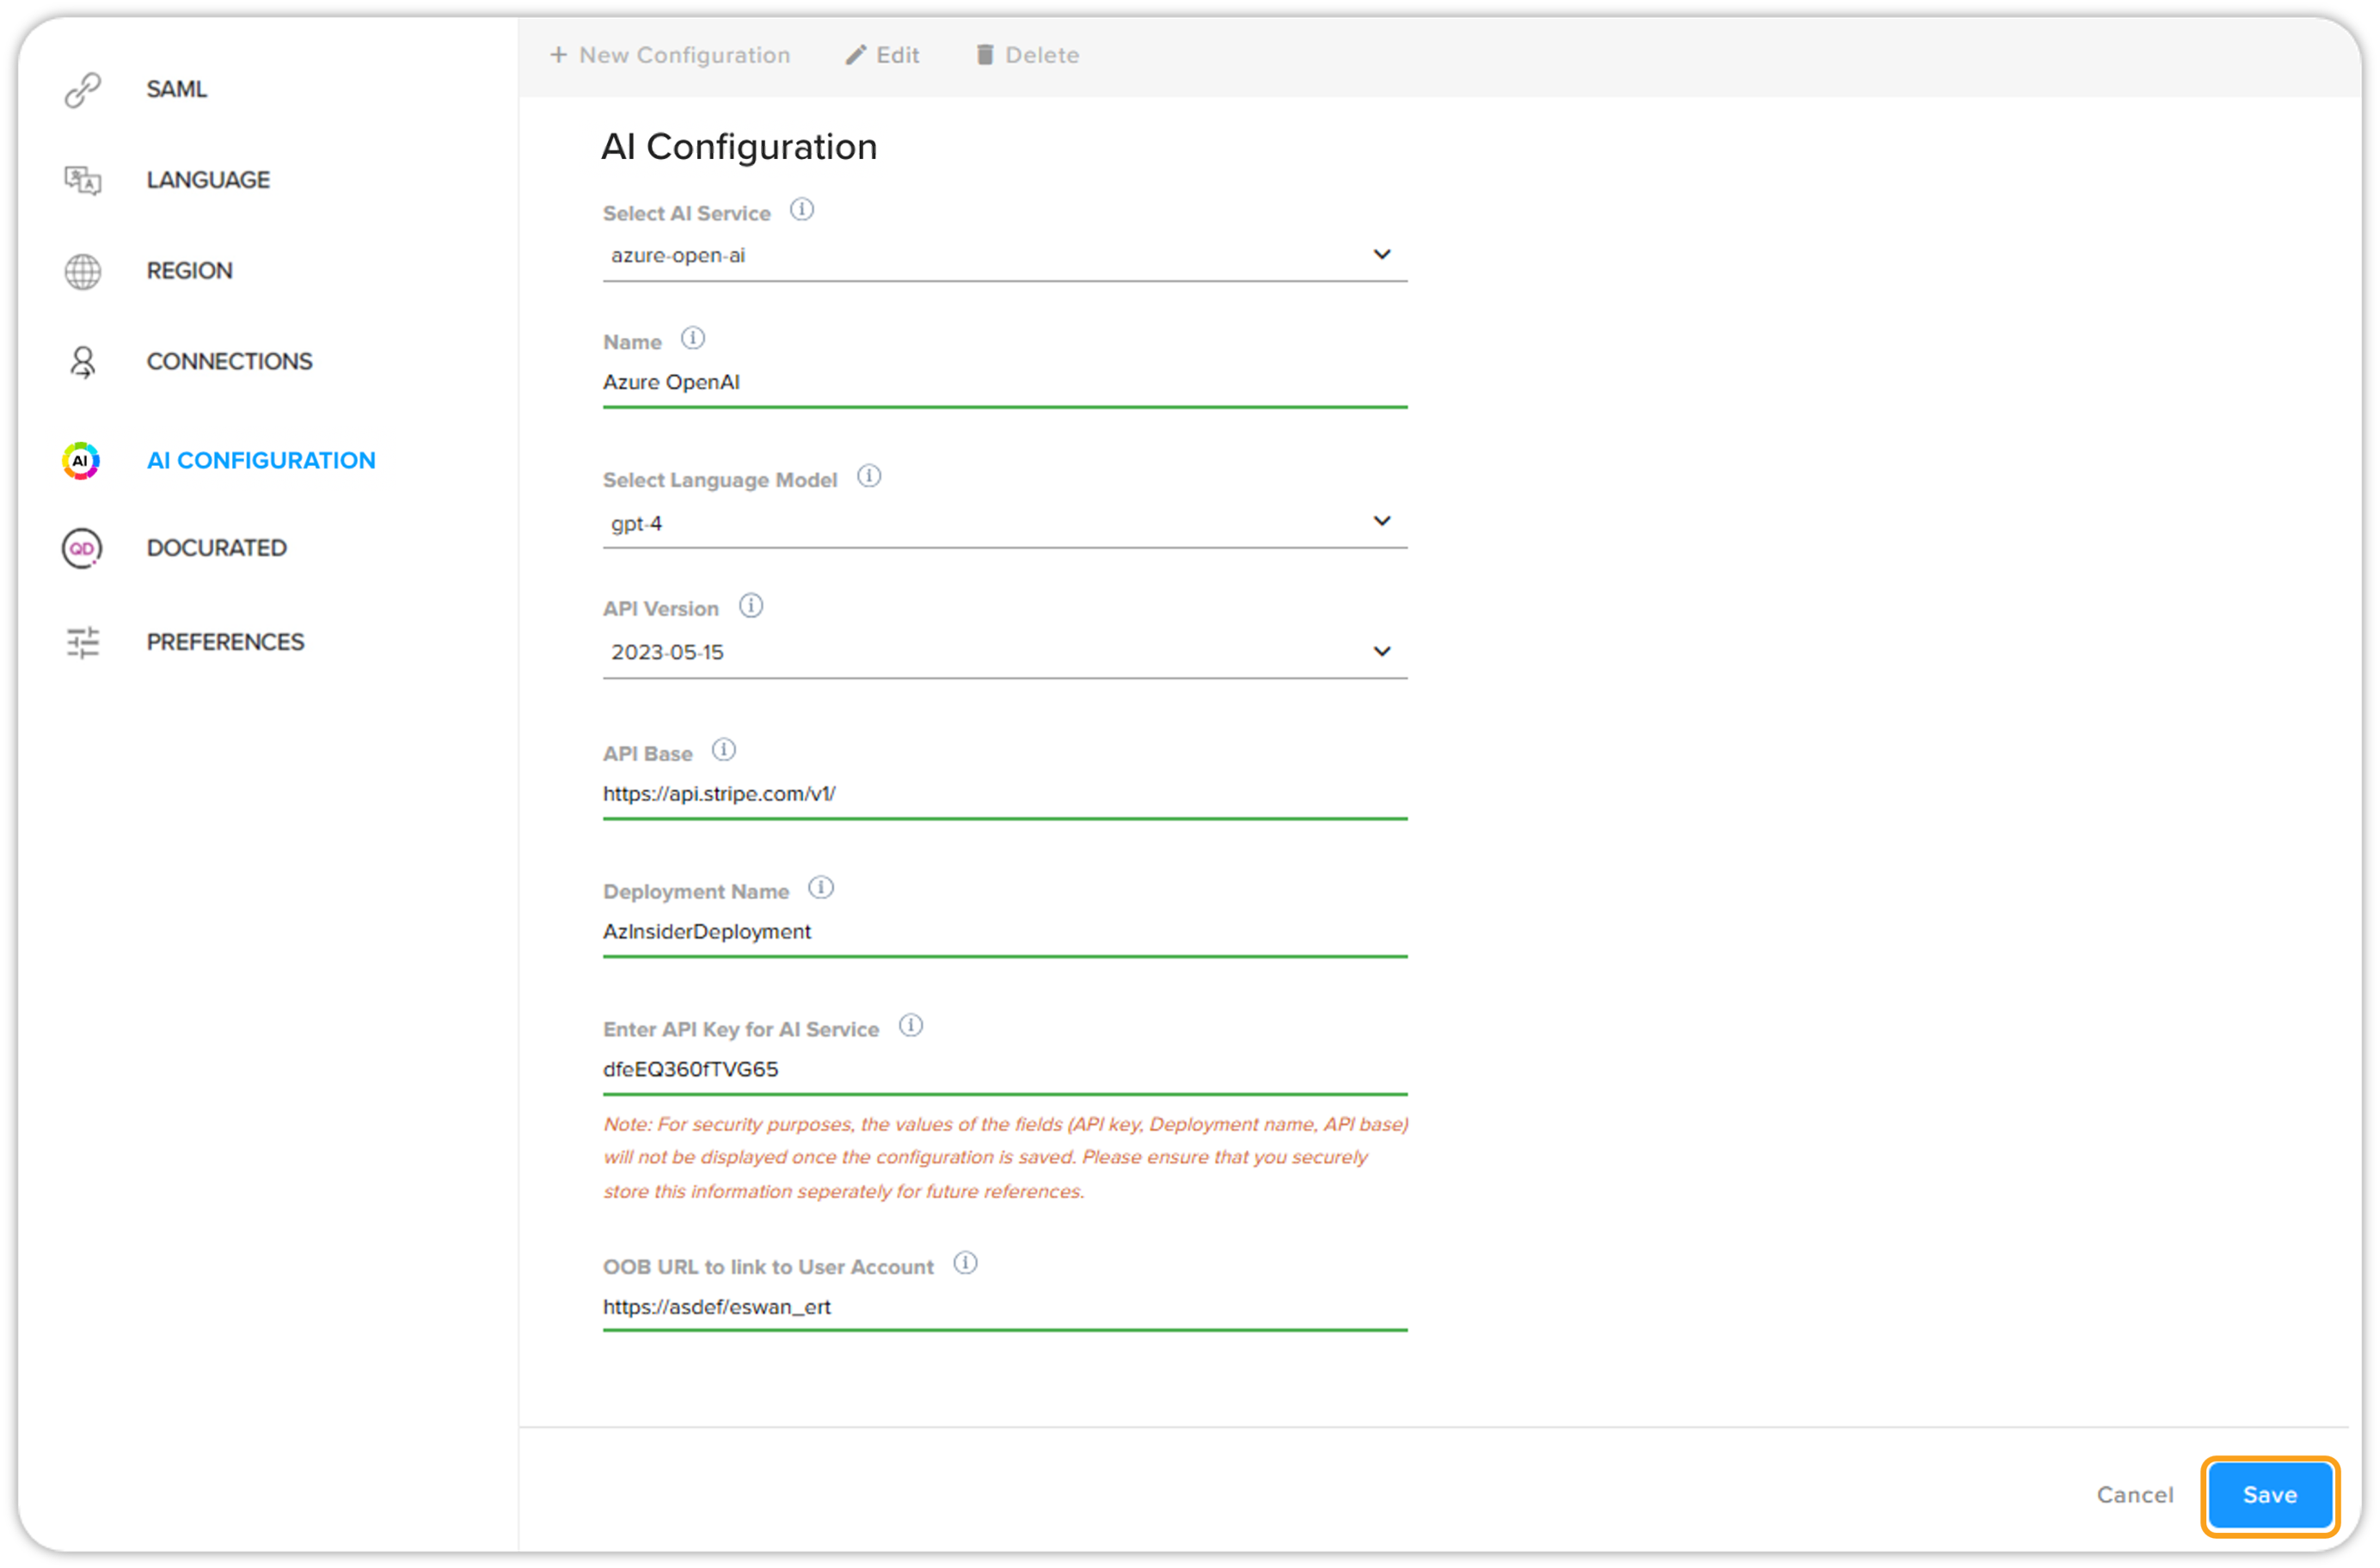
After a few seconds, you will receive an in-platform notification telling you about the successful configuration of your AI service.
If there is any issue with the information you provided for your AI service, you will receive a notification saying — The configuration could not be saved.
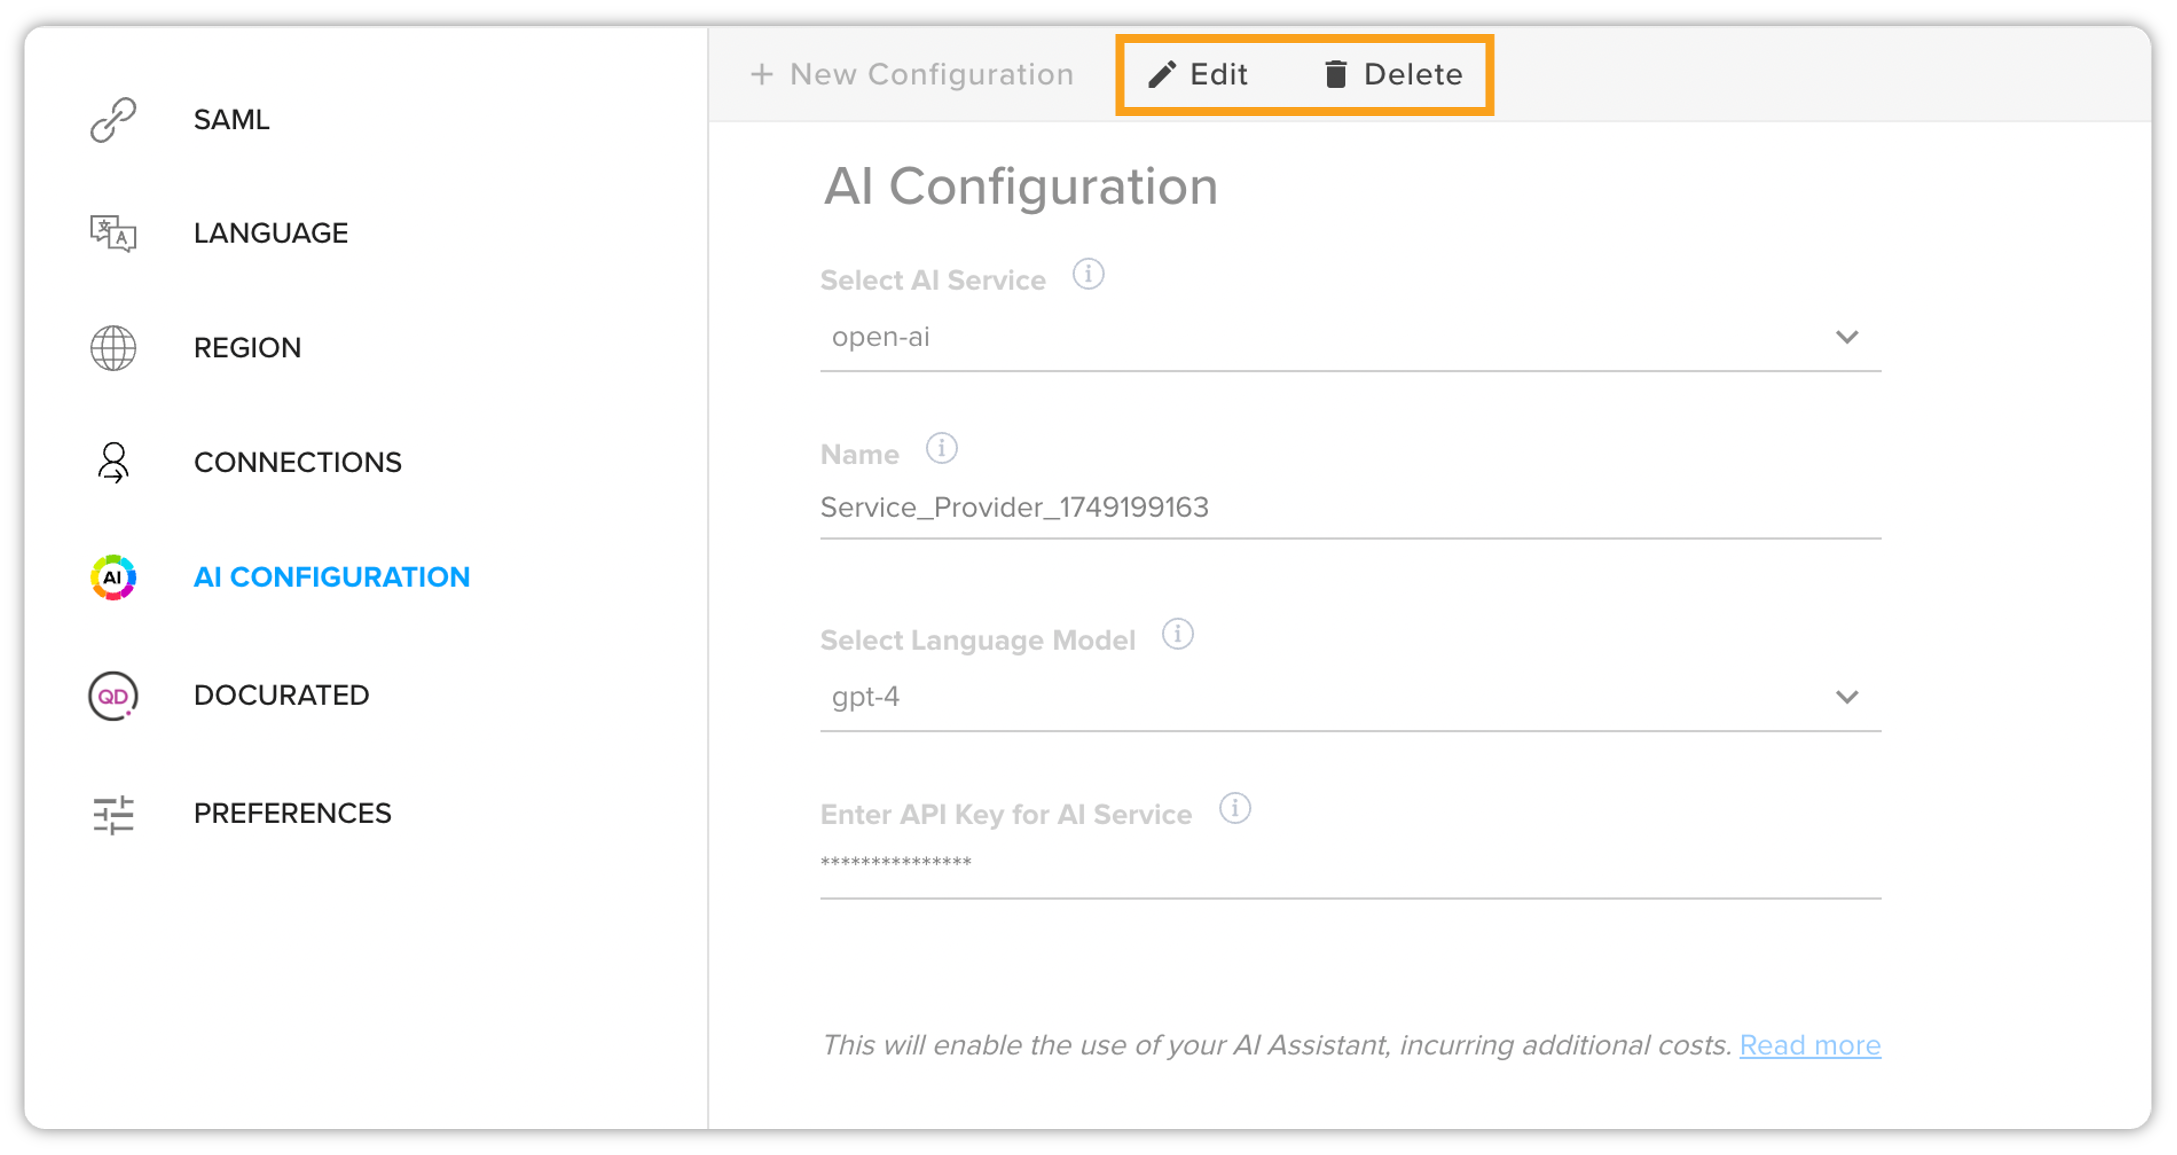
Edit/delete pre-existing AI Services
You can also edit or delete the AI services you have previously created, but make sure you have the admin license type.
Docurated
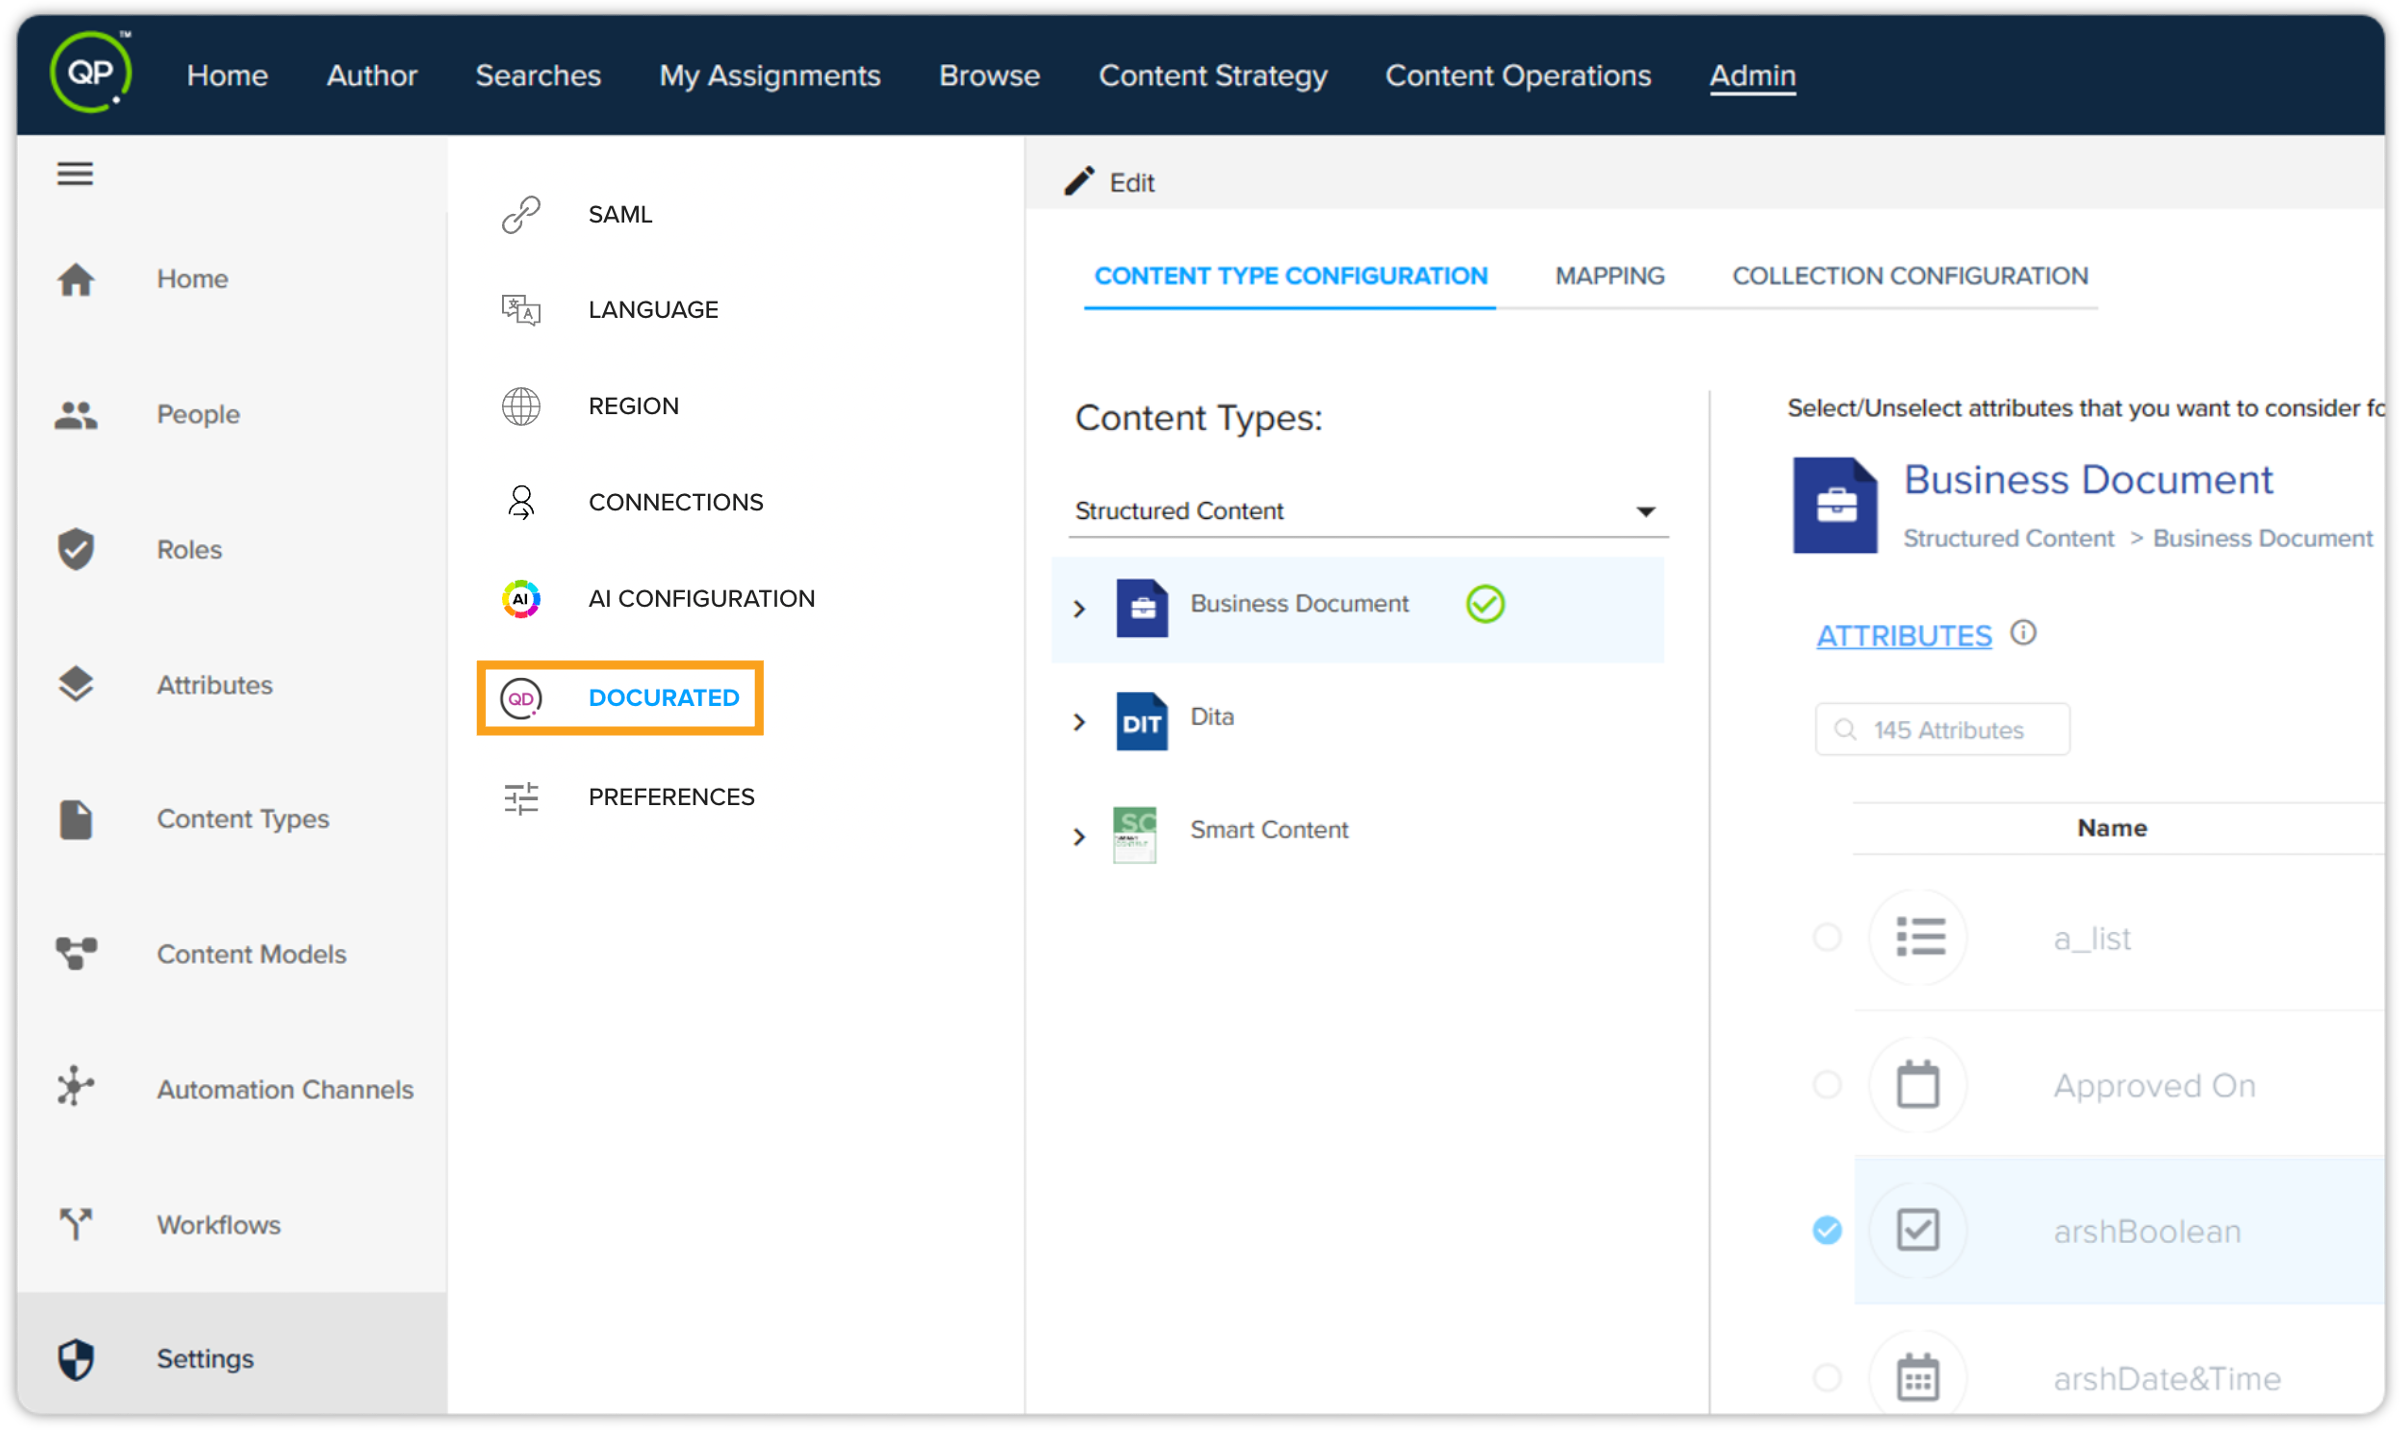
Under the AI Assistant tab, you'll find Docurated from where you can configure the "Pust to Docurated" functionality in your Quark Publishing Platform.
Content Type Configuration
The Content Type Configuration screen will display all content types and their supported attributes. Before initiating the push process, you need to configure the content types that you intend to push to Docurated. This involves selecting the specific types of content (assets and collections) along with the metadata that will be included in the push. To do that, follow the steps shown below –
-
On the Content Type Configuration tab, click the Edit option.
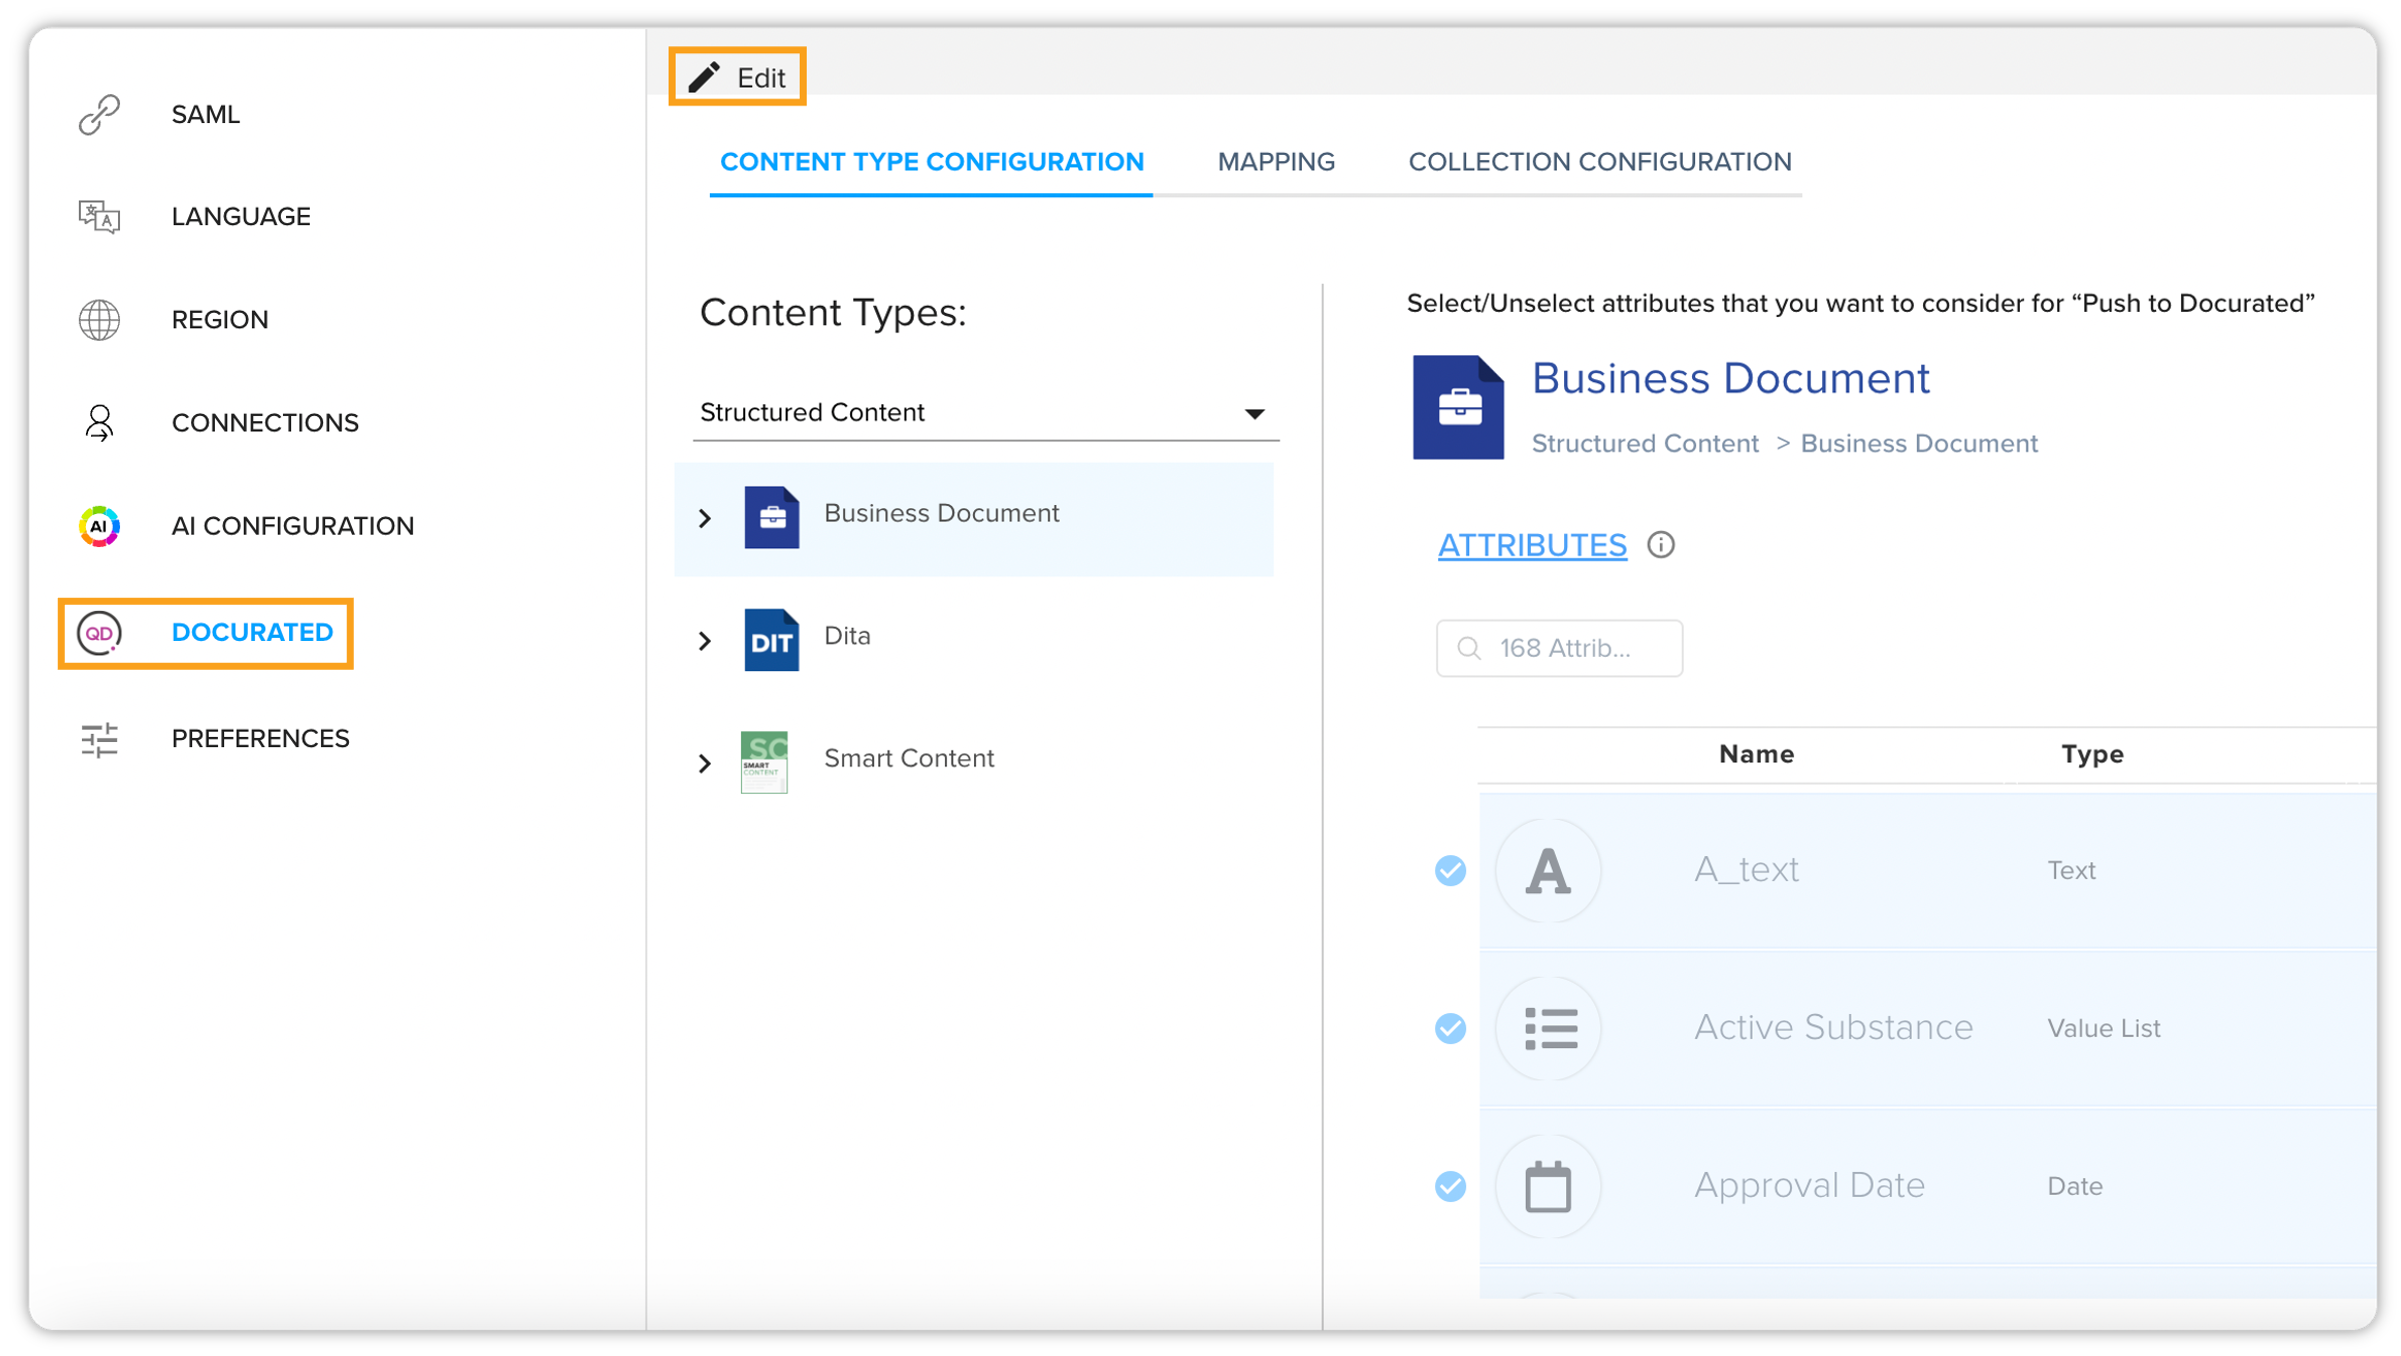
-
Select the desired content type and then choose the attributes that you want to consider for "Push to Docurated" by selecting or deselecting them.
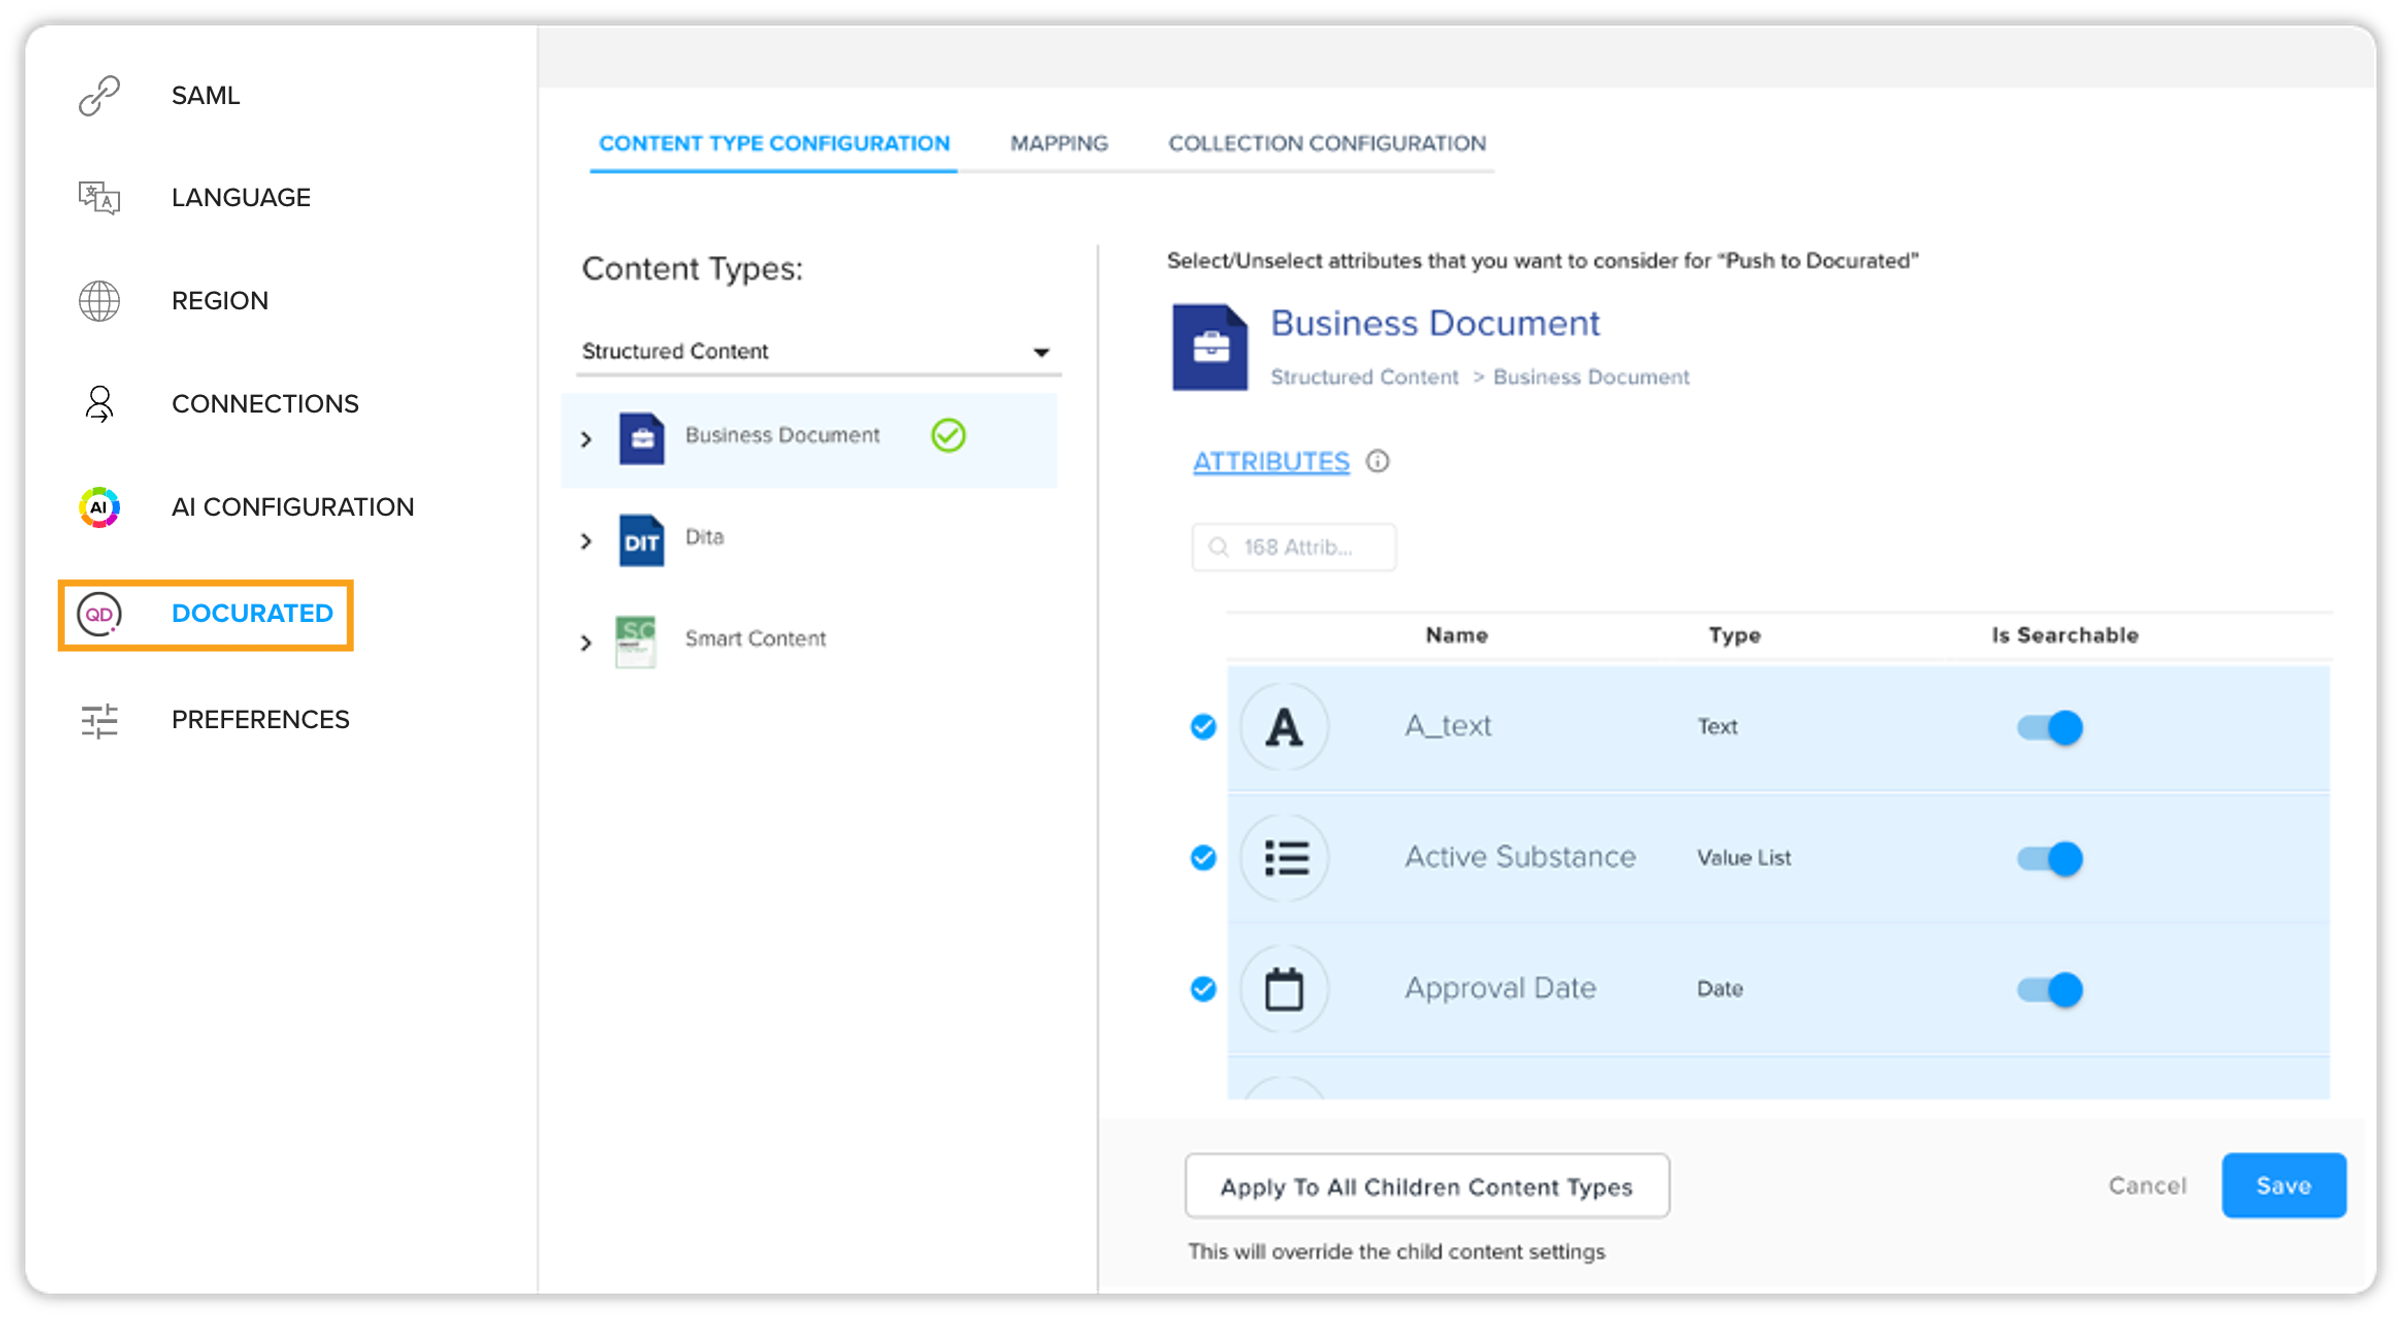
-
Click on Save to save the configuration.
Important to note
It's crucial to emphasize that during attribute selection, the "Is Searchable" toggle switch should be enabled only for the desired attributes. Enabling this toggle for each and every attribute will result in unnecessarily burdening the push operation. Hence, you're advised to carefully enable the "Is Searchable" toggle only for the attributes that are pertinent to the "Push to Docurated" operation.
By ensuring that the "Is Searchable" toggle is used selectively, you can optimize the push operation, preventing unnecessary load and streamlining the process for enhanced efficiency.
Mapping
The next step is to map the metadata fields of the selected content types to the corresponding fields in Docurated. This ensures that the metadata associated with the assets or collections is accurately transferred during the push process. Follow the steps shown below –
-
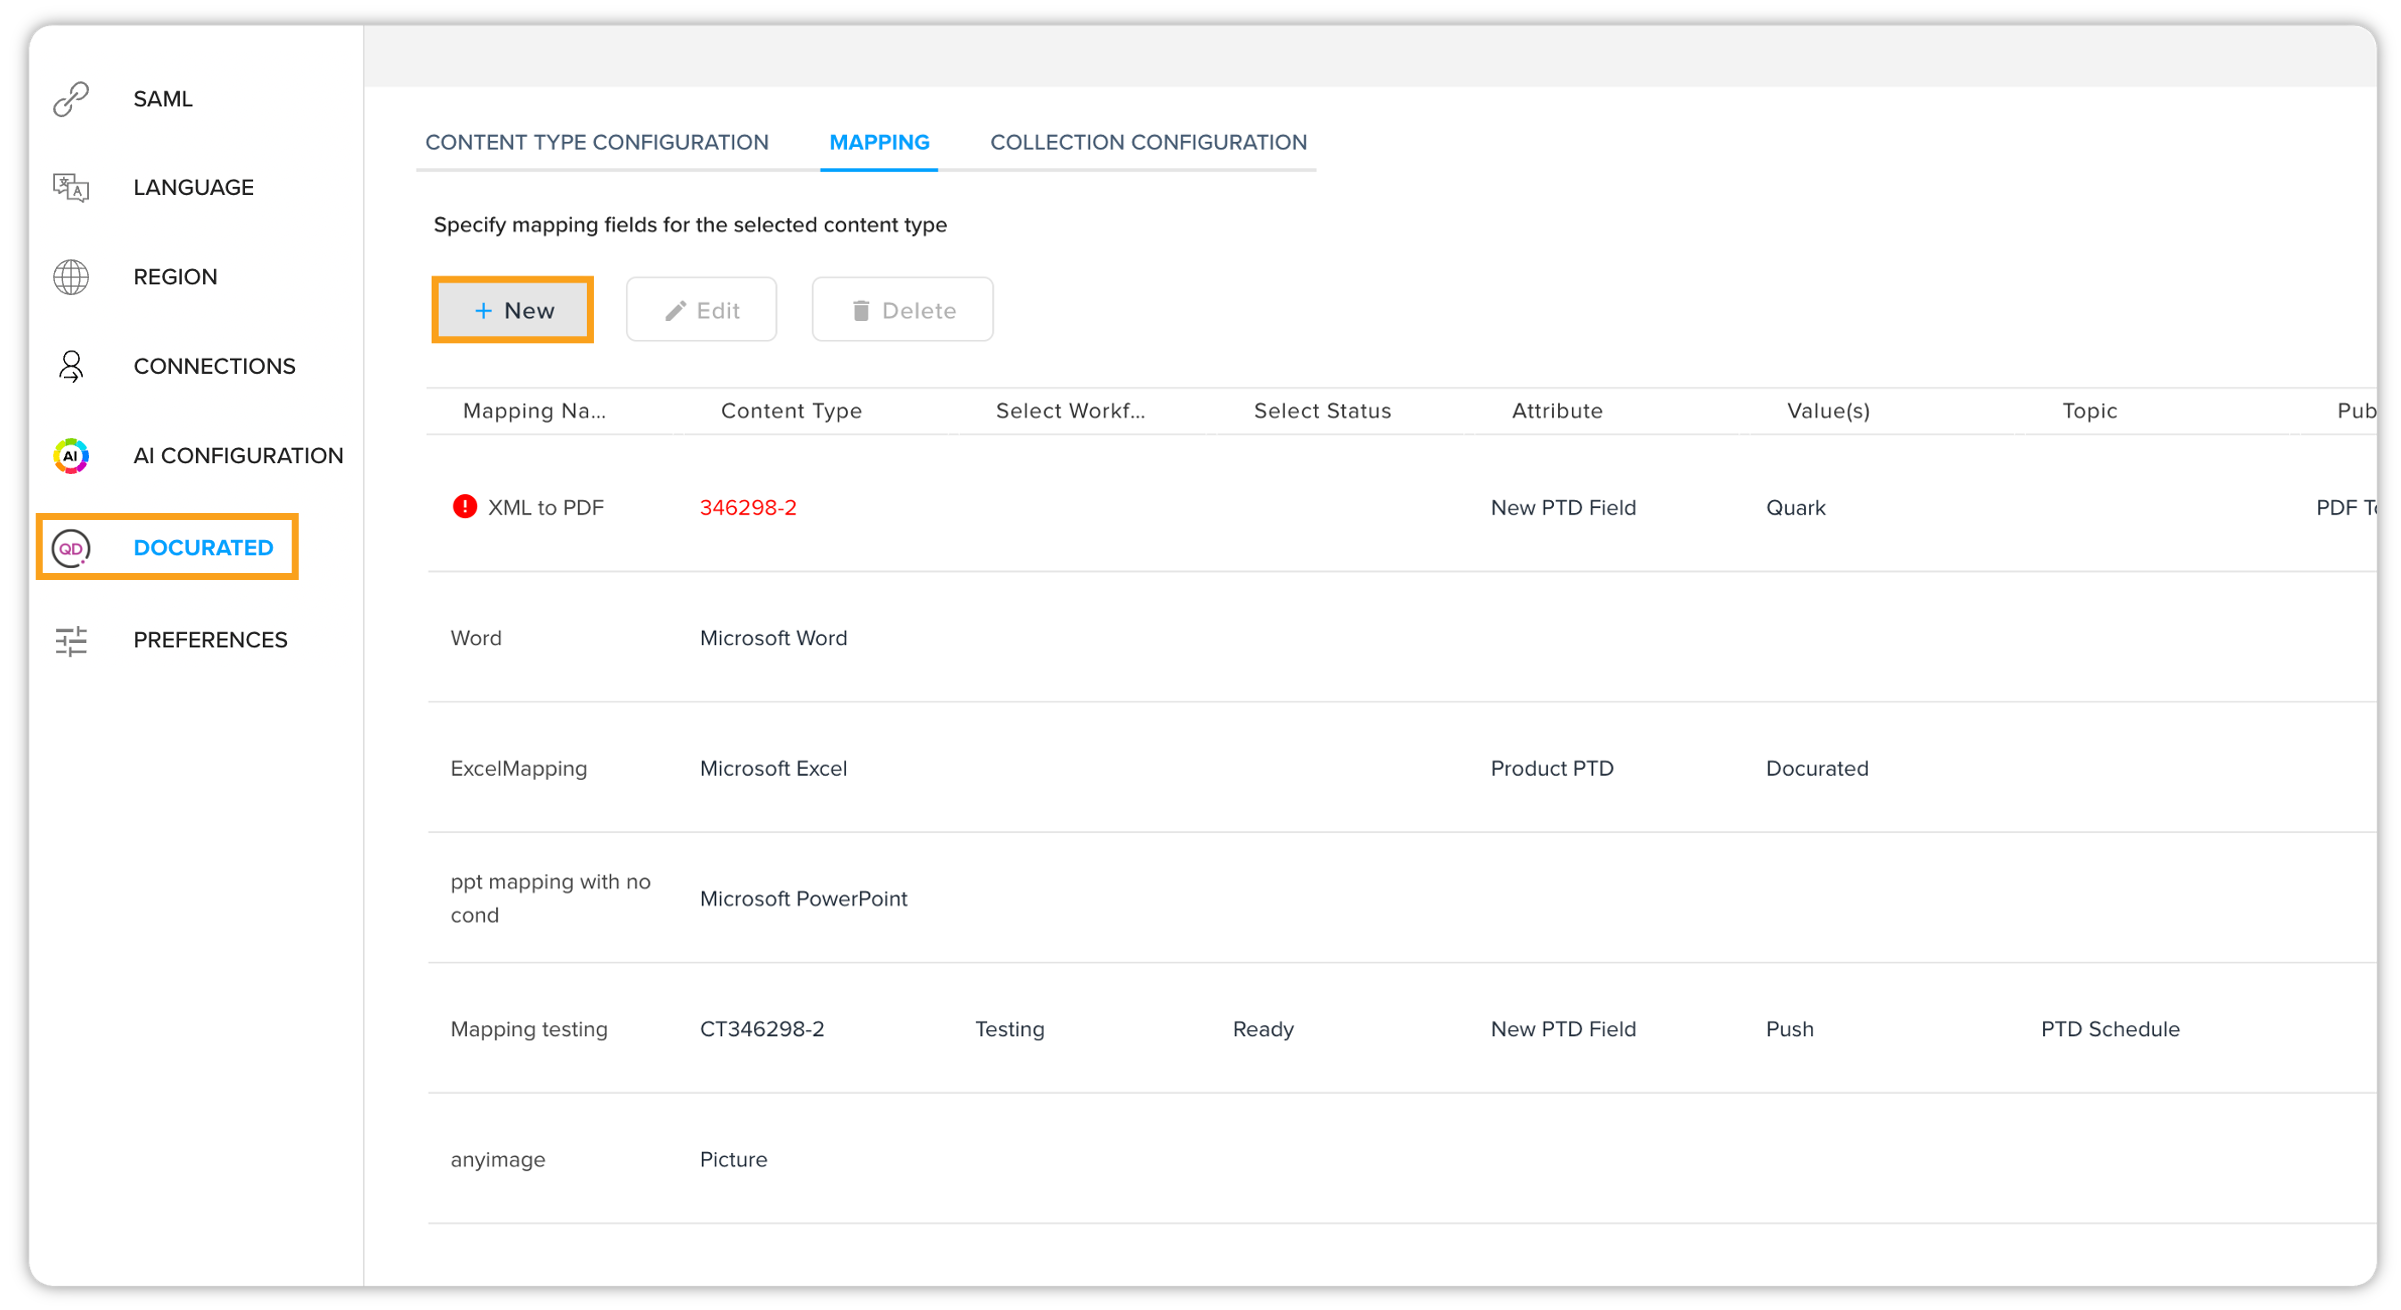
First, click the Mapping tab.
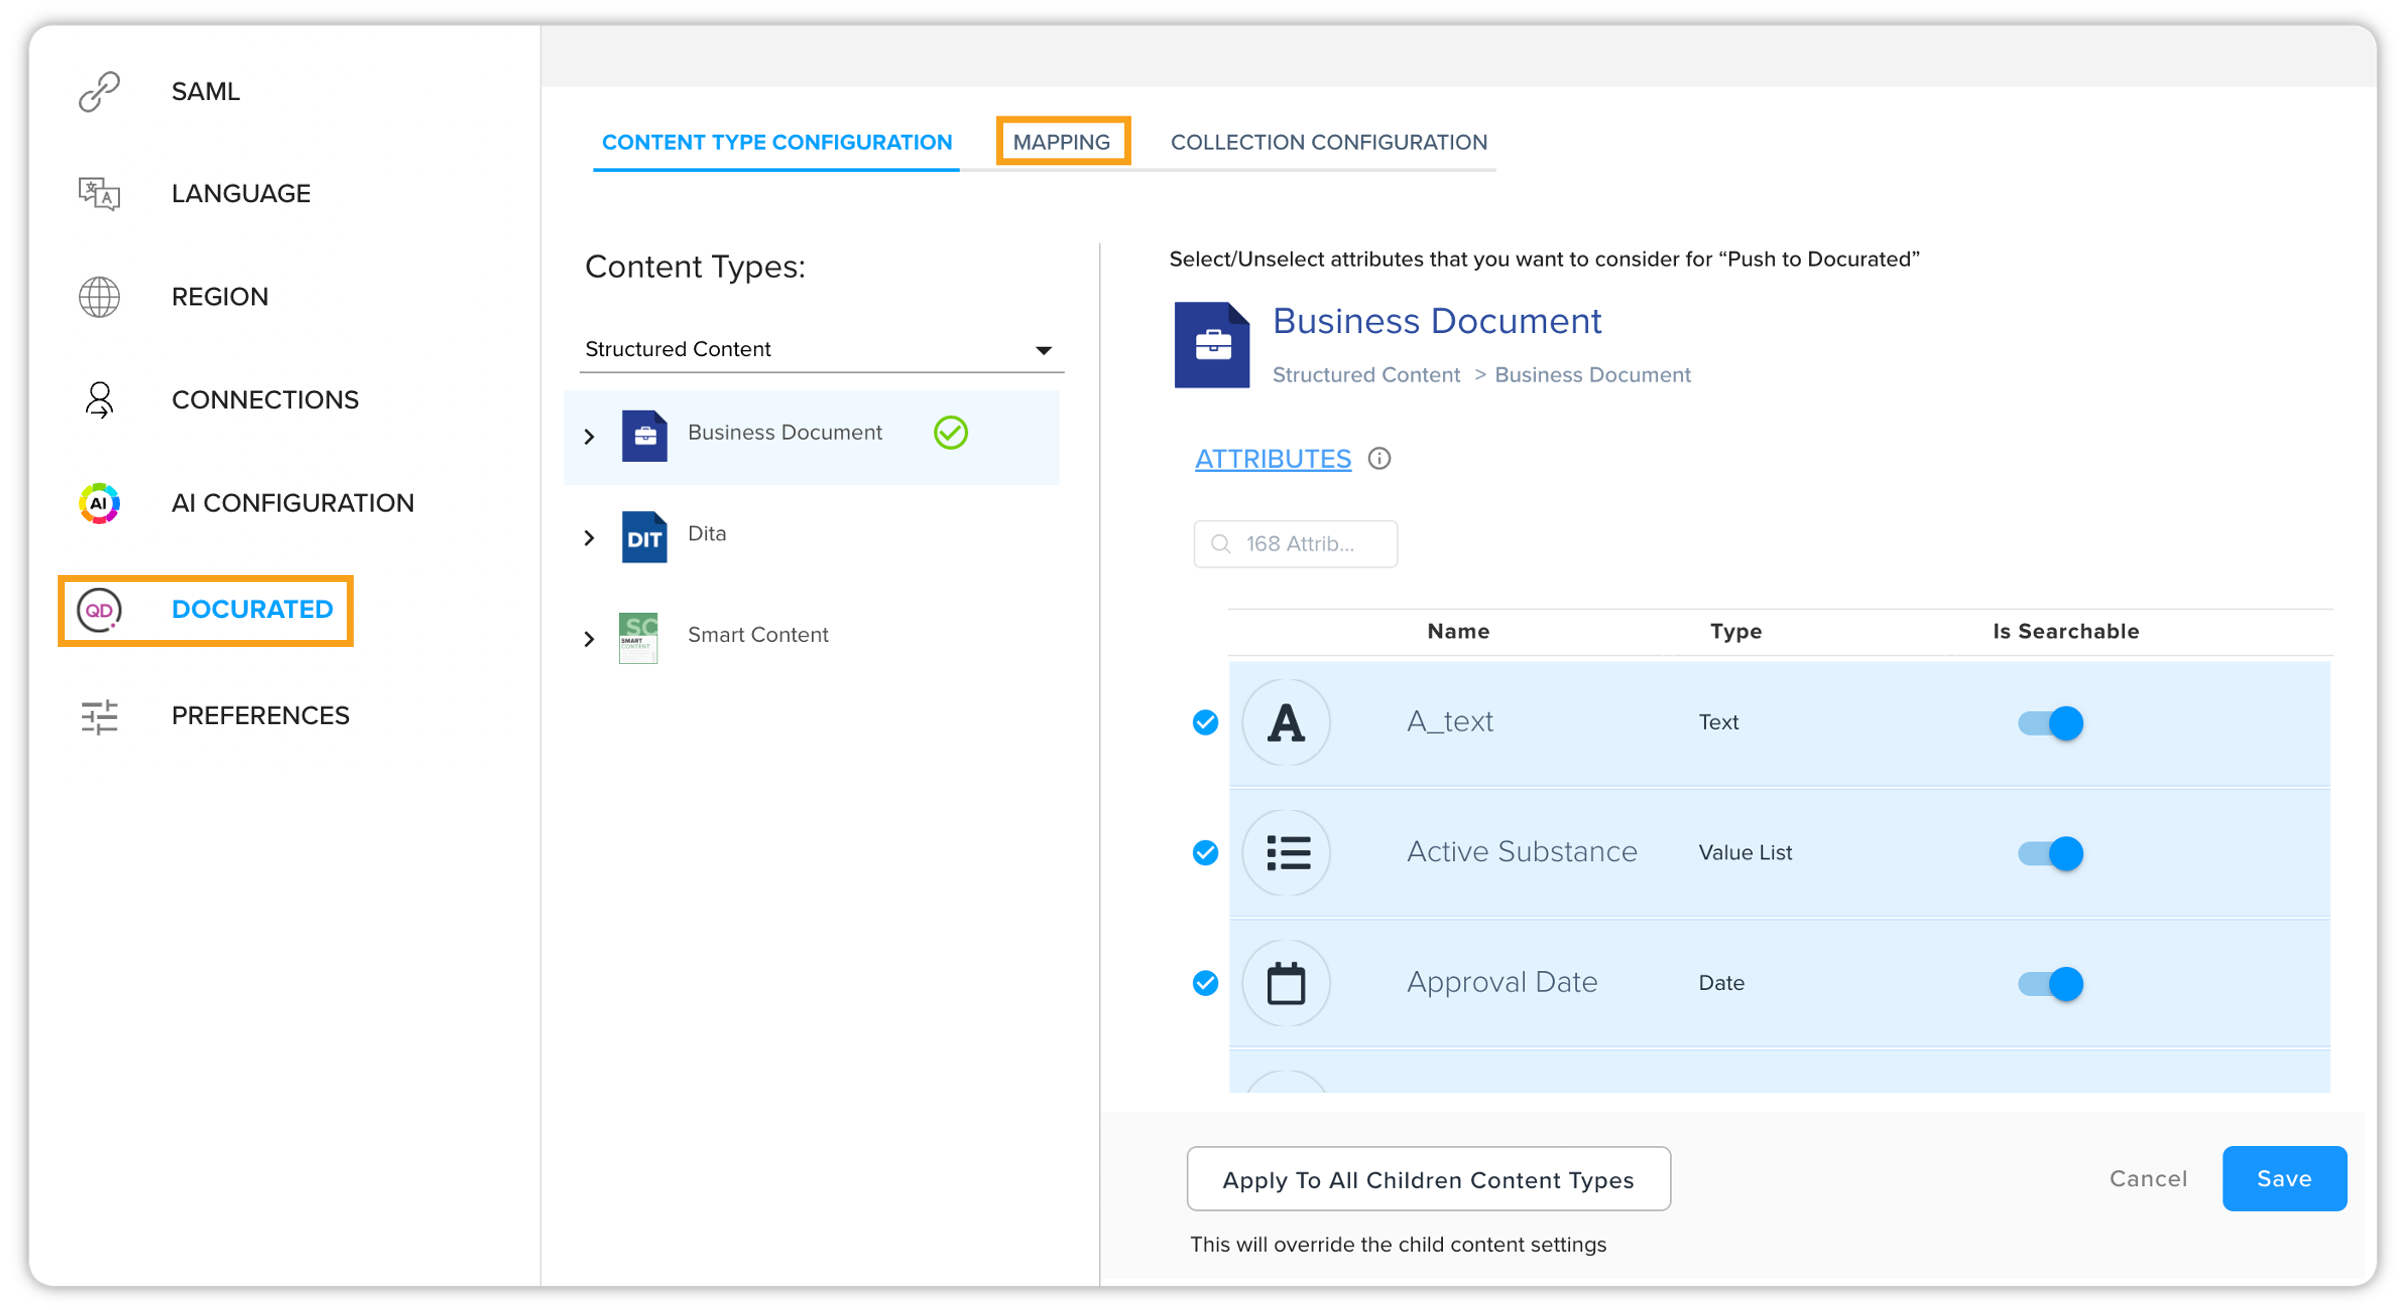
-
On the Mapping screen, you can specify mapping fields for the selected content type. You can either create a new mapping or edit an existing one.
-
To edit an existing mapping, click it once and then click the Edit option.
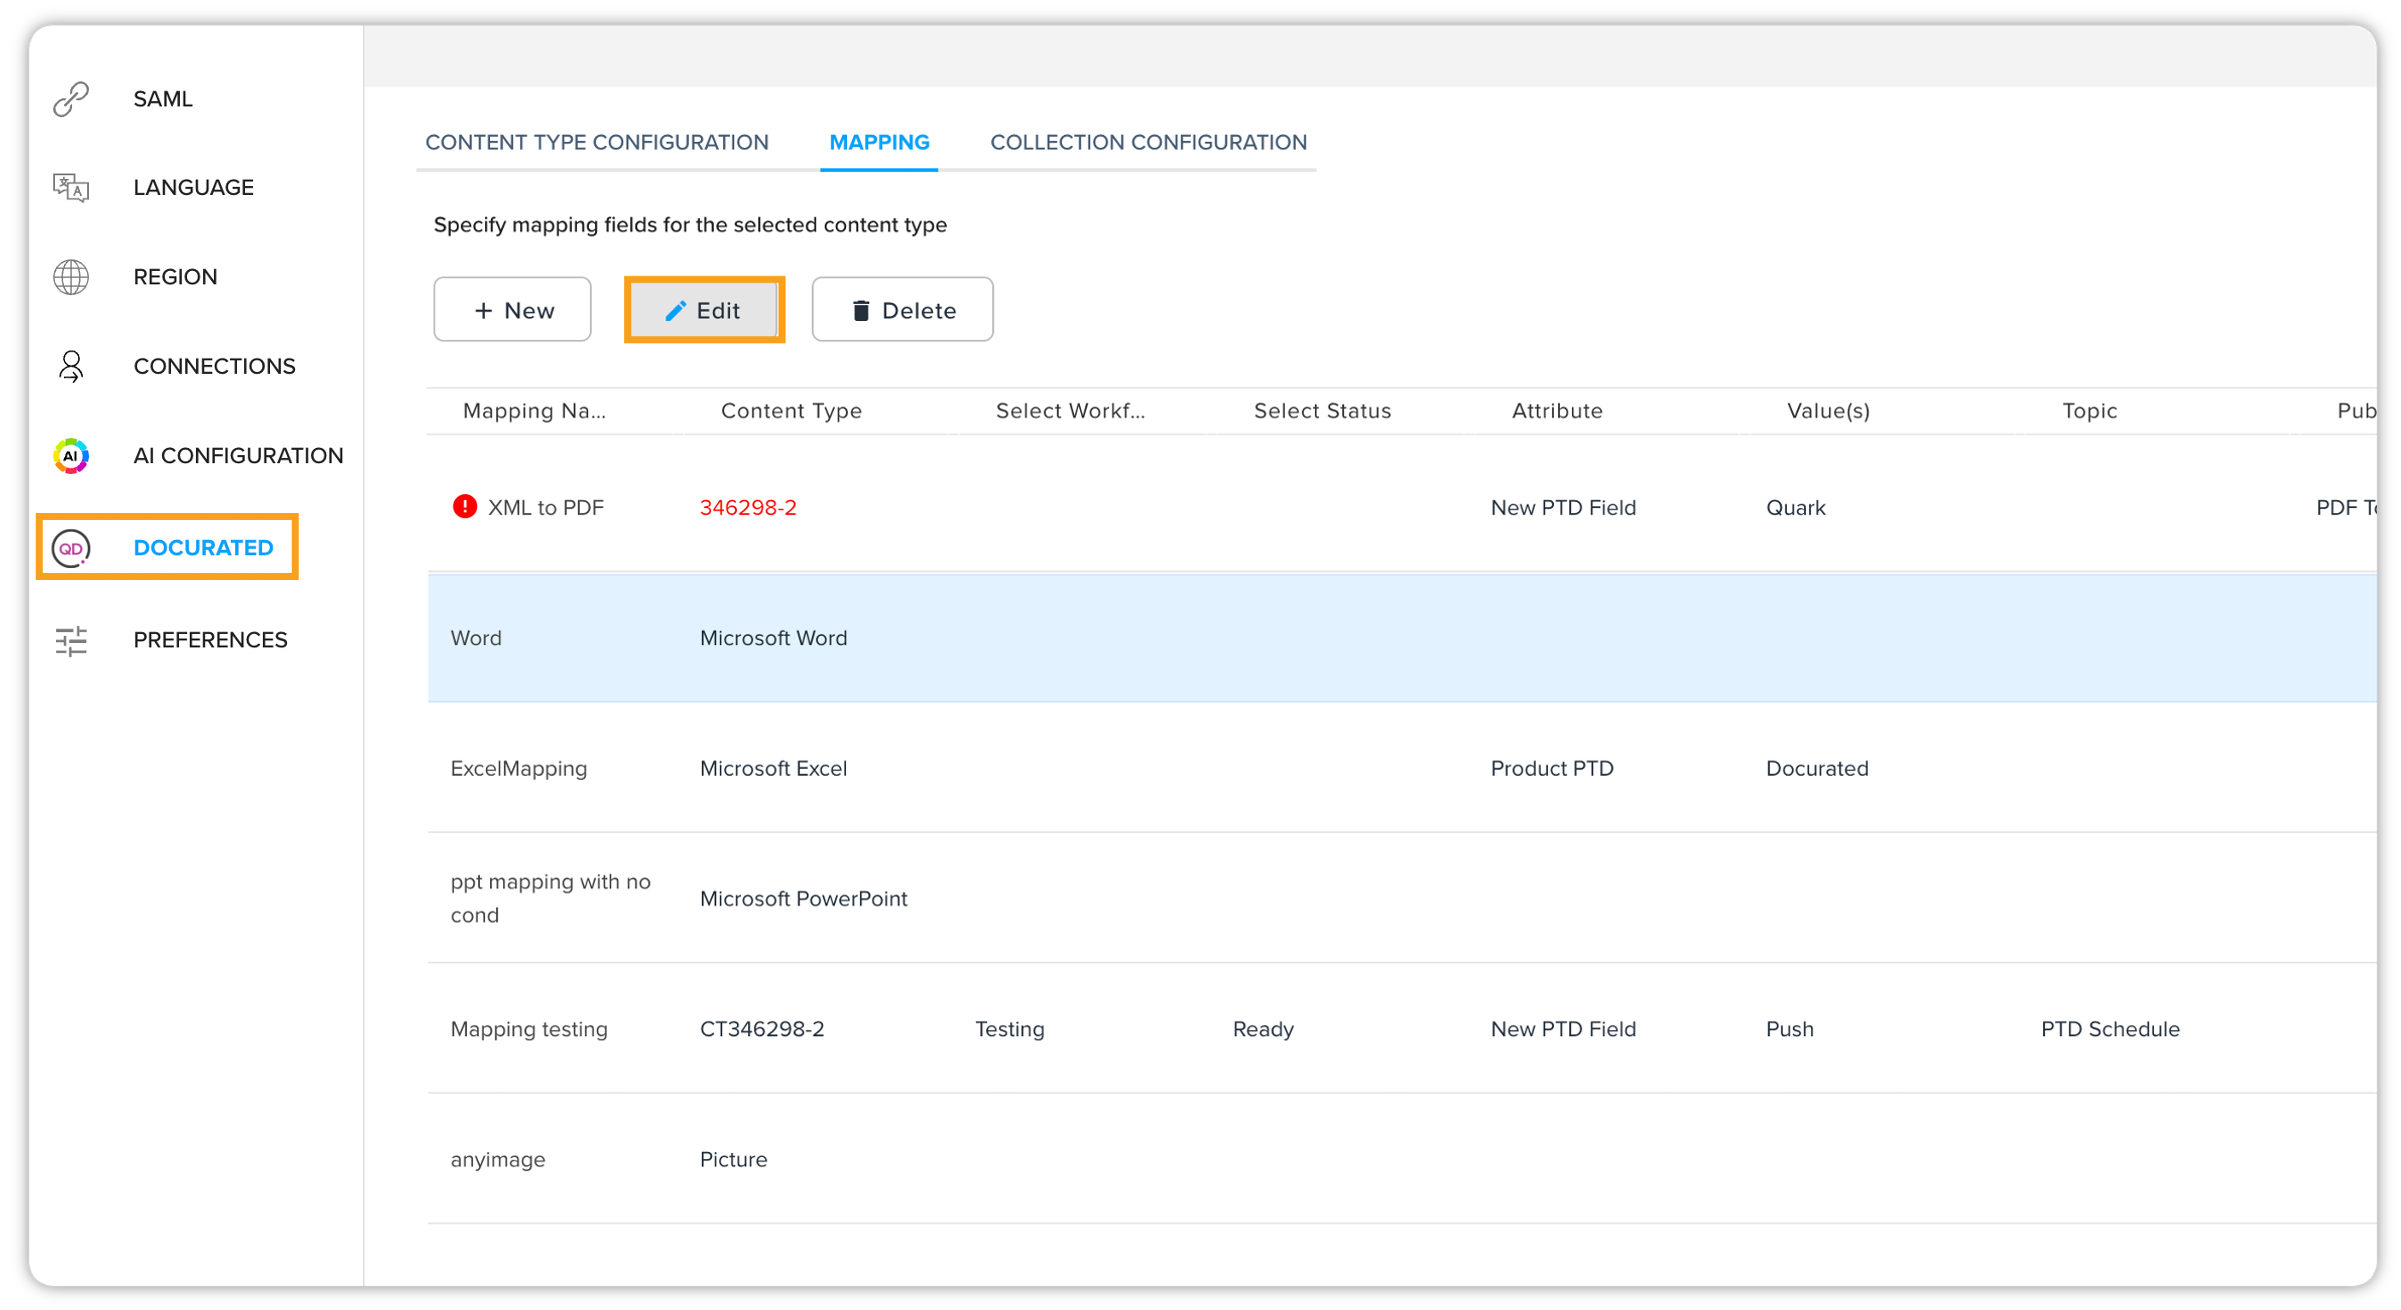
-
Or, to create a new mapping, click the New option.
-
-
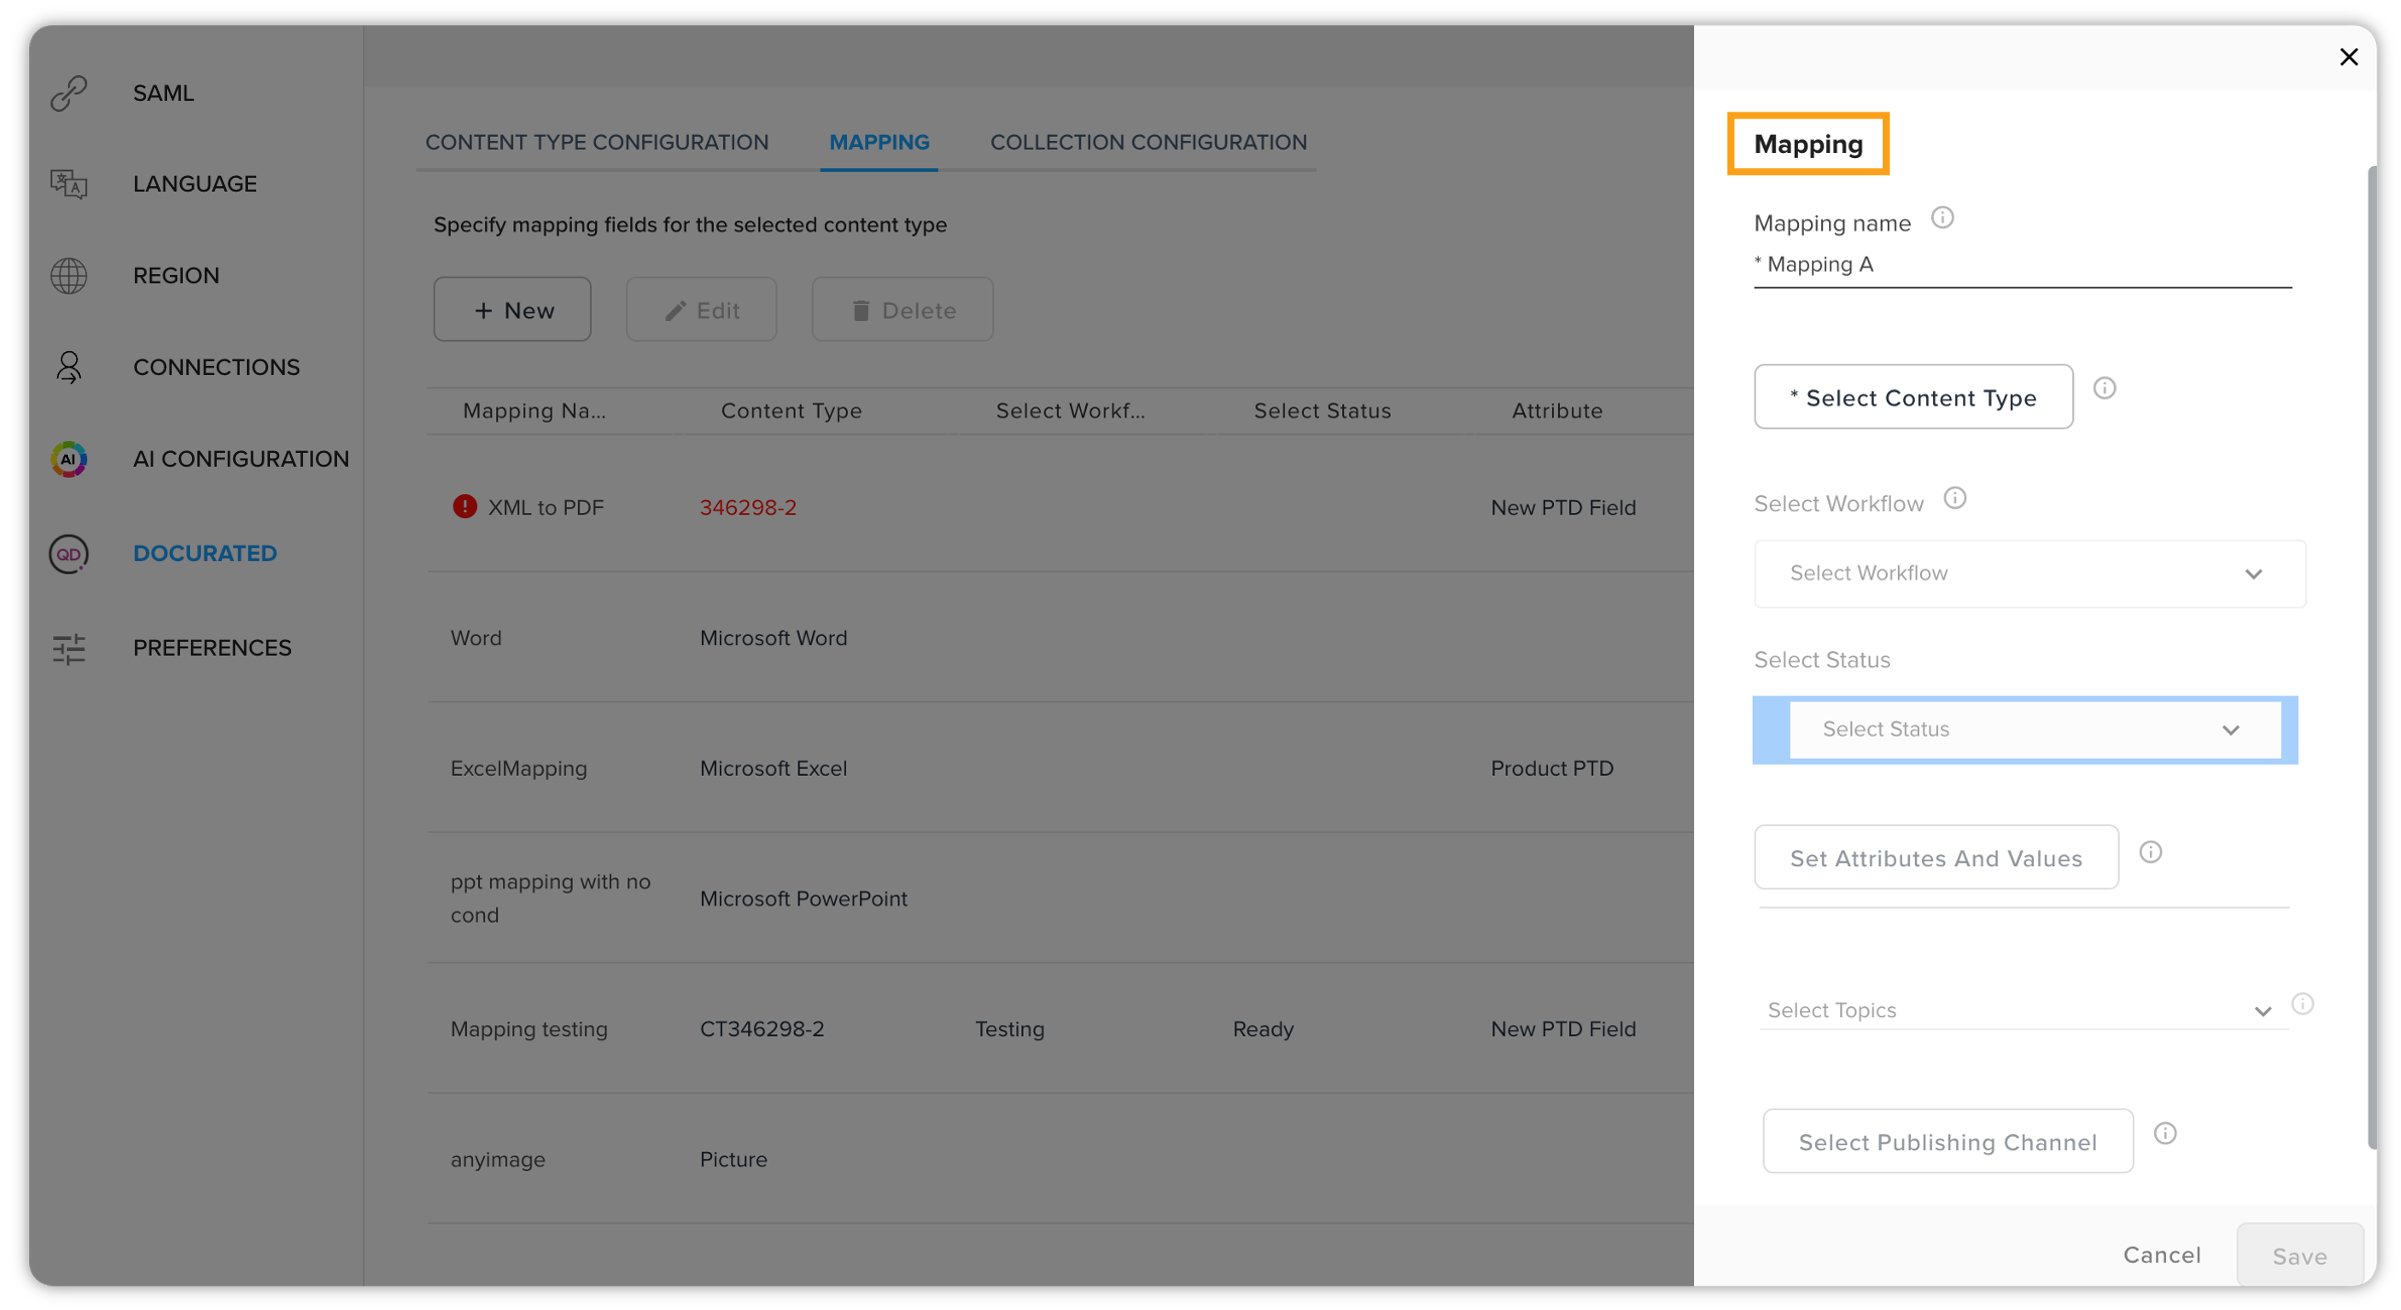
Upon clicking New or Edit, the Mapping screen will be opened on the right side where you need to enter the required mapping details (in case you are creating a new mapping) or edit the existing mapping details (in case you are editing an existing mapping).
-
Let’s say you are creating a new mapping. First, enter the desired name in the Mapping Name field.
-
Now select the Content Type and Workflow. Also, select Status for the workflow.
-
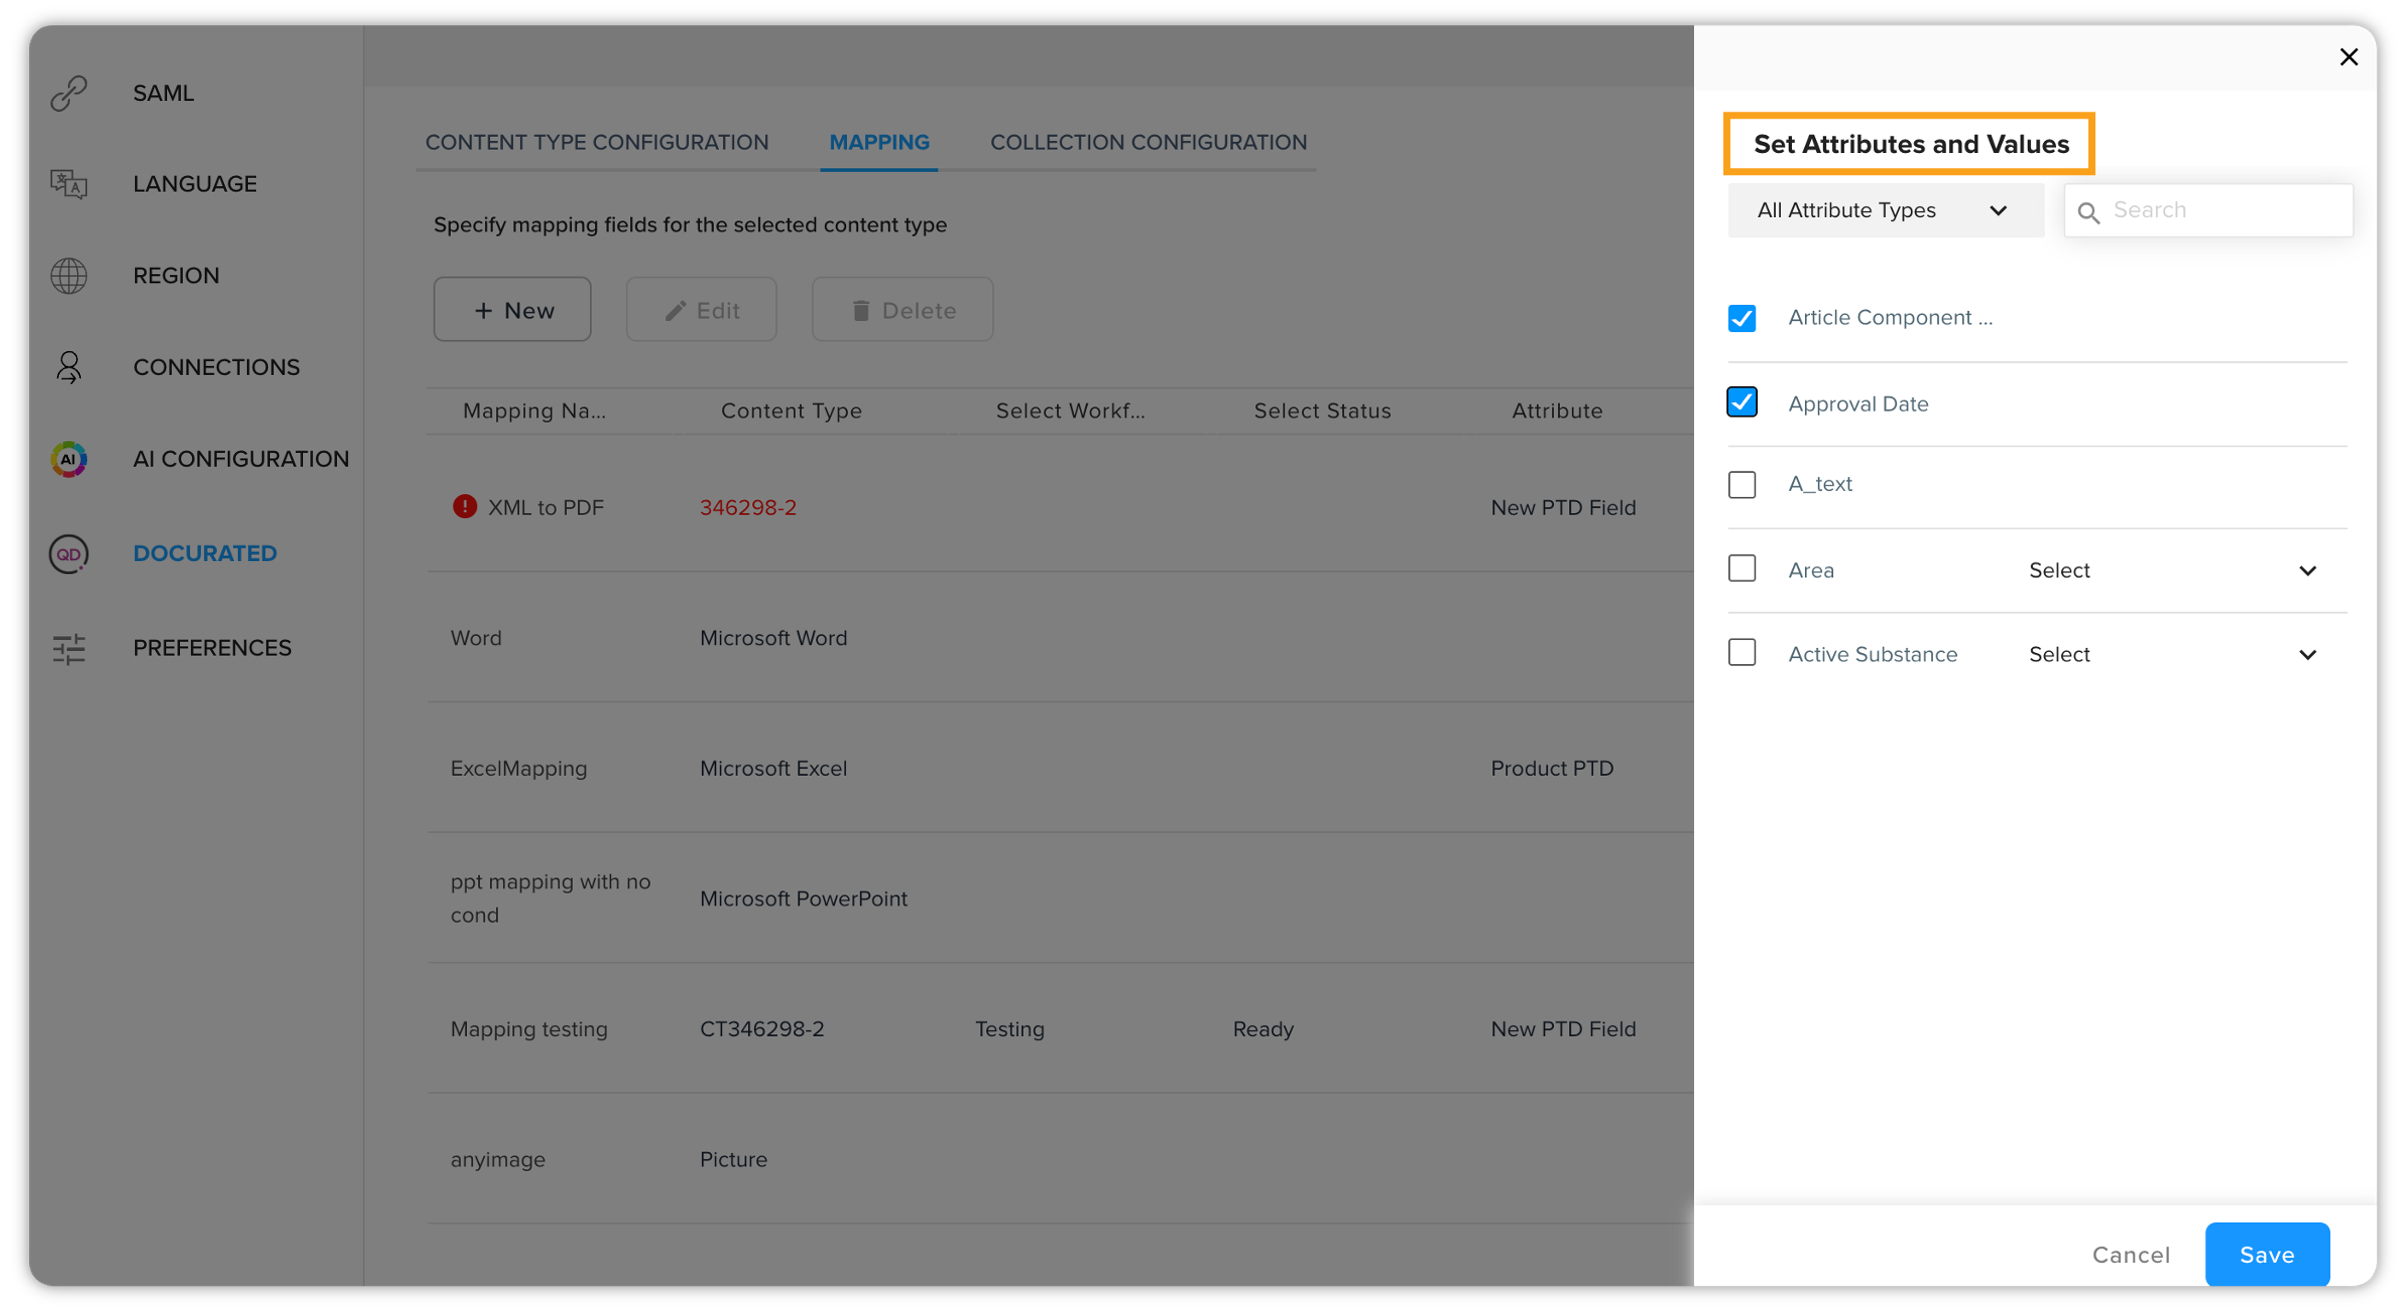
Select attributes and values for further filtering out assets.
-
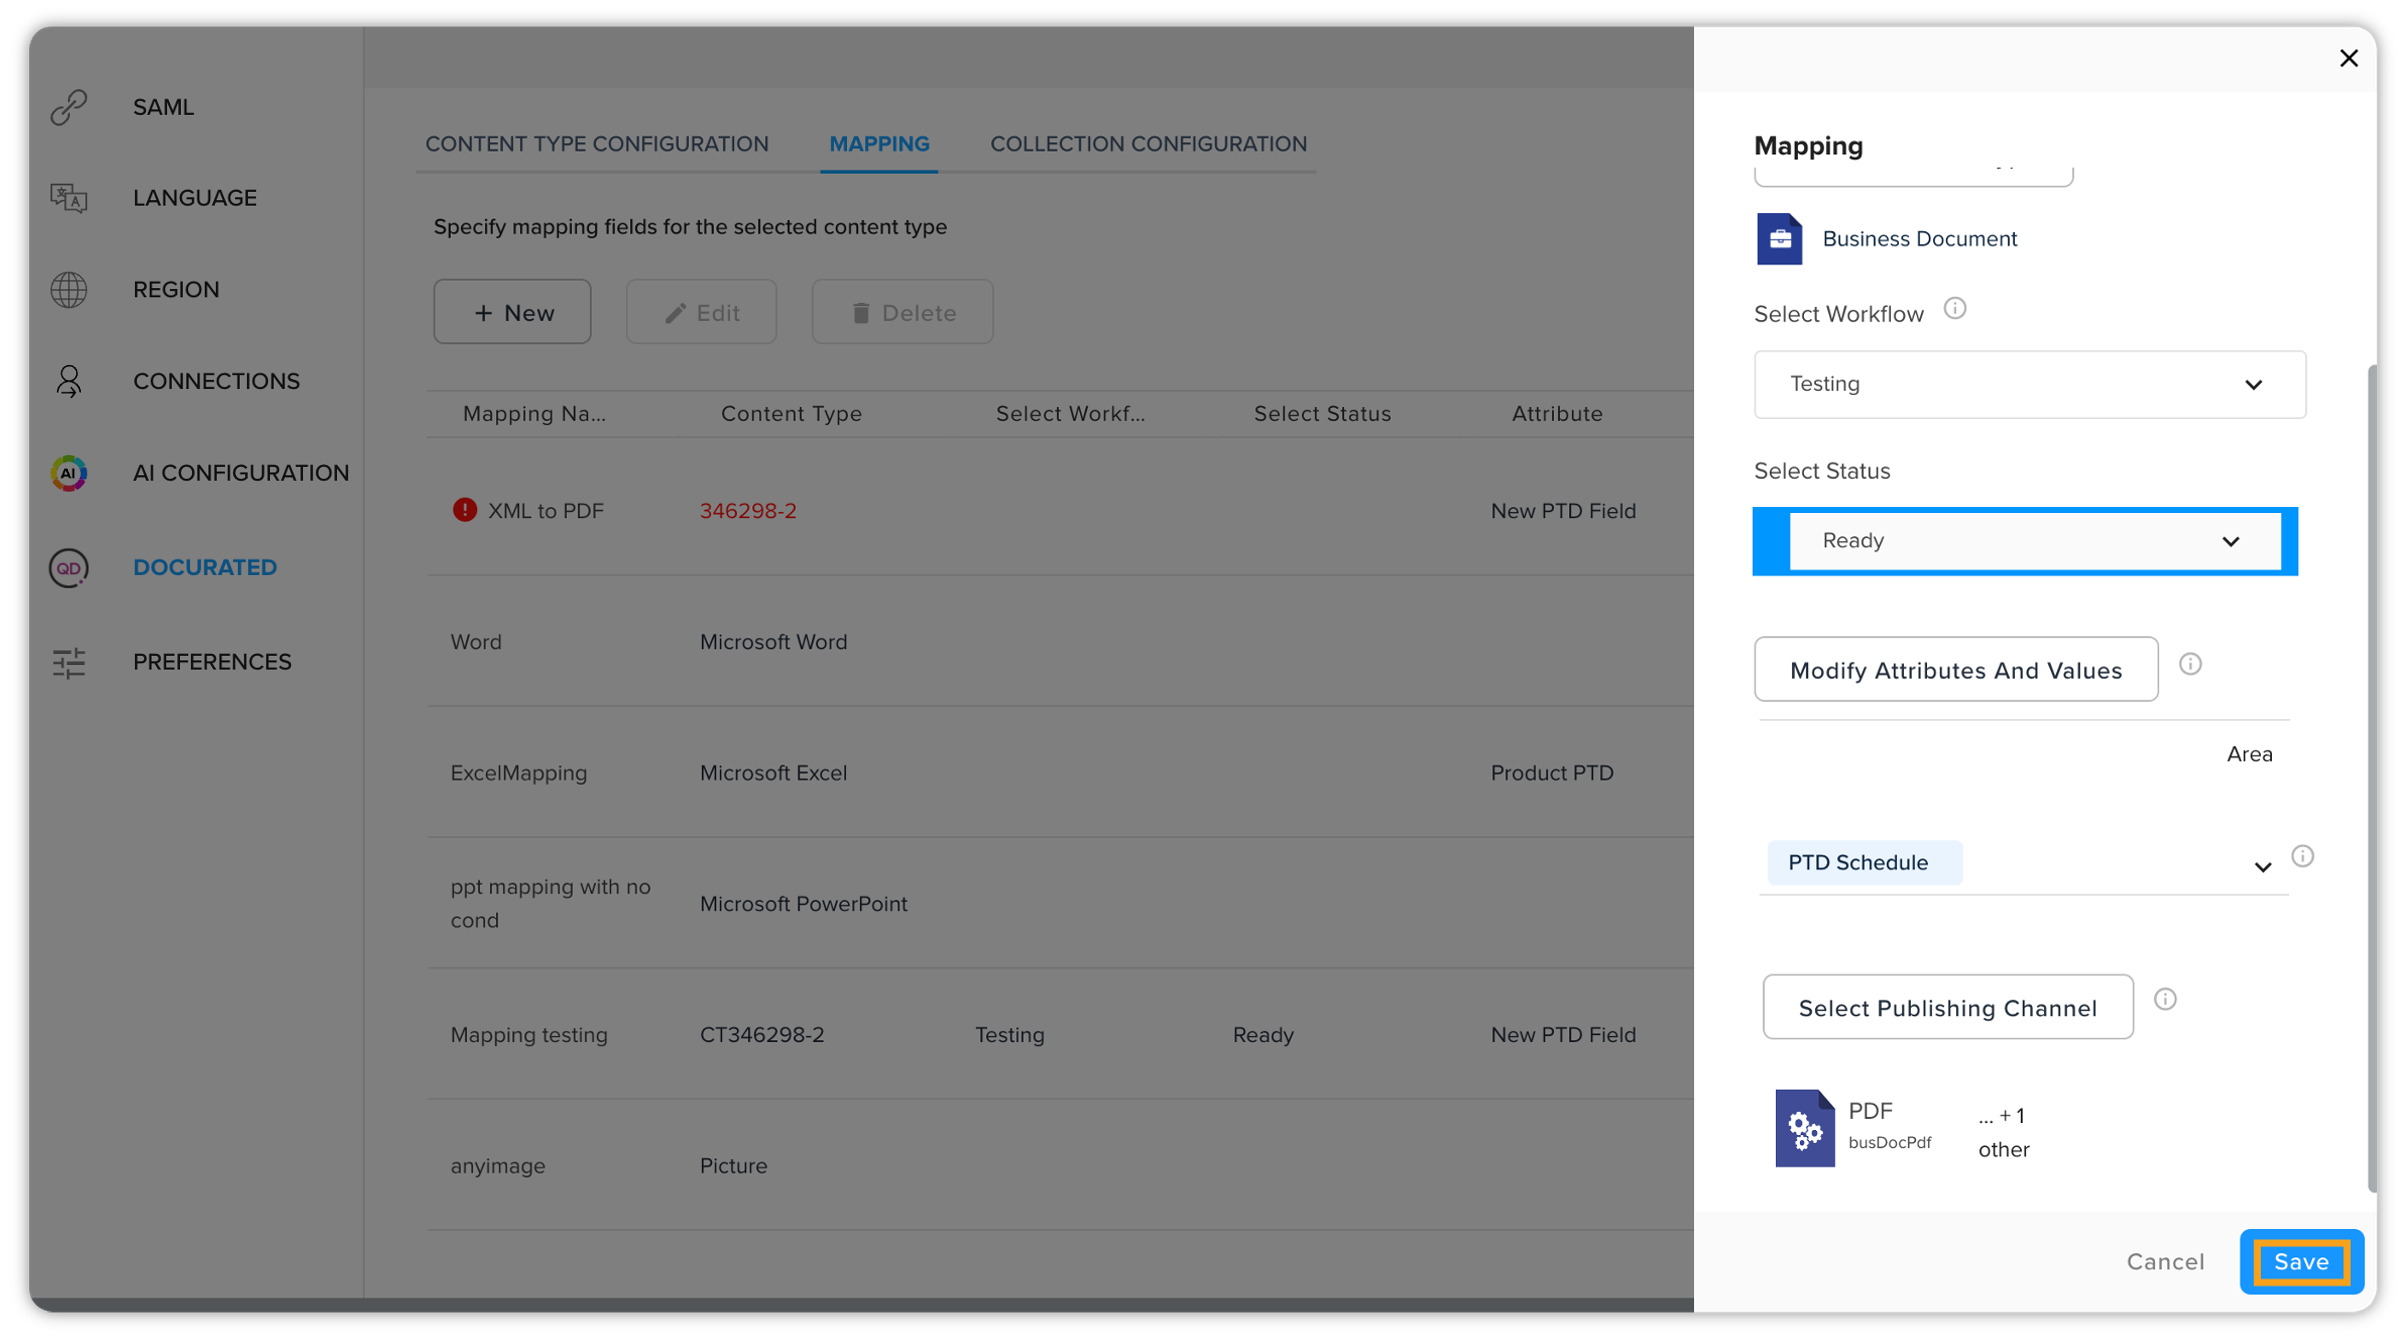
Then select Topics and Publishing Channel. Please note that selecting publishing channel for the structured content types is mandatory.
-
Click Save to save the mapping.
Collection Configuration
Now proceed to the Collection Configuration tab. This is the final step where you need to configure the settings for each collection. This includes defining the rules and criteria for the content within the collection that will be pushed to Docurated. Follow the steps shown below –
-
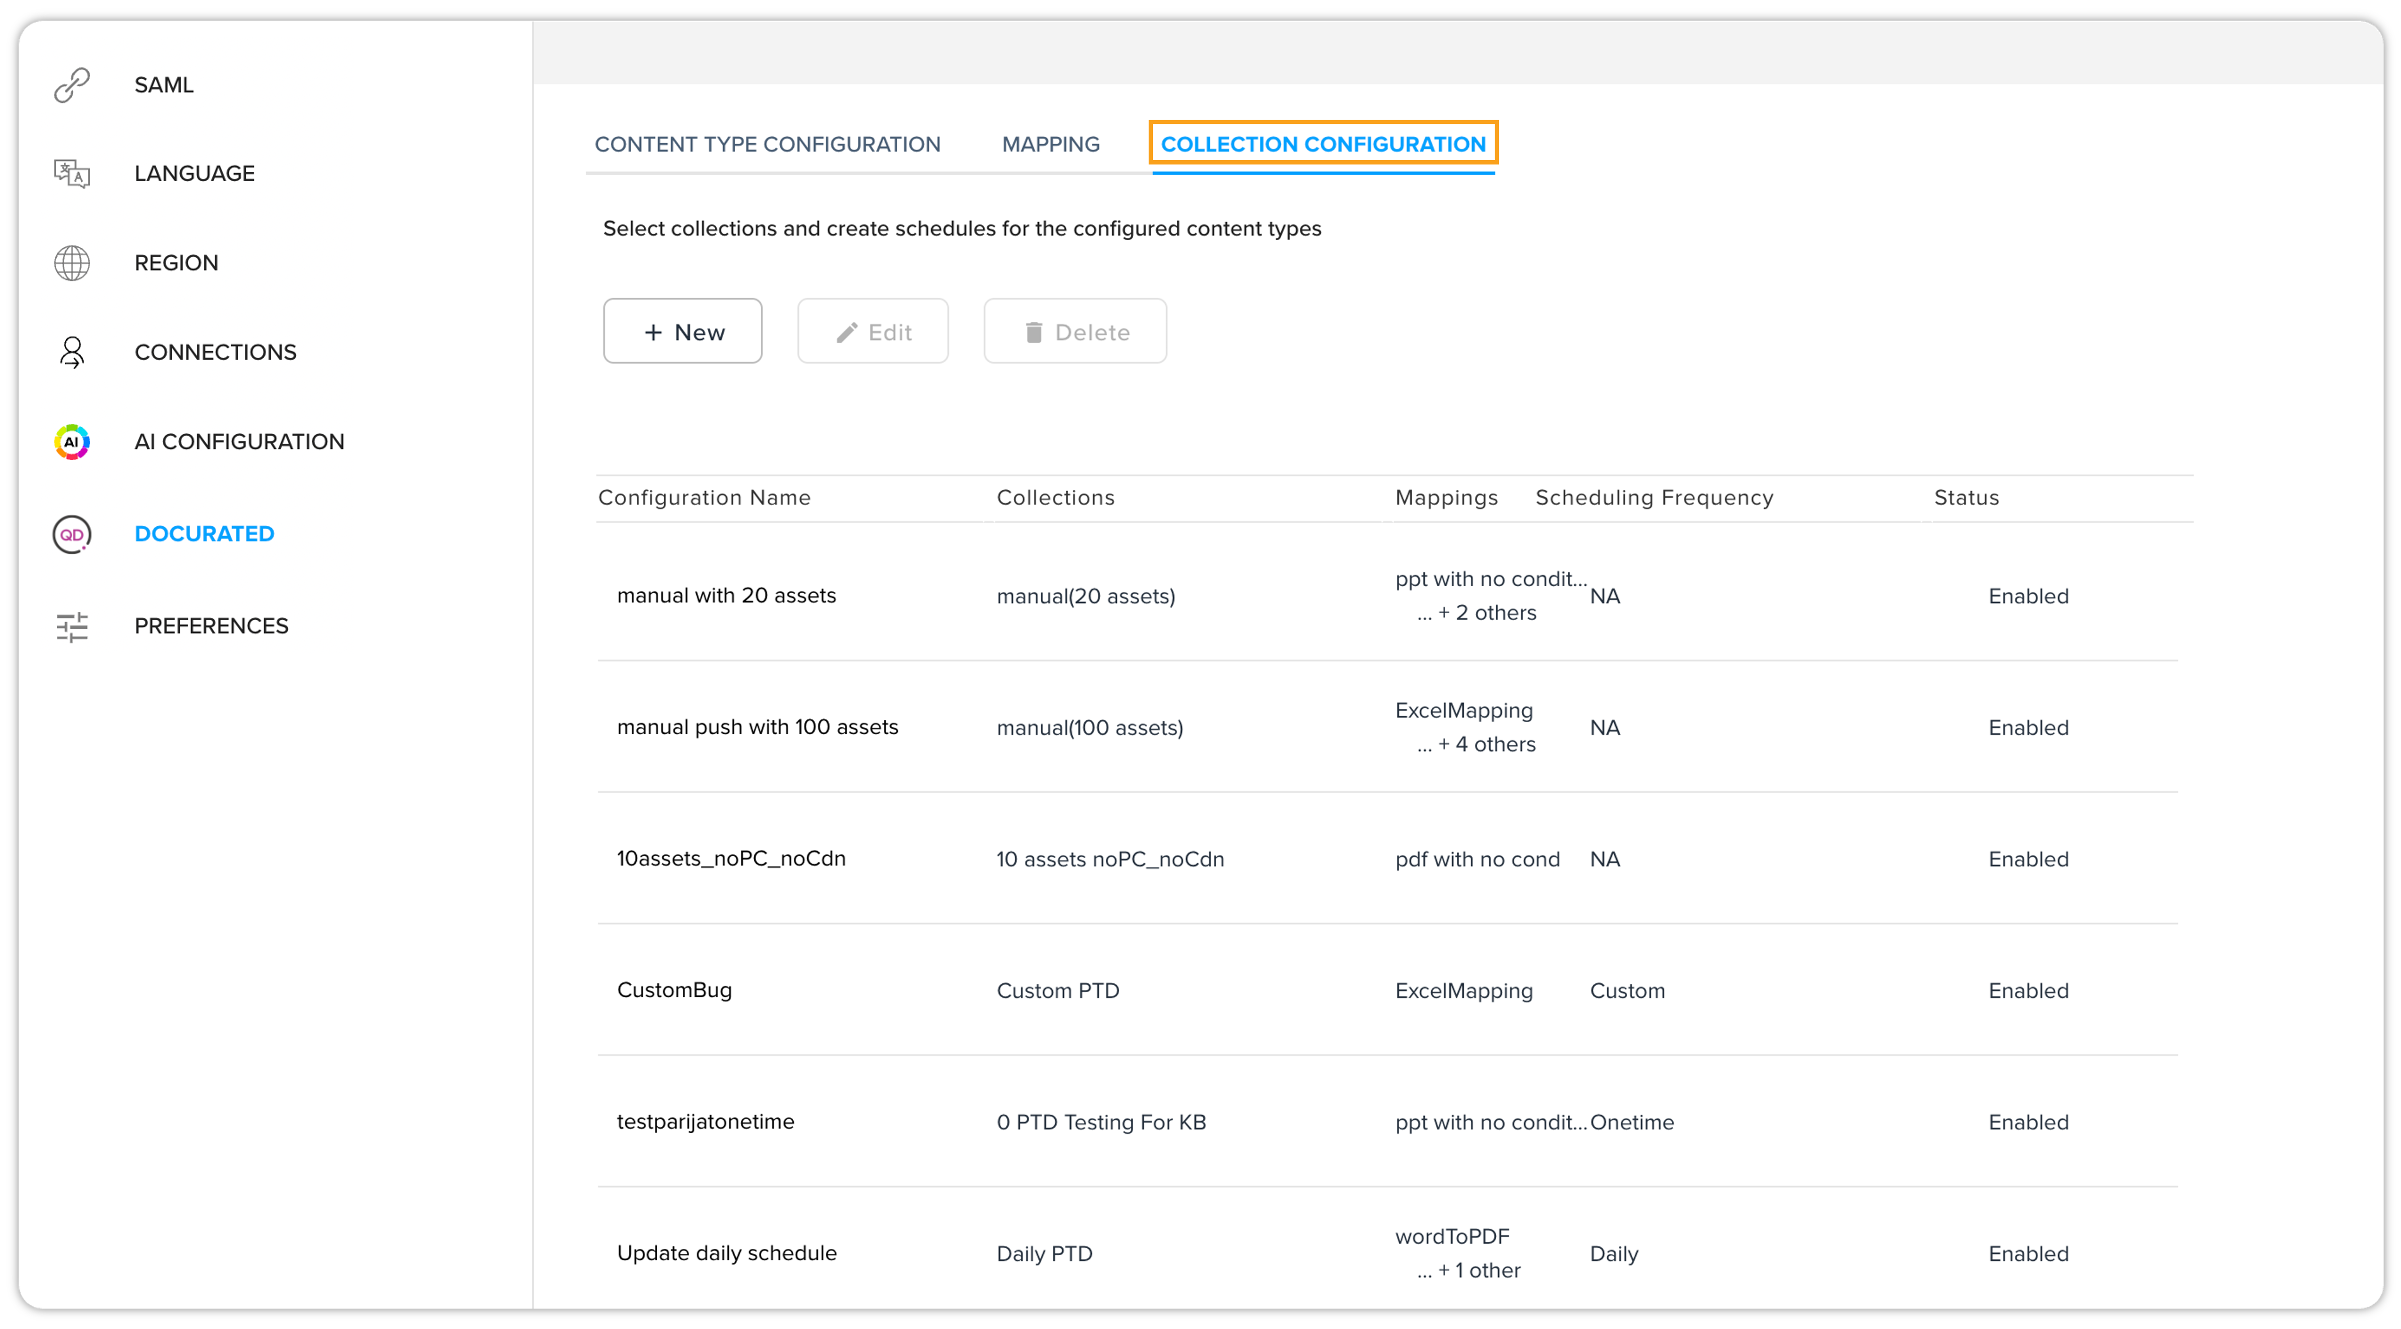
On the Collection Configuration screen, you can see the list of configurations along with their collections, mapping, scheduling frequency, and status.
-
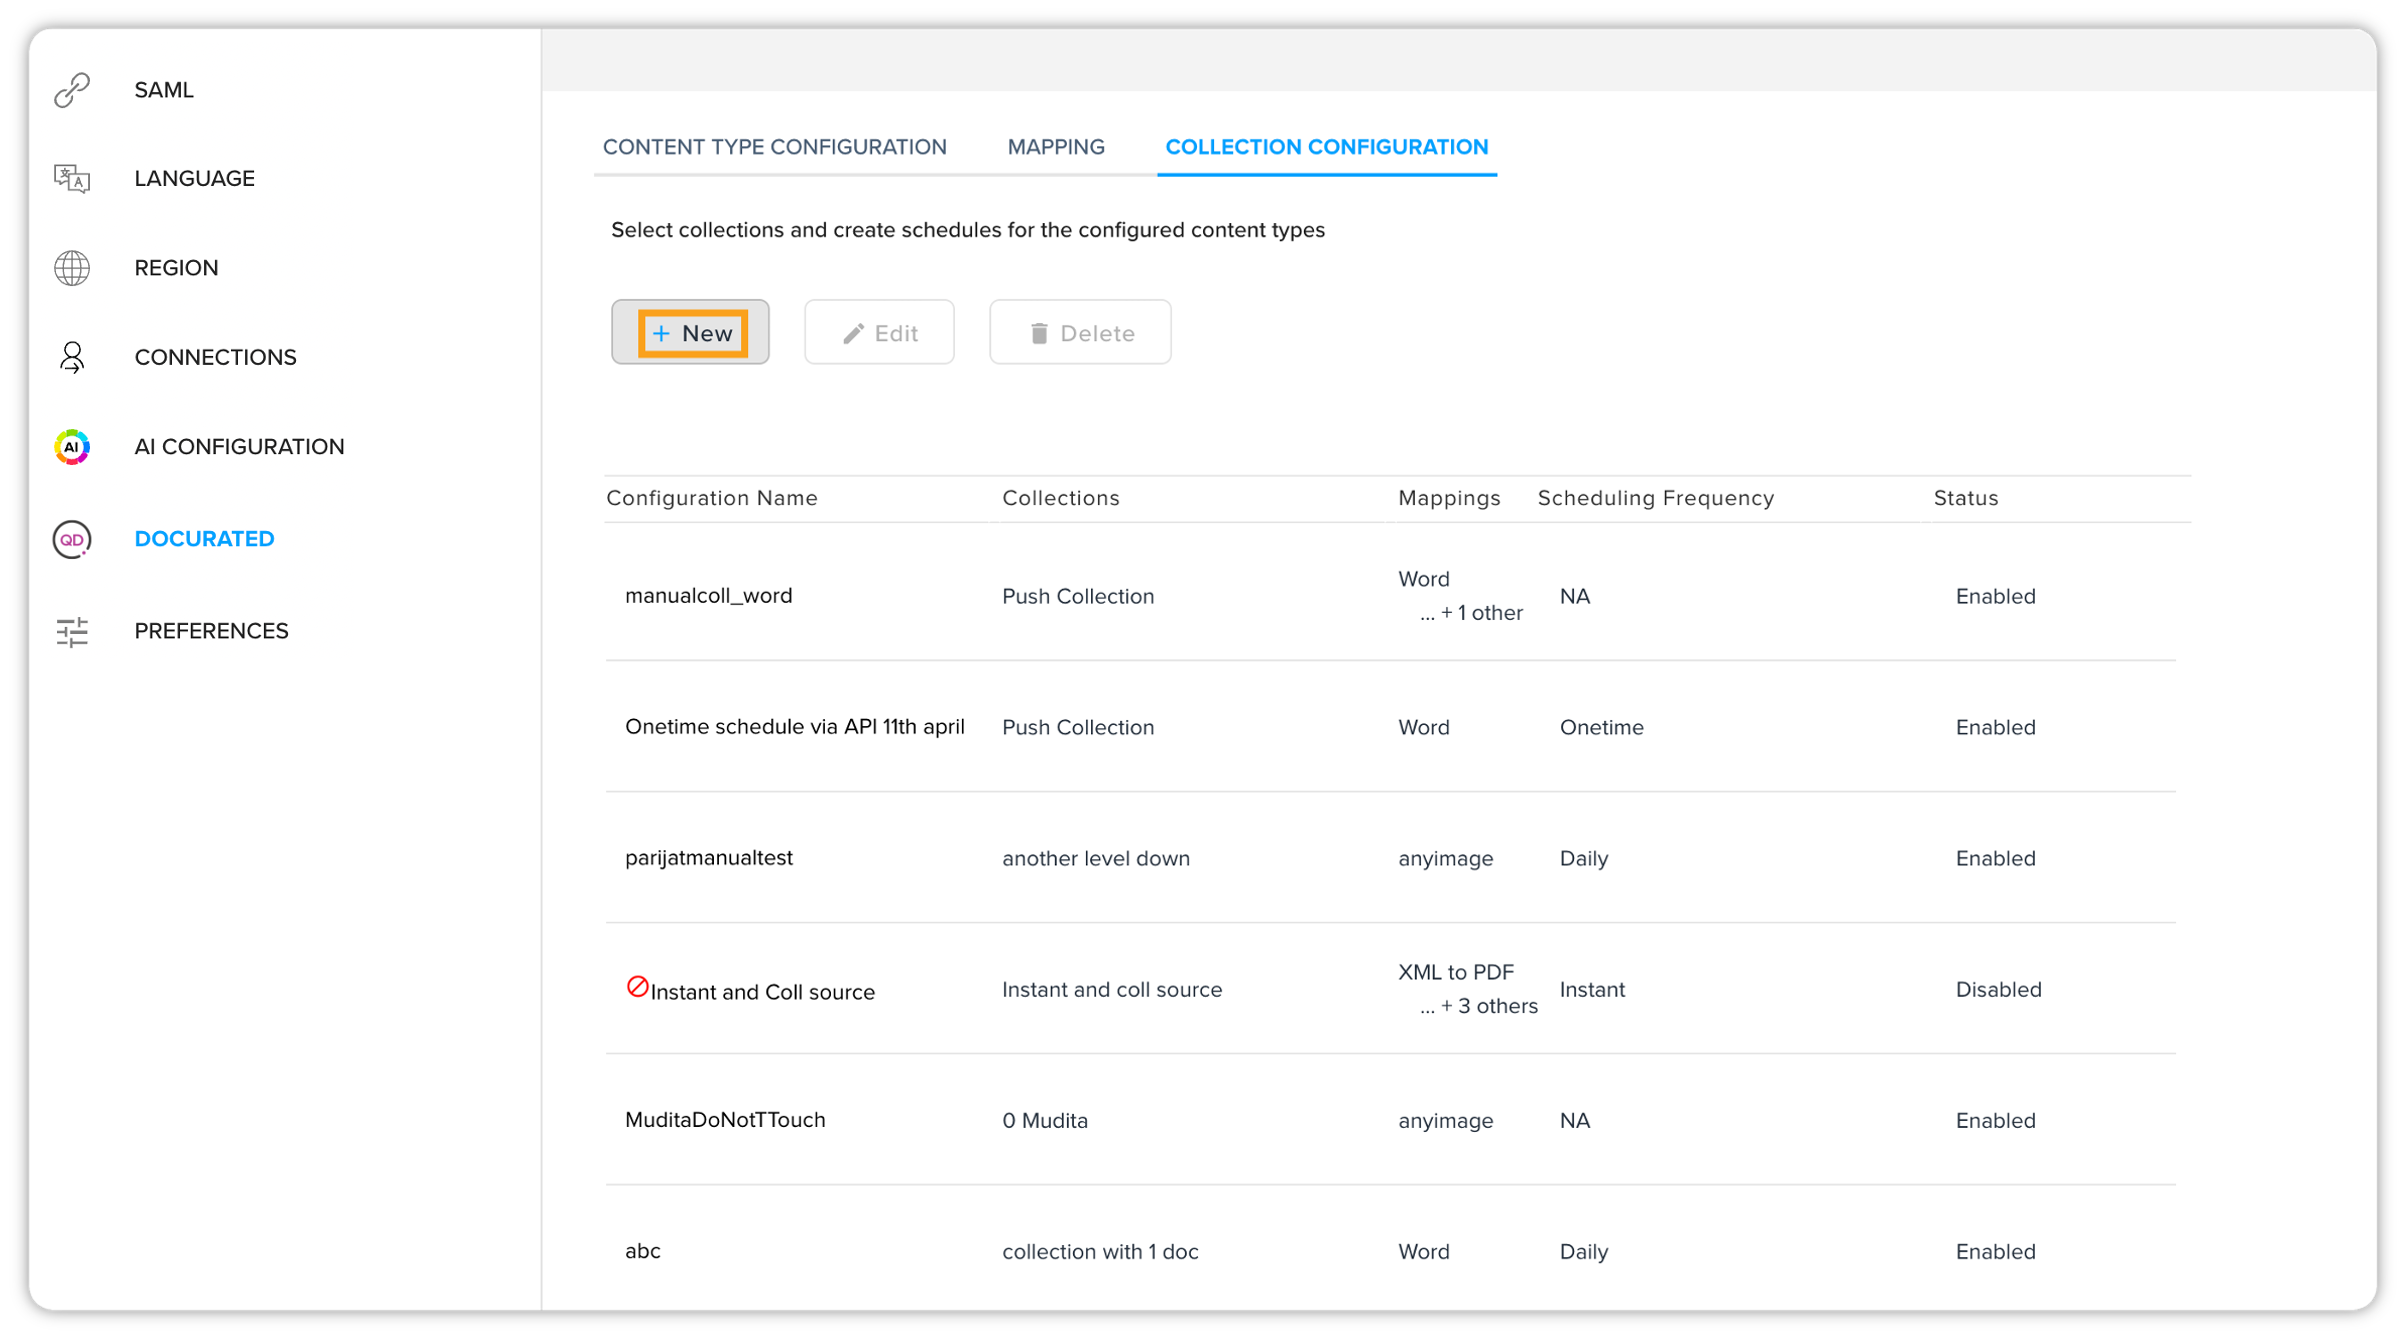
You can either create a new collection configuration or edit an existing one. Let’s say you want to create a new one. Click New.
-
This will open the Collection configuration screen on the right side where you need to enter the configuration name, collections, and mapping details.
-
After that, you need to specify your preferred scheduling frequency.
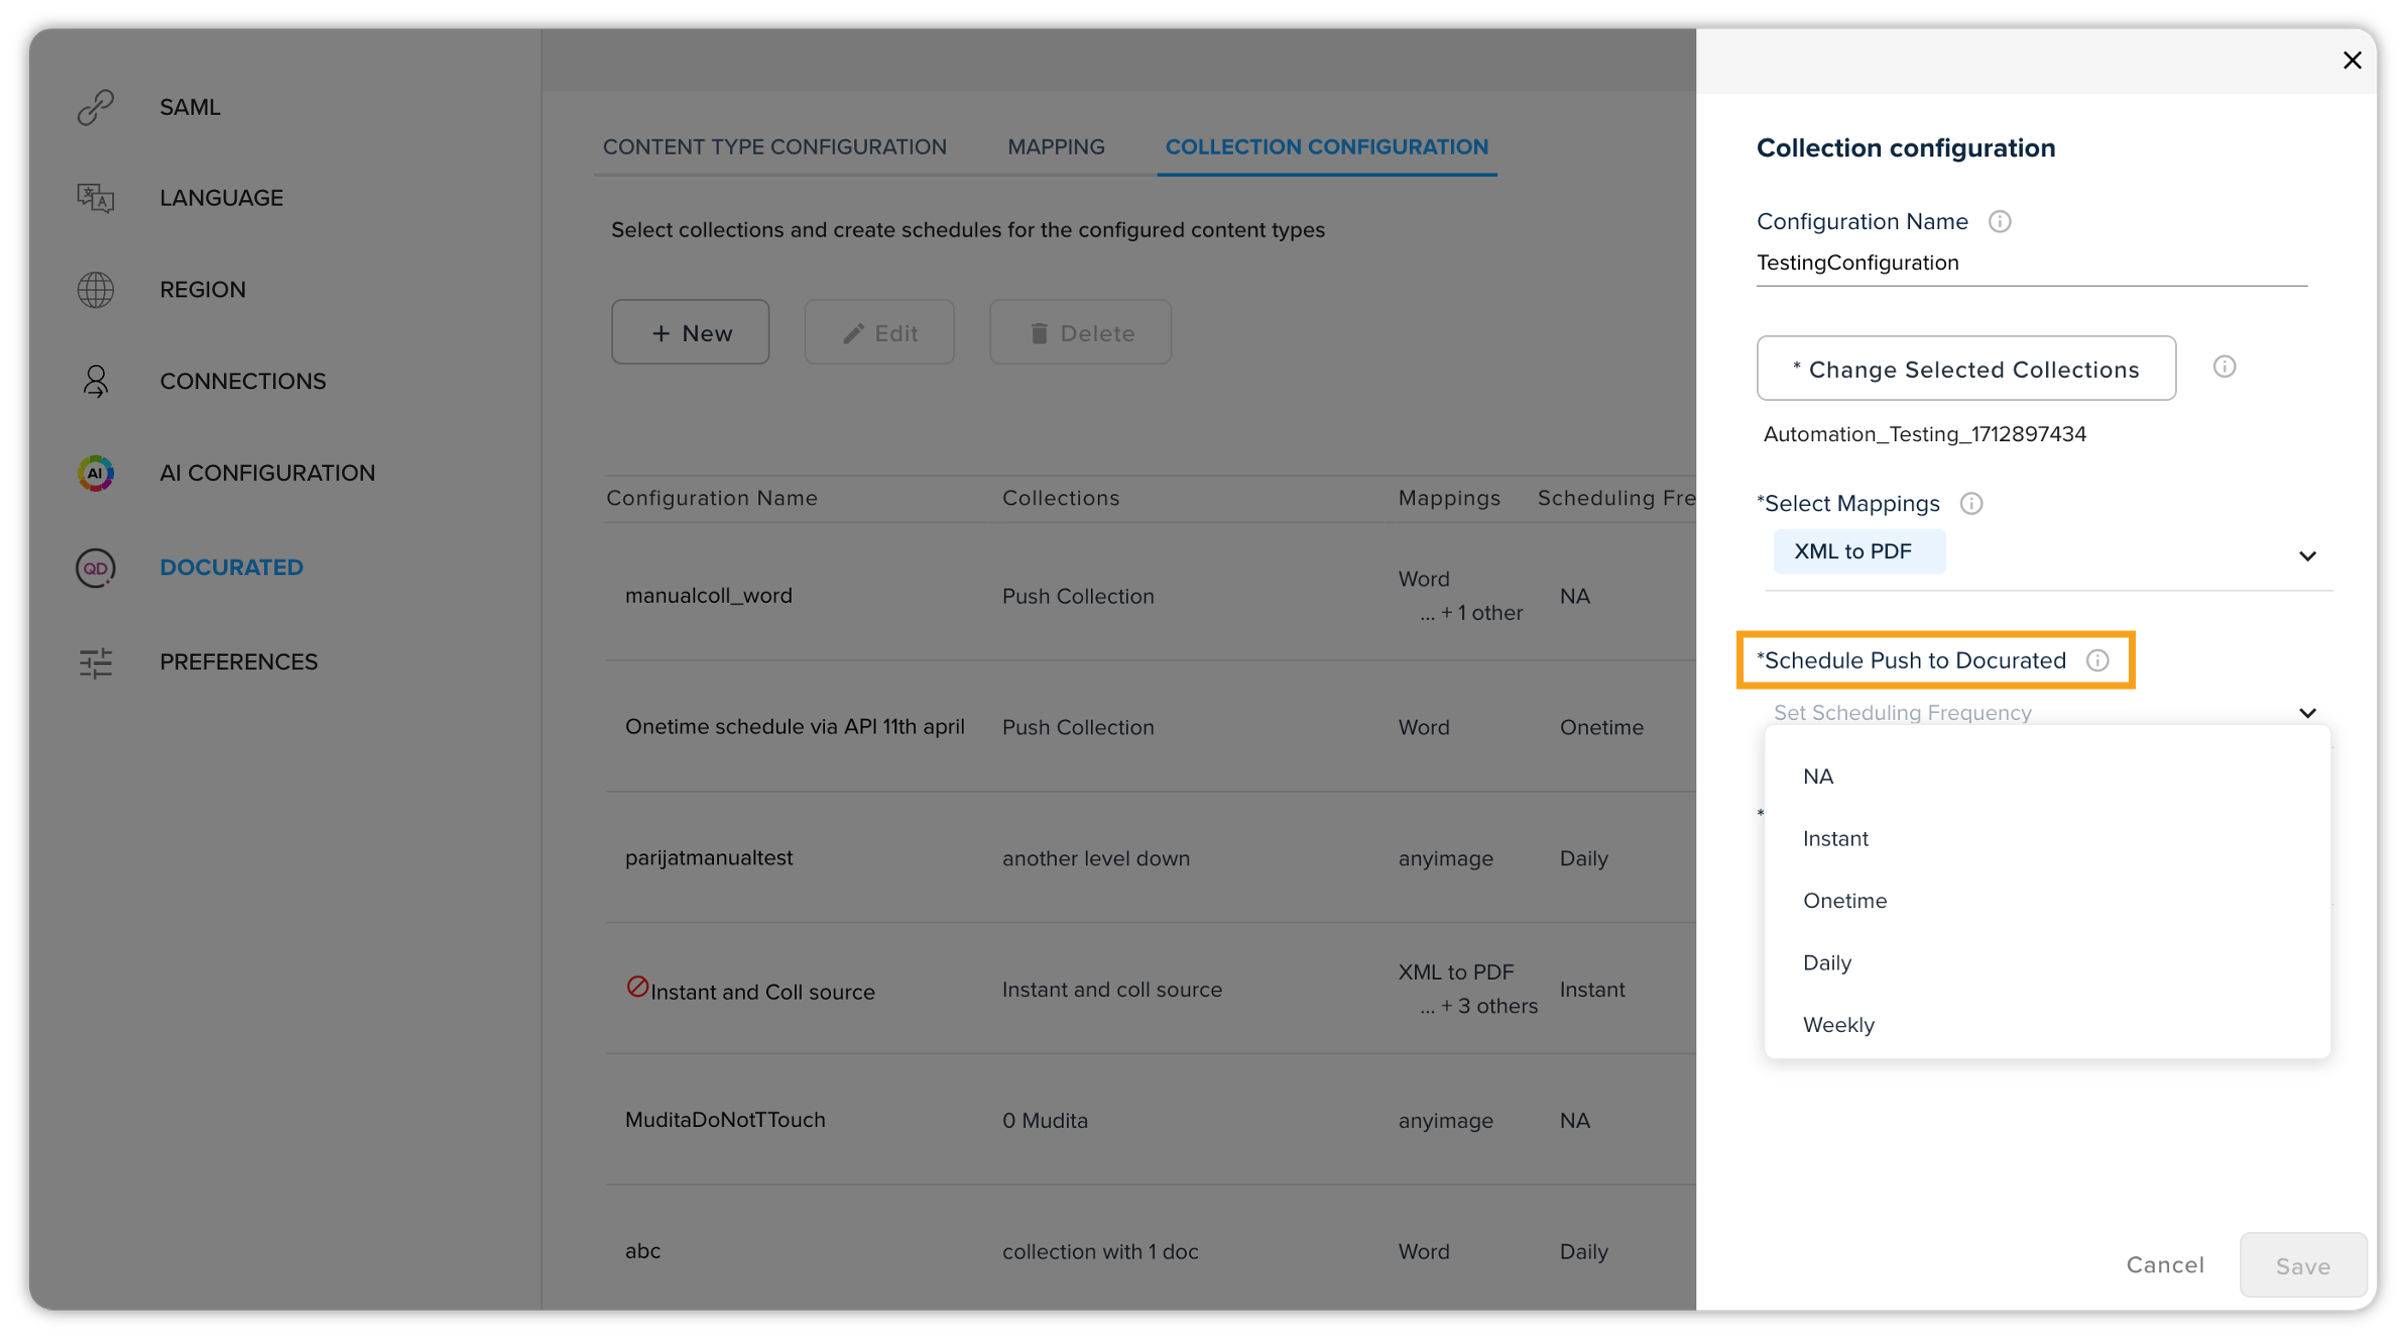
-
For example, if you want to push the collection or the individual assets to Docurated manually, you should select NA from the drop-down menu.
-
The Instant schedule option enables you to instantly push newly created collections/assets to Docurated, provided they meet the defined status requirements. This feature streamlines the process, ensuring that qualifying items are promptly integrated into the Docurated system, enhancing efficiency and enabling timely access to relevant data.
-
Or, if you want to define a scheduling frequency, you should choose other options like Onetime, Daily, Weekly, Monthly, or Custom. For example, you want the push operation to be done every week. You can select Weekly from the drop-down menu. Upon selecting Weekly, the Set Schedule button will appear. Here you can define the date and time on which you want the push operation done weekly.
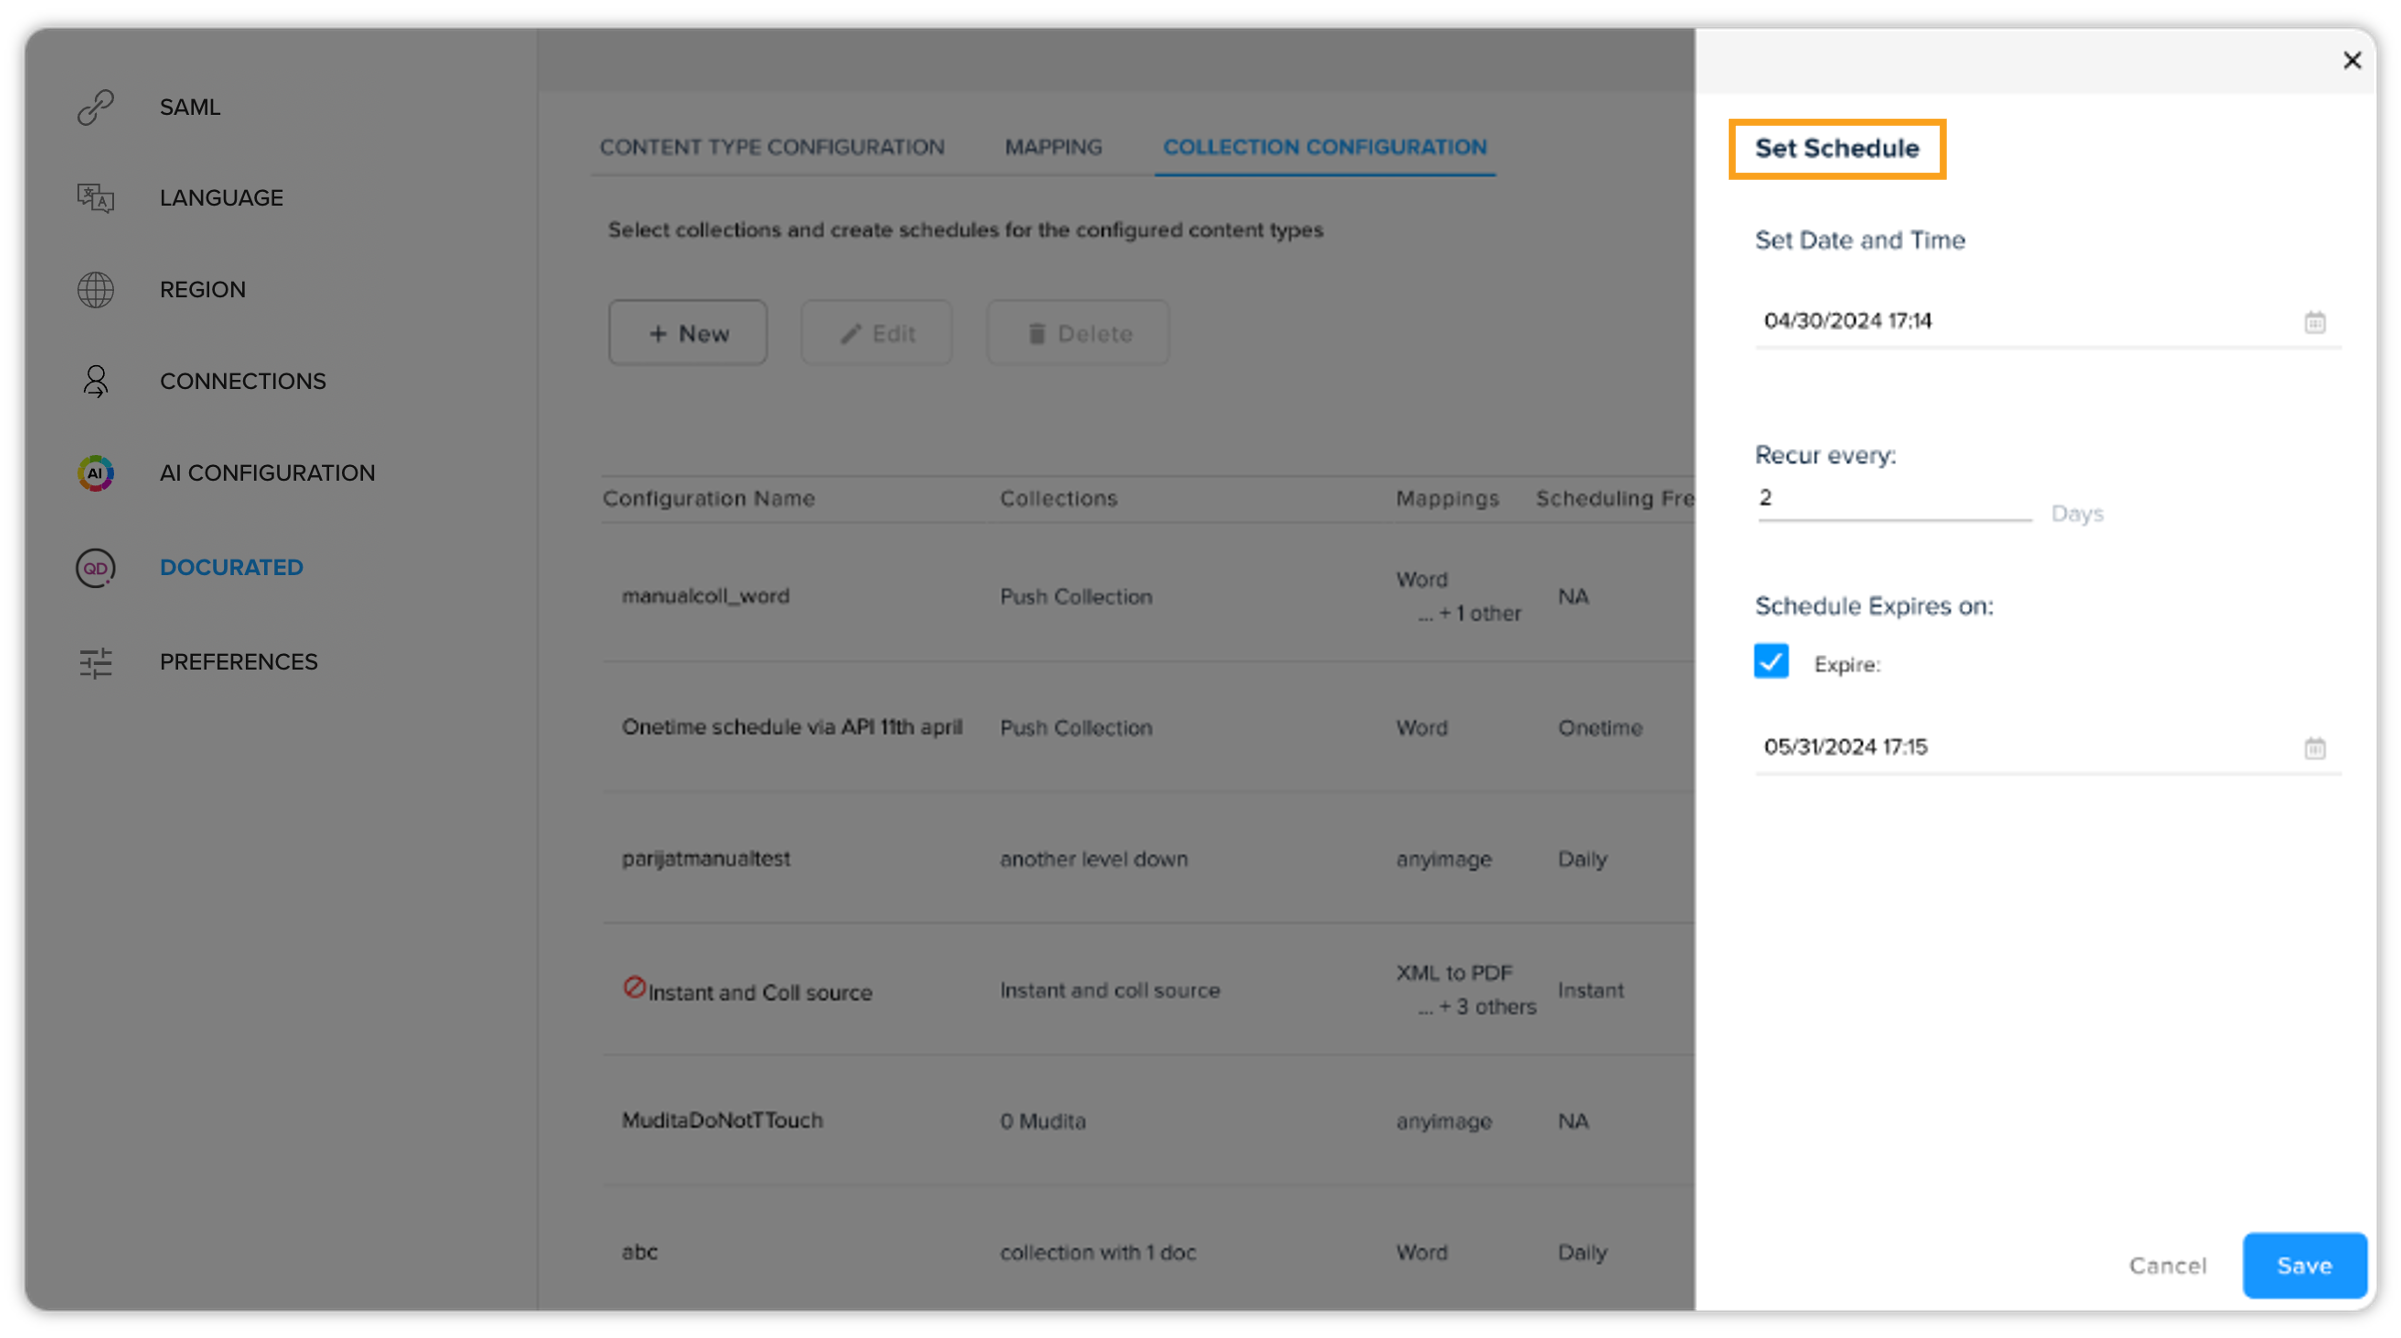
-
-
After setting the scheduling frequency, you need to set permissions for the configured collection. There are three options —
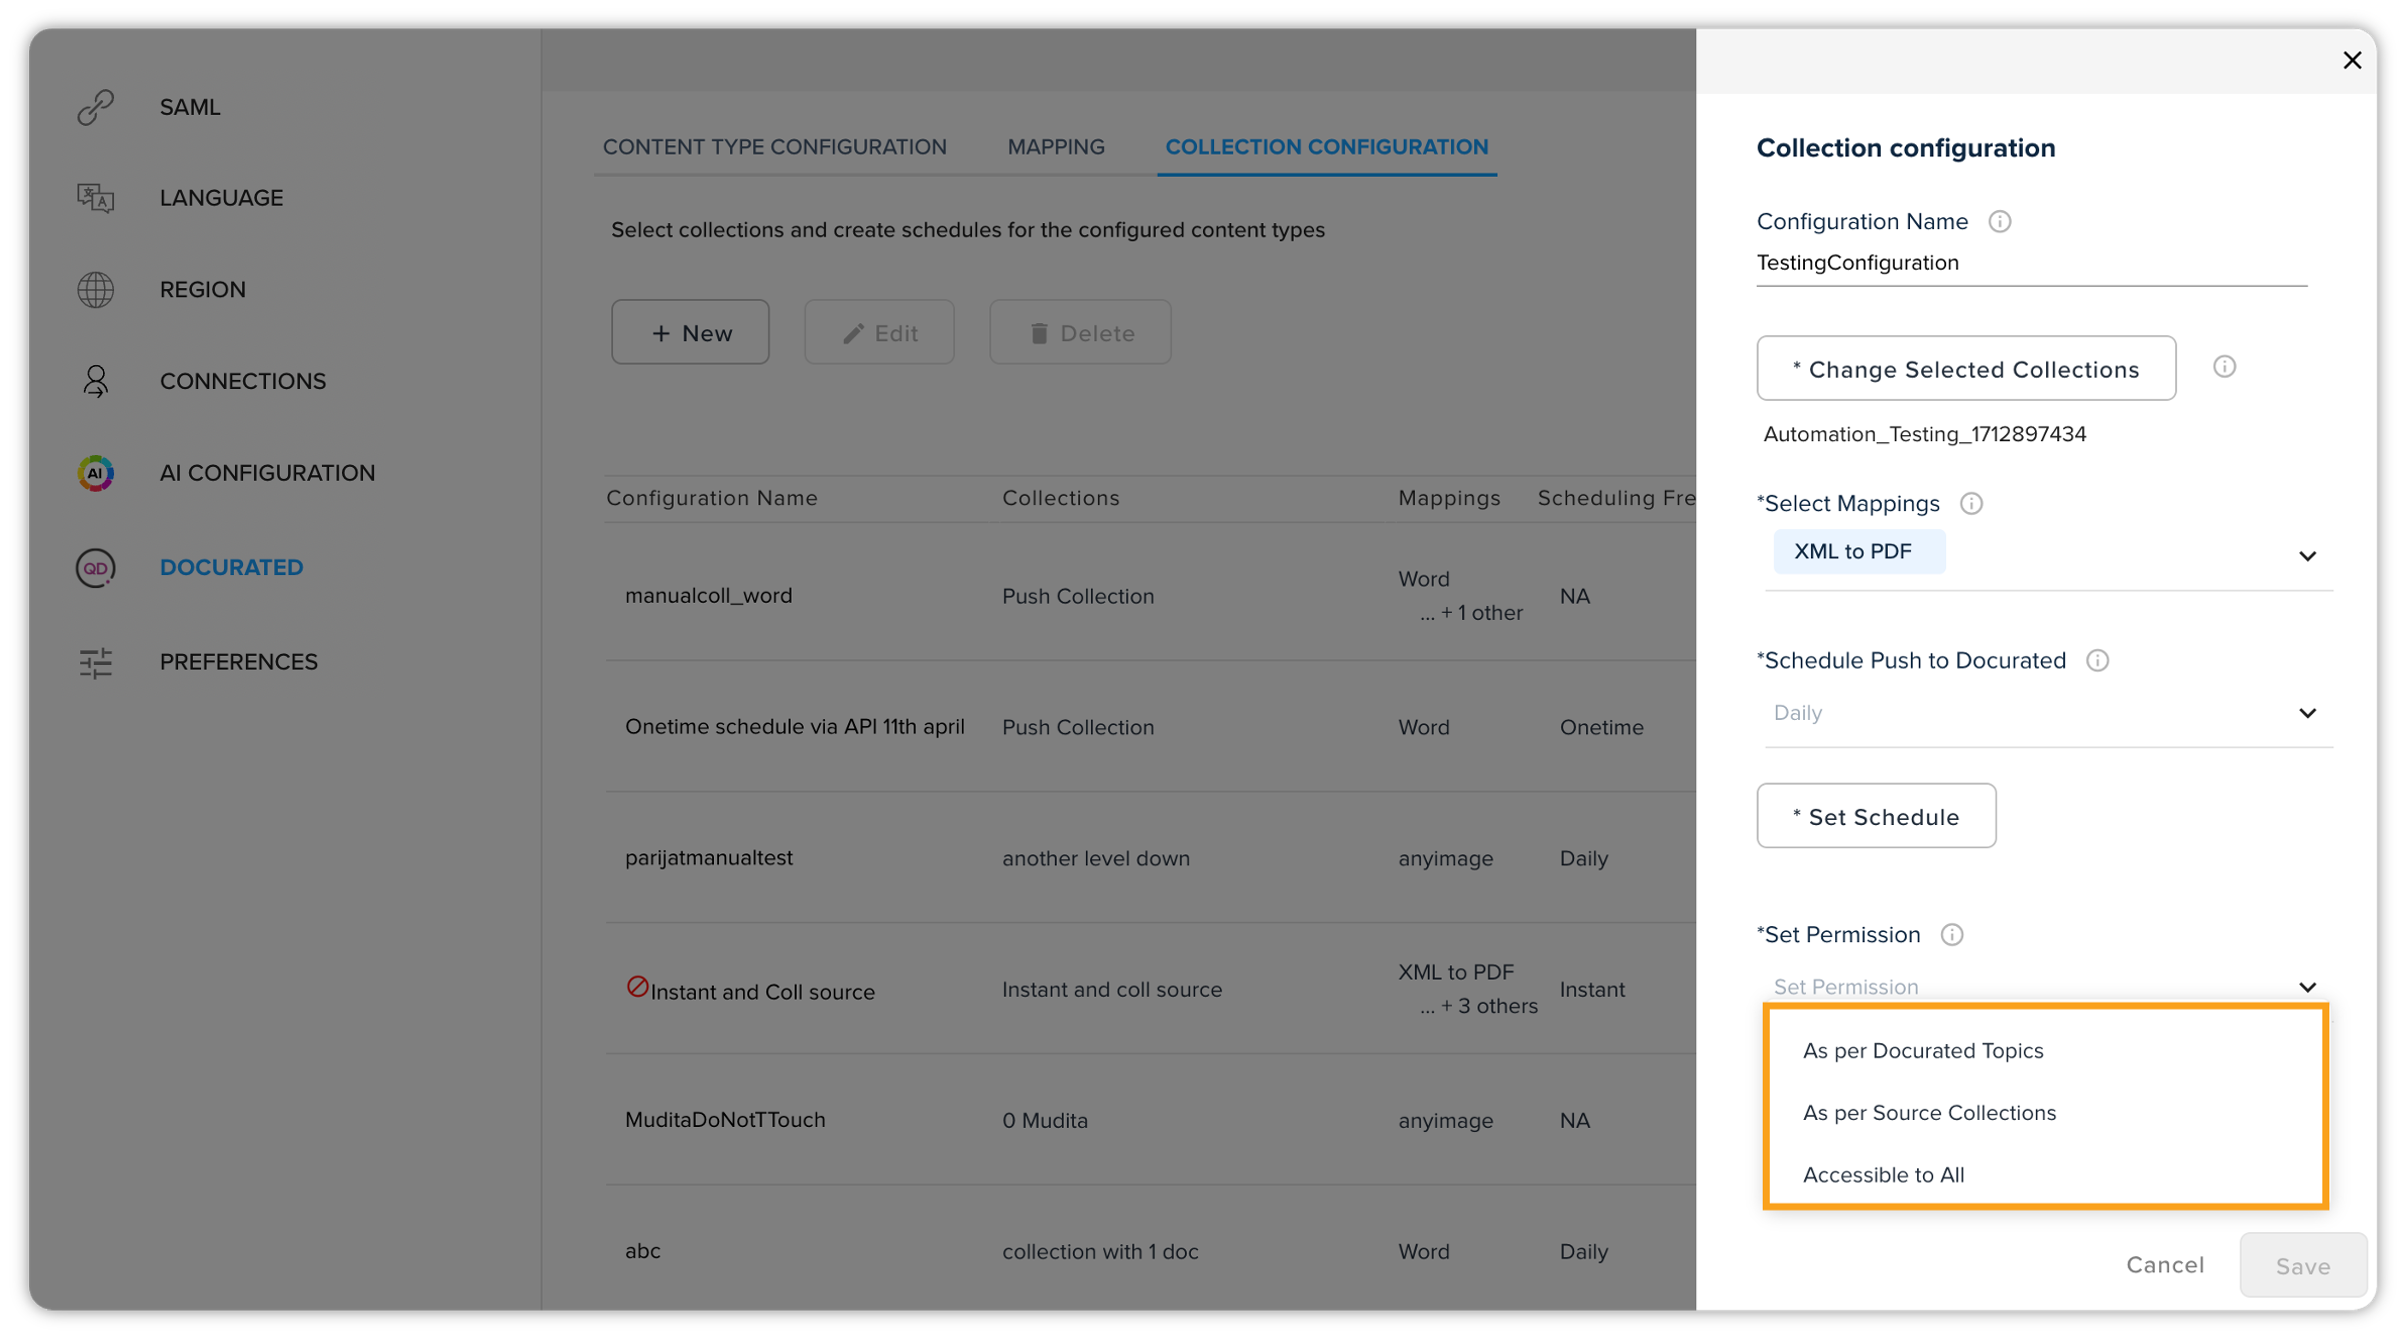
-
As per Docurated Topics: This will set the same sort of permission that has been applied to the Docurated Topics.
-
As per Source Collections: This will set the same sort of permission applied to the source collections.
-
Accessible to All: As the name implies, the collections or individual assets, whichever you are trying to push to Docurated, will be accessible to all users.
After completing the steps above, make sure to save any changes and review the configured settings.
-
You have now successfully configured the "Push to Docurated" capability within QPP.
Utilizing the feature
-
For automated pushes, the QPP will automatically push the specified content to Docurated as per the time frequency defined by you in the Collection Configuration step.
-
For manual pushes, you can initiate the push to Docurated by selecting the desired assets or collections and utilizing the "Push to Docurated" functionality.
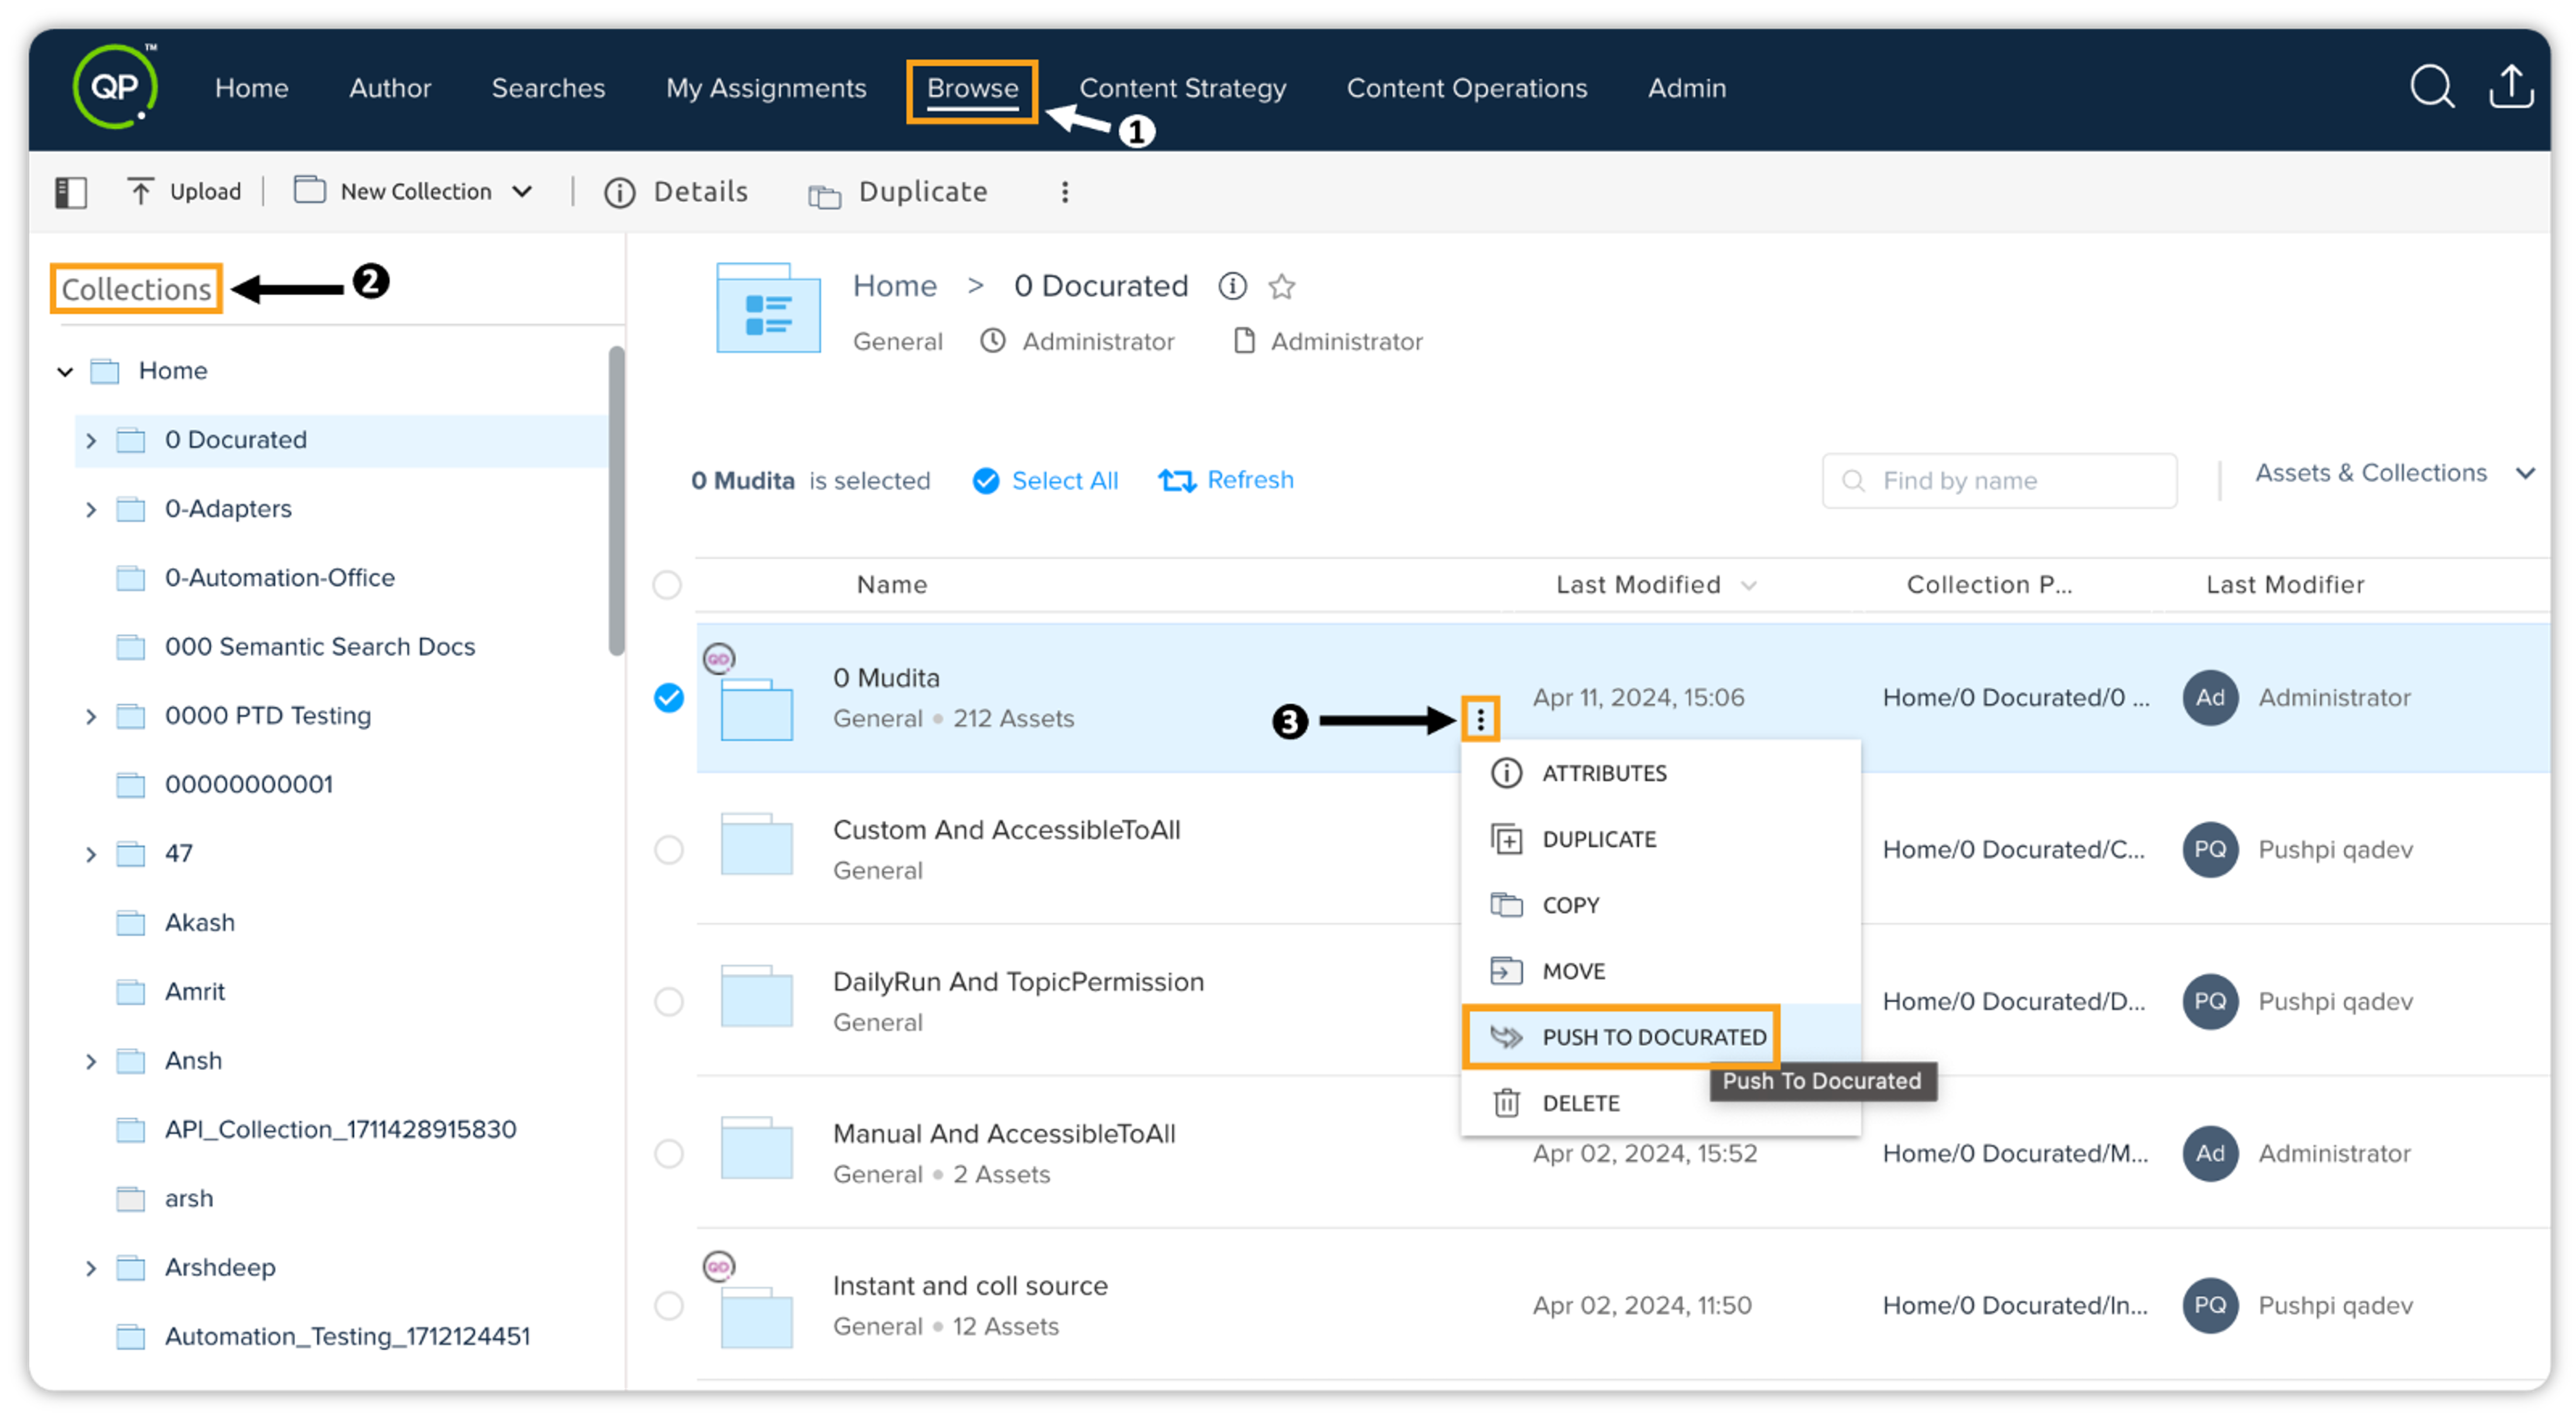
Scope and expected behavior
-
The Push to Docurated feature will work for both assets and collections.
-
For a first-time push of an asset to Docurated, a new asset will be created in Docurated. On the other hand, for any subsequent push of an asset, the existing asset in the Docurated will be updated.
-
When the synced asset is deleted from QPP, it'll be moved to the recycle bin in Docurated. Remember the option to restore from the recycle bin won't be present.
Preferences
The Preferences feature in QPP empowers you to customize your platform experience according to your unique needs and preferences. You can tailor your interaction with the platform by selecting from a range of options to personalize how you view and interact with assets and the platform interface. This section will walk you through the functionality and usage of the Preferences feature.
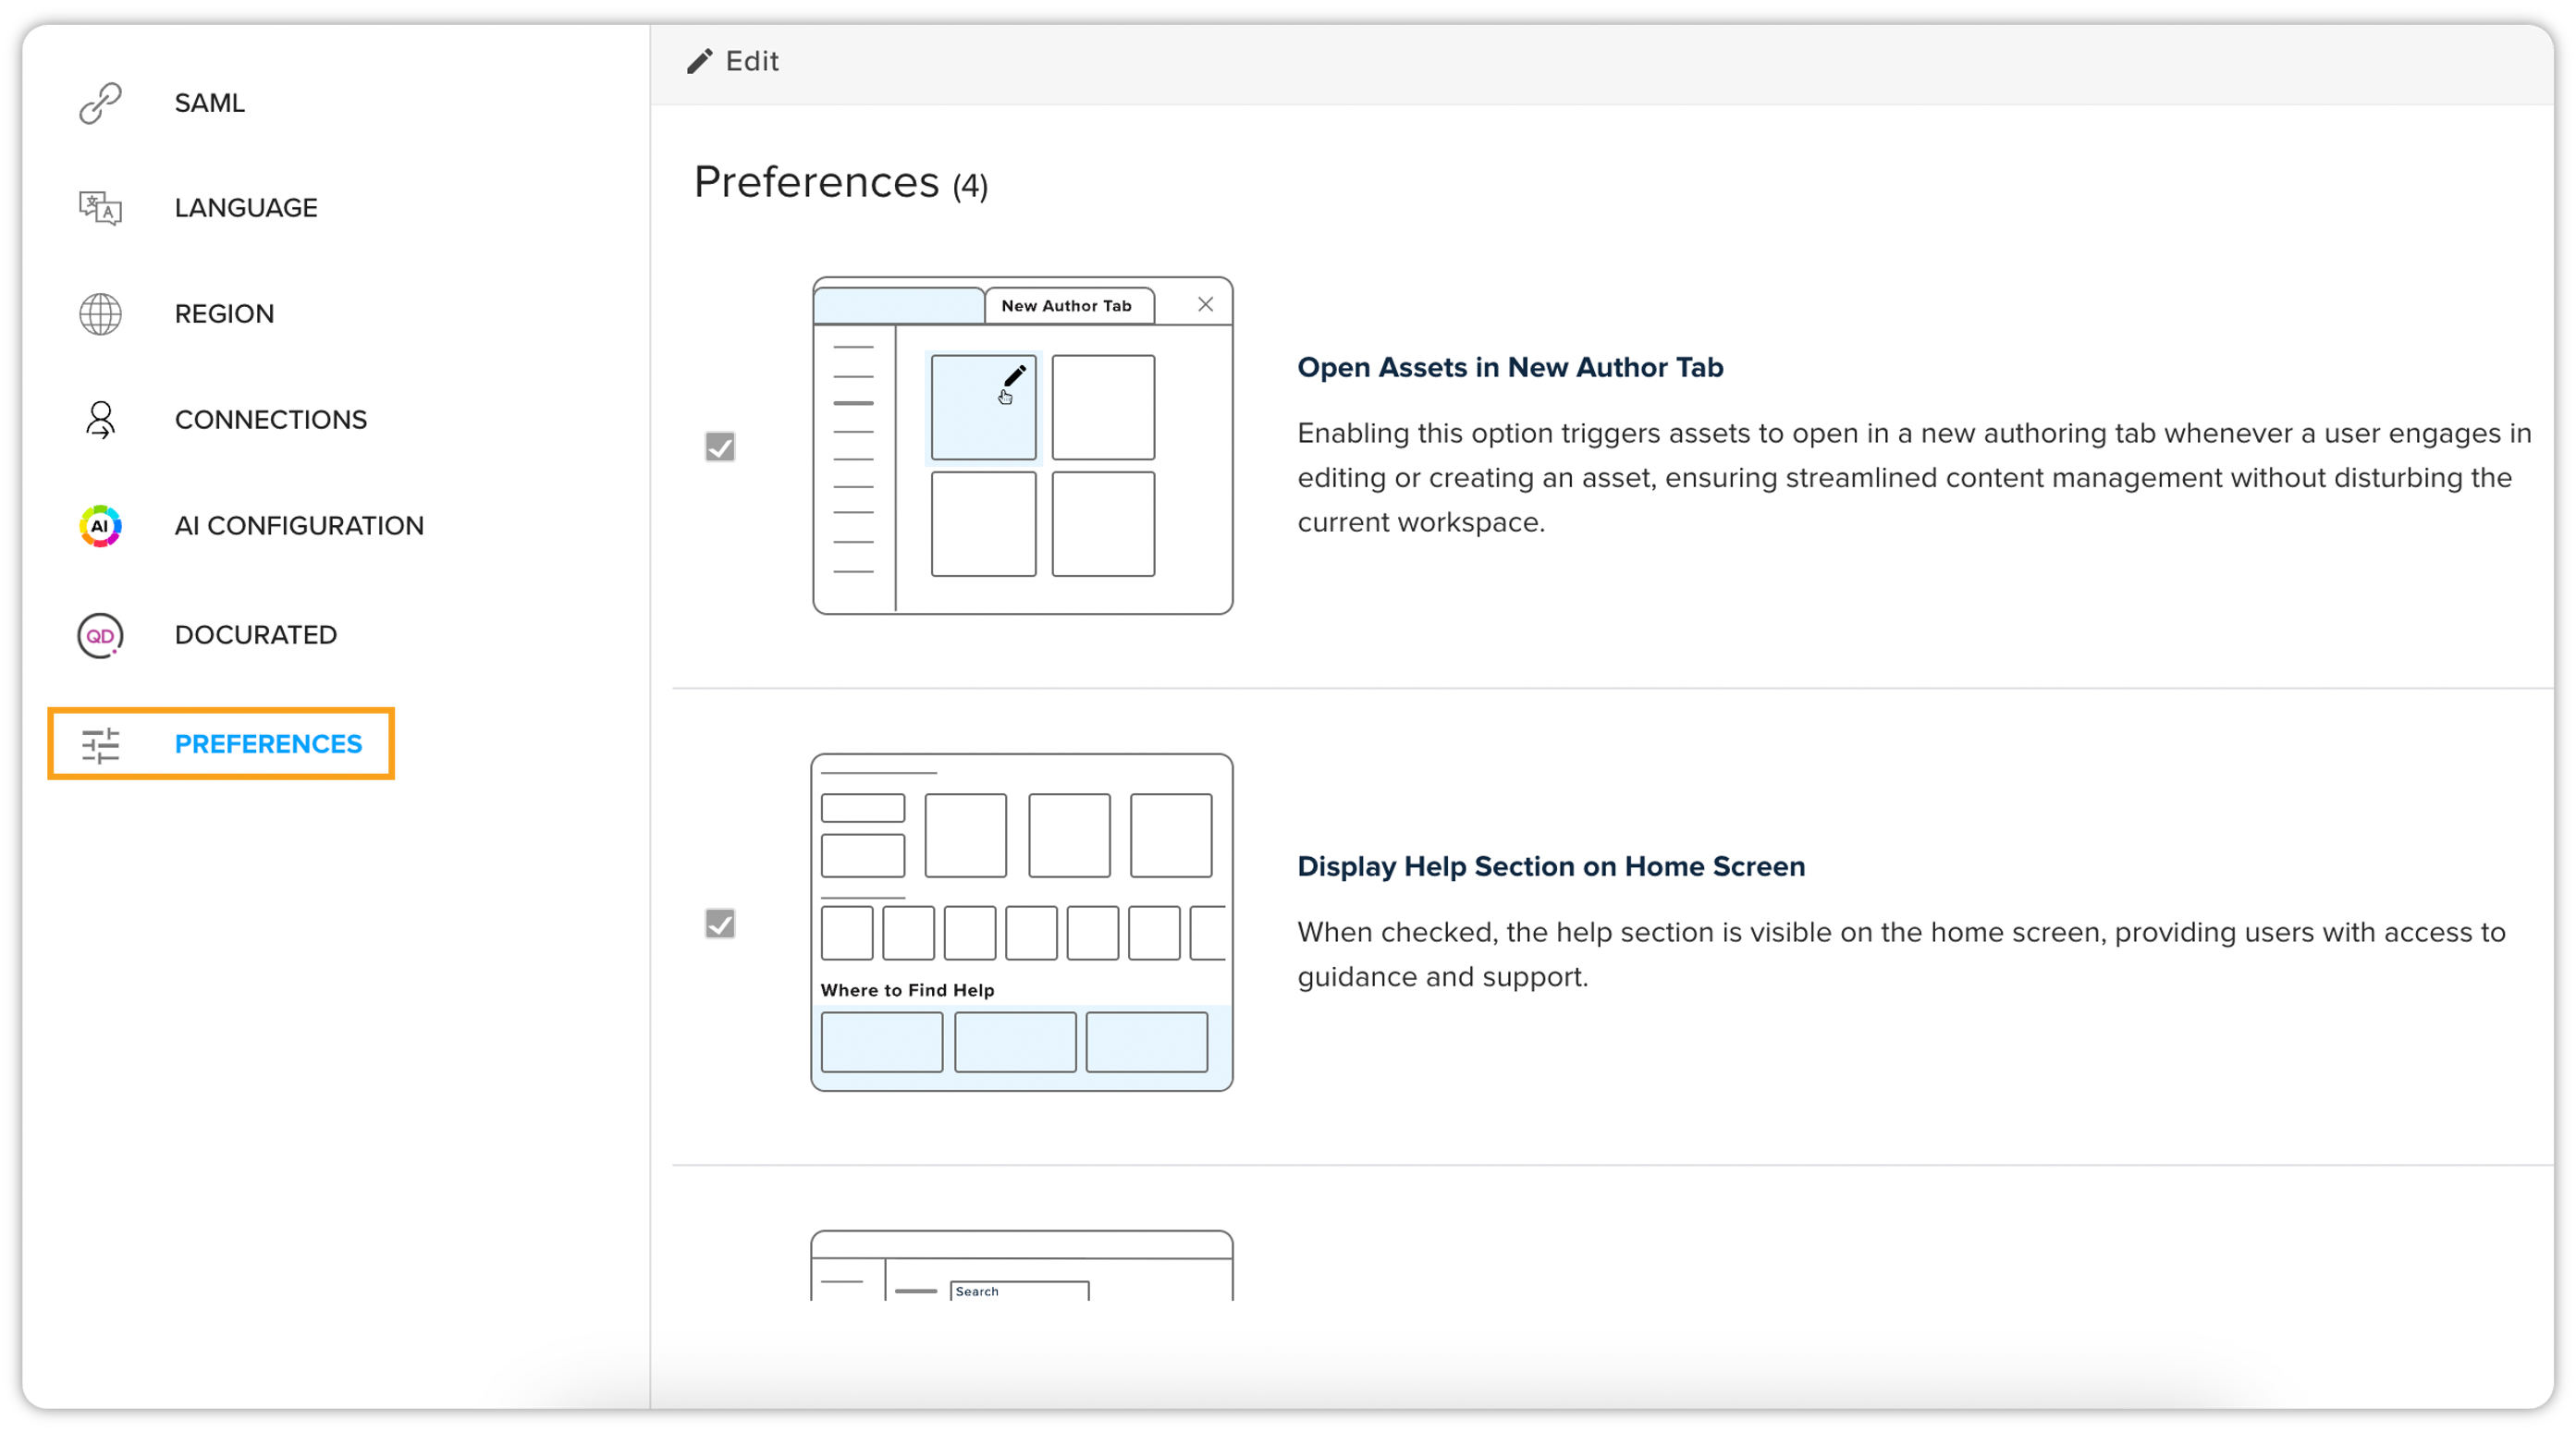
How to enable Preferences
With a keen focus on security, the Preferences feature will be permission-based, ensuring that only users with the appropriate privileges can access it. The privilege to access Preferences will be managed within the Roles section ⇒ Admin license type ⇒ Application Privileges ⇒ Administrations.
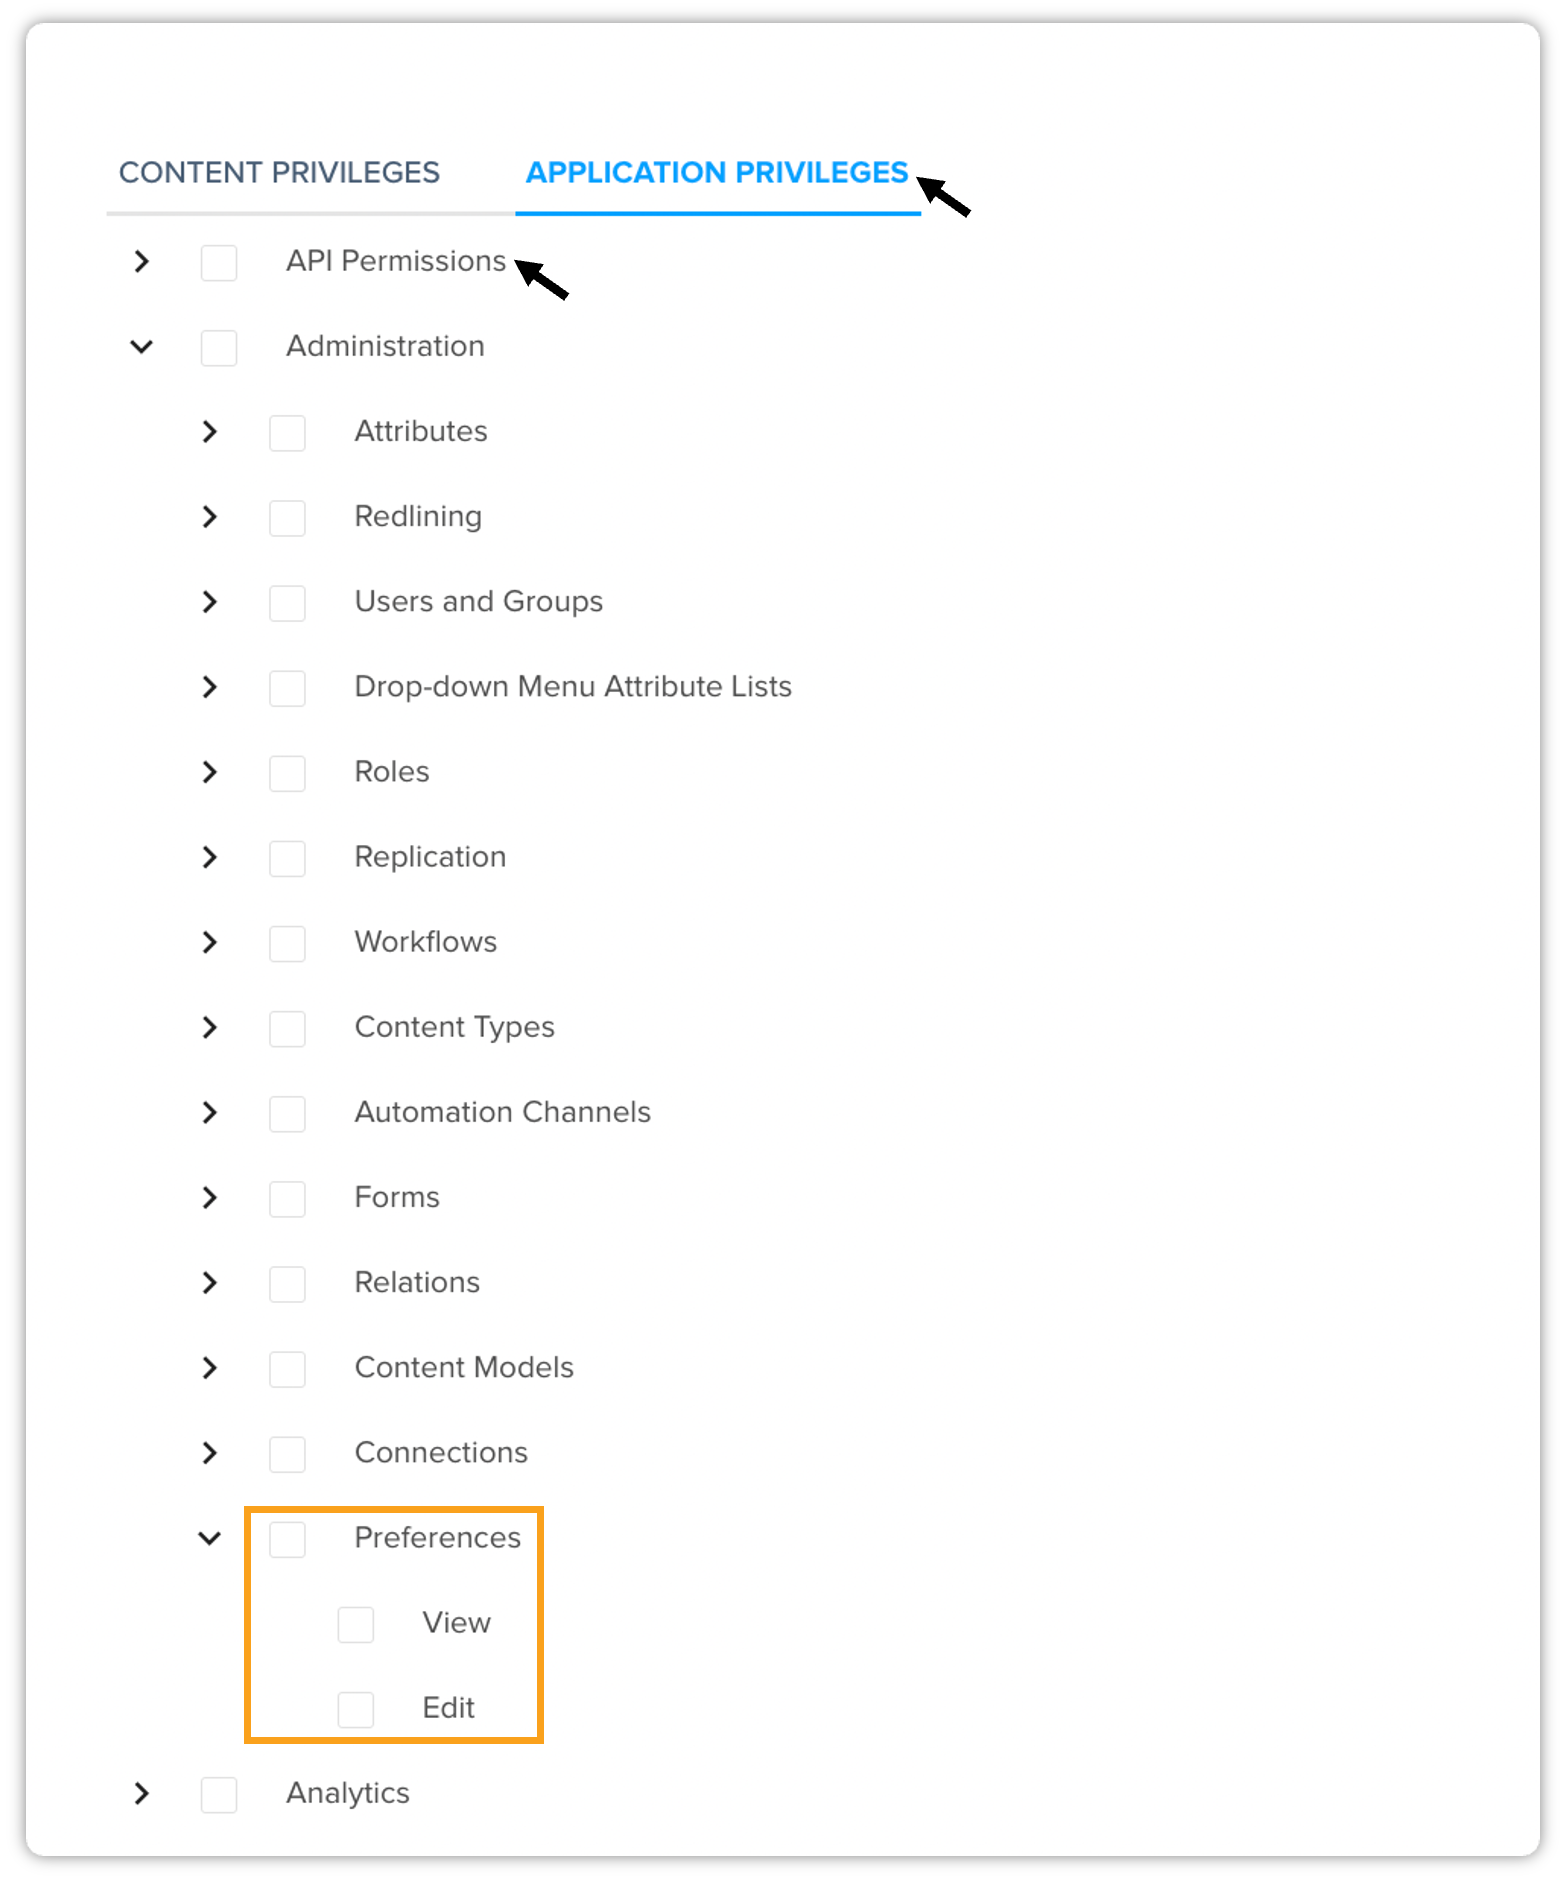
Customization options in Preferences
The Preferences feature supports the following customization options –
-
Open Assets in a New Author Tab
When this option is enabled, performing an action like editing an asset or creating a new asset, a new authoring tab will be opened, allowing you to seamlessly navigate between multiple assets without losing their place in the platform.
-
Display Help Section on Home Screen
Enabling this option allows you to have the help section displayed prominently on the home screen for easy access to support resources and information.
-
Default Asset Search: All Versions
Selecting this option sets the default asset search to display all versions, ensuring comprehensive search results when looking for specific assets.
-
Show Time Zone
Enabling this option will display the time zone with the user interface. This option ensures that you are always informed about your current operating time zone, enhancing clarity for time-sensitive tasks and communications.
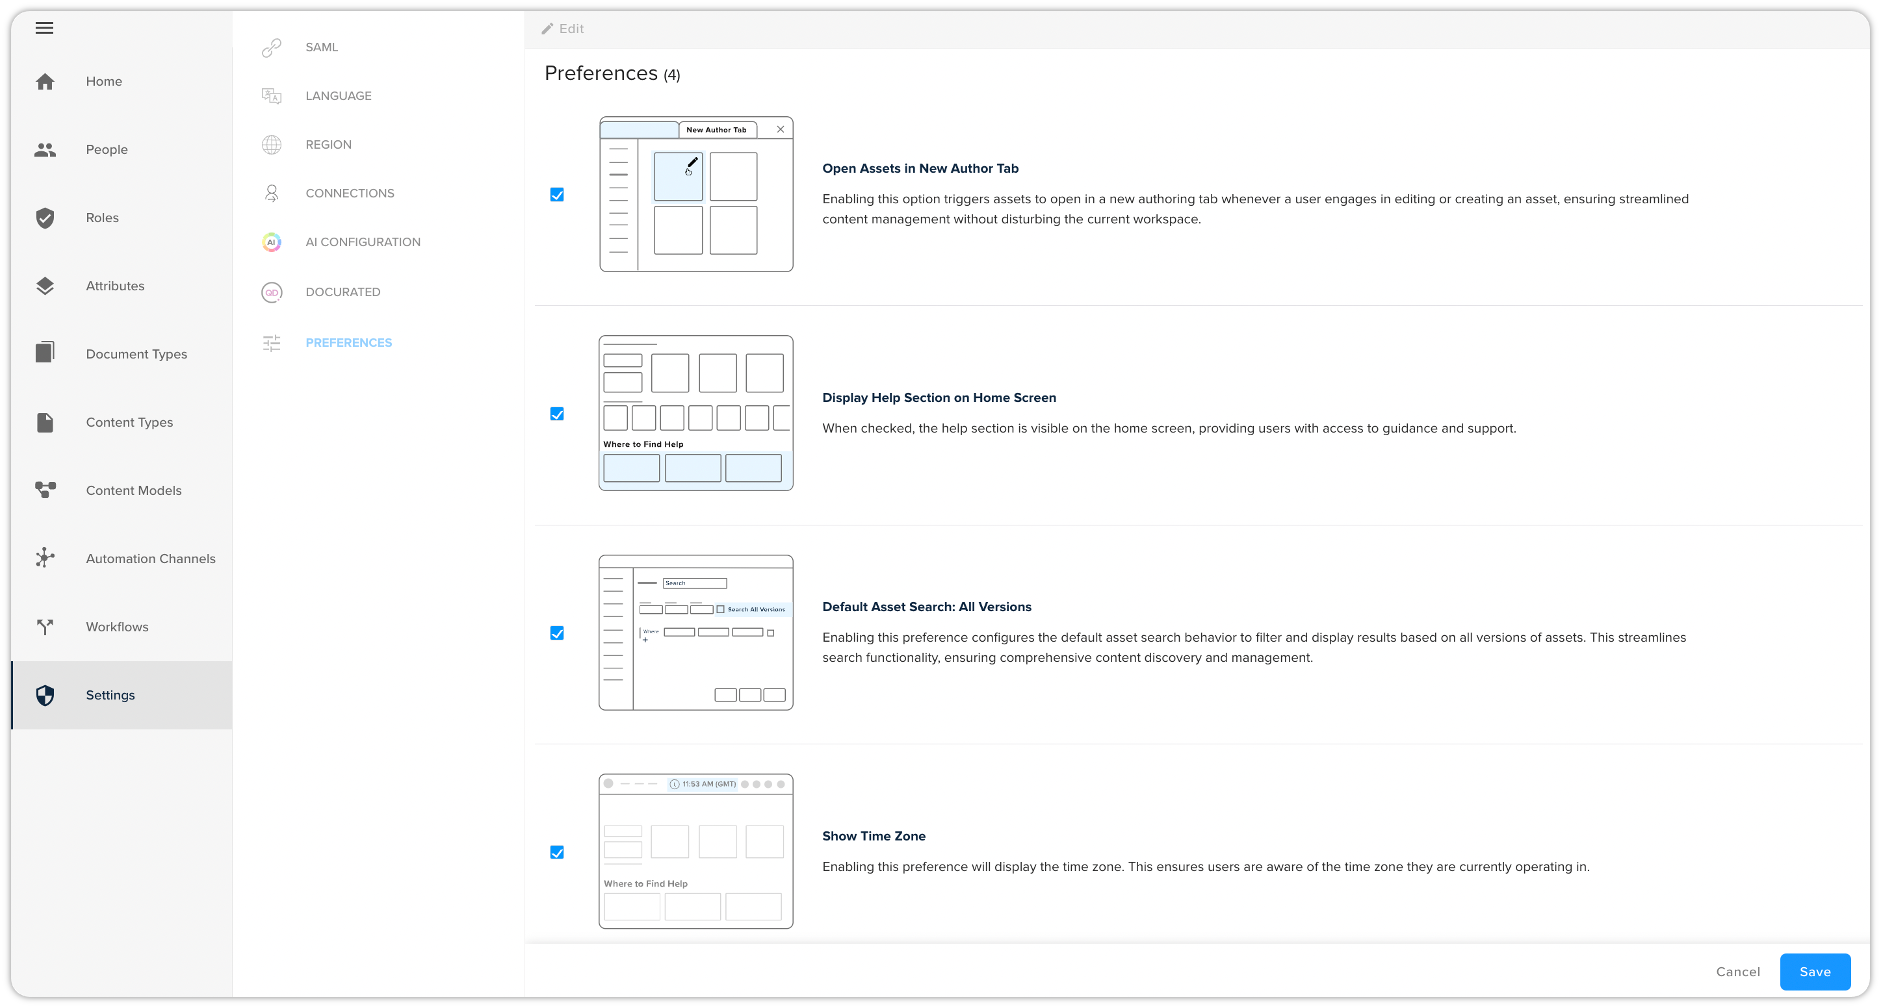
Show Time Zone Behavior
-
The time zone will be displayed on the taskbar across the platform. However, please note that in the Quark Author interface, the taskbar is hidden by default. You must click the drop-down arrow to reveal the taskbar, where the time zone will also be visible.
-
The time zone will be presented in AM/PM format, ensuring clarity in time representation.
-
The displayed time zone will reflect the setting from the user’s system. If a local system has a specific time zone set, it will show that zone. In cases where there’s a conflicting time zone set on the web browser, the platform will prioritize the browser's setting over the local system's time zone.
This feature empowers you to manage time-sensitive content more effectively, ensuring that you are always aligned with the correct time zone.
How to use Preferences
-
To configure your preferences, first click on the Edit option at the top.
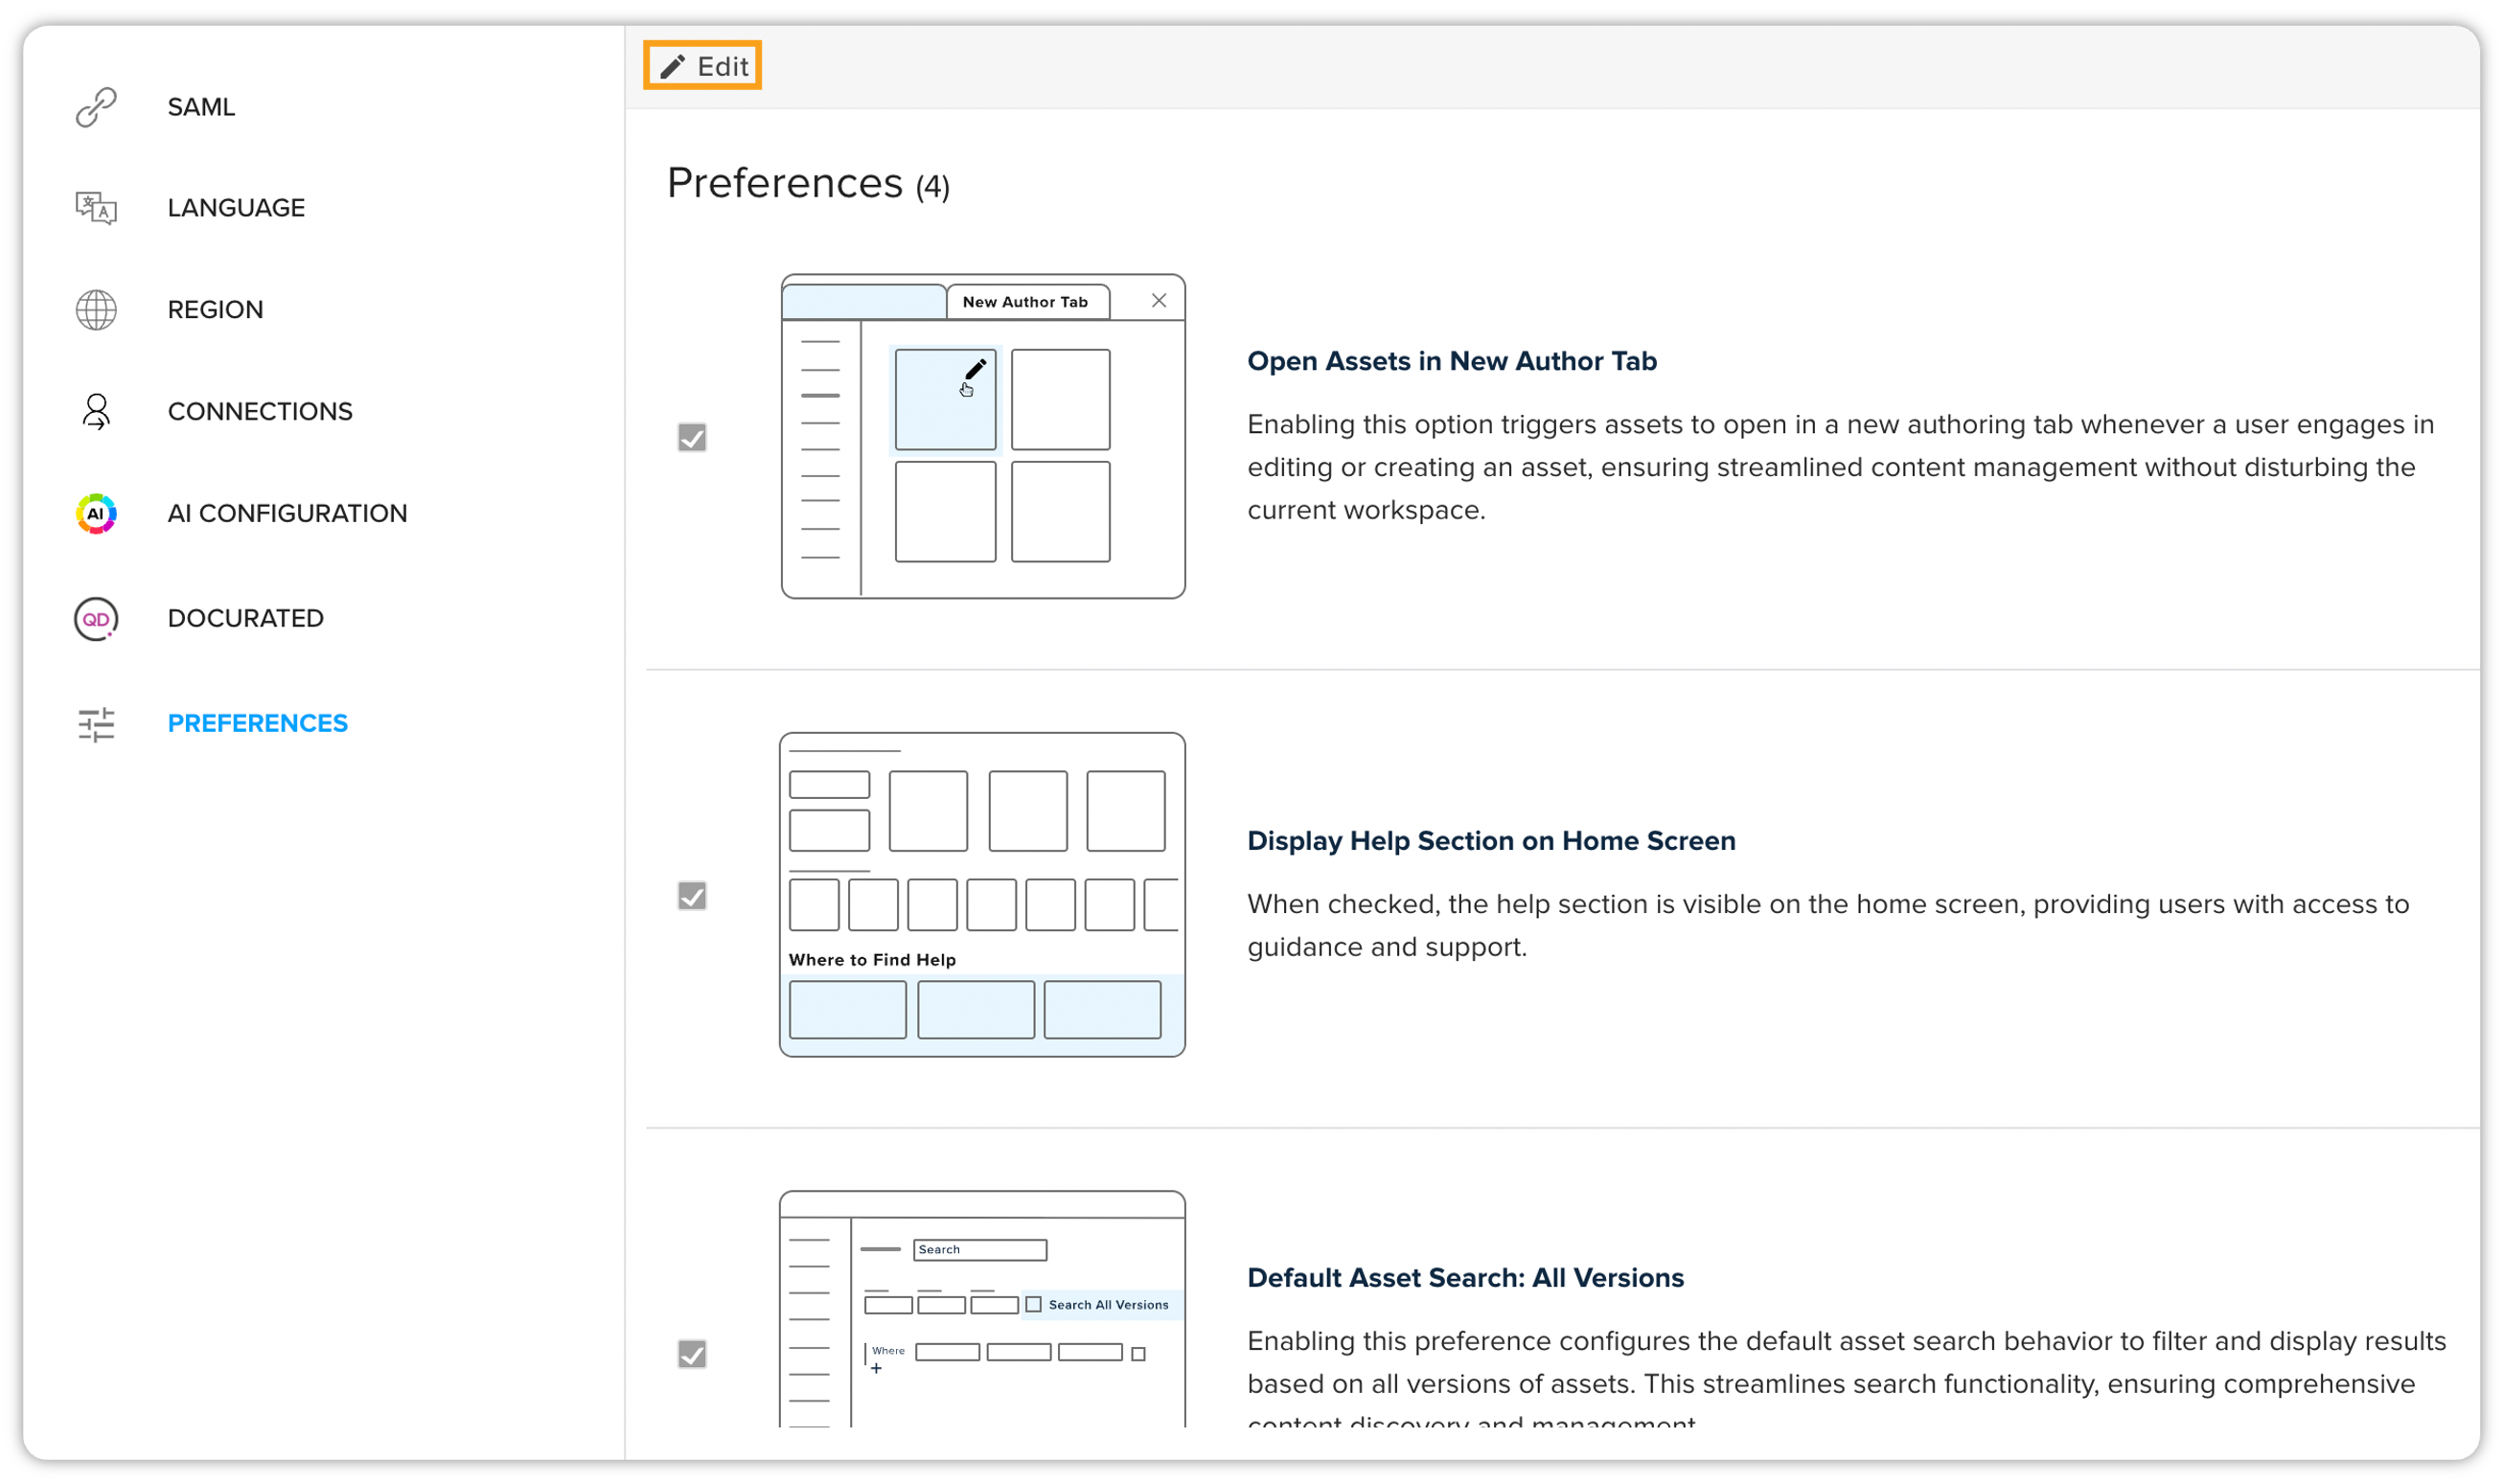
-
Now simply check the box next to each option that you want to enable.
-
You can select any combination of options based on your individual requirements.
-
Click on the Save button to save your preferences and implement the changes.
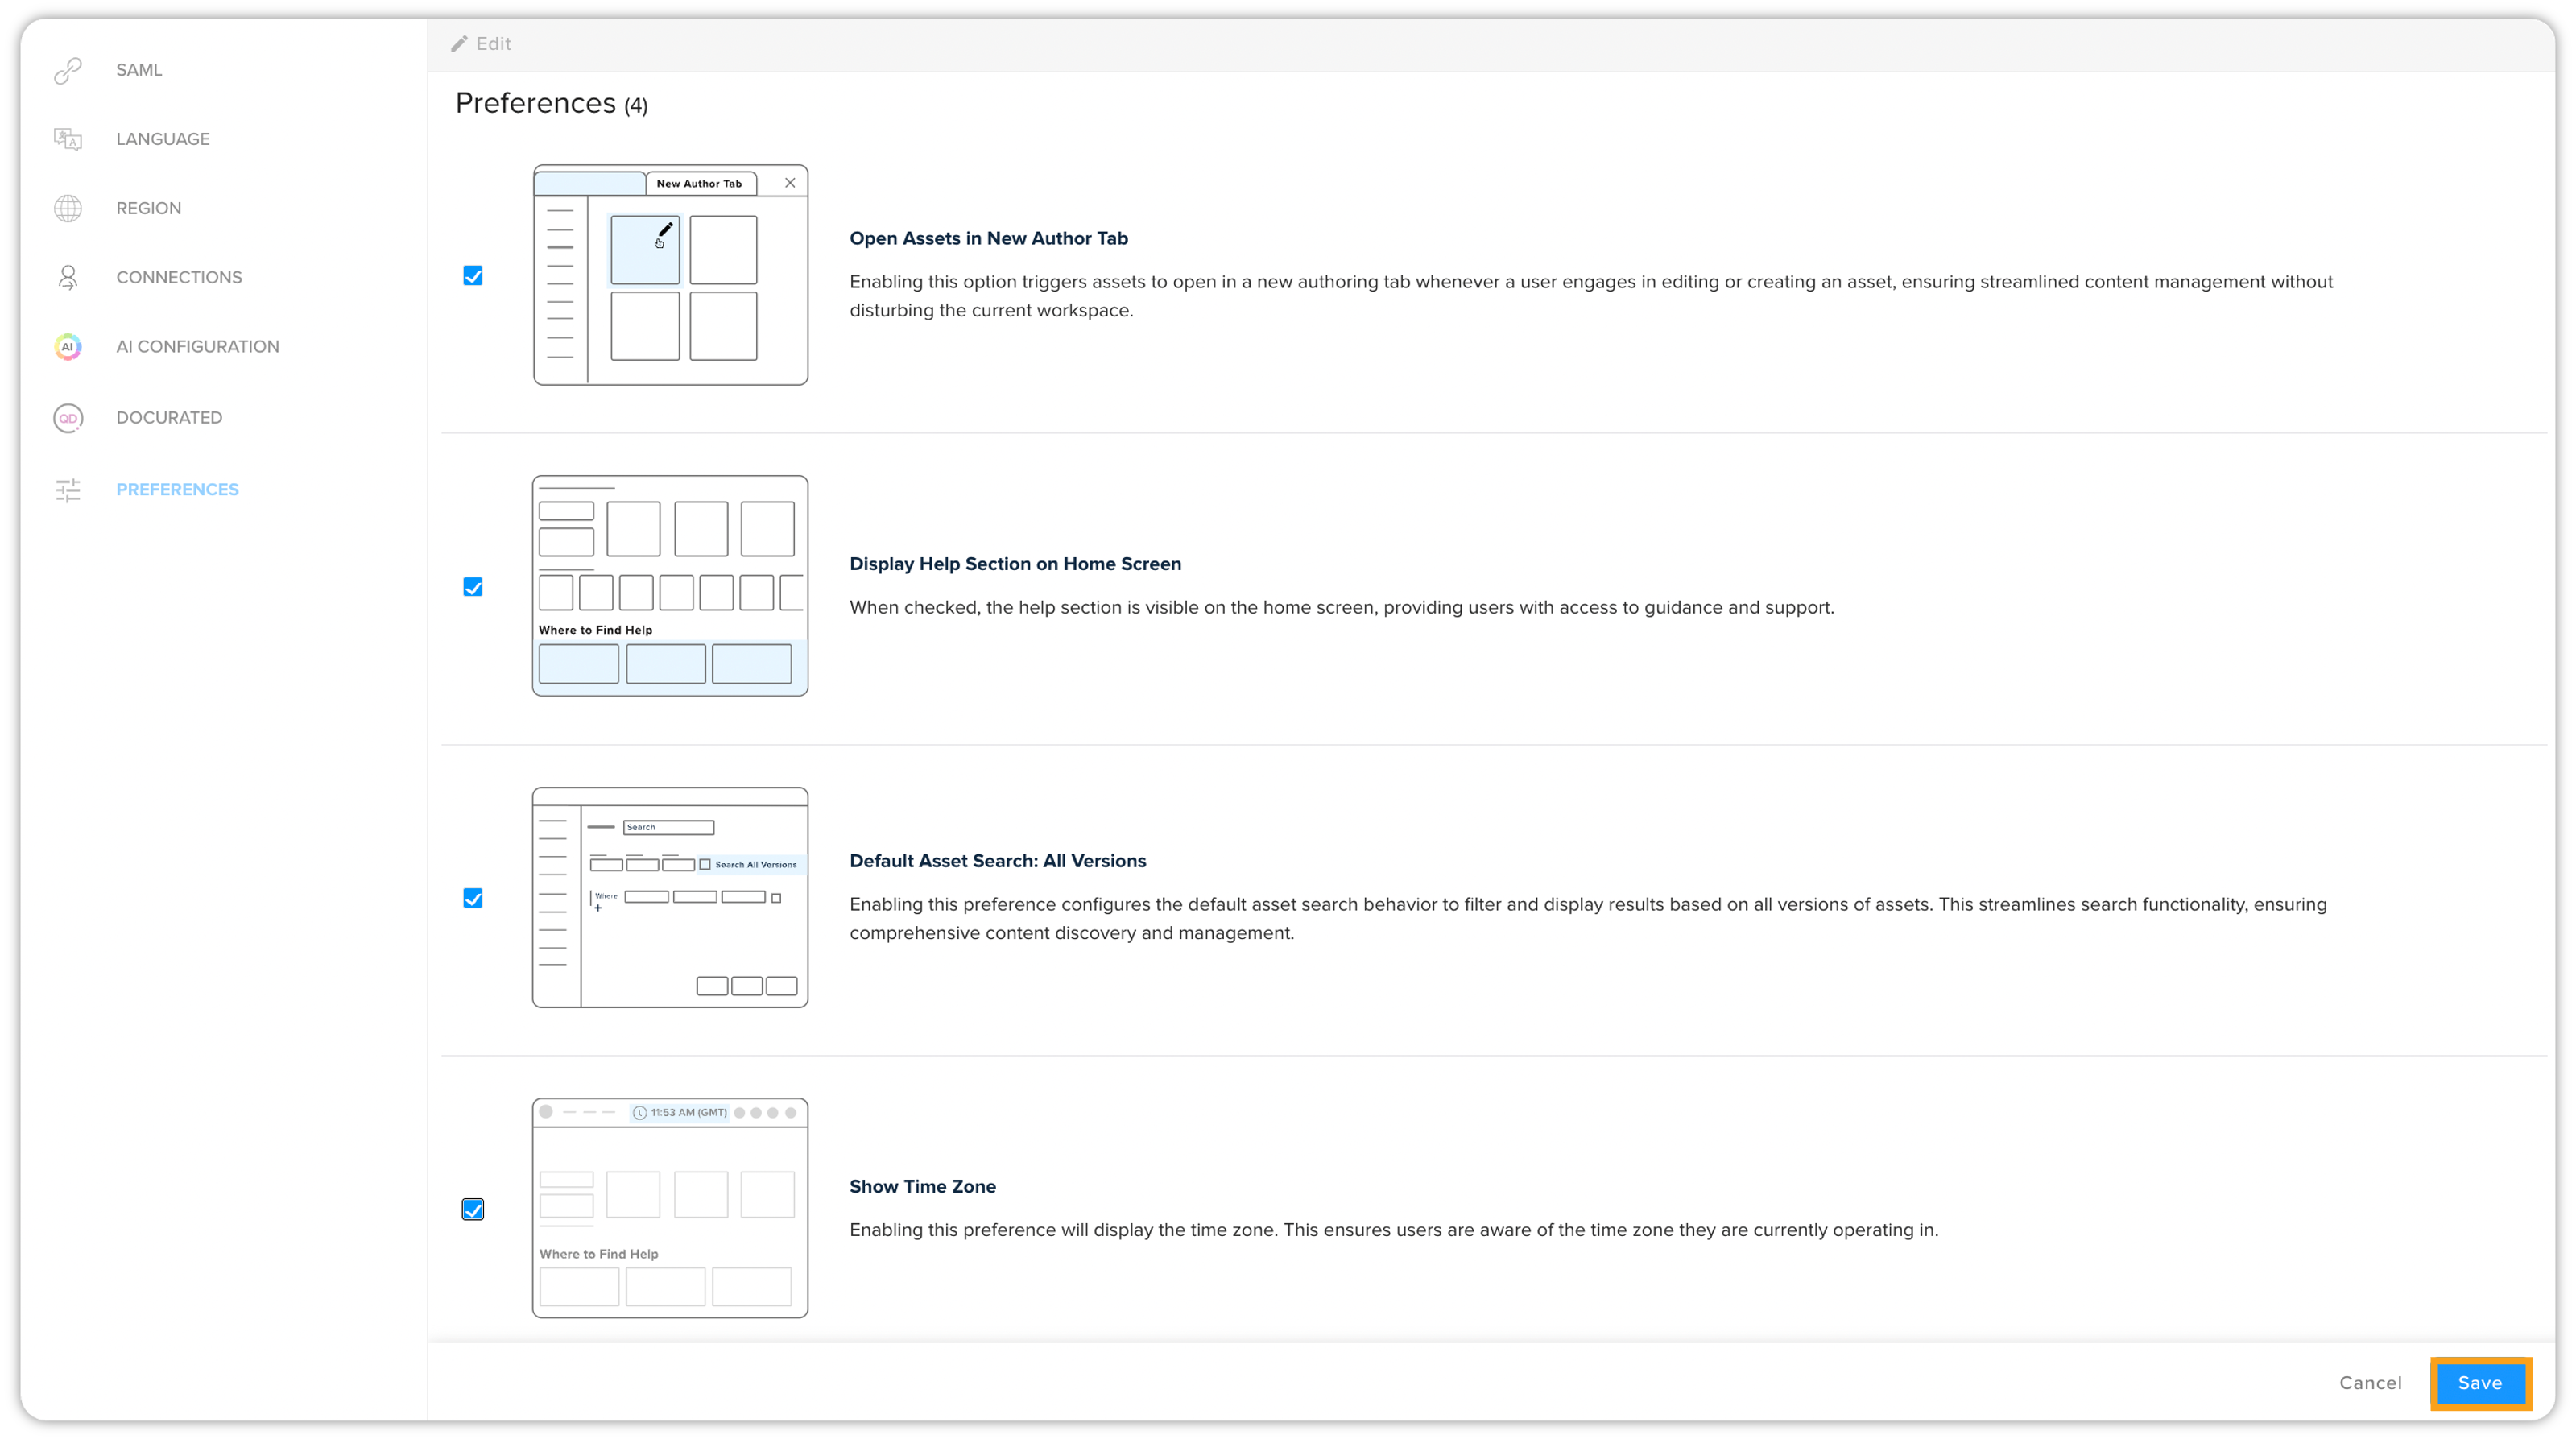
Personalize your platform experience
By customizing your preferences, you can tailor QPP to align with your workflow and optimize your productivity. Whether you prefer a multitasking-friendly environment with assets opening in new tabs, easy access to help resources, or a thorough search experience, the Preferences feature empowers you to make the platform work for you.
Import & Export
The Import & Export package helps administrators export and import comprehensive configurations and assets—known as Repeatable Accelerator Packs (RAPs)—to streamline deployments across development, staging and production environments. By exporting document-type configurations (workflows, automation channels, attributes, roles, privileges) and related assets into a single ZIP, you can accelerate onboarding cycles by 25–30%, ensure regulatory compliance, and maintain consistency across geographically distributed or multi-tier validation workflows.
Accessing Import & Export Package Feature
-
On the home page of QPP, navigate to Admin > Settings.
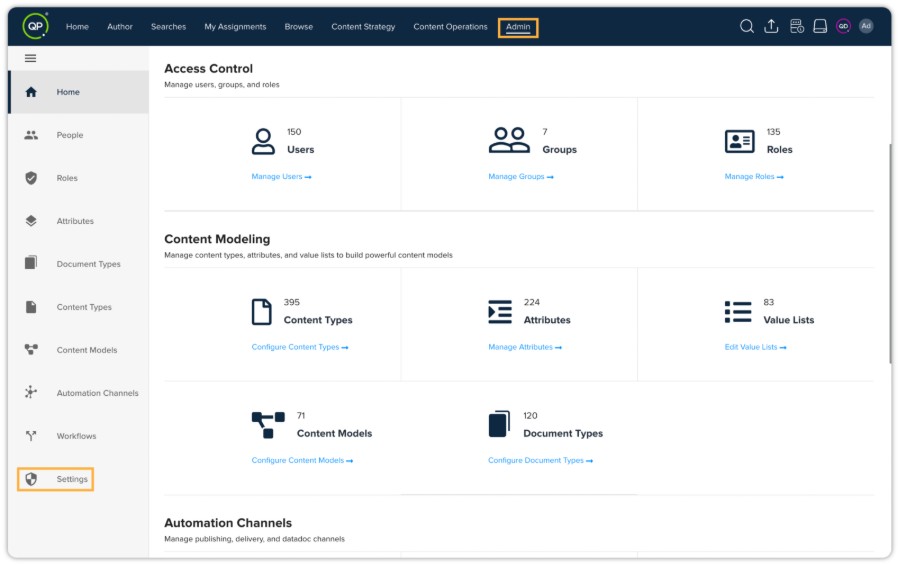
-
Click Import & Export.
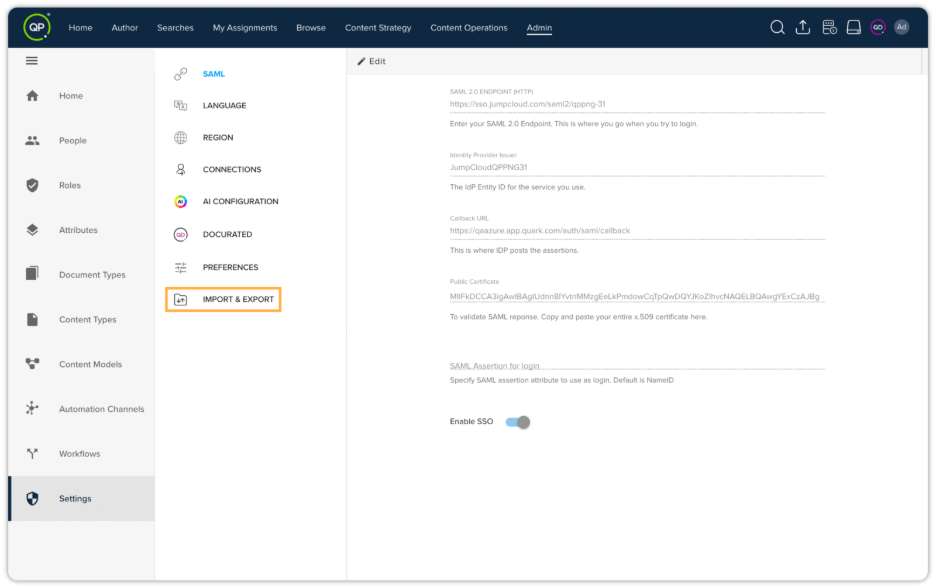
-
This pane has two tabs:
-
Import Package
-
Export Package
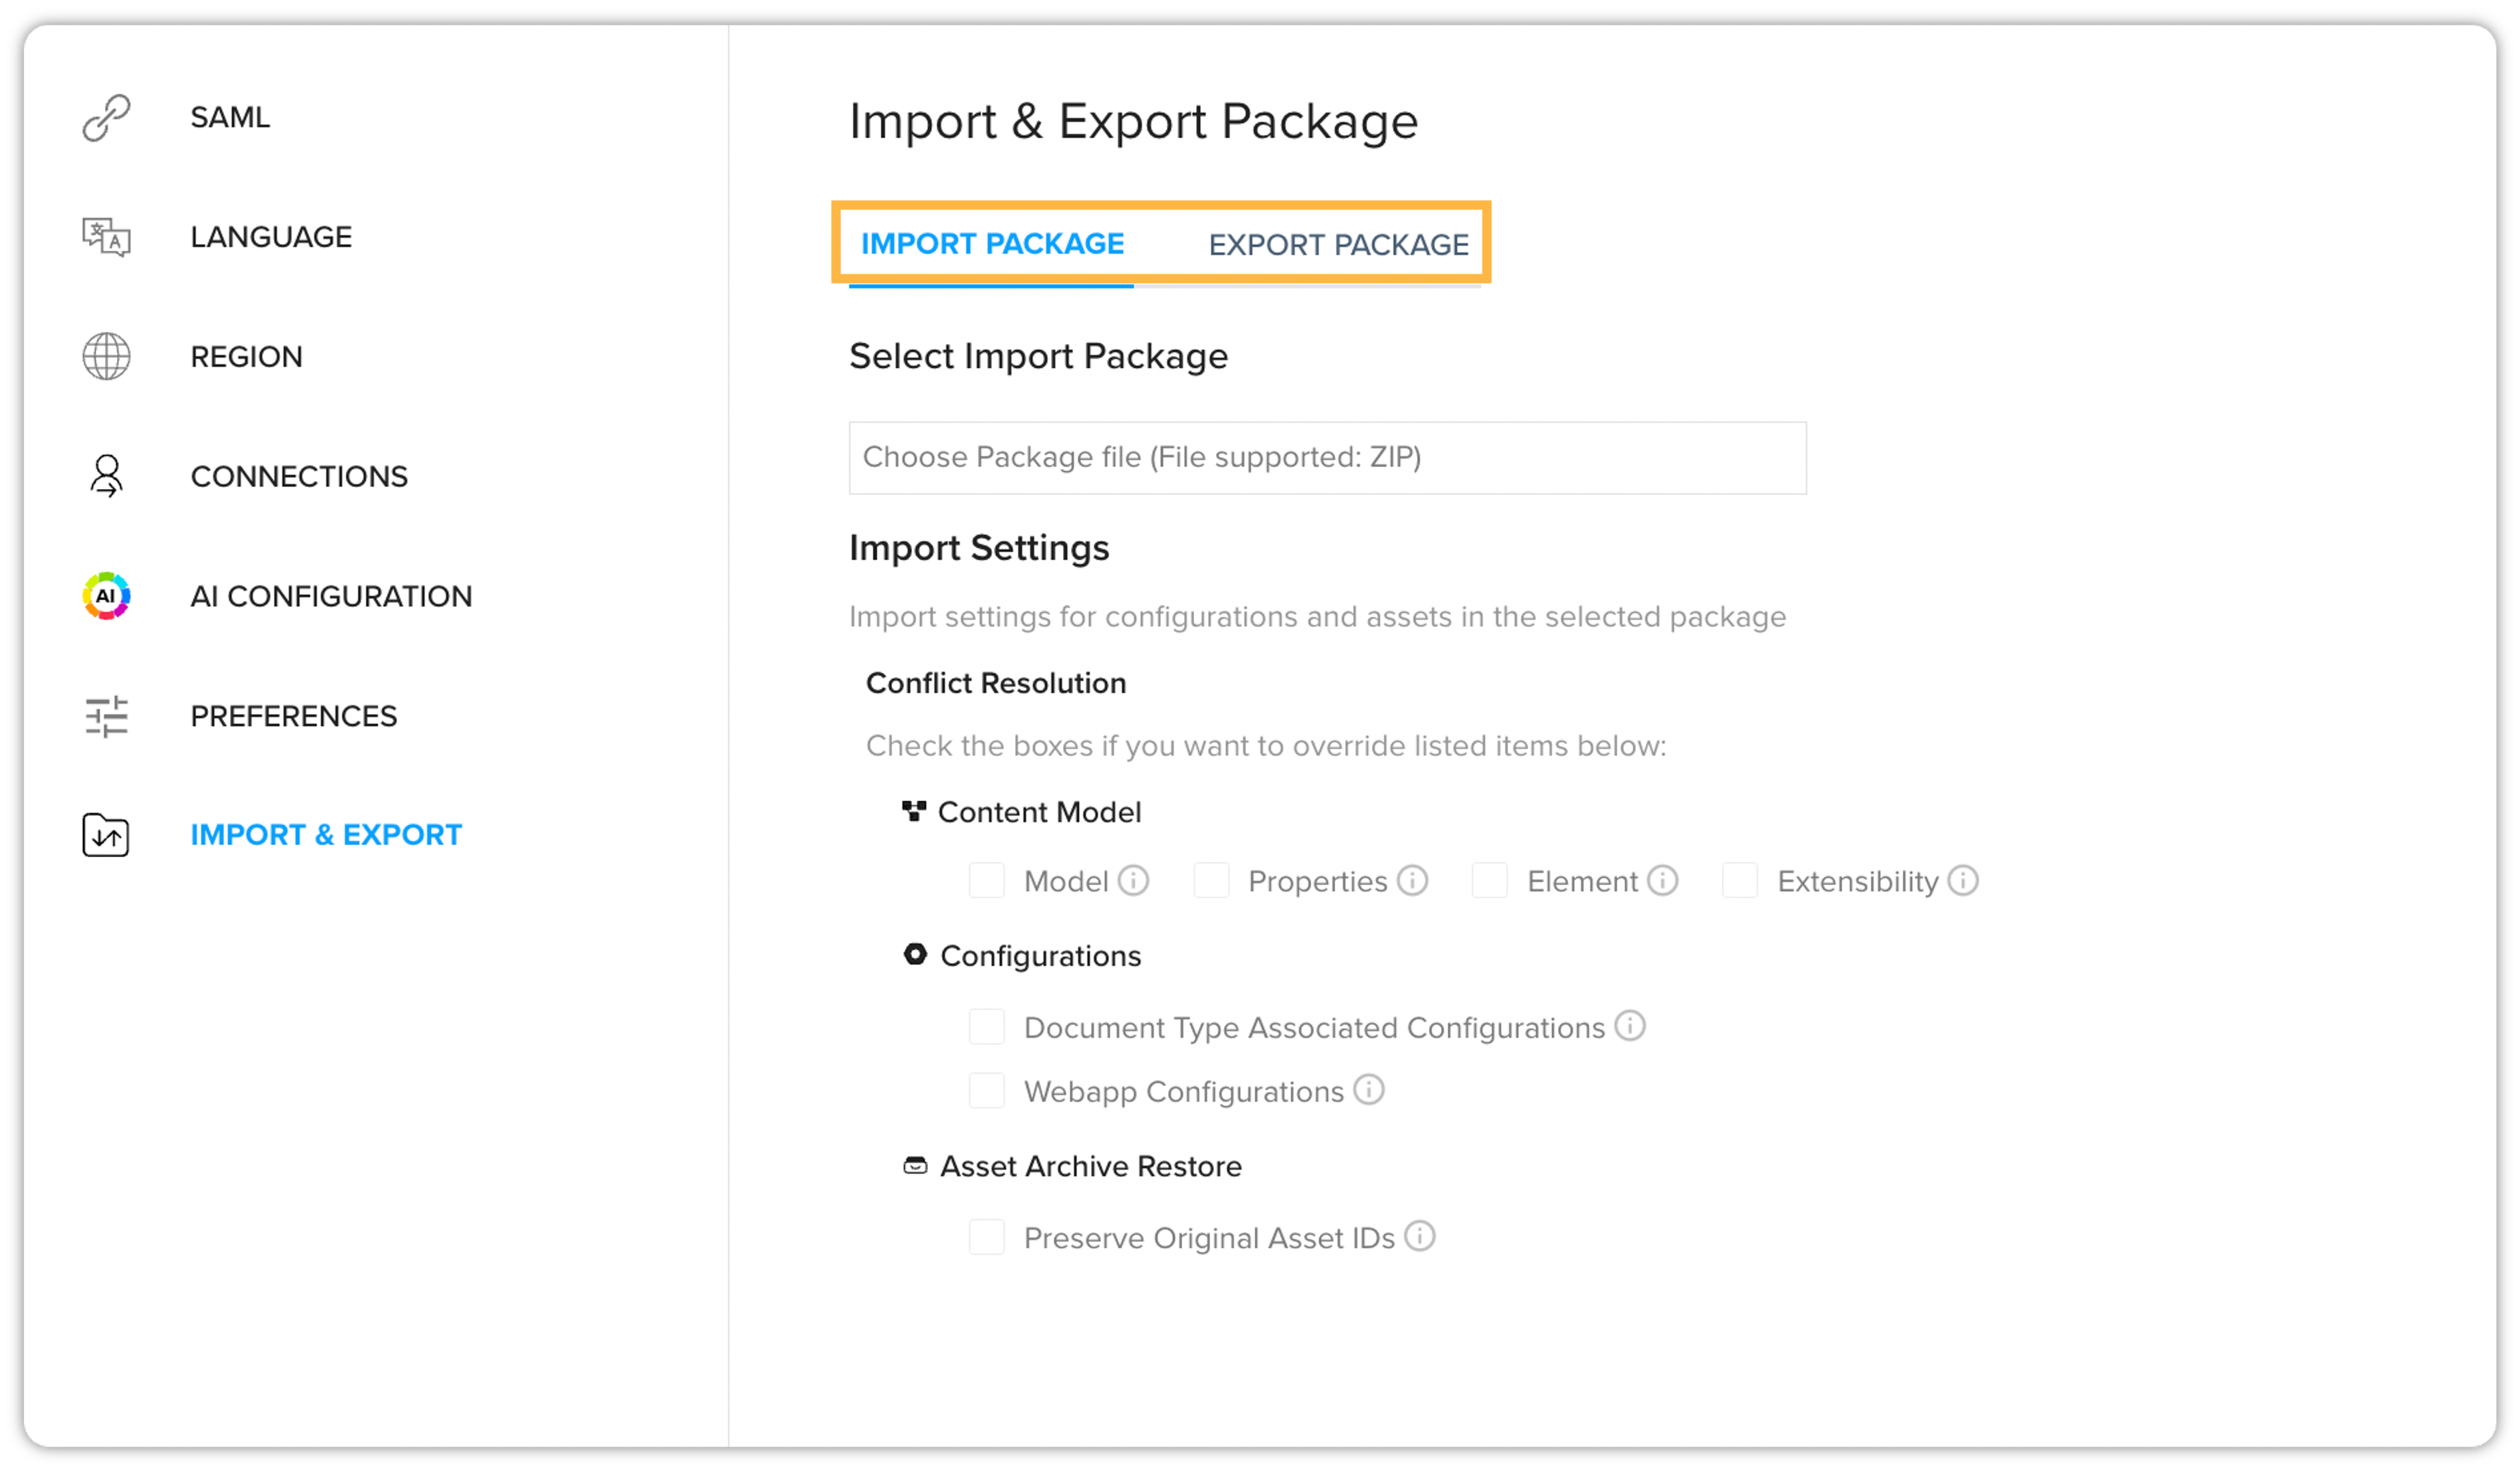
-
Prerequisites & Limitations
Prerequisites
-
Roles & Groups
Import or create all necessary roles, users, and groups on the target environment before running the RAP import.
-
Licenses & Add-Ons
If the package includes licensed users:
-
Verify that the total license count on source and target match.
-
Ensure the same add-ons are enabled on both systems.
-
-
Fonts for Publishing
Install any custom fonts used in your templates on the QXPS server or Automation Service instance to guarantee correct rendering.
-
Admin needs to update Webhook URLs to ensure using the correct IP addresses.
Limitations & Considerations
-
Content Models Overwrite
Importing a package will replace all Content Models on the target. Confirm that your source system has the latest model updates before exporting.
-
Webhooks Disabled
Disable any Webhooks on the target environment to prevent automatic event triggers during asset import.
-
Deleted User Attribution
If the person who created or last updated an asset no longer exists in the system, importing that version will show 'Administrator' as the creator, and the previous review history will not be kept.
-
User preferences, such as Collection View and Asset View in collection will not be exported/imported.
-
If the package includes licensed users, users will not be exported as part of package.
To Export Configuration Package
-
Click the Export Package tab.
-
Name your package. Use descriptive package names (e.g., FinanceRAP_Q2_2025) for easier reuse.
-
Enable Include Configurations in Package:
-
Upon checking, the Document Types selector appears.
-
Choose one or more document types.
-
All associated configurations (workflows, automation channels, attributes, roles, privileges) will be bundled.
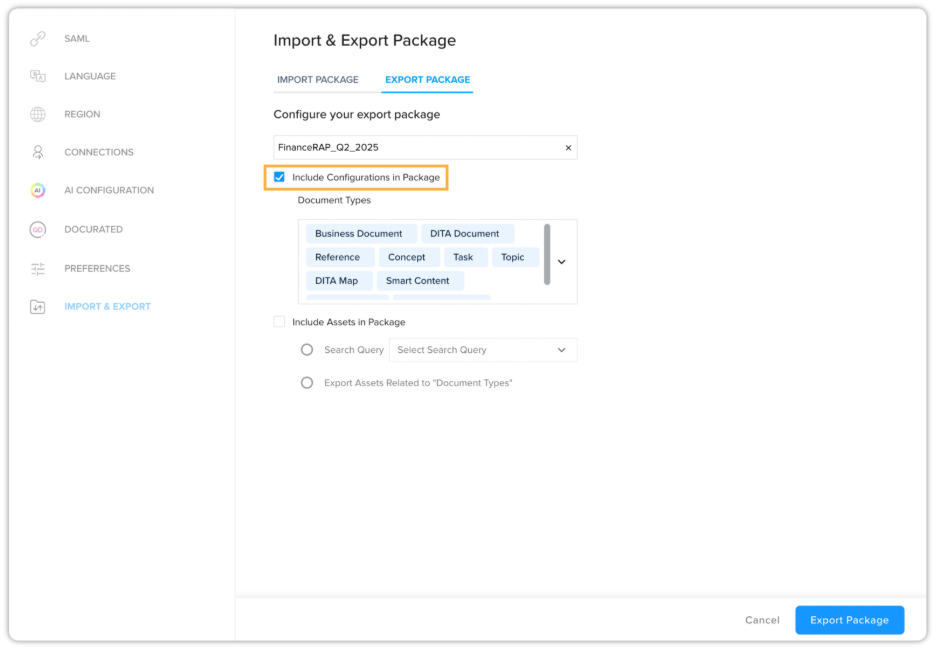
-
-
Enable Include Assets in Package:
-
Choose one of the following:
-
Search Query
-
Select saved queries from the dropdown. This will export all assets matching that query.
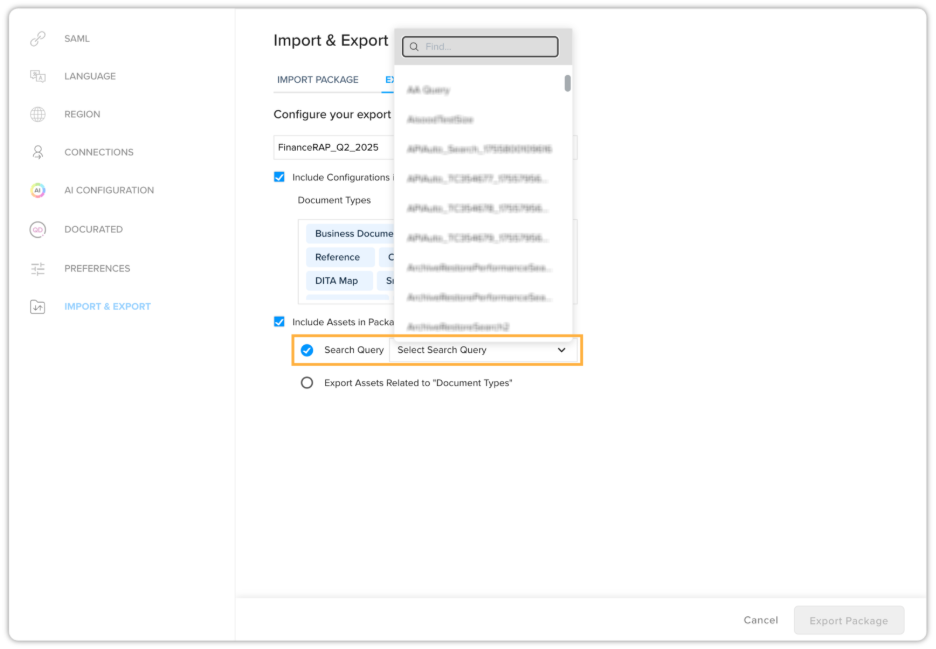
-
-
Assets Related to Document Types
-
Exports every asset related to the document types selected above.
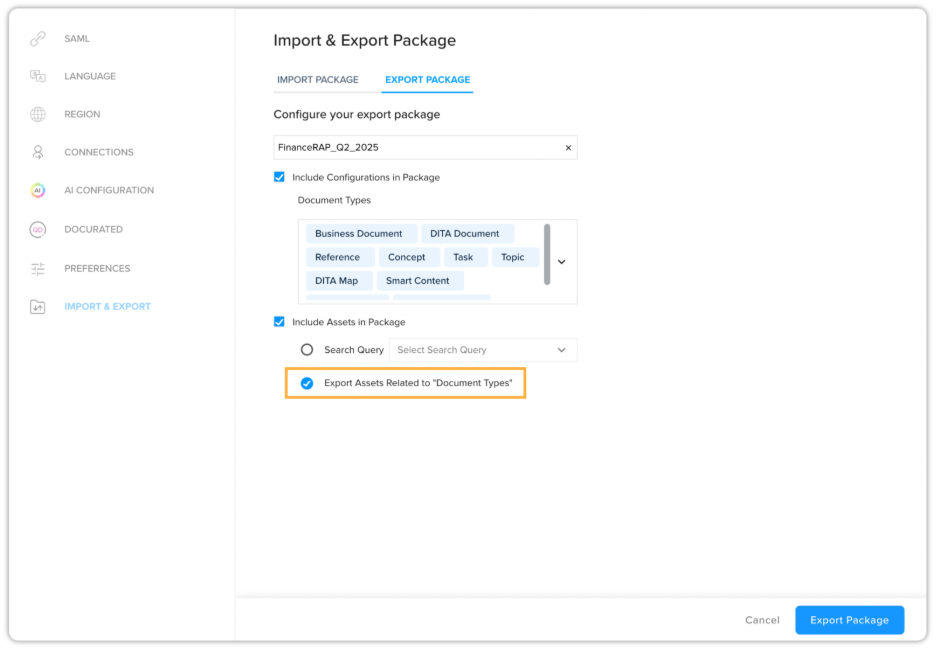
-
-
-
-
Click Export Package.
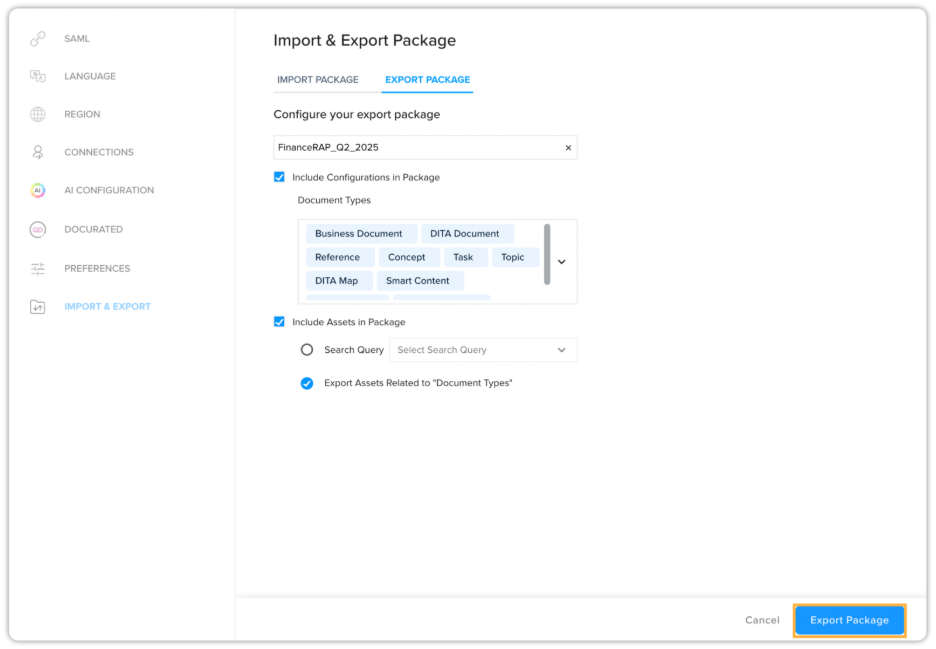
-
Review the confirmation message carefully, then confirm.
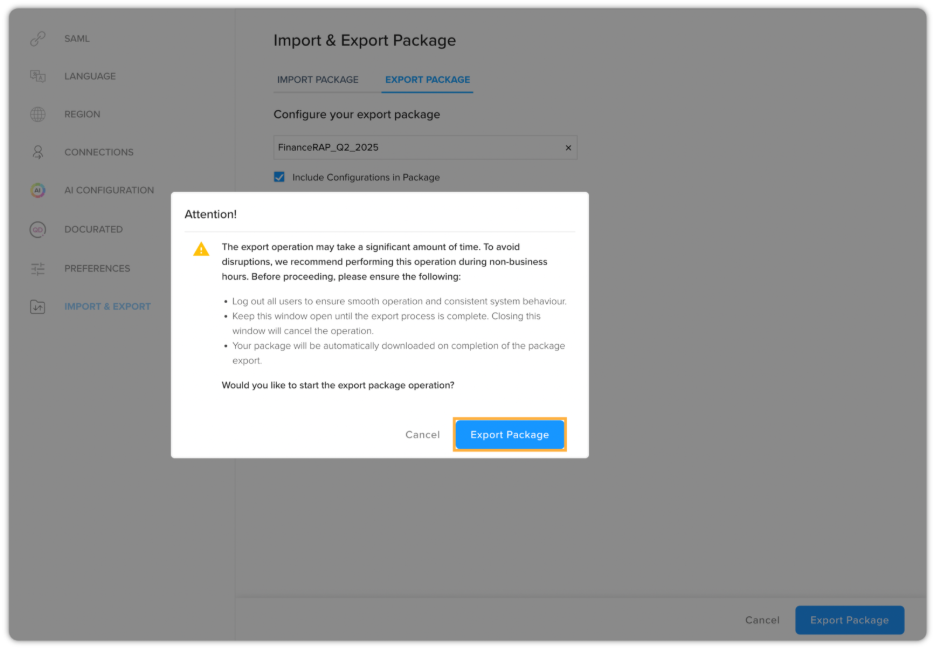
-
A .zip file downloads containing your RAP.
To Import Configuration Package
The Import feature allows you to deploy configurations and assets into your environment. When the system detects that an item being imported already exists in the destination environment, the Conflict Resolution settings allow you to choose how to handle those duplicates.
On the target environment (e.g., staging or production), follow these steps to deploy a previously exported package:
-
Navigate to Admin > Settings > Import & Export Package.
-
Go to the Import Package tab.
-
Click Choose File and select your .zip package.
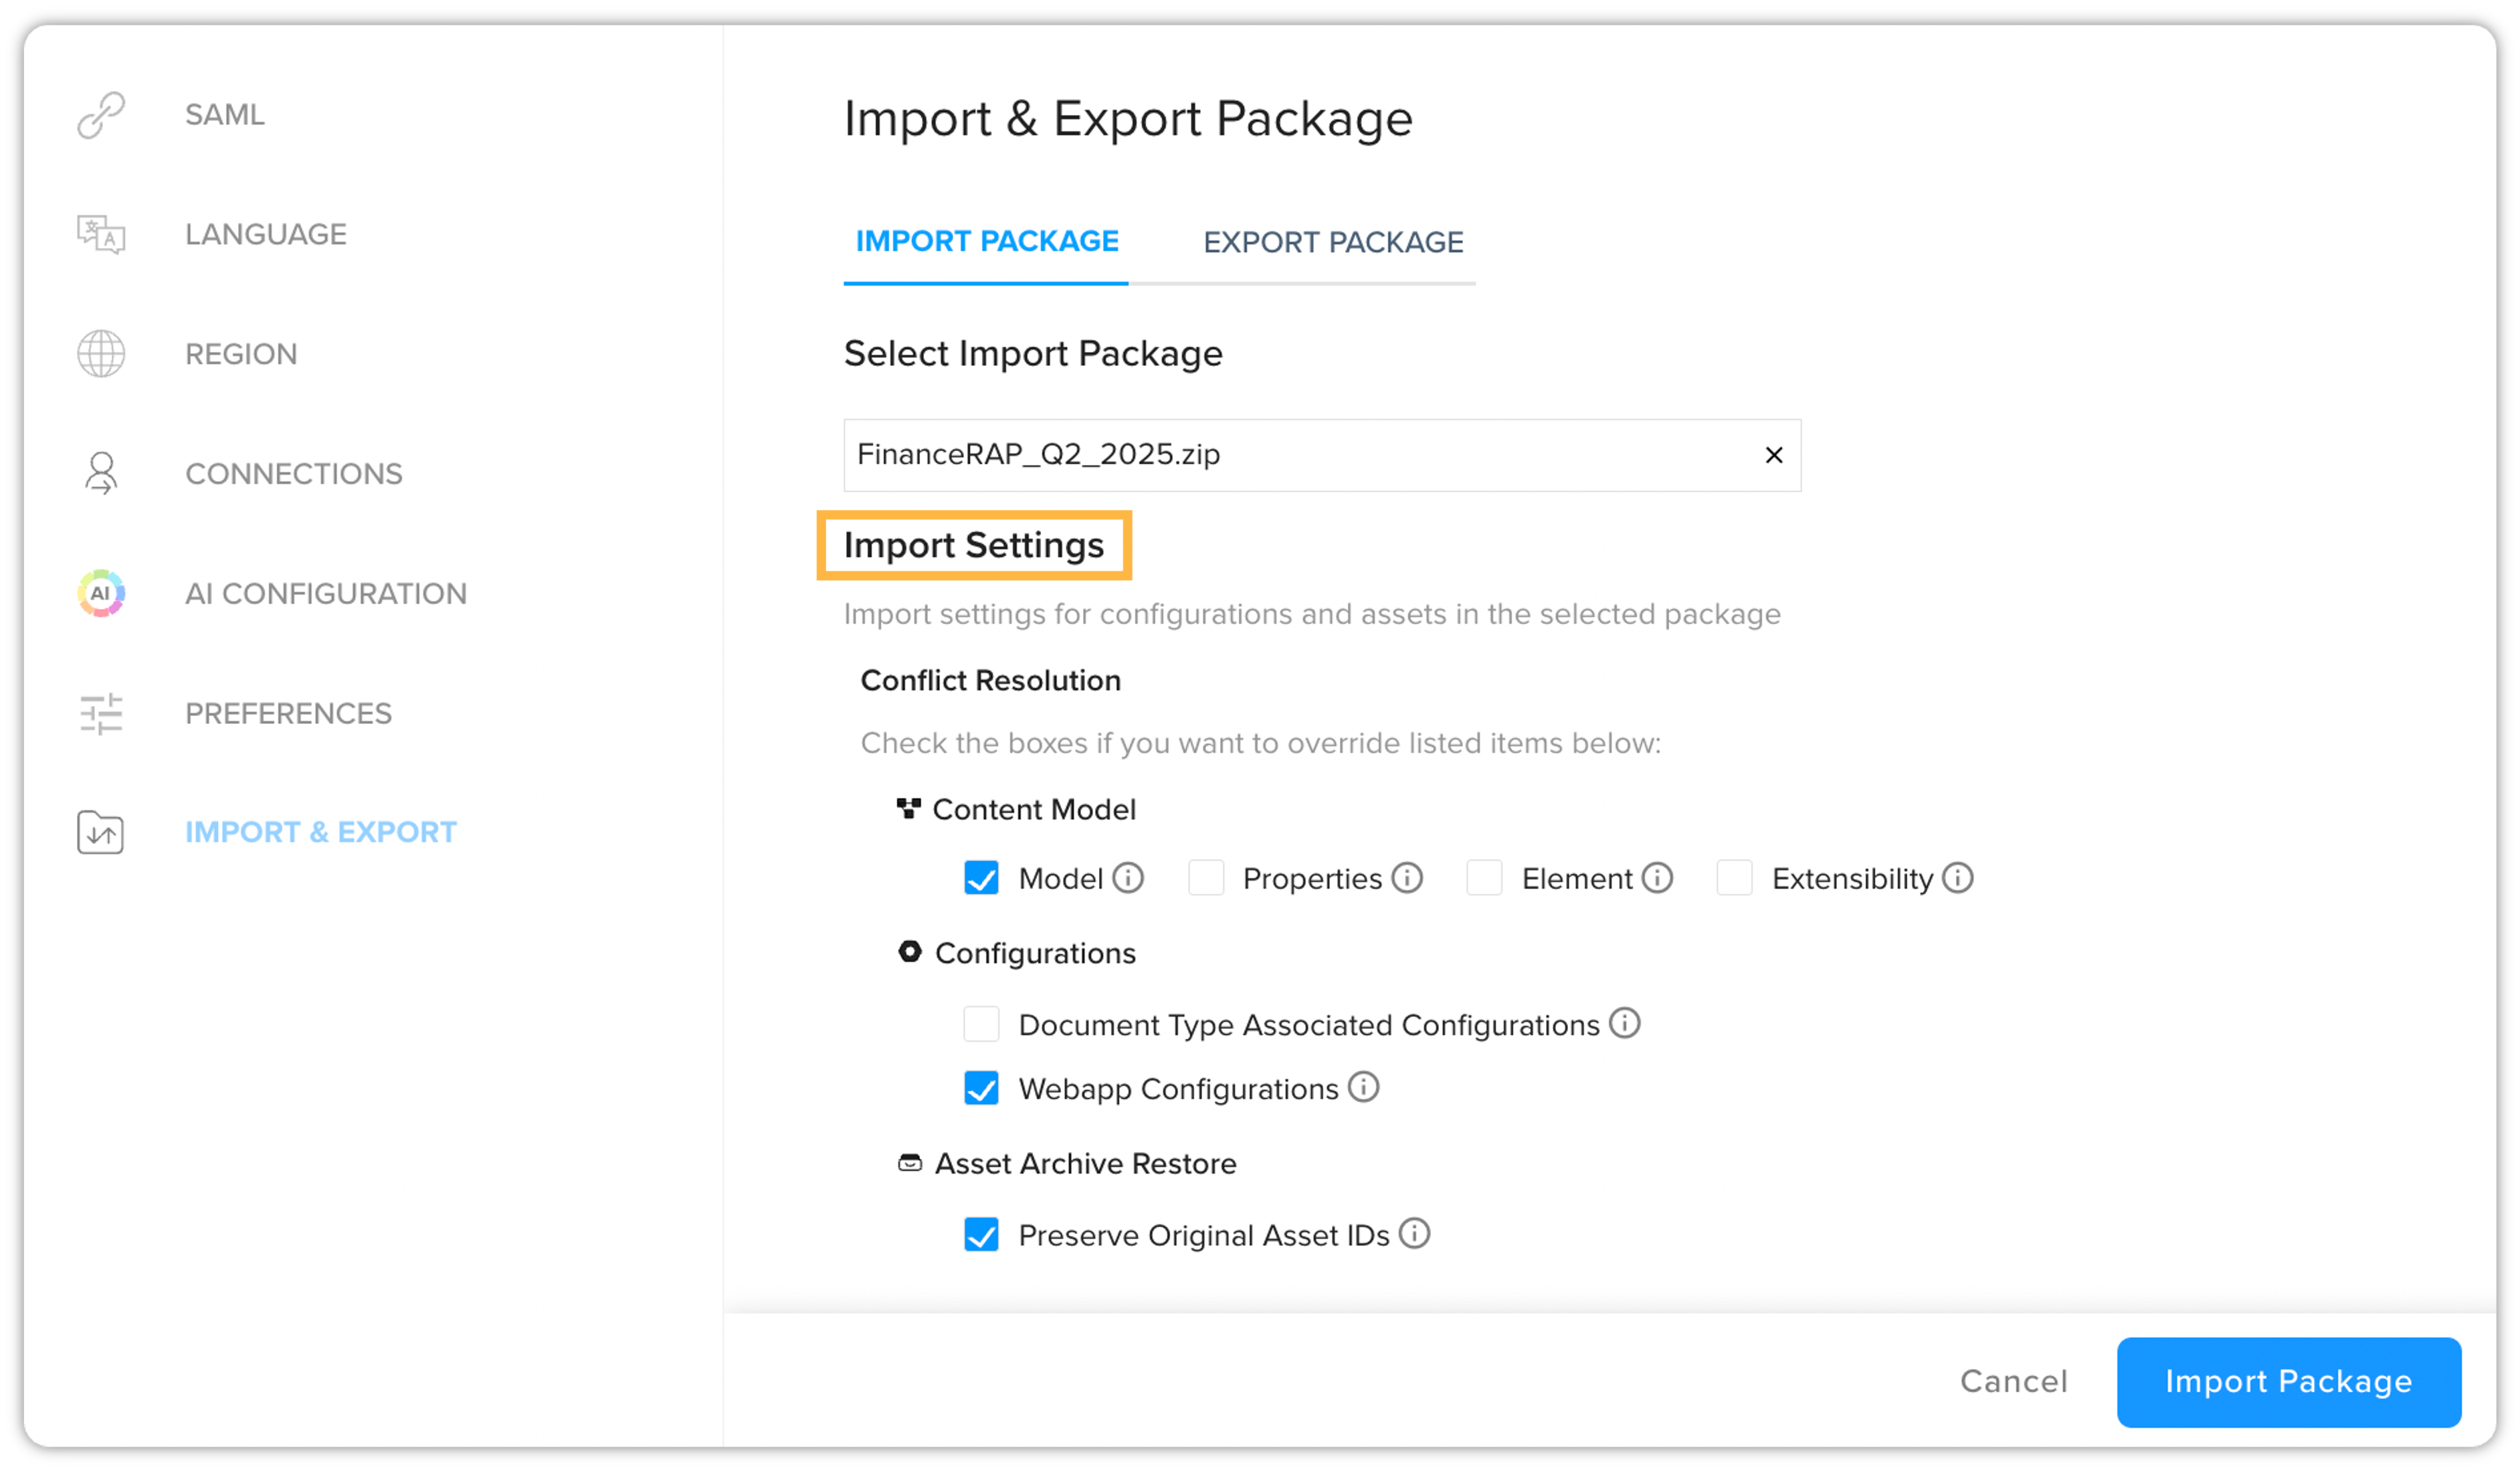
-
Handle Conflicts (Selective Override): If an item in the package already exists in your environment, use the following toggles to decide the outcome:
-
Content Model:
-
Skip: Keeps your current document structure as is.
-
Override: Replaces your existing content model with the one from the package.
-
-
Properties:
-
Skip: Preserves your existing metadata fields and attributes.
-
Override: Replaces existing properties with those defined in the RAP.
-
-
Elements:
-
Skip: Maintains your current document elements (e.g., sections, components).
-
Override: Updates elements to match the imported package.
-
-
Extensibility:
-
Skip/Override: Determines whether custom extensions or scripts attached to the document type should be updated.
-
-
-
Set Configuration
-
Document Type Associated Configuration: Choose Override if you want to update the workflow rules, validation settings, or publishing channels associated with that document type.
-
Webapp Configuration: Choose Override to update the user interface settings (how the document appears in the web editor) to match the source environment.
-
-
Check Preserve Original Asset IDs to maintain IDs from the export. By checking this option, the asset IDs of the documents in the source system will be retained into the new system.
-
Click Import Package.
-
Read the confirmation prompt, then confirm to begin import.