
Third-party Applications Integration
Salesforce
The Docurated plugin for Salesforce allows you (sales professionals) to find and use the content you need irrespective of the location it is stored. Docurated integrates with your organization’s repositories (Dropbox, Box, SharePoint, Google Drive, and so on) and provides you with the best content throughout the sales life cycle. The Docurated plugin for Salesforce also allows you to create new slides from the approved sales and marketing collateral, all from within Salesforce user interface.
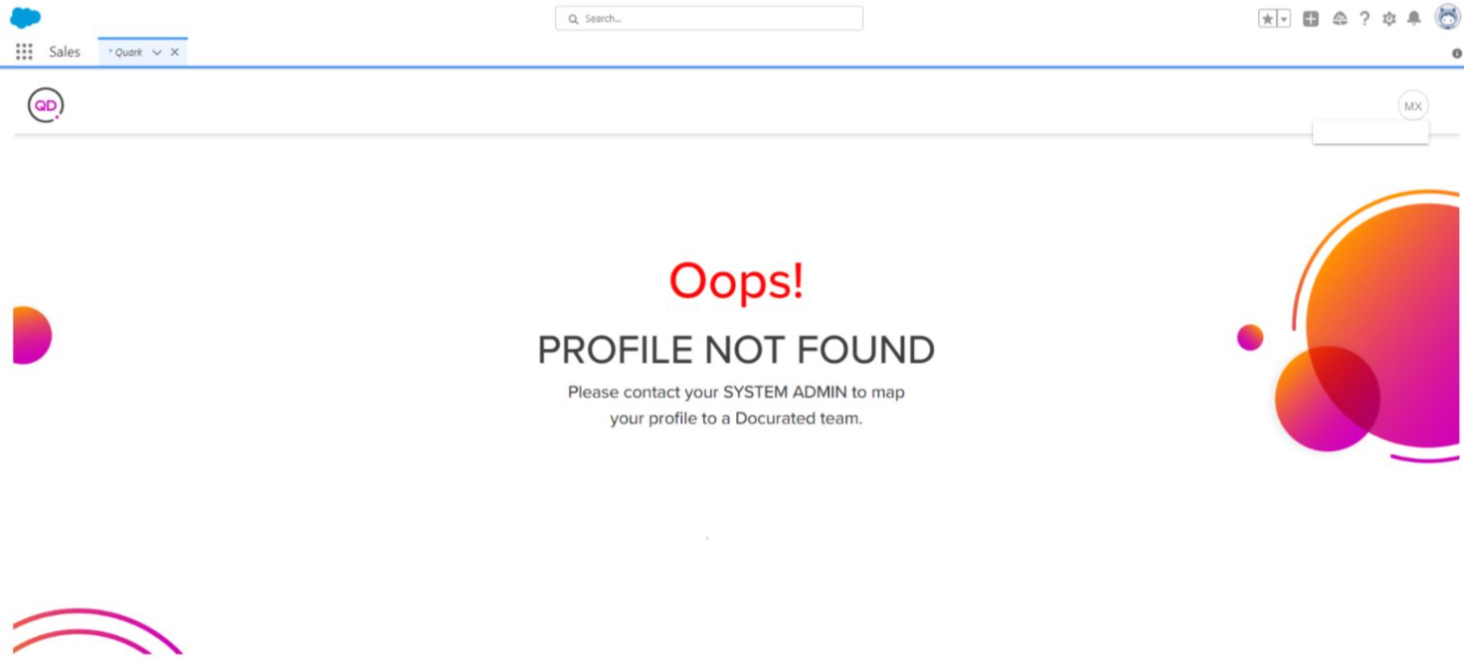
User Interface Features
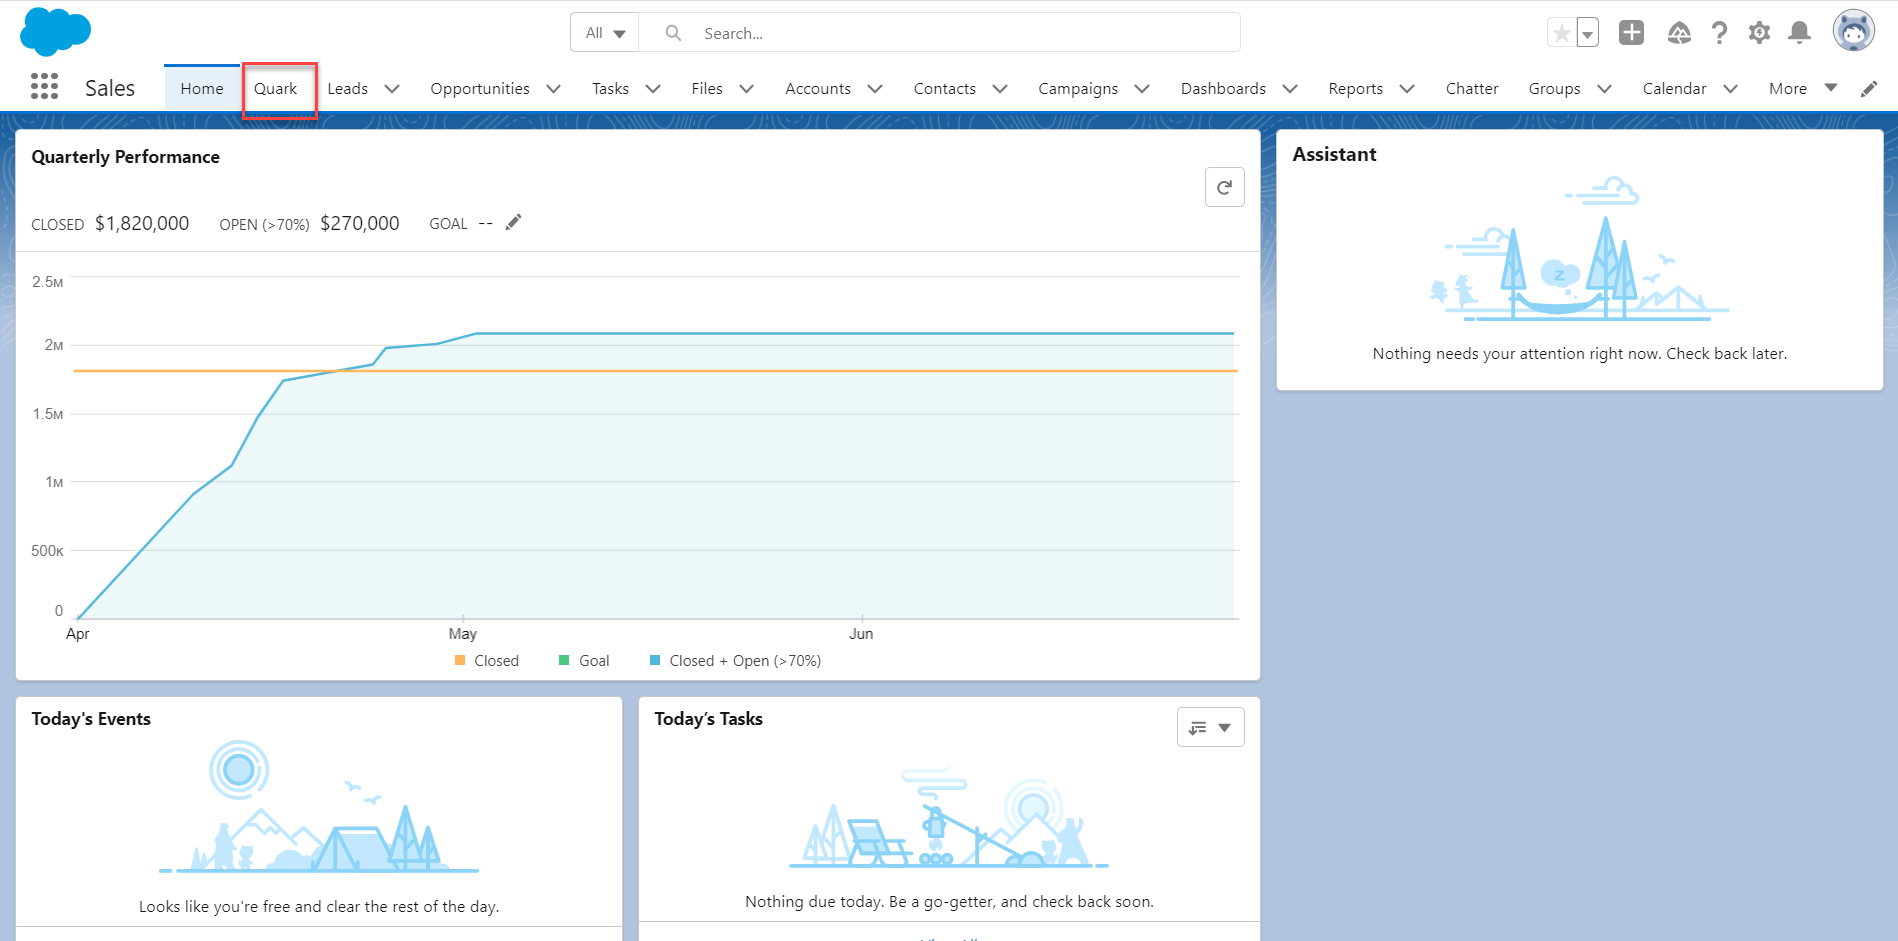
Quark Docurated plugin appears as a top navigation tab in your Salesforce web application, through which you can access your Docurated server from within the Salesforce user interface.
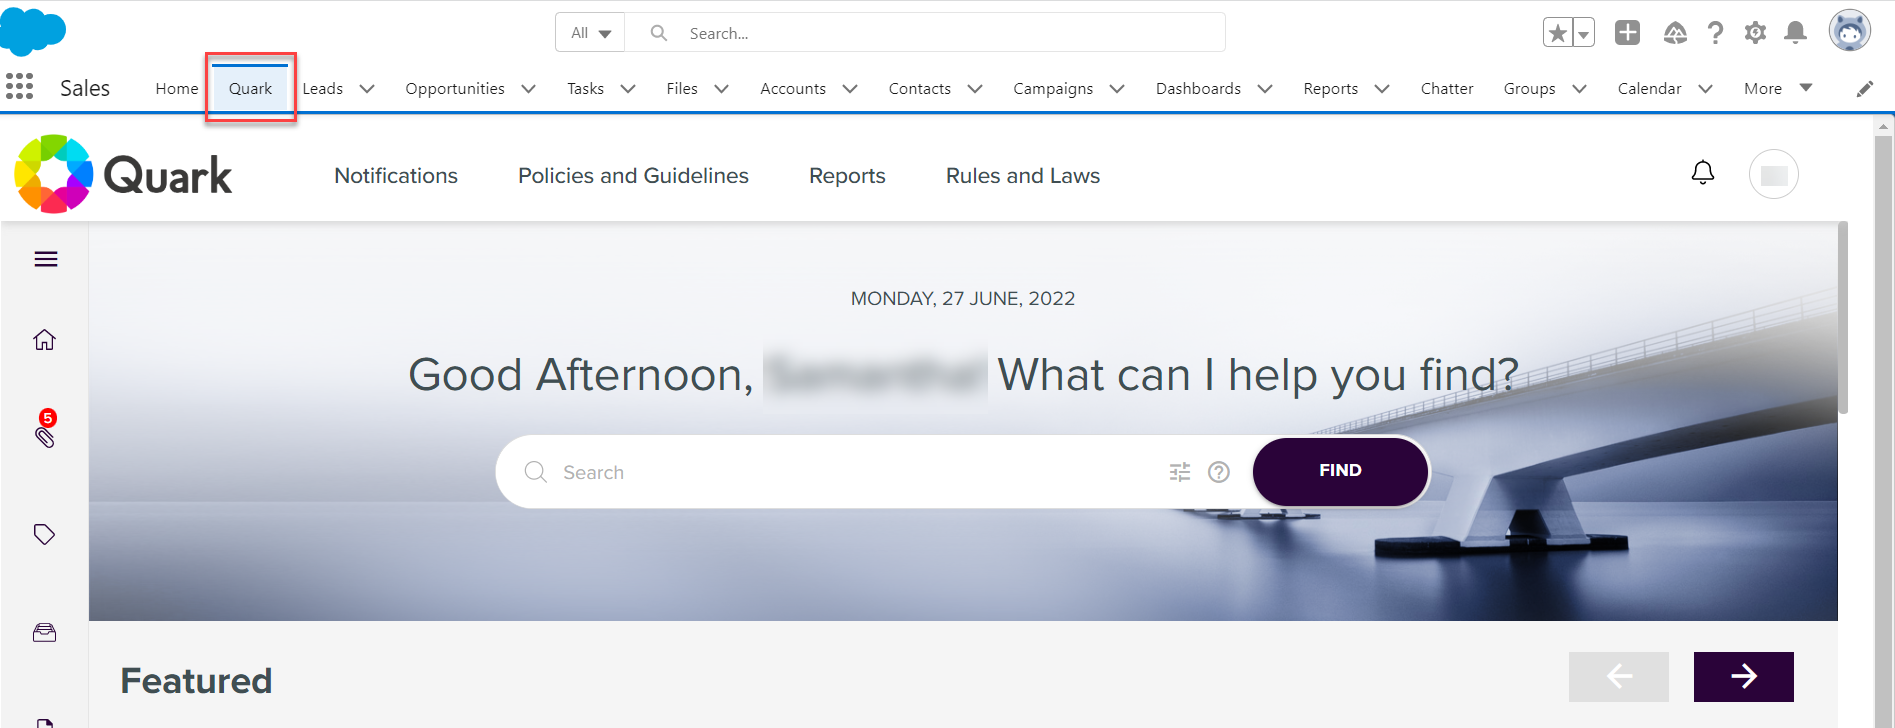
Additionally, Quark Docurated is configurable with the Salesforce objects Accounts, Contacts, Leads, and Opportunities, and allows you to make documents available through a custom lightning tab (named Quark in the screenshot below) for the prospects and clients listed under these objects.
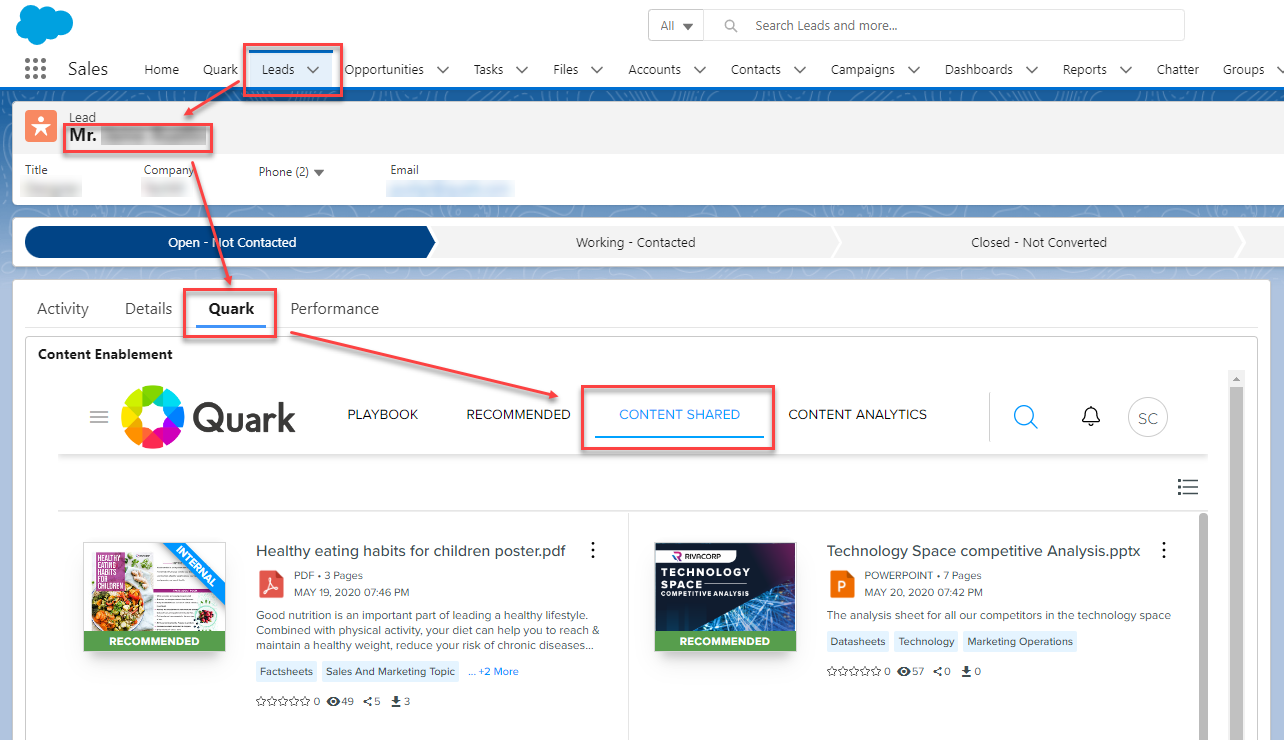
Salesforce Object Custom Lightning Tabs
The custom lightning tab of your Docurated plugin is similar across all configurable Salesforce objects (Accounts, Contacts, Leads, and Opportunities) and contains the following paginated sub-tabs:
-
Playbook: Lists the sales playbooks/user manuals, which are internally recommended to the sales team for a contact or a lead. These playbooks guide you on how to engage contacts and leads based on where they are in the purchase cycle.
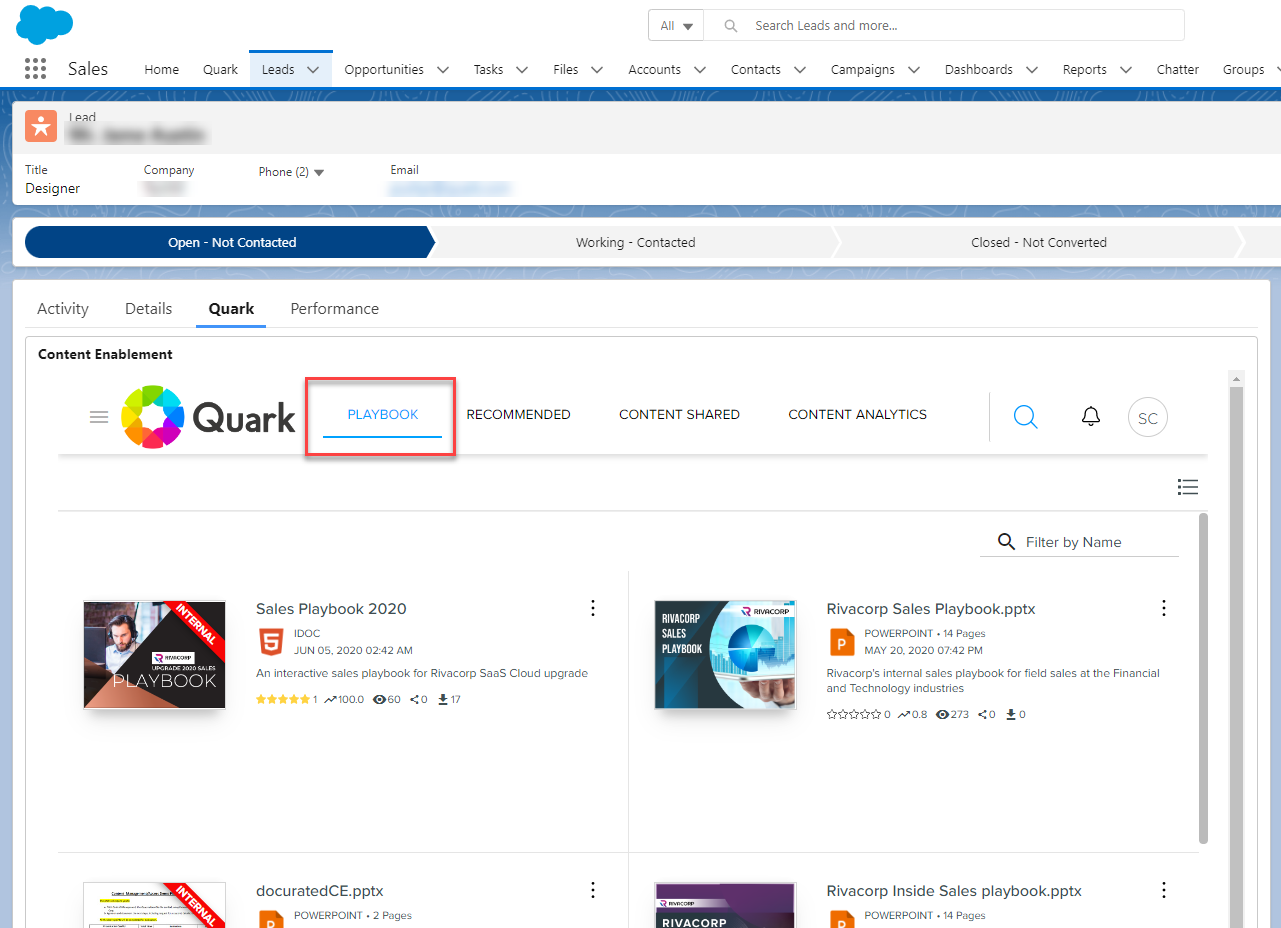 The Playbook sub-tab is only available for Contacts and Leads.
-
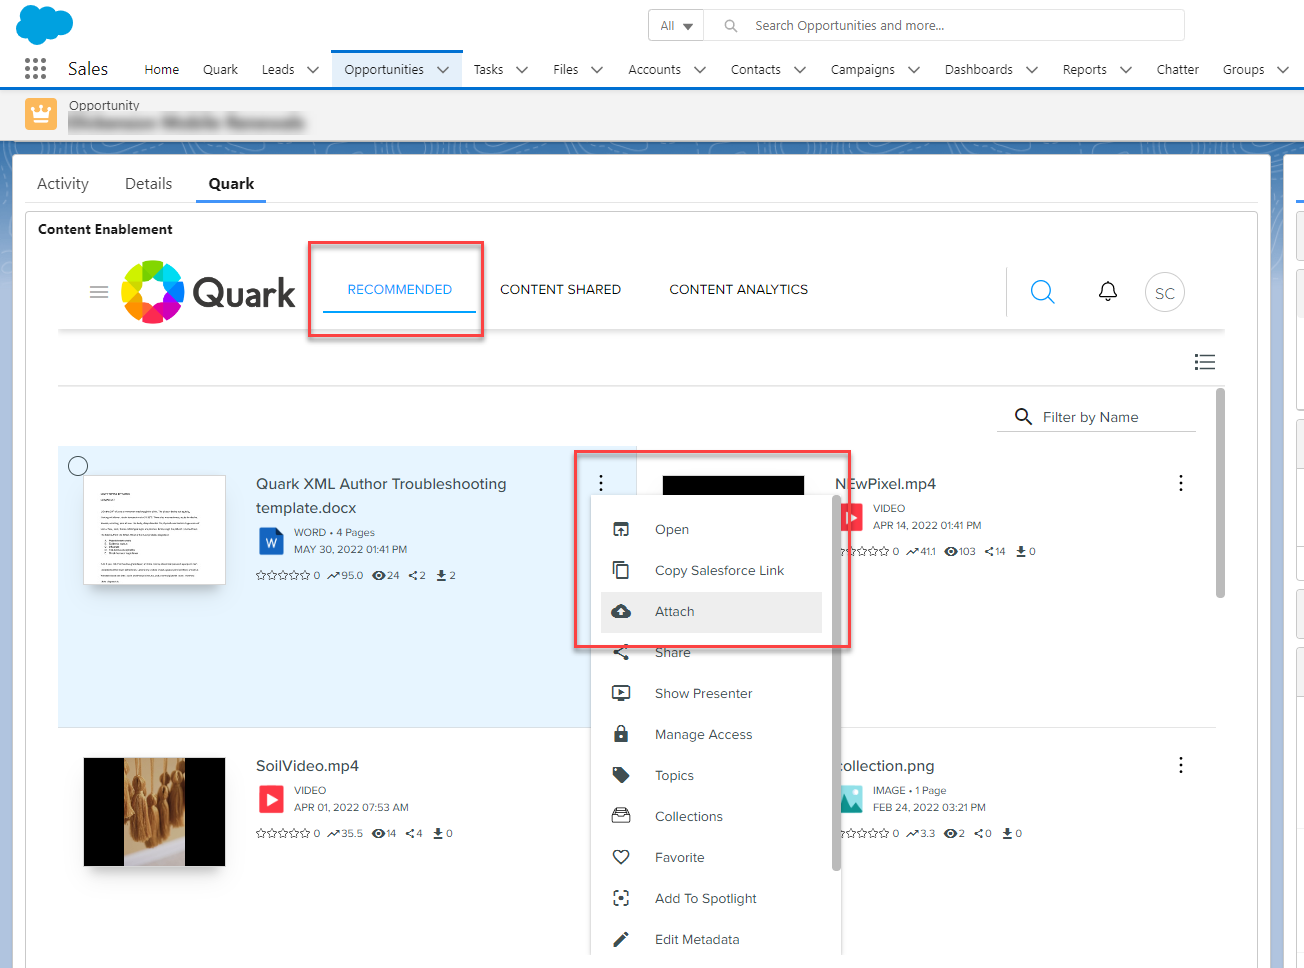
Recommended: Lists the documents that Docurated's AI-system recommends for a lead/account/contact/opportunity. You can make a recommended document available for a lead/account/contact/opportunity by attaching the document to that lead/account/contact/opportunity.
-
Content Shared: Lists the documents that you have shared with or attached manually to a lead/account/contact/opportunity.
-
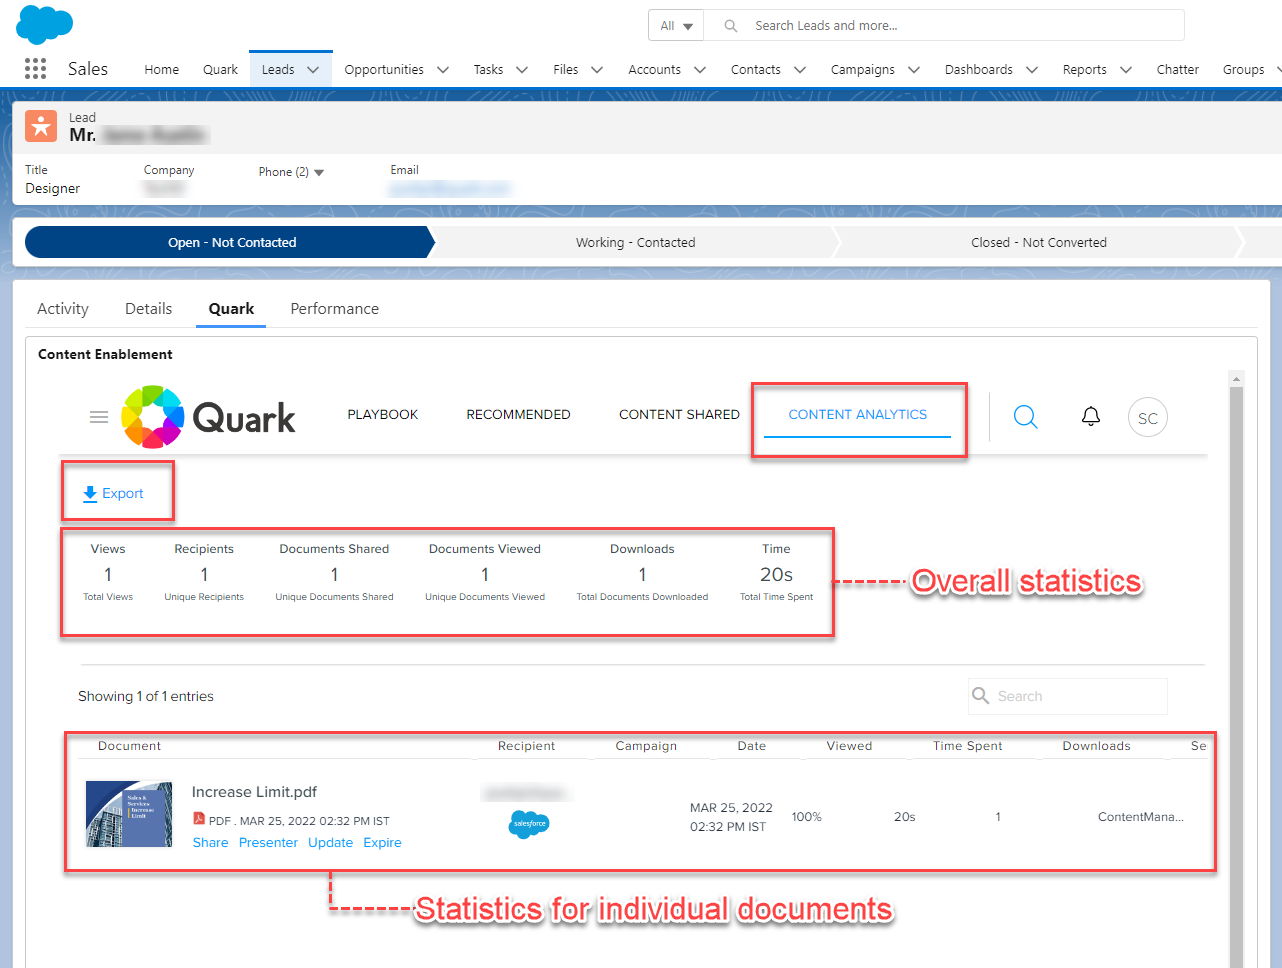
Content Analytics: Displays the content engagement analytics for the documents that you have shared with a lead/account/contact/opportunity.
Activity Log
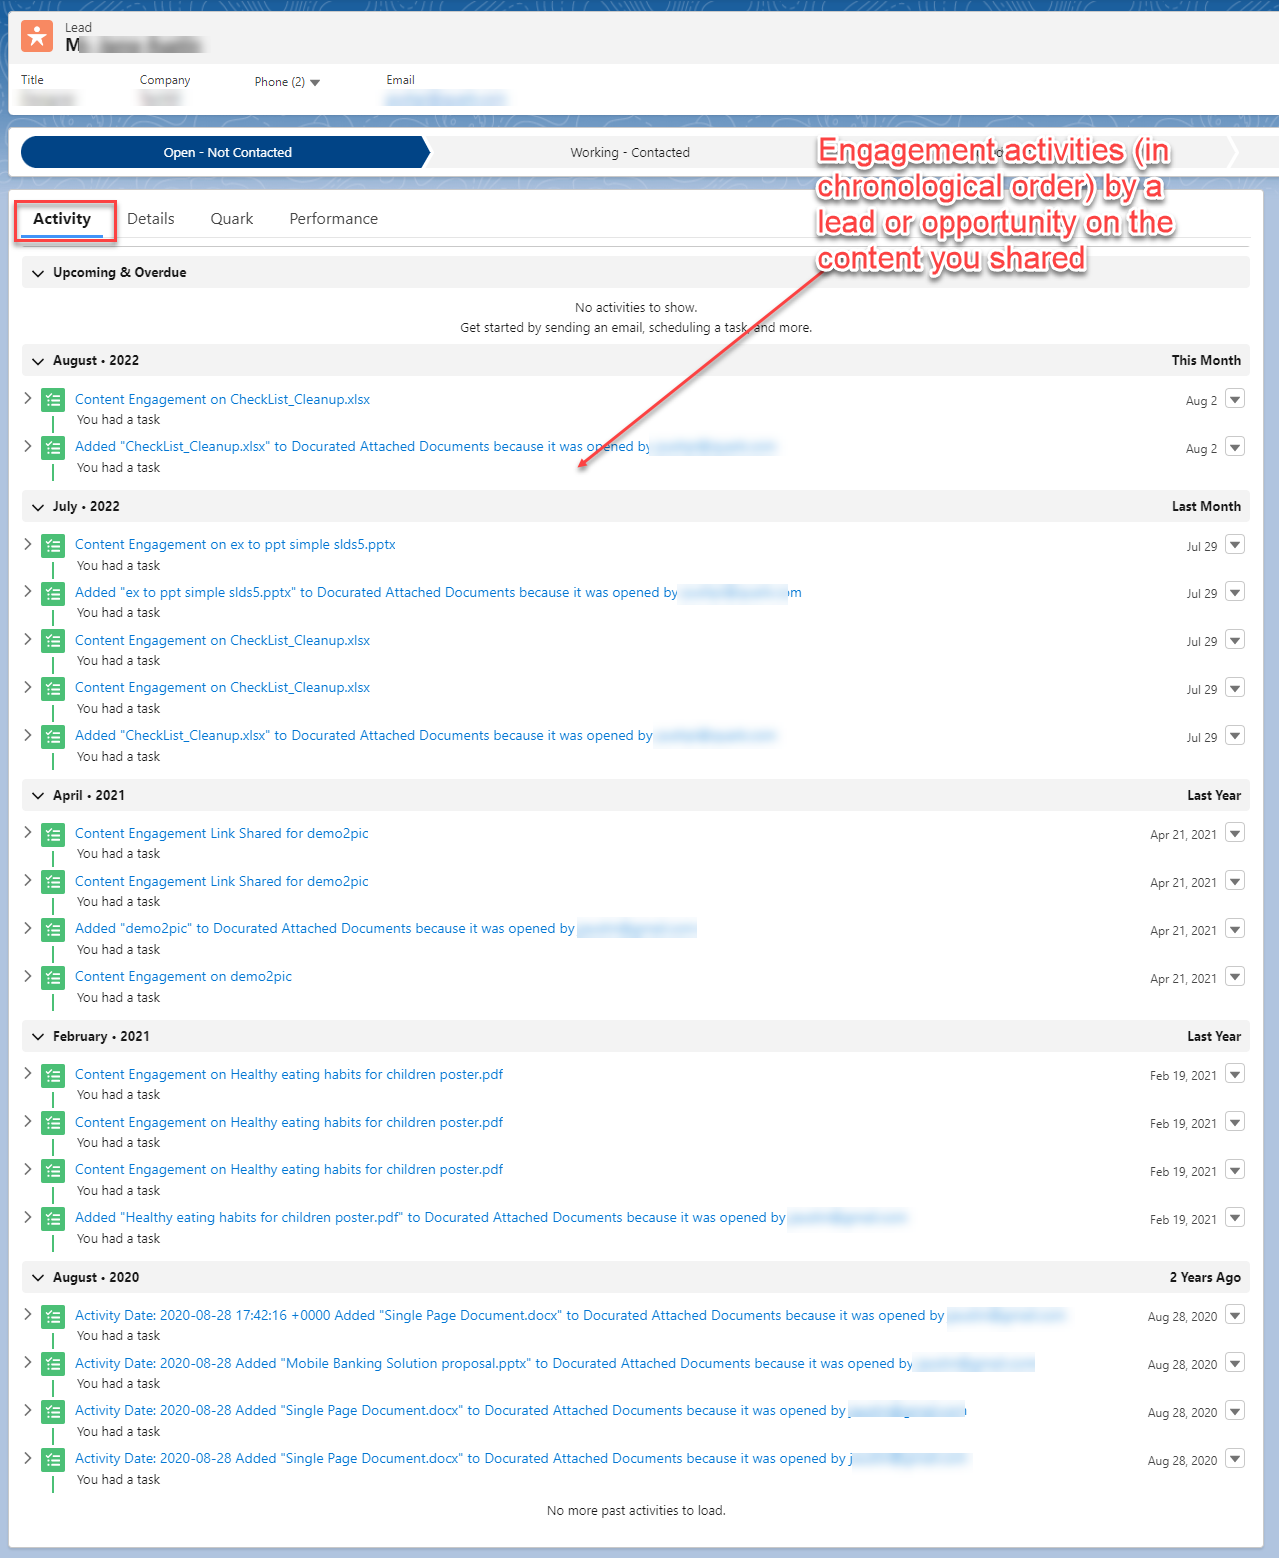
You can also check all the activities performed by a salesperson, a Lead, or an Opportunity on the content you shared through the custom lightning tab Activity.
The logged activities are as follows:
-
Opening a document
-
Engaging with the content of a document
-
Sharing a document
-
Attaching a document (to a prospect)
Attach a Document
Quark Docurated plugin for Salesforce allows you to attach a document to a lead/account/contact/opportunity listed under the respective Salesforce objects. This means, to make a document available for a specific prospect/client/organization listed under one of these Salesforce objects.
To attach a document:
-
In your Docurated server under the Quark Docurated tab, navigate to the document that you want to attach.
-
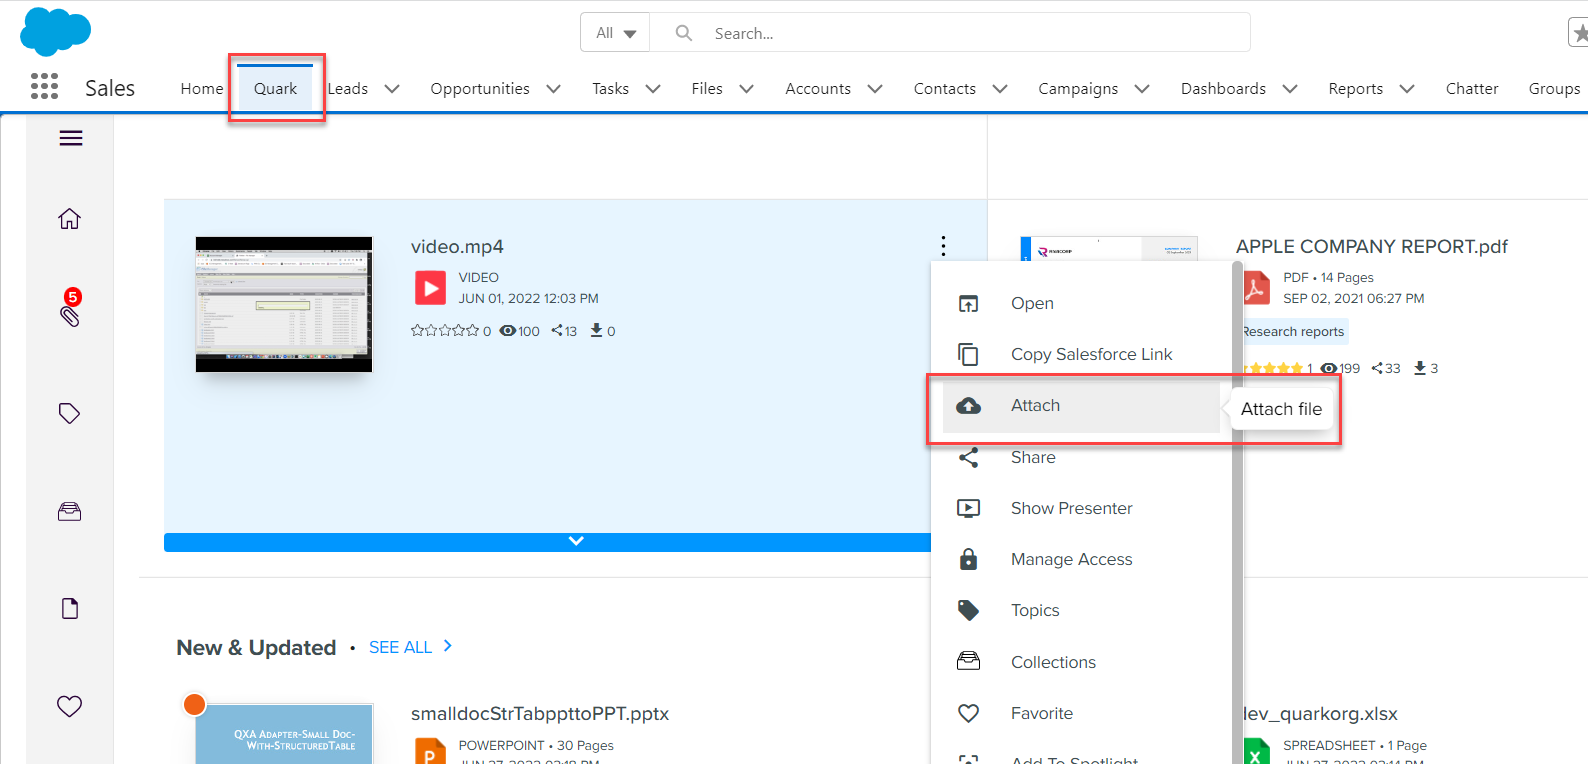
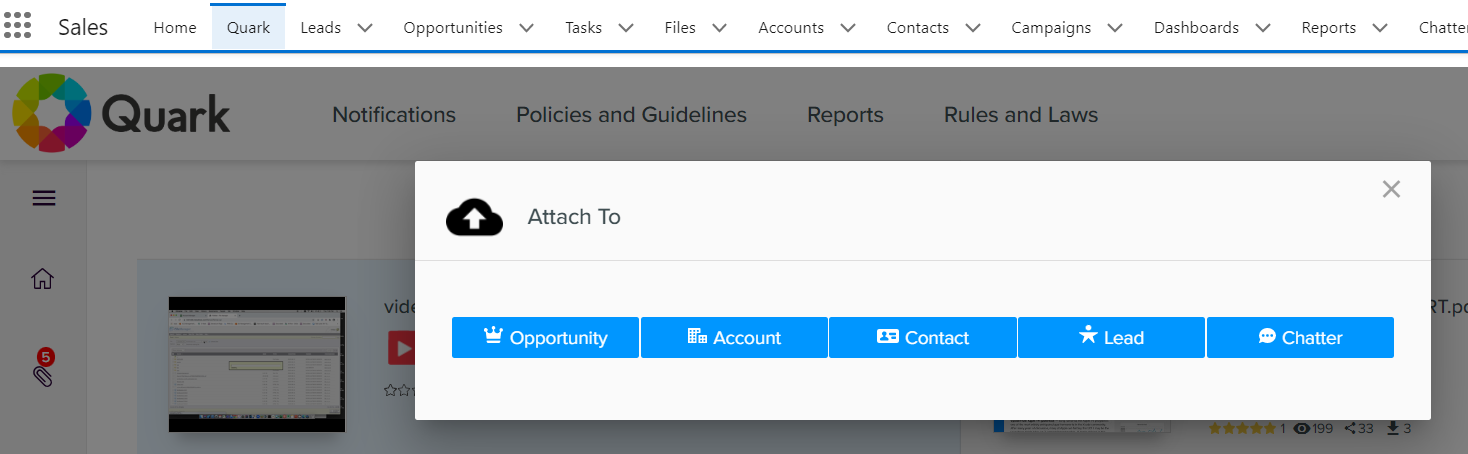
Expand the kebab menu on the document's card and then click Attach to open the dialog Attach To.
-
In the Attach To dialog, select the object (for example, Lead) you want to attach the document to.
-
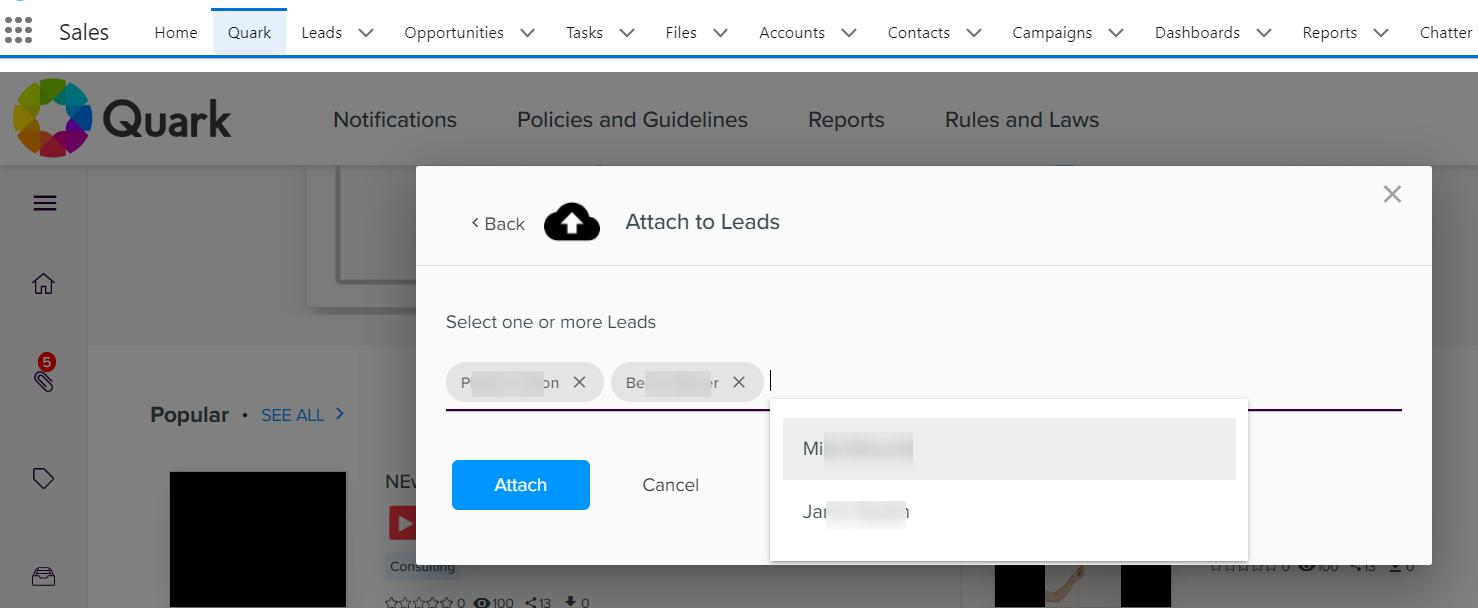
Add the names of the leads for whom you want to make the document available.
-
Click Attach.
Copy Salesforce Link
Quark Docurated plugin for Salesforce allows you to share a document, topic, or category within your organization by sharing a native Salesforce link.
To share a document, topic, or category directly via a Salesforce link:
-
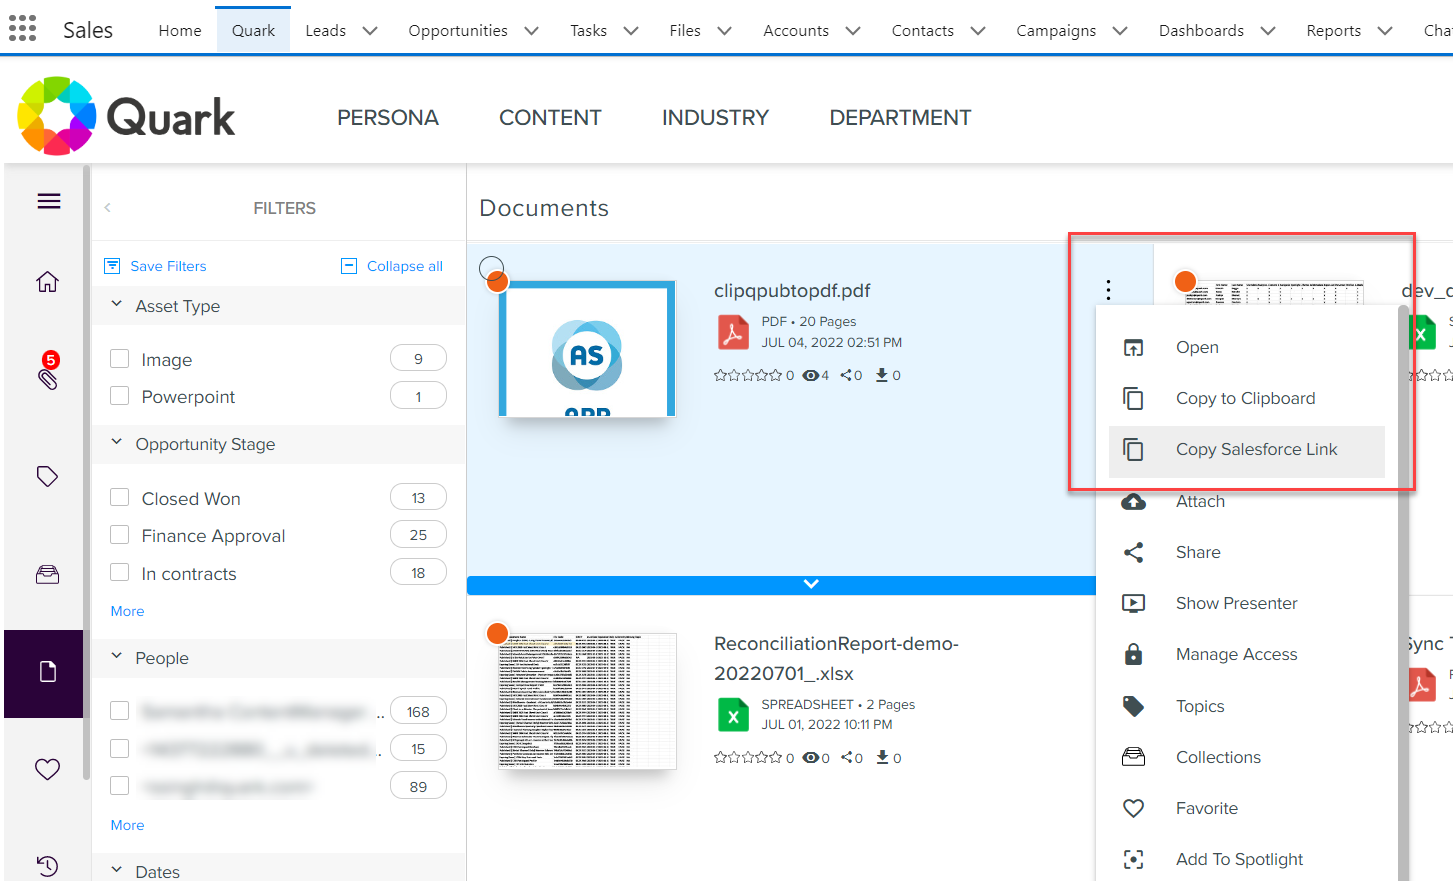
Expand the kebab menu on the document card.
-
Click Copy Salesforce Link.
-
Share the link directly with a client/prospect through any of the established means of communication.
Installation [Admin Only]
To install the Docurated plugin for Salesforce:
-
Log in to your Salesforce account as a Salesforce administrative user.
-
After you are logged in, in the left pane, under Platform Tools, click Apps > AppExchange Marketplace to open the AppExchange Home dialog.
You can also search for "AppExchange Marketplace" in the search bar at the top of the left pane.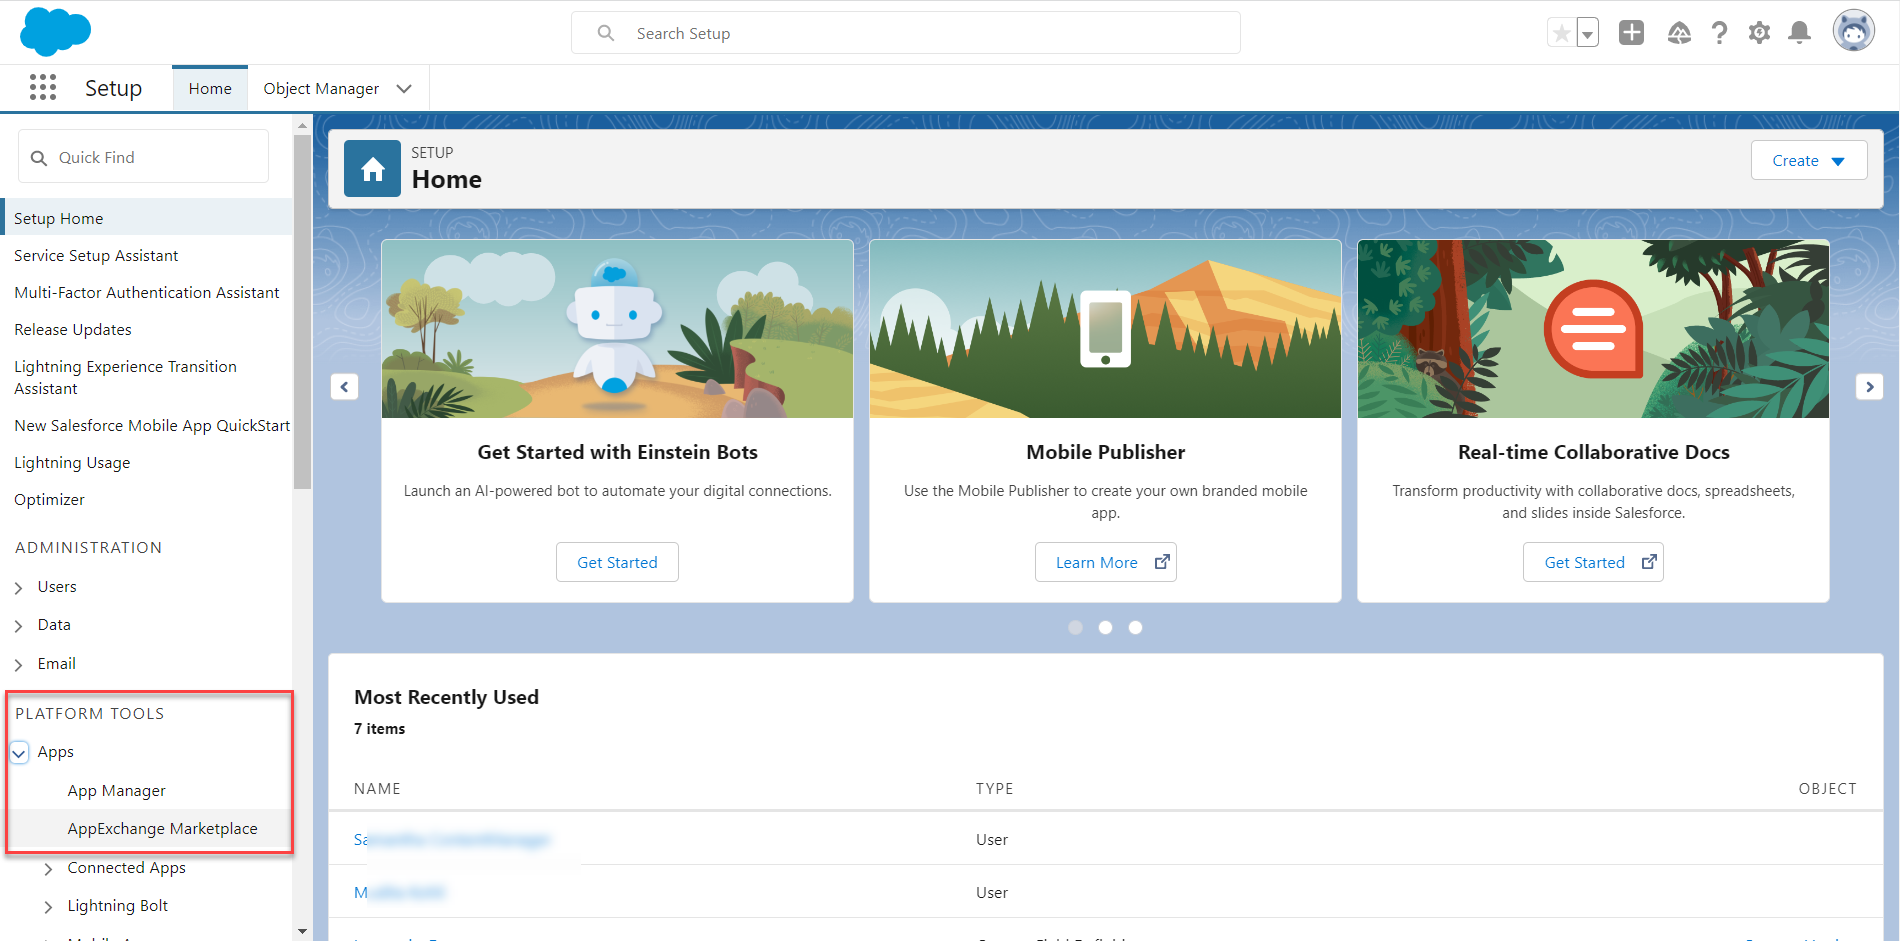
-
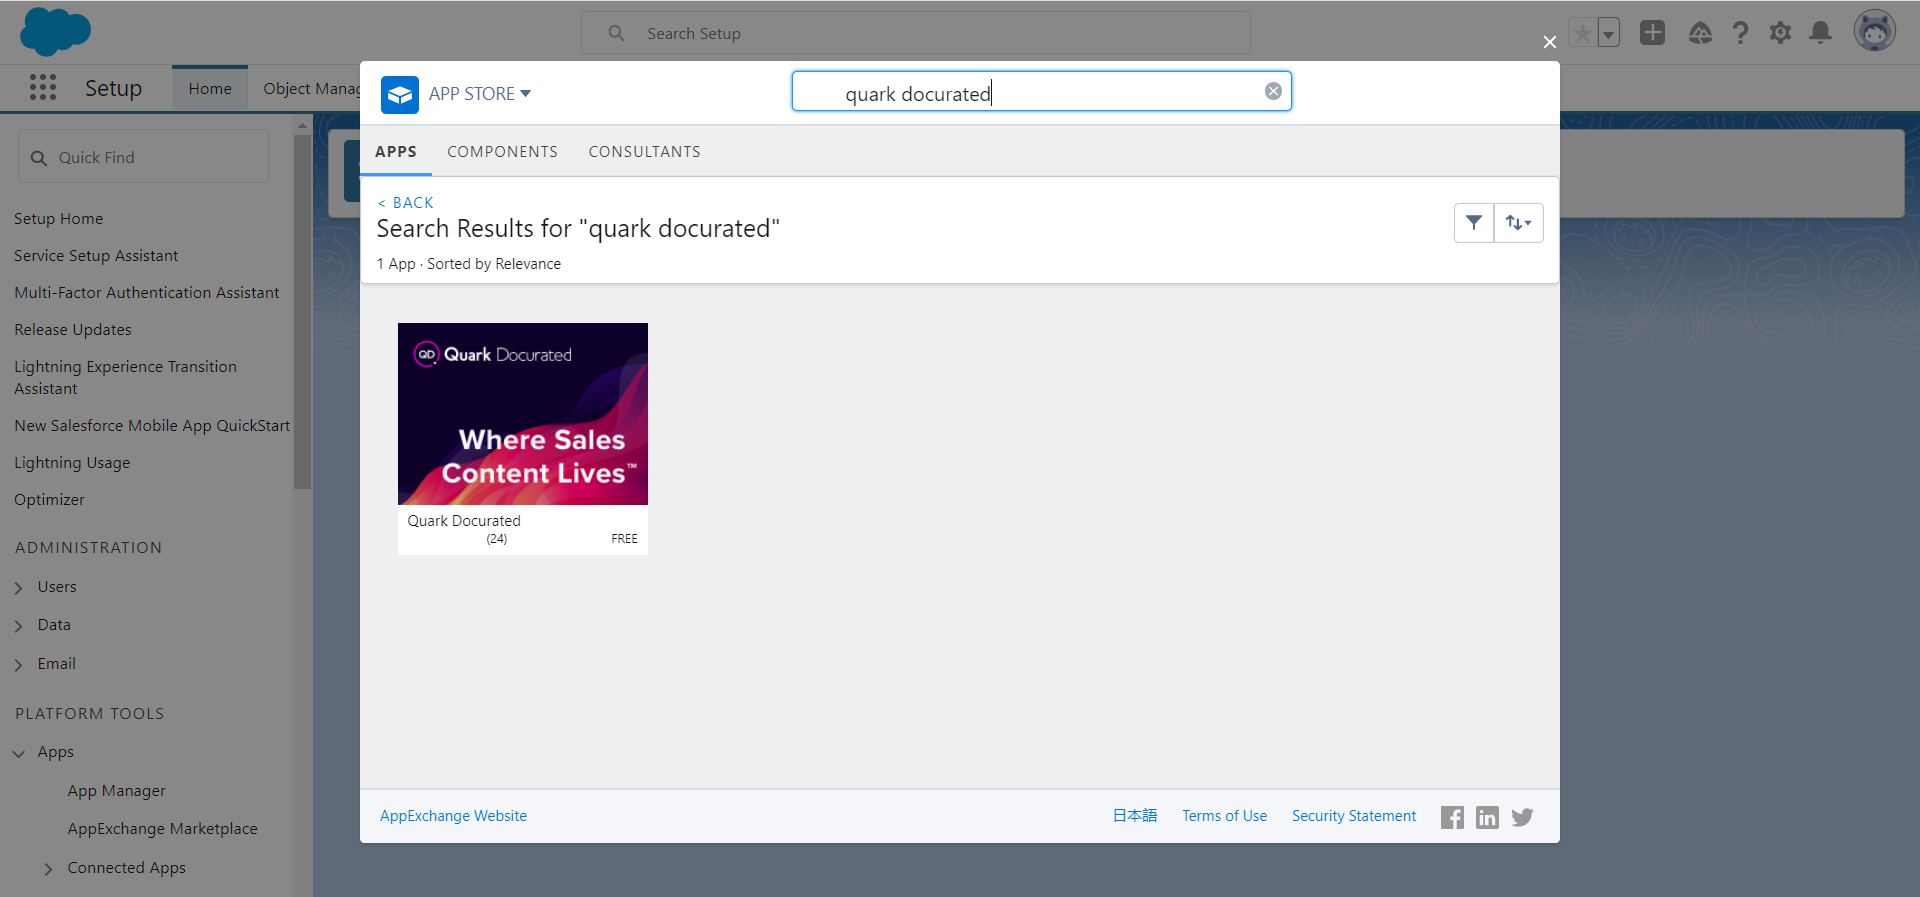
In the AppExchange Home dialog, search for "Quark Docurated".
-
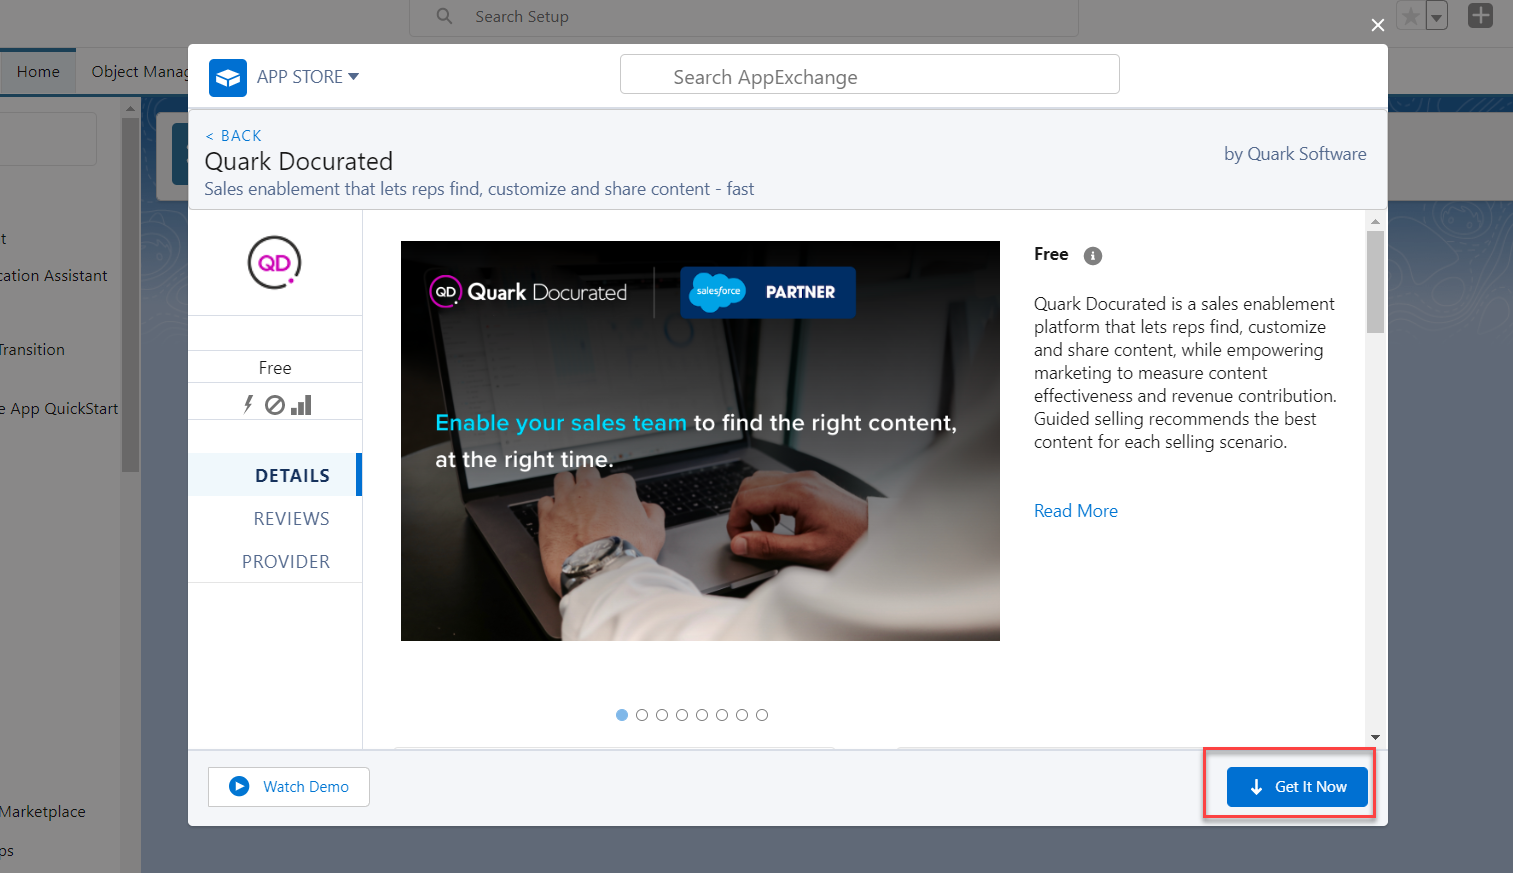
Click the result to view more information about the Quark Docurated plugin and the option to install it.
-
Click Get It Now.
-
On the next screen, log in to your AppExchange account through the button Open Login Screen.
If you do not have an AppExchange account, the Login dialog automatically uses your Salesforce credentials to log you in.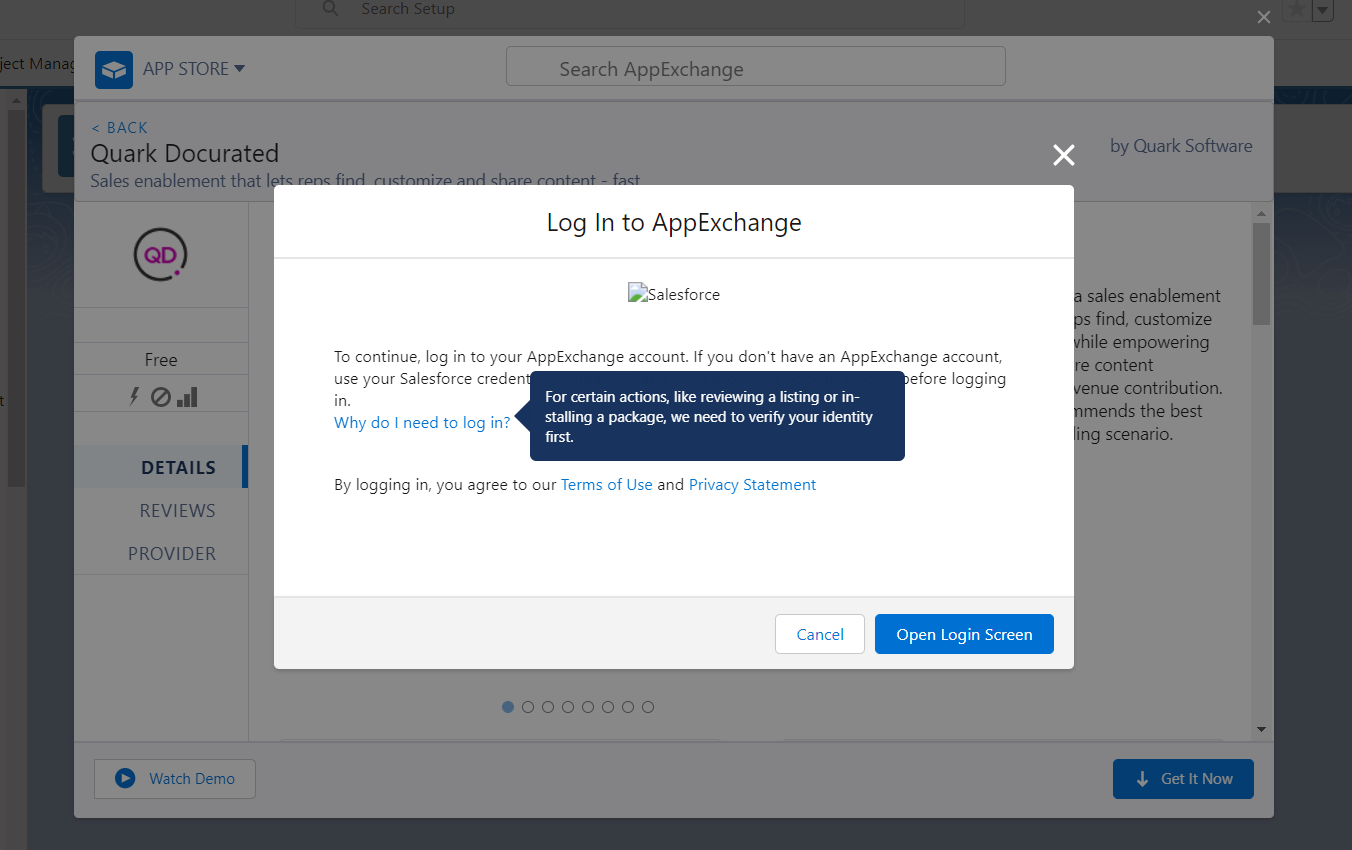
-
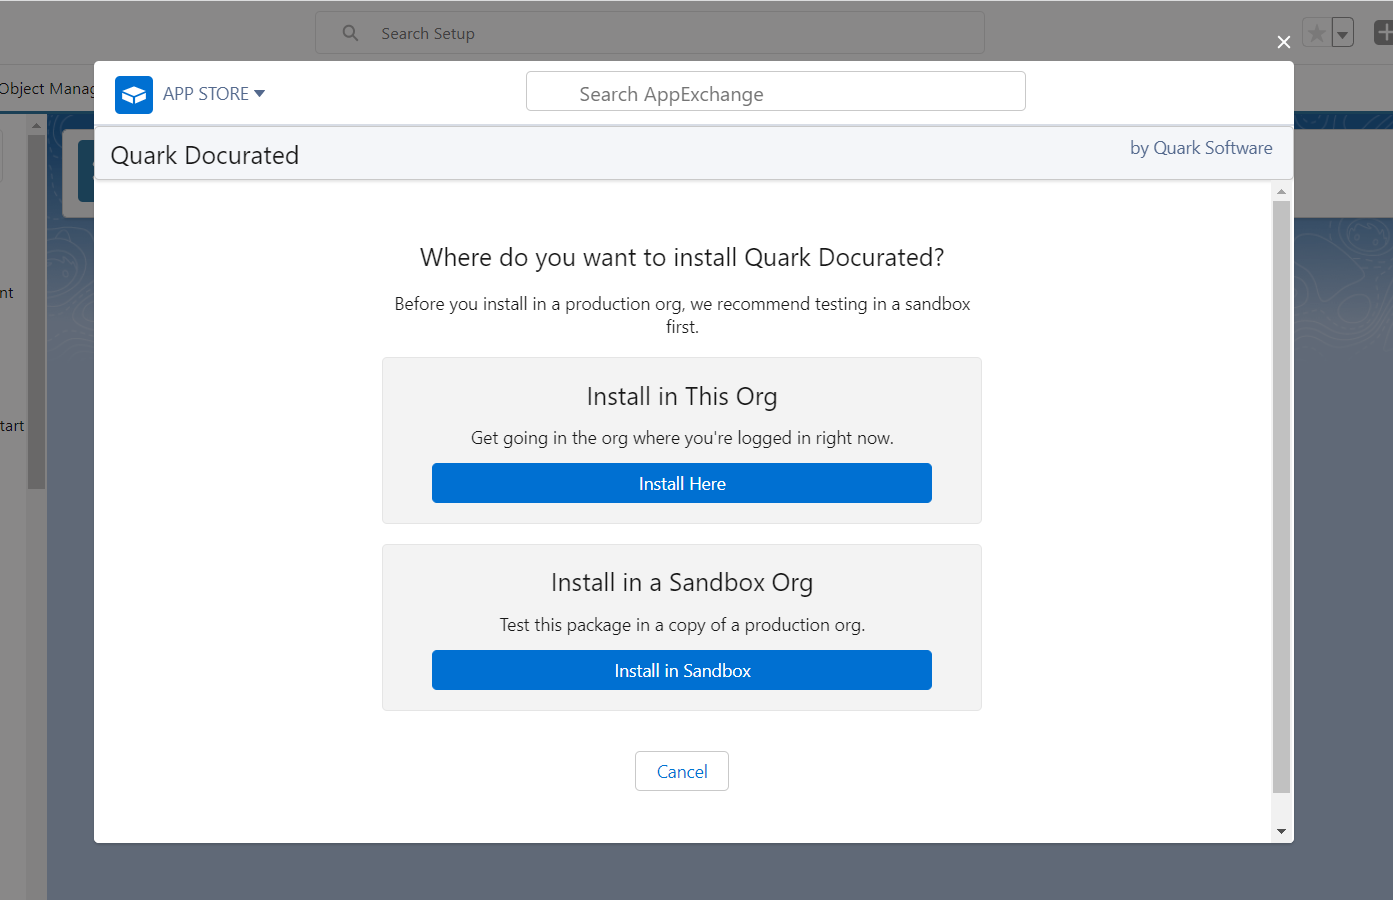
After you are logged in to AppExchange, the next screen asks whether you want to install the Docurated plugin on the Production environment (your current organization environment) or on the Sandbox copy of your Production environment.
-
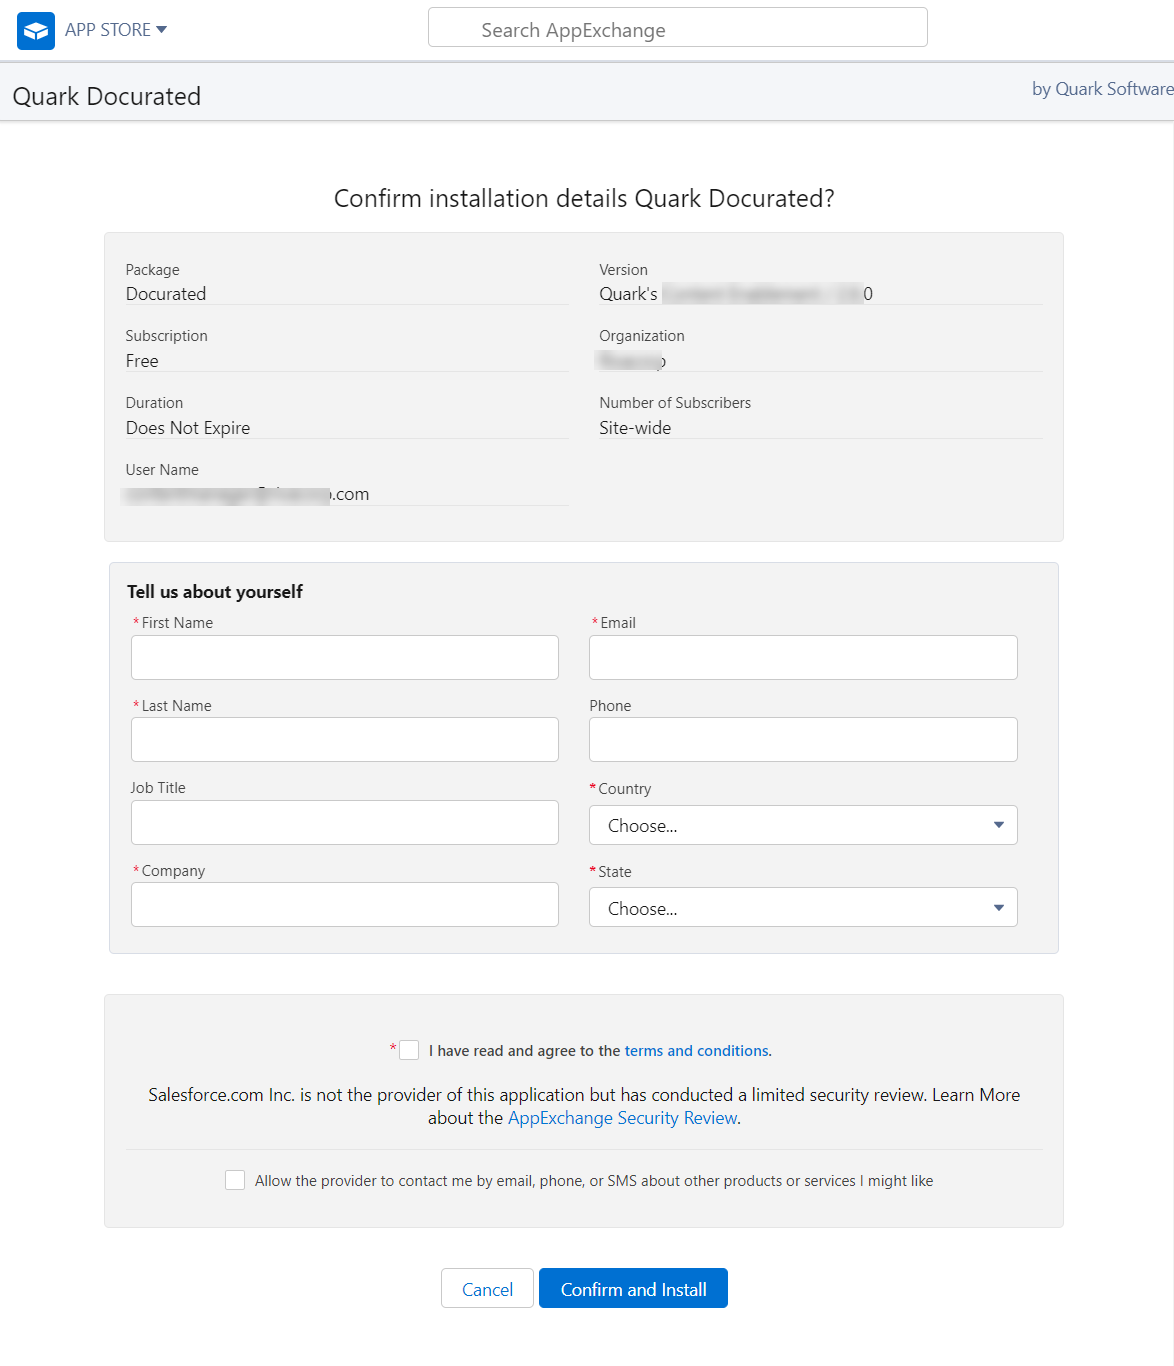
On the next screen (irrespective of the environment you have selected), provide your professional information (name, email, company, location, and so on), check the terms and conditions checkbox, and then click Confirm and Install.
-
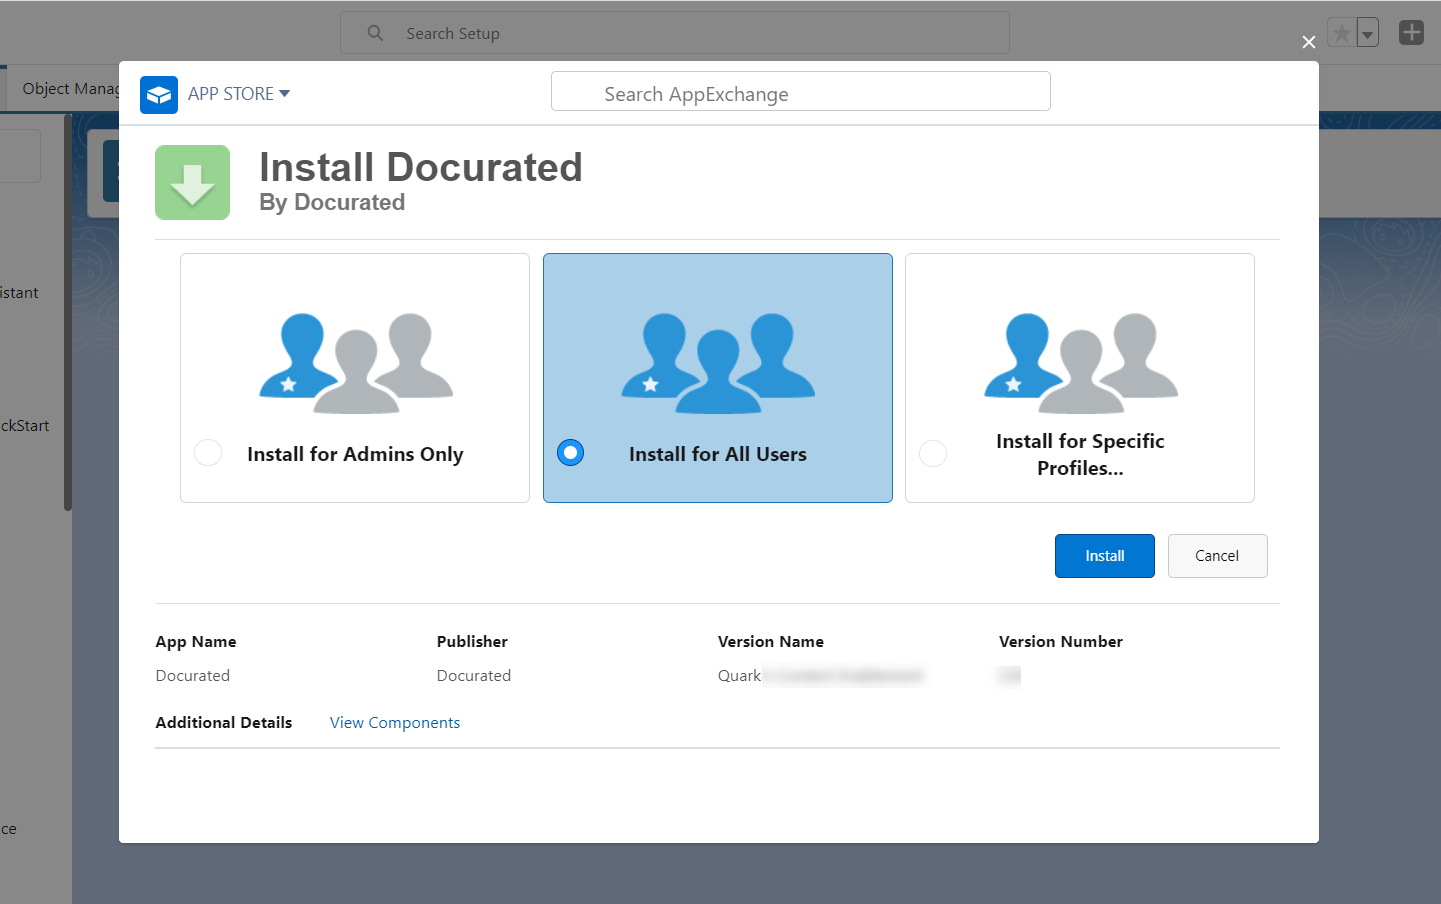
On the next screen, select for whom you want to install the Docurated plugin for Salesforce (for all users, for admins only, or for specific users) and then click Install.
-
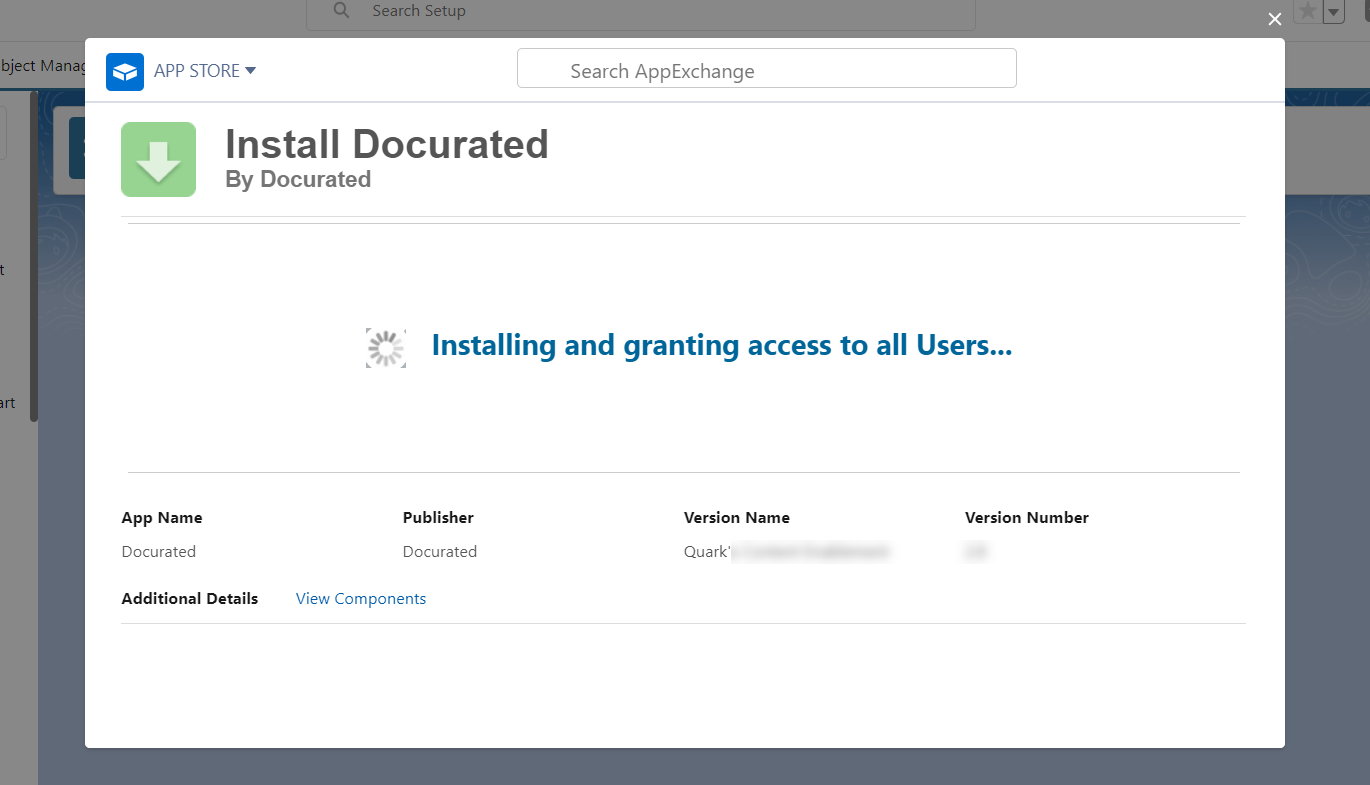
During the installation, you see the following screen.
Setup [Admin Only]
To set up the Docurated plugin for Salesforce, you first need to create a custom Salesforce tab for your plugin, create lightning tabs for Salesforce objects, and then do a few configurations, which are as follows:
Add a Custom Tab
To add a tab for the Docurated plugin for Salesforce:
-
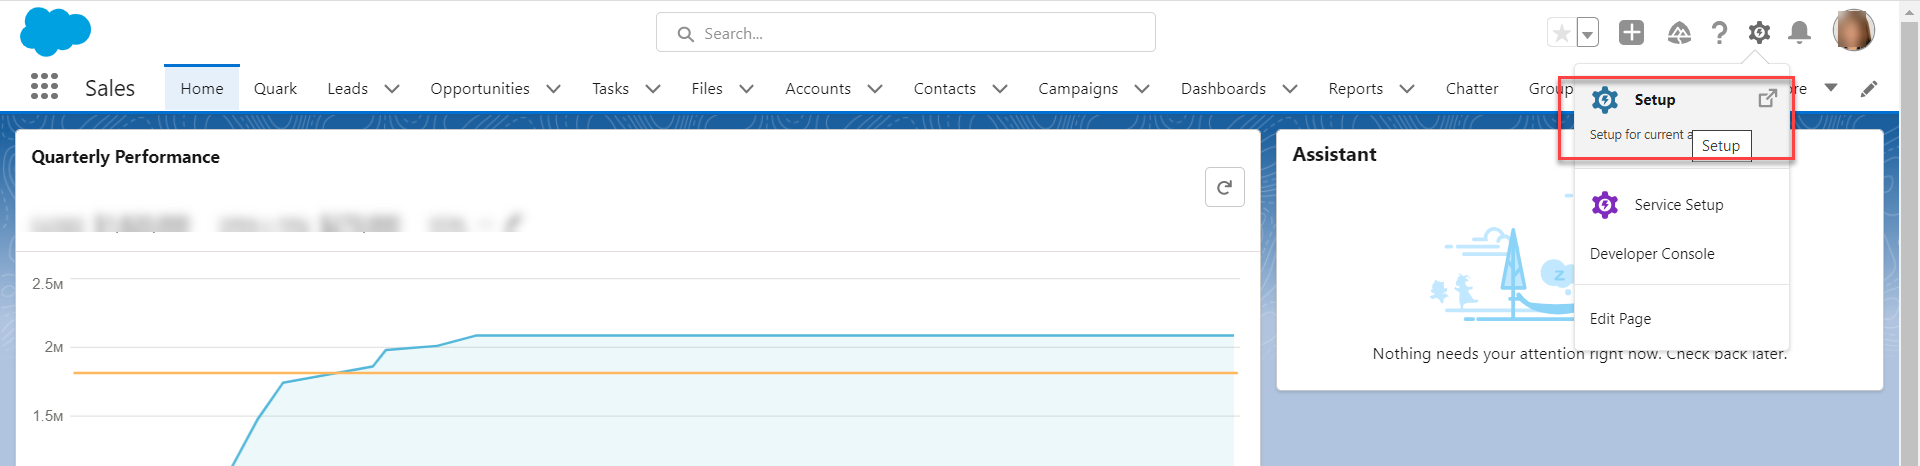
On the Salesforce user interface, click the setting icon in the top bar menu items and then click Setup.
-
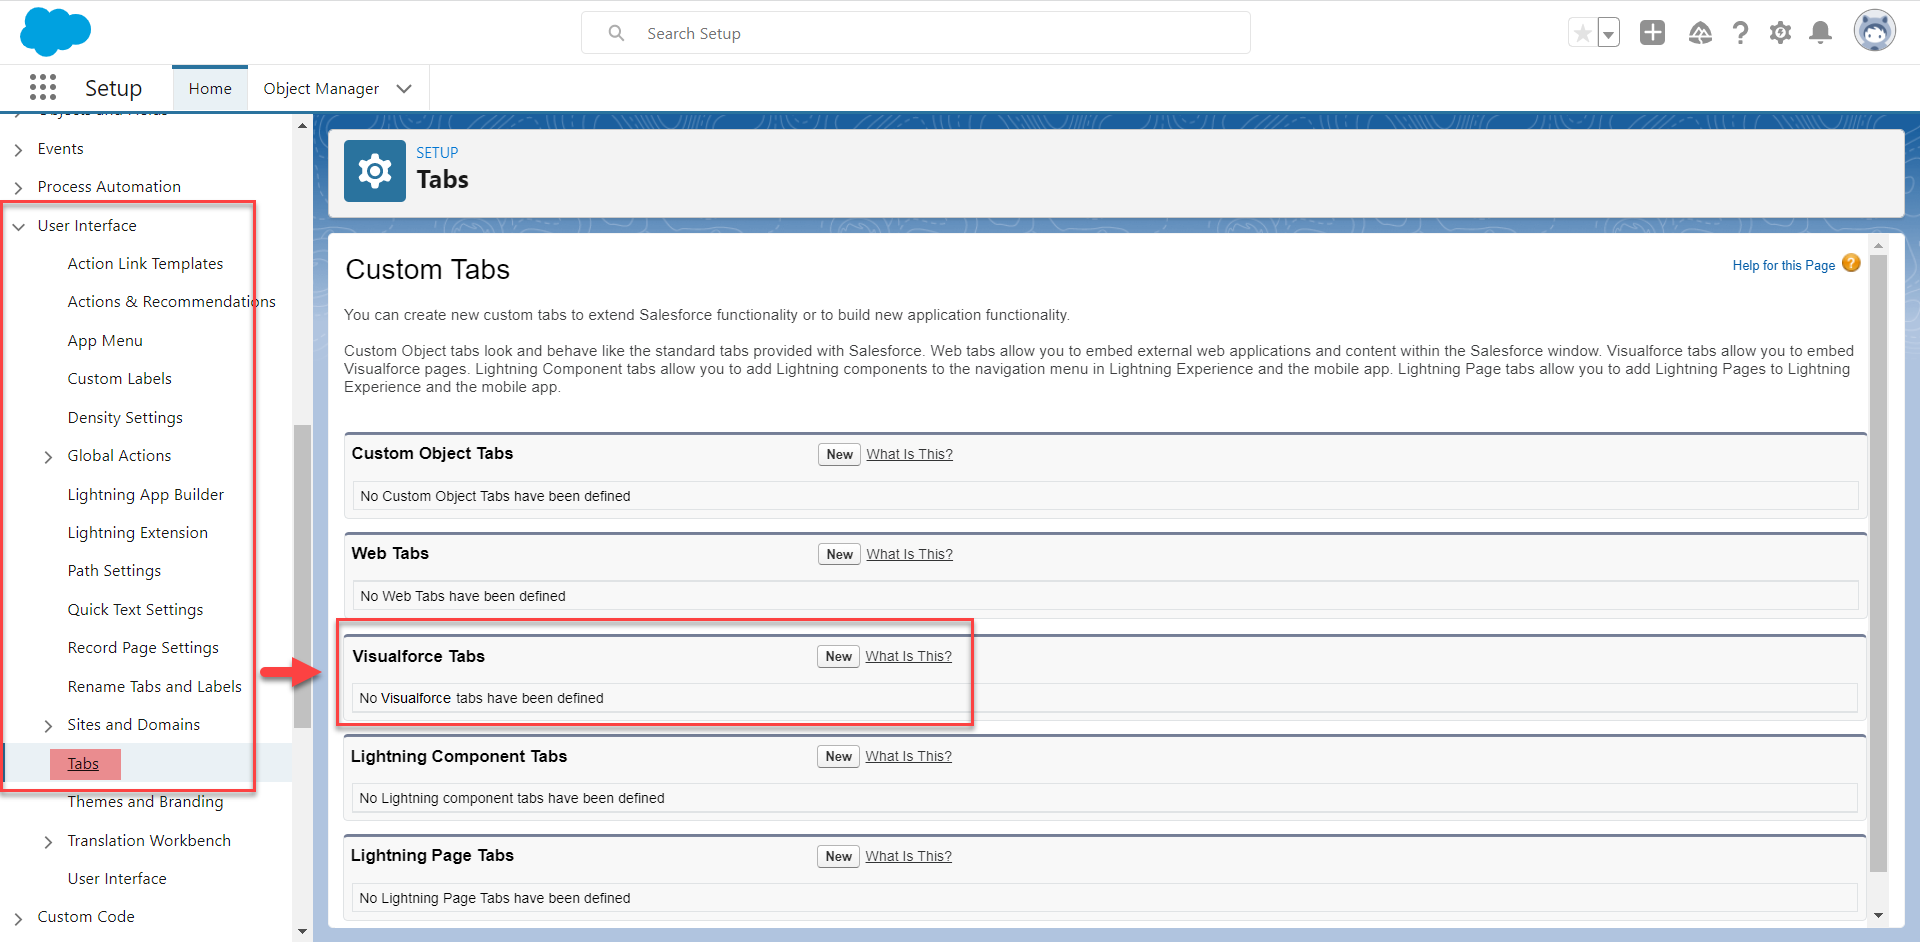
On the Setup user interface, in the left pane, under Platform Tools, click User Interface > Tabs.
-
On the Tabs page, in the section Visualforce Tabs, click New to create a new Visualforce tab.
-
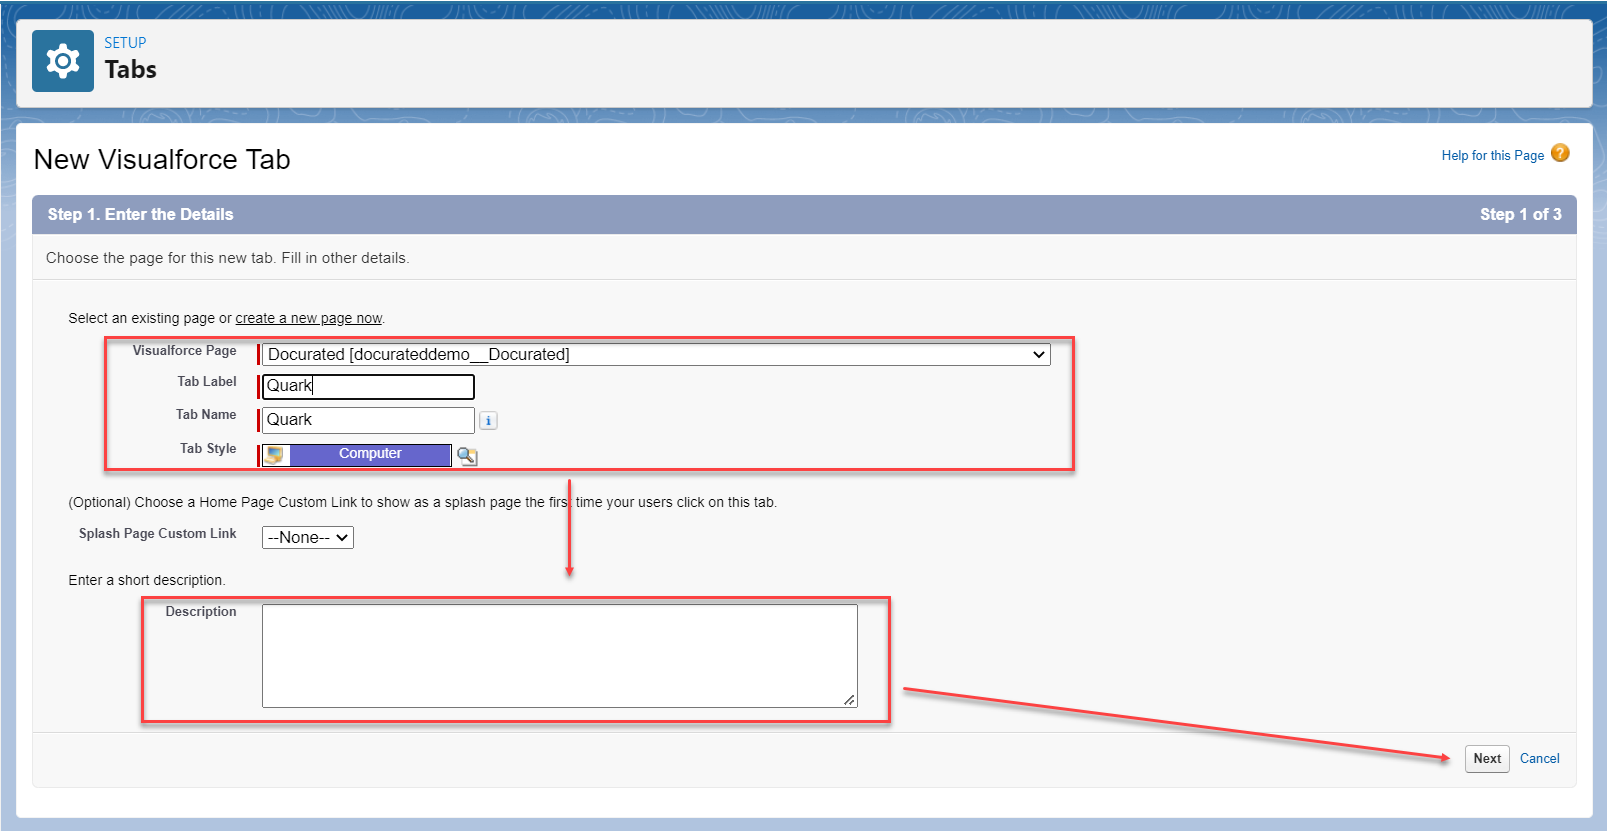
On the New Visualforce Tab page (as Step 1 of the process), provide the following information and then click Next:
-
Select a Visualforce page (choose Docurated).
-
Enter the label of the tab.
-
Enter the name of the tab (you can use your organization's name).
-
Select a tab style.
-
Enter a description.
-
-
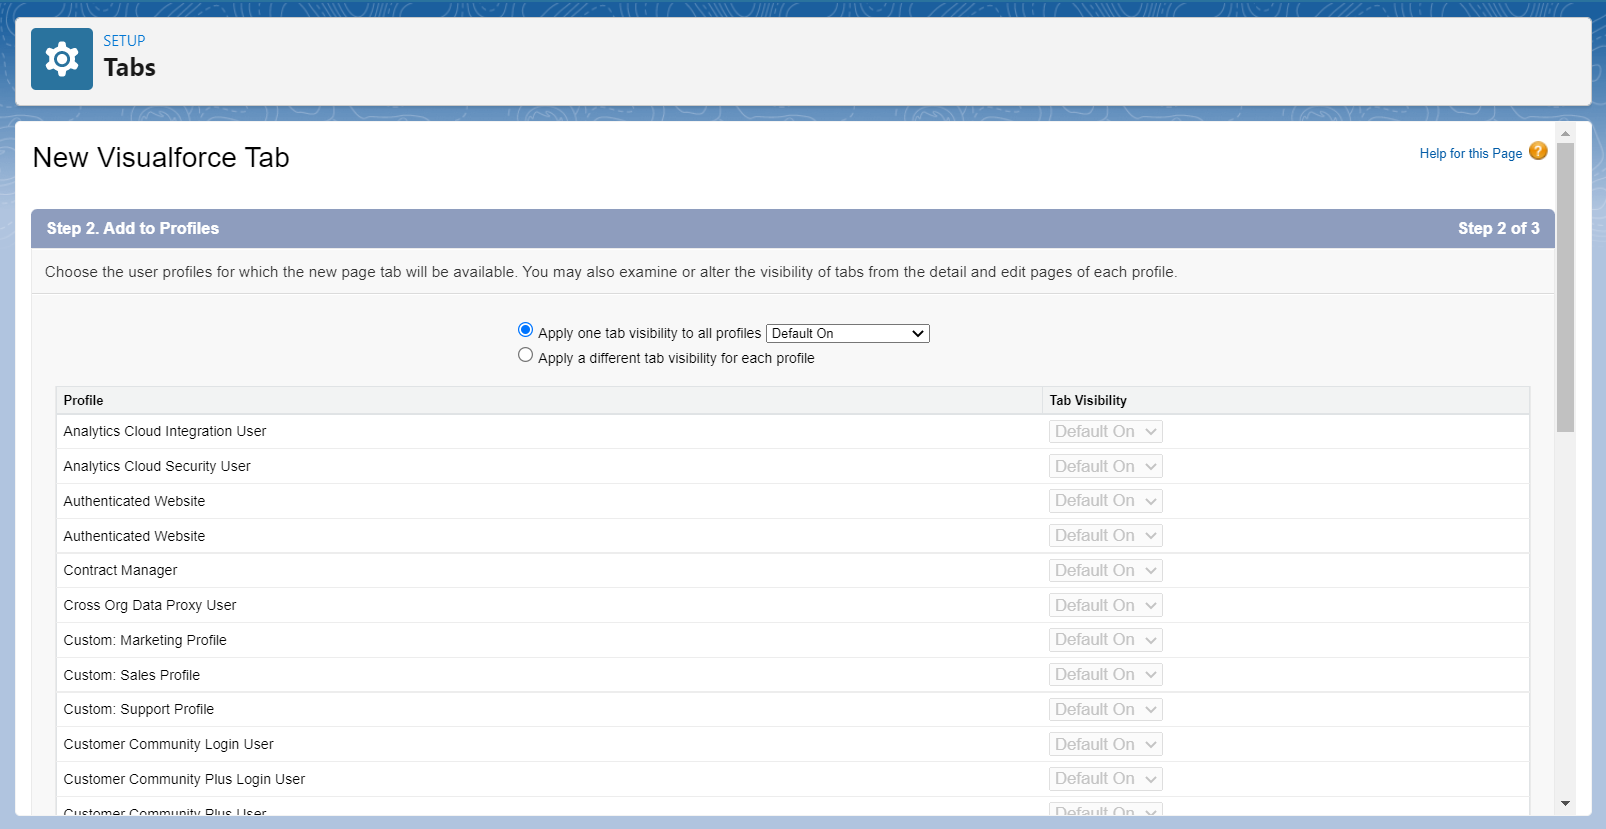
On the New Visualforce Tab page (as Step 2 of the process), choose the profiles for which you want to make the tab default, and then click Next.
-
On the New Visualforce Tab page (as Step 3 of the process), choose the custom apps for which you want to make the tab available, and then click Save to add the tab.
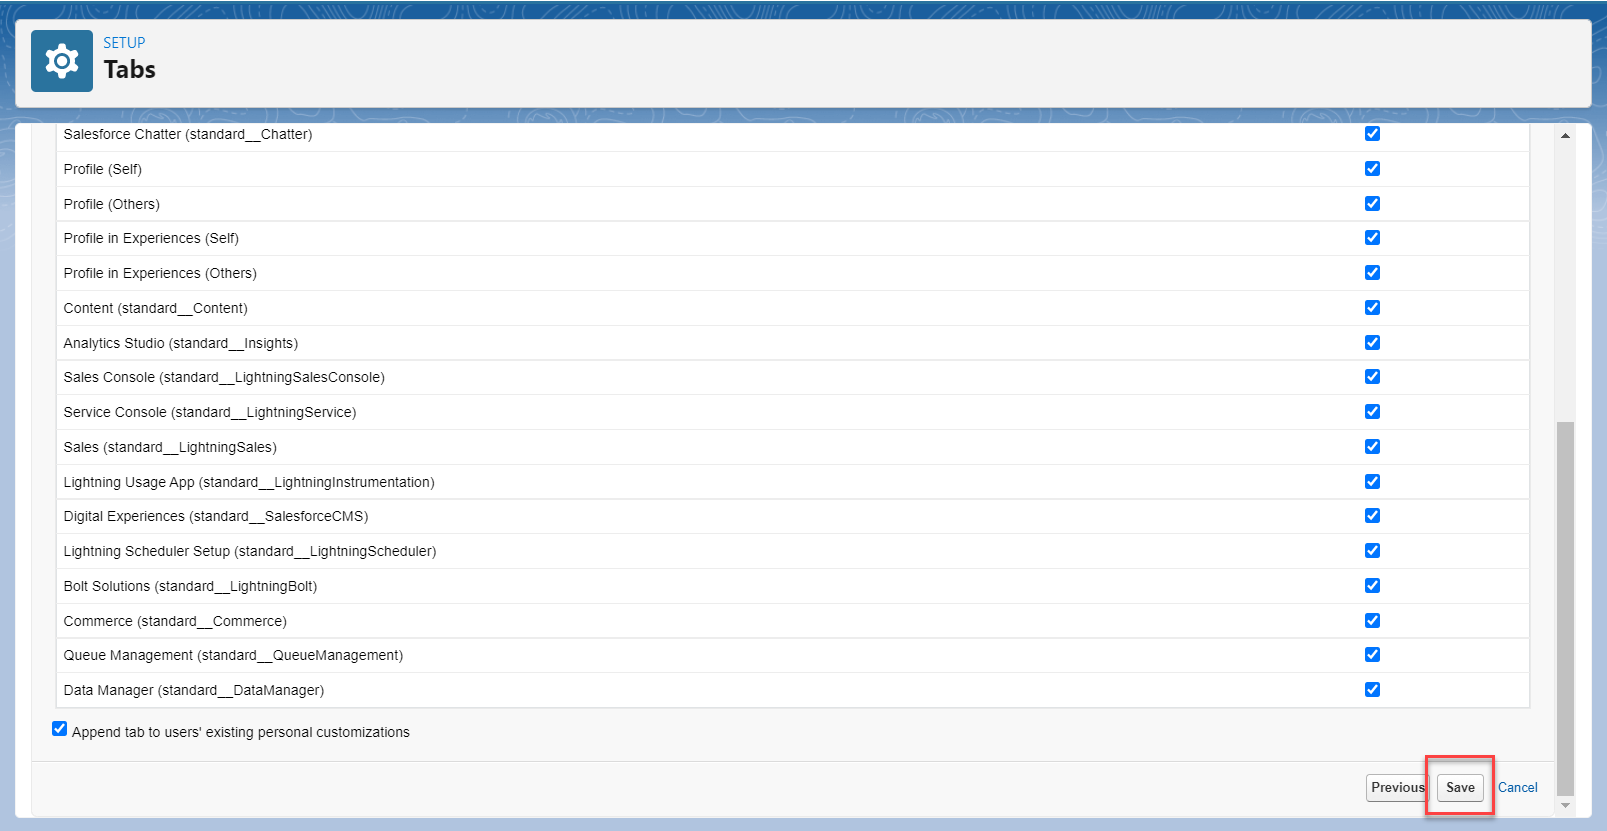
After you have created your custom tab for the Docurated plugin, you can see the tab on the Salesforce user interface for the profiles and custom apps you have made your tab available for.
Add Custom Lightning Tabs for Salesforce Objects
You can configure your custom lightning tabs (record pages) for the Salesforce objects - Accounts, Contacts, Leads, and Opportunities. You can create a custom lightning tab for a Salesforce object, in the same manner, you create a custom Salesforce tab for your Docurated plugin.
The Visualforce pages for these custom lightning tabs are as follows:
|
Salesforce Object |
Visualforce page |
|
Accounts |
Docurated_Embedded_Account_Next |
|
Contacts |
Docurated_Embedded_Contact_Next |
|
Leads |
Docurated_Embedded_Lead_Next |
|
Opportunities |
Docurated_Embedded_Opportunity_Next |
Configure Custom Lightning Tabs
To configure a custom lightning tab for Salesforce object:
-
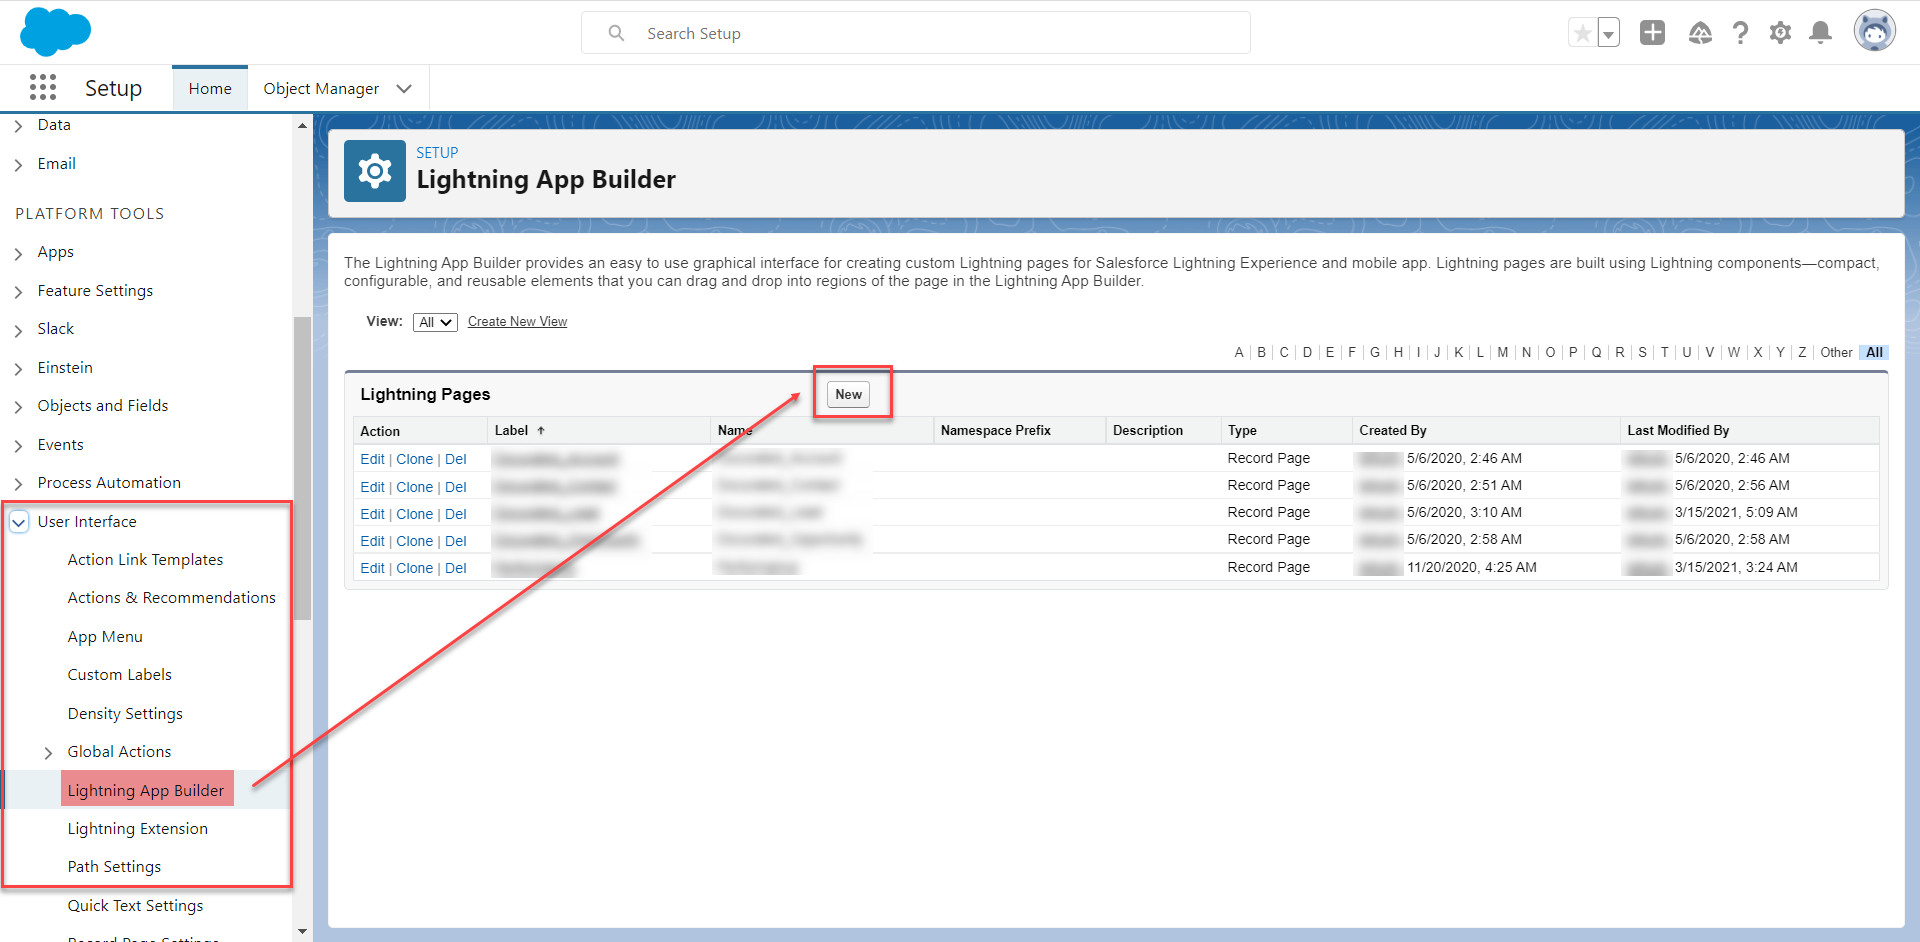
In the left pane, under Platform Tools, click User Interface > Lightning App Builder. The Lightning App Builder page lists the tabs that you configure for Quark Docurated.
You can also search for "Lightning App Builder" in the search bar at the top of the left pane. -
On the Lightning App Builder page, click New to create a new lightning page.
-
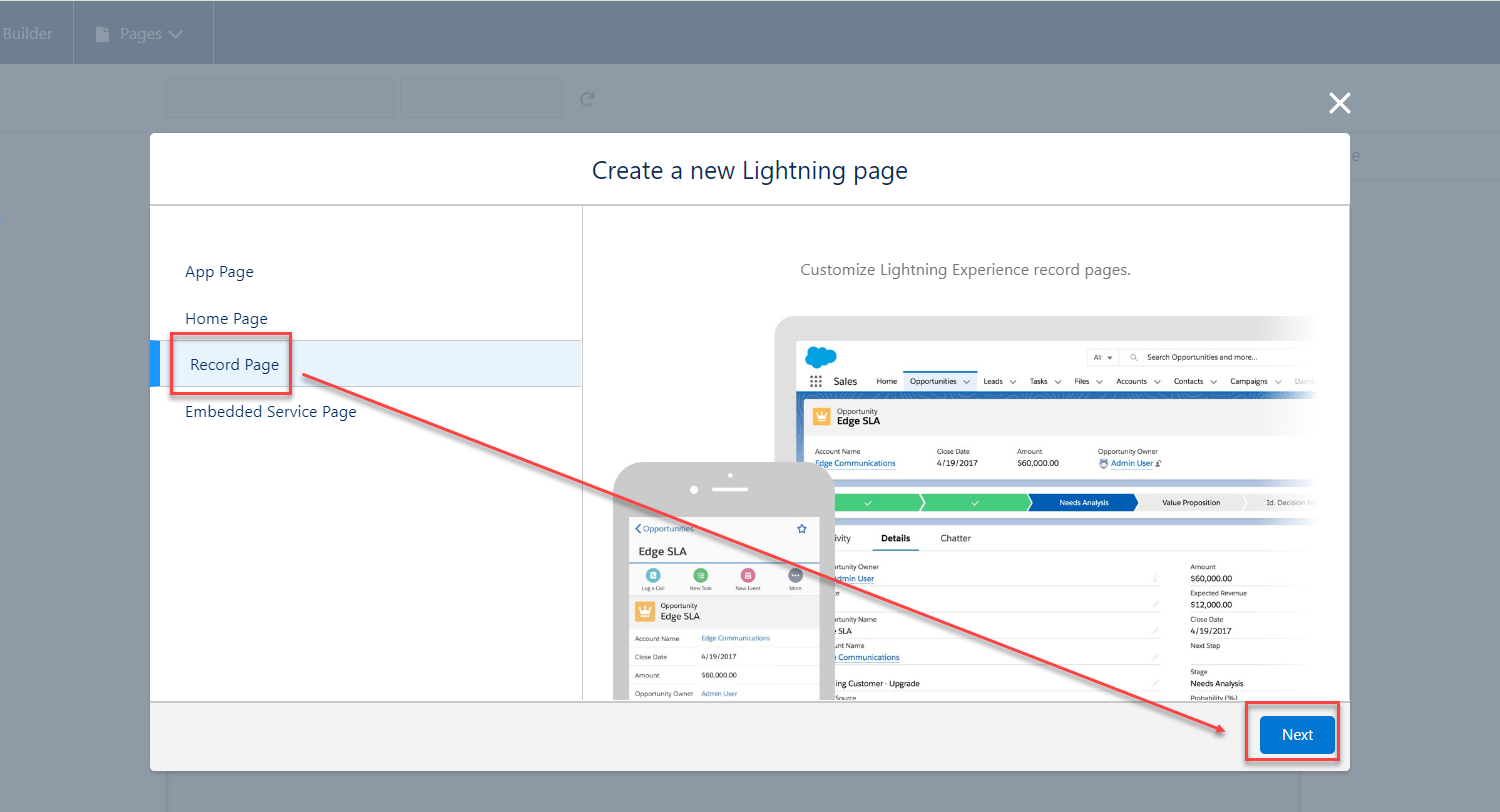
In the Create a new lightning page dialog, click Record Page and then click Next.
-
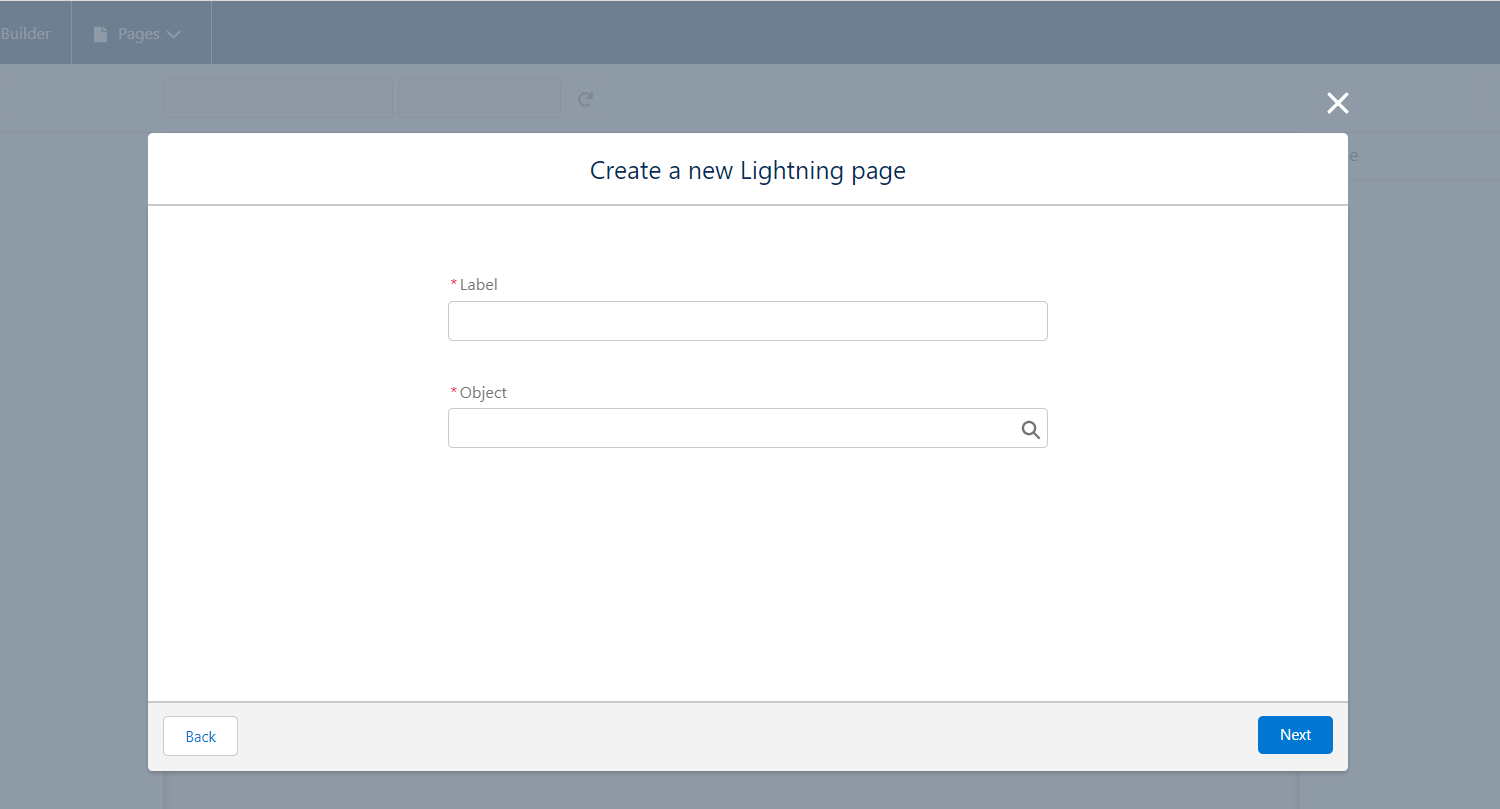
On the next screen, provide a label and select a Salesforce object for which you want to configure your custom lightning page, and then click Next. For example, for the object Accounts, you can add the label "Docurated_Account".
-
On the next screen, select a template for your custom lighting page and then click Finish to close the Create a new lightning page dialog.
Select any of the templates under the tab Close Salesforce Default Page if you do not require to set up your custom lightning page template.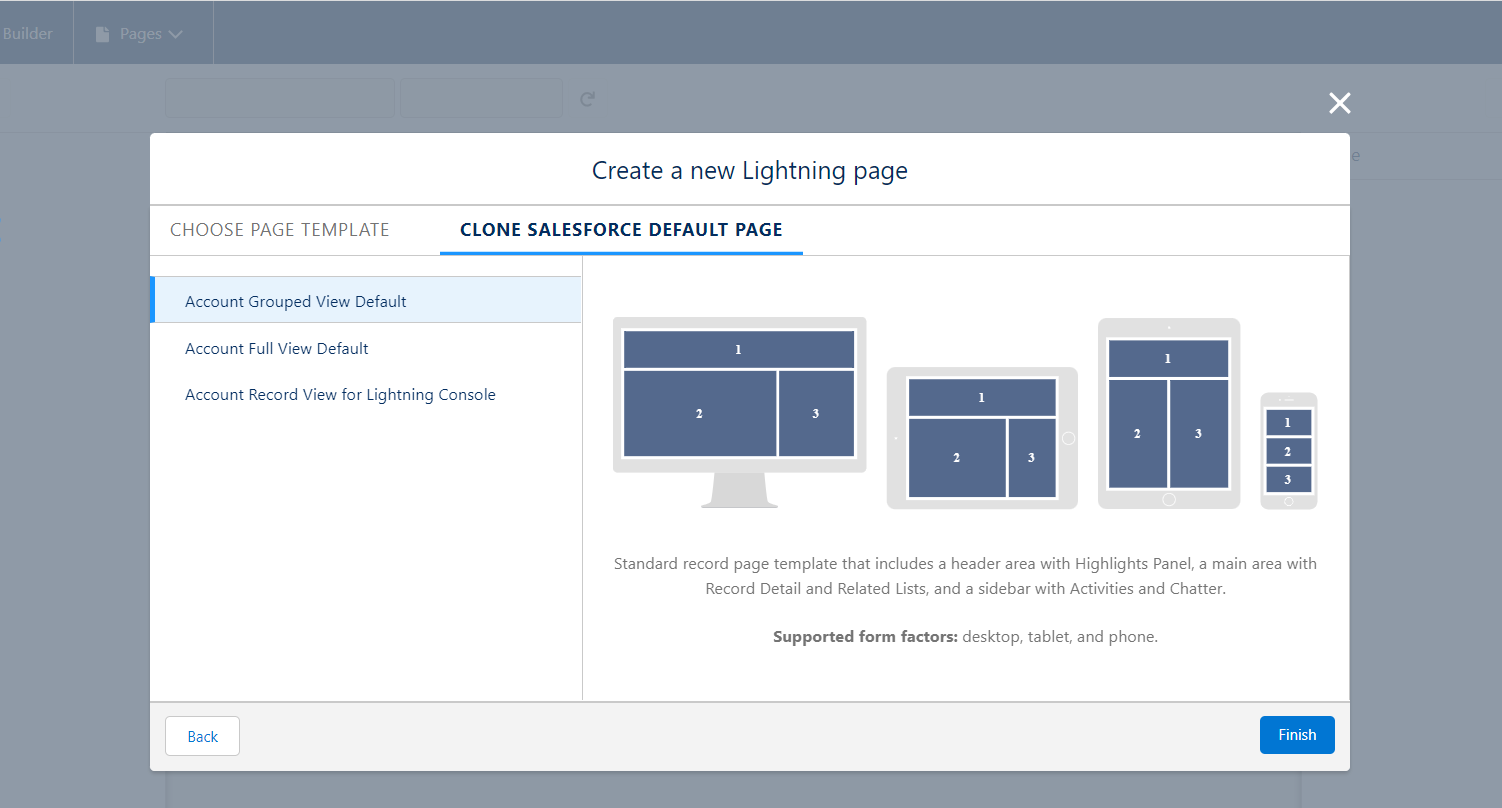
-
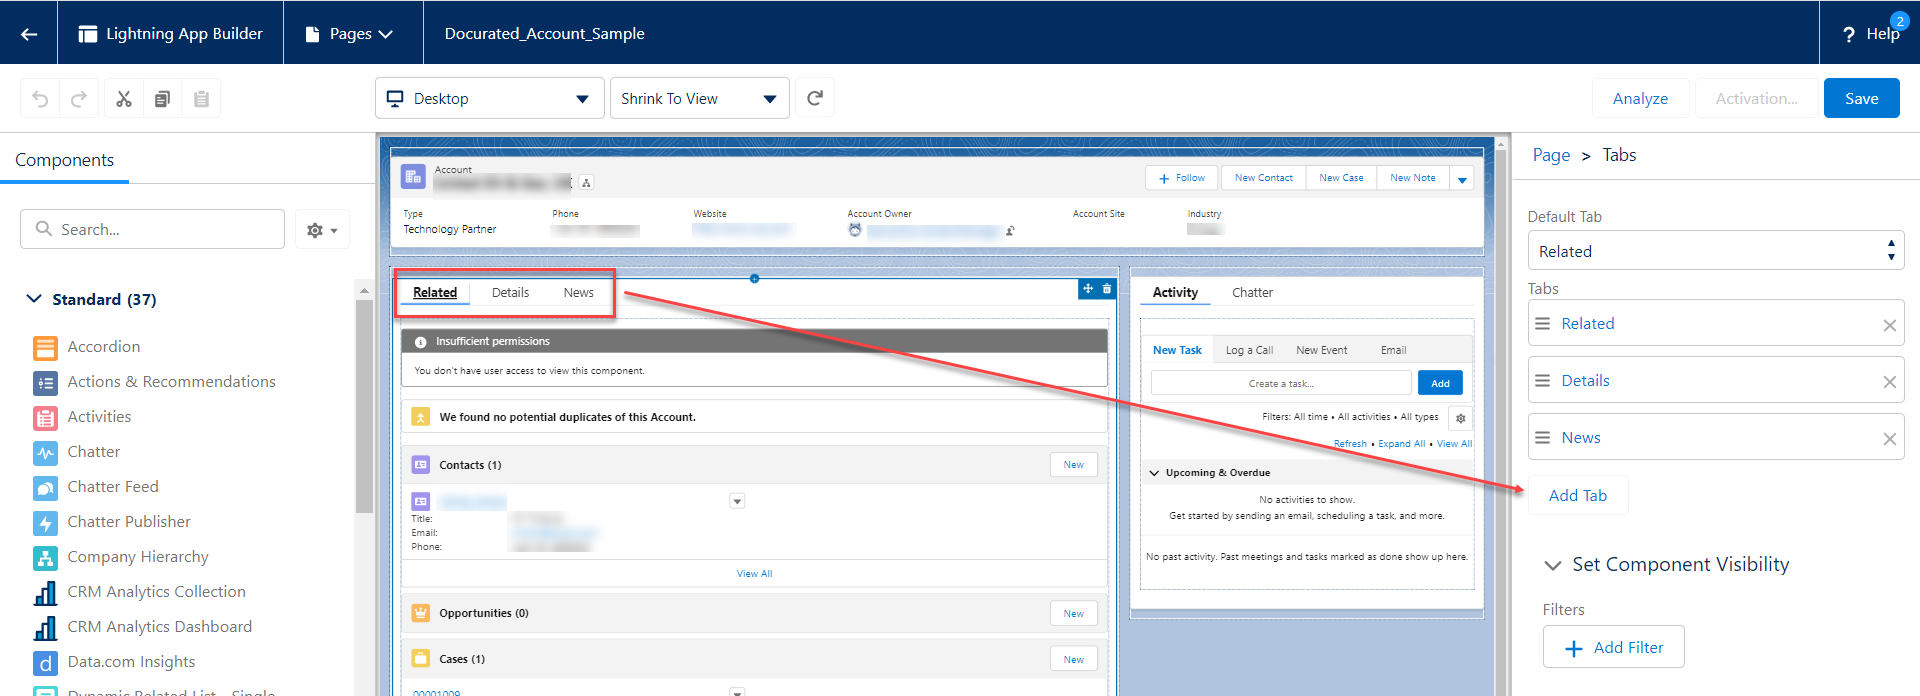
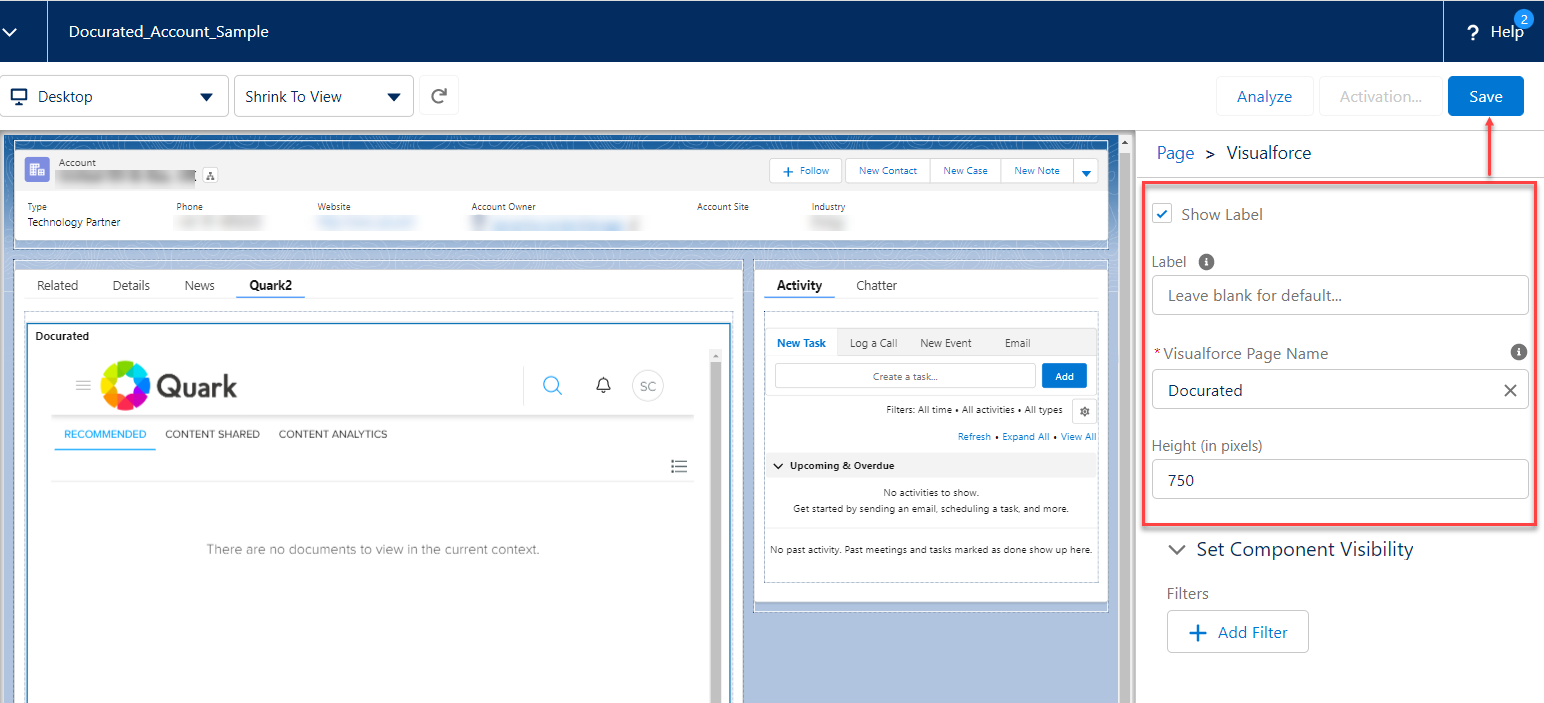
On the next screen (which is the setup page for your custom lightning tab), click any of the already available lightning tabs to make the tab-related options visible in the right pane, and then click Add Tab.
-
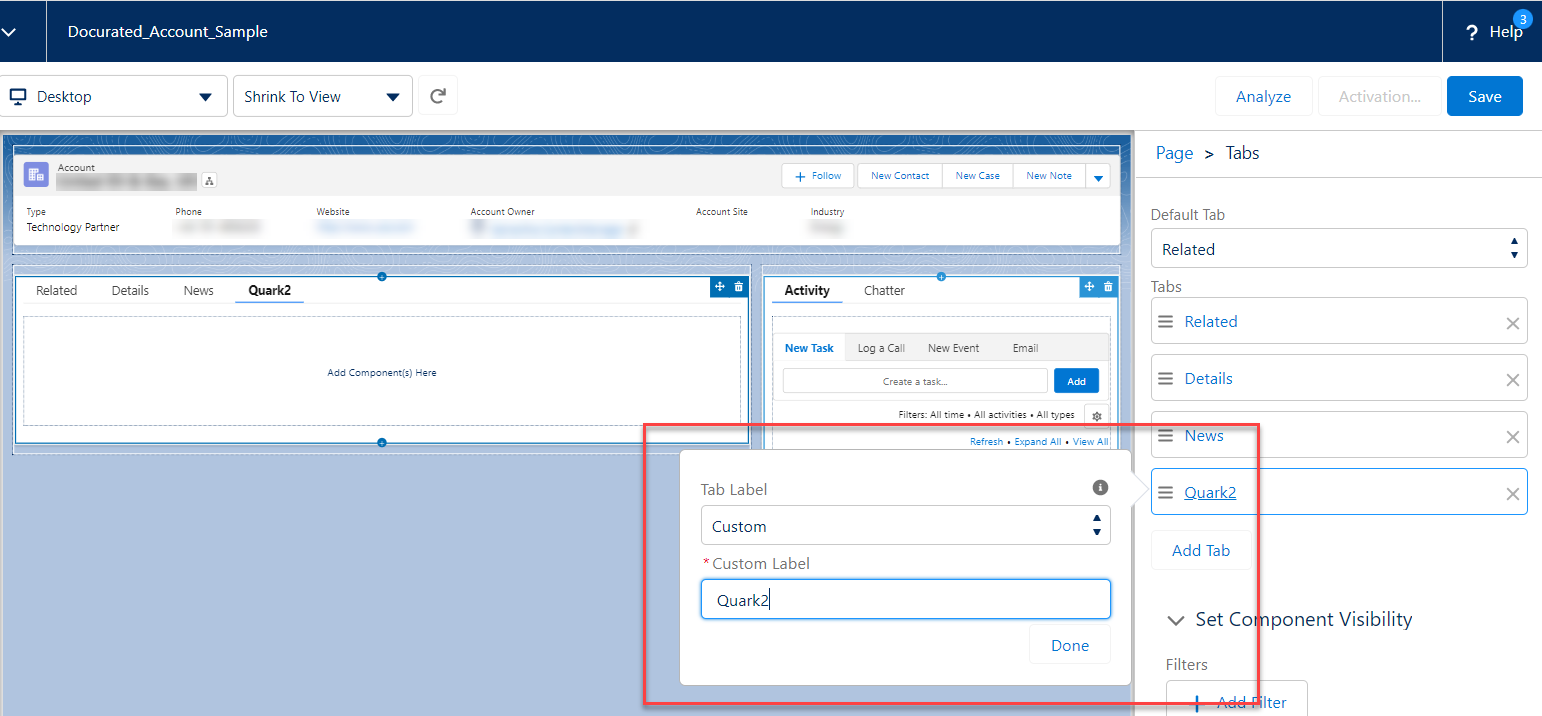
Click the tab you have added to open the dialog that lets you manage the tab label.
-
In the Tab Label dialog, click Custom from the dropdown list and then add a custom label for your lightning tab.
-
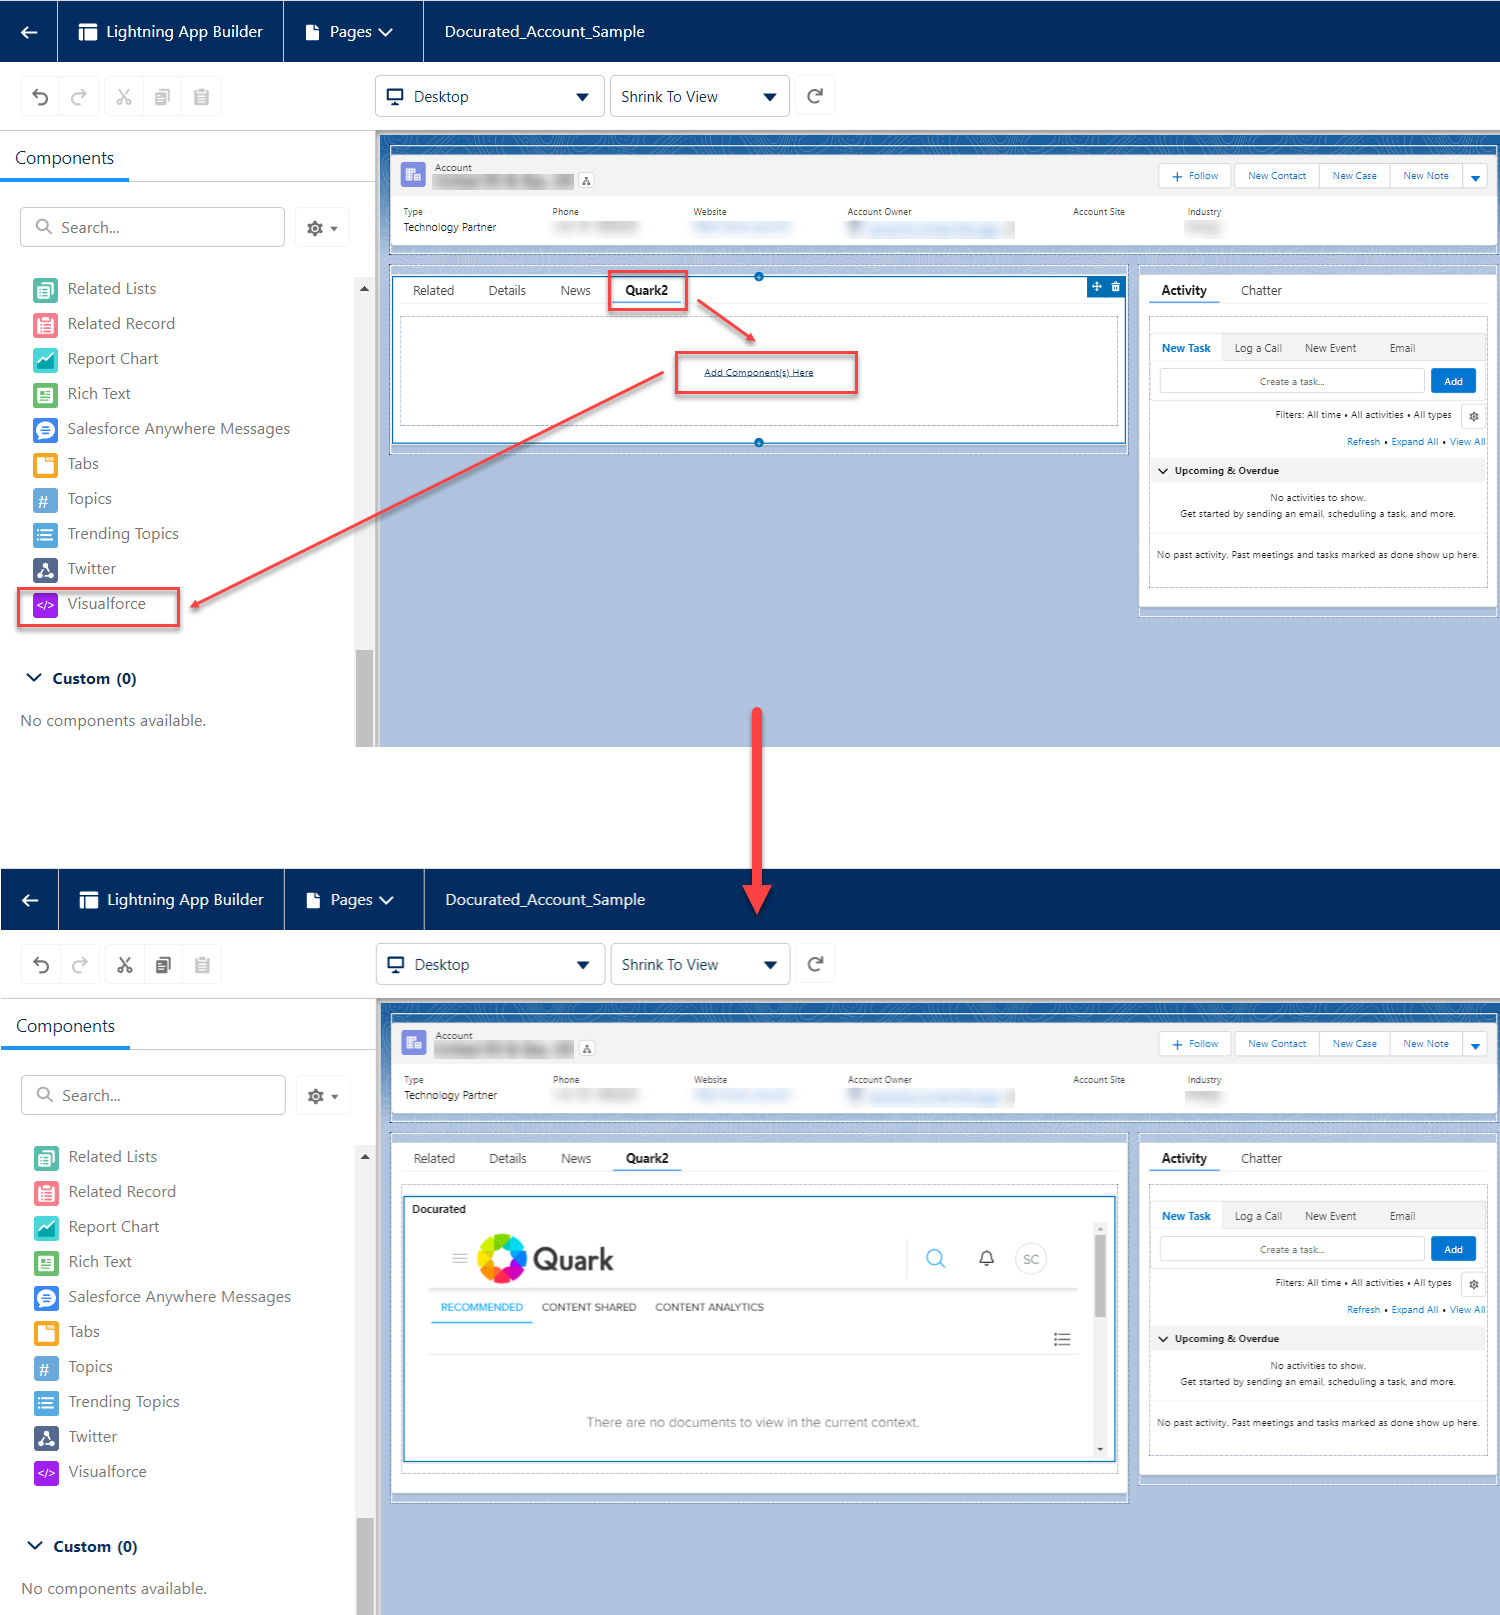
Under your custom tab, click Add Component(s) Here, and then click Visualforce in the left pane, which generates a view of your Docurated server within your custom lighting tab.
-
In the right pane, manage the following properties of your Visualforce component and then click Save to save your custom lightning tab.
-
Label (for example, "Docurated")
-
Visualforce Page Name (Visualforce page of the object for which you want to add your custom lightning tab; for example, Docurated_Embedded_Account_Next for the object Accounts)
-
Height (for the best experience, the recommended height is 750 pixels)
-
-
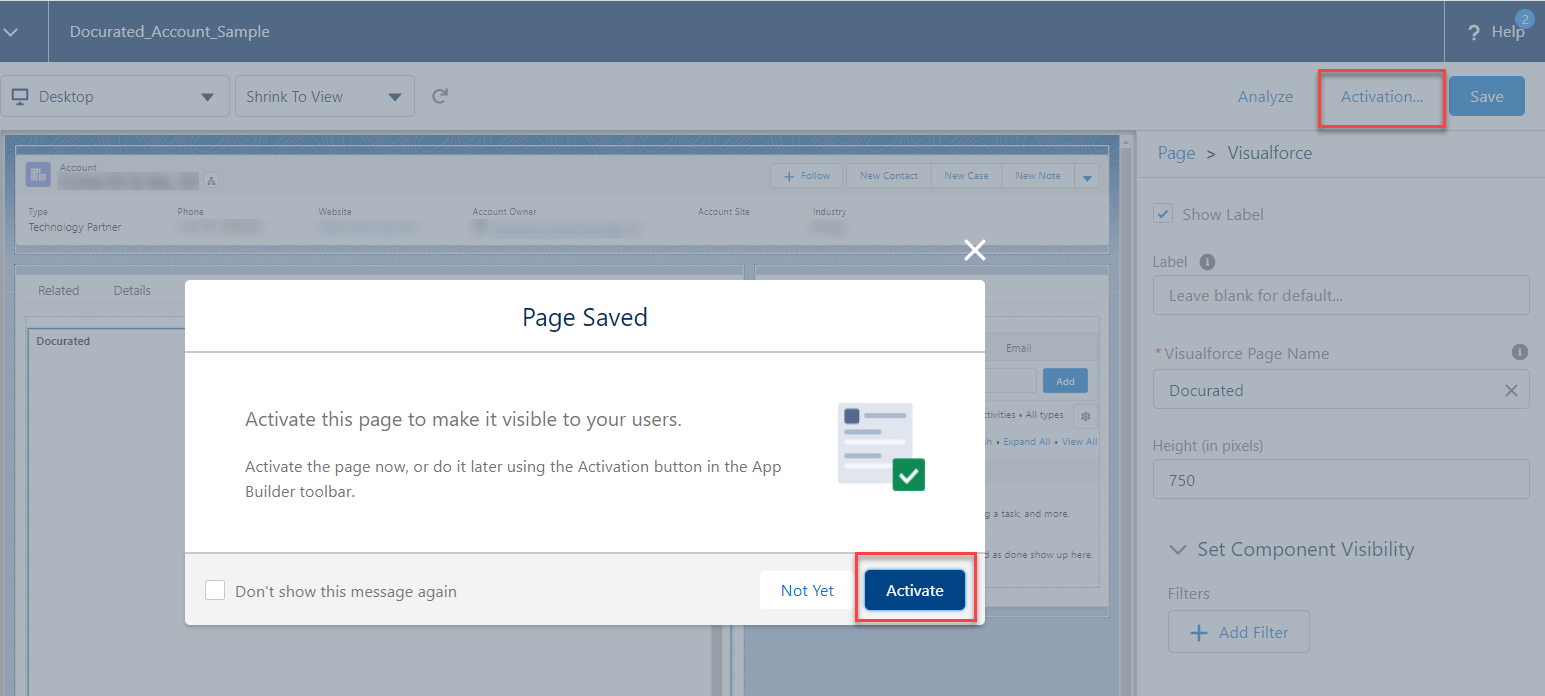
After you have saved your custom lightning tab, Salesforce displays a Page Saved confirmation dialog that asks you to activate your page. You can either click Activate on the dialog or can click Activation at the upper right corner of the setup page.
-
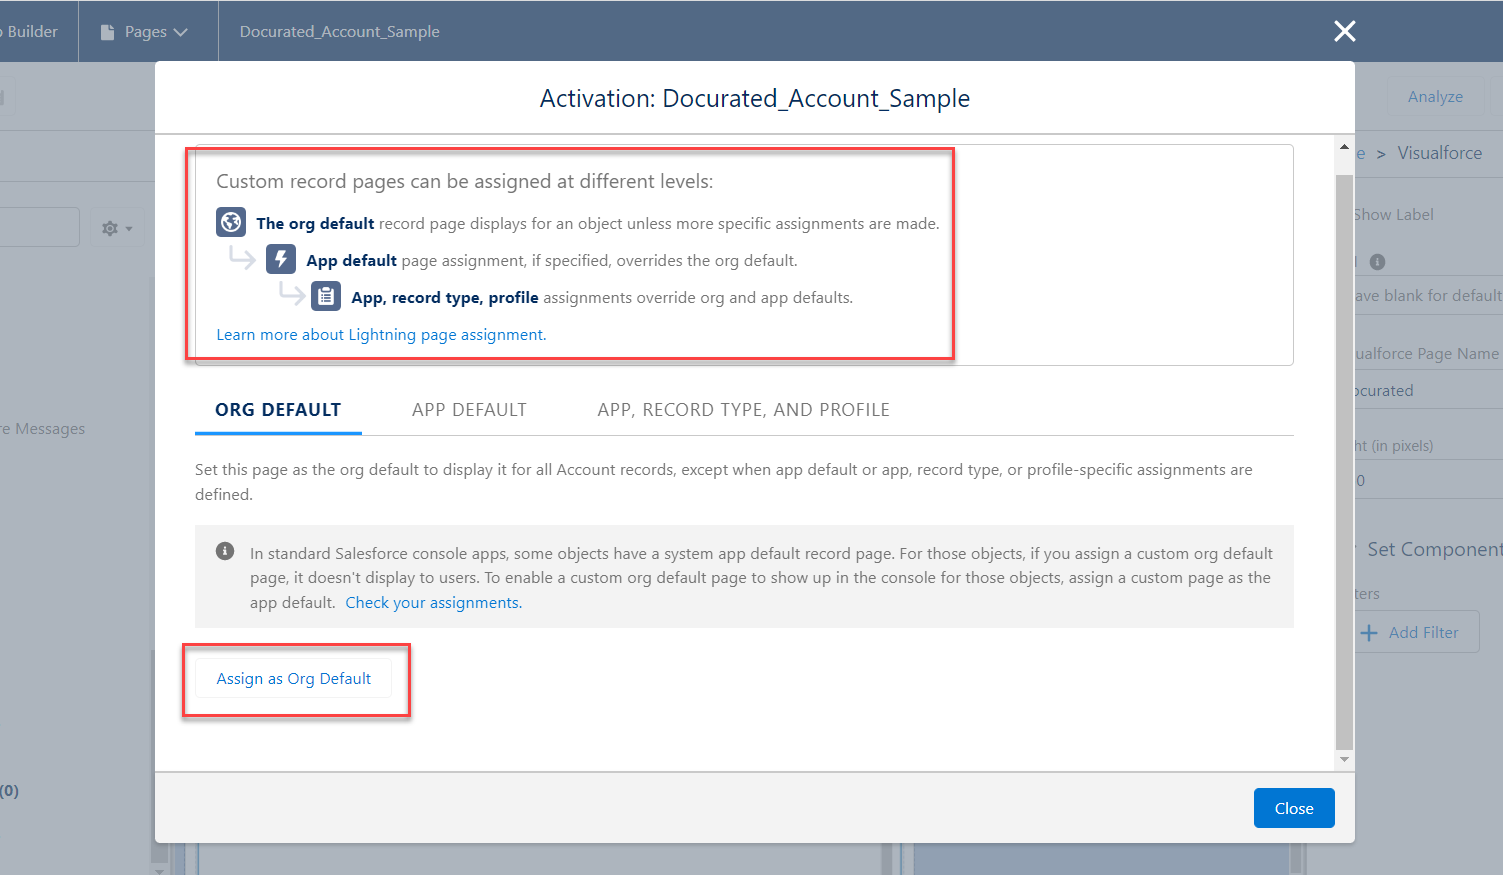
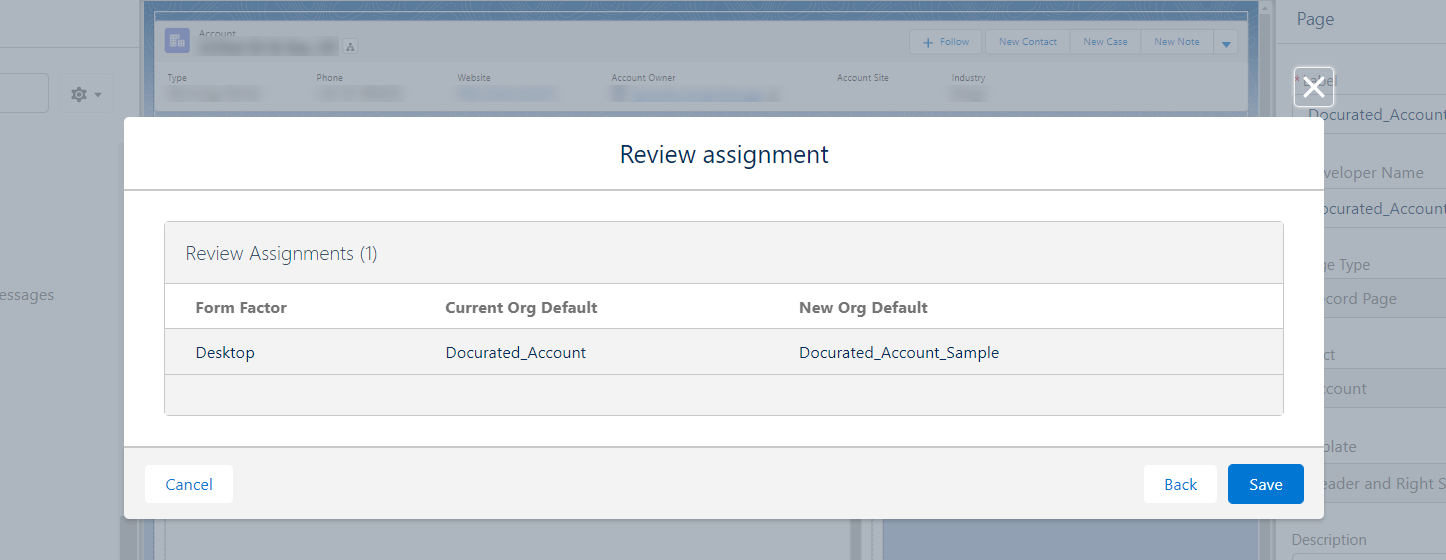
The Activation dialog essentially asks you to review for which user you want to make your custom lightning visible. For example, if you want to make your custom tab default for your entire organization, click Assign as Org Default under the tab Org Default.
-
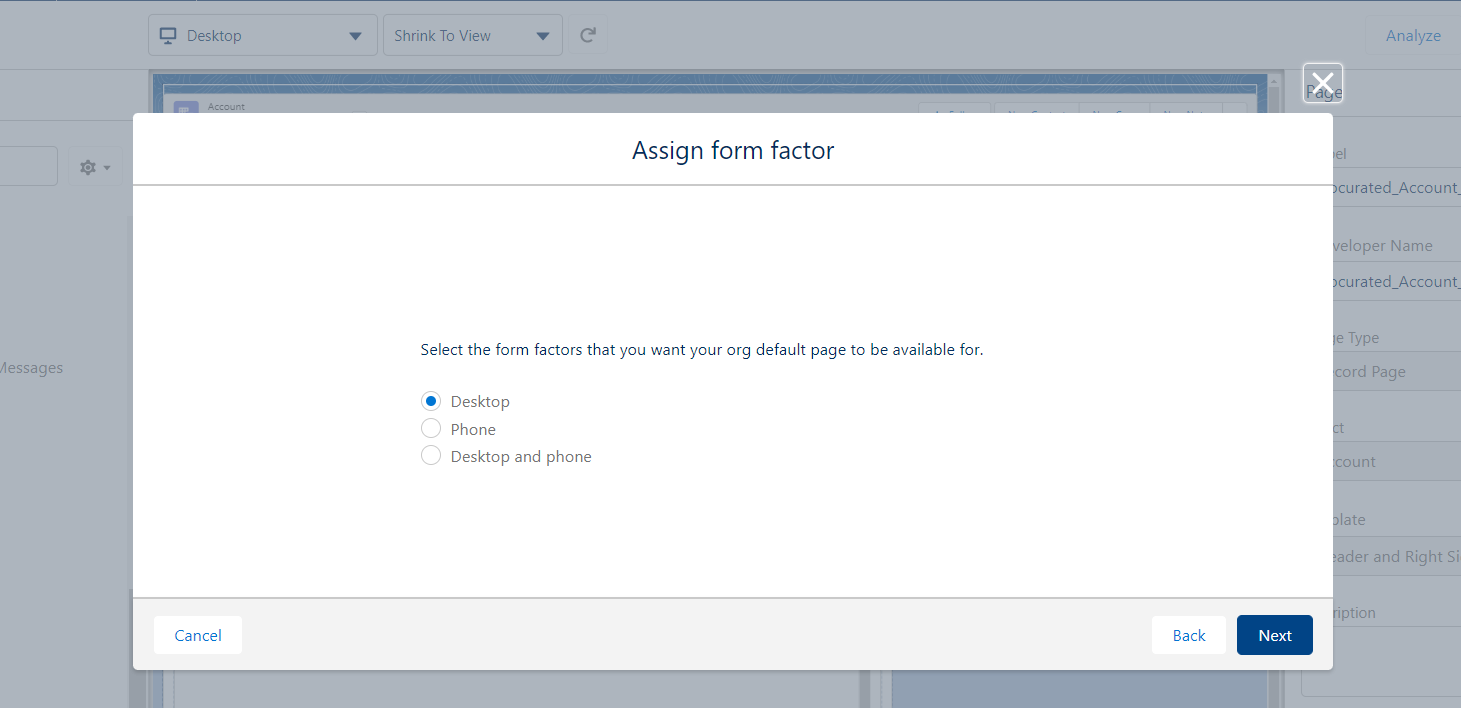
On the next screen, select a form factor (desktop, mobile, or both) on which you want to apply your preferences.
-
On the next screen, review your preferences and then click Save to make your custom lightning tab available for the selected Salesforce object.
Set Access Permission
To set the permission access to the Docurated plugin for Salesforce for the users of your organization:
-
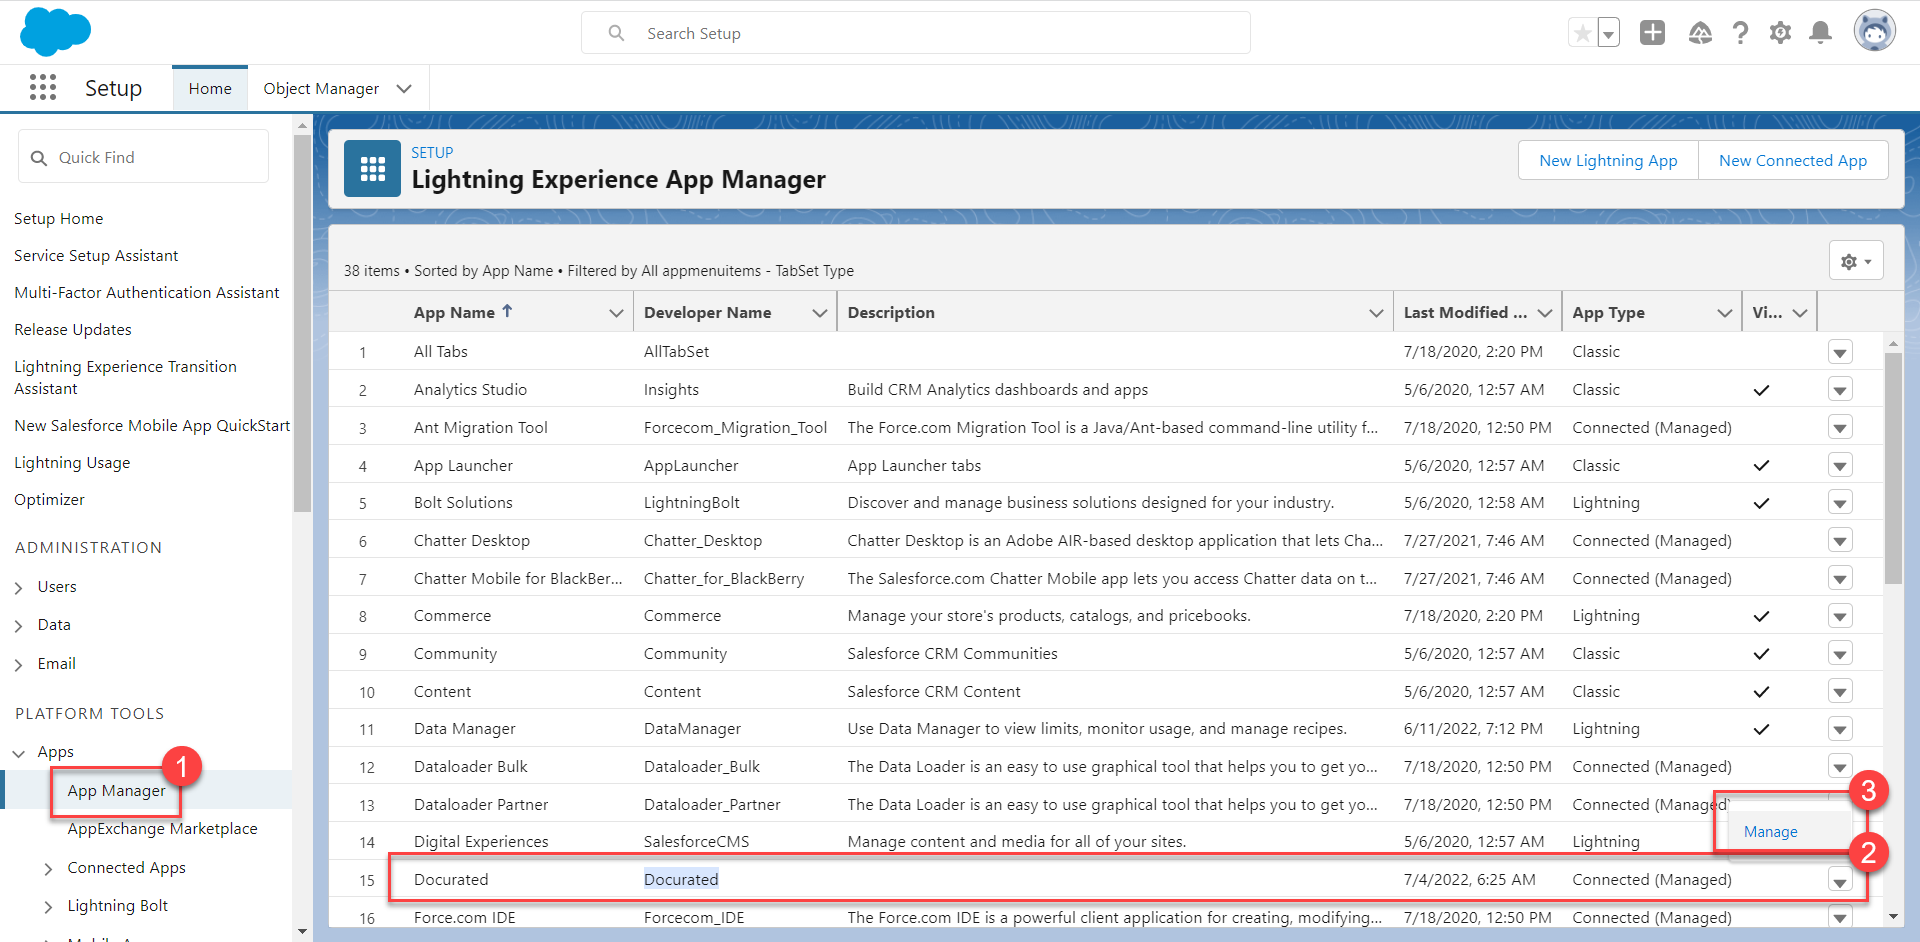
In the left pane, under Platform Tools, click Apps > App Manager. The Lightning Experience App Manager page lists the applications integrated with Salesforce.
You can also search for "App Manager" in the search bar at the top of the left pane. -
On the Lightning Experience App Manager page, click the dropdown icon against Docurated in the listed applications, and then click Manage to open the App Manager page.
-
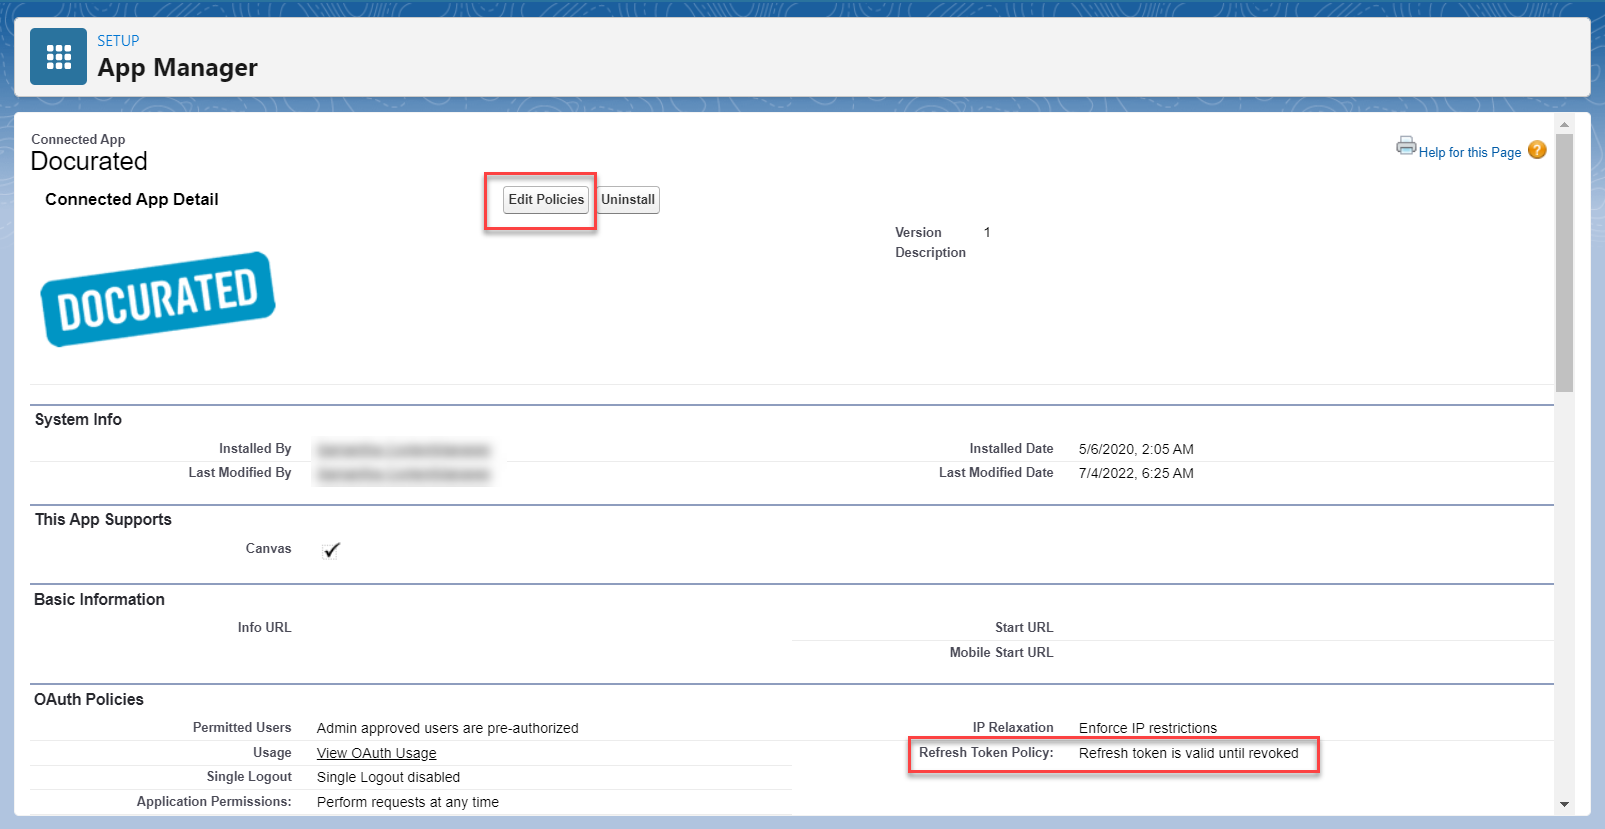
On the App Manager page, click Edit Policies.
-
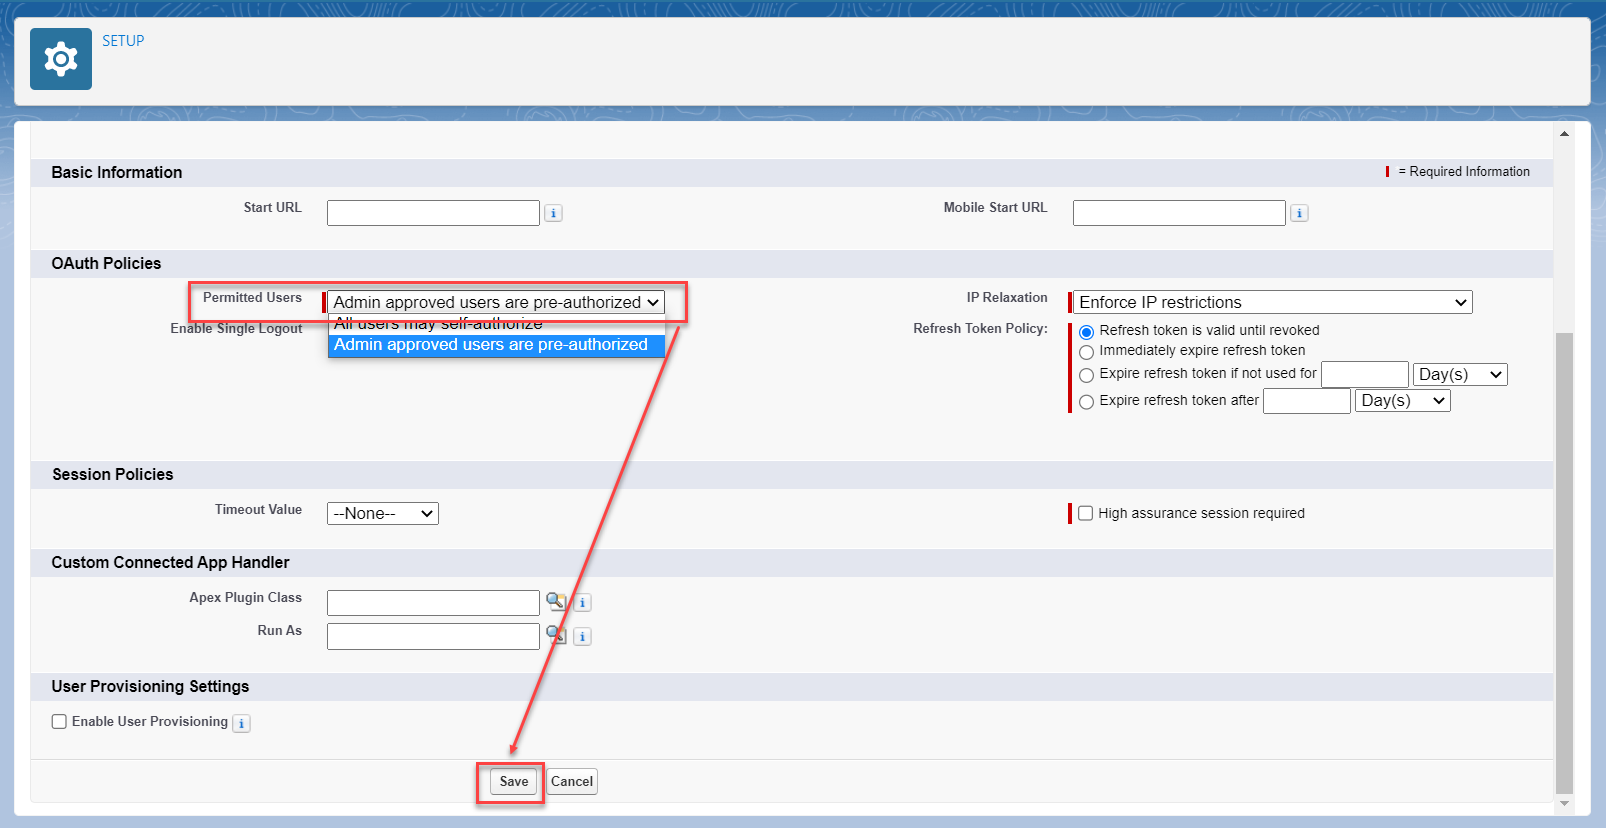
Set the field Permitted Users to Admin approved users are pre-authorized and then click Save. This is to enable the mechanism to manage user access to Docurated plugin.
-
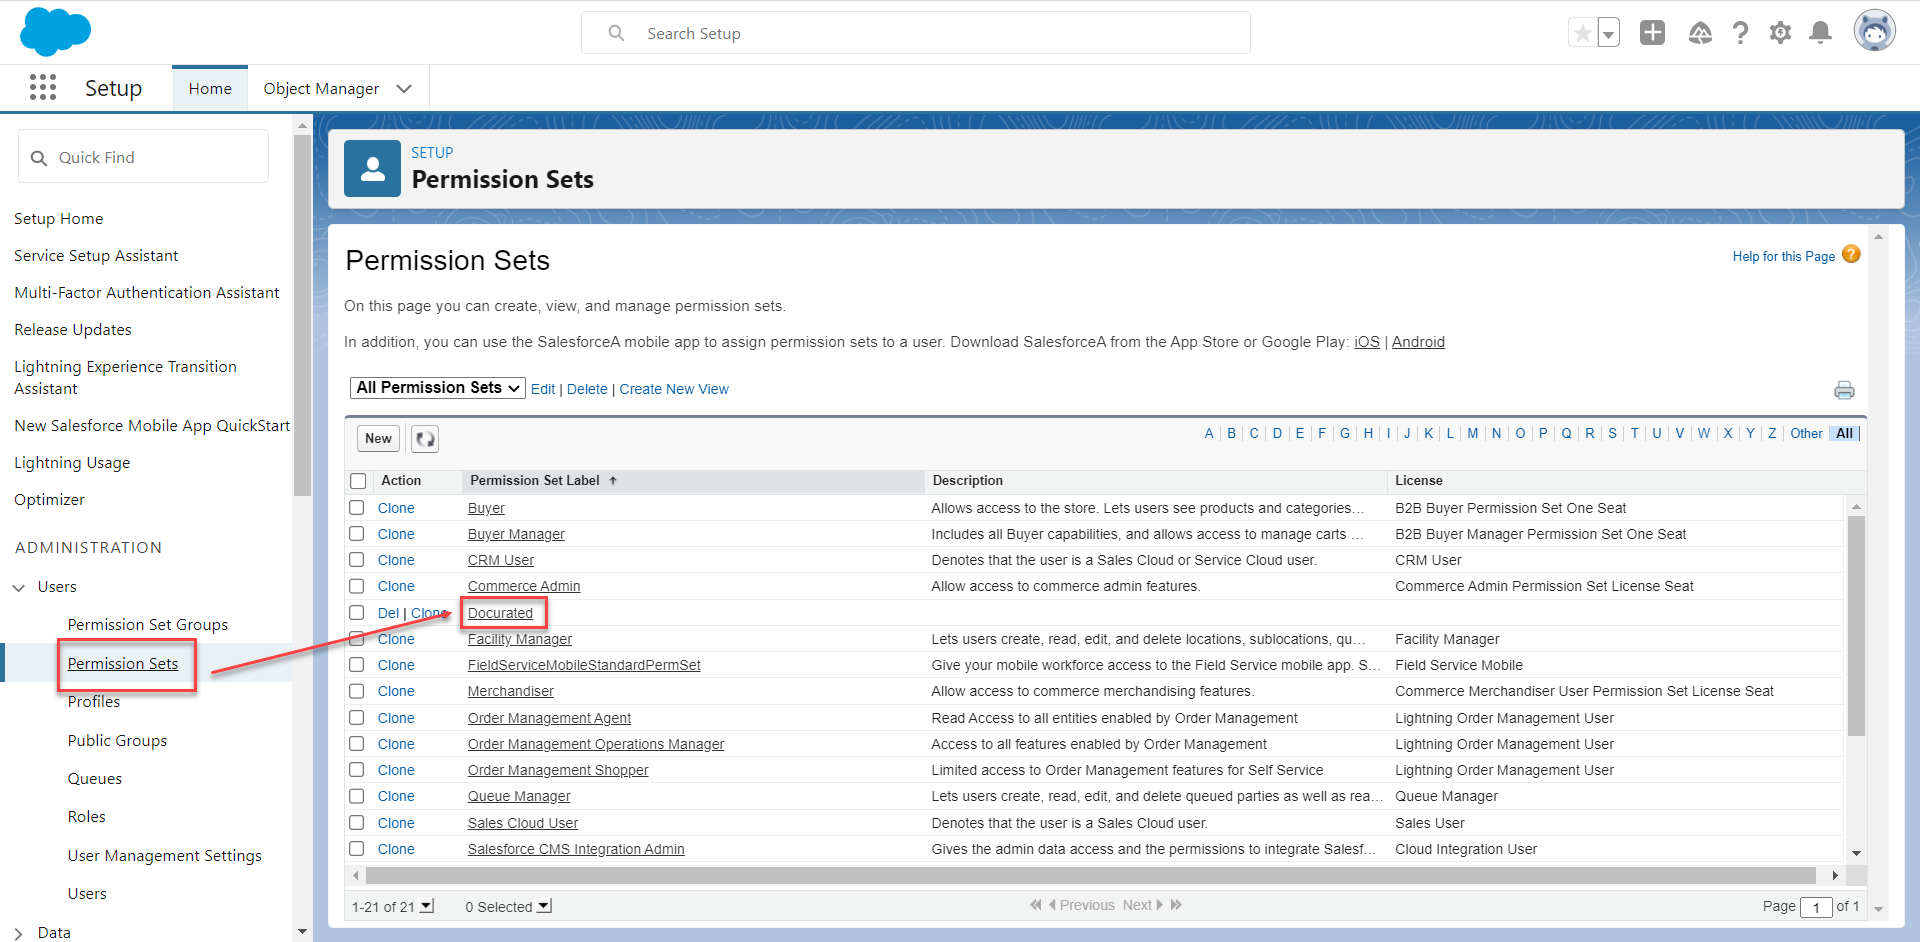
In the left pane, under Administration, click Users > Permission Sets. The Permission Sets page lists the user groups based on applications integrated with Salesforce.
-
On the Permission Sets page, click Docurated.
-
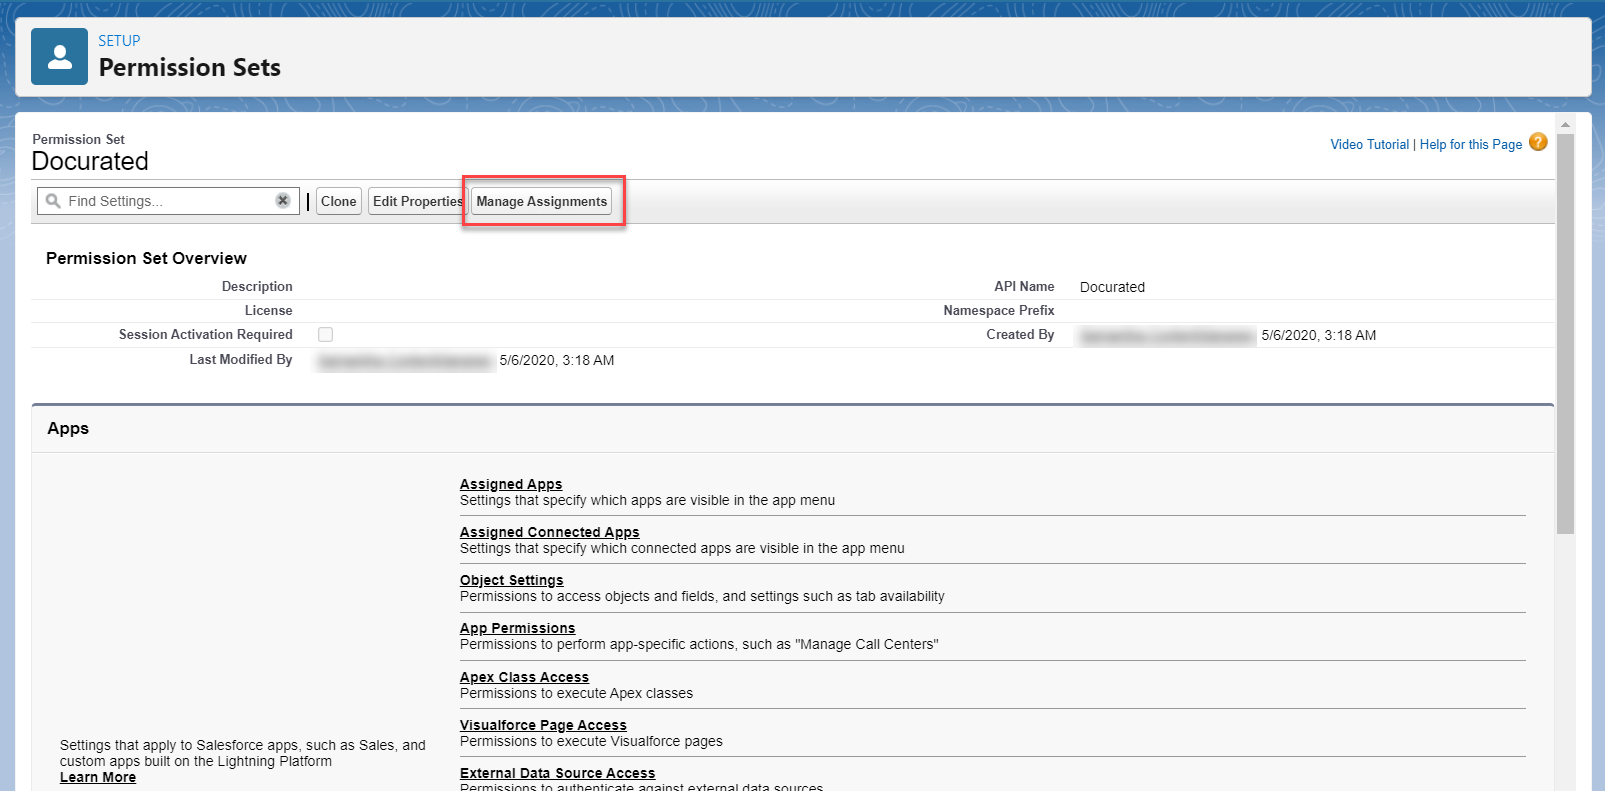
On the next screen, click Manage Assignments.
-
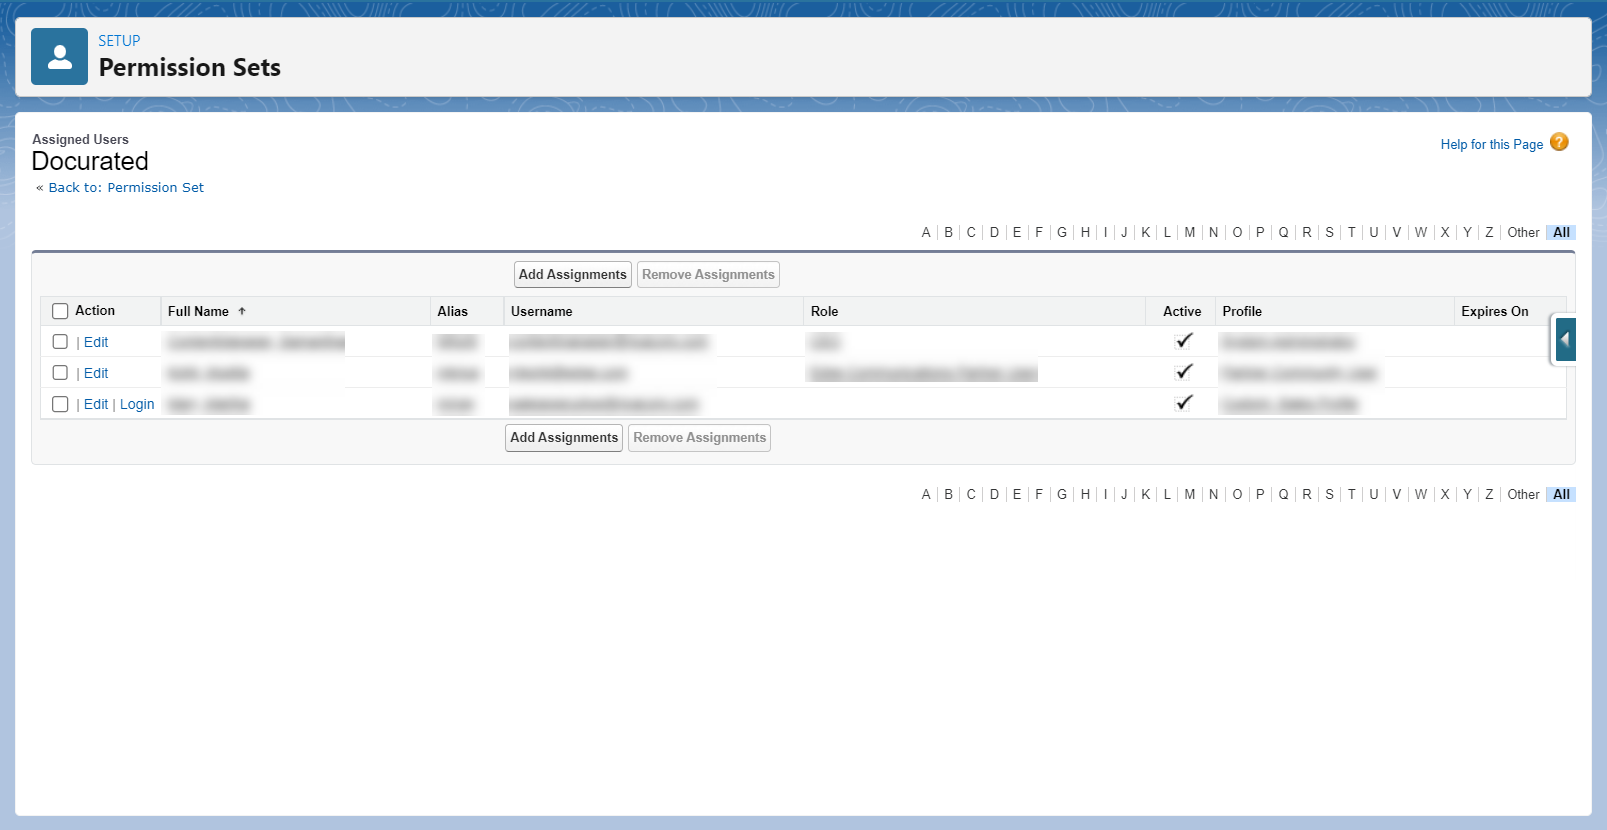
On the next screen, you can add, edit, or remove user access to Docurated plugin.
Sync Salesforce Objects (via Quark Docurated Support)
The Docurated support team can help you connect your Docurated plugin for Salesforce with various Salesforce objects, subject to your organization's API limits. Docurated uses API requests for features like playbook delivery, Salesforce library synchronization, content engagement tracking, and email activity logging.
You can sync the following Salesforce objects with assistance from the Quark Docurated support team, who can also customize object synchronization based on your needs:
|
Account |
Attachment |
|
ChatterActivity |
Contact |
|
ContentDocument |
ContentDistribution |
|
ContentVersion |
ContentWorkspace |
|
ContentWorkspaceDoc |
Document |
|
FeedItem |
Folder |
|
GoogleDoc |
Lead |
|
Note |
Opportunity |
|
OpportunityContactRole |
OpportunityFieldHistory |
|
OpportunityHistory |
OpportunityStage |
|
Profile |
User |
Sync Salesforce Content Workspaces (via Quark Docurated Support)
You can get Salesforce libraries mapped to your Docurated server. To map data from Salesforce libraries, Quark Docurated support team requires the following information:
-
The content workspace ID or the Salesforce library ID that you want to map.
-
The topic that corresponds to the library to which you want to map the data.
Chrome Extension
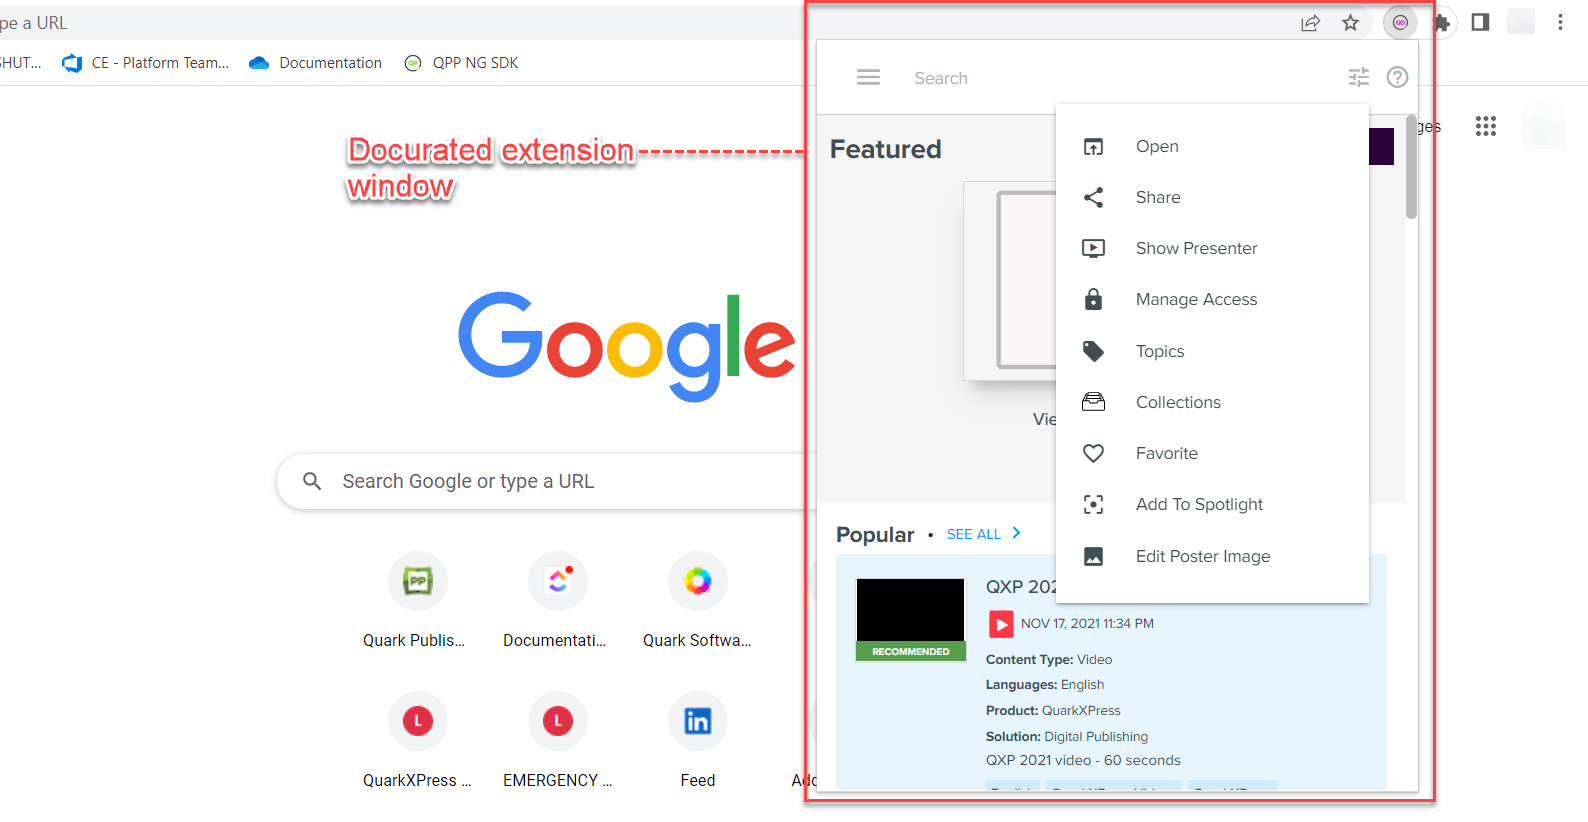
Quark Docurated browser extension is available on Google Chrome Web Store. Docurated browser extension allows you to search, browse, and share documents within the extension window (without having to open the Docurated web application in your browser) and is a handy marketing tool (see the section Third-party Application Integration > Marketo for more information).
-
Marketo
-
Pardot
-
Outreach
-
HVS (Salesforce)
To add Docurated browser extension:
-
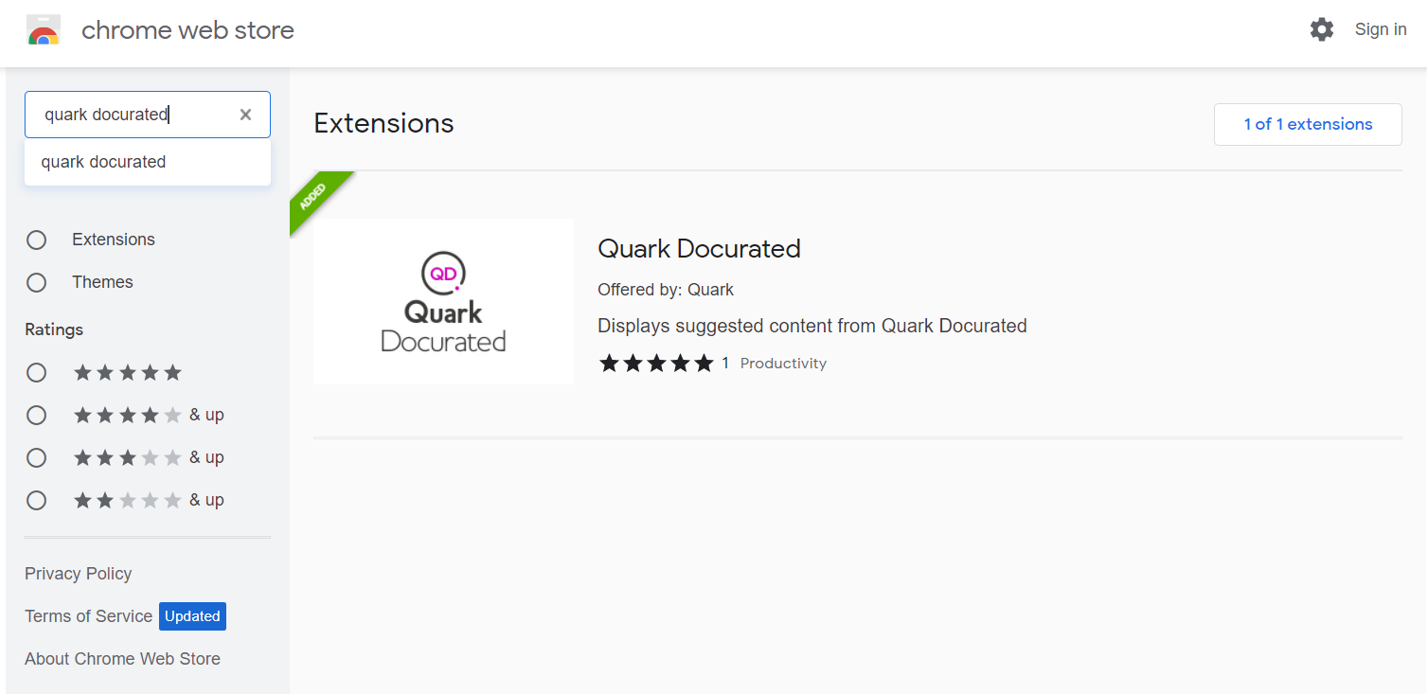
Go to Google Chrome Web Store.
-
Search for Quark Docurated.
-
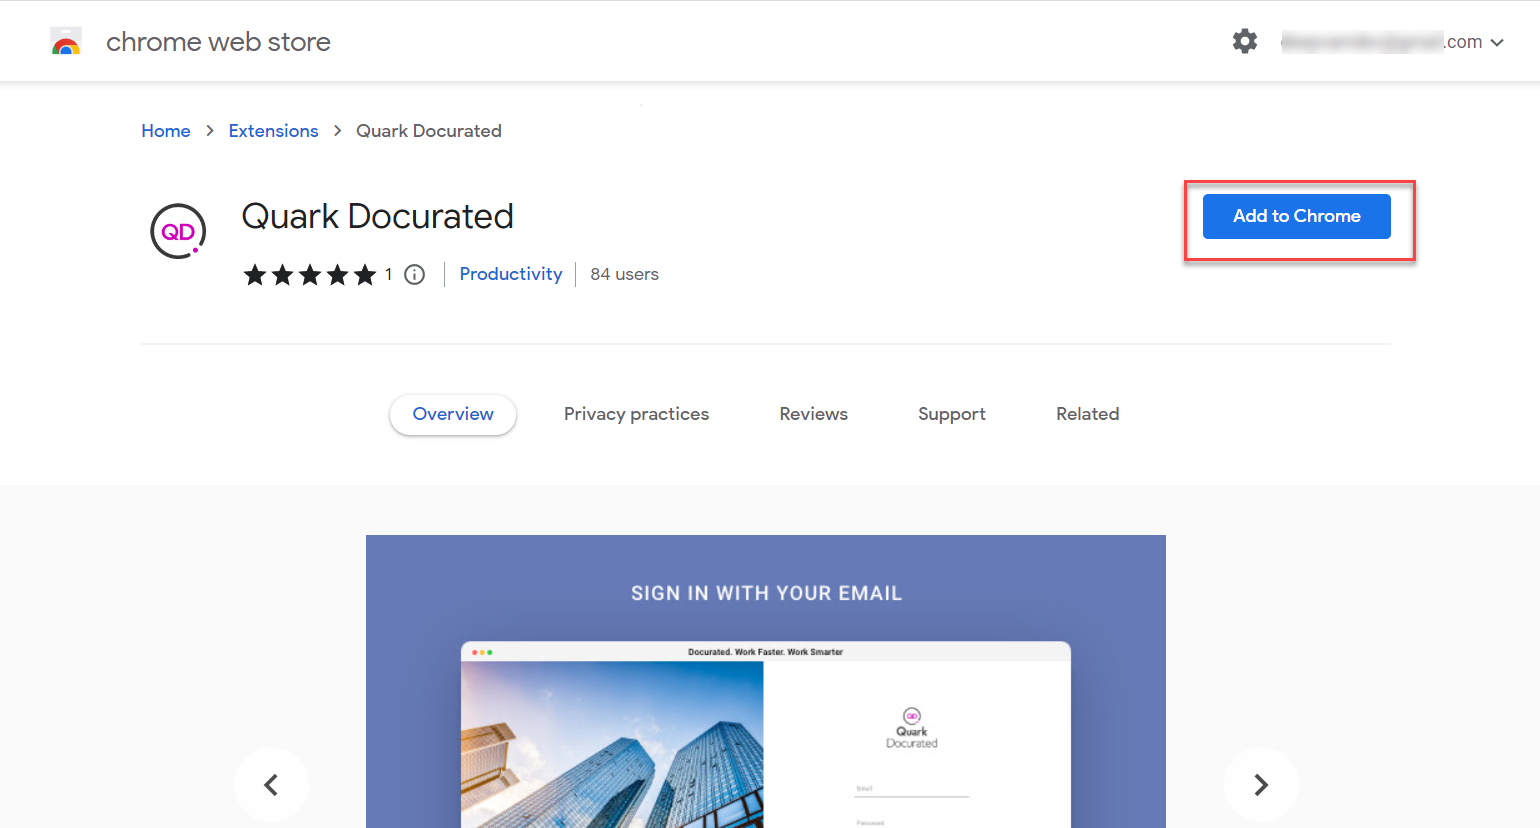
Click the search results and then click Add to Chrome.
-
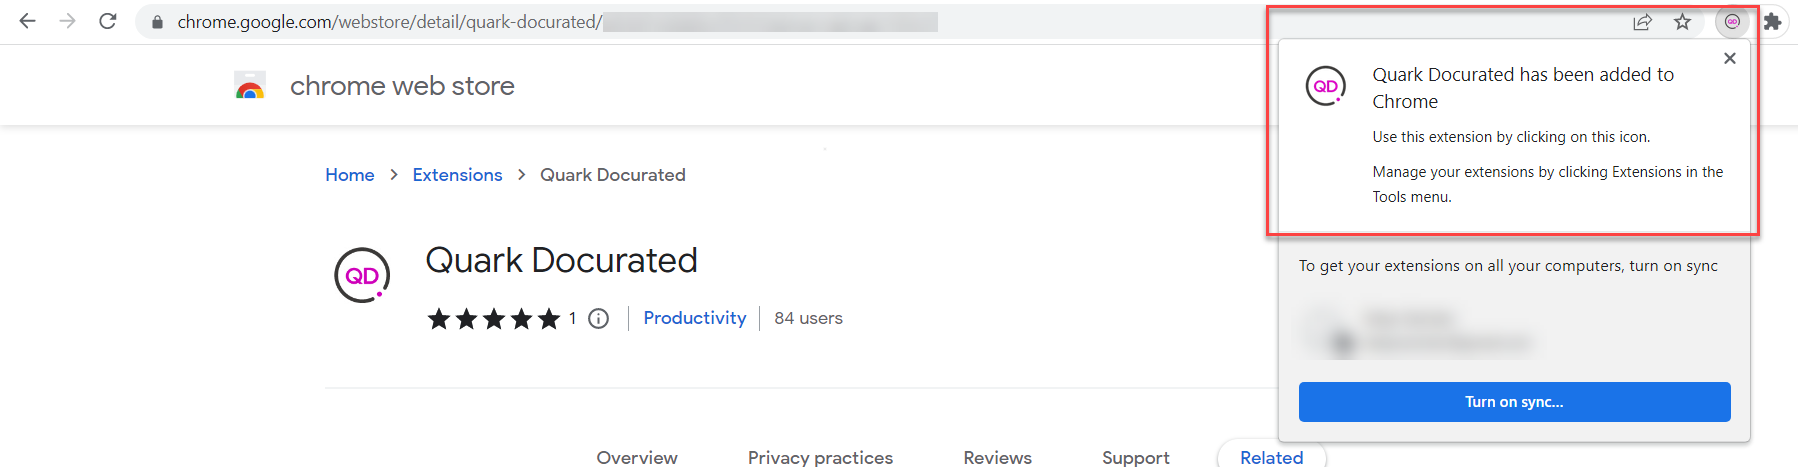
Google Chrome displays a dialog to confirm that the extension has been added.
Outlook Plugin
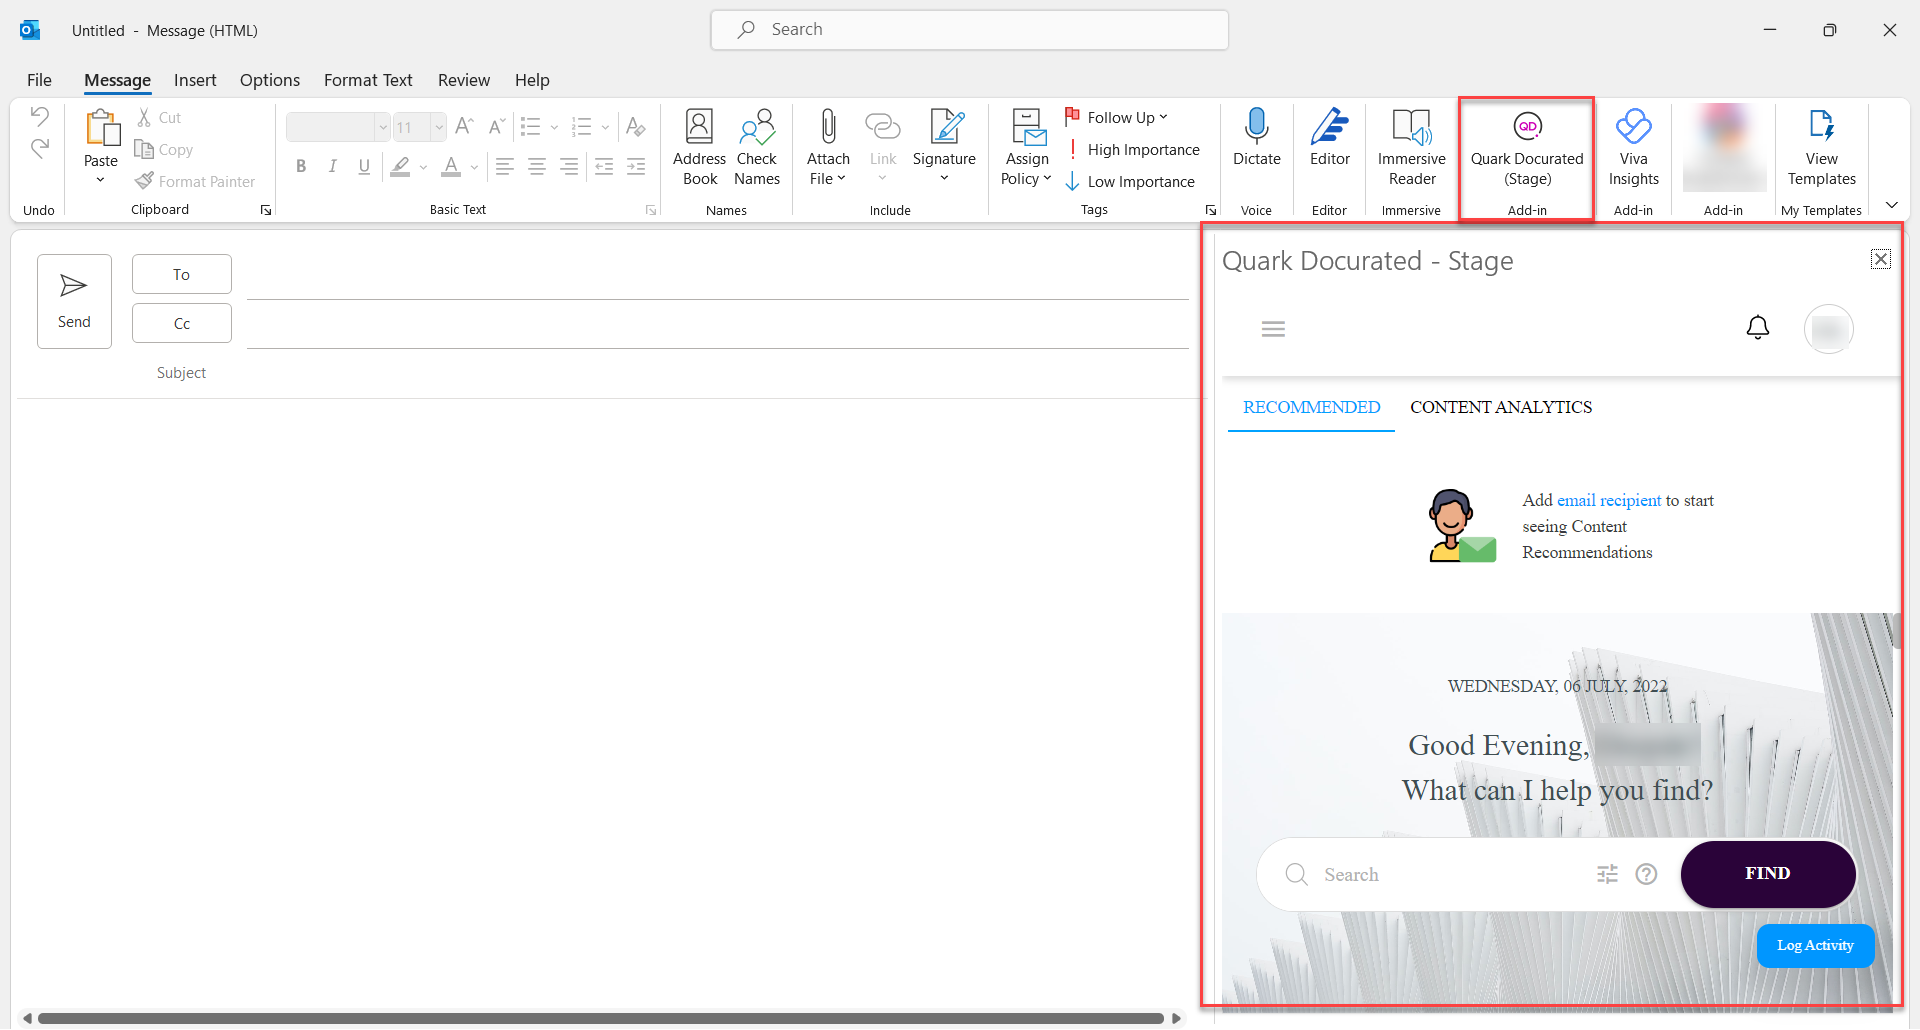
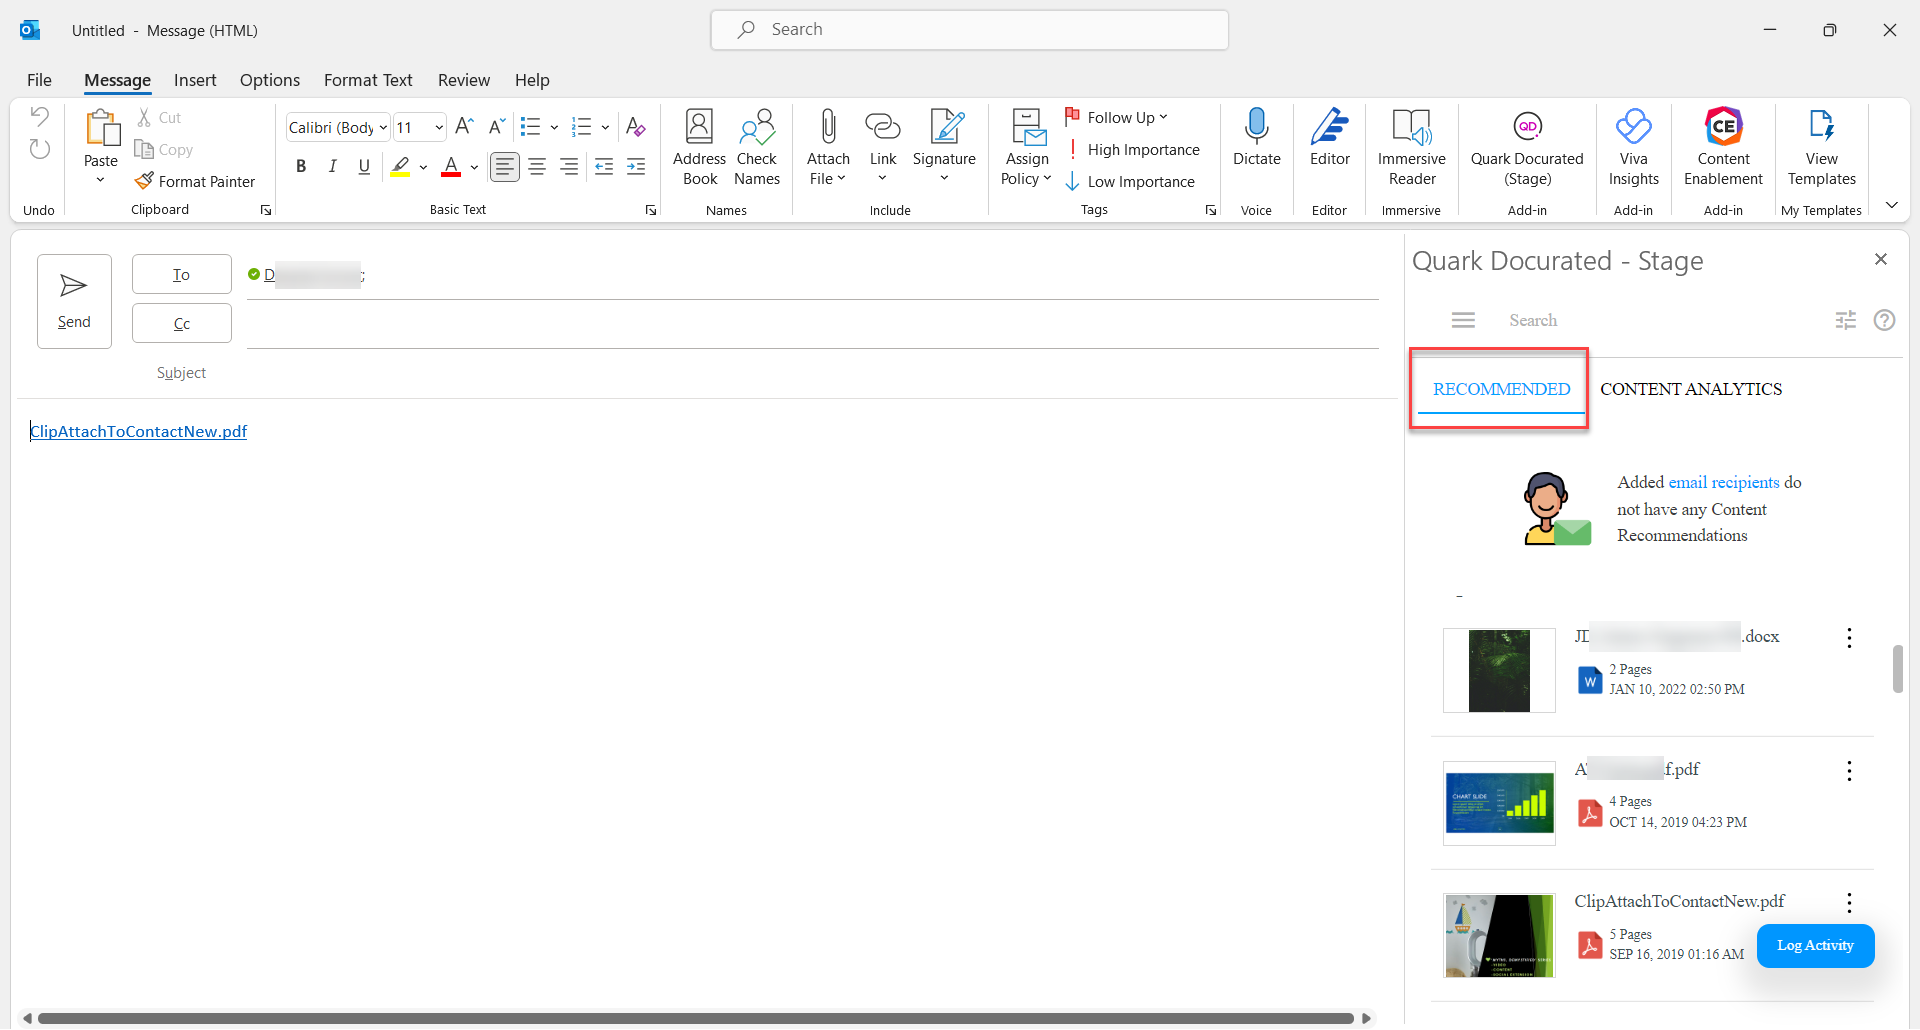
Quark Docurated plugin for Outlook allows you to share documents (via email) on your Docurated server from within the Outlook desktop application. You can search and navigate your Docurated server for a document from within Outlook desktop application as you do on a browser.
Additionally, the Quark Docurated plugin for Outlook offers the following capabilities:
-
Makes AI-based document recommendations based on the recipients to enable you to quickly add relevant documents for the recipient without searching.
-
Tracks engagement analytics for the documents you have shared in your Outlook email via Docurated plugin.
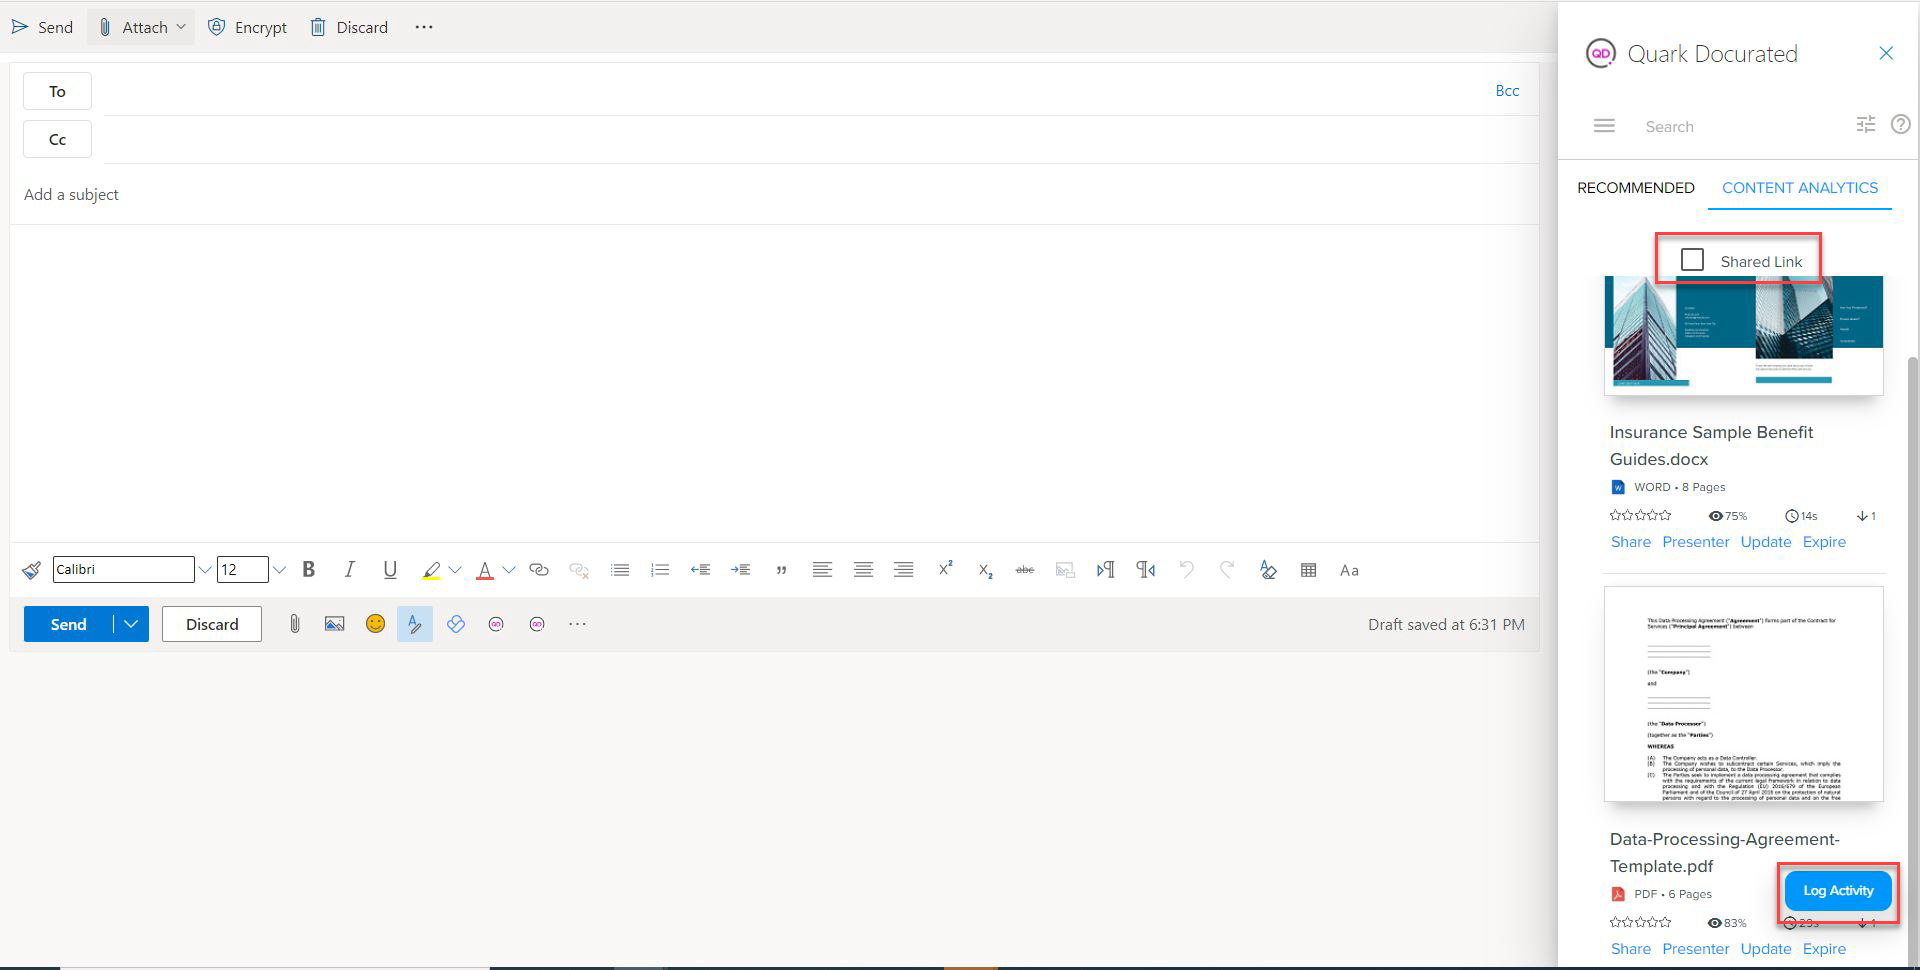
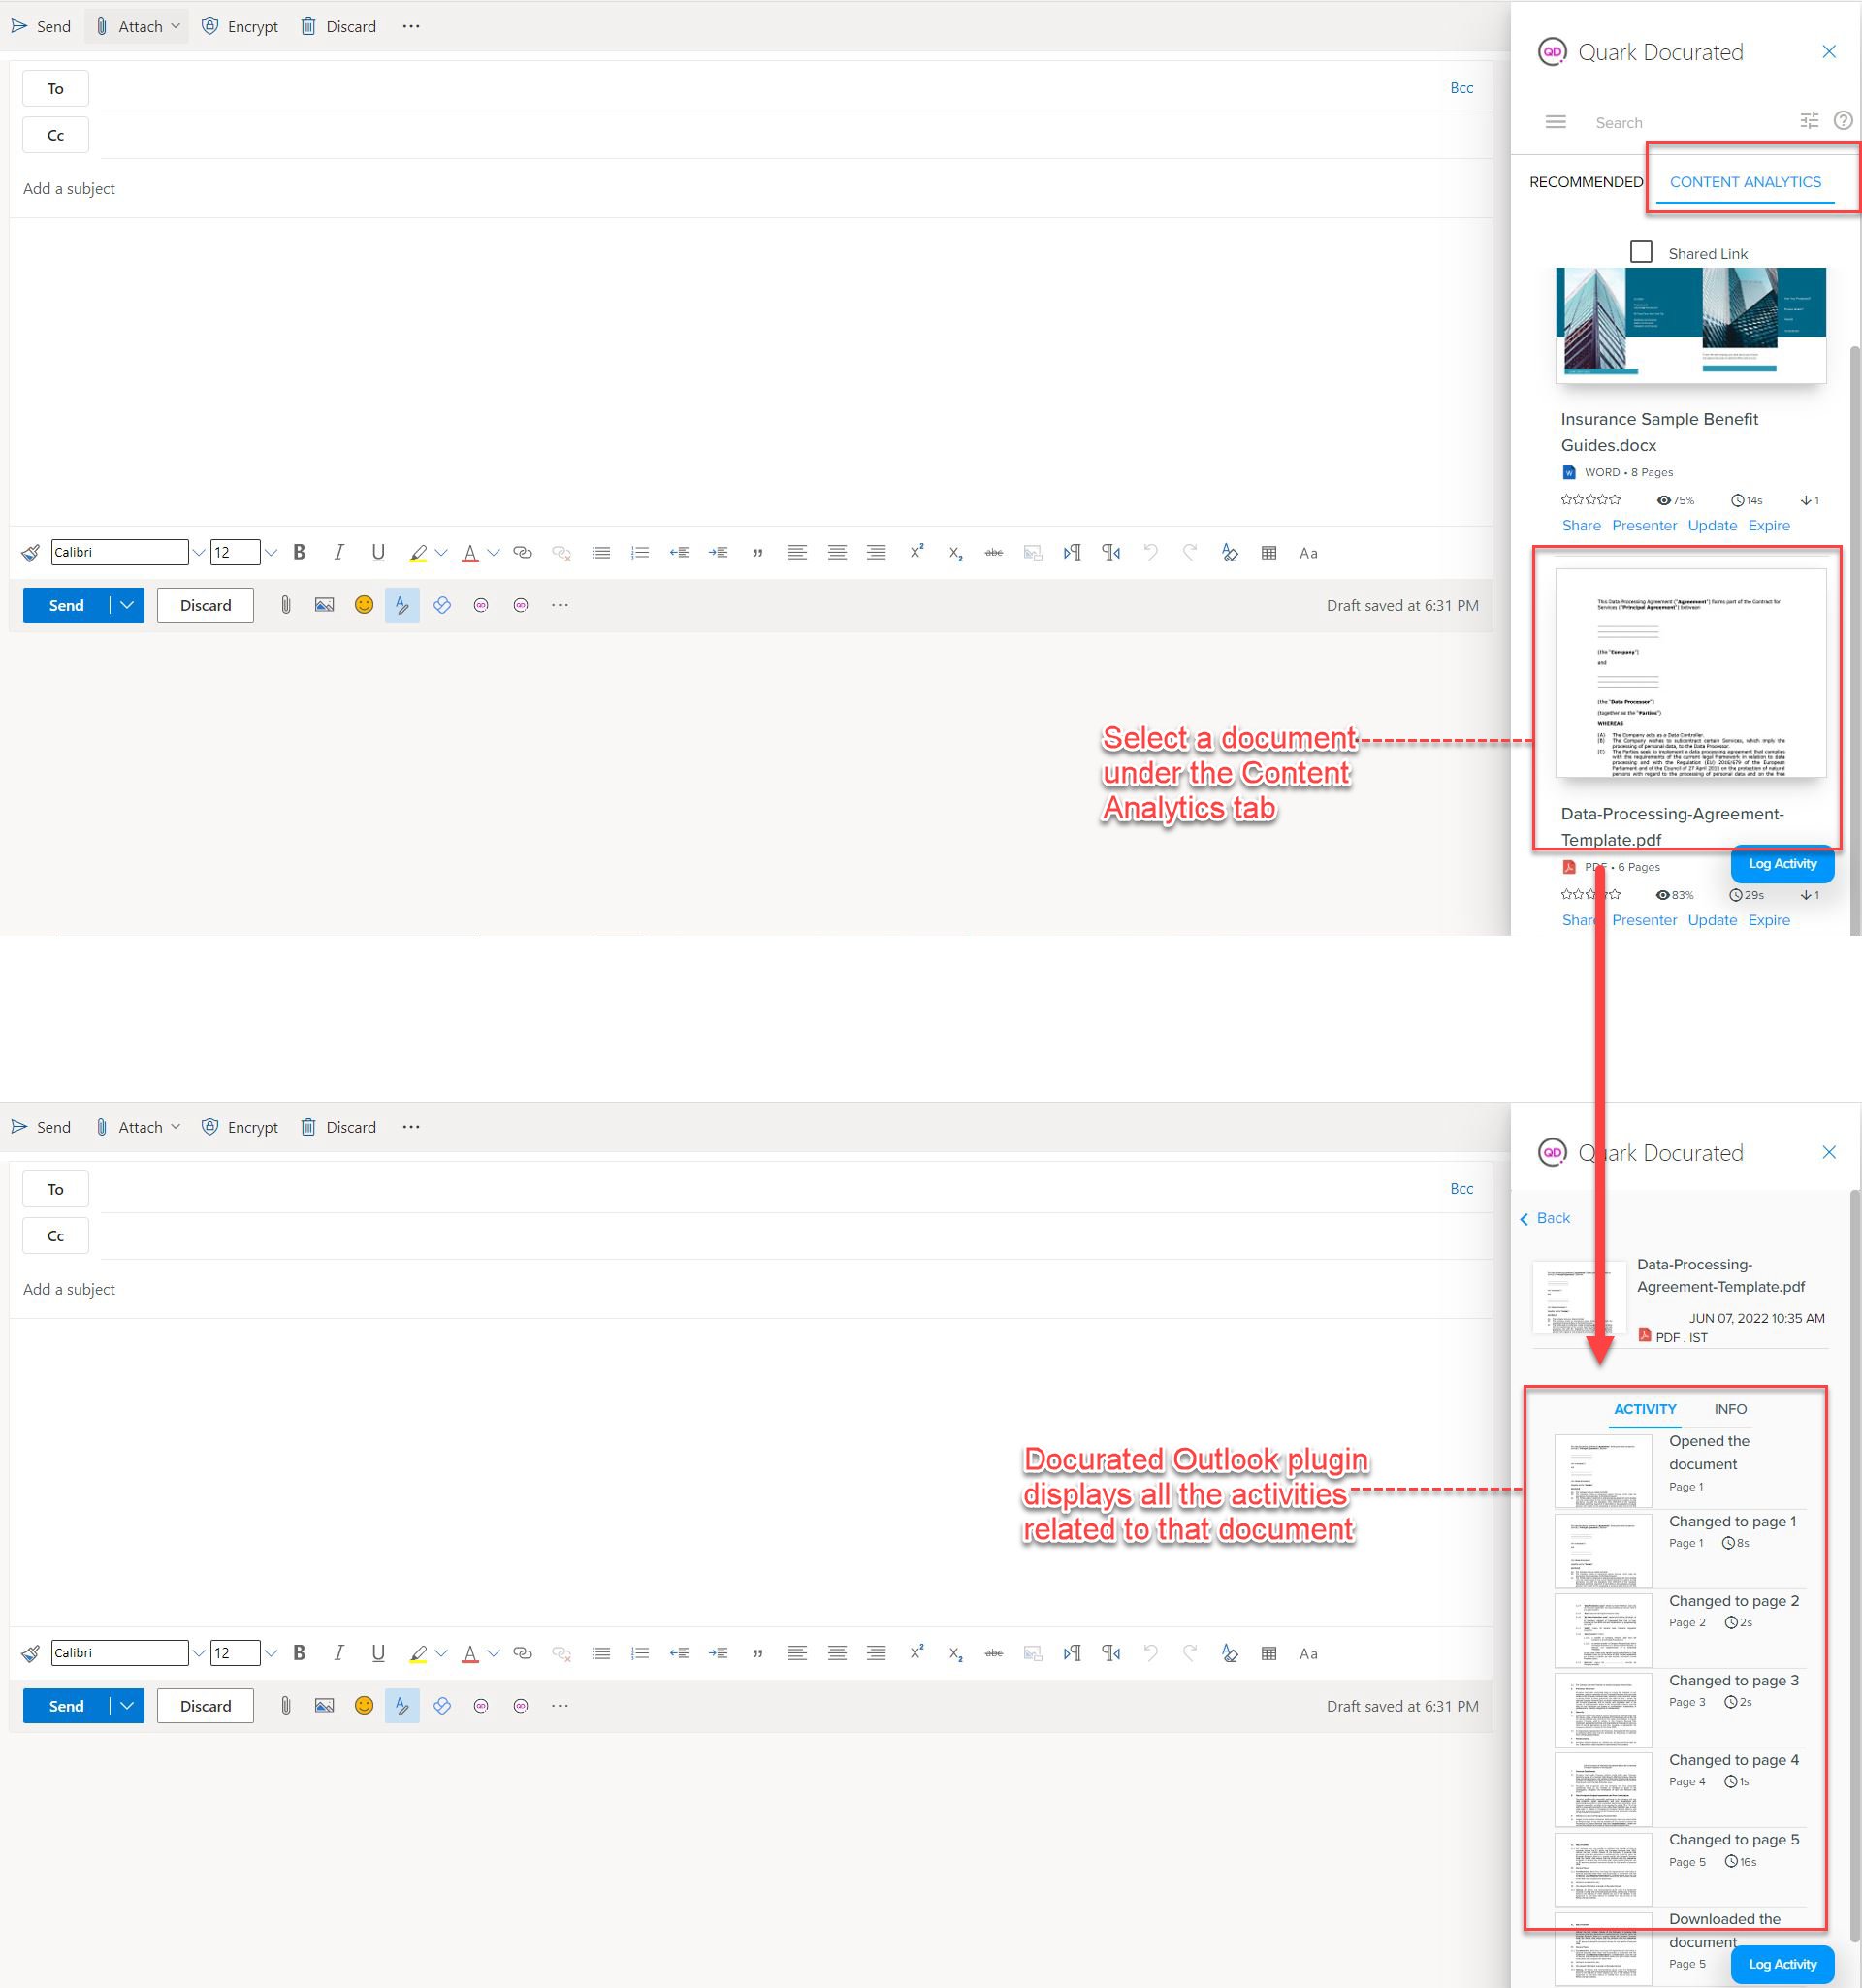 You can also see analytics for a specific document that you have shared through the checkbox Shared.Through the button Log Activity, you can enable Docurated plugin for Outlook to log activities (related to a document that you have shared) in your Docurated server analytics.
To share a document in Outlook through Docurated plugin:
-
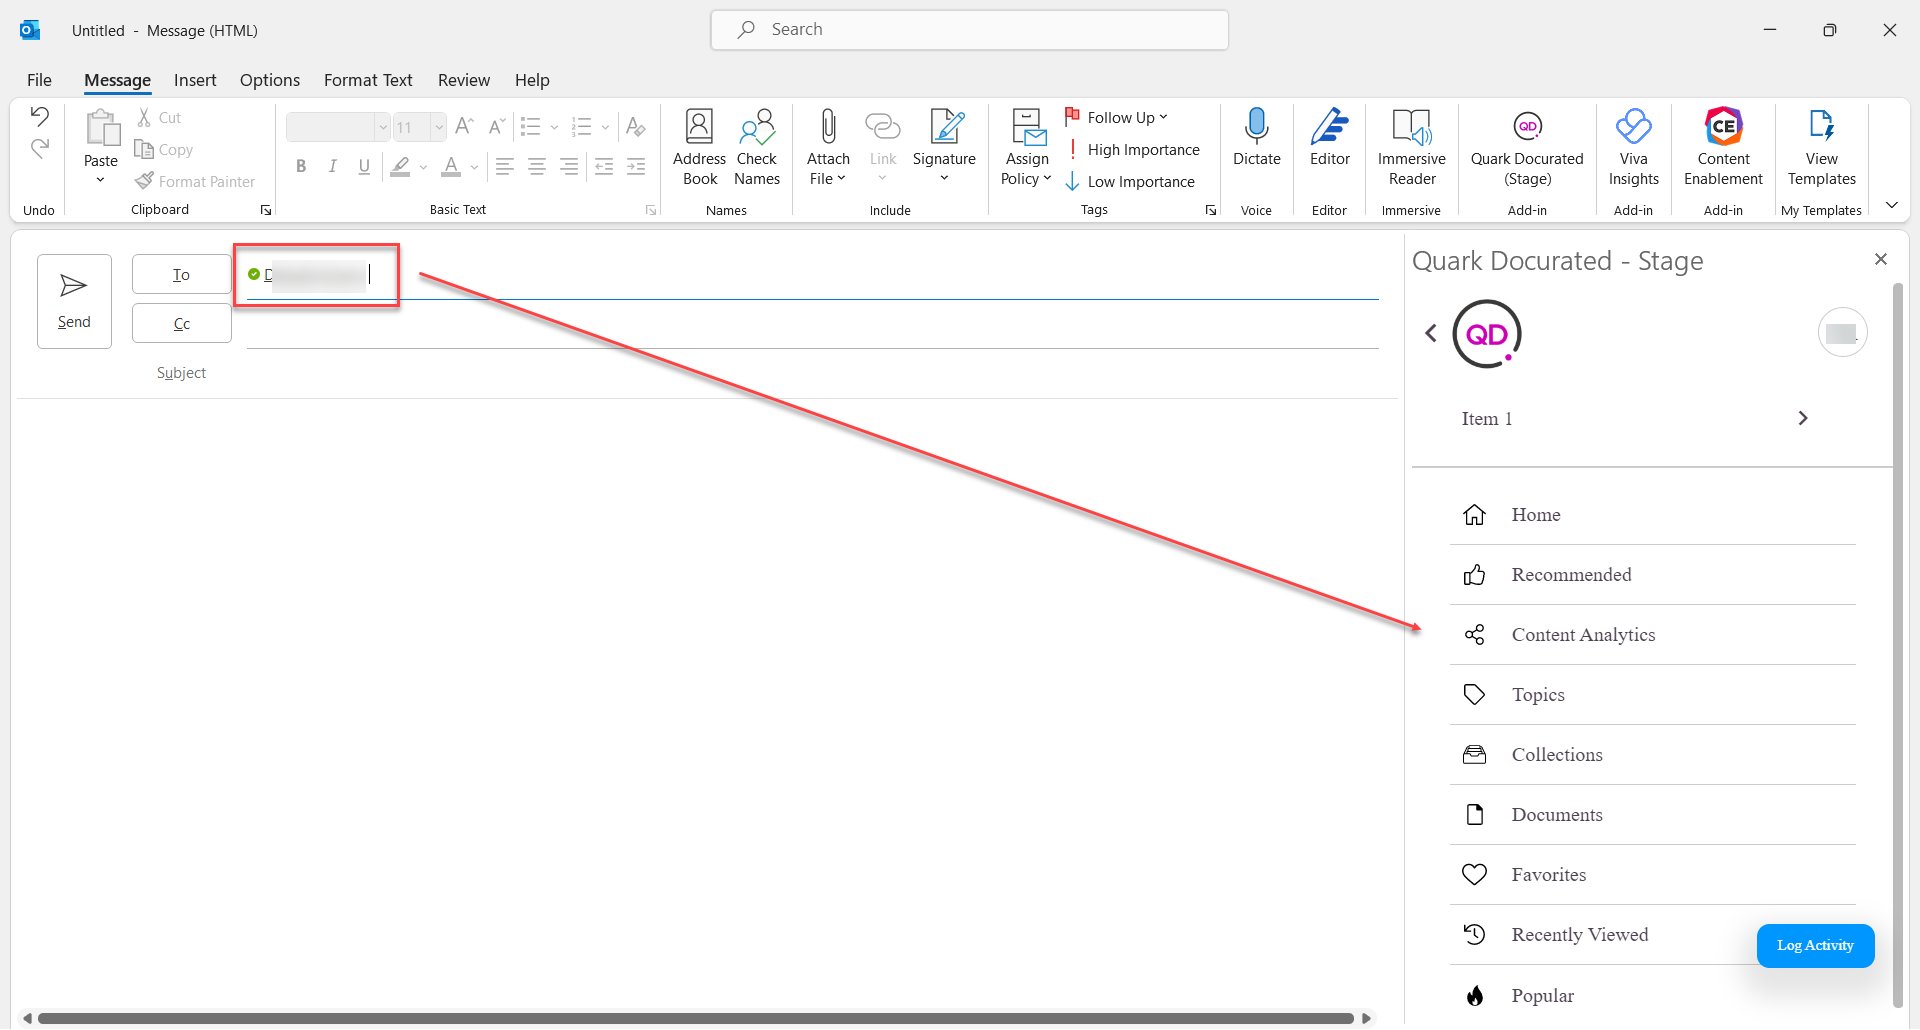
In your Outlook desktop application, click New Email and then click the Docurated add-in, which appears under the tab Messages on the header menu ribbon to open the Docurated plugin window.
-
Add a recipient in the To field of the Outlook New Email window and then search for or navigate to the document in the Docurated plugin window.
-
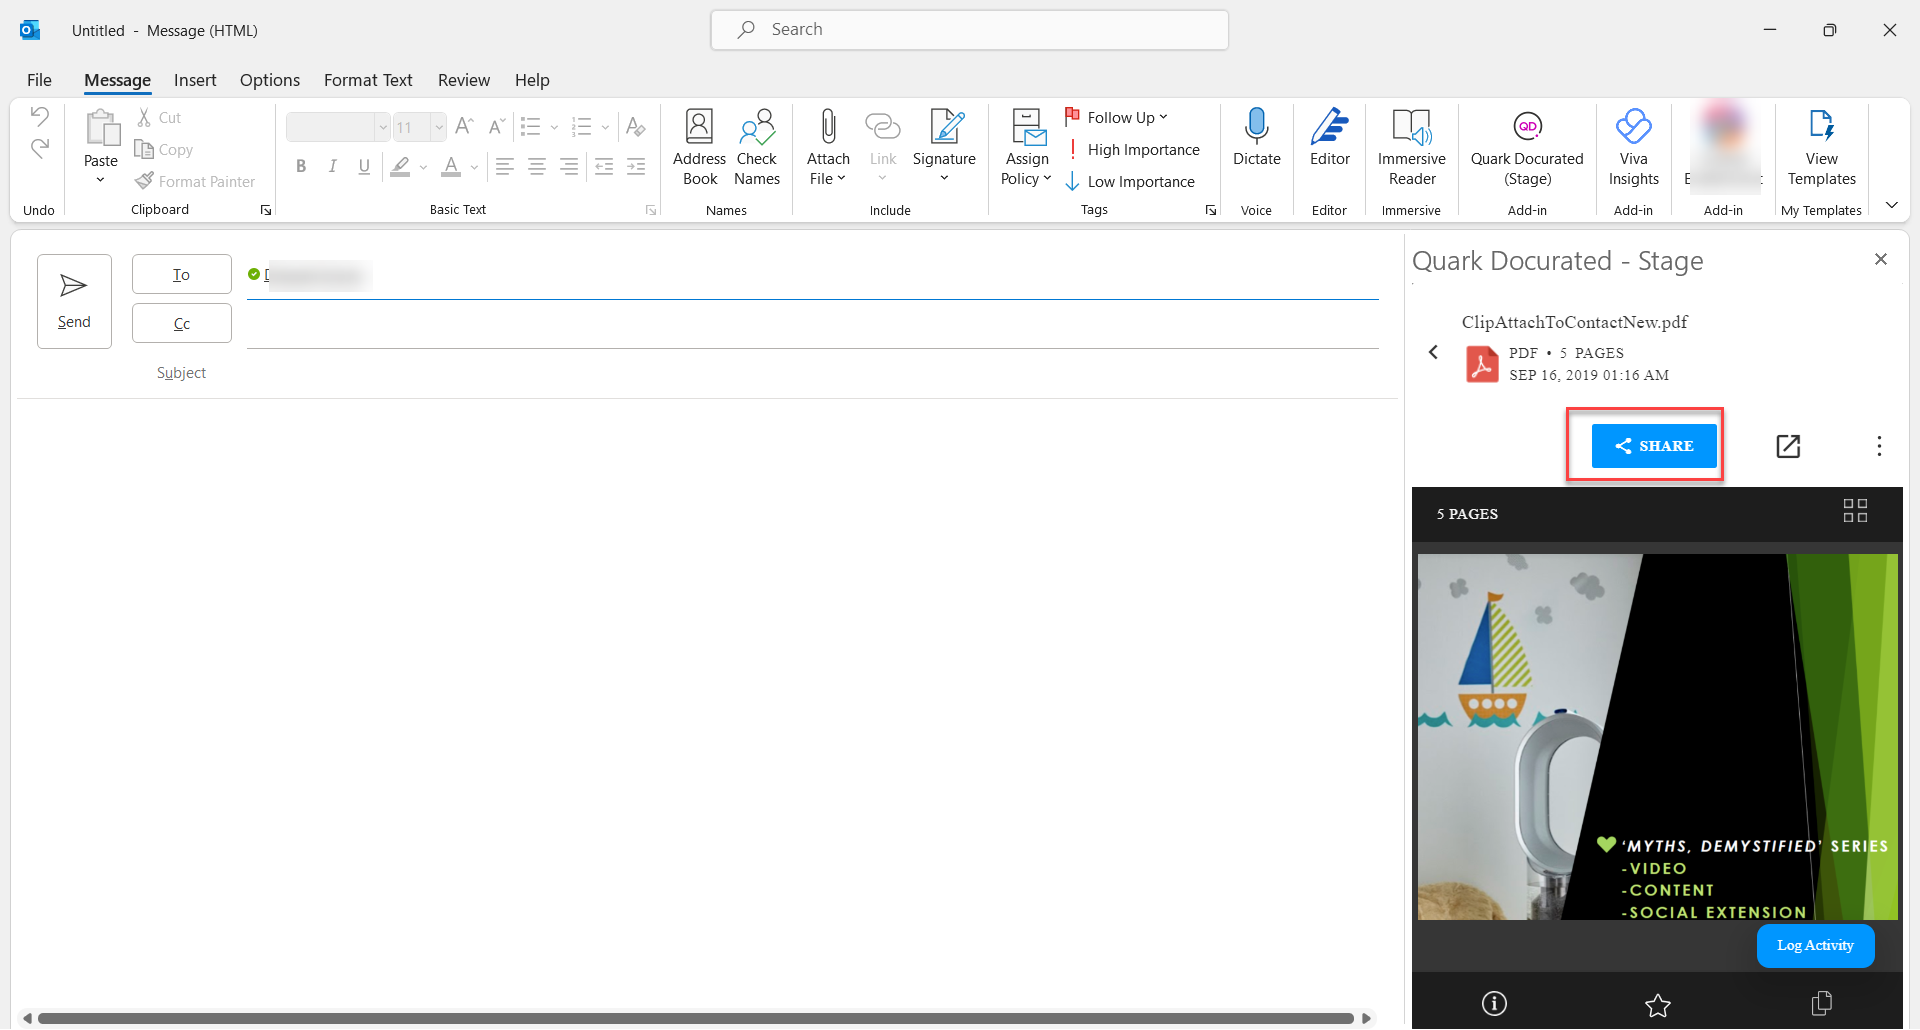
Click the document to expand its preview pane and then click Share.
-
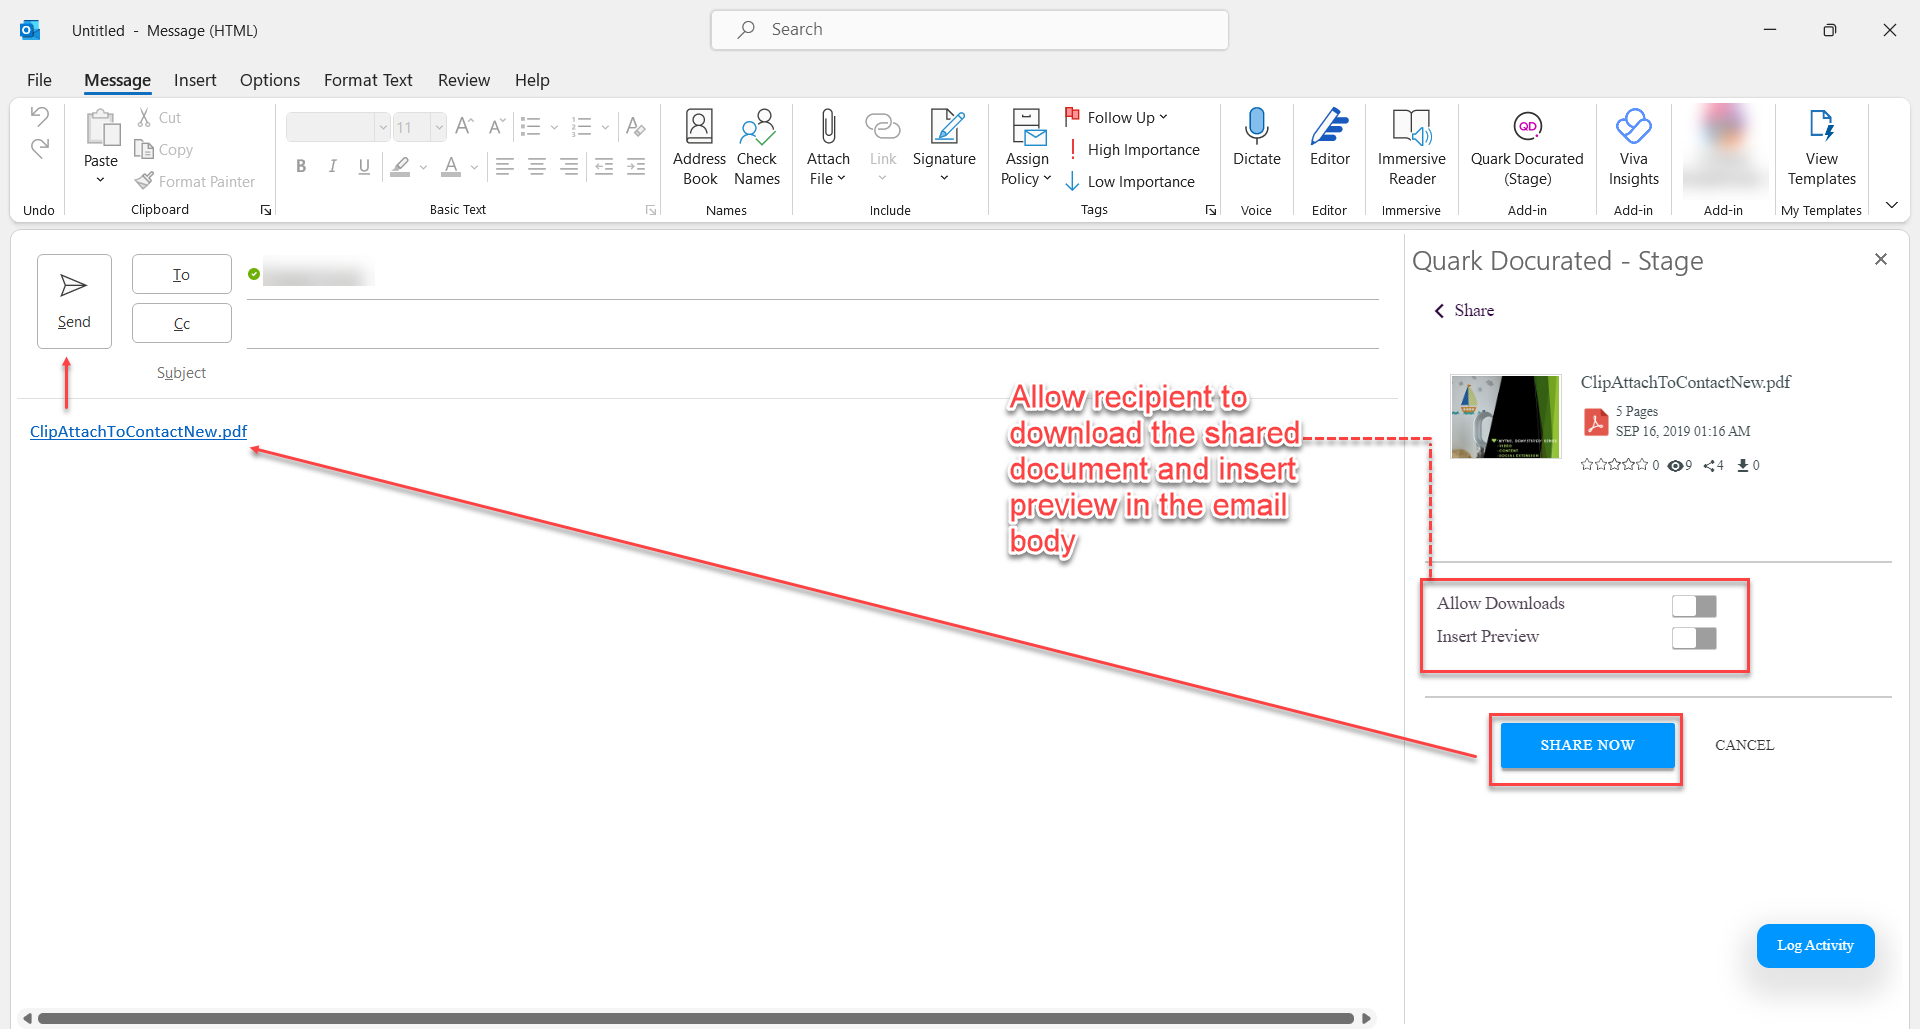
On the next screen, click Share Now to add a link to the document in your email body. Alternatively, you can insert a preview of the document in the email body through the slide button Insert Preview and also enable recipient to download the document through the slide button Allow Downloads.
-
Compose your email (optional) and then click Send.
Add Docurated Plugin
To add Docurated plugin to Outlook:
-
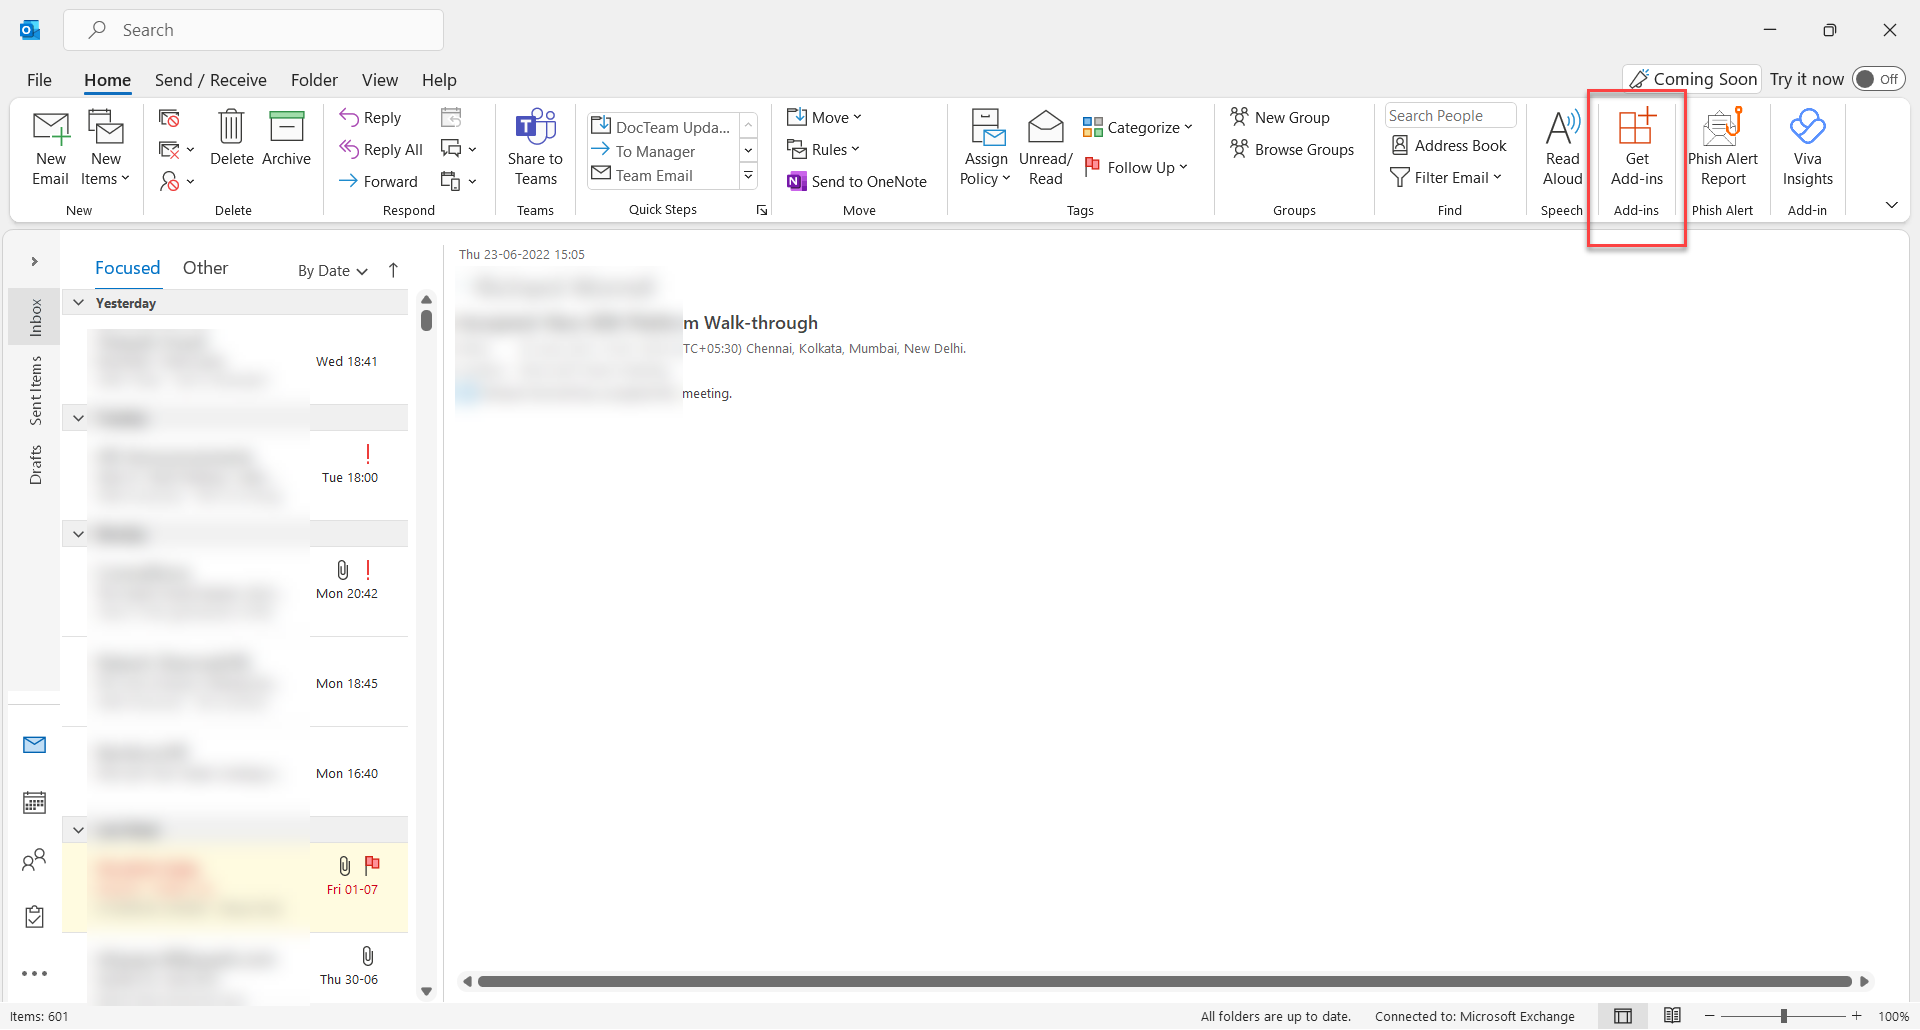
In the header menu ribbon of your Outlook desktop application, click Get Add-ins to open the dialog that lets you manage add-ins.
-
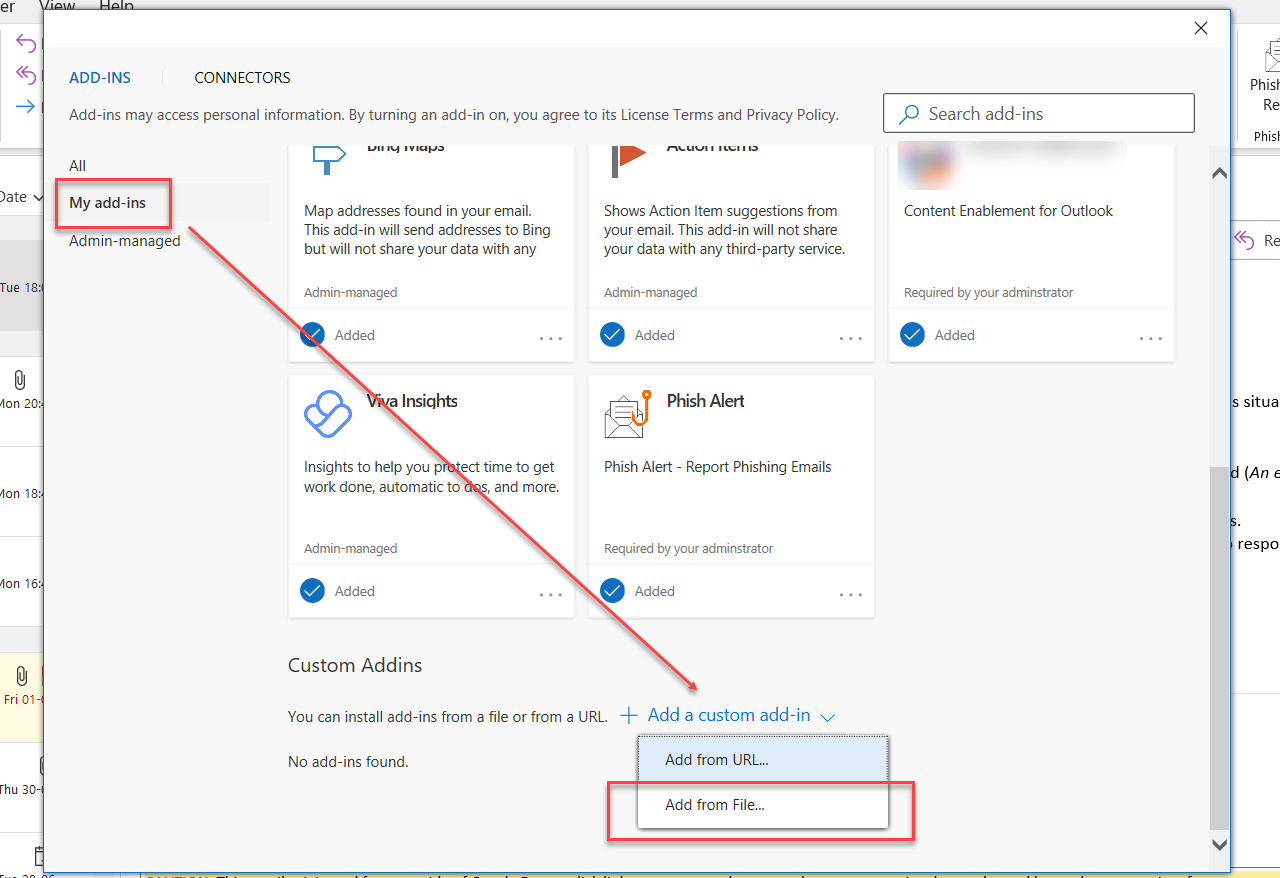
In the dialog, click My add-ins > Add a custom add-in > Add from file and then add the Docurated plugin file from your local machine.
-
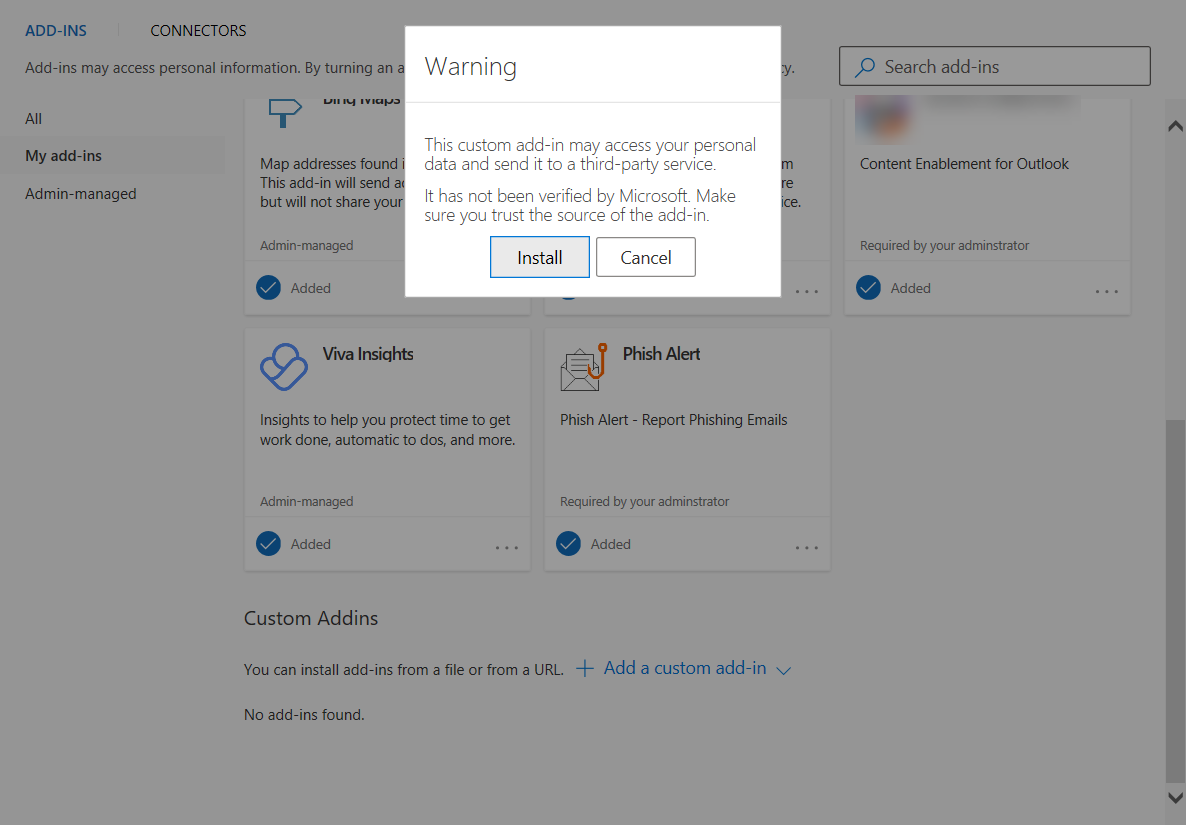
Outlook prompts a warning message to inform Docurated plugin may access your private data. Click Install on the warning message dialog.
-
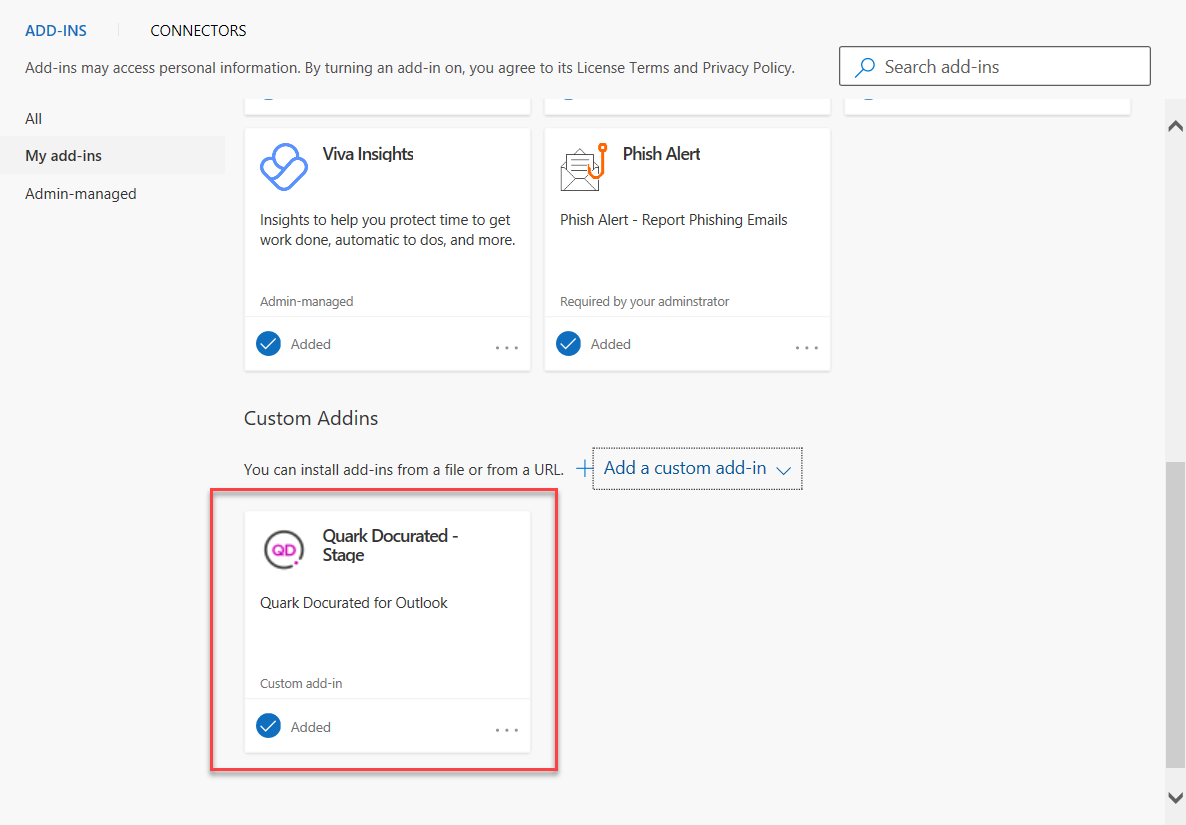
Outlook displays that your Docurated plugin has been integrated.
Marketo
Quark-Marketo integration enables marketing teams to use trackable links to Quark Docurated content in an email campaign, making Quark Docurated a single source for all the marketing and sales collateral.
Quark-Marketo integration allows you to:
-
Track how prospects engage with your email campaigns and content
-
Log the email/content engagement information from Docurated to Marketo
Integrating Marketo with Docurated
To integrate Marketo with your Docurated server:
-
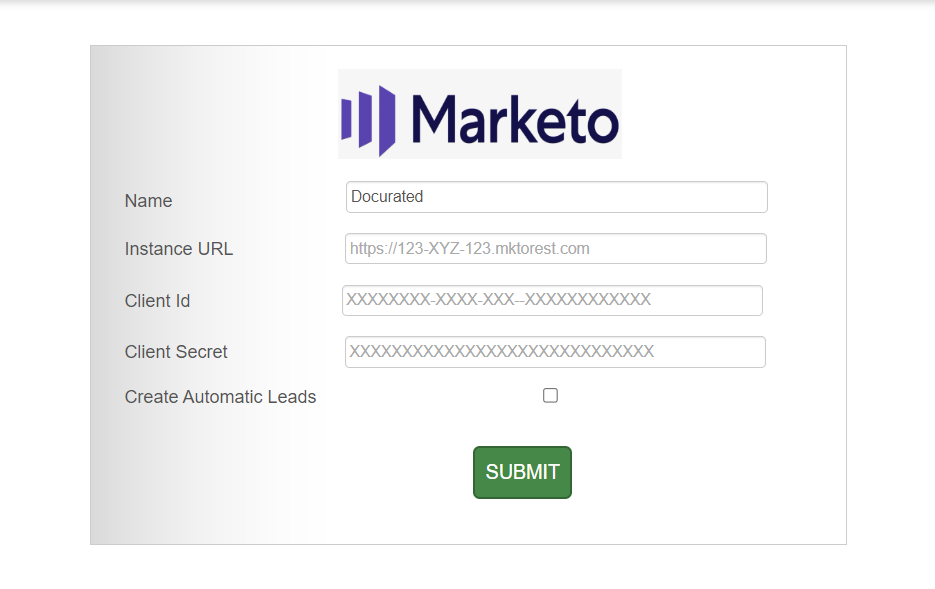
Select Marketo from the list of repositories in the right pane. This opens a form to synchronize Marketo with Docurated.
-
In the form, provide the following information:
-
Name: The name of your Docurated server.
-
Instance URL: Your organization-specific Marketo URL.
-
Client Id: The Client Id of the web service created for Docurated in Marketo.
-
Client Secret: The secret key to the web service created for Docurated in Marketo.
-
Create Automatic Leads: When checked, allows automatic creation of Marketo leads on your Docurated server.
-
-
Click Submit.
User Interface Features
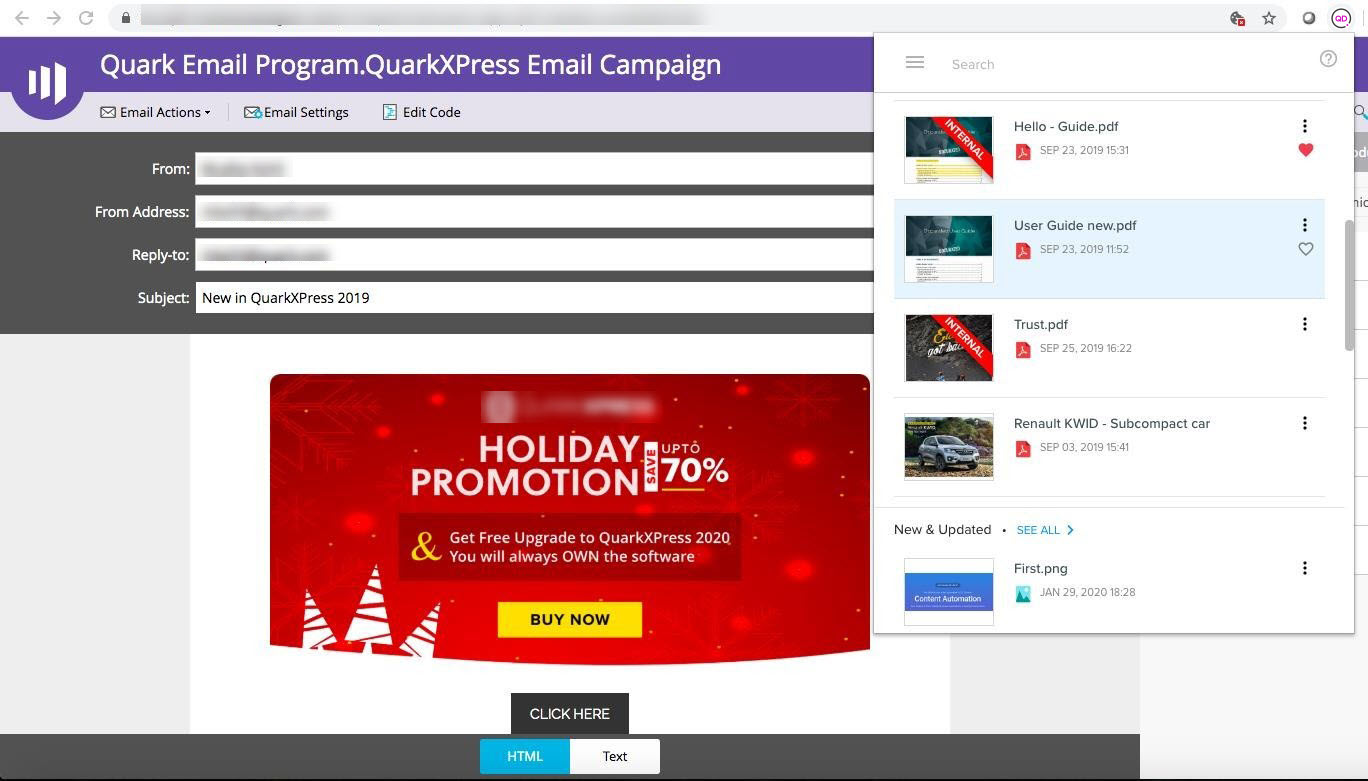
You can use Quark-Marketo integration via Quark Docurated Chrome extension. With the Marketo platform opened in a window of the Chrome browser, you can generate Marketo-specific links in the Docurated-Chrome extension window and use the links to send out as a part of your Marketo email campaigns.
Generate Context-specific Links
To generate context-specific (Marketo, in this case) document links:
-
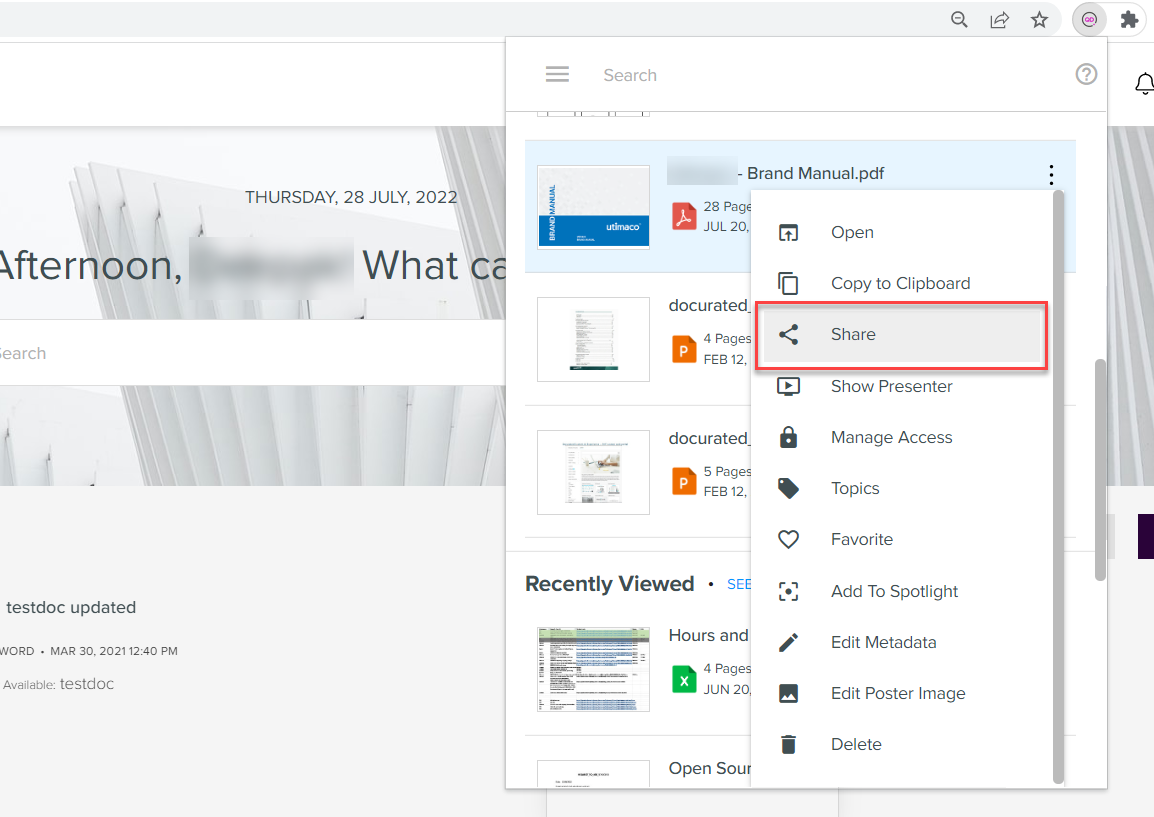
With the Marketo platform opened in a window of the Chrome browser, in the Docurated-Chrome extension window, navigate to the document for which you want to generate a Marketo-specific link, expand the kebab menu for that document, and then click Share.
-
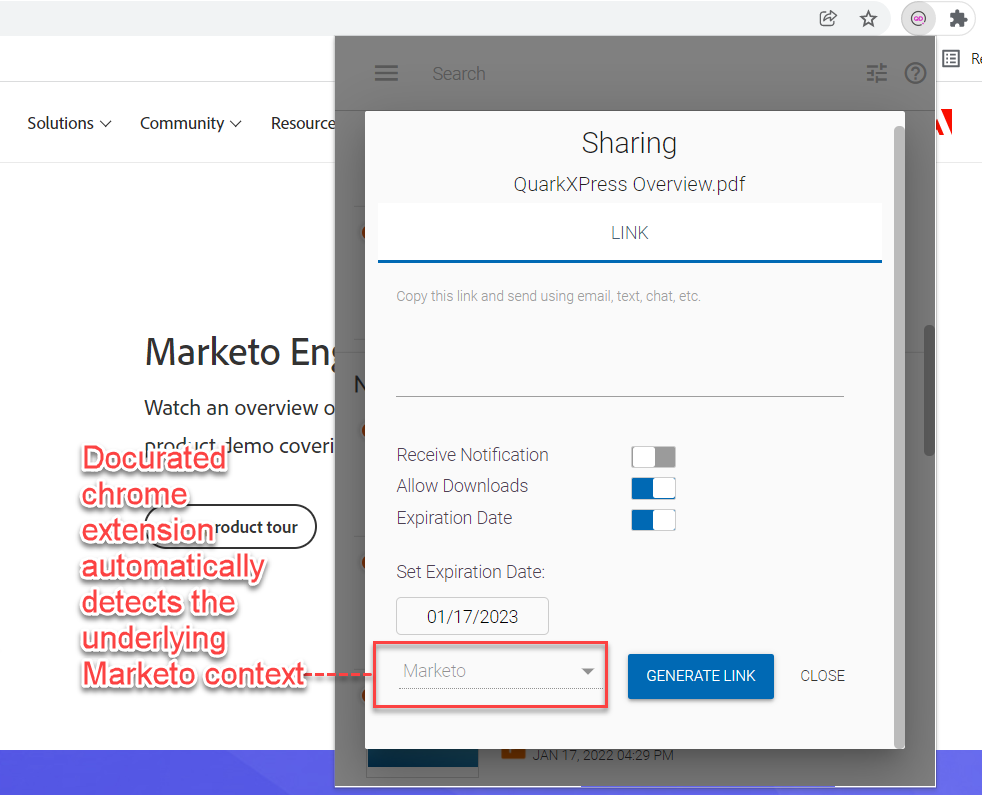
In the Share dialog, the Chrome extension automatically detects the underlying context for Marketo. Click Generate Link.
-
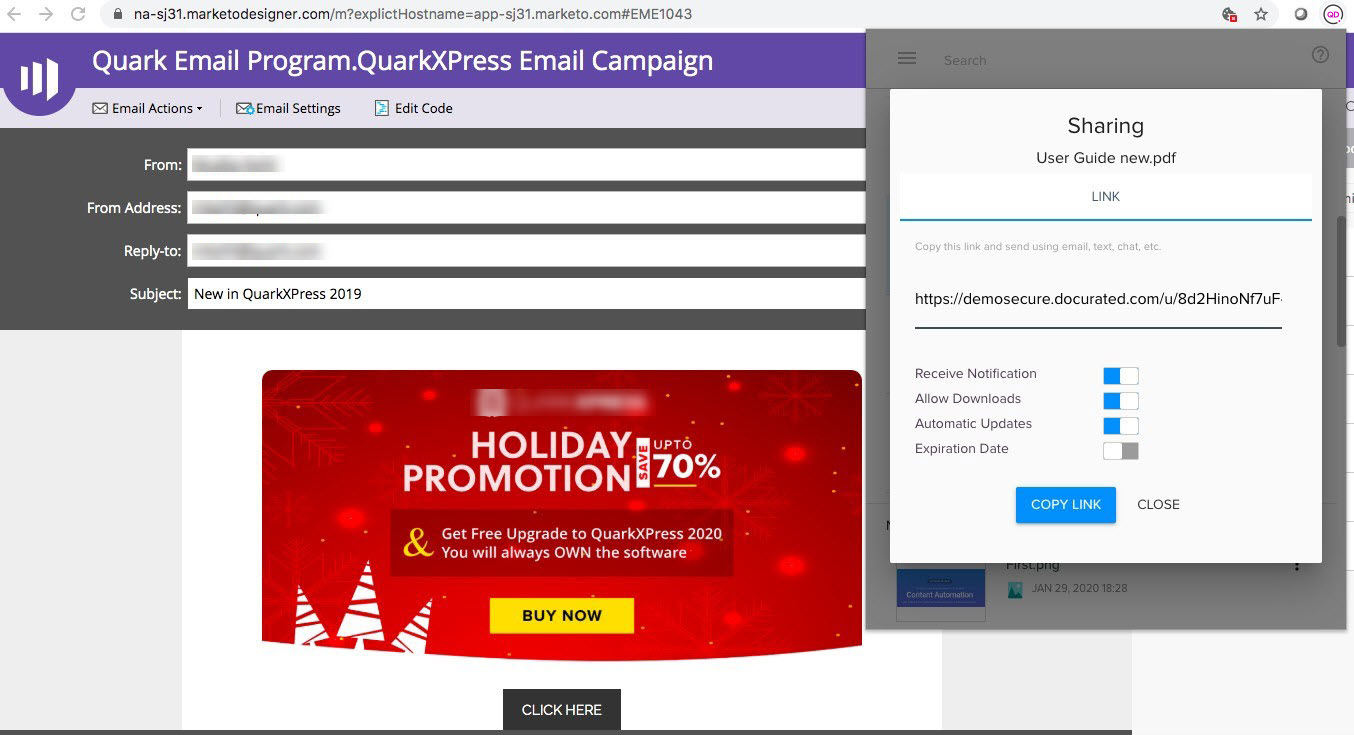
Copy the generated link, which also contains the value of a set of parameters appended (values of ‘Lead E-mail’ and ‘Campaign’ included, by default).
-
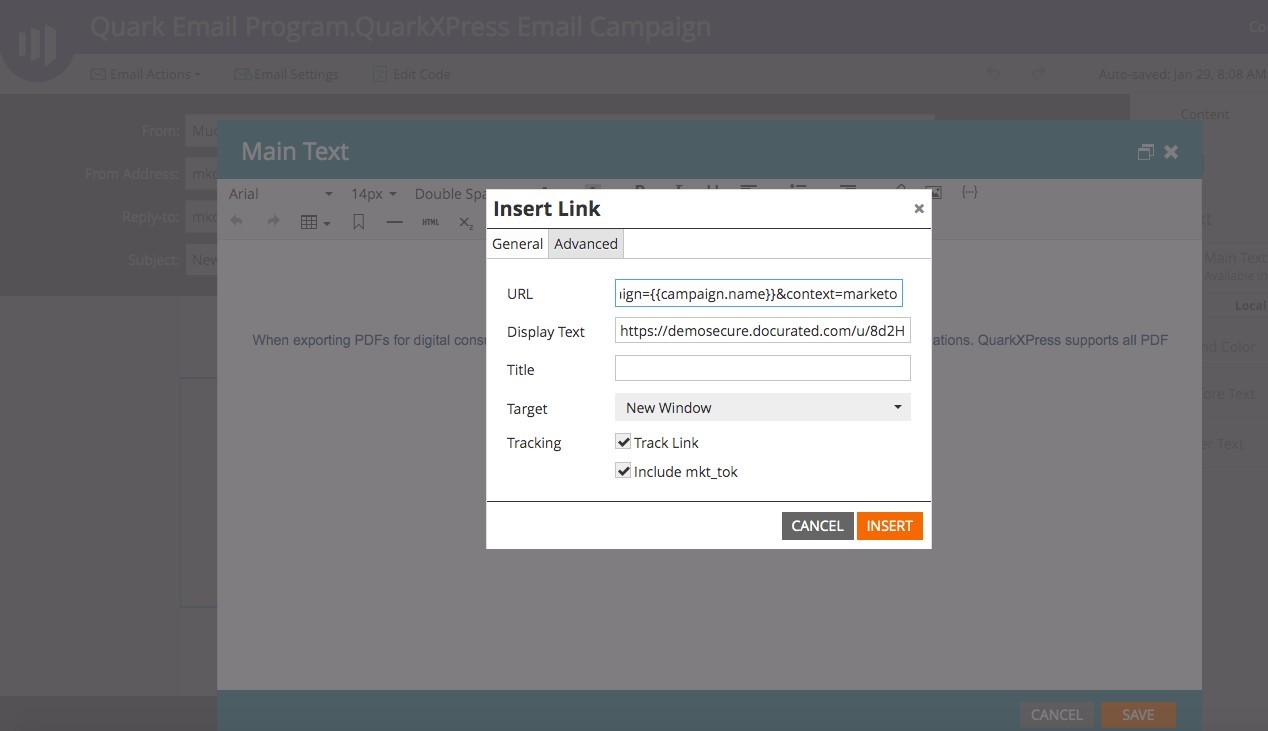
Insert the generated link (with tracking parameters) as per your preferences in your email draft.
-
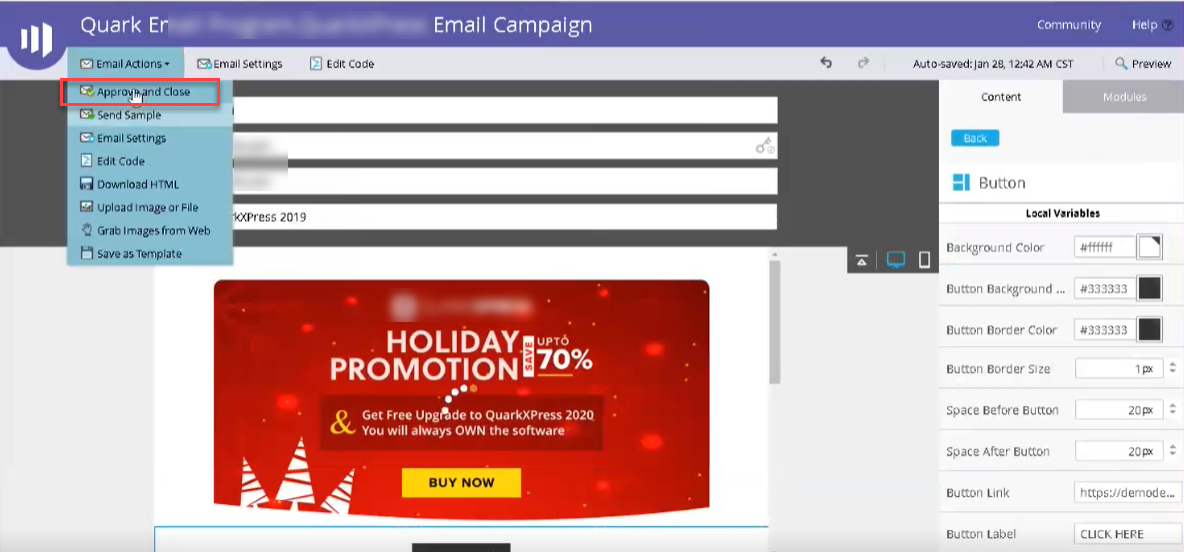
Expand the Email Actions dropdown menu, and click Approve and Close to set up the campaign for the launch.
Activity Log [Admin Only]
Quark-Marketo integration allows you to log several custom activities for the leads who engage with the Docurated content you share via a Marketo campaign. These custom activities help your marketing team to plan their lead scoring models even better.
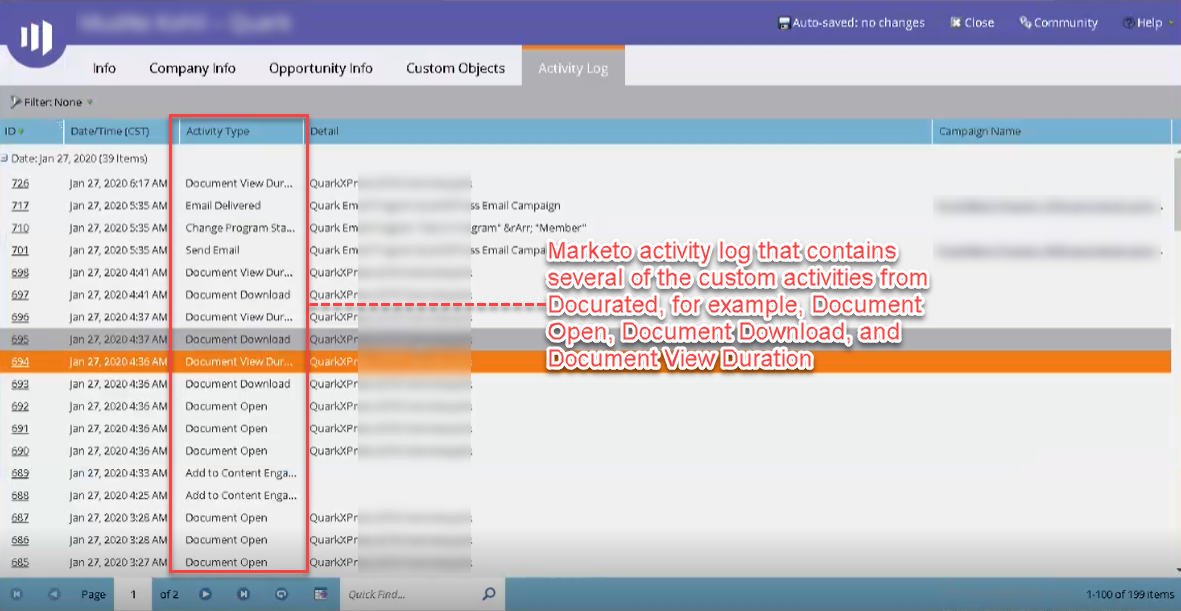
These custom activities logged are as follows:
-
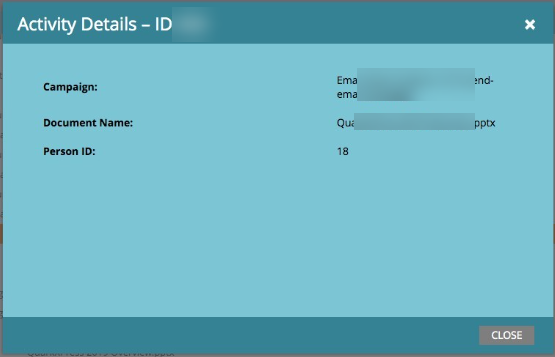
Document Open: This activity is logged when a lead opens a shared document. The log for this activity also contains the campaign name, document name, and the ID of the lead.
-
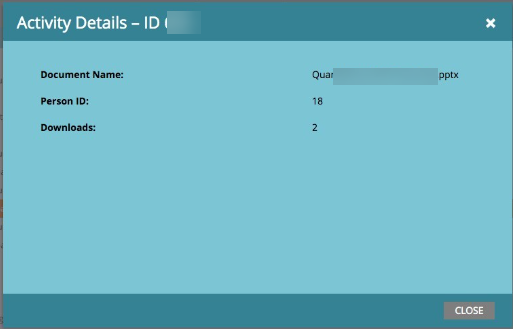
Download Document: This activity is logged when a lead downloads a shared document. The log for this activity also contains the document name, the ID of the lead, and the number of downloads.
-
View Duration: This log contains the duration (in seconds) for which a lead engaged with a document and also contains the document name and the ID of the lead.
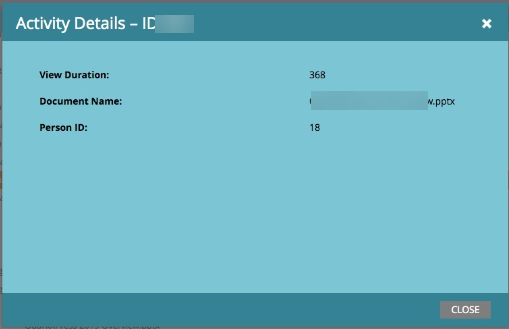
Custom Engagement Information
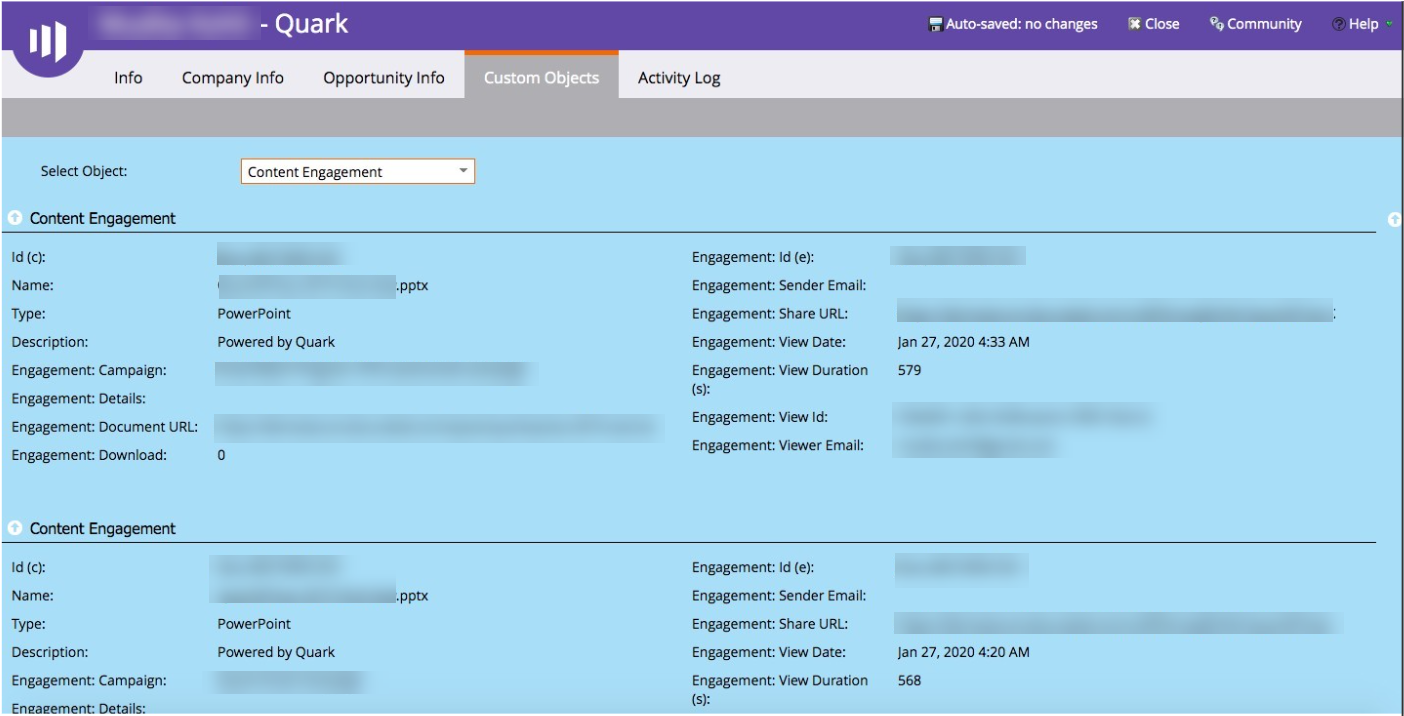
Quark-Marketo integration also provides the provision to log custom content engagement information based on the interaction of a lead with Docurated documents.
The following information is logged under the custom Marketo object Content Engagement:
-
Document Name
-
Document Type
-
Campaign Name
-
Shared URL of Document
-
Actual Document URL in Quark Docurated
-
View Duration in Seconds
-
Number of Downloads for the document
-
Recipient Email
-
View Date
Engagement Score
In the default configuration of Quark-Marketo integration, a custom field Engagement Score is available for every lead, which is calculated based on the engagement activities performed by a lead on Docurated documents.
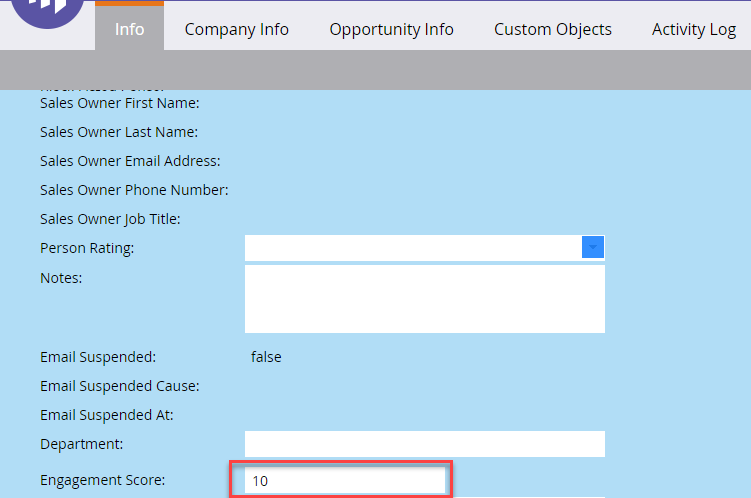
Your marketing team can leverage this Engagement Score in conjunction with Marketo's Lead Score for better insights into each lead.
Configuration [Admin Only]
The process to configure Marketo for Docurated is as follows:
Create an API User and Assign Roles
To create an API user:
-
Log in to the Marketo admin console with administrator credentials.
-
In the left pane, go to the tab Users & Roles.
-
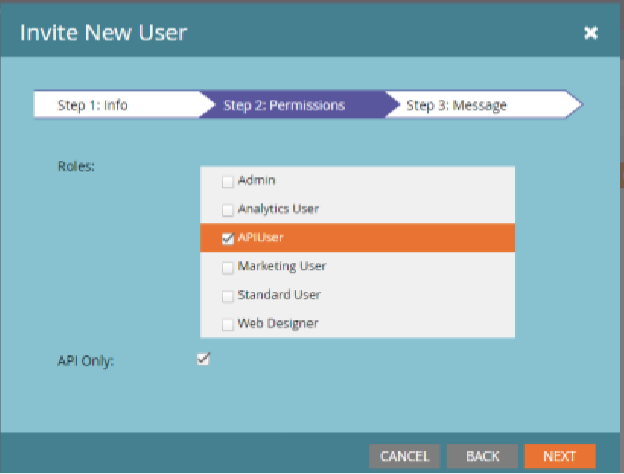
If the role API User is not available, create the role.
-
In the Info tab of the Invite New User dialog, provide an Email and name and then click Next.
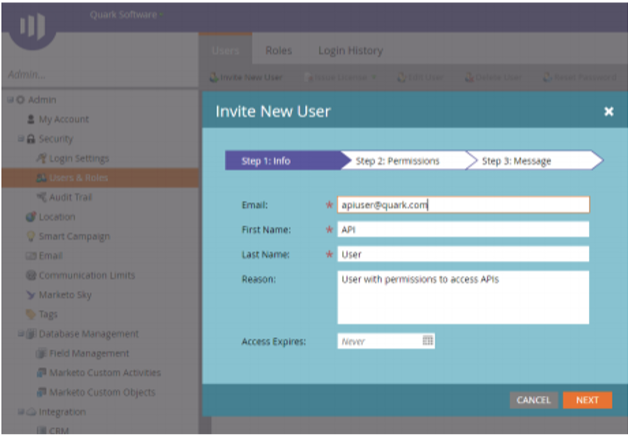
-
In the Permissions tab, select the roles and permissions necessary for an API user and then click Next.
-
-
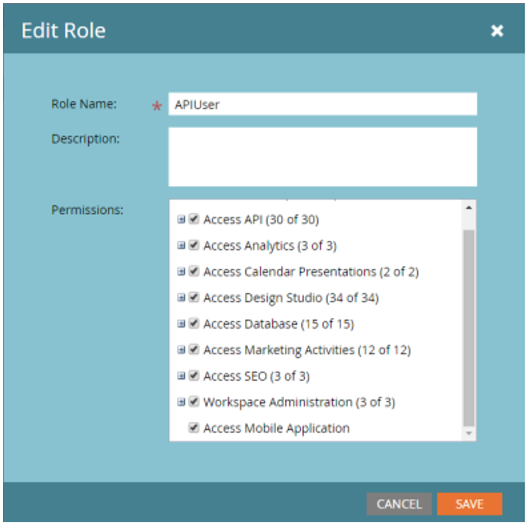
Edit the selected role for API User and provide the following set of permission to the role.
-
Click Save.
Access to API is a mandatory set of permission.
Create a Web Service
A web service is required to integrate Marketo with Quark.
To create a web service:
-
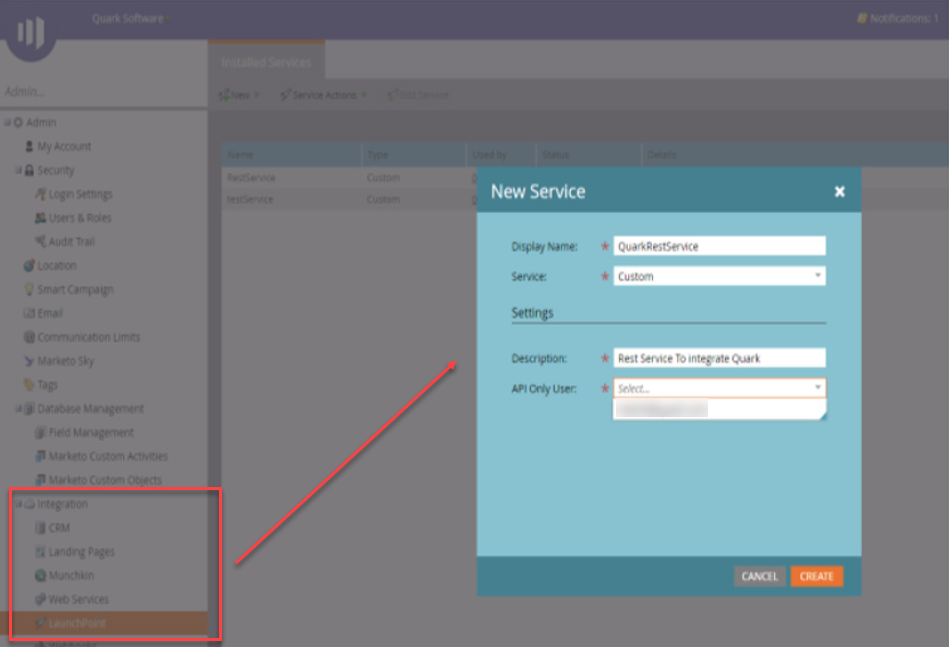
In the left pane menu of the Marketo admin console, click Integration > Launch Point to open the New Service dialog.
-
In the New Service dialog, provide the following values in the displayed fields:
Field Name
Value
Display Name
QuarkRestService
Service
Custom
Description
Rest Service To Integrate Quark
API Only User
From the dropdown list of users, select the user you have created
-
Click Create.
-
Go to the section View Details of the web service you have created and extract client ID and client secret.
Create Custom Activities
To accommodate custom activities from Docurated into the Marketo platform, you have to create these custom activities with the correct values.
To create these custom activities:
-
In the Marketo admin console, click Admin > Custom Activity > Create.
-
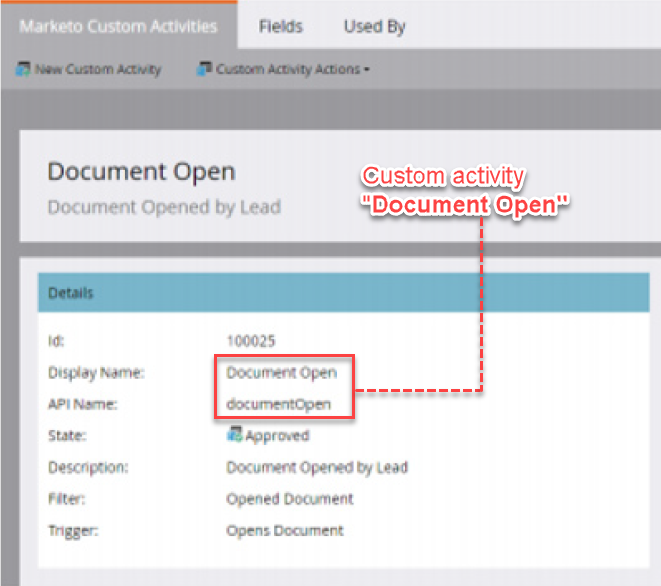
Add the following new three custom activities with the following field values:
-
Document Open
Field Name
Value
Display Name
Document Open
API Name
documentOpen
-
Document Download
Field Name
Value
Display Name
Document Download
API Name
documentDownload
-
Document View Duration
Field Name
Value
Display Name
Document Open
API Name
documentViewDuration
-
Create Custom Objects
You have to create two custom objects that address the following purposes:
-
A custom object corresponding to each Docurated document that a Marketo lead engages with
-
A custom object to display the engagement information by leads on Docurated documents
To create these custom objects:
-
In the Marketo admin console, click Admin > Marketo Custom Object to open the Create Object dialog.
-
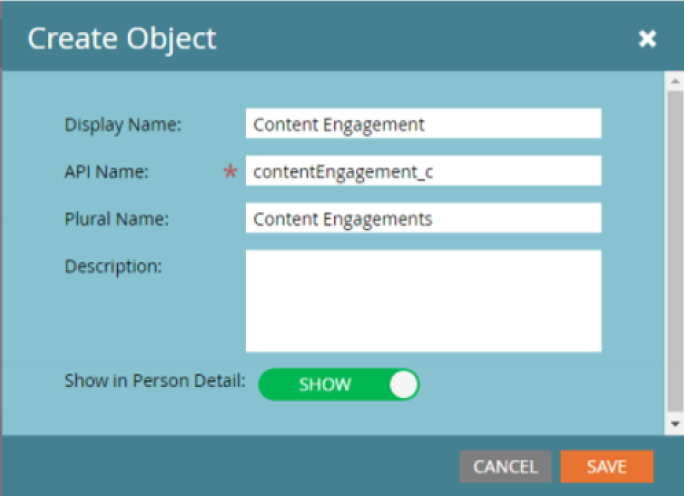
On the Create Object dialog, provide the following values in the displayed fields for the first object (Content Engagement) and then click Save:
Field Name
Value
Display Name
Content Engagement
API Name
contentEngagement_c
Plural Name
Content Engagements
Description
Every Docurated document being engaged has a corresponding custom object in Marketo
Show in Person Detail
Toggle On
-
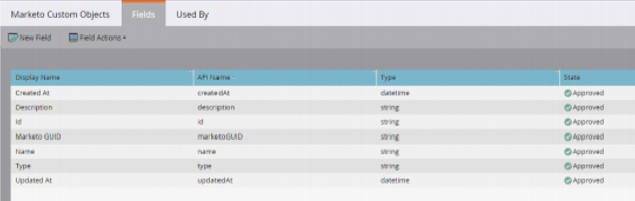
Create the following fields for the first custom object (Content Engagement)
Field Name
API Name
Data Type
Id
id
string
Name
name
string
Type
type
string
-
-
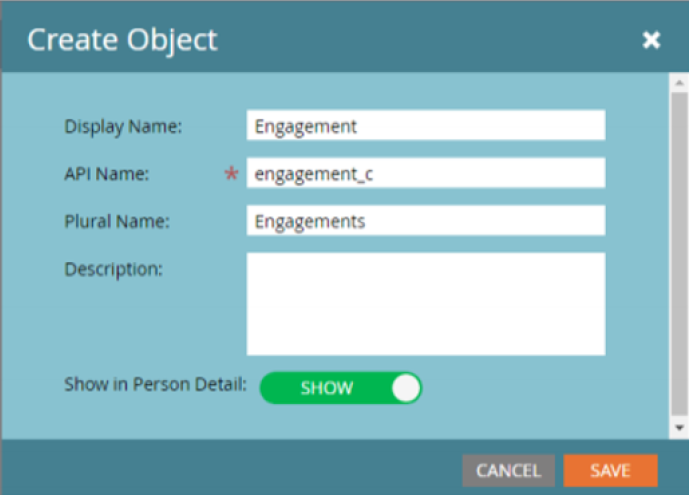
Create the second custom object (Engagement) in the same manner and provide the following values in the displayed fields and then click Save:
Field Name
Value
Display Name
Engagement
API Name
engagement_c
Plural Name
Engagements
Description
To show engagement details by leads on documents
Show in Person Detail
Toggle On
-
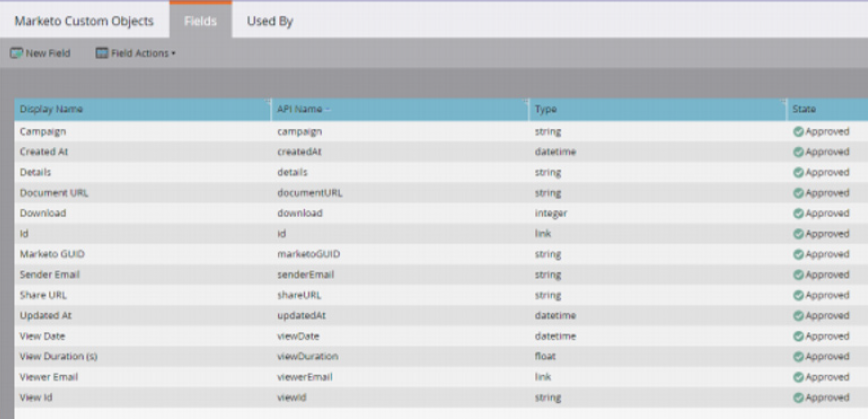
Create the following fields for the first custom object (Engagement)
Field Name
API Name
Data Type
Id
id
link (LinkObject: Content Engagement and Field: Id)
Campaign
campaign
string
Sender Email
senderEmail
email
Document URL
documentURL
string
Share URL
shareURL
string
View Id
viewId
string
Viewer Email
viewerEmail
link (LinkObject: Person Engagement and Field: Email Address)
View Date
viewDate
datetime
View Duration
viewDuration
float
-
Create a Custom Field
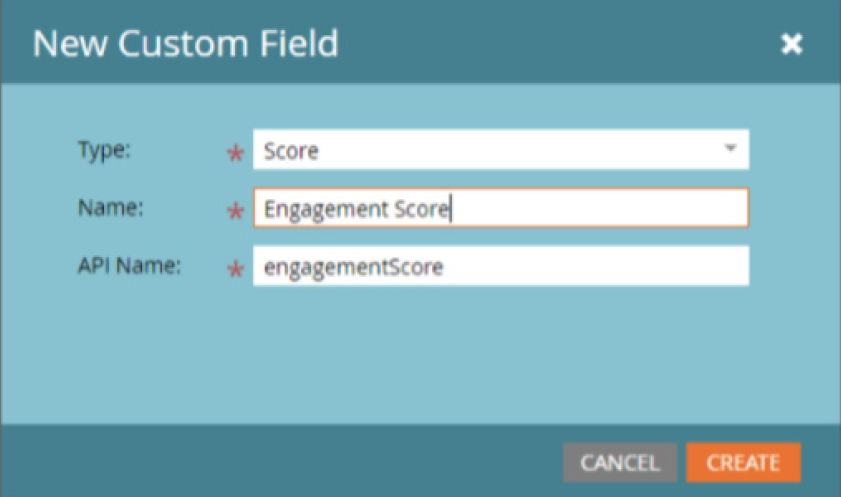
The Engagement Score (the Docurated-native counter part of Marketo's lead score) is a custom field, which you can create through the following process:
-
In the Marketo Admin console, click Database Management > Field Management > New Custom Field to open the New Custom Field dialog.
-
In the New Custom Field dialog provide the following values in the displayed fields:
Field Name
Value
Type
Score
Name
Engagement Score
API Name
engagementScore
-
Click Create.
Pardot
Like Marketo integration, Docurated-Pardot integration also allows you to track how prospects engage with your content and to log the content engagement information from Docurated to Pardot to produce an aggregate score for each prospect.