
Using Azure Blob Storage as a document pool in QuarkXPress Server
This section describes the steps necessary to use Azure Blob Storage as a docpool in QuarkXPress Server.
Define Connection String
To get the connection string for Blob Storage on the Azure portal, follow these steps:
-
Log in to Azure Portal: Navigate to the Azure portal and sign in with your credentials.
-
Navigate to Storage Account: Go to your specific storage account.
-
Access Keys: In the left-hand menu, under the "Security + networking" section, click on "Access keys."

-
Copy Connection String: You will see the connection strings for both primary and secondary access keys. Click the "Copy" button next to the connection string you need.

-
Paste Connection String: Paste the connection string next to the "qxps-blob-connection-string" entry in the "AZURE-BLOB.properties" file, located in the conf folder of your QXPS installation directory.

Get the Blob Storage path for docpool
To get the URL of your container from the Azure portal, follow these steps:
-
Log in to Azure Portal: Navigate to the Azure portal and sign in with your credentials.
-
Navigate to Storage Account: Go to your specific storage account.
-
Access Containers: In the left-hand menu, under the "Data storage" section, click on "Containers."
-
Select Your Container: Click on the container for which you want the URL.
-
Copy URL: In the container's overview, you will see the URL under "Settings > Properties". Click the "Copy" button next to the URL to copy it.
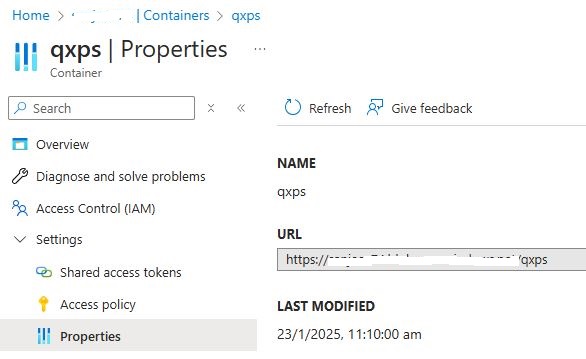
Register Azure Blob Storage as a Docpool in QuarkXPress Server
-
Open QuarkXPress Server's web-based Admin UI.
-
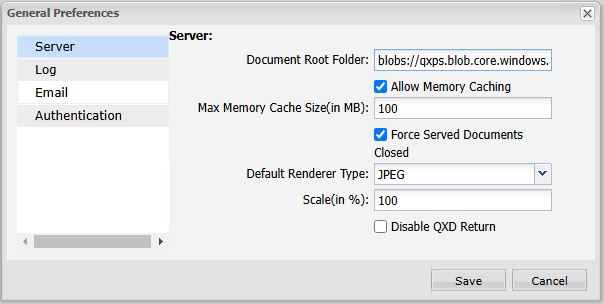
Go to Administration > Preferences > General.
-
In the Document Root Folder, specify the docpool URL:
blobs://qxps.blob.core.windows.net/qxps/docpoolChange "https" to "blobs" in the copied URL of the container and create a "docpool" folder within the container.
http://localhost:8080/setprefs?DocumentRootFolder=blobs://qxps.blob.core.windows.net/qxps/docpoolFont Management
Improved font management in multi-tenancy deployments for customer specific fonts. Fonts of different customers can be managed by creating customer specific folder (tenant id) on blob storage under "fonts" folder.
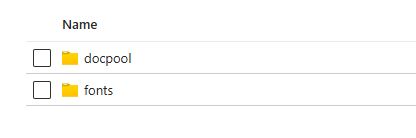
After managing fonts on blob storage, you can utilize either of two different paths to access tenant-specific fonts:
-
Azure to Local Fonts: Download all fonts from Azure to local disk once and use these fonts for your requests.
-
Azure Fonts: Use the Azure fonts with your requests.
Azure to Local Fonts
Whenever fonts are updated on Azure, you can download them to your local disk using
the following request: http://localhost:8080/download/fonts?fontsuri=fonts
After downloading, you can send the following request to use these fonts: http://localhost:8080/pdf/template.qxp?modify=file:mod.xml&tenantid=TENANT_ID&transactionuuid=TRANSACTION_UUID
Azure Fonts
You can use the following request to use the fonts directly from Azure: http://localhost:8080/pdf/template.qxp?modify=file:mod.xml&fontsuri=file:fonts&tenantid=TENANT_ID&transactionuuid=TRANSACTION_UUID