
The App Publishing Studio Feature
Understanding App Publishing Studio
The App Publishing Studio feature lets you create a customized app for the iPad®, iPhone®, or Android device; distribute that app through the Apple® App Store or an Android app store; and then create and publish content that your customers can purchase and download from within the app.
There are two parts to any App Publishing Studio solution:
-
An App Publishing Studio app is an app that you build with the App Publishing Studio Portal. After you build and test your App Publishing Studio app, you can submit it to the Apple App Store or an Android app store. If it is approved, it will be made available to your customers.
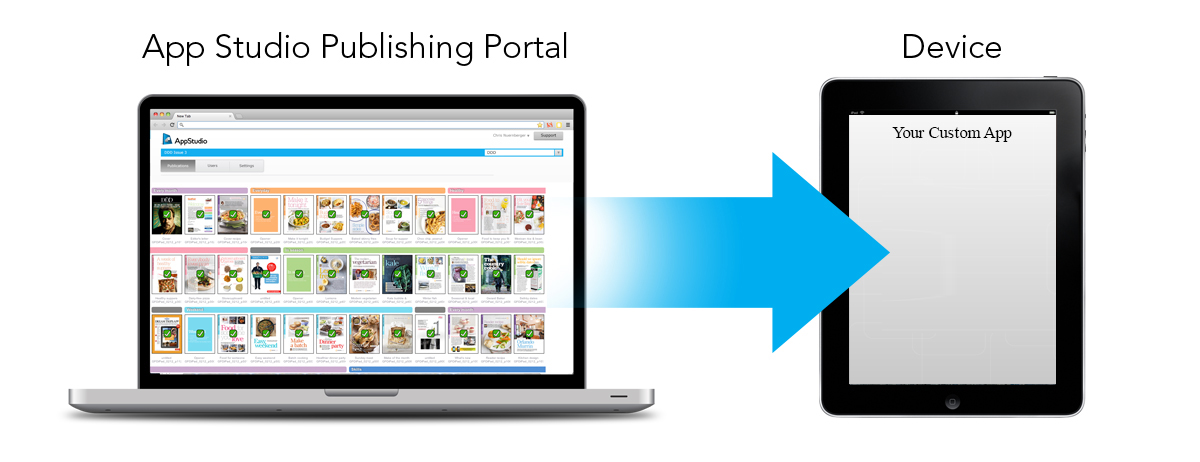
You can use the App Publishing Studio Portal to create your own custom apps. -
An App Publishing Studio issue is the digital equivalent of a book or a magazine. You can create and export App Publishing Studio issues in QuarkXPress.
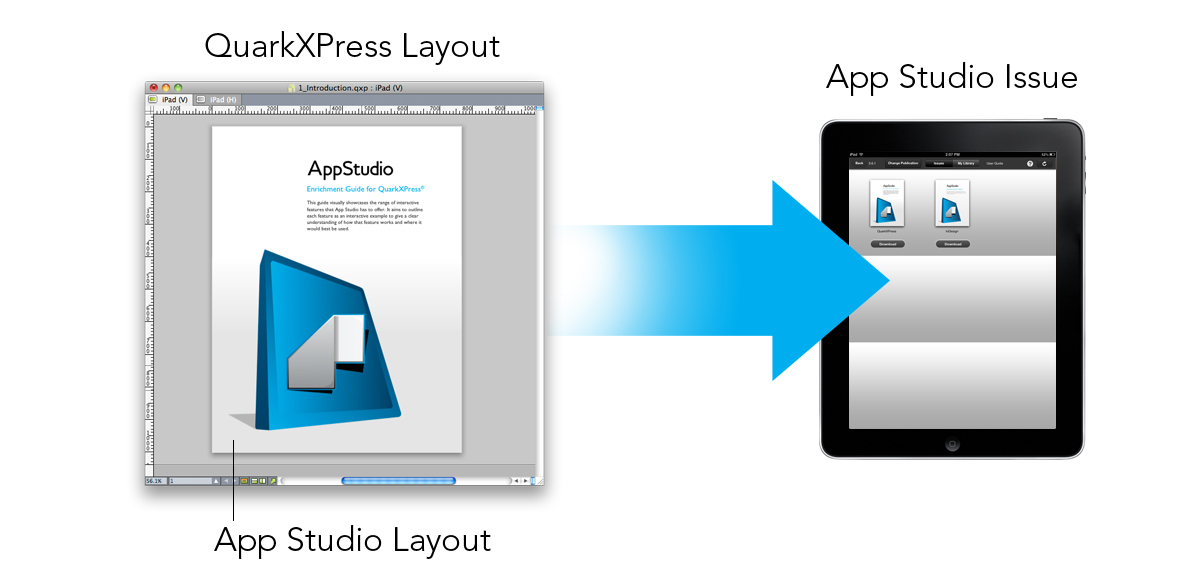
You can use QuarkXPress to create App Publishing Studio issues.
Your customers will use your App Publishing Studio app to view your App Publishing Studio issues. You and your customers can also view and test App Publishing Studio issues in a free Previewer iPad app that is available from the Apple App Store.
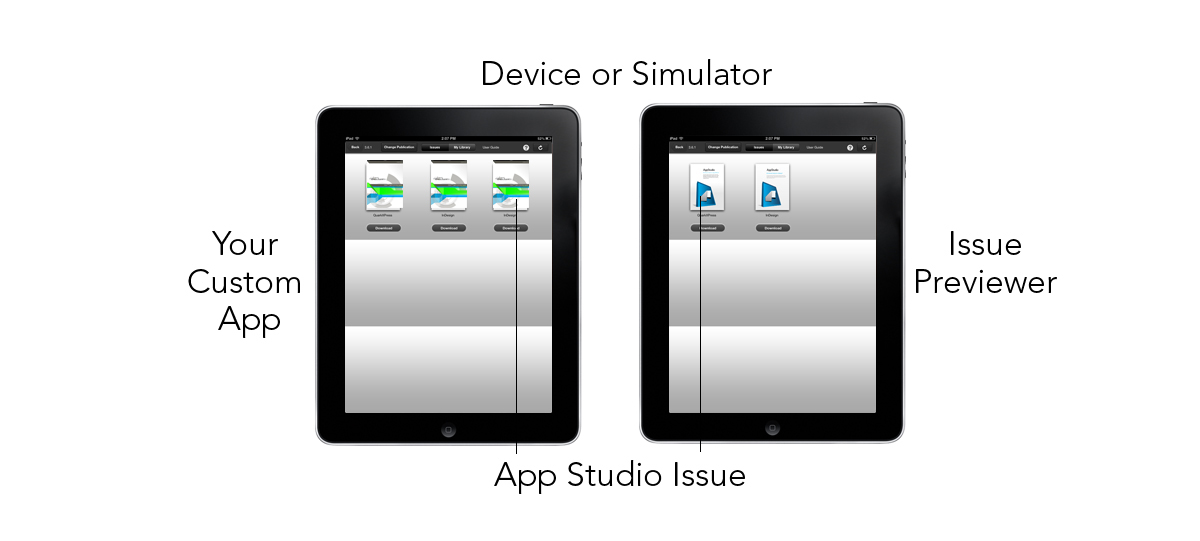
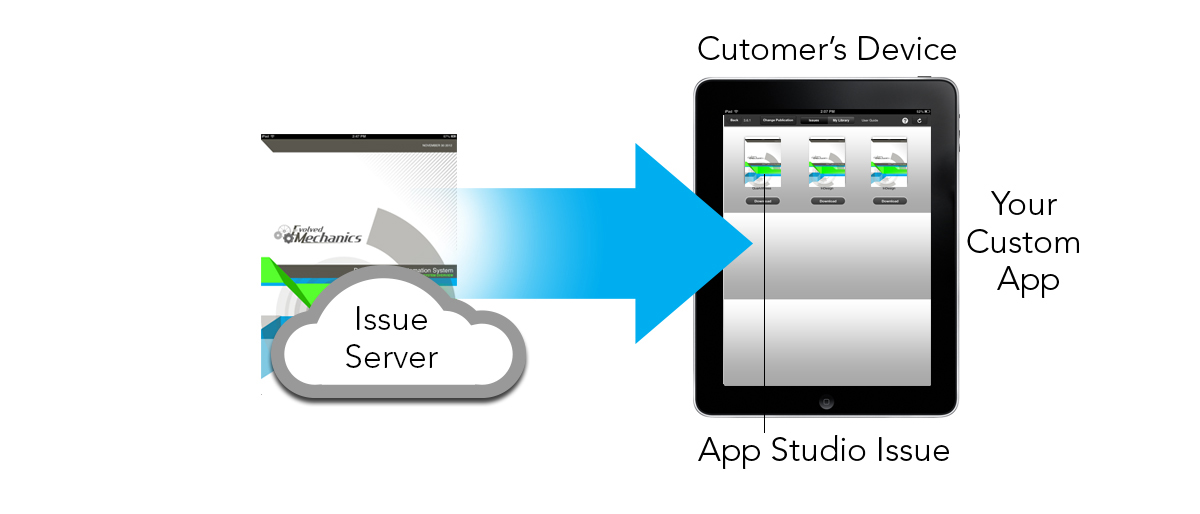
Once you've created your app and your issues, you can make the issues available on a Web server, set up in-app purchases for each of your issues on the Apple developer Website or on an Android app store, and then submit your app to the app store.
Once your app and its content is approved, your customers will be able to download your App Publishing Studio app from the app store and use it to browse, purchase, and read your App Publishing Studio issues. And you don't even have to set up your own eCommerce solution — the money from issue purchases goes automatically into your account through the in-app purchase feature.
Understanding the App Publishing Studio format
The App Publishing Studio format lets you create issues using HTML5 and JavaScript. Because HTML5 is a platform-independent format, you can read App Publishing Studio issues in any Web browser that has a compatible HTML5 renderer.
You can use three types of apps to view App Publishing Studio issues:
-
App Publishing Studio Issue Previewer. This free app is designed to let you view and test App Publishing Studio issues on a physical device.
-
A custom App Publishing Studio app. For example, if you are publishing a magazine, you might have an app that has been built specifically to deliver that magazine.
-
A Web App. A web-based reader to view publication issues in desktop and device browsers.
Each App Publishing Studio issue is made up of one or more articles. Each article corresponds to a single QuarkXPress project file and may consist of one digital layout (if the article supports only one orientation) or two digital layouts (if the article supports dual orientations). An article can be one or more pages long, and does not have to represent a discrete unit of content.
Exported App Publishing Studio issues are hosted on the App Publishing Studio Portal. Because they are in HTML5 content, you can view them in a Web browser by logging in to the App Publishing Studio Portal. There, you can navigate to your issues, display their component articles, and view individual pages in any orientation.
Understanding the App Publishing Studio portal
On the App Publishing Studio Portal (http://my.appstudio.net), content is organized into organizations, publications, issues, and articles.
-
Organization: Represents the organization that is responsible for one or more related publications. When you create an account on the App Publishing Studio Portal, one of the first things you do is create an organization.
-
Publication: Represents a set of related issues. For example, a publication might represent a particular magazine title.
-
Issue: Represents a discrete unit of content to be downloaded as a whole. For example, an issue might represent a single issue of a magazine title.
-
Article: Issues are divided into one or more articles, each of which is created from a single QuarkXPress project. Articles also allow issue creators to break issues down into multiple QuarkXPress projects. Each article displays as an entry in the automatically generated table of contents.
The content of your issues is stored on the App Publishing Studio Portal, which serves it to your App Publishing Studio apps. For more information about creating App Publishing Studio issues, see "Creating an App Publishing Studio issue."
The App Publishing Studio Portal also provides a way for you to create your own App Publishing Studio app. This is basically a matter of supplying descriptive information about your app and uploading some graphic resources. For more information, see "Creating an App Publishing Studio app."
Understanding App Publishing Studio apps
To create an App Publishing Studio app, you simply enter some descriptive information and upload your developer credentials. The Publishing Portal builds two versions of the app: a build for testing on your device, and a build for submission to the App Store. For more information, see "Creating an App Publishing Studio app."
Understanding layout families
A QuarkXPress project file can contain multiple layouts (for more information, see "Projects and layouts" in "A Guide to QuarkXPress"). When you create a digital layout, if you select Both under Orientation, QuarkXPress will automatically create two layouts for the chosen device, one with a Portrait orientation and one with a Landscape orientation.
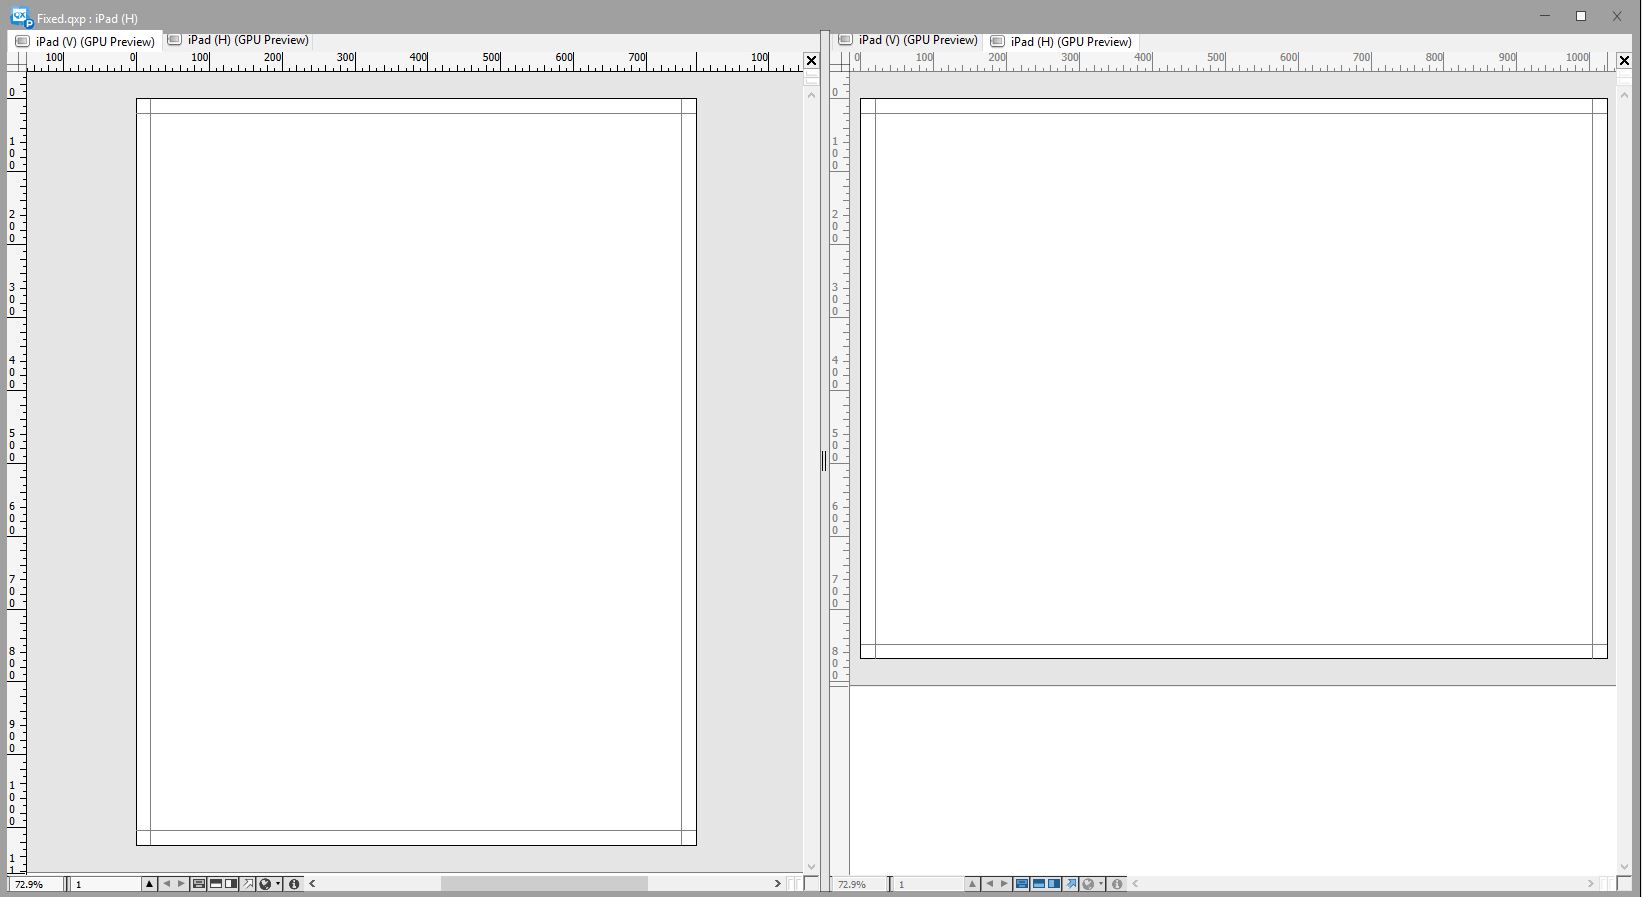
These two layouts are bound to one another in terms of page count; if you add or delete a page in one of the layouts, that page is added to or deleted from both of the layouts.
This make it easy for you to keep content synchronized between the two orientations. For example, assume that you're working on a 30-page issue, and you discover that you need to add a new page after page 12. You can go to one of the layouts and add the new page, and the page is automatically inserted into the other layout. This is much easier than manually adding the new page to each both layouts one-at-a-time. For more information, see "Working with shared content" in A Guide to QuarkXPress and "Synchronizing content between orientations".
When you create two layouts for a single device, QuarkXPress displays the project in a split view. You don't have to work on the layout in split view, but it can be helpful when you're trying to keep different orientations of a page consistent.
Creating an App Publishing Studio issue
App Publishing Studio issues are stored on the App Publishing Studio Portal. Before you can start creating content, you must create a free account on the Publishing Portal and set up an organization, a publication, and an issue for that account. Once you have created an issue, you can begin adding articles to it.
To create an App Publishing Studio issue:
-
Go to http://my.appstudio.net.
-
Log in with your user name and password.
-
If you don't have an account, create a free account.
-
If you have not registered your organization, register it now.
-
If you have not yet created a publication for your issues, create it now.
-
-
Select the publication you want to add an issue to.
-
Click Create Issue.
-
In the Title field, enter a title for the issue. You can use this field to enter an issue number.
-
In the Subtitle field, enter a subtitle for the issue. This additional info is displayed in the Apps Issue library.
-
In the Deadline field, enter a deadline. For example, the publication date of the issue (issues are ordered by this date in the Issues Library and it will be used to check the user's entitlement under a subscription).
-
In the Description field, enter a description for your issue.
-
Choose a Reading Direction (for example Left-to-Right).
-
Under Select Target platforms for issue publishing, you can optionally enter any In-App Purchase IDs for the target platforms (iOS, Android) that your customers can use to purchase the issue. (For more information, see "Setting up in-app purchases."
-
-
Click Create.
The issue is created on the server. You can now upload articles to this issue from within QuarkXPress. (For more information, see "Uploading an App Publishing Studio article.")
Uploading an App Publishing Studio article
Export works differently for App Publishing Studio issues than it does for other formats. Rather than creating a single local exported issue file on your hard disk, you upload the exported articles that make up an issue to the App Publishing Studio Portal. Once an article has been uploaded to the server, you can preview it on the App Publishing Studio Portal and in your copy of App Publishing Studio Issue Previewer. Once the content is final, you can serve it to your customers directly from the App Publishing Studio Portal.
To export the active layout as an article in an App Publishing Studio issue:
-
Display the App Publishing Studio palette (Window menu).
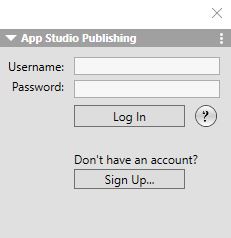
App Publishing Studio palette - login -
If you use a proxy server, choose Proxy Settings from the palette menu. The Proxy Settings dialog displays.
-
To automatically detect the network's proxy server, check Auto Detect Proxy Settings For This Network. If you uncheck this box, you must enter the proxy server's host address and port number manually.
-
Enter the user name and password for the proxy server.
-
Click OK.
-
-
If you do not yet have a free App Publishing Studio Portal account, click Sign Up and create one.
-
Enter your user name and password, and then click Log In. The App Publishing Studio palette changes to the upload interface.
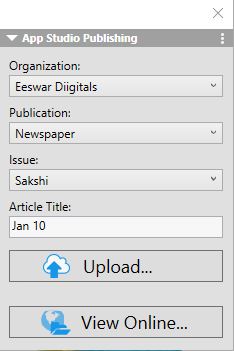
App Publishing Studio Portal palette - upload -
Choose your organization from the Organization drop-down menu.
-
Choose your publication from the Publication drop-down menu.
-
Choose the target issue from the Issue drop-down menu.
-
Enter a name for the article in the Article Title field. This name will display in the app's thumbnail table of contents.
-
-
To upload the article, click Upload. The Upload to App Publishing Studio dialog displays.
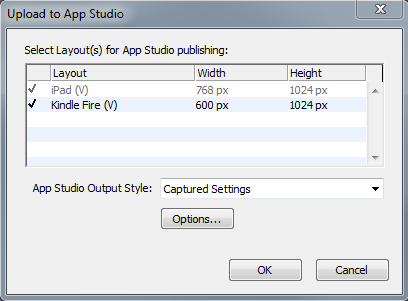
Upload to App Publishing Studio dialog -
Select the layout(s) you want to use to create the App Publishing Studio App.
-
Choose an output style from the App Publishing Studio Output Style drop-down menu or click Options. If you click Options, the App Publishing Studio Export Options dialog displays.
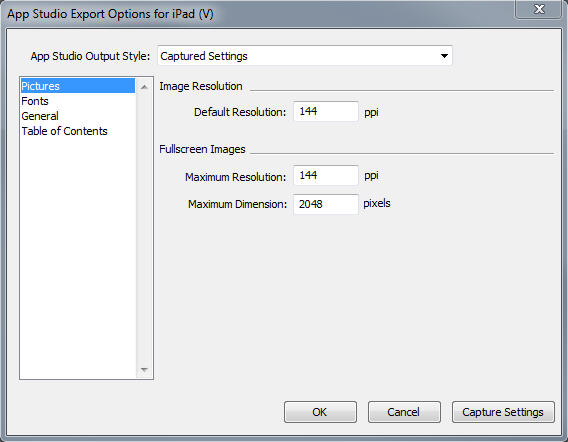
App Publishing Studio Export Options dialog -
Use the Pictures pane to specify the resolution of pictures in the AppStudio App file.
-
Use the Fonts pane to enable/disable packaging referenced fonts in the AppStudio App file. If disabled, the fonts will NOT be collected and the output may not be WYSIWYG. If enabled, users will get an alert about font licensing.
-
Use the General pane to enable/disable converting QuarkXPress Layout Sections to Page Stacks. Enable/disable "Continuous Page Stacks" to create a single continuous page of all pages in a section.
-
Use the Table of Contents pane to set options for the table of contents in the AppStudio App file.
-
When you're finished configuring options, click OK. To capture the current settings without uploading to AppStudio, click Capture Settings.
-
-
Click OK.
Output styles can be managed by selecting Edit > Output Styles. See A Guide to QuarkXPress. -
-
To view the uploaded article in your default Web browser, click View Online. The article's issue displays in your default Web browser.
-
To make the issue that the article is part of available in the test environment so that you can preview it, click Test in the App Publishing Studio Portal.
Previewing an App Publishing Studio issue
There are three ways to preview an App Publishing Studio issue.
-
The most accurate way to preview your issues is with the free Quark App Publishing Studio Previewer app. Download this app from the app store, launch it, tap Change Publication, and enter your login credentials for your App Publishing Studio Portal account. Then choose the publication you want to log on to.
There are two versions of each publication: the published version and the test version. The test version is provided so that you can test your issues on a physical device before you release them. An issue shows up in the test publication only if you have clicked Test for that issue in the App Publishing Studio Portal, and shows up in the regular publication only if you have published it from the App Publishing Studio Portal. (For more information, see "Publishing an App Publishing Studio issue.") -
The second way to preview your issues is on the App Publishing Studio Portal. You can click on any issue and view it in a compatible Web browser. (App Publishing Studio supports Google Chrome, Firefox, Safari, and any other browser that uses the WebKit browser engine. It does not support Internet Explorer.) You should consider this a secondary way to preview your issues, because not all types of interactivity can be previewed in a browser.
-
The third way to view issues is on the web app.
Publishing an App Publishing Studio issue
To make an App Publishing Studio issue available in your customers' apps, click Publish for that issue in the App Publishing Studio Portal. This issue automatically becomes available, across all platforms where it is published (iOS, Android, WebReader etc.).
Before you publish an App Publishing Studio issue, you can edit the metadata of the issue.
Creating an App Publishing Studio app
This chapter describes the process of preparing to submit an App Publishing Studio app to Apple or to an Android app store.
Preparing to submit an App Publishing Studio app to Apple
The process in general for preparing to submit an App Publishing Studio app to Apple is:
-
Create your Apple iOS Developer account.
-
Get your iPad's device ID.
-
Create your iOS Development Certificate.
-
Create your iOS Distribution Certificate.
-
Register your iPad so you can test on it.
-
Create your app ID.
-
Create your Development Provisioning Profile.
-
Create your App Store Distribution Provisioning Profile.
-
Create your app description.
-
If you are charging for your content, set up your in-app purchases.
The following topics explain this process in detail. For more information, see the iTunes Connect Developer Guide, which is available to Apple developers at itunesconnect.apple.com.
Creating your developer account
Before you can proceed, you must create an Apple iOS Developer account. To do so:
-
Go to http://developer.apple.com/programs/ios/ and click Enroll.
-
Click Continue and follow the instructions on the screen. When you are asked to enroll as an individual or a company, choose the appropriate option.
-
Go to itunesconnect.apple.com, click Contracts, Tax, and Banking, and enter into an iOS Paid Applications contract with Apple. If you plan to charge for your app or issues, this contract must be in effect, with valid bank info entered, before you submit your app to the Apple app store.
Getting your iPad's device ID
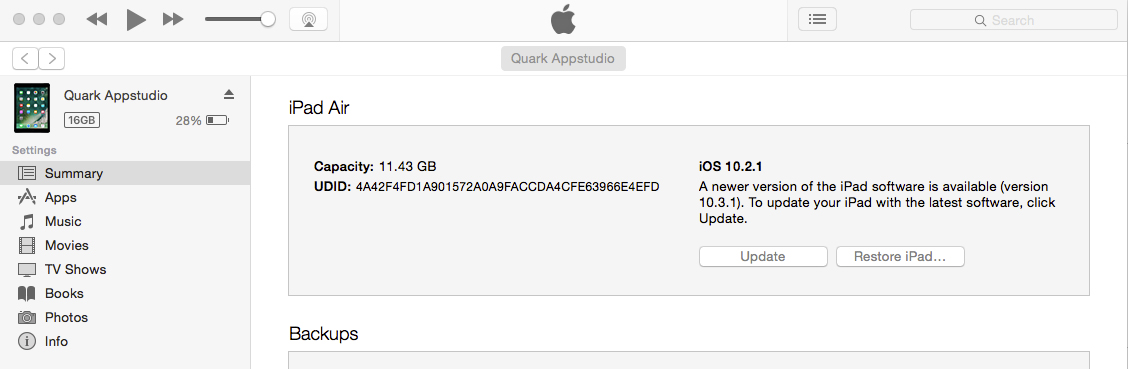
To test your app on your iPad, you must specify its device ID (that is, its UDID).
To get your iPad's UDID:
-
Plug your iPad into your computer.
-
Launch iTunes 7.7 or later.
-
Select the iPad in iTunes.
-
Click the Serial Number label. The label changes to Identifier (UDID).
-
Press Command+C to copy the device ID to the clipboard.
-
Paste the device ID into a text file. It should be a very long code with both numbers and lower-case letters, but no hyphens or other characters.
Creating your iOS Development Certificate
You must have an iOS Development Certificate to develop apps and test them on an iPad.
To create this Certificate:
-
Go to http://developer.apple.com/account/ and log in.
-
Click Certificates, Identifiers & Profiles.
-
Under the Certificates section in the left sidebar, click Development.
-
Click the New
 icon . The Add iOS "Certificate" screen displays.
-
In the Select Type tab, select iOS App Development from the Development section.
-
Click Continue.
-
Follow the instructions in the Request tab to create the CSR file.
-
Click Continue.
-
In the Generate tab, select Choose File and select the CSR file you just created.
-
Click Continue.
-
In the Download tab, select Choose File and select the CSR file you just created.
-
Follow the instructions on the screen to download, install and backup your Distribution Certificate.
-
Click Done.
Creating your iOS Distribution Certificate
You must have an iOS Distribution Certificate to submit an app to the App Store.
To create this Certificate:
-
Go to http://developer.apple.com/account/ and log in.
-
Click Certificates, Identifiers & Profiles.
-
Under the Certificates section in the left sidebar, click Production.
-
Click the
icon. The Add iOS Certificate dialog displays. -
In the Select Type tab, select App Store and Ad Hoc from the Production section.
-
Click Continue.
-
Follow the instructions in the Request tab to create the CSR file.
-
Click Continue.
-
In the Generate tab, select Choose File and select the CSR file you just created.
-
Click Continue.
-
In the Download tab, select Choose File and select the CSR file you just created.
-
Follow the instructions on the screen to download, install and backup your Distribution Certificate.
-
Click Done.
Registering devices
Until they are in the App Store, apps can be run only on devices that they are registered to run on.
To register your iPad for testing:
-
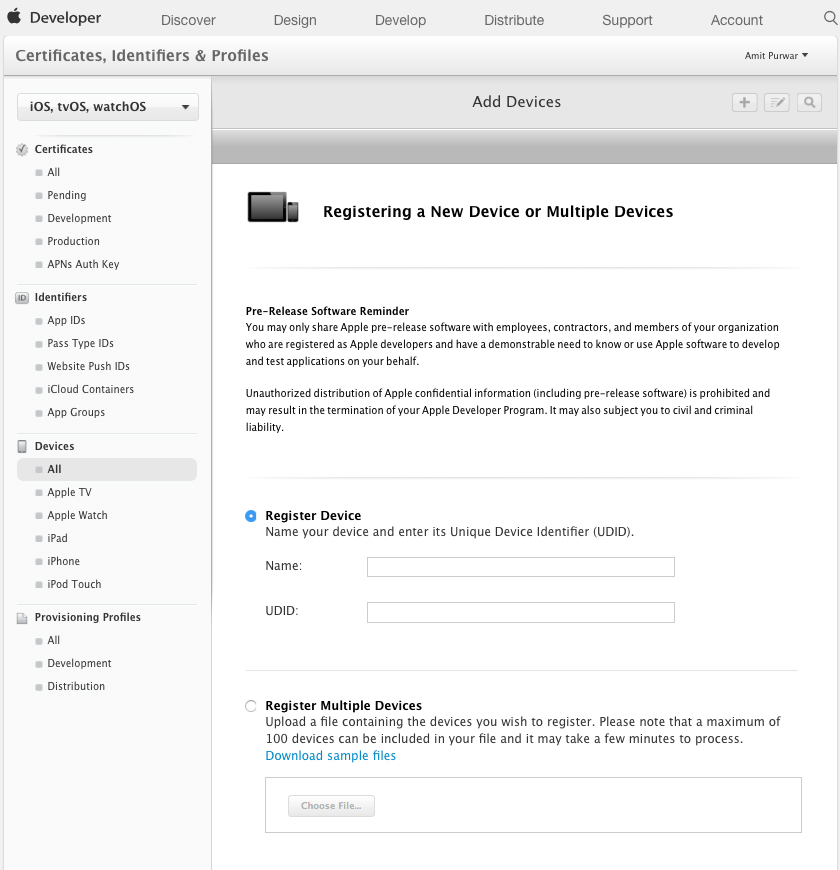
Under the Devices section in the left sidebar, choose the type of device that you want to register. (All, Apple TV, Apple Watch, iPad, iPhone, iPod Touch) For this example we have chosen iPad. The iPad screen displays.
-
Click the New icon. The Add iPad screen displays.
-
Enter a name for your iPad (for example, "Jane's iPad") in the Name field, then paste the iPad's UDID in the UDID field. See "Getting your iPad's device ID".
To register multiple devices at one time, select Register Multiple Devices and click Choose File to upload a file containing the devices you wish to register. (maximum of 100 devices per file.) -
Click Continue.
-
Click Submit.
Creating an app ID
Every app must have a unique ID.
To create your app ID:
-
Click App IDs in the left sidebar. The App IDs screen displays.
-
Click the New icon
. The Registering an App ID screen displays.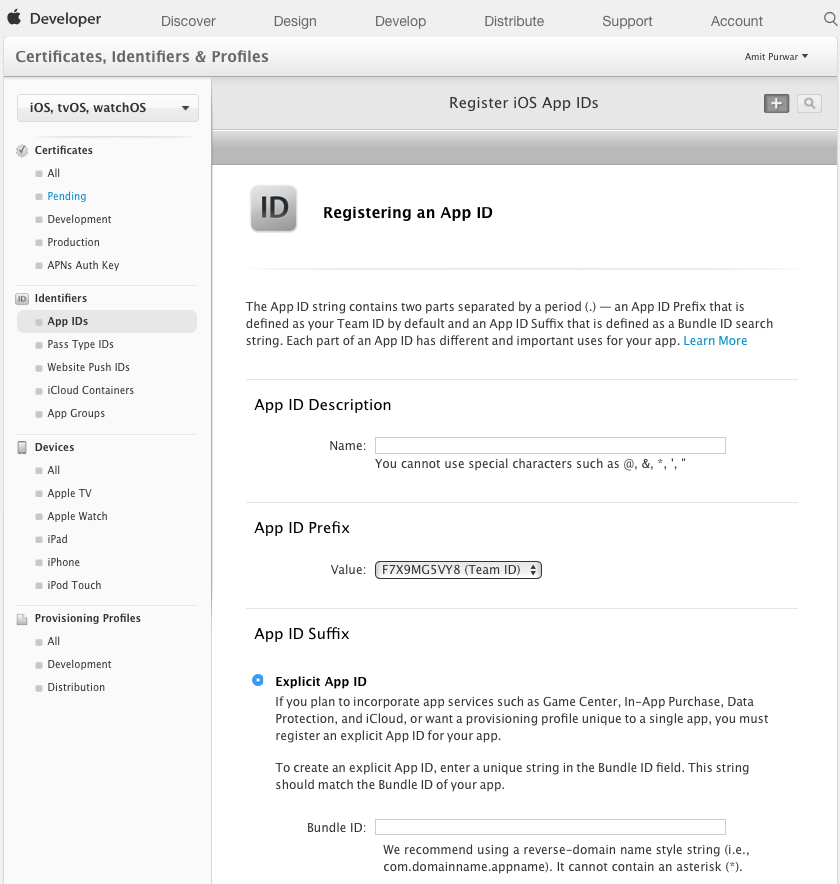
-
Enter the name of your app in the App ID Description field. Note that this is NOT the name that will display for the app in the App Store.
-
Leave the App ID Prefix drop-down menu set to Generate New.
-
In the App ID Suffix section, use the Bundle ID field to enter a unique identifier for your app, using the form
com.[your organization's name].[name of your app]. For example, if the app is being created for 123 Productions, the bundle identifier might becom.123productions.123magazine.Bundle IDs are case-sensitive. -
In the App Services section, select the services you would like to enable in your app.
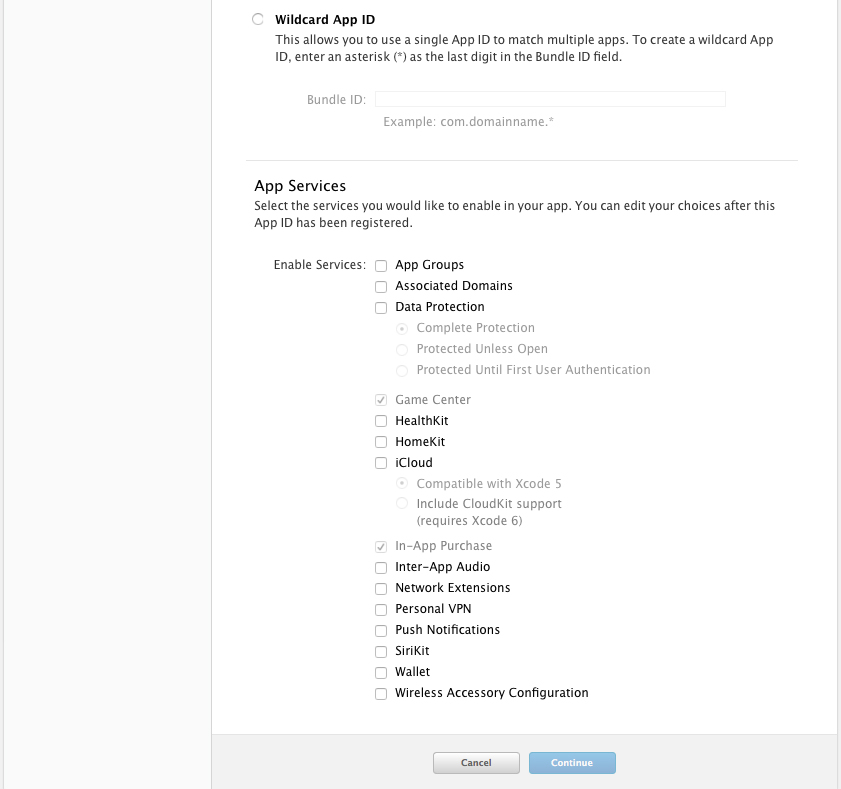 Do not check Enable Services > iCloud, Enable Services > Data Protection, or Enable Services > Game Center. For enabling push notifications, see "Setting up for push notifications".
-
-
Click Continue.
-
You will be asked to confirm the information for your app. Click Register.
Setting up for push notifications
You can use push notifications to notify your customers when a new issue of your publication becomes available.
To set up for push notifications:
-
Click App IDs in the left sidebar. The App IDs screen displays.
-
Click the name of the app you want to enable notifications for. The Configure App ID page displays.
-
Check Enable for Apple Push Notification Service.
-
Click the Configure button for Development Push SSL Certificate. The Apple Push Notification Service SSL Certificate Assistant screen displays.
-
Follow the instructions on the screen. The instructions will direct you to create a certificate signing request, upload it in the Apple Push Notification Service SSL Certificate Assistant screen, and download an Apple Push Notification Service SSL certificate. This file should have a name like "aps_development_identity.cer."
-
Double-click the certificate file to install it.
-
Repeat the last three steps for Production Push SSL Certificate.
-
Launch the Keychain Access application (Applications > Utilities) and click My Certificates in the list on the left. A list of certificates displays.
-
Expand the certificate named Apple Development iOS Push Services. A key icon displays.
-
Select both Apple Production iOS Push Services and the line with the key icon.
-
Control+click the two selected lines and choose Export 2 items, then save the items in Personal Information Exchange (.p12) format with the file name
myapp_development_push.p12. Do not enter a password. If a dialog box displays, stating that Keychain Access wants to export a key, enter your login password and then click Allow. -
Repeat the last three steps for Apple Production iOS Push Services and save the .p12 file as
myapp_production_push.p12. -
Set up an account at Urban Airship (http://urbanairship.com/. You will use this account to send your push notifications.
-
Keep the .p12 files nearby. You will need them when you submit your app request on the App Publishing Studio Portal. For more information, see "Requesting an App Publishing Studio app."
Creating a Development Provisioning Profile
You must have a Development Provisioning Profile to run your app on a physical iPad.
To create a Development Provisioning Profile:
-
Under the Provisioning Profiles section in the left sidebar, click Development. The iOS Provisioning Profiles (Development) screen displays.
-
Click the New icon
. The Add iOS Provisioning Profiles (Development) screen displays. -
In the Select Type tab, select iOS App Development from the Development section.
-
Click Continue.
-
In the Configure tab:
-
Choose an App ID from the drop-down menu and click Continue.
-
Choose the certificates you wish to include in the provisioning profiles and click Continue.
-
Select the devices you wish to include in this provisioning profiles and click Continue.
-
-
In the Generate tab, specify a name in the Profile Name field. This will be used to identify the profile in the portal.
-
Click Continue.
-
In the Download tab, click Download to download the Development Provisioning Profile to your desktop.
Creating an App Store Provisioning Profile
You must have an App Store Distribution Provisioning Profile to build an app for submission to the App Store.
To create an App Store Provisioning Profile:
-
Under the Provisioning Profiles section in the left sidebar, click Distribution. The iOS Provisioning Profiles (Distribution) screen displays.
-
Click the New icon
. The Add iOS Provisioning Profiles (Distribution) screen displays. -
In the Select Type tab, select App Store from the Distribution section.
-
Click Continue.
-
In the Configure tab:
-
Choose an App ID rom the drop-down menu and click Continue.
-
Choose the certificates you wish to include in the provisioning profiles and click Continue.
-
Click Continue.
-
-
In the Generate tab, specify a name in the Profile Name field. This will be used to identify the profile in the portal.
-
Click Continue.
-
In the Download tab, click Download to download the Distribution Provisioning Profile to your desktop.
Creating an app description in iTunes Connect
Before you can submit your app to Apple, you need to create a description for that app on the Apple developer Website.
To create an app description:
-
Go to http://itunesconnect.apple.com and log in (if necessary). The iTunes Connect screen displays.
-
Click My Apps. The My Apps screen displays.
-
Click the
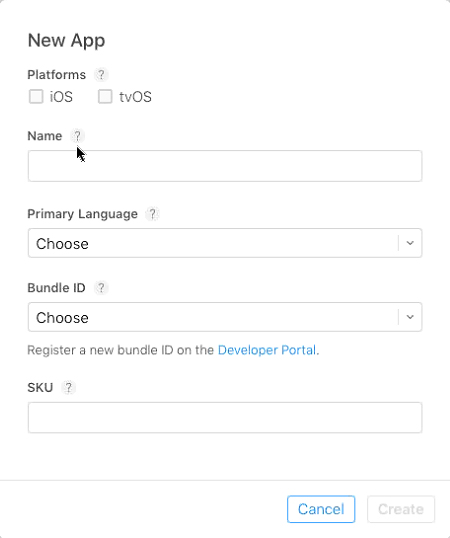
 icon and choose New App to add a new app. The New App dialog displays.
-
Select the Platforms you wish to enable your app for.
-
In the Name field, enter the name of your app as you want it to display in the App Store.
-
Choose a language from the Primary Language drop-down menu.
-
Choose the ID of your app from the Bundle ID drop-down menu or click Developer Portal to create a new Bundle ID. See "Creating an app ID."
Once the new Bundle ID has been created, it will appear on the drop-down menu. -
In the SKU field, enter a unique value that can be used to identify your app.
-
Click Create.
Your app is created, the Apple ID is generated and the App Information screen displays. You can use this screen to set the pricing and availability for your app.
Setting up in-app purchases
If you plan to charge for your issues or offer subscriptions, you must set up an in-app purchase for each issue with Apple. For information on how to do this, see "Managing Your In-App Purchases" in the iTunes Connect Developer Guide (available to registered Apple iOS developers at http://developer.apple.com).
The process, as it exists as of this writing, is as follows:
-
Go to http://itunesconnect.apple.com/ and log in (if necessary).
-
Click Manage Your Applications. The Manage Your Apps page displays.
-
Select your app. The app's page displays.
-
Click Features and from the left sidebar select In-App Purchases. The In-App Purchases page displays.
-
Click Create New. The Select Type screen displays.
-
To specify what type of in-app purchase you're creating, click one of the following buttons.
-
Consumable: Do not use this option.
-
Non-Consumable: Click this option to create an in-app purchase for a single issue.
-
Auto-Renewable Subscription: Check this option to create an automatically renewing paid subscription.
-
Non-Renewing Subscription: Check this option to create a non-renewing paid subscription.
-
Free Subscription: Check this option to create a free subscription. (Use this option if you want to use Newsstand with free issues.)
The next screen displays.
-
-
In the Reference Name field, enter the title and date of the in-app purchase issue. For example:
-
If you are creating a Non-Consumable in-app purchase, enter something like
123 Magazine - Single Issue. -
If you are creating a subscription in-app purchase, enter something like
123 Magazine Subscription.
-
-
If you are creating a Non-Consumable in-app purchase or subscription, enter your bundle identifier, followed by the issue name and date, in the Product ID field. For example:
com.123productions.123magazine.price.issue.default.-
To associate this in-app purchase with an App Publishing Studio issue, display the issue's main page on the App Publishing Studio Portal, then enter this product ID in the Apple ID field.
-
To associate this in-app purchase with a subscription, you will need to enter the subscription's information when you submit your app request on the App Publishing Studio Portal. For more information, see "Requesting an App Publishing Studio app."
-
-
To specify the language or languages of your issue, click Add Language and follow the instructions on the screen.
-
If you are creating a Non-Consumable in-app purchase, check Cleared for Sale and choose the price tier you want from the Price Tier drop-down menu. (For a corresponding list of prices, click View Pricing Matrix.)
-
If you are creating a subscription through in-app purchase, you must specify one or more available duration for the subscription. Click Add Duration and follow the instructions on the screen. The Create New In-App Purchase page displays.
-
In the Product ID field, enter your bundle identifier, followed by the issue duration. For example:
com.123productions.123magazine.6months. -
Check
Cleared for Sale. -
If you are creating a paid subscription, choose the price tier you want from the Price Tier drop-down menu. (For a corresponding list of prices, click View Pricing Matrix.)
-
-
In the Screenshot for Review area, click Choose File and upload a screen shot of what an issue of your app will look like when viewed on the iPad. Note that this image is only for review and will not be displayed in the App Store.
This screen shot can be changed later. -
If you plan to offer subscriptions, click View or generate a shared secret on the in-app purchases screen for your app. You will need your Shared Secret when you submit your app request on the App Publishing Studio Portal. For more information, see "Requesting an App Publishing Studio app."
-
Click Save.
Preparing to submit an Android App Publishing Studio app
There are a number of Android app stores that you can submit an app to, including the following:
-
Google Play (http://play.google.com/apps/publish): As of this writing, you can submit apps to the Google Play app store for a $25 registration fee.
-
Amazon Appstore (http://developer.amazon.com/welcome.html): As of this writing, you can submit apps to the Amazon Appstore for a yearly fee of $99 (which is currently being waived). Apps submitted to the Amazon Appstore are automatically considered for inclusion in the Kindle Fire Appstore.
The process for submitting an app to the above app stores is similar to the process of submitting an app to Apple. You must create a developer account, then create an app description with supporting pictures and other resources. You can currently submit the same app to both of the above app stores, and both of them offer an in-app purchase feature that allows you to charge for your issues.
For more information, see the Website for each app store.
Creating a keystore
Create a Google keystore for macOS
Read the documentation here:
http://docs.appstudio.net/display/AppStudio/2.+Create+a+Google+Keystore. For further information on this, please read the Android documentation here:
http://developer.android.com/tools/publishing/
To create a Google keystore for a Mac:
-
Edit:
Your_personal_file titleand Your_personal_alias in the following example of a Keytool command that generates a private key:keytool -genkey -v -keystore Your_personal_file_title.keystore -alias Your_personal_alias -keyalg RSA -keysize 2048 -validity 10000 .Customers with Java 9 or later versions installed need to add "-storetype JKS to the keystore command:keytool -genkey -v -storetype JKS -keystore Your_personal_file_title.keystore -alias Your_personal_alias -keyalg RSA -keysize 2048 -validity 10000 . -
You will need to edit several elements of your newly created key:
-
Open the Terminal App on your mac (Applications / Utilities / Terminal)
-
In the command line, copy and paste the Google Key you created and press ENTER
-
Enter the following profile information when prompted:
-
Keystore password
-
First and last name
-
Your organizational unit
-
Name of your organization
-
City or Locality
-
State or Province
-
The two-letter country code for your unit
-
-
Answer YES when asked to confirm that the information is correct.
-
-
You key will be generated and you will be asked for the following:
-
Keystore password. This is the keystore password you entered into the form.
-
Key password.
The key will be saved in your Users/hardrive name (home icon)/ mykeys.keystore. If you cannot find the key in this location, go back in to Terminal, press return and type in pwd my-macbook-pro-2:~ hardrivename$ pwd. This will return
Users/location/,This is the location of your key. -
-
Complete the Android App Publishing Studio App Submission form and attach your Google key.
Create a Google keystore for Windows
Read the documentation here:
http://www.thomasmortensen.com/index.php/71-android-keystore-jdk.
Ensure you have the Java Development kit installed on your machine before you start. You will need this to create your Keystore file.
To download the JDK installation file, click on this link: http://www.oracle.com/technetwork/java/javase/downloads/ and install the JDK.
To create a Google keystore for Windows:
-
Open the command prompt and navigate to Program Files/Java/jdk1.7.0_03/bin
-
Type in the following Keytool command to generate a private key (Editing the following:
Your_personal_file titleandYour_personal_alias:keytool -genkey -v -keystore Your_personal_file_title.keystore -alias Your_personal_alias -keyalg RSA -keysize 2048 -validity 10000Customers with Jave 9 or later versions installed need to add "-storetype JKS to the keystore command:keytool -genkey -v -storetype JKS -keystore Your_personal_file_title.keystore -alias Your_personal_alias -keyalg RSA -keysize 2048 -validity 10000 . -
Enter the following profile information when prompted:
-
Keystore password
-
First and last name
-
Your organizational unit
-
Name of your organization
-
City or Locality
-
State or Province
-
The two-letter country code for your unit
-
-
Answer YES when asked to confirm that the information is correct.
You key will be generated in your C:\Program files\Java\jdk1.7.0_03\bin directory, with the name you gave it.
Requesting an App Publishing Studio app
To get a build of an iOS or Android App Publishing Studio app, you must fill out a form online and submit any custom graphics you would like to add to the app. When Quark receives the form, they will use that information to create a custom build for testing and another custom build for app store submission.
If you are requesting an Apple app, make sure you have:
-
Your Development Certificate
-
Your Distribution Certificate
-
Your Ad Hoc Provisioning Profile
-
Your App Store Provisioning Profile
-
Your app's App ID
-
Your home screen icon in PNG format, at 1024 x 1024 pixels
-
Your landscape splash screen in PNG format, at 2048 x 1536 pixels
-
Your portrait splash screen in PNG format, at 1536 x 2048 pixels
-
The IDs of any in-app purchases you want to use
-
Your .p12 files (if you are using notifications)
To request an App Publishing Studio app:
-
On the App Publishing Studio Portal (http://my.appstudio.net), go to the publication for which you want to create an app.
-
Locate the entry for the application you want to build and click View for that application.
-
Click App Manager.
-
Click Build for the platform you want to build for. A form displays.
-
Fill out the form and provide the various resources it requests. If you have questions about a part of the form, click the corresponding question mark in the form.
When the build is ready, you will receive an e-mail. Download the builds per the instructions in the e-mail.
To test the app, drag the test version of the build onto your iTunes icon, then sync with your iPad.
If the app does not display on the iPad, verify that the iPad's UDID is associated with your Development Provisioning Profile. For more information, see "Registering devices" and "Creating a Development Provisioning Profile."
Updating an App Publishing Studio app
When you create a new version of an App Publishing Studio app, you must increment the version number or Apple will reject the app.
To prepare to upload a new version of an app on the Apple Developer site, log in at http://itunesconnect.apple.com, click Manage Your Applications, click the icon for your application, click Add Version, and then follow the instructions on the screen. When you specify the new version number, be sure it is greater than the current version number.
To update an App Publishing Studio app, enter the new version number in the form when you request a build of the new version of the app.
Submitting an app to Apple
Before you submit your app to the App Store, make sure that you have followed all the instructions in the "Preparing to submit an App Publishing Studio app to Apple" section.
To submit an app to Apple:
-
Log in to your Apple developer account at http://itunesconnect.apple.com.
-
Click My Apps. The My Apps screen displays.
-
Click the icon for your app. The app description screen displays.
-
Make any desired changes. In the Uploads area, upload final screen shots. (To take a screenshot on the iPad, press the Home button and then, while keeping it pressed, press the Power button once. The screenshot will be available in the Photos app.
If you are charging for issues, you must associate your in-app purchases with the app. To do this, click Edit in the In-App Purchases area, then check all the in-app purchases you want associated with the app and click Save. -
When you're sure everything is final, click Save.
-
Click Ready to Upload Binary. If you skip this step, you will not be able to upload your app in step 9.
-
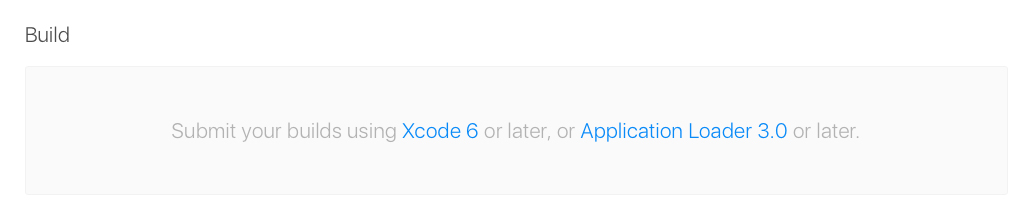
Download the Application Loader or Xcode app from the link provided in Build.
-
Launch Application Loader or Xcode and choose Xcode > Open Developer Tool > Application Loader.
-
Click Deliver Your App.
-
Follow the instructions on the screen. When the Choose an application screen displays, choose the name of your app.
-
When the Application Information screen displays, click Choose and select the .ipa file you downloaded from the App Publishing Studio Portal and click Open.
-
Follow the instructions on the screen. If you are asked whether your app contains cryptography, click No.
After your app has been successfully submitted, Apple will review it and contact you to let you know when it is approved.
Submitting an Android app
For Android app submission instructions, see the developer site for the target app store.