
Exporting as an iOS App
QuarkXPress allows users to select one or more digital layouts and export them directly to an iOS App.
The following prerequisites must be complete before you export as an iOS App:
Must have an Apple developer account to build the iOS Apps.
-
Create an Apple ID and Bundle ID using iTunes Connect for the iOS App you want to build.
-
Create Distribution and Developer certificates using your Apple developer account.
-
Create Distribution and Developer provisioning profiles, again using Apple developer.
-
Create graphic files required for App – home screen icon, optionally splash screens, etc. for iOS devices.
To export directly to an iOS App:
-
Choose File > Export as > iOS App. The Export as iOS App dialog displays.
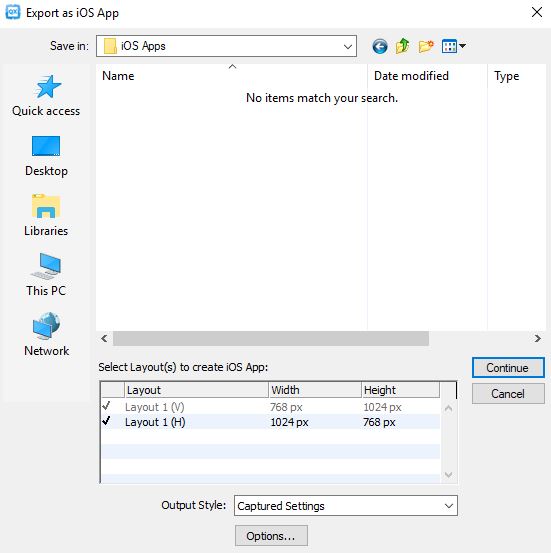
Export as iOS App dialog -
Navigate to the folder where you want to save the iOS App to.
-
Select the layout(s) you want to use to create the iOS App.
-
Choose a predefined output style from the Output Style drop-down menu or click Options. If you click Options, the iOS App Export Options dialog displays.
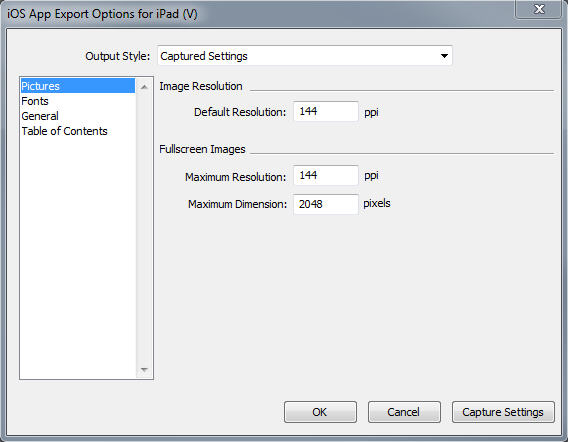
iOS App Export Options dialog Output styles can be managed by selecting Edit > Output Styles. See "A Guide to QuarkXPress".-
Use the Pictures pane to set default resolution for images exported for the App. Choose maximum resolution and/or dimensions for converted/down sampled images (only applies to images used in HTML5 interactivity).
-
Use the Fonts pane to enable/disable packaging referenced fonts in the App. If disabled, the fonts will NOT be collected and the output may not be WYSIWYG. If enabled, users will get an alert about font licensing.
-
Use the General pane to enable/disable converting QuarkXPress Layout Sections to Page Stacks in the App. Enable/disable "Continuous Page Stacks" to create a single continuous page of all pages in a section.
-
Use the Table of Contents pane to elect a named section from the list, all the pages in that section will be exported as TOC Pages. You may also choose to Include Pages in Publication, otherwise these pages will not be added to content pages. Specify a title for the TOC.
-
-
When you're finished configuring options, click OK. You will return to the Export as iOS App dialog box. To capture the current settings without creating an iOS App file, click Capture Settings.
-
Click Continue. The Export as iOS App dialog displays.
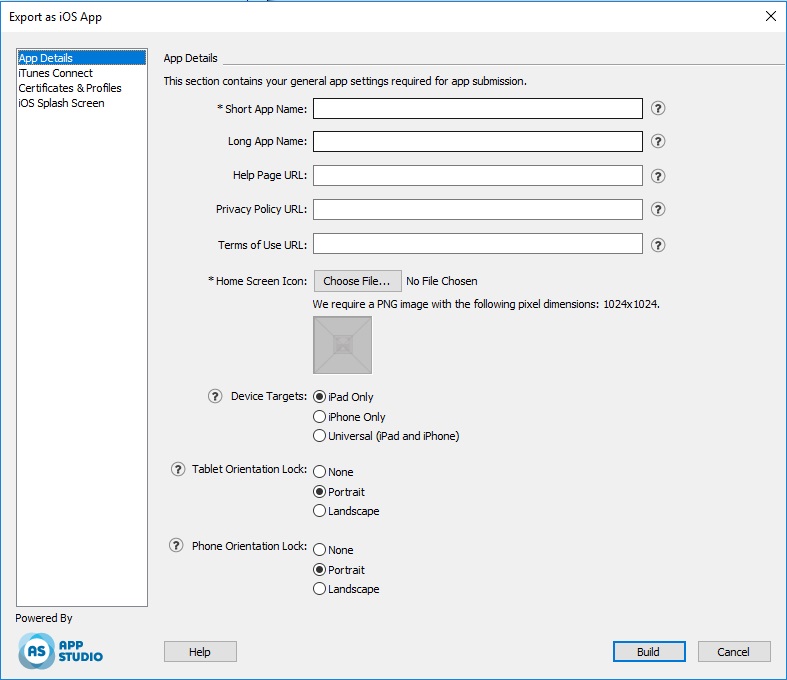
All mandatory fields, as required by Apple to build the iOS Apps in this dialog are indicated with *.Use the App Details pane to specify the general App settings required for App submission.
-
Short App Name: (Mandatory) Enter the name for the App on the homescreen (beneath the icon).
-
Long App Name: (Optional) Enter the Apps full name here for display throughout the App. (for example in the Scrubber view).
-
Help Page URL: (Optional) Enter the URL to the page which will be shown when the user clicks the help icon located on the navigation bars within the App.
-
Privacy Policy URL: (Mandatory) Enter the URL to the page which will be shown when the user clicks the privacy policy icon located on the navigation bars within the App.
-
Terms of Use URL: (Optional) Enter the URL to the page which will be shown when the user clicks the terms of use icon located on the navigation bars within the App.
-
Home Screen Icon: (Mandatory) Click Choose File and select the icon that will appear on the home screen of your App.
-
Device Targets: (Mandatory) Select the devices for which your App will be available.
-
Tablet Orientation Lock: (Mandatory) Set your orientation lock preferences for when the app is launched on a tablet.
-
Phone Orientation Lock: (Mandatory) Set your orientation lock preferences for when the app is launched on a phone.
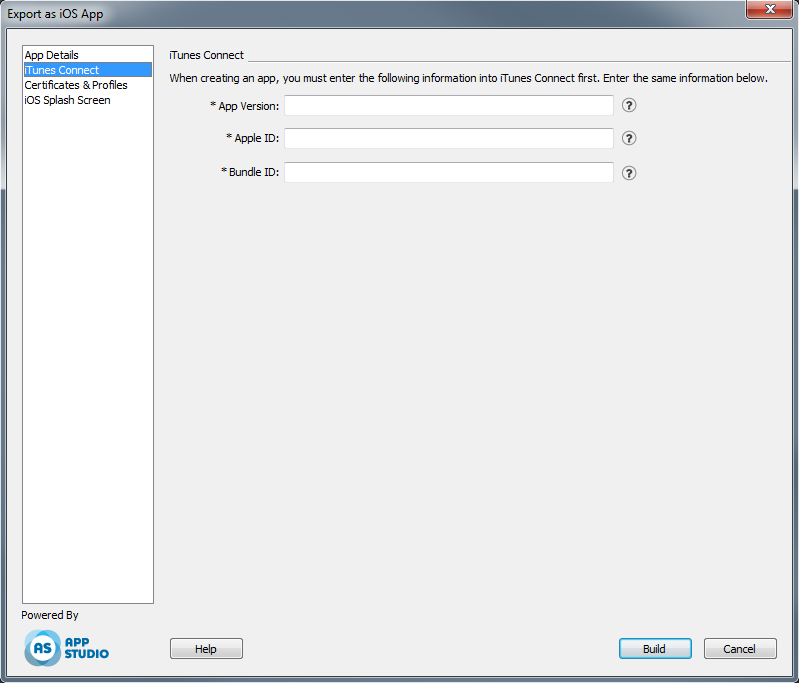
Use the iTunes Connect pane to specify the App ID and the Bundle ID along with the version of the App that will be created.
-
App Version: Enter the App version. Typically, the first version you submit to Apple will be 1.0.0, and then incremented every time you create a new version.
-
Apple ID: Enter the Apple ID. (This was created in "Creating an app description in iTunes Connect.")
-
Bundle ID: Enter the Bundle ID. (This is the App ID you created in "Creating an app ID.")
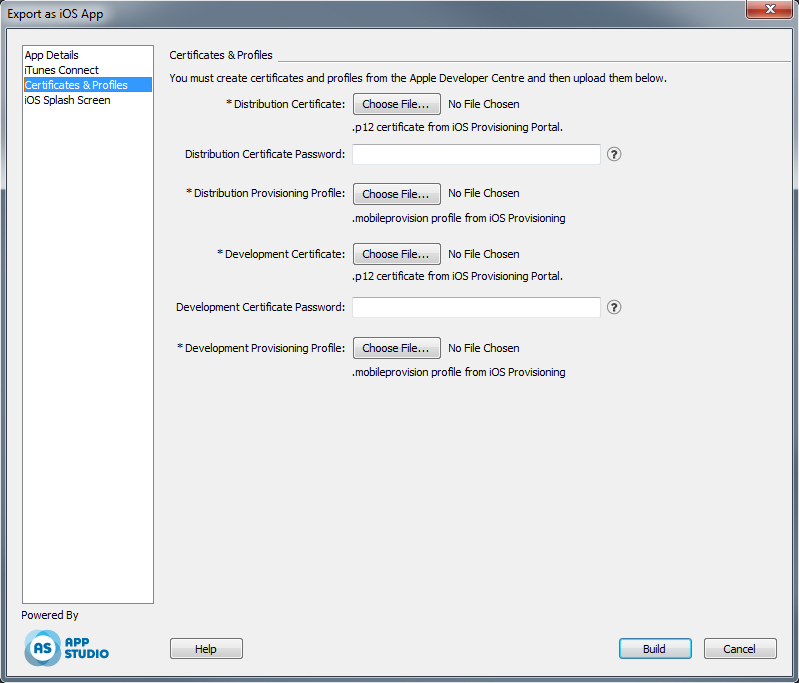
Use the Certificates & Profiles pane to bundle the Apple certificates required for app signing and the distribution profiles.
-
Distribution Certificate: Click Choose File and select an iOS Disribution Certificate.
This is the iOS Distribution Certificate you created in "Creating your iOS Distribution Certificate", but this created a .cer file when what we need is a .p12 file, so before you can choose this file you must first export the .cer file as a .p12 file. In the folder where the file resides, select the certificate file and its private key, right-click and choose Export 2 items, and save as a .p12 file. -
Distribution Certificate Password: Enter the password that you set when you exported the Distribution Certificate. If you did not set a password when you exported the file, leave this blank.
-
Distribution Provisioning Profile:Click Choose File and select a Distribution Provisioning Profile. (This is the Distribution Provisioning Profile you created in "Creating an App Store Provisioning Profile.")
-
Development Certificate: Click Choose File and select a Development Certificate.
This is the iOS Development Certificate you created in "Creating your iOS Development Certificate", but this created a .cer file when what we need is a .p12 file, so before you can choose this file you must first export the .cer file as a .p12 file. In the folder where the file resides, select the certificate file and its private key, right-click and choose Export 2 items, and save as a .p12 file. -
Development Certificate Password: Enter the password that you set when you exported the Development Certificate. If you did not set a password when you exported the file, leave this blank.
-
Development Provisioning Profile: Click Choose File and select a Development Provisioning Profile. (This is the Development Provisioning Profile you created in "Creating a Development Provisioning Profile.")
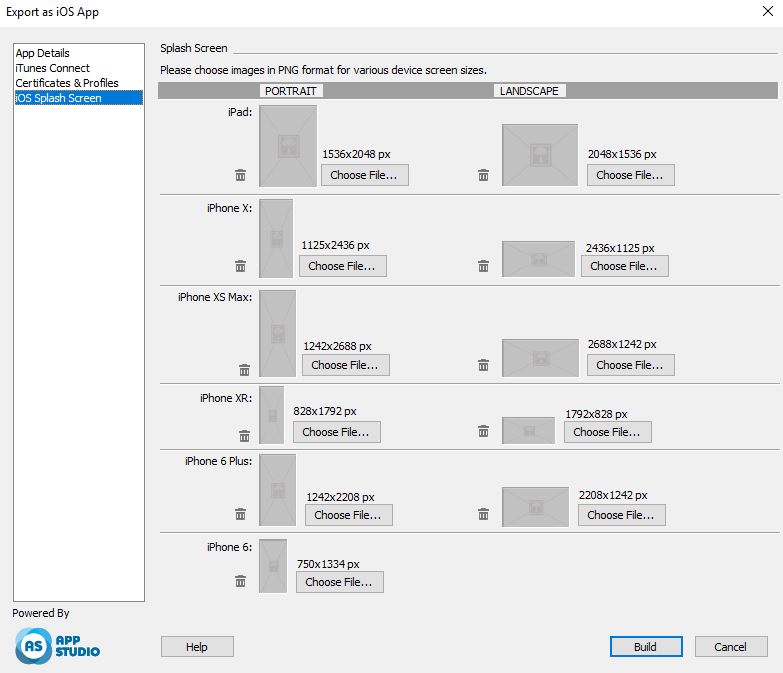
Use the iOS Splash Screen pane to specify the splash screens that will display when the App is launched.
-
Click Choose File and select the image you want displayed in the splash screen for each device, for both Portrait and Landscape orientations.
-
-
When you're finished configuring options, click Build.